Crosman CFAMP1L (2019) El manual del propietario
- Tipo
- El manual del propietario

OWNER’S MANUAL
CO
2
Powered, Semi/Full Auto, BB Air Pistol
Caliber- 4.5mm BB
READ ALL INSTRUCTIONS AND WARNINGS IN THIS MANUAL BEFORE USING
Crosman Airguns
A Velocity Outdoor Company
7629 Routes 5 & 20
Bloomeld, NY 14469
United States of America
1.800.724.7486
crosman.com
CFAMP1L-515
If you have questions contact Crosman at 1-800-724-7486, 585-657-6161 or www.crosman.com.
REMEMBER, THIS AIRGUN IS NOT A TOY. ALWAYS TREAT THE AIRGUN AS THOUGH IT IS LOADED AND WITH THE SAME RESPECT YOU WOULD A FIREARM.
A SPECIAL MESSAGE TO PARENTS Personal injury or death can result from improper handling if a pellet or BB strikes someone in a vulnerable spot. This airgun is not a toy. Therefore,
if you purchased this airgun for use by a younger shooter, please make certain he or she operates it under the supervision of an adult.
We are concerned that all users learn to use this gun properly without injury to themselves or others. You may be able to obtain further information for instruction in shooting from
one or more of the following groups: Boy Scouts of America, National Rie Association, conservation clubs, gun clubs, 4-H Clubs, hunter safety groups, or write to Crosman Corporation,
Rts 5 & 20, Bloomeld NY 14469. For more information on Crosman products and accessories visit our website at www.crosman.com
WARNING:
NOT A TOY. ADULT SUPERVISION REQUIRED. MISUSE OR CARELESS USE MAY CAUSE SERIOUS INJURY OR DEATH. DANGEROUS WITHIN
250 YARDS 229 METERS.
WARNING:
• AVOID DIRECT EYE EXPOSURE TO LASER BEAM. LASER RADIATION IS EMITTED FROM THE FRONT APERTURE OF THE LASER WHEN THE LASER IS ACTIVATED.
• A LASER SIGHT IS NOT A TOY. IT MUST BE USED UNDER THE SUPERVISION OF AN ADULT. IMPROPER OR CARELESS USE MAY CAUSE SERIOUS INJURY, ESPE
CIALLY TO THE EYE.
THIS AIRGUN IS INTENDED FOR USE BY THOSE 16 YEAR OF AGE OR OLDER.
YOU AND OTHERS WITH YOU SHOULD ALWAYS WEAR SHOOTING GLASSES TO PROTECT YOUR EYES.
BUYER AND USER HAVE THE DUTY TO OBEY ALL LAWS REGARDING THE USE AND OWNERSHIP OF THIS AIRGUN AND LASER SIGHT.
WARNING:
DO NOT BRANDISH OR DISPLAY THIS AIRGUN IN PUBLIC IT MAY CONFUSE PEOPLE AND MAY BE A CRIME. POLICE AND OTHERS MAY
THINK IT IS A FIREARM. DO NOT CHANGE THE COLORATION AND MARKINGS TO MAKE IT LOOK MORE LIKE A FIREARM. THAT IS DANGEROUS AND MAY BE A CRIME.
WARNING: THIS PRODUCT CAN EXPOSE YOU TO CHEMICALS INCLUDING LEAD, WHICH IS KNOWN TO THE STATE OF CALIFORNIA TO CAUSE
CANCER AND BIRTH DEFECTS OR OTHER REPRODUCTIVE HARM. FOR MORE INFORMATION GO TO WWW.P65WARNINGS.CA.GOV.
1. IMPORTANT SAFETY INFORMATION
• ALWAYS treat the airgun as though it is loaded and ready to re.
• ALWAYS treat airguns with the same respect you would a rearm.
• ALWAYS store the airgun unloaded and away from children.
• ALWAYS aim in a SAFE DIRECTION.
• ALWAYS keep the muzzle of the airgun pointed in a SAFE DIRECTION.
• ALWAYS keep your nger o the trigger and out of the trigger guard until ready to shoot.
• ALWAYS keep the airgun “ONSAFE” until you are ready to shoot.
• ALWAYS check to see if the airgun is “ONSAFE” and unloaded when removing it from storage.
• ALWAYS check to see if the airgun is “ONSAFE” and unloaded when handing it to, or receiving it from another person.
• ALWAYS have you and others wear shooting glasses to protect your eyes.
• ALWAYS wear shooting glasses over reading or prescription glasses.
• ALWAYS place a shooting backstop in a location that will be safe should the backstop fail.
• ALWAYS check your backstop for wear before and after each use. All backstops are subject to wear and will eventually fail. Replace your backstop if
the surface is worn or damaged, or if a ricochet occurs.
• ALWAYS use the proper size ammo in your airgun. Check the markings on your airgun to verify the ammo size.
• NEVER point the airgun at any person or at anything you do not intend to shoot.
• NEVER reuse ammunition.
• NEVER shoot at hard surfaces or at the surface of water. The ammo may bounce o or ricochet and hit someone or something you had not
intended to hit.
• NEVER attempt to disassemble or tamper with your airgun. Use an Authorized Service Station. Using an unauthorized service or repair center, or
modifying the function of your airgun in any way, may be unsafe and will void your warranty.
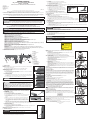
2. LEARNING THE PARTS OF YOUR AIRGUN
Learning the names of the parts of your new airgun will help you understand your owner’s manual.
Fig.1
A. Rear Sight
B. Slide
C. Barrel Latch Button
D. Barrel
E. Front Sight
F. Hammer
G. Grip
H. Trigger
I. Trigger Guard
J. Safety Lever
K. Muzzle
L. Magazine Release
M. Slide Lock lever
N. Laser
O. Laser ON/OFF
P. Battery Compartment
Q. Laser Aperture
R. Windage adjustment tool
(Small Allens Wrench)
S. Laser Installation Tool
(Large Allens Wrench)
3. OPERATING THE SAFETY
CAUTION:
Like all mechanical devices, an air pistol safety can fail. Even when the safety is “ONSAFE”, you should continue to handle
the air pistol in a safe manner.
• Locate the safety above the grip (see Fig.1).
• The condition of the safety is indicated by the direction of the safety covering up the RED dot indicator
IMPORTANT: To engage the safety, the hammer MUST be cocked in order to put the air pistol “ONSAFE”.
A. To Put the Airgun “ONSAFE”
1.
Cock the hammer to the rear
2. Push the safety lever all the way up to cover up the RED dot.
3. The safety is in the SAFE position and the air pistol is “ONSAFE” when the hammer is cocked to the rear and the RED dot
indicator is not showing (Fig.2A).
B. To Put the Airgun “OFFSAFE”
1.
Push the safety lever down
a. For Semi-Auto, push safety lever down One click so the lever covers the single dot symbol on the pistol grip (Fig.2B).
b. For Full Auto, push the safety lever all the way down so the lever covers the the triple dot symbol on the pistol grip
(Fig.2C).
2. The safety is in the FIRE positon and “OFFSAFE” when the RED indicator is showing (Fig.2B).
KEEP THE AIR PISTOL IN THE “ONSAFE” POSITION UNTIL YOU ARE ACTUALLY READY TO
SHOOT. THEN PUSH THE SAFETY TO THE “OFFSAFE” POSITION.
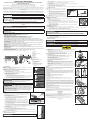
4. INSTALLING AND REMOVING THE CO
2
CARTRIDGE
• CO
2
CARTRIDGE MAY EXPLODE AT TEMPERATURES ABOVE 120°F 48.9°C. DO NOT MUTILATE OR INCINERATE
THEM. DO NOT EXPOSE THEM TO HEAT OR STORE CO
2
CARTRIDGES AT TEMPERATURES ABOVE 120°F 48.9°C.
• ALWAYS MAKE SURE THE CO
2
CARTRIDGE IS EMPTY BEFORE ATTEMPTING TO REMOVE IT FROM THE AIR PISTOL
BY SLOWLY TURNING THE WING COUNTERCLOCKWISE ALL THE WAY UNTIL YOU NO LONGER HEAR THE ESCAPE
OF CO
2
GAS.
• KEEP HANDS AND FACE AWAY FROM ESCAPING CO
2
GAS. IT CAN CAUSE FROSTBITE IF ALLOWED TO COME IN
CONTACT WITH SKIN.
CAUTION:
• We recommend the use of Crosman Powerlet CO
2
cartridges. They are made to t your air pistol. Other brands of
CO
2
cartridges may not t properly and may result in injury to you or damage to your air pistol.
•
DO NOT LEAVE CO
2
CARTRIDGE IN FOR MORE THAN 24 HOURS – DOING SO CAN CAUSE DAMAGE TO
THE AIRGUN SEAL.
A. Installing a New CO
2
Cartridge
1.
Put the air pistol “ONSAFE” (Section 3).
2. Make sure the air pistol is UNLOADED and pointed in a SAFE DIRECTION.
3. Press the magazine release button and remove the magazine from the air pistol.
4. Using the allen wrench, turn the CO
2
cap screw counter-clockwise to remove tension and allow for clearance
of the CO
2
cartridge (Fig.3).
5. Put 1 drop of Crosman Pellgunoil on the tip of every CO
2
cartridge in order to properly maintain the air
pistol seal.
6. Insert a new CO
2
cartridge into the magazine, small neck rst, pointing toward the piercing assembly
(Fig.4).
7. Using the allen wrench, turn the CO
2
cap screw clockwise until it pierces the CO
2
cartridge. If you hear
a hissing sound when piercing the cartridge, try tightening the CO
2
cap screw slightly more. Be careful
not to over-tighten when piercing. Over-tightening the CO
2
cartridge can cause injury to you or damage
to your air pistol.
8. To make sure the cartridge has been pierced, point the gun in a SAFE DIRECTION, take “OFFSAFE” and pull the trigger. If the air pistol does not make a popping noise after
pulling the trigger, the CO
2
is not being discharged. In that event, remove the grips and tighten the piercing wing a little more. Point the air pistol in a SAFE DIRECTION, and
pull the trigger until there is a popping noise, which means the air pistol is releasing CO
2
with each pull of the trigger.
B. Removing the CO
2
Cartridge
1.
Put the air pistol “ONSAFE” (Section 3).
2. Make sure the air pistol is UNLOADED and pointed in a SAFE DIRECTION.
3. Press the magazine release button and remove the magazine from the air pistol.
4. Using the allen wrench, SLOWLY turn the CO
2
cap screw counter-clockwise to release any remaining CO
2
, being careful not to come in
contact with the escaping gas.
5. Tip out the empty cartridge. It may be cold to the touch.
REMEMBER: Keep hands and face away from escaping CO
2
gas. It can cause frostbite if allowed to come in contact with skin.
5. LOADING AND UNLOADING BBs
EVEN THOUGH YOU GO THROUGH THE UNLOADING PROCEDURE, CONTINUE TO TREAT THE AIR PISTOL AS
THOUGH IT WERE LOADED. DO NOT POINT AT ANYTHING YOU DO NOT INTEND TO SHOOT.
CAUTION: This air pistol was designed to shoot either .177 caliber BBs to function best with COPPERHEAD
®
BBs.
• Use of other ammunition may cause the gun to malfunction and could cause damage to the air pistol.
• Never reuse ammunition.
• Review the entire manual, including the section ONSAFEty, before ring your air pistol.
A. Loading BBs
1.
Make sure the air pistol is “ONSAFE” and pointed in a SAFE DIRECTION.
2. Press the magazine release button and remove the magazine from the air pistol.
3. Pull down the BB Follower tab (Fig.5 A).
4. Insert up to 19 steel BBs into the BB loading hole (Fig.5 B).
5. After following these steps and reading the entire manual, including the section on reviewing safety procedures, your air pistol is now loaded and ready to re.
B. Unloading/ Removing a Jammed BB
Caution:
Never look down the muzzle end of the barrel to see if a jam has been cleared
1. Put your air pistol “ONSAFE” and pointed in a SAFE DIRECTION.
2. Press the magazine release button and remove the magazine from the air
pistol.
3. Pull the slide to the rear and push the slide lock lever up to lock it in the rear
position (Fig.6).
4. Use a ramrod (sold separately) to gently push out the BB towards the muzzle
rear sight until the BB comes out (Fig.7).
5. Replace the EMPTY clip with the ratchet teeth facing the front sight.
Note: If you are not able to unjam your air pistol by following this procedure, take no
further action. An Authorized Service Station will unjam your air pistol at no cost during the warranty period.
6. AIMING AND FIRING SAFELY
CAUTION:
• REMEMBER, choose your targets carefully and be sure that the area around the target is clear.
•
THINK about what you will hit if you miss the target!
1. YOUR air pistol is designed to target shooting and is suited for both indoor and outdoor use.
2. Follow the instructions for loading the CO
2
and loading BBs.
3. The air pistol is correctly aimed when the front sight blade is positioned in the notch of the rear sight (Fig.8).
4. The top of the front blade should be even with the top of the notch in the rear sight. The bulls-eye should appear to rest on top of the
front sight.
5. When you are sure of your target and backstop, and the area around the target is clear, take the air pistol “OFFSAFE” and pull the trigger
to re.
7. MAINTAINING YOUR AIRGUN
A. General Maintenance:
1.
Before you attempt to oil your airgun, make sure the gun is unloaded and the CO
2
cartridge has been removed.
2. Putting a drop of Pellgunoil
®
on the tip of every CO
2
cartridges will help to maintain the airgun seal in your airgun. DO NOT use petroleum distillate based oil or solvent and
DO NOT over-oil as this can cause damage to your airgun.
3. Periodically check your airgun. If anything seems changed, like a shorter or weaker trigger pull, this may mean worn out or broken parts. Call customer service for assistance
before using your airgun again.
4. If you drop your airgun, visually check to that no damage has occurred to the airgun.
• DO NOT ATTEMPT TO DISASSEMBLE YOUR AIR PISTOL.
• DO NOT MODIFY OR ALTER YOUR AIR PISTOL. ATTEMPTS TO MODIFY THE AIR PISTOL IN ANY WAY INCONSISTENT WITH THIS MANUAL MAY MAKE YOUR AIR
PISTOL UNSAFE TO USE, CAUSE SERIOUS INJURY OR DEATH, AND WILL VOID THE WARRANTY.
B. TROUBLESHOOTING:
If you experience inaccuracy or lower velocity, be sure you have not depleted the CO
2
supply:
1. As you use up the CO
2
accuracy will drop o.
2. Get to know your gun and the number of shots it takes for this to happen.
3. Change cartridges as needed.
8. LASER INSTALLATION AND USE
WARNING:
PRIOR TO INSTALLING, CHANGING BATTERY, ALIGNING LASER OR CLEANING & MAINTENANCE, MAKE SURE PISTOL IS UNLOADED. IF NOT,
UNLOAD FOLLOWING THE “UNLOADING” INSTRUCTIONS IN THISMANUAL.
WARNING:
CONTAINS A LITHIUM BATTERY. DO NOT DISASSEMBLE OR INCINERATE. KEEP OUT OF REACH OF CHILDREN. CONTACT POISON CONTROL
CENTER IF SWALLOWED. RECYCLE OR DISPOSE OF PROPERLY.
NOTE: The FDA requires the label supplied with you laser be axed to the outside of the gun near the laser
aperture.
A. Installing the Laser
• Remove the clamping screw with Alllens wrench provided (Fig.9).
• Place laser body on to accessory rail, making sure that the clamping screw hole is in line with the accessory slot.
• Place removable rail grip onto right side of laser body.
• Insert clamping screw into laser body and tight with the Allens wrench until snug (Fig.10).
NOTE: To prevent overtightening, use the the short side of the Allens wrench when mounting.
B. Operating the Laser
• To turn on the laser, push the activation switch in from the right side of the pistol. In the “ON” position, the switch will
protrude from the left hand side of the pistol (Fig.11).
• To turn o the laser, push the activation switch in from the left side of the pistol (Fig.11).
C. Installing/Replacing the Batteries
• This laser uses (1) 1/3N lithium battery OR (2) 357 batteries
• Use a athead screwdriver or coin to remove to remove the battery cover (Fig.12).
• Turn laser over to remove battery units.
• Install/replace battery units and reinstall battery cover.
D. Aligning the Laser
• Windage adjustment: with the muzzle pointing forward and the adjustment tool inserted into the windage port
on side of laser, a clockwise turn will shift the laser aiming point to the left and a counterclockwise turn will shift the
laser aiming point to the right (Fig.13).
•
Elevation adjustment: with the muzzle pointing forward and the adjustment tool inserted into the elevation port
on the bottom of the laser, a clockwise turn will shift the laser aiming point down, a counterclockwise turn will shift
the laser aiming point up (Fig.14).
PERFORMANCE
Many factors aect velocity, including brand of projectile, type of projectile, lubrication, barrel condition and temperature. This
airgun was designed to function best with CROSMAN
®
and COPPERHEAD
®
branded ammunition. Use of other ammunition may
cause the gun to malfunction.
LIMITED ONE YEAR WARRANTY
This airgun and laser aiming device are warranted to be free of defects in materials and workmanship for 1 year from the date
of purchase. This warranty does not cover accessories and/or attachments. Further, this warranty does not apply to expendable
parts (ex. batteries) that have denite and predictable life expectancies. In the event of a defect under this warranty, Crosman
will, at its option, repair or replace the product; provided, however, its inspection indicates that an original defect exists.
Crosman reserves the right to replace any product which is no longer available with a product of comparable value and function.
If Crosman determines the repair is not covered under the warranty guidelines, there could be a charge to you for the repair.
WHAT IS COVERED:
1. Parts and Repair of any factory defect of material or workmanship.
2. Transportation charges to consumer for the repaired product and/or replacement product.
WHAT IS NOT COVERED:
1. Transportation charges to Authorized Service Station for defective product.
2. Normal wear and tear from regular use.
3. Damaged parts as a result from misuse, neglect or tampering.
4. Damage caused by dry-re, abuse, modication or failure to perform normal maintenance – see Owner’s Manual.
5. Improper installation or maintenance performed by someone other than a Crosman Authorized ServiceStation.
6. Any other expense.
THIS LIMITED WARRANTY DOES NOT INCLUDE CONSEQUENTIAL DAMAGES, INCIDENTAL DAMAGES OR INCIDENTAL EXPENSES,
INCLUDING DAMAGE TO PROPERTY OR ANY OTHER EXPENSE. CROSMAN DISCLAIMS ANY IMPLIED WARRANTIES, INCLUDING THE
IMPLIED WARRANTIES OF MERCHANTABILITY AND FITNESS. SOME STATES DO NOT ALLOW THE EXCLUSION OR LIMITATION OF
INCIDENTAL OR CONSEQUENTIAL DAMAGES, OR ALLOW LIMITATIONS ON IMPLIED WARRANTIES SO THE ABOVE LIMITATIONS OR
EXCLUSIONS MAY NOT APPLY TO YOU. TO THE EXTENT ANY PROVISION OF THIS WARRANTY IS PROHIBITED BY FEDERAL, STATE OR
MUNICIPAL LAW, IT SHALL NOT BE APPLICABLE. THIS WARRANTY GIVES YOU SPECIFIC LEGAL RIGHTS, AND YOU MAY ALSO HAVE
OTHER RIGHTS, WHICH VARY FROM STATE TO STATE AND COUNTRY TO COUNTRY.
STOP – BEFORE YOU RETURN THIS PRODUCT TO THE STORE
Save on gas and avoid the trip back to the store. Contact our Customer Service/Technical Support representatives for
information and trouble-shooting help. Call 1-800-7AIRGUN (1-800-724-7486) or nd answers to frequently asked
questions at www.crosman.com.
WARRANTY CLAIM AND REPAIR SERVICE
If your airgun needs repair - DO NOT ATTEMPT TO DISASSEMBLE IT! Your airgun requires special tools and xtures to repair it. Any
disassembly or modication not performed by a Crosman Authorized Service Center will void the warranty.
U.S. Customers - Contact Crosman Customer Service at 800-724-7486 or e-mail us via www.crosman.com. You will be
instructed where and how to send your airgun in for repair under warranty or referred to one of our authorized service centers
in your area.
Crosman Corporation
Attn: Warranty Dept.
7629 Route 5 & 20
Bloomeld, NY 14469
Include with your product a copy of your receipt and a brief description of the problem. Be sure to indicate your name, mailing
address, e-mail address and telephone number. Allow 2-4 weeks for repairs. We recommend you use a method of shipping that
provides you with a tracking number and insurance options. Crosman is not liable for any damaged, lost or stolen merchandise
during shipping.
Canadian Customers - Contact the Gravel Agency, in Quebec at 866- 662-4869.
Outside U.S. Customers - Please contact your point of purchase dealer/distributor. If you do not know your
dealer/distributor, contact our International Dept. for assistance at
585-657-6161 or e-mail us via www.crosman.com.
CROSMAN, COPPERHEAD, PELLGUN OIL, and POWERLET are trademarks of Crosman Corporation.
© 2019 Crosman Corporation
07-19 OM
Fig.2A
Fig.2B
Fig.2C
Fig.3
Fig.4
Fig.5
Fig.6 Fig.7
Fig.8
Fig.9
Fig.10
Fig.11
Fig.12
Fig.13
Fig.14
LASER LIGHT
AVOID DIRECT EYE EXPOSURE
CLASS 3R LASER PRODUCT
LASER APERTURE
Wavelength: 630–670 nm
Output power: <5 mW
Complies with 21CFR 1040.10, 1040.11 &
LN 50. Complies with IEC/EN 60825-1:2007.
CenterPoint Optics,
Bloomeld, NY 14469
Made in China

MANUAL DEL PROPIETARIO
Pistola de aire de balines accionada por CO
2
, semiautomática y automática
Calibre: balín de 4.5 mm
LEA TODAS LAS INSTRUCCIONES Y ADVERTENCIAS ANTES DE USARLO
Crosman Airguns | A Velocity Outdoor Company | 7629 Routes 5 & 20 | Bloomeld, NY 14469 | United States of America | 1.800.724.7486 | crosman.com
CFAMP1L-515
Si tiene cualquier pregunta, comuníquese con Crosman al 1-800-724-7486, 585-657-6161 o en www.crosman.com.
RECUERDE QUE ESTE RIFLE DE AIRE NO ES UN JUGUETE. SIEMPRE TRATE EL RIFLE DE AIRE COMO SI ESTUVIERA CARGADO Y CON EL MISMO RESPETO QUE LE TENDRÍA A UN ARMA DE FUEGO.
MENSAJE ESPECIAL A LOS PADRES Pueden producirse lesiones personales o la muerte debido a la manipulación incorrecta si un perdigón o un balín golpean a alguien en un punto
vulnerable. Este rie de aire no es un juguete. Por lo tanto, si ha adquirido este rie de aire comprimido para ser usado por un tirador más joven, asegúrese de que lo utilice bajo la
supervisión de un adulto.
Nos preocupa que todos los usuarios aprendan a usar esta arma correctamente sin que sufran lesiones ellos mismos u otras personas. Podrá obtener más información para la instrucción
de tiro de uno o más de los siguientes grupos: Boy Scouts of America, Asociación Nacional del Rie, clubes de conservación, clubes de armas, clubes 4-H, grupos de seguridad de
cazadores, o escriba a Crosman Corporation, Rts 5 & 20, Bloomeld NY 14469. Para obtener más información sobre los productos y accesorios Crosman, visite nuestro sitio web en
www.crosman.com
NO ES UN JUGUETE. SE REQUIERE LA SUPERVISIÓN DE UN ADULTO. EL USO INCORRECTO O DESCUIDADO PUEDE CAUSAR
LESIONES GRAVES O LA MUERTE. PUEDE SER PELIGROSO HASTA A 250 YARDAS 229 METROS.
• EVITE LA EXPOSICIÓN DIRECTA DE LOS OJOS AL RAYO LÁSER. SE EMITE RADIACIÓN LÁSER DESDE LA APERTURA FRONTAL DEL LÁSER CUANDO ÉSTE SE ACTIVA.
• LA MIRA LÁSER NO ES UN JUGUETE. DEBE UTILIZARSE BAJO LA SUPERVISIÓN DE UN ADULTO. EL USO INCORRECTO O DESCUIDADO PUEDE CAUSAR LESIONES
GRAVES, ESPECIALMENTE EN LOS OJOS.
ESTA PISTOLA DE AIRE ESTÁ PENSADA PARA SER UTILIZADA POR PERSONAS DE 16 AÑOS DE EDAD O MÁS.
USTED Y LOS DEMÁS QUE ESTÉN CON USTED DEBEN USAR SIEMPRE ANTEOJOS PARA DISPARAR CON OBJETO DE PROTEGERSE LOS OJOS.
EL COMPRADOR Y EL USUARIO TIENEN LA OBLIGACIÓN DE OBEDECER TODAS LAS LEYES REFERENTES AL USO Y PROPIEDAD DEL ARMA DE AIRE Y DE LA
MIRA LÁSER.
NO BLANDA NI MUESTRE ESTE RIFLE DE AIRE EN PÚBLICO; PUEDE CONFUNDIR A LA GENTE Y PUEDE SER UN DELITO. LA PO
LICÍA Y OTRAS PERSONAS PUEDEN PENSAR QUE SE TRATA DE UN ARMA DE FUEGO. NO CAMBIE LA COLORACIÓN O LAS MARCAS DE MODO QUE TENGA UN ASPECTO
MÁS PARECIDO AL DE UN ARMA DE FUEGO. ES PELIGROSO Y PODRÍA TRATARSE DE UN DELITO.
ADVERTENCIA: ESTE PRODUCTO PUEDE EXPONERLE A SUSTANCIAS QUÍMICAS, ENTRE ELLAS EL PLOMO, QUE EL ESTADO DE CALIFOR
NIA HA DETERMINADO QUE OCASIONAN CÁNCER Y DEFECTOS CONGÉNITOS U OTROS DAÑOS REPRODUCTIVOS. PARA OBTENER MÁS INFORMACIÓN, VAYA A
WWW.P65WARNINGS.CA.GOV.
1. INFORMACIÓN IMPORTANTE DE SEGURIDAD
• Trate SIEMPRE al rie de aire como si estuviera cargado y listo para disparar.
• SIEMPRE trate los ries de aire con el mismo respeto que le tendría a un arma de fuego.
• SIEMPRE guarde el rie de aire descargado y lejos de los niños.
• SIEMPRE apunte en una DIRECCIÓN SEGURA.
• Mantenga SIEMPRE la boca del rie de aire apuntando en una DIRECCIÓN SEGURA.
• Mantenga SIEMPRE el dedo apartado del gatillo y fuera del guardamonte hasta que esté listo para disparar.
• Mantenga SIEMPRE el seguro del rie de aire activado (“ON SAFE”) hasta que esté listo para disparar.
• Compruebe SIEMPRE que el rie de aire tenga el seguro puesto (“ON SAFE”) y que esté descargado al sacarlo de su almacenamiento.
• Compruebe SIEMPRE que el rie de aire tenga el seguro puesto (“ON SAFE”) y que esté descargado al entregárselo a otra persona o al recibirlo de
ella.
• Cuide que usted y los demás utilicen SIEMPRE anteojos para disparar a n de protegerse los ojos. Utilice anteojos para disparar sobre sus anteojos
para lectura o recetados.
• Coloque SIEMPRE el respaldo en un lugar que sea seguro si llegase a fallar.
• Compruebe SIEMPRE el desgaste del respaldo antes y después de cada uso. Todos los respaldos están sujetos a desgaste y con el tiempo fallarán.
Reemplace el respaldo si la supercie está desgastada o dañada, o si ocurre un rebote.
• Utilice SIEMPRE perdigones del tamaño adecuado para su rie de aire. Compruebe las marcas de su rie de aire para vericar el tamaño de los
perdigones.
• NUNCA apunte el rie de aire a ninguna persona o cosa a las que no tenga la intención de dispararles.
• NUNCA reutilice la munición.
• NUNCA dispare contra supercies duras o a la supercie del agua. El perdigón puede rebotar y golpear a alguien o algo a los que usted no tuviera
intención de dispararles.
• NUNCA intente desmontar su rie de aire ni alterarlo. Use una estación de servicio autorizada. El uso de centros de servicio o reparación no autoriza-
dos o la modicación de la función de su rie de aire en cualquier manera puede ser inseguro y anularán la garantía.
2. CONOZCA LAS PARTES DE SU PISTOLA DE AIRE
Aprender los nombres de las partes de su nueva pistola de aire le ayudará a entender su manual del propietario.
Fig.1
A. Mira trasera
B. Corredera
C. Botón del pestillo del cañón
D. Cañón
E. Mira delantera
F. Martillo
G. Cacha
H. Gatillo
I. Guardamonte
J. Palanca del seguro
K. Boca
L. Liberación del cargador
M. Palanca de liberación de la corredera
N. Láser
O. Láser ENCENDIDO/APAGADO
P. Compartimiento de las baterías
Q. Apertura del láser
R. Herramienta de ajuste de compensación
de viento (llave allen pequeña)
S. Herramienta de instalación del láser
(llave allen grande)
3. OPERACIÓN DEL SEGURO
PRECAUCIÓN:
Como todos los dispositivos mecánicos, el seguro de una pistola de aire puede fallar. Incluso con el seguro activado
(“ONSAFE”), debe seguir manipulando la pistola de aire de modo seguro.
• Encuentre el seguro encima de la cacha (vea la Fig.1).
• El estado del seguro está indicado por la dirección del seguro cubriendo el indicador de punto ROJO.
IMPORTANTE: Para poner el seguro, el percutor DEBE estar amartillado para que la pistola de aire quede asegurada (“ONSAFE”).
A. Para activar el seguro de la pistola de aire (“ONSAFE”)
1.
Amartille el percutor hasta atrás
2. Empuje la palanca del seguro completamente hacia arriba para cubrir el punto ROJO.
3. El seguro está en posición de SEGURO (“SAFE”) y la pistola de aire está con el seguro activado (“ONSAFE”) cuando el
indicador del punto ROJO no se puede ver (Fig.2A).
B. Para quitar el seguro de la pistola de aire (“OFFSAFE”)
1.
Empuje hacia abajo la palanca del seguro
a. Para poner la pistola en modo semiautomático, empuje la palanca del seguro hacia abajo un solo clic, de modo que
cubra el símbolo de un punto individual de la empuñadura de la pistola (Fig.2B).
b. Para poner la pistola en modo totalmente automático, empuje la palanca del seguro totalmente hacia abajo de modo
que cubra el símbolo de tres puntos de la empuñadura de la pistola (Fig.2C).
2. El seguro está en posición de FUEGO (FIRE) y desactivado (“OFFSAFE”) cuando el indicador ROJO está visible.
MANTENGA ACTIVADO EL SEGURO DE LA PISTOLA DE AIRE. “ONSAFE” HASTA QUE ESTÉ EFECTIVAMENTE LISTO
PARA DISPARAR. LUEGO EMPUJE EL SEGURO A LA POSICIÓN DE DESACTIVADO “OFFSAFE”.
4. INSTALAR Y QUITAR EL CARTUCHO DE CO
2
• LOS CARTUCHOS DE CO
2
PUEDEN ESTALLAR A TEMPERATURAS POR ENCIMA DE LOS 120 °F 48,9 °C. NO LOS MUTI
LE NI INCINERE. NO EXPONGA AL CALOR NI GUARDE LOS CARTUCHOS DE CO
2
A TEMPERATURAS SUPERIORES A
120 °F 48,9 °C.
• ASEGÚRESE SIEMPRE DE QUE EL CARTUCHO DE CO
2
ESTÉ VACÍO ANTES DE INTENTAR QUITARLO DE LA PISTOLA DE
AIRE GIRANDO LENTAMENTE EL ALA EN SENTIDO CONTRARIO AL DE LAS MANECILLAS DEL RELOJ TOTALMENTE
HASTA QUE YA NO ESCUCHE EL ESCAPE DE GAS DE CO
2
.
• MANTENGA LAS MANOS Y EL ROSTRO APARTADOS DEL ESCAPE DE GAS CO
2
. SI DEJA QUE ENTRE EN CONTACTO
CON LA PIEL, PUEDE PROVOCAR UN CONGELAMIENTO.
PRECAUCIÓN:
• Recomendamos el uso de cartuchos de CO
2
Crosman Powerlet. Están hechos para ajustarse a su pistola de aire.
Otras marcas de cartuchos de CO
2
pueden no ajustarse correctamente y provocarle lesiones a usted o dañar su
pistola de aire.
• No guarde su pistola de aire con un cartucho de CO
2
en su interior. Hacerlo puede causarles daños a los sellos.
A. Instalar un nuevo cartucho de CO
2
1. Active el seguro de la pistola de aire (“ONSAFE”) (Sección 3).
2. Asegúrese de que la pistola de aire esté DESCARGADA y APUNTANDO EN UNA DIRECCIÓN SEGURA.
3. Oprima el botón de liberación del cargador y saque éste de la pistola de aire.
4. Usando la llave allen, gire el tornillo del tapón de CO
2
en sentido antihorario para liberar tensión y
permitir que se libere el cartucho de CO
2
(Fig.3).
5. Ponga 1 gota de Pellgunoil de Crosman en la punta de cada cilindro de CO
2
a n de tener un manteni-
miento correcto del sello de la pistola de aire.
6. Inserte un nuevo cartucho de CO
2
en el cargador, con el cuello pequeño insertado primero, apuntando
hacia el conjunto perforador (Fig.4).
7. Usando la llave allen, gire el tornillo del tapón de CO
2
en sentido horario hasta que perfore el cartucho
de CO
2
. Si escucha un sonido sibilante al perforar el cartucho, intente apretar el tornillo del tapón de CO
2
un poco más. Cuide de no apretar en exceso al perforar. Apretar en exceso el cartucho de CO
2
puede provocarle lesiones a usted o dañar su pistola de aire.
8. Inserte el cargador en la pistola de aire.
9. Para estar seguro de que el cartucho se ha perforado, apunte la pistola en una DIRECCIÓN SEGURA, quite el seguro (“OFFSAFE”) y apriete el
gatillo. Si la pistola de aire no hace un sonido de taponazo después de apretar el gatillo, no se está descargando el CO
2
. En ese caso, quite las
cachas y apriete un poco más el ala perforadora. Apunte la pistola en una DIRECCIÓN SEGURA y tire del gatillo hasta que haya un ruido de
taponazo, lo que signica que la pistola de aire está liberando CO
2
cada vez que tira del gatillo.
B. Retirar el cartucho de CO
2
1. Active el seguro de la pistola de aire (“ONSAFE”).
2. Asegúrese de que la pistola de aire esté DESCARGADA y APUNTANDO EN UNA DIRECCIÓN SEGURA.
3. Oprima el botón de liberación del cargador y saque éste de la pistola de aire.
4. Con la llave allen, gire LENTAMENTE el tornillo del tapón de CO
2
en sentido antihorario para liberar cualquier CO
2
restante, cuidando de no
entrar en contacto con el gas que escapa.
5. Deje caer el cartucho vacío. Puede estar frío al tacto.
RECUERDE: Mantenga las manos y el rostro apartados del escape de gas CO
2
. Si deja que entre en contacto con la piel, puede provocar congelamiento.
5. CARGAR Y DESCARGAR balines y perdigones
AUNQUE SIGA TODO EL PROCEDIMIENTO DE DESCARGA, SIGA TRATANDO LA PISTOLA DE AIRE
COMO SI ESTUVIERA CARGADA. NO APUNTE HACIA NADA A LO QUE NO TENGA INTENCIÓN DE DISPARARLE.
PRECAUCIÓN: Esta pistola de aire se ha diseñado para disparar balines calibre ,para funcionar mejor con balines o perdigones CROSMAN
®
y
COPPERHEAD
®
.
• El uso de otro tipo de munición puede causar un mal funcionamiento de la pistola de aire y podría ocasionarle daños a éste.
• Nunca reutilice la munición.
• Lea todo este manual, incluida la sección sobre Seguridad, antes de disparar su pistola de aire.
A. Carga de los balines
1.
Asegúrese de que la pistola de aire tenga el seguro activado (“ONSAFE”) (Sección 3) y esté apuntando en una DIRECCIÓN SEGURA.
2. Oprima el botón de liberación del cargador y saque éste de la pistola de aire.
3. Tire hacia abajo de la lengüeta seguidora de balines (Fig.5A)
4. Introduzca hasta 19 balines de acero en el oricio de carga de balines (Fig.5B).
5. Después de seguir estos pasos y leer todo el manual, incluida la sección sobre revisión de procedimientos de seguridad, su pistola de aire está ahora cargada y lista para
disparar.
B. Descargar o quitar un balín
Precaución:
Nunca mire por el extremo de la boca del cañón para ver si se ha eliminado
un atasco
1. Active el seguro de la pistola de aire (“ONSAFE”) y apunte en una DIRECCIÓN
SEGURA.
2. Oprima el botón de liberación del cargador y saque éste de la pistola de aire.
3. Tire de la corredera hacia atrás y empuje hacia arriba la palanca de bloqueo de
la corredera para bloquearla en la posición trasera (Fig.6).
4. Utilice una baqueta (se vende por separado) para empujar suavemente hacia
fuera el perdigón o el balín hacia la mira trasera hasta que salgan (Fig.7).
5. Vuelva a colocar el cargador VACÍO con los dientes del trinquete viendo hacia
la mira delantera.
Nota: Si no puede desatascar la pistola de aire siguiendo este procedimiento, no emprenda
ninguna otra acción. Una estación de servicio autorizada desatascará su pistola de aire sin coste durante el período de garantía.
6. APUNTAR Y DISPARAR CON SEGURIDAD
PRECAUCIÓN:
•
RECUERDE, elija sus blancos cuidadosamente y asegúrese de que esté despejada el área alrededor del blanco.
• ¡
PIENSE sobre lo que puede golpear si falla el blanco!
1. SU pistola de aire está diseñada para el tiro al blanco y es adecuada para uso tanto en interiores como al aire libre.
2. Siga las instrucciones para cargar el CO
2
y cargar balines.
3. La pistola de aire está apuntada correctamente cuando la hoja de la mira delantera está posicionada en la muesca de la mira trasera
(Fig.8).
4. La parte superior de la hoja delantera debe estar nivelada con la parte superior de la muesca de la mira trasera. La diana debe verse
como si descansara sobre la mira delantera.
5. Cuando esté seguro de su blanco y su respaldo, y el área alrededor del blanco esté despejada, quite el seguro de la pistola de aire
(“OFFSAFE”) y tire del gatillo para disparar.
7. MANTENIMIENTO DE SU PISTOLA DE AIRE
A. Mantenimiento general:
1.
Antes de intentar aceitar su pistola de aire, asegúrese de que esté descargada y se haya extraído el cilindro de CO
2
.
2. Poner 1 gota de Pellgunoil en la punta de cada cilindro de CO
2
le ayudará a mantener el sello de aire de su pistola de aire. NO utilice aceite o solventes basados en destilados
del petróleo y NO aplique aceite en exceso, ya que esto puede causarle daños a su pistola de aire.
3. Si deja caer la pistola de aire, inspeccione visualmente que no tenga daños antes de volver a usarla.
4. Si cualquier cosa parece haber cambiado, como un recorrido de gatillo más corto o más débil, puede signicar que hay piezas rotas.
• NO INTENTE DESARMAR SU PISTOLA DE AIRE.
• NO MODIFIQUE NI ALTERE SU PISTOLA DE AIRE. LOS INTENTOS DE MODIFICAR LA PISTOLA DE AIRE DE CUALQUIER FORMA QUE SEA CONTRARIA A ESTE
MANUAL PUEDEN HACER QUE NO SEA SEGURO USAR LA PISTOLA DE AIRE, CAUSAR LESIONES GRAVES O LA MUERTE, Y ANULARÁN LA GARANTÍA.
B. IDENTIFICACIÓN Y SOLUCIÓN DE PROBLEMAS:
Si experimenta inexactitud o menor velocidad, asegúrese de que no ha agotado la fuente de CO
2
:
1. Conforme agota el CO
2
, la precisión disminuirá.
2. Aprenda a conocer su arma y el número de disparos que se necesita para que esto ocurra.
3. Cambie los cartuchos según sea necesario.
8. INSTALACIÓN Y USO DEL LÁSER
ANTES DE INSTALAR, CAMBIAR LA BATERÍA, ALINEAR EL LÁSER O HACER LIMPIEZA Y MANTENIMIENTO, ASEGÚRESE DE QUE
LA PISTOLA ESTÉ DESCARGADA. SI NO LO ESTÁ, DESCÁRGUELA SIGUIENDO LAS INSTRUCCIONES DE “DESCARGA” DE ESTE MANUAL.
CONTIENE UNA BATERÍA DE LITIO. NO LA DESMONTE NI LA INCINERE. MANTÉNGALA FUERA DEL ALCANCE DE LOS NIÑOS.
COMUNÍQUESE CON UN CENTRO DE CONTROL DE ENVENENAMIENTOS SI SE INGIERE. RECÍCLELA O DESÉCHELA CORRECTAMENTE.
LASER LIGHT
AVOID DIRECT EYE EXPOSURE
CLASS 3R LASER PRODUCT
LASER APERTURE
Wavelength: 630–670 nm
Output power: <5 mW
Complies with 21CFR 1040.10, 1040.11 &
LN 50. Complies with IEC/EN 60825-1:2007.
CenterPoint Optics,
Bloomeld, NY 14469
Made in China
NOTA: La FDA exige que la etiqueta suministrada con su láser se je en el exterior del arma, cerca de la apertura del láser.
A. Instalación del láser
• Quite el tornillo de sujeción con la llave allen proporcionada (Fig.9).
• Coloque el cuerpo láser en el riel para accesorios, asegurándose de que el oricio del tornillo de sujeción esté alineado
con la ranura para accesorios.
• Coloque la empuñadura del riel extraíble del lado derecho del cuerpo del láser.
• Inserte el tornillo de sujeción en el cuerpo del láser y apriete con la llave allen hasta que esté ajustado (Fig.10).
NOTA: Para evitar apretar en exceso, utilice el lado corto de la llave allen al montar.
B. Funcionamiento del láser
• Para encender el láser, oprima el interruptor de activación desde el lado derecho de la pistola. En la posición de
encendido, el interruptor sobresaldrá por el lado izquierdo de la pistola (Fig.11).
• Para apagar el láser, empuje el interruptor de activación desde el lado izquierdo de la pistola (Fig.11).
C. Instalar o reemplazar las baterías
• Este láser utiliza (1) batería de litio 1/3N O BIEN (2) baterías 357
• Utilice un destornillador de cabeza plana o una moneda para quitar la tapa de la batería (Fig.12).
• Gire el láser media vuelta para extraer las unidades de batería.
• Instale o reemplace las unidades de batería y vuelva a instalar la tapa de baterías.
D. Alineación del láser
• Ajuste de la compensación de viento: con la boca apuntando hacia adelante y la herramienta de ajuste
insertada en el puerto de compensación de viento a un lado del láser, un giro en el sentido de las manecillas del reloj
desplazará el punto de mira del láser hacia la izquierda y un giro en sentido contrario al de las manecillas del reloj
desplazará el punto de mira del láser hacia la derecha (Fig.13).
• Ajuste de la elevación: con la boca apuntando hacia adelante y la herramienta de ajuste insertada en el puerto de
elevación en la parte inferior del láser, un giro en el sentido de las manecillas del reloj desplazará el punto de mira del
láser hacia abajo y un giro en sentido contrario al de las manecillas del reloj desplazará el punto de mira del láser hacia
la arriba (Fig.14).
DESEMPEÑO
Muchos factores afectan a la velocidad, entre ellos la marca y tipo del proyectil, la lubricación, el estado del cañón y la
temperatura. Esta pistola de aire está diseñada para funcionar mejor con munición de la marca CROSMAN
®
y COPPERHEAD
®
. El
uso de otra munición puede hacer que su pistola funcione incorrectamente.
GARANTÍA LIMITADA POR UN AÑO
Esta pistola de aire y dispositivo de puntería láser están garantizados libres de defectos de materiales y mano de obra durante 1 año a partir de la
fecha de compra. Esta garantía no cubre los accesorios o piezas adjuntas. Además, esta garantía no se aplica a piezas consumibles (por ejemplo,
baterías) que tienen expectativas de vida denidas y predecibles. En caso de un defecto de conformidad con esta garantía, Crosman, a su elección,
reparará o reemplazará el producto, siempre y cuando, sin embargo, su inspección indique que existe un defecto original. Crosman se reserva el
derecho de reemplazar cualquier producto que ya no esté disponible con un producto de valor y función comparables. Si Crosman determina que la
reparación no está cubierta por las directrices de la garantía, podría haber un cargo al consumidor por la reparación.
QUÉ ESTÁ CUBIERTO
1. Piezas y reparación de cualquier defecto de fábrica de materiales o mano de obra.
2. Gastos de transporte al consumidor por el producto reparado o un producto de reemplazo.
QUÉ NO ESTÁ CUBIERTO
1. Cargos por transporte del producto defectuosoa la estación de servicio autorizada.
2. Desgaste normal por el uso común.
3. Las piezas dañadas como resultado del mal uso, negligencia o manipulación.
4. Daños causados por disparo en seco, maltrato, modicación u omisión en la realización del mantenimiento normal: vea el manual del
propietario.
5. La instalación o mantenimiento indebidos proporcionados por alguien que no sea una estación de servicio autorizada de Crosman.
6. Cualquier otro gasto.
CUALQUIER DESENSAMBLADO O MODIFICACIÓN NO REALIZADOS POR UN CENTRO DE SERVICIO AUTORIZADO DE CROSMAN ANULARÁN LA GARANTÍA.
ESTA GARANTÍA LIMITADA NO INCLUYE DAÑOS Y PERJUICIOS CONSECUENCIALES O INCIDENTALES, O GASTOS INCIDENTALES, INCLUIDOS LOS DAÑOS Y
PERJUICIOS MATERIALES O CUALQUIER OTRO GASTO. CROSMAN DESCONOCE CUALQUIER GARANTÍA IMPLÍCITA, INCLUIDAS LAS GARANTÍAS IMPLÍCITAS
DE COMERCIABILIDAD E IDONEIDAD. ALGUNOS ESTADOS NO PERMITEN LA EXCLUSIÓN O LIMITACIÓN DE DAÑOS INCIDENTALES O CONSECUENCIALES, O
NO PERMITEN LIMITACIONES SOBRE LAS GARANTÍAS IMPLÍCITAS, DE MODO QUE LAS LIMITACIONES O EXCLUSIONES ARRIBA INDICADAS PODRÍAN NO
APLICÁRSELE A USTED. EN LA MEDIDA EN QUE CUALQUIER DISPOSICIÓN DE ESTA GARANTÍA ESTÉ PROHIBIDA POR LAS LEYES FEDERALES, ESTATALES O
MUNICIPALES, NO SERÁ APLICABLE. ESTA GARANTÍA LE OTORGA DERECHOS LEGALES CONCRETOS Y ES POSIBLE QUE TENGA TAMBIÉN OTROS DERECHOS
QUE VARÍAN SEGÚN EL ESTADO Y EL PAÍS.
ALTO! ANTES DE DEVOLVER ESTE PRODUCTO A LA TIENDA.
Ahorre gasolina y evítese el viaje de vuelta a la tienda. Comuníquese con nuestros representantes de Servicio al Cliente o de Soporte Técnico para
obtener información y ayuda para resolver problemas. Llame al 1-800-7AIRGUN (1-800-724-7486) o encuentre respuestas a las preguntas frecuentes
en www.crosman.com.
RECLAMACIONES DE GARANTÍA Y SERVICIO DE REPARACIONES
Si su pistola de aire necesita una reparación, ¡NO INTENTE DESMONTARLA! Su pistola de aire requiere herramientas y accesorios especiales para
repararla. Cualquier desensamblado o modicación no realizados por una estación de servicio autorizada anularán la garantía.
Clientes de los EE.UU. - Comuníquense con Servicio al Cliente de Crosman al 800-724-7486 o envíenos un correo electrónico mediante
www.crosman.com. Se le indicará dónde y cómo enviar su pistola de aire para reparación bajo la garantía o se le remitirá a uno de nuestros centros
de servicio autorizados en su zona.
Crosman Corporation
Atn: Depto. de garantía
7629 Route 5 & 20
Bloomeld, NY 14469
Incluya con su producto una copia de su recibo y una breve descripción del problema. Cuide de indicar su nombre, dirección postal y número
de teléfono. Conceda de 2 a 4 semanas para reparaciones. Le recomendamos que utilice un método de transporte que le ofrezca un número de
seguimiento y opciones de seguro. Crosman no es responsable de ninguna mercancía dañada, perdida o robada durante el transporte.
Clientes canadienses- Comuníquense con la Gravel Agency en Quebec al 866- 662-4869.
Clientes de fuera de los EE.UU. - Pónganse en contacto con el concesionario o distribuidor donde hicieron su compra. Si no conoce a su
concesionario o distribuidor, póngase en contacto con nuestro Departamento Internacional para obtener ayuda al 585-657-6161 o envíenos un
correo electrónico mediante www.crosman.com.
Crosman, Copperhead, Pellgun Oil y Powerlet son marcas comerciales de Crosman Corporation.
© 2019 Crosman Corporation
07-19 OM
Fig.2A
Fig.2B
Fig.2C
Fig.3
Fig.4
Fig.5
Fig.6 Fig.7
Fig.8
Fig.9
Fig.10
Fig.11
Fig.12
Fig.13
Fig.14
-
 1
1
-
 2
2


Crosman CFAMP1L (2019) El manual del propietario
- Tipo
- El manual del propietario
en otros idiomas
Artículos relacionados
-
Crosman P15B and P15BKT (2018-Present) El manual del propietario
-
-
-
-
-
-
-
-
-