Safety & Compliance Notices: Notice Concerning FCC Regulations: You are cautioned
that changes or modifications not expressly approved by the part responsible for compliance could void
the user’s authority to operate the equipment. This equipment has been tested and found to comply with
the limits for a Class B digital device, pursuant to Part 15 of the FCC rules. These limits are designed to
provide reasonable protection against harmful interference in a residential installation. This equipment
generates uses and can radiate radio frequency energy and, if not installed and used in accordance with
the instructions, may cause harmful interference to radio communications. However, there is no
guarantee that interference will not occur in a particular installation. If this equipment does cause harmful
interference to radio or television reception, which can be determined by turning the equipment off and
on, the user is encouraged to try to correct the interference by one or more of the following measures:
(a) Reorient or relocate the receiving antenna; (b) move this unit; (c) increase the separation between the
equipment and receiver; (d) connect the equipment into an outlet on a circuit different from that to which
the receiver is connected; (e) be sure that all cables are properly shielded, using a choke or ferrite where
appropriate; (f) consult the dealer or an experienced radio/television technician for help.
User Guide (English)
For more information about this product (system requirements, compatibility
information, etc.), product registration, or product support, visit m-audio.com.
For safety and warranty information, visit m-audio.com/warranty.
Package Contents: Super DAC, mini-USB cable, RCA cable, User Guide
Windows users: Visit m-audio.com/drivers to download the necessary
Windows drivers for Super DAC.
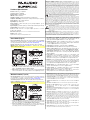
3. Line Input: Use a standard 1/8” (3.5mm) cable to connect this analog
input to the analog output of your audio source. This input will receive an
analog signal when the input selector is set to the “up” position.
4. Headphone Outputs: Connect standard 1/8” (3.5mm) or 1/4” (6.35mm)
stereo headphones to either or both of these analog outputs. Remember
to set the output selector to the “up” position.
5. Volume Dial: Use this dial to control the volume of all outputs.
6. Power Indicator: This light illuminates when Super DAC is powered on.
7. Analog Output Indicator: This light illuminates when Super DAC is
successfully sending an analog signal out of its left/right analog outputs.
8. Sampling Rate Indicators: One of these lights illuminates to indicate
which sampling rate Super DAC is currently using: 44.1, 48, 88.2, 96,
176.4, or 192 kHz.
9. Power Input: Use a power adapter (12 VDC, 1 A, center-positive, sold
separately) to connect this input to your power source. If Super DAC’s
USB port is connected to a computer (powered on), the connection will
supply the necessary power; a power adapter is not required in this case.
10. USB Port: Use the included mini-USB cable to connect this port to a USB
port on your computer (powered on). The connection will supply the
necessary power to Super DAC. This port will receive a digital signal from
your computer when the input selector is set to the “down” position.
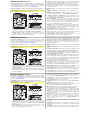
11. S/PDIF Output: Use a standard S/PDIF cable to connect this digital
output to the S/PDIF input of a receiver or playback device.
12. Coaxial Output: Use a standard coaxial cable to connect this digital
output to the coaxial input of a receiver or playback device.
13. Analog Outputs: Use a standard stereo RCA cable to connect these
analog outputs to the stereo RCA inputs of a playback device.
1. Output Selector: Set this switch to the “up” position to send the audio to
the headphone outputs. Set this switch to the “down” position to send the
audio to the S/PDIF, coaxial, and analog outputs.
2. Input Selector: Set this switch to the “up” position to select an analog input
source. Set this switch to the “down” position to select a digital input. source.
Guía del usuario (Español)
Para más información acerca de este producto (requisitos de sistema, información
de compatibilidad, etc.), registro o soporte del producto, visite m-audio.com. Para
información sobre la seguridad y la garantía, visite m-audio.com/warranty.
Contenido del paquete: Super DAC, cable mini-USB, cable RCA, guía del usuario
Usuarios de Windows: Visitar m-audio.com/drivers para descargar los drivers de
Windows necesarios para Super DAC.
3. Entrada de línea: Utilice un cable estándar de 3,5 mm (1/8 pulg.) para conectar esta
entrada analógica a la salida analógica de su fuente de audio. Esta entrada recibe una
señal analógica cuando el selector de entrada está ajustado a la posición “hacia arriba”.
4. Salidas para auriculares: Conecte auriculares estéreo estándar de 3,5 mm (1/8 pulg.) o
de 6,35 mm (1/4 pulg.) a estas dos salidas analógicas o a una de ellas. Recuerde ajustar
el selector de salida a la posición “hacia arriba”.
5. Cuadrante de volumen: Utilice este cuadrante para controlar el volumen de todas las
salidas.
6. Indicador de encendido: Esta luz se enciende cuando el Super DAC está encendido.
7. Indicador de salida analógica: Esta luz se enciende cuando el Super DAC envía
exitosamente una señal de salida analógica a sus salidas analógicas
izquierda/derecha.
8. Indicadores de frecuencia de muestreo: Una de estas luces se enciende para indicar
qué frecuencia de muestreo está utilizando el Super DAC en ese momento: 44,1, 48,
88,2, 96, 176,4 o 192 kHz.
9. Entrada de corriente: Use un adaptador de corriente (12 VCC, 1 A, centro positivo, que
se vende por separado) para conectar esta entrada a su fuente de alimentación. Si el
puerto USB del Super DAC está conectado a un ordenador (encendido), la conexión
suministra la corriente necesaria y en este caso no se requiere un adaptador de corriente.
10. Puerto USB: Utilice el cable mini-USB incluido para conectar este puerto a un puerto
USB disponible en su ordenador (encendido). La conexión suministra al Super DAC la
corriente necesaria. Este puerto recibe una señal digital del ordenador cuando el
selector de entrada está ajustado a la posición “hacia abajo”.
11. Salida S/PDIF: Utilice un cable S/PDIF estándar para conectar esta salida digital a la
entrada S/PDIF de un dispositivo receptor o de reproducción.
12. Salida coaxial: Utilice un cable coaxial estándar para conectar esta salida digital a la
entrada coaxial de un dispositivo receptor o de reproducción.
13. Salidas analógicas: Use un cable RCA estéreo estándar para conectar estas salidas
analó
g
icas a las entradas RCA de un dis
p
ositivo de re
p
roducción.
1. Selector de salida: Ajuste este interruptor en la posición “hacia arriba” para enviar
el audio a las salidas para auriculares. Ajuste este interruptor en la posición “hacia
abajo” para enviar el audio a las salidas S/PDIF, coaxial y analógica.
2. Selector de entrada: Ajuste este interruptor a la posición “hacia arriba” para
seleccionar una fuente de entrada analógica. Ajuste este interruptor a la posición
“hacia abajo” para seleccionar una fuente de entrada digital.
Technical Specifications
Interface: USB 2.0; 1.1-compatible
Converters: Wolfson
®
WM8740
Dynamic Range: 110 dB maximum
THD+N: 0.00003% maximum
Headphone Output (at 1 kHz): 190 mW (32 Ω); 210 mW (16 Ω)
Headphone Drive Ability: 16–100 Ω (1/8” / 3.5mm); 100–600 Ω (1/4” / 6.35mm)
Analog Inputs: (1) 1/8” (6.35mm) line-level
Digital Inputs: (1) USB 2.0 port
Analog Outputs: (1) RCA stereo pair; (1) 1/8” (3.5mm) headphone; (1) 1/4”
(6.35mm) headphone
Digital Outputs: (1) S/PDIF optical; (1) coaxial; Dolby
®
and DTS
®
pass-through
Sampling Rates: 44.1, 48, 88.2, 96, 176.4, 192 kHz
Power: via USB connection or via power adapter (12 VDC, 1 A, center-
positive, sold separately)
Dimensions (WxDxH): 3.7” x 3.6” x 1.1” / 94 mm x 91 mm x 27 mm
Weight: 0.5 lbs. / 0.21 kg
Specifications are subject to change without notice.
This device complies with Part 15 of the FCC rules. Operation is subject to the following two
conditions: (1) this device may not cause harmful interference, and (2) this device must accept
any interference received, including interference that may cause undesired operation.
FCC RF Radiation Exposure Statement: This equipment complies with FCC radiation exposure limits
set forth for an uncontrolled environment. End users must follow the specific operating instructions for
satisfying RF exposure compliance. This transmitter must not be co-located or operating in conjunction
with any other antenna or transmitter. For best audio quality, avoid using this device in a high RF-
radiated environment. RSS Statement for Canadian models: This device complies with Industry
Canada licence-exempt RSS standard(s). Operation is subject to the following two conditions: (1) this
device may not cause interference, and (2) this device must accept any interference, including
interference that may cause undesired operation of the device This unit does not exceed the Class B
limits for radio noise emission from digital apparatus set out in the radio interference regulations of the
Canadian De
p
artment of Communications.
ESD/EFT Warning: This unit may contain a microcomputer for signal processing and control
functions. In very rare situations, severe interference, noise from an external source, or static
electricity may cause it to lock up. In the unlikely event that this should happen, turn off the
unit, wait at least five seconds, and then turn it back on again. In an environment with radio
frequency interference, the unit may malfunction and resume normal operation after removal
of the interference.
Trademarks and Licenses: M-Audio is a trademark of inMusic Brands, Inc., registered in
the U.S. and other countries. Wolfson is a trademark of Wolfson Microelectronics PLC. Dolby is a
registered trademark of Dolby Laboratories. DTS is a registered trademark of DTS, Inc. Windows is a
registered trademark of Microsoft Corporation in the United States and other countries. All other product
or company names are trademarks or registered trademarks of their respective owners.
1
5
6
7
8
9
10
11 12 13 13
23 4 4
1
5
6
7
8
9
10
11 12 13 13
23 4 4

Guide d’utilisation (Français)
Pour plus d’informations sur la configuration système requise, la compatibilité, etc.,
l’enregistrement du produit ou de l’assistance technique concernant ce produit,
veuillez visiter m-audio.com. Pour consulter les Consignes de sécurité et informations
concernant la garantie, veuillez visiter le site m-audio.com/warranty.
Contenu de l’emballage : Super DAC, câble mini-USB, câble RCA, guide d’utilisation
Utilisateurs Windows : Veuillez visiter le site m-audio.com/drivers pour télécharger
les pilotes Windows nécessaires pour utiliser le Super DAC.
3. Entrée ligne : Utilisez un câble standard 3,5 mm pour brancher cette entrée
analogique sur la sortie analogique de votre source audio. Cette entrée recevra un
signal analogique lorsque le sélecteur d’entrée est sur la position du « haut ».
4. Sorties casque d’écoute : Branchez un ou des casques stéréo 3,5 mm ou
6,35 mm à ces prises casque analogiques. Veuillez régler le sélecteur de sortie
sur la position du « haut ».
5. Molette de volume : Cette molette permet de contrôler le volume de toutes les
sorties.
6. Indicateur d’alimentation : Ce témoin s’allume lorsque le Super DAC est sous
tension.
7. Indicateur de sortie analogique : Ce témoin s’allume lorsque le Super DAC
transmet un signal analogique sur ses sorties analogiques gauche/droite.
8. Indicateurs de fréquence d’échantillonnage : Un de ces indicateurs s’allume
pour indiquer la fréquence d’échantillonnage actuellement utilisée par le Super
DAC : 44,1, 48, 88,2, 96, 176,4 ou 192 kHz.
9. Entrée d’alimentation : Branchez le câble d’alimentation secteur inclus
(12 V CC, 1 A, centre positif, vendu séparément) à cette entrée, puis branchez
l’autre l’extrémité à une prise secteur. Si le port USB du Super DAC est
connecté à un ordinateur sous tension, la connexion fournit la puissance
nécessaire et un adaptateur d’alimentation n’est pas nécessaire.
10. Port USB : Utilisez le câble mini-USB pour relier ce port au port USB de votre
ordinateur sous tension. La connexion fournira suffisamment de puissance pour
alimenter le Super DAC. Cette entrée recevra un signal numérique lorsque le
sélecteur d’entrée est sur la position du « bas ».
11. Sortie S/PDIF : Utiliser un câble S/PDIF standard pour brancher cette sortie
numérique à l’entrée S/PDIF d’un appareil récepteur ou de la lecture.
12. Sortie coaxiale : Utiliser un câble coaxial standard pour brancher cette sortie
numérique à l’entrée coaxiale d’un appareil récepteur ou de la lecture.
13. Sorties analogiques : Utilisez un câble stéréo RCA pour brancher ces sorties
analogiques aux entrées RCA stéréo d’un appareil de lecture.
1. Sélecteur de sortie : Réglez ce sélecteur sur la position du « haut » pour envoyer
le signal audio aux sorties casque. Réglez ce sélecteur sur la position du « bas »
pour envoyer le signal audio aux sorties S/PDIF, coaxiales et analogiques.
2. Sélecteur d’entrée : Réglez ce sélecteur sur la position du « haut » pour
sélectionner une source audio analogique. Réglez ce sélecteur sur la position du
« bas » pour sélectionner une source audio numérique.
Guida per l’uso (Italiano)
Per maggiori informazioni in merito a questo prodotto (requisiti di sistema,
informazioni sulla compatibilità, ecc.), per la registrazione del prodotto e per
assistenza recarsi alla pagina m-audio.com. Per informazioni sulla sicurezza e in
merito alla garanzia, recarsi alla pagina m-audio.com/warranty.
Contenuti della confezione: Super DAC, cavo mini-USB, cavo RCA, Guida per l’uso
Utenti Windows: recarsi alla pagina m-audio.com/drivers per scaricare i necessari
driver Windows per Super DAC.
3. Ingresso di linea: servirsi di un cavo standard da 3,5 mm (1/8”) per collegare
questo ingresso analogico all’uscita analogica della fonte audio. Questo ingresso
riceverà un segnale analogico quando il selettore di ingressi è posizionato in alto.
4. Uscita cuffie: Collegare cuffie stereo standard da 3,5 mm (1/8”) o da 6,35 mm
(1/4”) a una o entrambe queste uscite analogiche. Ricordarsi di impostare il
selettore di uscita in alto.
5. Manopola volume: servirsi di questa manopola per regolare il volume di tutte le
uscite.
6. Indicatore di alimentazione: questa spia si illumina quando il Super DAC viene
acceso.
7. Indicatore di uscita analogica: questa spia si illumina quando il Super DAC invia
un segnale analogico di uscita dalle sue uscite analogiche sinistra/destra.
8. Indicatori di frequenza di campionamento: una di queste spia si illumina per
indicare quale frequenza di campionamento sta attualmente utilizzando il Super
DAC: 44,1, 48, 88,2, 96, 176,4, o 192 kHz.
9. Ingresso di alimentazione: servirsi di un adattatore di alimentazione (12 VCC, 1
A, polo centrale positivo, venduto separatamente) per collegare questo ingresso
alla fonte di alimentazione. Se la porta USB del Super DAC è collegata a un
computer (acceso), tale connessione fornirà l’energia necessaria; in questo caso
non è richiesto l’uso di un adattatore di alimentazione.
10. Porta USB: servirsi del cavo mini USB in dotazione per collegare questa porta a
una porta USB libera del computer (acceso). La connessione fornirà
l’alimentazione necessaria al Super DAC. Questa porta riceverà un segnale
digitale dal computer quando il selettore di ingressi è posizionato in basso.
11. Uscita S/PDIF: servirsi di un cavo standard S/PDIF per collegare questa uscita
digitale all’ingresso S/PDIF di un ricevitore o dispositivo di riproduzione.
12. Uscita coassiale: servirsi di un cavo standard coassiale per collegare questa
uscita digitale all’ingresso coassiale di un ricevitore o dispositivo di riproduzione.
13. Uscite analogiche: servirsi di un cavo stereo RCA standard per collegare queste
uscite analogiche agli ingressi stereo RCA di un dispositivo di riproduzione.
1. Selettore di uscite: impostare questo interruttore in alto per inviare l’audio alle
uscite delle cuffie. Posizionarlo in basso per inviare l’audio alle uscite S/PDIF,
coassiale e analogica.
2. Selettore di ingressi: impostare questo interruttore in alto per selezionare una
fonte di ingresso audio analogica. Posizionarlo in basso per selezionare una fonte
di ingresso audio digitale.
Benutzerhandbuch (Deutsch)
Für aktuelle Informationen zu diesem Produkt (Systemanforderungen,
Informationen zur Kompatibilität etc.), zur Produktregistrierung und den Support
besuchen Sie bitte m-audio.com. Die Sicherheits- und Garantieinformationen finden
Sie unter m-audio.com/warranty.
Lieferumfang: Super DAC, Mini-USB-Kabel, RCA-Kabel, Benutzerhandbuch
Windows-Benutzer: Besuchen Sie m-audio.com/drivers, um die notwendigen
Windows-Treiber für Super DAC herunterzuladen.
3. Line-Eingang: Verwenden Sie ein handelsübliches 3,5 mm Kabel, um diesen Analogeingang
mit dem Analogausgang Ihrer Audioquelle zu verbinden. Dieser Eingang empfängt ein
analoges Signal, wenn der Eingangswahlschalter in der „oberen“ Position steht.
4. Kopfhörerausgänge: Verbinden Sie einen handelsüblichen 3,5 mm oder 6,35 mm
Stereokopfhörer mit einem oder beiden Analogausgängen. Denken Sie daran, den
Ausgangswahlschalter auf die „obere“ Position zu setzen.
5. Lautstärkeregler: Verwenden Sie diesen Regler, um die Lautstärke aller Ausgänge zu
steuern.
6. Netzanzeige: Das Licht leuchtet auf, wenn Super-DAC eingeschaltet ist.
7. Analoge Ausgangsanzeige: Dieses Licht leuchtet auf, wenn Super-DAC ein analoges
Signal erfolgreich an die linken/rechten Analogausgänge sendet.
8. Abtastraten-Anzeigen: Eines dieser Lichter beginnt zu leuchten, um anzuzeigen, welche
Abtastrate Super-DAC derzeit verwendet: 44.1, 48, 88.2, 96, 176.4 oder 192 kHz.
9. Stromversorgung: Verwenden Sie ein Netzteil (12 VDC, 1 A, mittlerer Pin mit positiver
Polarität), um diesen Eingang mit Ihrer Stromquelle zu verbinden. Wenn der USB-
Anschluss des Super DAC mit einem (eingeschalteten) Computer verbunden ist,
versorgt diese Verbindung das Gerät mit dem notwendigen Strom; ein Netzteil ist in
diesem Fall nicht erforderlich.
10. USB-Port: Verwenden Sie das mitgelieferte Mini-USB-Kabel, um diesen Anschluss mit
einem freien USB-Anschluss Ihres (eingeschalteten) Computers zu verbinden. Die
Verbindung versorgt das Super DAC mit Strom. Dieser Anschluss wird ein digitales
Signal vom Ihrem Computer empfangen, wenn der Eingangswahlschalter in der
„unteren“ Position ist.
11. S/PDIF Ausgang: Verwenden Sie ein handelsübliches S/PDIF-Kabel, um diesen
Digitalausgang mit dem S/PDIF-Eingang eines Empfängers oder eines Wiedergabegeräts
zu verbinden.
12. Koaxial-Ausgang: Verwenden Sie ein handelsübliches Koaxialkabel, um diesen
Digitalausgang mit dem Koaxialeingang eines Empfängers oder eines Wiedergabegeräts
zu verbinden.
13. Analogausgänge: Verwenden Sie ein handelsübliches Stereo-Cinch-Kabel, um diese
Analogausgänge an die Stereo-Cinch-Eingänge eines Wiedergabegeräts anzuschließen.
1.
A
usgangswahlschalter: Stellen Sie diesen Schalter in die Position „oben“, um die
Audiosignale an die Kopfhörerausgänge zu senden. Stellen Sie diesen Schalter auf die
„untere“ Position, um die Audiosignale an S/PDIF, die Koaxial- und Analogausgänge
zu senden.
2. Eingangswahlschalter: Stellen Sie diesen Schalter auf die „obere“ Position, um eine
analoge Eingangsquelle auszuwählen. Stellen Sie diesen Schalter auf die „untere“
Position, um eine digitale Eingangsquelle auszuwählen.
1
5
6
7
8
9
10
11 12 13 13
23 4 4
1
5
6
7
8
9
10
11 12 13 13
23 4 4
1
5
6
7
8
9
10
11 12 13 13
23 4 4
Transcripción de documentos
Technical Specifications Interface: USB 2.0; 1.1-compatible ® Converters: Wolfson WM8740 Dynamic Range: 110 dB maximum THD+N: 0.00003% maximum Headphone Output (at 1 kHz): 190 mW (32 Ω); 210 mW (16 Ω) Headphone Drive Ability: 16–100 Ω (1/8” / 3.5mm); 100–600 Ω (1/4” / 6.35mm) Analog Inputs: (1) 1/8” (6.35mm) line-level Digital Inputs: (1) USB 2.0 port Analog Outputs: (1) RCA stereo pair; (1) 1/8” (3.5mm) headphone; (1) 1/4” (6.35mm) headphone ® ® Digital Outputs: (1) S/PDIF optical; (1) coaxial; Dolby and DTS pass-through Sampling Rates: 44.1, 48, 88.2, 96, 176.4, 192 kHz Power: via USB connection or via power adapter (12 VDC, 1 A, centerpositive, sold separately) Dimensions (WxDxH): 3.7” x 3.6” x 1.1” / 94 mm x 91 mm x 27 mm Weight: 0.5 lbs. / 0.21 kg Specifications are subject to change without notice. User Guide (English) For more information about this product (system requirements, compatibility information, etc.), product registration, or product support, visit m-audio.com. For safety and warranty information, visit m-audio.com/warranty. Package Contents: Super DAC, mini-USB cable, RCA cable, User Guide Windows users: Visit m-audio.com/drivers to download the necessary Windows drivers for Super DAC. Safety & Compliance Notices: Notice Concerning FCC Regulations: You are cautioned that changes or modifications not expressly approved by the part responsible for compliance could void the user’s authority to operate the equipment. This equipment has been tested and found to comply with the limits for a Class B digital device, pursuant to Part 15 of the FCC rules. These limits are designed to provide reasonable protection against harmful interference in a residential installation. This equipment generates uses and can radiate radio frequency energy and, if not installed and used in accordance with the instructions, may cause harmful interference to radio communications. However, there is no guarantee that interference will not occur in a particular installation. If this equipment does cause harmful interference to radio or television reception, which can be determined by turning the equipment off and on, the user is encouraged to try to correct the interference by one or more of the following measures: (a) Reorient or relocate the receiving antenna; (b) move this unit; (c) increase the separation between the equipment and receiver; (d) connect the equipment into an outlet on a circuit different from that to which the receiver is connected; (e) be sure that all cables are properly shielded, using a choke or ferrite where appropriate; (f) consult the dealer or an experienced radio/television technician for help. This device complies with Part 15 of the FCC rules. Operation is subject to the following two conditions: (1) this device may not cause harmful interference, and (2) this device must accept any interference received, including interference that may cause undesired operation. FCC RF Radiation Exposure Statement: This equipment complies with FCC radiation exposure limits set forth for an uncontrolled environment. End users must follow the specific operating instructions for satisfying RF exposure compliance. This transmitter must not be co-located or operating in conjunction with any other antenna or transmitter. For best audio quality, avoid using this device in a high RFradiated environment. RSS Statement for Canadian models: This device complies with Industry Canada licence-exempt RSS standard(s). Operation is subject to the following two conditions: (1) this device may not cause interference, and (2) this device must accept any interference, including interference that may cause undesired operation of the device This unit does not exceed the Class B limits for radio noise emission from digital apparatus set out in the radio interference regulations of the Canadian Department of Communications. ESD/EFT Warning: This unit may contain a microcomputer for signal processing and control functions. In very rare situations, severe interference, noise from an external source, or static electricity may cause it to lock up. In the unlikely event that this should happen, turn off the unit, wait at least five seconds, and then turn it back on again. In an environment with radio frequency interference, the unit may malfunction and resume normal operation after removal of the interference. Trademarks and Licenses: M-Audio is a trademark of inMusic Brands, Inc., registered in the U.S. and other countries. Wolfson is a trademark of Wolfson Microelectronics PLC. Dolby is a registered trademark of Dolby Laboratories. DTS is a registered trademark of DTS, Inc. Windows is a registered trademark of Microsoft Corporation in the United States and other countries. All other product or company names are trademarks or registered trademarks of their respective owners. 3. Line Input: Use a standard 1/8” (3.5mm) cable to connect this analog input to the analog output of your audio source. This input will receive an analog signal when the input selector is set to the “up” position. 4. Headphone Outputs: Connect standard 1/8” (3.5mm) or 1/4” (6.35mm) stereo headphones to either or both of these analog outputs. Remember to set the output selector to the “up” position. 5. Volume Dial: Use this dial to control the volume of all outputs. 6. Power Indicator: This light illuminates when Super DAC is powered on. 7. Analog Output Indicator: This light illuminates when Super DAC is successfully sending an analog signal out of its left/right analog outputs. 8. Sampling Rate Indicators: One of these lights illuminates to indicate which sampling rate Super DAC is currently using: 44.1, 48, 88.2, 96, 176.4, or 192 kHz. 9. Power Input: Use a power adapter (12 VDC, 1 A, center-positive, sold separately) to connect this input to your power source. If Super DAC’s USB port is connected to a computer (powered on), the connection will supply the necessary power; a power adapter is not required in this case. 10. USB Port: Use the included mini-USB cable to connect this port to a USB port on your computer (powered on). The connection will supply the necessary power to Super DAC. This port will receive a digital signal from 10 your computer when the input selector is set to the “down” position. 11 12 13 13 11. S/PDIF Output: Use a standard S/PDIF cable to connect this digital output to the S/PDIF input of a receiver or playback device. 1. Output Selector: Set this switch to the “up” position to send the audio to the headphone outputs. Set this switch to the “down” position to send the 12. Coaxial Output: Use a standard coaxial cable to connect this digital audio to the S/PDIF, coaxial, and analog outputs. output to the coaxial input of a receiver or playback device. 2. Input Selector: Set this switch to the “up” position to select an analog input 13. Analog Outputs: Use a standard stereo RCA cable to connect these analog outputs to the stereo RCA inputs of a playback device. source. Set this switch to the “down” position to select a digital input. source. 1 2 3 4 5 6 4 8 9 7 3. Entrada de línea: Utilice un cable estándar de 3,5 mm (1/8 pulg.) para conectar esta entrada analógica a la salida analógica de su fuente de audio. Esta entrada recibe una señal analógica cuando el selector de entrada está ajustado a la posición “hacia arriba”. Para más información acerca de este producto (requisitos de sistema, información de compatibilidad, etc.), registro o soporte del producto, visite m-audio.com. Para información sobre la seguridad y la garantía, visite m-audio.com/warranty. 4. Salidas para auriculares: Conecte auriculares estéreo estándar de 3,5 mm (1/8 pulg.) o de 6,35 mm (1/4 pulg.) a estas dos salidas analógicas o a una de ellas. Recuerde ajustar el selector de salida a la posición “hacia arriba”. Contenido del paquete: Super DAC, cable mini-USB, cable RCA, guía del usuario 5. Usuarios de Windows: Visitar m-audio.com/drivers para descargar los drivers de Windows necesarios para Super DAC. Cuadrante de volumen: Utilice este cuadrante para controlar el volumen de todas las salidas. 6. Indicador de encendido: Esta luz se enciende cuando el Super DAC está encendido. 7. Indicador de salida analógica: Esta luz se enciende cuando el Super DAC envía exitosamente una señal de salida analógica a sus salidas analógicas izquierda/derecha. 8. Indicadores de frecuencia de muestreo: Una de estas luces se enciende para indicar qué frecuencia de muestreo está utilizando el Super DAC en ese momento: 44,1, 48, 88,2, 96, 176,4 o 192 kHz. 9. Entrada de corriente: Use un adaptador de corriente (12 VCC, 1 A, centro positivo, que se vende por separado) para conectar esta entrada a su fuente de alimentación. Si el puerto USB del Super DAC está conectado a un ordenador (encendido), la conexión suministra la corriente necesaria y en este caso no se requiere un adaptador de corriente. Guía del usuario (Español) 1 2 3 4 5 6 7 4 8 9 10 11 12 13 13 10. Puerto USB: Utilice el cable mini-USB incluido para conectar este puerto a un puerto USB disponible en su ordenador (encendido). La conexión suministra al Super DAC la corriente necesaria. Este puerto recibe una señal digital del ordenador cuando el selector de entrada está ajustado a la posición “hacia abajo”. 1. Selector de salida: Ajuste este interruptor en la posición “hacia arriba” para enviar 11. Salida S/PDIF: Utilice un cable S/PDIF estándar para conectar esta salida digital a la el audio a las salidas para auriculares. Ajuste este interruptor en la posición “hacia entrada S/PDIF de un dispositivo receptor o de reproducción. abajo” para enviar el audio a las salidas S/PDIF, coaxial y analógica. 12. Salida coaxial: Utilice un cable coaxial estándar para conectar esta salida digital a la 2. Selector de entrada: Ajuste este interruptor a la posición “hacia arriba” para entrada coaxial de un dispositivo receptor o de reproducción. seleccionar una fuente de entrada analógica. Ajuste este interruptor a la posición 13. Salidas analógicas: Use un cable RCA estéreo estándar para conectar estas salidas “hacia abajo” para seleccionar una fuente de entrada digital. analógicas a las entradas RCA de un dispositivo de reproducción. Guide d’utilisation (Français) Pour plus d’informations sur la configuration système requise, la compatibilité, etc., l’enregistrement du produit ou de l’assistance technique concernant ce produit, veuillez visiter m-audio.com. Pour consulter les Consignes de sécurité et informations concernant la garantie, veuillez visiter le site m-audio.com/warranty. Contenu de l’emballage : Super DAC, câble mini-USB, câble RCA, guide d’utilisation Utilisateurs Windows : Veuillez visiter le site m-audio.com/drivers pour télécharger les pilotes Windows nécessaires pour utiliser le Super DAC. 1 2 3 4 5 6 4 8 9 7 10 11 12 13 13 1. Sélecteur de sortie : Réglez ce sélecteur sur la position du « haut » pour envoyer le signal audio aux sorties casque. Réglez ce sélecteur sur la position du « bas » pour envoyer le signal audio aux sorties S/PDIF, coaxiales et analogiques. 2. Sélecteur d’entrée : Réglez ce sélecteur sur la position du « haut » pour sélectionner une source audio analogique. Réglez ce sélecteur sur la position du « bas » pour sélectionner une source audio numérique. Guida per l’uso (Italiano) Per maggiori informazioni in merito a questo prodotto (requisiti di sistema, informazioni sulla compatibilità, ecc.), per la registrazione del prodotto e per assistenza recarsi alla pagina m-audio.com. Per informazioni sulla sicurezza e in merito alla garanzia, recarsi alla pagina m-audio.com/warranty. 3. Entrée ligne : Utilisez un câble standard 3,5 mm pour brancher cette entrée analogique sur la sortie analogique de votre source audio. Cette entrée recevra un signal analogique lorsque le sélecteur d’entrée est sur la position du « haut ». 4. Sorties casque d’écoute : Branchez un ou des casques stéréo 3,5 mm ou 6,35 mm à ces prises casque analogiques. Veuillez régler le sélecteur de sortie sur la position du « haut ». 5. Molette de volume : Cette molette permet de contrôler le volume de toutes les sorties. 6. Indicateur d’alimentation : Ce témoin s’allume lorsque le Super DAC est sous tension. 7. Indicateur de sortie analogique : Ce témoin s’allume lorsque le Super DAC transmet un signal analogique sur ses sorties analogiques gauche/droite. 8. Indicateurs de fréquence d’échantillonnage : Un de ces indicateurs s’allume pour indiquer la fréquence d’échantillonnage actuellement utilisée par le Super DAC : 44,1, 48, 88,2, 96, 176,4 ou 192 kHz. 9. Entrée d’alimentation : Branchez le câble d’alimentation secteur inclus (12 V CC, 1 A, centre positif, vendu séparément) à cette entrée, puis branchez l’autre l’extrémité à une prise secteur. Si le port USB du Super DAC est connecté à un ordinateur sous tension, la connexion fournit la puissance nécessaire et un adaptateur d’alimentation n’est pas nécessaire. 10. Port USB : Utilisez le câble mini-USB pour relier ce port au port USB de votre ordinateur sous tension. La connexion fournira suffisamment de puissance pour alimenter le Super DAC. Cette entrée recevra un signal numérique lorsque le sélecteur d’entrée est sur la position du « bas ». 11. Sortie S/PDIF : Utiliser un câble S/PDIF standard pour brancher cette sortie numérique à l’entrée S/PDIF d’un appareil récepteur ou de la lecture. 12. Sortie coaxiale : Utiliser un câble coaxial standard pour brancher cette sortie numérique à l’entrée coaxiale d’un appareil récepteur ou de la lecture. 13. Sorties analogiques : Utilisez un câble stéréo RCA pour brancher ces sorties analogiques aux entrées RCA stéréo d’un appareil de lecture. 3. Ingresso di linea: servirsi di un cavo standard da 3,5 mm (1/8”) per collegare questo ingresso analogico all’uscita analogica della fonte audio. Questo ingresso riceverà un segnale analogico quando il selettore di ingressi è posizionato in alto. 4. Uscita cuffie: Collegare cuffie stereo standard da 3,5 mm (1/8”) o da 6,35 mm (1/4”) a una o entrambe queste uscite analogiche. Ricordarsi di impostare il selettore di uscita in alto. Contenuti della confezione: Super DAC, cavo mini-USB, cavo RCA, Guida per l’uso 5. Manopola volume: servirsi di questa manopola per regolare il volume di tutte le uscite. Utenti Windows: recarsi alla pagina m-audio.com/drivers per scaricare i necessari driver Windows per Super DAC. 6. Indicatore di alimentazione: questa spia si illumina quando il Super DAC viene acceso. 7. Indicatore di uscita analogica: questa spia si illumina quando il Super DAC invia un segnale analogico di uscita dalle sue uscite analogiche sinistra/destra. 8. Indicatori di frequenza di campionamento: una di queste spia si illumina per indicare quale frequenza di campionamento sta attualmente utilizzando il Super DAC: 44,1, 48, 88,2, 96, 176,4, o 192 kHz. 1 2 3 4 5 6 4 8 9 7 10 11 12 13 13 1. Selettore di uscite: impostare questo interruttore in alto per inviare l’audio alle uscite delle cuffie. Posizionarlo in basso per inviare l’audio alle uscite S/PDIF, coassiale e analogica. 2. Selettore di ingressi: impostare questo interruttore in alto per selezionare una fonte di ingresso audio analogica. Posizionarlo in basso per selezionare una fonte di ingresso audio digitale. 9. Ingresso di alimentazione: servirsi di un adattatore di alimentazione (12 VCC, 1 A, polo centrale positivo, venduto separatamente) per collegare questo ingresso alla fonte di alimentazione. Se la porta USB del Super DAC è collegata a un computer (acceso), tale connessione fornirà l’energia necessaria; in questo caso non è richiesto l’uso di un adattatore di alimentazione. 10. Porta USB: servirsi del cavo mini USB in dotazione per collegare questa porta a una porta USB libera del computer (acceso). La connessione fornirà l’alimentazione necessaria al Super DAC. Questa porta riceverà un segnale digitale dal computer quando il selettore di ingressi è posizionato in basso. 11. Uscita S/PDIF: servirsi di un cavo standard S/PDIF per collegare questa uscita digitale all’ingresso S/PDIF di un ricevitore o dispositivo di riproduzione. 12. Uscita coassiale: servirsi di un cavo standard coassiale per collegare questa uscita digitale all’ingresso coassiale di un ricevitore o dispositivo di riproduzione. 13. Uscite analogiche: servirsi di un cavo stereo RCA standard per collegare queste uscite analogiche agli ingressi stereo RCA di un dispositivo di riproduzione. Benutzerhandbuch (Deutsch) 3. Für aktuelle Informationen zu diesem Produkt (Systemanforderungen, Informationen zur Kompatibilität etc.), zur Produktregistrierung und den Support besuchen Sie bitte m-audio.com. Die Sicherheits- und Garantieinformationen finden Sie unter m-audio.com/warranty. Line-Eingang: Verwenden Sie ein handelsübliches 3,5 mm Kabel, um diesen Analogeingang mit dem Analogausgang Ihrer Audioquelle zu verbinden. Dieser Eingang empfängt ein analoges Signal, wenn der Eingangswahlschalter in der „oberen“ Position steht. 4. Kopfhörerausgänge: Verbinden Sie einen handelsüblichen 3,5 mm oder 6,35 mm Stereokopfhörer mit einem oder beiden Analogausgängen. Denken Sie daran, den Ausgangswahlschalter auf die „obere“ Position zu setzen. Lieferumfang: Super DAC, Mini-USB-Kabel, RCA-Kabel, Benutzerhandbuch 5. Windows-Benutzer: Besuchen Sie m-audio.com/drivers, um die notwendigen Windows-Treiber für Super DAC herunterzuladen. Lautstärkeregler: Verwenden Sie diesen Regler, um die Lautstärke aller Ausgänge zu steuern. 6. Netzanzeige: Das Licht leuchtet auf, wenn Super-DAC eingeschaltet ist. 7. Analoge Ausgangsanzeige: Dieses Licht leuchtet auf, wenn Super-DAC ein analoges Signal erfolgreich an die linken/rechten Analogausgänge sendet. 8. Abtastraten-Anzeigen: Eines dieser Lichter beginnt zu leuchten, um anzuzeigen, welche Abtastrate Super-DAC derzeit verwendet: 44.1, 48, 88.2, 96, 176.4 oder 192 kHz. 9. Stromversorgung: Verwenden Sie ein Netzteil (12 VDC, 1 A, mittlerer Pin mit positiver Polarität), um diesen Eingang mit Ihrer Stromquelle zu verbinden. Wenn der USBAnschluss des Super DAC mit einem (eingeschalteten) Computer verbunden ist, versorgt diese Verbindung das Gerät mit dem notwendigen Strom; ein Netzteil ist in diesem Fall nicht erforderlich. 1 2 3 4 5 6 7 4 8 9 10 11 12 13 13 1. 2. Ausgangswahlschalter: Stellen Sie diesen Schalter in die Position „oben“, um die Audiosignale an die Kopfhörerausgänge zu senden. Stellen Sie diesen Schalter auf die „untere“ Position, um die Audiosignale an S/PDIF, die Koaxial- und Analogausgänge zu senden. Eingangswahlschalter: Stellen Sie diesen Schalter auf die „obere“ Position, um eine analoge Eingangsquelle auszuwählen. Stellen Sie diesen Schalter auf die „untere“ Position, um eine digitale Eingangsquelle auszuwählen. 10. USB-Port: Verwenden Sie das mitgelieferte Mini-USB-Kabel, um diesen Anschluss mit einem freien USB-Anschluss Ihres (eingeschalteten) Computers zu verbinden. Die Verbindung versorgt das Super DAC mit Strom. Dieser Anschluss wird ein digitales Signal vom Ihrem Computer empfangen, wenn der Eingangswahlschalter in der „unteren“ Position ist. 11. S/PDIF Ausgang: Verwenden Sie ein handelsübliches S/PDIF-Kabel, um diesen Digitalausgang mit dem S/PDIF-Eingang eines Empfängers oder eines Wiedergabegeräts zu verbinden. 12. Koaxial-Ausgang: Verwenden Sie ein handelsübliches Koaxialkabel, um diesen Digitalausgang mit dem Koaxialeingang eines Empfängers oder eines Wiedergabegeräts zu verbinden. 13. Analogausgänge: Verwenden Sie ein handelsübliches Stereo-Cinch-Kabel, um diese Analogausgänge an die Stereo-Cinch-Eingänge eines Wiedergabegeräts anzuschließen.-
 1
1
-
 2
2


En otros idiomas
- français: M-Audio Super DAC II Mode d'emploi
- italiano: M-Audio Super DAC II Guida utente
- English: M-Audio Super DAC II User guide
- Deutsch: M-Audio Super DAC II Benutzerhandbuch