
ZESTAW DO RENOWACJI REFLEKTORÓW . . . . . . . . . . . . . . . . . . . . . . . . . . . . . . . . . . . . . 12
KIT DE PULIDO DE FAROS . . . . . . . . . . . . . . . . . . . . . . . . . . . . . . . . . . . . . . . . . . . . . . . 2
KIT DE RESTAURAÇÃO DE FARÓIS . . . . . . . . . . . . . . . . . . . . . . . . . . . . . . . . . . . . . . . . . . 7
FÉNYSZÓRÓK HELYREÁLLÍTÁSÁRA SZOLGÁLÓ KÉSZLET. . . . . . . . . . . . . . . . . . . . . . . . . . . . 10
KIT DE RESTAURATION DE PHARES . . . . . . . . . . . . . . . . . . . . . . . . . . . . . . . . . . . . . . . . . 4
HEADLIGHT RESTORATION KIT . . . . . . . . . . . . . . . . . . . . . . . . . . . . . . . . . . . . . . . . . . . . 3
SCHEINWERFER-REPARATURSATZ . . . . . . . . . . . . . . . . . . . . . . . . . . . . . . . . . . . . . . . . . 5
SET PENTRU RESTAURAREA FAPTURILOR . . . . . . . . . . . . . . . . . . . . . . . . . . . . . . . . . . . . 8
. . . . . . . . . . . . . . . . . . . . . . . . . . . . . . . . . . . . 11
KIT DI RIPRISTINO FANALI . . . . . . . . . . . . . . . . . . . . . . . . . . . . . . . . . . . . . . . . . . . . . . . 6
KOPLAMPHERSTELKIT . . . . . . . . . . . . . . . . . . . . . . . . . . . . . . . . . . . . . . . . . . . . . . . . . 9
53626
MANUAL DE INSTRUCCIONES · INSTRUCTION MANUAL · GUIDE D’UTILISATION ·BEDIENUNGSANLEITUNG ·
MANUALE D’USO ·MANUAL DE INSTRUÇÕES ·MANUAL DE INSTRUCŢIUNI ·INSTRUCTIEHANDLEIDING·
ÜZEMELTETÉSI UTASÍTÁS · ·INSTRUKCJA OBSŁUGI

· 2 ·
MANUAL DE INSTRUCCIONES
ES
Puede causa irritación ocular / cutánea.
MANTENER FUERA DEL ALCANCE DE LOS NIÑOS
ADVERTENCIA!
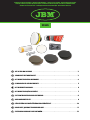
CONTENIDO DEL KIT:
• 2 x P800 Disco para lijar
• 2 x P1200 Disco para lijar
• 2 x P2000 Disco para lijar
• 1 x 85gm Pasta Pulidora
• 2 x 3.0ml Líquido protector UV
• 1 x Cinta adhesiva
• 1 x Disco Pulidor de Lana
• 1 x Disco Esponja Blanco
• 1 x Almohadilla de soporte M10 Rosca
• 2 x Adaptador (3/8” & 1/4”)
CARACTERÍSTICAS:
• Diseñado para restaurar la claridad de las lentes de los faros que se han vuelto amarillentas, turbias
o nebulosas.
• Mejora el rendimiento de las lentes de los faros.
• Tres pasos sencillos: lijar, pulir y proteger.
• Restaura los faros delanteros, las luces traseras, los faros antiniebla o las luces direccionales.
• Este kit está hecho para restaurar 2 faros.
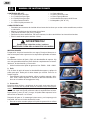
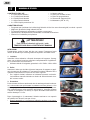
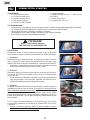
INSTRUCCIONES
Preparación: limpie la lente del faro con agua. Proteja el área que ro-
dea la lente para evitar rayones en las supercies pintadas cercanas.
1. Lijado
Humedezca el disco de lijado y fíjelo a la almohadilla de soporte. Lije
con tres granulados distintos para eliminar completamente el amari-
llamiento, la decoloración y la corrosión.
• Utilice los discos de lijado de grueso a no: P800 > 1200 > 2000
2. Pulir
Fije el disco de pulir de lana a la almohadilla de soporte y aplique la
pasta para pulir. Debe pulir la lente hasta que el brillo vuelva a su
estado original.
• Para obtener mejores resultados, utilice un pulidor manual o eléc-
trico. Pulir a mano requiere un mínimo de 200 movimientos circu-
lares en el sentido de las agujas del reloj.
3. Protección
Limpie la lente del faro y asegúrese de que esté seca antes de con-
tinuar. La luz del sol no puede entrar en contacto con el faro (impor-
tante). Con el disco esponjoso que viene con el kit, aplique uniforme-
mente una capa del líquido protector sobre la supercie de la lente.
Deje reposar y seca (15 min.). Luego, el líquido debe reposar a la luz
directa del sol durante 1 a 2 horas.
Después del paso nº 3, mantenga la lente seca y no la exponga a la
humedad. No lave el coche durante 24 horas.
• Evite la luz solar cuando aplique el líquido de protección en el faro
(importante).

· 3 ·
MANUAL OF INSTRUCTIONS
EN
KIT CONTENTS:
• 2 x P800 Sanding Discs
• 2 x P1200 Sanding Discs
• 2 x P2000 Sanding Discs
• 1 x 85gm Polish Paste
• 2 x 3.0ml UV Protect Liquid
• 1 x Masking tape
• 1 x Wool Polish Disc
• 1 x White Sponge Disc
• 1 x Backer Pad M10 Thread
• 2 x Adapter (3/8” & 1/4”)
FEATURES:
• Designed to restore clarity to headlight lenses that have become yellowed, cloudy, or hazy.
• Headlight lens restoration kit improves the performance of the headlight.
• Three easy steps: sand, polish and protect.
• Easier than replacing an old headlight.
• Comes with easy-to-use instructions.
• Car headlight restoration kit doesn’t include household polishing machine.
• Restores headlights, taillights, fog lights or directional lights.
• This kit is intended to restore 2 headlights.
May cause eye / skin irritation.
KEEP OUT OF REACH OF CHILDREN
WARNING!
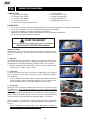
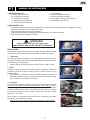
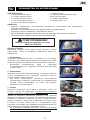
INSTRUCTION
Prepare: clean the headlight lens with water. Shield the area surroun-
ding the lens to avoid scratches on nearby painted surfaces.
1. Sanding
Wet the sanding disc and attach it to the backer pad. Sand with three
dierent grits to completely remove the heavy yellowing, fading and
corrosion.
• Use the sanding discs from coarse to ne: P800 > 1200 > 2000
2. Polishing
Attach the wool polish disc to the backer pad and apply the polish
paste. Polish the lens until shine is restored to its original condition.
• For best results, use an electric buer or polisher. Polishing by
hand: no less than 200 circular strokes clockwise.
3. Protection
Clean the headlight lens and make sure they are dry before conti-
nuing. No sunlight can contact the headlight (key). With the sponge
disc of the kit, evenly apply a layer of the protective liquid on the
surface of the lens. Let the liquid sit and dry (15 min). Then the liquid
should cure in direct sunlight for 1 to 2 hours.
After step nº 3, keep the lens dry and do not allow it to be exposed to
moisture. Do not wash the car for 24 hours.
• Avoid any sunlight when apply the liquid of protection on the head-
light (key).

· 4 ·
GUIDE D’UTILISATION
FR
COMPLÉTUDE:
• 2 x roues d’émeri P800
• 2 x roues d’émeri P1200
• 2 x roues d’émeri P2000
• 1 x 85 g de pâte à polir
• 2 x 3,0 ml de liquide de protection UV
• 1 x ruban adhésif
• 1 x roue à polir en laine
• 1 x disque éponge blanc
• 1 x buse, letage M10
• 2 x adaptateur (3/8” et 1/4”)
PROPRIÉTÉS:
• Le kit est conçu pour restaurer la transparence de verres optiques jaunis ou atténués des phares.
• Le kit de restauration de verres des phares augmente leur ecacité.
• Trois simples étapes : meulage, polissage et protection.
• Restaure les feux avant, arrière, antibrouillard ou les indicateurs de direction.
• Ce kit est conçu pour restaurer 2 phares.
Peut provoquer une irritation des yeux / de la peau.
TENIR HORS DE PORTÉE DES ENFANTS
AVERTISSEMENT
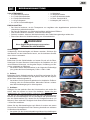
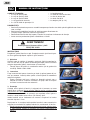
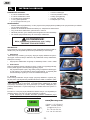
INSTRUCTIONS
Préparation : lavez le verre du phare avec de l’eau. Protégez la zone
autour du phare pour ne pas rayer les surfaces peintes autour de
celui-ci.
1. Meulage
Humidiez le disque à meuler et placez-le sur la buse. Nettoyez le
verre du phare avec des roues de trois grains diérents pour éliminer
complètement les dépôts jaunâtres, la décoloration et la corrosion.
• Utilisez les disques à meuler dans l’ordre suivant (du gros meula-
ge à celui n) : P800 > 1200 > 2000
2. Polissage
Fixez la roue à polir en laine sur la buse et appliquez-y de la pâte à
polir. Polissez le verre optique jusqu’à ce que la brillance d’origine
soit restaurée.
• Pour de meilleurs résultats, utilisez un dispositif tampon électrique
ou une machine à polir. Polissage manuel : au moins 200 mouve-
ments circulaires dans le sens des aiguilles d’une montre.
3. Protection
Nettoyez le verre optique du phare et assurez-vous qu’il est sec avant
de poursuivre. Il est interdit d’exposer au soleil le phare (capacité
adhésive). Avec le disque éponge du kit, appliquez uniformément une
couche de liquide de protection sur la surface du verre optique du
phare. Laissez le liquide sécher (15 min.). Ensuite, le liquide devrait
durcir à la suite d’une exposition au soleil pendant 1 à 2 heures.
Après l’étape nº 3, maintenez le verre du phare au sec et n’exposez
pas à l’humidité. Ne lavez pas le véhicule pendant les prochaines 24
heures.
• Évitez l’exposition au soleil lorsque vous appliquez le liquide de
protection sur le phare (capacité adhésive).

· 5 ·
BEDIENUNGSANLEITUNG
DE
VOLLSTÄNDIGKEIT:
• 2 x P800 Schleifscheiben
• 2 x P1200 Schleifscheiben
• 2 x P2000 Schleifscheiben
• 1 x 85 g Polierpaste
• 2 x 3,0 ml UV-Schutzüssigkeit
• 1 x Klebeband
• 1 x Wollpolierscheibe
• 1 x weiße Schwammscheibe
• 1 x Düse, Gewinde M10
• 2 x Adapter (3/8” und 1/4”)
EIGENSCHAFTEN:
• Der Satz ist bestimmt, um die Transparenz von vergilbten oder abgeblendeten optischen Glass-
cheinwerfern wiederherzustellen.
• Der Satz für Reparatur von Scheinwerfergläsern erhöht deren Ezienz.
• Drei einfache Schritte: Schleifen, Polieren und Schützen.
• Stellt die vorderen, hinteren, Nebelscheinwerfer oder Fahrtrichtungsanzeiger wieder her.
• Dieser Satz dient zur Wiederherstellung von 2 Scheinwerfern.
Kann Augen-/Hautreizungen verursachen.
FERNHALTEN VON KINDERN
WARNUNG!
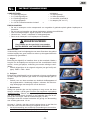
Anweisungen
Vorbereitung: Scheinwerferglas mit Wasser waschen. Schützen Sie
den Bereich um den Scheinwerfer herum, um die lackierten Oberä-
chen nicht zu zerkratzen.
1. Schleifen
Befeuchten Sie die Schleifscheibe und setzen Sie sie auf die Düse.
Schmirgeln Sie das Glas des Scheinwerfers mit Scheiben von drei
verschiedenen Körnungen, um die gelbe Plaque, Verfärbung und Ko-
rrosion vollständig zu entfernen.
• Verwenden Sie die Schleifscheiben in der folgenden Reihenfolge
(von grobes bis feines Schmirgeln): P800 > 1200 > 2000
2. Polieren
Befestigen Sie die Wollpolierscheibe an der Düse und tragen Sie Po-
lierpaste darauf auf. Polieren Sie das optische Glas, bis der ursprün-
gliche Glanz wiederhergestellt ist.
• Verwenden Sie für bessere Ergebnisse eine elektrische Puervo-
rrichtung oder eine Poliermaschine. Manuelles Polieren: mindes-
tens 200 Kreisbewegungen im Uhrzeigersinn.
3. Schützen
Reinigen Sie das optische Glas des Scheinwerfers und stellen Sie
sicher, dass es trocken ist, bevor Sie fortfahren. Setzen Sie den
Scheinwerfer den Sonnenstrahlen nicht aus (Klebefähigkeit). Brin-
gen Sie mit der Schwammscheibe aus dem Satz gleichmäßig eine
Schicht der Schutzüssigkeit auf die Oberäche des optischen Gla-
ses des Scheinwerfers auf. Lassen Sie die Flüssigkeit trocknen (15
Minuten). Dann sollte die Flüssigkeit durch Sonnenlicht innerhalb von
1-2 Stunden aushärten.
Halten Sie das Scheinwerferglas nach Schritt 3 trocken und setzen
Sie es keiner Feuchtigkeit aus. Das Fahrzeug innerhalb von nächsten
24 Stunden nicht waschen.
• Vermeiden Sie die Sonneneinstrahlung während des Aufbringens
der Schutzüssigkeit auf den Scheinwerfer (Klebefähigkeit).

· 6 ·
MANUALE D’USO
IT
CONTENUTO DEL KIT:
• 2 x P800 Dischi abrasivi
• 2 x P1200 Dischi abrasivi
• 2 x P2000 Dischi abrasivi
• 1 x 85gm Pasta lucidante
• 2 x 3.0ml Liquido protezione UV
• 1 x Nastro adesivo
• 1 x Disco per lucidare la lana
• 1 x Disco di spugna bianco
• 1 x Fascetta di supporto M10
• 2 x Adattatore (3/8” & 1/4”)
CARATTERISTICHE:
• Progettato per ripristinare la luciditá degli obiettivi dei fari che sono diventati gialli, nuvolosi o opachi.
• Migliora le prestazioni degli obiettivi dei fari.
• Tre semplici passaggi: carteggiare, lucidare e proteggere.
• Ripristina fari, fanali posteriori, fendinebbia o indicatori di direzione.
• Questo kit è realizzato per ripristinar.
Puó causare irritazioni agli occhi / pelle.
TENERE FUORI DALLA PORTATA DEI BAMBINI
¡ATTENZIONE!
ISTRUZIONI
Preparazione: pulire la lente del faro con acqua. Proteggere l’area
intorno all’obiettivo per evitare gra sulle superci verniciate vicine.
1. Lucidare
Inumidire il disco abrasivo e ssarlo al tampone di supporto. Carteg-
giare con tre diversi grani per eliminare completamente l’ingiallimen-
to, lo scolorimento e la corrosione.
• Utilizzare dischi di levigatura grossolani e ni: P800> 1200> 2000
2. Pulire
Attaccare il disco per lucidare la lana al tampone di supporto e appli-
care la pasta per la lucidatura. È necessario lucidare l’obiettivo no a
quando la luminosità non ritorna al suo stato originale.
• Per i migliori risultati, utilizzare un lucidatore manuale o elettrico.
La lucidatura manuale richiede un minimo di 200 movimenti circo-
lari in senso orario.
3. Protezione
Pulire la lente del faro e assicurarsi che sia asciutta prima di continua-
re. La luce solare non può entrare in contatto con il faro (chiave). Con
il disco spugnoso fornito nel kit, applicare uno strato di liquido prote-
ttivo uniformemente sulla supercie dell’obiettivo. Lasciare riposare
il liquido e asciugarlo (15 minuti). Il liquido dovrebbe stare alla luce
solare diretta per 1-2 ore.
Dopo il passaggio n.3, mantenere l’obiettivo asciutto e non esporlo
all’umidità. Non lavare l’auto per 24 ore.
• Dopo il passaggio n.3, mantenere l’obiettivo asciutto e non espor-
lo all’umidità.

· 7 ·
MANUAL DE INSTRUÇÕES
PT
CONTENIDO DEL KIT:
• 2 x P800 Discos de lixar
• 2 x P1200 Discos de lixar
• 2 x P2000 Discos de lixar
• 1 x 85gm Pasta de polimento
• 2 x 3.0ml Líquido protetor UV
• 1 x Fita adesiva
• 1 x Disco de polimento de lã
• 1 x Disco de Esponja Branco
• 1 x Almofada de suporte M10 Rosca
• 2 x Adaptador (3/8” & 1/4”)
CARACTERÍSTICAS:
• Projetado para restaurar a clareza das lentes dos faróis que caram amarelas, nubladas ou turvas.
• Melhora o desempenho das lentes dos faróis.
• Três passos simples: lixar, polir e proteger.
• Restaura faróis dianteiros, lanternas, faróis de neblina ou sinais de direção.
• Este kit é feito para restaurar 2 faróis.
Pode causar irritação nos olhos / pele.
MANTENHA FORA DO ALCANCE DE CRIANÇAS
¡ATENÇÃO!
INSTRUÇÕES
Preparação: limpe a lente do farol com água. Proteja a área ao redor
da lente para evitar arranhões nas superfícies pintadas próximas.
1. Lixamento
Humedeça o disco de lixagem e xe-o ao suporte de apoio. Lixe com
três grãos diferentes para eliminar completamente o amarelecimento,
a descoloração e a corrosão.
• Use os discos de lixado de grosso a no: P800 > 1200 > 2000
2. Polir
Coloque o disco de polimento de lã no suporte e aplique a pasta de
polimento. Você deve polir a lente até que o brilho retorne ao seu
estado original.
• Para melhores resultados, use um polidor manual ou elétrico. O
polimento manual requer um mínimo de 200 movimentos circula-
res no sentido dos ponteiros do relógio.
3. Proteção
Limpe a lente do farol e verique se ela está seca antes de continuar.
A luz solar não pode entrar em contato com o farol (clave). Com o
disco esponjoso que vem com o kit, aplique uma capa de líquido
protetor uniformemente sobre a superfície da lente. Deixe o líquido
em repouso e seque (15 min.). Então, o líquido deve car em luz solar
direta por 1 a 2 horas.
Após o passo 3, mantenha a lente seca e não a exponha à umidade.
Não lave o carro durante 24 horas.
• Evite a luz solar ao aplicar o uido de proteção no farol (clave).

· 8 ·
MANUAL DE INSTRUCŢIUNI
RO
COMPLETITUDINEA:
• 2 x roți de șlefuit P800
• 2 x roți de șlefuit P1200
• 2 x roți de șlefuit P2000
• 1 x 85 g pastă de lustruire
• 2 x 3,0 ml lichid de protecție UV
• 1 x bandă adezivă
• 1 x roată de lustruire din lână
• 1 x disc de burete alb
• 1 x duză, let M10
• 2 x adaptor (3/8 “și 1/4”)
PROPRIETĂȚI:
• Setul este predestinat pentru a restabili transparența farurilor de sticlă optică îngălbinite sau întune-
cate cu timpul.
• Setul pentru restabilirea farurilor de sticlă sporește ecacitatea lor.
• Trei pași simpli: șlefuirea, lustruirea și protecția.
• Restaurează farurile din față, spate și farurile de ceață sau indicatoare de direcție.
• Acest set este predestinat pentru restabilirea a 2 faruri.
Poate provoca iritarea ochilor / pielii.
FERIȚI DE COPII
AVERTISMEN!
INSTRUCȚIUNI
Pregătirea: spălați farurile cu apă. Protejați zona din jurul farului pen-
tru a nu zgâria suprafețele vopsite în jurul acestuia.
1. Șlefuirea
Umeziți roata de șlefuire și instalați-o pe duză. Șlefuiți suprafața fa-
rului cu cele trei roți de șlefuit de diferită granulație pentru a elimina
complet depunerile gălbui, decolorarea și coroziunea.
• Folosiți discuri de șlefuit în următoarea ordine (de la grosieră la
cea nă): P800> 1200> 2000
2. Lustruirea
Fixați roata de lână pentru lustruire pe duză și aplicați pasta de lus-
truit pe aceasta. Lustruiți sticla optică a farului până la restabilirea
strălucirii originale.
• Pentru rezultate mai bune, utilizați un dispozitiv electric sau o
mașină de lustruit. Lustruire manuală: cel puțin 200 de mișcări
circulare în sensul acelor de ceasornic.
3. Protecția
Curățați sticla optică al farului și asigurați-vă că acesta s-a uscat
înainte de a continua. Nu se permite căderea pe far a luminii soare
(capacitatea de adeziv). Cu discul de burete din set aplicți în mod
uniform un strat de lichid de protecție pe suprafața sticlei optice a
farurilor. Lăsați lichidul să se usuce (15 minute). Apoi,
lichidul trebuie să se întărească ca urmare a expunerii la lumina
soarelui timp de 1-2 ore.
După pasul nr. 3, mențineți sticla optică a farurilor în stare uscată și nu
expuneți la umezeală. Nu spălați vehiculul în următoarele 24 de ore.
• Evitați expunerea sticlei optice a farurului la lumina soarelui atun-
ci când aplicați lichidul de protecție pe acesta (capacitatea de
adeziv).

· 9 ·
INSTRUCTIEHANDLEIDING
NL
COMPLEETHEID:
• 2 x P800 slijpschijven
• 2 x P1200 slijpschijven
• 2 x P2000 slijpschijven
• 1 x 85 g polijstpasta
• 2 x 3,0 ml UV-beschermende vloeistof 1 x
afplakband
• 1 x wolpolijstschijf
• 1 x Witte sponsschijf
• 1 x mondstuk, draad M10
• 2 x adapter (3/8” en 1/4”)
EIGENSCHAPPEN:
• De set is ontworpen om de transparantie van vergeelde of gedimde optisch glazen koplampen te
herstellen.
• De set voor het herstellen van glazen koplampen verbetert hun eciëntie.
• Drie eenvoudige stappen: slijpen, polijsten en beschermen.
• Herstelt voor-, achter-, mistlichten of richtingaanwijzers.
• Deze set is ontworpen om 2 koplampen te herstellen.
Kan irritatie van de ogen/huid veroorzaken.
BUITEN BEREIK VAN KINDEREN BEWAREN
WAARSCHUWING!
INSTRUCTIES
Voorbereiding: was het koplampglas met water. Bescherm het gebied
rond de koplamp om geen krassen te maken op de oppervlakken die
eromheen zijn geschilderd.
1. Slijpen
Bevochtig de slijpschijf en installeer deze op het mondstuk. Maakt u
het glas van de koplamp met schijven van drie verschillende korrels
schoon, om de gele plaque, verkleuring en corrosie volledig te verwi-
jderen.
• Gebruik slijpschijven in de volgende volgorde (van grof tot jn stri-
ppen): P800 > 1200 > 2000
2. Polijsten
Bevestig de wolpolijstschijf op het mondstuk en breng er polijstpasta
op aan. Polijst het optische glas totdat de oorspronkelijke glans is
hersteld.
• Gebruik voor een beter resultaat een elektrisch buerapparaat of
een polijstmachine. Handmatig polijsten: minstens 200 cirkelvor-
mige bewegingen met de wijzers van de klok mee.
3. Beschermen
Reinig het optische glas van de koplamp en zorg ervoor dat deze
droog is voordat u verder gaat. Zonlicht niet toegestaan op koplamp
(hechtvermogen). Gebruik een sponsschijf uit de set om gelijkmatig
een laag beschermende vloeistof op het optische glas van de ko-
plamp aan te brengen. Laat de vloeistof drogen (15 min.).
Vervolgens moet de vloeistof verharden als gevolg van blootstelling
aan zonlicht gedurende 1-2 uur.
Na stap nº 3 houdt u het glas van de koplamp droog en stel het niet
bloot aan vocht. Was het voertuig de volgende 24 uur niet.
• Vermijd blootstelling aan zonlicht bij het aanbrengen van een bes-
chermende vloeistof op de koplamp (hechtvermogen).

· 10 ·
ÜZEMELTETÉSI UTASÍTÁS
HU
ÖSSZETEVŐK:
• 2 x P800 csiszolókorong
• 2 x P1200 csiszolókorong
• 2 x P2000 csiszolókorong
• 1 x 85g polírozó paszta
• 2 x 3.0 ml UV-védő folyadék
• 1 x ragasztószalag
• 1 x gyapjú polírozó korong 1 x fehér szivac-
sos korong
• 1 x feltét, M10 menet
• 2 x adapter (3/8 “ és 1/4””)
TULAJDONSÁGOK:
• A készlet célja a megsárgult, illetve homályos optikai üvegfényszórók átlátszóságának helyreállítsa.
• Az üvegfényszórók helyreállítására szolgáló készlet növeli azok hatékonyságát.
• Három egyszerű lépés: csiszolás, polírozás és védelem.
• Visszaállítja az első, hátsó lámpák, ködlámpák vagy irányjelző lámpáit.
• Ez a készlet 2 fényszóró helyreállítására szolgál.
Szem - / bőrirritációt okozhat.
TARTSA TÁVOL A GYEREKEKTŐL
FIGYELEM!
UTASÍTÁSOK
Előkészítés: mossa le vízzel a fényszóró üvegét. Védje a fényszóró
körüli területet, hogy ne sértse meg a körülötte lévő festett felületeket.
1. Csiszolás
Nedvesítse meg a csiszolókorongot, és helyezze a feltétre. Tisztítsa
meg a fényszóró üvegét három különböző szemű koronggal, hogy
teljesen eltávolítsa a sárgás lerakódásokat, a fakulást és a korróziót.
• Használja a csiszolókorongokat a következő sorrendben (durvától
kezdve nommal befejezve): P800 > 1200 > 2000
2. Polírozás
Rögzítse a gyapjú polírozókorongot a feltétre, és helyezzen rá políro-
zó pasztát. Fényezze ki az optikai üveget, amíg az eredeti csillogás
helyre nem áll.
• A jobb eredmény érdekében használjon elektromos puereszközt
vagy fényezőgépet. Kézi polírozás: legalább 200 körkörös moz-
gás az óramutató járásával megegyező irányban.
3. Védelem
Az eljárás folytatása előtt tisztítsa meg a fényszóró optikai üvegét, és
győződjön meg arról, hogy az száraz-e. Ne tegye ki a fényszórót a na-
pfény hatásának (adhéziós képesség). A készlethez tartozó szivacs-
lemez segítségével egyenletesen védőréteget vigyen fel az optikai
üvegfényszórók felületeire. Hagyja száradni a folyadékot (15 perc.).
Ezután a folyadéknak 1-2 órán belül a napfény hatása alatt meg kell
keményednie.
A nº 3. lépés után tartsa szárazon a fényszóróüveget, és ne tegye
ki nedvesség hatásának. A következő 24 órában belül ne mossa le
a járművet.
• Kerülje a közvetlen napfényt, amikor a védő folyadékot a fénys-
zóróra alkalmazza (adhéziós képesség).

· 11 ·
РУКОВОДСТВО ПО ЭКСПЛУАТАЦИИ
RU
КОМПЛЕКТНОСТЬ:
• 2 x P800 наждачных круга
• 2 x P1200 наждачных круга
• 2 x P2000 наждачных круга
• 1 x 85 г полировальной пасты
• 2 x 3,0 мл УФ-защитная жидкость
• 1 x клейкая лента
• 1 x шерстяной полировальный круг 1 x
белый губчатый диск
• 1 x насадка, резьба M10
• 2 x адаптер (3/8” и 1/4”)
СВОЙСТВА:
• Комплект предназначен восстановления прозрачности пожелтевших или помутневших
оптических стекол фар.
• Комплект для восстановления стекол фар повышает их эффективность.
• Три простых шага: шлифование, полирование и защита.
• Восстанавливает передние, задние, противотуманные фары или указатели поворотов.
• Данный комплект предназначен для восстановления 2 фар.
Может вызывать раздражение глаз/кожи.
БЕРЕЧЬ ОТ ДЕТЕЙ
ПРЕДУПРЕЖДЕНИЕ!
БЕРЕЧЬ ОТ ДЕТЕЙ
Подготовка: помойте стекло фары водой. Защитите участок
вокруг фары, чтобы не поцарапать окрашенные вокруг нее
поверхности.
1. Шлифование
Увлажните шлифовальный диск и установите его на насадку.
Зачистите стекло фары кругами трех разных зернистостей, чтобы
полностью удалить желтоватый налет, выцветание и коррозию.
• Используйте шлифовальные диски в следующей
последовательности (от грубой до чистовой зачистки): P800
> 1200 > 2000
2. Полирование
Закрепите шерстяной полировальный круг на насадку и нанесите
на него полировальную пасту. Полируйте оптическое стекло до
восстановления исходного блеска.
• Для более качественных результатов воспользуйтесь
электрическим буферным устройством или полировальным
станком. Ручное полирование: не менее 200 круговых
движений по часовой стрелке.
3. Защита
Почистите оптическое стекло фары и убедитесь, чтобы оно
высохло, прежде чем продолжить. Не допускается попадание
на фару солнечных лучей (адгезивная способность). Губчатым
диском из комплекта равномерно нанесите слой защитной
жидкости по поверхности оптического стекла фары. Предоставьте
возможность жидкости высохнуть (15 мин.). Затем жидкость
должна отвердеть в результате воздействия солнечных лучей
в течение 1-2 часов. После шага nº 3 поддерживайте сухое
состояние стекла фары и не подвергайте воздействию влаги. Не
мойте транспортное средство ближайшие 24 часа.
• Не допускайте попадания солнечных лучей при нанесении
защитной жидкости на фару (адгезивная способность).

· 12 ·
INSTRUKCJA OBSŁUGI
PL
ZAWARTOŚĆ ZESTAWU:
• 2 x tarcze szlierskie P800
• 2 x tarcze szlierskie P1200
• 2 x P2000 tarcze szlierskie
• 1 x 85 g pasta polerska
• 2 x 3,0 ml płyn ochronny UV
• 1 x taśma maskująca
• 1 x tarcza polerska z wełny
• 1 x biały dysk gąbkowy
• 1 x dysza, gwint M10
• 2 x adapter (3/8 “i 1/4”)
WŁAŚCIWOŚCI:
• Zestaw został zaprojektowany w celu przywrócenia przejrzystości pożółkłych lub przyciemnionych reekto-
rów ze szkła optycznego.
• Zestaw do odnawiania reektorów szklanych, zwiększa ich skuteczność.
• Trzy proste kroki: szlifowanie, polerowanie i ochrona.
• Odnawia przednie, tylne światła przeciwmgielne lub kierunkowskazy.
• Ten zestaw jest przeznaczony do renowacji 2 reektorów.
Może powodować podrażnienie oczu / skóry.
TRZYMAĆ Z DALA OD DZIECI
OSTRZEŻENIE!
INSTRUKCJE
Przygotowanie: umyj szybę reektora wodą. Zabezpiecz obszar wokół re-
ektora, aby nie zarysować powierzchni pomalowanych wokół niego.
1. Szlifowanie
Zwilż ściernicę i umieść ją na dyszy. Wyczyść szybę reektora za pomo-
cą kręgów z trzema różnymi ziarnami, aby całkowicie usunąć zażółcenie,
blaknięcie i korozję.
• Używaj tarcz szlierskich od grubej do delikatnej: P800 > 1200 > 2000
2. Polerowanie
Zamocuj wełnianą tarczę polerską na dyszy i nałóż na nią pastę polerską.
Poleruj szkło optyczne, aż odzyska oryginalny połysk.
• Aby uzyskać lepsze wyniki, użyj elektrycznego urządzenia buforujące-
go lub maszyny do polerowania. Ręczne polerowanie: co najmniej 200
ruchów kołowych zgodnych z ruchem wskazówek zegara.
3. Ochrona
Przed kontynuowaniem oczyść szybę optyczną reektora i upewnij się,
że jest sucha. Nie dopuść aby światło słoneczne trało na reektor (zdol-
ność adhezyjna). Przy pomocy dysku gąbkowego z zestawu równomiernie
nałóż warstwę płynu ochronnego na powierzchnię reektorów ze szkła
optycznego. Pozostaw płyn do wyschnięcia (15 minut). Następnie płyn
powinien stwardnieć w wyniku ekspozycji na światło słoneczne przez 1-2
godziny.
Po kroku nr 3 utrzymuj szybę reektora w stanie suchym i nie wystawiaj na
działanie wilgoci. Nie myj auto przez następne 24 godziny.
• Unikaj ekspozycji na światło słoneczne podczas nakładania płynu
ochronnego na reektor (zdolność adhezyjna).
www.jbmcamp.com
C/ Rejas, 2 - P5, Ocina 17
28821 Coslada (Madrid)
jbm@jbmcamp.com
Tel. +34 972 405 721
Fax. +34 972 245 437
53626
-
 1
1
-
 2
2
-
 3
3
-
 4
4
-
 5
5
-
 6
6
-
 7
7
-
 8
8
-
 9
9
-
 10
10
-
 11
11
-
 12
12


en otros idiomas
- français: JBM 53626 Mode d'emploi
- italiano: JBM 53626 Guida utente
- português: JBM 53626 Guia de usuario
- polski: JBM 53626 instrukcja
- română: JBM 53626 Manualul utilizatorului
Artículos relacionados

Otros documentos
-
Bosch HTD 6 Series Original Instructions Manual
-
Stiga Road Light Kit - right hand drive Instrucciones de operación
-
Facom 740A El manual del propietario
-
Segway P100SE Manual de usuario
-
GYS RENOV'POLYCARBONATE Ficha de datos
-
-
Belkin F8T061eaHP Manual de usuario