LANDMANN 45025 El manual del propietario
- Categoría
- Barbacoas
- Tipo
- El manual del propietario

1
For Outdoor Use Only.
Read and follow owner’s manual instructions and
safety warnings before operating this product.
Uses propane for fuel. Propane tank and fuel sold
separately. Product may vary slighly as shown.
WARNING: FUELS USED IN LIQUEFIED PROPANE
GAS APPLIANCES, AND THE PRODUCTS OF
COMBUSTION OF SUCH FUELS, CAN EXPOSE YOU
TO CHEMICALS INCLUDING CARBON MONOXIDE,
WHICH IS KNOWN TO THE STATE OF CALIFORNIA
TO CAUSE BIRTH DEFECTS OR OTHER REPRODUC-
TIVE HARM.
For more information go to: www.P65Warnings.ca.gov
WARNING: THIS PRODUCT CAN EXPOSE YOU
TO CHEMICALS, INCLUDING LEAD COMPOUNDS,
WHICH ARE KNOWN TO THE STATE OF
CALIFORNIA TO CAUSE CANCER, BIRTH DEFECTS
OR OTHER REPRODUCTIVE HARM.
For more information go to: www.P65Warnings.ca.gov
ASSEMBLY, CARE AND USE INSTRUCTIONS
READ CAREFULLY
IMPORTANT:
RETAIN THESE INSTRUCTIONS FOR FUTURE REFERENCE
5 Burner LP Barbecue Grill
MODEL 45025
Español p. 29
Questions, problems, missing parts? Before returning to your retailer, call our customer
service department at: 1-800-321-3473 8:00 AM - 5:00 PM (EST) English Only,
or Email [email protected]
This appliance is for
outdoor use only.
This is not a
commercial appliance.
5016209

2
Table of Contents
Important Safety Information.................................3-4
Liquid Propane (LP) Safety Information.....................5
Package Contents .................................................6-7
Preparation.................................................................8
Hardware Contents ...................................................8
Tools Required...........................................................8
Assembly Instructions .........................................9-24
Assembler/Installer
This instruction manual contains important information necessary for the proper assembly and safe use of this
appliance. Read and follow all warnings and instructions before assembling and using this appliance.
Leave these instructions with the consumer.
Consumer/User
Follow all warnings and instructions when using this appliance.
Keep these instructions for future reference.
If you smell gas:
1. Shut off gas to the appliance.
2. Extinguish any open flame.
3. Open lid.
4. If odor continues, keep away from the
appliance and immediately call your gas
supplier or your fire department.
5. Failure to follow these instructions could
result in explosion, or burn hazard which
could cause property damage, personal
injury or death.
1. DO NOT store or use gasoline or other flam-
mable liquids or vapors in the vicinity of this or
any other appliance.
2. An LP (liquid propane) cylinder not connected
for use should not be stored in the vicinity of
this or any other appliance.
3. This grill is FOR OUTDOOR USE only and
shall not be used in a building, garage, under
overhangs or any other enclosed area.
4. DO NOT leave a lit grill unattended. Keep chil-
dren and pets away from the grill at all times.
5. This appliance is for Household use only.
This is not a commercial appliance.
Connecting Gas Cylinder ..................................25
Lighting Instructions ..........................................26
Care and Maintenance .................................27-28
Cooking Methods and Grilling Tips ...................29
Troubleshooting .................................................30
Grilling Guidelines ........................................31-32
Replacement Parts ......................................33-34
Warranty ............................................................35

3
Important Safety Information
Warnings and Cautions contained
in this instruction manual may result in
serious bodily injury or death, or may
result in a fire or explosion causing
damage to property.
• Make sure to follow all assembly instructions
carefully. Improper assembly of this grill may be
dangerous.
• NEVER use charcoal, lighter fluid, gasoline, kerosene
or alcohol to ignite this grill.
• NEVER place more than 10 pounds on a side table.
DO NOT lean on grill.
• NEVER use charcoal briquettes or lighter fluid in a
gas grill. DO NOT move grill while it is lit.
• When igniting the grill or cooking, DO NOT lean over
the open grill.
• Always open the grill lid slowly and carefully as heat
trapped inside the grill can cause severe burns.
• DO NOT place hands or fingers at edge of the
firebox and the lid when the lid is open or the grill is
hot.
• Keep children and pets away from the grill when in
use. Accessible parts may be very hot.
• DO NOT attempt to disconnect the gas regulator
and hose assembly or any gas fitting while your grill
is operating.
• This grill SHOULD NOT be located under any
overhead unprotected combustible construction.
Always allow at least 24” from the top, bottom,
back and 24” from the sides of the grill (see below).
• This grill is an outside appliance and SHOULD
NOT be operated in a building, garage, or any other
enclosed area.
• DO NOT obstruct the flow of combustion and
ventilation air. Keep the ventilation openings of the
cylinder enclosure free and clear of debris.
• Should the burners go out while the grill is in
operation, turn all gas valves off. Open the lid and
wait five minutes before attempting to relight the
grill, using the igniting instructions.
• Keep this grill clear and free from combustible
material, gasoline and other flammable vapors and
liquids.
• NEVER store an extra or disconnected liquid
propane cylinder under or near this grill.
• Always use heat-resistant barbecue mitts or
gloves when operating the grill.
• DO NOT leave a hot grill unattended or move it
during operation.
• This grill is not intended to be used in or installed
on recreational vehicles, boats, portable trailers, or
in any moving location.
• DO NOT put a grill cover or anything flammable
on the grill while the grill is in operation or is hot.
• Storage of an outdoor cooking gas appliance
indoors is permissible only if the cylinder is
disconnected and removed from the outdoor
cooking gas appliance.
• When the grill is not in use, make sure the gas is
turned • OFF at the supply cylinder.
• Cylinders must be stored outdoors and out of the
reach of children. Cylinder must not be stored in a
building, garage or other enclosed areas.
• Always inspect the gas supply hose before every
use. If the hose shows any signs of abrasions or
cuts, DO NOT use the grill. The hose must be
replaced before using again.
• Always check the burners and venturi tubes for
insects and insect nests. A clogged tube can lead
to a fire beneath the grill.
• Always check the connections for leaks each time
you connect and disconnect the LP gas supply
cylinder.
•
DO NOT enlarge the valve orifices or burner
ports when cleaning the valves or burners.
The pressure regulator and hose
assembly supplied with this grill
must be used. Any requirements for
a replacement regulator and hose
assembly must be made through the
manufacturer, LANDMANN-USA.
24’’
(609mm)
24’’
(609mm)

4
Important Safety Information
• If you see, smell or hear hissing of gas escaping
from the LP gas cylinder, move away from the
LP gas cylinder. DO NOT attempt to correct the
problem yourself and call the fire department.
• If a grease fire occurs, turn • OFF the burner and
leave the lid closed until the fire is out.
• DO NOT alter this grill in any manner. Any
alteration automatically voids the warranty.
• DO NOT use the grill in high wind situations.
The LP gas supply cylinder to be used must be
constructed and marked in accordance with the
Specification for LP Gas Cylinders of the U.S.
Department of Transportation (DOT) or the National
Standard of Canada, CAN/CSA-b339 (Cylinders,
Spheres, and Tubes for transportation of Dangerous
Goods).
To avoid the possibility of tipping over the grill,
NEVER place more than 10 pounds on the side table.
NEVER leave cooking food unattended. Continually
observing the food will help in maintaining an even
temperature, conserve fuel, improve the food’s flavor
and lessen flare-ups.
State of California Proposition 65 Warnings
A fire causing death or serious
injury may occur if the following
is not followed exactly:
NEVER store or use gasoline or
other volatile substances in the
vicinity of this grill. NEVER store
a spare propane cylinder in the
vicinity of this grill, or in the vicinity
of another potential heat source.
DO NOT store spare gas cylinder
in or near grill.
Place dust cap on cylinder valve
outlet whenever the cylinder is not
in use. Install only the type of dust
cap on cylinder valve outlet that is
provided with the cylinder valve.
Other types of caps or plugs may
result in leakage of propane.
WARNING: FUELS USED IN LIQUEFIED
PROPANE GAS APPLIANCES, AND
THE PRODUCTS OF COMBUSTION
OF SUCH FUELS, CAN EXPOSE YOU
TO CHEMICALS INCLUDING CARBON
MONOXIDE, WHICH IS KNOWN TO
THE STATE OF CALIFORNIA TO CAUSE
BIRTH DEFECTS OR OTHER
REPRODUCTIVE HARM.
For more information go to:
www.P65Warnings.ca.gov
WARNING: THIS PRODUCT CAN
EXPOSE YOU TO CHEMICALS,
INCLUDING LEAD COMPOUNDS,
WHICH ARE KNOWN TO THE STATE
OF CALIFORNIA TO CAUSE CANCER,
BIRTH DEFECTS OR OTHER
REPRODUCTIVE HARM.
For more information go to:
www.P65Warnings.ca.gov

5
Liquid Propane (LP) Safety Information
General Information
• This grill is designed certified by ETL for use with a
standard 20 lb. LP gas cylinder.
• This grill CANNOT be converted to natural gas.
DO NOT attempt to convert this grill with a different
gas type.
Safety Information
• LP gas has an odor similar to natural gas.
• LP gas is heavier than air and leaking gas may collect
in low areas and resist dispersion.
• LP cylinders should not be dropped or handled
roughly.
• DO NOT use a damaged LP cylinder. A dented or
rusty LP cylinder or an LP cylinder with a damaged
valve may be hazardous and should be replaced with
a new cylinder immediately.
• ALWAYS close the cylinder valve after use.
• ALWAYS close the cylinder valve when disconnecting
the regulator.
• ALWAYS treat possible empty LP cylinders with the
same care as a full LP cylinder. There may still be gas
pressure inside a possible empty LP cylinder.
• NEVER store or transport an LP cylinder where the
temperature can reach 125ºF.
• Keep LP cylinders away from children and pets.
• DO NOT store disconnected LP cylinders in a
building, garage or other enclosed areas.
• If the LP cylinder is kept in the grill between
uses, make sure to keep both the grill and
the cylinder in an outdoor area with good
ventilation.
• ALWAYS leak test the LP cylinder
connection to the regulator when ever
changing LP cylinders.
Installation of LP Cylinder
1. Make sure all burner controls are in the OFF
position.
2. Carefully position in the large hole on the
bottom panel.
3. To secure the LP cylinder in place, screw the
tank holding tray bolt through the bottom
section of the LP cylinder.
4. Attach the regulator to the cylinder by
carefully HAND TIGHTENING only.
5. NEVER use a wrench or other tool to tighten
this connection.
6. Observe all governing codes and
ordinances.
Important
The United States LP gas appliance installation
must conform with local codes and ordinances.
In the absence of local codes, appliance
installation must conform with either the
National Fuel Gas Code, ANSI Z223.1/NFPA54,
Natural Gas and Propane Appliance code,
CSA B149.1, or Propane Storage and Handling
Code, B149.2, as applicable.
For Canada, installation of this grill must comply
with local codes and/or Standard CSA B149.2
(Propane Storage and Handling Code).
Please review the below guidelines and safety information when using Liquid Propane (LP) gas.

6
Package Contents
Part Description Quantity
1
5
15
25
3
13
23
33
7
17
27
10
20
30
2
12
22
32
34
6
16
26
9
19
29
4
14
24
8
18
28
11
21
31
1
5
1
1
1
1
1
1
2
1
1
1
1
1
1
1
1
1
1
1
1
1
1
1
1
1
2
1
1
2
2
1
1
1
1
Gas Grill
Flame Tamer
Bracket for LP Tank Bolt
Bezel
Warming Rack
Tank Stop Brace
Leg, Rear Right
Grease Cup
Side Shelf Support
Cart Base
Leg Extender
Side Burner Shelf Support
Leg Cross Brace
Wheel Axle
Grease Cup Holder
Temperature Gauge
Triangle Plate Left, Cart
Tank Hose Retainer
Grease Tray Handle
Left Side Shelf
Triangle Plate Right, Cart
Side Burner Shelf
Leg, Rear Left
Leg, Front Right
Side Burner Grate
Cooking Grate
LP Tank Bolt
Control Knob
Front Panel, Cart
Wheel
Side Burner
Leg, Front Left
Match Holder
Grease Tray

7
Package Contents
19
24
23
22
21
20
19
18
17
11
12
13
8
79
10
6
5
4
3
2
1
34
33
32
31
30
29
28
27
26
25
10
14 15
16

8
Preparation
Before beginning assembly of this grill, please remove all packing material and verify that all of the
assembly parts are included (see Package Contents on page 6). If any part is missing or damaged,
DO NOT attempt to assemble the product.
Estimated assembly time: 45 minutes with two people.
Tools Needed: Phillips Head screw driver.
2 pt Phillips Screwdriver
M6 x 15 M5 x 10 Ø6 M8 Ø10 M4 x 10
Wrench
38x 27x 6x 2x 2x 2x
Hardware Contents
Tools Required
C D E FA B

9
Assembly Instructions
1
.
2
.
1
2
A
A
14
15
18
2X

10
Assembly Instructions
3
.
4
.
B
A
A
A
B
B
B
B
B
B
11
17
20
8
8
8X
4X

11
Assembly Instructions
5
.
6
.
A
24
17
9
A
A
A
10
10
A
A
4X
4X

12
Assembly Instructions
7
.
8
.
19
19
21
A
D
D
D
E
E
E
A
A
A
8X
2X 2X

13
Assembly Instructions
9
.
10
.
B
B
B
B
B
16
13
12
8X
B
1 X
B

14
Assembly Instructions
11
.
12
.
22
B
B
1 X

15
Assembly Instructions
13
.
14
.
A
F
A
A
A
A
A
A
31
8X
2X
32
33
F

16
Assembly Instructions
15
.
16
.
34

17
Assembly Instructions
17
.
18
.
B
A
A
B
B
28
27
6
7
4X
1 X

18
Assembly Instructions
19
.
20
.
B
B
B
2X
A
A
A
A
C
C
C
C
3 X 3 X

19
Assembly Instructions
21
.
22
.
B
A
2X
1 X

20
Assembly Instructions
23
.
24
.
A
A
A
A
C
C
C
C
3 X 3 X

21
Assembly Instructions
25
.
26
.
25
29
26

22
Assembly Instructions
27
.
28
.
F
F
2X
5
F
F
2X
5

23
Assembly Instructions
29
.
30
.
3
4
30
3
4
30

24
Assembly Instructions
31
.
32
.
Note: AA battery
not included
Note: LP tank not
included
23

25
Connecting Gas Cylinder
1. ALWAYS place the propane cylinder on the tank
holder under the cart.
2. ALWAYS confirm that all burner control knobs
are in OFF position before activating the gas
supply.
3. Before connection, be sure that there is no
debris caught in the head of the gas cylinder,
head of the regulator valve, or in the head of the
burner and burner ports.
4. ALWAYS connect the gas supply regulator as
follows: Insert the nipple of the valve coupling
into the tank valve and tighten the connection
collar by turning it clockwise with one hand
while holding the regulator with the other hand.
5. Disconnect the propane cylinder from the
regulator valve when the grill is not in use.
6. DO NOT obstruct the flow of combustion air
and ventilation air to the grill.
7. Keep ventilation openings of the cylinder
enclosure free and clear from debris.
Please make sure the cylinder valve connection
device shall properly and safely mate with the
connection device attached to the inlet of the
pressure regulator.
Checking for Leaks
1. Make 2-3 oz. of leak solution by mixing one part
liquid dishwashing soap with three parts water.
2. Make sure control knobs are in the OFF position.
3. Spray some solution on the tank valve up to the
valve connection. (See diagram to below.)
4. Inspect the solution at the connections for
bubbles. If no bubbles appear, the connection is
secure.
5. If bubbles appear, you have a leak. Go to step 6.
6. Disconnect the regulator from the tank and
reconnect. Make sure the connection is tight and
secured.
7. Retest with solution.
8. If “growing” bubbles appear do not use or move
the LP cylinder. Contact an LP gas supplier or
your fire department!
To prevent fire or explosion hazard
when testing for a leak:
1. ALWAYS perform the 'leak test'
before lighting the grill and each time
the cylinder is connected for use.
2. DO NOT smoke or allow other
sources of ignition in the area while
conducting a leak test.
3. Conduct the leak test outdoors in a
well-ventilated area.
4. DO NOT use matches, lighters or a
flame to check for leaks.
5. DO NOT use grill until all leaks have
been stopped. If you are unable to
stop a leak, disconnect the propane
supply, call for gas appliance service
or your local propane gas supplier.

26
Lighting Instructions
Prior to the first use, it is important to clean your grill with heat.
This will clean the internal parts by burning off any residue and
odor from the manufacturing process. To perform this cleaning,
operate the grill for approximately 15-20 minutes at the highest
setting with the grill lid closed.
IMPORTANT
Please read these instructions before attempting to light the
grill.
Note: Match lighting tool is attached on the right side of
the cart.
1. Turn all gas control knobs to the
•
OFF position
2. Turn on gas valve from gas source.
3. Lid MUST be open when lighting.
4. Remove the match lighting tool and stick a match into
the end of the tool.
5. Light the match.
6. Once lit, guide the lit match under the grate.
7. Push in and turn the control knob to Max for the
burner closest to the light match. The burner should
light immediately.
8. Adjust burner control knob to the desired cooking
temperature.
Failure to open the lid before igniting
may result in an explosive flare-up,
which can cause serious bodily
injury or death.
DO NOT lean over the open grill
when lighting.
1. Open lid.
2. Ensure that all burner control knobs are in the “
•
OFF”
position.
3. Turn on the gas supply.
4. Push and turn any main burner control knob to the
“Max” position while pressing the electronic igniter
button.
5. If the burner does not ignite, then immediately turn the
control knob back to the “
•
OFF” position and repeat
step 4 several times.
6. If the ignition flame and burner will not ignite within 5
seconds, turn the control knob to the “
•
OFF” position
and wait 5 minutes for the gas to dissipate and then
repeat step 4.
7. To extinguish the burner, push in the control knob and
turn clockwise to the “
•
OFF” position.
Match Lighting
Failure to follow the five-minute
waiting period may result in an
explosive flare-up, which can cause
serious bodily injury or death.

27
Please use the following guidelines to keep your grill
clean and looking new. Before any cleaning, make
sure the control knobs are in the
•
OFF position and
grill is cool to the touch.
Cleaning the Outside of the Grill
For painted surfaces clean thoroughly with a hot
soapy water solution. Rinse with water and allow to
completely dry.
For the stainless steel surfaces, use a good quality
stainless steel cleaner.
• When cleaning, always rub or wipe in the
direction of the stainless steel grain.
• For stubborn spots, always scrub in the direction
of the stainless steel grain.
• DO NOT clean stainless steel with anything
containing acid, mineral spirits or xylene.
• DO NOT use a wire brush or any abrasive cleaner
on the stainless steel surface as this will cause
scratches in the stainless steel finish.
Cleaning the Inside of the Grill
For safety and efficiency, it is important to remove
any debris or excess grease that may accumulate
inside the grill.
• Wipe off the inner lid liner with a paper towel to
prevent grease build up.
• For the heat tents, clean residue off with wire
brush or a flat scraper.
• Remove the grease cup and empty into a suitable
container. Then wipe with a paper towel to remove
excess grease.
• Remove the grease tray from the grill and clean off
residue with a wire brush or flat scraper, then wipe
with a paper towel to remove any excess grease.
If using a bristle brush to clean cooking
surfaces make sure no loose bristles
remain on the cooking surface
as they may attach to food.
Care and Maintenance
Do not allow drippings or food residue
to remain on the heat tents or
grease tray. Clean regularly to ensure
proper cooking performance.
DO NOT line grease tray or grease
cup with aluminum foil.
Grease cup
The grease cup is located below the grill and should
be cleaned after each use to prevent heavy buildup
of debris.
Note: Allow the grease cup to cool before
attempting to clean.
LP Hose Inspection
The LP hose should be inspected periodically for
any signs of cracking, nicks, cuts or abrasions.
• If the LP hose is found to be damaged in any
way DO NOT use the grill.
• The LP hose must be replaced be a certified LP
hose as shown in the replacement parts section.
Checking the Flame
The flame coming out of the burners should be a
blue/yellow combination and between one to two
inches tall (see below).
To Remove Burner
Make sure all control knobs are in the OFF position,
the LP gas supply valve has been closed, and the
gas hose is disconnected from the gas supply.
1. Open Lid and remove warming rack, cooking
grates and heat tents.
2. Using a 2 pt Phillips screw driver, loosen the
screw holding the burner in the back of the grill.
Note: This is a screw/nut combination so make
sure to hold the nut while removing the screw.
3. Slide the burner forward and then lift up and out
of the firebox.
4. Unscrew the electrode & wire from the burner.
To Clean Burner
• Make sure all burner ports are clear of any clogs
Tip: Use a pin or paper clip to unclog.
• Make sure the burner is free of any damage. If
damage is found, replace the burner.
• Make sure the end of the burner and primary air
screen are clear from insect nests, dirt, or debris.
GoodFlame
Y
ellow
LightBlue
2in.(5cm)
Blue
Y
ellow
LightBlue
Blue
BadFlame

28
Care and Maintenance
To Reinstall Burner
1. Be sure the gas valve orifices are correctly
positioned inside the burner inlet.
2. Reattach the electrode and wire to the burner.
3. Reattach the screw/nut combination.
4. Reposition flame tents, cooking grates, and
warming rack.

29
Cooking Methods And Grilling Tips
Before Grilling
• Make sure that the food items are completely
thawed before grilling.
• With the grill lid closed, heat the grill on high for
5-10 minutes.
• DO NOT lift the lid during the preheating
process.
• The preheating process with high heat is
necessary to brown and seal juices of the food.
• For high-fat meat and poultry, trim excess fat
from meats and shorten the preheat time. Both
will help reduce flare-ups from dripping grease.
• Lightly oil the cooking grates when cooking low-
fat meat, fish or poultry. Beware that using too
much oil can cause a gray ash to deposit on the
food.
Direct Heat
Direct heat cooking means that the food is placed
on grill grates directly over the lighted burners.
• The lid position can be either up or down.
• If the lid is in the up position, generally cooking
time may be longer.
• Direct heat is used to sear the food to seal in
the natural juices by cooking with intense heat
for a short period of time. The outside of the
food is browned with a flavorful grilled coating
During Grilling
• The temperature gauge on the lid indicates the
cooking temperature inside the grill.
• Turn foods only once if possible. Juices are lost
when meat is turned several times.
• Turn meat just when the juices begin to appear
on the surface.
• Avoid puncturing or cutting the meat to test
doneness. This allows the juices to escape.
• Add barbecue sauce only during the last 10
minutes of cooking to avoid burning the sauce.
• The doneness of the meat will be controlled by
the type of meat, the size, shape and thickness
of the meat, the heat setting or method, and the
length of time on the grill.
• Cooking time will be longer with an open grill lid.
• Allow for more cooking time on cold and windy
days, or at higher altitudes. In reverse, allow for
less cooking time in extremely hot weather.
• Grilling conditions may require adjustments of
the burners to obtain and maintain the correct
cooking temperatures.
• Use tongs for turning and handling meat instead
of a fork, to avoid losing the meat juices.
• If a flare up occurs, turn the control knob to the
“
•
OFF” position and move the food to another
area of the cooking grate. After flames subside,
relight the burners using the lighting instruction in
this manual.
• NEVER use water to extinguish flame on a gas
grill.

30
Grilling Guidelines
Type
Steaks
NY Strip, Rib eye,
Porterhouse, T-Bone,
Sirloin, Filets
Direct High 10-15 min
Turn meat only once,
halfway through the
grilling time
Turn meat only once,
halfway through the
grilling time
Depends on the weight
of the meat for the
timing
Turn meat only once,
halfway through the
grilling time
This time is rated on
weight of the meat (i.e.
30-40 minutes per lb /
kg)
Turn occasionally. Sauce
in last 10 minutes
Turn to brown all sides
18-22 min
11-20 min
10-15 min
10-15 min
25-35 min
50-70 min
15-20 min
30-40 min
1 in /
2.5 cm
2 in /
5 cm
.75 in /
1.9 cm
.75 in /
1.9 cm
.75 in /
1.9 cm
1.5 in /
3.8 cm
High
High
High
Medium
Medium
Medium
Medium
Medium
4-6 lbs /
1.81-
2.71 kg
60-80 min
Medium
Medium
Medium
Medium
Medium
High
6-8 oz /
170.1-
226.8 g
10-12 lbs /
4.5-5.4 kg
Per .5 in / 1.3 cm
thickness. Grill, turning
once.
Per side
10-15 min
2-2.5 hours
10-12 min
4-6 min
14-18 min
Medium
4-6 oz /
113.4-
170.1 g
8-13 min
Direct
Direct
Direct
Indirect
Direct
Direct
Direct
Direct
Direct
Direct
Indirect
Indirect
Indirect
Indirect
Indirect
NY Strip, Rib eye,
Porterhouse, T-Bone,
Sirloin, Filets
Flank (per lb / kg)
Ground beef patty
Hamburgers
Roasts
Chops
Breast
Whole
Whole
Fillets or steak
Breast
Boneless, skinless
Unstuffed
Catfish,Trout, etc. (12
oz / 340 g)
Swordfish,Tuna,
Salmon, Halibut, etc.
Bone-in
Thighs Boneless, skinless
Whole
Roast
Ribs 2-5 lb / .9-2.2 kg racks
Tenderloin (per lb / kg)
Rib eye, Sirloin
Thickness Total time Instructions
Cooking
Method
Burner
setting
Description
BEEF
PORK
CHICKEN
TURKEY
FISH

31
Grilling Guidelines
Type
Direct
Direct
Direct
Direct
Direct
Direct
Direct
Direct
Direct
High
Medium
High
High
Medium
Medium
Medium
Medium
Medium
3-6 min
20-30 min
45-90 min
15-20 min
8-12 min
7-10 min
6-8 min
40-70 min
Individually wrapped in
aluminum foil. Rotating
occasionally
Individually wrapped in
aluminum foil. Rotating
occasionally
Grill, turning once.
12-15 min
Shrimp
Corn on the
Cob
Potatoes
Peppers
Onion
Squash
Asparagus
18-20 oz / 510-566 g
In Husk
Baking, whole
Roasted
Sliced
Summer, Zucchini
.5 in / 1.2 cm diameter
Sweet, whole
Husked
Thickness Total time Instructions
Cooking
Method
Burner
setting
Description
VEGETABLES

32
Troubleshooting
Problem
Grill will not light.
Flame is low, irregular
or noisy.
Excessive flare-ups
Grill does not get hot
enough.
Flame will not stay lit.
1. LP cylinder valve is closed.
2. LP cylinder gas level is low.
3. “Match lighting” may be necessary.
4. Electrodes may be wet.
5. Debris is blocking the electrodes.
6. No spark shows at electrode tip.
7. Igniter battery is not properly installed
or battery needs to be replaced.
8. Connections to the igniter are loose.
1. LP cylinder gas level is low.
2. Improper lighting procedure.
3. Burner ports may be clogged.
4. Gas supply may be bent or kinked.
5. Grill may be in an area that is too windy.
6. There are obstructions such as grease
debris, or insects in air inlets.
1. Flare-up are normally caused by
excessive fat from meat being grilled.
2. Grill is dirty.
3. The cooking temperature may be too
high.
4. Lid is closed.
5. Food is overcooked or burnt.
6. Firebox, grease tray and grease cup are
full of grease.
1. Propane cylinder gas level is low.
2. Gas flow limiting device may have
been activated.
1. LP cylinder valve is closed.
2. LP cylinder gas level is low.
3. Burner is not properly installed or dirty.
1. Turn ON LP cylinder valve.
2. Replace LP cylinder.
3. “Match lighting” light grill per this manual’s
instructions.
4. Dry electrodes with dry cloth.
5. Clean electrodes with rubbing alcohol and
retry.
6. Replace electrode.
7. Properly install or replace igniter battery.
8. Reconnect or replace wiring to igniter.
1. Replace propane cylinder.
2. Disconnect LP hose regulator from LP
tank, reconnect and then follow lighting
procedure exactly as listed.
3. If only one burner is affected, check and
clean the burner ports.
4. Straighten out the gas supply hose.
5. Wait until wind subsides to continue.
6. Clean burner air inlets of obstructions.
1. Trim fat from meat being grilled.
2. Make sure grill is clean.
3. Keep flame on low or turn one burner off.
4. Keep the lid up when grilling to avoid
excessive flare-ups.
5. Move food to another area of the grill until
flames subside.
6. Clean firebox, grease tray and grease cup.
1. Replace or refill LP Cylinder.
2. Turn OFF Control Knobs & LP Cylinder
valve. Disconnect regulator from LP
Cylinder. Inspect & clean LP Cylinder
fitting and regulator connector. Wait 1
minute. Reconnect regulator and perform
leak test. Light grill following exact
lighting procedure.
1. Turn ON LP cylinder valve.
2. Replace LP cylinder.
3. Reinstall burner properly and clean out
any debris.
Cause Solution
DO NOT spray
water on the gas
flames – this could
damage the grill.

33
Replacement Parts
AC
AD
AE
AF
AG
AH
AI
AJ
AK
AL
AM
AN
AO
AP
AQ
AR
AS
AT
AU
AV
AW
AX
AY
AZ
BA
BB
BC
BD
BE
BF
BG
BH
BI
BJ
BK
BL
BM
BN
BO
BP
BQ
BR
BS
BT
BU
BV
BW
BX
BY
BZ
C A
C B
C C
C D
C E
C F
C G
AB
AA

34
Replacement Parts
Parts Not Shown
Instruction manual
Hardware pack
1 PS5060
1 PS5061
Part Description Quantity Part # Part Description Quantity Part #
AA
AE BY
CG
AY
AO
BI
BQ
AC
AW
AM
BG
AG CA
BA
AQ
BK
BS
AJ
BD
AT
AB
AV
AL
BF
AF BZ
CB
AZ
AP
BJ
BR
AI
BC
AS
AD BX
CF
AX
AN
BH
BP
AH
BB
AR
AK
BE
AU
1 PS5001
2 1
1
PS5005 PS5051
PS5059
6 PS5025
1 PS5015
1
1
PS5035
PS5043
5 1PS5007 PS5053
1 PS5027
1 PS5017
1
1
PS5037
PS5045
1 PS5010
1 PS5030
1 PS5020
1 PS5003
1 PS5023
1 PS5013
1 PS5033
1 PS5002
1 PS5022
1 PS5012
1 PS5032
1 1
1
PS5006 PS5052
PS5054
2 PS5026
1 PS5016
1
1
PS5036
PS5044
1 PS5009
1 PS5029
1 PS5019
2 1
1
PS5004 PS5050
PS5058
6 PS5024
5 PS5014
1
2
PS5034
PS5042
2 PS5008
1 PS5028
1 PS5018
1 PS5011
2 PS5031
1 PS5021
Temperature gauge
Rubber bumper A Right fascia
Side burner lid
Control knob
Main burner electrode w/ 6” wire
Wheel axle
Grease cup
Warming rack
Electronic ignition module
Left grease tray support
Triangle plate right, cart
Flame tamer Side burner wire
Leg, rear left
Main burner electrode w/ 16.5” wire
Leg, front right
Grease tray
Side shelf support
Tank stop brace
Heat shield
Grill lid
Control panel w/ Logo
Left fascia
Triangle plate left, cart
Grill lid handle Side burner shelf
Side burner electrode
Leg cross brace
Main burner electrode w/ 11.8” wire
Bracket for LP tank bolt
Grease cup holder
Grill firebox
Cart base
Main burner electrode w/ 27.6” wire
Cooking grate Side burner shelf,support
Side burner grate
Bezel
Main burner
LP tank bolt
Front panel, cart
Rubber bumper B
Leg, front left
Main burner electrode w/ 21.6” wire
Left side shelf
Leg base
Manifold and valve assembly
BN
BL
BT
BO
BM
2 PS5040
1
1
PS5038
PS5046
1 PS5041
1 PS5039
Wheel
Match holder
Grease tray handle
Tank hose retainer
Leg, rear right
BV
CD
BW
CE
BU
CC
1
2
PS5048
PS5056
1
1
PS5049
PS5057
1
1
PS5047
PS5055
Flexible metal hose
Side burner lid hinge
Right grease tray support
Side burner
Side burner valve, LP hose & regulator
Side burner drip pan

35
Warranty
This Propane Gas Grill is warranted to be free of defects in material and workmanship when properly
assembled, used in a normal household setting and cared for as directed in these instructions for five (5) years
on main burners and for one (1) year an all other parts from the date of the original retail purchase.
This warranty does not cover rust, fading, peeling,damage or issues related to neglect, abuse, accident,
misuse, misapplication, improper assembly, transportation damages, commercial use or ANY modifications
made to this product.
Repair labor is not covered. This warranty is the only warranty offered and is in lieu of all other warranties,
whether expressed or implied, which includes implied warranty, merchandising or use for a particular purpose.
All replacement parts that meet the warranty requirements will be shipped at no charge via the discretion of
the manufacturer (ground shipments, US Mail, UPS or FedEx). Any special handling charges (i.e. Second Day,
overnight, etc.) will be the responsibility of the consumer.
All warranty claims apply only to the original purchaser and require a proof of purchase verifying the purchase
date. Do not return parts without first obtaining a return authorization number from our customer service
department.
Our customer service department can be reached at 1-800-321-3473 8:00 AM - 5:00 PM (EST) English Only,
or Email [email protected]
Please note for the United States, that some states do not allow the exclusion or limitation of incident
or consequential damages or limitations on how long an implied warranty lasts, so the above limitations or
exclusions may not apply to you. This warranty gives you specific legal rights and you may also have other
legal rights which may vary from state to state.
Landmann USA, Inc.
7405 Graham Rd
Fairburn, Ga 302130
www.landmann.com/us

36
Sólo para uso al aire libre.
Lea y siga las instrucciones del manual del
propietario y las advertencias de seguridad antes
de operar este producto. Usos propano para
combustible, tanque de propano y combustible
vendido por separado. El producto puede variar
ligeramente como se muestra.
ADVERTENCIA: COMBUSTIBLES UTILIZADOS
EN LOS APARATOS DE GAS PROPANO LICUADO
Y LOS PRODUCTOS DE LA COMBUSTIÓN DE
DICHOS COMBUSTIBLES, PUEDE EXPONERTE A
SUSTANCIAS QUÍMICAS, INCLUIDO EL MONÓXIDO
DE CARBONO, QUE ES CONOCIDO POR EL ESTADO
DE CALIFORNIA PARA CAUSAR DEFECTOS DE
NACIMIENTO Y OTROS DAÑOS REPRODUCTIVOS.
Para más información, viste www.P65Warnings.ca.gov
ADVERTENCIA: ESTO PUEDE EXPONERTE A
PRODUCTOS QUÍMICOS EN ESTE PRODUCTO, IN-
CLUYENDO COMPUESTOS DE PLOMO, LOS CUALES
SON CONOCIDOS EN EL ESTADO DE CALIFORNIA
COMO CAUSANTES DE CÁNCER, DEFECTOS DE
NACIMIENTO Y OTROS DAÑOS REPRODUCTIVOS.
Para más información, viste www.P65Warnings.ca.gov
NSTRUCCIONES DE MONTAJE, CUIDADO Y USO LEA CON
ATENCIÓN
IMPORTANTE:
CONSERVE ESTAS INSTRUCCIONES PARA FUTURA REFERENCIA
Parrilla de propano líquido con 5 quemadores para barbacoa
MODELO 45025
5016209
Español p. 29
¿Preguntas, problemas, piezas faltantes? Antes de devolverlo a su vendedor minorista, llame a nuestro
departamento de atención al cliente al: 1-800-321-3473 entre 8:00 a.m. y 5:00 p.m. (EST) Sólo en inglés,
o envíe un correo electrónico a [email protected]
Este aparato es para uso
doméstico exclusivamente.
No es un aparato para uso
comercial.

37
Información importante sobre la seguridad
• Asegúrese de seguir con atención todas las
instrucciones de montaje. Un montaje incorrecto
puede ser peligroso.
• Para encender esta parrilla, NUNCA use carbón,
líquido para encendedores, gasolina, queroseno ni
alcohol.
• NUNCA coloquemás de 10 librasenuna mesa lateral.
NO se apoyesobre la parrilla.
Contenido
Información importante sobre la
seguridad..........................................................30-32
Información de seguridad sobre el
propano líquido (PL).................................................33
Contenido del empaque ....................................34-35
Preparación..............................................................36
Contenido de tornillería ...........................................36
Herramientasnecesarias .........................................36
Instrucciones de montaje ..................................36-45
Ensamblador/Instalador
Este manual de instrucciones contiene información importante que es necesaria para montar este
aparato adecuadamente y usarlo de manera segura. Antes de montar y de usar este aparato, lea y
respete todas las advertencias e instrucciones.
Dejar estas instrucciones con el consumidor.
Consumidor/Usuario
Al usar este aparato, respete todas las advertencias e instrucciones.
Conserve estas instrucciones para futura referencia.
Si percibe olor a gas:
1. Cierre el suministro de gas al aparato.
2. Apague toda llama expuesta.
3. Abra la tapa.
4. Si el olor persiste, manténgase alejado del
aparato y llame a su proveedor de gas o al
Departamento de Bomberos.
5. No seguir estas instrucciones podría
provocar una explosión o peligro de
quemaduras, lo cual podría causar daños
materiales, daños personales o la muerte.
1. NO almacene ni use gasolina u otros líquidos
o vapores inflmables cerca de la unidad o de
cualquier otro electrodoméstico.
2. No se debe almacenar cerca de esta unidad
ni de otro electrodoméstico ningún tanque de
PL (propano líquido) que no esté conectado
para usarlo.
3. Esta parrilla es PARA USO EXCLUSIVO EN
EXTERIORES y no se debe utilizar dentro
de un edifico, cochera, bajo un saliente ni en
ninguna otra área cerrada.
4. NO deje desatendida una parrilla encendida.
Mantenga a los niños y mascotas lejos de la
parrilla en todo momento.
5. Este aparato es para uso doméstico
exclusivamente. No es para uso comercial.
Conexión del tanque de gas ..............................46
Instrucciones para el encendido ........................47
Cuidado y mantenimiento .............................48-49
Métodos de cocción y consejos
para asar a la parrilla .........................................50
Resolución de problemas ..................................51
Indicaciones para asar a la parrilla ...............52-53
Repuestos.....................................................54-55
Garantía .............................................................56
PELIGRO ADVERTENCIA
No hacer caso a las advertencias
y precauciones en este manual de
instrucciones puede ocasionar lesiones
graves o la muerte, o puede provocar
un incendio o una explosión que cause
daños materiales.
PRECAUCIÓN
Parrilla de propano líquido con 5 quemadores para barbacoa

38
Información importante sobre la seguridad
• Esta parrilla es para uso en exteriores y NO se
debe utilizar dentro de un edificio, cochera ni
enninguna otra área cerrada.
• NO obstruya el flujo de los gases de combustiónni
del aire de ventilación. Mantenga libres las
aberturas de ventilación del compartimento del
tanque y sin residuos.
• En caso de que los quemadores se apaguen
cuando la parrilla esté en funcionamiento, apague
todas las válvulas de gas. Levante la cubierta y
espere cinco minutos antes de intentar volver a
encender la parrilla según las instrucciones de
encendido.
• Mantenga la parrilla limpia y libre de materiales
combustibles, gasolina y otros vapores y líquidos
inflamables.
• NUNCA guarde los tanques extras o
desconectados de propano líquido debajo o cerca
de la parrilla.
• Cuando la parrilla esté en funcionamiento, use
siempre guantes o manoplas para barbacoa
resistentes al calor.
• Mientras esté en funcionamiento, NO deje la
parrilla sin atender ni la mueva.
• Esta parrilla no está destinada para usarse
o instalarse en vehículos de uso recreativo,
embarcaciones, remolques ni nada que se mueva.
• NO coloque la cubierta ni nada inflamable sore
la parrilla mientras esté en funcionamiento o
mientras esté caliente.
• Está permitido almacenar en interiores un aparato
de gas para cocinar para uso en exteriores
siempre y cuando el tanque esté desconectado y
no esté cerca del aparato.
• Cuando la parrilla no esté en uso, asegúrese
de que el gas esté apagado en el tanque de
suministro.
• Los tanques se deben guardar en exteriores y
fuera del alcance de los niños. El tanque no se
debe guardar dentro de un edificio, cochera ni
enninguna otra área cerrada.
• Revise siempre la manguera de suministro de
gas antes de cada uso. Si la manguera muestra
señales de abrasión o cortes, NO use la parrilla.
Se debe cambiar de manguera antes de usar de
nuevo.
• Revise siempre que en los quemadores y tubos
venturi no haya insectos ni nidos de insectos.
• Verfique siempre que las conexiones no tengan
fugas cuando conecte y desconecte el tanque de
suministro de gas PL.
• Los tanques de gas deben incluir un collarín para
proteger la válvula del tanque.
• Los tanques de gas PL abollados u oxidados
pueden resultar peligrosos y es necesario que su
proveedor de gas PL los revise.
Se debe usar la unidad del regulador
de presión y la manguera incluidos
con esta parrilla. Todo lo que se
requiera para sustituir la unidad del
regulador y la manguera se deberá
obtener a través del fabricante,
LANDMANN-USA.
PRECAUCIÓN
• NUNCA use briquetas de carbón o
líquidoinflamableen la parrilla de gas. NO mover la
parrillamientrasestáencendido.
• Cuandoencienda la parrilla o cocine, NO se
apoyeen la parrillaabierta.
• Siempreabra la tapa de la parrilla lentamente
y con cuidadoya que el calordentro de la
parrillapuedecausar graves quemaduras.
• NO ponga las manos o los dedos en el borde de
la cámara de combustión cuando la cubierta esté
abierta o cuando la parrilla esté caliente.
• Mantenga a los niños y mascotas lejos de la parrilla
cuando esté usándola. Las partes accesibles
pueden estar muy calientes.
•
Mientras la parrilla esté en funcionamiento,
NO intente desconectar el regulador del gas ni
la unidad de mangueras o las conexiones del
gas.
• La parrilla NO se debe colocar debajo de una
construcción combustible elevada no protegida.
Deje siempre por lo menos 24” de separación
desde la parte superior, inferior y posterior, así
como 24” a los lados de la parrilla (ver abajo).
24’’
(609mm)
24’’
(609mm)

39
• NO utilice tanques de gas PL que tengan la
válvula dañada.
• NO agrande los orificios de la válvula o los
puertosde los quemadores al limpiar las válvulas o
los quemadores.
• Si ve, percibe un olor o escucha un ruido sibilante
del gas que se escapa de un tanque de gas PL,
aléjese del tanque de gas. NO intente resolver el
problema usted mismo; llame al Departamento de
Bomberos.
• Si la grasa se prende fuego, apague todos los
quemadores (• APAGADO) y deje cerrada la
cubierta hasta que el fuego se extinga.
• NO modifique la parrilla en forma alguna.
Cualquiermodificación invalida automáticamente
la garantía.
• NO use la parrilla en situaciones donde haya
mucho viento.
El tanque de suministro de gas PL que se use
deberá estar construido y marcado conforme a
las Especificacines para Tanques de Gas PL del
Departamento de Transporte de Estados Unidos
(DOT) o de la Norma Nacional de Canadá, CAN/
CSA-b339 (Tanques, esferas y tubos para traslado
de material peligroso).
Para evitar la posibilidad de vuelcos de la parrilla,
NUNCA coloquemás de 10 librasen la mesa lateral.
NUNCA deje la cocción de alimentos sin
supervisión. Observe la comida constantemente
para mantenerunatemperaturaestable, conservar
el combustible, mejorar el sabor de la comida y
disminuir las llamas.
Advertencias de la Proposición 65 del Estado
de California
Si no se respetan exactamente las
instrucciones siguientes, se podría
ocasionar un incendio potencialmente
fatal o que provoque lesiones graves:
NUNCA almacene ni use gasolina u
otras sustancias volátiles cerca de esta
parrilla. NUNCA almacene un tanque
de propano de repuesto cerca de esta
parrilla ni en las cercanías de alguna otra
fuente potencial de calor. NUNCA llene el
tanque de propano a más del 80% de su
capacidad.
NO almacene un tanque de gas de
reserva en la parrilla o cerca de ella.
Coloque el tapón protector en la salida
de la válvula del tanque siempre que
no se use el tanque. Sólo instale en la
salida de la válvula del tanque la tapa
protectora que se proporciona con la
válvula del tanque. Otros tipos de tapas
o tapones pueden dar como resultado
fugas de gas propano.
ADVERTENCIA: COMBUSTIBLES
UTILIZADOS EN LOS APARATOS DE GAS
PROPANO LICUADO Y LOS PRODUCTOS
DE LA COMBUSTIÓN DE DICHOS
COMBUSTIBLES, PUEDE EXPONERTE
A SUSTANCIAS QUÍMICAS, INCLUIDO
EL MONÓXIDO DE CARBONO, QUE
ES CONOCIDO POR EL ESTADO DE
CALIFORNIA PARA CAUSAR DEFECTOS
DE NACIMIENTO Y OTROS DAÑOS
REPRODUCTIVOS.
Para más información, viste
www.P65Warnings.ca.gov
ADVERTENCIA: ESTO PUEDE
EXPONERTE A PRODUCTOS QUÍMICOS
EN ESTE PRODUCTO, INCLUYENDO
COMPUESTOS DE PLOMO, LOS CUALES
SON CONOCIDOS EN EL ESTADO DE
CALIFORNIA COMO CAUSANTES DE
CÁNCER, DEFECTOS DE NACIMIENTO Y
OTROS DAÑOS REPRODUCTIVOS.
Para más información, viste
www.P65Warnings.ca.gov
ADVERTENCIA
PELIGRO
ADVERTENCIA
ADVERTENCIA
Información importante sobre la seguridad

40
Información de seguridad sobre el propano líquido (PL)
Información general
• Esta parrilla está diseñada para usarse con tanque
estándar de gas PL de 20 libras.
• Cualquier marca de tanque de gas PL de 20 libras
es aceptable para usarse con esta parrilla, siempre y
cuando sea compatible con los sistemas de retención
de ésta (perno de la bandeja del tanque).
• Esta parrilla está diseñada y certificada por CSA
internacional para el suministro local de gas PL.
• Esta parrilla NO PUEDE convertirse para usar gas
natural. NO intente convertir esta parrilla para usar un
tipo diferente de gas.
Información sobre la seguridad
• El gas PL tiene un olor similar al gas natural.
• El gas PL es más pesado que el aire y el gas que se
fugue se puede acumular en áreas bajas y resistirse a
dispersarse.
• Los tanques de PL se deben instalar, transportar y
almacenar en posición vertical.
• Los tanques de PL no deben dejarse caer ni
manejarse de manera brusca.
• NO utilice un tanque de PL que esté dañado. Un
tanque de PL abollado u oxidado o que tenga la
válvula dañada puede resultar peligroso y se deberá
sustituir de inmediato por uno nuevo.
• Cierre SIEMPRE la válvula del tanque después de
usarlo.
• Cierre SIEMPRE la válvula del tanque al desconectar
el regulador.
• Trate SIEMPRE con el mismo cuidado un tanque de
PL vacío que uno lleno. Es posible que en el interior
del tanque vacío aún haya presión del gas.
• NUNCA almacene ni transporte un tanque de PL en
un lugar donde la temperatura pueda llegar a los 125
°F (51,6 °C).
• Mantenga los tanques de PL lejos del alcance de los
niños y mascotas.
• NO almacene los tanques de PL
desconectados dentro de un edificio,
cochera ni en ninguna otra área cerrada.
• Si el tanque de PL se mantiene en la parrilla
después de usarla, asegúrese de que tanto
la parrilla como el tanque estén en un área al
descubierto, con buena ventilación.
• Al cambiar de tanque de PL, compruebe
SIEMPRE que no haya fugas en la conexión
del tanque con el regulador.
Instalación del tanque de PL
1. Asegúrese de que el control de todos los
quemadores esté en posición • APAGADO.
2. Colóquelo con cuidado en el orificio grande
del panel inferior.
3. Para fijar el tanque de PL en su luga,
atornille el perno de la bandeja de soporte a
través de la sección inferior del tanque.
4. Conecte el regulador al tanque: con cuidado
APRIÉTELO CON LA MANO solamente.
5. NUNCA una llave ni ninguna otra
herramienta para apretar esta conexión.
6. Observe all governing codes and
ordinances.
Importante
La instalación en Estados Unidos del aparato
de gas PL debe cumplir con los códigos y leyes
locales. En ausencia de códigos locales, la
instalación del aparato deberá cumplir ya sea
con el Código Nacional de Gas, ANSI Z223.1/
NFPA54, con el código de Aparatos de Gas
Natural y de Propano, CSA B149.1, o con
el Código de Manejo y Almacenamiento de
Propano, B149.2, según corresponda.
En Canadá, la instalación de esta parrilla
deberá cumplir con los códigos locales y/o con
la Norma CSA B149.2 (Código de Manejo y
Almacenamiento de Propano).
Por favor, revise las indicaciones siguientes y la información sobre la seguridad cuando use gas de
propano líquido (PL).

41
Contenido del empaque
Pieza Descripción Cantidad
1
5
15
25
3
13
23
33
7
17
27
10
20
30
2
12
22
32
34
6
16
26
9
19
29
4
14
24
8
18
28
11
21
31
1
5
1
1
1
1
1
2
1
1
1
1
1
1
1
1
1
1
1
1
1
1
1
2
1
2
1
1
2
1
1
1
1
1
Parrilla de gas
Domador de llamas
Soporte para perno de tanque LP
Perilla de control
Parrilla de conservación de calor
Tirante de detención del tanque
Retenedor de manguera del tanque
Manija de la bandeja de grasa
Soporte de estante lateral
Extensor de pierna
Estante del quemador lateral
Apoyo cruzado de pierna
Pata, delantera derecha
Rejilla del quemador lateral
Indicador de temperatura
Placa triangular izquierda, carro
Match Holder
Bandeja de grasa
Copa de grasa
Estante lateral izquierdo
Placa triangular derecha, carro
Bisel
Pierna, trasera izquierda
Rueda
Quemador lateral
Rejilla de cocina
Perno de tanque LP
Pierna, trasera derecha
Panel frontal, carro
Base del carro
Soporte del estante del quemador lateral
Pierna, delantera izquierda
Eje de rueda
Portavasos de grasa

42
Contenido del empaque
19
24
23
22
21
20
19
18
17
11
12
13
8
79
10
6
5
4
3
2
1
34
33
32
31
30
29
28
27
26
25
10
14 15
16

43
Preparación
Antes de comenzar el montaje de esta parilla, quite todo el material de embalaje y verifique que todas las
pieas del montaje estén incluidas (ver Contenidos del paquete en la página 6). Si alguna pieza falta o está
dañada, NO intente montar el producto.
Tiempo aproximado de montaje: 45 minutos con dos personas.
Herramientas necesarias: Destornillador de tornillos con cabeza Phillips.
Contenido de tornillería
Herramientas necesarias
Destornillador Phillips de
dos puntos
M6 x 15 M5 x 10 Ø6 M8 Ø10 M4 x 10
Llave
38x 27x 6x 2x 2x 2x
C D E FA B

44
Instrucciones de montaje
1
.
2
.
1
2
A
A
14
15
18
2X

45
Instrucciones de montaje
3
.
4
.
B
A
A
A
B
B
B
B
B
B
11
17
20
8
8
8X
4X

46
Instrucciones de montaje
5
.
6
.
A
24
17
9
A
A
A
10
10
A
A
4X
4X

47
Instrucciones de montaje
7
.
8
.
19
19
21
A
D
D
D
E
E
E
A
A
A
8X
2X 2X

48
Instrucciones de montaje
9
.
10
.
B
B
B
B
B
16
13
12
8X
B
1 X
B

49
Instrucciones de montaje
11
.
12
.
22
B
B
1 X

50
Instrucciones de montaje
13
.
14
.
A
F
A
A
A
A
A
A
31
8X
2X
32
33
F

51
Instrucciones de montaje
15
.
16
.
34

52
Instrucciones de montaje
17
.
18
.
B
A
A
B
B
28
27
6
7
4X
1 X

53
19
.
20
.
B
B
B
2X
A
A
A
A
C
C
C
C
3 X 3 X
Instrucciones de montaje

54
21
.
22
.
B
A
2X
1 X
Instrucciones de montaje

55
Instrucciones de montaje
23
.
24
.
A
A
A
A
C
C
C
C
3 X 3 X

56
25
.
26
.
25
29
26
Instrucciones de montaje

57
Instrucciones de montaje
27
.
28
.
F
F
2X
5
F
F
2X
5

58
Instrucciones de montaje
29
.
30
.
3
4
30
3
4
30

59
Instrucciones de montaje
31
.
32
.
Nota: Batería AA
no incluida
Nota: Tanque LP
no incluido
23

60
Conexión del tanque de gas
1. SIEMPRE coloque el tanque de gas en el
portatanque que se encuentra debajo del carro.
2. Antes de abrir el suministro de gas, asegúrese
SIEMPRE de que las perillas de control de
todos los quemadores estén en posición
•
APAGADO.
3. Antes de conectarlo asegúrese de que no haya
residuos atrapados en la cabeza del tanque de
gas, la válvula del regulador ni en la cabeza y
los orificis del quemador.
4. Conecte SIEMPRE los reguladores del
suministro de gas de la siguiente manera:
Inserte el manguito de unión del acoplador de
la válvula en la válvula del tanque y apriete el
collarín de conexión girándolo en el sentido de
las manecillas del reloj con una mano mientras
sujeta el regulador con la otra mano.
5. Desconecte el tanque de propano de la válvula
del regulador cuando no use la parrilla.
6. NO obstruya el fujo del aire de combustión y de
ventilación a la parrilla.
7. Mantenga las aberturas de ventilación del
compartimento del tanque sin residuos.
Asegúrese de que el dispositivo de conexión de
la válvula del cilindro encaje adecuadamente y
de manera segura en el dispositivo de conexión
unido a la entrada del regulador de presión.
Revisión de la presencia de fugas
1. Prepare de 2 a 3 onzas de una solución para
detectar fugas mezclando una parte de jabón
líquido para vajillas y tres partes de agua.
2. Asegúrese de que todas las perillas de control
estén en la posición
•
APAGADO.
3. Rocíe la solución en la válvula del tanque hasta
la conexión de la misma. (Vea el diagrama a
continuación).
4. Observe si la solución forma burbujas en
las conexiones. Si no aparecen burbujas, la
conexión es segura.
5. Si aparecen burbujas es que hay una fuga.
Continúe con el paso 6.
6. Desconecte el regulador del tanque y vuelva a
conectarlo. Asegúrese de que la conexión esté
apretada y frme.
7. Vuelva a hacer la prueba con la solución.
8. Si aparecen burbujas “crecientes”, no use ni
mueva el tanque de PL. Comuníquese con un
distribuidor de gas PL o el Departamento de
Bomberos.
Para evitar el riesgo de incendio o
explosión, cuando compruebe si hay
alguna fuga:
1. Realice SIEMPRE la “prueba de
fugas” antes de encender la parrilla
y cada vez que conecte el tanque
para usarlo.
2. NO fume ni permita que haya
otras fuentes de ignición en el área
mientras realiza la prueba de fugas.
3. Haga la prueba de fugas en
exteriores, en un área bien ventilada.
4. NO use fósforos, encendedores ni
llamas para comprobar si existen
fugas.
5. NO use la parrilla sino hasta que
detenga todas las fugas. Si no
puede detener una fuga, desconecte
el suministro de propano y llame
para solicitar servicio para la parrilla
o llame a su proveedor de gas
propano.
PELIGRO

61
Instrucciones para el encendido
Antes de usar por primera vez, es importante limpiar la parrilla
con calor. Esto limpiará las partes internas al quemar todos los
residuos y olores del proceso de fabricación. Para realizar la
limpieza, ponga a funcionar la parrilla aproximadamente 15-20
minutos al ajuste más alto con la tapa de la parrilla cerrada.
IMPORTANTE
Por favor, lea estas instrucciones antes de intentar encender la
parrilla.
Nota: El implemento para encender con fósforos (W) se
adjunto en el lado derecho del carrito.
1. Coloque todas las perillas de control de gas en
posición
•
APAGADO.
2. Abra la válvula de la fuente de gas.
3. La cubierta DEBE estar abierta durante el encendido.
4. Retire el implemento para encender con fósforos e
introduzca uno en el extremo del dispositivo.
5. Encienda el fósforo.
6. Una vez que esté encendido, diríjalo hacia debajo de
la parrilla.
7. Oprima y gire la perilla de control hacia ALTO del
quemador que esté más cerca del fósforo encendido.
El quemador se debe encender inmediatamente.
8. Ajuste la perilla de control del quemador a la
temperatura de cocción deseada.
No abrir la cubierta antes de
encender la parrilla puede provocar
una llamarada explosiva que puede
causar lesiones graves o la muerte.
NO se apoye sobre la parrilla abierta
cuando la encienda.
1. Abra la tapa.
2. Asegúrese de que todas las perillas del quemador
estén en la posición apagado "OFF".
3. Encienda el suministro de gas.
4. Empuje y gire cualquier perilla del quemador principal
a la posición máxima "Max" mientras presiona el
botón de encendido electrónico.
5. Si el quemador no enciende, después inmediatamente
gire la perilla de control de vuelta a la posición "OFF" y
repita el paso 4 varias veces.
6. Si la llama de encendido y el quemador no se
enciende en 5 segundos, gire la perilla de control a la
posición "OFF" y espere 5 minutos para que se disipe
el gas y luego repita el paso 4.
7. Para apagar un quemador, presione la(s) perilla(s) de
control y gírelas en el sentido de las manecillas del
reloj a la posición
•
APAGADO.
Encendido con fósforos.
No esperar cinco minutos puede
ocasionar una llamarada explosiva
que puede provocar lesiones graves
o la muerte.
ADVERTENCIA
ADVERTENCIA
ADVERTENCIA

62
Por favor, siga las indicaciones siguientes para
mantener su parrilla limpia y que luzca como nueva.
Antes de limpiar, asegúrese de que todos los
quemadores estén en la posición
•
APAGADO y
que la parrilla esté fría al tocarla.
Limpieza del exterior de la parrilla
Para las superficies pintadaslimpiebien con
unasolucióncaliente de agua y detergente. Enjuague
con agua y dejesecarporcompleto.
Para las superficies de aceroinoxidable, utilice un
limpiador para aceroinoxidable de buenacalidad.
• Al limpiar, siempre frote o limpie en dirección del
grano del acero inoxidable.
• Para las manchas difíciles, limpie siempre en
dirección del grano del acero inoxidable.
• NO limpie el acero inoxidable con nada que
contenga algún ácido, disolvente o xileno.
• NO use cepillo de alambre ni ningún limpiador
abrasivo en la superficie de acro inoxidable, ya
que esto rayaría el acabado de acero inoxidable.
Limpieza del interior de la parrilla
Por seguridad y eficiencia, es importanteretirar
cualquier desecho o exceso de grasa que pueda
acumularse dentro de la parrilla.
• Limpie el recubrimientointerno de la tapa
con unatoalla de papel para evitar que se
acumulegrasa.
• Para los calentadores superiores, limpie
los residuos con un cepillo de alambre o
rasquetaplana.
• Quite el recipiente para grasa y vacíeloen un
recipienteadecuado. Luegolimpie con unatoalla de
papel para quitar el excedente de grasa.
• Quite la bandeja de grasa de la parrilla y
limpielosresiduos con un cepillo de alambre o
rasquetaplana, luegolimpie con unatoalla de papel
para quitar la grasaexcedente.
Si utiliza un cepillo para limpiar superficies
de cocina, procure que no queden cerdas
sueltas endi cha superficie, ya que estas a
suvezpuedenquedarenlos alimentos.
Cuidado y mantenimiento
No dejegotasnirestos de alimentos
enloscalentadoressuperioresni
la bandeja de grasa. Limpie
periódicamente para garantizar un
rendimiento adecuado en la cocina.
NO forre con papel aluminio el
interior de la bandeja para la grasa.
Revisión de la manguera LP
La manguera LP se debe revisar periódicamente
para identificar cualquier indicio de grietas, rayones,
corteso abrasiones.
• Si se la manguera LP está dañada de alguna
forma, NO use la parrilla.
• Debe sustituirla con una manguera LP
certificada según se indica en la sección de
piezas de repuesto.
Revisión de la llama
La llama que sale de los quemadores debe ser de
una combinación de azul y amarillo, y tener una
altura de una a dos pulgadas (ver a continuación).
Para retirar un quemador
Asegúrese de que todas las perillas de control
estén en posición
•
APAGADO, que la válvula
de suministro de gas PL esté cerrada y que
la manguera del gas esté desconectada del
suministro de gas.
1. Abra la tapa y retire el estantecalentador, las
rejillas de cocción y loscalentadoressuperiores.
2. Con undestornillador Phillips de 2 pt, afloje
el tornillo que sostiene el quemadoren
la parte posterior de la parrilla. Nota:
estaesunacombinacióndestornillador/tuerca,
de modo que debeprocurarsostener la
tuercamientrasquita el tornillo.
3. Deslice el quemadorhaciaadelante y levántelo
para sacarlodelfogón.
4. Destornille el electrodo y el alambre del
quemador.
Para limpiar el quemador
• Asegúrese de que ninguno de los puertos de los
quemadores tenga una obstrucción. Consejo:
Para desatascar, utilice un alfiler o un clip.
• Asegúrese de que el quemador no esté dañado.
Si observa algún daño, sustituya el quemador.
• Procure que el extremo del quemador y
losorificiosprincipales de salida de aire no
tengannidos de insectos, polvonisuciedad.
ADVERTENCIA
PRECAUCIÓN
PRECAUCIÓN
2in.(5cm)
Buena llama Mala llama
Amarillo Amarillo
Azul claro Azul claro
Azul Azul

63
Cuidado y mantenimiento
Para reinstalar el quemador
1. Asegúrese de que los orificios de la válvula degas
estén colocados correctamente dentro de la
entrada del quemador.
2. Vuelva a colocar la unidad perno/tuerca.
3. Vuelvaaajustar el tornillo y la tuerca.
4. Vuelva a posicionarloscalentadoressuperiores,
rejas de cocina y el estantecalentador.

64
Métodos de cocción y consejos para asar a la parrilla
Antes de asar
• Asegúrese de que los alimentos estén
completamente descongelados antes de ponerlos
a asar.
• Cuando la tapa estécerrada, precaliente la
parrilla al máximo (con todoslosquemadores)
duranteaproximadamente 5-10 minutos.
• NO levante la tapa durante el proceso
deprecalentamiento.
• El proceso de precalentamiento con calor alto
es necesario para dorar y sellar los jugos en los
alimentos.
• Para la carne y las aves con alto contenido de
grasa, retire el exceso de grasa y reduzca el tiempo
de precalentamiento. Ambas cosas reducirán las
llamaradas de la grasa que gotee.
• Engrase ligeramente las rejillas para cocinar
cuando se trate de carne de bajo contenido en
grasa, pescado o aves. Tenga en cuenta que usar
demasiado aceite puede producir ceniza gris que
caiga sobre los alimentos.
Calorinfrarrojo
Utilice el quemadorinfrarrojo para
dorarlosalimentosrápi-damente sin perderlosjugosni
el sabor. Los alimento-spuedencocinarseporcompleto
solo con el quemadorin-frarrojo, o bienpuedeusar el
quemadorinfrarrojo para doraralimentosporfuera y
luegoterminar de cocinaren-losquemadoresregulares
de la parrilla.
• Dado el intensocalordelquemador para dorar,
losalimentospuedenquemarserápidamente,
estésiempreatentocuando use el quemador para
dorar y no dejeolvidadoslosalimentos.
• Cuandococina con estemétodo, la tapa
puedeestarhaciaarriba o haciaabajo.
Calor directo
Calor directo signific que los alimentos se colocan
sobre la parrilla directamente sobre los quemadores
encendidos.
• La posición de la cubierta puede ser o abierta o
cerrada.
• Si la cubierta está abierta, por lo general el tiempo
de cocción puede ser mayor.
• El calor directo se usa para dorar los alimentos y
sellar los jugos naturales al cocinarlos con calor
intenso durante un breve periodo de tiempo.
El exterior del alimento queda dorado con un
recubrimiento asado lleno de sabor.
Calor indirecto
Cocinar con calor indirecto significa ue los alimentos
se colocan sobre la parrilla sobre un quemador
sin calentar, lo que permite que el calor de los
quemadores que estén encendidos a su alrededor
los cocinen.
• Para obtener los mejores resultados, encienda
dos quemadores y cocine con la cubierta
cerrada. Esto reducirá el tiempo de cocción.
• NO opte por cocinar con calor indirecto cuando
haga viento.
Calor directo
• El indicador de temperatura que está en la cubierta
indica la temperatura dentro de la parrilla para
cocinar.
• De ser posible, voltee los alimentos sólo una vez.
Los jugos se pierden cuando la carne se voltea
varias veces.
• Voltee la carne justo cuando los jugos empiecen a
aparecer en la su superfici.
• Evite pinchar o cortar la carne para ver si tiene el
punto deseado. Eso hace que los jugos se salgan.
• Agregue la salsa barbacoa sólo durante los últimos
10 minutos de cocción para evitar que se queme.
• El punto deseado de la carne se controlará según el
tipo de carne, su tamaño, su forma y su grosor, el
calor o el método de cocción, así como el tiempo
que esté en la parrilla.
• El tiempo de cocción será mayor si la cubierta está
abierta.
• Deje más tiempo de cocción cuando haga frío o
viento o en altitudes mayores. Por el contrario,
deje menos tiempo de cocción en condiciones
extremas de calor.
• Las condiciones para asar pueden requerir ajustar
los quemadores para así obtener y mantener las
temperaturas correctas de cocción.
• Amontonar los alimentos en la rejilla para cocinar
hará que estos necesiten más tiempo para
cocinarse.
• Use tenazas para voltear y manejar la carne, en
lugar de un tenedor, a fn de evitar que se pierdan
los jugos de la carne.
• Si se produce una llamarada, apague los
quemadores • APAGADO y mueva los alimentos
a otra área de la rejilla para cocinar. Una vez
que las llamas disminuyan, vuelva a encender
los quemadores siguiendo las instrucciones
correspondientes en este manual.
• NUNCA use agua para extinguir las llamas de una
parrilla de gas.

65
Indicaciones para asar a la parrilla
Tipo
Bistecs
NY Strip, Rib eye,
Porterhouse, T-Bone,
solomillo, filets
Directo Alto 10-15 min.
Voltee la carne sólo
una vez a la mitad del
tiempo para asar
Voltee la carne sólo
una vez a la mitad del
tiempo para asar
El tiempo depende del
peso de la carne
Voltee la carne sólo
una vez a la mitad del
tiempo para asar
El tiempo se determina
según el peso de la
carne (p. ej. 30 – 40
minutos por libra / kg)
Dé vuelta de vez en
cuando. Vierta la salsa en
los últimos 10 minutos.
Dé vuelta para que se
doren todos los lados.
18-22 min.
11-20 min.
10-15 min.
10-15 min.
25-35 min.
50-70 min.
15-20 min.
30-40 min.
1 pulg. /
5 cm
2 pulg. /
5 cm
0,75 pulg. /
1,9 cm
0,75 pulg. /
1,9 cm
0,75 pulg. /
1,9 cm
1,5 pulg. /
3,8 cm
Alto
Alto
Alto
Medio
Medio
Medio
Medio
Medio
4 – 6 lbs /
1,81 – 2,71
kg
60-80 min.
Medio
Medio
Medio
Medio
Medio
Alto
6 – 8 oz
/ 170,1 –
226,8 g
10 – 12 lbs /
4,5 – 5,4 kg
Por cada 0,5 pulg. / 1,3
cm de grosor Ase sobre la
parrilla y voltee una vez.
Por lado
10-15 min.
2 – 2,5 horas
10-12 min.
4-6 min.
14 – 18 min.
Medio
4 – 6 oz
/ 113,4 –
170,1 g
8-13 min.
Directo
Directo
Directo
Indirecto
Directo
Directo
Directo
Directo
Directo
Directo
Indirecto
Indirecto
Indirecto
Indirecto
Indirecto
NY Strip, Rib eye,
Porterhouse, T-Bone,
solomillo, filets
Falda (por libra/kg)
Hamburguesa de
carne molida de res
Hamburguesas
Carne asada
Chuletas
Pechuga
Entero
Entero
Filetes o bistec
Pechuga
Sin hueso ni piel
Sin rellenar
Pez gato, trucha, etc.
(12 oz / 340 g)
Pez espada, atún,
salmón, fletn, etc.
Con hueso
Muslos Sin hueso ni piel
Entero
Carne asada
Costillas
Costillar de 2 – 5 libras
/ 0,9 – 2,2 kg
Solomillo (por libra /
kg)
Rib eye, solomillo
Espesor
Tiempo total
Instrucciones
Método de
coc-ción
Confiu-ración
del quemador
Descripción
CARNE DE RES
CERDO
POLLO
PAVO
PESCADO

66
Indicaciones para asar a la parrilla
Tipo Espesor
Tiempo total
Instrucciones
Método de
coc-ción
Confiu-ración
del quemador
Descripción
Directo
Directo
Directo
Directo
Directo
Directo
Directo
Directo
Directo
Alto
Medio
Alto
Alto
Medio
Medio
Medio
Medio
Medio
3-6 min.
20-30 min.
45-90 min.
15-20 min.
8-12 min.
7-10 min.
6-8 min.
40-70 min.
Envueltas individualmente
en papel aluminio. Girar
ocasionalmente
Envueltas individualmente
en papel aluminio. Girar
ocasionalmente
Ase sobre la parrilla y voltee
una vez.
12-15 min.
Gambas
Mazorca de
maíz
Papas
Pimientos
Cebolla
Calabaza
Espárragos
18 – 20 oz / 510 – 566 g
Con la cáscara
Para hornear, enteras
Asados
En rebanadas
Calabaza amarilla, calabacín
0,5 pulg. / 1,2 cm de
diámetro
Camote (batata),
entero
Sin cáscara
VERDURAS

67
Resolución de problemas
Problema
La parrilla no se
enciende.
La llama es débil, es
irregular o hace ruido.
Llamaradas en exceso
La parrilla no se calienta
lo suficiente.
La llama no permanece
encendida.
1.
La válvula del tanque de PL está cerrada.
2. El nivel de gas del tanque de PL está bajo.
3.
La pila del encendedor no está instalada
adecuadamente o es necesario cambiar la
pila.
4.
Puede ser que sea necesario encender con
un fósforo.
5.
Las conexiones al encendedor o los
electrodos están flojs.
6.
Es posible que los electrodos estén
mojados.
7.
La batería del encendedor no está instalada
correctamente o la batería necesita ser
reemplazada.
8.
Las conexiones al encendedor están flojas.
1.
El nivel de gas del tanque de PL está bajo.
2.
Procedimiento de encendidoincorrecto.
3.
Los puertos del
quemadorpuedenestarobstruidos.
4.
La manguera de suministro de gas
puedeestardoblada o retorcida.
5.
La parrillapuedeestaren un
áreademasiadoventosa.
6.
Hay obstruccionescomoresiduos de grasa
o insectosen las entradas de aire.
1.
Las llamaradas normalmente son
causadas por un exceso de grasa de la
carne que se esté asando.
2. La parrilla está sucia.
3.
La temperatura de cocción quizás está
demasiado alta.
4.
La cubierta está cerrada.
5.
Los alimentos quedan sobrecocidos o
quemados.
6.
Horno
la bandeja y el recipiente para la
grasa están llenos de grasa.
1.
El nivel de gas del cilindro de
propano esbajo.
2.
El dispositivolimitador de flujo de gas
puedehaberseactivado.
1. La válvula del tanque de PL está cerrada.
2. El nivel de gas del tanque de PL está bajo.
3. El quemador no está instalado
correctamente o está sucio.
1. Abra la válvula del tanque de PL.
2. Sustituya el tanque de PL.
3.
Instale correctamente o sustituya la pila
del encendedor.
4. Encienda la parrilla con fósforo según las
instrucciones de este manual.
5.
Reconecte o sustituya el cableado del
encendedor o los electrodos.
6. Seque los electrodos con un paño seco.
7. Instale o reemplace adecuadamente la
batería del encendedor.
8. Reconecte o reemplace el cableado al
encendedor.
1. Reemplace el cilindro de propano.
2. Desconecte el regulador de la manguera de PL
del tanque de PL, vuelva a conectar y siga el
procedimiento de encendidotalcomo se indica.
3. Si solo hay un quemadorafectado, verifique y
limpielospuertos del quemador.
4. Enderece la manguera de suministrode gas.
5. Espere a que el viento se calme para
continuar.
6. Quite las obstrucciones de las entradas de aire
del quemador.
1.
Quite grasa de la carne que vaya a asar.
2.
Asegúrese de que la parrilla esté limpia.
3.
Mantenga baja la llama o apague un
quemador.
4.
Mantenga la cubierta abierta cuando
esté asando para así evitar demasiadas
llamaradas.
5.
Ponga los alimentos en la rejilla para
calentar hasta que las llamas se hayan
reducido.
6.
Limpie horno la bandeja y el recipiente
para la grasa.
1. Reemplace o rellene el cilindro de propano.
2. Cierre las perillas de control y la válvula del
cilindro de propano. Desconecte el regulador
del cilindro de propano. Inspeccione y limpie
el adaptador y el regulador del cilindro de
propano. Espere 1 minuto. Vuelva a conectar
el regulador y realice la prueba de fugas.
Encienda la parrillasegún el procedimiento
de encendidoexacto.
1. Abra la válvula del tanque de PL.
2. Sustituya el tanque de PL.
3.
Vuelva a instalar correctamente el
quemador y limpie cualquier residuo.
Causa Solución
NO rocíe agua
sobre las llamas
del gas, ya que
esto podría dañar
la parrilla
PRECAUCIÓN

68
Repuestos
AC
AD
AE
AF
AG
AH
AI
AJ
AK
AL
AM
AN
AO
AP
AQ
AR
AS
AT
AU
AV
AW
AX
AY
AZ
BA
BB
BC
BD
BE
BF
BG
BH
BI
BJ
BK
BL
BM
BN
BO
BP
BQ
BR
BS
BT
BU
BV
BW
BX
BY
BZ
C A
C B
C C
C D
C E
C F
C G
AB
AA

69
Repuestos
Part Description Quantity Part # Part Description Quantity Part #
Parts Not Shown
Manual de instrucciones
Paquete de hardware
1 PS5060
1 PS5061
AA
AE
BY
CG
AY
AO
BI
BQ
AC
AW
AM
BG
AG
CA
BA
AQ
BK
BS
AJ
BD
AT
AB
AV
AL
BF
AF
BZ
CB
AZ
AP
BJ
BR
AI
BC
AS
AD
BX
CF
AX
AN
BH
BP
AH
BB
AR
AK
BE
AU
1 PS5001
2
1
1
PS5005
PS5051
PS5059
6 PS5025
1 PS5015
1
1
PS5035
PS5043
5
1
PS5007
PS5053
1 PS5027
1 PS5017
1
1
PS5037
PS5045
1 PS5010
1 PS5030
1 PS5020
1 PS5003
1 PS5023
1 PS5013
1 PS5033
1 PS5002
1 PS5022
1 PS5012
1 PS5032
1
1
1
PS5006
PS5052
PS5054
2 PS5026
1 PS5016
1
1
PS5036
PS5044
1 PS5009
1 PS5029
1 PS5019
2
1
1
PS5004
PS5050
PS5058
6 PS5024
5 PS5014
1
2
PS5034
PS5042
2 PS5008
1 PS5028
1 PS5018
1 PS5011
2 PS5031
1 PS5021
Indicador de temperatura
Tope de goma A
Fascia derecha
Tapa del quemador lateral
Perilla de control
Electrodo del quemador principal con cable de 6’’
Electrodo del quemador principal con cable de 11.8’’
Electrodo del quemador principal con cable de 16.5’’
Electrodo del quemador principal con cable de 21.6’’
Electrodo del quemador principal con cable de 27.6’’
Eje de la rueda
Taza de grasa
Rejilla de calentamiento
Módulo de encendido electrónico
Soporte izquierdo de la bandeja de grasa
Placa triangular derecha, carro
Domador de llamas
Quemador lateral
Pierna trasera izquierda
Pierna delantera derecha
Bandeja de grasa
Soporte de estante lateral
Tirante de parada de tanque
Escudo térmico
Tapa de la parrilla
Panel de control con logo
Conjunto de múltiple y válvula
Fascia izquierda
Placa triangular izquierda, carro
Asa de la tapa de la parrilla
Estante de quemador lateral
Electrodo del quemador lateral
Pierna cruzada
Soporte para perno de tanque LP
Portavasos de grasa
Parrilla de fuego
Base del carro
Parrilla de cocina
Soporte de estante de quemador lateral
Rejilla de quemador lateral
Bisel
Quemador principal
Perno del tanque de LP
Panel frontal, carro
Tope de goma B
Pierna delantera izquierda
Estante lateral izquierdo
Base de la pierna
BN
BL
BT
BO
BM
2 PS5040
1
1
PS5038
PS5046
1 PS5041
1 PS5039
Rueda
Titular del partido
Asa de la bandeja de grasa
Tanque retenedor de manguera
Pierna trasera derecha
BV
CD
BW
CE
BU
CC
1
2
PS5048
PS5056
1
1
PS5049
PS5057
1
1
PS5047
PS5055
Manguera de metal flexible
Bisagra de la tapa del quemador lateral
Soporte de bandeja de grasa derecha
Quemador lateral
Válvula de quemador lateral,
manguera LP y regulador
Bandeja de goteo del quemador lateral

70
Garantía
Se garantiza que estaparrilla a gas propanolíquido no tienedefectosensusmaterialesnimano de obracuando-
estáensambladacorrectamente y se usaen un ámbitodoméstico normal, con loscuidados que se indicanenes-
tasinstruccionesdurante un 5 años en los quemadores principales y durante 1 años y todas las demás partes
desde la fecha de la compra original al por menor.
La únicaexcepciónaesto son losquemadorestubulares de aceroinoxidable que tienentres (3) años de
garantía a partir de la fecha de la compraminorista original. Estagarantía no incluyecorrosión, rayas y
decoloraciónporusoy cuidadoindebidos de estaparrilla.
Esta garantía no cubre daños o problemas en relación con negligencia, abuso, accidente, mal uso,
mala aplicación, montaje inadecuado, daños causados en su traslado, uso comercial ni CUALQUIER
modificaciónque se haga al producto. No cubre la mano de obra de reparación. Esta es la única garantía
que se ofrece y se da en lugar de cualquier otra garantía, ya sea expresa o implícita, que incluya la garantía
tácita, la≈comercialización o el uso para un propósito en particular.
Todas las piezas de repuesto que cumplan con los requisitos de la garantía serán enviadas sin costo alguno
por el medio que el fabricante elija (envío terrestre, por correo de EE. UU., UPS o FedEx). Cualquier cargo
especial por manejo (p. ej. envío de dos días, al día siguiente, etc.) será responsabilidad del consumidor.
Toda reclamación de garantía corresponde sólo al comprador original y requiere de comprobante de compra
que especifique la fecha de la adquisición. No devuelva piezas sin haber obtenido primro el número de
autorización de devolución de nuestro departamento de atención al cliente.
Puede comunicarse con nuestro departamento de atención al cliente llamando al 1-800-321-3473 entre
las 8:00 a.m. y las 5:00 p.m. (EST), sólo en inglés, o enviando un correo electrónico a CustomerService@
landmann-usa.com
Por favor, tenga en cuenta que en Estados Unidos algunos estados no permiten la exclusión o limitación de
accidentes o de daños indirectos o limitaciones en la duración de una garantía implícita, por lo que puede
ser las anteriores limitaciones o exclusiones no sean aplicables en su caso. Esta garantía le otorga derechos
legales específicos y también es posible que tenga oros que puedan variar de un estado a otro.
Landmann USA, Inc.
7405 Graham Rd
Fairburn, Ga 302130
www.landmann.com/us
-
 1
1
-
 2
2
-
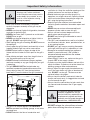 3
3
-
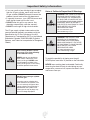 4
4
-
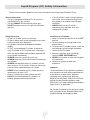 5
5
-
 6
6
-
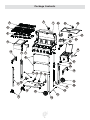 7
7
-
 8
8
-
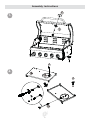 9
9
-
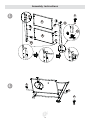 10
10
-
 11
11
-
 12
12
-
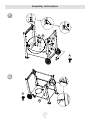 13
13
-
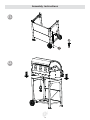 14
14
-
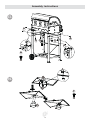 15
15
-
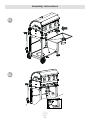 16
16
-
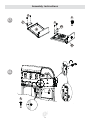 17
17
-
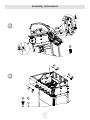 18
18
-
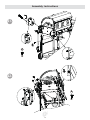 19
19
-
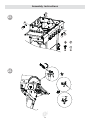 20
20
-
 21
21
-
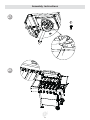 22
22
-
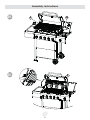 23
23
-
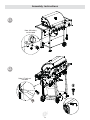 24
24
-
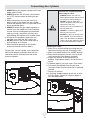 25
25
-
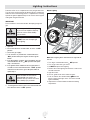 26
26
-
 27
27
-
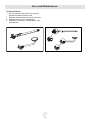 28
28
-
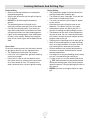 29
29
-
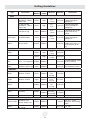 30
30
-
 31
31
-
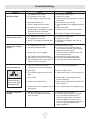 32
32
-
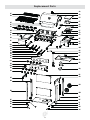 33
33
-
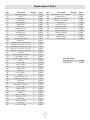 34
34
-
 35
35
-
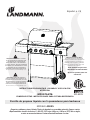 36
36
-
 37
37
-
 38
38
-
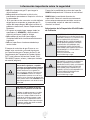 39
39
-
 40
40
-
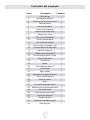 41
41
-
 42
42
-
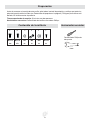 43
43
-
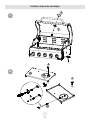 44
44
-
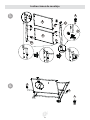 45
45
-
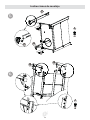 46
46
-
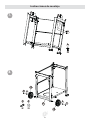 47
47
-
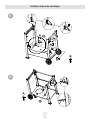 48
48
-
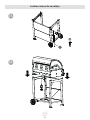 49
49
-
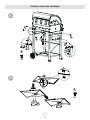 50
50
-
 51
51
-
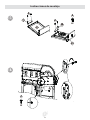 52
52
-
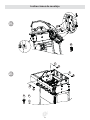 53
53
-
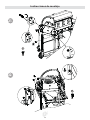 54
54
-
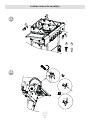 55
55
-
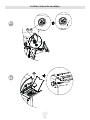 56
56
-
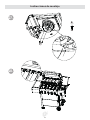 57
57
-
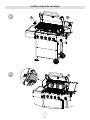 58
58
-
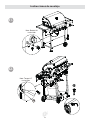 59
59
-
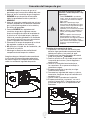 60
60
-
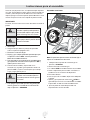 61
61
-
 62
62
-
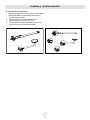 63
63
-
 64
64
-
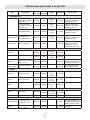 65
65
-
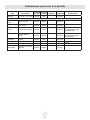 66
66
-
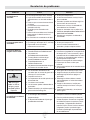 67
67
-
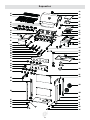 68
68
-
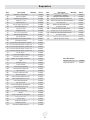 69
69
-
 70
70


LANDMANN 45025 El manual del propietario
- Categoría
- Barbacoas
- Tipo
- El manual del propietario
en otros idiomas
- English: LANDMANN 45025 Owner's manual
Artículos relacionados
-
LANDMANN 42224 El manual del propietario
-
-
LANDMANN 42301 El manual del propietario
-
LANDMANN 42304NG El manual del propietario
-
-
LANDMANN 12302 Manual de usuario
-
-