White 1780 Manual de usuario
- Categoría
- Máquinas de coser
- Tipo
- Manual de usuario
La página se está cargando ...

English
IMPORTANT
SAFETY
INSTRUCTIONS
When
using
an
electrical
appliance,
basic
safety
precautions
should
always
be
followed,
including
the
following:
Read
all
instructions
before
using
(this
appliance).
DANGER
-
-
To
reduce
the
risk
of
electric
shock:
1.
The
sewing
machine
should
never
be
left
unattended
when
plugged
in.
Always
unplug
this
sewing
machine
from
the
electric
outlet
immediately
after
using
and
before
cleaning.
2.
Always
unplug
before
relamping.
Replace
bulb
with
same
type
rated
5
watts.
WARNING
- -
To
reduce
the
risk
of
burns,
fire,
electric
shock,
or
injury
to
persons:
•
Do
not
allow
to
be
used
as
a
toy.
Close
attention
is
necessary
when
this
sewing
machine
is
used
by
or
near
children.
•
Use
this
sewing
machine
only
for
its
intended
use
as
described
in
this
manual.
Use
only
attachments
recommended
by
the
manufacturer
as
contained
in
this
manual.
•
Never
operate
this
sewing
machine
if
it
has
a
damaged
cord
or
plug,
if
it
is
not
working
properly,
if
it
has
been
dropped
or
damaged,
or
dropped
into
water.
Return
the
sewing
machine
to
the
nearest
authorized
dealer
or
service
center
for
examination,
repair,
electrical
or
mechanical
adjustment.
•
Never
operate
the
sewing
machine
with
any
air
openings
blocked.
Keep
ventilation
openings
of
the
sewing
machine
and
foot
control
free
from
the
accumulation
of
lint,
dust,
and
loose
cloth.
•
Keep
fingers
away
from
all
moving
parts.
Special
care
is
required
around
the
sewing
machine
needle.
•
Always
use
the
proper
needle
plate.
The
wrong
plate
can
cause
the
needle
to
break.
•
Do
not
use
bent
needles.
•
Do
not
pull
or
push
fabric
while
stitching.
It
may
deflect
the
needle
causing
it
to
break.
•
Switch
the
sewing
machine
off
(“0”)
when
making
any
adjustment
in
the
needle
area,
such
as
threading
needle,
changing
needle,
threading
bobbin,
or
changing
presser
foot,
etc.
•
Always
unplug
sewing
machine
from
the
electrical
outlet
when
removing
covers,
lubricating,
or
when
making
any
other
user
servicing
adjustments
mentioned
in
the
instruction
manual.
•
Never
drop
or
insert
any
object
into
any
opening.
•
Do
not
use
outdoors.
•
Do
not
operate
where
aerosol
(spray)
products
are
being
used
or
where
oxygen
is
being
administered.
•
To
disconnect,
turn
all
controls
to
the
off
(“0”)
position,
then
remove
plug
from
outlet.
•
Do
not
unplug
by
pulling
on
cord.
To
unplug,
grasp
the
plug,
not
the
cord.
•
Keep
fingers
away
from
moving
parts,
especially
the
area
near
the
blades.
SAVE
THESE
INSTRUCTIONS
For
the
USA
and
Canada
This
sewing
machine
has
a
polarized
plug
(one
blade
wider
than
the
other).
To
reduce
the
risk
of
electric
shock,
this
plug
is
intended
to
fit
in
a
polarized
outlet
only
one
way.
If
the
plug
does
not
fit
fully
in
the
outlet,
reverse
the
plug.
If
it
still
does
not
fit,
contact
a
qualified
electrician
to
install
the
proper
outlet.
Do
not
modify
the
plug
in
any
way.
Español
INSTRUCCIONES
IMPORTANTES
DE
SEGURIDAD
Cuando
se
utiliza
un
aparato
eléctrico,
se
deben
respetar
siempre
ciertas
precauciones
básicas
de
seguridad,
incluyendo
las
siguientes:
Lea
todas
las
instrucciones
antes
de
utilizar
esta
maquina.
PELIGRO
-
-
Para
reducir
el
riesgo
de
descargas
eléctricas.
1.
No
deje
nunca
desatendida
Ia
máquina
de
coser
mientras
esté
enchufada.
Desenchüfela
siempre
inmediatamente
después
de
haber
cosido
con
ella
y
antes
de
limpiarla.
2.
Desenchufe
siempre
Ia
máquina
antes
de
cambiar
Ia
bombilla.
Reemplace
ésta
por
una
bombilla
de
15
vatios
del
mismo
tipo.
3.
No
toque
ningün
aparato
que
se
haya
caIdo
al
agua.
Saque
inmediatamente
el
enchufe.
4. No
coloque
ni
guarde
nunca
Ia
máquina
de
coser
en
un
sitio
de
donde
se
pueda
caer
o
donde
corra
el
riesgo
de
ser
empujada
y
caer
en
un
lavabo
o
bañera.
No
Ia
pose
en
un
sitio
hümedo
ni
Ia
meta
en
el
agua
o
cualquier
otro
lIquido.
ADVERTENCIA
-
-
Para
reducir
el
riesgo
de
quemaduras,
incendios,
descargas
eléctricas
0
lesiones.
1.
No
deje
que
jueguen
con
Ia
máquina.
Preste
especial
atenciOn
cuando
algün
niño
utilice
Ia
mãquina
o
se
encuentre
cerca
de
ella.
2. Utilice
esta
máquina
sOlo
para
el
uso
previsto,
tal
como
se
describe
en
este
manual.
Utilice
inicamente
los
accesorios
recomendados
por
el
fabricante
que
se
incluyen
en
este
manual.
3. No
utilice
nunca
Ia
máquina
de
coser
si
su
cable
o
enchufe
tienen
defectos,
si
flO
funciona
correctamente,
si
se
ha
caIdo
o
está
estropeada,
0
Si
se
ha
dejado
caer
en
el
agua.
Lleve
Ia
máquina
al
vendedor
autorizado
o
al
servicio
de
reparaciOn
más
cercano
para
que
Ia
examinen,
reparen
o
efectüen
los
ajustes
eléctricos
o
mecánicos
neceSarios.
4.
No
utilice
nunca
Ia
máquina
de
coser
cuando
tenga
un
orificio
de
ventilaciOn
obstruido.
Mantenga
los
orificios
de
ventilacion
de
Ia
máquina
y
del
mando
de
pedal
limpios
de
pelusa,
polvo
o
tela.
5.
Nunca
deje
caer
o
introduzca
ningUn
objeto
en
los
orificios.
6.
No
utilice
Ia
máquina
al
aire
libre.
7. No
utilice
Ia
máquina
en
lugares
donde
se
estén
utilizando
aerosoles
o
donde
se
esté
administrando
oxigeno.
8.
Para
apagarla,
desconecte
todos
los
mandos
(posicion
0”)
y
saque
el
enchufe
de
a
toma
de
corriente.
9.
No
desenchufe
Ia
máquina
tirando
del
cable.
Para
desenchufar,
tire
siempre
del
enchufe,
nunca
del
cable.
10.
Mantenga
los
dedos
alejados
de
todas
las
piezas
mOviles.
Preste
especial
atenciOn
cuando
trabaje
cerca
de
Ia
aguja.
11.
Utilice
siempre
una
placa
adecuada
para
Ia
aguja.
Si
utiliza
una placa
inadecuada,
Ia
aguja
se
puede
romper.
12.
No
utilice
agujas
torcidas.
13.
No
tire
de
Ia
tela
mientras
esté
cosiendo.
Si
tirade
Ia
tela,
Ia
aguja
se
puede
doblar
y
romper.
14.
Apague
Ia
maquina
de
coser
(interruptor
en
Ia
posiciOn
0’)
cuando
efectUe
operacioneS
cerca
de
Ia
aguja,
como
por
ejemplo
enhebrar
o
cambiar
Ia
aguja,
o
reemplazar
el
prensatelas.
15.
Desenchufe
siempre
Ia
maquina
anteS
de
quitar
tapas,
lubricar
0
efectuar
cualquier
tipo
de
ajuste
o
mantenimiento
mencionado
en
este
manual
de
instrucciones.
16.
No
utilice
ñunca
Ia
máquina
sobre
una
superticie
blanda
como
una
cama
o un
canapé,
que
pueda
tapar
los
orificios
de
ventilaciôn.

Ill
Ill
Ill
Ill
Ill
III
Ill
Ill
a
I
English
Español
EJEMPLOS
DE
PUNTOS
STITCH
SAMPLE
Ill
Stretch
stitch
Ill
Buttonhole
Zipper
sewing
Overcasting
Decorative
stitch
Appliqué
Decorative
stitch
Punto
elástico
Ojal
Costura
de
cremallera
Sobrehilado
Punto
de
adorno
Parche
Punto
de
adorno
a
A
I
La página se está cargando ...

Español
INDICE
Nombre
de
las
piezas
2
Accesorios
estándar
4
Tiposdecostura
6
2.
COMO
UTILIZAR
SU
MAQUINA
DE
COSER
Interruptor
de
corriente
y
de
Ia
bombilla
7
SelecciOn
del
punto
7
Funciones
de
Ia
pantalla
LCD
de
ayuda
7
Palanca
del
prensatelas
8
Selector
de
anchura
de
puntada
8
Selector
de
longitud
de
puntada
8
Velocidad
de
Ia
maquina
8
Mando
de
pedal
9
Mando
de
ajuste
de
los
dientes
10
Palanca
de
ajuste
de
Ia
presiOn
del
prensatelas
10
Cómo
guardar
Ia
máquina
10
3.
PREPARACION
DE
LA
MAQUINA
Hacer
canilla
12
Enhebrar
el
hilo
de
Ia
canilla
14
Enhebrar
el
hilo
superior
16
COmo
se
utiliza
el
enhebrador
de
aguja
....
17
Reemplazo
del
prensatelas
19
Reemplazo
de
Ia
aguja
20
Tabla
de
telas,
hilos
y
agujas
21
4.
COSTURA
Puntorecto
23
InversiOn
de
puntada
24
Ajuste
de
Ia
tensiOn
del
hilo
24
Costura
en
zigzag
26
Prensatelas
para
sobrehilar
27
Parches
28
Prensatelas
para
costuras
invisibles
29
Prensatelas
para
ojales
30
Prensatelas
para
cremalleras
33
Punto
elástico
34
5.ACOLCHANDO
42
6.
MANTENIMIENTO
Limpieza
de
Ia
zona
del
prensatelas
y
de
Ia
lanzadera
43
Reemplazo
de
Ia
bombilla
45
7.
MENSAJES
DE
ERROR
Y
ALARMAS
48
8.
LOCALIZACION
Y
REPARACION
DE
AVERIAS
51—52
9.
CARACTERSTlCAS
53
1.
RESUMEN
La página se está cargando ...

English
1.
SUMMARY
Name
of
parts
1-1.
Thread
guide
1
-2.
Bobbin
winder
guide
2.
Upper
thread
tension
dial
(See
page
24)
3.
Stitch
width
adjustment
dial
(See
page
8)
4.
Stitch
length
adjustment
dial
(See
page
8)
5.
Presser
foot
pressure
adjustment
lever
(See
page
10)
6.
Light
bulb
7.
Thread
cutter
8.
Free-arm
sewing
Pull
the
extension
table
off
to
the
left
and
ma
chine
converts
to
a
free-arm
model.
Extension
table
Help
window
LCD
(See
page
7)
Stitch
selection
dial
Needle
threader
(See
page
17)
Presser
foot
holder
Needle
clamp
screw
Needle
thread
guide
Needle
Presser
foot
Needle
plate
Feed
dog
Bobbin
thread
cutter
Bobbin
case
Bobbin
case
cover
Buttons
and
levers
Speed
control
lever
(See
page
8)
Reverse
stitch
lever
(See
page
8)
Needle
up
and
down
button
(See
page
8)
Start
and
stop
button
(See
page
8)
Bobbin
stop
Bobbin
winder
shaft
Handle
Spool
pin
Spool
cap
Presser
foot
lift
(See
page
8)
Handwheel
Power
and
light
switch
Plug
socket
Plug
socket
(Foot
control)
Buttonhole
adjuster
(See
page
32)
Feed
dog
control
(See
page
10)
Buttonhole
lever
Face
cover
Español
1.RESUMEN
Nombre
de
las
piezas
1-1.
GuiahIlos
1-2.
Gufa
para
el
hilo
de
Ia
canilla
2.
Selector
de
tension
del
hilo
superior
(véase
página
24)
3.
Selector
de
anchura
de
puntada
(véase
página
8)
4.
Selector
de
longitud
de
puntada
(véase
pagina
8)
5.
Palanca
de
ajuste
de
Ia
presiOn
del
prensatelas
(véase
página
10)
6.
BombiHa
7.
Cuchilla
para
cortar
el
hilo
8.
Costura
con
brazo
libre
Saque
el
tablero
de
extension
por
Ia
izquierda
para
convertir
Ia
máquina
en
un
mocielo
con
brazolibre.
9.
Tablero
de
extensiOn
10.
Pantalla
LCD
de
ayuda
(véase
Ia
página
7)
11.
Selector
de
punto
12.
Enhebrador
de
aguja
(véase
página
17)
13.
Soporte
del
prensatelas
14.
Tornillo
del
soporte
de
Ia
aguja
15.
GuiahIlos
de
Ia
aguja
16.
Aguja
17.
Prensatelas
18.
Placa
de
Ia
aguja
19.
Dientes
20.
Cuchilla
para
cortar
el
hilo
de
Ia
canilla
Alojamiento
de
Ia
canilia
Tapa
del
alojamiento
de
Ia
canilla
Selector
de
velocidad
(véase
página
9)
Palanca
de
inversiOn
de
Ia
puntada
(véase
pagina
9)
BotOn
para
subir
y
bajar
Ia
aguja
(véase
página
9)
BotOn
de
arranque
y
parada
(véase
pãgina
9)
Sujetabobina
Eje
para
hacer
canilla
Asa
Eje
portabobina
Tope
de
bobina
Palanca
del
prensatelas
(véase
pagina
9)
Volante
Al
girar
el
volante,
Ia
aguja
sube
o
baja.
Gire
siempre
el
volante
hacia
Ud.
31.
Interruptor
de
corriente
y
de
Ia
bombilla
32.
Entrada
del
cable
de
alimentaciOn
eléctrica
33.
Entrada
del
cable
del
mando
de
pedal
34.
Mando
de
ajuste
de
Ia
puntäda
de
los
ojales
(véase
página
32)
35.
Mando
de
ajuste
de
los
dientes
(véase
página
10)
36.
Palanca
para
ojales
37.
Nominal
cubrir
20.
21.
22.
23.
23-1.
23-2.
23-3.
23-4.
24.
25.
26.
27.
28.
29.
30.
31.
32.
33.
34.
35.
36.
37.
9.
10.
11.
12.
13.
14.
15.
16.
17.
18.
19.
21.
22.
23-1.
23-2.
23-3.
23-4.
24.
25.
26.
27.
28.
29.
30.
La página se está cargando ...

12.
Needles
(iset)
#90/14X2
13.
Screwdriver
14.
Cleaning
brush
15.
Walking foot
16.
Quilting
guide
17.
Narrow
hem
foot (3mm)
18.
Gathering
foot
19.
1/4
inch
piecing
foot
20.
Darning
foot
21.
Button
sewing
foot
22.
Clear
satin
(open
toe)
foot
Español
Accesorios
estándar
Los
accesorios
se
encuentran
dentro
del
tablero
de
extension.
Nota:
•
Se recomienda
utilizar
accesorios
de
origen
WHITE.
•
Cuando
compre
carretes
nuevos,
elija
el
tamaño
adecuado
(20,5
mm
de
diámetro
y
11
—11,6
mm
de
alto).
•
Utilice
canillas de
plástico.
1.
Compartimiento
para
accesorios
2.
Tablero
de
extensiOn
3.
Mando
de
pedal
(véase
Ia
pagina
9)
4.
Prensatelas
para
costuras
en
zigzag
(ya
instalado
en
Ia
maquina)
5.
Prensatelas
para
ojales
6.
Prensatelas
para
cremalleras
7.
Prensatelas
para
sobrehilar
8.
Prensatelas
para
costuras
invisibles
9.
Abreojales
10.
Tope
de
bobina
(ya
instalado
en
Ia
maquina)
11.
Canillas
(2)
12.
Agujas
(1
juego)
#90/14X2
13.
Destornillador
14.
Brocha
para
limpiar
Ia
máquina
15.
Prensatelas
caminador
16.
Gula
para
acoichar
17.
Prensatelas
para
dobladillos
estrechos
18.
Prensatelas
de
recogido
19.
Prensatelas
para
1/4”
de
costura
20.
Prensatelas
de
zurcido
21.
Prensatelas
de
coser
botones
22.
Prensatelas
transparente
English
Standard
accessories
Accessories
are stored
inside
the
extension
table.
Note:
•
Genuine
WHITE
accessories
are
recommended.
•
When
purchasing
a
new
bobbin,
be
sure
the
size
is
3/4(20.5
mm)
in
diameter
and
3/8”(ll—ll
.6
mm)
in
height.
•
Use
plastic
bobbins.
1.
Accessory
box
2.
Extension
table
3.
Foot control
(See
page
9)
4.
Zigzag
foot
(On
the
machine)
5.
Buttonhole
foot
6.
Zipper
foot
7.
Overcasting
foot
8.
Blind
hem
foot
9.
Buttonhole
cutter
10.
Spool
cap
(On
the
machine)
11.
Bobbin
(2)
The
1/4
inch
piecing
foot
is
for
straight
stitch
only.
Prior to
using
this
foot,
please
refer
to
the
enclosed
video.
La página se está cargando ...

Español
Tipos
de
costura
Tipos
de
costura
Anchura
Longitud
Nc
de
Tipos
de
costura
Prensatelas
Anchura
Longitud
Prensatelas
N°
de
(página
de
de
Ia
de
Ia
(página
de
de
Ia
de
Ia
puntada
reterencia)
puntada
puntada
referenda)
puntada
puntada
puntada
puntada
puntada
Ojal
(pagina
30)
Prensatelas
para
ojales
4-5
0.4-0.6
10
Punto
recto
(pagina
23)
Prensatelas
para
cpsturas
en
zigzag
1-4
11
C
remallera
(pagina
33)
0
2
Prensatelas
para
cremalleras
FestOn
Punto
de
adorno
Punto
por
encima
doble
Punto
por
encima
inclinado
2-3
12
Costura
en
zigzag
Parche
de
adorno
(páginas
25
y
27)
Prensatelas
para
costuras
en
ziazaci
3-6
0.5-2
0.4-1
4
13
Sobrehilado
en
una
tela
de
peso
medio
(pagina
27)
Sobrehilado
5
1-4
3
14
Costura
de
adorno
0
sobrehilado
Punto
por
encima
elástico
/
Punto
elástico
sobre
las
orillas
Prensatelas
para
costuras
en
zigzag
5-6
P
rensatelas
F---.
—
costuras
en
zigzag
Costura
invisible
4
de
dobladillo
Prensatelas
(pagina
29)
para
‘
costuras
invisibles
Sobrehilado
en
una
tela
ligera
5
(pagina
27)
Prensatelas
para
‘
Zurcido/
costuras
en
—
Remiendo
zigzag
Costura
invisible
6
de
dobladillo
en
Prensatelas
una
tela
elástica
para
(pagina
29)
costuras
invisibles
15
16
17
18
Bellota
/
Punto
por
encima
Punto
de
espiga
Punto
por
encima
/
Sobrehilado
Punto
por
encima
4-6
1-2
7
Punto
de
uniOn
UI
I”
8
9
Punto
de
concha
FestOn
de
rombo
Sobrehilado
en
19
unatelapesada
5
o
elastica
Sobrehilado
(pagina
27)
Prensatelas
para
costuras
en
zigzag
I
5-6
20
III—
IlI
0.4-1
Costura
elástica
recta
o
en
zigzag
(página
34)
P
rensatelas
para
costuras
en
ziozao
0-6

.
.
.
.
.
.
2.
HOW
TO
OPERATE
YOUR
SEWING
MACHINE
Power
and
light
switch
A.
Power
and
light
switch
First
connect
the
power
cord
to
the
plug
socket
of
your
sewing
machine.
Next,
connect
the
plug
of
power
cord
to
an
electric
outlet.
®
Power
and
light
switch
©
Plug
®
Power
cord
B.
Push
the
switch
to
the
I
direction
to
turn
the
switch
ON.
This
switch
controls
both
power
and
light.
Push
the
switch
to
the
0
direction
to
turn
the
switch
OFF.
Selecting
the
stitch
pattern
Raise
the
needle
to
its
highest
position.
(See
page
8
“Needle
up
and
down
button”)
Turn
the
stitch
selection
dial
to
select
the
stitch
pattern.
Help
window
LCD
functions
C.
The
selected
stitch
pattern
is
displayed
on
the
help
window
LCD.
1.
Stitch
pattern.
2.
Stitch
number
3.
Stitch
width
The
recommended
stitch
width
is
displayed.
4.
Stitch
length
The
recommended
stitch
length
is
displayed.
5.
Bobbin
winding
cD
Displayed
when
the
bobbin
winder
shaft
moves
to
the
right.
(Usually
not
displayed)
©
Flashes
with
beep
sounds
when
the
machine
is
not
operated
correctly.
6.
Foot
control
®
Displayed
when
the
foot
control
is
connected
to
the
sewing
machine.
(Usually
not
displayed)
©
Flashes
with
beep
sounds
when
the
machine
is
not
operated
correctly.
7.
Flashinq
display
2.
COMO
UTILIZAR
SU
MAQUINA
DE
COSER
Interruptor
de
corriente
y
de
Ia
bombilla
A.
Enchufe
primero
el
cable
de
alimentaciOn
eléctrica
€
•
entrada
prevista
para
ello
en
Ia
máquina
de
coser.
•
lntroduzca
luego
el
enchufe
del
cable
de
alimentaci
•
en
Ia
toma
de
corriente
mural.
®
Interruptor
de
corriente
y
de
Ia
bombilla
•
©
Enchute
•
®
Cable
de
alimentaciOn
eléctrica
B.
Pulse
el
interruptor
del
lado
i
para
encender.
Este
interruptor
controla
a
Ia
vez
el
suministro
de
corriente
eléctrica
y
Ia
bombilla.
•
Pulse
el
interruptor
del
lado
0
para
apagar.
Selecciôn
del
punto
•
Suba
Ia
aguja
al
máximo
(consulte
Ia
página
8
Botó
para
subir
y
bajar
Ia
aguja”)
Gire
el
selector
de
punto
para
elegir
el
tipo
de
punto
•
Funciones
de
Ia
pantalla
LCD
de
ayuda
C.
La
pantalla
LCD
indica
el
tipo
de
punto
seleccionadt
•
1.Tipodepunto
•
La
pantalla
muestra
el
tipo
de
punto
seleccionado.
•
2.
Nümero
de
punto
3.
Anchura
de
Ia
puntada
•
La
pantalla
muestra
a
anchura
de
puntada
recomend
•
4.
Longitud
de
Ia
puntada
La
pantalla
muestra
Ia
longitud
de
puntada
recomend
•
5.Bobinado
•
Aparece
cuando
el
eje
para
hacer
canilla
se
despIa
•
hacia
Ia
derecha.
(No
aparece
permanentemente)
©
Parpadea
y
emite
un
sonido
cuando
no
se
utiliza
Ia
•
maquina
correctamente.
•
6.
Mando
de
pedal
i)
Aparece
cuando
el
mando
de
pedal
está
conectado
•
máquina
de
coser.
(No
aparece
permanentemente)
©
Parpadea
y
emite
un
sonido
cuando
no
se
utiliza
Ia
•
máquina
correctamente.
•
7.
Mensajes
de
error
(parpadeo)
A
I
w
D
2.
Vi
.
.
B
C
5
English
6
Espanol
S
F
T
I
C
2
4
C
1(
11
1’
1

English
A.
Presser
foot
lift
Before
sewing,
lower
the
presser
foot
lift
to
lower
the
presser
foot.
©
When
inserting
the
fabric,
lift
up
the
presser
foot
lift
to
raise
the
presser
foot.
©
When
inserting
a
very
thick
fabric
under
the
presser
foot,
the
lift
height
can
be
increased
by
raising
the
presser
foot
lever
to
this
position.
B.
Stitch
width
adjustment
dial
Set
the
stitch
width
and
the
stitch
length
to
the
recommended
number
displayed
on
the
help
window
LCD.
1.
The
zigzag
width
can
be
altered
by
turning
the
stitch
width
adjustment
dial.
2.
For
narrow
zigzag
stitches.
turn
the
dial
to
a
smaller
number.
For
wide
zigzag
stitches,
turn
the
dial
to
a
larger
number.
3.
When
the
dial
is
set
at
‘0’,
the
stitch
will
be
a
straight
stitch.
C.
Stitch
length
adjustment
dial
1.
The
stitch
length
can
be
altered
by
turning
the
stitch
length
adjustment
dial.
2.
For
shorter
stitches,
turn
the
dial
to
a
smaller
number.
For
longer
stitches,
turn
the
dial
to
a
larger
number.
D.
Button
and
levers
1.
Sewing
speed
control
Sewing
speed
is
adjusted
by
the
sewing
speed
control
lever.
2.
Reverse
stitch
lever
The
machine
will
feed
the
fabric
backward
and
stitch
slowly
in
reverse
when
pressing
the
reverse
stitch
lever
down.
3.
Needle
up
and
down
button
Press
the
button
and
the
needle
will
move
to
its
lowest
position.
Press
again
and
the
needle
will
move
to
its
highest
position.
Instead
of
pressing
the
needle
up
and
down
button,
you
can
turn
the
handwheel
to
adjust
the
needle
height.
4.
Start
and
stop
button
Press
the
button
to
start
sewing.
Prc,oc
,,n&r,
fr,
fr,n
+h
m,-hir,,
Español
A.
Palanca
del
prensatelas
•
Para
empezar
a
coser,
baje
a
palanca
para
bajar
el
•
prensatelas.
•
©
Para
introducir
Ia
tela,
levante
Ia
palanca
para
subir
el
prensatelas.
•
©
Para
introducir
tela
gruesa
debajo
del
prensatelas,
ajuste
•
Ia
altura
de
éste
manteniendo
Ia
palanca
sujeta
a
Ia
altura
•
adecuada.
B.
Selector
de
anchura
de
puntada
•
1.
La
anchura
del
punto
en
zigzag
puede
cambiarse
girando
el
selector
de
anchura
de
puntada.
2.
Para
obtener
un
zigzag
estrecho,
gire
el
selector
hacia
un
•
nümero
más
pequeno.
Para
obtener
un
zigzag
ancho,
gire
-
el
selector
hacia
un
nümero
mayor.
•
3.
Con
el
selector
en
Ia
posiciOn
“0”,
se
obtiene
una
puntada
recta.
C.
Selector
de
longitud
de
puntada
•
Para
seleccionar
Ia
anchura
y
Ia
longitud
de
Ia
puntada,
utilice
el
nümero
recomendado
que
aparece
en
Ia
pantalla
LCD.
•
1.
La
longitud
de
Ia
puntada
puede
cambiarse
girando
el
•
selector
de
longitud
de
puntada.
•
2.
Para
hacer
puntadas
cortas,
gire
el
selector
hacia
un
nümero
más
pequeno.
•
Para
hacer
puntadas
largas,
gire
el
selector
hacia
un
•
nümero
mayor.
D.
Velocidad
de
Ia
máquina
•
1.
La
velocidad
de
Ia
máquina
se
ajusta
con
el
selector
de
•
velocidad.
•
2.
Palanca
de
inversiOn
de
Ia
puntada
Al
bajar
esta
patanca,
Ia
mãquina
introduce
Ia
tela
en
el
•
sentido
opuesto
y
empieza
a
coser
al
revés
a
baja
velocidad.
3.
BotOn
para
subir
y
bajar
Ia
aguja
•
Pulse
el
botOn
para
bajar
Ia
aguja
at
máximo.
Vuelva
a
pulsar
el
botOn
para
subir
Ia
aguja
hasta
su
posiciOn
más
alta.
También
se
puede
ajustar
Ia
altura
de
Ia
aguja
girando
el
•
volante.
•
4.
BotOn
de
arranque
y
parada
Pulse
el
botOn
para
empezar
a
coser.
B
A
C
D
1
2
3
4

A
B
English
A.
Foot
control
WARNING
Foryoursafeg
always
disconnect
the
machí’ie
from
the
power
supp4’before
connecthig
the
foot
control
Foot
control
enables
you
to
control
start,
stop
and
sewing
speed
of
the
machine
with
your
foot.
(Start,
stop
and
sewing
speed
of
bobbin
winding
is
also
controlled
by
the
foot
control.)
Note:
The
start
and
stop
button
cannot
be
operated
when
the
foot
control
is
connected
to
the
sewing
machine.
Connecting
the
loot
control
D
Turn
the
sewing
machine
OFF.
©
Connect
the
plug
®
of
the
foot
control
cord
to
the
sewing
machine
and
the
plug
®
to
the
foot
control.
©
When
the
foot
control
is
connected
to
the
sewing
machine,
is
display
on
the
help
window
LCD.
When
the
foot
control
is
disconnected,
it
disappears.
B.
How
to
use
the
foot
control
1.
Press
on
the
foot
control
slowly.
2.
The
more
you
press
the
foot
control,
the
faster
the
machine
sews.
3.
Release
the
foot
control
to
stop
the
machine.
±
You
can
control
the
maximum
speed
of
the
foot
control
by
adjusting
the
sewing
speed
control
lever.
C.
How
to
store
the
foot
control
Store
the
foot
control
in
the
base
of
the
extension
table.
C-i
Press
the
foot
control
with
your
hand
and
insert
the
plugs
®
and
®
together
into
the
opening
©.
C-2
Wind
the
cord
around
the
foot
control.
C-3
Insert
foot
control
in
the
base
of
the
extension
table
under
the
accessory
box.
C-3
Español
A.
Mando
de
pedal
ADVERTENCIA
Para
su
segundao
desenchufe
si’mpre
Ia
maquina
ai
de
conectar
elmando
depedal
El
mando
de
pedal
le
permite
arrancar,
parar
y
control
Ia
velocidad
de
Ia
máquina.
(Tamblén
permite
arrancar,
parar
y
controlar
Ia
velocicL
del
bobinado.)
Nota:
El
botOn
de
arranque
y
parada
no
funciona
cuan
Ia
máquina
de
coser
esta
conectada
al
mando
d
pedal.
Conexión
del
mando
de
pedal
D
Apague
Ia
máquina
de
coser.
•
©
Conecte
Ia
extremidad
del
cable
del
mando
de
pedal
en
Ia
maquina
y
Ia
extremidad
®
al
mando
dE
pedal
mismo.
•
®
Cuando
se
conecta
el
mando
de
pedal
a
Ia
mãquinE
coser,
el
sImbolo
aparece
en
Ia
pantalla
LCD.
•
Este
sImbolo
desaparece
en
cuanto
se
desconecta
el
mandode
pedal.
•
B.
Utilizaciôn
del
mando
de
pedal
1.
Apoye
despacio
pisando
sobre
el
pedal.
•
2.
Cuanto
más
fuerte
pise
el
mando,
más
correrá
Ia
máquina.
•
3.
Para
parar
Ia
máquina,
suelte
el
mando
de
pedal.
•
±
Se
puede
ajustar
Ia
velocidad
maxima
del
mahdo
d
pedal
girando
el
selector
de
velocidad
de
Ia
máquin
C.
Para
guardar
el
mando
de
pedal
El
mando
de
pedal
se
guarda
en
Ia
base
del
tablero
dE
•
extension.
•
C-i
Presione
el
mando
de
pedal
con
Ia
mano
e
introduzca
las
clavijas
®
y
®
juntas
en
el
orificio
•
C-2
Enrosque
el
cable
alrededor
el
mando
de
pedal.
fl
ntrndi
i7r
cI
mndn
dc!
ndI
n
I
hse
dl
tabkr
Whe
A
*
e
3-
as-
ti
C
1C2
IT
d
a
1
ft
.p
•E
n
•1
Ii
.t
.1:
.(
Si
For
ml
intE
cot
I
•1
2.
3.
1.!
2.
3.
4.
5;
6.
7.
8.
9.
10.
11.
12.
13.
14
15

English
A.
Feed
dog
control
You
can
drop
the
feed
dog
to
stop
the
feeding
of
the
fabric.
This
can
be
used
for
embroidery
and
quilting.
Put
the
fabric
in
a
hoop.
Note:
Before
operating
the
feed
dog
control,
always
remove
the
extension
table
and
raise
the
presser
foot.
Raise
the
feed
dog
for
ordinary
sewing.
Drop
the
feed
dog
so
the
machine
will
not
feed
the
fabric.
B.
Presser
foot
pressure
adjustment
lever
•
You
can
change
the
presser
foot
pressure
with
the
position
of
the
presser
foot
pressure
lever.
•
The
lower
position
is
for
normal
fabrics.
•
For
stretch
or
light
fabrics,
raise
the
lever
to
reduce
the
presser
foot
pressure.
How
to
store
the
sewing
machine
Before
storing
the
machine,
be
sure
to:
1.
Turn
the
machine
OFF.
2.
Unplug
the
power
cord
from
the
outlet
and
the
sewing
machine.
3.
Store
the
foot
control
inside
the
accessory
box,
then
put
the
cover
on.
When
storing
the
sewing
machine:
1.
Do
not
expose
the
machine
in
a
dusty
or
highly
humid
area.
2.
Do
not
expose
the
machine
under
direct
sunlight
or
near
heating
equipment.
3.
To
prevent
the
machine
from
falling,
do
not
place
it
on
unstable
surfaces.
4.
Do
not
place
the
machine
upside-down
or
on
its
side.
5.
Do
not
expose
the
machine
near
smoke
or
steam.
When
taking
the
machine
out
of
the
storage:
1.
Remove
the
cover.
2.
Hold
the
handle
of
the
sewing
machine
with
one
hand,
Español
A.
Mando
de
ajuste
de
los
dientes
Los
dientes
pueden
bajarse
para
controlar
el
avance
de
Ia
tela.
Esta
función
se
puede
utilizar
para
bordados
y
telas
guateadas,
y
también
para
varios
espesores.
Nota:
Antes
de
utilizar
el
mando
de
ajuste
de
los
dientes,
quite
siempre
el
tablero
de
extensiOn
y
levante
el
prensatelas.
Para
los
trabajos
de
costura
corrientes,
utilice
los
dientes
en
su
posiciOn
más
elevada.
Baje
los
dientes
para
impedir
que
Ia
máquina
haga
avanzar
Ia
tela.
B.
Palanca
de
ajuste
de
Ia
presión
del
prensatelas
•
La
presiOn
ejercida
por
el
prensatelas
se
puede
ajustar
con
Ia
palanca
de
ajuste
del
prensatelas.
•
La
posición
baja
es
para
telas
normales.
•
Para
telas
elásticas
o
ligeras,
levante
Ia
palanca
para
reducir
a
presiOn
del
prensatelas.
Cômo
guardar
Ia
máquina
Cuando
vaya
a
guardar
Ia
máquina:
1.
Apague
primero
Ia
mãquina.
2.
Desconecte
el
cable
de
alimentacion
eléctrica
de
Ia
toma
de
corriente
y
de
Ia
máquina
de
coser.
3.
Coloque
el
mando
de
pedal
dentro
de
su
alojamiento
y
tape
Ia
máquina.
Nota:
Cuando
guarde
Ia
máquina
de
coser,
respete
las
siguientes
instrucciones.
1.
No
guarde
Ia
maquina
en
un
sitio
donde
haya
polvo
o
demasiada
humedad.
(Riesgo
de
averias)
2.
No
exponga
Ia
máquina
a
los
rayos
del
sol
ni
Ia
coloque
cerca
de
aparatos
que
despidan
calor.
(Riesgo
de
decoloración
y
daños)
3.
Evite
que
Ia
máquina
se
caiga
colocándola
en
una
superticie
estable.
4.
No
deje
Ia
máquina
aI
revés
o
volcada.
(Riesgo
de
averlas)
5.
No
exponga
Ia
mãquina
a
humo
o
vapor.
(Riesgo
de
averlas)
Nota:
Cuando
saque
Ia
máquina
del
lugar
en
que
estã
•gadada,
respete
las
siguientes
instrucciones.
A
B
La página se está cargando ...

English
3.
SETTING
UP
YOUR
MACHINE
Winding
bobbin
A.
Put
a
thread
spool
and
spool
cap
on
to
the
spool
pin.
*
Leave
an
opening
of
1/16”(2
mm)
between
the
thread
spool
and
spool
cap.
•
For
a
small
thread
spool,
use
small
cap
side.
•
For
a
large
thread
spool,
use
large
cap
side.
B.
Draw
thread
through
thread
guide
D,
and
bobbin
thread
guide
©.
C.
Pass
the
thread
end
through
the
hole
of
the
bobbin
as
shown.
•
Place
the
bobbin
on
to
the
bobbin
winder
shaft
so
the
groove
will
meet
the
shaft
spring.
•
Push
the
bobbin
down
and
the
bobbin
winder
shaft
will
automatically
move
to
the
right.
()
is
displayed
on
the
help
window
LCD.
D.
For
faster
bobbin
winding,
slide
the
sewing
speed
control
lever
to
the
right.
WARNING
Do
not
touch
the
bobbin
wñider
shaft
when
winding
the
bobbfri.
E.
Hold
the
thread
end.
Press
the
start
and
stop
button
and
start
the
machine.
*
When
using
the
foot
control,
step
on
the
foot
control
to
start
the
machine.
F.
After
winding
a
little,
stop
the
machine
and
cut
extra
thread
above
the
bobbin
hole
and
continue.
G.’
The
bobbin
will
stop
when
fully
wound.
•
Press
the
start
and
stop
button
and
stop
the
machine.
*
When
using
the
foot
control,
release
your
foot
from
the
foot
control.
H.
Push
the
bobbin
winder
shaft
back
to
the
left
with
your
finger.
*
You
are
not
able
to
sew
when
the
bobbin
winder
is
set
on
the
right.
I.
•
Remove
the
bobbin
from
the
shaft.
•
Cut
the
thread.
Espanol
3.
PREPARACION
DE
LA
MAQUINA
Hacer
canilla
A.
Coloque
una
bobina
de
hilo
y
el
tope
de
bobina
en
el
eje
portabobina.
*
Deje
un
espacio
de
2
mm
entre
Ia
bobina
y
el
lope.
•
Para
una
bobina
pequeña
•
Para
una
bobina
grande
B.
Pase
el hilo
por
el
guiah
lbs
y
Ia
gula
del
hilo
de
Ia
can
lila
©.
Guiahilos
®.
Gula
del
hilo
de
Ia
canilla
©.
C.
Pase
el
cabo
del
hilo
por
el
agujero
de
Ia
canilla,
como
se
muestra
en
Ia
ilustraciOn.
•
Coloque
Ia
canilla
en
el
eje
para
hacer
canilla
de
modo
que
Ia
ranura
corresponda
al
resorte
del
eje.
Empuje
Ia
canilla.
El
eje
se
desplazará
automãticamente
hacia
Ia
derecha.
•
El
sImbolo
(
)
aparecerá
en
Ia
pantalla
LCD.
D.
Para
acelerar
el
bobinado,
deslice
el
selector
de
velocidad
hacia
Ia
derecha.
ADVERTENCIA
No
toque
el
ej’para
hacercanihla
cuando
esté
bob,iando.
E.
Sujete
eI
cabo
del
hilo.
Pulse
el
botOn
de
arranque
y
parada
para
arrancar
Ia
máquina.
±
Si
utiliza
el
mando
de
pedal,
piselo
para
arrancar
Ia
máquina.
F.
Cuando
Ia
canilla
haya
dado
varias
vueltas,
pare
Ia
mãquina,
corte
el
cabo
que
sale
por
el
agujero
de
Ia
canilla
y
siga
bobinando.
G.•
La
canilla
se
para
sola
cuando
esté
completamente
bobinada.
•
Pulse
el
botOn
de
arranque
y
parada
para
parar
Ia
máquina.
±
Si
utiliza
el
mando
de
pedal,
levante
el
pie.
H.
Vuelva
a
colocar
eI
eje
en
su
sitio
empujándolo
hacia
Ia
izquierda
con
el
dedo.
4
i
Hci
cI
rIcl
lwIn
rIrrhn
n,
nodr.i
nncr
La página se está cargando ...

English
Threading
bobbin
thread
A.
•
Turn
the
machine
OFF.
Open
the
bobbin
case
cover
by
sliding
it
toward
you
and
the
bobbin
thread
cutter
will
appear.
B.
Insert
the
bobbin
into
the
bobbin
case,
making
sure
that
the
bobbin
rotates
counterclockwise.
Note:
Inserting
the
bobbin
in
the
wrong
direction
causes
irregular
thread
tension.
C.
Hold
the
bobbin
with
your
finger,
so
it
does
not
turn
as
you
pull
the
thread
under
the
bobbin
thread
tension
guide.
D.
Pull
the
thread
into
the
bobbin
thread
tension
guide
to
the
end.
E.
Pull
the
thread
through
the
bobbin
thread
cutter
and
cut
the
thread.
When
using
stretch
threads
such
as
wool,
do
not
cut
the
thread
after
threading
the
bobbin
thread
guide.
Pull
out
and
leave
about
6”(l5cm)
of
thread.
F.
Slide
the
bobbin
case
cover
back
to
its
place.
Note:
You
can
stitch
without
bringing
up
the
bobbin
thread.
Español
Enhebrar
el
hilo
de
Ia
canilla
A.
•
Apague
Ia
máquina.
Abra
Ia
tapa
de
alojamiento
de
Ia
canilla
tirando
hacia
Ud.
Vera
entonces
Ia
cuchilla
para
cortar
el
hilo
de
Ia
canilla.
B.
lntroduzca
Ia
canilla
en
su
alojamiento
procurando
que
Ia
canilla
gire
en
sentido
contrario
a
las
agujas
de
un
reloj.
Nota:
Si
se
coloca
Ia
canilla
al
revés,
Ia
tensiOn
del
hilo
serã
irregular.
C.
Tire
del
hilo
por
debajo
del
guIahilos
de
Ia
canilla.
D.
Siga
tirando
del
hilo
a
lo
largo
del
guiahilos
de
Ia
canilla
hasta
el
final.
E.
Pase
el
hilo
por
debajo
de
Ia
cuchilla
y
cOrtelo.
Cuchilla
para
cortar
el
hilo
de
Ia
canilla
*
Cuando
utilice
hilos
elásticos
como,
por
ejemplo,
Ia
lana,
no
corte
el
hilo
después
de
pasarlo
por
el
guiahIlos
de
Ia
canilla.
Sáquelo
y
deje
sueltos
unos
15cm
de
hilo.
F.
Vuelva
a
colocar
Ia
tapa
del
alojamiento
de
Ia
canilla
en
su
sitio.
Tapa
del
alojamiento
de
Ia
canilla.
Nota:
No
necesita
sacar
el
hilo
de
Ia
canilla
para
empezar
a
coser.
La página se está cargando ...

English
Upper
threading
IMPORTANT:
Turn
the
machine
OFF.
A.
Put
a
thread
spool
and
spool
cap
on
to
the
spool
pin.
•
For
a
small
thread
spool,
use
small
cap
size.
•
For
a
large
thread
spool,
use
large
cap
size.
*
Leave
a
space
of
1/16”(2
mm)
between
the
thread
spool
and
spool
cap.
B.
Press
the
needle
up
and
down
button
and
raise
the
needle
to
its
highest
position.
*
Instead
of
pressing
the
needle
up
and
down
button,
you
can
turn
the
handwheel
to
raise
the
needle
to
its
highest
position.
C.
To
thread
the
tension
disks,
ALWAYS
raise
the
presser
foot
hft.
D.
Hold
the
thread
with
one
hand,
press
the
thread
with
the
other
hand
and
thread
the
thread
guide.
Thread
the
machine
straight
down
the
express
thread
path.
E.
Pass
the
thread
through
the
needle
thread
guide.
F.
Thread
the
needle
eye
from
the
front
to
back,leaving
about
6”(l
5cm)
of
thread.
*
Needle
threading
is
easier
using
the
needle
threader
(See
page
17).
Español
Enhebrar
el
hilo
superior
IMPORTANTE:
Apague
Ia
máquina.
A.
Coloque
una
bobina
de
hilo
y
el
tope
de
bobina
en
el
eje
portabobina.
Para
una
bobina
pequena
Para
una
bobina
grande
±
Deje
uh
espacio
de
2
mm
entre
Ia
bobina
y
el
tope.
B.
Pulse
el
botOn
para
subir
y
bajar
Ia
aguja
y
suba
Ia
aguja
hasta
el
tope.
±
En
lugar
de
utilizar
este
botón,
también
puede
girar
el
volante
para
subir
Ia
aguja.
C.
Para
enhebrar
Ia
placa
de
tension,
suba
SIEMPRE
Ia
palanca
del
prensatelas.
D.
Sujete
el
cabo
del
hilo
con
una
mano,
ejerza
una
presiOn
en
el
hilo
con
Ia
otra,
y
empiece
a
enhebrar.
Enhebre
siguiendo
el
recorrido
indicado.
E.
Pase
el
hilo
por
el
guiahIlos
de
Ia
aguja.
F.
Pase
el
cabo
del
hilo
por
el
ojo
de
Ia
aguja,
de
adelante
hacia
atrás,
y
deje
unos
15cm
de
hilo
suelto.
*
Resulta
más
fãcil
enhebrar
Ia
aguja
con
el
enhebrador
(consulte
Ia
página
17).

A
B
C
D
English
How
to
use
needle
threader
Note:
•
See
“Fabric,
thread
and
needle
guide”
(page
21)
to
determine
which
thread
and
needle
to
use.
•
This
needle
threader
is
for
needles
larger
than
#75/
11.
A.
First,
make
sure
that
the
needle
thread
guide
is
threaded
correctly.
B.
Press
the
needle
up
and
down
button
and
raise
the
needle
to
its
highest
position.
Instead
of
pressing
the
needle
up
and
down
button,
you
can
turn
the
handwheel
to
raise
the
needle
to
it’s
highest
position.
C.
•
Turn
the
machine
OFF.
Raise
the
presser
foot
lift.
D.
•
Hook
the
thread
to
the
thread
guide
A.
Español
Preparaciôn
de
Ia
máquina
Cómo
se
utiliza
el
enhebrador
de
aguja
•
Nota:
•
Consulte
Ia
“Tabla
de
telas,
hilos
y
agujas”
(página
21)
para
saber
qué
hilo
y
aguja
Pu,
•
utilizar.
•
Este
enhebrador
no
se
puede
utilizar
para
Ia
ag
•
#75/11.
A.
Antes
de
enhebrar
Ia
aguja,
asegürese
de
que
E
hilo
pasa
correctamente
por
todas
las
guIas.
B.
Pulse
el
botOn
para
subir
y
bajar
Pa
aguja
y
subs
aguja
hasta
el
tope.
•
+
En
Iugar
de
utilizar
este
botOn,
también
puede
g
el
volante
para
subir
Ia
aguja.
•
C.’
Apague
Ia
máquina.
•
Suba
Ia
palanca
del
prensatelas.
D.
Pase
el
hilo
por
el
gancho
A.

E
F
English
E.
Pass
the
thread
under
the
thread
guide
B.
F.
Put
the
thread
into
the
slit
of
the
thread
guide
C.
Pull
out
about
4”(lO
cm)
of
the
thread.
G.
Press
down
the
needle
threader
lever
slowly,
so
that
the
guide
will
rotate
and
the
hook
will
pass
through
the
needle
eye.
H.
Slowly
return
the
lever
and
the
needle
will
be
threaded
automatically.
Pull
out
thread
toward
the
back
of
the
machine
under
the
presser
foot
leaving
6”(l
5
cm)
of
the
thread.
I.
If
threading
the
needle
eye
was
unsuccessful,
use
the
needle
threader
again.
Español
E.
Pase
el
hilo
por
debajo
del
guiahIlos
B.
F.
Pase
el
hilo
por
Ia
ranura
del
guiahflos
C.
Deje
sobrepasar
unos
10
cm
de
hilo.
G.
Baje
despacio
Ia
palanca
del
enhebrador
para
girar
•
Ia
guIa
e
introducir
el
gancho
en
el
ojo
de
Ia
aguja.
*
Para
poder
enhebrar
Ia
aguja,
se
debe
introducir
•
siempre
el
gancho
en
el
ojo
de
Ia
aguja.
*
Si
el
gancho
estã
doblado
y
no
entra
en
el
ojo
de
Ia
•
aguja,
utilice
el
destornillador
para
enderezarlo.
H.
Suba
despaclo
Ia
palanca.
La
aguja
se
enhebrará
automáticamente.
•
Tire
del
hilo
hacia
Ia
parte
de
atrás
de
Ia
máquina,
pasándolo
por
debajo
del
prensatelas,
y
deje
libre
•
uncabodel5cm.
I.
Si
no
se
ha
enhebrado
Ia
aguja,
vuelva
a
pasar
el
•
hilo
por
Ia
gula
e
intente
de
nuevo
enhebrar
Ia
aguja
con
el
enhebrador.
G
H
I

A
B
______________
English
___________
Changing
the
presser
foot
IMPORTANT
Ensure
the
presser
foot
is
secure4’
held
by
the
presser
foot
holder
Removing
the
presser
foot
A.
Turn
the
machine
OFF.
Turn
the
handwheel
toward
you
and
raise
the
needle.
Also
raise
the
presser
foot
lift.
B.
Push
the
button
of
presser
foot
holder
and
the
foot
will
come
off.
Attaching
the
presser
foot
C.
Position
a
new
foot
under
the
presser
foot
holder
with
the
pin
right
beneath
the
groove
of
the
holder.
D.
Lower
the
presser
foot
lift
slowly
so
that
the
presser
foot
holder
catches
the
foot.
Español
Reemplazo
del
prensatelas
•
ADVERTENCIA
Para
evh’arher/das,
asegUrese
de
que
elprensatela:
esti
correctamente
sujeto
en
su
soporte.
•
Desmontaje
del
prensatelas
A.
Apague
Ia
máquina.
Gire
el
volante
hacia
Ud.
para
levantar
Ia
aguja.
Suba
Ia
palanca
del
prensatelas.
B.
Pulse
el
botOn
del
soporte
del
prensatelas
para
qi
se
suelte
el
prensatelas.
Instalación
del
prensatelas
C.
Coloque
un
prensatelas
nuevo
debajo
del
soporte
procurando
que
Ia
varilla
del
prenstatelas
quede
debajo
de
Ia
ranura
del
soporte.
D.
Baje
Ia
palanca
del
prensatelas
despacio
hasta
qi
se
junten
el
prensatelas
y
su
soporte.
C
D

English
Changing
the
needle
IMPORTANT
After
changing
the
needle
always
make
sure
the
needle
c/amp
screw
ic
ti’ghtened
hrmv
Do
not
use
bent
needle.
A.•
Turn
the
machine
OFF.
•
Bring
the
needle
to
its
highest
position.
•
Loosen
the
needle
clamp
screw
with
a
screw
driver
and
remove
the
needle.
B.
Insert
a
new
needle
with
the
flat
side
away
from
you
and
push
it
up
until
it
reaches
the
stopper
®.
Tighten
the
needle
clamp
screw
firmly.
How
to
select
a
correct
needle
*
Bent
or
dull
needles
will
cause
skipped
stitches
and
thread
breakage.
c-i.
o
Correct
needle
X
Defective
needle
C-2.
0
Correct
needle
X
Dull
needle
X
Bent
needle
Espanol
Reempiazo
de
Ia
aguja
ADVERTENCIA
Antes
de
reemp/azar
Ia
aguj
asegürese
de
que
el
tornillo
de/sopo#e
de
Ia
agu4’
esti
bin
apretado.
No
utllh2e
agujs
torcidas.
A.•
Apague
Ia
máquina.
•
Suba
Ia
aguja
al
máximo.
•
Suelte
el
tornillo
del
soporte
de
Ia
aguja
con
un
destornillador
y
quite
Ia
aguja.
B.
Tornillo
del
soporte
de
Ia
aguja
lntroduzca
Ia
aguja
nueva
con
el
lado
piano
dirigido
hacia
Ud.
Empuje
luego
Ia
aguja
hacia
arriba
hasta
que
toque
el
tope
Apriete
bien
el
tornillo
del
soporte
de
Ia
aguja.
Seleccionar
Ia
aguja
correcta
*
Las
agujas
torcidas
o
con
Ia
punta
mal
afilada
estropean
Ia
tela
y
pueden
romper
el
hilo.
C-i.
0
Aguja
adecuada
X
Aguja
defectuosa
C-2.
0
Aguja
adecuada
X
Punta
mal
afilada
X
Aguja
torcida
A
C
c-i
0
B
C-2
Occ::I:::

English
Fabric,
thread
and
needle
table
For
precise
stitches
refer
to
the
table
below:
Fabtie
Needle
size
Thread
size
Cotton
60
-
1
Light
Sheer
fabric
Standard
needle
Silk
50-8
weight
Lawn,
Georgette
#75/11
Synthetic
60
-
8
Gingham,
Woolen
fabric,
Velvet,
Satin,
Standard
needle
Cotton
60
—
1
Medium
.
Poplin,
Soft
denim,
Cotton
gabardine,
#75/11
#90/14
Silk
50
-
8
weight
Medium
weight
cloth
Synthetic
60
8
Cotton
40—5
Heavy
Tweed,
Denim
Standard
needle
Silk
50
weight
Canvas,
Corduroy
#100/16
Synthetic
30
—
5
Stretch
Knit,
Jersey
Ballpoint
needle
#1
1
Synthetic
50
6
Note:
•
Same
size
and
type
of
threads
should
be
used
for
upper
thread
and
bobbin.
•
Use
Ballpoint
needles
for
stretch
fabric.
•
Use
Denim
needle
for
thick
fabric
or
denim.
•
The
needle
becomes
thicker
as
the
needle
size
number
becomes
larger.
•
The
thread
becomes
thinner
as
the
thread
size
number
becomes
larger.
Español
Tabla
de
telas,
hilos
y
agujas
Para
mejorar
Ia
calidad
de
las
puntadas,
consulte
Ia
siguiente
tabla:
•
Tela
Tamaño
de
Ia
aguja
Grosor
del
hilo
AlgodOn
(de
60
a
1
Ligera
Linón,
crespOn
Aguja
estãndar
Seda
(de
50
a
80)
#75/11
Sintético
(de
60
a
Guinga,
lana,
terciopelo,
raso,
AlgodOn
(de
60
a
1
Peso
popelina,
tejano
ligero,
gabardina
de
Aguja
estándar
Seda
(de
50
a
80)
#75/11
a
#90/14
medio
algodOn,
telas
de
peso
medio
Sintético
(de
60
a
Pesada
Tweed,
tejano,
tapicerla,
pana
Aguja
estandar
AlgodOn
(de
40
a
E
#100/16
Seda
(de
50)
Sintético
(de
30
a
Elástica
Punto
Aguja
de
punta
redonda
#11
Sintético
(de
50
a
Nota:
•
El
hilo
superior
y
el
hilo
de
Ia
canilla
han
de
ser
de
mismo
grosor
y
tipo.
•
Utilice
agujas
de
punta
redonda
para
las
telas
elásticas.
•
Utilice
agujas
“Denim”
para
coser
telas
gruesas,
tejanos,
cortinas
o
galones.
•
El
grosor
de
las
agujas
aumenta
con
su
tamano.
•
Cuanto
mayor
sea
el
numero
de
hilo,
más
fino
será
éste.

English
4.
SEWING
Straight
stitch
A/ways
use
correct
presser
foot
for
the
stitch
pattern.
A.
Attach
the
zigzag
foot.
B.
Set
the
stitch
width
at
“0”.
When
the
stitch
width
is
not
set
at
“0”,
the
stitch
will
zigzag.
C.
Turn
the
stitch
selection
dial
and
select
straight
stitch
(Stitch
No.2).
D.
Set
the
stitch
length
between
“1”
and
“4”.
E.
Set
the
thread
tension
dial
at
“4”.
•
Insert
the
fabric
under
the
foot.
Lower
the
needle
by
pressing
the
needle
up
and
down
button.
•
Lower
the
presser
foot
lift.
•
Press
the
start
and
stop
button
and
start
sewing.
W
When
using
the
foot
control,
step
on
the
foot
control
to
start
the
machine.
±
The
first
2
or
3
stiches
will
start
slowly.
Removing
the
fabric
F.
Press
the
start
and
stop
button
and
stop
the
ma
chine.
*
When
using
the
foot
control,
release
the
foot
control.
G.
Raise
the
presser
foot
lift
and
gently
pull
the
fabric
to
the
left.
H.
Cut
excess
thread
with
the
thread
cutter.
Punto
recto
•
ADVERTENCIA
Utth’e
si’mpre
tin
prensate/as
adecuado
a!
tipo
d6
punto.
A.
Coloque
un
prensatelas
para
costuras
en
zigzaç
Prensatelas
para
costuras
en
zigzag
•
B.
Coloque
el
selector
de
anchura
de
puntada
en
I
posiciOn
‘0”.
•
±
Cuando
el
selector
de
anchura
de
puntada
se
encuentra
en
otra
posiciOn
que
el
“0”,
Ia
máquir
•
cose
en
zigzag.
C.
Gire
el
selector
de
punto
para
seleccionar
el
pu
•
recto
(n°2).
D.
Coloque
eI
selector
de
longitud
de
puntada
enti
1
y
el
I4h1
E.
Coloque
el
selector
de
tension
del
hilo
en
Ia
posick
Coloque
Ia
tela
debajo
del
prensatelas.
Baje
Ia
•
con
el
botón
de
subida
y
bajada
de
Ia
aguja.
•
Baje
Ia
palanca
del
prensatelas.
•
•
Pulse
el
botón
de
arranque
y
parada,
y
empiec
coser.
•
±
Si
utiliza
el
mando
de
pedal,
pIselo
para
arranc
máquina.
•
±
Las
2
O
3
primeras
puntadas
se
hacen
muy
despacio.
Para
sacar
Ia
tela
F.
Pulse
el
botOn
de
arranque
y
parada
para
parE
máquina.
±
Si
utiliza
el
mando
de
pedal,
levante
el
pie.
-
.
_I__i
—•--———n+t•dnn
I,
4.COSTURA
Espanol

A
B
Dj
©
C
0
x
x
H
r r
r
—II
II
--
-
F=RJFRT
.
—
©
English
Reverse
stitch
To
reinforce
the
seam,
it
is
recommended
to
begin
or
end
seams
with
several
stitches
in
reverse.
A
•
Mark
the
point
of
reverse
stitching
as
shown
in
the
illustration.
Place
the
fabric
under
the
foot
so
that
the
needle
pierces
the
fabric
at
the beginning
of
reverse
stitch.
Lower
the
presser
foot
lift.
Reverse
stitch
©
Forward
stitch
©
Reverse
stitch
B
•
Press
down
the
reverse
stitch
lever
®
and
start
sewing
backward.
The
sewing
speed
will
be
between
90
—150
r.p.m.
Adjust
the
speed
with
the
speed
control
lever®.
Release
the
lever
to
stop
sewing.
C.
Adjusting
thread
tension
A
balanced
stitch
is
formed
when
the
tensions
of
both
upper
and
bobbin
threads
are
even
and
locked
in
the
middle
of
the layers.
Set
tension
dial
at
“4”
for
normal
sewing.
When
you
have
irregular
stitches
Top
stitch
is
too
tight
This
means
the
upper
thread
tension
is
too
tight.
Reduce
the
tension
by
turning
the
dial
to
a
smaller
number.
©
:
This
means
the
upper
thread
tension
is
too
loose.
Increase
the
tension
by
turning
the
dial
to
a
larger
number.
Espanol
Inversion
de
puntada
Para
reforzar
Ia
costura,
se
recomienda
empezar
y
acabar
las
costuras
haciendo
varios
puntos
en
sentido
inverso.
A
•
Marque
el
punto
donde
ha de
invertirse
Ia
puntada.
Coloque
Ia
tela
debajo
del
prensatelas
e
introduzca
Ia
aguja
en
Ia
tela
en
el
punto
donde
vaya
a
empezar
a
invertir
Ia
puntada.
Baje
Ia
palanca
del
prensatelas.
Puntada
invertida
©
Puntada
en
el
sentido
de
Ia
costura
©
Puntada
invertida
B.
Baje
Ia
palanca
de
inversiOn
de
Ia
puntada
®
y
empiece
a
coser
al
revés.
La
velocidad
de
cosido
se
sitüa
entre
90
y
150
rpm.
Ajuste
Ia
velocidad
con
el
selector
de velocidad
®.
Para
parar
de
coser,
suelte
Ia
palanca.
C.
Ajuste
de
Ia
tension
del
hilo
®:
La
puntada
queda
equilibrada
cuando
Ia
tensiOn
del
hilo
superior
y
Ia
del
hilo
de
Ia
bobina
son
iguales
y
que
los
hilos
se
juntan
en
el
medio
de
las
capas.
Coloque
el
selector
de
tensiOn
en
Ia
posicion
“4”
para
las
costuras
normales.
Puntadas
irregulares
:
Puntada
demasiado
apretada
Esto
significa
que
el hilo
superior
estã
demasiado
tenso.
Reduzca
Ia
tensiOn
seleccionando
un
nümero
inferior.
©:
Puntada
demasiado
floja
Esto
significa
que
el
hilo
superior
está
demasiado
flojo.
Aumente
Ia
tensiOn
seleccionando
un
numero
mayor.
La página se está cargando ...

English
Zigzag
stitch
For
neater
finishes,
slightly
reduce
the
upper
thread
tension.
Basic
zigzag
sewing
A.
Attach
the
zigzag
foot.
B.
Set
the
stitch
width
between
“3”
and
“6”.
C.
Turn
the
stitch
selection
dial
and
select
zigzag
stitch
(Stitch
No.2).
D.
Set
the
stitch
length
between
“Q.5”
and
“4”.
E.
Slightly
reduce
the
thread
tension.
Adjusting
thread
tension
F.
Bobbin
thread
appears
on
the
right
side.
Reduce
the
tension
by
turning
the
dial
to
a
smaller
number.
G.Upper
thread
appears
on
the
wrong
side.
Increase
the
tension
by
turning
the
dial
to
a
larger
number.
Español
Costura
en
zigzag
Para
obtener
un
mejor
resultado,
afloje
Ia
tensiOn
del
hilo
superior.
Costura
básica
en
zigzag
A.
Coloque
un
prensatelas
para
costuras
en
zigzag
Prensatelas
para
costuras
en
zigzag
B.
Coloque
el
selector
de
anchura
de
puntada
entre
el
“3”
y
el
“6”.
C.
Gire
el
selector
de
punto
para
seleccionar
el
punto
en
zigzag
(n°2).
D.
Coloque
el
selector
de
longitud
de
puntada
entre
el
“0,5”
y
el
“4”.
E.
Afloje
ligeramente
Ia
tensiOn
del
hilo
Ajuste
de
Ia
tension
del
hilo
F.
El
hilo
de
Ia
canilla
aparece
por
el
lado
derecho.
Reduzca
Ia
tensiOn
seleccionando
un
nümero
inferior.
G.El
hilo
superior
aparece
por
el
revés.
Aumente
Ia
tensiOn
seleccionando
un
nümero
mayor.

I
Enghsh
Overcasting
loot
Overcasting
prevents
fabric
edges
from
fraying.
1.
Refer
to
the
following
table
and
select
the
appropriate
stitch
pattern
and
the
foot
for
the
fabric
you
are
sewing.
*
Always
set
the
stitch
width
to
“5”
when
using
the
overcasting
foot.
Fabric
Stitch
#
Stitch
width
Sttitch
length
Presser
foot
Needla
Light
Standard
needle
b
55
46
1-2
#75/11
.
weight
Zigzag
foot
Medium
Standard
needle
weight
2
5
1
Ballpoint
needle
(Elastic)
#75/11
#9O/14
Overcasting
foot
Heavy
Standard
needle
weight
19
Ballpoint
needle
(Elastic)
#90/14
—
#100/16
Espan&
Prensatelas
para
sobrehilar
El
sobrehilado
evita
que
Ia
tela
se
deshilache.
1.
Consulte
Ia
siguiente
tabla
para
seleccionar
el
tipo
de
puntada
y
el
prensatelas
que
mejor
correspondan
a
Ia
tela
que
vaya
a
coser.
El
ancho
de
Ia
puntada
ha
de
ser
siempre
“5”
cuando
se
usa
el
prensatelas
para
sobrehilar.
Prensatelas
Aguja
Tela
Puntada
#
punfda
puntada
Ancho
de
Ia
Longitud
tie
Ia
%
?
Ligera
5
5
4
6
1
2
Prensatelas
para
Aguja
estándar
#75/11
costuras
en
zigzag
Peso
medio
2
5
1
—
4
Aguja
de
punta
redonda
(tel
elástica)
#75/11
—#90/14
Prensatelas
para
hIar
Aguja
de
punta
redonda
Pesada
19
sobre
(tela
elástica)
#90/14
—#100/16

2
English
2.
•
Turn
the
handwheel
until
the
needle
moves
to
the
right.
Place
the
fabric
so
that
needle
pierces
just
outside
the
edge.
•
Lower
the
needle.
•
Lower
the
presser
foot
lift
and
start
sewing.
When
using
the
overcasting
foot,
make
sure
that
the
foot
guide
is
at
the
right
edge
of
the
fabric.
Appliqué
A..
Draw
a
design
on
the
material
for
the
appliqué
and
cut
it
out.
•
Place
the
cut-out
on
the
base
fabric
and
baste
or
pin
it.
B.
Sew
around
the
edge
of
cut-out
with
zigzag
stitch.
!€
Use
the
stitch
width
of
‘3”
or
“4”
and
the
stitch
length
between
“0.5”
and
“2”
according
to
the
shape
and
size
of
the
appliqué
and
fabric
type.
To
change
direction
at
corners
or
to
sew
very
small
circles,
stop
the
machine
with
the
needle
piercing
outside
the
edge,
raise
the
presser
foot
lever
and
turn
the
fabric.
Espanol
2.
•
Gire
el
volante
hasta
que
Ia
aguja
se
desplace
hacia
Ia
derecha.
Coloque
Ia
tela
de
modo
que
Ia
aguja
quede
ligeramente
fuera
del
borde
de
Ia
tela.
•
Baje
Ia
aguja.
•
Baje
Ia
palanca
del
prensatelas
y
empiece
a
coser.
Cuando
cosa
con
el
prensatelas
para
sobrehilar,
procure
que
Ia
guIa
del
prensatelas
quede
pegada
al
borde
de
Ia
tela.
Parches
A.
•
Haga
el
dibujo
del
parche
en
Ia
tela
y
recôrtelo.
•
Coloque
el
dIbujo
sobre
Ia
tela
y
fijelo
con
un
hilvan
o
con
alfileres.
B.
Sobrehile
los
bordes
del
parche.
*
La
anchura
de
Ia
puntada
ha
de
ser
de
“3”
O
“4”
y
Ia
longitud
de
Ia
puntada
ha
de
situarse
entre
“0,5”
y
“2”,
segün
Ia
forma
y
el
tamaño
del
parche
y
de
Ia
tela
de
base.
*
Para
cambiar
de
direcciOn
en
las
esquinas
o
para
hacer
pequeños
cIrcuios,
pare
Ia
máquina
con
Ia
aguja
fuera
del
borde
del
parche,
suba
Ia
palanca
del
prensatelas
y
dé
vuelta
a
Ia
tela.
A
B

A
B
C
English
Blind
hem
toot
The
thread
will
not
appear
on
the
right
side
of
the
fabric.
A.
Attach
the
blind
hem
foot.
B.
Turn
the
sitich
selection
dial
and
select
blind
hem
stitch
(Stitch
No.4
or
6).
Set
the
stitch
width
between
“4”
and
“6”
and
the
stitch
length
between
“1”
and
“2”
C.
•
Fold
the
fabric
as
shown
in
the
illustration.
•
Baste
or
press
the
fold
before
sewing.
D.
Place
the
fabric
so
the
zigzag
catches
one
or
two
threads
of
the
folded
edge.
E.
•
Lower
the
presser
foot
lift.
•
Adjust
with
the
adjustment
screw
so
that
the
foot
guide
moves
along
the
fold.
Correct
hem
X-Y
®:
When
the
fabric
is
opened,
the
right
side
of
the
fabric
will
show
only
the
blind
hem
stitches.
Incorrect
hems
X-Y
:
The
needle
is
catching
the
edge
of
the
fold
too
much.
Stitches
on
the
right
side
are
too
big.
X-Y
©
:
The
needle
is
not
catching
the
edge
of
the
fold
at
all.
Blind
hem
stitches
are
not
formed.
xJjJjLj
L(
HL<
Español
Prensatelas
para
costuras
invisibles
El
punto
invisible
de
dobladillo
permite
coser
dobladillos
quedando
el
hilo
casi
invisible
en
Ia
te
el
color
del
hilo
corresponde
al
de
Ia
tela).
A.
Coloque
un
prensatelas
para
costuras
de
dobk
invisibles
Prensatelas
para
costuras
de
dobladillo
invisibl
B.
Gire
el
selector
de
punto
para
seleccionar
el
pi.
invisible
de
dobladillo
(n°4
o
6).
Seleccione
un
anchura
de
puntada
entre
“4”
y
“6”
y
una
longit
puntada
de
“1”
o
“2”.
C.
•
Doble
Ia
tela
como
se
muestra
en
Ia
ilustració
•
Hilvane
o
presione
el
pliegue
antes
de
coser.
D.
Coloque
Ia
tela
de
modo
que
el
zigzag
vaya
cogiendo
uno
o
dos
hilos
en
el
borde
del
pliegL
E.
•
Baje
Ia
palanca
del
prensatelas.
•
Ajuste
Ia
gula
del
prensatetas
con
el
tornillo
d
ajuste
para
que
vaya
pegada
al
pliegue.
Costura
correcta
X-Y
®:
Cuando
se
abre
Ia
tela,
sOlo
aparecen
puntadas
invisibles
por
el
laclo
derecho
d
tela.
Costuras
incorrectas
X-Y
:
La
puntada
del
lado
derecho
de
Ia
tela
es
demasiado
ancha.
X-Y
©:
No
se
ha
hecho
el
dobladillo
x
#6
1
E’?
D
E
l/8(3—5mm)
ox
F
x
©

A
B
C
buttonhole
that
matches
the
D
J
English
Español
Buttonhole
foot
You
are
able
to
stitch
a
size
of
a
button.
Note:
•
This
toot
is
not
able
to
sew
a
buttonhole
for
a
button
larger
than
1
“(2.7
cm)
in
diameter.
You
cannot
use
thick
buttons
or
buttons
with
unique
shapes.
•
When
stitching
stretch
or
light
weight
fabric,
it
is
recommended
to
use
a
stabilizer
for
better
finishes.
A.
Attach
the
buttonhole
foot.
B.
Turn
the
stitch
selection
dial
and
select
buttonhole
stitch
(Stitch
No.1).
Set
the
stitch
length
between
“0.4”
and
“0.6”.
Set
the
stitch
width
between
“4”
and
“5”.
C.
Mark
the
buttonhole
position
on
the
fabric
as
illus
trated.
D.
Starting
position
•
Place
a
button
on
the
button
plate
®.
•
Insert
the
fabric
so that
the
marked
position
is
under
the
needle.
•
Lower
the
presser
foot
lift.
•
Draw
the
upper
thread
and
place
it
under
the
buttonhole
foot
with
the
bobbin
thread.
Prensatelas
para
ojales
Se
pueden
hacer
ojales
que
correspondan
al
támano
de
los
botones.
Nota:
•
Con
esta
máquina
no
se pueden
hacer
ojales
de
mas
de
2.7
cm
de
diámetro.
No
se
pueden
utilizar
botones
redondos,
gruesos
o
de
forma
especial.
•
Si
Ia
tela
es
elãstica
o
ligera,
conviene
colocar
un
estabilizador
para
obtener
un
resultado
más
bonito.
A.
Coloque
un
prensatelas
para
ojales.
Prensatelas
para
ojales
B.
Gire
el
selector
de
punto
para
seleccionar
el
ojal
(n01).
La
longitud
de
Ia
puntada
ha
de
situarse
entre
“0.4”
y
“0.6”.
La
anchura
de
Ia
puntada
debe
ser
de
“4”
o
“5”.
C.
Marque
Ia
posición
de
los
ojales
en
Ia
tela,
como
se
muestra
en
Ia
ilustraciOn.
D.
Posicion
inicial
•
Coloque
el
botOn
en
el
alojamiento
©.
•
Coloque
Ia
tela
procurando
que
Ia
marca
del
ojal
quede
debajo
de
Ia
aguja.
•
Baje
Ia
palanca
del
prensatelas.
•
Tire
del
hilo
superior
y
páselo
por
debajo
del
prensatelas,
con
el
hilo
de
Ia
canilla.
Prensatelas
para
ojales

E
F
___
3
II
English
E.
•
Pull
down
the
buttonhole
lever
,
and
push
the
lever
to
the
back
until
Lclicks,
Press
the
start
and
stop
button
to
start
sewing.
*
When
using
the
foot
control,
step
on
the
foot
control
to
start
the
machine.
F.
•
The
buttonhole
sewing
is
complete
in
the
order
of
‘3)
as
shown.
•
Stop
the
machine
when
the
needle
returns
to
the
starting
position..
*
When
using
the
foot
control,
release
your
foot
from
the
foot
control.
•
Raise
the
presser
foot
lift
and
remove
the
fabric.
G.
•
For
reinforcement,
pull
out
the
upper
thread
from
the
wrong
side
by
pulling
the
bobbin
thread
and
tie
a
knot
WARNING
To
prevent
injury,
do
not
hold
the
buttonhole
cutter
against
your
hand,
H.
With
a
buttonhole
cutter,
carefully
cut
an
opening
in
the
middle of
the
buttonhole.
*
To
prevent
over
cutting,
place
a
pin
through
the
bartacks.
__________________
Español
E.
Baje
Ia
palanca
@
del
ojal
y
emp(4ela
hada
atn
hasta
que
haga
dic.
•
Pulse
el
botôn
tie
arranque
y
parada,
y
empiec
coser,.
*
Si
utiliza
el
mando
do
pedal.
piselo
para
arranc
máquina.
F•
El
ojal
se
coseen
at
ordena,
•
Pare
Ia
mãquina
cuando
Ia
aguja
llegue
ala
posij
inicial.
*
Si
utiliza
el
mando
tie
pedal,
levante
at
pie.
•
Levante
Ia
palanca
del
prensatelas
y
saque
la
tela.
I
G.
•
Para
reforzar
at
ojat,
saque
at
hilo
supeior
pod
revés
de
Is
tela,
tirando
del
hUe
de
Ia
eanilla,
haga
tin
iludo.
ADVERTENCIA
Para
evitar
heridas,
mantenga
at
abreojales
ale
su
mano,
H.
Abra
el ojal
por
el
medlo
con
el
abreojales.
*
Ponga
un
alfiler
a
cads
extremo
pars
no
cortar
de
Ia
cuenta,
G
H

Unsuccessful
buttonhole
sewing
It
the
buttonhole
sewing
is
unsuccessful,
follow
the
instructions
below
before
starting
to
sew
the
next
buttonhole.
A..
If
the
sewing
was
unsuccessful
at
the
positions
CD
1
Raise
the
buttonhole
lever
up.
2
Raise
the
buttonhole
foot
and
gently
pull
out
the
fabric.
3
Undo
all
the
threads
(use
the
buttonhole
cutter).
4
Remove
the
thread
from
the
needle
eye
and
turn
the
handwheel
toward
you
for
ten
times.
5
Sew
a
new
buttonhole
from
the
beginning.
B..
If
the
sewing
was
unsuccessful
at
the
positions
®
1
Raise
the
buttonhole
foot
and
gently
pull
out
the
fabric.
2
Undo
all
the
threads
(use
the
buttonhole
cutter).
3
Sew
a
new
buttonhole
from
the
beginning.
Adjusting
the
stitch
balance
C.
Occasionally,
the
left
and
right
buttonhole
columns
may
need
to
be
balanced
on
specialty
fabric.
In
such
case,
adjust
the
stitch
balance
by
turning
the
button
hole
stitch
adjuster
®
on
the
back
of
the
machine.
Use
a
coin
or
a
screwdriver
to
turn
the
buttonhole
adjuster.
D.
•
If
the
right
side
of
the
buttonhole
is
too
dense,
turn
the
buttonhole
adjuster
to
the
direction.
E.
•
If
the
left
side
of
the
buttonhole
is
too
dense,
turn
the
buttonhole
adjuster
to
the
direction.
Si
los
ojales
están
mal
hechos,
tome
las
medidas
siguientes
antes
de
pasar
a
otro
ojal.
A..
Si
salen
mal
los
lados
CD
y
®
1
Levante
Ia
palanca
para
ojales.
2
Levante
el
prensatelas
y
saque
Ia
tela.
3
Deshaga
toda
Ia
costura.
(Utilice
para
ello
el
abreojales)
4
Saque
eI
hilo
de
Ia
aguja
y
haga
10
puntadas.
5
Vuelva
a
hacer
el
ojal.
B.•
Si
salen
mal
los
lados
®
y
1
Levante
el
prensatelas
y
saque
Ia
tela.
2
Deshaga
toda
Ia
costura.
(Utilice
para
ello
el
abreojales)
3
Vuelva
a
hacer
el
ojal.
Ajuste
de
Ia
puntada
C.
Con
ciertos
tipos
de
tela,
es
a
veces
necesario
ajustar
los
lados
derecho
e
izquierdo
de
los
ojales.
Para
ello,
gire
el
mando
de
ajuste
de
Ia
puntada
de
los
ojales
®,
situado
en
Ia
parte
de
atrás
de
Ia
máquina.
Utilice
una
moneda
o
un
destornillador
para
girar
el
mando.
D.
•
Si
las
puntadas
del
lado
derecho
del
botOn
están
demasiado
separadas,
gire
el
mando
de
ajuste
de
Ia
puntada
en
Ia
direcciOn
.
E.
•
Si
las
puntadas
del
lado
derecho
del
botOn
están
demasiado
juntas,
gire
el
mando
de
ajuste
de
Ia
puntada
en
Ia
direcclón
+.
A
B
©
C
D
E
I
4
4
English
I
Ojales
mal
hechos
Español

B
C
Engtish
Zipper
foot
By
using
the
zipper
foot.
zipper
sewing
can
be
easily
accomplished.
First
sew
the
left
side
of
the
zipper.
A.
Attach
the
zipper
foot
so
that
the
presser
foot
holder
catches
right
side
of
the
pin
®.
B.
Turn
the
stitch
selection
dial
and
select
straight
stitch
(Stitch
No2).
Set
the
stitch
width
to
and
thestitch
length
between
and
3”.
C.
Baste
the
zipper
and
fabric
together
as
illustrated.
D.
Place
the
fabric
so
that
the
zipper
is
on
the
right
side
of
the
foot.
E.
•
Lower
the
presser
foot
lift,
•
Sew
until
the
foot
slightly
touches
the
slider
and
stops
the
machine.
F.
•
Lower
the
needle.
Raise
the
presser
foot
lifter.
•
Turn
the
fabric
and
move
the
slider
behind
the
presser
foot.
Lower
the
presser
foot
and
sew
to
the end.
G.
‘
Remove
the
foot
and
attach
to
the
left
side
of
the
presser
foot
pin
@,
•
Sew
the
right
side
of
the
zipper
following
the
same
stepsD—R
*
Sewing
toward
same
direction
will
eliminate
uneven
finishes.
Español
_________
Prensatelas
para
cremalleras
Las
cremalleras
se
cosen
facilmente
con
el
prensatelas
para
cremalIeras
Cosa
primero
el
lado
izquierdo
de
Ia
cremallera.
A.
lnstal
el
prensatelas
para
cremalleras
procuran
que
el
soporte
de
este
quede
sujeto
a
Ia
varilla
di
derecha
®.
B.
Gire
el
selector
de
punto
para
seleccionar
el
punt
recto
(n°2).
Seleccione
una
anchura
de
puntada
1
y
una
longitud
de
puntada
de
6
C.
Coloque
Ia
tela
sobre
Ia
cremallera
e
hilvánelas.
0.
Coloque
Ia
tela
debajo
del
prensatelas,
con
Ia
cremallera
del
lade
derecho
de
éste.
E.
•
Baje
Ia
palanca.
del
prensatelas.
•
Cosa
hasta
que
el
prensatelas
toque
ligerament
el
cursor
y
pare
Ia
maquina.
F.
•
Baje
Ia
aguja.
Suba
Ia
palanca
del
prensatelas.
•
Gire Is
tela
pars
colocar
el
cursor
deträs
del
prensatelas.
Baje
el
prensatelas
y
siga
cosiendo
hasta
elfin
G.
‘
Suelte
el
prensatelas
y
sujete
el
soporte
del
prensatelas
a
Ia
varilla
de
Ia
izquierda
del
prensatelas
.
•
Cosa
el
lado
derecho
de
Ia
cremallera
como
se
indica
en
los
puntos
D
a
F.
*
Cosiendo
en
la
misrna
dirección
se
mejora
51
resultado
evitando
costuras
desiguales.
A
D
*
j1LI
—
ir1
I
E
F
0
4

A
B
English
Stretch
stitch
Stretch
stitch
is
particularly
suitable
for
reinforcing
the
seam
or
for
sewing
stretch
fabric.
When
sewing
stretch
fabric
such
as
jersey,
it
is
recommended
to
use
ballpoint
needles
for
neater
seams.
A.
Attach
the
zigzag
foot.
B.
Set
the
stitch
width
and
the
stitch
length
as
shown
on
the
help
window
LCD.
C.
Turn
the
sitich
selection
dial
and
select
stretch
stitch
(No.20).
D.
Set
the
stitch
length
at
“4”.
E.
•
Insert
the
fabric
under
the
foot.
•
Lower
the
needle.
•
Lower
the
presser
foot
lift
and
start
the
machine.
Punto
elástico
El
punto
elástico
conviene
especialmente
para
reforzar
costuras
o
coser
telas
elásticas.
Para
coser
telas
elásticas
como
el
punto,
se
•
recomiencla
utilizar
agujas
de
punta
redonda
para
obtener
costuras
más
limpias.
A.
Coloque
un
prensatelas
para
costuras
en
zigzag
Prensatelas
para
costuras
en
zigzag.
B.
Seleccione
Ia
anchura
y
Ia
longitud
de
puntada
•
indicadas
en
Ia
pantalla
LCD.
C.
Gire
el
selector
de
punto
para
seleccionar
el
punto
•
elástico
(n°20).
D.
Coloque
el
selector
de
longitud
de
puntada
en
Ia
posiciOn
“4”.
E.
•
Coloque
Ia
tela
debajo
del
prensatelas.
•
•
Baje
Ia
aguja.
Baje
Ia
palanca
del
prensatelas
y
empiece
a
•
coser.
C
D
E
#eLi
Ii
‘1
—
I
HP
Español
La página se está cargando ...
La página se está cargando ...
La página se está cargando ...
La página se está cargando ...
La página se está cargando ...
La página se está cargando ...
La página se está cargando ...

Español
5.
ACOLCHANDO
Porpieza:
El
primer
paso
para
hacer
una
coicha
es
cortar
las
piezas
de
Ta
parte
superior
de
Ia
coicha.
Coloque
el
prensatelas
para
1/4”
de
costura.
Seleccione
Ta
Puntada
Recta
#2,
Largo
de
Puntada
2.
Gula
Ta
orilla
de
las
piezas
a
Ia
par
con
Ia
orilla
del
prensatelas.
Una
vez
que
ha
quedado
unida
Ia
parte
superior
de
Ia
coicha
con
Ta
guata
y
Ia
parte
de
atrás,
está
listo
para
acolcharlo.
Acoichado
libre:
Baje
los
dientes
de
Ia
máquina.
Deslice
el
Control
de
los
Dientes
de
leva
hacia
Ia
izquierda.
Utilice
el
Prensatelas
de
Zurcido
(Stippling/Darning).
Enhebre
arriba
y
Ia
canilla
con
hilo
de
costura.
Seleccione
Ia
Puntada
Recta
#
2.
La
longitud
de
Ia
puntada
no
importa
porque
los
dientes
de
leva
están
abajo.
Coloque
Ia
coicha
debajo
del
prensatelas.
Asegürese
de
bajar
el
Prénsatelas
para
lograr
tensiOn
en
(a
parte
superior.
Coloque
sus
manos
en
Ia
colcha
en
cada
lado
del
prensatelas.
Moverá
Ia
tela.
Practique
en
un
pedazo
de
tela
hasta
que
se
sienta
seguro
al
moviendo
Ia
tela.
En
Ia
manera
en
Ia
que
mueve
Ia
tela
usted
está
controlando
el
largo
de
Ia
puntada
y
su
direcciónn.
TaT
vez
sea
necesario
que
ajuste
Ia
tensiOn.
Por
lo
general,
tiene
que
hacerlo
ligeramente
más
apretado
ajustándolo
a
un
nümero
mayor.
Eso
dependerá
de
Ia
tela,
guata
e
hilos
que
utilice.
Un
método
tradicional
de
acolchado
se
conoce
como
Zurcido
(stippling).
Usted
mueve
Ia
tela
en
direcciones
diversas,
en
curvas,
creando
el
patrOn
que
se
muestra.
La
finalidad
es
mover
Ia
tela
de
manera
que
no
haga
puntadas
sobre
las
puntadas
previas.
Coser
en
Ia
Orilla
(Stitch
in
the
Dicth):
Muchas
veces
no
se
requiere
que
las
puntadas
de
Ia
colcha
se
vean.
Stitch
in
the
ditch
(puntada
en
Ia
ranura)
significa
que
hace
una
puntada
recta
a
10
largo
de
Ia
linea
de
pedazos
cosidos.
Enhebre
con
hilo
invisible
por
arriba.
Coloque
hito
de
algodOn
en
Ia
canilla.
Coloque
el
prensatelas
Caminador
(Walking).
Los
dientes
de
leva
deberãn
estar
en
arriba.
Seleccione
Ia
Puntada
Recta
#2,
Largo
de
Puntada
3.
Haga
puntadas
en
Ia
“ranura”
creada
por
las
costuras.
Acoichado
de
Canal:
El
acoichado
de
canal
son
filas
de
puntadas
con
una
separación
pareja.
Coloque
el
Prensatelas
Caminador
(Walking).
Los
dientes
de
leva
deberán
estar
elevados.
Deslice
Ia
barra
de
Acolchado.
Determine
Ia
distancia
deseada
entre
las
filas
de
puntadas
y
ajuste
Ia
distancia
de
Ia
aguja
en
Ia
barra.
Seleccione
Ia
puntada
recta
#2,
Largo
de
Puntada
3.
Marque
Ia
primera
fila
con
un
marcador
para
tela.
Cosa
sobre
Ia
Ilnea
marcada.
Cosa
las
fi!as
adicionales,
guiando
Ia
barra
de
acolchado
a
lo
(argo
de
Ia
Ilnea
de
costura
anterior.
Acoichado
con
Parches
Locos:
El
acolchado
con
parches
locos
se
logra
con
piezas
irregulares
de
tela
y
luego
se
cose
sobre
las
costuras
con
puntadas
decorativas.
Corte
las
figuras,
luego
inserte
el
prensatelas
Zigzag.
Enhebre
con
hilo
decorativo
como
el
hilo
para
Bordar
de
RayOn
Sulky
4Owt
para
Ia
parte
de
arriba
y
con
hilo
para
costura
en
Ia
canilla.
Coloque
el
estabilizador
desechable
debajo
de
Ia
parte
superior
de
Ia
colcha
y
haga
sus
puntadas
decorativas
favoritas
sobre
las
costuras.
I
I I I
I I
•
I
I
I I
I
I
I
I
I I
I
•
I
I
I
I I
I I
$
I
I
I
•
I
I I
I
I
I
I I
I
I
I
I
I I I
I I
I
I I
I
I
I
•
I I
I I I
•
*
I
I
*
I
I
I I
I
I I
•
I
I
I I
I

6.
MAINTENANCE
Your
machine
requires
regular
cleaning
(and
lubrication)
for
best
possible
sewing
performance.
Note:
•
Wipe
any
stains
with
a
soft
cloth.
•
Do
not
allow
water
to
touch
the
sewing
machine.
•
Do
not
use
detergent,
bleach,
benzene
or
thinner.
It
may
cause
discoloration
and
cracking.
Cleaning
the
feed
dog
and
shuttle
area
(how
to
remove
the
bobbin
case)
If
threads
are
stuck
in
the
bobbin
case
or
shuttle
area,
follow
the
instructions
below
to
remove
the
bobbin
case.
•
Unplug
the
machine
and
remove
the
needle
and
the
presser
foot.
A
•
Open
the
bobbin
case
cover
by
sliding
it
toward
you
and
remove
the
bobbin.
B
•
Insert
the
screwdriver
into
the
right
opening
on
the
rear
of
the
needle
plate.
Tip
the
screwdriver
toward
you
and
snap
off
the
needle
plate.
C
•
Lift
the
bobbin
case
toward
you
and
remove
it.
•
Clean
the
lint
and
dust
off
the
bobbin
case.
D
With
a
soft
cloth
or
brush,
clean
the
thread
and
dust
on
the
feed
dog
and
shuttle
area.
A
vacuum
cleaner
may
be
used
to
clean
up
the
threads.
6.
MANTENIMIENTO
Para
obtener
un
resultado
optimo,
es
necesa
•
y
engrasar
Ia
máquina
de
vez
en
cuando.
Nota:
•
•
Limpie
todas
las
manchas
con
un
paño
si
•
Evite
todo
contacto
de
Ia
maquina
con
el
•
•
No
use
detergentes,
lejIa,
gasolina,
benc
diluyentes.
•
Estos
productos
pueden
ocasionar
decolorac
grietas.
Limpieza
de
Ia
zona
del
prensatelas
y
de
Ia
I
(desmontaje
del
alojamiento
de
Ia
canilla)
*
Cuando
el
hilo
se
enreda
en
el
alojamientc
canilla
o
en
Ia
Ianzadera,
siga
las
instrucci
•
dadas
a
continuación
para
desmontar
el
al
de
Ia
canilla.
•
*
•
Desenchufe
Ia
mäquina
y
quite
Ia
aguja
y
prensatelas.
A
•
Deslice
Ia
tapa
del
alojamiento
de
Ia
caniH
Ud.
para
abrirla
y
saque
Ia
canilla.
B
•
lntroduzca
Ia
punta
del
destornillador
en
l
•
situada
de
lado
derecho
de
Ia
placa
de
Ia
Empuje
el
destornillador
hacia
atrás
para
•
placa.
C
•
Levante
el
alojamiento
de
Ia
canilla
hacia
•
sáquelo.
•
Limpie
Ia
pelusa
y
el
polvo
que
haya
en
el
alojamiento
de
Ia
canilla.
•
D
Con
un
paño
suave
o
una
brocha,
limpie
el
quite
el
polvo
que
haya
en
Ia
zona
de
los
d
•
Ia
Ianzadera.
niicHc
i
ifIIir
j....
A
B
C
D
English
N
Español

A
B
C
English
Attaching
the
bobbin
case
A.
Replace
the
bobbin
case
back
in
its
place.
B.
Place
the
needle
plate
on
the
bobbin
case
and
slide
it
from front
to
back.
C.
Turn
the
handwheel
and
see
if
it
moves
smoothly.
If
the
bobbin
case
is
attached
incorrectly,
the
handwheel
is
heavy
and
does
not
turn
smoothly.
In
such
case,
remove
the
bobbin
case
and
attach
it
again.
Español
Instalaciôn
del
alojamiento
de
Ia
canilla
A.
Vuelva
a
colocar
el
alojamiento
de
Ia
canilla
en
su
•
sitio.
B.
Ponga
Ia
placa
de
Ia
aguja
sobre
el
alojamiento
de
•
Ia
canilla
y
desilcela
hacia
atrás.
C.
Gire
el
volante
y
compruebe
su
movimiento.
•
Si
el
alojamiento
de
Ia
canilla
está
mal
colocado,
el
volante
está
duro
y
gira
con
dificultad.
•
Saque
el
alojamiento
de
Ia
canilla
y
vuelva
a
colocarlo.

English
Changing
the
light
bulb
WARNING
For
your
safety,
always
disconnect
the
machine
from
the
power
supply.
To
prevent
burns
and
electric
shocks,
let
the
bulb
cool
down
before
replacing
it.
Bulbs
can
be
purchased
at
your
nearest
dealer.
(Always
use
12V
5W
model
T1O
bulbs)
A.
•
Ensure
the
machine
is
unplugged
and
the
light
bulb
is
cool.
•
Loosen
the
screw
on
the
face
cover
and
remove
the
face
cover
as
shown
in
the
illustration.
B.
•
Gently
pull
the
bulb
downward
to
remove
it.
•
Insert
a
new
bulb
by
pushing
it
all
the
way
to
the
top.
C.
•
Lower
the
presser
foot
pressure
rod.
D.
•
Insert
the
presser
foot
pressure
rod
into
the
presser
foot
pressure
adjustment
lever.
Attach
the
face
cover.
E.
Check
if
the
presser
foot
pressure
adjustment
lever
moves
smoothly.
If
it
does
not,
remove
the
face
cover
and
repeat
the
steps
C
-
E.
Español
Reemplazo
de
Ia
bombilla
ADVERTENCIA
Para
su
seguridad,
desenchufe
siempre
Ia
ma
Ia
toma
de
corriente
de
Ia
pared.
Para
evitar
quemaduras
y
descargas
eléctrica
enfriar
Ia
bombilla
antes
de reemplazarla.
Cualquier
vendedor
de
máquinas
de
coser
de
podrá
proporcionarle
bombillas.
(Utilice
siempre
bombillas
de
12V
5W
del
mod
A.
•
Asegürese
de
que
Ia
maquina
está
desen
y
que
Ia
bombilla
está
frIa.
•
Saque
el
tornillo
de
Ia
tapa
lateral
y
quite
como
se
muestra
en
Ia
ilustración.
B.
•
Tire
despacio
de
Ia
bombilla
hacia
abajo
p
quitarla.
•
Coloque
una
bombilla
nueva
empujándoI
arriba
hasta
el
tope.
C.
•
Baje
Ia
varilla
de
ajuste
de
Ia
presiOn
del
prensatelas.
D.
•
Introduzca
Ia
varilla
en
Ia
palanca
de
ajusi
presiOn
del
prensatelas.
Coloque
Ia
tapa
l
E.
Compruebe
que
Ia
palanca
de
ajuste
de
Ia
del
prensatelas
se
mueve
normalmente.
Si
no
es
asI,
vuelva
a
quitar
Ia
tapa
lateral
y
seguir
las
instrucciones
desde
el
punto
tres
E.
A
B
C
D
E
La página se está cargando ...

Espanol
7.
MENSAJES
DE
ERROR
Y
ALARMAS
En
Ia
pantalla
LCD
de
Ia
máquina
de
coser
salen
mensajes
de
error
cuando
no
se
utiliza
Ia
máquina
correctamente.
Cuando
aparezca
uno
de
estos
mensajes,
resuelva
el
problema
siguiendo
las
instrucciones
dadas
a
continuaciOn.
Mensaje
de
error
Origen
posible
y
solución
Parpadeo
en
Ia
pantalla
y
sonidos
de
alarma
(“bip”)
Posible
causa
Parpadeo
en
Ia
pantalla
Sin
sonido
de
alarma
1
Enchufe
correctarnente
el
cable
del
mando
de
pedal.
2
No
pulse
el
boton
de
arranque
y
parada
cuando
Ia
máquina
esté
conectada
al
mando
de
pedal.
1
El
mando
de
pedal
se
ha
desconectado
mientras
Ia
máquina
estaba
cosiendo.
2
El
botOn
de
arranque
y
parada
ha
sido
pulsado
estando
conectado
el
mando
de
pedal
a
Ia
maquina.
Seleccione
Ia
longitud
de
puntada
adecuada
1
Se
ha
seleccionado
una
costura
elástica
(n°11-20)
sin
colocar
el
selector
de
anchura
de
Ia
puntada
en
Ia
posiciOn
“4”.
2
El
selector
de
anchura
de
Ia
puntada
esta
en
Ia
posicion
“4”
con
los
puntos
n°1
o
n°3-1
0
seleccionados.
Seleccione
una
anchura
de
puntada
correcta
(que
no
sea
el
“O’)
El
selector
de
anchura
de
Ia
puntada
está
en
“0”
mientras
que
el
tipo
de
punto
seleccionado
NO
es
el
punto
recto
Solución
*
if
35
—
—
p
____P
Baje
Ia
palanca
del
prensatelas.
Se
ha
pulsado
el
botón
de
arranque
y
parada
(o
palanca
de
inversiOn
de
Ia
puntada)
estando
Ia
palanca
del
prensatelas
levantada.
Soluciôn
Baje
Ia
palanca
del
ojal
y
empüjela
hacia
atrás
hasta
que
#
‘i
-
5
0-i
-
as
—
—
—
haga”clic”.
-
F
--
—
‘-F
El
botOn
de
arranque
y
parada
ha
sido
pulsado
estando
Causa
.
seleccionada
Ia
puntada
para
ojales
(puntada
n°1),
y
con
posible
Ia
palanca
para
ojales
levantada.
SoluciOn
Levante
Ia
palanca
para
ojales.
#
if
3-5
D.5-
---
—
El
boton
de
arranque
y
parada
ha
sido
pulsado
sin
estar
Causa
\,
.
seleccionada
Ia
puntada
para
ojales
(puntada
n°1),
y
con
posible
Ia
palanca
para
ojales
hacia
abajo.
SoluciOn
Desplace
el
eje
para
hacer
canilla
hacia
Ia
derecha.
Causa
El
eje
para
hacer
canilla
ha
sido
desplazado
hacia
Ia
posible
izquierda
mientras
Ia
canilla
estaba
bobinando.
*
if
3-5
C5-’-I
Solución
Causa
posible
Solución
Causa
posible
*1
-
as
SoluciOn
Causa
rs,-,kIô
La página se está cargando ...
La página se está cargando ...

8.
TROUBLE
SHOOTING
Desplace
el
eje
para
hacer
canilla
hacia
Ia
derecha.
Conecte
correctamente
el
cable
de
alimentación
eléctrica
a
Ia
toma de
corriente
y
a
Ia
máquina.
F
Pulse
el
interruptor
del
lado
T’.
Conecte
correctamente
el
cable
de
alimentaciOn
eléctrica
a
Ia
toma
de
corriente
y
a
Ia
máquina.
Pulse
el
interruptor
del
lado
9”.
Limpie
Ia
lanzadera
y
los
dientes.
Vuelva
a
colocar
Ia
aguja.
Apriete
el
tornillo
del
soporte
de
Ia
aguja.
Utilice
una
aguja
de
tamaño
correcto.
Consulte
Ia
página
21
para
ver
qué
tipo
de
hilo
y
aguja
puede
utilizar.
Following
cases
are
not
failure
of
the
machine.
Check
your
machine
before
you
call
for
service.
sotucaON
P
La
aguja
se
rompe
Tbrnh..
e
de
Ia
aguja
demasiado
P
Aguja
demasiado
fina
para
Ia
tela
o
aguja
doblada.
Hilo
superior
demasiado
tirante.
Ajuste
de
Ia
tension
del
hilo.
P2
La
aguja
es
de
tipo
#65/9.
•
El
enhebrador
de
aguja
no
funciona
P2
P2
La
aguja
no
se
encuentra
en
su
Suba
Ia
aguja
al
máximo.
posiciOn
mãs
elevada.
Aguja
mal
colocada.
Vuelva
a
colocar
Ia
aguja.
P2(
Aguja
doblada.
Coloque
una
aguja
nueva.
Enderece
el
gancho
con
el
destornillador
de
modo
que
el
El
gancho
del
enhebrador
de
gancho
entre
por
el
ojo
de
Ia
aguja
P18
aguja
estã
doblado.
cuando
se
baja
Ia
palanca
del
enhebrador.
La
guia
de
Ia
aguja
esta
mal
enhebrada.
•
Se
ye
demasiado
el
hilo
por
el
lado
derecho
de
Ia
tela.
Canilla
mal
enhebrada.
Vuelva
a
enhebrar
Ia
canilla.
P13
Vuelva
a
enhebrar
Ia
guia
de
Ia
aguja.
P17
Revés
Derecho
HiIo
superior
demasiado
tirante.
Ajuste
de
Ia
tensiOn
del
hilo.
P24

Español
Si
no
se
ha
resuelto
&
problema,
pOngase
en
contacto
con
el
vendedor
mãs
cercano
o
flame
a
un
tecnico.
PROBLEMA
CAUSA
SOLUCION
PAGINA
•
Hay
demasiado
hilo
por
el
Hilo
superior
mal
enhebrado
Vuelva
a
enhebrar
el
hilo
superior.
revés
de
Ia
tela.
(La
placa
de
tensiOn
no
estã
P15
,
enhebrada)
//51—
Revés
Derecho
Hilo
superior
demasiado
tirante.
Ajuste
de
Ia
tension
del
hilo.
P24
Hilo
superior
mal
enhebrado.
Vuelva
a
enhebrar
el
hilo
superior.
P15
Canilla
mal
enhebrada.
Vuelva
a
enhebrar
Ia
canilla.
P13
•
El
hilo
superior
se
rompe
Presencia
de
pelusa
en
Ia
lanzadera.
Limpie
Ia
Ianzadera
y
los
dientes.
P43
Hilo
superior
demasiado
tirante.
Ajuste
de
Ia
tensiOn
del
hilo.
P24
Aguja
doblada
o
con
Ia
punta
mai
alilada.
Coloque
una
aguja
nueva.
P20
•
El
hilo
de
Ia
canilla
se
rompe
Canilla
mal
enhebrada.
Vuelva
a
enhebrar
Ia
canilla.
P13
Aguja
mal
colocada.
Vuelva
a
colocar
Ia
aguja.
Aguja
doblada.
Coloque
una
aguja
nueva.
P20
•
La
máquina
se
salta
Aguja
o
hilo
inadecuados
para
Ia
Utilice
hNo
y
aguja
adecuados.
puntadas
tela.
Aguja
mal
enhebrada.
Vuelva
a
enhebrar
Ia
aguja.
Hilo
superior
mal
enhebrado.
Vuelva
a
enhebrar
el
hilo
superior.
P15
Hilo
superior
demasiado
tirante.
Ajuste
de
Ia
tension
del
hilo.
P24
Hilo
superior
mal
enhebrado.
Vuelva
a
enhebrar
el
hilo
superior.
P15
•Arrugas-
CanlIa
mal
enhebrada.
Vuelva
a
enhebrar
Ia
canilla.
P13
Aguja
demasiado
gruesa
para
Ia
tela.
Utilice
hilo
y
aguja
adecuados.
P21
PresiOn
excesiva
del
prensatelas.
Levante
Ia
palanca
de
ajuste
de
Ia
P10
presion
del
prensatelas.
Presencia
de
pelusa
en
los
dientes.
Limpie
Ia
lanzadera
y
los
dientes.
P43
•
La
tela
no
avanza
Presion
del
prensatelas
Baje
Ia
palanca
de
ajuste
de
Ia
correctamente.
insuficiente.
presiOn
del
prensatelas.
Los
dientes
no
sujetan
Ia
tela.
Suba
los
dientes.

I
I
English
9.
SPECIFICATIONS
Espanol
9.
CARACTERISTICAS
Modelo
1780
Gancho
Horizontal
Aguja
Aguja
estándar
(#90/1
4X2)
Tipo
de
canilla
Plástico
(altura
11-11,6
mm!
diãmetro
20,5
mm)
Anchura
maxima
de
Ia
puntada
6
mm
Longitud
maxima
de
Ia
puntada
4
mm
Max.:
800
rpm
Velocidad
Mm.:
90
rpm
Posición
de
Ia
aguja
Centro
Peso
9
kg
Anchura:
435
mm
Dimensiones
de
Ia
máquina
Prof
undidad:
195
mm
Altura:
325
mm
CA
120
V
Alimentación
eléctrica
60
Hz
45W/0.45A(bombilladel2V/5W)
Model
1780
Hook
Horizontal
Needle
Standard
needle
(#90/1
4X2)
.
Plastic
(Height
3/8”(l
1-1
1.6mm)
/
Bobbin
type
Diameter
3/4”(20.5mm))
Maximum
stitch
width
6
mm
Maximum
stitch
length
4
mm
.
Max:800r.p.m
Sewing
speed
Mm
:
90
r.p.m
Needle
position
Center
Weight
9kg
(20
Ibs)
Width:
435
mm
(17
in)
Machine
dimensions
Depth:
195
mm
(8
in)
Height:
325
mm
(13
in)
AC
120
V
Ratings
60
Hz
45
W
I
0.45
A
(Light
bulb
12
V
I
5
W)
Foot
control
678560-AGA1
0
La página se está cargando ...
Transcripción de documentos
English IMPORTANT SAFETY INSTRUCTIONS When using an electrical appliance, basic safety precautions should always be followed, including the following: Read all instructions before using (this appliance). DANGER - - To reduce the risk of electric shock: 1. The sewing machine should never be left unattended when plugged in. Always unplug this sewing machine from the electric outlet immediately after using and before cleaning. 2. Always unplug before relamping. Replace bulb with same type rated 5 watts. WARNING - - To reduce the risk of burns, fire, electric shock, or injury to persons: • Do not allow to be used as a toy. Close attention is necessary when this sewing machine is used by or near children. • Use this sewing machine only for its intended use as described in this manual. Use only attachments recommended by the manufacturer as contained in this manual. • Never operate this sewing machine if it has a damaged cord or plug, if it is not working properly, if it has been dropped or damaged, or dropped into water. Return the sewing machine to the nearest authorized dealer or service center for examination, repair, electrical or mechanical adjustment. • Never operate the sewing machine with any air openings blocked. Keep ventilation openings of the sewing machine and foot control free from the accumulation of lint, dust, and loose cloth. • Keep fingers away from all moving parts. Special care is required around the sewing machine needle. • Always use the proper needle plate. The wrong plate can cause the needle to break. • Do not use bent needles. • Do not pull or push fabric while stitching. It may deflect the needle causing it to break. • Switch the sewing machine off (“0”) when making any adjustment in the needle area, such as threading needle, changing needle, threading bobbin, or changing presser foot, etc. • Always unplug sewing machine from the electrical outlet when removing covers, lubricating, or when making any other user servicing adjustments mentioned in the instruction manual. • Never drop or insert any object into any opening. • Do not use outdoors. • Do not operate where aerosol (spray) products are being used or where oxygen is being administered. • To disconnect, turn all controls to the off (“0”) position, then remove plug from outlet. • Do not unplug by pulling on cord. To unplug, grasp the plug, not the cord. • Keep fingers away from moving parts, especially the area near the blades. SAVE THESE INSTRUCTIONS For the USA and Canada This sewing machine has a polarized plug (one blade wider than the other). To reduce the risk of electric shock, this plug is intended to fit in a polarized outlet only one way. If the plug does not fit fully in the outlet, reverse the plug. If it still does not fit, contact a qualified electrician to install the proper outlet. Do not modify the plug in any way. Español INSTRUCCIONES IMPORTANTES DE SEGURIDAD Cuando se utiliza un aparato eléctrico, se deben respetar siempre ciertas precauciones básicas de seguridad, incluyendo las siguientes: Lea todas las instrucciones antes de utilizar esta maquina. PELIGRO Para reducir el riesgo de descargas eléctricas. 1. No deje nunca desatendida Ia máquina de coser mientras esté enchufada. Desenchüfela siempre inmediatamente después de haber cosido con ella y antes de limpiarla. 2. Desenchufe siempre Ia máquina antes de cambiar Ia bombilla. Reemplace ésta por una bombilla de 15 vatios del mismo tipo. 3. No toque ningün aparato que se haya caIdo al agua. Saque inmediatamente el enchufe. 4. No coloque ni guarde nunca Ia máquina de coser en un sitio de donde se pueda caer o donde corra el riesgo de ser empujada y caer en un lavabo o bañera. No Ia pose en un sitio hümedo ni Ia meta en el agua o cualquier otro lIquido. ADVERTENCIA Para reducir el riesgo de quemaduras, incendios, descargas eléctricas 0 lesiones. 1. No deje que jueguen con Ia máquina. Preste especial atenciOn cuando algün niño utilice Ia mãquina o se encuentre cerca de ella. 2. Utilice esta máquina sOlo para el uso previsto, tal como se describe en este manual. Utilice inicamente los accesorios recomendados por el fabricante que se incluyen en este manual. 3. No utilice nunca Ia máquina de coser si su cable o enchufe tienen defectos, si flO funciona correctamente, si se ha caIdo o está estropeada, 0 Si se ha dejado caer en el agua. Lleve Ia máquina al vendedor autorizado o al servicio de reparaciOn más cercano para que Ia examinen, reparen o efectüen los ajustes eléctricos o mecánicos neceSarios. 4. No utilice nunca Ia máquina de coser cuando tenga un orificio de ventilaciOn obstruido. Mantenga los orificios de ventilacion de Ia máquina y del mando de pedal limpios de pelusa, polvo o tela. 5. Nunca deje caer o introduzca ningUn objeto en los orificios. 6. No utilice Ia máquina al aire libre. 7. No utilice Ia máquina en lugares donde se estén utilizando aerosoles o donde se esté administrando oxigeno. 8. Para apagarla, desconecte todos los mandos (posicion 0”) y saque el enchufe de a toma de corriente. 9. No desenchufe Ia máquina tirando del cable. Para desenchufar, tire siempre del enchufe, nunca del cable. 10. Mantenga los dedos alejados de todas las piezas mOviles. Preste especial atenciOn cuando trabaje cerca de Ia aguja. 11. Utilice siempre una placa adecuada para Ia aguja. Si utiliza una placa inadecuada, Ia aguja se puede romper. 12. No utilice agujas torcidas. 13. No tire de Ia tela mientras esté cosiendo. Si tirade Ia tela, Ia aguja se puede doblar y romper. 14. Apague Ia maquina de coser (interruptor en Ia posiciOn 0’) cuando efectUe operacioneS cerca de Ia aguja, como por ejemplo enhebrar o cambiar Ia aguja, o reemplazar el prensatelas. 15. Desenchufe siempre Ia maquina anteS de quitar tapas, lubricar 0 efectuar cualquier tipo de ajuste o mantenimiento mencionado en este manual de instrucciones. 16. No utilice ñunca Ia máquina sobre una superticie blanda como una cama o un canapé, que pueda tapar los orificios de ventilaciôn. - - - - Ill III Ill Ill a I English STITCH SAMPLE Ill Stretch stitch Ill Buttonhole Zipper sewing Overcasting Español EJEMPLOS DE PUNTOS Ill Ill Ill Ill a A Punto elástico Ojal Costura de cremallera Sobrehilado Decorative stitch Punto de adorno Appliqué Parche Decorative stitch I Punto de adorno Español INDICE 4. COSTURA 1. RESUMEN Nombre de las piezas Accesorios estándar Tiposdecostura 2 4 6 2. COMO UTILIZAR SU MAQUINA DE COSER Interruptor de corriente y de Ia bombilla SelecciOn del punto Funciones de Ia pantalla LCD de ayuda Palanca del prensatelas Selector de anchura de puntada Selector de longitud de puntada Velocidad de Ia maquina Mando de pedal Mando de ajuste de los dientes Palanca de ajuste de Ia presiOn del prensatelas Cómo guardar Ia máquina 7 7 7 8 8 8 8 9 10 10 10 3. PREPARACION DE LA MAQUINA Hacer canilla Enhebrar el hilo de Ia canilla Enhebrar el hilo superior COmo se utiliza el enhebrador de aguja Reemplazo del prensatelas Reemplazo de Ia aguja Tabla de telas, hilos y agujas .... 12 14 16 17 19 20 21 Puntorecto InversiOn de puntada Ajuste de Ia tensiOn del hilo Costura en zigzag Prensatelas para sobrehilar Parches Prensatelas para costuras invisibles Prensatelas para ojales Prensatelas para cremalleras Punto elástico 5.ACOLCHANDO 23 24 24 26 27 28 29 30 33 34 42 6. MANTENIMIENTO Limpieza de Ia zona del prensatelas y de Ia lanzadera 43 Reemplazo de Ia bombilla 45 7. MENSAJES DE ERROR Y ALARMAS 48 8. LOCALIZACION Y REPARACION DE AVERIAS 51—52 9. CARACTERSTlCAS 53 English 1. SUMMARY Name of parts 1-1. Thread guide 1 -2. Bobbin winder guide 2. Upper thread tension dial (See page 24) 3. Stitch width adjustment dial (See page 8) 4. Stitch length adjustment dial (See page 8) 5. Presser foot pressure adjustment lever (See page 10) 6. Light bulb 7. Thread cutter 8. Free-arm sewing Pull the extension table off to the left and ma chine converts to a free-arm model. 9. Extension table 10. Help window LCD (See page 7) 11. Stitch selection dial 12. Needle threader (See page 17) 13. Presser foot holder 14. Needle clamp screw 15. Needle thread guide 16. Needle 17. Presser foot 18. Needle plate 19. Feed dog 20. Bobbin thread cutter 21. Bobbin case 22. Bobbin case cover 23. Buttons and levers 23-1. Speed control lever (See page 8) 23-2. Reverse stitch lever (See page 8) 23-3. Needle up and down button (See page 8) 23-4. Start and stop button (See page 8) 24. Bobbin stop 25. Bobbin winder shaft 26. Handle 27. Spool pin 28. Spool cap 29. Presser foot lift (See page 8) 30. Handwheel 31. Power and light switch 32. Plug socket 33. Plug socket (Foot control) 34. Buttonhole adjuster (See page 32) 35. Feed dog control (See page 10) 36. Buttonhole lever 37. Face cover Español 1.RESUMEN Nombre de las piezas 1-1. GuiahIlos 21. Alojamiento de Ia canilia 1-2. Gufa para el hilo de Ia canilla 22. Tapa del alojamiento de Ia canilla 2. Selector de tension del hilo superior (véase 23-1. Selector de velocidad (véase página 9) página 24) 23-2. Palanca de inversiOn de Ia puntada 3. Selector de anchura de puntada (véase página 8) (véase pagina 9) 4. Selector de longitud de puntada (véase pagina 8) 23-3. BotOn para subir y bajar Ia aguja (véase página 9) 5. Palanca de ajuste de Ia presiOn del prensatelas 23-4. BotOn de arranque y parada (véase pãgina 9) (véase página 10) 24. Sujetab obina 6. BombiHa 25. Eje para hacer canilla 7. Cuchilla para cortar el hilo 26. Asa 8. Costura con brazo libre 27. Eje portabobina Saque el tablero de extension por Ia izquierda 28. Tope de bobina para convertir Ia máquina en un mocielo con 29. Palanca del prensatelas (véase pagina 9) brazolibre. 9. Tablero de extensiOn 30. Volante 10. Pantalla LCD de ayuda (véase Ia página 7) Al girar el volante, Ia aguja sube o baja. 11. Selector de punto Gire siempre el volante hacia Ud. 12. Enhebrador de aguja (véase página 17) 31. Interruptor de corriente y de Ia bombilla 13. Soporte del prensatelas 32. Entrada del cable de alimentaciOn eléctrica 14. Tornillo del soporte de Ia aguja 33. Entrada del cable del mando de pedal 15. GuiahIlos de Ia aguja 34. Mando de ajuste de Ia puntäda de los ojales 16. Aguja (véase página 32) 17. Prensatelas 35. Mando de ajuste de los dientes (véase página 10) 18. Placa de Ia aguja 36. Palanca para ojales 19. Dientes 37. Nominal cubrir 20. Cuchilla para cortar el hilo de Ia canilla English Standard accessories Accessories are stored inside the extension table. Note: • Genuine WHITE accessories are recommended. • When purchasing a new bobbin, be sure the size is 3/4(20.5 mm) in diameter and 3/8”(ll—ll .6 mm) in height. • Use plastic bobbins. 12. Needles (iset) #90/14X2 1. Accessory box 13. Screwdriver 2. Extension table 14. Cleaning brush 3. Foot control (See page 9) 15. Walking foot 4. Zigzag foot (On the machine) 16. Quilting guide 5. Buttonhole foot 17. Narrow hem foot (3mm) 6. Zipper foot 7. Overcasting foot 8. Blind hem foot 9. Buttonhole cutter 10. Spool cap (On the machine) 11. Bobbin (2) 18. 19. 20. 21. 22. Gathering foot 1/4 inch piecing foot Darning foot Button sewing foot Clear satin (open toe) foot The 1/4 inch piecing foot is for straight stitch only. Prior to using this foot, please refer to the enclosed video. Español Accesorios estándar Los accesorios se encuentran dentro del tablero de extension. Nota: • Se recomienda utilizar accesorios de origen WHITE. • Cuando compre carretes nuevos, elija el tamaño adecuado (20,5 mm de diámetro y 11 —11,6 mm de alto). • Utilice canillas de plástico. 1. Compartimiento para accesorios 2. Tablero de extensiOn 3. Mando de pedal (véase Ia pagina 9) 4. Prensatelas para costuras en zigzag 5. 6. 7. 8. (ya instalado en Ia maquina) Prensatelas para ojales Prensatelas para cremalleras Prensatelas para sobrehilar Prensatelas para costuras invisibles 9. Abreojales 10. Tope de bobina (ya instalado en Ia maquina) 11. Canillas (2) 12. Agujas (1 juego) #90/14X2 13. Destornillador 14. Brocha para limpiar Ia máquina 15. Prensatelas caminador 16. Gula para acoichar 17. Prensatelas para dobladillos estrechos 18. Prensatelas de recogido 19. Prensatelas para 1/4” de costura 20. Prensatelas de zurcido 21. Prensatelas de coser botones 22. Prensatelas transparente Español Tipos de costura Anchura Tipos de costura Prensatelas N° de (página de de Ia puntada puntada reterencia) puntada Ojal (pagina 30) Punto recto (pagina 23) C remallera (pagina 33) 2 Costura en zigzag Parche de adorno (páginas 25 y 27) 4-5 Longitud Nc de de Ia puntada puntada Tipos de costura (página de referenda) 0.4-0.6 10 FestOn 1-4 11 Punto de adorno 2-3 12 Punto por encima doble 0.5-2 13 Punto por encima inclinado 14 Punto por encima elástico / Punto elástico sobre las orillas Anchura Longitud Prensatelas de Ia Ia de puntada puntada puntada 0.4-1 Prensatelas para ojales Prensatelas para cpsturas en zigzag 0 Prensatelas para cremalleras Prensatelas para costuras en ziazaci Sobrehilado en una tela de peso medio Sobrehilado (pagina 27) 3-6 5 1-4 5-6 P rensatelas F---. 3 Costura de adorno 0 sobrehilado 4 Costura invisible de dobladillo (pagina 29) ‘ 5 ‘ — Sobrehilado en una tela ligera (pagina 27) Zurcido/ Remiendo Costura invisible de dobladillo en una tela elástica (pagina 29) 6 Prensatelas para costuras en zigzag 15 Bellota / Punto por encima Prensatelas para costuras invisibles 16 Punto de espiga Prensatelas para costuras en zigzag 17 Punto por encima / Sobrehilado 18 UI Punto por encima 4-6 1-2 Prensatelas para costuras invisibles I” Punto de uniOn 7 19 Punto de concha 8 9 I FestOn de rombo Prensatelas para costuras en zigzag 5-6 — costuras en zigzag 0.4-1 Sobrehilado en unatelapesada o elastica Sobrehilado (pagina 27) Costura elástica en 20 III— recta o P rensatelas (página zigzag para IlI costuras en 34) ziozao 5 0-6 4 I B A w D 2. Vi . . C . . 5 . . 6 . . S F T I C 2 4 C 1( 11 1’ 1 English 2. HOW TO OPERATE YOUR SEWING MACHINE Power and light switch A. Power and light switch First connect the power cord to the plug socket of your sewing machine. Next, connect the plug of power cord to an electric outlet. ® Power and light switch © Plug ® Power cord B. Push the switch to the I direction to turn the switch ON. This switch controls both power and light. Push the switch to the 0 direction to turn the switch OFF. Selecting the stitch pattern Raise the needle to its highest position. (See page 8 “Needle up and down button”) Turn the stitch selection dial to select the stitch pattern. Help window LCD functions C. The selected stitch pattern is displayed on the help window LCD. 1. Stitch pattern. 2. Stitch number 3. Stitch width The recommended stitch width is displayed. 4. Stitch length The recommended stitch length is displayed. 5. Bobbin winding cD Displayed when the bobbin winder shaft moves to the right. (Usually not displayed) © Flashes with beep sounds when the machine is not operated correctly. 6. Foot control ® Displayed when the foot control is connected to the sewing machine. (Usually not displayed) © Flashes with beep sounds when the machine is not operated correctly. 7. Flashinq display • • • • • • • • • • • • • • • • • • • • • Espanol 2. COMO UTILIZAR SU MAQUINA DE COSER Interruptor de corriente y de Ia bombilla A. Enchufe primero el cable de alimentaciOn eléctrica € entrada prevista para ello en Ia máquina de coser. lntroduzca luego el enchufe del cable de alimentaci en Ia toma de corriente mural. ® Interruptor de corriente y de Ia bombilla © Enchute ® Cable de alimentaciOn eléctrica B. Pulse el interruptor del lado i para encender. Este interruptor controla a Ia vez el suministro de corriente eléctrica y Ia bombilla. Pulse el interruptor del lado 0 para apagar. Selecciôn del punto Suba Ia aguja al máximo (consulte Ia página 8 Botó para subir y bajar Ia aguja”) Gire el selector de punto para elegir el tipo de punto Funciones de Ia pantalla LCD de ayuda C. La pantalla LCD indica el tipo de punto seleccionadt 1.Tipodepunto La pantalla muestra el tipo de punto seleccionado. 2. Nümero de punto 3. Anchura de Ia puntada La pantalla muestra a anchura de puntada recomend 4. Longitud de Ia puntada La pantalla muestra Ia longitud de puntada recomend 5.Bobinado Aparece cuando el eje para hacer canilla se despIa hacia Ia derecha. (No aparece permanentemente) © Parpadea y emite un sonido cuando no se utiliza Ia maquina correctamente. 6. Mando de pedal i) Aparece cuando el mando de pedal está conectado máquina de coser. (No aparece permanentemente) © Parpadea y emite un sonido cuando no se utiliza Ia máquina correctamente. 7. Mensajes de error (parpadeo) A B C D 1 2 3 4 English A. Presser foot lift Before sewing, lower the presser foot lift to lower the presser foot. © When inserting the fabric, lift up the presser foot lift to raise the presser foot. © When inserting a very thick fabric under the presser foot, the lift height can be increased by raising the presser foot lever to this position. B. Stitch width adjustment dial Set the stitch width and the stitch length to the recommended number displayed on the help window LCD. 1. The zigzag width can be altered by turning the stitch width adjustment dial. 2. For narrow zigzag stitches. turn the dial to a smaller number. For wide zigzag stitches, turn the dial to a larger number. 3. When the dial is set at ‘0’, the stitch will be a straight stitch. C. Stitch length adjustment dial 1. The stitch length can be altered by turning the stitch length adjustment dial. 2. For shorter stitches, turn the dial to a smaller number. For longer stitches, turn the dial to a larger number. D. Button and levers 1. Sewing speed control Sewing speed is adjusted by the sewing speed control lever. 2. Reverse stitch lever The machine will feed the fabric backward and stitch slowly in reverse when pressing the reverse stitch lever down. 3. Needle up and down button Press the button and the needle will move to its lowest position. Press again and the needle will move to its highest position. Instead of pressing the needle up and down button, you can turn the handwheel to adjust the needle height. 4. Start and stop button Press the button to start sewing. Prc,oc ,,n&r, fr, fr,n +h m,-hir,, • • • • • • • • - • • • • • • • • • • • • • • Español A. Palanca del prensatelas Para empezar a coser, baje a palanca para bajar el prensatelas. © Para introducir Ia tela, levante Ia palanca para subir el prensatelas. © Para introducir tela gruesa debajo del prensatelas, ajuste Ia altura de éste manteniendo Ia palanca sujeta a Ia altura adecuada. B. Selector de anchura de puntada 1. La anchura del punto en zigzag puede cambiarse girando el selector de anchura de puntada. 2. Para obtener un zigzag estrecho, gire el selector hacia un nümero más pequeno. Para obtener un zigzag ancho, gire el selector hacia un nümero mayor. 3. Con el selector en Ia posiciOn “0”, se obtiene una puntada recta. C. Selector de longitud de puntada Para seleccionar Ia anchura y Ia longitud de Ia puntada, utilice el nümero recomendado que aparece en Ia pantalla LCD. 1. La longitud de Ia puntada puede cambiarse girando el selector de longitud de puntada. 2. Para hacer puntadas cortas, gire el selector hacia un nümero más pequeno. Para hacer puntadas largas, gire el selector hacia un nümero mayor. D. Velocidad de Ia máquina 1. La velocidad de Ia máquina se ajusta con el selector de velocidad. 2. Palanca de inversiOn de Ia puntada Al bajar esta patanca, Ia mãquina introduce Ia tela en el sentido opuesto y empieza a coser al revés a baja velocidad. 3. BotOn para subir y bajar Ia aguja Pulse el botOn para bajar Ia aguja at máximo. Vuelva a pulsar el botOn para subir Ia aguja hasta su posiciOn más alta. También se puede ajustar Ia altura de Ia aguja girando el volante. 4. BotOn de arranque y parada Pulse el botOn para empezar a coser. B A Whe A * e 3- i t as- IT d a 1 ft C 1C2 C-3 .p •E n •1 Ii .t .1: .( English Si For ml intE cot I •1 2. 3. 1.! 2. 3. 4. 5; 6. 7. 8. 9. 10. 11. 12. 13. 14 15 A. Foot control WARNING Foryoursafeg always disconnect the machí’ie from the power supp4’before connecthig the foot control Foot control enables you to control start, stop and sewing speed of the machine with your foot. (Start, stop and sewing speed of bobbin winding is also controlled by the foot control.) Note: The start and stop button cannot be operated when the foot control is connected to the sewing machine. Connecting the loot control D Turn the sewing machine OFF. © Connect the plug ® of the foot control cord to the sewing machine and the plug ® to the foot control. © When the foot control is connected to the sewing is display on the help window LCD. machine, When the foot control is disconnected, it disappears. B. How to use the foot control 1. Press on the foot control slowly. 2. The more you press the foot control, the faster the machine sews. 3. Release the foot control to stop the machine. ± You can control the maximum speed of the foot control by adjusting the sewing speed control lever. C. How to store the foot control Store the foot control in the base of the extension table. C-i Press the foot control with your hand and insert the plugs ® and ® together into the opening ©. C-2 Wind the cord around the foot control. C-3 Insert foot control in the base of the extension table under the accessory box. Español A. Mando de pedal ADVERTENCIA Para su segundao desenchufe si’mpre Ia maquina ai de conectar elmando depedal El mando de pedal le permite arrancar, parar y control Ia velocidad de Ia máquina. (Tamblén permite arrancar, parar y controlar Ia velocicL del bobinado.) Nota: El botOn de arranque y parada no funciona cuan Ia máquina de coser esta conectada al mando d pedal. Conexión del mando de pedal D Apague Ia máquina de coser. del cable del mando de • © Conecte Ia extremidad pedal en Ia maquina y Ia extremidad ® al mando dE pedal mismo. • ® Cuando se conecta el mando de pedal a Ia mãquinE aparece en Ia pantalla LCD. coser, el sImbolo • Este sImbolo desaparece en cuanto se desconecta el mandode pedal. • B. Utilizaciôn del mando de pedal 1. Apoye despacio pisando sobre el pedal. • 2. Cuanto más fuerte pise el mando, más correrá Ia máquina. • 3. Para parar Ia máquina, suelte el mando de pedal. • ± Se puede ajustar Ia velocidad maxima del mahdo d pedal girando el selector de velocidad de Ia máquin C. Para guardar el mando de pedal El mando de pedal se guarda en Ia base del tablero dE • extension. • C-i Presione el mando de pedal con Ia mano e introduzca las clavijas ® y ® juntas en el orificio • C-2 Enrosque el cable alrededor el mando de pedal. fl ntrndi i7r cI mndn dc! ndI n I hse dl tabkr A English A. Feed dog control You can drop the feed dog to stop the feeding of the fabric. This can be used for embroidery and quilting. Put the fabric in a hoop. Note: Before operating the feed dog control, always remove the extension table and raise the presser foot. Raise the feed dog for ordinary sewing. Drop the feed dog so the machine will not feed the fabric. B. Presser foot pressure adjustment lever • You can change the presser foot pressure with the position of the presser foot pressure lever. • The lower position is for normal fabrics. • For stretch or light fabrics, raise the lever to reduce the presser foot pressure. How to store the sewing machine Before storing the machine, be sure to: 1. Turn the machine OFF. 2. Unplug the power cord from the outlet and the sewing machine. 3. Store the foot control inside the accessory box, then put the cover on. When storing the sewing machine: 1. Do not expose the machine in a dusty or highly humid area. 2. Do not expose the machine under direct sunlight or near heating equipment. 3. To prevent the machine from falling, do not place it on unstable surfaces. 4. Do not place the machine upside-down or on its side. 5. Do not expose the machine near smoke or steam. When taking the machine out of the storage: 1. Remove the cover. 2. Hold the handle of the sewing machine with one hand, B Español A. Mando de ajuste de los dientes Los dientes pueden bajarse para controlar el avance de Ia tela. Esta función se puede utilizar para bordados y telas guateadas, y también para varios espesores. Nota: Antes de utilizar el mando de ajuste de los dientes, quite siempre el tablero de extensiOn y levante el prensatelas. Para los trabajos de costura corrientes, utilice los dientes en su posiciOn más elevada. Baje los dientes para impedir que Ia máquina haga avanzar Ia tela. B. Palanca de ajuste de Ia presión del prensatelas • La presiOn ejercida por el prensatelas se puede ajustar con Ia palanca de ajuste del prensatelas. • La posición baja es para telas normales. • Para telas elásticas o ligeras, levante Ia palanca para reducir a presiOn del prensatelas. Cômo guardar Ia máquina Cuando vaya a guardar Ia máquina: 1. Apague primero Ia mãquina. 2. Desconecte el cable de alimentacion eléctrica de Ia toma de corriente y de Ia máquina de coser. 3. Coloque el mando de pedal dentro de su alojamiento y tape Ia máquina. Nota: Cuando guarde Ia máquina de coser, respete las siguientes instrucciones. 1. No guarde Ia maquina en un sitio donde haya polvo o demasiada humedad. (Riesgo de averias) 2. No exponga Ia máquina a los rayos del sol ni Ia coloque cerca de aparatos que despidan calor. (Riesgo de decoloración y daños) 3. Evite que Ia máquina se caiga colocándola en una superticie estable. 4. No deje Ia máquina aI revés o volcada. (Riesgo de averlas) 5. No exponga Ia mãquina a humo o vapor. (Riesgo de averlas) Nota: Cuando saque Ia máquina del lugar en que estã •gadada, respete las siguientes instrucciones. English 3. SETTING UP YOUR MACHINE Winding bobbin A. Put a thread spool and spool cap on to the spool pin. * Leave an opening of 1/16”(2 mm) between the thread spool and spool cap. • For a small thread spool, use small cap side. • For a large thread spool, use large cap side. B. Draw thread through thread guide D, and bobbin thread guide ©. C. Pass the thread end through the hole of the bobbin as shown. • Place the bobbin on to the bobbin winder shaft so the groove will meet the shaft spring. • Push the bobbin down and the bobbin winder shaft will automatically move to the right. () is displayed on the help window LCD. D. For faster bobbin winding, slide the sewing speed control lever to the right. WARNING Do not touch the bobbin wñider shaft when winding the bobbfri. E. Hold the thread end. Press the start and stop button and start the machine. * When using the foot control, step on the foot control to start the machine. F. After winding a little, stop the machine and cut extra thread above the bobbin hole and continue. G.’ The bobbin will stop when fully wound. • Press the start and stop button and stop the machine. When using the foot control, release your foot from the foot control. * H. Push the bobbin winder shaft back to the left with your finger. * You are not able to sew when the bobbin winder is set on the right. I. • Remove the bobbin from the shaft. • Cut the thread. Espanol 3. PREPARACION DE LA MAQUINA Hacer canilla A. Coloque una bobina de hilo y el tope de bobina en el eje portabobina. * Deje un espacio de 2 mm entre Ia bobina y el lope. • Para una bobina pequeña • Para una bobina grande B. Pase el hilo por el guiah lbs y Ia gula del hilo de Ia can lila ©. Guiahilos ®. Gula del hilo de Ia canilla ©. C. Pase el cabo del hilo por el agujero de Ia canilla, como se muestra en Ia ilustraciOn. • Coloque Ia canilla en el eje para hacer canilla de modo que Ia ranura corresponda al resorte del eje. Empuje Ia canilla. El eje se desplazará automãticamente hacia Ia derecha. • El sImbolo ( ) aparecerá en Ia pantalla LCD. D. Para acelerar el bobinado, deslice el selector de velocidad hacia Ia derecha. ADVERTENCIA No toque el ej’para hacercanihla cuando esté bob,iando. E. Sujete eI cabo del hilo. Pulse el botOn de arranque y parada para arrancar Ia máquina. ± Si utiliza el mando de pedal, piselo para arrancar Ia máquina. F. Cuando Ia canilla haya dado varias vueltas, pare Ia mãquina, corte el cabo que sale por el agujero de Ia canilla y siga bobinando. G.• La canilla se para sola cuando esté completamente bobinada. • Pulse el botOn de arranque y parada para parar Ia máquina. ± Si utiliza el mando de pedal, levante el pie. H. Vuelva a colocar eI eje en su sitio empujándolo hacia Ia izquierda con el dedo. 4 i Hci cI rIcl lwIn rIrrhn n, nodr.i nncr English Threading bobbin thread A. • Turn the machine OFF. Open the bobbin case cover by sliding it toward you and the bobbin thread cutter will appear. B. Insert the bobbin into the bobbin case, making sure that the bobbin rotates counte rclockwise. Note: Inserting the bobbin in the wrong direction causes irregular thread tension . C. Hold the bobbin with your finger, so it does not turn as you pull the thread under the bobbin thread tension guide. D. Pull the thread into the bobbin thread tension guide to the end. E. Pull the thread through the bobbin thread cutter and cut the thread. When using stretch threads such as wool, do not cut the thread after threading the bobbin thread guide. Pull out and leave about 6”(l5cm) of thread. F. Slide the bobbin case cover back to its place. Note: You can stitch without bringing up the bobbin thread. Español Enhebrar el hilo de Ia canilla A. • Apague Ia máquina. Abra Ia tapa de alojamiento de Ia canilla tirando hacia Ud. Vera entonces Ia cuchill a para cortar el hilo de Ia canilla. B. lntroduzca Ia canilla en su alojamiento procurando que Ia canilla gire en sentido contrario a las agujas de un reloj. Nota: Si se coloca Ia canilla al revés, Ia tensiOn del hilo serã irregular. C. Tire del hilo por debajo del guIahilos de Ia canilla. D. Siga tirando del hilo a lo largo del guiahilos de Ia canilla hasta el final. E. Pase el hilo por debajo de Ia cuchilla y cOrtelo. Cuchilla para cortar el hilo de Ia canilla * Cuando utilice hilos elásticos como, por ejemplo, Ia lana, no corte el hilo despué s de pasarlo por el guiahIlos de Ia canilla. Sáquelo y deje sueltos unos 15cm de hilo. F. Vuelva a colocar Ia tapa del alojamiento de Ia canilla en su sitio. Tapa del alojamiento de Ia canilla. Nota: No necesita sacar el hilo de Ia canilla para empezar a coser. English Upper threading IMPORTANT: Turn the machine OFF. A. Put a thread spool and spool cap on to the spool pin. • For a small thread spool, use small cap size. • For a large thread spool, use large cap size. * Leave a space of 1/16”(2 mm) between the thread spool and spool cap. B. Press the needle up and down button and raise the needle to its highest position. * Instead of pressing the needle up and dow n button, you can turn the handwheel to raise the needle to its highest position. C. To thread the tension disks, ALWAYS raise the presser foot hft. D. Hold the thread with one hand, press the thread with the other hand and thread the thread guide. Thread the machine straight down the expr ess thread path. E. Pass the thread through the needle threa d guide. F. Thread the needle eye from the front to back,leaving about 6”(l 5cm) of thread. * Needle threading is easier using the need le threader (See page 17). Español Enhebrar el hilo superior IMPORTANTE: Apague Ia máquina. A. Coloque una bobina de hilo y el tope de bobina en el eje portabobina. Para una bobina pequena Para una bobina grande ± Deje uh espacio de 2 mm entre Ia bobi na y el tope. B. Pulse el botOn para subir y bajar Ia aguj a y suba Ia aguja hasta el tope. ± En lugar de utilizar este botón, también pued e girar el volante para subir Ia aguja. C. Para enhebrar Ia placa de tension, suba SIEMPRE Ia palanca del prensatelas. D. Sujete el cabo del hilo con una mano, ejerz a una presiOn en el hilo con Ia otra, y emp iece a enhebrar. Enhebre siguiendo el recorrido indicado. E. Pase el hilo por el guiahIlos de Ia aguj a. F. Pase el cabo del hilo por el ojo de Ia aguj a, de adelante hacia atrás, y deje unos 15cm de hilo suelto. * Resulta más fãcil enhebrar Ia aguja con el enhebrador (consulte Ia página 17). A B C D English How to use needle threader Note: • See “Fabric, thread and needle guide” (page 21) to determine which thread and needle to use. • This needle threader is for needles larger than #75/ 11. A. First, make sure that the needle thread guide is threaded correctly. B. Press the needle up and down button and raise the needle to its highest position. Instead of pressing the needle up and down button, you can turn the handwheel to raise the needle to it’s highest position. C. • Turn the machine OFF. Raise the presser foot lift. D. • Hook the thread to the thread guide A. Español • • • • • Preparaciôn de Ia máquina Cómo se utiliza el enhebrador de aguja Nota: • Consulte Ia “Tabla de telas, hilos y agujas” (página 21) para saber qué hilo y aguja Pu, utilizar. • Este enhebrador no se puede utilizar para Ia ag #75/11. A. Antes de enhebrar Ia aguja, asegürese de que E hilo pasa correctamente por todas las guIas. B. Pulse el botOn para subir y bajar Pa aguja y subs aguja hasta el tope. + En Iugar de utilizar este botOn, también puede g el volante para subir Ia aguja. C.’ Apague Ia máquina. • Suba Ia palanca del prensatelas. D. Pase el hilo por el gancho A. E F G H English I Español E. Pass the thread under the thread guide B. F. Put the thread into the slit of the thread guide C. Pull out about 4”(lO cm) of the thread. G. Press down the needle threader lever slowly, so that the guide will rotate and the hook will pass through • the needle eye. H. Slowly return the lever and the needle will be • threaded automatically. Pull out thread toward the back of the machine • under the presser foot leaving 6”(l 5 cm) of the thread. I. If threading the needle eye was unsuccessful, use • the needle threader again. • • E. Pase el hilo por debajo del guiahIlos B. F. Pase el hilo por Ia ranura del guiahflos C. Deje sobrepasar unos 10 cm de hilo. G. Baje despacio Ia palanca del enhebrador para girar Ia guIa e introducir el gancho en el ojo de Ia aguja. * Para poder enhebrar Ia aguja, se debe introducir siempre el gancho en el ojo de Ia aguja. * Si el gancho estã doblado y no entra en el ojo de Ia aguja, utilice el destornillador para enderezarlo. H. Suba despaclo Ia palanca. La aguja se enhebrará automáticamente. Tire del hilo hacia Ia parte de atrás de Ia máquina, pasándolo por debajo del prensatelas, y deje libre uncabodel5cm. I. Si no se ha enhebrado Ia aguja, vuelva a pasar el hilo por Ia gula e intente de nuevo enhebrar Ia aguja con el enhebrador. ___________ ___ ___________ B A D C English Changing the presser foot IMPORTANT Ensure the presser foot is secure4’ held by the presser foot holder Removing the presser foot A. Turn the machine OFF. Turn the handwheel toward you and raise the needle. Also raise the presser foot lift. B. Push the button of presser foot holder and the foot will come off. Attaching the presser foot C. Position a new foot under the presser foot holder with the pin right beneath the groove of the holder. D. Lower the presser foot lift slowly so that the presser foot holder catches the foot. Español Reemplazo del prensatelas • ADVERTENCIA Para evh’arher/das, asegUrese de que elprensatela: esti correctamente sujeto en su soporte. • Desmontaje del prensatelas A. Apague Ia máquina. Gire el volante hacia Ud. para levantar Ia aguja. Suba Ia palanca del prensatelas. B. Pulse el botOn del soporte del prensatelas para qi se suelte el prensatelas. Instalación del prensatelas C. Coloque un prensatelas nuevo debajo del soporte procurando que Ia varilla del prenstatelas quede debajo de Ia ranura del soporte. D. Baje Ia palanca del prensatelas despacio hasta qi se junten el prensatelas y su soporte. B A C c-i C-2 Occ::I::: 0 English Changing the needle IMPORTANT After changing the needle always make sure the needle c/amp screw ic ti’ghtened hrmv Do not use bent needle. A.• Turn the machine OFF. • Bring the needle to its highest position. • Loosen the needle clamp screw with a screw driver and remove the needle. B. Insert a new needle with the flat side away from you and push it up until it reaches the stopper ®. Tighten the needle clamp screw firmly. How to select a correct needle * Bent or dull needles will cause skipped stitches and thread breakage. c-i. o Correct needle X Defective needle C-2. 0 Correct needle X Dull needle X Bent needle Espanol Reempiazo de Ia aguja ADVERTENCIA Antes de reemp/azar Ia aguj asegürese de que el tornillo de/sopo#e de Ia agu4’ esti bin apretado. No utllh2e agujs torcidas. A.• Apague Ia máquina. • Suba Ia aguja al máximo. • Suelte el tornillo del soporte de Ia aguja con un destornillador y quite Ia aguja. B. Tornillo del soporte de Ia aguja lntroduzca Ia aguja nueva con el lado piano dirigido hacia Ud. Empuje luego Ia aguja hacia arriba hasta que toque el tope Apriete bien el tornillo del soporte de Ia aguja. Seleccionar Ia aguja correcta * Las agujas torcidas o con Ia punta mal afilada estropean Ia tela y pueden romper el hilo. C-i. 0 Aguja adecuada X Aguja defectuosa C-2. 0 Aguja adecuada X Punta mal afilada X Aguja torcida English Fabric, thread and needle table For precise stitches refer to the table below: Needle size Fabtie Thread size Light weight Sheer fabric Lawn, Georgette Standard needle #75/11 60 - 1 Cotton 50-8 Silk Synthetic 60 - 8 Medium weight Gingham, Woolen fabric, Velvet, Satin, Poplin, Soft denim, Cotton gabardine, Medium weight cloth Standard needle #75/11 #90/14 60 — 1 Cotton 50 - 8 Silk Synthetic 60 8 Heavy weight Tweed, Denim Canvas, Corduroy Standard needle #100/16 40—5 Cotton Silk 50 Synthetic 30 — 5 Stretch Knit, Jersey . Note: Ballpoint needle #1 1 Synthetic 50 6 Same size and type of threads should be used for upper thread and bobbin. • Use Ballpoint needles for stretch fabric. • Use Denim needle for thick fabric or denim. • The needle becomes thicker as the needle size number becomes larger. • The thread becomes thinner as the thread size number becomes larger. • Español Tabla de telas, hilos y agujas Para mejorar Ia calidad de las puntadas, consulte Ia siguiente tabla: • Tela Tamaño de Ia aguja Grosor del hilo AlgodOn (de 60 a 1 Seda (de 50 a 80) Sintético (de 60 a Ligera Linón, crespOn Aguja estãndar #75/11 Peso medio Guinga, lana, terciopelo, raso, popelina, tejano ligero, gabardina de algodOn, telas de peso medio Aguja estándar #75/11 a #90/14 AlgodOn (de 60 a 1 Seda (de 50 a 80) Sintético (de 60 a Pesada Tweed, tejano, tapicerla, pana Aguja estandar #100/16 AlgodOn (de 40 a E Seda (de 50) Sintético (de 30 a Elástica Punto Aguja de punta redonda #11 Sintético (de 50 a Nota: • • • • • El hilo superior y el hilo de Ia canilla han de ser de mismo grosor y tipo. Utilice agujas de punta redonda para las telas elásticas. Utilice agujas “Denim” para coser telas gruesas, tejanos, cortinas o galones. El grosor de las agujas aumenta con su tamano. Cuanto mayor sea el numero de hilo, más fino será éste. Espanol English 4. SEWING Straight stitch for the stitch pattern. A/ways use correct presser foot A. Attach the zigzag foot. B. Set the stitch width at “0”. “0”, the stitch will When the stitch width is not set at zigzag. and select straight C. Turn the stitch selection dial stitch (Stitch No.2). “1” and “4”. D. Set the stitch length between “4”. at dial E. Set the thread tension Lower the needle by • Insert the fabric under the foot. n button. pressing the needle up and dow • Lower the presser foot lift. and start sewing. • Press the start and stop button step on the foot control W When using the foot control, to start the machine. t slowly. ± The first 2 or 3 stiches will star Removing the fabric and stop the ma F. Press the start and stop button chine. release the foot control. * When using the foot control, gently pull the fabric G. Raise the presser foot lift and to the left. excess thread with the thread cutter. Cut H. • • • • • 4.COSTURA Punto recto ADVERTENCIA cuado a! tipo d6 Utth’e si’mpre tin prensate/as ade punto. turas en zigzaç A. Coloque un prensatelas para cos ag Prensatelas para costuras en zigz puntada en I de a hur anc de ctor B. Coloque el sele posiciOn ‘0”. de puntada se ± Cuando el selector de anchura el “0”, Ia máquir que n encuentra en otra posiciO cose en zigzag. a seleccionar el pu C. Gire el selector de punto par recto (n°2). d de puntada enti D. Coloque eI selector de longitu I4h1 1 y el hilo en Ia posick E. Coloque el selector de tension del telas. Baje Ia Coloque Ia tela debajo del prensa Ia aguja. con el botón de subida y bajada de • s. tela • Baje Ia palanca del prensa arranque y parada, y empiec • • Pulse el botón de coser. pIselo para arranc • ± Si utiliza el mando de pedal, máquina. se hacen muy • ± Las 2 O 3 primeras puntadas despacio. Para sacar Ia tela ada para parE F. Pulse el botOn de arranque y par máquina. levante el pie. utiliza el mando de pedal, ——n+ Si ± t•dnn —•--— - . _I__i I, A B Dj © C 0 x H r —II r II -- - r . x — F=RJFRT © English Reverse stitch To reinforce the seam, it is recommended to begin or end seams with several stitches in reverse. A • Mark the point of reverse stitching as shown in the illustration. Place the fabric under the foot so that the needle pierces the fabric at the beginning of reverse stitch. Lower the presser foot lift. Reverse stitch © Forward stitch © Reverse stitch B • Press down the reverse stitch lever ® and start sewing backward. The sewing speed will be between 90 —150 r.p.m. Adjust the speed with the speed control lever®. Release the lever to stop sewing. C. Adjusting thread tension A balanced stitch is formed when the tensions of both upper and bobbin threads are even and locked in the middle of the layers. Set tension dial at “4” for normal sewing. When you have irregular stitches Top stitch is too tight This means the upper thread tension is too tight. Reduce the tension by turning the dial to a smaller number. © : This means the upper thread tension is too loose. Increase the tension by turning the dial to a larger number. Espanol Inversion de puntada Para reforzar Ia costura, se recomienda empezar y acabar las costuras haciendo varios puntos en sentido inverso. A • Marque el punto donde ha de invertirse Ia puntada. Coloque Ia tela debajo del prensatelas e introduzca Ia aguja en Ia tela en el punto donde vaya a empezar a invertir Ia puntada. Baje Ia palanca del prensatelas. Puntada invertida © Puntada en el sentido de Ia costura © Puntada invertida B. Baje Ia palanca de inversiOn de Ia puntada ® y empiece a coser al revés. La velocidad de cosido se sitüa entre 90 y 150 rpm. Ajuste Ia velocidad con el selector de velocidad ®. Para parar de coser, suelte Ia palanca. C. Ajuste de Ia tension del hilo ®: La puntada queda equilibrada cuando Ia tensiOn del hilo superior y Ia del hilo de Ia bobina son iguales y que los hilos se juntan en el medio de las capas. Coloque el selector de tensiOn en Ia posicion “4” para las costuras normales. Puntadas irregulares : Puntada demasiado apretada Esto significa que el hilo superior estã demasiado tenso. Reduzca Ia tensiOn seleccionando un nümero inferior. ©: Puntada demasiado floja Esto significa que el hilo superior está demasiado flojo. Aumente Ia tensiOn seleccionando un numero mayor. English Zigzag stitch For neater finishes, slightly reduce the upper thread tension. Basic zigzag sewing A. Attach the zigzag foot. B. Set the stitch width between “3” and “6”. C. Turn the stitch selection dial and select zigzag stitch (Stitch No.2). D. Set the stitch length between “Q.5” and “4”. E. Slightly reduce the thread tension. Adjusting thread tension F. Bobbin thread appears on the right side. Reduce the tension by turning the dial to a smaller number. G.Upper thread appears on the wrong side. Increase the tension by turning the dial to a larger number. Español Costura en zigzag Para obtener un mejor resultado, afloje Ia tensiOn del hilo superior. Costura básica en zigzag A. Coloque un prensatelas para costuras en zigzag Prensatelas para costuras en zigzag B. Coloque el selector de anchura de puntada entre el “3” y el “6”. C. Gire el selector de punto para seleccionar el punto en zigzag (n°2). D. Coloque el selector de longitud de puntada entre el “0,5” y el “4”. E. Afloje ligeramente Ia tensiOn del hilo Ajuste de Ia tension del hilo F. El hilo de Ia canilla aparece por el lado derecho. Reduzca Ia tensiOn seleccionando un nümero inferior. G.El hilo superior aparece por el revés. Aumente Ia tensiOn seleccionando un nümero mayor. I Enghsh Overcasting loot ric you are sewing. ric edges from fraying. tern and the foot for the fab pat Overcasting prevents fab ch stit te ria rop app le and select the 1. Refer to the following tab rcasting foot. to “5” when using the ove th wid ch stit the set ays * Alw Fabric Stitch width Stitch # Sttitch length Presser foot b . Light weight Medium weight 1-2 46 55 Overcasting foot Heavy weight Standard needle #75/11 Ballpoint needle (Elastic) Standard needle #75/11 #9O/14 1 5 2 Zigzag foot Needla 19 Ballpoint needle (Elastic) Standard needle #90/14 — #100/16 Espan& hilar Prensatelas para sobre respondan a Ia tela se deshilache. El sobrehilado evita que Ia el prensatelas que mejor cor y a tad pun de o tip el ar la para seleccion 1. Consulte Ia siguiente tab a sobrehilar. tela que vaya a coser. se usa el prensatelas par ndo cua “5” re mp sie ser de El ancho de Ia puntada ha Tela Puntada # Ancho de Ia punfda Longitud tie Ia puntada % Ligera Peso medio ? 5 6 4 5 2 5 2 1 1 — Prensatelas Prensatelas para costuras en zigzag 19 Aguja estándar #75/11 (tel Aguja de punta redonda elástica) #75/11 —#90/14 4 Prensatelas para sobre hIar Pesada Aguja Aguja de punta redonda (tela elástica) #90/14 —#100/16 2 B A Espanol English 2. • Turn the handwheel until the needle moves to the right. Place the fabric so that needle pierces just outside the edge. • Lower the needle. • Lower the presser foot lift and start sewing. When using the overcasting foot, make sure that the foot guide is at the right edge of the fabric. Appliqué A.. Draw a design on the material for the appliqué and cut it out. • Place the cut-out on the base fabric and baste or pin it. B. Sew around the edge of cut-out with zigzag stitch. !€ Use the stitch width of ‘3” or “4” and the stitch length between “0.5” and “2” according to the shape and size of the appliqué and fabric type. To change direction at corners or to sew very small circles, stop the machine with the needle piercing outside the edge, raise the presser foot lever and turn the fabric. Gire el volante hasta que Ia aguja se desplace hacia Ia derecha. Coloque Ia tela de modo que Ia aguja quede ligeramente fuera del borde de Ia tela. • Baje Ia aguja. • Baje Ia palanca del prensatelas y empiece a coser. Cuando cosa con el prensatelas para sobrehilar, procure que Ia guIa del prensatelas quede pegada al borde de Ia tela. 2. • Parches Haga el dibujo del parche en Ia tela y recôrtelo. • Coloque el dIbujo sobre Ia tela y fijelo con un hilvan o con alfileres. B. Sobrehile los bordes del parche. * La anchura de Ia puntada ha de ser de “3” O “4” y Ia longitud de Ia puntada ha de situarse entre “0,5” y “2”, segün Ia forma y el tamaño del parche y de Ia tela de base. * Para cambiar de direcciOn en las esquinas o para hacer pequeños cIrcuios, pare Ia máquina con Ia aguja fuera del borde del parche, suba Ia palanca del prensatelas y dé vuelta a Ia tela. A. • A B C x l/8(3—5mm) #6 1 E ’? D E F ox x © xJjJjLj L( HL< English Blind hem toot The thread will not appear on the right side of the fabric. A. Attach the blind hem foot. B. Turn the sitich selection dial and select blind hem stitch (Stitch No.4 or 6). Set the stitch width between “4” and “6” and the stitch length between “1” and “2” C. • Fold the fabric as shown in the illustration. • Baste or press the fold before sewing. D. Place the fabric so the zigzag catches one or two threads of the folded edge. E. • Lower the presser foot lift. • Adjust with the adjustment screw so that the foot guide moves along the fold. Correct hem X-Y ®: When the fabric is opened, the right side of the fabric will show only the blind hem stitches. Incorrect hems X-Y : The needle is catching the edge of the fold too much. Stitches on the right side are too big. X-Y © : The needle is not catching the edge of the fold at all. Blind hem stitches are not formed. Español Prensatelas para costuras invisibles El punto invisible de dobladillo permite coser dobladillos quedando el hilo casi invisible en Ia te el color del hilo corresponde al de Ia tela). A. Coloque un prensatelas para costuras de dobk invisibles Prensatelas para costuras de dobladillo invisibl B. Gire el selector de punto para seleccionar el pi. invisible de dobladillo (n°4 o 6). Seleccione un anchura de puntada entre “4” y “6” y una longit puntada de “1” o “2”. C. • Doble Ia tela como se muestra en Ia ilustració • Hilvane o presione el pliegue antes de coser. D. Coloque Ia tela de modo que el zigzag vaya cogiendo uno o dos hilos en el borde del pliegL E. • Baje Ia palanca del prensatelas. • Ajuste Ia gula del prensatetas con el tornillo d ajuste para que vaya pegada al pliegue. Costura correcta X-Y ®: Cuando se abre Ia tela, sOlo aparecen puntadas invisibles por el laclo derecho d tela. Costuras incorrectas X-Y : La puntada del lado derecho de Ia tela es demasiado ancha. X-Y ©: No se ha hecho el dobladillo A B C D J English Buttonhole foot You are able to stitch a buttonhole that matches the size of a button. Note: • This toot is not able to sew a buttonhole for a button larger than 1 “(2.7 cm) in diameter. You cannot use thick buttons or buttons with unique shapes. • When stitching stretch or light weight fabric, it is recommended to use a stabilizer for better finishes. A. Attach the buttonhole foot. B. Turn the stitch selection dial and select buttonhole stitch (Stitch No.1). Set the stitch length between “0.4” and “0.6”. Set the stitch width between “4” and “5”. C. Mark the buttonhole position on the fabric as illus trated. D. Starting position • Place a button on the button plate ®. • Insert the fabric so that the marked position is under the needle. • Lower the presser foot lift. • Draw the upper thread and place it under the buttonhole foot with the bobbin thread. Español Prensatelas para ojales Se pueden hacer ojales que correspondan al támano de los botones. Nota: • Con esta máquina no se pueden hacer ojales de mas de 2.7 cm de diámetro. No se pueden utilizar botones redondos, gruesos o de forma especial. • Si Ia tela es elãstica o ligera, conviene colocar un estabilizador para obtener un resultado más bonito. A. Coloque un prensatelas para ojales. Prensatelas para ojales B. Gire el selector de punto para seleccionar el ojal (n01). La longitud de Ia puntada ha de situarse entre “0.4” y “0.6”. La anchura de Ia puntada debe ser de “4” o “5”. C. Marque Ia posición de los ojales en Ia tela, como se muestra en Ia ilustraciOn. D. Posicion inicial • Coloque el botOn en el alojamiento ©. • Coloque Ia tela procurando que Ia marca del ojal quede debajo de Ia aguja. • Baje Ia palanca del prensatelas. • Tire del hilo superior y páselo por debajo del prensatelas, con el hilo de Ia canilla. Prensatelas para ojales __________________ E ___ F 3 II G H English E. • Pull down the buttonhole lever , and push the lever to the back until Lclicks, Press the start and stop button to start sewing. * When using the foot control, step on the foot control to start the machine. F. • The buttonhole sewing is complete in the order of ‘3) as shown. • Stop the machine when the needle returns to the starting position.. * When using the foot control, release your foot from the foot control. • Raise the presser foot lift and remove the fabric. G. • For reinforcement, pull out the upper thread from the wrong side by pulling the bobbin thread and tie a knot WARNING To prevent injury, do not hold the buttonhole cutter against your hand, H. With a buttonhole cutter, carefully cut an opening in the middle of the buttonhole. * To prevent over cutting, place a pin through the bartacks. Español E. Baje Ia palanca @ del ojal y emp(4ela hada atn hasta que haga dic. • Pulse el botôn tie arranque y parada, y empiec coser,. * Si utiliza el mando do pedal. piselo para arranc máquina. F• El ojal se coseen at ordena, • Pare Ia mãquina cuando Ia aguja llegue ala posij inicial. * Si utiliza el mando tie pedal, levante at pie. • Levante Ia palanca del prensatelas y saque la tela. I G. • Para reforzar at ojat, saque at hilo supeior pod revés de Is tela, tirando del hUe de Ia eanilla, haga tin iludo. ADVERTENCIA Para evitar heridas, mantenga at abreojales ale su mano, H. Abra el ojal por el medlo con el abreojales. * Ponga un alfiler a cads extremo pars no cortar de Ia cuenta, A B © C D E I4 English Unsuccessful buttonhole sewing It the buttonhole sewing is unsuccessful, follow the instructions below before starting to sew the next buttonhole. A.. If the sewing was unsuccessful at the positions CD 1 Raise the buttonhole lever up. 2 Raise the buttonhole foot and gently pull out the fabric. 3 Undo all the threads (use the buttonhole cutter). 4 Remove the thread from the needle eye and turn the handwheel toward you for ten times. 5 Sew a new buttonhole from the beginning. B.. If the sewing was unsuccessful at the positions ® 1 Raise the buttonhole foot and gently pull out the fabric. 2 Undo all the threads (use the buttonhole cutter). 3 Sew a new buttonhole from the beginning. Adjusting the stitch balance C. Occasionally, the left and right buttonhole columns may need to be balanced on specialty fabric. In such case, adjust the stitch balance by turning the button hole stitch adjuster ® on the back of the machine. Use a coin or a screwdriver to turn the buttonhole adjuster. D. • If the right side of the buttonhole is too dense, turn the buttonhole adjuster to the direction. E. • If the left side of the buttonhole is too dense, turn the buttonhole adjuster to the direction. I 4 Español Ojales mal hechos Si los ojales están mal hechos, tome las medidas siguientes antes de pasar a otro ojal. A.. Si salen mal los lados CD y ® 1 Levante Ia palanca para ojales. 2 Levante el prensatelas y saque Ia tela. 3 Deshaga toda Ia costura. (Utilice para ello el abreojales) 4 Saque eI hilo de Ia aguja y haga 10 puntadas. 5 Vuelva a hacer el ojal. B.• Si salen mal los lados ® y 1 Levante el prensatelas y saque Ia tela. 2 Deshaga toda Ia costura. (Utilice para ello el abreojales) 3 Vuelva a hacer el ojal. Ajuste de Ia puntada C. Con ciertos tipos de tela, es a veces necesario ajustar los lados derecho e izquierdo de los ojales. Para ello, gire el mando de ajuste de Ia puntada de los ojales ®, situado en Ia parte de atrás de Ia máquina. Utilice una moneda o un destornillador para girar el mando. D. • Si las puntadas del lado derecho del botOn están demasiado separadas, gire el mando de ajuste de Ia puntada en Ia direcciOn E. • Si las puntadas del lado derecho del botOn están demasiado juntas, gire el mando de ajuste de Ia puntada en Ia direcclón +. . _________ A D C B * j1LI I — ir1 F E Engtish 4 Zipper foot By using the zipper foot. zipper sewing can be easily accomplished. First sew the left side of the zipper. A. Attach the zipper foot so that the presser foot holder catches right side of the pin ®. B. Turn the stitch selection dial and select straight and stitch (Stitch No2). Set the stitch width to and 3”. thestitch length between as illustrated. together fabric and zipper the Baste C. the right side is on zipper the that so fabric the D. Place of the foot. E. • Lower the presser foot lift, • Sew until the foot slightly touches the slider and stops the machine. F. • Lower the needle. Raise the presser foot lifter. • Turn the fabric and move the slider behind the presser foot. Lower the presser foot and sew to the end. G. ‘ Remove the foot and attach to the left side of the presser foot pin @, • Sew the right side of the zipper following the same stepsD—R * Sewing toward same direction will eliminate uneven finishes. 0 Español Prensatelas para cremalleras Las cremalleras se cosen facilmente con el prensatelas para cremalIeras Cosa primero el lado izquierdo de Ia cremallera. A. lnstal el prensatelas para cremalleras procuran que el soporte de este quede sujeto a Ia varilla di derecha ®. B. Gire el selector de punto para seleccionar el punt recto (n°2). Seleccione una anchura de puntada 1 6 y una longitud de puntada de hilvánelas. e cremallera Ia sobre Ia tela C. Coloque con Ia prensatelas, del debajo 0. Coloque Ia tela éste. de cremallera del lade derecho E. • Baje Ia palanca. del prensatelas. • Cosa hasta que el prensatelas toque ligerament el cursor y pare Ia maquina. F. • Baje Ia aguja. Suba Ia palanca del prensatelas. • Gire Is tela pars colocar el cursor deträs del prensatelas. Baje el prensatelas y siga cosiendo hasta elfin G. ‘ Suelte el prensatelas y sujete el soporte del prensatelas a Ia varilla de Ia izquierda del prensatelas . • Cosa el lado derecho de Ia cremallera como se indica en los puntos D a F. * Cosiendo en la misrna dirección se mejora 51 resultado evitando costuras desiguales. A B C D #eLi ‘1 Ii — E I HP English Español Stretch stitch Stretch stitch is particularly suitable for reinforcing the seam or for sewing stretch fabric. When sewing stretch fabric such as jersey, it is recommended to use ballpoint needles for neater seams. A. Attach the zigzag foot. B. Set the stitch width and the stitch length as shown on the help window LCD. C. Turn the sitich selection dial and select stretch stitch (No.20). D. Set the stitch length at “4”. E. • Insert the fabric under the foot. • Lower the needle. • Lower the presser foot lift and start the machine. Punto elástico El punto elástico conviene especialmente para reforzar costuras o coser telas elásticas. Para coser telas elásticas como el punto, se recomiencla utilizar agujas de punta redonda para obtener costuras más limpias. A. Coloque un prensatelas para costuras en zigzag Prensatelas para costuras en zigzag. B. Seleccione Ia anchura y Ia longitud de puntada indicadas en Ia pantalla LCD. C. Gire el selector de punto para seleccionar el punto elástico (n°20). D. Coloque el selector de longitud de puntada en Ia posiciOn “4”. E. • Coloque Ia tela debajo del prensatelas. • Baje Ia aguja. Baje Ia palanca del prensatelas y empiece a coser. • • • • • Español 5. ACOLCHANDO Porpieza: El primer paso para hacer una coicha es cortar las piezas de Ta parte superior de Ia coicha. Coloque el prensatelas para 1/4” de costura. Seleccione Ta Puntada Recta #2, Largo de Puntada 2. Gula Ta orilla de las piezas a Ia par con Ia orilla del prensatelas. Una vez que ha quedado unida Ia parte superior de Ia coicha con Ta guata y Ia parte de atrás, está listo para acolcharlo. Acoichado libre: Baje los dientes de Ia máquina. Deslice el Control de los Dientes de leva hacia Ia izquierda. Utilice el Prensatelas de Zurcido (Stippling/Darning). Enhebre arriba y Ia canilla con hilo de costura. Seleccione Ia Puntada Recta # 2. La longitud de Ia puntada no importa porque los dientes de leva están abajo. Coloque Ia coicha debajo del prensatelas. Asegürese de bajar el Prénsatelas para lograr tensiOn en (a parte superior. Coloque sus manos en Ia colcha en cada lado del prensatelas. Moverá Ia tela. Practique en un pedazo de tela hasta que se sienta seguro al moviendo Ia tela. En Ia manera en Ia que mueve Ia tela usted está controlando el largo de Ia puntada y su direcciónn. TaT vez sea necesario que ajuste Ia tensiOn. Por lo general, tiene que hacerlo ligeramente más apretado ajustándolo a un nümero mayor. Eso dependerá de Ia tela, guata e hilos que utilice. Un método tradicional de acolchado se conoce como Zurcido (stippling). Usted mueve Ia tela en direcciones diversas, en curvas, creando el patrOn que se muestra. La finalidad es mover Ia tela de manera que no haga puntadas sobre las puntadas previas. Coser en Ia Orilla (Stitch in the Dicth): Muchas veces no se requiere que las puntadas de Ia colcha se vean. Stitch in the ditch (puntada en Ia ranura) significa que hace una puntada recta a 10 largo de Ia linea de pedazos cosidos. Enhebre con hilo invisible por arriba. Coloque hito de algodOn en Ia canilla. Coloque el prensatelas Caminador (Walking). Los dientes de leva deberãn estar en arriba. Seleccione Ia Puntada Recta #2, Largo de Puntada 3. Haga puntadas en Ia “ranura” creada por las costuras. Acoichado de Canal: El acoichado de canal son filas de puntadas con una separación pareja. Coloque el Prensatelas Caminador (Walking). Los dientes de leva deberán estar elevados. Deslice Ia barra de Acolchado. Determine Ia distancia deseada entre las filas de puntadas y ajuste Ia distancia de Ia aguja en Ia barra. Seleccione Ia puntada recta #2, Largo de Puntada 3. Marque Ia primera fila con un marcador para tela. Cosa sobre Ia Ilnea marcada. Cosa las fi!as adicionales, guiando Ia barra de acolchado a lo (argo de Ia Ilnea de costura anterior. Acoichado con Parches Locos: El acolchado con parches locos se logra con piezas irregulares de tela y luego se cose sobre las costuras con puntadas decorativas. Corte las figuras, luego inserte el prensatelas Zigzag. Enhebre con hilo decorativo como el hilo para Bordar de RayOn Sulky 4Owt para Ia parte de arriba y con hilo para costura en Ia canilla. Coloque el estabilizador desechable debajo de Ia parte superior de Ia colcha y haga sus puntadas decorativas favoritas sobre las costuras. I I I I I I • I • I • I I I I I I I I I I $ I I I I I I I I I I I I I I I I I I I I I I • • I • I I I * I I I I I I I I I I I I I I I I I * I I I I I I I I A B C D English 6. MAINTENANCE Your machine requires regular cleaning (and lubrication) for best possible sewing performance. Note: • Wipe any stains with a soft cloth. • Do not allow water to touch the sewing machine. • Do not use detergent, bleach, benzene or thinner. It may cause discoloration and cracking. Cleaning the feed dog and shuttle area (how to remove the bobbin case) If threads are stuck in the bobbin case or shuttle area, follow the instructions below to remove the bobbin case. • Unplug the machine and remove the needle and the presser foot. A • Open the bobbin case cover by sliding it toward you and remove the bobbin. B • Insert the screwdriver into the right opening on the rear of the needle plate. Tip the screwdriver toward you and snap off the needle plate. C • Lift the bobbin case toward you and remove it. • Clean the lint and dust off the bobbin case. D With a soft cloth or brush, clean the thread and dust on the feed dog and shuttle area. A vacuum cleaner may be used to clean up the threads. N • • • • • • • • • • • Español 6. MANTENIMIENTO Para obtener un resultado optimo, es necesa y engrasar Ia máquina de vez en cuando. Nota: • Limpie todas las manchas con un paño si • Evite todo contacto de Ia maquina con el • No use detergentes, lejIa, gasolina, benc diluyentes. Estos productos pueden ocasionar decolorac grietas. Limpieza de Ia zona del prensatelas y de Ia I (desmontaje del alojamiento de Ia canilla) * Cuando el hilo se enreda en el alojamientc canilla o en Ia Ianzadera, siga las instrucci dadas a continuación para desmontar el al de Ia canilla. * • Desenchufe Ia mäquina y quite Ia aguja y prensatelas. A • Deslice Ia tapa del alojamiento de Ia caniH Ud. para abrirla y saque Ia canilla. B • lntroduzca Ia punta del destornillador en l situada de lado derecho de Ia placa de Ia Empuje el destornillador hacia atrás para placa. C • Levante el alojamiento de Ia canilla hacia sáquelo. • Limpie Ia pelusa y el polvo que haya en el alojamiento de Ia canilla. D Con un paño suave o una brocha, limpie el quite el polvo que haya en Ia zona de los d Ia Ianzadera. niicHc i ifIIir j.... B A C English Attaching the bobbin case A. Replace the bobbin case back in its place. B. Place the needle plate on the bobbin case and slide it from front to back. C. Turn the handwheel and see if it moves smoothly. If the bobbin case is attached incorrectly, the handwheel is heavy and does not turn smoothly. In such case, remove the bobbin case and attach it again. Español • • • • Instalaciôn del alojamiento de Ia canilla A. Vuelva a colocar el alojamiento de Ia canilla en su sitio. B. Ponga Ia placa de Ia aguja sobre el alojamiento de Ia canilla y desilcela hacia atrás. C. Gire el volante y compruebe su movimiento. Si el alojamiento de Ia canilla está mal colocado, el volante está duro y gira con dificultad. Saque el alojamiento de Ia canilla y vuelva a colocarlo. B A D C English Changing the light bulb WARNING For your safety, always disconnect the machine from the power supply. To prevent burns and electric shocks, let the bulb cool down before replacing it. Bulbs can be purchased at your nearest dealer. (Always use 12V 5W model T1O bulbs) A. • Ensure the machine is unplugged and the light bulb is cool. • Loosen the screw on the face cover and remove the face cover as shown in the illustration. B. • Gently pull the bulb downward to remove it. • Insert a new bulb by pushing it all the way to the top. C. • Lower the presser foot pressure rod. D. • Insert the presser foot pressure rod into the presser foot pressure adjustment lever. Attach the face cover. E. Check if the presser foot pressure adjustment lever moves smoothly. If it does not, remove the face cover and repeat the steps C E. - E Español Reemplazo de Ia bombilla ADVERTENCIA Para su seguridad, desenchufe siempre Ia ma Ia toma de corriente de Ia pared. Para evitar quemaduras y descargas eléctrica enfriar Ia bombilla antes de reemplazarla. Cualquier vendedor de máquinas de coser de podrá proporcionarle bombillas. (Utilice siempre bombillas de 12V 5W del mod A. • Asegürese de que Ia maquina está desen y que Ia bombilla está frIa. • Saque el tornillo de Ia tapa lateral y quite como se muestra en Ia ilustración. B. • Tire despacio de Ia bombilla hacia abajo p quitarla. • Coloque una bombilla nueva empujándoI arriba hasta el tope. C. • Baje Ia varilla de ajuste de Ia presiOn del prensatelas. D. • Introduzca Ia varilla en Ia palanca de ajusi presiOn del prensatelas. Coloque Ia tapa l E. Compruebe que Ia palanca de ajuste de Ia del prensatelas se mueve normalmente. Si no es asI, vuelva a quitar Ia tapa lateral y seguir las instrucciones desde el punto tres E. Espanol 7. MENSAJES DE ERROR Y ALARMAS En Ia pantalla LCD de Ia máquina de coser salen mensajes de error cuando no se utiliza Ia máquina correctamente. Cuando aparezca uno de estos mensajes, resuelva el problema siguiendo las instrucciones dadas a continuaciOn. Mensaje de error Parpadeo en Ia pantalla y sonidos de alarma (“bip”) * if Origen posible y solución 35 — — # ‘i 5 - - — Solución Baje Ia palanca del prensatelas. Posible causa Se ha pulsado el botón de arranque y parada (o palanca de inversiOn de Ia puntada) estando Ia palanca del prensatelas levantada. p 0-i F - as Soluciôn — — — Baje Ia palanca del ojal y empüjela hacia atrás hasta que haga”clic”. -- ‘-F Causa posible El botOn de arranque y parada ha sido pulsado estando seleccionada Ia puntada para ojales (puntada n°1), y con Ia palanca para ojales levantada. SoluciOn Levante Ia palanca para ojales. Causa posible El boton de arranque y parada ha sido pulsado sin estar seleccionada Ia puntada para ojales (puntada n°1), y con Ia palanca para ojales hacia abajo. SoluciOn Desplace el eje para hacer canilla hacia Ia derecha. Causa posible El eje para hacer canilla ha sido desplazado hacia Ia izquierda mientras Ia canilla estaba bobinando. Solución 1 Enchufe correctarnente el cable del mando de pedal. 2 No pulse el boton de arranque y parada cuando Ia máquina esté conectada al mando de pedal. Causa posible 1 El mando de pedal se ha desconectado mientras Ia máquina estaba cosiendo. 2 El botOn de arranque y parada ha sido pulsado estando conectado el mando de pedal a Ia maquina. Solución Seleccione Ia longitud de puntada adecuada . # if 3-5 D.5- --- — \, . * if Parpadeo en Ia pantalla Sin sonido de alarma 3-5 C5-’-I Causa posible *1 - as SoluciOn Causa rs,-,kIô 1 Se ha seleccionado una costura elástica (n°11-20) sin colocar el selector de anchura de Ia puntada en Ia posiciOn “4”. 2 El selector de anchura de Ia puntada esta en Ia posicion “4” con los puntos n°1 o n°3-1 0 seleccionados. Seleccione una anchura de puntada correcta (que no sea el “O’) El selector de anchura de Ia puntada está en “0” mientras que el tipo de punto seleccionado NO es el punto recto 8. TROUBLE SHOOTING Following cases are not failure of the machine. Check your machine before you call for service. sotucaON Desplace el eje para hacer canilla hacia Ia derecha. Conecte correctamente el cable de alimentación eléctrica a Ia toma de corriente y a Ia máquina. F Pulse el interruptor del lado T’. Conecte correctamente el cable de alimentaciOn eléctrica a Ia toma de corriente y a Ia máquina. P Pulse el interruptor del lado 9”. Limpie Ia lanzadera y los dientes. La aguja se rompe Vuelva a colocar Ia aguja. Apriete el tornillo del soporte de Ia aguja. Tbrnh.. e de Ia aguja demasiado Hilo superior demasiado tirante. Ajuste de Ia tension del hilo. P2 Aguja demasiado fina para Ia tela o aguja doblada. Utilice una aguja de tamaño correcto. P2 La aguja es de tipo #65/9. Consulte Ia página 21 para ver qué tipo de hilo y aguja puede utilizar. P2 La aguja no se encuentra en su posiciOn mãs elevada. • El enhebrador de aguja no funciona P Suba Ia aguja al máximo. Aguja mal colocada. Vuelva a colocar Ia aguja. Aguja doblada. El gancho del enhebrador de aguja estã doblado. Coloque una aguja nueva. Enderece el gancho con el destornillador de modo que el gancho entre por el ojo de Ia aguja cuando se baja Ia palanca del enhebrador. La guia de Ia aguja esta mal enhebrada. Vuelva a enhebrar Ia guia de Ia aguja. P17 Vuelva a enhebrar Ia canilla. P13 Ajuste de Ia tensiOn del hilo. P24 • Se ye demasiado el hilo por Canilla mal enhebrada. el lado derecho de Ia tela. P2( P18 Revés Derecho HiIo superior demasiado tirante. Español Si no se ha resuelto & proble ma, pOngase en contacto con el vendedor mãs cercano o flame a un tecnico. PROBLEMA CAUSA • Hay demasiado hilo por el revés de Ia tela. , //51— Revés Derecho SOLUCION Hilo superior mal enhebrado (La placa de tensiOn no estã enhebrada) Vuelva a enhebrar el hilo sup erior. P15 Hilo superior demasiado tirante . Hilo superior mal enhebrado. Canilla mal enhebrada. • El hilo superior se rompe PAGINA Presencia de pelusa en Ia lanzade ra. Hilo superior demasiado tirante . Ajuste de Ia tension del hilo . Vuelva a enhebrar el hilo sup erior. Vuelva a enhebrar Ia canilla . Limpie Ia Ianzadera y los die ntes. P13 Aguja o hilo inadecuados par a Ia tela. Hilo superior mal enhebrado . Vuelva a colocar Ia aguja. Coloque una aguja nueva. Utilice hNo y aguja adecuados . P20 Vuelva a enhebrar Ia aguja. P15 Ajuste de Ia tension del hilo . Vuelva a enhebrar el hilo sup P24 erior. P15 Vuelva a enhebrar Ia canilla . Aguja demasiado gruesa para Ia tela. Utilice hilo y aguja ade cuados. PresiOn excesiva del prensatel as. Levante Ia palanca de ajuste de Ia presion del prensatelas. Presencia de pelusa en los die ntes. Limpie Ia lanzadera y los dientes. Presion del prensatelas Baje Ia palanca de ajuste insuficiente. presiOn del prensatelas. de Ia Los dientes no sujetan Ia tela . Suba los dientes. P13 Hilo superior mal enhebrado. • La tela no avanza correctamente. P24 Vuelva a enhebrar el hilo sup erior. Hilo superior demasiado tirante . •Arrugas- P43 P20 Aguja doblada. Aguja mal enhebrada. P13 Vuelva a enhebrar Ia canilla . Aguja mal colocada. • La máquina se salta puntadas P15 Ajuste de Ia tensiOn del hilo . ada. Coloque una aguja nue va. Aguja doblada o con Ia punta mai alil • El hilo de Ia canilla se rom pe Canilla mal enhebr ada. P24 CanlIa mal enhebrada. P21 P10 P43 English 9. SPECIFICATIONS Model 1780 Hook Horizontal Needle Standard needle (#90/1 4X2) Plastic (Height 3/8”(l 1-1 1.6mm) / Diameter 3/4”(20.5mm)) 6 mm Bobbin type . Maximum stitch width Maximum stitch length 4 mm . Sewing speed Max:800r.p.m Mm : 90 r.p.m Needle position Center Weight I I 9kg (20 Ibs) Machine dimensions Width: 435 mm (17 in) Depth: 195 mm (8 in) Height: 325 mm (13 in) Ratings AC 120 V 60 Hz 45 W I 0.45 A (Light bulb 12 V I 5 W) Foot control 678560-AGA1 0 9. CARACTERISTICAS Espanol Modelo Gancho Aguja Tipo de canilla 1780 Horizontal Aguja estándar (#90/1 4X2) Plástico (altura 11-11,6 mm! diãmetro 20,5 mm) Anchura maxima de Ia puntada 6 mm Longitud maxima de Ia puntada 4 mm Velocidad Posición de Ia aguja Peso Max.: 800 rpm Mm.: 90 rpm Centro 9 kg Dimensiones de Ia máquina Anchura: 435 mm Prof undidad: 195 mm Altura: 325 mm Alimentación eléctrica CA 120 V 60 Hz 45W/0.45A(bombilladel2V/5W)-
 1
1
-
 2
2
-
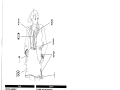 3
3
-
 4
4
-
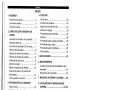 5
5
-
 6
6
-
 7
7
-
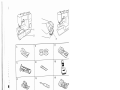 8
8
-
 9
9
-
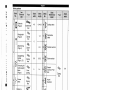 10
10
-
 11
11
-
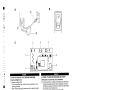 12
12
-
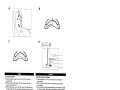 13
13
-
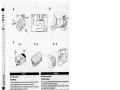 14
14
-
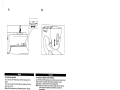 15
15
-
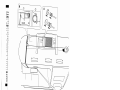 16
16
-
 17
17
-
 18
18
-
 19
19
-
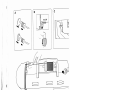 20
20
-
 21
21
-
 22
22
-
 23
23
-
 24
24
-
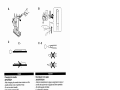 25
25
-
 26
26
-
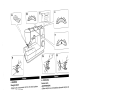 27
27
-
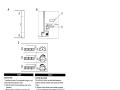 28
28
-
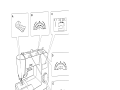 29
29
-
 30
30
-
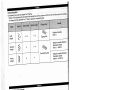 31
31
-
 32
32
-
 33
33
-
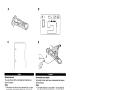 34
34
-
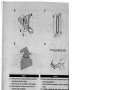 35
35
-
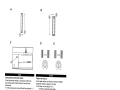 36
36
-
 37
37
-
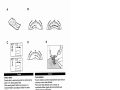 38
38
-
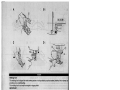 39
39
-
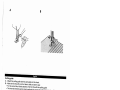 40
40
-
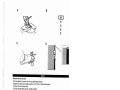 41
41
-
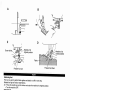 42
42
-
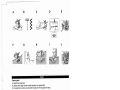 43
43
-
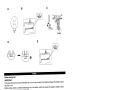 44
44
-
 45
45
-
 46
46
-
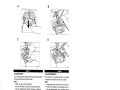 47
47
-
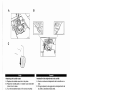 48
48
-
 49
49
-
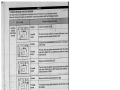 50
50
-
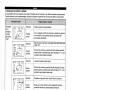 51
51
-
 52
52
-
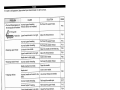 53
53
-
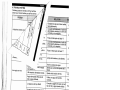 54
54
-
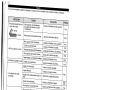 55
55
-
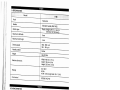 56
56
-
 57
57


White 1780 Manual de usuario
- Categoría
- Máquinas de coser
- Tipo
- Manual de usuario
En otros idiomas
- English: White 1780 User manual
Otros documentos
-
JATA MC802 Manual de usuario
-
SINGER 117 Manual de usuario
-
-
-
-
-
Kenmore Kenmore 385.17628 El manual del propietario
-
-
Duerkopp Adler 540 Instrucciones de operación
-