Brinkmann Q Beam Max Million III Owner's Manual & Operating Instructions
- Tipo
- Owner's Manual & Operating Instructions

SPOTLIGHT OWNER’S MANUAL & OPERATING INSTRUCTIONS
R
®
TM
MANUAL DEL USUARIO E INSTRUCCIONES DE
OPERACIÓN PARA LA LÁMPARA DE LUZ CONCENTRADA
TO PREVENT DAMAGE TO EYESIGHT, NEVER LOOK
INTO SPOTLIGHT WHEN LIGHT IS ON. DO NOT
SHINE LIGHT INTO THE FACE OF SOMEONE ELSE.
PARA PREVENIR DAÑO A LA VISTA, NUNCA MIRE
DENTRO DE LINTERNA CUANDO ESTÁ
ENCENDIDA. NUNCA APUNTE LUZ A LA CARA DE
OTRA PERSONA.
WARNING / ADVERTENCIA
WARNING / ADVERTENCIA
READ AND FOLLOW ALL WARNINGS AND
INSTRUCTIONS IN THIS MANUAL TO AVOID
PERSONAL INJURY OR PROPERTY DAMAGE.
LEA Y SIGA TODAS LAS ADVERTENCIAS E
INSTRUCCIONES DE ESTE MANUAL PARA EVITAR
LESIONES CORPORALES O DAÑOS A LA
PROPIEDAD.
™
INS_800-2380-0_MM3-Bi.qxd 5/16/08 2:16 PM Page 1

1
• Never place spot/flood light face down when light is on or is still hot from recent use. Doing so could
burn/ignite surfaces such as seats, carpeting, etc. and cause major property damage. Always turn spot/flood
light off when not in use.
• To prevent serious damage to eyesight, never look into spot/flood light when light is on. DO NOT shine light
into the face of someone else.
• DO NOT touch lens of spot/flood light when light is on or if it was recently on. The lens will be hot and could
cause serious burns.
• DO NOT place spot/flood light in water. Keep all components dry and out of water at all times.
• DO NOT allow children to handle or operate this spot/flood light.
• DO NOT use this product for other than its intended use.
• DO NOT charge or operate in close proximity of combustible or flammable materials.
• DO NOT charge battery in gas tight enclosures.
• DO NOT attempt to charge battery pack using both AC and DC chargers at the same time.
• DO NOT attempt to charge or operate this spot/flood light if cord, plug, battery, bulb or any part of the
spot/flood light is damaged or corroded.
• DO NOT allow metal parts to touch metal contacts on battery as this can cause a short circuit and result in
a fire.
• DO NOT use an outdoor AC outlet to recharge battery.
• To prevent accidental electrical shock we recommend this product always be charged on a GFCI (Ground Fault
Circuit Interrupter) outlet.
• Only use charging devices that are provided with the Q-Beam Max Million III Rechargeable Spot/Flood light or
its replacements.
• DO NOT disassemble or tamper with the battery.
• DO NOT dispose of battery in fire as this may result in explosion.
• When disposing of battery, place electrical tape over metal contacts on battery to prevent short circuit which
could cause a fire.
• The sealed battery contains lead and must be recycled or disposed of properly. Contact your local county solid
waste authority for proper recycling or disposal information.
USE CAUTION AND COMMON SENSE WHEN OPERATING YOUR RECHARGEABLE LIGHT.
FAILURE TO ADHERE TO THE SAFETY WARNINGS AND GUIDELINES IN THIS MANUAL
COULD RESULT IN BODILY INJURY OR PROPERTY DAMAGE.
SAVE THIS MANUAL FOR FUTURE REFERENCE.
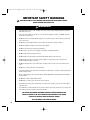
IMPORTANT SAFETY WARNINGS
READ AND FOLLOW ALL SAFETY WARNINGS AND INSTRUCTIONS IN THE OWNER’S MANUAL
BEFORE OPERATING SPOT/FLOOD LIGHT.
WARNING
INS_800-2380-0_MM3-Bi.qxd 5/16/08 2:16 PM Page 2

Inspect contents of the box to ensure all parts are included and undamaged.
2
OPERATING INSTRUCTIONS
READ AND FOLLOW ALL SAFETY WARNINGS AND INSTRUCTIONS IN THE OWNER’S MANUAL
BEFORE OPERATING SPOT/FLOOD LIGHT.
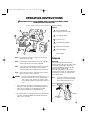
Part List:
Q-Beam Max Million III
Rechargeable Spot/Flood Light
1 Rechargeable Battery
3 Colored Lenses
\ 12-volt DC Charger/Adapter
Replacement Halogen Bulb
120-volt AC Charger
Owner’s Manual
1
2
3
4
5
6
3
4
5
4
1
2
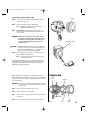
Lock Button
On/Off Trigger
Switch
Spot/Flood
Trigger
To Operate
IMPORTANT:
Unlock and turn spot/flood light OFF before
charging from AC or DC outlet. The battery cannot
charge if the spot/flood light is ON. Leaving
spot/flood light ON during charging may cause
damage to battery and AC charger.
12-volt DC charger/adapter operates from a
cigarette lighter receptacle for charging battery in
spot/flood light or continuous corded operation
with or without battery.
Note: To prevent car battery from completely
discharging, it is recommended that car
engine remain running while in use.
Step 1: Follow charging instructions on page 3 of this manual and
allow battery to fully charge.
Step 2: Depress trigger switch in handle to turn spot/flood light ON.
Release trigger switch to turn spot/flood light OFF.
Step 3: To lock trigger switch to ON, depress trigger switch and slide
down lock button on side of handle. To unlock and turn
spot/flood light OFF, depress trigger and slide lock button up.
Step 4: Squeeze Spot/Flood trigger to activate Flood feature. Release
Spot/Flood trigger to return to spot beam.
WARNING: Never place spot/flood light face down when light is on or
is still hot from recent use. Doing so could burn/ignite
surfaces such as seats, carpeting, etc. and cause major
property damage. Always turn spot/flood light off when not
in use.
• The life expectancy of the battery is approximately 500 cycles, at
which time a replacement battery is recommended. A replacement
battery may be purchased from The Brinkmann Corporation
Customer Service Department by calling 800-468-5252.
• Do not allow battery to completely discharge. A dim light indicates a
low battery. Turn OFF and UNLOCK spot/flood light and recharge
battery as soon as possible.
INS_800-2380-0_MM3-Bi.qxd 5/16/08 2:16 PM Page 3

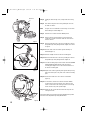
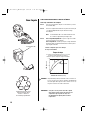
THE BATTERY CAN BE CHARGED INSIDE OR OUTSIDE OF SPOT/FLOOD LIGHT.
To Charge Battery Inside of Spot/flood light:
Step 1: Make sure the trigger switch is not locked ON.
Step 2: Plug the AC charger directly into back of battery or DC
charger/adapter into bottom of spot/flood light handle.
Note: LED Indicator light will turn on when battery is charging
from AC charger only.
Step 3: For DC Charger/Adapter - Battery charges only while vehicle
engine is running.
For AC Charger - Allow battery to fully charge. LED indicator on
battery will automatically turn off when battery is fully charged.
See chart for recommended charge times.
WARNING:
A damaged battery can leak acid. Avoid contact with eyes and
skin. If contact occurs, flush immediately with large amounts of
water. DO NOT ingest. If contact with eyes or ingestion occurs,
consult physician immediately.
3
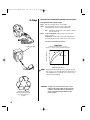
To Charge
10
46810
20
DC Charge
AC Charge
USAGE (Minutes)
CHARGE TIME (Hours)
Charge Times
Charge times are dependent on usage of the
product. See chart below for recommended charge times.
IMPORTANT: If battery is not used for more than 90 days, remove
battery from the spot/flood light. Charge battery every
2 months to ensure battery does not completely lose
charge. A completely discharged battery may not
recharge properly.
LED Indicator Light
Contains lead-acid (Pb)
batteries. Batteries must be
recycled or disposed of
properly.
INS_800-2380-0_MM3-Bi.qxd 5/16/08 2:16 PM Page 4

4
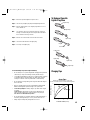
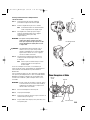
Only use Brinkmann’s 12V75W halogen bulb that is designed for the
Q-Beam Max Million III Rechargeable Spot/Flood Light as a replacement.
Use of any other bulb may result in poor performance and may damage
your spot/flood light.
IMPORTANT: Do not touch the glass part of bulb with fingers as natural
oils affect the life and performance of bulb. Handle bulb by
metal end only.
Step 1: Disconnect spot/flood light from power source.
Step 2: Remove battery from spot/flood light.
Step 3: Remove the two screws from top and bottom of front housing.
(See Figure 1.)
Step 4: Lay the spot/flood light face (lens) down on a flat surface.
To Replace Bulb
Battery
LED Indicator Light
To Charge Battery Outside of Spot/flood light:
Step 1: Remove battery from back of spot/flood light by pressing
on the quick-release tabs.
Step 2: Plug the AC charger into battery as illustrated.
Note: LED Indicator light will turn on when battery is
charging from AC charger only.
Step 3: For AC Charger - Allow battery to fully charge. LED
indicator on battery will automatically turn off when battery
is fully charged.
IMPORTANT: If battery is not used for more than 90 days, remove
battery from the spot/flood light. Charge battery every
2 months to ensure battery does not completely lose
charge. A completely discharged battery may not
recharge properly.
WARNING:
A damaged battery can leak acid. Avoid contact with eyes
and skin. If contact occurs, flush immediately with large
amounts of water. DO NOT ingest. If contact with eyes or
ingestion occurs, consult physician immediately.
Step 4: Place charged battery inside light so that metal contacts on
battery and light are making contact.
Note: Press battery firmly until fully inserted and locked
with quick-release tabs.
For extended lighting requirements, we recommend purchasing an
additional battery as a back-up. Additional/replacement batteries may
be purchased from The Brinkmann Corporation Customer Service
Department by calling 800-468-5252.
Lens
Rear
Housing
Front
Housing
Reflector
Inner Reflector
Figure 1
INS_800-2380-0_MM3-Bi.qxd 5/16/08 2:16 PM Page 5

Step 5: Holding the front housing secure, slowly lift the rear housing
off.
Step 6: Pull reflector away from rear housing carefully. Do not touch
the inside of reflector.
Note: The glass lens is not attached to front housing. Use care when
disassembling to avoid breaking lens.
Step 7: Rotate the inner reflector bracket to OPEN position.
Step 8: Pull inner reflector bracket away from rear housing being
careful not to pull wire connections inside. Do not touch the
inside of reflector.
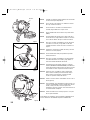
Step 9: Disconnect bulb wire from connector by holding the connector
firmly with fingers then pulling bulb wire straight out as shown
in Figure 2.
Step 10: Pinch the ends of the wire retainer together and lift up as
illustrated (Figure 3).
Step 11: Pull bulb straight out from the reflector mounting plate.
Step 12: Disconnect bulb wire from connector by holding the connector
firmly with fingers then pulling bulb wire straight out.
Step 13: To install new bulb, grasp the bulb from the metal end (DO NOT
TOUCH THE GLASS PART) and insert into the reflector
mounting plate. Align the slots in the bulb base with those in
the reflector mounting plate.
Step 14: Replace wire retainer by pinching ends together while pressing
down. Push ends apart so they catch on the reflector mounting
plate.
Step 15: Reconnect the bulb wire to the connector as illustrated
(Figure 4).
Step 16: To reassemble, rotate the inner reflector bracket to CLOSE
position. Place the front housing face (lens) down on a flat
surface. Set the reflector into housing. Insert the rear housing
into the front housing of the spot/flood light.
Step 17: Replace the two screws that were removed in Step 3. Do not
over tighten screws.
Replacement bulbs may be purchased from The Brinkmann Corporation
Customer Service Department by calling 800-468-5252.
5
Connector
Figure 3
Figure 4
Figure 2
INS_800-2380-0_MM3-Bi.qxd 5/16/08 2:16 PM Page 6

Charging Tips
To Prevent Damage to Spot/flood light and Battery:
• Do not attempt to use spot/flood light while charging directly from AC
outlet. Doing so may cause damage to battery and AC charger.
• 12-volt DC charger/adapter operates from a cigarette lighter receptacle
for charging battery in spot/flood light only while vehicle engine is
running or continuous corded operation with or without battery.
• Do not attempt to charge battery pack using both AC an DC chargers
at the same time.
• Only use charging devices that are provided with the Q-Beam Max
Million III Rechargeable Spot/Flood Light or its replacements.
• For DC Charger/Adapter - Battery charges only while vehicle engine
is running.
For AC Charger - Allow battery to fully charge. LED indicator on
battery will automatically turn off when battery is fully charged.
See chart for recommended charge times.
• Do not allow battery to completely discharge. A dim light indicates a
low battery. Recharge battery as soon as possible after each use.
• Always keep the battery fully charged when not in use.
10
46810
20
DC Charge
AC Charge
USAGE (Minutes)
CHARGE TIME (Hours)
Charge Times
Charge times are dependent on usage of the
product. See chart below for recommended charge times.
6
To Replace Cigarette
Lighter Plug Fuse
Lighter Plug
Lighter Cap
Lighter Plug
Lighter Plug
Lighter Cap
Fuse
Fuse Holder
Lighter Cap
Lighter Cap
Step 1: Disconnect spot/flood light from power source.
Step 2: Unscrew cap of lighter plug and pull straight away from fuse.
Step 3: Pull fuse holder and fuse out of lighter plug. Observe to see if
fuse is burned out.
Note: Use a 8A fuse only. Fuse is burned out when fuse element is
missing or broken inside glass tube. Replace with new 8A fuse
if fuse element is missing or broken.
Step 4: Pull fuse out of fuse holder. Insert new fuse into holder.
Step 5: Insert fuse holder and fuse into lighter plug.
Step 6: Screw cap onto lighter plug.
INS_800-2380-0_MM3-Bi.qxd 5/16/08 2:16 PM Page 7

7
• Nunca coloque la lámpara reflector o de luz concentrada boca abajo cuando está encendida o todavía está
caliente por uso reciente, ya que podría quemar o encender superficies tales como asientos, alfombras, etc. y
causar graves daños a la propiedad. Siempre apague su lámpara cuando no la esté utilizando.
• Para no dañarse seriamente la vista, nunca mire directamente a la luz de su lámpara reflector o de luz
concentrada encendida. NO alumbre directamente a la cara de otra persona.
• NO toque el lente de la lámpara reflector o de luz concentrada cuando esté encendida o haya sido usada
recientemente, porque el lente estará caliente y podría causar quemaduras graves.
• NO meta la lámpara al agua. Asegúrese de que todos los componentes estén secos y no entren en contacto con
agua en todo momento.
• NO permita que niños pequeños manipulen u operen esta lámpara.
• NO use este producto para una finalidad que no sea la indicada.
• NO cargue o utilice su lámpara cerca de materiales combustibles o inflamables.
• NO cargue la pila en espacios cerrados herméticos a los gases.
• NO intente cargar las pilas con ambos cargadores para corriente directa y alterna (CA y CD) al mismo tiempo.
• NO intente cargar o utilizar esta lámpara si su cable, enchufe, pila, bombilla o cualquier parte de ella se ha
dañado o corroído.
• NO deje que partes metálicas toquen los contactos de metal en la pila, ya que esto podría causar un corto
circuito que a su vez podría provocar un incendio.
• NO use un tomacorriente externo de corriente alterna (CA) para recargar la pila.
• Para evitar un choque eléctrico accidental, recomendamos que este producto siempre se cargue en un
tomacorriente con interruptor de circuito para conexión a tierra (GFCI).
• Sólo use los cargadores incluidos con la lámpara reflector o de luz concentrada Q-Beam Max Million III
recargable o sus repuestos.
• NO desarme o manipule la pila indebidamente.
• NO eche la pila al fuego ya que ésta podría explotar.
• Al desechar la pila, cubra los contactos metálicos de la pila con cinta eléctrica para impedir que haya un corto
circuito, que a su vez podría causar un incendio.
• La pila sellada contiene plomo que debe reciclarse o desecharse de forma adecuada. Contacte a las
autoridades locales pertinentes a cargo de los desechos sólidos para saber cómo reciclar la pila o
desecharla correctamente.
TENGA PRECAUCIÓN Y USE SU SENTIDO COMÚN AL UTILIZAR SU LÁMPARA RECARGABLE.
LA PERSONA QUE NO SIGA LAS ADVERTENCIAS E INDICACIONES DE SEGURIDAD DE ESTE MANUAL
PODRÍA LESIONARSE O CAUSAR DAÑOS A LA PROPIEDAD.
GUARDE ESTE MANUAL PARA CONSULTARLO EN EL FUTURO.
ADVERTENCIAS IMPORTANTES DE SEGURIDAD
LEA Y SIGA TODAS LAS ADVERTENCIAS E INSTRUCCIONES DE SEGURIDAD DEL MANUAL DEL
USUARIO ANTES DE UTILIZAR SU LÁMPARA REFLECTOR O DE LUZ CONCENTRADA.
ADVERTENCIAS
INS_800-2380-0_MM3-Bi.qxd 5/16/08 2:16 PM Page 8

Inspeccione el contenido de la caja para asegurarse de que todas las piezas hayan sido incluidas y estén intactas.
8
INSTRUCCIONES DE OPERACIÓN
LEA Y SIGA TODAS LAS ADVERTENCIAS E INDICACIONES DE SEGURIDAD DE ESTE MANUAL
DEL USUARIO ANTES DE UTILIZAR SU LÁMPARA REFLECTOR O DE LUZ CONCENTRADA.
Lista de Piezas:
Lámpara Reflector o de Luz
Concentrada Q-Beam Max
Million III Recargable
1 Pila Recargable
3 Lentes de Colores
Cargador/Adaptador de
12 voltios para CD
Bombilla de Halógeno
de Repuesto
Cargador de 120 voltios
para CA
Manual del Usuario
1
2
3
4
5
6
3
4
5
4
1
2
Botón
de Bloqueo
Interruptor de
disparo ON/OFF
Disparador
Haz/Reflector
Cómo Utilizarla
IMPORTANTE:
Desbloquee y APAGUE la lámpara antes de
cargarla en el tomacorriente CA o CD. La pila no
puede cargarse si la lámpara está ENCENDIDA. Si
deja la lámpara ENCENDIDA mientras la carga,
pueden dañarse la pila y el cargador de corriente
alterna (CA). El cargador o adaptador de corriente
directa (CD) se conecta a un tomacorriente de
coche (encendedor de cigarrillos) para cargar la
pila de la lámpara o para función continua con
cable, con o sin pila.
Nota: Para impedir que la batería del coche se
descargue totalmente, recomendamos
no apagar el motor del coche mientras
utiliza el tomacorriente.
Paso 1: Siga las instrucciones de carga de la página 3 de este manual
y permita que la pila se cargue totalmente.
Paso 2: Presione el interruptor de disparo en el mango para
ENCENDER la lámpara reflector o de luz concentrada.
Suelte el interruptor de disparo para APAGAR la lámpara.
Paso 3: Para trabar el interruptor de disparo en posición ENCENDIDA,
presiónelo y deslice el botón de bloqueo que está a un lado
del mango hacia abajo. Para APAGAR la lámpara reflector o
de luz concentrada, presione el interruptor de disparo y
deslice el botón de bloqueo hacia arriba.
Paso 4: Apriete el interruptor Haz/Reflector de la lámpara para activar
la función de reflector. Suelte el disparador para regresar al
haz de luz concentrada.
ADVERTENCIA: Nunca coloque la lámpara boca abajo cuando está
encendida o todavía está caliente por el uso reciente,
ya que podría quemar o encender superficies tales
como asientos, alfombras, etc. y causar fuertes daños
a la propiedad. Siempre apague su lámpara cuando no
la esté utilizando.
• La vida útil de la pila es de aproximadamente 500 ciclos, periodo
después del cual se recomienda reemplazarla. Puede adquirir la pila
de repuesto en el Departamento de Servicios al Cliente de
The Brinkmann Corporation llamando al 800-468-5252.
• No permita que la pila se descargue totalmente. Una luz tenue indica
que la carga de la pila está baja. APAGUE y ABRA la lámpara
reflector o de luz concentrada y recargue la pila tan pronto como
le sea posible.
INS_800-2380-0_MM3-Bi.qxd 5/16/08 2:16 PM Page 9

LA PILA PUEDE CARGARSE DENTRO O FUERA DE LA LÁMPARA.
Cómo Cargar la Pila Dentro de la Lámpara:
Paso 1: Fíjese que el interruptor de disparo no esté trabado en posición
de encendido (ON).
Paso 2: Conecte el cargador CA directamente a la parte trasera de la pila
o el cargador/adaptador CD a la parte inferior del mango
de la lámpara.
Nota: La luz indicadora LED se encenderá únicamente cuan
do se utiliza el cargador CA para cargar la pila.
Paso 3: Para el cargador/adaptador CD – La pila se carga sólo cuando
el motor del vehículo está en marcha.
Para el cargador CA – Permita que la pila se cargue totalmente.
El indicador LED se apagará automáticamente cuando la pila se
haya cargado totalmente.
Consulte el diagrama para ver los tiempos
de carga recomendados.
ADVERTENCIA:
Una pila dañada puede dejar salir ácido. Evite el contacto con
los ojos y la piel. Si hay contacto, enjuáguese inmediatamente
con mucha agua. NO lo ingiera. Si hubo contacto con los ojos
o ingestión consulte a su médico cuanto antes.
9
Cómo Cargarla
10
468 10
20
Carga con CD
Carga con CA
USO (Minutos)
TIEMPO DE CARGA (Horas)
Tiempos de Carga
Los tiempos de carga dependen del uso que se le dé al
producto. Consulte el diagrama que aparece a
continuación para los tiempos de carga recomendados.
IMPORTANTE: Si la pila no se usa por más de 90 días, sáquela
de la lámpara. Cargue la pila cada 2 meses para
asegurarse de que no pierda su carga. Una
pila totalmente descargada podría no volver a
cargarse bien.
Luz Indicadora LED
Contiene baterías plomo ácido
(Pb). Estas baterías deben
reciclarse o deben ser
desechadas apropiadamente.
INS_800-2380-0_MM3-Bi.qxd 5/16/08 2:16 PM Page 10

10
Sólo use bombillas de halógeno de 12V y 75W hechas por Brinkmann
como repuesto para la lámpara reflector o de luz concentrada Q-Beam
Max Million III recargable. La utilización de otras bombillas podría
ocasionar menor rendimiento y dañar su lámpara reflector o de luz
concentrada.
IMPORTANTE: No toque el vidrio de la bombilla con los dedos, porque
los aceites naturales de los mismos afectan la vida y el
rendimiento de la bombilla. Toque o manipule sólo el
extremo metálico de la bombilla.
Paso 1: Desconecte la lámpara de la fuente de poder.
Paso 2: Saque la pila de la lámpara.
Paso 3: Saque los dos tornillos de las partes superior e inferior de la
cubierta frontal. (Vea la Figura 1.)
Paso 4: Ponga la carátula de la lámpara (el lente) boca abajo, sobre
una superficie plana.
Cómo Reemplazar el Bulbo
Pila
Luz Indicadora LED
Para Cargar la Batería Fuera de la Lámpara Reflector
o de Luz Concentrada:
Paso 1: Saque la pila de la parte trasera de la lámpara
presionando las lengüetas de liberación rápida.
Paso 2: Enchufe el cargador CA a la pila como se muestra.
Nota: La luz indicadora LED se encenderá únicamente
cuando el cargador CA esté cargando la pila.
Paso 3: Para cargador CA - Permita que la pila se cargue
totalmente. El indicador LED en la pila se apagará
automáticamente cuando la pila se haya
cargado totalmente.
IMPORTANTE: Si la pila no se usa por más de 90 días,
sáquela de la lámpara. Cargue la pila cada 2
meses para asegurarse de que no pierda su carga.
Una pila totalmente descargada podría no volver
a cargarse bien.
ADVERTENCIA:
Una pila dañada puede dejar salir ácido. Evite el
contacto con los ojos y la piel. Si hay contacto,
enjuáguese inmediatamente con mucha agua. NO lo
ingiera. Si hubo contacto con los ojos o ingestión
consulte a su médico cuanto antes.
Paso 4: Introduzca la pila a la lámpara de tal manera que los
contactos de metal de la pila hagan contacto con los
de la lámpara.
Nota: Presione la pila con firmeza hasta que esté bien
metida y asegurada con las lengüetas de
liberación rápida.
Si va a usar su lámpara con frecuencia, le recomendamos que
compre otra pila de repuesto. Puede adquirirla en el Departamento de
Servicio al Cliente de The Brinkmann Corporation llamando al
800-468-5252.
Lente
Carcasa
Trasera
Cubierta Frontal
Reflector
Reflector Interno
Figura 1
INS_800-2380-0_MM3-Bi.qxd 5/16/08 2:16 PM Page 11

Paso 5: Sujetando con firmeza la cubierta frontal, deslice suavemente
la carcasa trasera para desprenderla.
Paso 6: Jale el reflector y para separarlo con cuidado de la carcasa.
No toque el interior del reflector.
Nota: El lente de vidrio no está unido a la cubierta frontal. Al
desarmar, tenga cuidado de no romper el lente.
Paso 7: Gire la abrazadera del reflector interior a la posición abierta
(OPEN).
Paso 8: Jale la abrazadera del reflector interno y para sacarlo de la
carcasa. Al hacerlo, tenga cuidado de no jalar las conexiones
de los cables de adentro. No toque el interior del reflector.
Paso 9: Desconecte el cable de la bombilla del conector, deteniendo
este último con sus dedos y luego jalando el cable de la
bombilla para sacarlo en línea recta como se muestra en la
Figura 2.
Paso 10: Comprima los extremos del sujetador de cables y jale hacia
arriba como se ilustra (Figura 3).
Paso 11: Jale la bombilla hacia arriba para separarla de la placa de
montaje del reflector.
Paso 12: Desconecte el cable de la bombilla del conector deteniendo
este último firmemente con sus dedos y luego jalando el
cable de la bombilla directamente hacia fuera.
Paso 13: Para instalar una nueva bombilla, sujétela por el extremo
metálico (NO TOQUE LA PARTE DE VIDRIO) e introdúzcala a
la placa de montaje del reflector. Alinee las ranuras en la base
de la bombilla con las de la placa de montaje del reflector.
Paso 14: Coloque de nuevo el sujetador de cables comprimiendo
ambos extremos mientras presiona hacia abajo. Empuje
ambos extremos para separarlos y lograr que puedan
sujetarse a la placa de montaje del reflector.
Paso 15: Vuelva a conectar el cable de la bombilla al conector como se
ilustra (Figura 4).
Paso 16: Para reensamblar, gire la abrazadera del reflector interno a la
posición cerrada (CLOSE). Coloque la carátula de la cubierta
frontal (el lente) boca abajo sobre una superficie lisa.
Introduzca el reflector a la carcasa. Una la carcasa trasera con
la cubierta frontal de la lámpara.
Paso 17: Vuelva a atornillar los dos tornillos que quitó en el 3er paso.
No los apriete demasiado.
Puede adquirir sus bombillas de repuesto llamando al Departamento de
Servicio al Cliente de The Brinkmann Corporation: 800-468-5252.
11
Conector
Figura 3
Figura 4
Figura 2
INS_800-2380-0_MM3-Bi.qxd 5/16/08 2:16 PM Page 12

Consejos Para Cargar Bien la Pila
Para Impedir Daños a la Lámpara y Pila:
• No intente usar su lámpara mientras carga directamente del
tomacorriente CA, ya que podría dañar la pila y el cargador CA.
• El cargador/adaptador CD de 12 voltios se conecta a un tomacorriente
de coche (encendedor para cigarrillos) para cargar la pila de la
lámpara sólo si el motor del vehículo está en marcha, o para
operación continua con cable, con o sin pila.
• No trate de cargar la pila usando ambos cargadores CA y CD al mismo
tiempo.
• Use solamente los cargadores incluidos con la lámpara reflector o de
luz concentrada Q-Beam Max Million III recargable o sus repuestos.
• Para el Adaptador/cargador CD – La pila se carga únicamente
mientras el motor está en marcha.
Para el Adaptador CA – Permita que la pila se cargue totalmente. La
luz indicadora LED en la pila se apagará automáticamente cuando la
pila se haya cargado totalmente.
Consulte el diagrama para ver los tiempos de carga recomendados.
• No permita que la pila se descargue totalmente. Una luz tenue indica
que la carga de la pila está baja. Recárguela tan pronto como le sea
posible tras cada uso.
• Siempre conserve la pila totalmente cargada cuando no la use.
10
468 10
20
Carga con CD
Carga con CA
USO (Minutos)
TIEMPO DE CARGA (Horas)
Tiempos de Carga
Los tiempos de carga dependen del uso que se le dé al
producto. Consulte el diagrama que aparece a
continuación para los tiempos de carga recomendados.
12
Cómo Cambiar el Fusible del Enchufe
Para Tomacorriente de Coche
Enchufe
Tapa del Enchufe
Enchufe
Enchufe
Tapa del Enchufe
Fusible
Sujetador del
Enchufe
Tapa del Enchufe
Tapa del Enchufe
Paso 1: Desconecte la lámpara de la fuente de poder.
Paso 2: Desatornille la tapa del enchufe y jálela para separarla del
fusible.
Paso 3: Jale el fusible y su sujetador para sacarlos del enchufe.
Verifique si el fusible está quemado.
Nota: Use un fusible de 8A solamente. El fusible se ha quemado
cuando el elemento dentro del tubo de vidrio ya no está o
está roto. Reemplácelo con un nuevo fusible de 8A si dicho
elemento falta o está roto.
Paso 4: Quite el fusible dañado del sujetador de fusibles e inserte un
fusible nuevo en el sujetador.
Paso 5: Introduzca el sujetador de fusibles y el fusible en el enchufe.
Paso 6: Atornille la tapa del enchufe.
INS_800-2380-0_MM3-Bi.qxd 5/16/08 2:16 PM Page 13

For 1-year from date of purchase, The Brinkmann Corporation warrants the Q-Beam Max Million III Rechargeable Spot/Flood Light against defects due to
workmanship or materials to the original purchaser. The Brinkmann Corporation’s obligations under this warranty are limited to the following guidelines:
• This warranty does not extend to the bulb or battery.
• This warranty does not cover rechargeable lights that have been altered or damaged due to: normal wear, abuse, improper
maintenance, improper use, disassembly of parts and/or attempted repair by anyone other than an authorized employee of
The Brinkmann Corporation.
• This warranty does not cover surface scratches or weathering as this is considered normal wear.
• Warranty service is limited to repair or replacement of rechargeable lights which prove defective under normal use and which upon examination shall indicate
to Brinkmann’s satisfaction, they are defective. If Brinkmann confirms the defect and approves the claim, Brinkmann will elect to repair or replace the
rechargeable light as covered by the terms of this warranty.
• This warranty extends to the original purchaser only and is not transferable or assignable to subsequent purchasers.
The Brinkmann Corporation requires reasonable proof of purchase. Therefore, we strongly recommend that you retain your sales receipt or invoice. To obtain
repair or replacement of your Q-Beam Max Million III Rechargeable Spot/Flood Light under the terms of this warranty, please call Customer Service Department at
800-527-0717 for a Return Authorization Number and further instructions. A receipt will be required. Rechargeable lights returned to Brinkmann must include
your name, address and telephone number. Please make sure the light is properly packed, postage prepaid, and insured. A Return Authorization Number must be
clearly marked on the outside of the box. Brinkmann cannot be responsible for any rechargeable lights forwarded to us without a Return Authorization Number.
EXCEPT AS ABOVE STATED, THE BRINKMANN CORPORATION MAKES NO OTHER EXPRESS WARRANTY.
THE IMPLIED WARRANTIES OF MERCHANTABILITY AND FITNESS FOR A PARTICULAR PURPOSE ARE LIMITED IN DURATION TO
1-YEAR FROM THE DATE OF PURCHASE. SOME STATES DO NOT ALLOW LIMITATIONS ON HOW LONG AN IMPLIED WARRANTY LASTS, SO THE ABOVE
LIMITATION MAY NOT APPLY TO YOU.
ANY LIABILITY FOR INDIRECT, INCIDENTAL OR CONSEQUENTIAL DAMAGES ARISING FROM THE FAILURE OF THE Q-BEAM MAX MILLION III RECHARGEABLE
SPOT/FLOOD LIGHT TO COMPLY WITH THIS WARRANTY OR ANY IMPLIED WARRANTY IS EXCLUDED. CUSTOMER ACKNOWLEDGES THAT THE PURCHASE
PRICE CHARGED IS BASED UPON THE LIMITATIONS CONTAINED IN THE WARRANTY SET OUT ABOVE. SOME STATES DO NOT ALLOW THE EXCLUSION OR
LIMITATION OF INCIDENTAL OR CONSEQUENTIAL DAMAGES, SO THE ABOVE LIMITATION OR EXCLUSION MAY NOT APPLY TO YOU. THIS WARRANTY GIVES
YOU SPECIFIC LEGAL RIGHTS, AND YOU MAY ALSO HAVE OTHER RIGHTS WHICH VARY FROM STATE TO STATE.
1-YEAR LIMITED WARRANTY
140-2380-0
5/08
Owner’s Manual for Model 800-2380-0
Manual del usuario para el modelo 800-2380-0
©2008 The Brinkmann Corporation
Dallas, Texas 75244 U.S.A
www.brinkmann.net
1-YEAR LIMITED WARRANTY
The Brinkmann Corporation garantiza esta lámpara reflector o de luz concentrada Q-Beam Max Million III recargable por defectos de materiales o de mano de obra
por 1 año a partir de la fecha de compra a su comprador original. Las obligaciones de The Brinkmann Corporation que cubre esta garantía se limitan a las
siguientes condiciones:
• Esta garantía no cubre la bombilla o pila.
• Esta garantía no cubre lámparas recargables que han sido modificadas o dañadas debido a: desgaste normal, maltrato, mantenimiento inadecuado, uso
indebido, desarmado de partes y/o intento de reparación por cualquier otra persona que no sea un empleado autorizado de The Brinkmann Corporation.
• Esta garantía no cubre raspaduras o efectos de la intemperie en la superficie, puesto que éstos se consideran desgaste normal.
• El servicio de la garantía se limita a reparar o reemplazar lámparas recargables que se haya comprobado son defectuosas al utilizarlas normalmente y que
además se hayan sometido a revisión, cuyos resultados indiquen, a satisfacción de Brinkmann, que son defectuosas. Si Brinkmann confirma el defecto y
aprueba la reclamación, Brinkmann optará por reparar o reemplazar la lámpara recargable de acuerdo a la cobertura que establecen las condiciones de esta
garantía.
• Esta garantía se le otorga sólo al comprador original y no es transferible ni puede cederse a compradores subsecuentes.
The Brinkmann Corporation solicita un comprobante razonable de compra. Por lo tanto, recomendamos encarecidamente que guarde su recibo o factura de
compra. Para que se repare o reemplace su lámpara reflector o de luz concentrada Q-Beam Max Million III recargable bajo las condiciones de esta garantía, sírvase
llamar al Departamento de Servicio al Consumidor al 800-527-0717 para obtener un Número de Autorización de Devolución y más instrucciones. Se le exigirá el
recibo. Las lámparas recargables devueltas a Brinkmann deberán incluir su nombre, dirección y teléfono. Le pedimos que empaque la lámpara de manera
adecuada y la envíe asegurada con porte prepagado. El Número de Autorización de Devolución deberá indicarse claramente en el exterior de la caja.
Brinkmann no puede hacerse responsable por ninguna lámpara recargable enviada sin un Número de Autorización de Devolución.
A EXCEPCION DE LO ANTES MENCIONADO, THE BRINKMANN CORPORATION NO OTORGA NINGUNA OTRA GARANTÍA EXPRESA.
LAS GARANTÍAS IMPLÍCITAS DE COMERCIALIZACIÓN Y ADECUACIÓN PARA UNA FINALIDAD EN PARTICULAR SE LIMITAN AL PLAZO DE 1 AÑO A PARTIR DE
LA FECHA DE COMPRA. ALGUNOS ESTADOS NO PERMITEN QUE SE LIMITE LA DURACIÓN DE UNA GARANTÍA IMPLÍCITA, POR LO QUE LA LIMITACIÓN
ANTERIOR PUDIESE NO CORRESPONDERLE A USTED.
QUEDA EXCLUIDA TODA RESPONSABILIDAD CIVIL POR DAÑOS INDIRECTOS, INCIDENTALES O EMERGENTES OCURRIDOS A CAUSA DE QUE LA LÁMPARA
REFLECTOR O DE LUZ CONCENTRADA Q-BEAM MAX MILLION III RECARGABLE NO CUMPLA CON ESTA GARANTÍA O CUALQUIER GARANTÍA IMPLÍCITA. EL
COMPRADOR RECONOCE QUE EL PRECIO DE ADQUISICIÓN COBRADO SE BASA EN LAS LIMITACIONES CONTENIDAS EN ESTA GARANTÍA PRESENTADAS
ANTERIORMENTE. ALGUNOS ESTADOS NO PERMITEN QUE SE EXCLUYAN O LIMITEN DAÑOS INCIDENTALES O EMERGENTES, POR LO QUE LA LIMITACIÓN O
EXCLUSIÓN ANTERIOR PUDIESE NO CORRESPONDERLE USTED. ESTA GARANTÍA LE OTORGA DERECHOS LEGALES CONCRETOS Y ES POSIBLE QUE GOCE DE
OTROS DERECHOS QUE VARÍAN DE UN ESTADO A OTRO.
INS_800-2380-0_MM3-Bi.qxd 5/16/08 2:16 PM Page 14
-
 1
1
-
 2
2
-
 3
3
-
 4
4
-
 5
5
-
 6
6
-
 7
7
-
 8
8
-
 9
9
-
 10
10
-
 11
11
-
 12
12
-
 13
13
-
 14
14


Brinkmann Q Beam Max Million III Owner's Manual & Operating Instructions
- Tipo
- Owner's Manual & Operating Instructions
en otros idiomas
- English: Brinkmann Q Beam Max Million III
Artículos relacionados
Otros documentos
-
PEAK PKC0TR El manual del propietario
-
Workzone GT-C-1-US Manual de usuario
-
Princeton Tec Apex Industrial Manual de usuario
-
West Marine 6795264 El manual del propietario
-
 Code 3 Emergency Systems 2021 Guía del usuario
-
Milwaukee 2004HZL Manual de usuario
-
 Welch Allyn LumiView Series Operating Instructions Manual
-
Mark MULTIPAR 575/2 Manual de usuario
-
-

