Simplicity 030527-00 Manual de usuario
- Categoría
- Generadores de poder
- Tipo
- Manual de usuario
Este manual también es adecuado para

BRIGGS & STRATTON POWER PRODUCTS GROUP, LLC
MILWAUKEE, WISCONSIN, U.S.A.
Manual No. 313734GS Revision B
Inverter Generator/Groupe électrogène Inverter/Generador inversor/
Inverter-Generator/Generatore inverter/Agregat prądotwórczy/Invertorová
elektrocentrála/Инверторный генератор/İnverter Jeneratör/
Operator’s Manual/Manuel d’utilisation/Manual de
instrucciones/Bedienungsanleitung/Manuale per l’operatore/
Instrukcja obsługi/Návod k obsluze/Руководство по
эксплуатации/Kullanma Kılavuzu/
This generator is rated in accordance with ISO 8528 G3.
P2000
Not for
Reproduction

2 BRIGGSandSTRATTON.COM
A
1
A
2
E
F
M
K
A
G
N
P
L
J
H
C
B
D
R
3
A
4
S
Not for
Reproduction

3
C
A
D
B
10
5
B
A
6
7
8
9
13
14
12
11
Not for
Reproduction

4 BRIGGSandSTRATTON.COM
Thank you for purchasing this quality-built Briggs & Stratton® generator. We are pleased that you’ve placed your confidence in the Briggs & Stratton brand. When operated
and maintained according to the instructions in this manual, your Briggs & Stratton generator will provide many years of dependable service.
This manual contains safety information to make you aware of the hazards and risks associated with generators and how to avoid them. This generator is designed and intended only
for supplying electrical power for operating compatible electrical lighting, appliances, tools and motor loads, and is not intended for any other purpose. It is important that you read
and understand these instructions thoroughly before attempting to start or operate this equipment. Save these original instructions for future reference.
This generator requires final assembly before use. Refer to the Assembly section of this manual for instructions on final assembly procedures. Follow the instructions completely.
Where to Find Us
You never have to look far to find Briggs & Stratton support and service for your generator. There are thousands of Briggs & Stratton authorized service dealers worldwide
who provide quality service. You can also find the nearest Authorized Service Dealer in our dealer locator map on the Internet at BRIGGSandSTRATTON.COM.
Generator
Model Number
Revision
Serial Number
Date Purchased
Table of Contents
Operator Safety ...........................................5
Equipment Description ..........................................................5
Important Safety Information .....................................................5
Assembly ...............................................7
Unpack Generator..............................................................7
Add Engine Oil ................................................................7
Add Fuel . . . . . . . . . . . . . . . . . . . . . . . . . . . . . . . . . . . . . . . . . . . . . . . . . . . . . . . . . . . . . . . . . . . . .7
Features and Controls.......................................7
Operation ...............................................8
Grounding Fastener ............................................................8
Generator Location.............................................................8
Starting the Engine.............................................................8
Connecting Electrical Loads . . . . . . . . . . . . . . . . . . . . . . . . . . . . . . . . . . . . . . . . . . . . . . . . . . . . . .8
Stopping the Engine ............................................................8
POWERSMART Mode...........................................................9
Charging a Battery .............................................................9
Don’t Overload Generator........................................................9
Maintenance ............................................10
Maintenance Schedule .........................................................10
Generator Maintenance.........................................................10
Engine Maintenance . . . . . . . . . . . . . . . . . . . . . . . . . . . . . . . . . . . . . . . . . . . . . . . . . . . . . . . . . . .10
Storage.....................................................................11
Troubleshooting..........................................12
Specifications ...........................................12
Product Specifications .........................................................12
Common Service Parts.........................................................12
Warranties .............................................13
Generator Owner Warranty......................................................13
Copyright © 2011 Briggs & Stratton Power Products Group, LLC
Milwaukee, WI, USA. All rights reserved.
BRIGGS & STRATTON POWER PRODUCTS is a registered
trademark of Briggs & Stratton Corporation
Milwaukee, WI, USA
ORIGINAL INSTRUCTIONS
Not for
Reproduction

5
Operator Safety
Equipment Description
Read this manual carefully and become familiar with your generator.
Know its applications, its limitations and any hazards involved.
The generator is an engine–driven, revolving field, alternating and direct current (AC
& DC) generator. It was designed to supply electrical power for operating compatible
electrical lighting, appliances, tools and motor loads. The generator’s revolving field is
driven at about 4,500 rpm (with POWERSMART mode switch off) by a single-cylinder
engine.
Every effort has been made to ensure that the information in this manual is both
accurate and current. However, the manufacturer reserves the right to change, alter
or otherwise improve the generator and this documentation at any time without prior
notice.
Important Safety Information
The manufacturer cannot possibly anticipate every possible circumstance that might
involve a hazard. The warnings in this manual, and the tags and decals affixed to the
unit are, therefore, not all-inclusive. If you use a procedure, work method or operating
technique that the manufacturer does not specifically recommend, you must satisfy
yourself that it is safe for you and others. You must also make sure that the procedure,
work method or operating technique that you choose does not render the generator
unsafe.
Safety Symbols and Meanings
The safety alert symbol indicates a potential personal injury hazard. A signal word
(DANGER, WARNING, or CAUTION) is used with the alert symbol to designate a
degree or level of hazard seriousness. A safety symbol may be used to represent the
type of hazard. The signal word NOTICE is used to address practices not related to
personal injury.
DANGER indicates a hazard which, if not avoided, will result in death or serious
injury.
WARNING indicates a hazard which, if not avoided, could result in death or
serious injury.
CAUTION indicates a hazard which, if not avoided, could result in minor or
moderate injury.
NOTICE address practices not related to personal injury.
Fire
Explosion
Toxic Fumes
Hot Surface
Moving Parts
Electrical Shock
Kickback
Flying Objects
Operator’s Manual
Explosive Pressure Chemical Burn
WARNING Running engine gives off carbon monoxide, an odorless,
colorless, poison gas.
Breathing carbon monoxide could result in death, serious injury, headache,
fatigue, dizziness, vomiting, confusion, seizures, nausea or fainting.
ventilation intakes, or other openings.
equipment, marine applications, or enclosure, even if windows and doors are open.
WARNING Starter cord kickback (rapid retraction) will pull hand and arm
toward engine faster than you can let go which could cause broken
bones, fractures, bruises, or sprains resulting in serious injury.
to avoid kickback.
WARNING Storage batteries give off explosive hydrogen gas during
recharging. Hydrogen gas stays near battery for a long time
after battery has been charged. Slightest spark could ignite
hydrogen causing explosion resulting in death, serious injury
and/or property damage.
Battery electrolyte fluid contains acid and is extremely caustic. Contact with battery
fluid could cause chemical burns resulting in serious injury and/or property damage.
minutes after charging a battery.
WARNING
Generator voltage could cause electrical shock or burn resulting
in death or serious injury.
electric utility workers.
as metal decking or steel work.
otherwise damaged.
barefoot, or while hands or feet are wet.
Not for
Reproduction

6 BRIGGSandSTRATTON.COM
NOTICE
Exceeding generators wattage/amperage capacity could damage generator
and/or electrical devices connected to it.
DO NOT exceed the generator’s wattage/amperage capacity. See Don’t Overload
Generator in the Operation section.
generator.
NOTICE
Improper treatment of generator could damage it and shorten its life.
center.
generator.
-electrical output is lost;
-equipment sparks, smokes, or emits flames;
-unit vibrates excessively.
WARNING Fuel and its vapors are extremely flammable and explosive which
could cause burns, fire or explosion resulting in death,
serious injury and/or property damage.
WHEN ADDING OR DRAINING FUEL
cap. Loosen cap slowly to relieve pressure in tank.
sources.
necessary.
WHEN STARTING EQUIPMENT
WHEN OPERATING EQUIPMENT
equipment, marine applications, or enclosure.
Choke” position (
).
WHEN TRANSPORTING, MOVING OR REPAIRING EQUIPMENT
WHEN STORING FUEL OR EQUIPMENT WITH FUEL IN TANK
appliances that have pilot light or other ignition source because they could ignite
fuel vapors.
WARNING Exhaust heat/gases could ignite combustibles, structures or
damage fuel tank causing a fire, resulting in death, serious
injury and/or property damage.
Contact with muffler area could cause burns resulting in
serious injury.
arrester designed for the exhaust system installed on this engine.
the original parts.
WARNING Unintentional sparking could cause fire or electric shock resulting
in death or serious injury.
WHEN ADJUSTING OR MAKING REPAIRS TO YOUR GENERATOR
cannot contact spark plug.
WHEN TESTING FOR ENGINE SPARK
DO NOT check for spark with spark plug removed.
WARNING Starter and other rotating parts could entangle hands, hair,
clothing, or accessories resulting in serious injury.
starter or other rotating parts.
CAUTION Excessively high operating speeds could result in minor injury
and/or generator damage.
Excessively low speeds impose a heavy load.
speed.
Not for
Reproduction

7
Assembly
Your generator is ready for use after it has been properly serviced with the
recommended fuel and oil.
If you have any problems with the servicing of your generator, contact your local
Briggs & Stratton service center. If you need assistance, please have the model,
revision, and serial number from the identification label available. See Generator
Features and Controls for identification label location.
Unpack Generator
1. Set the carton on a rigid, flat surface.
2. Remove everything from carton.
The generator is supplied with:
Add Engine Oil
1. Place generator on a level surface.
2. Add engine oil as described in Adding Engine Oil of the Engine
Maintenance section.
NOTICE
Improper treatment of generator could damage it and shorten its life.
serviced with the recommended oil. This could result in an engine failure.
Add Fuel Figure
1
Fuel must meet these requirements:
High
Altitude.
butyl ether) is acceptable.
NOTICE Avoid generator damage.
Failure to follow Operator’s Manual for fuel recommendations voids warranty.
To protect the fuel system from gum formation, mix in a fuel stabilizer when adding
fuel. See Storage. All fuel is not the same. If you experience starting or performance
problems after using fuel, switch to a different fuel provider or change brands. This
engine is certified to operate on petrol. The emission control system for this engine is
EM (Engine Modifications).
1. Clean area around fuel fill cap, remove cap.
2. Slowly add unleaded fuel to red fuel level indicator (A) in fuel tank. Be careful not
to fill above the indicator. This allows adequate space for fuel expansion.
3. Install fuel cap and let any spilled fuel evaporate before starting engine.
High Altitude
RON) petrol is acceptable. To remain emissions compliant, high altitude adjustment
is required. Operation without this adjustment will cause decreased performance,
increased fuel consumption, and increased emissions. See a Briggs & Stratton
Authorized Dealer for high altitude adjustment information. Operation of the engine at
altitudes below 750 meters (2,500 feet) with the high altitude kit is not recommended.
Fuel Tank Cap Vent Lever Figure
2
The fuel tank cap is provided with a vent lever (A) to seal the fuel tank. The vent
lever must be in the on position (I) for the engine to run.
When the engine is not in use, leave the vent lever in the off position (O) to reduce the
possibility of fuel leakage. Allow the engine to cool before turning the vent lever to the
off position (O).
Features and Controls Figure
3
Read this Operator’s Manual and safety rules before operating your
generator. Compare the illustrations with your generator, to familiarize
yourself with the locations of various controls and adjustments. Save this
manual for future reference.
A - Fuel Tank Cap Vent Lever — Turn the vent lever to the on position (I) when
operating generator. Turn to the off position (O) when not in use.
B - Fuel Tank — Capacity of 3.7 L (1.0 U.S. gallons).
C - Choke Lever — Used when starting a cold engine.
D - Side Maintenance Cover — Remove to gain access to the air cleaner and oil
service.
E - Recoil Starter — Used to start the engine manually.
F - Engine Switch — Set this switch to I before using recoil starter. Set switch to O to
stop engine. Also turns fuel valve on and off.
G - Output Indicator (OK) — The green LED output indicator light comes on when the
generator is operating normally. It indicates that the generator is producing power
at the receptacles.
H - 12 Volt DC Receptacle — Use this receptacle with battery charge cables to charge
J - Grounding Fastener — Consult your local agency having jurisdiction for grounding
requirements in your area.
K - POWERSMART Switch— Use this switch to turn the POWERSMART mode on and
off.
L - Overload Alarm (!) — The red LED overload alarm light comes on and cuts power
to the receptacles if you overload the generator. The green output indicator light
will also go off. If the generator was overloaded, you must turn off and unplug
all electrical loads, shut down the generator and restart it to continue in normal
operating mode.
M - Low Oil Indicator (
) — The low oil indicator system is designed to
prevent engine damage caused by not enough engine oil. If the engine oil level
drops below a preset level, the yellow LED low oil indicator light comes on and an
oil switch will stop the engine. If the engine stops or the yellow LED low oil
indicator light comes on when you pull the recoil handle, check the engine oil level.
N - 230 Volt AC Outlets — May be used to supply electrical power for the operation
loads. These outlets are protected against overload by an internal overload system.
P - Spark Arrester Muffler — Exhaust muffler lowers engine noise and is equipped
with a spark arrester screen.
R - Top Maintenance Cover — Remove to gain access to the spark plug.
S - Identification Label — Provides model, revision, and serial number of generator.
Please have these readily available when calling for assistance.
Items Not Shown:
Air Cleaner (under side maintenance cover) — Protects engine by filtering dust and
debris out of intake air.
Oil Fill Cap (under side maintenance cover) — Check and add engine oil here.
WARNING Fuel and its vapors are extremely flammable and explosive which
could cause burns, fire or explosion resulting in death, serious
injury and/or property damage.
WHEN ADDING FUEL
cap. Loosen cap slowly to relieve pressure in tank.
sources.
necessary.
Not for
Reproduction

Operation
Grounding Fastener
The generator is provided with a grounding fastener. Local electrical codes may
require this to be connected to a suitable earth connection. The generator neutral
is floating, which means that the AC stator winding is isolated from the grounding
fastener and the AC receptacle ground pins. Electrical devices, such as RCD,
requiring a grounded neutral may not operate properly from this generator.
Special Requirements
There may be Federal, local codes, or ordinances that apply to the intended use of
the generator. Please consult a qualified electrician, electrical inspector, or the local
a bonded neutral.
Generator Location Figure
4
Clearances and Air Movement
Place generator outdoors in an area that will not accumulate deadly exhaust gas. DO
NOT place generator where exhaust gas (A) could accumulate and enter inside or be
drawn into a potentially occupied building. Ensure exhaust gas is kept away from any
windows, doors, ventilation intakes, or other openings that can allow exhaust gas
to collect in a confined area. Prevailing winds and air currents should be taken into
consideration when positioning generator.
Starting the Engine Figure
2
3
1. Make sure unit is on a smooth, level surface.
NOTICE Failure to start and operate the unit on a smooth, level surface will cause the
unit not to start or shut down during operation. Placing unit on any surface that will
block underside cooling vent locations could result in a loss of power output. If output
is lost, turn unit off, relocate and let cool before restarting.
2. Make sure POWERSMART switch (3, K) is in off position (O).
3. Turn the engine switch (3, F) to the on position (I).
4. Turn fuel cap vent lever (2, A) to on position (I).
5. Push choke lever (3, C) to choke position (
).
NOTICE To start the engine for the very first time, after running out of fuel or after a
long period of storage, fill fuel tank to red fuel indicator as described in Add Fuel. It will
require more than several start attempts until the air in the fuel system has been purged.
6. Grasp recoil handle (3, E) and pull slowly until slight resistance is felt. Then pull
rapidly to start engine.
7. Move choke lever to half choke position, and pull recoil handle twice.
8. Slowly move choke lever to run position (
). If engine falters, move choke
lever to half choke position until engine runs smoothly, and then to run position
(
).
NOTICE If engine floods, move choke lever to run position (
) and crank until
engine starts.
NOTICE If engine starts after 3 pulls but fails to run, or if unit shuts down during
operation, make sure unit is on a level surface and check for proper oil level in
crankcase. This unit is equipped with a low oil protection device. If so, oil must be at
proper level for engine to start.
Connecting Electrical Loads
AC outlets. Inspect extension cables before each use. Check that all extension cables
are suitably rated and are not damaged. Keep extension cables as short as possible to
minimize voltage drop.
1. Make sure the green output indicator light comes on (it may take up to three
seconds).
2. Let engine stabilize and warm up for a few minutes after starting.
NOTICE
Don’t Overload Generator.
NOTICE Exceeding generators wattage/amperage capacity could damage generator
and/or electrical devices connected to it.
DO NOT exceed the generator’s wattage/amperage capacity. See Don’t Overload
Generator in the Operation section.
Stopping the Engine
1. Turn OFF and unplug all electrical loads from generator panel receptacles.
2. Move POWERSMART switch to off position (O).
3. Let engine run at no-load for several minutes to stabilize internal temperatures
of engine and generator.
4. Turn engine switch to the off position (O).
5. Turn fuel cap vent lever to the off position (O).
WARNING Exhaust heat/gases could ignite combustibles, structures or
damage fuel tank causing a fire, resulting in death, serious
injury and/or property damage.
Contact with muffler area could cause burns resulting in
serious injury.
spark arrester designed for the exhaust system installed on this engine.
the original parts.
WARNING
Generator voltage could cause electrical shock or burn resulting
in death or serious injury.
otherwise damaged.
barefoot, or while hands or feet are wet.
8 BRIGGSandSTRATTON.COM
WARNING Damaged or overloaded electrical cables could overheat, arc, and
burn resulting in death, serious injury, and/or property damage.
WARNING Starter cord kickback (rapid retraction) will pull hand and arm
toward engine faster than you can let go which could cause broken
bones, fractures, bruises, or sprains resulting in serious injury.
to avoid kickback.
WARNING Running engine gives off carbon monoxide, an odorless,
colorless, poison gas.
Breathing carbon monoxide could result in death, serious injury, headache,
fatigue, dizziness, vomiting, confusion, seizures, nausea or fainting.
ventilation intakes, or other openings.
equipment, marine applications, or enclosure, even if windows and doors are open.
Not for
Reproduction

9
POWERSMART Mode
This feature is designed to greatly improve fuel economy and reduce noise. When
this switch is turned ON (I), the engine speed will increase as electrical loads are
connected, and decreased as electrical loads are removed.
With the switch off (O), the engine will run at full governed speed.
NOTICE Always have the switch OFF when starting or stopping the generator or
when using the DC receptacle.
Charging a Battery Figure
5
or utility style storage battery. The maximum current available for the battery
charge circuit is 5 Amps. A DC circuit breaker protects this outlet from overloads. If
an overload occurs, the circuit breaker will trip (push button pops out). Wait a few
minutes and push the button in to reset the circuit breaker.
NOTICE When using the battery charge circuit, turn the POWERSMART switch to
the off position (O).
NOTICE
To recharge 12 Volt batteries, proceed as follows:
1. If necessary, clean battery posts or terminals.
2. Check fluid level in all battery cells. If necessary, add ONLY distilled water to
cover separators in battery cells. DO NOT use tap water.
3. If the battery is equipped with vent caps, make sure they are installed and are
tight.
4. Connect battery charge cable clamp with red handle to battery post or terminal
indicated by Positive, POS or (+).
5. Connect battery charge cable clamp with black handle to battery post or terminal
indicated by Negative, NEG, or (–).
7. Start generator as described in Starting The Engine. Let the engine run while
battery recharges.
NOTICE Normally a period of 30 to 120 minutes is sufficient to recharge a weak battery.
8. When battery has charged, shut down engine as described in Stopping The Engine.
9. Remove the battery charging cable from the generator and then disconnect
from the battery posts.
NOTICE Use an automotive hydrometer to test battery state of charge and condition.
Follow the hydrometer manufacturer’s instructions carefully. Generally, a battery is
by hydrometer) is 1.260 or higher.
Don’t Overload Generator
Capacity
You must make sure your generator can supply enough rated (running) and surge
1. Select the items you will power at the same time.
2. Total the rated (running) watts of these items. This is the amount of power your
generator must produce to keep your items running. See Wattage Reference
Guide.
3. Estimate how many surge (starting) watts you will need. Surge wattage is the
short burst of power needed to start electric motor-driven tools or appliances
such as a circular saw or refrigerator. Because not all motors start at the same
time, total surge watts can be estimated by adding only the item(s) with the
highest additional surge watts to the total rated watts from step 2.
Example:
Total Rated (Running) Watts = 1555
Highest Additional Surge Watts = 600
Total Generator Output Required = 2155
Power Management
To prolong the life of your generator and attached devices, it is important to take care
when adding electrical loads to your generator. There should be nothing connected to
the generator outlets before starting its engine. The correct and safe way to manage
1. With nothing connected to the generator, start the engine as described in this
manual.
2. Plug in and turn on the first load, preferably the largest load you have.
3. Permit the generator output to stabilize (engine runs smoothly and attached
device operates properly).
4. Plug in and turn on the next load.
5. Again, permit the generator to stabilize.
6. Repeat steps 4 and 5 for each additional load.
surge loads in generator capacity, as described above.
* Wattages listed are approximate only. Check tool or appliance for actual wattage.
WARNING Storage batteries give off explosive hydrogen gas during
recharging. Hydrogen gas stays near battery for a long time
after battery has been charged. Slightest spark could ignite
hydrogen causing explosion resulting in death, serious injury
and/or property damage.
Battery electrolyte fluid contains acid and is extremely caustic. Contact with battery
fluid could cause chemical burns resulting in serious injury and/or property damage.
minutes after charging a battery.
Tool or Appliance Rated (Running) Watts
Additional Surge
(Starting) Watts
Window Fan 300 600
Deep Freezer 500 500
Television 500 —
Security System 180 —
Light (75 Watts) 75 —
1555 Total Running Watts
600 Highest Surge Watts
Wattage Reference Guide
Tool or Appliance
Rated* (Running)
Watts
Additional Surge
(Starting) Watts
Essentials
Light Bulb - 75 watt 75 —
Deep Freezer 500 500
Sump Pump 800 1200
Refrigerator/Freezer - 18 cf 800 1600
Water Well Pump - 1/3 hp 1000 2000
Heating/Cooling
Window AC - 10,000 BTU 1200 1800
Window Fan 300 600
Furnace Fan Blower - 1/2 hp 800 1300
Kitchen
Microwave Oven - 1000 Watt 1000 —
Coffee Maker 1500 —
Electric Stove - Single Element 1500 —
Family Room
100 —
100 —
Stereo Receiver 450 —
Color Television - 27 in 500 —
Personal Computer w/17 in monitor 800 —
Other
Security System 180 —
AM/FM Clock Radio 300 —
Garage Door Opener - 1/2 hp 480 520
DIY/Job Site
Quartz Halogen Work Light 1000 —
Airless Sprayer - 1/3 hp 600 1200
Reciprocating Saw 960 960
Electric Drill - 1/2 hp 1000 1000
Circular Saw - 7-1/4 in 1500 1500
Not for
Reproduction

10 BRIGGSandSTRATTON.COM
Maintenance
Maintenance Schedule
Follow the hourly or calendar intervals, whichever occurs first. More frequent service is
required when operating in adverse conditions noted below.
¹
Service more often under dirty or dusty conditions.
General Recommendations
Regular maintenance will improve the performance and extend the life of the generator.
See any authorized dealer for service.
The generator’s warranty does not cover items that have been subjected to operator
abuse or negligence. To receive full value from the warranty, the operator must
maintain the generator as instructed in this manual.
NOTICE
Improper treatment of generator could damage it and shorten its life.
cooling.
Some adjustments will need to be made periodically to properly maintain your
generator.
All service and adjustments should be made at least once each season. Follow the
requirements in the Maintenance Schedule chart above.
NOTICE Once a year you should clean or replace the spark plug and replace the air
filter. A new spark plug and clean air filter assure proper fuel-air mixture and help your
engine run better and last longer.
Generator Maintenance
Generator maintenance consists of keeping the unit clean and dry. Operate and store
the unit in a clean dry environment where it will not be exposed to excessive dust, dirt,
moisture, or any corrosive vapors. Cooling air slots in the generator must not become
clogged with snow, leaves, or any other foreign material.
NOTICE DO NOT use water or other liquids to clean generator. Liquids can enter
engine fuel system, causing poor performance and/or failure to occur. In addition, if
liquid enters generator through cooling air slots, some of the liquid will be retained in
voids and cracks of the rotor and stator winding insulation. Liquid and dirt buildup on
the generator internal windings will eventually decrease the insulation resistance of
these windings.
Cleaning
Daily or before use, look around and underneath the generator for signs of oil or fuel leaks.
Clean accumulated debris from inside and outside the generator. Inspect cooling air slots
and openings on generator. These openings must be kept clean and unobstructed.
Engine parts should be kept clean to reduce the risk of overheating and ignition of
NOTICE
Improper treatment of generator could damage it and shorten its life.
Cleaning Fuel Strainer
Figure
6
The fuel strainer helps prevent debris from entering the fuel system.
Clean the fuel strainer as follows:
1. Make sure generator is on a level surface.
2. Remove the fuel cap (A) and fuel strainer (B).
3. Wash fuel strainer in liquid detergent and water.
4. Wipe fuel strainer clean with a clean, dry cloth.
5. Carefully reinstall the fuel strainer and fuel cap.
Engine Maintenance
Oil
Oil Recommendations
We recommend the use of Briggs & Stratton Warranty Certified oils for best
performance. Other high-quality detergent oils are acceptable if classified for service
SF, SG, SH, SJ or higher. DO NOT use special additives.
Outdoor temperatures determine the proper oil viscosity for the engine. Use the chart
to select the best viscosity for the outdoor temperature range expected.
* Below 4°C (40°F) the use of SAE 30 will result in hard starting.
** Above 27°C (80°F) the use of 10W30 may cause increased oil consumption. Check
oil level more frequently.
NOTICE Synthetic oil meeting ILSAC GF-2, API certification mark and API
acceptable oil at all temperatures. Use of synthetic oil does not alter
required oil change intervals.
Checking Oil Level
Figure
8
Oil level should be checked prior to each use or at least every 8 hours of operation.
Keep oil level maintained.
1. Make sure generator is on a level surface.
2. Loosen the side maintenance cover screws and remove the side maintenance
cover.
3. Clean area around oil fill and remove oil fill cap.
5. Replace and tighten oil fill cap.
6. Reinstall the side maintenance cover and hand tighten the cover screws.
Adding Engine Oil
Figure
9
1. Make sure generator is on a level surface.
2. Repeat steps 2 through 4 to check oil level as described in Checking Oil Level.
3. If needed, slowly pour oil into oil fill opening to the point of overflowing at oil fill.
4. Replace and tighten oil fill cap.
5. Reinstall the side maintenance cover and hand tighten the cover screws.
Every 8 Hours or Daily
First 10 Hours
Every 50 Hours or 3 Months
Every 100 Hours or 6 Months
¹
Every 250 Hours or Yearly
WARNING Unintentional sparking could cause fire or electric shock resulting
in death or serious injury.
WHEN ADJUSTING OR MAKING REPAIRS TO YOUR GENERATOR
cannot contact spark plug.
WHEN TESTING FOR ENGINE SPARK
DO NOT check for spark with spark plug removed.
Not for
Reproduction

11
Changing Engine Oil
If you are using your generator under extremely dirty or dusty conditions, or in
extremely hot weather, change the oil more often.
RESOURCES. RETURN USED OIL TO COLLECTION CENTERS.
Change the oil while the engine is still warm from running, as follows:
1. Make sure generator is on a level surface.
2. Loosen the side maintenance cover screws and remove the side maintenance
cover.
3. Clean area around oil fill and remove oil fill cap.
4. Tip your generator to drain oil from oil fill into a suitable container making sure
you tip your unit toward the oil filler neck. When crankcase is empty, return
generator to upright position.
5. Repeat steps 3 through 5 to add engine oil as described in Adding Engine Oil.
Service Air Cleaner
Figure
10
Your engine will not run properly and may be damaged if you run it with a dirty air
cleaner. Service more often if operating under dirty or dusty conditions.
To service the air cleaner, follow these steps:
1. Loosen the side maintenance cover screws and remove the side maintenance
cover.
2. Loosen air cleaner cover screw (A) and remove air cleaner cover (B).
3. Carefully remove foam air cleaner (C) by pulling it out towards you.
4. Carefully remove breather filter (D) by pulling it out towards you.
5. Wash foam air cleaner and breather filter in liquid detergent and water only.
Squeeze dry in a clean cloth.
6. SATURATE foam air cleaner in clean engine oil and squeeze in a clean cloth to
remove excess oil.
7. Reinstall clean or new foam air cleaner inside base.
8. Reinstall clean or new breather filter inside base.
9. Reinstall the air cleaner cover and tighten screw.
10. Reinstall the side maintenance cover and hand tighten the cover screws.
Service Spark Plug
Figure
11
12
Changing the spark plug will help your engine to start easier and run better.
1. Remove top maintenance cover.
2. Clean area around spark plug and remove spark plug boot.
3. Remove and inspect spark plug.
4. Check electrode gap with wire feeler gauge and reset spark plug gap to
recommended gap if necessary (see Specifications).
5. Replace spark plug if electrodes are pitted, burned or porcelain is cracked. Use
the recommended replacement plug. See Specifications.
6. Install spark plug and tighten firmly. Reinstall spark plug boot.
7. Reinstall top maintenance cover.
Inspect Muffler and Spark Arrester
Figure
13
14
Inspect the muffler for cracks, corrosion, or other damage. Remove the spark arrester,
if equipped, and inspect for damage or carbon blockage. If replacement parts are
required, make sure to use only original equipment replacement parts.
Clean and inspect the spark arrester as follows:
1. To remove muffler guard, remove four screws that connects guard to generator.
2. Remove screw that attaches spark arrester screen to muffler. Remove spark
arrester screen.
3. Inspect screen and obtain a replacement if torn, perforated or otherwise
damaged. DO NOT use a defective screen. If screen is not damaged, clean it
with a brush.
4. Reattach screen to muffler. Reattach muffler guard.
Check Valve Clearance
Regular valve clearance check and adjustment will improve performance and extend
engine life. This procedure cannot be done without partial engine disassembly and
the use of special tools. For this reason we recommend that you have an authorized
Service Dealer check and adjust valve clearance at recommended intervals (see
Maintenance Schedule in the Maintenance section).
Storage
guidelines to prepare it for storage.
Generator Storage
Cleaning.
Long Term Storage Instructions
Fuel can become stale when stored over 30 days. Stale fuel causes acid and gum
deposits to form in the fuel system or on essential carburetor parts. To keep fuel fresh,
use Briggs & Stratton FRESH START® fuel stabilizer, available as a liquid additive or a
drip concentrate cartridge.
There is no need to drain petrol from the engine if a fuel stabilizer is added according
to instructions. Run the engine for 2 minutes to circulate the stabilizer throughout the
If petrol in the engine has not been treated with a fuel stabilizer, it must be drained into
an approved container. Run the engine until it stops from lack of fuel. The use of a fuel
stabilizer in the storage container is recommended to maintain freshness.
Change Engine Oil
While engine is still warm, drain oil from crankcase. Refill with recommended grade.
See Changing Engine Oil.
Other Storage Tips
1. DO NOT store fuel from one season to another unless it has been treated as
described in Long Term Storage Instructions.
2. Replace fuel container if it starts to rust. Rust and/or dirt in fuel can cause
problems if it’s used with this unit.
3. Cover unit with a suitable protective cover that does not retain moisture.
4. Store generator in clean, dry area.
CAUTION Avoid prolonged or repeated skin contact with used motor oil.
animals.
WARNING Contact with muffler area can result in serious burns.
Exhaust heat/gases can ignite combustibles, structures or
damage fuel tank causing a fire.
overhead.
arrester designed for the exhaust system installed on this engine.
original parts.
WARNING Fuel and its vapors are extremely flammable and explosive which
could cause burns, fire or explosion resulting in death, serious
injury and/or property damage.
WHEN STORING FUEL OR EQUIPMENT WITH FUEL IN TANK
appliances that have pilot light or other ignition source because they could ignite
fuel vapors.
WHEN DRAINING FUEL
cap. Loosen cap slowly to relieve pressure in tank.
sources.
necessary.
WARNING Storage covers could cause a fire resulting in death, serious
injury and/or property damage.
Not for
Reproduction

12 BRIGGSandSTRATTON.COM
Troubleshooting
Problem Cause Correction
Engine is running, but no AC output is
available.
1. Red overload alarm light is on. Generator is overloaded.
2. Green output indicator light not on. Fault in generator.
3. Poor connection or defective extension cable.
4. Connected device is bad.
1. See Don’t Overload Generator in Operation section.
Shut down generator and restart.
2. Contact authorized service facility.
3. Check and repair.
4. Connect another device that is in good condition.
Engine runs good at no-load but “bogs
down” when loads are connected.
1. Short circuit in a connected load.
2. Engine speed is too slow.
3. Generator is overloaded.
4. Shorted generator circuit.
1. Disconnect shorted electrical load.
2. Contact authorized service facility.
3. See Don’t Overload Generator in Operation section.
4. Contact authorized service facility.
Engine will not start; shuts down when
running or starts and runs rough.
1. Engine switch set to off position (O).
2. Fuel cap vent lever is in off position (O).
3. Low oil indicator light comes on. Low oil level.
4. Dirty air cleaner.
5. Out of fuel.
6. Stale fuel.
7. Spark plug wire not connected to spark plug.
8. Bad spark plug.
9. Water in fuel.
10. Flooded.
11. Excessively rich fuel mixture.
12. Intake valve stuck open or closed.
13. Engine has lost compression.
1. Set engine switch to on position (I).
2. Turn fuel cap vent lever to on position (I).
3. Fill crankcase to proper level or place generator on
level surface.
4. Clean or replace air cleaner.
5. Fill fuel tank.
6. Drain fuel tank and carburetor; fill with fresh fuel.
7. Connect wire to spark plug.
8. Replace spark plug.
9. Drain fuel tank and carburetor; fill with fresh fuel.
10. Wait 5 minutes and re-crank engine.
11. Contact authorized service facility.
12. Contact authorized service facility.
13. Contact authorized service facility.
Engine lacks power.
1. Load is too high.
2. Dirty air filter.
1. See Don’t Overload Generator in Operation section.
2. Replace air filter.
Engine “hunts” or falters. Carburetor is running too rich or too lean. Contact authorized service facility.
Product Specifications
Starting Wattage ............................................ 2,000 Watts
Wattage* .................................................. 1,600 Watts
.............................................7.0 Amps
...............................................5 Amps
Rated Frequency ..............................................50 Hertz
Phase .....................................................Single Phase
Displacement .......................................105.6 cc (6.44 cu. in.)
Spark Plug Gap ................................0.6-0.7 mm (0.023-0.027 in.)
................ 0.08 - 0.12 mm (0.0031 - 0.0047 in.) cold
.............. 0.13 - 0.17 mm (0.0051 - 0.0067 in.) cold
Fuel Capacity ......................................3.7 L (1.0 U.S. gallon)
Oil Capacity .......................................0.4 Liters (13.5 Ounces)
Power Ratings: The gross power rating for individual gas engine models is labeled
in accordance with SAE (Society of Automotive Engineers) code J1940 (Small Engine
Power & Torque Rating Procedure), and rating performance has been obtained
and corrected in accordance with SAE J1995 (Revision 2002-05). Torque values
are derived at 3060 RPM; horsepower values are derived at 3600 RPM. Actual
gross engine power will be lower and is affected by, among other things, ambient
operating conditions and engine-to-engine variability. Given both the wide array
of products on which engines are placed and the variety of environmental issues
applicable to operating the equipment, the gas engine will not develop the rated
net power). This difference is due to a variety of factors including, but not limited
to, accessories (air cleaner, exhaust, charging, cooling, carburetor, fuel pump, etc.),
application limitations, ambient operating conditions (temperature, humidity,
altitude), and engine-to-engine variability. Due to manufacturing and capacity
limitations, Briggs & Stratton may substitute an engine of higher rated power for
this Series engine.
* This generator is rated in accordance with ISO 8528 G3.
Common Service Parts
Foam Air Cleaner ..............................................311388GS
Breather Filter ................................................311389GS
Resistor Spark Plug .........................................NGK CR7HSA
Not for
Reproduction

13
BRIGGS & STRATTON POWER PRODUCTS GROUP, LLC PORTABLE GENERATOR OWNER WARRANTY POLICY
LIMITED WARRANTY
Briggs & Stratton Power Products Group, LLC will repair or replace, free of charge, any part(s) of the portable generator that is defective in material or workmanship
or both. Transportation charges on product submitted for repair or replacement under this warranty must be borne by purchaser. This warranty is effective
for the time periods and subject to the conditions stated below. For warranty service, find the nearest Authorized Service Dealer in our dealer locator map at
BRIGGSandSTRATTON.COM.
THERE IS NO OTHER EXPRESS WARRANTY. IMPLIED WARRANTIES, INCLUDING THOSE OF MERCHANTABILITY AND FITNESS FOR A PARTICULAR PURPOSE, ARE LIMITED
TO ONE YEAR FROM PURCHASE, OR TO THE EXTENT PERMITTED BY LAW. ANY AND ALL IMPLIED WARRANTIES ARE EXCLUDED. LIABILITY FOR INCIDENTAL OR
CONSEQUENTIAL DAMAGES ARE EXCLUDED TO THE EXTENT EXCLUSION IS PERMITTED BY LAW. Some states or countries do not allow limitations on how long an
implied warranty lasts, and some states or countries do not allow the exclusion or limitation of incidental or consequential damages, so the above limitation and
exclusion may not apply to you. This warranty gives you specific legal rights and you may also have other rights which vary from state to state or country to country.
equipment has experienced commercial use, it shall thereafter be considered as commercial use for purposes of this warranty.
DETERMINE THE WARRANTY PERIOD.
ABOUT YOUR WARRANTY
We welcome warranty repair and apologize to you for being inconvenienced. Any Authorized Service Dealer may perform warranty repairs. Most warranty repairs are
handled routinely, but sometimes requests for warranty service may not be appropriate. For example, warranty service would not apply if equipment damage occurred
because of misuse, lack of routine maintenance, shipping, handling, warehousing or improper installation. Similarly, the warranty is void if the manufacturing date or the
serial number on the portable generator has been removed or the equipment has been altered or modified. During the warranty period, the Authorized Service Dealer, at
its option, will repair or replace any part that, upon examination, is found to be defective under normal use and service. This warranty will not cover the following repairs
Normal Wear
normal use has exhausted the life of a part or the equipment.
Installation and Maintenance
and modification, misuse, negligence, accident, overloading, overspeeding, improper maintenance, repair or storage so as, in our judgment, to adversely affect its
performance and reliability. This warranty also does not cover normal maintenance such as air filters, adjustments, fuel system cleaning and obstruction (due to
chemical, dirt, carbon, lime, and so forth).
Other Exclusions
improper servicing or freezing or chemical deterioration. Accessory parts such as starting batteries, generator adapter cord sets and storage covers are excluded
from the product warranty. This warranty excludes used, reconditioned, and demonstration equipment, equipment used for prime power in place of utility power,
equipment used in life support applications, and failures due to acts of God and other force majeure events beyond the manufacturers control. 198189E, Rev. C,
11/2/2009
BRIGGS & STRATTON POWER PRODUCTS GROUP, LLC
MILWAUKEE, WI, USA
Effective November 1, 2009; replaces all undated Warranties and all Warranties dated before November 1, 2009.
2 years*
1 year
Consumer Use
Commercial Use
*Second year parts only
WARRANTY PERIOD
Not for
Reproduction

4 BRIGGSandSTRATTON.COM
Merci pour l’achat de ce groupe électrogène de qualité construit par Briggs & Stratton®. Nous sommes heureux que vous ayez fait confiance à la marque Briggs & Stratton. Utilisez
et entretenez votre groupe électrogène Briggs & Stratton conformément aux instructions de ce manuel, afin d’optimiser sa durée de vie et sa fiabilité.
Ce manuel contient des informations relatives à la sécurité qui vous avertiront des dangers et risques liés aux groupes électrogènes et vous indiqueront la façon de les éviter. Ce
groupe électrogène est conçu exclusivement pour fournir du courant électrique destiné à faire fonctionner l’éclairage, les appareils, les outils et les charges motorisées électriques
compatibles et n’est destiné à aucun autre usage. Il est important de lire et comprendre parfaitement ces instructions avant d’essayer de mettre en marche ou de faire fonctionner cet
équipement. Conservez ces instructions d’origine afin de pouvoir vous y reporter ultérieurement.
Un assemblage de finition est nécessaire avant d’utiliser ce groupe électrogène. Reportez-vous à la section Assemblage de ce manuel pour consulter les instructions sur les
procédures d’assemblage final. Suivez attentivement les directives.
Où nous trouver
Nul besoin de chercher très loin le support et le service Briggs & Stratton pour votre groupe électrogène. Des milliers de distributeurs agréés Briggs & Stratton, présents dans le
Internet BRIGGSandSTRATTON.COM.
Groupe électrogène
Référence du modèle
Révision
Numéro de Série
Date d’achat
Table des matières
Sécurité de l’opérateur......................................5
Description de l’équipement......................................................5
Instructions importantes de sécurité ...............................................5
Montage ................................................7
Déballage du groupe électrogène ..................................................7
Appoint en huile moteur.........................................................7
Appoint en carburant ...........................................................7
Fonctions et commandes ....................................7
Fonctionnement...........................................8
Attache de mise à la terre........................................................8
Emplacement du groupe électrogène ...............................................8
Démarrage du moteur ..........................................................8
Connexion des charges électriques ................................................8
Arrêt du moteur ...............................................................8
Mode POWERSMART...........................................................9
Chargement d’une batterie . . . . . . . . . . . . . . . . . . . . . . . . . . . . . . . . . . . . . . . . . . . . . . . . . . . . . . .9
Éviter la surcharge du groupe électrogène...........................................9
Maintenance ............................................10
Programme de maintenance.....................................................10
Maintenance du groupe électrogène...............................................10
Maintenance du moteur ........................................................10
Stockage....................................................................11
Dépannage .............................................12
Spécifications ...........................................12
Spécifications du produit .......................................................12
Pièces de rechange courantes ...................................................12
Garanties ..............................................13
Garantie propriétaire du groupe électrogène ........................................13
Copyright © 2009 Briggs & Stratton Power Products Group, LLC
Milwaukee, WI, USA. Tous droits réservés.
BRIGGS & STRATTON POWER PRODUCTS est une marque
déposée de Briggs & Stratton Corporation
Milwaukee, WI, USA
TRADUIT D’APRÈS LES INSTRUCTIONS ORIGINALES
Not for
Reproduction

5 5
Sécurité de l’opérateur
Description de l’équipement
Lisez attentivement ce manuel afin de vous familiariser avec votre groupe
électrogène. Découvrez ses applications, ses limites et les risques qu’il
présente.
Ce groupe électrogène est un groupe électrogène entraîné par un moteur, à champ tour-
nant, à courant continu et alternatif (CA & CC). Il a été conçu pour fournir de l’énergie
électrique permettant de faire fonctionner des éclairages, appareils, outils et charges
moteur électriques compatibles. Le champ tournant du groupe électrogène est entraîné à
Nous avons fait notre possible pour que les informations contenues dans ce manuel
soient à la fois précises et actuelles. Toutefois, le fabricant se réserve le droit de
modifier, changer ou améliorer de toute autre façon le groupe électrogène et cette
documentation, à tout moment et sans préavis.
Instructions importantes de sécurité
Le fabricant ne peut anticiper toute circonstance possible pouvant présenter un risque.
Les avertissements contenus dans ce manuel et les étiquettes et autocollants apposés
sur l’appareil ne sont ainsi pas exhaustifs. Si vous utilisez une procédure, une méthode
de travail ou une technique de fonctionnement non spécifiquement recommandée par le
fabricant, il vous revient de vous assurer que celle-ci est sûre pour vous et pour autrui.
de fonctionnement que vous avez choisie ne nuit pas à la sécurité du groupe électrogène.
Symboles de sécurité et leur signification
Le symbole d’alerte de sécurité indique un risque potentiel de dommages
avec le symbole d’alerte pour indiquer la probabilité ou la gravité du danger. Un
symbole de sécurité peut être utilisé pour représenter le type de danger. Le mot-
indicateur REMARQUE est utilisé pour faire référence à des conditions d’utilisation
non associées à des dommages corporels.
DANGER indique un danger qui, s’il n’est pas évité, entraînera la mort ou de
graves blessures.
ATTENTION indique un danger qui, s’il n’est pas écarté, pourrait entraîner la
mort ou de graves blessures.
AVERTISSEMENT indique un danger qui, s’il n’est pas évité, pourrait entraîner
des blessures mineures ou modérées.
REMARQUE désigne des conditions d’utilisations non associées à des dommages
corporels.
Incendie
Explosion
Gaz toxiques
Surface chaude
Pièces en
mouvement
Choc électrique
Effet de recul
Objets projetés
Manuel d’utilisation
Pression explosive Brûlure chimique
ATTENTION Le moteur en marche émet du monoxyde de carbone, un gaz
toxique inodore et incolore.
L’inhalation de monoxyde de carbone peut entraîner la mort, des blessures
graves, des maux de tête, une fatigue, des vertiges, des vomissements, un
état de confusion, des crises, des nausées ou des évanouissements.
chambres à coucher.
fenêtres, portes, prises d’air ou autres ouvertures.
de matériel roulant, de matériel maritime, ou d’un espace clos, même si les portes
et les fenêtres sont ouvertes.
ATTENTION
de tirer la main et le bras en direction du moteur plus rapidement qu’il
osseuses, des contusions ou des entorses entraînant de graves blessures.
sentir une résistance, puis tirez rapidement pour éviter tout effet de recul.
sont branchés sur celui-ci et sont en marche.
ATTENTION Les batteries d’accumulateurs émettent de l’hydrogène gazeux
explosif pendant la charge. L’hydrogène gazeux reste à proximité
de la batterie longtemps après que celle-ci ait été chargée. La
moindre étincelle peut enflammer l’hydrogène et provoquer une
explosion pouvant causer la mort, de graves blessures et/ou des dommages matériels.
Le fluide de l’électrolyte de la batterie contient de l’acide et est extrêmement caus-
tique. Tout contact avec le fluide de batterie peut causer des brûlures chimiques
entraînant de graves blessures et/ou des dommages matériels.
pendant la charge de la batterie et plusieurs minutes après celle-ci.
caoutchouc.
chargée.
ATTENTION
La tension du groupe électrogène peut causer un choc
électrique ou des brûlures susceptibles d’entraîner la mort ou de graves
blessures.
Utilisez un équipement de transfert approprié afin d’empêcher tout retour de l’éner-
gie électrique, en isolant le groupe électrogène des employés du réseau électrique.
la société de distribution d’électricité.
hautement conductrice, telle qu’un pont métallique ou un ouvrage en acier.
à nu ou endommagés de toute autre manière.
NE faites PAS fonctionner le groupe électrogène sous la pluie ou par temps humide.
tenant dans l’eau, en étant pieds nus ou en ayant les mains ou les pieds mouillés.
fonctionner ou d’entretenir le groupe électrogène.
Not for
Reproduction

6 BRIGGSandSTRATTON.COM
REMARQUE
Le dépassement de la capacité de puissance/intensité du groupe
électrogène peut endommager le groupe électrogène et/ou les dispositifs électriques
qui y sont connectés.
NE DÉPASSEZ PAS la capacité de puissance/intensité du groupe électrogène.
Reportez-vous au chapitre Éviter la surcharge du groupe électrogène dans la section
Fonctionnement.
des charges électriques.
d’arrêter celui-ci.
REMARQUE
Une utilisation incorrecte du groupe électrogène peut l’endommager et
raccourcir sa durée de vie.
distributeur ou contactez le centre de service local.
excessives, ou à des vapeurs corrosives.
électrogène.
- vous perdez la puissance restituée ;
- l’équipement fait des étincelles, fume ou émet des flammes ;
- l’unité vibre de manière excessive.
ATTENTION Le carburant et ses vapeurs sont extrêmement inflammables et
explosifs, ce qui peut provoquer des brûlures, un incendie ou
une explosion susceptibles d’entraîner la mort, de graves
blessures et/ou des dommages matériels.
LORS DE L’AJOUT OU DE LA VIDANGE DE CARBURANT
lentement le bouchon pour libérer la pression présente à l’intérieur du réservoir.
carburant.
le moteur.
sources de chaleur ou d’autres sources d’allumage.
raccords de carburant ne présentent ni fissures ni fuites. Remplacez si nécessaire.
LORS DU DÉMARRAGE DE L’ÉQUIPEMENT
sont bien en place.
LORS DU FONCTIONNEMENT DE L’ÉQUIPEMENT
d’un porche, d’un matériel roulant, de matériel maritime ou d’un espace clos.
provoquerait le renversement du carburant.
Choke
moteur (
).
LORS DU TRANSPORT, DU DÉPLACEMENT OU DE LA RÉPARATION DE L’ÉQUIPEMENT
robinet de carburant en position FERMÉE.
provoquerait le renversement du carburant.
LORS DU STOCKAGE DE CARBURANT OU DE L’ÉQUIPEMENT AVEC DU
CARBURANT DANS LE RÉSERVOIR
linge ou autres appareils qui disposent d’une veilleuse ou de toute autre source
d’allumage susceptible d’inflammer les vapeurs de carburant.
ATTENTION Les gaz d’échappement/la chaleur peuvent inflammer des
combustibles, des structures, ou endommager le réservoir de
carburant, provoquant ainsi un incendie pouvant entraîner la
mort, de graves blessures et/ou des dommages matériels.
Tout contact avec la zone du silencieux peut causer des
brûlures susceptibles d’entraîner de graves blessures.
électrogène, dessus compris.
Contactez le fabriquant, détaillant ou distributeur de l’équipement d’origine pour obtenir
un pare-étincelles conçu pour le système d’échappement installé sur ce moteur.
de la même façon que celles-ci.
ATTENTION Une production involontaire d’étincelles peut provoquer un
incendie ou un choc électrique susceptible d’entraîner la mort
ou de graves blessures.
LORS DE RÉGLAGES OU DE RÉPARATIONS SUR VOTRE GROUPE ÉLECTROGÈNE
plus entrer en contact avec la bougie.
LORS DU TEST DE LA BOUGIE MOTEUR
NE CONTRÔLEZ PAS la bougie lorsque celle-ci est retirée.
ATTENTION Le démarreur et d’autres pièces rotatives peuvent happer les
mains, les cheveux, les vêtements ou autres accessoires, entraînant
ainsi de graves blessures.
couvercles de protection.
d’êtres happés dans le démarreur ou dans d’autres pièces rotatives.
AVERTISSEMENT Des vitesses de fonctionnement trop élevées peuvent
causer des blessures mineures et/ou endommager le groupe électrogène.
Des vitesses trop lentes impliquent une lourde charge.
augmenter le régime du moteur.
Not for
Reproduction

7 7
Montage
avec le carburant et l’huile recommandés.
Si vous rencontrez un quelconque problème avec l’entretien de votre groupe électrogène,
adressez-vous à votre centre de service Briggs & Stratton local. Lors de toute demande
d’assistance, munissez-vous du modèle, de la révision et du numéro de série, indiqués
sur l’étiquette d’identification. Reportez-vous au chapitre Fonctions et commandes du
groupe électrogène pour repérer l’emplacement de l’étiquette d’identification.
Déballage du groupe électrogène
1. Déposez le carton sur une surface rigide et plane.
2. Retirez tous les éléments du carton.
Le groupe électrogène est fourni avec :
Appoint en huile moteur
1. Placez le groupe électrogène sur une surface plane.
2. Ajoutez de l’huile moteur comme indiqué dans le chapitre Appoint en huile
moteur de la section Maintenance du moteur.
REMARQUE
Une utilisation incorrecte du groupe électrogène peut l’endommager et
raccourcir sa durée de vie.
Appoint en carburant Figure
1
Le carburant doit répondre aux critères suivants :
reportez-vous au chapitre Haute altitude.
d’éther méthyl-tertiobutylique est acceptable.
REMARQUE Évitez d’endommager le groupe électrogène.
Le non respect du manuel d’utilisation pour les recommandations en matière de
carburant annule la garantie.
Pour protéger le circuit de carburant contre la formation de gomme, mélangez un
stabilisateur au carburant lors du remplissage. Reportez-vous au chapitre Stockage.
Tous les carburants ne sont pas identiques. Si vous avez du mal à démarrer ou si vous
rencontrez des problèmes de fonctionnement, changez de fournisseur ou de marque
des émissions de ce moteur est EM (Engine Modifications).
1.
Nettoyez la zone autour du bouchon de remplissage de carburant, retirez le bouchon.
2.
Ajoutez doucement du carburant sans plomb dans le réservoir de carburant jusqu’à
l’indicateur de niveau de carburant rouge (A). Soyez attentif à ne pas dépasser
l’indicateur. Cela laissera suffisamment de place pour la dilatation du carburant.
3. Remettez en place le bouchon de carburant et laissez s’évaporer le carburant
éventuellement répandu avant de démarrer le moteur.
Haute altitude
À des altitudes supérieures à 1 500 mètres (5 000 pieds), de l’essence d’au minimum
85 octanes/85 AKI (89 RON) est acceptable. Pour rester en conformité avec les normes
d’émissions, un réglage pour les hautes altitudes est nécessaire. Faire fonctionner le
moteur sans ce réglage donnera lieu à des performances réduites, une consommation
de carburant supérieure et une augmentation des émissions. Adressez-vous à un
distributeur agréé Briggs & Stratton pour plus d’informations sur les réglages de
haute altitude. Il n’est pas recommandé de faire fonctionner le moteur à des altitudes
inférieures à 750 mètres (2 500 pieds) avec le kit haute altitude.
Levier d’évent du bouchon du réservoir de carburant Figure
2
Le bouchon du réservoir de carburant est doté d’un levier d’évent (A) pour sceller le
réservoir de carburant. Le levier d’évent doit se trouver en position marche (I) pour que
le moteur fonctionne.
Lorsque le moteur n’est pas utilisé, laissez le levier d’évent en position arrêt (O) afin de
réduire la possibilité de fuite de carburant. Laissez refroidir le moteur avant de placer le
levier d’évent en position arrêt (O).
Fonctions et commandes Figure
3
Lisez ce manuel d’utilisation et les règles de sécurité avant de faire
fonctionner votre groupe électrogène. Comparez les illustrations avec votre
groupe électrogène afin de vous familiariser avec l’emplacement des divers
commandes et réglages. Conservez ce manuel pour future référence.
A - Levier d’évent du bouchon du réservoir de carburant — Tournez le levier d’évent
en position marche (I) lorsque vous faites fonctionner le groupe électrogène.
Tournez-le en position arrêt (O) lorsque vous n’utilisez pas le groupe électrogène.
B - Réservoir de carburant — Capacité de 3,7 L (1.0 U.S. gallons).
C - Levier de starter — Utilisé pour démarrer un moteur froid.
D - Couvercle de maintenance latéral — Retirez-le pour accéder au filtre à air et à
l’entretien relatif à l’huile.
E - Démarreur manuel — Utilisé pour démarrer le moteur manuellement.
F - Commutateur du moteur — Placez ce commutateur sur I avant d’utiliser le
démarreur manuel. Placez ce commutateur sur O pour arrêter le moteur. Ouvre et
ferme également la soupape de carburant.
G - Indicateur de sortie (OK) — Le témoin vert de l’indicateur de sortie à LED s’allume
lorsque le groupe électrogène fonctionne normalement. Il indique que le groupe
électrogène produit de l’électricité au niveau des connecteurs.
H - Connecteur CC 12 volts
batterie pour charger une batterie de 12 volts. Ce connecteur est protégé par un
disjoncteur à pousser pour réarmer.
J - Attache de mise à la terre — Consultez votre agence locale qui vous
communiquera les règlementations en matière de mise à la terre dans votre région.
K - Commutateur POWERSMART— Utilisez ce commutateur pour activer et désactiver
le mode POWERSMART.
L - Alarme de surcharge (!) — Le témoin rouge de l’alarme de surcharge à LED
s’allume et coupe l’électricité vers les connecteurs si vous surchargez le groupe
électrogène. Le témoin vert de l’indicateur de sortie s’éteindra également. Si le
groupe électrogène a été surchargé, vous devez arrêter et débrancher toutes les
charges électriques, arrêter le groupe électrogène et le redémarrer pour continuer
en mode de fonctionnement normal.
M - Indicateur de niveau d’huile bas (
) — Le système d’indicateur de niveau
d’huile bas est conçu pour empêcher l’endommagement du moteur causé par un
manque d’huile moteur. Si le niveau d’huile moteur descend en dessous d’un
niveau prédéterminé, le témoin jaune de l’indicateur de niveau d’huile bas à LED
s’allume et un contacteur à huile arrête le moteur. Si le moteur s’arrête ou si le
témoin jaune de l’indicateur de niveau d’huile bas à LED s’allume lorsque vous tirez
sur le démarreur manuel, vérifiez le niveau d’huile moteur.
N - Sorties 230 volts CA — Peuvent être utilisées pour fournir de l’électricité pour le
fonctionnement d’éclairages, appareils, outils et charges moteur électriques 50 Hz,
monophasées, 230 volts CA. Ces sorties sont protégées contre la surcharge par un
système de surcharge interne.
P - Silencieux à pare-étincelles — Le silencieux d’échappement réduit le bruit du
moteur et est équipé d’un écran pare-étincelles.
R - Couvercle de maintenance supérieur — Retirez-le pour accéder à la bougie.
S -
Étiquette d’identification — Indique le modèle, la révision et le numéro de série du groupe
électrogène. Munissez-vous de informations lorsque vous demandez de l’assistance.
Éléments non illustrés :
Filtre à air (sous le couvercle de maintenance latéral) — Protège le moteur en
filtrant la poussière et les débris de l’air d’admission.
Bouchon de remplissage d’huile (sous le couvercle de maintenance latéral) —
ATTENTION Le carburant et ses vapeurs sont extrêmement inflammables et
explosifs, ce qui peut provoquer des brûlures, un incendie ou
une explosion susceptibles d’entraîner la mort, de graves
blessures et/ou des dommages matériels.
LORS DE L’APPOINT EN CARBURANT
minutes avant d’ouvrir le bouchon du réservoir de carburant. Desserrez lentement
de bouchon pour libérer la pression présente à l’intérieur du réservoir.
NE remplissez PAS trop le réservoir. Laissez de l’espace pour la dilatation du carburant.
le moteur.
sources de chaleur ou d’autres sources d’allumage.
raccords de carburant ne présentent ni fissures ni fuites. Remplacez si nécessaire.
Not for
Reproduction

8 BRIGGSandSTRATTON.COM
Fonctionnement
Attache de mise à la terre
Le groupe électrogène est pourvu d’une attache de mise à la terre. Les codes électriques
locaux peuvent exiger qu’elle soit connectée à un raccord à la terre approprié. Le conduc-
teur neutre du groupe électrogène est flottant, ce qui signifie que l’enroulement de stator
CA est isolé de l’attache de mise à la terre et des broches de mise à la terre du connecteur
CA. Les dispositifs électriques, tels que le RCD, qui requièrent un conducteur neutre mis à
la terre, peuvent ne pas fonctionner correctement à partir de ce groupe électrogène.
Exigences spécifiques
Certains règlements ou ordonnances locaux peuvent s’appliquer à l’usage prévu du
être utilisé sur des chantiers requérant un conducteur neutre lié à la masse.
Emplacement du groupe électrogène Figure
4
Espaces et mouvement d’air
Placez le groupe électrogène à l’extérieur, dans une zone dans laquelle les gaz d’échappement
mortels ne s’accumuleront pas. NE placez PAS le groupe électrogène dans un endroit dans
lequel le gaz d’échappement (A) pourrait pénétrer et s’accumuler ou pourrait être aspiré dans
de toute fenêtre, porte, orifices de ventilation ou autres ouvertures qui peuvent permettre aux
gaz d’échappement de s’accumuler dans une zone confinée. Les vents dominants et courants
d’air doivent être pris en considération lors du positionnement du groupe électrogène.
Démarrage du moteur Figure
2
3
Débranchez toutes les charges électriques du groupe électrogène. Utilisez les
1. Assurez-vous que l’unité se trouve sur une surface lisse et plane.
REMARQUE Si vous ne démarrez pas et ne faites pas fonctionner l’unité sur
une surface lisse et plane, celle-ci ne démarrera pas ou s’arrêtera au cours du
fonctionnement. Si vous placez l’unité sur une surface qui bloque les emplacements
d’aération et de refroidissement sur le dessous, vous perdrez de la puissance de sortie.
Si vous perdez la sortie, arrêtez l’unité et laissez-la refroidir avant de la redémarrer.
2.
Assurez-vous que le commutateur POWERSMART (3, K) se trouve en position arrêt (O).
3. Tournez le commutateur du moteur (3, F) en position marche (I).
4. Tournez le levier d’évent du bouchon de carburant (2, A) en position marche (I).
5. Poussez le levier de starter (3, C) en position choke (
).
REMARQUE Pour démarrer le moteur la toute première fois, après une panne de carburant
ou après une longue période de stockage, remplissez le réservoir de carburant jusqu’à l’indi-
cateur de carburant rouge, comme décrit dans le chapitre Appoint en carburant. Il faudra plu-
sieurs tentatives de démarrage jusqu’à ce que l’air ait été purgé dans le circuit de carburant.
6. Saisissez le démarreur manuel (3, E) et tirez lentement jusqu’à sentir une légère
résistance. Tirez ensuite rapidement pour démarrer le moteur.
7. Déplacez le levier de starter en position de semi-choke et tirez deux fois sur le
démarreur manuel.
8. Déplacez lentement le levier de starter en position de fonctionnement ( ). Si le
moteur faiblit, déplacez le levier de starter en position semi-choke jusqu’à ce que
le moteur tourne facilement, puis placez-le en position de fonctionnement (
).
REMARQUE Si le moteur se noie, déplacez le levier de starter en position de
fonctionnement (
) et lancez jusqu’au démarrage du moteur.
REMARQUE Si le moteur démarre après 3 tractions mais ne parvient pas à
fonctionner, ou si l’unité s’arrête pendant le fonctionnement, assurez-vous que l’unité
se trouve sur une surface plane et vérifiez que le niveau d’huile est correct dans le
carter. L’unité est équipée d’un dispositif de protection de niveau d’huile bas. Si c’est le
cas, l’huile doit se trouver à un niveau approprié pour que le moteur démarre.
Connexion des charges électriques
courts que possible afin de minimiser la chute de tension.
1. Assurez-vous que le témoin vert de l’indicateur de sortie s’allume (cela peut
prendre 3 secondes).
2. Laissez le moteur se stabiliser et chauffer pendant quelques minutes après le
démarrage.
3. Branchez et mettez en marche les charges électriques 50 Hz, monophasées,
230 volts CA souhaitées.
REMARQUE
Éviter la surcharge du groupe électrogène.
REMARQUE Le dépassement de la capacité de puissance/intensité du groupe
électrogène peut endommager le groupe électrogène et/ou les dispositifs électriques
qui y sont connectés.
NE DÉPASSEZ PAS la capacité de puissance/intensité du groupe électrogène.
Reportez-vous au chapitre Éviter la surcharge du groupe électrogène dans la section
Fonctionnement.
des charges électriques.
d’arrêter celui-ci.
Arrêt du moteur
1. Arrêtez et débranchez toutes les charges électriques des connecteurs du groupe
électrogène. Ne démarrez ou n’arrêtez JAMAIS le moteur lorsque des dispositifs
électriques sont branchés sur celui-ci et sont en marche.
2. Amenez le commutateur POWERSMART en position arrêt (O).
3.
Laissez tourner le moteur en l’absence de charge pendant plusieurs minutes afin de
laisser se stabiliser les températures internes du moteur et du groupe électrogène.
4. Tournez le commutateur du moteur en position arrêt (O).
5. Tournez le levier d’évent du bouchon de carburant en position arrêt (O).
ATTENTION Les gaz d’échappement/la chaleur peuvent inflammer des
combustibles, des structures, ou endommager le réservoir de
carburant, provoquant ainsi un incendie pouvant entraîner la
mort, de graves blessures et/ou des dommages matériels.
Tout contact avec la zone du silencieux peut causer des brûlures susceptibles
d’entraîner de graves blessures.
électrogène, dessus compris.
Contactez le fabriquant, détaillant ou distributeur de l’équipement d’origine pour obtenir
un pare-étincelles conçu pour le système d’échappement installé sur ce moteur.
de la même façon que celles-ci.
ATTENTION
La tension du groupe électrogène peut causer un choc
électrique ou des brûlures susceptibles d’entraîner la mort ou de graves
blessures.
à nu ou endommagés de toute autre manière.
NE faites PAS fonctionner le groupe électrogène sous la pluie ou par temps humide.
tenant dans l’eau, en étant pieds nus ou en ayant les mains ou les pieds mouillés.
fonctionner ou d’entretenir le groupe électrogène.
ATTENTION
surchauffer, provoquer un arc électrique et brûler, causant ainsi la mort,
de graves blessures et/ou des dommages matériels.
ATTENTION
de tirer la main et le bras en direction du moteur plus rapidement qu’il
osseuses, des contusions ou des entorses entraînant de graves blessures.
sentir une résistance, puis tirez rapidement pour éviter tout effet de recul.
sont branchés sur celui-ci et sont en marche.
ATTENTION Le moteur en marche émet du monoxyde de carbone, un gaz
toxique inodore et incolore.
L’inhalation de monoxyde de carbone peut entraîner la mort, des blessures
graves, des maux de tête, une fatigue, des vertiges, des vomissements, un
état de confusion, des crises, des nausées ou des évanouissements.
t UNIQUEMENT à l’extérieur.
chambres à coucher.
fenêtres, portes, prises d’air ou autres ouvertures.
de matériel roulant, de matériel maritime, ou d’un espace clos, même si les portes
et les fenêtres sont ouvertes.
Not for
Reproduction

9 9
Mode POWERSMART
Cette fonction est conçue pour améliorer considérablement l’économie de carburant
et réduire le bruit. Lorsque ce commutateur est en MARCHE (I), la vitesse du moteur
augmente lorsque des charges électriques sont connectées, et diminue lorsque des
charges électriques sont retirées.
Lorsque le commutateur est en position arrêt (O), le moteur fonctionne à la pleine
vitesse commandée.
REMARQUE
l’arrêt du groupe électrogène, ou lorsque vous utilisez le connecteur CC.
Chargement d’une batterie Figure
5
automobile ou polyvalente 12 volts déchargée. L’intensité maximale disponible pour le
circuit de charge de la batterie est de 5 Amps. Un disjoncteur CC protège cette sortie des
surcharges. Si une surcharge se produit, le disjoncteur se déclenche (le bouton-poussoir
saute). Attendez quelques minutes et poussez le bouton pour réinitialiser le disjoncteur.
REMARQUE Lorsque vous utilisez le circuit de charge de batterie, tournez le
O).
REMARQUE
N’utilisez PAS l’unité pour faire démarrer un moteur ayant une batterie déchargée.
Pour recharger des batteries 12 volts, procédez comme suit :
1. Si nécessaire, nettoyez les bornes ou les terminaux de la batterie.
séparateurs dans les cellules de la batterie. N’UTILISEZ PAS d’eau du robinet.
3. Si la batterie est équipée de bouchons d’évent, assurez-vous qu’ils sont
installés et serrés.
rouge à la borne
ou au terminal de batterie indiqué par Positif, POS ou (+).
noire à la borne
ou au terminal de batterie indiqué par Négatif, NEG, ou (–).
7. Démarrez le groupe électrogène comme décrit dans le chapitre Démarrage du
moteur. Laissez tourner le moteur pendant la charge de la batterie.
REMARQUE En général, une période de 30 à 120 minutes est suffisante pour
recharger une batterie faible.
8. Lorsque la batterie est chargée, arrêtez le moteur comme décrit dans le chapitre
Arrêt du moteur.
le des bornes de la batterie.
REMARQUE Utilisez un densimètre automobile pour tester l’état de charge de la batterie
et son état général. Suivez attentivement les instructions du fabricant du densimètre. En
spécifique de son fluide (mesurée par le densimètre) est supérieure ou égale à 1,260.
Éviter la surcharge du groupe électrogène
Capacité
puissance nominale (fonctionnement) et de puissance de crête (démarrage) pour les
1. Sélectionnez les éléments que vous souhaitez alimenter simultanément.
2.
Faites le total de la puissance nominale (fonctionnement) de ces éléments. Il s’agit
de la quantité d’énergie que votre groupe électrogène doit produire pour que ces
éléments fonctionnent. Reportez-vous au Guide de référence des puissances.
3.
Estimez la puissance de crête (démarrage) dont vous aurez besoin. La puissance de
crête est la brève poussée d’énergie requise pour faire démarrer des outils ou appa-
reils entraînés par un moteur électrique, tels qu’une scie circulaire ou un réfrigérateur.
Étant donné que tous les moteurs ne démarrent pas en même temps, la puissance de
crête totale peut être estimée en ajoutant uniquement le(s) élément(s) ayant la puis-
sance de crête maximale au total de la puissance nominale calculé à l’étape 2.
Exemple :
Puissance nominale totale (fonctionnement) = 1555
Puissance de crête supplémentaire maximale = 600
Sortie totale requise du groupe électrogène = 2155
Gestion de la puissance
Pour prolonger la vie de votre groupe électrogène et des dispositifs associés, il est
important que vous soyez très précautionneux lors de l’ajout de charges électriques à
votre groupe électrogène. Rien ne doit être connecté aux sorties du groupe électrogène
avant le démarrage du moteur. Le moyen adéquat et sûr de gérer la puissance du
1. Rien n’étant connecté au groupe électrogène, démarrez le moteur comme décrit
dans ce manuel.
2. Branchez et mettez en marche la première charge, de préférence la charge la
plus importante que vous ayez.
3. Laissez la sortie du groupe électrogène se stabiliser (le moteur tourne
facilement et le dispositif associé fonctionne correctement).
4. Branchez et mettez en marche la charge suivante.
5. À nouveau, laissez le groupe électrogène se stabiliser.
6. Répétez les étapes 4 et 5 pour chaque charge supplémentaire.
N’ajoutez JAMAIS plus de charges que n’en supporte la capacité du groupe
électrogène. Soyez particulièrement attentif aux charges de crête vis-à-vis de la
capacité du groupe électrogène, comme décrit ci-dessus.
puissance réelle de l’outil ou appareil.
ATTENTION Les batteries d’accumulateurs émettent de l’hydrogène gazeux
explosif pendant la charge. L’hydrogène gazeux reste à
proximité de la batterie longtemps après que celle-ci ait été
chargée. La moindre étincelle peut enflammer l’hydrogène et
provoquer une explosion pouvant causer la mort, de graves blessures et/ou des
dommages matériels.
Le fluide de l’électrolyte de la batterie contient de l’acide et est extrêmement
caustique. Tout contact avec le fluide de batterie peut causer des brûlures
chimiques entraînant de graves blessures et/ou des dommages matériels.
pendant la charge de la batterie et plusieurs minutes après celle-ci.
Portez des lunettes de protection, un tablier en caoutchouc et des gants en caoutchouc.
NE continuez PAS à charger une batterie qui devient chaude ou est entièrement chargée.
Outil ou appareil
Puissance nominale en
watts (fonctionnement)
Puissance de crête supplémen-
taire en watts (démarrage)
300 600
Congélateur 500 500
Téléviseur 500 —
Système de sécurité 180 —
Lumière (75 watts) 75 —
Puissance de fonctionne-
ment totale = 1 555 watts
Puissance de crête max. =
Guide de référence des puissances
Outil ou appareil
Puissance
nominale* en watts
(fonctionnement)
Puissance de crête
supplémentaire en
watts (démarrage)
Essentiels
Ampoule - 75 watts 75 —
Congélateur 500 500
Pompe de vidange 800 1200
Réfrigérateur/Congélateur - 18 m3 800 1600
Pompe de puits à eau - 1/3 ch 1000 2000
Chauffage/refroidissement
1200 1800
300 600
800 1300
Cuisine
Micro-ondes - 1 000 watts 1000 —
Cafetière 1500 —
Cuisinière électrique - Élément simple 1500 —
Chambre familiale
100 —
100 —
Récepteur stéréo 450 —
Téléviseur couleur - 27" 500 —
Ordinateur personnel moniteur 17" 800 —
Autre
Système de sécurité 180 —
Radio-réveil AM/FM 300 —
Système d’ouverture de la porte de garage - 1/2 ch
480 520
Bricolage/chantier
Lampe de travail quartz-halogène 1000 —
Pulvérisateur électrique - 1/3 ch 600 1200
Scie alternative 960 960
Perceuse électrique - 1/2 ch 1000 1000
Scie circulaire - 7-1/4" 1500 1500
Not for
Reproduction

10 BRIGGSandSTRATTON.COM
Maintenance
Programme de maintenance
Respectez les intervalles horaires ou calendaires, selon le cas. Un entretien plus fréquent
est nécessaire lors d’une utilisation dans des conditions difficiles indiquées ci-dessous.
¹
Entretenez plus souvent votre équipement dans des environnements sales ou poussiéreux.
Recommandations générales
Un entretien régulier améliorera les performances et augmentera la durée de vie du
groupe électrogène. Adressez-vous à un distributeur agréé pour le service.
La garantie du groupe électrogène ne couvre pas les éléments qui ont été soumis à un
abus ou une négligence de l’opérateur. Pour recevoir la pleine valeur de la garantie,
l’opérateur doit entretenir le groupe électrogène comme indiqué dans ce manuel.
REMARQUE
Une utilisation incorrecte du groupe électrogène peut l’endommager et
raccourcir sa durée de vie.
de protection, afin d’assurer un refroidissement adéquat.
votre groupe électrogène.
Tous les entretiens et réglages doivent être effectués au moins à chaque saison.
Respectez les exigences du tableau du Programme de maintenance ci-dessus.
REMARQUE Une fois par an, vous devez nettoyer ou remplacer la bougie et remplacer
le filtre à air. Une nouvelle bougie et un filtre à air propre garantissent un mélange air-
carburant adéquat et aident votre moteur à mieux fonctionner et à avoir une vie plus longue.
Maintenance du groupe électrogène
La maintenance du groupe électrogène consiste à garder l’unité propre et sèche.
exposée à une poussière, une saleté, une humidité excessives, ou à des vapeurs
corrosives. Les fentes d’air de refroidissement dans le groupe électrogène ne doivent
pas être colmatées avec de la neige, des feuilles ou tout autre matière étrangère.
REMARQUE N’utilisez PAS d’eau ou d’autres liquides pour nettoyer le groupe
électrogène. Les liquides peuvent pénétrer dans le circuit de carburant du moteur,
réduire ses performances et/ou causer des pannes. En outre, si du liquide pénètre
dans le groupe électrogène par les fentes d’air de refroidissement, une partie du
liquide sera retenue dans les creux et fentes de l’isolant de l’enroulement de rotor et de
stator. L’accumulation de liquide et de saleté sur les enroulements internes du groupe
électrogène peut faire baisser la résistance de l’isolant de ces enroulements.
Nettoyage
Tous les jours ou avant utilisation, inspectez les alentours et le dessous du groupe
électrogène pour rechercher des signes de fuites d’huile ou de carburant. Nettoyez les
débris accumulés de l’intérieur et de l’extérieur du groupe électrogène. Inspectez les
fentes d’air de refroidissement et les ouvertures situées sur le groupe électrogène. Ces
ouvertures doivent rester propres et non obstruées.
Toutes les pièces du moteur doivent rester propres afin de limiter le risque de
REMARQUE
Une utilisation incorrecte du groupe électrogène peut l’endommager et
raccourcir sa durée de vie.
excessives, ou à des vapeurs corrosives.
Nettoyage du tamis à carburant
Figure
6
Le tamis à carburant permet d’empêcher les débris de pénétrer dans le circuit de carburant.
Nettoyez le tamis à carburant comme suit :
1. Assurez-vous que le groupe électrogène se trouve sur une surface plane.
2. Retirez le bouchon de carburant (A) et le tamis à carburant (B).
3. Lavez le tamis à carburant dans du détergent liquide et de l’eau.
4. Essuyez le tamis à carburant à l’aide d’un chiffon doux et sec.
5.
Remettez soigneusement en place le tamis à carburant et le bouchon de carburant.
Maintenance du moteur
Huile
Huiles recommandées
Nous recommandons l’utilisation d’huiles garanties et certifiées Briggs & Stratton pour obte-
nir les meilleures performances. D’autres huiles détergentes de haute qualité sont acceptables
si elles sont de catégorie SF, SG SH, SJ ou supérieure. N’utilisez PAS d’additifs spéciaux.
Les températures extérieures déterminent la viscosité de l’huile convenant au moteur.
Utilisez le tableau pour sélectionner la meilleure viscosité pour la fourchette de
températures extérieures prévues.
* À une température inférieure à 4 °C (40 °F), l’emploi de SAE 30 rendra difficile la
mise en marche du moteur.
** Au-dessus de 27 °C (80 °F) l’utilisation de 10W30 peut causer une augmentation de
REMARQUE L’huile de synthèse répondant aux spécifications des normes
ILSAC GF-2, comportant la marque de certification API et le symbole
huile acceptable à toutes les températures L’utilisation d’une huile de
synthèse ne modifie en rien les périodes de changement d’huile préconisées.
Contrôle du niveau d’huile Figure
8
heures de fonctionnement. Le niveau d’huile doit rester constant.
1. Assurez-vous que le groupe électrogène se trouve sur une surface plane.
2. Desserrez les vis du couvercle de maintenance latéral et retirez le couvercle de
maintenance latéral.
3. Nettoyez la zone autour du remplissage d’huile et retirez le bouchon de
remplissage d’huile.
de remplissage d’huile.
5. Remettez en place et serrez le bouchon de remplissage d’huile.
6. Remettez en place le couvercle de maintenance latéral et serrez à la main les vis
du couvercle.
Appoint en huile moteur
Figure
9
1. Assurez-vous que le groupe électrogène se trouve sur une surface plane.
chapitre Contrôle du niveau d’huile.
3. Si nécessaire, versez lentement de l’huile dans l’orifice de remplissage d’huile
jusqu’au point de débordement au niveau du remplissage d’huile.
4. Remettez en place et serrez le bouchon de remplissage d’huile.
5. Remettez en place le couvercle de maintenance latéral et serrez à la main les vis
du couvercle.
Toutes les 8 heures ou chaque jour
Après les 10 premières heures
Toutes les 50 heures ou tous les 3 mois
Toutes les 100 heures ou tous les 6 mois
¹
Toutes les 250 heures ou une fois par an
ATTENTION Une production involontaire d’étincelles peut provoquer un
incendie ou un choc électrique susceptible d’entraîner la mort
ou de graves blessures.
LORS DE RÉGLAGES OU DE RÉPARATIONS SUR VOTRE GROUPE ÉLECTROGÈNE
plus entrer en contact avec la bougie.
LORS DU TEST DE LA BOUGIE MOTEUR
NE CONTRÔLEZ PAS la bougie lorsque celle-ci est retirée.
Not for
Reproduction

11 11
Changement de l’huile moteur
Si vous utilisez votre groupe électrogène dans des conditions de poussière ou de saleté
extrêmes, ou par temps très chaud, changez l’huile plus souvent.
LES RESSOURCES. RAMENEZ L’HUILE USAGÉE DANS DES CENTRES DE
COLLECTE.
Changez l’huile lorsque le moteur est encore chaud après avoir tourné, de la
manière suivante :
1. Assurez-vous que le groupe électrogène se trouve sur une surface plane.
2. Desserrez les vis du couvercle de maintenance latéral et retirez le couvercle de
maintenance latéral.
3. Nettoyez la zone autour du remplissage d’huile et retirez le bouchon de
remplissage d’huile.
4. Inclinez votre groupe électrogène pour transvaser l’huile du remplissage d’huile
vers un conteneur approprié, en vous assurant que vous inclinez votre unité en
direction du goulot de remplissage d’huile. Lorsque le carter est vide, remettez
le groupe électrogène en position droite.
5. Répétez les étapes 3 à 5 pour faire l’appoint en huile moteur, comme décrit
dans le chapitre Appoint en huile moteur.
Entretien du filtre à air
Figure
10
tourner avec un filtre à air sale. Entretenez plus souvent votre filtre à air dans des
environnements sales ou poussiéreux.
Pour entretenir le filtre à air, procédez comme suit :
1. Desserrez les vis du couvercle de maintenance latéral et retirez le couvercle de
maintenance latéral.
2.
Desserrez la vis du couvercle du filtre à air (A) et retirez le couvercle du filtre à air
(B).
3. Retirez précautionneusement le filtre à air en mousse (C) en le tirant vers vous.
4. Retirez précautionneusement le filtre de la prise d’air (D) en le tirant vers vous.
5.
Lavez le filtre à air en mousse et le filtre de la prise d’air dans du détergent liquide
et de l’eau uniquement. Séchez les éléments en les pressant dans un chiffon propre.
6. SATUREZ d’huile moteur propre le filtre à air en mousse, puis pressez-le dans
un chiffon propre pour éliminer l’excès d’huile.
7.
Remettez en place le filtre à air en mousse propre ou un filtre neuf dans la base.
8. Remettez en place le filtre de la prise d’air propre ou un filtre neuf dans la base.
9. Remettez en place le couvercle du filtre à air et serrez la vis.
10. Remettez en place le couvercle de maintenance latéral et serrez à la main les vis
du couvercle.
Entretien de la bougie
Figure
11
12
Le remplacement de la bougie permettra à votre moteur de démarrer plus facilement et
de mieux fonctionner.
1. Retirez le couvercle de maintenance supérieur.
2. Nettoyez la zone autour de la bougie et retirez la coiffe de bougie.
3. Retirez et inspectez la bougie.
à fils et ramenez la distance entre les électrodes de la bougie à la distance
recommandée si nécessaire (reportez-vous au chapitre Spécifications).
5. Remplacez la bougie si les électrodes sont trouées ou brûlées ou si la
porcelaine est fissurée. Utilisez la bougie de remplacement recommandée.
Reportez-vous au chapitre Spécifications.
6.
Mettez en place la bougie et serrez fortement. Remettez en place la coiffe de bougie.
7.
Remettez en place le couvercle de maintenance supérieur
.
Inspection du silencieux et du pare-étincelles Figure
13
14
Inspectez le silencieux pour rechercher d’éventuelles fissures, traces de corrosion
ou autres dommages. Retirez le pare-étincelles, le cas échéant, et inspectez-le pour
rechercher des dommages ou des blocs de carbone. Si l’inspection détermine qu’il faut
le remplacer, assurez-vous d’utiliser des pièces de rechange d’origine.
Nettoyez et inspectez le pare-étincelles comme suit :
1. Pour retirer le cache du silencieux, retirez les quatre vis qui relient le cache au
groupe électrogène.
2. Retirez la vis qui rattache l’écran pare-étincelles au silencieux. Retirez l’écran
pare-étincelles.
3. Inspectez l’écran et remplacez-le s’il est déchiré, perforé ou endommagé
d’une autre manière. N’utilisez PAS un écran défectueux. Si l’écran n’est pas
endommagé, nettoyez-le à l’aide d’une brosse.
4.
Fixez de nouveau l’écran au silencieux. Remettez en place le cache du silencieux.
Contrôle du jeu de soupape
et allongent la durée de vie du moteur. Cette procédure ne peut être réalisée sans
un démontage partiel du moteur et l’utilisation d’outils spéciaux. Pour cette raison,
régler le jeu de soupape aux intervalles recommandées (reportez-vous aux chapitre
Programme de maintenance dans la section Maintenance).
Stockage
Si vous n’utilisez pas votre groupe électrogène pendant plus de 30 jours, reportez-vous
aux indications suivantes pour le préparer au stockage.
Stockage du groupe électrogène
Nettoyage.
le groupe électrogène sont propres et non obstruées.
Instructions pour un stockage de long terme
Le carburant peut s’éventer quand il est stocké plus de 30 jours. Le carburant éventé
sur les pièces essentielles du carburateur. Pour que le carburant conserve toutes ses
propriétés, utilisez le stabilisateur de carburant FRESH START® de Briggs & Stratton qui
est disponible sous forme d’additif liquide ou en cartouche compte-gouttes de concentré.
Il n’est pas nécessaire de purger l’essence dans le moteur si un stabilisateur de
carburant a été ajouté selon les instructions. Faites fonctionner le moteur pendant
le carburant peuvent être stockés pendant une période allant jusqu’à 24 mois.
être vidangé dans un récipient approuvé. Faites fonctionner le moteur jusqu’à ce qu’il s’arrête
par manque de carburant. L’utilisation d’un stabilisateur de carburant dans le récipient de
stockage est recommandée pour que le carburant conserve toutes ses propriétés.
Changement de l’huile moteur
Le moteur encore chaud, vidangez l’huile du carter Remplissez avec le grade
recommandé. Reportez-vous au chapitre Changement de l’huile moteur.
Autres conseils de stockage
1. NE STOCKEZ PAS le carburant d’une saison sur l’autre sans l’avoir traité
comme décrit dans le chapitre Instructions pour un stockage de long terme.
2. Remplacez le récipient de carburant s’il commence à rouiller. De la rouille et/
ou de la saleté dans le carburant peuvent causer des problèmes si celui-ci est
utilisé avec cette unité.
3. Couvrez le groupe électrogène d’une couverture de protection adéquate qui ne
retient pas l’humidité.
4. Stockez le groupe électrogène dans une zone propre et sèche.
AVERTISSEMENT Évitez tout contact prolongé ou répété de la peau avec de
l’huile moteur usagée.
certains animaux de laboratoire.
ATTENTION Tout contact avec la zone du silencieux peut causer de graves brûlures.
Les gaz d’échappement/la chaleur peuvent inflammer des
combustibles, des structures, ou endommager le réservoir de
carburant, provoquant ainsi un incendie.
électrogène, dessus compris.
Contactez le fabriquant, détaillant ou distributeur de l’équipement d’origine pour obtenir
un pare-étincelles conçu pour le système d’échappement installé sur ce moteur.
de la même façon que celles-ci.
ATTENTION Le carburant et ses vapeurs sont extrêmement inflammables et
explosifs, ce qui peut provoquer des brûlures, un incendie ou
une explosion susceptibles d’entraîner la mort, de graves
blessures et/ou des dommages matériels.
LORS DU STOCKAGE DE CARBURANT OU DE L’ÉQUIPEMENT AVEC DU
CARBURANT DANS LE RÉSERVOIR
linge ou autres appareils qui disposent d’une veilleuse ou de toute autre source
d’allumage susceptible d’inflammer les vapeurs de carburant.
LORS DE LA VIDANGE DE CARBURANT
lentement de bouchon pour libérer la pression présente à l’intérieur du réservoir.
sources de chaleur ou d’autres sources d’allumage.
raccords de carburant ne présentent ni fissures ni fuites. Remplacez si nécessaire.
ATTENTION Les couvertures de stockage sont susceptibles de provoquer un
incendie pouvant entraîner la mort, de graves blessures et/ou des
dommages matériels.
couverture sur celui-ci.
Not for
Reproduction

12 BRIGGSandSTRATTON.COM
Dépannage
Problème
Cause Correction
Le moteur tourne, mais il n’y a aucune
sortieCA.
1. Le témoin rouge de l’alarme de surcharge est allumé. Le groupe
électrogène est surchargé.
2. Le témoin vert de l’indicateur de sortie n’est pas allumé.
Dysfonctionnement du groupe électrogène.
3. Mauvaise connexion ou jeu de cordons défectueux.
4. Le dispositif connecté est en mauvais état.
1. Reportez-vous au chapitre Éviter la surcharge du groupe
électrogène dans la section Fonctionnement. Arrêtez le
groupe électrogène et redémarrez.
2. Contactez le service d’entretien agréé.
4. Connectez un autre dispositif en bon état.
Le moteur tourne bien en l’absence de
charge mais «s’embourbe» lorsque
des charges sont connectées.
1. Court-circuit dans une charge connectée.
2. La vitesse du moteur est trop lente.
3. Le groupe électrogène est surchargé.
4. Court-circuit dans le groupe électrogène.
1. Déconnectez la charge électrique court-circuitée.
2. Contactez le service d’entretien agréé.
3. Reportez-vous au chapitre Éviter la surcharge du groupe
électrogène dans la section Fonctionnement.
4. Contactez le service d’entretien agréé.
Le moteur ne démarre pas ; il s’arrête
pendant le fonctionnement
ou démarre mais fonctionne
difficilement.
1. Le commutateur du moteur est en position arrêt (O).
2. Le levier d’évent du bouchon de carburant est en position
O).
3. Le témoin de l’indicateur de niveau d’huile bas s’allume. Niveau
d’huile bas.
4. Filtre à air sale.
5. Panne de carburant.
6. Carburant éventé.
7. Le fil de la bougie n’est pas connecté à la bougie.
8. Bougie défectueuse.
9. Présence d’eau dans le carburant.
10. Moteur noyé.
11. Mélange de carburant trop riche.
12. La soupape d’admission est bloquée en position ouverte ou
fermée.
13. Le moteur a perdu de la compression.
1. Placez le commutateur du moteur en position marche (I).
2. Tournez le levier d’évent du bouchon de carburant en
position marche (I).
3. Remplissez le carter au niveau adéquat ou placez le groupe
électrogène sur une surface plane.
4. Nettoyez ou remplacez le filtre à air.
5. Remplissez le réservoir de carburant.
remplissez avec du carburant neuf.
7. Connectez le fil à la bougie.
8. Remplacez la bougie.
remplissez avec du carburant neuf.
10. Attendez 5 minutes et relancez le moteur.
11. Contactez le service d’entretien agréé.
12. Contactez le service d’entretien agréé.
13. Contactez le service d’entretien agréé.
Le moteur manque de puissance.
1. La charge est trop élevée.
2. Le filtre à air est sale.
1. Reportez-vous au chapitre Éviter la surcharge du groupe
électrogène dans la section Fonctionnement.
2. Remplacez le filtre à air.
Le moteur « rame » ou vacille.
Le carburateur fonctionne avec un mélange trop riche ou trop pauvre. Contactez le service d’entretien agréé.
Spécifications du produit
Puissance de démarrage .......................................2 000 watts
Puissance* ..................................................1 600 watts
à 230 volts CA ............................................. 7,0 Amps
à 12 volts CC ................................................5 Amps
Fréquence nominale ............................................ 50 hertz
Phase ......................................................Monophasé
Déplacement ......................................105,6 cm3 (6,44 cu. in.)
Espacement de la bougie .........................0,6-0,7 mm (0,023-0,027 in.)
Jeu de soupape d’admission ..........0,08 - 0,12 mm (0,0031 - 0,0047 in.) à froid
Jeu de soupape d’échappement ........0,13 - 0,17 mm (0,0051 - 0,0067 in.) à froid
Capacité du réservoir de carburant .....................3,7 L (1,0 U.S. gallon)
Capacité du réservoir d’huile ..........................0,4 litres (13,5 Ounces)
Puissances nominales : Les étiquettes de puissance nominale brute pour les
modèles de moteurs à essence individuels répondent au code J1940 (Small Engine
Power & Torque Rating Procedure) de la SAE (Society of Automotive Engineers) ;
et la performance nominale a été obtenue et corrigée conformément à SAE J1995
de puissance en ch sont mesurées à 3 600 tr/min. La puissance de moteur brute réelle
peut être inférieure et est affectée par, sans en exclure d’autres, les conditions de
fonctionnement ambiantes et la variabilité d’un moteur à l’autre. Étant donné la gamme
étendue de produits sur lesquels les moteurs sont placés et la variété des problèmes
environnementaux applicables au fonctionnement de l’équipement, le moteur à
essence ne développe pas la puissance nominale brute quand il est utilisé dans une
La différence est due à plusieurs facteurs parmi lesquels, sans en exclure d’autres,
accessoires (filtre à air, échappement, charge, refroidissement, carburateur, pompe
à essence, etc.), limitations d’application, conditions de fonctionnement ambiantes
(température, humidité, altitude) et variabilité d’un moteur à l’autre. En raison des
limites de fabrication et de capacité, Briggs & Stratton peut substituer un moteur d’une
puissance nominale supérieure pour le moteur de cette série.
* Ce groupe électrogène est calibré conformément à la norme ISO 8528 G3.
Pièces de rechange courantes
Filtre à air en mousse ..........................................311388GS
Filtre de prise d’air .............................................311389GS
Bougie avec résistance ......................................NGK CR7HSA
Not for
Reproduction

13 13
BRIGGS & STRATTON POWER PRODUCTS GROUP, LLC GARANTIE PROPRIÉTAIRE GROUPE ÉLECTROGÈNE PORTABLE
GARANTIE LIMITÉE
Briggs & Stratton Power Products Group, LLC réparera ou remplacera gratuitement toute pièce du groupe électrogène portable ayant un vice de matériau ou de fabrication,
ou les deux. Les frais de transport du produit à réparer ou remplacer seront, dans le cadre de cette garantie, réglés par l’acheteur. Cette garantie est en vigueur pour les
périodes de temps et conformément aux conditions stipulées ci-dessous. Pour les réparations couvertes par la garantie, adressez-vous au distributeur agréé le plus proche de
chez vous en utilisant la carte de localisation de nos distributeurs sur le site www.BRIGGSandSTRATTON.com.
IL N’EXISTE AUCUNE AUTRE GARANTIE EXPLICITE. LES GARANTIES IMPLICITES, Y COMPRIS CELLES DE QUALITÉ MARCHANDE ET D’ADAPTATION À UN EMPLOI
IMPLICITES SONT EXCLUES. LES RESPONSABILITÉS POUR LES DOMMAGES ACCESSOIRES ET INDIRECTS SONT EXCLUES DANS LA MESURE OÙ L’EXCLUSION EST
AUTORISÉE PAR LA LOI. Certains États ou pays ne permettent pas les limitations de durée de la garantie implicite. Certains États ou pays n’autorisent pas l’exclusion ou la
limitation des dommages consécutifs ou indirects. Dans ce cas, la limitation ci-dessus ne s’applique pas à votre cas. La présente garantie vous offre des droits juridiques
spécifiques et il se peut que vous ayez d’autres droits qui varient d’une juridiction à une autre, ou de pays à pays.
La période de garantie commence à la date d’achat par le premier utilisateur final, que ce soit un particulier ou une entreprise, et se poursuit sur la période énoncée ci-dessus.
utilisations possibles, y compris commerciales, génératrices de revenus ou locatives. Une fois que le produit a été utilisé dans un but commercial, il sera considéré comme
d’utilisation commerciale dans le cadre de cette garantie.
RÉFÉRENCE POUR DÉTERMINER LA PÉRIODE DE GARANTIE.
À PROPOS DE VOTRE GARANTIE
Nous sommes totalement disposés à réaliser des réparations dans le cadre de la garantie et nous nous excusons des éventuels inconvénients. Tout distributeur autorisé peut
réaliser des réparations dans le cadre de la garantie. Parfois les demandes de réparations dans le cadre de la garantie peuvent ne pas être pertinentes. Par exemple, une réparation
sous garantie ne s’applique pas si l’équipement a été endommagé suite à une mauvaise utilisation, l’absence d’entretien normal, une expédition, une manutention, un stockage
ou une installation défectueuse. De même, la garantie est nulle si la date de fabrication ou le numéro de série ont été enlevés ou si l’équipement a été altéré ou modifié. Pendant
la période de garantie, le Distributeur Agréé peut, de son plein gré, décider de réparer ou de remplacer une pièce qui, à l’examen, s’avère être défectueuse lors d’une utilisation
Usure normale
fonctionner correctement. Cette garantie ne couvre pas la réparation de pièces ou d’équipements usés par un usage normal.
Installation et maintenance
d’altérations, de modifications, d’utilisation non conforme, d’accidents, de négligence, de surcharge, de survitesse, de maintenance inappropriée, de réparation ou de
stockage qui, à notre avis, ont affecté les performances et la fiabilité. Cette garantie ne couvre pas non plus l’entretien normal comme les réglages, le nettoyage du système
d’alimentation d’essence et les obstructions (dues à des produits chimiques, de la poussière, du carbone ou du tartre, etc.)
Autres exclusions
non conforme, de modifications, d’altérations, de maintenance inappropriée, de gel ou de détérioration chimique. Les pièces accessoires, telles que les batteries de démarrage,
les jeux de cordons adaptateurs du groupe électrogène et les couvercles de stockage, sont exclues de la garantie sur le produit. Cette garantie exclut les équipements utilisés,
réemballés et de démonstration, les équipements utilisés pour une puissance de base à la place d’une puissance de réseau, les équipements utilisés dans les applications
BRIGGS & STRATTON POWER PRODUCTS GROUP, LLC
MILWAUKEE, WI, USA
Effectif au 1er novembre 2009 ; remplace toutes les garanties non datées et toutes les garanties datées d’avant le 1er novembre 2009.
2 ans*
1 an
Utilisation par le consommateur
Utilisation commerciale
*Seconde année pièces uniquement
PÉRIODE DE GARANTIE
Not for
Reproduction

4 BRIGGSandSTRATTON.COM
Gracias por adquirir este generador Briggs & Stratton® de calidad. Le agradecemos la confianza que ha depositado en la marca Briggs & Stratton. Si lo maneja y mantiene tal y
como se indica en este manual, su generador Briggs & Stratton le proporcionará muchos años de funcionamiento fiable.
Este manual contiene información sobre seguridad para advertirle sobre los peligros y riesgos asociados con los generadores y cómo evitarlos. Este generador está diseñado e indicado
para suministrar energía eléctrica a equipos de iluminación, aparatos, herramientas y motores eléctricos compatibles, y no debe utilizarse para ningún otro fin. Es importante que, antes
de arrancar o hacer funcionar este equipo, lea estas instrucciones con detenimiento y las comprenda totalmente. Conserve estas instrucciones para poder consultarlas en el futuro.
Debe montar este generador antes de utilizarlo. Para obtener instrucciones sobre el procedimiento de montaje final, consulte el apartado Montaje de este manual. Siga las
instrucciones al pie de la letra.
Dónde encontrarnos
No tendrá que ir muy lejos para encontrar el servicio técnico de Briggs & Stratton para su generador. Hay miles de distribuidores autorizados de Briggs & Stratton en todo el
mundo que proporcionan un servicio de alta calidad. También podrá localizar el servicio técnico autorizado más próximo en el mapa de distribuidores que se ofrece en Internet en
BRIGGSandSTRATTON.COM.
Generador
Número de modelo
Número de serie
Fecha de compra
Índice
Seguridad del usuario ......................................5
Descripción del equipo..........................................................5
Información importante sobre seguridad ............................................5
Montaje ................................................7
Desembalaje del generador ......................................................7
Relleno de aceite de motor.......................................................7
Adición de combustible .........................................................7
Características y mandos ....................................7
Funcionamiento...........................................8
Enganche de conexión a tierra ....................................................8
Ubicación del generador.........................................................8
Arranque del motor ............................................................8
Conexión de cargas eléctricas ....................................................8
Parada del motor ..............................................................8
Modo POWERSMART...........................................................9
Carga de una batería............................................................9
No sobrecargue el generador .....................................................9
Mantenimiento ..........................................10
Plan de mantenimiento.........................................................10
Mantenimiento del generador....................................................10
Mantenimiento del motor .......................................................10
Almacenaje ..................................................................11
Solución de problemas.....................................12
Características técnicas ....................................12
Características del producto.....................................................12
Repuestos frecuentes..........................................................12
Garantías ..............................................13
Garantía para el propietario del generador ..........................................13
Copyright © 2011 Briggs & Stratton Power Products Group, LLC
Milwaukee, WI, EE.UU. Reservados todos los derechos.
BRIGGS & STRATTON POWER PRODUCTS es una marca
registrada de Briggs & Stratton Corporation
Milwaukee, WI, EE. UU.
TRADUCCIÓN DE LAS INSTRUCCIONES ORIGINALES
Not for
Reproduction

5 5
Seguridad del usuario
Descripción del equipo
Lea atentamente este manual y familiarícese con el generador. Conozca
sus aplicaciones, limitaciones y riesgos.
Este generador de corriente alterna y continua (CA y CC) con inductor giratorio
funciona a motor. Se ha diseñado para suministrar energía eléctrica a equipos de
iluminación, aparatos, herramientas y motores eléctricos compatibles. El campo
inductor del generador gira a unas 4500 r.p.m. (con el modo POWERSMART
desactivado) impulsado por un motor monocilíndrico.
Se ha intentado por todos los medios que la información contenida en este manual
sea precisa y esté actualizada. No obstante, el fabricante se reserva el derecho de
modificar, alterar o mejorar de cualquier otra forma el generador y este documento en
cualquier momento y sin previo aviso.
Información importante sobre seguridad
El fabricante no puede prever todas las circunstancias posibles que podrían acarrear
riesgos. Por lo tanto, las advertencias incluidas en este manual, así como las etiquetas
y pegatinas colocadas sobre el aparato, no tienen carácter exhaustivo. Si utiliza
un procedimiento, método de trabajo o técnica que el fabricante no recomienda
específicamente, debe cerciorarse de que sea seguro para usted y otras personas.
También debe comprobar que el procedimiento, método de trabajo o técnica que haya
elegido no vuelva inseguro el generador.
Símbolos sobre la seguridad y sus significados
El símbolo de alerta de seguridad indica un riesgo de lesiones físicas.
alerta. Para representar el tipo de riesgo, se puede utilizar un símbolo de seguridad.
La palabra de señalización AVISO se utiliza para designar prácticas no relacionadas
con lesiones físicas.
PELIGRO indica un riesgo que, de no evitarse, provocará lesiones de gravedad o
la muerte.
ADVERTENCIA indica un riesgo que, de no evitarse, podría provocar lesiones de
gravedad o la muerte.
PRECAUCIÓN denota un riesgo que, si no se evita, podría resultar en lesiones
leves o moderadas.
AVISO hace referencia a prácticas no relacionadas con lesiones físicas.
Fuego
Explosión
Humos tóxicos
Superficie
caliente
Piezas móviles
Descarga eléctrica
Retroceso
Objetos propulsados
Manual de instrucciones
Presión explosiva Quemadura química
ADVERTENCIA Los motores emiten monóxido de carbono, un gas tóxico,
inodoro e incoloro.
La inhalación de monóxido de carbono puede provocar dolor de cabeza,
fatiga, mareos, náuseas, vómitos, confusión, pérdida de conocimiento,
convulsiones, lesiones graves o incluso la muerte.
funcione a pilas.
puertas, tomas de ventilación u otras aberturas.
equios móviles, embarcaciones o recintos, aunque estén abiertas puertas y
ventanas.
ADVERTENCIA El retroceso (retracción rápida) del cable de arranque tirará
de la mano y el brazo hacia el motor con fuerza, por lo que podría causar
contusiones, esguinces, fracturas de huesos u otras lesiones graves.
resistencia y entonces tire con rapidez para evitar el retroceso.
enchufados y encendidos.
ADVERTENCIA Mientras se recargan, las baterías emiten gas de hidrógeno
explosivo. Dicho gas permanece cerca de las baterías durante
mucho tiempo después de que se hayan cargado. Cualquier
chispa podría prender el hidrógeno y producir una explosión
que cause daños materiales, lesiones graves y la muerte.
El líquido electrolítico de las baterías contiene ácido que es extremadamente
cáustico. El contacto con el líquido de las baterías podría producir quemaduras por
sustancias químicas y causar daños materiales y lesiones graves.
carga de baterías ni hasta varios minutos después.
ADVERTENCIA
La tensión generada puede causar quemaduras o descargas
eléctricas, que podrían acarrear lesiones graves o la muerte.
-
ción y así aislar el generador de la instalación eléctrica y los trabajadores.
compañía eléctrica.
conductividad, como sobre cubiertas metálicas o en acerías.
pelados o deteriorados de algún otro modo.
agua o con las manos o pies mojados.
Not for
Reproduction

6 BRIGGSandSTRATTON.COM
AVISO
Superar la capacidad de potencia o intensidad del generador puede
estropear el generador o los aparatos eléctricos conectados a él.
NO supere la capacidad de potencia o intensidad del generador. Consulte No sobre-
cargue el generador en el apartado Funcionamiento.
estabilice.
generador.
AVISO
Un cuidado inadecuado del generador puede estropearlo y acortar su vida útil.
servicio técnico.
corrosivos.
generador.
- se pierde la salida eléctrica;
- salen chispas, humo o llamas de los equipos;
- el generador vibra en exceso.
ADVERTENCIA El combustible y sus vapores son muy inflamables y
explosivos y pueden causar quemaduras, incendios o
explosiones y derivar en daños materiales, lesiones graves o
incluso la muerte.
AL AÑADIR O VACIAR COMBUSTIBLE
que se enfríe durante al menos 2 minutos. Afloje el tapón lentamente para liberar
la presión acumulada en el depósito.
y otras fuentes de ignición.
depósito, el tapón y los racores. Cámbielos si es necesario.
AL ARRANCAR EL GENERADOR
aire estén en condiciones.
AL UTILIZAR EL GENERADOR
equipos móviles, embarcaciones o recintos.
combustible.
Choke” (
).
AL TRANSPORTAR, TRASLADAR O REPARAR EL GENERADOR
con la llave de paso cerrada.
combustible.
AL ALMACENAR COMBUSTIBLE O EL GENERADOR CON COMBUSTIBLE DENTRO
u otros electrodomésticos que tengan llamas piloto u otras fuentes de ignición,
porque podrían prender los vapores del combustible.
ADVERTENCIA El calor o los gases del escape podrían prender objetos infla-
mables o estructuras o dañar el depósito, causando incen-
dios, daños materiales, lesiones graves o incluso la muerte.
El contacto con la zona del silenciador podría causar quema-
duras y lesiones graves.
-
do en este motor, acuda al fabricante original del aparato o a un distribuidor.
las originales.
ADVERTENCIA Si salieran chispas, podrían causar incendios o descargas
eléctricas, que podrían acarrear lesiones graves o la muerte.
AL AJUSTAR O REPARAR EL GENERADOR
bujía.
AL COMPROBAR EL ENCENDIDO DEL MOTOR
NO revise la chispa si la bujía no está en su sitio.
ADVERTENCIA El motor de arranque y otras partes giratorias podrían
atrapar manos, cabellos, ropas o accesorios y causar lesiones graves.
de arranque o en otras piezas giratorias.
PRECAUCIÓN El funcionamiento a un régimen demasiado alto podría
estropear el generador o causar lesiones leves.
Un régimen demasiado bajo supone una sobrecarga.
el régimen del motor.
Not for
Reproduction

7 7
Montaje
El motor está listo para uso si ha recibido el mantenimiento adecuado y el combustible
y aceite recomendados.
Si tiene algún problema con el mantenimiento del generador, acuda a un centro de
servicio técnico de Briggs & Stratton. En caso de necesitar asistencia, tenga a mano el
modelo, la versión y el número de serie que figuran en la etiqueta identificativa. Para
conocer la ubicación de dicha etiqueta, consulte Características y mandos.
Desembalaje del generador
1. Coloque la caja sobre una superficie plana y rígida.
2. Saque todo el contenido de la caja.
El generador se suministra con:
Relleno de aceite de motor
1. Coloque el generador sobre una superficie horizontal.
2. Rellene aceite de motor como se describe en Adición de aceite de motor en el
apartado Mantenimiento del motor.
AVISO
Un cuidado inadecuado del generador puede estropearlo y acortar su vida útil.
recomendado, pues podría averiar el motor.
Adición de combustible Figura
1
El combustible debe cumplir estos requisitos:
Gran
altura.
AVISO Evite que se estropee el generador.
La garantía quedará anulada si no se siguen las recomendaciones de este manual
sobre el combustible.
Para proteger la formación de residuos gomosos en el sistema de combustible, mezcle
un estabilizador en el combustible que añada. Consulte Almacenaje. No todos los
combustibles son iguales. Si sufre problemas de arranque o rendimiento después
de añadir combustible, cambie de marca o de proveedor. Este motor está certificado
para funcionar con gasolina. El sistema de control de emisiones de este motor es EM
(modificaciones del motor).
1. Limpie la zona del tapón del combustible y quítelo.
2. Añada lentamente gasolina sin plomo hasta el indicador rojo de nivel (A) del
depósito. Tenga cuidado de no superar el indicador para que quede espacio
suficiente para la expansión del combustible.
3. Antes de arrancar el motor, coloque el tapón y deje que se evapore el
combustible que se haya derramado.
Gran altura
A altitudes mayores de 1500 metros (5000 pies), es aceptable usar gasolina con
la norma, se requiere un ajuste especial para altura. Sin este ajuste, el generador
perderá rendimiento y aumentará el consumo de combustible y las emisiones. Para
información sobre el ajuste especial para altura, consulte a un distribuidor autorizado
de Briggs & Stratton. Se desaconseja utilizar el motor a altitudes por debajo de 750
metros (2500 pies) con la configuración especial para altura.
Palanca de ventilación del tapón del depósito de combustible Figura
2
El tapón del depósito de combustible está provisto de una palanca de ventilación (A)
para cerrar herméticamente el depósito. Para que funcione el motor, la palanca debe
estar en la posición ON (I).
Cuando no use el motor, coloque la palanca en la posición OFF (O) para reducir la
posibilidad de derrames. Antes de girarla a la posición OFF (O), deje que se enfríe el
motor.
Características y mandos Figura
3
Antes de utilizar el generador, lea este manual de instrucciones y las
normas de seguridad. Compare las ilustraciones con el generador para
familiarizarse con la situación de los distintos mandos y ajustes. Guarde este
manual para consultas futuras.
A - Palanca de ventilación del tapón del depósito de combustible: gire la palanca
de ventilación a la posición ON (I) cuando vaya a usar el generador. Gírela a la
posición OFF (O) cuando no vaya a usarlo.
B - Depósito de combustible: capacidad de 3,7 litros (1,0 galón).
C - Palanca del estrangulador: sirve para cerrar la entrada de aire y facilitar el
arranque en frío.
D - Tapa lateral de mantenimiento: retírela para poder acceder al depurador del aire y
al servicio del aceite.
E - Tirador de arranque: sirve para arrancar el motor a mano.
F - Interruptor del motor: colóquelo en la posición I antes de utilizar el tirador de
arranque. Póngalo en O para parar el motor. También abre y cierra la llave de paso
del combustible.
G - Indicador de salida (OK): este LED verde se ilumina cuando el generador funciona
normalmente para indicar que produce electricidad en los receptáculos.
H - Receptáculo de CC a 12 V: utilícelo con los cables de carga de baterías para cargar
rearma con un botón.
J - Enganche de conexión a tierra: consulte al organismo responsable de los
requisitos de conexión a tierra en su zona.
K - Interruptor POWERSMART: utilícelo para activar o desactivar el modo
POWERSMART.
L - Alarma de sobrecarga (!): cuando se produce una sobrecarga en el generador, el
LED rojo se ilumina y además se corta la corriente en los receptáculos. También se
apagará el indicador verde de salida. Si el generador se ha sobrecargado, deberá
apagar y desenchufar todas las cargas eléctricas, apagar el generador y ponerlo en
marcha de nuevo para continuar el funcionamiento normal.
M - Indicador de aceite bajo (
que el motor se estropee por no tener suficiente aceite. Si el nivel del aceite del
motor baja de un nivel preajustado, se iluminará este indicador y se parará el
motor. En caso de que se pare el motor o se ilumine el indicador de aceite bajo al
tirar del cable de arranque, compruebe el nivel del aceite del motor.
N - Tomas de CA a 230 V: permiten suministrar energía eléctrica para alimentar
equipos de iluminación, aparatos, herramientas y motores eléctricos monofásicos a
mediante un sistema interno.
P - Pantalla antichispas: el silenciador del escape reduce el ruido del motor y está
dotado de una pantalla antichispas.
R - Tapa superior de mantenimiento: retírela para poder acceder a la bujía.
S - Etiqueta identificativa: señala el modelo, la versión y el número de serie del
generador. Tenga esta información a mano cuando llame para pedir asistencia.
Elementos no mostrados:
Depurador de aire (bajo la tapa lateral de mantenimiento): protege el motor filtrando
el polvo y otras partículas en la admisión de aire.
Tapón de llenado de aceite (bajo la tapa lateral de mantenimiento)
comprobar y añadir aceite del motor.
ADVERTENCIA El combustible y sus vapores son muy inflamables y
explosivos y pueden causar quemaduras, incendios o
explosiones y derivar en daños materiales, lesiones graves o
incluso la muerte.
AL AÑADIR COMBUSTIBLE
que se enfríe durante al menos 2 minutos. Afloje el tapón lentamente para liberar
la presión acumulada en el depósito.
y otras fuentes de ignición.
depósito, el tapón y los racores. Cámbielos si es necesario.
Not for
Reproduction

8 BRIGGSandSTRATTON.COM
Funcionamiento
Enganche de conexión a tierra
El generador se suministra con un enganche de conexión a tierra. Los reglamentos
eléctricos locales pueden requerir que se conecte ahí una toma de tierra apropiada. El
neutro del generador es flotante, por lo que el devanado del estátor de CA está aislado
del enganche de conexión a tierra y de las clavijas de tierra de los receptáculos de
CA. Los dispositivos eléctricos que requieren un neutro conectado a tierra, como los
interruptores diferenciales, puede que no funcionen correctamente con este generador.
Requisitos especiales
Es posible que existan reglamentos locales o nacionales que afecten al uso que
pretende hacer del generador. Consulte a un electricista cualificado, a un inspector
neutro fijo.
Ubicación del generador Figura
4
Separación y movimiento del aire
Coloque el generador donde los letales gases del escape (A) no se puedan acumular o
entrar en un edificio o recinto que pueda estar habitado. Asegúrese de que los gases
del escape estén lejos de ventanas, puertas, tomas de ventilación u otras aberturas que
permitan su paso y acumulación en espacios reducidos. Cuando elija la ubicación del
generador, debe tener en cuenta los vientos y corrientes de aire dominantes.
Arranque del motor Figura
2
3
1. Asegúrese de que el generador esté sobre una superficie lisa y horizontal.
AVISO Si se arranca y utiliza el generador sobre una superficie que no esté lisa y
horizontal, es posible que no arranque o que se apague durante el uso. Si se obstruyeran
las rendijas de refrigeración de la base, podría producirse una pérdida de potencia en la
salida. En tal caso, apague el generador y deje que se enfríe antes de arrancarlo de nuevo.
2.
Asegúrese de que el interruptor POWERSMART (3, K) esté en la posición OFF (O).
3. Gire el interruptor del motor (3, F) a la posición ON (I).
4. Gire la palanca del tapón del depósito (2, A) a la posición ON (I).
5. Empuje la palanca del estrangulador (3, C) a la posición de aire cerrado (
).
AVISO Para arrancar el motor por primera vez, después de agotar el combustible
o después de un período largo de almacenaje, llene el depósito de combustible hasta el
indicador rojo como se describe en el apartado Adición de combustible. Tendrá que realizar
varios intentos de arranque hasta que se purgue el aire en el sistema de combustible.
6. Tome el tirador del arranque (3, E) y tire lentamente hasta que perciba cierta
resistencia. Entonces tire con rapidez para arrancar el motor.
7. Mueva la palanca del estrangulador a una posición intermedia y tire del cable
de arranque dos veces.
8. Mueva lentamente la palanca del estrangulador a la posición de funcionamiento
normal (
). Si el motor vacila, mueva la palanca del estrangulador a una
posición intermedia hasta que el motor gire con suavidad y posteriormente a la
posición
.
AVISO Si el motor se ahoga, desplace la palanca del estrangulador a la posición
e
intente arrancarlo hasta que se ponga en marcha.
AVISO Si el motor se pone en marcha después de tres tirones pero no continúa
funcionando, asegúrese de que el generador esté sobre una superficie horizontal y
que el nivel del aceite en el cárter sea adecuado. Este generador está equipado con un
dispositivo de protección para un nivel bajo de aceite. Por lo tanto, para que arranque,
el nivel debe superar el mínimo.
Conexión de cargas eléctricas
calidad y buen aislamiento. Examine las mangueras antes de cada uso. Compruebe que
todas tengan las características adecuadas y no estén estropeadas. Para minimizar la
pérdida de tensión, las mangueras deben tener la menor longitud posible.
1. Tras arrancar el motor, compruebe que se ilumine el indicador verde de salida
(puede tardar hasta tres segundos).
2.
Deje que el motor se estabilice y caliente durante unos minutos después de arrancarlo.
AVISO
No sobrecargue el generador.
AVISO Superar la capacidad de potencia o intensidad del generador puede estropear
el generador o los aparatos eléctricos conectados a él.
NO supere la capacidad de potencia o intensidad del generador. Consulte No
sobrecargue el generador en el apartado Funcionamiento.
estabilice.
Antes de detener el generador, apague las cargas eléctricas y desconéctelas del generador.
Parada del motor
1. Apague y desenchufe todas las cargas eléctricas de los receptáculos del
generador. NUNCA arranque o pare el motor mientras haya dispositivos
eléctricos enchufados y encendidos.
2. Desplace el interruptor POWERSMART a la posición OFF (O).
3. Deje que el motor funcione sin carga varios minutos para que se estabilicen las
temperaturas internas del motor y el generador.
4. Gire el interruptor del motor a la posición OFF (O).
5. Gire la palanca del tapón del depósito a la posición OFF (O).
ADVERTENCIA El calor o los gases del escape podrían prender objetos infla-
mables o estructuras o dañar el depósito, causando incendios,
daños materiales, lesiones graves o incluso la muerte.
El contacto con la zona del silenciador podría causar quema-
duras y lesiones graves.
-
do en este motor, acuda al fabricante original del aparato o a un distribuidor.
las originales.
ADVERTENCIA
La tensión generada puede causar quemaduras o descargas
eléctricas, que podrían acarrear lesiones graves o la muerte.
pelados o deteriorados de algún otro modo.
agua o con las manos o pies mojados.
ADVERTENCIA Unos cables eléctricos dañados o sobrecargados podrían
sobrecalentarse, formar arcos eléctricos y arder, con el consiguiente
riesgo de daños materiales, lesiones graves y muerte.
alargaderas.
ADVERTENCIA El retroceso (retracción rápida) del cable de arranque tirará de
la mano y el brazo hacia el motor con fuerza, por lo que podría causar
contusiones, esguinces, fracturas de huesos u otras lesiones graves.
resistencia y entonces tire con rapidez para evitar el retroceso.
enchufados y encendidos.
ADVERTENCIA Los motores emiten monóxido de carbono, un gas tóxico,
inodoro e incoloro.
La inhalación de monóxido de carbono puede provocar dolor de cabeza,
fatiga, mareos, náuseas, vómitos, confusión, pérdida de conocimiento,
convulsiones, lesiones graves o incluso la muerte.
funcione a pilas.
puertas, tomas de ventilación u otras aberturas.
-
pos móviles, embarcaciones o recintos, aunque estén abiertas puertas y ventanas.
Not for
Reproduction

9 9
Modo POWERSMART
Esta función está diseñada para mejorar considerablemente el consumo de combustible y
reducir el ruido. Cuando este interruptor está en la posición ON (I), el régimen del motor
aumentará conforme se conecten cargas eléctricas y disminuirá cuando se desconecten.
Con el interruptor en la posición OFF (O), el motor funcionará a pleno régimen.
AVISO En el momento de arrancar o detener el generador y siempre que use el
receptáculo de CC, el interruptor debe estar en la posición OFF.
Carga de una batería Figura
5
o usos varios que esté descargada. La corriente máxima disponible para el circuito
de carga de baterías es de 5 A. Un disyuntor de CC protege esta toma frente a
sobrecargas. Si se produce una sobrecarga, el disyuntor actuará (el botón saltará).
Espere unos minutos y pulse el botón para rearmar el disyuntor.
AVISO Cuando utilice el circuito de carga de baterías, gire el interruptor
POWERSMART a la posición OFF (O).
AVISO
Para recargar una batería de 12 V, actúe como sigue:
1. Si es necesario, limpie los bornes de la batería.
2. Compruebe el nivel del electrolito en todas las celdas de la batería. Si es
separación de las celdas. NO utilice agua del grifo.
3. Si la batería tiene tapones de ventilación, asegúrese de que estén puestos y
apretados.
4. Conecte la pinza del cable de carga de baterías con el mango rojo en el borne
de la batería marcado con Positivo, POS o +.
5. Conecte la pinza del cable con el mango negro en el borne de la batería
marcado con Negativo, NEG o –.
6.
7. Arranque el generador como se describe en Arranque del motor. Déjelo en
marcha mientras se recarga la batería.
AVISO Normalmente bastan entre 30 y 120 minutos para recargar una batería casi agotada.
8. Cuando la batería se haya cargado, apague el motor como se describe en
Parada del motor.
9. Saque el cable de carga de baterías del generador y entonces desconéctelo de
los bornes de la batería.
AVISO Utilice un hidrómetro de automóviles para comprobar el estado y la carga de la
batería. Siga con atención las instrucciones del fabricante del hidrómetro. En general,
del líquido (medida por un hidrómetro) sea de 1,260 o mayor.
No sobrecargue el generador
Capacidad
Debe asegurarse de que el generador pueda suministrar suficiente potencia nominal
(en funcionamiento) y transitoria (en el arranque) para los aparatos que vaya a
1. Seleccione los aparatos que alimentará al mismo tiempo.
2. Sume la potencia nominal (en funcionamiento) de esos aparatos. Esa es la
cantidad de potencia que el generador debe producir para mantenerlos en
funcionamiento. Consulte la Guía de referencia sobre la potencia.
3. Estime cuánta potencia transitoria (en el arranque) necesitará. Esos son los vatios
que, durante un corto período de tiempo, requieren para ponerse en marcha
los aparatos o herramientas impulsadas por motores eléctricos, como cierras
circulares o frigoríficos. Como no todos los motores arrancan al mismo tiempo,
la potencia total transitoria puede estimarse sumando los aparatos con la mayor
potencia transitoria adicional y la potencia nominal total obtenida en el paso 2.
Ejemplo:
Potencia (W) nominal total funcionando = 1555
Potencia transitoria adicional máxima = 600
Potencia total requerida del generador = 2155
Gestión de la electricidad
Para prolongar la vida útil del generador y los aparatos conectados, es importante
tener cuidado al sumar las cargas eléctricas aplicadas. Al arrancar el motor, no
debería haber nada conectado al generador. La forma correcta y segura de gestionar la
1. Sin que haya nada conectado al generador, arranque el motor como se describe
en este manual.
2. Enchufe y active la primera carga, preferiblemente la mayor.
3. Permita que la salida del generador se estabilice (el motor gire con suavidad y
el aparato conectado funcione correctamente).
4. Enchufe y active la siguiente carga.
5. Una vez más, permita que el generador se estabilice.
6. Repita los pasos 4 y 5 para cada carga adicional.
NUNCA añada más cargas que la capacidad admitida por el generador. Tenga especial
cuidado al estimar las cargas transitorias sobre la capacidad del generador, como se
ha indicado antes.
* Las potencias indicadas tienen carácter orientativo. Compruebe la potencia real de
cada herramienta o aparato.
ADVERTENCIA Mientras se recargan, las baterías emiten gas de hidrógeno
explosivo. Dicho gas permanece cerca de las baterías durante
mucho tiempo después de que se hayan cargado. Cualquier
chispa podría prender el hidrógeno y producir una explosión
que cause daños materiales, lesiones graves y la muerte.
El líquido electrolítico de las baterías contiene ácido que es extremadamente
cáustico. El contacto con el líquido de las baterías podría producir quemaduras por
sustancias químicas y causar daños materiales y lesiones graves.
carga de baterías ni hasta varios minutos después.
NO continúe cargando las baterías si se calientan o cuando ya están cargadas del todo.
Herramienta o aparato
Potencia (W) nominal
funcionando
Potencia (W) transitoria
adicional en el arranque
300 600
Ultracongelador 500 500
Televisor 500 —
Sistema de seguridad 180 —
Bombilla (75 W) 75 —
1555 W de potencia total
en funcionamiento
600 W de potencia
transitoria máxima
Guía de referencia sobre la potencia
Herramienta o aparato
Potencia
(W)* nominal
funcionando
Potencia (W)
transitoria adicional
en el arranque
Elementos esenciales
Bombilla de 75 W 75 —
Ultracongelador 500 500
Bomba de sentina 800 1200
Frigorífico/congelador de 500 litros 800 1600
1000 2000
Calefacción/refrigeración
Aire acondicionado de ventana de 2500 frigorías
1200 1800
300 600
800 1300
Cocina
Horno microondas de 1000 W 1000 —
Cafetera 1500 —
Horno eléctrico con un solo elemento 1500 —
Sala de estar
100 —
100 —
Receptor estéreo 450 —
Televisor en color de 27 pulgadas 500 —
Ordenador personal con monitor de 17 pulgadas
800 —
Otros
Sistema de seguridad 180 —
Radio AM/FM con reloj 300 —
480 520
Bricolaje o trabajo
Luz halógena de cuarzo de trabajo 1000 —
600 1200
Sierra de vaivén 960 960
1000 1000
Sierra circular de 18 cm 1500 1500
Not for
Reproduction

10 BRIGGSandSTRATTON.COM
Mantenimiento
Plan de mantenimiento
Respete los intervalos de funcionamiento o temporales, lo que suceda antes. Si el
generador funciona en las condiciones adversas indicadas más abajo, el mantenimiento
debe ser más frecuente.
¹
Realice el mantenimiento con más frecuencia en condiciones de mucho polvo o suciedad.
Recomendaciones generales
El mantenimiento periódico mejorará el rendimiento y alargará la vida útil del
generador. Para revisiones o reparaciones, acuda a un distribuidor autorizado.
La garantía del generador no cubre los elementos sometidos a un uso indebido o
negligente por parte del usuario. Para hacer valer la garantía, el usuario debe mantener
el sistema según las instrucciones de este manual.
AVISO
Un cuidado inadecuado del generador puede estropearlo y acortar su vida útil.
o carcasas protectoras.
Para mantener el generador en buen estado, será necesario realizar algunos ajustes
periódicamente.
La totalidad del mantenimiento y los ajustes se deben realizar al menos una vez por
temporada. Siga los requisitos de la tabla Plan de mantenimiento.
AVISO Una vez al año debe limpiar o sustituir la bujía, así como reemplazar el filtro de
aire. Una bujía nueva y un filtro de aire limpio aseguran la mezcla adecuada de combustible
y aire y contribuyen a mejorar el rendimiento del motor y a prolongar su vida útil.
Mantenimiento del generador
El mantenimiento del generador consiste en conservarlo limpio y seco. Utilice y guarde
el generador en un lugar limpio y seco, donde no esté expuesto a exceso de polvo,
suciedad, humedad o vapores corrosivos. Las rendijas de refrigeración no deben
quedar obstruidas por nieve, hojas u otros tipos de cuerpos extraños.
AVISO NO utilice agua u otros líquidos para limpiar el generador pues pueden
penetrar en el sistema de combustible del motor y causar averías o deteriorar el
rendimiento. Además, si entra líquido en el generador a través de las rendijas de
refrigeración, parte de él se retendrá en huecos y grietas del rotor y el aislamiento del
devanado del estátor. La acumulación de líquidos o suciedad en el devanado interno
del generador acabará por disminuir la resistencia de su aislamiento.
Limpieza
Cada día o antes del uso, compruebe alrededor y debajo del generador si hay fugas
de aceite o combustible. Limpie los residuos acumulados en el interior y el exterior
del generador. Examine las rendijas y aberturas de refrigeración del generador. Deben
estar limpias y despejadas.
Mantenga limpios los componentes del motor con el fin de reducir el riesgo de
AVISO
Un cuidado inadecuado del generador puede estropearlo y acortar su vida útil.
NO exponga el generador a un exceso de humedad, polvo, suciedad o vapores corrosivos.
Limpieza del filtro de combustible
Figura
6
El filtro de combustible contribuye a impedir que entre suciedad en el sistema de combustible.
Limpie el filtro de combustible como sigue:
1. Asegúrese de que el generador esté sobre una superficie horizontal.
2. Quite el tapón (A) y el filtro de combustible (B).
3. Lave el filtro de combustible con detergente líquido y agua.
4. Límpielo con un paño seco y limpio.
Mantenimiento del motor
Aceite
Recomendaciones sobre el aceite
Para obtener un rendimiento óptimo, se recomienda el uso de aceites certificados por
Briggs & Stratton. Otros aceites con detergentes de alta calidad son aceptables si cuentan
con la clasificación de servicio SF, SG, SH, SJ o superior. NO utilice aditivos especiales.
La temperatura exterior determina la viscosidad adecuada del aceite para el motor.
Use la tabla para seleccionar la mejor viscosidad para el intervalo de temperaturas
exteriores que se prevea.
*
Por debajo de 4 °C (40 °F), el uso de aceite SAE 30 provocará dificultades de arranque.
** A temperaturas superiores a 27 °C (80 °F), el uso de 10W30 puede aumentar el
consumo de aceite. Compruebe el nivel de aceite con mayor frecuencia.
AVISO A todas las temperaturas es aceptable cualquier aceite sintético que
cumpla las especificaciones ILSAC GF-2, con marca de certificación API y
uso de aceite sintético no altera los intervalos indicados para el cambio de
aceite.
Comprobación del nivel de aceite
Figura
8
El nivel del aceite debe comprobarse antes de cada uso y al menos cada 8 horas de
funcionamiento. No deje de revisar el nivel del aceite.
1. Asegúrese de que el generador esté sobre una superficie horizontal.
2. Afloje los tornillos de la tapa lateral de mantenimiento y retírela.
3. Limpie la zona del tapón del aceite y quítelo.
Adición de aceite de motor Figura
9
1. Asegúrese de que el generador esté sobre una superficie horizontal.
2. Repita los pasos del 2 al 4 para comprobar el nivel del aceite como se describe
en Comprobación del nivel de aceite.
3. Si es necesario, vierta aceite lentamente en la abertura al efecto hasta el punto
de rebose.
Cada 8 horas de funcionamiento o a diario
10 primeras horas de funcionamiento
Cada 50 horas de funcionamiento o cada 3 meses
Cada 100 horas de funcionamiento o cada 6 meses
¹
Cada 250 horas de funcionamiento o cada año
ADVERTENCIA Si salieran chispas, podrían causar incendios o descargas
eléctricas, que podrían acarrear lesiones graves o la muerte.
AL AJUSTAR O REPARAR EL GENERADOR
bujía.
AL COMPROBAR EL ENCENDIDO DEL MOTOR
NO revise la chispa si la bujía no está en su sitio.
Not for
Reproduction

11 11
Cambio del aceite del motor
Si utiliza el generador en un ambiente muy sucio, polvoriento o caluroso, cambie el
aceite con mayor frecuencia.
MANTÉNGASE FUERA DEL ALCANCE DE LOS NIÑOS. NO CONTAMINE.
CENTROS DE RECOGIDA.
Cambie el aceite mientras el motor no se haya enfriado del todo después de su
uso, como sigue:
1. Asegúrese de que el generador esté sobre una superficie horizontal.
2. Afloje los tornillos de la tapa lateral de mantenimiento y retírela.
3. Limpie la zona del tapón del aceite y quítelo.
4. Incline el generador hacia el cuello de la abertura de relleno para vaciar el aceite
en un recipiente apropiado. Cuando el cárter esté vacío, vuelva a poner derecho
el generador.
5.
Añada aceite siguiendo los pasos del 3 al 5 descritos en Adición de aceite de motor.
Mantenimiento del depurador de aire Figura
10
Si el motor se utiliza con un depurador de aire sucio, no funcionará correctamente y
es posible que se estropee. Su mantenimiento debe ser más frecuente si funciona en
ambientes sucios o donde haya polvo.
Para realizar el mantenimiento del depurador de aire, siga estos pasos:
1. Afloje los tornillos de la tapa lateral de mantenimiento y retírela.
2. Afloje el tornillo de la tapa del filtro de aire (A) y retírela (B).
3. Retire con cuidado el depurador de espuma (C) tirando hacia fuera.
4. Retire con cuidado el filtro del respiradero (D) tirando hacia fuera.
5. Lave el depurador de espuma y el filtro del respiradero únicamente con
detergente líquido y agua. Séquelos estrujándolos en un paño limpio.
6. SATURE el depurador de espuma en aceite limpio de motor y estrújelo en un
paño limpio para quitar el exceso de aceite.
10.
Revisión de la bujía Figura
11
12
Cambiar la bujía hará que el motor arranque más fácilmente y funcione mejor.
1. Retire la tapa superior de mantenimiento.
2. Limpie la zona de la bujía y retire la pipa de la bujía.
3. Extraiga e inspeccione la bujía.
4. Compruebe la separación entre los electrodos con un calibrador y, si es
necesario, ajústela a la separación recomendada (consulte el apartado
Características del producto).
5. Cambie la bujía si los electrodos están picados o quemados o si la
porcelana está agrietada. Utilice la bujía de repuesto recomendada. Consulte
Características del producto.
Inspección del silenciador y la pantalla antichispas
Figura
13
14
Inspeccione el silenciador por si presenta fisuras, corrosión u otros daños. Retire
la pantalla antichispas, si está instalada, e inspeccione si presenta daños o acumula
carbonilla. Si debe reemplazar alguna pieza, utilice solo repuestos originales.
Limpie e inspeccione la pantalla antichispas como sigue:
1. Para quitar el protector del silenciador, retire los cuatro tornillos que lo sujetan
al generador.
2.
Quite el tornillo que sujeta la pantalla antichispas al silenciador. Retire la pantalla.
3. Inspeccione la pantalla y, si está rasgada, perforada o estropeada de algún
otro modo, reemplácela. NO utilice una pantalla que no esté en perfectas
condiciones. Si la pantalla no está estropeada, límpiela con un cepillo.
Comprobación de holgura de las válvulas
La comprobación periódica y el ajuste de la holgura de las válvulas mejorará el rendimiento
y prolongará la vida útil del motor. Este procedimiento requiere el desmontaje parcial del
motor y el uso de herramientas especiales. Por este motivo, recomendamos que encargue la
comprobación y el ajuste de la holgura de las válvulas a un servicio técnico autorizado en los
intervalos recomendados (consulte Plan de mantenimiento en el apartado Mantenimiento).
Almacenaje
prepararlo para el almacenaje.
Almacenaje del generador
Limpieza.
despejadas.
Instrucciones de almacenaje a largo plazo
Cuando se guarda el combustible durante más de 30 días, puede viciarse, haciendo
que se formen depósitos gomosos y de ácido en el sistema o en piezas esenciales del
carburador. Para mantener el combustible en buenas condiciones, utilice estabilizador
Briggs & Stratton FRESH START®, que se ofrece como aditivo líquido o en cartuchos
de concentrado.
Si añade estabilizador de combustible siguiendo las instrucciones, no tiene que
vaciar la gasolina del motor. Haga funcionar el motor durante 2 minutos para que el
estabilizador circule por todo el sistema. Entonces, el motor y el combustible pueden
Si la gasolina que hay en el motor no se ha tratado con un estabilizador, deberá
vaciarla en un recipiente homologado. Haga funcionar el motor hasta que se detenga
por la falta de combustible. Para mantener la frescura de la gasolina, se recomienda
añadir estabilizador en el recipiente.
Cambio del aceite del motor
Antes de que el motor se haya enfriado del todo, vacíe el aceite del cárter. Rellene
aceite del grado recomendado. Consulte Cambio del aceite del motor.
Otros consejos de almacenaje
1. NO guarde combustible de una temporada a otra si no lo lo trata como se
describe en Instrucciones de almacenaje a largo plazo.
2. Reemplace el recipiente de combustible si empieza a producir óxido.
problemas en este generador.
3. Cubra el generador con una funda adecuada que no retenga la humedad.
4. Guarde el generador en un lugar limpio y seco.
PRECAUCIÓN Evite el contacto prolongado o repetido de la piel con aceite
de motor usado.
animales de laboratorio.
ADVERTENCIA El contacto con la zona del silenciador puede causar
quemaduras graves.
El calor o los gases del escape pueden prender objetos inflamables
o estructuras o dañar el depósito, causando incendios.
-
do en este motor, acuda al fabricante original del aparato o a un distribuidor.
las originales.
ADVERTENCIA El combustible y sus vapores son muy inflamables y
explosivos y pueden causar quemaduras, incendios o
explosiones y derivar en daños materiales, lesiones graves o
incluso la muerte.
AL ALMACENAR COMBUSTIBLE O EL GENERADOR CON COMBUSTIBLE DENTRO
u otros electrodomésticos que tengan llamas piloto u otras fuentes de ignición,
porque podrían prender los vapores del combustible.
AL VACIAR COMBUSTIBLE
que se enfríe durante al menos 2 minutos. Afloje el tapón lentamente para liberar
la presión acumulada en el depósito.
y otras fuentes de ignición.
ADVERTENCIA Las fundas de almacenaje podrían causar incendios con el
consiguiente riesgo de daños materiales, lesiones graves y muerte.
Not for
Reproduction

12 BRIGGSandSTRATTON.COM
Solución de problemas
Problema Causa Corrección
El motor funciona pero no hay salida de CA.
1. El indicador rojo de alarma de sobrecarga está encendido.
Se ha sobrecargado el generador.
2. El indicador verde de salida no está encendido. Avería del
generador.
3. Mala conexión o defecto en el juego de cables.
4. El dispositivo conectado está averiado.
1.
Consulte No sobrecargue el generador en el apartado
Funcionamiento. Apague el generador y vuelva a arrancarlo.
2. Acuda a un servicio técnico autorizado.
3. Compruebe y repare.
4. Conecte otro aparato que sepa que funciona bien.
El motor funciona bien sin carga, pero “se
viene abajo” cuando se conectan
cargas.
1. Cortocircuito en una carga conectada.
2. El régimen del motor es demasiado bajo.
3. Se ha sobrecargado el generador.
4. Cortocircuito en el generador.
1. Desconecte la carga cortocircuitada.
2. Acuda a un servicio técnico autorizado.
3. Consulte No sobrecargue el generador en el apartado
Funcionamiento.
4. Acuda a un servicio técnico autorizado.
El motor no arranca; se para mientras está
funcionando o arranca pero funciona
mal.
1. El interruptor del motor está en la posición OFF (O).
2. La palanca del tapón del depósito de combustible está en
la posición OFF (O).
3. El indicador de aceite bajo se enciende. Bajo nivel de
aceite.
4. Depurador de aire sucio.
5. Sin combustible.
6. Combustible viciado.
7. El cable de la bujía no está conectado a la bujía.
8. Bujía defectuosa.
9. Agua en el combustible.
10. Ahogado.
11. Mezcla de combustible demasiado rica.
12. La válvula de admisión se queda abierta o cerrada.
13. Pérdida de compresión en el motor.
1. Ponga el interruptor del motor en la posición ON (I).
2. Gire la palanca del tapón del depósito a la posición
I).
3. Rellene aceite en el cárter hasta el nivel adecuado o
coloque el generador sobre una superficie horizontal.
4. Limpie o reemplace el depurador de aire.
5. Rellene el depósito de combustible.
rellene con combustible nuevo.
7. Conecte el cable a la bujía.
8. Reemplace la bujía.
rellene con combustible nuevo.
10. Espere 5 minutos y vuelva a arrancar el motor.
11. Acuda a un servicio técnico autorizado.
12. Acuda a un servicio técnico autorizado.
13. Acuda a un servicio técnico autorizado.
Al motor le falta potencia.
1. La carga es excesiva.
2. Filtro de aire sucio.
1. Consulte No sobrecargue el generador en el apartado
Funcionamiento.
2. Reemplace el filtro de aire.
El motor funciona con irregularidad o
“vacila”.
El carburador funciona con una mezcla demasiado rica o
demasiado pobre.
Acuda a un servicio técnico autorizado.
Características del producto
Potencia de arranque .............................................2000 W
Potencia* ......................................................1600 W
....................................................7,0 A
......................................................5 A
Frecuencia nominal .............................................. 50 Hz
Fases ........................................................Una fase
Cilindrada .................................105,6 c.c. (6,44 pulgadas cúbicas)
Separación entre electrodos ....................0,6-0,7 mm (0,023-0,027 pulg.)
Holgura de las válvulas de admisión ..0,08 - 0,12 mm (0,0031 - 0,0047 pulg.) en frío
Holgura de las válvulas de escape ....0,13 - 0,17 mm (0,0051 - 0,0067 pulg.) en frío
Capacidad para combustible ...............................3,7 l (1,0 galón)
Capacidad para aceite ....................................0,4 l (13,5 onzas)
Clasificación de la potencia: Las características de potencia bruta de cada modelo de
motor a gasolina están identificadas de conformidad con el código J1940 (Procedimiento
de cálculo de potencia y par de motores pequeños) de la SAE (Society of Automotive
Engineers) y se han obtenido y corregido de conformidad con el código J1995 de la
SAE (modificación 2002-05). Los valores de par se han obtenido a 3060 r.p.m., los de
potencia, a 3600 r.p.m. La potencia bruta real del motor será menor pues se ve afectada,
entre otras cosas, por las condiciones ambientales de funcionamiento y la variabilidad
de un motor a otro. Dada la gran variedad de productos en que se colocan motores y de
factores ambientales que pueden afectar a su funcionamiento, los motores de gasolina no
desarrollarán la potencia nominal bruta cuando se empleen en otro aparato (situación real o
potencia neta). Estas diferencias son debidas a una amplia variedad de factores, incluidos,
entre otros, los componentes (filtros de aire, tubos de escape, carga, refrigeración,
carburador, bomba de combustible, etc.), limitaciones de aplicación, condiciones
ambientales de funcionamiento (temperatura, humedad, altitud) y la variabilidad entre
motores. A causa de las limitaciones de fabricación y de capacidad, Briggs & Stratton podrá
emplear un motor de mayor potencia nominal en lugar del motor de esta serie.
* Las características de este generador son conformes con la norma ISO 8528 G3.
Repuestos frecuentes
Depurador de espuma ..........................................311388GS
Filtro de respiradero ............................................311389GS
Bujía de resistencia .........................................NGK CR7HSA
Not for
Reproduction

13 13
GARANTÍA PARA EL PROPIETARIO DEL GENERADOR PORTÁTIL DE BRIGGS & STRATTON POWER PRODUCTS GROUP, LLC
GARANTÍA LIMITADA
Briggs & Stratton Power Products Group, LLC reparará o reemplazará, sin coste, la pieza o piezas del generador portátil que presenten defectos de material o mano de obra.
El comprador deberá correr con los gastos de transporte del producto que envíe para reparación o reemplazo al amparo de esta garantía. Esta garantía tiene vigencia durante
el período de tiempo señalado y de acuerdo con las condiciones establecidas a continuación Para recurrir al servicio en garantía, busque el servicio técnico autorizado más
cercano en el mapa localizador de distribuidores que hay disponible en www.BRIGGSandSTRATTON.com.
. Algunos estados o países no permiten
limitaciones sobre la duración de una garantía implícita o la exclusión o limitación de daños fortuitos o indirectos, por lo que puede que la limitación y exclusión anteriores no
sean aplicables en todos los casos. Esta garantía le otorga derechos legales específicos; también podría tener otros que varían según el estado o el país.
ingresos o alquiler. Una vez que el producto se haya usado para fines comerciales, en adelante se considerará como para uso comercial a los efectos de esta garantía.
ACERCA DE LA GARANTÍA
Aceptamos las reparaciones en garantía y nos disculpamos por las molestias. Cualquier servicio técnico autorizado puede realizar reparaciones al amparo de la garantía. La mayoría
de las reparaciones en garantía se llevan a cabo de manera rutinaria, aunque en ocasiones puede que las solicitudes de servicio de garantía no sean pertinentes. Por ejemplo,
De forma parecida, la garantía es nula si se han eliminado la fecha de fabricación o el número de serie del generador portátil o si el aparato ha sido alterado o modificado. Durante
el período de garantía, el servicio técnico autorizado reparará o reemplazará, a su criterio, cualquier pieza que, al examinarla, se considere defectuosa con un uso y mantenimiento
Desgaste normal
Instalación y mantenimiento
o no autorizadas, a mal uso, negligencia, accidente, sobrecarga, régimen excesivo o mantenimiento, reparación o almacenaje inadecuados que, a nuestro juicio, hayan
afectado negativamente a su funcionamiento y fiabilidad. Esta garantía tampoco cubre el mantenimiento normal, por ejemplo, filtros de aire, ajustes, limpieza del sistema de
combustible u obstrucciones (por productos químicos, suciedad, carbonilla, cal, etc.).
Otras exclusiones
modificaciones, alteraciones o mantenimiento inadecuado, o congelación o deterioro químico. Las piezas accesorias, como baterías de arranque, juegos de mangueras del
generador y fundas de almacenaje, están excluidas de la garantía del producto. Esta garantía excluye equipos usados, reacondicionados y de demostración, equipos usados
para suministro eléctrico principal en lugar del suministro por una red de distribución, equipos usados para soporte vital, y averías causadas por fenómenos de la naturaleza
o casos de fuerza mayor fuera del control del fabricante. 198189E, versión C, 2/11/2009
BRIGGS & STRATTON POWER PRODUCTS GROUP, LLC
MILWAUKEE, WI, EE. UU.
Entra en vigor el 1 de noviembre de 2009 y reemplaza todas las garantías sin fecha y todas las garantías con fecha previa al 1 de noviembre de 2009.
2 años*
1 año
Uso particular
Uso comercial
PERÍODO DE GARANTÍA
Not for
Reproduction

4 BRIGGSandSTRATTON.COM
Vielen Dank
und Wartung gemäß den Angaben in dieser Bedienungsanleitung wird Ihr Briggs & Stratton Produkt über viele Jahre zuverlässig funktionieren.
Dieses Handbuch beinhaltet Sicherheitsinformationen, um Ihnen die Gefahren und Risiken im Zusammenhang mit Generatoren bewusst zu machen, und Ihnen zu vermitteln,
wie man diese vermeidet. Dieser Generator ist lediglich für die Erzeugung von elektrischem Strom für den Betrieb kompatibler elektrischer Beleuchtungen, Geräte, Werkzeuge und
Motoren, nicht für andere Zwecke, konzipiert. Es ist wichtig, dass Sie diese Bedienungsanleitung durchlesen und zur Kenntnis nehmen, bevor Sie die Maschine in Betrieb nehmen
oder nutzen. Bewahren Sie diese Original-Bedienungsanleitung zum späteren Nachschlagen auf.
Dieser Generator muss vor der Verwendung fertig montiert werden. Eine Anleitung zur abschließenden Montage befindet sich im Abschnitt Montage dieses Handbuches. Befolgen
Sie strikt alle Anweisungen.
Wo Sie uns finden
Sie müssen nie lange suchen, um Unterstützung und Kundendienstleistungen von Briggs & Stratton für Ihren Generator zu finden. Weltweit gibt es Tausende autorisierte Briggs
& Stratton-Servicehändler, die einen qualitativ hochwertigen Service bieten. Mithilfe unserer Händlersuchkarte finden Sie im Internet unter www.BRIGGSandSTRATTON.com den
Generator
Modellnummer
Revision
Seriennummer
Kaufdatum
Inhaltsverzeichnis
Bedienersicherheit.........................................5
Gerätebeschreibung ............................................................5
Wichtige Sicherheitshinweise.....................................................5
Zusammenbau............................................7
Generator entpacken............................................................7
Nachfüllen von Motoröl .........................................................7
Einfüllen von Kraftstoff..........................................................7
Funktionen und Bedienungselemente . . . . . . . . . . . . . . . . . . . . . . . . . . . .7
Betrieb .................................................8
Erdungshalter .................................................................8
Standort des Generators.........................................................8
Starten des Motors.............................................................8
Anschluss elektrischer Geräte ....................................................8
Abstellen des Motors ...........................................................8
POWERSMART-Modus..........................................................9
Laden der Batterie .............................................................9
Generator nicht überlasten .......................................................9
Wartung ...............................................10
Wartungsplan ................................................................10
Wartung des Generators........................................................10
Wartung des Motors...........................................................10
Lagerung ...................................................................11
Fehlersuche und -behebung .................................12
Technische Daten ........................................12
Produktspezifikationen . . . . . . . . . . . . . . . . . . . . . . . . . . . . . . . . . . . . . . . . . . . . . . . . . . . . . . . . .12
Ersatzteile für alle Modelle ......................................................12
Garantie . . . . . . . . . . . . . . . . . . . . . . . . . . . . . . . . . . . . . . . . . . . . . . .13
Garantie für den Generatorbesitzer................................................13
Copyright © 2011 Briggs & Stratton Power Products Group, LLC
Milwaukee (Wisconsin/USA). Alle Rechte vorbehalten.
BRIGGS & STRATTON POWER PRODUCTS ist eine eingetragene
Marke von Briggs & Stratton Corporation
Milwaukee (Wisconsin/USA)
ÜBERSETZUNG DER ORIGINAL-BEDIENUNGSANLEITUNG
Not for
Reproduction

5 5
Bedienersicherheit
Gerätebeschreibung
Lesen Sie diese Anleitung sorgfältig durch und machen Sie sich mit dem
Generator vertraut. Nehmen Sie seine Anwendungsbereiche,
Einschränkungen und etwaige Gefahren zur Kenntnis.
Der Generator ist ein motorbetriebener Innenpolgenerator für Wechsel- und
Gleichstrom. Er liefert elektrischen Strom für den Betrieb kompatibler elektrischer
Beleuchtungen, Geräte, Werkzeuge und Motoren. Das rotierende Feld des Generators
wird von einem Einzylindermotor mit einer Drehzahl von ca. 4.500 U/min (bei
ausgeschaltetem POWERSMART-Modus-Schalter) angetrieben.
Die Richtigkeit und Aktualität der Informationen in diesem Handbuch wurden nach
bestem Wissen gewährleistet. Der Hersteller behält sich jedoch das Recht vor, den
Generator und die vorliegende Dokumentation jederzeit ohne vorherige Ankündigung zu
verändern oder anderweitig zu verbessern.
Wichtige Sicherheitshinweise
der eine Gefahr bergen könnte. Die Warnungen in diesem Handbuch und die Hinweise
Arbeitsweise oder Betriebstechnik verwenden, die nicht ausdrücklich vom Hersteller empfehlen
wurde, müssen Sie sich selbst davon überzeugen, dass diese für Sie selbst und andere sicher
sind. Sie müssen auch sicherstellen, dass die Sicherheit des Generators durch das gewählte
Warnsymbole und deren Bedeutung
verwendet, um das Ausmaß der Gefährdung anzuzeigen. Ein Gefahrensymbol kann
verwendet werden, um die Art der Gefahr darzustellen. Das Signalwort HINWEIS wird
GEFAHR
führt, wenn sie nicht vermieden wird.
WARNUNG weist auf eine Gefahr hin, die zum Tod oder zu schweren
könnte, wenn sie nicht vermieden wird.
VORSICHT weist auf eine Gefahr hin, die zu leichten bis mittelschweren
könnte, wenn sie nicht vermieden wird.
HINWEIS
Brandgefahr!
Explosionsgefahr!
Giftige Dämpfe!
Heiße Oberfläche!
Bewegliche Teile!
Stromschlaggefahr!
Rückschlaggefahr!
Umherfliegende
Objekte!
Bedienungsanleitung
Explosionsdruck!
WARNUNG Bei laufendem Motor wird Kohlenmonoxid, ein geruchloses,
farbloses, giftiges Gas freigesetzt.
zustände, Krämpfe, Übelkeit oder Ohnmachtsanfälle zur Folge haben.
In der Nähe von Schlafräumen batteriebetriebene Kohlenmonoxidmelder anbringen.
Öffnungen in geschlossene Räume gelangen.
der Schifffahrt oder geschlossenen Bereichen verwendet werden, auch wenn die
Fenster und Türen geöffnet sind.
WARNUNG Der Rückschlag des Starterseilzugs (schnelles Zurückziehen)
kann die Hand und den Arm zum Motor hinziehen, bevor ein Loslassen
Dann kräftig ziehen, um Rückschlag zu vermeiden.
angeschlossen und eingeschaltet sind.
WARNUNG
Batterien geben während des Aufladens explosives Wasserstoffgas
ab. Wasserstoffgas verbleibt nach dem Aufladen über einen län-
geren Zeitraum in der Nähe der Batterien. Durch kleinste Funken
könnte Wasserstoff gezündet und zur Explosion gebracht wer-
die Folge sein.
Elektrolytflüssigkeit von Batterien enthält Säure und ist extrem ätzend. Die Berührung
verursachen.
danach in der Nähe der Batterie kein offenes Feuer, keine Funken, Wärmequellen
oder brennende Zigaretten befinden.
WARNUNG
Der Generator muss so dadurch so isoliert werden, dass Mitarbeiter von
Stromversorgungsunternehmen nicht gefährdet werden können.
Stromversorgungsunternehmen benachrichtigen.
baukonstruktionen einen Fehlerstromschutzschalter (FI-Schutzschalter) einsetzen.
ausgefranst, blank oder auf andere Weise beschädigt sind.
wenn man barfuß ist oder nasse Hände und Füße hat.
oder gewartet werden.
Not for
Reproduction

6 BRIGGSandSTRATTON.COM
HINWEIS
Überschreitungen der höchstzulässigen Generatorleistung bzw.
des höchstzulässigen Generatorstroms können den Generator und die an ihn
angeschlossenen elektrischen Geräte beschädigen.
NICHT überschreiten. Siehe Generator nicht überlasten im Abschnitt Betrieb.
Motor stabil läuft.
Generator trennen.
HINWEIS
Unsachgemäßer Umgang mit dem Generator kann diesen beschädigen
und seine Lebensdauer verkürzen.
Händler oder an ein Service-Center in Ihrer Nähe.
Dämpfen aussetzen.
ausschalten und vom Generator trennen.
- Leistungsabfall
- Gerät zeigt Funken- oder Rauchbildung oder schlägt Flammen
- Gerät vibriert übermäßig
WARNUNG Kraftstoffe und deren Dämpfe sind sehr leicht entzündlich und
Explosionen verursachen, die zum Tod, zu schweren
EINFÜLLEN ODER ABLASSEN VON KRAFTSTOFF
Den Motor abstellen und mindestens 2 Minuten lang abkühlen lassen, bevor der Tank-
deckel abgenommen wird. Den Deckel langsam lösen, um den Druck im Tank abzulassen.
Motor starten.
Zündquellen fernhalten.
auf Risse und Undichtheiten überprüfen. Die Teile gegebenenfalls auswechseln.
START DES GERÄTS
an ihrem Platz sind.
BETRIEB DES GERÄTS
Schifffahrt oder geschlossenen Bereichen verwendet werden.
Motor bzw. Gerät NICHT in einem Winkel kippen, bei dem Kraftstoff auslaufen könnte.
Den Motor NICHT abstellen, indem der Choke in Stellung „Choke ) gebracht wird.
TRANSPORTIEREN, BEWEGEN ODER REPARATUR DES GERÄTS
transportieren.
Motor bzw. Gerät NICHT in einem Winkel kippen, bei dem Kraftstoff auslaufen könnte.
LAGERUNG VON KRAFTSTOFF BZW. DES GERÄTS MIT GEFÜLLTEM KRAFTSTOFFTANK
oder ähnlichen Geräten mit Dauerflammen oder anderen Zündquellen abstellen,
weil dadurch Kraftstoffdämpfe entzündet werden könnten.
WARNUNG Heiße Abgase können brennbare Materialien oder Bauten
entzünden oder Kraftstofftanks beschädigen und Brände
oder Sachschäden führen können.
Funkenfänger zu erwerben, der für die an diesen Motor angebaute Abgasanlage
geeignet ist.
angebracht werden.
WARNUNG
Unbeabsichtigte Funken können einen Brand oder Stromschlag
EINSTELLUNGEN ODER REPARATUREN AM GENERATOR
Zündkerze entstehen kann.
KONTROLLE DER ZÜNDUNG
NICHT bei entfernter Zündkerze überprüfen.
WARNUNG Der Starterzug oder andere rotierende Teile können die Hände,
Haare, Kleidungsstücke oder Ausrüstungsteile ergreifen und zu
Starter oder von anderen rotierenden Teilen erfasst werden könnte.
VORSICHT Übermäßig hohe Betriebsdrehzahlen könnten leichte
Zu hohe Drehzahlen verursachen hohe Last.
erhöhen.
Not for
Reproduction

7 7
Zusammenbau
Der Generator ist einsatzbereit, nachdem er ordnungsgemäß mit dem empfohlenen
Kraftstoff und dem empfohlenen Öl befüllt wurde.
Wenn Sie Probleme mit der Befüllung des Generators haben, wenden Sie sich bitte an
das Service-Center von Briggs & Stratton vor Ort. Wenn Sie Unterstützung benötigen,
halten Sie bitte die Modell-, Revisions- und Seriennummer vom Typenschild bereit.
Position des Typenschilds siehe Funktionen und Bedienungselemente.
Generator entpacken
1. Den Karton auf einen festen, ebenen Untergrund stellen.
2. Alle Teile aus dem Karton entnehmen.
Der Generator wird mit folgendem Zubehör geliefert:
Nachfüllen von Motoröl
1. Den Generator auf einen ebenen Untergrund stellen.
2. Motoröl gemäß Beschreibung unter Motoröl nachfüllen im Abschnitt Wartung
des Motors einfüllen.
HINWEIS
Unsachgemäßer Umgang mit dem Generator kann diesen beschädigen
und seine Lebensdauer verkürzen.
mit dem empfohlenen Öl befüllt wurde. Andernfalls könnte der Motor schwer
beschädigt werden.
Kraftstoff einfüllen Abbildung
1
Der Kraftstoff muss diese Anforderungen erfüllen:
Einsatz in
großen Höhen.
HINWEIS Beschädigungen des Generators vermeiden.
Werden die Empfehlungen der Bedienungsanleitung in Bezug auf den Kraftstoff
missachtet, erlischt die Garantie.
Zum Schutz der Kraftstoffanlage vor Kraftstoffrückständen sollte beim Nachfüllen
von Kraftstoff ein Stabilisiermittel beigemischt werden. Siehe Lagerung. Nicht jeder
eines bestimmten Kraftstoffs auftreten, sollte ein anderer Kraftstoff verwendet
werden. Der Motor ist für den Betrieb mit Benzin zugelassen. Der Motor hat das
Schadstoffbegrenzungssystem EM (Motormodifikationen).
1. Den Bereich um den Tankdeckel reinigen und den Deckel abnehmen.
2. Langsam bis zum roten Füllstandsanzeiger (A) mit bleifreiem Kraftstoff
betanken. Sicherstellen, dass nicht über die Markierung hinaus befüllt wird.
3. Den Tankdeckel anbringen und darauf warten, bis sich eventuell verschütteter
Kraftstoff verflüchtigt hat, bevor der Motor gestartet wird.
Einsatz in großen Höhen
Bei Höhen von über 1500 Metern über NN ist ein Kraftstoff mit mindestens 85
Oktan/85 AKI (89 RON) zulässig. Damit die Emissionen im zulässigen Bereich bleiben,
ist eine Anpassung für große Höhen erforderlich. Der Betrieb ohne diese Anpassung
führt zu verringerter Leistung, erhöhtem Kraftstoffverbrauch und erhöhten Emissionen.
Nähere Informationen zur Anpassung an große Höhenlagen erhalten Sie bei einem
autorisierten Briggs & Stratton-Händler. Der Betrieb des Motors in Höhen unter 750
Metern mit dem Umrüstsatz für große Höhenlagen wird nicht empfohlen.
Lüftungshebel auf dem Kraftstofftankdeckel Abbildung
2
Der Tankdeckel ist mit einem Lüftungshebel (A) zur Abdichtung des Kraftstofftanks
ausgestattet. Der Lüftungshebel muss in Stellung (I) sein, damit der Motor läuft.
Wenn der Motor nicht in Betrieb ist, den Hebel in Stellung (O) belassen, um die
Gefahr von Kraftstoffleckagen zu reduzieren. Den Motor abkühlen lassen, bevor der
Lüftungshebel in Stellung (O) gebracht wird.
Funktionen und Bedienungselemente Abbildung
3
Lesen Sie vor dem Einsatz des Generators diese Bedienungsanleitung und
die Sicherheitsregeln durch.
Generator, damit Sie die verschiedenen Bedienungselemente und
Einstellungen kennenlernen. Bewahren Sie diese Anleitungen für späteres
Nachschlagen auf.
A - Lüftungshebel auf dem Kraftstofftankdeckel – Den Lüftungshebel beim Betrieb des
Generators in Stellung (I) bringen. Bei Außerbetriebnahme in Stellung (O) bringen.
B - Kraftstofftank – Fassungsvermögen 3,7 l.
C - Chokehebel – Zum Start des kalten Motors.
D - Seitliche Wartungsabdeckung – Abdeckung entfernen, um Zugang zum Luftfilter
und Öleinfüllstutzen zu erhalten.
E - Seilzugstarter – Zum manuellen Starten des Motors.
F - Motorschalter – Diesen Schalter vor Betätigung des Seilzugstarters auf I schalten.
Zum Ausschalten des Motors Schalter auf O schalten. Damit wird auch das
Kraftstoffventil geöffnet und geschlossen.
G - Leistungsanzeige (OK) – Die grüne Leistungsanzeige-LED leuchtet, wenn der
Generator ordnungsgemäß funktioniert. Sie zeigt an, dass der Generator Strom an
die Steckdosen liefert.
H - 12V-Gleichstromsteckdose – Diese Steckdose mit Batterieladekabel zum Aufladen
gesichert, der per Taste zurückgesetzt werden kann.
J - Erdungshalter – Erdungsvorschriften bei der zuständigen Behörde erfragen.
K - POWERSMART-Schalter – Dieser Schalter dient zum Ein- und Ausschalten des
POWERSMART-Modus.
L - Überlastalarm (!) – Die rote Überlastalarm-LED leuchtet, wenn der Generator
überlastet wird. Gleichzeitig wird die Stromversorgung der Steckdosen
unterbrochen. Die grüne Leistungsanzeige-LED erlischt. Wenn der Generator
getrennt werden. Der Generator muss ausgeschaltet und erneut gestartet werden,
damit der normale Betriebszustand fortgesetzt werden kann.
M - Motorölstand-Warnleuchte (
) – Die Motorölstand-Warnleuchte schützt
vor Motorschäden durch zu geringen Ölstand. Wenn der Motorölstand unter einen
bestimmten Wert fällt, leuchtet die gelbe Motorölstand-LED-Warnleuchte.
Gleichzeitig wird der Motor über einen Motorölschalter abgeschaltet. Wenn der
Motor ausgeht oder die gelbe Motorölstand-LED-Warnleuchte aufleuchtet, wenn
der Seilzugstarter betätigt wird, muss der Motorölstand kontrolliert werden.
N - Steckdosen für 230 V-Wechselspannung – Zur Stromversorgung elektrischer
Beleuchtungen, Geräte, Werkzeuge und Motoren mit einphasiger Wechselspannung
Überlast gesichert.
P - Funkenfänger und Schalldämpfer – Der Abgasschalldämpfer dämpft das
Motorgeräusch. Er ist mit einem Funkenfängerschirm ausgestattet.
R - Obere Wartungsabdeckung – Abdeckung entfernen, um Zugang zur Zündkerze zu
erhalten.
S - Typenschild – Enthält Modell-, Revisions- und Seriennummer des Generators. Bitte
halten Sie diese Nummer bereit, wenn Sie anrufen, um Unterstützung anzufordern.
Nicht abgebildete Teile:
Luftfilter (unter der seitlichen Wartungsabdeckung) – Filtert Staub und
Öleinfülldeckel (unter der seitlichen Wartungsabdeckung) – Hier Motoröl einfüllen
und Ölstand prüfen.
WARNUNG Kraftstoffe und deren Dämpfe sind sehr leicht entzündlich und
Explosionen verursachen, die zum Tod, zu schweren
NACHFÜLLEN VON KRAFTSTOFF
Tankdeckel abgenommen wird. Den Deckel langsam lösen, um den Druck im Tank
abzulassen.
Motor starten.
Zündquellen fernhalten.
auf Risse und Undichtheiten überprüfen. Die Teile gegebenenfalls auswechseln.
Not for
Reproduction

8 BRIGGSandSTRATTON.COM
Betrieb
Erdungshalter
elektrische Anlagen ist ggf. vorgeschrieben, dass hier eine geeignete Erdung angeschlossen
Statorwicklung ist vom Erdungshalter und den Erdungskontakten der Wechselstromsteckdosen
isoliert. Elektrische Geräte wie etwa FI-Schutzschalter, die einen geerdeten Nullleiter erfordern,
können mit diesem Generator möglicherweise nicht ordnungsgemäß betrieben werden.
Spezielle Anforderungen
Für den geplanten Einsatz des Generators gelten möglicherweise besondere
Dieser Generator verfügt über einen nicht geerdeten Nullleiter. Er ist nicht für
den Einsatz an Orten konzipiert, an denen ein geerdeter Nullleiter erforderlich ist.
Standort des Generators Abbildung
4
Abstand und Luftzirkulation
Den Generator im Freien so aufstellen, dass sich keine tödlichen Abgase sammeln
können. Den Generator NICHT so aufstellen, dass sich Abgase (A) sammeln und in
den Innenraum oder in ein Gebäude gelangen können, in dem sich möglicherweise
Personen befinden. Darauf achten, dass Abgase nicht in die Nähe von Fenstern,
Türen, Lüftungseinlässen und anderen Öffnungen gelangen, über die sich Abgase in
geschlossenen Räumen ansammeln könnten. Die vorherrschende Windrichtung und
häufige Luftströme sind bei der Positionierung des Generators zu berücksichtigen.
Starten des Motors Abbildung
2
3
1. Sicherstellen, dass das Gerät sich auf einer glatten, ebenen Unterlage befindet.
HINWEIS Wird das Gerät nicht auf einer glatten, ebenen Unterlage gestartet und
betrieben, startet es nicht oder schaltet sich während des Betriebs ab. Wird das Gerät
so platziert, dass die Kühlungsöffnungen an der Unterseite blockiert sind, kann dies zu
einem Leistungsabfall führen. Tritt ein Leistungsabfall auf, das Gerät vor dem erneuten
Start ausschalten und abkühlen lassen.
2.
Darauf achten, dass sich der POWERSMART-Schalter (3, K) in Stellung (O) befindet.
3. Den Motorschalter (3, F) in Stellung (I) schalten.
4. Den Lüftungshebel auf dem Kraftstofftankdeckel (2, A) in Stellung (I) drehen.
5. Den Chokehebel (3, C) in Stellung Choke (
) drehen.
HINWEIS Beim erstmaligen Start des Motors, beim Start nach etwaigem Ausgehen
durch Kraftstoffmangel oder nach längerer Lagerung den Kraftstofftank bis zur roten
Füllstandsanzeige betanken. Siehe Abschnitt Kraftstoff einfüllen. Es werden mehrere
Startversuche erforderlich sein, bis die Luft aus der Kraftstoffanlage entwichen ist.
6. Den Seilzugstarter greifen (3, E) und langsam ziehen, bis ein leichter Wider-
stand spürbar wird. Dann den Seilzug schnell ziehen, um den Motor zu starten.
7. Den Chokehebel in die halbe Choke-Stellung bringen und den Seilzugstarter
zwei Mal ziehen.
8. Chokehebel langsam in die Betriebsstellung (
) bringen. Wenn der Motor
stottert, den Chokehebel in die halbe Choke-Stellung bringen, bis der Motor
gleichmäßig läuft. Dann den Hebel in die Betriebsstellung (
) bringen.
HINWEIS Wenn der Motor absäuft, den Chokehebel in die Betriebsstellung (
)
bringen und den Motor anwerfen, bis er startet.
HINWEIS Wenn der Motor nach dreimaligem Ziehen startet, aber nicht weiterläuft, oder
wenn sich das Gerät während des Betriebs abschaltet, darauf achten, dass sich das Gerät
auf ebenem Untergrund befindet, und den Ölstand im Kurbelgehäuse prüfen. Das Gerät
muss ein korrekter Ölstand gewährleistet sein, damit der Motor gestartet werden kann.
Anschluss elektrischer Geräte
um den Spannungsabfall zu minimieren.
1. Darauf achten, dass die grüne Leistungsanzeige leuchtet (kann bis zu drei
Sekunden dauern).
2. Den Motor nach dem Start stabilisieren und kurze Zeit warmlaufen lassen.
HINWEIS
Generator nicht überlasten.
HINWEIS Überschreitungen der höchstzulässigen Generatorleistung bzw.
des höchstzulässigen Generatorstroms können den Generator und die an ihn
angeschlossenen elektrischen Geräte beschädigen.
NICHT überschreiten. Siehe Generator nicht überlasten im Abschnitt Betrieb.
Motor stabil läuft.
Generator trennen.
Abstellen des Motors
des Generators trennen. Den Motor NIEMALS starten oder abstellen, wenn
elektrische Geräte angeschlossen und eingeschaltet sind.
2. Den POWERSMART-Schalter in die Stellung (O) schalten.
3. Den Motor einige Minuten lang ohne Last laufen lassen, damit sich die
Temperaturen im Motor und Generator stabilisieren können.
4. Den Motorschalter in die Stellung (O) schalten.
5. Den Lüftungshebel auf dem Kraftstofftankdeckel in Stellung (O) drehen.
WARNUNG Heiße Abgase können brennbare Materialien oder Bauten
entzünden oder Kraftstofftanks beschädigen und Brände
oder Sachschäden führen können. Die Berührung des
fänger zu erwerben, der für die an diesen Motor angebaute Abgasanlage geeignet ist.
angebracht werden.
WARNUNG
ausgefranst, blank oder auf andere Weise beschädigt sind.
wenn man barfuß ist oder nasse Hände und Füße hat.
oder gewartet werden.
WARNUNG Beschädigte oder überlastete elektrischen Leitungen können
überhitzen, einen Lichtbogen bilden und brennen. Dies kann zum Tod,
WARNUNG Der Rückschlag des Starterseilzugs (schnelles Zurückziehen)
kann die Hand und den Arm zum Motor hinziehen, bevor ein Loslassen
Dann kräftig ziehen, um Rückschlag zu vermeiden.
angeschlossen und eingeschaltet sind.
WARNUNG Bei laufendem Motor wird Kohlenmonoxid, ein geruchloses,
farbloses, giftiges Gas freigesetzt.
Kopfschmerzen, Müdigkeit, Schwindelanfälle, Erbrechen,
In der Nähe von Schlafräumen batteriebetriebene Kohlenmonoxidmelder anbringen.
Öffnungen in geschlossene Räume gelangen.
der Schifffahrt oder geschlossenen Bereichen verwendet werden, auch wenn die
Fenster und Türen geöffnet sind.
Not for
Reproduction

9 9
POWERSMART-Modus
Diese Funktion senkt den Kraftstoffverbrauch und die Lärmentwicklung deutlich. Befindet sich
dieser Schalter in Stellung (I)
Befindet sich der Schalter in Stellung (O), läuft der Motor mit maximaler geregelter Drehzahl.
HINWEIS Beim Starten und Abstellen des Motors sowie bei Nutzung der
Gleichstromsteckdose den Schalter immer in Aus-Stellung (OFF) belassen.
Laden der Batterie Abbildung
5
Diese Steckdose ist mit einem Gleichstromunterbrecher gegen Überlast abgesichert.
Bei Überlast löst der Unterbrecher aus (Drucktaste springt heraus). Nach einigen
Minuten die Taste eindrücken, um den Unterbrecher zurückzusetzen.
HINWEIS
in Stellung (O) drehen.
HINWEIS
angeschlossen ist.
Zum Laden von 12V-Batterien folgendermaßen vorgehen:
1. Falls notwendig Batteriepole bzw. -anschlüsse reinigen.
2. Flüssigkeitsstand in allen Batteriezellen prüfen. Wenn nötig, ausschließlich
destilliertes Wasser hinzugeben, bis die Separatoren in den Batteriezellen
bedeckt sind. KEINESFALLS Leitungswasser verwenden.
3. Wenn die Batterie über Entlüftungskappen verfügt, sicherstellen, dass diese
angebracht und dicht sind.
4. Die Klemme des Batterieladekabels mit rotem Griff an den Batteriepol bzw.
-anschluss anschließen, der mit Plus, POS oder (+) gekennzeichnet ist.
5. Die Klemme des Batterieladekabels mit schwarzem Griff an den Batteriepol bzw.
-anschluss anschließen, der mit Minus, NEG oder (-) gekennzeichnet ist.
Steckdosenleiste einstecken.
7. Den Generator wie unter Starten des Motors beschrieben starten. Den Motor
laufen lassen, während die Batterie geladen wird.
HINWEIS Normalerweise ist ein Zeitraum von 30 bis 120 Minuten ausreichend,
8. Wenn die Batterie geladen ist, den Motor wie unter Abstellen des Motors
beschrieben abstellen.
9.
Das Batterieladekabel vom Generator und dann von den Batteriepolen abklemmen.
HINWEIS Mit einem Säureheber den Ladezustand und den sonstigen Zustand der
Batterie prüfen. Die Anweisungen des Säureheberherstellers sind genau zu beachten.
Allgemein gilt eine Batterie als voll geladen, wenn die mit dem Säureheber gemessene
spezifische Säuredichte mindestens 1,260 beträgt.
Generator nicht überlasten
Kapazität
Darauf achten, dass der Generator gleichzeitig genügend Nennleistung für den Betrieb
werden können. Siehe Referenzleistungstabelle.
3. Abschätzen, wie viel zusätzliche Spitzenleistungsaufnahme beim Einschalten (in
W) erforderlich sein wird. Die Spitzenleistungsaufnahme beim Einschalten bezeich-
net die kurzfristige Leistungsspitze, die für das Starten von Werkzeugen oder
Da nicht alle Motoren gleichzeitig starten, kann die Spitzenleistungsaufnahme
mit der höchsten zusätzlichen Spitzenleistungsaufnahme beim Einschalten zur
Gesamtnennleistung aus Schritt 2 addiert werden.
Beispiel:
Gesamtnennleistung im Betrieb (in W) = 1555
Höchste zusätzliche Spitzenleistungsaufnahme (in W) = 600
Erforderliche Gesamtleistung des Generators = 2155
Leistungsnutzung
anschließen. Die Leistung des Generators wird auf korrekte, sichere Weise genutzt,
1. Den Motor wie in diesem Handbuch beschrieben starten, ohne dass
Leistungsaufnahme – einstecken und einschalten.
3. Warten, bis sich die Generatorleistung stabilisiert hat (der Motor läuft ruhig und
das angeschlossene Gerät funktioniert ordnungsgemäß).
5. Erneut warten, bis sich der Generator stabilisiert hat.
der Kapazität des Generators wie oben beschrieben besonders auf Spitzenlasten achten.
* Die angegebenen Leistungswerte in Watt sind lediglich Schätzwerte. Istleistung der
WARNUNG Batterien geben während des Aufladens explosives Wasserstoffgas ab.
Wasserstoffgas verbleibt nach dem Aufladen über einen längeren
Zeitraum in der Nähe der Batterien. Durch kleinste Funken könnte
Wasserstoff gezündet und zur Explosion gebracht werden. Tödliche
Elektrolytflüssigkeit von Batterien enthält Säure und ist extrem ätzend. Die Berührung mit
danach in der Nähe der Batterie kein offenes Feuer, keine Funken, Wärmequellen
oder brennende Zigaretten befinden.
Werkzeug bzw. Gerät
Nennleistung im
Betrieb (in W)
Zusätzliche Spitzen leistungs-
aufnahme beim Einschalten (in W)
Haushaltsventilator 300 600
Tiefkühltruhe 500 500
Fernsehgerät 500 –
Alarmanlage 180 –
Leuchte (75 W) 75 –
1555 W Gesamt-
leistung im Betrieb
600 W zusätzliche
Spitzenleistungsaufnahme
Referenzleistungstabelle
Werkzeug bzw. Gerät
Nennleistung*
im Betrieb (in W)
Zusätzliche Spitzen leistungs-
aufnahme beim Einschalten (in W)
Grundlegende Geräte
Glühlampe - 75 W 75 –
Tiefkühltruhe 500 500
Ölpumpe der Heizung 800 1200
Kühl-/Gefrierschrank - 0,5 m³ 800 1600
Brunnenpumpe - 245 W 1000 2000
Heizen / Kühlen
Fenster-Kühlaggregat - 10.000 BTU
1200 1800
Haushaltsventilator 300 600
Heizlüfter - 370 W 800 1300
Küche
Mikrowellenherd - 1000 Watt 1000 –
Kaffeemaschine 1500 –
Elektroheizung – Einzelelement 1500 –
Wohnzimmer
100 –
100 –
Stereo-Receiver 450 –
Farbfernseher - 70 cm 500 –
PC mit 17-Zoll-Bildschirm 800 –
Sonstiges
Alarmanlage 180 –
MW/UKW-Radiowecker 300 –
Garagentoröffner – 370 W 480 520
Heimwerker/Arbeitsplatz
Quarz-Halogen-Arbeitsleuchte 1000 –
Airless-Spritzgerät – 245 W 600 1200
Handstichsäge 960 960
Bohrmaschine – 370 W 1000 1000
Kreissäge - 18 cm 1500 1500
Not for
Reproduction

10 BRIGGSandSTRATTON.COM
Wartung
Wartungsplan
Die in Betriebsstunden oder Jahren angegebenen Intervalle befolgen, je nachdem,
welcher Fall zuerst eintritt. Bei Einsatz unter erschwerten Bedingungen ist die Wartung
häufiger erforderlich.
¹
Bei hohem Schmutz- bzw. Staubaufkommen häufiger reinigen.
Allgemeine Empfehlungen
Regelmäßige Wartung verbessert die Leistung und verlängert die Lebensdauer des
Die Garantie des Generators greift nicht für Gegenstände, die durch eine falsche
Um die Garantie in Anspruch nehmen zu können, muss der Anwender den Generator
gemäß den hier aufgeführten Anweisungen warten.
HINWEIS
Unsachgemäßer Umgang mit dem Generator kann diesen beschädigen
und seine Lebensdauer verkürzen.
ordnungsgemäße Kühlung zu gewährleisten.
Einige Einstellungen müssen regelmäßig vorgenommen werden, um den Generator
korrekt instandzuhalten.
Sämtliche Wartungs- und Einstellungsarbeiten sollten mindestens einmal pro Saison
durch geführt werden. Die Anforderungen aus dem obigen Wartungsplan sind zu beachten.
HINWEIS Einmal pro Jahr die Zündkerze reinigen oder ersetzen und den Luftfilter
ersetzen. Eine neue Zündkerze und ein sauberer Luftfilter sorgen für das korrekte
Kraftstoff-Luft-Gemisch und tragen dazu bei, dass der Motor besser läuft und länger hält.
Wartung des Generators
Zur Wartung des Generators gehört es, das Gerät sauber und trocken zu halten. Das Gerät
in einer sauberen, trockenen Umgebung betreiben und lagern, in der es nicht übermäßig
Staub, Schmutz, Feuchtigkeit oder korrosiven Dämpfen ausgesetzt ist. Die Kühlluftschlitze
im Generator dürfen nicht durch Schnee, Blätter oder andere Fremdkörper verstopft werden.
HINWEIS Zum Reinigen des Generators KEIN Wasser und KEINE anderen Flüssigkeiten
verwenden. Flüssigkeit kann in die Kraftstoffanlage des Motors eindringen und zu
Leistungsverlusten bzw. -ausfällen führen. Außerdem verbleibt ein Teil der durch die
Kühlluftschlitze in den Generator eingedrungenen Flüssigkeit in Leerräumen und Rissen der
Isolierung von Rotor- und Statorwicklungen. Durch Flüssigkeit und Schmutzablagerungen an
den Wicklungen des Generators sinkt allmählich der Isolationswiderstand dieser Wicklungen.
Reinigung
Täglich oder vor jedem Gebrauch den Generator auf allen Seiten auf auslaufendes Öl
oder auslaufenden Kraftstoff untersuchen. Schmutzablagerungen innen und außen
am Generator beseitigen. Kühlluftschlitze und Öffnungen am Generator prüfen. Diese
Öffnungen müssen sauber und frei gehalten werden.
Motorteile sind sauber zu halten, damit das Überhitzungs- und Entzündungsrisiko
durch die Ansammlung von Fremdkörpern verringert wird.
HINWEIS
Unsachgemäßer Umgang mit dem Generator kann diesen beschädigen
und seine Lebensdauer verkürzen.
Dämpfen aussetzen.
Kraftstofffilter reinigen
Abbildung
6
Der Kraftstofffilter verhindert, dass Schmutz in die Kraftstoffanlage eindringen kann.
Den Kraftstofffilter folgendermaßen reinigen:
1. Sicherstellen, dass sich der Generator auf einer ebenen Unterlage befindet.
2. Tankdeckel (A) und Kraftstofffilter (B) entfernen.
3. Den Kraftstofffilter in Flüssigreiniger und Wasser auswaschen.
4. Den Kraftstofffilter mit einem sauberen, trockenen Lappen auswischen.
5. Den Kraftstofffilter und den Tankdeckel sorgfältig wieder anbringen.
Wartung des Motors
Öl
Empfehlungen zum Öl
die Briggs & Stratton-Garantie abgedeckt sind. Andere hochwertige Öle sind zulässig,
wenn sie für die Service-Klassen SF, SG, SH, SJ oder höher klassifiziert sind. KEINE
speziellen Additive verwenden.
führen. Überprüfen Sie den Ölstand öfter.
HINWEIS Synthetisches Öl gemäß ILSAC GF-2, mit API-Zertifikat und API-
ändern sich die erforderlichen Ölwechselintervalle nicht.
Ölstandskontrolle
Abbildung
8
Der Ölstand ist vor jedem Gebrauch oder mindestens alle 8 Betriebsstunden zu
überprüfen. Auf korrekten Ölstand achten.
1. Sicherstellen, dass sich der Generator auf einer ebenen Unterlage befindet.
2. Die Schrauben der seitlichen Wartungsabdeckung lösen und die seitliche
Wartungsabdeckung entfernen.
3.
Den Bereich um den Öleinfüllstutzen reinigen und den Öleinfüllverschluss entfernen.
4. Überprüfen, ob der Ölstand an der Öleinfüllöffnung bis zum Überlauf gefüllt ist.
5. Den Öleinfüllverschluss wieder anbringen und festziehen.
6. Die seitliche Wartungsabdeckung wieder anbringen und die Schrauben der
Abdeckung von Hand anziehen.
Nachfüllen von Motoröl
Abbildung
9
1. Sicherstellen, dass sich der Generator auf einer ebenen Unterlage befindet.
2. Zum Prüfen des Ölstands die Schritte 2 bis 4 wiederholen, wie unter
Ölstandskontrolle beschrieben.
3. Wenn nötig, langsam bis zum Überlauf Öl in die Öleinfüllöffnung einfüllen.
4. Den Öleinfüllverschluss wieder anbringen und festziehen.
5. Die seitliche Wartungsabdeckung wieder anbringen und die Schrauben der
Abdeckung von Hand anziehen.
Alle 8 Betriebsstunden oder täglich
Nach den ersten 10 Betriebsstunden
Alle 50 Betriebsstunden oder alle 3 Monate
Alle 100 Betriebsstunden oder alle 6 Monate
¹
Alle 250 Stunden oder jährlich
WARNUNG Unbeabsichtigte Funken können einen Brand oder Stromschlag
führen.
EINSTELLUNGEN ODER REPARATUREN AM GENERATOR
Zündkerze entstehen kann.
KONTROLLE DER ZÜNDUNG
NICHT bei entfernter Zündkerze überprüfen.
Not for
Reproduction

11 11
Wechsel des Motoröls
Beim Einsatz des Generators unter extrem schmutzigen oder staubigen Bedingungen
oder in extrem heißem Klima muss das Öl öfter gewechselt werden.
RESSOURCEN SCHONEN. ALTÖL AN SAMMELSTELLEN ABGEBEN.
Das Öl wechseln, wenn der Motor noch warm ist. Dazu wie folgt vorgehen:
1. Sicherstellen, dass sich der Generator auf einer ebenen Unterlage befindet.
2. Die Schrauben der seitlichen Wartungsabdeckung lösen und die seitliche
Wartungsabdeckung entfernen.
3.
Den Bereich um den Öleinfüllstutzen reinigen und den Öleinfüllverschluss entfernen.
4. Den Generator so kippen, dass das Öl aus der Öleinfüllöffnung in einen
geeigneten Behälter läuft. Dabei darauf achten, dass das Gerät in Richtung
Öleinfüllöffnung gekippt wird. Wenn das Kurbelgehäuse entleert ist, den
Generator in die aufrechte Position zurückkippen.
5. Zum Einfüllen des Motoröls die Schritte 3 bis 5 wiederholen, wie unter
Nachfüllen von Motoröl beschrieben.
Wartung des Luftfilters
Abbildung
10
Der Motor läuft nicht richtig und kann beschädigt werden, wenn er mit einem schmutzigen
Luftfilter betrieben wird. Bei hohem Schmutz- bzw. Staubaufkommen häufiger warten.
Zur Wartung des Luftfilters wie folgt vorgehen:
1. Die Schrauben der seitlichen Wartungsabdeckung lösen und die seitliche
Wartungsabdeckung entfernen.
2. Die Luftfilterdeckelschraube (A) lösen und den Luftfilterdeckel (B) entfernen.
3.
Schaumstoff-Luftfilter (C) durch Herausziehen in die eigene Richtung sorgfältig entfernen.
4.
Belüftungsfilter (D) durch Herausziehen in die eigene Richtung sorgfältig entfernen.
5. Schaumstoff-Luftfilter und Belüftungsfilter nur in Flüssigreiniger und Wasser
auswaschen. In einem sauberen Lappen ausdrücken.
6. Den Schaumstoff-Luftfilter in sauberes Motoröl TAUCHEN und in einem
sauberen Lappen ausdrücken, um überschüssiges Öl zu beseitigen.
7. Gereinigten bzw. neuen Schaumstoff-Luftfilter wieder einbauen.
8. Gereinigten bzw. neuen Belüftungsfilter wieder einbauen.
9. Luftfilterdeckel wieder anbringen und Schraube anziehen.
10. Die seitliche Wartungsabdeckung wieder anbringen und die Schrauben der
Abdeckung von Hand anziehen.
Zündkerze warten
Abbildung
11
12
Mit einer neuen Zündkerze startet und läuft der Motor besser.
1. Obere Wartungsabdeckung entfernen.
2. Den Bereich um die Zündkerze reinigen und den Zündkerzenstecker entfernen.
3. Die Zündkerze herausnehmen und überprüfen.
4. Den Elektrodenabstand mit einer Zündkerzenlehre messen. Bei Bedarf den
Elektrodenabstand so anpassen, dass er dem empfohlenen Wert entspricht
(siehe Technische Daten).
5. Die Zündkerze ersetzen, wenn die Elektroden korrodiert oder durchgebrannt
sind oder wenn das Porzellan gebrochen ist. Nur empfohlene Ersatzzündkerzen
verwenden. Siehe Technische Daten.
6.
Die Zündkerze einsetzen und gut festziehen. Den Zündkerzenstecker wieder anbringen.
7. Obere Wartungsabdeckung wieder anbringen.
Schalldämpfer und Funkenfänger überprüfen
Abbildung
13
14
Den Schalldämpfer auf Risse, Korrosion oder andere Beschädigungen prüfen.
Den Funkenfänger, falls vorhanden, entfernen und auf Beschädigungen oder
Kohlenstoffablagerungen prüfen. Wenn Ersatzteile erforderlich sind, darauf achten,
dass ausschließlich Original-Ersatzteile verwendet werden.
Den Funkenfänger wie folgt reinigen und überprüfen:
1. Zum Entfernen der Schalldämpferabdeckung die vier Schrauben entfernen, mit
denen die Abdeckung am Generator befestigt ist.
2. Die Schraube entfernen, mit der der Funkenfänger am Schalldämpfer befestigt
ist. Funkenfängersieb entfernen.
3. Das Sieb prüfen und austauschen, falls es gerissen, löchrig oder auf andere
Weise beschädigt ist. KEIN defektes Sieb verwenden. Wenn das Sieb nicht
beschädigt ist, Sieb mit einer Bürste reinigen.
4.
Sieb wieder am Schalldämpfer anbringen. Schalldämpferabdeckung wieder anbringen.
Ventilspiel überprüfen
den Motor teilweise zu demontieren und Spezialwerkzeug einzusetzen. Daher wird
überprüfen und einstellen zu lassen (siehe unter Wartungsplan im Abschnitt Wartung).
Lagerung
Wenn der Generator mehr als 30 Tage lang nicht benutzt werden soll, das Gerät
anhand der folgenden Richtlinien für die Lagerung vorbereiten.
Lagerung des Generators
Reinigung beschrieben.
Kontrollieren, ob die Kühlluftschlitze und Öffnungen am Generator offen und frei sind.
Anweisungen zur Langzeitlagerung
Kraftstoff kann altern, wenn er länger als 30 Tage gelagert wird. Abgestandener
Kraftstoff führt dazu, dass sich Säure und Gummiablagerungen im Kraftstoffsystem
verwenden Sie Briggs & Stratton FRESH START®-Kraftstoffstabilisator, der als
flüssiger Zusatz oder Tropfkonzentrat-Patrone erhältlich ist.
Es ist nicht nötig, den Kraftstoff aus dem Motor abzulassen, wenn ein
Kraftstoffstabilisator gemäß den Anweisungen hinzugefügt wird. Lassen Sie den Motor
2 Minuten lang laufen, um den Stabilisator im gesamten Kraftstoffsystem zu verteilen.
Der Motor und der Kraftstoff können dann bis zu 24 Monate lang gelagert werden.
Falls der Kraftstoff im Motor nicht mit einem Kraftstoffstabilisator behandelt wurde, muss
er in einen zugelassenen Behälter abgelassen werden. Lassen Sie den Motor so lange
im Lagerungsbehälter wird empfohlen, um die Frische aufrecht zu erhalten.
Motoröl wechseln
Bei warmem Motor das Öl aus dem Kurbelgehäuse ablassen. Mit Motoröl der
empfohlenen Klasse befüllen. Siehe Wechsel des Motoröls.
Andere Lagerungstipps
1.
Kraftstoff darf NICHT von einer Saison zur nächsten aufbewahrt werden, wenn er
nicht wie unter Anweisungen zur Langzeitlagerung beschrieben behandelt wurde.
2. Kraftstofftank austauschen, wenn er zu korrodieren beginnt. Rost bzw.
3. Das Gerät mit einer geeigneten Schutzplane abdecken, die Feuchtigkeit abweist.
4. Den Generator an einem sauberen, trockenen Ort lagern.
ACHTUNG Längeren oder wiederholten Kontakt der Haut mit gebrauchtem
Motoröl vermeiden.
Seife gewaschen werden.
WARNUNG Die Berührung des Auspuffbereichs kann zu schweren
Heiße Abgase können brennbare Materialien entzünden oder
den Kraftstofftank beschädigen und Brände verursachen.
fänger zu erwerben, der für die an diesen Motor angebaute Abgasanlage geeignet ist.
angebracht werden.
WARNUNG Kraftstoffe und deren Dämpfe sind sehr leicht entzündlich und
Explosionen verursachen, die zum Tod, zu schweren
LAGERUNG VON KRAFTSTOFF BZW. DES GERÄTS MIT GEFÜLLTEM KRAFTSTOFFTANK
oder ähnlichen Geräten mit Dauerflammen oder anderen Zündquellen abstellen,
weil dadurch Kraftstoffdämpfe entzündet werden könnten.
ABLASSEN VON KRAFTSTOFF
Tankdeckel abgenommen wird. Den Deckel langsam lösen, um den Druck im Tank
abzulassen.
Zündquellen fernhalten.
auf Risse und Undichtheiten überprüfen. Die Teile gegebenenfalls auswechseln.
WARNUNG Lagerungsabdeckungen können Brände verursachen, die zum
Not for
Reproduction

12 BRIGGSandSTRATTON.COM
Fehlersuche und -behebung
Problem Ursache Behebung
Motor läuft, liefert aber keinen
Wechselstrom.
1. Rote Überlastalarm-Leuchte leuchtet. Der Generator ist
überlastet.
2. Grüne Leistungsanzeige leuchtet nicht. Fehler im Generator.
4. Das angeschlossene Gerät ist defekt.
1. Siehe Generator nicht überlasten im Abschnitt Betrieb. Generator
abschalten und neu starten.
3. Prüfen und reparieren.
4. Ein anderes, bekanntermaßen korrekt funktionierendes Gerät anschließen.
Der Generator läuft allein korrekt, aber
„säuft ab“, wenn Verbraucher
angeschlossen werden.
2. Motordrehzahl ist zu gering.
3. Der Generator ist überlastet.
4. Kurzgeschlossener Generatorschaltkreis.
3. Siehe Generator nicht überlasten im Abschnitt Betrieb.
Motor springt nicht an, geht nach dem
Starten aus oder springt an und läuft
unrund.
1. Motorschalter in Stellung (O).
2. Lüftungshebel auf dem Kraftstofftankdeckel ist in Stellung (O).
3. Öldruck-Warnleuchte leuchtet auf. Niedriger Ölstand.
5. Kein Kraftstoff.
6. Alter Kraftstoff.
7. Zündkabel nicht an der Zündkerze angeschlossen.
8. Zündkerze defekt.
9. Wasser im Kraftstoff.
10. Abgesoffen.
11. Zu fettes Gemisch.
12. Einlassventil sitzt offen oder geschlossen fest.
13. Kompressionsverlust des Motors.
1. Motorschalter in Stellung (I) schalten.
2. Lüftungshebel auf dem Kraftstofftankdeckel in Stellung (I) drehen.
3. Kurbelgehäuse bis zum vorgeschriebenen Ölstand auffüllen und den
Generator auf ebene Unterlage stellen.
4. Den Luftfilter reinigen oder austauschen.
5. Kraftstofftank befüllen.
7. Zündkabel an Zündkerze anschließen.
8. Zündkerze austauschen.
10. 5 Minuten warten und Motor neu starten.
Motor bringt nicht genug Leistung.
1. Die Last ist zu hoch.
1. Siehe Generator nicht überlasten im Abschnitt Betrieb.
2. Luftfilter wechseln.
Motordrehzahl schwankt oder Motor stottert.
Produktspezifikationen
Startleistung ....................................................2000 W
Leistung* ..................................................... 1.600 W
....................................................7,0 A
......................................................5 A
Nennfrequenz ................................................... 50 Hz
Phase ....................................................... einphasig
Hubraum ....................................................105,6 cm³
Elektrodenabstand der Zündkerze .............................. 0,6 - 0,7 mm
.....................................0,08 - 0,12 mm kalt
..................................... 0,13 - 0,17 mm kalt
Tankinhalt ...................................................... 3,7 l
Ölmenge ......................................................... 0,4 l
in Übereinstimmung mit SAE-Code J1940 (Small Engine Power & Torque Rating
Procedure) angegeben. Die Nennleistung wurde in Übereinstimmung mit SAE
Die tatsächliche Motorleistung ist geringer und hängt unter anderem von den
Betriebsbedingungen und von Abweichungen von einem Motor zum anderen ab. In
Maschine nicht die angegebene Brutto-Nennleistung erbringt (Istleistung). Dieser
auf Einschränkungen bezüglich der Anwendung, Betriebsbedingungen (Temperatur,
Luftfeuchtigkeit, Einsatzhöhe) und Abweichungen von einem Motor zum anderen. Auf
Grund von Herstellungs- und Leistungsbegrenzungen ist Briggs & Stratton berechtigt,
den Motor dieser Serie durch einen Motor mit höherer Leistung zu ersetzen.
* Dieser Generator ist gemäß ISO 8528, G3, klassifiziert.
Ersatzteile für alle Modelle
Schaumstoff-Luftfilter ..........................................311388GS
Belüftungsfilter ................................................311389GS
Widerstandszündkerze .......................................NGK CR7HSA
Not for
Reproduction

13 13
BRIGGS & STRATTON POWER PRODUCTS GROUP, LLC - GARANTIE FÜR EIGENTÜMER TRAGBARER GENERATOREN
EINGESCHRÄNKTE GARANTIE
Briggs & Stratton Power Products Group, LLC wird alle Teile des Produkts kostenlos reparieren oder ersetzen, die Material- oder Fertigungsmängel aufweisen. Die Transportkosten für das
zur Reparatur oder zum Austausch eingesandte Produkt unter dieser Garantie müssen vom Käufer getragen werden. Diese Garantie ist für die genannten Zeiträume und unter den unten
ES BESTEHT KEINE ANDERE AUSDRÜCKLICHE GARANTIE. IMPLIZIERTE GARANTIEN, EINSCHLIESSLICH DER ALLGEMEINEN GEBRAUCHSTAUGLICHKEIT ODER EIGNUNG FÜR
EINEN BESTIMMTEN ZWECK, SIND AUF EIN JAHR AB DEM KAUFDATUM ODER AUF DEN GESETZLICH ZUGELASSENEN UMFANG BESCHRÄNKT. ALLE IMPLIZIERTEN GARANTIEN
SIND AUSGESCHLOSSEN. DIE HAFTBARKEIT FÜR FOLGE- ODER BEGLEITSCHÄDEN IST IM GESETZLICH ZULÄSSIGEN RAHMEN AUSGESCHLOSSEN. In einigen Staaten ist
die Beschränkung der Dauer der implizierten Garantie bzw. die Beschränkung von Folge- oder Begleitschäden nicht zulässig. Daher trifft die oben genannte Beschränkung bzw.
Ausnahme möglicherweise nicht auf Sie zu. Durch diese Garantie erhalten Sie spezielle Rechte. Außerdem haben Sie möglicherweise andere, von Land zu Land variierende Rechte.
FÜR DIE GÜLTIGKEIT DER GARANTIE FÜR BRIGGS & STRATTON PRODUKTE IST KEINE GARANTIEREGISTRIERUNG ERFORDERLICH. BEWAHREN SIE EINFACH IHREN
ANHAND DES DATUMS DER HERSTELLUNG DES GERÄTS BESTIMMT.
INFORMATIONEN ZUR GARANTIE
Wir führen gern Reparaturen im Rahmen der Garantie aus und entschuldigen uns für die Ihnen entstandenen Unannehmlichkeiten. Garantiereparaturen können von jedem
Transport, Lagerung oder unsachgemäße Montage verursacht wurden. Ebenso erlischt die Garantie, wenn das Herstellungsdatum oder die Seriennummer auf dem tragbaren
Normaler Verschleiß
Installation und Wartung
Fahrlässigkeit, Unfall, Überlastung, Überdrehen, falscher Wartung, Reparatur oder Lagerung ausgesetzt worden sind, wodurch Leistung und Zuverlässigkeit nach unserem
Ermessen nachteilig beeinträchtigt wurden. Diese Garantieleistung deckt auch keine normalen Wartungsarbeiten wie Luftfilter, Einstellungen, Reinigung der Kraftstoffanlage
Andere Ausschlüsse
Primärstromversorgung anstelle der Netzstromversorgung verwendet werden, Geräten, die für lebenserhaltende Anwendungen verwendet werden, und nicht bei Ausfällen
aufgrund höherer Gewalt oder sonstiger Ereignisse, auf die der Hersteller keinen Einfluss hat. 198189E, Rev. C, 02.11.2009
BRIGGS & STRATTON POWER PRODUCTS GROUP, LLC
MILWAUKEE (WISCONSIN, USA)
Gültig ab 1. November 2009. Ersetzt alle nicht datierten Garantien und alle Garantien mit Datum vor dem 1. November 2009.
2 Jahre*
1 Jahr
Privatnutzung
Gewerbliche Nutzung
*Im zweiten Jahr nur Teile
GARANTIEZEITRAUM
Not for
Reproduction

4 BRIGGSandSTRATTON.COM
La ringraziamo per avere acquistato questo generatore Briggs & Stratton® di alta qualità. Siamo lieti che abbia posto la Sua fiducia nel marchio Briggs & Stratton. Se viene usato e
mantenuto seguendo le istruzioni del presente manuale, questo prodotto Briggs & Stratton Le darà molti anni di servizio affidabile.
Il presente manuale contiene istruzioni sulla sicurezza finalizzate a rendere l’utente consapevole dei pericoli e dei rischi associati ai generatori e sul modo di evitarli. Questo
generatore è progettato e destinato esclusivamente all’alimentazione elettrica per l’attivazione di impianti di illuminazione elettrica, apparecchi, attrezzi e carichi motore compatibili, e
non deve essere utilizzato per qualsiasi altra applicazione. È importante leggere e comprendere completamente queste istruzioni prima di cercare di avviare o utilizzare l’apparecchio.
Conservare queste istruzioni tradotte dall’originale per potervi fare riferimento in futuro.
Prima dell’uso, questo generatore necessita di un assemblaggio finale. Assemblaggio di questo manuale per istruzioni sulle procedure per l’assemblaggio
finale. Seguire tutte le istruzioni.
Dove siamo
Non bisogna andare lontano per trovare supporto e assistenza Briggs & Stratton per il generatore. Ci sono migliaia di officine autorizzate Briggs & Stratton in tutto il mondo che
Generatore
Numero modello
Revisione
Numero di serie
Data di acquisto
Indice
Sicurezza dell’operatore .....................................5
Descrizione dell’apparecchio .....................................................5
Importanti istruzioni di sicurezza ..................................................5
Montaggio...............................................7
Disimballaggio del generatore ....................................................7
Aggiunta dell’olio motore . . . . . . . . . . . . . . . . . . . . . . . . . . . . . . . . . . . . . . . . . . . . . . . . . . . . . . . .7
Rifornimento di carburante.......................................................7
Caratteristiche e comandi ....................................7
Funzionamento ...........................................8
Dispositivo di messa a terra......................................................8
Posizionamento del generatore ...................................................8
Avviamento del motore..........................................................8
Collegamento dei carichi elettrici ..................................................8
Arresto del motore . . . . . . . . . . . . . . . . . . . . . . . . . . . . . . . . . . . . . . . . . . . . . . . . . . . . . . . . . . . . .8
Modalità POWERSMART ........................................................9
Caricamento della batteria .......................................................9
Non sovraccaricare il generatore ..................................................9
Manutenzione ...........................................10
Programma di manutenzione . . . . . . . . . . . . . . . . . . . . . . . . . . . . . . . . . . . . . . . . . . . . . . . . . . . .10
Manutenzione del generatore . . . . . . . . . . . . . . . . . . . . . . . . . . . . . . . . . . . . . . . . . . . . . . . . . . . .10
Manutenzione del motore.......................................................10
Rimessaggio.................................................................11
Individuazione ed eliminazione dei problemi......................12
Dati tecnici . . . . . . . . . . . . . . . . . . . . . . . . . . . . . . . . . . . . . . . . . . . . .12
Dati tecnici del prodotto ........................................................12
Ricambi comuni . . . . . . . . . . . . . . . . . . . . . . . . . . . . . . . . . . . . . . . . . . . . . . . . . . . . . . . . . . . . . .12
Garanzie...............................................13
Garanzia del proprietario del generatore............................................13
Copyright © 2011 Briggs & Stratton Power Products Group, LLC
Milwaukee, WI, USA. Tutti i diritti riservati.
BRIGGS & STRATTON POWER PRODUCTS è un marchio registrato
di Briggs & Stratton Corporation
Milwaukee, WI, USA
ISTRUZIONI TRADOTTE DALL’ORIGINALE
Not for
Reproduction

5 5
Sicurezza dell’operatore
Descrizione dell’apparecchio
Leggere con attenzione questo manuale per acquisire dimestichezza con il
generatore e per conoscerne le applicazioni, le limitazioni e i pericoli che
comporta.
Questo apparecchio è un generatore a motore, a campo rotante, a corrente alternata
e continua (C.A. e C.C.). È progettato per erogare energia elettrica per l’attivazione di
impianti di illuminazione, apparecchi e utensili elettrici e carichi motore compatibili. Il
campo rotante del generatore, azionato da un motore a un cilindro, ha una velocità di
rotazione di circa 4.500 giri/min (con modalità POWERSMART disattivata).
È stato compiuto ogni sforzo per assicurare che le informazioni in questo manuale
siano precise e aggiornate. Tuttavia, il produttore si riserva il diritto di modificare,
alterare o perfezionare in qualsiasi momento il generatore e la relativa documentazione,
senza alcun preavviso.
Importanti istruzioni di sicurezza
Il produttore non può prevedere ogni possibile circostanza che potrebbe implicare
un pericolo. Le avvertenze in questo manuale nonché le etichette e le decalcomanie
applicate sull’unità non contemplano pertanto ogni possibile circostanza. Se si utilizza
una procedura, un metodo di lavoro o una tecnica di funzionamento che il produttore
non raccomanda specificamente, si deve accertare personalmente che sia sicura per sé
stessi e per gli altri. Ci si deve sempre assicurare che la procedura, il metodo di lavoro
o la tecnica di funzionamento scelti non rendano insicuro il generatore.
Simboli indicanti rischio e relativi significati
Il simbolo avvertenza di sicurezza indica un potenziale rischio di lesioni
personali. Con il simbolo di avvertenza si usa un termine di segnalazione (PERICOLO,
di segnalazione AVVISO indica pratiche che non comportano lesioni personali.
PERICOLO indica un pericolo che, se non evitato, provocherà gravi lesioni o
morte.
AVVERTENZA indica un pericolo che, se non evitato, potrebbe provocare gravi
lesioni o morte.
ATTENZIONE indica un pericolo che, se non evitato, potrebbe provocare lesioni
minori o moderate.
AVVISO si riferisce a pratiche che non comportano lesioni personali.
Incendio
Esplosione
Fumi tossici
Superfici estre-
mamente calde
Parti in movimento
Scossa elettrica
Contraccolpo
Oggetti volanti
Manuale per l’operatore
Pressione esplosiva Ustione chimica
AVVERTENZA Il motore in funzione emette monossido di carbonio, un gas
inodore, incolore e velenoso.
Respirare monossido di carbonio può provocare gravi danni, cefalea,
spossatezza, vertigini, vomito, confusione, colpo apoplettico, nausea,
svenimento o morte.
camere da letto.
attraverso finestre, porte, prese di ventilazione o altre aperture.
apparecchiature mobili, o in spazi limitati, anche se sono aperte le finestre e le
porte, e non usarlo per applicazioni marine.
AVVERTENZA Il contraccolpo (rapida ritrazione) della fune del motorino di
avviamento tira velocissimamente la mano e il braccio verso il motore e
può provocare la frattura di ossa, contusioni, distorsioni o gravi lesioni.
resistenza, quindi tirarla rapidamente per evitare il contraccolpo.
all’alimentazione elettrica e accesi.
AVVERTENZA Le batterie degli accumulatori rilasciano idrogeno esplosivo
durante la ricarica. L’idrogeno rimane attorno a una batteria
per molto tempo dopo la sua ricarica. Una scintilla, anche se
piccolissima, potrebbe accendere l’idrogeno provocando
esplosioni con conseguenti gravi lesioni, anche letali, e/o danni alle cose.
Il liquido degli elettroliti delle batterie contiene acido ed è estremamente caustico.
Il contatto con il liquido delle batterie potrebbe provocare ustioni chimiche con
conseguenti gravi lesioni e/o danni alle cose.
sigarette quando la si carica e per parecchio tempo dopo la ricarica.
completamente carica.
AVVERTENZA
La tensione del generatore potrebbe provocare scosse
elettriche o bruciature, con conseguenti gravi lesioni, anche letali.
isolando il generatore da eventuali tecnici che stanno eseguendo interventi sulla
rete elettrica.
l’azienda elettrica.
conduttive, come sotto una copertura metallica o carpenteria metallica.
atmosferica.
immersi in acqua oppure con le mani o i piedi bagnati.
Not for
Reproduction

6 BRIGGSandSTRATTON.COM
AVVISO
Il superamento della capacità di wattaggio/amperaggio del generatore
potrebbe danneggiare il generatore e/o i dispositivi elettrici collegati ad esso.
NONNon
sovraccaricare il generatore nella sezione Funzionamento.
carichi elettrici.
AVVISO
L’utilizzo improprio può danneggiare e ridurre la vita utile del generatore.
centro di assistenza nella propria zona.
-viene persa potenza elettrica;
-l’apparecchio emette scintille, fumo o fiamme;
-l’unità vibra eccessivamente.
AVVERTENZA Il carburante e i suoi vapori sono estremamente infiammabili
ed esplosivi, potrebbero provocare ustioni, incendio o
esplosione con conseguenti gravi lesioni, anche letali, e/o
danni alle cose.
DURANTE IL RIEMPIMENTO O LO SCARICO DEL CARBURANTE
prima di togliere il tappo del carburante. Allentare lentamente il tappo per
rilasciare la pressione nel serbatoio.
l’espansione del carburante.
di accensione.
verificare se sono presenti lesioni o perdite. Sostituire se necessario.
QUANDO SI AVVIA L’APPARECCHIO
siano montati correttamente.
QUANDO SI UTILIZZA L’APPARECCHIO
apparecchiature mobili, o in luoghi chiusi e non usarlo per applicazioni marine.
carburante.
CHOKE per fermare il motore (
).
QUANDO SI TRASPORTA, SPOSTA O RIPARA L’APPARECCHIO
carburante.
QUANDO SI IMMAGAZZINA IL CARBURANTE O L’APPARECCHIO CON
CARBURANTE NEL SERBATOIO
Conservare lontano da forni, stufe, caldaie, asciugatrici o altri dispositivi con fiamme
pilota o altre fonti di accensione in grado di innescare incendi ai vapori del carburante.
AVVERTENZA Il calore ed i gas di scarico possono incendiare materiali e
strutture infiammabili o danneggiare il serbatoio del
carburante provocando un incendio con conseguenti gravi
lesioni, anche letali e/o danni alle cose.
Il contatto con l’area del silenziatore può provocare gravi ustioni.
scarico caldi.
ad esso.
sistema di scarico installato su questo motore.
originali.
AVVERTENZA Scintille accidentali potrebbero provocare incendi o scosse
elettriche con conseguenti gravi lesioni, anche letali.
DURANTE LE REGOLAZIONI O LE RIPARAZIONI DEL GENERATORE
a contatto con la candela.
QUANDO SI VERIFICA LA SCINTILLA
NON controllare le scintille con la candela rimossa.
AVVERTENZA Il motorino d’avviamento e le altre parti rotanti potrebbero
impigliare le mani, i capelli, gli indumenti o gli accessori provocando
gravi lesioni.
impigliati nel motorino d’avviamento o in altre parti rotanti.
ATTENZIONE
provocare lesioni minori e/o danni.
la velocità del motore.
Not for
Reproduction

7 7
Montaggio
Il generatore, dopo essere stato riempito con i quantitativi consigliati di carburante e
olio, è pronto per l’uso.
Se si incontrano problemi nelI’eseguire la manutenzione del generatore, contattare il
centro di assistenza Briggs & Stratton nella propria zona. Se si necessita di assistenza,
tenere a portata di mano l’annotazione del modello, della revisione e del numero di
Caratteristiche e comandi del generatore per
individuare la posizione della targhetta.
Disimballaggio del generatore
1. Collocare il cartone su una superficie rigida e piana.
2. Estrarre tutto il contenuto dal cartone.
Il generatore viene fornito con:
Aggiunta dell’olio motore
1. Collocare il generatore su una superficie in piano.
2. Aggiungere l’olio motore come descritto nel punto Aggiunta dell’olio motore
della sezione Manutenzione del motore.
AVVISO
L’utilizzo improprio del generatore può danneggiarlo e ridurne la vita utile.
Potrebbe provocare il guasto del motore.
Rifornimento di carburante Figura
1
È necessario che la benzina sia conforme a questi requisiti:
vedere Altitudine elevata.
AVVISO Fare attenzione a non danneggiare il generatore.
La mancata osservanza delle raccomandazioni sul carburante fornite nel manuale per
l’operatore comporta il decadimento della garanzia.
Per proteggere il sistema di alimentazione dalla formazione di residui gommosi,
Rimessaggio. Non tutti i
carburanti sono uguali. Se si verificano problemi di avviamento o di prestazioni,
sostituire il carburante con quello di un altro fornitore o con un’altra marca. Questo
motore è omologato per l’alimentazione a benzina. Il sistema di controllo delle
emissioni di scarico è EM (Engine Modifications, Modifiche al motore).
1.
Pulire l’area intorno al tappo di rifornimento del carburante e rimuovere il tappo.
2. Riempire lentamente il serbatoio con benzina senza piombo fino all’indicatore
di livello (A). Non riempire oltre l’indicatore per lasciare lo spazio adeguato per
l’espansione del carburante.
3. Montare il tappo del carburante ed attendere che l’eventuale carburante
fuoriuscito sia evaporato prima di avviare il motore.
Altitudine elevata
Ad altitudini superiori a 1.500 metri, è accettabile benzina con numero minimo di
ottani di 85/85 AKI (89 RON). Per mantenere la conformità ai requisiti sulle emissioni
è richiesta una regolazione per altitudini elevate. Il funzionamento senza regolazione
causa prestazioni inferiori, maggiore consumo di carburante e maggiori emissioni.
Per informazioni sulla regolazione ad altitudini elevate, rivolgersi a un rivenditore
autorizzato Briggs & Stratton. Si sconsiglia il funzionamento del motore ad altitudini
inferiori a 750 metri con il kit per altitudini elevate.
Leva di ventilazione tappo serbatoio carburante Figura
2
Il tappo del serbatoio del carburante è dotato di una leva di ventilazione (A) per la
chiusura ermetica del serbatoio. La leva di ventilazione deve essere attivata (I) per
permettere il funzionamento del motore.
Quando il motore è disattivato, lasciare la leva di ventilazione disattivata (O) per ridurre
la possibilità di perdite di carburante. Fare raffreddare il motore prima di disattivare la
leva di ventilazione (O).
Caratteristiche e comandi Figura
3
Leggere il presente manuale per l’operatore e le norme di sicurezza prima
di utilizzare il generatore. Confrontare le illustrazioni con il proprio
generatore per prendere dimestichezza con la posizione dei vari comandi e
regolazioni. Conservare questo manuale per futuro riferimento.
A - Leva di ventilazione del tappo del serbatoio del carburante — Attivare la leva di
ventilazione (I) quando si mette in funzione il generatore. Disattivarla (O) quando
non è in funzione.
B - Serbatoio del carburante — Capacità 3,7 l.
C - Leva dello starter — Si utilizza per l’avviamento del motore a freddo.
D - Copertura laterale per la manutenzione — Rimuoverla per accedere al filtro
dell’aria e per rabboccare l’olio.
E - Motorino di avviamento a strappo — Per avviare il motore manualmente.
F - Interruttore motore — Portare questo interruttore in posizione I prima di usare
il motorino di avviamento a strappo. Portare l’interruttore su O per arrestare il
motore. Inoltre attiva e disattiva la valvola del carburante.
G - Indicatore erogazione (OK) — La spia LED verde di erogazione si accende quando
il generatore funziona normalmente. Indica che il generatore produce potenza nelle
prese elettriche.
H -
Presa elettrica 12 volt C.C. — Usare questa presa con i cavi caricabatteria per
caricare una batteria da 12 volt. Questa presa è protetta da un interruttore automatico.
J - Dispositivo di messa a terra — Consultare l’ente locale competente per i requisiti
di messa a terra nella propria zona.
K - Interruttore POWERSMART— Usare questo interruttore per attivare e disattivare la
modalità POWERSMART.
L - Allarme sovraccarico (!) — La spia LED d’allarme rossa si accende e interrompe
l’alimentazione alle prese elettriche in caso di sovraccarico del generatore. Si
spegne la spia d’erogazione verde. Se il generatore è stato sovraccaricato, è
necessario disattivare e scollegare tutti i carichi elettrici, spegnere il generatore e
riavviarlo per rimetterlo in funzione in modalità normale.
M - Indicatore basso livello dell’olio (
) — Il sistema di indicazione di basso
livello dell’olio è progettato per evitare danni al motore provocati da un livello
insufficiente d’olio. Se il livello dell’olio scende al di sotto di un livello prestabilito,
si accende la spia LED gialla di indicazione di basso livello dell’olio e un interruttore
arresta il motore. Se il motore si arresta o se si accende la spia LED gialla di
indicazione di basso livello dell’olio quando si tira la leva del motorino
d’avviamento, controllare il livello dell’olio.
N - Prese 230 volt C.A. — Possono essere usate per erogare energia elettrica per
l’attivazione di impianti di illuminazione, apparecchi ed attrezzi elettrici e carichi
motore da 230 volt C.A., monofase, 50 Hz. Queste prese sono protette contro il
sovraccarico da un sistema interno.
P - Silenziatore e parascintille — Il silenziatore di scarico riduce il rumore del motore
ed è dotato di schermo parascintille.
R -
Copertura superiore per la manutenzione — Rimuoverla per accedere alla candela.
S - Targhetta — Su di essa sono indicati il modello, la revisione e il numero di serie
del generatore. Tenere a portata di mano l’annotazione di questi dati quando si
chiama un centro assistenza.
Componenti non illustrati in figura:
Filtro dell’aria (sotto la copertura laterale per la manutenzione) — Protegge il
motore filtrando polvere e detriti dall’aria di aspirazione.
Tappo di riempimento dell’olio (sotto la copertura laterale per la manutenzione) —
Controllare il livello dell’olio motore e rabboccarlo da qui.
AVVERTENZA
Il carburante e i suoi vapori sono estremamente infiammabili ed
esplosivi, potrebbero provocare ustioni, incendio o esplosione
con conseguenti gravi lesioni, anche letali, e/o danni alle cose.
DURANTE IL RIEMPIMENTO DEL CARBURANTE
tappo del carburante. Allentare lentamente il tappo per rilasciare la pressione nel
serbatoio.
l’espansione del carburante.
di accensione.
verificare l’eventuale presenza di incrinature o perdite. Sostituire se necessario.
Not for
Reproduction

8 BRIGGSandSTRATTON.COM
Funzionamento
Dispositivo di messa a terra
Il generatore è dotato di dispositivo di messa a terra. I regolamenti elettrici locali potreb-
bero richiedere che sia collegato a un collegamento di terra idoneo. Il neutro del generato-
re è flottante, che significa che l’avvolgimento dello statore C.A. è isolato dal dispositivo di
messa a terra e dai pin di terra della presa C.A. I dispositivi elettrici che richiedono un neu-
tro a terra, come gli RCD, possono non funzionare correttamente con questo generatore.
Requisiti speciali
Possono esistere regolamenti o ordinanze locali relativi all’uso previsto del generatore.
in cui sia richiesto un neutro collegato a massa.
Posizionamento del generatore Figura
4
Distanze e circolazione dell’aria
Collocare il generatore all’aperto, in un’area in cui non si possano accumulare i gas
di scarico letali. NON collocare il generatore in un’area in cui i gas di scarico (A) si
potrebbero accumulare e penetrare all’interno o essere aspirati in un edificio che
potrebbe essere occupato da persone. Assicurarsi che i gas di scarico siano tenuti
a distanza da finestre, porte, aperture di ventilazione o altre aperture che potrebbero
permettere l’accumulo in un’area ristretta dei gas di scarico. Quando si posiziona il
generatore tenere conto dei venti prevalenti e delle correnti d’aria.
Avviamento del motore Figura
2
3
1. Assicurarsi che l’unità sia su una superficie uniforme e in piano.
AVVISO Se il generatore non viene collocato su una superficie uniforme e in piano,
non si avvia o si spegne durante il funzionamento. L’unità può perdere potenza, se viene
collocata su una superficie che blocca le aperture di raffreddamento inferiori. In caso di
perdita di potenza, spegnere l’apparecchio e lasciarlo raffreddare prima di riavviarlo.
2. Assicurarsi che l’interruttore POWERSMART (3, K) sia in posizione di
disattivazione (O).
3. Portare l’interruttore del motore (3, F) in posizione di attivazione (I).
4. Portare la leva di ventilazione del tappo del serbatoio del carburante (2, A) in
posizione di attivazione (I).
5. Portare la leva dello starter (3, C) in posizione CHOKE (
).
AVVISO Per avviare il motore per la prima volta, dopo avere esaurito il carburante o dopo un
periodo di immagazzinaggio prolungato, riempire il serbatoio del carburante fino all’indicatore
di livello rosso, come descritto nel punto Rifornimento di carburante. Sarà necessario tentare
diverse volte l’avviamento prima che venga spurgata l’aria nel sistema di alimentazione.
6. Afferrare la leva del motorino d’avviamento (3, E) e tirarla lentamente finché
non si avverte resistenza. Poi tirarla velocemente per avviare il motore.
7. Spostare la leva dello starter in posizione HALF CHOKE e tirare due volte la leva
del motorino d’avviamento.
8. Spostare lentamente la leva dello starter nella posizione di marcia (aria
aperta)
. Se il motore si inceppa, spostare la leva dello starter in posizione
HALF CHOKE finché il motore non funziona regolarmente, poi portarla in
posizione di marcia (
).
AVVISO Se il motore si ingolfa, spostare la leva dello starter in posizione di marcia
(
) e provare ad avviare il motore.
AVVISO Se il motore si avvia dopo 3 tentativi, ma non rimane in funzione, o se l’unità
si spegne durante il funzionamento, assicurarsi che sia su una superficie in piano e
controllare che il livello dell’olio nel carter sia corretto. Questa unità è dotata di un
dispositivo di protezione che indica quando il livello dell’olio è troppo basso. In questo
caso il motore non si avvia.
Collegamento dei carichi elettrici
Utilizzare soltanto cavi prolunga di alta qualità e ben isolati per le prese da 230 volt
C.A. del generatore. Ispezionare i cavi prolunga prima di usarli. Controllare che i valori
possibile per minimizzare i cali di tensione.
1. Assicurarsi che la spia d’erogazione verde sia accesa (potrebbe richiedere fino a
tre secondi).
2. Dopo l’avviamento, attendere qualche minuto per il riscaldamento in modo che
il motore si stabilizzi
3.
Collegare e attivare i carichi elettrici desiderati da 230 volt C.A., monofase, 50 Hz.
AVVISO
Non sovraccaricare il
generatore.
AVVISO Il superamento della capacità di wattaggio/amperaggio del generatore può
danneggiare l’apparecchio e/o i dispositivi elettrici collegati ad esso.
NONNon
sovraccaricare il generatore nella sezione Funzionamento.
carichi elettrici.
posizione ON per accenderlo.
Arresto del motore
NON avviare o arrestare mai il motore con dispositivi elettrici collegati
all’alimentazione elettrica e accesi.
2. Portare l’interruttore POWERSMART in posizione di disattivazione (O).
3. Lasciar funzionare il motore a vuoto per alcuni minuti per stabilizzare le
temperature interne del motore e del generatore.
4. Portare l’interruttore del motore in posizione di disattivazione (O).
5. Portare la leva di ventilazione del tappo del serbatoio del carburante in
posizione di disattivazione (O).
AVVERTENZA Il calore ed i gas di scarico possono incendiare materiali e
strutture infiammabili o danneggiare il serbatoio del
carburante provocando un incendio con conseguenti gravi
lesioni, anche letali e/o danni alle cose.
Il contatto con l’area del silenziatore può provocare gravi ustioni.
scarico caldi.
ad esso.
sistema di scarico installato su questo motore.
originali.
AVVERTENZA
La tensione del generatore potrebbe provocare scosse
elettriche o bruciature, con conseguenti gravi lesioni, anche letali.
atmosferica.
immersi in acqua oppure con le mani o i piedi bagnati.
AVVERTENZA Cavi elettrici danneggiati o sovraccaricati potrebbero
surriscaldarsi, provocare scintille e incendiarsi, con conseguenti gravi
lesioni, anche letali e/o danni alle cose.
AVVERTENZA Il contraccolpo (rapida ritrazione) della fune del motorino di
avviamento tira velocissimamente la mano e il braccio verso il motore e
può provocare la frattura di ossa, contusioni, distorsioni o gravi lesioni.
resistenza, quindi tirarla rapidamente per evitare il contraccolpo.
all’alimentazione elettrica e accesi.
AVVERTENZA Il motore in funzione emette monossido di carbonio, un gas
inodore, incolore e velenoso.
Respirare monossido di carbonio può provocare gravi danni, cefalea,
spossatezza, vertigini, vomito, confusione, colpo apoplettico, nausea,
svenimento o morte.
camere da letto.
attraverso finestre, porte, prese di ventilazione o altre aperture.
apparecchiature mobili, o in luoghi chiusi, anche se sono aperte le finestre e le
porte e non usarla per applicazioni marine.
Not for
Reproduction

9 9
Modalità POWERSMART
Questa funzione è studiata per migliorare notevolmente il risparmio di carburante e
ridurre la rumorosità. Quando questo interruttore è in posizione di ATTIVAZIONE (I),
la velocità del motore aumenta quando i carichi elettrici sono collegati e diminuisce
quando i carichi elettrici vengono rimossi.
Con l’interruttore in posizione di disattivazione (O), il motore funziona a piena
velocità costante.
AVVISO
o arresta il generatore o quando si usa la presa C.C.
Caricamento della batteria Figura
5
Il generatore è in grado di ricaricare una batteria scarica di un’autovettura da 12 volt
o una batteria di accumulatori di rete. La corrente massima disponibile per il circuito
di carica della batteria è di 5 amp. Un interruttore C.C. protegge questa presa dai
sovraccarichi. Se si verifica un sovraccarico, scatta l’interruttore (il pulsante si solleva).
Attendere alcuni minuti e premere il pulsante per resettare l’interruttore.
AVVISO Quando si usa il circuito di carica della batteria, portare l’interruttore
POWERSMART in posizione di disattivazione (O).
AVVISO
Per ricaricare batterie da 12 volt, procedere nel modo seguente:
1. Se necessario, pulire i poli o terminali della batteria.
2. Controllare il livello del liquido in tutte le celle della batteria. Se necessario,
aggiungere SOLTANTO acqua distillata per coprire i separatori nelle celle della
batteria. NON usare acqua di rubinetto.
3.
Se la batteria è dotata di tappi di sfiato, assicurarsi che siano installati e ben serrati.
4. Collegare il morsetto del cavo caricabatteria con l’impugnatura rossa al polo o
terminale positivo della batteria, POS o (+).
5. Collegare il morsetto del cavo caricabatteria con l’impugnatura nera al polo o
terminale negativo della batteria, NEG, o (–).
6. Collegare il connettore del cavo caricabatteria alla presa da 12 volt C.C..
7. Avviare il generatore nel modo descritto nel punto Avviamento del motore. Fare
funzionare il motore mentre la batteria si ricarica.
AVVISO Normalmente sono sufficienti 30-120 minuti per ricaricare una batteria quasi
scarica.
8. Quando la batteria è carica, spegnere il motore nel modo descritto nel punto
Arresto del motore.
9.
Togliere il cavo caricabatteria dal generatore, poi scollegarlo dai poli della batteria.
AVVISO Usare un densimetro per autovetture per controllare lo stato di carica e
la condizione della batteria. Seguire attentamente le istruzioni del produttore del
specifico del suo liquido (misurato mediante il densimetro) è 1.260 o maggiore.
Non sovraccaricare il generatore
Capacità
Ci si deve assicurare che il generatore possa erogare una potenza nominale (watt di funzio-
namento) e una sovrapotenza transitoria (watt di avviamento) sufficienti per gli apparecchi
1. Selezionare gli apparecchi che si intende alimentare contemporaneamente.
2. Sommare la potenza nominale (watt di funzionamento) di questi apparecchi.
Questa è la potenza che il generatore deve erogare per far funzionare tali
3.
Calcolare la sovrapotenza transitoria (watt di avviamento) necessaria. La sovra-
potenza transitoria è il breve incremento di potenza necessario per avviare
attrezzi a motore elettrico o apparecchi come una sega circolare o un frigorifero.
Poiché non tutti i motori si avviano contemporaneamente, la sovrapotenza tran-
sitoria totale (watt) può essere stimata aggiungendo soltanto gli apparecchi con
Esempio:
Potenza nominale totale (watt di funzionamento) = 1555
Potenza totale del generatore necessaria = 2155
Gestione della potenza
Per prolungare la durata del generatore e dei dispositivi collegati, è importante prestare
attenzione quando si aggiungono carichi elettrici al generatore. Non dovrebbe esserci
nessun apparecchio collegato alle prese del generatore prima di avviare il motore. Il
modo corretto e sicuro per gestire la potenza del generatore consiste nell’aggiungere i
1. Con nessun apparecchio collegato al generatore, avviare il motore nel modo
descritto in questo manuale.
3. Attendere che l’erogazione del generatore si stabilizzi (il motore deve funzionare
in modo lineare ed il dispositivo collegato deve funzionare correttamente).
4. Collegare e attivare il carico successivo.
5. Attendere di nuovo che l’erogazione del generatore si stabilizzi.
6. Ripetere i punti 4 e 5 per ogni carico supplementare.
NON aggiungere mai un numero di carichi maggiore delle capacità del generatore. Ricordarsi
di considerare i carichi di sovrapotenza nella capacità del generatore, come descritto sopra.
sull’attrezzo o sull’apparecchio.
AVVERTENZA Le batterie degli accumulatori rilasciano idrogeno esplosivo
durante la ricarica. L’idrogeno rimane attorno a una batteria
per molto tempo dopo la sua ricarica. Una scintilla, anche se
piccolissima, potrebbe accendere l’idrogeno provocando
esplosioni con conseguenti gravi lesioni, anche letali, e/o danni alle cose.
Il liquido degli elettroliti delle batterie contiene acido ed è estremamente caustico.
Il contatto con il liquido delle batterie potrebbe provocare ustioni chimiche con
conseguenti gravi lesioni e/o danni alle cose.
sigarette quando la si carica e per parecchio tempo dopo la ricarica.
completamente carica.
Attrezzo o apparecchio
Potenza nominale (watt
di funzionamento)
Sovrapotenza transitoria
(watt di avviamento)
300 600
Congelatore 500 500
Televisore 500 —
Sistema di sicurezza 180 —
Lampadina (75 watt) 75 —
Potenza di funzionamento
Sovrapotenza transitoria
Guida di riferimento wattaggio
Attrezzo o apparecchio
Potenza nominale (watt
di funzionamento)
Sovrapotenza transito-
ria (watt di avviamento)
Essenziali
Lampadina - 75 watt 75 —
Congelatore 500 500
Idrovora 800 1200
Frigorifero/Congelatore - 18 m
3
800 1600
Pompa pozzo d’acqua - 1/3 hp 1000 2000
Riscaldamento/Raffreddamento
Condizionatore da finestra - 10.000 BTU 1200 1800
300 600
800 1300
Cucina
Forno a microonde - 1000 watt 1000 —
Macchina per caffè 1500 —
Piano di cottura elettrico - Elemento singolo
1500 —
Soggiorno
100 —
100 —
Ricevitore stereo 450 —
Televisore a colori - 27" 500 —
PC con monitor 17" 800 —
Altro
Sistema di sicurezza 180 —
Radiosveglia AM/FM 300 —
Aprigarage - 1/2 hp 480 520
Bricolage/Posto di lavoro
Luce da lavoro alogena al quarzo 1000 —
Spruzzatore senza aria - 1/3 hp 600 1200
Seghetto alternativo 960 960
Trapano elettrico - 1/2 hp 1000 1000
Sega circolare - 7-1/4 in 1500 1500
Not for
Reproduction

10 BRIGGSandSTRATTON.COM
Manutenzione
Programma di manutenzione
Seguire le scadenze orarie o periodiche, rispettando quella che si presenta per
prima. Tuttavia, si fa presente che in caso di funzionamento in condizioni difficili, la
¹
Consigli di carattere generale
La manutenzione programmata migliora le prestazioni e prolunga la durata del
generatore. Per la manutenzione, rivolgersi al proprio rivenditore autorizzato.
La garanzia di questo generatore non copre componenti usati in modo improprio o che
siano stati oggetto di negligenza da parte dell’operatore. Per ottenere copertura totale
dalla garanzia, l’operatore deve attenersi alle indicazioni di manutenzione del generatore
riportate in questo manuale.
AVVISO
L’utilizzo improprio del generatore può danneggiarlo e ridurne la vita utile.
un corretto raffreddamento.
Per mantenere il generatore in buone condizioni, devono essere effettuate
periodicamente alcune regolazioni.
Tutti gli interventi di manutenzione e le regolazioni dovrebbero essere effettuati almeno
una volta per ogni stagione. Osservare i requisiti nel programma di manutenzione
sopra indicato.
AVVISO Una volta all’anno, pulire o sostituire la candela e sostituire il filtro dell’aria.
Una candela nuova e un filtro dell’aria pulito assicurano una corretta miscela
carburante/aria e favoriscono un migliore funzionamento del motore aumentandone la
durata.
Manutenzione del generatore
La manutenzione del generatore consiste nel tenerlo pulito e asciutto. L’apparecchio
deve essere fatto funzionare e immagazzinato in un ambiente pulito e asciutto, dove
non sia esposto a polvere eccessiva, sporcizia, umidità o a vapori corrosivi. Le alette di
raffreddamento del generatore non devono essere intasate da neve, foglie o corpi estranei.
AVVISO NON usare acqua o altri liquidi per pulire il generatore. I liquidi possono
penetrare nel sistema di alimentazione del motore provocandone un cattivo
funzionamento e/o guasti. Inoltre, se penetra del liquido nel generatore attraverso
le alette di raffreddamento, una parte del liquido viene trattenuta negli spazi vuoti e
nelle fenditure del rotore e nell’isolamento degli avvolgimenti dello statore. Il liquido e
l’accumulo di sporcizia sugli avvolgimenti interni del generatore possono diminuire la
resistenza dell’isolamento degli avvolgimenti.
Pulizia
Giornalmente o prima dell’uso controllare se sono presenti perdite d’olio o carburante
attorno al generatore o sotto di esso. Pulire i detriti accumulati all’interno e all’esterno
del generatore. Ispezionare le alette di raffreddamento e le aperture del generatore.
Queste aperture devono essere mantenute pulite e prive di ostruzioni.
I componenti del motore devono essere mantenuti puliti per ridurre al minimo il rischio
di surriscaldamento del motore e di incendio dei detriti accumulati.
AVVISO
L’utilizzo improprio del generatore può danneggiarlo e ridurne la vita utile.
Pulizia del filtro del carburante
Figura
6
Il filtro del carburante contribuisce a impedire la penetrazione di detriti all’interno del
sistema di alimentazione.
Pulire il filtro nel modo seguente:
1. Assicurarsi che il generatore sia su una superficie uniforme e in piano.
2. Rimuovere il tappo del serbatoio del carburante (A) e il filtro del carburante (B).
3. Lavare il filtro con detergente liquido e acqua.
4. Asciugarlo con un panno pulito e asciutto.
5. Rimontare con attenzione il filtro e il serbatoio del tappo del carburante.
Manutenzione del motore
Olio
Raccomandazioni per l’olio
Per le migliori prestazioni, si consiglia l’uso di oli con certificato di garanzia Briggs &
Stratton. Altri oli detergenti di alta qualità sono accettabili se classificati per servizio SF,
SG, SH, SJ o superiore. NON utilizzare additivi speciali.
Le temperature esterne determinano la corretta viscosità dell’olio per il motore. Usare la
tabella per selezionare la migliore viscosità per l’intervallo di temperature esterne previsto.
* Al di sotto di 4 °C l’uso di SAE 30 provoca un avvio difficile.
** Al di sopra di 27 °C l’uso di 10W30 può causare un maggiore consumo di olio.
AVVISO Un olio sintetico con marchio ILSAC GF-2, API e marchio API di
qualsiasi temperatura. L’uso di olio sintetico non modifica gli intervalli di
cambio dell’olio richiesti.
Controllo del livello dell’olio
Figura
8
Il livello dell’olio dovrebbe essere controllato prima di ogni utilizzo o almeno ogni 8 ore
di funzionamento. Mantenere costante il livello dell’olio.
1. Assicurarsi che il generatore sia su una superficie in piano.
2.
Allentare le viti della copertura laterale per la manutenzione e rimuovere la copertura.
3. Pulire l’area attorno al tappo di riempimento dell’olio e rimuovere il tappo.
dell’apertura di rifornimento.
5. Rimontare il tappo di rifornimento dell’olio e serrarlo.
6.
Rimontare la copertura laterale per la manutenzione e serrare manualmente le viti.
Aggiunta dell’olio motore Figura
9
1. Assicurarsi che il generatore sia su una superficie in piano.
2. Ripetere le operazioni dalla 2 alla 4 per controllare il livello dell’olio come
descritto nel punto Controllo del livello dell’olio.
3. Se necessario, versare lentamente l’olio nell’apertura di rifornimento fino al
punto di tracimazione.
4. Rimontare il tappo di rifornimento dell’olio e serrarlo.
5.
Rimontare la copertura laterale per la manutenzione e serrare manualmente le viti.
Ogni 8 ore o giornalmente
Prime 10 ore
Ogni 50 ore o 3 mesi
Ogni 100 ore o 6 mesi
¹
Ogni 250 ore o una volta l’anno
AVVERTENZA Scintille accidentali potrebbero provocare incendi o scosse
elettriche con conseguenti gravi lesioni, anche letali.
DURANTE LE REGOLAZIONI O LE RIPARAZIONI DEL GENERATORE
a contatto con la candela.
QUANDO SI VERIFICA LA SCINTILLA
NON controllare le scintille con la candela rimossa.
Not for
Reproduction

11 11
Cambio dell’olio motore
Se si usa il generatore in presenza di molta sporcizia o polvere, o in condizioni
TENERE LONTANO DALLA PORTATA DEI BAMBINI. NON INQUINARE.
RACCOLTA.
Cambiare l’olio con il motore ancora caldo dopo l’uso procedendo nel modo seguente:
1. Assicurarsi che il generatore sia su una superficie in piano.
2.
Allentare le viti della copertura laterale per la manutenzione e rimuovere la copertura.
3. Pulire l’area attorno al tappo di riempimento dell’olio e rimuovere il tappo.
4. Inclinare il generatore per svuotare l’olio dal bocchettone in un recipiente
idoneo, facendo attenzione a inclinare l’unità verso il bocchettone. Quando il
carter è vuoto, riportare il generatore in posizione verticale.
5. Ripetere le operazioni dalla 3 alla 5 per aggiungere l’olio motore nel modo
descritto nel punto Aggiunta dell’olio motore.
Sottoporre a manutenzione il filtro dell’aria Figura
10
Se il filtro dell’aria è sporco, il motore potrebbe non funzionare correttamente e
Per la manutenzione del filtro dell’aria, procedere nel modo seguente:
1.
Allentare le viti della copertura laterale per la manutenzione e rimuovere la copertura.
2.
Allentare la vite della copertura del filtro dell’aria (A) e rimuovere la copertura (B).
3. Rimuovere con cautela il filtro dell’aria in spugna (C) tirandolo verso di sé.
4. Rimuovere con cautela il filtro dello sfiato (D) tirandolo verso di sé.
5. Lavare il filtro dell’aria in schiuma e il filtro dello sfiato soltanto con detergente
liquido e acqua. Strizzare in un panno pulito.
6. IMPREGNARE il filtro dell’aria in spugna con olio motore pulito e strizzarlo con
un panno pulito per rimuovere l’olio in eccesso.
7. Rimontare la base interna del filtro dell’aria in spugna pulito o nuovo.
8. Rimontare la base interna del filtro dello sfiato pulito o nuovo.
9. Rimontare il coperchio del filtro dell’aria e serrare le viti.
10.
Rimontare la copertura laterale per la manutenzione e serrare manualmente le viti.
Manutenzione della candela Figura
11
12
La sostituzione della candela facilita l’avviamento del motore e ne migliora il funzionamento.
1. Rimuovere la copertura superiore per la manutenzione.
2. Pulire l’area attorno alla candela e rimuovere l’attacco della candela.
3. Rimuovere ed ispezionare la candela.
4. Controllare la distanza tra gli elettrodi con uno spessimetro e, se necessario,
riportarla al valore raccomandato (vedere la sezione Dati tecnici).
5. Sostituire la candela se gli elettrodi sono consumati o bruciati o se la porcellana
Dati tecnici.
6. Installare la candela e serrare saldamente. Rimontare l’attacco della candela.
7. Rimontare la copertura superiore per la manutenzione.
Ispezionare il silenziatore e il parascintille
Figura
13
14
Controllare il silenziatore per verificare l’eventuale presenza di incrinature, corrosione o
altri danni. Rimuovere il parascintille, se in dotazione, e ispezionarlo per verificare se è
danneggiato o se è presente un’occlusione provocata dal carbonio. Se sono necessari
ricambi, usare esclusivamente ricambi originali.
Pulire e ispezionare il parascintille nel modo seguente:
1. Per rimuovere la protezione del silenziatore, togliere le quattro viti che fissano
la protezione al generatore.
2. Rimuovere la vite che fissa lo schermo parascintille al silenziatore. Rimuovere
lo schermo parascintille.
3. Ispezionare lo schermo e, se è spaccato, perforato o danneggiato in altro modo,
procurarne uno di ricambio. NON usare uno schermo difettoso. Se lo schermo
non è danneggiato, pulirlo con una spazzola.
4. Rimontare lo schermo sul silenziatore. Rimontare la protezione del silenziatore.
Controllare il gioco delle valvole
Controllare se il gioco delle valvole è corretto. La regolazione aumenta le prestazioni e la
durata del motore. Per eseguire questa procedura è necessario smontare parzialmente
il motore e utilizzare attrezzi speciali. Per questa ragione, consigliamo di fare controllare
e regolare ad intervalli regolari il gioco delle valvole presso un Centro di Assistenza
Autorizzato (vedere il punto Programma di manutenzione nella sezione Manutenzione).
Rimessaggio
prepararlo per il rimessaggio.
Rimessaggio del generatore
Pulizia.
aperte e libere.
Istruzioni per il rimessaggio prolungato
Se conservato per oltre 30 giorni, il carburante può scadere. Il carburante scaduto
fa sì che si formino depositi acidi e gommosi nel sistema di alimentazione o su parti
essenziali del carburatore. Per mantenere fresco il carburante, usare lo stabilizzante
Briggs & Stratton FRESH START® disponibile come additivo liquido o come cartuccia
concentrata a gocciolamento.
Non è necessario scaricare il carburante dal motore se viene aggiunto uno stabilizzante
secondo le istruzioni. Far girare il motore per due minuti per far circolare lo
stabilizzante in tutto il sistema di alimentazione. Il motore e il carburante possono
quindi essere immagazzinati fino a 24 mesi.
Se la benzina contenuta nel motore non è stata trattata con uno stabilizzante, deve
essere scaricata in un contenitore approvato. Far andare il motore finché non si arresta
per mancanza di carburante. Si consiglia l’uso di uno stabilizzante nel contenitore per
mantenere la freschezza.
Cambiare l’olio motore
Con il motore ancora caldo, svuotare l’olio dal carter. Riempirlo di nuovo con olio della
Cambio dell’olio motore.
Altri suggerimenti per il rimessaggio
1. NON conservare il carburante da una stagione all’altra, a meno che non sia
stato trattato come descritto nel punto Istruzioni per il rimessaggio prolungato.
2. Sostituire il serbatoio del carburante se ha iniziato ad arruginirsi. L’uso di
carburante con ruggine e/o sporcizia può provocare problemi all’apparecchio.
3. Coprire l’apparecchio con un telone adeguato per proteggerlo dall’umidità e
dalla polvere.
4. Immagazzinarlo in un luogo pulito e asciutto.
ATTENZIONE Evitare il contatto prolungato o ripetuto della pelle con l’olio
motore esausto.
è cancerogeno per la pelle.
AVVERTENZA
Il contatto con l’area del silenziatore può provocare gravi ustioni.
Il calore ed i gas di scarico possono incendiare materiali e
strutture infiammabili o danneggiare il serbatoio del carburante
provocando incendi.
scarico caldi.
ad esso.
sistema di scarico installato su questo motore.
originali.
AVVERTENZA Il carburante e i suoi vapori sono estremamente infiammabili
ed esplosivi, potrebbero provocare ustioni, incendio o
esplosione con conseguenti gravi lesioni, anche letali, e/o
danni alle cose.
QUANDO SI IMMAGAZZINA IL CARBURANTE O L’APPARECCHIO CON
CARBURANTE NEL SERBATOIO
fiamme pilota o altre fonti di accensione in grado di innescare incendi ai vapori del
carburante.
DURANTE LO SCARICO DEL CARBURANTE
tappo del carburante. Allentare lentamente il tappo per rilasciare la pressione nel
serbatoio.
di accensione.
verificare l’eventuale presenza di incrinature o perdite. Sostituire se necessario.
AVVERTENZA I teloni protettivi potrebbero provocare incendi con
conseguenti gravi lesioni, anche letali e/o danni alle cose.
Not for
Reproduction

12 BRIGGSandSTRATTON.COM
Individuazione ed eliminazione dei problemi
Problema Causa Rimedio
Il motore funziona, ma non eroga C.A.
1. La spia di sovraccarico rossa è accesa. Il generatore è
sovraccarico.
2. La spia d’erogazione verde non è accesa. Generatore
difettoso.
3. Set di cavi collegati male o difettosi.
4. Il dispositivo collegato è difettoso.
1.
Non sovraccaricare il generatore nella
sezione Funzionamento. Spegnere il generatore e riavviarlo.
2. Contattare un Centro di Assistenza Autorizzato.
3. Controllare e riparare.
4. Collegare un altro dispositivo funzionante.
Il motore funziona correttamente, ma perde
potenza sotto carico.
1. Cortocircuito in un carico collegato.
2. La velocità del motore è troppo bassa.
3. Il generatore è sovraccarico.
4. Cortocircuito nel generatore.
1. Scollegare il carico elettrico in cortocircuito.
2. Contattare un Centro di Assistenza Autorizzato.
Non sovraccaricare il generatore nella
sezione Funzionamento.
4. Contattare un Centro di Assistenza Autorizzato.
Il motore non si avvia, si spegne durante il
funzionamento o si avvia e funziona in
modo irregolare.
1. Interruttore del motore in posizione di disattivazione (O).
2. Leva di ventilazione del tappo del serbatoio del carburante
in posizione di disattivazione (O).
3. Si è accesa la spia di indicazione di basso livello dell’olio.
Basso livello dell’olio.
4. Filtro dell’aria sporco.
5. Mancanza di carburante.
6. Carburante scaduto.
7. Cavo della candela scollegato.
8. Candela difettosa.
9. Acqua nel carburante.
10. Ingolfamento.
11. Miscela di carburante eccessivamente ricca.
12.
13. Compressione insufficiente del motore.
1. Portare l’interruttore del motore in posizione di
attivazione (I).
2. Portare la leva di ventilazione del tappo del serbatoio
del carburante in posizione (I).
3. Riempire il carter fino al livello corretto o collocare il
generatore su una superficie in piano.
4. Pulire o sostituire il filtro dell’aria.
5. Riempire il serbatoio del carburante.
6. Svuotare il serbatoio del carburante e il carburatore,
riempirli con carburante fresco.
7. Collegare il cavo alla candela.
8. Sostituire la candela.
9. Svuotare il serbatoio del carburante e il carburatore,
riempirli con carburante fresco.
10. Attendere 5 minuti e riavviare il motore.
11. Contattare un Centro di Assistenza Autorizzato.
12. Contattare un Centro di Assistenza Autorizzato.
13. Contattare un Centro di Assistenza Autorizzato.
Il motore perde potenza.
1. Il carico è troppo elevato.
2. Filtro dell’aria sporco.
Non sovraccaricare il generatore nella
sezione Funzionamento.
2. Sostituire il filtro dell’aria.
Il motore "pendola" o si inceppa. Miscela troppo ricca o povera nel carburatore. Contattare un Centro di Assistenza Autorizzato.
Dati tecnici del prodotto
Potenza d’avvio ...............................................2.000 watt
Potenza* ....................................................1.600 watt
a 230 volt C.A. .............................................. 7,0 amp
a 12 volt C.C. .................................................5 amp
Frequenza nominale ............................................ 50 hertz
Fase ........................................................Monofase
Cilindrata .....................................................105,6 cc
Distanza tra gli elettrodi ........................................0,6-0,7 mm
Gioco valvola di aspirazione .......................... 0,08 - 0,12 mm a freddo
Gioco valvola di scarico ............................. 0,13 - 0,17 mm a freddo
Capacità carburante ............................................... 3,7 l
Capacità olio ................................................... 0,4 litri
Potenza Nominale: Le etichette dei dati nominali di potenza lorda per i modelli con
motore sono forniti in conformità a SAE (Society of Automotive Engineers), codice
J1940 (Small Engine Power & Torque Rating Procedure), e i dati di prestazione sono
stati ricavati e corretti in conformità a SAE J1995 (revisione 2002-05). I valori di coppia
sono ottenuti a 3.060 giri/min; i valori di potenza sono ottenuti a 3.600 giri/min. La
potenza lorda reale può essere inferiore, per esempio a causa delle condizioni operative
ambientali e della variabilità da motore a motore. Considerando la vasta gamma di
prodotti su cui i nostri motori vengono installati e la varietà delle condizioni ambientali
nelle quali operano le macchine, è possibile che il motore a benzina non sviluppi il
valore nominale di potenza lorda quando viene usato in un determinato apparecchio
(potenza effettiva "in sito" o netta). Questa differenza può essere dovuta a diversi fattori
fra cui , a puro titolo esemplificativo e non limitativo, gli accessori (filtro dell’aria, sca-
rico, carica, raffreddamento, carburatore, pompa del carburante, ecc.), restrizioni appli-
cative, condizioni operative ambientali (temperatura, umidità, altitudine) e la variabilità
del motore. A causa di limitazioni alla produzione e di capacità, Briggs & Stratton potrà
sostituire questo motore di serie con un motore di potenza nominale superiore.
* Questo generatore è classificato in conformità alla ISO 8528, G3.
Ricambi comuni
Filtro dell’aria in spugna .........................................311388GS
Filtro dello sfiato ..............................................311389GS
Candela con resistore .......................................NGK CR7HSA
Not for
Reproduction

13 13
POLIZZA DI GARANZIA RELATIVA AI GENERATORI PORTATILI BRIGGS & STRATTON POWER PRODUCTS GROUP, LLC
GARANZIA LIMITATA
Briggs & Stratton Power Products Group, LLC riparerà o sostituirà gratuitamente qualsiasi parte o parti del prodotto che dimostri difetti nel materiale o nella lavorazione o in entram-
bi. Le spese di trasporto del prodotto destinato alla riparazione o sostituzione ai sensi di questa garanzia sono a carico dell’acquirente. La presente garanzia è valida per i periodi di
consentono limiti alla durata della garanzia implicita e alcuni stati o Paesi non ammettono l’esclusione o la limitazione di danni incidentali o consequenziali, quindi la suddetta
limitazione ed esclusione potrebbe non essere applicabili al singolo utente. La presente garanzia concede all’utente specifici diritti legali e lo stesso potrebbe avere altri diritti
che variano da stato a stato o da Paese a Paese.
Il periodo di garanzia decorre dalla data di acquisto da parte del primo utente finale e continua per il periodo di tempo suddetto. Per "uso privato" si intende l’utilizzo effettuato da un
acquirente al dettaglio presso la propria residenza. Per "uso commerciale" si intendono tutti gli altri tipi di utilizzo, compreso l’utilizzo a scopi commerciali, che generano reddito, o il
noleggio. Se l’apparecchio viene utilizzato a fini commerciali sarà pertanto considerato un apparecchio per uso commerciale ai fini della presente garanzia.
NOTE SULLA GARANZIA
Briggs & Stratton è lieta di effettuare gli interventi in garanzia e si scusa per l’inconveniente. Le riparazioni in garanzia possono essere eseguite da qualsiasi Centro di Assistenza
Autorizzato. La maggior parte delle riparazioni viene di norma gestita celermente come semplice procedura di routine; tuttavia alcune richieste di garanzia non appaiono giustificate.
Ad esempio, la garanzia non verrà applicata nel caso in cui il danno all’apparecchio si sia verificato a causa di un uso improprio, oppure da una scorretta manutenzione, o ancora, in
caso di danni durante la spedizione, l’imballaggio o da un’installazione scorretta. Analogamente, la garanzia sarà invalidata nel caso in cui siano stati rimossi il numero di serie o la
data di produzione dell’apparecchio o in cui essa sia stata cambiata o modificata. Durante il periodo di garanzia, il Centro di Assistenza Autorizzato, a propria discrezione, riparerà o
Normale usura
dispositivi meccanici. La garanzia non copre le riparazioni di quelle parti dell’apparecchio che hanno esaurito la propria vita utile.
Installazione e manutenzione
modifiche o manomissioni, negligenza, abuso, incidente, sovraccarico, fuori giri oppure manutenzione, riparazione o rimessaggio tali, a nostro giudizio, da comprometterne
sia le prestazioni che l’affidabilità. Inoltre, la garanzia non copre i normali interventi di manutenzione come regolazioni e pulizia del sistema di alimentazione per depositi e
ostruzioni (dovuti a sostanze chimiche, sporcizia, carbonio, calcare, ecc.).
Altre esclusioni
alterazioni, manutenzione scorretta, congelamento o deterioramento chimico. Sono esclusi dalla garanzia gli accessori, quali le batterie di avviamento, i set di cavi adattatore
generatore e i teloni protettivi per l’immagazzinaggio. La garanzia esclude apparecchi usati, revisionati e dimostrativi, apparecchi usati come fonte di alimentazione primaria
anziché come fonte di alimentazione di rete, apparecchi salvavita e guasti dovuti ad atti di Dio e altri eventi di forza maggiore al di fuori del controllo del produttore.
198189E, rev. C, 11/2/2009
BRIGGS & STRATTON POWER PRODUCTS GROUP, LLC
MILWAUKEE, WI, USA
In vigore dal 01 novembre 2009; sostituisce tutte le garanzie non datate e tutte le garanzie con data antecedente al 01 novembre 2009.
2 anni*
1 anno
Uso privato
Uso commerciale
*Secondo anno solo ricambi
PERIODO DI GARANZIA
Not for
Reproduction

4 BRIGGSandSTRATTON.COM
Dziękujemy za zakup wysokiej jakości agregatu prądotwórczego Briggs & Stratton®. Pragniemy wyrazić zadowolenie z zaufania pokładanego w produktach marki Briggs & Stratton. Eksploatowany i konserwowany zgodnie
zinstrukcjami agregat prądotwórczy Briggs & Stratton będzie niezawodnie służyć przez wiele lat.
Niniejsza instrukcja obsługi zawiera informacje na temat zagrożeń i ryzyka związanych z agregatami prądotwórczymi oraz zalecenia pozwalające się przed nimi zabezpieczyć. Agregat został zaprojektowany wyłącznie do zasilania
energią elektryczną kompatybilnego oświetlenia, urządzeń, narzędzi isilników oraz nie może być stosowany wżadnym innym celu. Przed uruchomieniem bądź eksploatacją urządzenia użytkownik ma obowiązek zapoznać się ze
zrozumieniem zniniejszą instrukcją. Należy zachować oryginalną instrukcję do wykorzystania w przyszłości.
Przed przystąpieniem do użytkowania należy przygotować agregat do pracy.Należy zapoznać się z częścią Przygotowanie do pracy niniejszej Instrukcji, w której podano wszelkie procedury. Należy postępować zgodnie
zInstrukcją.
Gdzie można nas znaleźć
Pomoc techniczna i serwis firmy Briggs & Stratton jest zawsze wpobliżu. Na całym świecie działa kilka tysięcy autoryzowanych dealerów firmy Briggs & Stratton, którzy zapewniają serwis dobrej jakości. Najbliższy autoryzowany punkt
serwisowy można znaleźć na mapie dostępnej na stronie BRIGGSandSTRATTON.COM.
Agregat prądotwórczy
Numer modelu
Wersja
Numer seryjny
Data zakupu
Spis treści
Bezpieczeństwo pracy ............................................................5
Opis urządzenia...............................................................................................5
Ważne instrukcje bezpieczeństwa ...............................................................................5
Przygotowanie do pracy...........................................................7
Rozpakowanie agregatu .......................................................................................7
Uzupełnianie oleju silnikowego .................................................................................7
Uzupełnianie paliwa...........................................................................................7
Budowa ielementy obsługowe.....................................................7
Obsługa.........................................................................8
Punkt podłączania uziemienia ..................................................................................8
Miejsce pracy agregatu ........................................................................................8
Uruchamianie silnika ..........................................................................................8
Podłączanie odbiorników elektrycznych ..........................................................................8
Wyłączanie silnika.............................................................................................8
Tryb POWERSMART............................................................................................9
Ładowanie akumulatora .......................................................................................9
Uwagi dot. przeciążania agregatu ...............................................................................9
Konserwacja....................................................................10
Harmonogram konserwacji . . . . . . . . . . . . . . . . . . . . . . . . . . . . . . . . . . . . . . . . . . . . . . . . . . . . . . . . . . . . . . . . . . . . . . . . . . . . . . . . . . . .10
Konserwacja agregatu ........................................................................................10
Konserwacja silnika...........................................................................................10
Przechowywanie.............................................................................................11
Rozwiązywanie problemów.......................................................12
Dane techniczne ................................................................12
Dane techniczne produktu.....................................................................................12
Części eksploatacyjne . . . . . . . . . . . . . . . . . . . . . . . . . . . . . . . . . . . . . . . . . . . . . . . . . . . . . . . . . . . . . . . . . . . . . . . . . . . . . . . . . . . . . . . . .12
Gwarancja......................................................................13
Gwarancja dla użytkownika agregatu prądotwórczego ............................................................13
Copyright © 2011 Briggs & Stratton Power Products Group, LLC
Milwaukee, WI, USA. Wszystkie prawa zastrzeżone.
BRIGGS & STRATTON POWER PRODUCTS jest zarejestrowanym
znakiem towarowym Briggs & Stratton Corporation
Milwaukee, WI, USA
TŁUMACZENIE ORYGINALNEJ WERSJI INSTRUKCJI
Not for
Reproduction

5 5
Bezpieczeństwo pracy
Opis urządzenia
Należy uważnie zapoznać się zniniejszą instrukcją oraz oznaczeniami na agregacie
prądotwórczym. Należy zapoznać się zdopuszczalnymi zastosowaniami, ograniczeniami
oraz niebezpieczeństwami.
Agregat prądotwórczy to napędzany silnikiem generator prądu zmiennego istałego (ACiDC) zpolem wirującym.
Agregat został zaprojektowany wyłącznie do zasilania energią elektryczną kompatybilnego oświetlenia,
urządzeń, narzędzi isilników. Agregat wytwarzający pole wirujące napędzany jest silnik jednocylindrowy iosiąga
prędkość około 4500 obr./min (przy wyłączonym trybie POWERSMART).
Dołożono wszelkich starań wcelu zapewnienia dokładności iaktualności informacji zawartych wniniejszej
instrukcji. Jednakże producent zastrzega sobie prawo do wprowadzania zmian, modyfikacji oraz ulepszeń
wagregacie idokumentacji bez powiadomienia.
Ważne instrukcje bezpieczeństwa
Producent nie jest wstanie wskazać wszystkich sytuacji mogących stwarzać niebezpieczeństwo. Ztego
powodu ostrzeżenia znajdujące się wniniejszej instrukcji oraz oznaczenia inaklejki na urządzeniu nie obejmują
wszystkich tych sytuacji. Wprzypadku stosowania procedur, metod oraz technik pracy, które nie są zalecane
przez klienta, należy zapewnić bezpieczeństwo sobie oraz innym. Należy również upewnić się, że wybrana
procedura, metoda lub technika nie wpłynie na bezpieczeństwo pracy agregatu.
Symbole bezpieczeństwa i ich znaczenie
Symbol ostrzegawczy wskazuje na potencjalne niebezpieczeństwo odniesienia obrażeń. Słowo
ostrzegawcze (NIEBEZPIECZEŃSTWO, OSTRZEŻENIE lub OSTROŻNIE) stosowane jest z symbolami
ostrzegawczymi iokreśla stopień lub poziom zagrożenia. Symbol ostrzegawczy może być używany do
zasygnalizowania rodzaju zagrożenia. Słowo UWAGA jest stosowane w odniesieniu do czynności, które nie
stwarzają zagrożenia odniesieniem obrażeń.
Słowo NIEBEZPIECZEŃSTWO wskazuje na niebezpieczeństwo, które w razie jego nieuniknięcia
doprowadzi do śmierci lub odniesienia poważnych obrażeń.
Słowo OSTRZEŻENIE wskazuje na niebezpieczeństwo, które w razie jego nieuniknięcia może
doprowadzić do śmierci lub odniesienia poważnych obrażeń.
Słowo OSTROŻNIE wskazuje na niebezpieczeństwo, które w razie jego nieuniknięcia może doprowadzić
do odniesienia niewielkich lub średnich obrażeń.
UWAGA odnosi się do czynności, które nie stwarzają zagrożenia odniesieniem obrażeń.
Pożar
Wybuch
Opary toksyczne
Gorąca powierzchnia
Części ruchome
Porażenie prądem elektrycznym
Odrzut
Wyrzucane przedmioty
Instrukcja obsługi
Podmuch eksplozji Oparzenie chemiczne
OSTRZEŻENIE Pracujące silniki emitują tlenek węgla – gaz bezwonny, bezbarwny itrujący.
Wdychanie tlenku węgla może doprowadzić do śmierci, poważnych obrażeń, bólu głowy,
uczucia zmęczenia, wymiotów, dezorientacji, drgawek lub omdleń.
wentylacyjne lub inne otwory.
winstalacjach morskich oraz pomieszczeniach zamkniętych nawet po otwarciu wszystkich okien idrzwi.
OSTRZEŻENIE Odrzut (gwałtowne zwinięcie) linki rozrusznika może pociągnąć rękę wkierunku
silnika przed zwolnieniem uchwytu linki, co może doprowadzić do poważnych obrażeń,
np.złamań lub pęknięć kości, krwiaków lub zwichnięć.
anastępnie pociągnąć energicznie, aby uniknąć odrzutu.
elektrycznych.
OSTRZEŻENIE Podczas ładowania akumulatory wydzielają wybuchowy wodór. Wodór utrzymuje
się wpobliżu akumulatora przez długi czas po zakończeniu ładowania. Nawet
najmniejsza iskra może zainicjować eksplozję wodoru, która może doprowadzić
do śmierci, poważnych obrażeń i/lub uszkodzenia mienia.
Elektrolit znajdujący się wakumulatorze zawiera bardzo żrący kwas. Kontakt zelektrolitem może być
przyczyną oparzeń chemicznych powodujących poważne obrażenia i/lub uszkodzenia mienia.
przez kilka minut od zakończenia ładowania akumulatorów.
OSTRZEŻENIE
Napięcie obecne wagregacie może być przyczyną porażenia prądem elektrycznym
lub oparzeń skutkujących śmiercią lub kalectwem.
przy użyciu przełącznika nadmiarowego dopuszczonego typu.
fakcie dostawcę energii elektrycznej.
metalowe lub konstrukcje stalowe) należy zastosować wyłącznik różnicowo-prądowy.
lub są uszkodzone winny sposób.
mokre stopy ani NIE obsługiwać agregatu mokrymi rękami.
Not for
Reproduction

6 BRIGGSandSTRATTON.COM
UWAGA
Przekroczenie znamionowych wartości mocy/prądu może doprowadzić do uszkodzenia agregatu i/
lub podłączonych do niego urządzeń elektrycznych.
NIE NALEŻY dopuścić do przekroczenia znamionowego poziomu mocy/prądu agregatu. Zob. Uwagi dot.
przeciążania agregatu wczęści Obsługa.
ustabilizuje się.
UWAGA
Nieprawidłowa obsługa agregatu może doprowadzić do jego uszkodzenia lub obniży jego trwałość.
centrum serwisowym.
wobecności oparów powodujących korozję.
– utraty zasilania na wyjściu
– pojawienia się iskier, dymu lub płomieni
– nadmiernych wibracji agregatu
OSTRZEŻENIE Paliwo ijego opary są wyjątkowo łatwopalne oraz wybuchowe imogą być
przyczyną pożaru lub wybuchu skutkującego śmiercią, oparzeniami, kalectwem
lub stratami materialnymi.
PODCZAS UZUPEŁNIANIA LUB SPUSZCZANIA PALIWA
korek wlewu paliwa. Powoli poluzować korek, aby zredukować ciśnienie wzbiorniku.
źródeł zapłonu.
Jeślito konieczne, należy je wymienić na nowe.
PODCZAS URUCHAMIANIA URZĄDZENIA
właściwych miejscach.
PODCZAS OBSŁUGI URZĄDZENIA
winstalacjach morskich oraz pomieszczeniach zamkniętych.
Choke” ( ).
PODCZAS TRANSPORTU, PRZENOSZENIA LUB NAPRAWY URZĄDZENIA
odcinającym paliwo.
PODCZAS PRZECHOWYWANIA PALIWA LUB URZĄDZENIA Z PEŁNYM ZBIORNIKIEM
kontrolnymi lub innych źródeł zapłonu, ponieważ mogą one spowodować zapłon oparów paliwa.
OSTRZEŻENIE Ciepło/gazy wylotowe mogą spowodować zapłon materiałów isubstancji palnych
lub uszkodzenie zbiornika paliwa, skutkujące śmiercią, kalectwem i/lub
poważnymi stratami materialnymi.
Kontakt ztłumikiem może być przyczyną poważnych poparzeń.
zakupu chwytacza iskier przeznaczonego do układu wydechowego danego silnika.
oryginalne.
OSTRZEŻENIE Samoistne iskrzenie wagregacie może być przyczyną porażenia prądem
elektrycznym lub pożaru skutkującego śmiercią lub kalectwem.
PODCZAS REGULACJI INAPRAW AGREGATU
ze świecą.
PODCZAS KONTROLI ZAPŁONU ISKROWEGO
NIE należy sprawdzać iskry przy wyjętej świecy zapłonowej.
OSTRZEŻENIE Rozrusznik oraz inne ruchome elementy mogą pochwycić dłonie, włosy, odzież lub
dodatki, co może doprowadzić do poważnych obrażeń.
przez rozrusznik lub inne ruchome elementy.
OSTROŻNIE Nadmierna prędkość robocza może być przyczyną obrażeń i/lub uszkodzenia agregatu.
Zbyt niska prędkość pracy może być przyczyną nadmiernego obciążenia urządzenia.
prędkości obrotowej silnika.
Not for
Reproduction

7 7
Przygotowanie do pracy
Agregat prądotwórczy jest gotowy do użycia po jego odpowiednim przygotowaniu inapełnieniu zalecanym
paliwem iolejem silnikowym.
Wprzypadku jakichkolwiek problemów z serwisowaniem agregatu należy skontaktować się zcentrum
serwisowym firmy Briggs & Stratton. Wtakiej sytuacji należy podać model, wersję oraz numer seryjny znajdujące
się na tabliczce znamionowej urządzenia. Położenie tabliczki identyfikacyjnej podano wczęści Budowa ielementy
obsługowe.
Rozpakowanie agregatu
1. Ustawić opakowanie na trwałym, płaskim podłożu.
2. Wyjąć całą zawartość opakowania.
Agregat dostarczany jest wraz z:
Uzupełnianie oleju silnikowego
1. Ustawić agregat na poziomej powierzchni.
2. Uzupełnić olej silnikowy wsposób opisany wczęści Uzupełnianie oleju silnikowego rozdziału
Konserwacja silnika.
UWAGA
Nieprawidłowa obsługa agregatu może doprowadzić do jego uszkodzenia lub obniży jego trwałość.
olejem. Może to spowodować uszkodzenie silnika.
Uzupełnianie paliwa Rysunek
1
Paliwo musi spełniać następujące wymagania:
zob. część Duże wysokości.
tert-butylowo-metylowy).
UWAGA Unikać uszkodzenia agregatu.
Niezastosowanie się do wskazówek dotyczących paliwa zawartych wInstrukcji obsługi spowoduje
unieważnienie gwarancji.
W celu ochrony układu paliwowego przed wytrącaniem się żywic podczas uzupełniania paliwa dodać
stabilizator paliwa. Zob. część Przechowywanie. Każde paliwo jest inne. W przypadku wystąpienia problemów
zuruchamianiem lub wydajnością po zastosowaniu nowego paliwa w silniku należy zmienić dostawcę
lub gatunek stosowanego paliwa. Niniejszy silnik jest przeznaczony do zasilania benzyną. Wtym silniku
zastosowano system kontroli emisji EM (modyfikacje silnika).
1. Oczyścić obszar wokół korka wlewu paliwa iwyjąć korek.
2. Powoli dolewać benzyny bezołowiowej, aż jej poziom sięgnie czerwonego znacznika (A) wzbiorniku.
Nie przepełniać. Dzięki temu wzbiorniku pozostanie miejsce na wypadek rozszerzenia się paliwa.
3. Włożyć korek paliwa iprzed uruchomieniem silnika zaczekać, aż rozlane paliwo odparuje.
Duże wysokości
Na wysokościach powyżej 1500metrów (5000 stóp) dopuszcza się stosowanie benzyny ominimalnej liczbie
oktanowej 85/85 AKI (89 RON). Aby zachować zgodność emisji z normami, wymagana jest regulacja dla
dużych wysokości. Praca bez takiej regulacji spowoduje obniżenie wydajności, zwiększenie zużycia paliwa
izwiększy emisję spalin. Informacje o przystosowaniu silnika do pracy na znacznej wysokości można uzyskać
od autoryzowanych dealerów Briggs & Stratton. Nie zaleca się wykorzystywania silnika zzestawem dla dużych
wysokości na wysokościach niższych niż 750 metrów (2500 stóp).
Odpowietrznik korka wlewu paliwa Rysunek
2
Wkorku wlewu paliwa znajduje się odpowietrznik (A) zapewniający szczelność zbiornika paliwa. Wcelu
uruchomienia silnika należy ustawić odpowietrznik wpołożeniu włączenia (I).
Jeśli silnik nie jest używany, należy ustawić odpowietrznik wpołożeniu wyłączenia (O), co zmniejszy ryzyko
wycieku paliwa. Przed ustawieniem odpowietrznika wpołożeniu wyłączenia (O) zaczekać, aż silnik ostygnie.
Budowa ielementy obsługowe Rysunek
3
Przed przystąpieniem do obsługi agregatu należy zapoznać się zInstrukcją obsługi
izasadami bezpieczeństwa. Porównać rysunki z agregatem w celu zapoznania się z położeniem
elementów obsługowych. Zaleca się zachowanie Instrukcji do wykorzystania w przyszłości.
A – Odpowietrznik korka wlewu paliwa – jeśli agregat będzie używany, ustawić odpowietrznik wpołożeniu
włączenia (I). Wprzeciwnym wypadku ustawić odpowietrznik wpołożeniu wyłączenia (O).
B – Zbiornik paliwa – pojemność 3,7l (1,0 galon amer.).
C – Dźwignia ssania – używana przy uruchamianiu zimnego silnika.
D – Boczna pokrywa serwisowa – usunąć wcelu uzyskania dostępu do filtra powietrza iwcelu wymiany
oleju.
E – Rozrusznik mechaniczny – używany do ręcznego uruchamiania silnika.
F – Wyłącznik silnika – przed uruchomieniem rozrusznika mechanicznego ustawić wyłącznik wpołożeniuI.
Aby zatrzymać silnik, ustawić wyłącznik wpołożeniu O. Wyłącznik ten służy również do otwierania/
zamykania zaworu paliwa.
G – Wskaźnik pracy (OK) – zielona kontrolka świeci, jeśli agregat pracuje prawidłowo. Wskazuje, że wdo
gniazdek agregatu doprowadzane jest zasilanie.
H – Gniazdo 12VDC – służy do podłączania przewodów ładowania akumulatora 12V. Gniazdo to wyposażone
jest wwyłącznik zmożliwością resetowania.
J – Punkt podłączania uziemienia – skontaktować się zwłaściwym urzędem wsprawie wymagań
dotyczących uziemienia obowiązujących na danym terenie.
K – Przełącznik trybu POWERSMART – służy do włączania iwyłączania trybu POWERSMART.
L – Alarm przeciążenia (!) – wprzypadku przeciążenia agregatu czerwona kontrolka alarmu zacznie świecić,
azasilanie gniazdek zostanie odłączone. Zielony wskaźnik pracy zgaśnie. Wprzypadku przeciążenia agregatu
wcelu przywrócenia normalnego trybu pracy należy wyłączyć iodłączyć wszystkie podłączone urządzenia
elektryczne, wyłączyć agregat iuruchomić go ponownie.
M – Wskaźnik niskiego poziomu oleju ( ) – zadaniem układu ostrzegania oniskim poziomie oleju
jest zapobieganie uszkodzeniom silnika zpowodu niewystarczającej ilości oleju. Jeśli poziom oleju spadnie
poniżej ustalonej wartości, żółty wskaźnik niskiego poziomu oleju zaświeci się, aczujnik poziomu oleju
wyłączy silnik. Jeśli silnik zatrzyma się lub po pociągnięciu uchwytu rozrusznika zaświeci żółty wskaźnik
niskiego poziomu oleju, należy sprawdzić poziom oleju.
N – Gniazda 230VAC – służą do zasilania oświetlenia, urządzeń elektrycznych, narzędzi isilników prądem
jednofazowym 230VAC oczęstotliwości 50Hz. Gniazda te są zabezpieczone przed przeciążeniem przez
wbudowany układ zabezpieczający.
P – Tłumik zchwytaczem iskier – tłumik wyposażony wchwytacz iskier redukuje hałas generowany przez
urządzenie.
R – Górna pokrywa serwisowa – usunąć wcelu uzyskania dostępu do świecy zapłonowej.
S – Tabliczka znamionowa – wskazuje model, wersję oraz numer seryjny agregatu. Wprzypadku
kontaktowania się zpomocą techniczną należy podać informacje znajdujące się na tej tabliczce.
Niepokazane elementy:
Filtr powietrza (pod boczną pokrywą serwisową) – zabezpiecza silnik, usuwając kurz izanieczyszczenia
zpowietrza wlotowego.
Korek wlewu oleju (pod boczną pokrywą serwisową) – służy do sprawdzania poziomu iuzupełniania oleju
silnikowego.
OSTRZEŻENIE Paliwo ijego opary są wyjątkowo łatwopalne oraz wybuchowe imogą być
przyczyną pożaru lub wybuchu skutkującego śmiercią, oparzeniami, kalectwem
lub stratami materialnymi.
PODCZAS DOLEWANIA PALIWA
korek wlewu paliwa. Powoli poluzować korek, aby zredukować ciśnienie wzbiorniku.
źródeł zapłonu.
Jeślito konieczne, należy je wymienić na nowe.
Not for
Reproduction

8 BRIGGSandSTRATTON.COM
Obsługa
Punkt podłączania uziemienia
Agregat jest wyposażony wpunkt podłączania uziemienia. Wświetle lokalnie obowiązujących przepisów elektrycznych
jest on wymagany do uzyskania odpowiedniego połączenia uziemiającego. Punkt zerowy agregatu nie jest uziemiony,
co oznacza, że uzwojenie prądu zmiennego stojana jest odizolowane od punktu podłączania uziemienia ikołków
uziemiających gniazda prądu zmiennego. Zniniejszym agregatem mogą nie współpracować właściwie takie urządzenia
elektryczne jak wyłączniki różnicowo-prądowe, które wymagają stosowania uziemionego punktu zerowego.
Wymagania specjalne
Użytkowanie agregatu zgodnie zprzeznaczeniem może podlegać federalnym lub lokalnym przepisom lub
rozporządzeniom. Należy skonsultować się zwykwalifikowanym technikiem-elektrykiem, inspektorem nadzoru
wktórych wymagane jest stosowanie uziemionego punktu zerowego.
Miejsce pracy agregatu Rysunek
4
Odstępy iruch powietrza
Agregat należy ustawić na otwartym powietrzu wmiejscu, wktórym nie gromadzą się szkodliwe spaliny. NIE
należy ustawiać agregatu wmiejscu, gdzie spaliny (A) mogą się gromadzić iprzenikać lub być zasysane do
wnętrza budynku, wktórym mogą przebywać ludzie. Nie można dopuścić do tego, aby spaliny przedostawały
się do zamkniętych pomieszczeń przez okna, drzwi, wloty wentylacyjne lub inne otwory igromadziły się wtych
pomieszczeniach. Podczas ustawiania agregatu należy uwzględnić działanie wiatru iprądów powietrza.
Uruchamianie silnika Rysunek
2
3
1. Upewnić się, że urządzenie jest ustawione na równym, poziomym podłożu.
UWAGA Urządzenie, które przed uruchomieniem nie zostanie ustawione na równym, poziomym podłożu,
może się nie uruchomić bądź wyłączyć samoczynnie podczas pracy. Ustawienie urządzenia na powierzchni
ograniczającej jego wentylację od spodu może skutkować utratą mocy wyjściowej. Wprzypadku utraty mocy
wyjściowej należy wyłączyć urządzenie, aprzed ponownym jego włączeniem zaczekać na jego ostygnięcie.
2. Sprawdzić, czy przełącznik trybu POWERSMART (3, K) znajduje się wpołożeniu wyłączenia (O).
3. Ustawić wyłącznik silnika (3, F) wpozycji włączenia (I).
4. Ustawić odpowietrznik (2, A) korka wlewu paliwa wpozycję włączenia (I).
5. Pchnąć dźwignię ssania (3, C
).
UWAGA Wprzypadku pierwszego uruchomienia silnika oraz jego uruchomienia po wyczerpaniu się paliwa bądź
długim okresie przestoju należy napełnić zbiornik paliwa do poziomu wskazywanego przez czerwony wskaźnik
paliwa – zob. Uzupełnianie paliwa. Usunięcie powietrza zukładu paliwowego będzie wymagać przeprowadzenia
kilku lub nawet kilkunastu prób uruchomienia.
6. Ująć uchwyt rozrusznika (3, E) ipociągnąć go powoli aż do momentu odczucia lekkiego oporu.
Następnie pociągnąć mocno wcelu uruchomienia silnika.
7.
). Jeśli silnik nie pracuje równomiernie,
).
UWAGA(
), anastępnie
obracać wałem korbowym silnika do momentu uruchomienia silnika.
UWAGA Jeśli silnik uruchamia się po 3pociągnięciach, lecz nie chce pracować, lub jeśli agregat wyłącza się
podczas pracy, należy sprawdzić, czy stoi on na poziomym podłożu oraz skontrolować poziom oleju wskrzyni
korbowej. Niniejsze urządzenie jest wyposażone wniedomiarowe zabezpieczenie poziomu oleju. Wtej sytuacji
wmomencie uruchomienia silnika poziom oleju musi być prawidłowy.
Podłączanie odbiorników elektrycznych
Do wyjść 230V AC agregatu należy podłączać wyłącznie należycie izolowane kable przedłużające owysokiej
jakości. Przed każdym użyciem przedłużaczy należy dokonać ich przeglądu. Sprawdzić, czy wszystkie
przedłużacze posiadają wymagane parametry znamionowe oraz czy nie są uszkodzone. Aby zminimalizować
spadek napięcia, należy zachować możliwie najmniejszą długość kabli przedłużających.
1. Sprawdzić, czy zielony wskaźnik pracy świeci (może to nastąpić po maks. trzech sekundach).
2. Po uruchomieniu zaczekać klika minut na rozgrzanie się silnika iustabilizowanie jego pracy.
3. Podłączyć iwłączyć wymagane odbiorniki energii elektrycznej – 230V AC, jednofazowe, 50Hz.
UWAGA
Uwagi dot. przeciążania agregatu.
UWAGA Przekroczenie wartości mocy znamionowej/prądu znamionowego agregatu może skutkować jego
uszkodzeniem i/lub uszkodzeniem podłączonych do niego urządzeń elektrycznych.
NIE NALEŻY dopuścić do przekroczenia znamionowego poziomu mocy/prądu agregatu. Zob. Uwagi dot.
przeciążania agregatu wczęści Obsługa.
ustabilizuje się.
Wyłączanie silnika
1. Wyłączyć wszystkie urządzenia elektryczne iodłączyć je od gniazd znajdujących się na panelu
urządzeniach elektrycznych.
2. Ustawić przełącznik trybu POWERSMART wpozycji wyłączenia (O).
3. Pozwolić silnikowi pracować przez kilka minut bez obciążenia wcelu ustabilizowania temperatury
wewnątrz silnika iagregatu.
4. Ustawić wyłącznik silnika wpozycji wyłączenia (O).
5. Ustawić odpowietrznik korka wlewu paliwa wpołożeniu wyłączenia (O).
OSTRZEŻENIE Ciepło/gazy wylotowe mogą spowodować zapłon materiałów isubstancji palnych
lub uszkodzenie zbiornika paliwa, skutkujące śmiercią, kalectwem i/lub
poważnymi stratami materialnymi.
Kontakt ztłumikiem może być przyczyną poważnych poparzeń.
zakupu chwytacza iskier przeznaczonego do układu wydechowego danego silnika.
oryginalne.
OSTRZEŻENIE
Napięcie obecne wagregacie może być przyczyną porażenia prądem elektrycznym
lub oparzeń skutkujących śmiercią lub kalectwem.
lub są uszkodzone winny sposób.
mokre stopy ani NIE obsługiwać agregatu mokrymi rękami.
OSTRZEŻENIE Uszkodzenie lub przeciążenie kabli elektrycznych może być przyczyną ich przegrzania,
przebicia lub przepalenia skutkującego śmiercią, kalectwem i/lub stratami materialnymi.
OSTRZEŻENIE Odrzut (gwałtowne zwinięcie) linki rozrusznika może pociągnąć rękę wkierunku
silnika przed zwolnieniem uchwytu linki, co może doprowadzić do poważnych obrażeń,
np.złamań lub pęknięć kości, krwiaków lub zwichnięć.
anastępnie pociągnąć energicznie, aby uniknąć odrzutu.
elektrycznych.
OSTRZEŻENIE Pracujące silniki emitują tlenek węgla – gaz bezwonny, bezbarwny itrujący.
Wdychanie tlenku węgla może doprowadzić do śmierci, poważnych obrażeń, bólu głowy,
uczucia zmęczenia, wymiotów, dezorientacji, drgawek lub omdleń.
wentylacyjne lub inne otwory.
winstalacjach morskich oraz pomieszczeniach zamkniętych nawet po otwarciu wszystkich okien idrzwi.
Not for
Reproduction

9 9
Tryb POWERSMART
Funkcja ta ma na celu znaczącą optymalizację zużycia paliwa oraz redukcję hałasu. Po ustawieniu
przełącznika wpozycji włączenia (I) prędkość pracy silnika rośnie wmiarę podłączania odbiorników energii
elektrycznej, zaś maleje wmiarę ich odłączania.
Po ustawieniu przełącznika wpozycji wyłączenia (O), silnik pracuje na pełnych obrotach.
UWAGA Podczas włączania lub wyłączania agregatu bądź podczas korzystania zgniazda prądu stałego
Ładowanie akumulatora Rysunek
5
Za pomocą agregatu można ponownie naładować wyczerpany akumulator samochodowy lub przeznaczony
do zasilania innych urządzeń na napięcie 12V. Maksymalna wartość prądu podawanego na obwód ładowania
akumulatora wynosi 5A. Wyjście to jest zabezpieczone przed przeciążeniami za pomocą wyłącznika prądu
stałego. Wyłącznik ten zadziała wmomencie wystąpienia przeciążenia (wyskoczenie przycisku). Należy odczekać
kilka minut iwcisnąć przycisk, aby zresetować wyłącznik.
UWAGA Podczas korzystania zobwodu ładowania akumulatorów przełącznik trybu POWERSMART powinien być
ustawiony wpozycji wyłączenia (O).
UWAGA
Wcelu ponownego ładowania akumulatorów 12V należy:
1. Wrazie konieczności oczyścić czopy bądź zaciski akumulatorów.
2. Sprawdzić poziom cieczy we wszystkich komorach akumulatora. Wrazie konieczności należy dodawać
NIE stosować
wody wodociągowej.
3. Jeśli akumulator posiada otwory odpowietrzające, należy sprawdzić obecność oraz szczelność ich
zaślepek.
4. Podłączyć zacisk przewodu ładowania akumulatorów zczerwonym uchwytem do czopu lub zacisku
oznaczonego napisem Positive, POS lub symbolem (+).
5. Podłączyć zacisk przewodu ładowania akumulatorów zczarnym uchwytem do czopu lub zacisku
oznaczonego napisem Negative, NEG lub symbolem (–).
6. Podłączyć wtyk przewodu ładowania akumulatorów do gniazda 12VDC na panelu.
7. Uruchomić agregat wsposób opisany wczęści Uruchamianie silnika. Nie wyłączać silnika, dopóki
akumulator nie zostanie ponownie naładowany.
UWAGA Do ponownego naładowania wyczerpanego akumulatora wystarcza zwykle od 30 do 120 minut.
8. Po naładowaniu akumulatora należy wyłączyć silnik wsposób opisany wczęści Wyłączanie silnika.
9. Odłączyć przewód ładowania akumulatorów od agregatu, anastępnie od czopów akumulatorów.
UWAGA Do sprawdzania stanu naładowania istanu ogólnego akumulatora należy używać aerometru
samochodowego. Podczas wykonywania tych czynności należy postępować zgodnie ze wskazówkami podanymi
płynu akumulatorowego (zmierzony aerometrem) wynosi 1260 jednostek lub więcej.
Uwagi dot. przeciążania agregatu
Pojemność
Należy sprawdzić, czy agregat może wygenerować wystarczającą moc znamionową (roboczą) oraz udarową
1. Wybrać urządzenia, które mają być zasilane wtym samym czasie.
2. Zsumować moc znamionową (roboczą) tych urządzeń (wwatach). Jest to moc, jaką agregat musi
wytworzyć wcelu utrzymania zasilanych urządzeń wruchu. Zob. Tabela poboru mocy.
3. Ocenić moc udarową (rozruchowej) wwatach. Mierzona wwatach moc udarowa to krótki impuls
mocy niezbędny do uruchomienia narzędzi lub urządzeń napędzanych silnikiem elektrycznym, np.
piły tarczowej lub lodówki. Ponieważ nie wszystkie silniki uruchamiają się jednocześnie, całkowitą
moc udarową (wW) można ocenić, sumując jedynie najwyższą moc udarową wymaganą przez dane
urządzenie (urządzenia) zsumą całkowitą mocy znamionowej obliczoną wramach kroku 2.
Przykład:
Łączna moc znamionowa (robocza) wW = 1555
Najwyższa dodatkowa moc udarowa wW = 600
Wymagana całkowita moc wyjściowa agregatu = 2155
Zarządzanie mocą
Aby wydłużyć żywotność agregatu oraz podłączonych do niego urządzeń, podczas podłączania odbiorników
energii elektrycznej do agregatu należy zachować szczególną ostrożność. Przed włączeniem silnika agregatu
nie można podłączać do niego jakichkolwiek urządzeń. Aby zarządzać mocą wyjściową generatora wsposób
1. Uruchomić silnik wsposób opisany wniniejszej instrukcji, nie podłączając uprzednio do agregatu
jakichkolwiek urządzeń.
2.
Podłączyć iwłączyć pierwszy odbiornik; przy czym zaleca się, aby był to odbiornik największy ze wszystkich.
3. Zaczekać na ustabilizowanie się prądu wytwarzanego przez agregat (silnik pracuje miarowo,
apodłączone urządzenie działa poprawnie).
4. Podłączyć iwłączyć następny odbiornik.
5. Odczekać ponownie do momentu ustabilizowania się pracy agregatu.
6. Powtórzyć kroki 4 i5 przy każdym następnym urządzeniu.
szczególną uwagę przy uwzględnianiu obciążeń udarowych wmocy wyjściowej generatora wsposób opisany powyżej.
* Wartości mocy wwatach podane są jedynie wprzybliżeniu. Należy sprawdzić rzeczywisty pobór mocy
narzędzia lub urządzenia.
OSTRZEŻENIE Podczas ładowania akumulatory wydzielają wybuchowy wodór. Wodór utrzymuje
się wpobliżu akumulatora przez długi czas po zakończeniu ładowania. Nawet
najmniejsza iskra może zainicjować eksplozję wodoru, która może doprowadzić
do śmierci, poważnych obrażeń i/lub uszkodzenia mienia.
Elektrolit znajdujący się wakumulatorze zawiera bardzo żrący kwas. Kontakt zelektrolitem może być
przyczyną oparzeń chemicznych powodujących poważne obrażenia i/lub uszkodzenia mienia.
przez kilka minut od zakończenia ładowania akumulatorów.
Narzędzie lub urządzenie Moc znamionowa (robocza)
Dodatkowa moc udarowa
(rozruchowa)
Wentylator okienny 300 600
Zamrażarka 500 500
Telewizor 500 —
Instalacja alarmowa 180 —
Oświetlenie (75watów) 75 —
Tabela poboru mocy
Narzędzie lub urządzenie
Moc znamionowa*
(robocza)
Dodatkowa moc
udarowa (rozruchowa)
Urządzenia podstawowe
Żarówka – 75watów 75 —
Zamrażarka 500 500
Pompa odwadniająca 800 1200
Lodówka/zamrażarka – 18stóp sześciennych 800 1600
Hydrofor – 1/3 KM 1000 2000
Instalacja grzewcza/chłodząca
Klimatyzator okienny – 10000 BTU 1200 1800
Wentylator okienny 300 600
Dmuchawa do pieca – 1/2 KM 800 1300
Sprzęt AGD
Kuchenka mikrofalowa – 1000watów 1000 —
Ekspres do kawy 1500 —
Kuchenka elektryczna – jeden palnik 1500 —
Salon
Odtwarzacz DVD/CD 100 —
Odtwarzacz wideo 100 —
Odbiornik stereo 450 —
Telewizor kolorowy – 27cali 500 —
Komputer zmonitorem 17cali 800 —
Inne
Instalacja alarmowa 180 —
Radio AM/FM zzegarem 300 —
Mechanizm podnoszenia drzwi garażowych – 1/2 KM 480 520
Warsztat
Oświetlenie kwarcowo-halogenowe 1000 —
Pistolet natryskowy – 1/3 KM 600 1200
Piła szablowa 960 960
Wiertarka elektryczna – 1/2 KM 1000 1000
Piła tarczowa – 7 1/4cala 1500 1500
Not for
Reproduction

10 BRIGGSandSTRATTON.COM
Konserwacja
Harmonogram konserwacji
Należy przestrzegać godzinowych lub sezonowych odstępów czasu, zależnie od tego, co wystąpi wcześniej. Praca
wwarunkach niekorzystnych wymaga częstszych konserwacji niż podano poniżej.
¹
Wprzypadku pracy wzanieczyszczonym otoczeniu prace serwisowe należy wykonywać zwiększą częstotliwością.
Zalecenia ogólne
Regularna konserwacja zapewni prawidłowe osiągi agregatu iprzedłuży jego żywotność. Wsprawie prac
serwisowych należy kontaktować się z autoryzowanym dealerem.
Gwarancja dotycząca niniejszego agregatu nie obejmuje sytuacji związanych znadużyciem lub zaniedbaniem
spowodowanym przez operatora. Aby wpełni skorzystać z gwarancji, operator musi konserwować agregat
zgodnie zzaleceniami podanymi wniniejszej instrukcji.
UWAGA
Nieprawidłowa obsługa agregatu może doprowadzić do jego uszkodzenia lub obniży jego trwałość.
prawidłowego chłodzenia urządzenia.
Prawidłowa konserwacja agregatu będzie wymagać okresowego dokonywania pewnych czynności
regulacyjnych.
Wszystkie prace serwisowe iczynności regulacyjne należy wykonywać przynajmniej raz wsezonie. Niezbędne
jest przestrzeganie podanego wyżej harmonogramu prac konserwacyjnych.
UWAGA Raz do roku należy przeczyścić lub wymienić świecę zapłonową oraz wymienić filtr powietrza.
Zamontowanie nowej świecy zapłonowej oraz czystego filtra powietrza zapewni wytwarzanie odpowiedniej
mieszanki paliwa zpowietrzem oraz przyczyni się do polepszenia pracy iwydłużenia okresu użytkowania silnika.
Konserwacja agregatu
Konserwacja agregatu sprowadza się do utrzymywania go wczystości izapewnianiu suchości. Urządzenie
należy obsługiwać iprzechowywać wczystym isuchym otoczeniu, chroniąc je przed nadmiernym zapyleniem,
zabrudzeniem, zawilgoceniem bądź wpływem agresywnych oparów. Szczeliny wlotowe powietrza chłodzącego
wagregacie isilniku nie mogą zostać zapchane śniegiem, liśćmi lub innymi ciałami obcymi.
UWAGA Czyszczenie agregatu wodą lub innymi cieczami jest ZABRONIONE. Ciecze mogą przeniknąć do układu
paliwowego silnika, powodując jego nieprawidłowe działanie i/lub awarię. Ponadto, jeśli ciecz przeniknie do
wnętrza agregatu przez szczeliny wlotowe powietrza chłodzącego, jej część osiądzie wkawernach ipęknięciach
izolacji uzwojeń wirnika istojana. Gromadzenie się cieczy ibrudu na wewnętrznych uzwojeniach agregatu może
spowodować obniżenie rezystancji izolacji tych uzwojeń.
Czyszczenie
Codziennie lub każdorazowo przed rozpoczęciem eksploatacji agregatu należy dokonać oględzin jego części
bocznych oraz dolnej pod kątem wycieków oleju lub paliwa. Oczyścić agregat zzanieczyszczeń nagromadzonych
wjego wnętrzu ina zewnątrz. Sprawdzić stan szczelin wlotowych powietrza chłodzącego agregat. Otwory te
muszą być utrzymywane wczystości ichronione przed zapchaniem.
Silnik ijego części należy utrzymywać wczystości, aby zmniejszyć ryzyko przegrzania izapłonu nagromadzonych
zanieczyszczeń.
UWAGA
Nieprawidłowa obsługa agregatu może doprowadzić do jego uszkodzenia lub obniży jego trwałość.
wobecności oparów powodujących korozję.
Czyszczenie filtra paliwa
Rysunek
6
Filtr paliwa zapobiega przedostawaniu się zanieczyszczeń do układu paliwowego.
Aby oczyścić filtr paliwa, należy:
1. Upewnić się, że agregat jest ustawiony na poziomym podłożu.
2. Zdjąć korek wlewu paliwa (A) ifiltr paliwa (B).
3. Oczyścić filtr paliwa za pomocą płynnego detergentu iwody.
4. Wytrzeć filtr paliwa do sucha za pomocą czystej suchej szmatki.
5. Zamontować starannie filtr ikorek wlewu paliwa na swoim miejscu.
Konserwacja silnika
Olej
Zalecenia dotyczące oleju
Aby osiągnąć najlepszą wydajność urządzenia, należy stosować oleje firmy Briggs & Stratton opatrzone
certyfikatem gwarancji. Dopuszczalne jest stosowanie innych wysokiej jakości olejów detergentowych klas SF,
SG, SH, SJ lub wyższych. NIE używać dodatków specjalnych.
Temperatury zewnętrzne wyznaczają właściwą lepkość oleju dla silnika. Najlepszą lepkość dla zakresu
temperatur zewnętrznych należy wybrać przy użyciu wykresu.
*
Jeśli olej SAE 30 zostanie użyty wtemperaturze poniżej 4°C (40°F), wystąpią trudności zuruchomieniem silnika.
** Wtemperaturach powyżej 27°C (80°F) stosowanie oleju 10W-30 może spowodować zwiększone zużycie
oleju. Należy częściej sprawdzać poziom oleju.
UWAGA Olej syntetyczny opatrzony znakiem dopuszczenia ILSAC GF-2, API isymbolem
do stosowania we wszystkich temperaturach. Zastosowanie oleju syntetycznego nie wpływa na
zmianę okresów, w których należy dokonywać wymiany oleju.
Sprawdzanie poziomu oleju
Rysunek
8
Poziom oleju należy sprawdzać przed każdym użyciem bądź przynajmniej co 8godzin eksploatacji. Utrzymywać
stały poziom oleju.
1. Upewnić się, że agregat jest ustawiony na poziomym podłożu.
2. Poluzować śruby bocznej pokrywy serwisowej, po czym zdjąć ją zurządzenia.
3. Oczyścić obszar wokół korka wlewu paliwa, po czym zdjąć korek.
4. Sprawdzić, czy po otwarciu wlewu olej znajduje się na poziomie krawędzi wlewu.
5. Założyć idokręcić korek wlewu oleju.
6. Założyć na miejsce boczną pokrywę serwisową, po czym dokręcić ręcznie śruby mocujące pokrywę.
Uzupełnianie oleju silnikowego
Rysunek
9
1. Upewnić się, że agregat jest ustawiony na poziomym podłożu.
2.
Powtórzyć kroki od 2 do 4, aby sprawdzić poziom oleju wsposób opisany wczęści Sprawdzanie poziomu oleju.
3. Wrazie potrzeby dolać ostrożnie oleju przez otwór wlewowy do poziomu krawędzi wlewu.
4. Założyć idokręcić korek wlewu oleju.
5. Założyć na miejsce boczną pokrywę serwisową, po czym dokręcić ręcznie śruby mocujące pokrywę.
Po każdych 8 godzinach pracy lub codziennie
Po pierwszych 10 godzinach pracy
Po każdych 50 godzinach pracy lub co 3miesiące
Po każdych 100 godzinach pracy lub co 6miesięcy
¹
Po każdych 250 godzinach pracy lub raz wroku
OSTRZEŻENIE Samoistne iskrzenie wagregacie może być przyczyną porażenia prądem
elektrycznym lub pożaru skutkującego śmiercią lub kalectwem.
PODCZAS REGULACJI INAPRAW AGREGATU
ze świecą.
PODCZAS KONTROLI ZAPŁONU ISKROWEGO
NIE należy sprawdzać iskry przy wyjętej świecy zapłonowej.
Not for
Reproduction

11 11
Wymiana oleju silnikowego
Eksploatując agregat wwarunkach ekstremalnego zabrudzenia lub zapylenia bądź ekstremalnych temperatur
otoczenia, należy wymieniać olej zwiększą częstotliwością.
Wymiany oleju należy dokonywać w rozgrzanym silniku wnastępujący sposób:
1. Upewnić się, że agregat jest ustawiony na poziomym podłożu.
2. Poluzować śruby bocznej pokrywy serwisowej, po czym zdjąć ją zurządzenia.
3. Oczyścić obszar wokół korka wlewu paliwa, po czym zdjąć korek.
4. Przechylić agregat wcelu spuszczenia oleju zotworu wlewowego do odpowiedniego zasobnika,
zwracając uwagę, aby urządzenie było przechylone wstronę szyjki wlewu oleju. Po opróżnieniu skrzyni
korbowej ponownie ustawić agregat we właściwej pozycji.
5. Powtórzyć kroki od 3 do 5, aby uzupełnić olej silnikowy wsposób opisany wp. Uzupełnianie oleju
silnikowego.
Serwisowanie wkładu filtra powietrza
Rysunek
10
Zabrudzenie filtra powietrza może skutkować nieprawidłową pracą silnika bądź jego uszkodzeniem. Wprzypadku
pracy wzanieczyszczonym otoczeniu prace serwisowe należy wykonywać zwiększą częstotliwością.
Serwisowanie filtra powietrza obejmuje następujące czynności:
1. Poluzować śruby bocznej pokrywy serwisowej, po czym zdjąć ją zurządzenia.
2. Poluzować śrubę (A) pokrywy filtra powietrza, po czym zdjąć pokrywę (B) filtra powietrza.
3. Zdemontować piankowy filtr powietrza (C), pociągając go ostrożnie ku sobie.
4. Zdemontować filtr wydechowy (D), pociągając go ostrożnie ku sobie.
5. Wymyć piankowy filtr powietrza oraz filtr wydechowy, używając do tego celu jedynie płynnego
detergentu oraz wody. Wycisnąć do sucha wczystą ściereczkę
ściereczkę wcelu usunięcia nadmiaru oleju.
7. Wmontować czysty lub nowy piankowy filtr powietrza wwewnętrzną część podstawy.
8. Wmontować czysty lub nowy filtr wydechowy wwewnętrzną część podstawy.
9. Założyć na swoje miejsce pokrywę filtra powietrza, po czym dokręcić śruby.
10. Założyć na miejsce boczną pokrywę serwisową, po czym dokręcić ręcznie śruby mocujące pokrywę.
Serwisowanie świecy zapłonowej
Rysunek
11
12
Wymiana świecy zapłonowej ułatwi uruchomienie silnika ipolepszy jego pracę.
1. Zdjąć górną pokrywę serwisową.
2. Wyczyścić obszar wokół świecy zapłonowej, po czym zdjąć zniej kołpak ochronny.
3. Zdemontować świecę zapłonową, po czym dokonać jej przeglądu.
4. Sprawdzić wielkość szczeliny międzyelektrodowej za pomocą szczelinomierza, po czym wrazie
potrzeby przywrócić jej zalecany wymiar (zob. Dane techniczne).
5. Wymienić świecę zapłonową na nową, jeśli jej elektrody posiadają wżery, są nadpalone bądź widoczne
są pęknięcia porcelany. Użyć świecy zalecanego typu. Zob. Dane techniczne.
6. Zamontować świecę zapłonową idokręcić ją do oporu. Założyć kołpak świecy zapłonowej na właściwe
miejsce.
7. Założyć na swoje miejsce górną pokrywę serwisową.
Sprawdzanie tłumika ichwytacza iskier
Rysunek
13
14
Skontrolować stan tłumika pod kątem pęknięć, korozji bądź innych uszkodzeń. Zdemontować chwytacz iskier,
jeśli jest zamontowany, po czym przejrzeć go pod kątem uszkodzeń oraz obecności nagaru węglowego. Jeśli
wymagane jest stosowanie części zamiennych, należy skontrolować, czy stosowane są wyłącznie oryginalne
części zamienne zalecane przez producenta danego urządzenia.
Oczyścić iskontrolować chwytacz iskier wnastępujący sposób:
1. Zdjąć osłonę tłumika, odkręciwszy uprzednio cztery śruby łączące ją zagregatem.
2. Odkręcić śrubę łączącą osłonę chwytacza iskier ztłumikiem. Zdjąć osłonę chwytacza iskier.
3. Sprawdzić stan osłony iwymienić ją na nową, jeśli uległa rozdarciu, perforacji bądź innym
uszkodzeniom. NIE stosować uszkodzonej osłony. Jeśli osłona nie jest uszkodzona, należy oczyścić ją za
pomocą szczotki.
4. Przymocować zpowrotem osłonę do tłumika. Zamontować osłonę tłumika we właściwym miejscu.
Sprawdzić luz zaworowy
Regularna kontrola iregulacja luzu zaworowego przyczynia się do polepszenia pracy silnika iprzedłużenia okresu
jego trwałości. Procedury tej nie można wykonać bez uprzedniego częściowego zdemontowania silnika oraz
użycia narzędzi specjalnych. Ztej przyczyny zaleca się przeprowadzanie kontroli iregulacji luzu zaworowego
wautoryzowanej jednostce serwisowej wokreślonych odstępach czasu (zob. Harmonogram konserwacji, rozdział
Konserwacja).
Przechowywanie
Jeśli użytkownik ma zamiar przerwać eksploatację agregatu na czas dłuższy niż 30dni, powinien uprzednio
wykonać poniżej opisane czynności przygotowawcze.
Przechowywanie agregatu
Czyszczenie.
Wskazówki dot. długotrwałego przechowywania
Jeśli paliwo jest przechowywane przez okres dłuższy niż 30 dni, może zwietrzeć. Zwietrzałe paliwo powoduje
tworzenie się osadów gumy ikwasów wukładzie paliwa lub wnajważniejszych częściach gaźnika. Aby zachować
świeżość paliwa, należy zastosować stabilizator paliwa FRESH START® firmy Briggs & Stratton, który dostępny
jest wpostaci płynnego dodatku lub koncentratu umieszczonego wpojemniku.
Jeśli stabilizator paliwa dodawany jest zgodnie zinstrukcją, nie ma potrzeby spuszczania paliwa zsilnika.
Włączyć silnik na 2minuty, aby rozprowadzić stabilizator wukładzie paliwa. Po wykonaniu tych czynności silnik
ipaliwo można przechowywać przez okres do 24 miesięcy.
Jeśli do paliwa znajdującego się wsilniku nie dodano stabilizatora, należy spuścić paliwo do odpowiedniego
pojemnika. Pozostawić silnik włączony do czasu, aż wyłączy się z powodu braku paliwa. Celem zachowania
świeżości paliwa zaleca się dodawanie stabilizatora do paliwa przechowywanego wkanistrze.
Wymiana oleju silnikowego
Gdy silnik jest jeszcze ciepły, należy spuścić olej ze skrzyni korbowej Nalać oleju zalecanego gatunku. Zob.
Wymiana oleju silnikowego.
Pozostałe wskazówki dot. przechowywania
1. NIE należy przechowywać paliwa przez okres dłuższy niż jeden sezon, nie poddając go uzdatnieniu
opisanemu wp. Wskazówki dot. długotrwałego przechowywania.
2. Jeśli zbiornik paliwa zaczyna rdzewieć, należy wymienić go na nowy. Obecność rdzy i/lub
zanieczyszczeń wpaliwie może skutkować problemami wprzypadku stosowania go jako środka
pędnego do niniejszego urządzenia.
3. Przykryć urządzenie odpowiednią osłoną zabezpieczającą, która nie wchłania wilgoci.
4. Przechowywać agregat wczystym isuchym środowisku.
OSTROŻNIE Unikać wydłużonego lub powtarzającego się kontaktu skóry ze zużytym olejem
silnikowym.
OSTRZEŻENIE Kontakt ztłumikiem może być przyczyną poważnych oparzeń.
Ciepło/gazy wylotowe mogą spowodować zapłon materiałów isubstancji
palnych lub uszkodzenia zbiornika paliwa, stwarzając niebezpieczeństwo pożaru.
zakupu chwytacza iskier przeznaczonego do układu wydechowego danego silnika.
oryginalne.
OSTRZEŻENIE Paliwo ijego opary są wyjątkowo łatwopalne oraz wybuchowe imogą być
przyczyną pożaru lub wybuchu skutkującego śmiercią, oparzeniami, kalectwem
lub stratami materialnymi.
PODCZAS PRZECHOWYWANIA PALIWA LUB URZĄDZENIA Z PEŁNYM ZBIORNIKIEM
zlampkami kontrolnymi bądź innych źródeł zapłonu, ponieważ mogą one spowodować zapalenie oparów
paliwa.
PODCZAS SPUSZCZANIA PALIWA
korek wlewu paliwa. Powoli poluzować korek, aby zredukować ciśnienie wzbiorniku.
źródeł zapłonu.
to konieczne, należy je wymienić na nowe.
OSTRZEŻENIE Stosowanie pokrowców magazynowych może być przyczyną pożaru skutkującego
śmiercią, kalectwem i/lub stratami materialnymi.
Not for
Reproduction

12 BRIGGSandSTRATTON.COM
Rozwiązywanie problemów
Problem Przyczyna Czynności zaradcze
Silnik pracuje, jednak brak prądu przemiennego na
wyjściu.
1. Świeci czerwona kontrolka alarmu przeciążenia. Agregat jest przeciążony.
2. Zielony wskaźnik pracy nie świeci. Uszkodzenie agregatu.
3. Złe połączenie lub zastosowanie niewłaściwego zestawu przewodów.
4. Podłączone urządzenie jest wadliwe.
1. Zob. p. Uwagi dot. przeciążania agregatu wrozdziale Obsługa.
Wyłączyć agregat iwłączyć go ponownie.
2. Skontaktować się zautoryzowaną jednostką serwisową.
3. Sprawdzić idokonać naprawy.
4. Podłączyć inne urządzenie będące wdobrym stanie.
Silnik pracuje prawidłowo na biegu jałowym, ale
„utyka” po podłączeniu odbiorników energii.
1. Zwarcie wpodłączonym odbiorniku energii.
2. Zbyt mała prędkość pracy silnika.
3. Agregat jest przeciążony.
4. Zwarcie wobwodzie generującym prąd.
1. Odłączyć odbiornik energii, wktórym występuje zwarcie.
2. Skontaktować się zautoryzowaną jednostką serwisową.
3. Zob. p. Uwagi dot. przeciążania agregatu wrozdziale Obsługa.
4. Skontaktować się zautoryzowaną jednostką serwisową.
Silnik nie uruchamia się, wyłącza się podczas pracy
lub uruchamia się ipracuje nierówno.
1. Wyłącznik silnika znajduje się wpozycji wyłączenia (O).
2. Odpowietrznik korka wlewu paliwa znajduje się wpozycji wyłączenia (O).
3. Zapala się żółty wskaźnik niskiego poziomu oleju. Niski poziom oleju
4. Zabrudzony filtr powietrza.
5. Brak paliwa.
6. Zwietrzałe paliwo.
7. Do świecy zapłonowej nie jest podłączony odpowiedni przewód.
8. Wadliwa świeca zapłonowa.
9. Woda wpaliwie.
10. Zalanie.
11. Zbyt bogata mieszanka paliwowa.
12. Zawór ssący zablokowany wpozycji otwartej lub zamkniętej.
13. Utrata sprężania wsilniku.
1. Ustawić wyłącznik silnika wpozycji włączenia (I).
2. Ustawić odpowietrznik korka wlewu paliwa wpozycji włączenia (I).
3. Napełnić skrzynię korbową do odpowiedniego poziomu lub ustawić
agregat na poziomej powierzchni.
4. Oczyścić lub wymienić filtr powietrza.
5. Napełnić zbiornik paliwa.
6. Spuścić paliwo ze zbiornika izgaźnika; napełnić świeżym paliwem.
7. Podłączyć odpowiedni przewód do świecy zapłonowej.
8. Wymienić świecę zapłonową na nową.
9. Spuścić paliwo ze zbiornika izgaźnika; napełnić świeżym paliwem.
10. Odczekać 5minut iponownie uruchomić silnik.
11. Skontaktować się zautoryzowaną jednostką serwisową.
12. Skontaktować się zautoryzowaną jednostką serwisową.
13. Skontaktować się zautoryzowaną jednostką serwisową.
Silnik nie ma mocy.
1. Zbyt wysokie obciążenie.
2. Zabrudzony filtr powietrza.
1. Zob. p. Uwagi dot. przeciążania agregatu wrozdziale Obsługa.
2. Wymienić filtr powietrza na nowy.
Silnik „kicha” lub słabnie. Gaźnik wytwarza zbyt bogatą lub zbyt ubogą mieszankę. Skontaktować się zautoryzowaną jednostką serwisową.
Dane techniczne produktu
Moc rozruchowa ...........................................................................2000W
Moc znamionowa* .........................................................................1600W
przy 230V AC .............................................................................7,0A
przy 12V DC ............................................................................... 5A
Częstotliwość znamionowa .................................................................. 50Hz
Liczba faz .............................................................................. Jedna faza
Pojemność skokowa .......................................................105,6 cm³ (6,44 cala sześc.)
Szczelina świecy zapłonowej ..........................................0,6–0,7mm (0,023–0,027cala)
Luz zaworu ssącego ...........................0,08 – 0,12 mm (0,0031 – 0,0047cala) wstanie chłodnym
Luz zaworu wydechowego ......................0,13 – 0,17mm (0,0051 – 0,0067cala) wstanie chłodnym
Pojemność zbiornika paliwa ...................................................3,7l (1,0galon U.S.A.)
Pojemność zbiornika oleju ........................................................... 0,4l (13,5uncji)
Moc znamionowa: Maksymalna moc znamionowa poszczególnych modeli silników benzynowych jest
podawana zgodnie zprzepisami J1940 (Small Engine Power & Torque Rating Procedure) ustalonymi przez SAE
(Society of Automotive Engineers), zaś wyjściowa moc znamionowa została ustalona iskorygowana zgodnie
zwymaganiami SAE J1995 (aktualizacja 2002-05). Wartości momentu obrotowego obliczono przy prędkości
3060obr/min, natomiast wartości mocy – przy prędkości 3600obr/min. Rzeczywista maksymalna moc silnika
jest niższa m.in. ze względu na zewnętrzne warunki eksploatacji oraz różnice pomiędzy poszczególnymi
silnikami. Biorąc pod uwagę zarówno szeroki asortyment produktów, wktórych montowane są silniki, jak
iróżnorodność zagadnień ochrony środowiska dotyczących eksploatacji urządzeń, stosowany wkonkretnym
urządzeniu silnik benzynowy nie uzyska maksymalnej mocy znamionowej brutto (będzie to rzeczywista moc
zainstalowana lub moc netto). Różnica ta wynika zwielu czynników, m.in. akcesoriów (takich jak filtr powietrza,
układ wydechowy, układ ładowania akumulatorów, układ chłodzenia, gaźnik, pompa paliwowa itd.), ograniczeń
dotyczących stosowania, warunków środowiska eksploatacji (temperatury, wilgotności, wysokości n.p.m.)
orazróżnic pomiędzy poszczególnymi silnikami. Zuwagi na ograniczenia produkcyjne ipojemnościowe firma
Briggs & Stratton może zastępować silniki tej serii silnikami owyższej mocy znamionowej.
* Parametry znamionowe niniejszego agregatu spełniają wymagania normy ISO 8528, G3.
Części eksploatacyjne
Piankowy filtr powietrza ..................................................................311388GS
Filtr wydechowy .........................................................................311389GS
Opornościowa świeca zapłonowa .........................................................NGK CR7HSA
Not for
Reproduction

13 13
POLITYKA GWARANCYJNA FIRMY BRIGGS & STRATTON POWER PRODUCTS GROUP, LLC WOBEC WŁAŚCICIELI URZĄDZEŃ
GWARANCJA OGRANICZONA
Briggs&Stratton Power Products Group, LLC naprawi lub wymieni na nowe, bez obciążania użytkownika kosztami naprawy lub wymiany, jakąkolwiek część/części maszyny wykazujące defekty materiałowe lub niewłaściwą
jakość wykonania. Opłaty za transport produktu przekazanego do naprawy lub wymiany w ramach niniejszej gwarancji ponosi nabywca. Gwarancja obowiązuje przez okresy oraz na warunkach podanych poniżej. Obsługę
serwisową należy wykonywać w autoryzowanym punkcie serwisowym, który można znaleźć na stronie internetowej BRIGGSandSTRATTON.COM.
PRZEZ PRAWO. Wniektórych stanach lub krajach nie zezwala się na ograniczenie okresu obowiązywania gwarancji domniemanej, a niektóre stany lub kraje nie zezwalają na wykluczenia lub ograniczenie odpowiedzialności
za szkody przypadkowe lub następcze, w związku z tym powyższe ograniczenie i wykluczenie mogą nie dotyczyć niektórych użytkowników. Niniejsza gwarancja daje użytkownikowi określone prawa. Użytkownik może mieć
również inne prawa, które są odmienne w każdym stanie lub kraju.
produktu do celów komercyjnych w rozumieniu niniejszej gwarancji jest on uważany za urządzenie komercyjne.
INFORMACJE O GWARANCJI
Dziękujemy za zwrócenie się do nas w sprawie naprawy gwarancyjnej i przepraszamy za niedogodności. Naprawy gwarancyjne mogą być wykonywane przez każdy autoryzowany punkt serwisowy. Większość napraw gwarancyjnych to
naprawy rutynowe, jednak czasem wezwanie serwisu gwarancyjnego może być nieuzasadnione. Na przykład gwarancją nie są objęte uszkodzenia wynikające zniewłaściwego użytkowania, braku rutynowej konserwacji, uszkodzenia
powstałe podczas transportu, obsługi, przechowywania lub nieprawidłowego montażu. Podobnie gwarancja nie obowiązuje wprzypadku usunięcia daty produkcji lub numeru seryjnego zprzenośnego agregatu prądotwórczego lub
wprzypadku jego modyfikacji. Wtrakcie obowiązywania gwarancji autoryzowany punkt serwisowy dokona naprawy lub wymiany części uszkodzonej wczasie normalnego użytkowania i serwisowania urządzenia. Niniejsza gwarancja
Normalne zużycie
części lub urządzenia naprawa nie jest objęta gwarancją.
Instalacja ikonserwacja
przeciążenia, pracy znadmierną szybkością, nieprawidłowej konserwacji, naprawy lub przechowywania, które według naszej oceny mogły wpłynąć na trwałość iniezawodność urządzenia. Niniejsza gwarancja nie obejmuje
również normalnych czynności konserwacyjnych takich jak wymiana filtrów powietrza, regulacja, czyszczenie iusuwanie zatorów zukładu paliwowego (zanieczyszczeń chemicznych, kurzu, osadów wapiennych itd.).
Inne
spowodowanych zamarznięciem lub działaniem substancji chemicznych. Akcesoria takie jak akumulatory rozruchowe, zestawy przewodów oraz pokrowce magazynowe również nie podlegają gwarancji. Niniejsza gwarancja
nie obejmuje również części używanych, regenerowanych idemonstracyjnych, urządzeń wykorzystywanych jako główne źródło zasilania zastępujące standardowe zasilanie, urządzeń wykorzystywanych wsystemach
podtrzymywania życia oraz usterek powstałych wwyniku sił wyższych oraz klęsk żywiołowych, na które to producent nie ma żadnego wpływu. 198189E, wer. C, 11/2/2009
BRIGGS & STRATTON POWER PRODUCTS GROUP, LLC
MILWAUKEE, WI, USA
Obowiązuje od 1listopada 2009r.; zastępuje wszelkie niedatowane gwarancje oraz wszystkie gwarancje datowane przed 1listopada 2009r.
2 lata*
1 rok
Zastosowanie konsumenckie
Zastosowanie komercyjne
*Drugi rok dotyczy wyłącznie części
OKRES OBOWIĄZYWANIA GWARANCJI
Not for
Reproduction

4 BRIGGSandSTRATTON.COM
Děkujeme za zakoupení této kvalitní elektrocentrály od společnosti Briggs & Stratton®. Těší nás, že důvěřujete značce Briggs & Stratton. Budete-li při provozu a údržbě elektrocentrály značky Briggs & Stratton postupovat podle
pokynů uvedených vtéto příručce, bude vám mnoho let poskytovat spolehlivé služby.
Tato příručka obsahuje bezpečnostní informace nezbytné pro to, abyste věděli, jaká nebezpečí a rizika souvisí selektrocentrálami ajak se jim vyhnout. Tato elektrocentrála je navržena aurčena pouze pro dodávku elektrické energie
pro provoz kompatibilního elektrického osvětlení, spotřebičů, nářadí amotorových spotřebičů, anení určena kjinému účelu. Je důležité, abyste si před pokusem ospuštění aprovoz tohoto zařízení přečetli tento návod adůkladně mu
porozuměli. Tento původní návod uschovejte pro pozdější použití.
Elektrocentrála před použitím vyžaduje konečnou montáž. Podrobné informace okonečné montáži naleznete vtéto příručce včásti Montáž. Postupujte přesně podle pokynů.
Kde nás najdete
Podpora aservis pro elektrocentrálu společnosti Briggs & Stratton je vždy snadno dostupná. Po celém světě jsou kdispozici tisíce autorizovaných servisních prodejců společnosti Briggs & Stratton zajišťujících kvalitní servis. Dále máte
možnost vyhledat nejbližšího autorizovaného servisního prodejce podle naší mapy prodejců na webové stránce www.BRIGGSandSTRATTON.com.
Elektrocentrála
Číslo modelu
Revize
Sériové číslo
Datum nákupu
Obsah
Bezpečnost obsluhy ..............................................................5
Popis zařízení.................................................................................................5
Důležité informace obezpečnosti................................................................................5
Montáž .........................................................................7
Vybalení elektrocentrály .......................................................................................7
Doplnění motorového oleje.....................................................................................7
Doplnění paliva ...............................................................................................7
Funkce aovládací prvky ...........................................................7
Provoz . . . . . . . . . . . . . . . . . . . . . . . . . . . . . . . . . . . . . . . . . . . . . . . . . . . . . . . . . . . . . . . . . . . . . . . . . . 8
Zemnicí svorka................................................................................................8
Umístění elektrocentrály .......................................................................................8
Spuštění motoru ..............................................................................................8
Připojení elektrických spotřebičů ................................................................................8
Zastavení motoru .............................................................................................8
Režim POWERSMART ..........................................................................................9
Nabíjení baterie...............................................................................................9
Nepřetěžujte elektrocentrálu....................................................................................9
Údržba.........................................................................10
Plán údržby .................................................................................................10
Údržba elektrocentrály........................................................................................10
Údržba motoru ..............................................................................................10
Skladování ..................................................................................................11
Řešení problémů . . . . . . . . . . . . . . . . . . . . . . . . . . . . . . . . . . . . . . . . . . . . . . . . . . . . . . . . . . . . . . . . 12
Technické údaje.................................................................12
Technické údaje produktu .....................................................................................12
Běžné servisní díly............................................................................................12
Záruka.........................................................................13
Záruka elektrocentrály ........................................................................................13
Copyright © 2011 Briggs & Stratton Power Products Group, LLC
Milwaukee, WI, USA. Všechna práva vyhrazena.
BRIGGS & STRATTON POWER PRODUCTS je registrovaná
ochranná známka společnosti Briggs & Stratton Corporation
Milwaukee, WI, USA
PŘELOŽENO Z PŮVODNÍHO NÁVODU
Not for
Reproduction

5 5
Bezpečnost obsluhy
Popis zařízení
Přečtěte si pečlivě tuto příručku a seznamte se se svou elektrocentrálou. Zjistěte,
jakémá využití, jaká jsou její omezení a související rizika.
Tato elektrocentrála představuje generátor smotorovým pohonem sotočným polem pro střídavý istejnosměrný
proud. Je určena pro dodávku elektrické energie pro provoz kompatibilního elektrického osvětlení, spotřebičů,
nářadí amotorových spotřebičů. Otáčivé pole elektrocentrály je poháněno rychlostí 4500 ot./min (svypnutým
přepínačem režimu POWERSMART) jednoválcovým motorem.
Vynaložili jsme veškeré úsilí, aby informace vtéto příručce byly přesné aaktuální. Výrobce si nicméně
vyhrazuje právo kdykoli a bez předchozího upozornění měnit, upravit nebo jinak zlepšit elektrocentrálu a tuto
dokumentaci.
Důležité informace obezpečnosti
Výrobce nemůže předvídat všechny možné okolnosti, které mohou představovat nebezpečí. Upozornění vtéto
příručce aznačky análepky umístěné na jednotky proto nezahrnují všechny situace. Pokud používáte postup,
pracovní metody a provozní techniky, které nejsou výrobcem výslovně doporučeny, musíte se ujistit, že je to pro
vás aostatní bezpečné. Musíte se také ujistit, že zvolený postup, pracovní metody a provozní techniky nezpůsobí
nebezpečnost elektrocentrály.
Bezpečnostní symboly ajejich význam
Bezpečnostní varovný symbol poukazuje na možné riziko poranění. Signální slova (NEBEZPEČÍ,
VAROVÁNÍ nebo POZOR) jsou používána s varovnou značkou k upozornění na stupeň vážnosti rizika.
Bezpečnostní značka může být navíc použita k reprezentaci typu rizika. Signální slovo UPOZORNĚNÍ se používá
k upozornění na postupy, které nejsou spojeny s možností poranění.
NEBEZPEČÍ poukazuje na riziko, které, jestliže se ho nevyvarujete, povede ke smrti nebo vážnému
poranění.
VAROVÁNÍ poukazuje na riziko, které, jestliže se ho nevyvarujete, může vést ke smrti nebo vážnému
poranění.
POZOR poukazuje na riziko, které, jestliže se ho nevyvarujete, může vést k malému či střednímu
poranění.
UPOZORNĚNÍ poukazuje na postupy, které nejsou spojeny s poraněním osob.
Požár
Exploze
Toxické výpary
Horký povrch
Pohyblivé části
Úraz elektrickým proudem
Zpětný vrh
Létající předměty
Návod kobsluze
Výbušný tlak Poleptání
VAROVÁNÍ Běžící motor produkuje oxid uhelnatý, což je bezbarvý jedovatý plyn bez zápachu.
Vdechování oxidu uhelnatého může způsobit smrt, vážné zranění, bolest hlavy, únavu,
závratě, zvracení, zmatenost, křeče, nevolnost nebo mdloby.
otvory výfukové plyny.
nebo ohrazení, a to ani v případě, že jsou otevřená okna adveře.
VAROVÁNÍ Zpětný ráz startovací šňůry (rychlé zatažení) táhne ruku arameno směrem kmotoru
rychleji, než se můžete pustit amůže mít za následek zlomeniny, pohmožděniny apodvrtnutí
vedoucí kvážným poraněním.
zabránili zpětnému rázu.
VAROVÁNÍ Skladované baterie při nabíjení vydávají výbušný vodík. Vodík zůstává ubaterie dlouhou
dobu poté, co byla baterie nabita. Sebemenší jiskra může vodík zapálit azpůsobit
výbuch snásledkem smrti, vážného zranění a/nebo poškození majetku.
Tekutina elektrolytu uvnitř baterie obsahuje kyselinu aje velmi žíravá. Styk
skapalinou zbaterie může způsobit poleptání vedoucí kvážnému zranění nebo poškození majetku.
nebo zapálené cigarety.
VAROVÁNÍ
Napětí elektrocentrály může způsobit úraz elektrickým proudem nebo popáleniny
snásledkem smrti nebo vážného zranění.
provádějících údržbu energetických zařízení.
použijte proudový chránič (RCD).
kabely.
bez bot nebo máte mokré ruce či nohy.
Not for
Reproduction

6 BRIGGSandSTRATTON.COM
UPOZORNĚNÍ
Překročení povoleného příkonu aproudu může vést kpoškození elektrocentrály a elektrických
zařízení, která jsou kelektrocentrále připojena.
NEPŘEKRAČUJTE povolený příkon aproud. Podrobné informace naleznete vkapitole Nepřetěžujte
elektrocentrálu včásti Provoz.
UPOZORNĚNÍ
Nesprávná péče oelektrocentrálu může vést kpoškození azkrácení životnosti.
středisko.
- dojde ke ztrátě elektrického výkonu;
- zařízení jiskří, kouří se z něj nebo zněj vycházejí plameny;
- zařízení příliš vibruje.
VAROVÁNÍ Palivo ajeho výpary jsou vysoce hořlavé a výbušné, což může vést kpopálení, požáru
nebo výbuchu snásledkem smrti, vážného zranění a/nebo poškození majetku.
DOPLŇOVÁNÍ AVYPOUŠTĚNÍ PALIVA
Víčko povolujte opatrně, aby se mohl vyrovnat tlak v nádrži.
Jestliže je to nutné, nahraďte je novými.
SPUŠTĚNÍ ZAŘÍZENÍ
PROVOZ ZAŘÍZENÍ
nebo ohrazení.
Choke“ (sytič) (
).
PŘEPRAVA, STĚHOVÁNÍ A OPRAVY ZAŘÍZENÍ
SKLADOVÁNÍ PALIVA NEBO ZAŘÍZENÍ S PALIVEM V NÁDRŽI
plamínek, i mimo dosah jiných zdrojů zapálení, mohlo by totiž dojít ke vznícení výparů paliva.
VAROVÁNÍ Teplota výfukových plynů může vést ke vznícení hořlavin, konstrukcí nebo poškození
palivové nádrže apožáru, což může mít za následek úmrtí, vážné zranění
a/nebopoškození majetku.
Kontakt soblastí tlumiče výfuku může způsobit popáleniny vedoucí kvážnému
zranění.
výrobce původního zařízení, prodejce nebo dodavatele.
VAROVÁNÍ Neúmyslné jiskření může způsobit požár nebo úraz elektrickým proudem s následkem
smrti nebo vážného zranění.
SEŘIZOVÁNÍ NEBO PROVÁDĚNÍ OPRAV ELEKTROCENTRÁLY
ZKOUŠENÍ ZAPALOVACÍ SVÍČKY
NEZKOUŠEJTE jiskření zapalování přivyjmuté zapalovací svíčce.
VAROVÁNÍ Startér adalší rotující části mohou zachytit ruce, vlasy, oděv či výstroj azpůsobit vážné
zranění.
částmi.
POZOR Nadměrně vysoké provozní otáčky mohou vést klehkému zranění a/nebo poškození
elektrocentrály.
Příliš nízké otáčky představují vysoké zatížení.
Not for
Reproduction

7 7
Montáž
Vaše elektrocentrála je připravena kpoužití po seřízení adoplnění doporučeného paliva aoleje.
Máte-li sobsluhou vaší elektrocentrály libovolný problémy, obraťte se na místní servisní středisko společnosti
Briggs & Stratton. Pokud potřebujete pomoc, připravte si číslo modelu, revize a sériové číslo zidentifikačního
štítku. Informace oumístění identifikačního štítku naleznete včásti Funkce aovládací prvky elektrocentrály.
Vybalení elektrocentrály
1. Umístěte krabici na pevnou arovnou plochu.
2. Vyjměte vše z krabice.
Balení elektrocentrály obsahuje následující:
Doplnění motorového oleje
1. Umístěte elektrocentrálu na rovný povrch.
2. Doplňte olej podle postupu uvedeného vkapitole Doplnění motorového oleje včásti Údržba motoru.
UPOZORNĚNÍ
Nesprávná péče oelektrocentrálu může vést kpoškození azkrácení životnosti.
motoru.
Doplnění paliva Obrázek
1
Palivo musí splňovat následující požadavky:
Vysoké nadmořské výšky.
(metyltercbutyléter).
UPOZORNĚNÍ Předcházejte poškození elektrocentrály.
Nedodržení doporučení ohledně paliva vede kzániku záruky.
Pro ochranu palivového systému proti tvorbě pryskyřičných usazenin přimíchejte při doplňování paliva
palivový stabilizátor. Viz Skladování. Všechna paliva nejsou stejná. Pokud po použití paliva zjistíte problémy se
startováním nebo výkonem, změňte dodavatele paliva nebo změňte značku paliva. Schváleným palivem pro
1. Vyčistěte oblast kolem uzávěru nalévacího hrdla a sejměte víčko.
2. Pomalu přilévejte bezolovnatý benzín až po červenou palivovou rysku (A) vpalivové nádrži. Dávejte
pozor, abyste nepřekročili uvedenou rysku. Takto vnádrži zůstane místo pro tepelnou roztažnost
paliva.
3. Našroubujte víčko palivové nádrže a nechte případné rozlité palivo před spuštěním motoru vypařit.
Vysoké nadmořské výšky
Ve výškách nad 1500 metrů (5000 stop) je přípustný minimálně 85oktanový / 85 AKI (89 RON) benzín.
Prododržení předpisů o emisích je potřeba provést úpravu pro vysoké výšky. Provoz bez této úpravy může
snížit výkonnost, zvýšit spotřebu paliva a zvýšit vylučování emisí. Informace o seřízení pro vyšší nadmořské
výšky získáte uautorizovaného prodejce značky Briggs & Stratton. Provozování motoru ve výškách menších než
750metrů (2500 stop) s úpravou pro provoz ve vysokých výškách se nedoporučuje.
Odvzdušňovací páčka palivové nádrže Obrázek
2
Palivová nádrž je opatřena odvzdušňovací páčkou (A), která slouží kutěsnění palivové nádrže. Při běžícím
motoru musí být odvzdušňovací páčka vpoloze (I).
Pokud není motor používán, ponechte odvzdušňovací páčku vzavřené poloze (O). Díky tomu se sníží možnost
úniku paliva. Před přepnutím odvzdušňovací páčky do zavřené polohy (O) nechte motor vychladnout.
Funkce aovládací prvky Obrázek
3
Než začnete pracovat selektrocentrálou, přečtěte si tento návod k obsluze a
bezpečnostní zásady. Abyste se seznámili s umístěním různých ovládacích a seřizovacích prvků,
porovnejte ilustrace svaší elektrocentrálou. Tento návod si uschovejte pro další použití.
A - Odvzdušňovací páčka palivové nádrže – před použitím elektrocentrály přepněte odvzdušňovací páčku do
polohy (I). Pokud elektrocentrálu nepoužíváte, přepněte ji do zavřené polohy (O).
B - Palivová nádrž – objem 3,7l (1,0 gal).
C - Páčka sytiče – používá se při startování studeného motoru.
D - Boční kryt pro údržbu – po sejmutí je možný přístup kevzduchovému filtru adoplnění oleje.
E - Ruční startér – slouží kručnímu spuštění motoru.
F - Přepínač motoru – před použitím ručního startéru přepněte tento přepínač do polohy I. Nastavením
přepínače do polohy O se motor zastaví. Dále zapíná avypíná palivový ventil.
G - Kontrolka výstupu (OK) – tato zelená kontrolka výstupu svítí vpřípadě, že elektrocentrála pracuje
normálně. Signalizuje, že elektrocentrála produkuje napětí do zásuvek.
H - Zásuvka 12V stejnosm. – tato zásuvka slouží k nabíjení 12V baterie pomocí kabelů pro nabíjení baterie.
Tato zásuvka je chráněna jističem.
J - Zemnicí spojka – požadavky na uzemnění ve vaší oblasti vám poskytnou místní úřady.
K - Přepínač POWERSMART– pomocí tohoto přepínače se zapíná avypíná režim POWERSMART.
L - Přetížení (!) – vpřípadě, že je elektrocentrála přetížená, rozsvítí se červená kontrolka přetížení asníží se
napětí zásuvek. Dále přestane svítit zelená kontrolka výstupu. Pokud je elektrocentrála přetížená, je před
návratem do normálního provozního režimu nutné vypnout aodpojit veškeré elektrické spotřebiče, vypnout
elektrocentrálu arestartovat ji.
M - Kontrolka nedostatku oleje (
) – signalizační systém upozorňující na nedostatek oleje
zabraňuje poškození motoru vdůsledku nedostatku oleje. Pokud hladina motorového oleje poklesne pod
nastavenou úroveň, rozsvítí se žlutá kontrolka nedostatku oleje aolejový spínač zastaví motor. Pokud se
motor zastaví nebo se při zatažení za ruční startér rozsvítí žlutá kontrolka nedostatku oleje, zkontrolujte
množství motorového oleje.
N - Zásuvky 230V stříd. – lze použít knapájení elektrickou energií pro provoz elektrických spotřebičů
sparametry 230V stříd., jedna fáze, 50Hz, například osvětlení, spotřebičů, nářadí amotorů. Tyto zásuvky
jsou proti přetížení chráněny vnitřním systémem proti přetížení.
P - Tlumič výfuku alapač jisker – tlumič výfuku snižuje hlučnost motoru aje vybaven lapačem jisker.
R - Horní kryt pro údržbu – po sejmutí je možný přístup kzapalovací svíčce.
S - Identifikační štítek – na identifikačním štítku je uvedeno číslo modelu, revize a sériové číslo. Připravte si
tyto údaje, pokud se budete dožadovat asistence servisu.
Nezobrazené části:
Vzduchový filtr (pod bočním krytem pro údržbu) – chrání motor filtrováním prachu anečistot
znasávaného vzduchu.
Uzávěr oleje (pod bočním krytem pro údržbu) – slouží pro kontrolu adoplňování motorového oleje.
VAROVÁNÍ Palivo ajeho výpary jsou vysoce hořlavé a výbušné, což může vést kpopálení, požáru
nebo výbuchu snásledkem smrti, vážného zranění a/nebo poškození majetku.
DOPLŇOVÁNÍ PALIVA
Víčko povolujte opatrně, aby se mohl vyrovnat tlak v nádrži.
Jestliže je to nutné, nahraďte je novými.
Not for
Reproduction

8 BRIGGSandSTRATTON.COM
Provoz
Zemnicí svorka
Elektrocentrála je vybaven zemnicí svorkou. Místní elektrotechnické předpisy mohou vyžadovat připojení
kvhodnému uzemnění. Nulový vodič elektrocentrály je plovoucí, což znamená, že střídavé vinutí statoru je
izolováno od zemnicí svorky azemnicích kolíků střídavých zásuvek. Elektrická zařízení, jako jsou proudové
chrániče, které vyžadují uzemnění nulového vodiče nemusí stouto elektrocentrálou pracovat správně.
Zvláštní požadavky
Pro zamýšlené použití elektrocentrály mohou být vplatnosti národní amístní předpisy nebo nařízení. Poraďte se
nulový vodič.
Umístění elektrocentrály Obrázek
4
Vzdálenosti apohyb vzduchu
Umístěte elektrocentrálu ve venkovních prostorách, kde se nebudou hromadit smrtící výfukové plyny.
NEUMÍSŤUJTE elektrocentrálu do míst, kde by mohlo docházet k hromadění výfukových plynů (A), které by se
mohly dostat dovnitř potenciálně obydlené budovy. Zkontrolujte, zda výfukové plyny nemohou pronikat okny,
dveřmi, ventilačními otvory nebo jinými otvory do uzavřeného prostoru. Při umísťování elektrocentrály berte
vúvahu běžné proudění větru a vzduchu.
Spuštění motoru Obrázek
2
3
1. Ujistěte se, že je elektrocentrála umístěna na hladkém arovném povrchu.
UPOZORNĚNÍ Pokud není elektrocentrála umístěna na hladkém arovném povrchu, nemusí se spustit nebo se
může při provozu zastavit. Umístění jednotky na jakýkoliv povrch, který blokuje spodní chladicí aodvzdušňovací
prostor, může mít za následek ztrátu výkonu. Pokud dojde ke ztrátě výkonu, pak elektrocentrálu vypněte a před
restartováním nechte vychladnout.
2. Ujistěte se, že je přepínač režimu POWERSMART (3, K) ve vypnuté poloze (O).
3. Přepněte přepínač motoru (3, F) do zapnuté polohy (I).
4. Přepněte odvzdušňovací páčku palivové nádrže (2, A) do zapnuté polohy (I).
5. Zatlačte páčku sytiče (3, C) do polohy (
).
UPOZORNĚNÍ Chcete-li spustit motor poprvé, poté, co došlo palivo, nebo po dlouhé době skladování, naplňte
palivovou nádrž po červenou rysku, jak je popsáno včásti Doplnění paliva. Spuštění bude vyžadovat více pokusů,
protože se zpalivového systému musí odstranit nahromaděný vzduch.
6. Uchopte rukojeť ručního startéru (3, E) apomalu táhněte, dokud neucítíte slabý odpor. Poté prudkým
zatáhnutím nastartujte motor.
7. Přesuňte páčku sytiče do polohy spolovičním přiškrcením a dvakrát zatáhněte rukojeť ručního startéru.
8. Pomalu přesuňte páčku sytiče do spuštěné polohy (
). Pokud motor běží nepravidelně, přesuňte
páčku sytiče do polohy spolovičním přiškrcením, dokud se motor nerozeběhne správně apoté přesuňte
páčku sytiče do spuštěné polohy (
).
UPOZORNĚNÍ Pokud je motor zahlcený, přesuňte páčku sytiče do spuštěné polohy (
) astartujte, dokud
motor nenaskočí.
UPOZORNĚNÍ Pokud motor po 3 zataženích nastartuje, ale nespustí se, nebo pokud se vypíná za provozu,
ujistěte se, že je elektrocentrála umístěna na rovném povrchu azkontrolujte hladinu oleje vklikové skříni.
Tato elektrocentrála je vybavena zařízením pro ochranu před nízkou hladinou oleje. Pakliže je elektrocentrála
vybavena tímto zařízením, je pro spuštění motoru nutná správná hladina oleje.
Připojení elektrických spotřebičů
U230V zásuvek elektrocentrály používejte pouze kvalitní, dobře izolované prodlužovací kabely. Před každým
použitím prodlužovací kabely zkontrolujte. Ověřte, že jsou všechny prodlužovací kabely dostatečně dimenzovány
anejsou poškozeny. Prodlužovací kabely používejte co nejkratší, aby se minimalizovala ztráta napětí.
1. Ujistěte se, že se rozsvítila zelená kontrolka výstupu (může se rozsvítit až po třech sekundách).
2. Po spuštění nechte motor několik minut ustálit a zahřát.
3. Zapojte aspusťte požadované spotřebiče sparametry 230V stříd., jedna fáze, 50Hz.
UPOZORNĚNÍ
Nepřetěžujte elektrocentrálu.
UPOZORNĚNÍ Překročení povoleného příkonu aproudu může vést kpoškození elektrocentrály a elektrických
zařízení, která jsou kelektrocentrále připojena.
NEPŘEKRAČUJTE povolený příkon aproud. Podrobné informace naleznete vkapitole Nepřetěžujte
elektrocentrálu včásti Provoz.
Zastavení motoru
1. Vypněte motor aodpojte veškeré elektrické spotřebiče ze zásuvek. NIKDY nespouštějte ani nezastavujte
motor spřipojenými azapnutými elektrickými zařízeními.
2. Přesuňte přepínač režimu POWERSMART do vypnuté polohy (O).
3. Nechte motor několik minut běžet na volnoběh, aby se ustálily teploty jednotlivých částí motoru a
elektrocentrály.
4. Přesuňte přepínač motoru do vypnuté polohy (O).
5. Přepněte odvzdušňovací páčku palivové nádrže do vypnuté polohy (O).
VAROVÁNÍ Teplota výfukových plynů může vést ke vznícení hořlavin, konstrukcí nebo poškození
palivové nádrže apožáru, což může mít za následek úmrtí, vážné zranění
a/nebo poškození majetku.
Kontakt soblastí tlumiče výfuku může způsobit popáleniny vedoucí kvážnému
zranění.
výrobce původního zařízení, prodejce nebo dodavatele.
VAROVÁNÍ
Napětí elektrocentrály může způsobit úraz elektrickým proudem nebo popáleniny
snásledkem smrti nebo vážného zranění.
kabely.
bez bot nebo máte mokré ruce či nohy.
VAROVÁNÍ Poškozené nebo přetížené elektrické kabely se mohou přehřát, spálit nebo může dojít
kelektrickému oblouku snásledkem smrti, vážného zranění a/nebo poškození majetku.
VAROVÁNÍ Zpětný ráz startovací šňůry (rychlé zatažení) táhne ruku arameno směrem kmotoru
rychleji, než se můžete pustit amůže mít za následek zlomeniny, pohmožděniny apodvrtnutí
vedoucí kvážným poraněním.
zabránili zpětnému rázu.
VAROVÁNÍ Běžící motor produkuje oxid uhelnatý, což je bezbarvý jedovatý plyn bez zápachu.
Vdechování oxidu uhelnatého může způsobit smrt, vážné zranění, bolest hlavy, únavu,
závratě, zvracení, zmatenost, křeče, nevolnost nebo mdloby.
otvory výfukové plyny.
nebo ohrazení, a to ani v případě, že jsou otevřená okna adveře.
Not for
Reproduction

9 9
Režim POWERSMART
Tato funkce výrazně zlepšuje hospodaření spalivem asnižuje hlučnost. Pokud je tento přepínač zapnutý(I),
zvýší se při zapojení elektrických spotřebičů otáčky motoru apři odpojení elektrických spotřebičů se otáčky
motoru sníží.
Pokud je přepínač vypnutý (O), poběží motor na plné regulované otáčky.
UPOZORNĚNÍ Přepínač ponechte vždy vypnutý při spouštění azastavování elektrocentrály apři používání
stejnosměrné zásuvky.
Nabíjení baterie Obrázek
5
Vaše elektrocentrála umí dobíjet vybité 12V automobilové nebo užitkové baterie. Maximální proud dostupný pro
obvod nabíjení baterie je 5A. Před přetížením tuto zásuvku chrání stejnosměrný jistič. Dojde-li kpřetížení, jistič
se rozpojí (tlačítko vyskočí). Počkejte několik minut astisknutím tlačítka jistič obnovte.
UPOZORNĚNÍ Před použitím obvodu pro nabíjení baterie přepněte přepínač režimu POWERSMART do vypnuté
polohy (O).
UPOZORNĚNÍ
Chcete-li dobíjet 12Vbaterie, postupujte následovně:
1. Podle potřeby vyčistěte kolíky asvorky baterie.
2. Zkontrolujte hladinu kapaliny všech článků. Vpřípadě potřeby dolijte POUZE destilovanou vodu tak,
aby byly zakryty oddělovače včláncích baterie. NEPOUŽÍVEJTE vodu zvodovodu.
3. Pokud je baterie vybavena odvzdušňovacími uzávěry, ujistěte se, že jsou nainstalovány ajsou
utěsněny.
4. Připojte svorku nabíjecího kabelu sčervenou násadou na kolík nebo svorku baterie označenou jako
kladná, POS nebo (+).
5. Připojte svorku nabíjecího kabelu sčernou násadou na kolík nebo svorku baterie označenou jako
záporná, NEG nebo (-).
6. Připojte nabíjecí kabel do 12V stejnosměrné zásuvky.
7. Spusťte elektrocentrálu postupem uvedeným včásti Spuštění motoru. Nechte motor běžet, dokud se
baterie nedobije.
UPOZORNĚNÍ Kdobití slabě nabité baterie obvykle postačuje 30 až 120 minut.
8. Jakmile je baterie nabitá, vypněte motor postupem uvedeným včásti Zastavení motoru.
9. Odpojte nabíjecí kabel od elektrocentrály ateprve poté jej odpojte od baterie.
UPOZORNĚNÍ Pro testování stavu nabití acelkového stavu baterie použijte automobilový hustoměr. Pečlivě se
(naměřené hustoměrem) 1,260 nebo vyšší.
Nepřetěžujte elektrocentrálu
Kapacita
Ujistěte se, že elektrocentrála může dodávat dostatečný jmenovitý (provozní) apřepěťový (startovací) výkon pro
1. Vyberte spotřebiče, které budou připojeny ve stejnou dobu.
2. Sečtěte jmenovité (provozní) výkony těchto spotřebičů. Výsledná hodnota odpovídá výkonu, který musí
být elektrocentrála schopná dodávat. Viz Referenční příručka příkonu.
3. Odhadněte potřebný přepěťový (startovací) výkon. Přepěťový výkon je krátkodobě zvýšený výkon
potřebný ke spuštění nástrojů poháněných elektromotorem nebo zařízení, jako jsou kotoučové pily
nebo chladničky. Protože všechny motory nejsou spouštěny ve stejnou dobu, lze celkový přepěťový
výkon určit přidáním hodnoty přepěťového výkonu spotřebiče snejvyšším přepěťovým výkonem
kcelkovému jmenovitému výkonu zkroku 2.
Příklad:
Celkový jmenovitý (provozní) příkon = 1555
Nejvyšší přepěťový příkon = 600
Požadovaný celkový výkon elektrocentrály = 2155
Řízení napájení
Vrámci prodloužení životnosti elektrocentrály apřipojených zařízení je důležité dávat pozor při připojování
elektrických spotřebičů kelektrocentrále. Před spuštěním motoru nesmí být kzásuvkám elektrocentrály nic
1. Spusťte motor pomocí postupu uvedeného vtomto návodu (kzásuvkám elektrocentrály není nic
připojeno).
2. Zapojte azapněte první spotřebič, ideálně ten snejvětším výkonem.
3. Nechte výstup elektrocentrály ustálit (pozná se tak, že motor jde hladce a připojené zařízení funguje
správně).
4. Zapojte azapněte další spotřebič.
5. Opět ponechte elektrocentrálu ustálit.
6. Kroky 4 a5 opakujte pro každý další spotřebič.
Nikdy nepřipojujte spotřebiče svyšším příkonem, než je kapacita elektrocentrály. Věnujte zvláštní pozornost
zahrnutí přepěťového výkonu do kapacity elektrocentrály, viz výše uvedený postup.
* Uvedené výkony jsou pouze orientační. Skutečný výkon je uveden na nástrojích aspotřebičích.
VAROVÁNÍ Skladované baterie při nabíjení vydávají výbušný vodík. Vodík zůstává ubaterie dlouhou
dobu poté, co byla baterie nabita. Sebemenší jiskra může vodík zapálit azpůsobit
výbuch snásledkem smrti, vážného zranění a/nebo poškození majetku.
Tekutina elektrolytu uvnitř baterie obsahuje kyselinu aje velmi žíravá. Styk
skapalinou zbaterie může způsobit poleptání vedoucí kvážnému zranění nebo poškození majetku.
nebo zapálené cigarety.
Nástroje nebo zařízení Jmenovitý (provozní) příkon Přepěťový (startovací) příkon
Okenní ventilátor 300 600
Mraznička 500 500
Televize 500 —
Zabezpečovací systém 180 —
Žárovka (75 W) 75 —
Celkový provozní příkon 1555W Nejvyšší přepěťový příkon 600W
Referenční příručka příkonu
Nástroje nebo zařízení
Jmenovitý*
(provozní) příkon
Přepěťový (startovací)
příkon
Základy
Žárovka – 75W 75 —
Mraznička 500 500
Kalové čerpadlo 800 1200
Chladnička/mraznička – 510 l 800 1600
Vodní čerpadlo – 1/3 hp 1000 2000
Vytápění/chlazení
Okenní klimatizační jednotka – 10000 BTU 1200 1800
Okenní ventilátor 300 600
Ventilátor topeniště – 1/2 hp 800 1300
Kuchyně
Mikrovlnná trouba – 1000W 1000 —
Kávovar 1500 —
Elektrický sporák – jednotlivý prvek 1500 —
Rodinný pokoj
Přehrávač disků DVD/CD 100 —
Videorekordér 100 —
Stereo přijímač 450 —
Barevná televize – 27" 500 —
Osobní počítač se 17" monitorem 800 —
Jiné
Zabezpečovací systém 180 —
Radiobudík 300 —
Ovladač garážových vrat – 1/2 hp 480 520
Hobby/pracoviště
Halogenová pracovní svítilna 1000 —
Bezvzduchové stříkací zařízení – 1/3 hp 600 1200
Pila ocaska 960 960
Elektrická vrtačka – 1/2 hp 1000 1000
Kotoučová pila – 7-1/4" 1500 1500
Not for
Reproduction

10 BRIGGSandSTRATTON.COM
Údržba
Plán údržby
Dodržujte termíny určené počtem provozních hodin nebo dobou uplynulou od poslední údržby, podle toho,
conastane dříve. Jestliže motor pracuje ve ztížených podmínkách, musíte provádět údržbu častěji – viz
poznámka.
¹
Pokud elektrocentrálu používáte ve znečištěném nebo prašném prostředí, provádějte servis častěji.
Obecná doporučení
Pravidelná údržba zlepšuje výkon a prodlužuje životnost stroje. Servisní služby poskytují autorizovaní prodejci.
Záruka na tuto elektrocentrálu se nevztahuje na poškození, knimž došlo vdůsledku nesprávného použití nebo
nedbalosti ze strany obsluhy. Abyste mohli plně využívat výhody záruky, je nutné dodržovat pokyny uvedené
vtomto návodu kelektrocentrále.
UPOZORNĚNÍ
Nesprávná péče oelektrocentrálu může vést kpoškození azkrácení životnosti.
Některé seřizovací postupy je nutné vrámci údržby elektrocentrály provádět pravidelně.
Minimálně jednou za sezónu je potřeba provést servis a seřízení. Postupujte podle pokynů uvedených výše
vtabulce Plán údržby.
POZNÁMKA Jednou ročně je třeba vyčistit nebo vyměnit zapalovací svíčku a vyměnit vzduchový filtr. Nová
zapalovací svíčka a čistý vzduchový filtr zajistí správné smíchání paliva se vzduchem a delší životnost motoru.
Údržba elektrocentrály
Údržba elektrocentrály spočívá v tom, že ji udržujeme čistou a suchou. Elektrocentrálu používejte a skladujte
jen v čistém suchém prostředí, kde není vystavena nadměrné prašnosti, nečistotám, vlhkosti nebo korozivním
výparům. Chladicí otvory v elektrocentrále a motoru nesmí být ucpány sněhem, listím nebo jinými cizími
materiály.
POZNÁMKA Kčištění elektrocentrály NEPOUŽÍVEJTE vodu ani jiné kapaliny. Kapaliny mohou proniknout do
motoru avést kesnížení výkonu aporuchám. Kromě toho, pokud kapalina pronikne do elektrocentrály větracími
otvory, může zůstávat vdutinách aprasklinách vokolí rotoru aizolace vinutí statoru. Tekuté apevné nečistoty se
hromadí na vnitřním vinutí elektrocentrály apostupně snižují izolační odpor těchto vinutí.
Čištění
Denně nebo před každým použitím zkontrolujte okolí elektrocentrály a prostor pod ní, zda nevykazuje známky
unikání oleje nebo paliva. Čistěte nahromaděné nečistoty uvnitř i vně elektrocentrály. Zkontrolujte chladicí
štěrbiny a otvory elektrocentrály. Tyto otvory musí být vždy čisté a nesmí být ucpané.
Motor a jeho díly je nutné udržovat čisté, aby se snížilo riziko přehřátí a vznícení vrstvy nahromaděných nečistot.
UPOZORNĚNÍ
Nesprávná péče oelektrocentrálu může vést kpoškození azkrácení životnosti.
Čištění palivového filtru
Obrázek
6
Palivový filtr zabraňuje vstupu nečistot do palivového systému.
Palivový filtr čistěte následujícím způsobem:
1. Ujistěte se, že je elektrocentrála umístěna na rovném povrchu.
2. Demontujte palivové víčko (A) apalivový filtr (B).
3. Umyjte palivový filtr pomocí tekutého čisticího prostředku avody.
4. Otřete palivový filtr čistým asuchým hadříkem.
5. Opatrně namontujte palivový filtr apalivové víčko.
Údržba motoru
Olej
Doporučený olej
Nejlepší výkonnosti dosáhnete, budete-li používat doporučené oleje značky Briggs & Stratton spotvrzenou
zárukou. Ostatní vysoce jakostní detergentní oleje jsou přijatelné, jestliže jsou klasifikovány minimálně pro SF,
SG, SH, SJ nebo vyšší. NEPOUŽÍVEJTE žádné speciální přísady.
Venkovní teploty určují správnou viskozitu oleje pro motor. Pro očekávaný rozsah venkovní teploty vyberte
nejlepší viskozitu pomocí tabulky.
* Používání oleje SAE 30 při teplotách nižších než 4°C (40°F) způsobuje obtížné startování.
** Použití oleje 10W30 při teplotách nad 27°C (80°F) může vést ke zvýšené spotřebě oleje. Vtakovém případě
kontrolujte častěji stav oleje.
POZNÁMKA
všechny teplotní rozsahy. Použití syntetického oleje nemění dobu předepsanou pro výměnu oleje.
Kontrola hladiny oleje
Obrázek
8
Hladinu oleje kontrolujte před každým použitím a výměnu oleje provádějte minimálně po každých 8 hodinách
provozu. Udržujte stálou hladinu oleje.
1. Ujistěte se, že je elektrocentrála umístěna na rovném povrchu.
2. Povolte šrouby bočního krytu pro údržbu asejměte boční kryt pro údržbu.
3. Vyčistěte oblast kolem nalévacího hrdla a sejměte víčko.
4. Ověřte, že olej téměř přetéká nalévací hrdlo.
5. Nainstalujte a dotáhněte víčko.
6. Nasaďte boční kryt pro údržbu arukou dotáhněte šrouby bočního krytu pro údržbu.
Doplnění motorového oleje
Obrázek
9
1. Ujistěte se, že je elektrocentrála umístěna na rovném povrchu.
2. Zkontrolujte hladinu oleje postupem uvedeným včásti Kontrola hladiny oleje vkrocích 2 až 4.
3. Podle potřeby dolijte olej tak, aby téměř přetékal nalévací hrdlo.
4. Nainstalujte a dotáhněte víčko.
5. Nasaďte boční kryt pro údržbu arukou dotáhněte šrouby bočního krytu pro údržbu.
Každých 8 hodin či denně
Vprvních 10 hodinách provozu
Každých 50 hodin nebo po 3 měsících
Každých 100 hodin nebo po 6 měsících
¹
Každých 250 hodin provozu nebo ročně
VAROVÁNÍ Neúmyslné jiskření může způsobit požár nebo úraz elektrickým proudem s následkem
smrti nebo vážného zranění.
SEŘIZOVÁNÍ NEBO PROVÁDĚNÍ OPRAV ELEKTROCENTRÁLY
ZKOUŠENÍ ZAPALOVACÍ SVÍČKY
NEZKOUŠEJTE jiskření zapalování přivyjmuté zapalovací svíčce.
Not for
Reproduction

11 11
Výměna motorového oleje
Používáte-li elektrocentrálu vextrémně špinavém nebo prašném prostředí nebo vextrémně horkém počasí,
jenutné měnit olej častěji.
Olej vyměňujte, když je motor ještě teplý, dle následujících pokynů:
1. Ujistěte se, že je elektrocentrála umístěna na rovném povrchu.
2. Povolte šrouby bočního krytu pro údržbu asejměte boční kryt pro údržbu.
3. Vyčistěte oblast kolem nalévacího hrdla a sejměte víčko.
4. Naklopte elektrocentrálu avypusťte olej do vhodné nádoby. Ujistěte se, že elektrocentrálu nakláníte
směrem knalévacímu hrdlu. Po vyprázdnění klikové skříně vraťte elektrocentrálu do svislé polohy.
5. Doplňte olej postupem uvedeným včásti Doplnění motorového oleje vkrocích 3 až 5.
Výměna vložky vzduchového filtru
Obrázek
10
Pokud budete motor spouštět se znečištěným vzduchovým filtrem, nebude motor fungovat správně.
Pokudelektrocentrálu používáte ve znečištěném nebo prašném prostředí, provádějte servis častěji.
Při servisu vzduchového filtru postupujte podle následujících kroků:
1. Povolte šrouby bočního krytu pro údržbu asejměte boční kryt pro údržbu.
2. Povolte šrouby krytu vzduchového filtru (A) asejměte kryt vzduchového filtru (B).
3. Tahem ksobě opatrně vyjměte pěnový vzduchový filtr (C).
4. Tahem ksobě opatrně vyjměte odvzdušňovací filtr (D).
5. Umyjte odvzdušňovací filtr apěnový vzduchový filtr pomocí tekutého čisticího prostředku avody.
Vymačkejte je do čisté savé látky.
6. Namočte pěnový vzduchový filtr v motorovém oleji a vymačkejte jej do čisté látky, abyste odstranili
přebytečný olej.
7. Nainstalujte vyčištěný nebo nový pěnový vzduchový filtr do základny.
8. Nainstalujte vyčištěný nebo nový odvzdušňovací filtr do základny.
9. Opět nasaďte kryt vzduchového filtru adotáhněte šroub.
10. Nasaďte boční kryt pro údržbu arukou dotáhněte šrouby bočního krytu pro údržbu.
Servis zapalovací svíčky
Obrázek
11
12
Výměna svíčky umožní rychlejší start alepší běh motoru.
1. Sejměte horní kryt pro údržbu.
2. Vyčistěte okolí svíčky avyjměte zástrčku svíčky.
3. Vyjměte azkontrolujte svíčku.
4. Zkontrolujte mezeru mezi elektrodami pomocí spároměru avpřípadě potřeby nastavte mezeru na
doporučenou hodnotu (viz Technické údaje).
5. Pokud jsou elektrody zkorodované, spálené nebo pokud je porcelán popraskaný, vyměňte zapalovací
svíčku. Použijte doporučenou náhradní svíčku. Viz Technické údaje.
6. Nainstalujte zapalovací svíčku a pevně ji utáhněte. Nainstalujte zástrčku svíčky.
7. Nainstalujte horní kryt pro údržbu.
Kontrola tlumiče výfuku alapače jisker
Obrázek
13
14
Zkontrolujte, zda tlumič výfuku nevykazuje praskliny, korozi nebo jiné opotřebení. Sejměte lapač jisker, je-li
jím motor vybaven, a zkontrolujte, zda není poškozen nebo zanesen uhlíkovými usazeninami. Pokud je potřeba
některé díly vyměnit, použijte pouze originální náhradní díly.
Lapač jisker vyčistěte azkontrolujte následujícím způsobem:
1. Odstraňte čtyři šrouby, kterými je kryt výfuku připevněn kelektrocentrále, akryt sejměte.
2. Odstraňte šroub, kterým je lapač jisker připevněn kvýfuku. Sejměte lapač jisker.
3. Zkontrolujte lapač avpřípadě, že je roztržený, perforovaný nebo jinak poškozený, vyměňte jej.
NEPOUŽÍVEJTE poškozený lapač. Pokud není poškozený, vyčistěte lapač pomocí kartáče.
4. Připevněte lapač na výfuk. Připevněte na výfuk kryt.
Kontrola vůle ventilu
Pravidelné kontroly vůle ventilů a seřízení zvyšují výkon a prodlužují životnost motoru. Tento postup nelze
provést bez částečné demontáže motoru apoužití speciálních nástrojů. Ztohoto důvodu doporučujeme, aby jste
kontrolu aseřízení nechali vdoporučených intervalech (viz Plán údržby včásti Údržba) provádět autorizovaného
servisního prodejce.
Skladování
Pokud nebudete elektrocentrálu používat více než 30 dní, pomocí následujících pokynů ji připravte na
uskladnění.
Skladování elektrocentrály
Čištění.
Pokyny pro dlouhodobé skladování
Palivo skladované déle než 30 dní může zvětrat. Zvětralé palivo způsobuje, že se vpalivové soustavě nebo na
základní částech karburátoru tvoří pryskyřičné usazeniny. Chcete-li, aby palivo nezvětrávalo, použijte stabilizátor
paliva značky Briggs & Stratton FRESH START®, který je kdostání jako kapalné aditivum nebo jako kapkový
zásobník koncentrátu stabilizátoru.
Benzín nemusíte zmotoru vypouštět, pokud do paliva přidáte podle pokynů stabilizátor paliva. Nechte motor
běžet 2 minuty, aby se stabilizátor dostal do celé palivové soustavy. Pak může být motor ipalivo uskladněno až
24 měsíců.
Pokud nebyl benzín vmotoru ošetřen stabilizátorem paliva, musí být vypuštěn do schválené nádoby. Motor
nechte běžet do té doby, než se zastaví kvůli nedostatku paliva. Doporučuje se použít stabilizátor paliva i do
kanistru, ve kterém bude uskladněn, aby nedošlo k jeho zvětrání.
Výměna motorového oleje
Zklikové skříně zahřátého motoru vypusťte olej. Naplňte čerstvý olej doporučené jakosti. Viz Výměna motorového
oleje.
Další tipy pro skladování
1. NESKLADUJTE palivo do příští sezony, pokud nebylo ošetřeno dle údajů vsekci Pokyny pro dlouhodobé
skladování.
2. Pokud zásobník paliva začíná korodovat, vyměňte jej. Rez anečistoty vpalivu mohou při použití
vtomto přístroji způsobit problémy.
3. Zakryjte zařízení vhodným ochranným krytem, který nezadržuje vlhkost.
4. Skladujte elektrocentrálu včistých asuchých prostorách.
POZOR Vyhýbejte se delšímu nebo opakovanému kontaktu pokožky spoužitým motorovým olejem.
VAROVÁNÍ Kontakt soblastí tlumiče výfuku může způsobit vážné popáleniny.
Od vypouštěného horka/plynů se mohou vznítit hořlavé materiály či konstrukce
nebo může dojít ke vznícení v důsledku poškození palivové nádrže.
výrobce původního zařízení, prodejce nebo dodavatele.
VAROVÁNÍ Palivo ajeho výpary jsou vysoce hořlavé a výbušné, což může vést kpopálení, požáru
nebo výbuchu snásledkem smrti, vážného zranění a/nebo poškození majetku.
SKLADOVÁNÍ PALIVA NEBO ZAŘÍZENÍ S PALIVEM V NÁDRŽI
plamínek, i mimo dosah jiných zdrojů zapálení, mohlo by totiž dojít ke vznícení výparů paliva.
VYPOUŠTĚNÍ PALIVA
Víčko povolujte opatrně, aby se mohl vyrovnat tlak v nádrži.
Jestliže je to nutné, nahraďte je novými.
VAROVÁNÍ Kryty používané při skladování mohou způsobit požár snásledkem smrti, vážného
zranění a/nebo poškození majetku.
Not for
Reproduction

12 BRIGGSandSTRATTON.COM
Řešení problémů
Problém Příčina Náprava
Motor běží, ale na výstupu není napětí.
1. Svítí červená kontrolka přetížení. Elektrocentrála je přetížená.
2. Zelená kontrolka výstupu nesvítí. Porucha elektrocentrály.
3. Špatné připojení nebo vadný kabel.
4. Připojené zařízení je poškozené.
1. Viz kapitola Nepřetěžujte elektrocentrálu včásti Provoz. Vypněte
arestartujte elektrocentrálu.
2. Kontaktujte autorizovaný servis.
3. Proveďte kontrolu aopravu.
4. Připojte jiné zařízení, které není porouchané.
Motor běží, ale při připojení spotřebičů se zpomalí.
1. Zkrat připojeného spotřebiče.
2. Otáčky motoru jsou příliš nízké.
3. Elektrocentrála je přetížená.
4. Zkrat obvodu elektrocentrály.
1. Odpojte zkratovaný elektrický spotřebič.
2. Kontaktujte autorizovaný servis.
3. Viz kapitola Nepřetěžujte elektrocentrálu včásti Provoz.
4. Kontaktujte autorizovaný servis.
Motor se nespustí; zastavuje se za provozu nebo běží
nepravidelně.
1. Přepínač motoru je ve vypnuté poloze (O).
2. Odvzdušňovací páčka palivové nádrže je ve vypnuté poloze (O).
3. Rozsvítí se kontrolka nedostatku oleje. Nedostatek oleje.
4. Špinavý vzduchový filtr.
5. Nedostatek paliva.
6. Zvětralé palivo.
7. Kabel zapalovací svíčky je odpojený od zapalovací svíčky.
8. Poškozená zapalovací svíčka.
9. Voda vpalivu.
10. Zahlcený motor.
11. Příliš bohatá směs paliva.
12. Zaseknutí sacího ventilu v zavřené nebo otevřené poloze.
13. Ztráta komprese motoru.
1. Přepněte přepínač motoru do polohy (I).
2. Přepněte odvzdušňovací páčku palivové nádrže do polohy (I).
3. Naplňte klikovou skříň olejem na správnou hladinu nebo umístěte
elektrocentrálu na rovný povrch.
4. Vyčistěte nebo vyměňte vzduchový filtr.
5. Doplňte palivovou nádrž.
6. Vypusťte palivovou nádrž akarburátor; naplňte je čerstvým palivem.
7. Zapojte zapalovací svíčku.
8. Vyměňte zapalovací svíčku.
9. Vypusťte palivovou nádrž akarburátor; naplňte je čerstvým palivem.
10. Počkejte 5 minut a znovu natočte motor.
11. Kontaktujte autorizovaný servis.
12. Kontaktujte autorizovaný servis.
13. Kontaktujte autorizovaný servis.
Motor nemá dostatečný výkon.
1. Zátěž je příliš vysoká.
2. Špinavý vzduchový filtr.
1. Viz kapitola Nepřetěžujte elektrocentrálu včásti Provoz.
2. Vyměňte vzduchový filtr.
Motor zadrhává. Karburátor je nastaven na příliš bohatou nebo příliš chudou směs. Kontaktujte autorizovaný servis.
Technické údaje produktu
Startovací výkon ...........................................................................2000W
Výkon* ...................................................................................1600W
při 230V stříd. ............................................................................7,0A
při 12V stejn. .............................................................................. 5A
Jmenovitý kmitočet ........................................................................ 50Hz
Fáze ................................................................................... Jedna fáze
Objem ............................................................. 105,6 ccm (6,44 kubického palce)
Mezera mezi elektrodami svíčky ..................................... 0,6 – 0,7mm (0,023 – 0,027 palce)
Vůle sacích ventilů ..................................0,08 – 0,12mm (0,0031 – 0,0047 palce) za studena
Vůle výfukových ventilů .............................. 0,13 – 0,17mm (0,0051 – 0,0067 palce) za studena
Palivová nádrž .......................................................................3,7l (1,0 gal)
Objem oleje ..........................................................................0,4l (13,5 oz)
Jmenovitý výkon: Hodnocení výkonu jednotlivých modelů motorů je v souladu s kodexem SAE (Society of
Automotive Engineers) J1940 (Postupy pro hodnocení výkonu malých motorů) a hodnocení bylo obdrženo
a upraveno v souladu s SAE J1995 (Revize 2002-05). Hodnoty točivého momentu jsou určeny při 3060 ot./
min, hodnoty výkonu jsou odvozeny při 3600 ot./min. Skutečný výkon motoru bude nižší, mimo jiné na něj
budou mít vliv okolní podmínky a drobné rozdíly mezi jednotlivými motory. Vzhledem k širokému množství
výrobků, sekterými se motory používají, a množství prostředí, kde fungují, motor při použití s určitým zařízením
výsledkem celé řady faktorů včetně, ale bez omezení na, dalších částí (vzduchový filtr, výfuk, nabíjení, chlazení,
karburátor, palivová pumpa atd.), aplikace omezení, okolních podmínek (teplota, vlhkost, nadmořská výška) a
rozdílů mezi jednotlivými motory. Vzhledem k omezením výroby a kapacity může společnost Briggs & Stratton
motor nahradit silnějším motorem stejné série.
* Tato elektrocentrála je hodnocena vsouladu snormou ISO 8528 G3.
Běžné servisní díly
Pěnový vzduchový filtr ....................................................................311388GS
Odvzdušňovací filtr .......................................................................311389GS
Zapalovací svíčka sodrušením ...........................................................NGK CR7HSA
Not for
Reproduction

13 13
PODMÍNKY ZÁRUKY NA ZAŘÍZENÍ VYRÁBĚNÁ SPOLEČNOSTÍ BRIGGS & STRATTON POWER PRODUCTS GROUP, LLC
OMEZENÁ ZÁRUKA
Společnost Briggs & Stratton Power Products Group, LLC bezplatně opraví nebo nahradí jakýkoliv díl nebo díly s vadou materiálu nebo dílenského zpracování nebo obojí. Za přepravní náklady spojené s přepravou výrobku
kopravě či náhradě při uplatnění záruky je zodpovědný zákazník. Tato záruka je platná pro dobu a předmět stanovené v níže uvedených podmínkách. Pro záruční servis se obracejte na nejbližšího autorizovaného servisního
prodejce, jehož naleznete na mapě prodejců na webové stránce www.BRIGGSandSTRATTON.com.
Neexistuje žádná další výslovná záruka. Implikované záruky, včetně těch týkajících se prodejnosti a vhodnosti pro konkrétní účel, jsou omezeny na dobu jednoho roku od zakoupení nebo na jinou dobu povolenou zákonem.
nebo země nepovolují vyloučení nebo omezení náhodných či následných škod, takže se vás výše uvedená omezení či vyloučení nemusí týkat. Tato záruka vám dává specifická práva a práva, která budete mít, se mohou lišit
mezi jednotlivými státy a zeměmi.
všechna ostatní použití, včetně pro komerční, výnosné a nájemné účely. Pokud bylo zařízení použito ke komerčním účelům, je již nadále pro účely této záruky považováno za komerčně používané zařízení.
Pro obdržení záruky na výrobky Briggs & Stratton není nutná registrace záruky. Uschovejte si váš pokladní doklad. JESTLIŽE PŘI ŽÁDOSTI O ZÁRUČNÍ SERVIS NEPŘEDLOŽÍTE DŮKAZ O DNI PRVNÍHO ZAKOUPENÍ, PRO URČENÍ ZÁRUČNÍ
O VAŠÍ ZÁRUCE
Reklamace přijímáme alitujeme, že jste měli potíže. Záruční opravy může provést libovolný autorizovaný servisní prodejce. Většina záručních oprav je rutinní záležitostí, ale někdy mohou být požadavky na záruční servis nepřiměřené.
Záruční se například nevztahuje na závady způsobené neodborným zacházením, nedostatečnou běžnou údržbou, přepravou, manipulací, skladováním nebo nesprávnou montáží. Záruku nelze uplatnit ani v případě, kdy bylo
zpřenosné elektrocentrály odstraněno datum výroby asériové číslo nebo bylo zařízení pozměněno nebo upraveno. Během záruční doby autorizovaný servisní prodejce podle svého uvážení opraví nebo vymění všechny části, které jsou
Běžné opotřebení
konkrétního dílu nebo celého zařízení.
Instalace a údržba
přetáčeny, nesprávně udržovány, opraveny a nebo skladovány způsobem, který podle našeho úsudku nepříznivě ovlivňuje výkon a spolehlivost zařízení. Tato záruka se rovněž nevztahuje na běžnou údržbu, jako jsou
vzduchové filtry, seřizování, čištění palivové soustavy ausazenin (vdůsledku chemikálií, špíny, uhlíku, vápna a podobně).
Jiné výjimky
chemikálií. Příslušenství, jako startovací baterie, kabel adaptéru elektrocentrály akryty používané při skladování, je vyloučeno ze záruky. Tato záruka se nevztahuje na použité, repasované apředváděcí zařízení, vybavení
používaná pro primární napájení místo veřejné sítě, zařízení používaná vaplikacích pro podporu života aporuchy způsobené vyšší mocí a další události vyšší moci mimo kontrolu výrobce. 198189E, Rev. C, 11/2/2009
BRIGGS & STRATTON POWER PRODUCTS GROUP, LLC
MILWAUKEE, WI, USA
Súčinností od 1. listopadu 2009 nahrazuje všechny časově neurčené záruky a všechny záruky sdatem starším než 1. listopadu 2009.
2 roky*
1 rok
Soukromé použití
Komerční použití
*Druhý rok pouze na díly
ZÁRUČNÍ LHŮTA
Not for
Reproduction

4 BRIGGSandSTRATTON.COM
Briggs & Stratton®. , Briggs & Stratton.
Briggs & Stratton .
, , , , .
, , .
. .
. .
.
Briggs & Stratton, , .
Briggs & Stratton, . - BRIGGSandSTRATTON.COM.
..........................................5
......................................................................................5
..........................................................................5
.........................................................................7
.......................................................................................7
.................................................................................7
.........................................................................................7
.............................................7
...................................................................8
...........................................................................................8
....................................................................................8
.............................................................................................8
.........................................................................8
.........................................................................................8
POWERSMART .........................................................................................9
........................................................................................9
...................................................................................9
.....................................................10
......................................................................10
.......................................................................10
........................................................................10
...................................................................................................11
.............................................12
....................................................12
.........................................................................12
....................................................................12
......................................................................13
..............................................................................13
© 2011, Briggs & Stratton Power Products Group, LLC,
, , . .
BRIGGS & STRATTON POWER PRODUCTS
Briggs & Stratton,
, , .
Not for
Reproduction

5 5
.
,
.
(AC
DC) .
, , .
4500 / (
POWERSMART).
. , ,
.
,
. , ,
, . , ,
,
. , ,
.
.
(«», «» «»),
.
. «» ,
, , ,
.
, , ,
.
, , ,
.
ПРИМЕЧАНИЕ , .
– ,
, .
, , ,
, , , , , .
.
, , .
( ) ,
, – ,
, – .
, , .
.
. ,
– / .
.
– /
.
.
– .
.
, .
, , .
.
.
.
Not for
Reproduction

6 BRIGGSandSTRATTON.COM
ПРИМЕЧАНИЕ
/ .
. .
.
.
ПРИМЕЧАНИЕ
.
.
- ;
- , ;
- .
– ,
– , / .
2. .
.
.
.
, .
« » (
).
,
.
, ,
.
/
,
, – , /
.
– .
.
, , .
– .
.
.
, ,
.
.
/
.
.
.
Not for
Reproduction

7 7
.
,
Briggs & Stratton. , , ,
. .
.
1. , .
2. .
:
1. .
2. ,
.
ПРИМЕЧАНИЕ
.
. .
Рис.
1
:
.
), .
ПРИМЕЧАНИЕ .
.
,
. . .
,
.
.
1. , .
2. (A)
. , .
.
3.
.
1500 85/85AKI (89).
, .
,
.
Briggs & Stratton. ,
, 750.
Рис.
2
() .
(I), .
, (O),
.
(O.
Рис.
3
. ,
. ,
.
A – –
(I) . (O),
.
B – – 3,7.
C – – .
D – –
.
E – – .
F – – I
. O .
.
G – (OK) – ,
. ,
H – 12 .
.
J – – .
K – POWERSMART–
POWERSMART.
L – (!) –
. ,
, ,
.
M – (
) –
,
. ,
.
, .
N – 230 . –
, , , ,
230 . , ., 50.
.
P – –
.
R – –
.
S – – , ,
. .
( ) –
.
(
)– .
– ,
– , / .
2. .
, , .
.
.
Not for
Reproduction

8 BRIGGSandSTRATTON.COM
.
.
, ,
, , .
, ,
. ,
.
Рис.
4
,
. , (A)
, . ,
, , ,
.
.
Рис.
2
3
1. , ,
ПРИМЕЧАНИЕ ,
, .
,
, .
.
2. , POWERSMART (3, K) (O).
3. (3, F) (I).
4. (2, A) (I).
5. (3, C) (
).
ПРИМЕЧАНИЕ , , ,
, ,
. , .
6. (3, ) ,
. , .
7. , ,
.
8.
( ).
, ,
, , (
).
ПРИМЕЧАНИЕ
(
) , .
ПРИМЕЧАНИЕ 3, , ,
, , ,
– .
. , .
, -
230 . . - .
, - .
-, .
1. , ( ).
2. . .
3. , 230 .
, ., 50.
ПРИМЕЧАНИЕ
.
ПРИМЕЧАНИЕ
/ .
. .
.
.
.
2. POWERSMART (O).
3.
.
4. (O).
5. (O).
/
,
, – , /
.
– .
.
, , .
– .
.
.
.
,
, ,
/ .
( ) ,
, –
, , – .
, , .
.
– ,
, .
, , ,
, , , , , .
.
, , .
Not for
Reproduction

9 9
POWERSMART
.
(I),
.
(O), .
ПРИМЕЧАНИЕ
Рис.
5
12. , , 5.
.
( ).
, , .
ПРИМЕЧАНИЕ PowerSmart
(O).
ПРИМЕЧАНИЕ
12, :
1. .
2. .
, .
.
3.
, , .
4.
Positive, POS (+).
5.
Negative, NEG (–).
6.
7. . ,
.
ПРИМЕЧАНИЕ 30 –120.
8. ,
.
9. ,
.
ПРИМЕЧАНИЕ .
. ,
, ()
( ) , .
1. .
2.
() . ,
. . .
3. ( ).
– ,
, , .
,
()
.
, 2.
:
() = 1555
= 600
= 2155
,
.
.
1.
, , .
2. , .
3. ( ,
).
4. .
5. .
6. 4 5 .
, .
, .
* . ,
.
. ,
– / .
.
– /
.
.
()
,
( ),
300 600
500 500
500 —
180 —
(75) 75 —
() 1555
600
*
()
,
(),
– 75 75 —
500 500
800 1200
/ – 18. . 800 1600
– 1/3.. 1000 2000
/
– 10000BTU 1200 1800
300 600
– 1/2.. 800 1300
– 1000 1000 —
1500 —
– 1500 —
DVD/CD- 100 —
100 —
450 —
– 27 500 —
17 800 —
180 —
AM/FM- 300 —
– 1/2..
480 520
/
/ 1000 —
– 1/3.. 600 1200
960 960
– 1/2.. 1000 1000
– 7 1/4 1500 1500
Not for
Reproduction

10 BRIGGSandSTRATTON.COM
, ,
. .
¹
.
.
.
, .
ПРИМЕЧАНИЕ
.
.
.
.
.
ПРИМЕЧАНИЕ
. -
.
, , ,
.
, .
ПРИМЕЧАНИЕ .
, / .
,
.
.
.
. .
.
.
ПРИМЕЧАНИЕ
.
Рис.
6
.
:
1. , .
2. () (.
3. .
4. .
5. .
Briggs & Stratton. , ,
, SF, SG, SH, SJ .
.
.
, .
* SAE30 4°C .
** 10W30 27°C .
.
ПРИМЕЧАНИЕ , ILSAC GF-2,
API API «SJ/CF ENERGY CONSERVING» ,
.
.
Рис.
8
8 . .
1. , .
2. .
3.
.
4. .
5. .
6.
.
Рис.
9
1. , .
2. 2 4, ,
.
3.
.
4. .
5.
.
8
10
50 3
100 6
1
250
– .
.
.
Not for
Reproduction

11 11
,
.
, , :
1. , .
2. .
3.
.
4. , ,
, .
, .
5. 3 5, ,
.
Рис.
10
,
. .
:
1. .
2. () (B).
3. (C), .
4. (D), .
5. .
.
6.
.
7. .
8. .
9. .
10.
.
Рис.
11
12
.
1. .
2. .
3. .
4.
(. ).
5.
. . . .
6. . .
7. .
Рис.
13
14
, . ,
, .
, , .
:
1. , ,
.
2. , . .
3. , , ,
. . , .
4. . .
.
. ,
(. ).
30, ,
.
.
.
, 30
, FRESH START®
Briggs & Stratton, .
,
. 2
. 24.
,
. , - .
.
, . . .
.
1. , ,
.
2. , . /
, .
3. , .
4. .
.
.
/
,
, .
.
, , .
– ,
– , / .
, ,
.
2. .
.
.
– ,
/ .
Not for
Reproduction

12 BRIGGSandSTRATTON.COM
.....................................................................2000
* .............................................................................. 1600
230 . .....................................................................7,0
12 . ......................................................................... 5
..................................................................... 50
.............................................................................
...........................................................................105,6.
................................................................0,6–0,7
.................................................0,08 – 0,12,
................................................0.13 – 0,17,
...................................................................3,7
..................................................................... 0,4
:
SAE (Society of Automotive Engineers,
) J1940 (
), SAE
J1995 ( 2002-05). 3060 /;
3600/. ; ,
, .
, ,
( « »
) , , ,
( , , , , ,
..), , (, , )
. ,
Briggs & Stratton .
* ISO8528, G3.
. ............................................................311388GS
. . . . . . . . . . . . . . . . . . . . . . . . . . . . . . . . . . . . . . . . . . . . . . . . . . . . . . . . . . . . . . . . . . . . . . . . . .311389GS
.............................................................NGK CR7HSA
,
.
1. .
.
2. . .
3. .
4. .
1. . .
.
2. .
3. .
4. .
,
.
1. .
2. .
3. .
4. .
1. .
2. .
3. . .
4. .
,
.
1. (O).
2.
(O).
3. . .
4. .
5. .
6. .
7. .
8. .
9. .
10. .
11. .
12. .
13. .
1. (I).
2.
(I).
3.
.
4. .
5.
6. ; .
7. .
8.
9. ; .
10. 5 .
11. .
12. .
13. .
.
1. .
2. .
1. . .
2. .
. . .
Not for
Reproduction

13 13
BRIGGS & STRATTON POWER PRODUCTS GROUP, LLC
«Briggs & Stratton Power Products Group, LLC» , , .
. - BRIGGSandSTRATTON.COM.
, , . , , .
. , , ,
. . , .
, . « »
. «» » , , ,
. * ,
, .
«Briggs & Stratton» .
. . . ,
, ,
, - , - . , ,
. ,
. , , .
.
, , , , , ,
, , , ,
, , ( , , , ..).
, , , . ,
, , . ,
, , , , ,
, - . 198189E, . C, 11/2/2009
BRIGGS & STRATTON POWER PRODUCTS GROUP, LLC
, , .
1 2009.; , , 1 2009.
2*
1
*
Not for
Reproduction

4 BRIGGSandSTRATTON.COM
Bu kaltel Brggs & Stratton® jeneratörü satın aldığınız çn teşekkür ederz. Brggs & Stratton markasına güvendğnz çn ayrıca teşekkür ederz. Brggs & Stratton jeneratörü bu kılavuzdak talmatlara uygun şeklde kullanıp bakım
yaptığınız sürece ürününüz uzun yıllar güvenl br şeklde hzmet verecektr.
Bu kılavuz jeneratöre lşkn tehlke ve rskler le bunların önlenmesne lşkn güvenlk blgler çermektedr. Bu jeneratör, uyumlu elektrkl aydınlatma, chazlar, aletler ve motor yüklernn çalıştırılması çn elektrk gücü sağlamak
amacıyla tasarlanmıştır ve başka br kullanım amacına hzmet etmemektedr. Bu ekpmanı çalıştırmadan veya kullanmadan önce bu talmatları dkkatl br şeklde okuyup anlamanız büyük önem taşımaktadır. Bu orjnal talmatları
lerde başvurmak üzere saklayın.
Bu jeneratör kullanılmadan önce son montaj gerektrr. Son montaj prosedürleryle lgl talmatlar çn bu kılavuzdak Montaj bölümüne bakın. Talmatları harfyen uygulayın.
Bze Ulaşın
Jeneratörünüz çn Brggs & Stratton desteğ ve servs çn çok uzaklara gtmenze gerek yok. Dünya çapında kaltel hzmete sağlayan bnlerce yetkl Brggs & Stratton bays bulunmaktadır. En yakın Yetkl Servs Bayn
BRIGGSandSTRATTON.COM adresn kullanarak İnternet'tek bay bulma hartasından da bulablrsnz.
Jeneratör
Model Numarası
Revzyon
Ser Numarası
Satış Tarh
İçndekler
Operatör Güvenlğ ...............................................................5
Ekpman Açıklaması ...........................................................................................5
Öneml Güvenlk Talmatları ....................................................................................5
Montaj..........................................................................7
Jeneratörün Ambalajından Çıkarılması ...........................................................................7
Motor Yağının Doldurulması ....................................................................................7
Yakıtın Doldurulması ..........................................................................................7
Özellkler ve Kumandalar..........................................................7
Çalıştırma .......................................................................8
Topraklama Bağlantısı .........................................................................................8
Jeneratörün Konumu ..........................................................................................8
Motorun Çalıştırılması .........................................................................................8
Elektrk Yüklernn Bağlanması . . . . . . . . . . . . . . . . . . . . . . . . . . . . . . . . . . . . . . . . . . . . . . . . . . . . . . . . . . . . . . . . . . . . . . . . . . . . . . . . . .8
Motorun Durdurulması.........................................................................................8
POWERSMART Modu...........................................................................................9
Akünün Şarj Edlmes ..........................................................................................9
Jeneratöre Aşırı Yükleme Yapmayın..............................................................................9
Bakım .........................................................................10
Bakım Programı..............................................................................................10
Jeneratör Bakımı.............................................................................................10
Motor Bakımı................................................................................................10
Depolama...................................................................................................11
Sorun Gderme..................................................................12
Teknk Özellkler ................................................................12
Ürün Teknk Özellkler ........................................................................................12
Sık Kullanılan Onarım Parçaları.................................................................................12
Garantler ......................................................................13
Jeneratör Ürün Sahb Garants ................................................................................13
Telf Hakkı © 2011 Brggs & Stratton Power Products Group, LLC
Mlwaukee, WI ABD. Tüm hakları saklıdır.
BRİGGS & STRATTON POWER PRODUCTS
Brggs & Stratton Corporaton
Mlwaukee, WI, ABD şrketnn tescll markasıdır
ORİJİNAL TALİMATLARDAN TERCÜME EDİLMİŞTİR
Not for
Reproduction

5 5
Operatör Güvenlğ
Ekpman Açıklaması
Bu kılavuzu dkkatl br şeklde okuyun ve jeneratörünüzü tanıyın. Uygulamalarını,
sınırlamalarını ve lgl tüm tehlkeler öğrenn.
Jeneratör motor tahrkldr, döner sargılıdır, alternatf ve doğru akım (AC ve DC) kullanır. Elektrkle çalışan
aydınlatma, alet, chaz ve motor yüklerne uygun elektrk gücünü tedark etmek çn tasarlanmıştır. Jeneratörün
döner sargısı tek slndrl br motorla yaklaşık 4.500 dev/dak hızında tahrk edlr (POWERSMART modu anahtarı
kapalıyken).
Bu kılavuzdak blglern doğru ve güncel olmasını sağlamak çn her türlü çaba sarf edlmştr. Ancak üretc
önceden bldrmekszn stedğ zaman jeneratörü ve lgl belgeler değştrme, düzeltme ve başka br şeklde
gelştrme hakkını saklı tutmaktadır.
Öneml Güvenlk Talmatları
Üretc tehlke çereblecek bütün olası durumları tahmn edemez. Bu nedenle bu kılavuzdak uyarılar, üntede
bulunan etket ve çıkartmalar tüm olasılıkları kapsamamaktadır. Üretcnn özelkle tavsye etmedğ br prosedür
veya çalıştırma teknğ kullanırsanız kendnz ve başkaları açısından emnyetl olduğundan emn olmalısınız. Aynı
zamanda seçtğnz prosedürün, çalışma yöntemnn veya çalışma teknğnn jeneratörün emnyetsz br şeklde
çalışmasına neden olmadığından da emn olmanız gerekr.
Güvenlk Semboller ve Anlamları
Güvenlk alarm sembolü olası kşsel yaralanma tehlkesn belrtr. Uyarı sembolüyle brlkte yer alan
sözcük (TEHLİKE, UYARI veya DİKKAT), olası tehlkenn cddyet derecesn veya sevyesn göstermektedr.
Tehlkenn türünü belrtmek çn güvenlk sembolü de kullanılablr. İKAZ kelmes kşsel yaralanmayla lgl
olmayan uygulamaları şaret etmek çn kullanılır.
TEHLİKE önlem alınmadığı takdrde ölüm veya cdd yaralanma le sonuçlanacak br tehlkey belrtr.
UYARI önlem alınmadığı takdrde veya cdd yaralanma le sonuçlanablecek br tehlkey belrtr.
DİKKAT önlem alınmadığı takdrde veya orta şddetl yaralanma le sonuçlanablecek br tehlkey belrtr.
İKAZ kşsel yaralanmayla lgl olmayan uygulamaları şaret eder.
Yangın
Patlama
Zehrl Gazlar
Sıcak Yüzey
Hareketl Parçalar
Elektrk Çarpması
Ger Tepme
Parçaların Fırlaması
Kullanma Kılavuzu
Patlayıcı Basınç Kmyasal Yanık
UYARI Çalıştırılan motor kokusuz, renksz, zehrl br gaz olan karbonmonokst salar.
Karbonmonokst solumak ölüme, cdd yaralanmalara, baş ağrısına, halszlğe, kusmaya, kafa
karışıklığına, nöbetlere, mde bulantısına veya bayılmaya neden olablr.
denzclk uygulamaları veya korunaklı yerlern çnde çalıştırmayın.
UYARI Ateşleme blezğnn ger tepmes (hızlı ger çeklme) elnz ve kolunuzu engel
olamayacağınız kadar hızlı br şeklde motora doğru çeker; bu durum kemk kırılmasına,
çatlaklara, zedelenmelere veya burkulmalara yol açarak cdd yaralanmalara sebep olablr.
çekn.
UYARI Aküler yenden şarj edlrken patlayıcı hdrojen gazı salar. Hdrojen gazı akü şarj edldkten
sonra uzun br süre akünün etrafında kalır. En küçük br kıvılcım ble hdrojen
ateşleyeblr ve ölüme, cdd yaralanmalara ve/veya mala zarara neden olacak br
patlamaya sebep olablr.
Akü elektrolt sıvısı ast çerr ve son derece yakıcıdır. Akü sıvısıyla temas cdd yaralanmalara ve/veya mala
zarara neden olan kmyasal yanıklara sebep olablr.
yakılmasına İZİN VERMEYİN.
UYARI
Jeneratörün voltajı ölüm veya cdd yaralanmalarla sonuçlanablecek elektrk çarpması veya
yanıklara neden olablr.
ekpmanları kullanın.
kullanın.
Not for
Reproduction

6 BRIGGSandSTRATTON.COM
İKAZ
Jeneratörlern elektrk gücü/amper kapastesn aşmak, jeneratöre ve/veya jeneratöre bağlı elektrkl
chazlara zarar vereblr.
AŞMAYIN. Çalıştırma bölümünde Jeneratöre Aşırı Yükleme
Yapmayın başlığına bakın.
İKAZ
Jeneratöre uygun şeklde müdahale edlmemes hasara sebep olablr ve jeneratörün ömrünü kısaltablr.
-elektrk çıkışının kaybedlmes;
-ekpmandan kıvılcım, duman veya alev çıkması;
-üntenn aşırı şeklde ttremes.
UYARI Yakıt ve buharları aşırı derecede yanıcı ve patlayıcıdır, ölüm, cdd yaralanma ve/veya mal
zararına neden olan yanıklara, yangınlara veya patlamalara sebep olablr.
YAKIT EKLERKEN VEYA BOŞALTIRKEN
basıncın boşalması çn kapağı yavaşça gevşetn.
kontrol edn Gerekrse değştrn.
EKİPMANI BAŞLATIRKEN
EKİPMANI ÇALIŞTIRIRKEN
yerlerde ÇALIŞTIRMAYIN.
Jkle” konumuna alarak DURDURMAYIN (
).
EKİPMANI TAŞIRKEN, HAREKET ETTİRİRKEN VEYA ONARIRKEN
YAKITI VEYA EKİPMANI DEPO YAKIT İLE DOLUYKEN SAKLAMA
alev olan dğer aygıtların uzağında depolanmalıdır.
UYARI Egzoz ısısı/gazları yanıcı maddeler ve yapıları tutuşturablr veya yakıt deposuna hasar
vererek yangına neden olablr, cdd yaralanmalara ve/veya mala zarara yol
açablr.
Egzoz alanıyla temas cdd yanıklara neden olablr.
perakendecye veya bayye başvurun.
UYARI Yanlışlıkla oluşan kıvılcımlanma elektrk çarpmasına veya yangına sebep olarak ölüm veya
cdd yaralanmalarla sonuçlanablr.
JENERATÖRÜ AYARLARKEN YA DA ONARIM YAPARKEN
MOTORDA KIVILCIM TESTİ YAPARKEN
YAPMAYIN.
UYARI Marş ve dğer döner parçalar ellere, saça, kıyafetlere veya aksesuarlara takılarak cdd
yaralamalara neden olablr.
DİKKAT Yüksek çalışma hızları ufak yaralanmalara ve/veya jeneratör hasarına sebep olablr.
Çok düşük hızlar ağır br yük bndreblr.
Not for
Reproduction

7 7
Montaj
Tavsye edlen yakıt ve yağla uygun br şeklde bakımı yapıldıktan sonra jeneratörünüz kullanıma hazırdır.
Jeneratörünüzün bakımını yapma konusunda sorun yaşarsanız, bölgenzdek Brggs & Stratton servs merkezyle
rtbata geçn. Yardım çn aradığınızda lütfen kmlk etketndek model, revzyon ve ser numarasını hazır
bulundurun. Kmlk etketnn yern öğrenmek çn Jeneratör Özellkler ve Kumandaları bölümüne bakın.
Jeneratörün Ambalajından Çıkarılması
1. Kartonu düz ve sağlam br yüzeye yerleştrn.
2. Kutudak her parçayı çıkarın.
Jeneratör aşağıdaklerle brlkte sağlanmaktadır:
Motor Yağının Doldurulması
1. Jeneratörü düz br yüzeye yerleştrn.
2. Motor yağını Motor Bakımı bölümündek Motor Yağının Doldurulması başlığında belrtldğ şeklde
doldurun.
İKAZ
Jeneratöre uygun şeklde müdahale edlmemes hasara sebep olablr ve jeneratörün ömrünü kısaltablr.
olablr.
Yağın Doldurulması Şekil
1
Yakıt aşağıdak şartları karşılamalıdır:
Yüksek İrtfa.
kabul edleblr.
İKAZ Jeneratöre hasar vermemeye özen göstern.
Yakıt önerler konusunda Kullanım Kılavuzuna uymamak garanty geçersz kılar.
Yakıt sstemnde okstlenmş yakıt artığı oluşmasını engellemek çn yakıt doldururken yakıt stablzatörü
karıştırın. Bkz. Depolama. Bütün yakıtlar aynı değldr. Yakıt kullandıktan sonra çalıştırma veya performans
sorunu yaşarsanız yakıt tedarkçnz veya yakıt markanızı değştrn. Bu motor benzn le çalışacak şeklde
onaylanmıştır. Bu motorun emsyon kontrol sstem EM’dr (Motor Modfkasyonları).
1. Yakıt doldurma kapağının çevresn temzleyn, kapağı çıkarın.
2. Kurşunsuz benzn yakıt deposundak kırmızı yakıt göstergesne (A) kadar yavaşça doldurun.
Göstergenn üzerne çıkmamaya dkkat edn. Bu, yakıt genleşmes çn yeterl alanı sağlar.
3. Yakıt kapağını takın ve motoru çalıştırmadan önce dökülen yakıtın buharlaşmasını bekleyn.
Yüksek İrtfa
1500 metrenn (5.000 ft) üzerndek yükseklklerde, en az 85 oktan / 85 AKI (89 RON) benzn kabul edleblr.
Emsyon değerlernn korunması çn, yüksek rtfaya uygun ayar yapılmalıdır Bu ayar yapılmadan motorun
kullanılması benzn tüketmnde artışa, performansta düşüklüğe ve emsyonda artışa yol açar Yüksek rtfa ayarı
çn Brggs & Stratton Yetkl Bayne başvurun. 750 metrenn (2.500 ft) altındak yükseklklerde motorun yüksek
rtfa ktyle kullanılması tavsye edlmez.
Yakıt Deposu Kapağı Havalandırma Kolu Şekil
2
Yakıt deposunun sızdırmazlığını sağlamak çn yakıt kapağıyla brlkte (A) br havalandırma kolu sağlanır.
Motorun çalışması çn havalandırma kolunun doğru konumda (I) olması gerekr.
Motor çalışmıyorken, yakıt sızıntısı olasılığını azaltmak çn (O) havalandırma kolunu kapalı konumda bırakın.
Havalandırma kolunu kapalı konuma getrmeden önce motorun soğumasını sağlayın (O).
Özellkler ve Kumandalar Şekil
3
Jeneratörünüzü çalıştırmadan önce bu Kullanım Kılavuzunu ve güvenlk kurallarını
okuyun. Çeştl kumandaların ve ayarların yern öğrenmek çn çzm motorunuzla karşılaştırın. Bu
kılavuzu gelecekte de kullanmak üzere saklayın.
A - Yakıt Deposu Kapağı Havalandırma Kolu — Jeneratörü çalıştırırken (I) havalandırma kolunu açık
konumuna getrn. Kullanımda değlken (O) kapalı konumuna getrn.
B - Yakıt Deposu — 3,7 L Kapaste (1,0 ABD galonu).
C - Jkle Kolu — Soğuk br motoru çalıştırırken kullanılır.
D - Yan Bakım Kapağı — Hava temzleycs ve yağ bakımına erşmek çn bu kapağı sökün.
E - Çalıştırma Kolu — Motoru manuel çalıştırmak çn kullanılır.
F - Motor Düğmes — Çalıştırma kolunu kullanmadan önce bu düğmey I konumuna getrn. Motoru
durdurmak çn bu düğmey O konumuna getrn. Aynı zamanda yakıt valfını açar kapar.
G - Çıkış Gösterges (OK) — Jeneratör normal şeklde çalışırken yeşl LED çıkış gösterges yanar. Jeneratörün
przlerde güç ürettğn gösterr.
H - 12 Volt DC Prz — 12 Volt br pl şarj etmek çn şarj kablolarıyla bu prz kullanın. Bu prz br kere basılarak
devre kescy sıfırlayacak şeklde korunmaktadır.
J - Topraklama Bağlantısı — Bölgenzdek topraklama koşulları hakkında blg çn yerel darenzle görüşün.
K - POWERSMART Anahtarı — POWERSMART modunu açmak ve kapatmak çn bu düğmey kullanın.
L - Aşırı Yük Alarmı (!) — Jeneratörü aşırı yüklersenz kırmızı LED aşırı yük alarmı yanar ve przlere gden güç
keslr. Yeşl çıkış gösterge ışığı da kapanır. Jeneratör aşırı yüklenrse, tüm elektrk yüklern kapatmanız ve
fşn çekmenz, jeneratörü kapatmanız ve normal çalışma modunda devam etmek çn yenden çalıştırmanız
gerekr.
M - Düşük Yağ Gösterges (
) — Düşük yağ gösterges sstem yeterl motor yağı olmadığı çn
meydana gelen motor hasarını önlemek amacıyla tasarlanmıştır. Motor yağ sevyes önceden belrlenen
sevyenn altına düşerse, sarı LED düşük yağ gösterges yanar ve yağ anahtarı motoru durdurur. Çalıştırma
kolunu çektğnzde, motor durur veya sarı LED düşük yağ gösterges yanarsa, motor yağ sevyesn kontrol
edn.
N - 230 Volt AC Çıkışları — 230 Volt AC, tek fazlı, 50 Hz elektrkl aydınlatma, araç, alet ve motor yüklernn
çalışması çn elektrk gücü tedark etmek amacıyla kullanılablr. Bu przler dahl br aşırı yük sstemyle aşırı
yüke karşı korunur.
P - Kıvılcım Tutucu — Egzoz susturucusu motor gürültüsünü azaltır ve kıvılcım tutucuyla donatılmıştır.
R - Üst Bakım Kapağı — Bujye ulaşmak çn bu kapağı çıkarın.
S - Kmlk Etket — Jeneratörün modeln, revzyon ve ser numarasını belrtr. Destek stedğnzde bu
blgler hazır edn.
Gösterlmeyen Öğeler:
Hava Temzleycs (yan bakım kapağının altında) — Toz ve artıkları grş havasında süzerek motoru korur.
Yağ Doldurma Kapağı (yan bakım kapağının altında) — Motor yağı buradan kontrol edlr ve doldurulur.
UYARI Yakıt ve buharları aşırı derecede yanıcı ve patlayıcıdır, ölüm, cdd yaralanma ve/veya mal
zararına neden olan yanıklara, yangınlara veya patlamalara sebep olablr.
YAKIT DOLDURURKEN
basıncın boşalması çn kapağı yavaşça gevşetn.
kontrol edn Gerekrse değştrn.
Not for
Reproduction

8 BRIGGSandSTRATTON.COM
Çalıştırma
Topraklama Bağlantısı
Jeneratörde topraklama bağlantısı bulunmaktadır. Bölgesel elektrk kuralları bu bağlantının uygun toprak
bağlantısına bağlanmasını gerektreblr. Jeneratör nötrü değşkendr; bu, AC statör sargısının topraklama
bağlantısından ve AC przn toprak pmnden zole edldğ anlamına gelr. Topraklı br nötr gerektren RCD gb
elektrkl chazlar bu jeneratör le uygun şeklde çalışmayablr.
Özel Gerekllkler
Jeneratörün amaçlanan kullanımı çn geçerl olan Federal, bölgesel kurallar veya yönetmelkler olablr. Lütfen
Jeneratör Konumu Şekil
4
Boşluklar ve Hava Hareket
Jeneratörü dışarıya, ölümcül egzoz gazı brkmeyecek br yere yerleştrn. Jeneratörü egzoz gazının (A)
brkebleceğ ve çne grebleceğ veya çer çekebleceğ çnde nsan olablecek bnalara YERLEŞTİRİN.
Egzoz gazının kapalı br alanda toplanmasına neden olablecek pencere, kapı, havalandırma grşler ve dğer
açıklıklardan uzak olmasını sağlayın. Jeneratör konumlandırılırken hakm rüzgârlar ve hava akımları göz önünde
bulundurulmalıdır.
Motoru Çalıştırma Şekil
2
3
1. Üntenn düzgün, düz br zemnde olduğundan emn olun.
İKAZ Üntey düzgün, düz br yüzeyde çalıştırmamak üntenn çalışmamasına veya çalışırken durmasına neden
olacaktır. Üntey alt taraftak soğutucu hava bölümlern engelleyecek br yüzeye yerleştrmek güç çıkışının
kaybedlmesne neden olablr. Çıkış kaybolursa, üntey kapatın ve yenden çalıştırmadan önce soğumasını
sağlayın.
2. POWERSMART anahtarının (3, K) kapalı konumunda (O) olduğundan emn olun.
3. Motor anahtarını (3, F) açık konumuna (I) getrn.
4. Yakıt kapağı havalandırma kolunu (2, A) açık (I) konumuna getrn.
5. Jgle kolunu (3, C) jkle konumuna (
) tn.
İKAZ Yakıt bttkten sonra veya uzun br saklama dönemnn ardından motoru lk defa çalıştırmak çn Yakıt
Doldurma bölümünde belrtldğ şeklde yakıt deposunu kırmızı yakıt göstergesne kadar doldurun. Yakıt
sstemndek hava dışarı atılana kadar br kaç defa çalıştırmayı denemek gerekecektr.
6. Çalıştırma kolunu (3,E) kavrayın ve haff br drenç hssedene kadar yavaşça çekn. Ardından motoru
çalıştırmak çn hızlıca çekn.
7. Jkle kolunu yarım jkle konumuna getrn ve çalıştırma kolunu k defa çekn.
8. Jkle kolunu yavaşça çalıştırma konumuna getrn (
). Motor duraksarsa, motor düzgün br şeklde
çalışana kadar jkle kolunu yarım jkle konumuna, ardından da çalıştırma (
) konumuna getrn.
İKAZ Motor amble ederse, jkle kolunu çalıştırma konumuna getrn (
) ve çalışana kadar krank kolunu
çevrn.
İKAZ Motor 3 çekşten sonra çalışır; ancak çalışmazsa veya çalışırken kapanırsa, üntenn düz br yüzeyde
olduğundan emn olun ve yağ karterndek yağın doğru sevyede olup olmadığını kontrol edn. Bu ünte br düşük
yağ koruma chazıyla donatılmıştır. Motorun çalışması çn yağın doğru sevyede olması gerekr.
Elektrk Yüklernn Bağlanması
Jeneratörün 230 Volt AC çıkışlarında yalnızca kaltel, y yalıtımlı uzatma kabloları kullanın. Her kullanımdan
önce uzatma kablolarını kontrol edn. Tüm uzatma kablolarının uygun ölçüde ve hasarsız olup olmadığını kontrol
edn. Voltaj düşüşünü en aza ndrmek çn uzatma kablolarını mümkün olduğunca kısa tutun.
1. Yeşl çıkış gösterge ışığının yandığından emn olun (üç sanye kadar süreblr).
2. Çalıştırdıktan sonra motorun dengelenmesne ve ısınmasına zn vern.
3. Fş prze takın ve stenlen 230 Volt AC, tek fazlı, 50 Hz elektrk yüküne getrn.
İKAZ
Jeneratöre Aşırı Yükleme Yapmayın.
İKAZ Elektrk yükü/amper kapastesn aşmak jeneratöre ve/veya jeneratöre bağlı elektrkl chazlara zarar
vereblr.
AŞMAYIN. Çalıştırma bölümünde Jeneratöre Aşırı Yükleme
Yapmayın başlığına bakın.
Motorun Durdurulması
1. Elektrk yüklern KAPATIN ve tümünü jeneratör panelnn przlernden çekn. Elektrkl chazların fşler
prze takılıyken ve AÇIKKEN motoru KESİNLİKLE çalıştırmayın veya durdurmayın.
2. POWERSMART anahtarını kapalı konumuna (O) getrn.
3. Motorun ve jeneratörün ç sıcaklıklarının sabtlenmes çn motoru brkaç dakka yüksüz çalıştırın.
4. Motor anahtarını kapalı konumuna (O) getrn.
5. Yakıt kapağı havalandırma kolunu kapalı konumuna (O) getrn.
UYARI Egzoz ısısı/gazları yanıcı maddeler ve yapıları tutuşturablr veya yakıt deposuna hasar
vererek yangına neden olablr, cdd yaralanmalara ve/veya mala zarara yol
açablr.
Egzoz alanıyla temas cdd yanıklara neden olablr.
perakendecye veya bayye başvurun.
UYARI
Jeneratörün voltajı ölüm veya cdd yaralanmalarla sonuçlanablecek elektrk çarpması veya
yanıklara neden olablr.
UYARI Hasar gören veya aşırı yük verlmş elektrk kabloları aşırı ısınablr, büküleblr ve yanablr,
bu durum ölüme, cdd yaralanmalara ve/veya mala zarara neden olablr.
UYARI Ateşleme blezğnn ger tepmes (hızlı ger çeklme) elnz ve kolunuzu engel
olamayacağınız kadar hızlı br şeklde motora doğru çeker; bu durum kemk kırılmasına,
çatlaklara, zedelenmelere veya burkulmalara yol açarak cdd yaralanmalara sebep olablr.
çekn.
UYARI Çalıştırılan motor kokusuz, renksz, zehrl br gaz olan karbonmonokst salar.
Karbonmonokst solumak ölüme, cdd yaralanmalara, baş ağrısına, halszlğe, kusmaya, kafa
karışıklığına, nöbetlere, mde bulantısına veya bayılmaya neden olablr.
denzclk uygulamaları veya korunaklı yerlern çnde çalıştırmayın.
Not for
Reproduction

9 9
POWERSMART Modu
Bu özellk, yakıt ekonomsn büyük ölçüde arttırmak ve gürültüyü azaltmak çn tasarlanmıştır. Bu anahtar
AÇIK (I) konuma getrldğnde, elektrk yükler bağlanırken motor hızı artacak ve elektrk yükler
çıkarıldığında azalacaktır.
Anahtar kapalı (O) konumundayken, motor tam yönetlen hızda çalışacaktır.
İKAZ Jeneratörü çalıştırırken ve durdururken veya DC przn kullanırken her zaman anahtar KAPALI konumda
olmalıdır.
Akünün Şarj Edlmes Şekil
5
Jeneratörünüz 12 Volt boş br otomotv tp veya yardımcı br aküyü şarj edeblr. Akü şarj devres çn
kullanılablr maksmum akım 5 Amperdr. Br DC devre kescs bu çıkışı aşırı yüklere karşı korur. Aşırı yük
meydana gelrse, devre kescs açılacaktır (buton dışarı çıkar). Brkaç dakka bekleyn ve devre kescsn
sıfırlamak çn butona basın.
İKAZ Akü şarj devresn kullanırken, POWERSMART anahtarını kapalı konumuna (O) getrn.
İKAZ
12 Volt aküler yenden şarj etmek çn aşağıdak şlemler gerçekleştrn:
1. Gerekrse, akü başlarını veya kutup başlarını temzleyn.
2. Tüm akü hücrelerndek sıvı düzeyn kontrol edn. Gerekrse, akü hücrelerndek separatörler kaplamak
çn YALNIZCA damıtılmış su doldurun. MUSLUK SUYU KULLANMAYIN.
3. Akü havalandırma kapaklarıyla donatılmışsa, takıldıklarından ve sıkı olduklarından emn olun.
4. Kırmızı kol Poztf, POS veya (+) le gösterlen akü başına veya kutup başına gelecek şeklde akü şarj
kablosunu bağlayın.
5. Syah kol Negatf, NEG, veya (–) le gösterlen akü başına veya kutup başına gelecek şeklde akü şarj
kablosunu bağlayın.
6. Akü şarj kablosunun bağlantı fşn 12 Volt DC panel przne bağlayın.
7. Motorun Çalıştırılması bölümünde belrtldğ şeklde Jeneratörü çalıştırın. Akü yenden şarj edlrken
motorun çalışmasına zn vern.
İKAZ Normalde zayıf br aküyü şarj etmek çn 30 le 120 dakka arasında br süre yeterldr.
8. Akü şarj olduktan sonra, motoru Motorun Durdurulması bölümünde belrtldğ şeklde kapatın.
9. Akü şarj kablosunu jeneratörden çıkarın ve akü uçlarının bağlantısını kesn.
İKAZ Akünün şarj durumunu test etmek çn br otomotv hdrometres kullanın. Hdrometre üretcsnn
talmatlarına dkkatl br şeklde uyun. Genel olarak, akü sıvısının özgül ağırlığı (hdrometre le ölçülen) 1260
Jeneratöre Aşırı Yükleme Yapmayın
Kapaste
Jeneratörünüzün aynı anda güç vereceğnz öğeler çn yeterl anma (çalıştırma) ve dalga (başlatma) watt
1. Aynı anda güç vereceğnz öğeler seçn.
2. Bu öğelern anma (çalıştırma) watt değerlern toplayın. Bu öğelernzn çalışması çn jeneratörünüzün
üretmes gereken mktardır. Elektrk Gücü Referans Kılavuzuna bakın.
3. Ne kadar dalga (başlangıç) watt değerne htyacınız olacağını tahmn olarak belrleyn. Dalga vat
mktarı daresel testere veya soğutucu gb motor tahrkl aletler veya chazları çalıştırmak çn gerekl
güç patlamasıdır. Tüm motorlar aynı anda çalışmaya başlamadığı çn, toplam dalga watt değer adım
2’dek toplam anma watt değerne yalnızca en yüksek lave dalga watt değerne sahp öğeler eklenerek
tahmn edleblr.
Örnek:
Toplam Anma (Çalıştırma) Watt Değer = 1555
En Yüksek İlave Dalga Watt Değer = 600
Gereken Toplam Jeneratör Çıkışı = 2155
Güç Yönetm
Jeneratörünüzün ve jeneratöre bağlı chazlarını ömrünü uzatmak çn, elektrk yüklern jeneratörünüze
bağlarken dkkatl olmak gerekr. Motor çalıştırılmadan önce jeneratör çıkışında hçbr şey bağlı olmamalıdır.
1. Jeneratöre hçbr şey bağlı değlken, motoru bu kılavuzda belrtldğ şeklde çalıştırın.
2. İlk yükü takın ve açın, terchen elnzdek en uzun yük olmalıdır.
3. Jeneratör çıkışının dengelenmesne zn vern (motor düzgün br şeklde çalışır ve bağlı chaz düzgün br
şeklde çalışır).
4. Sonrak yükü takın ve açın.
5. Br kez daha jeneratörün dengelenmesne zn vern.
6. Her br lave yük çn adım 4 ve 5’ tekrarlayın.
KESİNLİKLE jeneratör kapastesnden fazla yük eklemeyn. Yukarıda belrtldğ üzere jeneratör kapastesnde
dalga yüklern dkkate almaya özellkle özen göstern.
* Elektrk güçler yalnızca yaklaşık olarak belrtlr. Asıl elektrk gücü çn alet veya aracı kontrol edn.
UYARI Aküler yenden şarj edlrken patlayıcı hdrojen gazı salar. Hdrojen gazı akü şarj edldkten
sonra uzun br süre akünün etrafında kalır. En küçük br kıvılcım ble hdrojen
ateşleyeblr ve ölüme, cdd yaralanmalara ve/veya mala zarara neden olacak br
patlamaya sebep olablr.
Akü elektrolt sıvısı ast çerr ve son derece yakıcıdır. Akü sıvısıyla temas cdd yaralanmalara ve/veya mala
zarara neden olan kmyasal yanıklara sebep olablr.
yakılmasına İZİN VERMEYİN.
Alet veya Chaz Anma (Çalıştırma) Watt
El Dalga (Başlangıç)
Watt Değer
Pencere Fanı 300 600
Dern Dondurucu 500 500
Televzyon 500 —
Güvenlk Sstem 180 —
Lamba (75 Watt) 75 —
1555 Toplam Çalışma Watt
Değer
600 En Yüksek Dalga Watt Değer
Elektrk Gücü Referans Kılavuzu
Alet veya Chaz
Anma* (Çalıştırma)
Watt
El Dalga (Başlangıç)
Watt Değer
Öneml Blgler
Ampul - 75 watt 75 —
Dern Dondurucu 500 500
Kuyu Pompası 800 1200
Soğutucu/Dondurucu- 18 feet küp 800 1600
Su Kuyusu Pompası - 1/3 hp 1000 2000
Isıtma/Soğutma
Pencere AC - 10.000 BTU 1200 1800
Pencere Fanı 300 600
Ocak Vantlatörü - 1/2 hp 800 1300
Mutfak
Mkrodalga Fırını - 1000 Watt 1000 —
Kahve Maknes 1500 —
Elektrkl Soba - Tek Elemanlı 1500 —
Ale Odası
DVD/CD Oynatıcı 100 —
VCR 100 —
Stereo Alıcı 450 —
Renkl Televzyon- 27 nç 500 —
Blgsayar ve 17 nç montör 800 —
Dğer
Güvenlk Sstem 180 —
AM/FM Saatl Radyo 300 —
Garaj Kapısı Açacağı- 1/2 hp 480 520
DIY/Şantye
Kuvars Halojen Çalışma Işığı 1000 —
Havasız Püskürtücü - 1/3 hp 600 1200
Motorlu Oyma Testeres 960 960
Elektrkl Matkap- 1/2 hp 1000 1000
Daresel Testere - 7-1/4 nç 1500 1500
Not for
Reproduction

10 BRIGGSandSTRATTON.COM
Bakım
Bakım Programı
Saatlk bakım aralıklarını veya takvm peryotlarını -hangs önce gerçekleşrse - takp edn. Aşağıda belrtlen
olumsuz koşullarda çalıştırıldığında daha sık bakım gerekr.
¹
Tozlu ve krl koşullarda çalıştırırken daha erken bakım yapın.
Genel Tavsyeler
Düzenl bakım jeneratörün performansını arttırır ve ömrünü uzatır. Bakım çn yetkl bay le görüşün.
Jeneratörün garants kullanıcının kötü kullanımı veya hmalne maruz kalan öğeler kapsamaz. Garantden tam
olarak yararlanmak çn kullanıcı jeneratörü bu kılavuzda belrtldğ gb korumalıdır.
İKAZ
Jeneratöre uygun şeklde müdahale edlmemes hasara sebep olablr ve jeneratörün ömrünü kısaltablr.
çalıştırmayın.
Jeneratörünüzün performansını korumak çn peryodk olarak bazı ayarlamalar gerekr.
Tüm bakım ve ayarlamalar her sezon en az br defa yapılmalıdır. Yukarıdak Bakım Çzelges tablosundak
koşullara uyun.
İKAZ Yılda br defa bujy temzlemel veya değştrmelsnz; hava fltresn de değştrmelsnz. Yen br buj ve
temz br hava fltres düzgün yakıt-hava karışımını sağlar ve motorunuzun daha y çalışmasına ve daha uzun
süreler dayanmasına yardımcı olur.
Jeneratör Bakımı
Jeneratör bakımı üntey temz ve kuru tutmaktan oluşur. Üntey aşırı toz, kr, nem ve aşındırıcı buhara maruz
kalmayacak temz ve kuru br ortamda muhafaza edn. Jeneratördek soğutucu hava yuvaları kar, yaprak veya
dğer yabancı maddelerle tıkanmamalıdır.
İKAZ Jeneratörü temzlemek çn su veya dğer sıvılar KULLANMAYIN. Sıvılar motor yakıt sstemne greblr,
düşük performansa ve/veya çalışmamaya neden olablr. Ayrıca, soğutucu hava yuvalarından sıvı grerse, sıvının
br kısmı rotor ve statör sargısının yalıtımının boşlukları ve çatlaklarında tutulur. Jeneratörün ç sargılarında sıvı
ve kr oluşumu sonuç olarak bu sargıların yalıtım drencnn azalmasına neden olacaktır.
Temzlk
Her gün veya kullanmadan önce, jeneratörün çevresnde ve altında yağ veya yakıt sızıntısı olup olmadığını
kontrol edn. Jeneratörün çnde ve dışında brken kalıntıları temzleyn. Jeneratörün üzerndek soğutucu hava
kanallarını ve delkler kontrol edn. Bu delkler temz tutulmalı ve tıkalı olmamalıdır.
Aşırı ısınmayı ve brken artıkların tutuşmasını önlemek çn motor parçaları temz tutulmalıdır.
İKAZ
Jeneratöre uygun şeklde müdahale edlmemes hasara sebep olablr ve jeneratörün ömrünü kısaltablr.
Yakıt Süzgecnn Temzlenmes
Şekil
6
Yakıt süzgec artıkların yakıt sstemne grmesn engeller.
Yakıt süzgecn aşağıdak şeklde temzleyn:
1. Jeneratörün düz br yüzeyde olduğundan emn olun.
2. Yakıt kapağını (A) ve yakıt süzgecn (B) sökün.
3. Yakıt süzgecn sıvı deterjan ve su le yıkayın.
4. Yakıt süzgecn temz, kuru br bez le temzleyn.
5. Yakıt süzgecn ve yakıt kapağını dkkatl br şeklde yenden takın.
Motor Bakımı
Yağ
Yağ Tavsyeler
En y performans çn Brggs & Stratton Garant Sertfkalı yağların kullanılması tavsye edlmektedr. SF, SG, SH,
SJ veya daha yüksek sınıftak dğer maden yağlar da uygundur Özel katkı maddeler KULLANMAYIN.
Motor çn uygun yağ vskoztesn dış sıcaklık belrler. Beklenen dış sıcaklık aralığına en uygun vskoztey seçmek
çn tabloyu kullanın.
* SAE 30’un 4°C’nn (40°F) altında kullanımı motorun çalışmasında zorlanmaya yol açar.
** 10W-30’un 27°C’nn (80°F ) üzernde kullanımı yağ tüketmnde artışa yol açablr Yağ sevyesn daha sık
kontrol edn.
İKAZ
ENERJİ TASARRUFU” veya daha y olan sentetk yağlar, tüm sıcaklıklar çn kabul edleblr yağlardır
Sentetk yağ kullanımı gerekl yağ değşm peryotlarını değştrmez.
Yağ Sevyesnn Kontrol Edlmes
Şekil
8
Yağ Sevyes her kullanımdan önce ya da en azından 8 saatlk çalışma sonunda kontrol edlmeldr. Yağ sevyesn
koruyun.
1. Jeneratörün düz br yüzeyde olduğundan emn olun.
2. Yan bakım kapağının vdalarını gevşetn ve yan bakım kapağını sökün.
3. Yağ dolum delğnn çevresn temzleyn ve yağ dolum kapağını çıkarın.
4. Yağın yağ dolum delğnn taşma noktasında olduğundan emn olun.
5. Yağ doldurma kapağını değştrn ve sıkın.
6. Yan bakım kapağını yerne takın ve kapağın vdalarını elnzle sıkın.
Motor Yağını Doldurma
Şekil
9
1. Jeneratörün düz br yüzeyde olduğundan emn olun.
2. Yağ sevyesn Yağ Sevyes Kontrolü bölümünde belrtldğ gb, 2 le 4 arasındak adımları
tekrarlayarak kontrol edn.
3. Gerekrse, yağ dolum delğnden taşma noktasına gelene kadar yavaşça yağ dökün.
4. Yağ doldurma kapağını değştrn ve sıkın.
5. Yan bakım kapağını yerne takın ve kapağın vdalarını elnzle sıkın.
8 Saatte Br veya Günde Br
İlk 10 Saat
50 Saatte Br veya 3 Ayda Br
100 Saatte Br veya 6 Ayda Br
¹
250 Saatte Br veya Yılda Br
UYARI Yanlışlıkla oluşan kıvılcımlanma elektrk çarpmasına veya yangına sebep olarak ölüm veya
cdd yaralanmalarla sonuçlanablr.
JENERATÖRÜ AYARLARKEN YA DA ONARIM YAPARKEN
MOTORDA KIVILCIM TESTİ YAPARKEN
YAPMAYIN.
Not for
Reproduction

11 11
Motor Yağının Değştrlmes
Jeneratörü çok krl veya tozlu koşullarda ya da çok sıcak havada kullanıyorsanız yağını daha sık değştrn.
Motor çalıştırıldıktan sonra ısındığında yağı aşağıdak şeklde değştrn:
1. Jeneratörün düz br yüzeyde olduğundan emn olun.
2. Yan bakım kapağının vdalarını gevşetn ve yan bakım kapağını sökün.
3. Yağ dolum delğnn çevresn temzleyn ve yağ dolum kapağını çıkarın.
4. Üntenz yağ dolum boğazına doğru yana yatırarak yağı yağ dolum delğnden uygun br kaba
boşaltmak çn jeneratörünüzü yan yatırın. Yağ karter boşken, jeneratörü dk konuma getrn.
5. Motor yağını Motor Yağının Doldurulması bölümünde belrtldğ şeklde doldurmak çn adım 3 le 5
arasını tekrar edn.
Bakım Havası Temzleycs
Şekil
10
Motorunuzu krl hava temzleyc le çalıştırırsanız düzgün çalışmaz ve zarar göreblr. Tozlu ve krl koşullarda
çalıştırırken daha erken bakım yapın.
Hava temzleycye bakım yapmak çn aşağıdak adımları uygulayın:
1. Yan bakım kapağının vdalarını gevşetn ve yan bakım kapağını sökün.
2. Hava temzleycs kapağının vdasını gevşetn (A) ve hava temzleycsnn kapağını (B) sökün.
3. Kendnze doğru çekerek köpük hava temzleycsn (C) dkkatl br şeklde sökün.
4. Kendnze doğru çekerek havalandırma fltresn (D) dkkatl br şeklde sökün.
5. Yalnızca sıvı deterjan ve su le hava temzleycsn ve havalandırma fltresn yıkayın. Temz br kumaşla
sıkarak kurutun.
6. Fazla yağı temzlemek çn köpük hava temzleycsn temz motor yağına BATIRIN, temz br bezle
ıslatın ve sıkın.
7. Temz veya yen köpük hava temzleycsn yerne takın.
8. Temz veya yen havalandırma fltresn yerne takın.
9. Hava temzleyc kapağını yerne takın ve vdasını sıkın.
10. Yan bakım kapağını yerne takın ve kapağın vdalarını elnzle sıkın.
Bujye Bakım Yapma
Şekil
11
12
Bujy değştrmek motorunuzun daha kolay ve daha y çalışmasına yardımcı olacaktır.
1. Üst bakım kapağını sökün.
2. Bujnn etrafını temzleyn ve bujnn toz lastğn sökün.
3. Bujy sökün ve kontrol edn.
4. Kablolu kalınlık ölçeğ le buj tırnak açıklığını kontrol edn ve gerekyorsa buj boşluğunu tavsye edlen
boşluğa sıfırlayın (bkz. Teknk Özellkler).
5. Elektrotlar oyulmuş, yanmış ya da porselen çatlamışsa bujy değştrn. Tavsye edlen yedek bujy
kullanın. Bkz. Teknk Özellkler.
6. Bujy takın ve yce sıkın. Buj toz lastğn takın.
7. Üst bakım kapağını tekrar takın.
Egzozu ve Kıvılcım Tutucuyu kontrol edn
Şekil
13
14
Egzozda çatlak, korozyon veya dğer hasarların olup olmadığını kontrol edn Varsa, kıvılcım tutucuyu sökün,
hasar veya karbon tıkanması olup olmadığını kontrol edn Yedek parça gerekrse, sadece orjnal yedek parçaları
kullandığınızdan emn olun.
Kıvılcım tutucuyu aşağıdak şeklde temzleyn ve kontrol edn:
1. Susturucu kapağını sökmek çn kapağı jeneratöre bağlayan dört adet vdayı sökün.
2. Kıvılcım tutucuyu susturucuya bağlayan vdayı sökün. Kıvılcım tutucu eleğn temzleyn.
3. Eleğ kontrol edn ve yıpranmış, delnmş veya hasar görmüşse yedek elek ednn. Kusurlu elekler
KULLANMAYIN. Elek hasar görmemşse, br fırça le temzleyn.
4. Eleğ tekrar susturucuya takın. Susturucu kapağını tekrar takın.
Valf Açıklığının Kontrol Edlmes
Düzenl valf açıklığı kontrolü ve ayarı performansı artıracak ve motor ömrünü uzatacaktır. Bu prosedür
kısm motor sökümü ve özel alet kullanımı olmadan gerçekleştrlemez. Bu nedenle yetkl Servsten kontrol
yaptırmanızı ve tavsye edlen aralıklarla valf açıklığını ayarlatmanızı tavsye ederz (bkz. Bakım bölümündek
Bakım Çzelges başlığı).
Depolama
Jeneratörü 30 günden fazla kullanmayacaksanız, depolamaya hazırlamak çn aşağıdak talmatları zleyn.
Jeneratörün Depolanması
Temzleme bölümünde belrtldğ şeklde temzleyn.
edn.
Uzun Vadel Depolama Talmatları
Yakıt 30 günün üzernde depolandığında bozulablr. Bozulan yakıt, yakıt sstemnde veya öneml karbüratör
parçalarında ast ve okstlenmş yakıt artıkları oluşmasına neden olur. Yakıtın bozulmasını önlemek çn sıvı
katkı maddes veya damla konsantre kartuş olarak temn edleblen Brggs & Stratton FRESH START® yakıt
stablzatörünü kullanın.
Talmatlara uygun şeklde yakıt stablzatörü eklendğnde motordak benzn boşaltmaya gerek kalmaz.
Stablzatörü yakıt sstemnde dolaştırmak çn motoru 2 dakka boyunca çalıştırın. Böylece motor ve yakıt 24 aya
kadar depolanablr.
Motordak benzne yakıt stablzatörü katılmamışsa, onaylanmış br kaba boşaltılmalıdır. Motoru yakıtın
btmesne bağlı olarak durana kadar çalıştırın Depolama kabında bozulmayı önlemek çn yakıt stablzatörü
kullanılması önerlmektedr.
Motor Yağının Değştrlmes
Motor hala sıcakken, yağ karternden yağı boşaltın. Tavsye edlen derecede yağ le doldurun. Bkz. Motor Yağının
Değştrlmes.
Dğer Depolama İpuçları
1. Yakıtı, Uzun Sürel Depolama Talmatları bölümünde açıklandığı şeklde muamele görmedğ takdrde
br sezondan dğerne kadar DEPOLAMAYIN.
2. Paslanmaya başlarsa yakıt kabını değştrn. Yakıtta pas ve/veya kr bu üntede kullanıldığında sorun
yaratablr.
3. Üntenn üzern nem tutmayan uygun br koruyucu örtüyle örtün.
4. Jeneratörü temz, kuru br alanda depolayın.
DİKKAT Kullanılmış motor yağını uzun süre ya da tekrar tekrar cldnze temas ettrmekten kaçının.
UYARI Egzoz alanıyla temas cdd yanıklara neden olablr.
Egzoz ısısı/gazları yanıcı maddeler, yapıları tutuşturablr veya yakıt deposuna
hasar vererek yangına neden olablr.
perakendecye veya bayye başvurun.
UYARI Yakıt ve buharları aşırı derecede yanıcı ve patlayıcıdır, ölüm, cdd yaralanma ve/veya mal
zararına neden olan yanıklara, yangınlara veya patlamalara sebep olablr.
YAKITI VEYA EKİPMANI DEPO YAKIT İLE DOLUYKEN SAKLAMA
alev olan dğer aygıtların uzağında depolanmalıdır.
YAKITI BOŞALTIRKEN
basıncın boşalması çn kapağı yavaşça gevşetn.
kontrol edn Gerekrse değştrn.
UYARI Depolama kapakları ölüm, cdd yaralanma ve/veya mala zarara neden olan br yangına
sebep olablr.
Not for
Reproduction

12 BRIGGSandSTRATTON.COM
Sorun Gderme
Sorun Neden Düzeltme
Motor çalışıyor, ancak hçbr AC çıkışı mevcut değl.
1. Kırmızı aşırı yük alarmının ışığı açık. Jeneratöre aşırı yük verlmş.
2. Yeşl çıkış göstergesnn ışığı yanıyor. Jeneratörde arıza.
3. Zayıf bağlantı veya kusurlu kablo.
4. Bağlı chaz bozuk.
1. Bkz. Çalıştırma bölümündek Jeneratöre Aşırı Yükleme Yapmayın başlığı.
Jeneratörü kapatın ve yenden çalıştırın.
2. Yetkl servs le rtbata geçn.
3. Kontrol edn ve onarın.
4. İy durumdak başka br chaz bağlayın.
Motor yük olmadan y çalışıyor ancak yükler
bağlandığında durma noktasına gelyor.
1. Bağlı br yükte kısa devre.
2. Motor hızı çok düşük.
3. Jeneratöre aşırı yüklenme yapılmış.
4. Kısa devre yapmış jeneratör devres.
1. Kısa devre yapmış elektrk yükünün bağlantısını kesn.
2. Yetkl servs le rtbata geçn.
3. Bkz. Çalıştırma bölümündek Jeneratöre Aşırı Yükleme Yapmayın başlığı.
4. Yetkl servs le rtbata geçn.
Motor çalışmıyor; çalışırken kapanıyor veya doğru
çalışmıyor.
1. Motor anahtarı kapalı konumuna (O) getrlmş.
2. Yakıt kapağı havalandırma kolu kapalı konumunda (O).
3. Düşük yağ düzey göstergesnn ışığı yanıyor. Düşük yağ sevyes.
4. Hava temzleycs krlenmş.
5. Yakıt btmş.
6. Bozuk yakıt.
7. Buj kablosu bujye bağlı değl.
8. Kötü buj.
9. Yakıtta su var.
10. Amble edlmş.
11. Yüksek oranda yakıt karışımı.
12. Grş valfı açık veya kapalı kalmış.
13. Motor basınç kaybetmş.
1. Motor anahtarını açık (I) konumuna getrn.
2. Yakıt kapağı havalandırma kolunu açık konumuna (I) getrn.
3. Yağ kartern uygun düzeye kadar doldurun veya jeneratörü düz br
yüzeye yerleştrn.
4. Hava fltresn temzleyn veya değştrn.
5. Yakıt deposunu doldurun.
6. Yakıt deposunu ve karbüratörü boşaltın; yen yakıt doldurun.
7. Kabloyu bujye bağlayın.
8. Bujy değştrn.
9. Yakıt deposunu ve karbüratörü boşaltın; yen yakıt doldurun.
10. 5 dakka bekleyn ve motoru yenden çalıştırın.
11. Yetkl servs le rtbata geçn.
12. Yetkl servs le rtbata geçn.
13. Yetkl servs le rtbata geçn.
Motorda güç yok.
1. Yük çok yüksek.
2. Hava fltres krl.
1. Bkz. Çalıştırma bölümündek Jeneratöre Aşırı Yükleme Yapmayın başlığı.
2. Hava fltresn değştrn.
Motor "aksıyor" veya duraksıyor. Karbüratör çok verml veya zayıf çalışıyor. Yetkl servs le rtbata geçn.
Ürün Teknk Özellkler
Çalıştırma Watt Değer ...................................................................2.000 Watt
Watt değer* ...........................................................................1.600 Watt
230 Volt AC'de .......................................................................7.0 Amper
12 Volt DC'de ..........................................................................5 Amper
Anma Frekans ...........................................................................50 Hertz
Faz Tek Faz
Deplasman ....................................................................105,6 cc (6,44 cu. nç)
Buj Tırnak Aralığı .......................................................0,6-0,7 mm (0,023-0,027 nç)
Grş Valfı Açıklığı ...........................................0,08 - 0,12 mm (0,0031 - 0,0047 nç) soğuk
Egzoz Valfı Açıklığı ..........................................0,13 - 0,17 mm (0,0051 - 0,0067 nç) soğuk
Yakıt Kapastes ..............................................................3,7 L (1,0 ABD galonu)
Yağ Kapastes ...................................................................0,4 Ltre (13,5 Ons)
Güç Değerler: Münfert benznl motor modellernn toplam güç değer SAE (Socety of Automotve Engneers)
kod J1940 (Küçük Motor Güç ve Tork Değer Belrleme İşlem)'ne göre etketlenmştr ve değer performansı SAE
J1995 (Revzyon 2002-05)'e göre elde edlmş ve düzeltlmştr. Tork değerler 3060 Dev/Dak hızında türetlmştr;
beygr gücü değerler 3600 Dev/Dak hızında türetlmştr. Gerçek toplam motor gücü daha düşük olacaktır ve
dğer etkenlern yanı sıra ortam şartlarından ve motorlar arası farklardan etklenecektr. Motorların takıldıkları
genş ürün yelpazes ve ekpmanın kullanılmasına lşkn ortam hususlarının farklılığı göz önüne alındığında
benznl motor, herhang br motorlu ekpmanda kullanıldığında toplam anma gücü üretemeyecektr (gerçek
"yernde" veya net güç). Bu fark aksesuarlar (hava temzleyc, egzoz, şarj etme, soğutma, karbüratör, yakıt
pompası vs.), uygulama sınırları, ortam şartları (sıcaklık, nem, yükseklk) ve motorlar arası farklılıklar gb çok
sayıda faktörden kaynaklanmaktadır. Üretm ve kapaste sınırlamalarından dolayı Brggs & Stratton bu Ser
motoru daha güçlü br motorla değştreblr.
* Bu jeneratör ISO 8528 G3'e göre derecelendrlmştr.
Sık Kullanılan Servs Parçaları
Köpüklü Hava Temzleyc .................................................................311388GS
Havalandırma Fltres .....................................................................311389GS
Rezstör Bujs .........................................................................NGK CR7HSA
Not for
Reproduction

13 13
BRIGGS & STRATTON POWER PRODUCTS GROUP, LLC TAŞINABİLİR JENERATÖR ÜRÜN SAHİBİ GARANTİ SÖZLEŞMESİ
SINIRLI GARANTİ
Brggs & Stratton Elektrkl Ürünler Grubu, LLC malzeme ve/veya şçlk kusurları nedenyle ürünün arızalanan parçasını veya parçalarını ücretsz olarak onaracak veya değştrecektr Bu garant kapsamında onarım ya da
değştrme çn gönderlen ürünlern naklye masrafları alıcıya attr. Bu garant aşağıda belrtlen süre zarfında geçerldr ve aşağıdak şartlara tabdr. Garant hzmet çn BRIGGSandSTRATTON.COM adresndek bay bulma
hartasını kullanarak en yakın Yetkl Servs Baysn bulun.
garant süresne sınırlama getrlmemektedr; bazı eyalet ve ülkelerdeyse dolaylı veya dolaysız hasarlara lşkn kapsam dışı bırakmaya veya sınırlamaya zn verlmemektedr. Bu nedenle yukarıdak sınırlamalar ve kapsam dışı
durumlar szn çn geçerl olmayablr. Bu garant sze özel bazı yasal haklar tanımaktadır; ayrıca eyalet ve ülkelere göre değşeblecek dğer haklardan da yararlanablrsnz.
Garant süres lk breysel tüketc veya tcar son kullanıcının ürünü satın alma tarhnde başlar ve yukarıda belrtlen süre boyunca geçerldr. “Tüketc Kullanımı” breysel tüketc tarafından kşsel mülkte kullanım anlamına
gelmektedr. “Tcar Kullanım” tcar, gelr elde etme veya kralama amaçlı da dahl olmak üzere dğer tüm kullanımları kapsamaktadır. Ekpman br kez tcar amaçlı kullanılırsa bu garantnn uygulanması açısından tcar kullanım
amaçlı olarak değerlendrlecektr.
BELGE SUNAMAZSANIZ, GARANTİ SÜRESİNİ BELİRLEMEK İÇİN ÜRÜNÜN ÜRETİM TARİHİ KULLANILACAKTIR.
GARANTİNİZ HAKKINDA
Szlere garant kapsamında onarım hzmet sunmaktan memnunyet duyar ve ürünü kullanamadığınız süre çn özür dlerz. Garant kapsamındak onarımı herhang br Yetkl Servs Bay yapablr. Garant kapsamındak onarımlar
en kısa sürede yapılmaktadır, fakat bazı garant hzmet talepler uygun olmayablr. Örneğn ekpman hasarı yanlış kullanım, rutn bakım eksklğ, naklye, müdahale, depolama ya da yanlış kurulum nedenyle oluşmuşsa kabul
edlmeyecektr. Benzer şeklde, jeneratör veya motor üzerndek üretm tarh veya ser numarası çıkarılmışsa ya da ekpman değştrlmş veya modfye edlmşse garant geçerszdr. Garant peryodu süresnce Yetkl Servs Bays,
Normal Aşınma
parçasının normal kullanım ömrü dolduktan sonrak onarımları kapsamaz.
Kurulum ve Bakım
aşırıhız, yanlış bakım, onarım veya depolamaya maruz kalan ekpman veya parçalar çn geçerl değldr. Bu garant ayrıca hava fltreler, ayarlamalar, yakıt sstem temzlğ ve tıkanıklık (kmyasal, kr vs. nedenyle) gb
normal bakım şlemlern kapsamaz.
Dğer Kapsam Dışı Durumlar
dahl değldr. Çalıştırma aküler, jeneratör adaptör kablo setler ve depo kapakları gb aksesuar parçaları ürün garantsne dahl değldr. Kullanılmış, onarılmış ve serg ekpmanları, kamu kurumları tarafından sağlanan
elektrk yerne brncl güç çn kullanılan ekpmanlar, yaşam desteğ uygulamalarında kullanılan ekpmanlar, doğal afetlere ve dğer üretcnn kontrolü dışındak mücbr sebeplere bağlı arızalar bu garantnn kapsamında
değldr. 198189E, Rev. C, 11/2/2009
BRIGGS & STRATTON POWER PRODUCTS GROUP, LLC
MILWAUKEE, WI, ABD
1 Kasım 2009 tbaryle geçerldr; tarh belrlenemeyen ve 1 Kasım 2009 tarhnden önce yürürlükte olan tüm Garantlern yern alır.
2 yıl*
1 yıl
Tüketc Kullanımı
Tcar Kullanım
*İknc yıl yalnızca parçalar
GARANTİ SÜRESİ
Not for
Reproduction

4 BRIGGSandSTRATTON.COM
.
.
.(DC AC)
) 4,500
.
. (
.
.
.
.
.
.
( ) .
() . .
.
.
.
.
.
.
.
. •
. •
. •
•
.
( )
.
.
.
.
.
. /
.
.
. /
.
.
.
.
.
.
.
.
. (RCD)
.
.
.
.
.
Not for
Reproduction

5 5
&
. & .® & Briggs & Stratton
.
.
. . .
. . .
. & .
&
.BRIGGSandSTRATTON.COM
5 . . . . . . . . . . . . . . . . . . . . . . . . . . . . . . . . . . . . . . . . . . . . . . .
5 . . . . . . . . . . . . . . . . . . . . . . . . . . . . . . . . . . . . . . . . . . . . . . . . . . . . . . . . . . . . . . . . . . . .
5 . . . . . . . . . . . . . . . . . . . . . . . . . . . . . . . . . . . . . . . . . . . . . . . . . . . . . . . . . . . . . . . .
7 . . . . . . . . . . . . . . . . . . . . . . . . . . . . . . . . . . . . . . . . . . . . . . . . . . .
7 . . . . . . . . . . . . . . . . . . . . . . . . . . . . . . . . . . . . . . . . . . . . . . . . . . . . . . . . . . . . . . . . . .
7 . . . . . . . . . . . . . . . . . . . . . . . . . . . . . . . . . . . . . . . . . . . . . . . . . . . . . . . . . . . . . . . . . .
7 . . . . . . . . . . . . . . . . . . . . . . . . . . . . . . . . . . . . . . . . . . . . . . . . . . . . . . . . . . . . . . . . . . . . .
7 . . . . . . . . . . . . . . . . . . . . . . . . . . . . . . . . . . . . . . . . . .
8 . . . . . . . . . . . . . . . . . . . . . . . . . . . . . . . . . . . . . . . . . . . . . . . . . . .
8 . . . . . . . . . . . . . . . . . . . . . . . . . . . . . . . . . . . . . . . . . . . . . . . . . . . . . . . . . . . . . . . . . . .
8 . . . . . . . . . . . . . . . . . . . . . . . . . . . . . . . . . . . . . . . . . . . . . . . . . . . . . . . . . . . . . . . . . . . . .
8 . . . . . . . . . . . . . . . . . . . . . . . . . . . . . . . . . . . . . . . . . . . . . . . . . . . . . . . . . . . . . . . . . . . . .
8 . . . . . . . . . . . . . . . . . . . . . . . . . . . . . . . . . . . . . . . . . . . . . . . . . . . . . . . . . . . . . . .
8 . . . . . . . . . . . . . . . . . . . . . . . . . . . . . . . . . . . . . . . . . . . . . . . . . . . . . . . . . . . . . . . . . . .
9 . . . . . . . . . . . . . . . . . . . . . . . . . . . . . . . . . . . . . . . . . . . . . . . . . . . . . . . . . . . . . . . . .
9 . . . . . . . . . . . . . . . . . . . . . . . . . . . . . . . . . . . . . . . . . . . . . . . . . . . . . . . . . . . . . . . . . . . .
9 . . . . . . . . . . . . . . . . . . . . . . . . . . . . . . . . . . . . . . . . . . . . . . . . . . . . . . . . . . . .
10 . . . . . . . . . . . . . . . . . . . . . . . . . . . . . . . . . . . . . . . . . . . . . . . . . .
10 . . . . . . . . . . . . . . . . . . . . . . . . . . . . . . . . . . . . . . . . . . . . . . . . . . . . . . . . . . . . . . . . . . .
10 . . . . . . . . . . . . . . . . . . . . . . . . . . . . . . . . . . . . . . . . . . . . . . . . . . . . . . . . . . . . . . . . . . .
10 . . . . . . . . . . . . . . . . . . . . . . . . . . . . . . . . . . . . . . . . . . . . . . . . . . . . . . . . . . . . . . . . . . .
11 . . . . . . . . . . . . . . . . . . . . . . . . . . . . . . . . . . . . . . . . . . . . . . . . . . . . . . . . . . . . . . . . . . . . . .
12 . . . . . . . . . . . . . . . . . . . . . . . . . . . . . . . . . . . . . . . . . . . . . .
12 . . . . . . . . . . . . . . . . . . . . . . . . . . . . . . . . . . . . . . . . . . . . . . . .
12 . . . . . . . . . . . . . . . . . . . . . . . . . . . . . . . . . . . . . . . . . . . . . . . . . . . . . . . . . . . . . . . . .
12 . . . . . . . . . . . . . . . . . . . . . . . . . . . . . . . . . . . . . . . . . . . . . . . . . . . . . . . . . . . . . . .
13 . . . . . . . . . . . . . . . . . . . . . . . . . . . . . . . . . . . . . . . . . . . . . . . . .
13 . . . . . . . . . . . . . . . . . . . . . . . . . . . . . . . . . . . . . . . . . . . . . . . . . . . . . . . . . . . . . . .
Copyright © 2011 Briggs & Stratton Power Products Group, LLC
. .Milwaukee, WI, USA
BRIGGS & STRATTON POWER PRODUCTS
Briggs & Stratton
Milwaukee, WI, USA
Not for
Reproduction

6 BRIGGSandSTRATTON.COM
.
. &
.
.
. .1
. .2
:
.
.1
” .2
.
.
:
. .
1
:
.
” .(AKI (91 RON 87/ 87
. ( ) MTBE ()
.
:
.
.E85
.
.
. . .
.
.( ) EM .
. .1
. (A) . 2
. .
. .3
.(AKI (89 RON 85 / 85 ( ) 1500
.
.
( 2,500) 750 .
.
:
. /
. 2
.
.
. .
.
.
. .
.
2
(I) . (A)
.
. (0)
.(0)
3
.
. .
(0) .
(I) – –
.
.( 1.0) 3.7 – -
. – –
. – .
. - .
. 0 . (I) – –
.off On
.
LED – (Ok) –
.
. 12 – 12 –
.
. – –
.off on – –
LED - (!) -
. .
.
– (
) –
.
LED .
.
230 - 230 –
. 50
.
. – –
. – .
. .
– -
:
. – ( )
. – ( )
Not for
Reproduction

7 7
. /
. 2
.
.
. .
.
.
. .
.
.
.
.
.
.(
”
. /
/
.
.
.
. /
.
. •
. •
.
( 5) 1.5 •
•
.
. •
.
.
.
.
.
.
.
.
.
/
.
. •
.
•
. /
:
. ”
” .
/
.
.ON OFF
.
OFF
.
:
.
.
.
.
.
.
-
-
. -
Not for
Reproduction

8 BRIGGSandSTRATTON.COM
1555 = ( )
600 =
2155 =
.
.
.
.1
. .2
.( )
.3
. .4
.
.5
. 5 4
.6
.
.
. . *
(I) .
(0) .
.
.DC
5
. 12
. DC . 5
. .( )
.(0)
.
. 6
.
: 12
. .1
. .2
.
. .3
.(+) Pos .4
.(-) neg .5
. 12 .6
. ”
. 7
. 120 30 :
” .8
.
.9
. . :
.( ) 1.260
( ) ( )
.
. .1
. ( ) . 2
. .
. ( )
. 3
.
.2
. :
.
. /
.
. /
.
.
.
.
( ) ( )
600 300
500 500
— 500
— 180
— 75 ( 75)
600 1555
( )
( ) *
— 75 ( 75) -
500 500
1200 800
1600 800 18 – /
2000 1000 1/3 –
/
1800 1200 BTU 10,000 –
600 300
1300 800 ½ –
— 1000 1000 -
— 1500
— 1500 –
— 100 /
— 100
— 450
— 500 27 –
— 800 17 /
— 180
— 300 AM/FM
520 480 ½ –
— 1000
1200 600 1/3 –
960 960
1000 1000 ½ –
1500 1500 7-1 –
Not for
Reproduction

9 9
3
. .
.
. . 230
.
.
.( ) .1
. .2
. 50 230 .3
.
.
60
.
. /
:
.
” .
/
.
.ON OFF
.
OFF
.
. 1
.
. (0) .2
.
.3
.(0) .4
.(0) .5
. .
AC
RCD . AC
.
.
.
4
(A)
.
.
.
.
3
2
.
. .1
.
.
.
.(0) (K 3) .2
.(I) (F 3) .3
. (I) (A ,2) .4
.(
) (C3) .5
:
. Add Fuel
.
. (E 3) . 6
.
.8
.7
. .7
.6 5
.(
) . 8
.(
)
. (
)
. /
.
.
.
.
( 5) 1.5
.
.
.
:
.
.
.
.
.
.
. /
.
.
.
( )
.
.
.
.
.
.
.
.
.
Not for
Reproduction

10 BRIGGSandSTRATTON.COM
:
.
.1
. . .2
. .
. 3
.
. . .4
.
.
” )
. 30
”
.
. 30
®Briggs & Stratton FRESH START .
.
.
. 24
.
.
.
.
. .
”
” . 1
. . . 2
. .3
.
.4
.
. . .
.
. .1
. – .2
. .3
.
.4
.
5 3
.5
10
.
.
:
. – .1
.(B) (A) .2
. (C) .3
. (D) .4
. . . 5
. .6
. .7
. .8
. .9
.
– .10
12
11
.
. .1
. .2
. .3
. 4
.()
. . . 5
.
. .
.6
. .7
14
13
.
.
.
. :
.
.
.
:
.
.
.
.
( 5) 1.5
.
.
:
. /
.
. . 2
.
.
. .
.
. / :
.
•
. •
Not for
Reproduction

11 11
.
. . SF-SG-SH-SJ
.
.
. SAE 30 ( 40) 4 *
. 10W 30 ( 80) 27 **
.
“ API ILSAC GF-2, API :
. ”SJ/CF
.
8
. 8
.
. .1
. – .2
. .3
. .4
. .5
.
– .6
9
. .1
” 4 2
.2
. .3
. .4
.
– .5
.
.
. 1
.
.
.
.
.
:
.
.
. .
. :
.
.
.
.
/ .
:
.
.
.
.
.
.
.
.
.
:
.
.
.
.
6
.
:
. .1
.(B) (A) .2
. .3
. .4
. .5
8
10
3 50
1
6 100
1
250
. :
.
.
.
Not for
Reproduction

12 BRIGGSandSTRATTON.COM
.
.
Briggs & Stratton Power Products Group, LLC
. .
.BRIGGSandSTRATTON.COM
. . .
.
.
.
” . ” .
.
.
. . .
. . .
.
.
.
. .
.( ) .
.
.
11/2/2009 198189E
BRIGGS & STRATTON POWER PRODUCTS GROUP, LLC
MILWAUKEE, WI, USA
.2009 1 2009 1
* 2
1
*
Not for
Reproduction

13 13
. ”
” .1
.
. .2
. .3
. .4
.
. .1
.
. .2
. .3
. .4
.
. .1
. .2
. ”
” .3
. .4
. .1
. .2
.
.3
.
.4
. ”
.(I) .1
.(I) .2
.3
.
. .4
. .5
. .6
. .7
. .8
. .9
. 5 .10
. .11
. .12
. .13
.(0) .1
.(0) .2
. . .3
.4
.5
. .6
. .7
.8
. .9
. .10
. .11
. () .12
. .13
.
. ”
” .1
. .2
. .1
. .2
.
. . . ”
2,000 . . . . . . . . . . . . . . . . . . . . . . . . . . . . . . . . . . . . . . . . . . . . . . . . . . .
1,600 . . . . . . . . . . . . . . . . . . . . . . . . . . . . . . . . . . . . . . . . . . . . . . . . . . . . . . . *
7.0 . . . . . . . . . . . . . . . . . . . . . . . . . . . . . . . . . . . . . . . . . . . . 230
5 . . . . . . . . . . . . . . . . . . . . . . . . . . . . . . . . . . . . . . . . . . . . . . . 12
50 . . . . . . . . . . . . . . . . . . . . . . . . . . . . . . . . . . . . . . . . . . . . . . . . . . . . . . .
. . . . . . . . . . . . . . . . . . . . . . . . . . . . . . . . . . . . . . . . . . . . . . . . . . . . . . . . . . .
( 6.44) 105.6 . . . . . . . . . . . . . . . . . . . . . . . . . . . . . . . . . . . . . . . . .
( 0.023-0.027) 0.6-0.7 . . . . . . . . . . . . . . . . . . . . . . . . . . . . . . . . . . . .
( 0.0031-0.0047) 0.008-0.12 . . . . . . . . . . . . . . . . . . . . . . . . . . . .
( 0.0051-0.0067) 0.13-0.17 . . . . . . . . . . . . . . . . . . . . . . . . . . . . .
( 1.0) 3.7 . . . . . . . . . . . . . . . . . . . . . . . . . . . . . . . . . . . . . . . . . .
( 13.5) 0.4 . . . . . . . . . . . . . . . . . . . . . . . . . . . . . . . . . . . . . . . . . . . . . .
.(2002-05 ) SAE J1995 ( & ) J1940 (
) SAE :
. . 3600 3060
.( ” )
. ( ) ( )
.
.ISO 8528 G3
*
311388GS . . . . . . . . . . . . . . . . . . . . . . . . . . . . . . . . . . . . . . . . . . . . . . . . . .
311389GS . . . . . . . . . . . . . . . . . . . . . . . . . . . . . . . . . . . . . . . . . . . . . . . . . .
NGK CR7HSA. . . . . . . . . . . . . . . . . . . . . . . . . . . . . . . . . . . . . . . . . . . . . . .
Not for
Reproduction

BRIGGS & STRATTON POWER PRODUCTS GROUP, LLC
MILWAUKEE, WISCONSIN, U.S.A.
Not for
Reproduction
-
 1
1
-
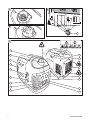 2
2
-
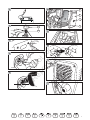 3
3
-
 4
4
-
 5
5
-
 6
6
-
 7
7
-
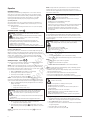 8
8
-
 9
9
-
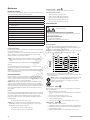 10
10
-
 11
11
-
 12
12
-
 13
13
-
 14
14
-
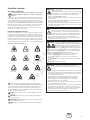 15
15
-
 16
16
-
 17
17
-
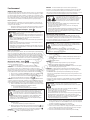 18
18
-
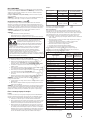 19
19
-
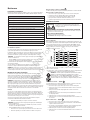 20
20
-
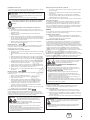 21
21
-
 22
22
-
 23
23
-
 24
24
-
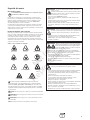 25
25
-
 26
26
-
 27
27
-
 28
28
-
 29
29
-
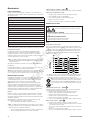 30
30
-
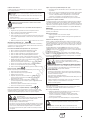 31
31
-
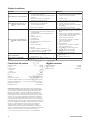 32
32
-
 33
33
-
 34
34
-
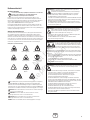 35
35
-
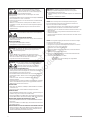 36
36
-
 37
37
-
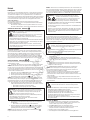 38
38
-
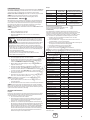 39
39
-
 40
40
-
 41
41
-
 42
42
-
 43
43
-
 44
44
-
 45
45
-
 46
46
-
 47
47
-
 48
48
-
 49
49
-
 50
50
-
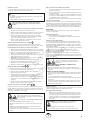 51
51
-
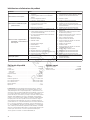 52
52
-
 53
53
-
 54
54
-
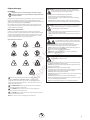 55
55
-
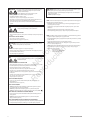 56
56
-
 57
57
-
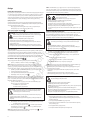 58
58
-
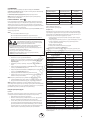 59
59
-
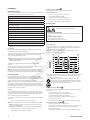 60
60
-
 61
61
-
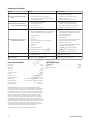 62
62
-
 63
63
-
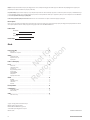 64
64
-
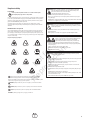 65
65
-
 66
66
-
 67
67
-
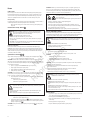 68
68
-
 69
69
-
 70
70
-
 71
71
-
 72
72
-
 73
73
-
 74
74
-
 75
75
-
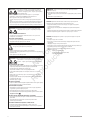 76
76
-
 77
77
-
 78
78
-
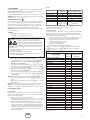 79
79
-
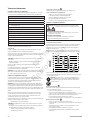 80
80
-
 81
81
-
 82
82
-
 83
83
-
 84
84
-
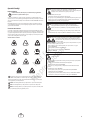 85
85
-
 86
86
-
 87
87
-
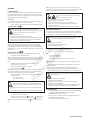 88
88
-
 89
89
-
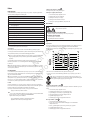 90
90
-
 91
91
-
 92
92
-
 93
93
-
 94
94
-
 95
95
-
 96
96
-
 97
97
-
 98
98
-
 99
99
-
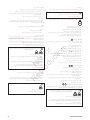 100
100
-
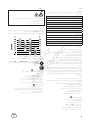 101
101
-
 102
102
-
 103
103
-
 104
104


Simplicity 030527-00 Manual de usuario
- Categoría
- Generadores de poder
- Tipo
- Manual de usuario
- Este manual también es adecuado para
en otros idiomas
- français: Simplicity 030527-00 Manuel utilisateur
- italiano: Simplicity 030527-00 Manuale utente
- polski: Simplicity 030527-00 Instrukcja obsługi
- Türkçe: Simplicity 030527-00 Kullanım kılavuzu
Artículos relacionados
-
Simplicity 030526-00 Manual de usuario
-
-
-
-
-
-
Simplicity PORTAbLE GENERATOR Manual de usuario
-
-
-