
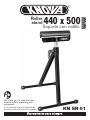
KN SR-01
We invite you to read the user
manual before operating your
equipment.
Lo invitamos a leer el manual del
usuario antes de operar su equipo.
Soporte con rodillo
440 x 500
Roller
stand
mm

SPECIFICATIONS
1. Keep work area clean. Cluttered areas invite injuries.
2. Observe work area conditions. Ensure roller support stand
is set up on rm, level ground in a stable manner.
3. Keep children away. Children must never be allowed in
the work area. Do not let them handle machines, tools,
or extension cords.
4. Be aware of over-balancing. When a large piece is cut from
one end of a job, the remaining piece may be heavy
enough to tip the stander. Always ensure the workpiece
is well supported.
5. Use the right tool for the job. Do not modify this tool and
do not use this tool for a purpose for which it was not
intended.
6. Dress properly. Do not wear loose clothing or jewelry as
they can be caught in moving parts. Protective, electrically
non-conductive clothes and non-skid footwear are
recommended when working. Wear restrictive hair
covering to contain long hair.
7. Use eye and ear protection. Always wear ANSI approved
impact safety goggles.
8. Work Safe. Keep proper footing and balance at all times.
Never use support stand as step ladder, nor stand on
support stand top. Never exceed recommended maximum
weight capacity of support stand (132 lbs.). Always lower
heavy loads onto stand gently, so that strain is taken up
gradually.
9. Stay alert. Watch what you are doing, use common sense.
Do not operate any tool when you are tired.
10. Check to make sure that all xing screws and knobs are
tight and all legs are locked into place before operating
the stand.
11. Check damaged parts. Before further use of tool, it should
be carefully checked to determine that it will operate
properly and perform its intended function.
12. Do not operate any tool if under the inuence of alcohol
or drugs. Read warning labels on prescriptions to
determine if your judgment or reexes are impaired while
taking drugs. If there is any doubt, do not operate any tool.
13. When not in use, tools should be stored in a dry locked-up
place, out of the reach of children and persons unfamiliar
with the tool.
WARNING
READ, UNDERSTAND AND FOLLOW
ALL INSTRUCTIONS AND WARNINGS BEFORE
OPERATING THIS TOOL. FAILURE TO DO SO MAY
RESULT IN PERSONAL INJURY AND/OR
PROPERTY DAMAGE AND WILL VOID WARRANTY.
IMPORTANT SAFETY INFORMATION
Model
Open size:
Out tube:
Adjustable tube:
Roller width:
Rotary drum dia:
Base tube dia:
Weight capacity:
Weight:
KN SR-01
17.3 x 19.6 x 26.3 in - 43.3 in
1.18 x 1.18 x 0.04 in
0.98 x 0.98 x 0.04 in
11 in
1.88 in
0.98 in
132 lbs
8.4 lbs
TECHNICAL DATA WARNING
WARNING
The use of any accessory or attachment
other than one recommended in this instruction
manual may present a risk of personal injury.
The warnings, cautions, and instructions
discussed in this instruction manual cannot cover all
possible conditions and situations that may occur.
It must be understood by the operator that common
sense and caution are factors which cannot be built
into this product, but must be supplied by the
operator. Read and understand all of the instructions
provided in the instruction manual as well as any other
tool (s) used with the roller support stand.
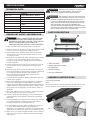
PARTS DESCRIPTION
21
3
4
5
1 Roller Assembly
2 Height Adjustment Handle
3 Leg Assembly
4 Stand Assembly
5 Hex key & Hardware
ASSEMBLY INSTRUCTIONS
Use hex key provided.
Step 1.
Remove the pins from the leg assembly (3) and insert the pins
into the holes of the stand assembly (4) as shown in Fig. 1.
Fig. 1

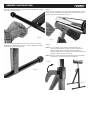
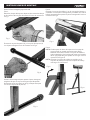
ASSEMBLY INSTRUCTIONS
Connect the leg assembly (3) and stand assembly (4) with the
hex bolt as shown in Fig 2.
Use the hex key to tighten the hex bolt, make sure the leg
assembly is locked rmly as shown in Fig 3. Repeat this step
with the other leg assembly (3).
Fig. 2
Fig. 3
Step 3.
Put the roller assembly (1) on the stand assembly and connect
them with two hex bolts and washers (5). Use the hex key to
tighten the hex bolts as show in Fig 4.
F i g . 4
Step 4.
NOTE: You can adjust the height of the stand with the
adjustment handle by turning counter-clockwise to
loosen. While loose, raise the roller assembly to
desired height and turn adjustment handle clockwise to
tighten in place as shown in Fig 5.
NOTE: Set the roller assembly parallel with the leg assembly
to support a longer work-piece more rmly.
Fig. 5
Fig. 6

ESPECIFICACIONES
Modelo
Tamaño desplegado:
Tubo de salida:
Tubo ajustable:
Ancho de rodillo:
Diám. del tambor giratorio:
Diám. del tubo base:
Capacidad de peso:
Peso:
KN SR-01
440 x 500 x 670 mm - 1,100 mm
30 x 30 x 1.2 mm
25 x 25 x 1.2 mm
279.7 mm
48 mm
25 mm
59.8 kg
3.81 kg
INFORMACIÓN TÉCNICA
1. Mantenga limpia el área de trabajo. Las áreas
desordenadas invitan a las lesiones.
2. Observe las condiciones del área de trabajo. Asegúrese
de que el soporte del rodillo esté colocado sobre un suelo
rme y nivelado de manera estable.
3. Mantenga alejados a los niños. Nunca se debe permitir
que los niños entren en el área de trabajo. No permita que
manejen máquinas, herramientas o cables de extensión.
4. Tenga en cuenta el exceso de equilibrio. Cuando se corta
una pieza grande de un extremo de un trabajo, la pieza
restante puede ser lo sucientemente pesada como para
inclinar el soporte. Asegúrese siempre de que la pieza de
trabajo esté bien sujeta.
5. Utilice la herramienta adecuada para el trabajo. No
modique esta herramienta y no la utilice para un propósito
para el que no fue diseñada.
6. Vístase apropiadamente. No use ropa holgada ni joyas,
ya que pueden engancharse en las piezas móviles. Se
recomienda usar ropa protectora, no conductora de
electricidad y calzado antideslizante cuando se trabaja.
Use una cobertura de cabello restrictiva para contener
el cabello largo.
7. Utilice protección para los ojos y los oídos. Utilice siempre
gafas de seguridad contra impactos aprobadas por ANSI.
8. Trabaje seguro. Mantenga la postura y el equilibrio en todo
momento. Nunca use el pedestal de apoyo como escalera
de mano, ni se pare en la parte superior del pedestal de
apoyo. Nunca exceda la capacidad de peso máxima
recomendada del soporte de soporte (59.8 kg). Siempre
baje las cargas pesadas sobre el soporte con cuidado, de
modo que la tensión se absorba gradualmente.
INFORMACION DE SEGURIDAD IMPORTANTE
LEA, COMPRENDA Y SIGA TODAS
LAS INSTRUCCIONES Y ADVERTENCIAS ANTES
DE UTILIZAR ESTA HERRAMIENTA. EL NO
HACERLO PUEDE RESULTAR EN LESIONES
PERSONALES Y / O DAÑOS A LA PROPIEDAD
Y ANULARÁ LA GARANTÍA.
ADVERTENCIA
9. Manténgase alerta. Observe lo que está haciendo, use
el sentido común. No opere ninguna herramienta cuando
esté cansado.
10. Verique para asegurarse de que todos los tornillos y
perillas de jación estén apretados y que todas las patas
estén bloqueadas en su lugar antes de operar el soporte.
11. Revise las partes dañadas. Antes de seguir utilizando la
herramienta, debe comprobarse cuidadosamente para
determinar si funcionará correctamente y realizará la
función para la que fue diseñada.
12. No utilice ninguna herramienta si está bajo la inuencia
de alcohol o drogas. Lea las etiquetas de advertencia en
las recetas para determinar si su juicio o reejos se ven
afectados mientras toma medicamentos. Si tiene alguna
duda, no utilice ninguna herramienta.
13. Cuando no estén en uso, las herramientas deben guardarse
en un lugar seco y cerrado, fuera del alcance de los niños y
personas que no estén familiarizadas con la herramienta.
El uso de cualquier accesorio o
aditamento que no sea el recomendado en este manual
de instrucciones puede presentar un riesgo de lesiones
personales.
Las advertencias, precauciones e
instrucciones que se describen en este manual de
instrucciones no pueden cubrir todas las posibles
condiciones y situaciones que pueden ocurrir.
El operador debe entender que el sentido común y la
precaución son factores que no pueden incorporarse a
este producto, sino que deben ser proporcionados por
el operador. Lea y comprenda todas las instrucciones
proporcionadas en el manual de instrucciones, así
como cualquier otra herramienta utilizada con el
soporte de rodillo.
ADVERTENCIA
ADVERTENCIA
DESCRIPCIÓN DE PARTES
21
3
4
5
1 Conjunto de rodillo
2 Mango de ajuste de altura
3 Ensamblaje de la pierna
4 Montaje del soporte
5 Llave hexagonal y tornillos

Fig. 3
INSTRUCCIONES DE MONTAJE
Conecte el conjunto de patas (3) y el conjunto de soporte (4)
con el perno hexagonal como se muestra en la Fig 2.
Fig. 2
Utilice la llave hexagonal para apretar el perno hexagonal,
asegúrese de que el conjunto de la pata esté bloqueado
rmemente como se muestra en la Fig 3. Repita este paso
con el otro conjunto de la pata (3).
Utilice la llave hexagonal proporcionada.
Paso 1.
Retire las clavijas del conjunto de patas (3) e inserte las clavijas
en los oricios del conjunto de la base (4) como se muestra en
la Fig.1.
Fig. 1
Paso 3.
Coloque el conjunto de rodillos (1) en el conjunto del soporte y
conéctelos con dos pernos hexagonales y arandelas (5). Utilice
la llave hexagonal para apretar los pernos hexagonales como se
muestra en la Fig 4.
F i g . 4
Paso 4.
NOTA: Puede ajustar la altura del soporte con la manija de
ajuste girando en sentido antihorario para aojar.
Mientras está suelto, levante el conjunto de rodillos a
la altura deseada y gire la manija de ajuste en el sentido
de las agujas del reloj para apretar en su lugar como se
muestra en la Figura 5.
NOTA: Coloque el conjunto de rodillos en paralelo con el
conjunto de patas para soportar una pieza de trabajo
más larga con más rmeza.
Fig. 5
Fig. 6

NOTES / NOTAS

NOTES / NOTAS

www.knova.com.mx
-
 1
1
-
 2
2
-
 3
3
-
 4
4
-
 5
5
-
 6
6
-
 7
7
-
 8
8


en otros idiomas
- English: KNOVA KN SR-01 Owner's manual
Otros documentos
-
Delta 36-136 Manual de usuario
-
Rikon Power Tools 10-321 El manual del propietario
-
-
-
RIDGID R4091 Guía del usuario
-
Craftsman 124.32607 Manual de usuario
-
-
-
-
Ryobi ts1341 Manual de usuario