
1
ITEM #1599753, 1599757, 0889518, 1599760
MODEL # 7360ALMV, 7361ALMV, 7362ALMV, 7364ALMV
IS7300-I
Style Selections is a trademarkof LF, LLC. All Rights Reserved.
Suction Mount Option:
IMPORTANT:
• Thoroughly clean the mounting surface and suction cups with a mild household cleaner, rinse thoroughly with water, and allow to fully dry.
• Do not use suction cups on porous or textured surfaces because they will not function properly.
• Suction cups are movable to avoid positioning over any grout lines.
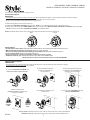
1. Remove the protective cover from the suction cup.
2. Rotate knob COUNTER CLOCKWISE until loose, g 1. NOTE: If you accidentally removed knob, re-attach with 2 turns.
3. With the item in its nal location, PRESS FIRMLY against the mounting surface WHILE TURNING THE KNOB CLOCKWISE until fully tight, g 2.
NOTE: To remove, turn the knob COUNTER CLOCKWISE until completely loose.
NOTE: Occasional cleaning of the suction cups and the wall surface will ensure maximum performance.
Adhesive Mount Option:
IMPORTANT:
• Thoroughly clean the mounting surface with a mild household cleaner, rinse thoroughly with water, and allow to fully dry.
• Avoid positioning adhesive pads over any grout lines.
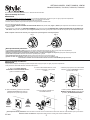
1. Turn knob COUNTER CLOCKWISE and
remove the suction cup from the item.
2. Insert the adhesive pad and
re-attach the assembly and
turn knob 2 turns.
4. Remove assembly and
rmly press down the adhesive pad
to remove air bubbles.
5. Re-attach the assembly to the
adhesive pad.
CRITICAL
STEP
CRITICAL
STEP
Having issues? Please don’t return to store. Call our customer care line for help 1-866-389-8827.
Installation video link. https://www.zenith-products.com/org-dual-mount-installation-video
3. Remove the plastic backing from
the adhesive pad and rmly press
against the mounting surface.
6. Turn the knob CLOCKWISE until snug.
DO NOT OVERTIGHTEN!
Having issues?
• Are the surfaces clean and dry? Clean with mild household cleaner, rinse thoroughly with water and allow to fully dry.
• Was the knob fully loosened prior to mounting? Turn knob counter clockwise.
• Did you press rmly against wall while tightening knob clockwise? Maintain pressure while turning knob.
• Are your walls textured? Works on at, smooth surfaces only.
• Are you mounting over a grout line? Reposition suction cup on center of surface.
• Installation video link. https://www.zenith-products.com/org-dual-mount-installation-video
Please don’t return to store. Call our customer care line for help 1-866-389-8827.
Fig. 1
Fig. 2

2
IS7300-I
Style Selections es una marca registrada de LF, LLC. Todos los derechos reservados.
ARTÍCULO #1599753, 1599757, 0889518, 1599760
Modelo #7360ALMV, 7361ALMV, 7362ALMV, 7364ALMV
Opción de montaje de succión:
IMPORTANTE:
• Limpie a fondo la supercie de montaje y las ventosas con un producto de limpiezasuave, enjuague muy bien con agua y deje secar completamente.
• No utilice ventosas en supercies porosas o con textura porque no se adherirán correctamente.
• Las ventosas se pueden mover para evitar posicionarlas sobre líneas de juntas.
• Enlace de video de instalación: https://www.zenith-products.com/org-dual-mount-installation-video.
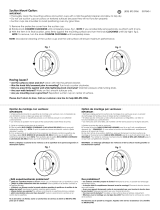
1. Quite la cubierta protectora de la ventosa.
2. Gire la perilla EN EL SENTIDO CONTRARIO A LAS AGUJAS DEL RELOJ hasta que esté suelta, (Figura 1). NOTA: Si quitó la perilla en forma accidental, vuelva a jarla
dándole 2 vueltas.
3. Con el artículo en su ubicación nal, PRESIONE FIRMEMENTE contra la supercie demontaje MIENTRAS GIRA LA PERILLA EN DIRECCIÓN DE LAS MANECILLAS
DEL RELOJ, hastaque esté completamente apretada (Figura 2). NOTA: para retirarlo, gire la perilla contralas manecillas del reloj hasta que esté completamente suelto.
NOTA: La limpieza ocasional de las ventosas y de la supercie de la pared asegurarán un desempeño óptimo.
Opción de montaje con adhesivo:
IMPORTANTE:
• Limpie a fondo la supercie de montajeun producto de limpieza suave, enjuague muybien con agua y deje secar completamente.
• Evite posicionar las almohadillas adhesivas sobre las líneas de juntas.
¿Está experimentando problemas?
• ¿Las supercies están limpias y secas? Limpie con un producto de limpieza suave,enjuague muy bien con agua y deje secar completamente.
• ¿Aojó la perilla totalmente antes de montarla? Gire la perilla en el sentido contrario alas agujas del reloj.
• ¿Presionó con rmeza contra la pared mientras apretaba la perilla en el sentido de lasagujas del reloj? Mantenga la presión mientras gira la perilla.
• ¿Tienen textura sus paredes? Se adhiere únicamente a supercies planas y parejas.
• ¿Está colocándola sobre una línea de junta? Vuelva a posicionar la ventosa en el centro de la supercie.
• ¿Enlace de video de instalación: https://www.zenith-products.com/org-dual-mount-installation-vide
No la devuelva a la tienda. Llame a nuestra línea de servicio al cliente al 1-866-389-8827 para que lo asistan.
1. Gire la perilla EN EL SENTIDO
CONTRARIO A LAS AGUJASDEL RELOJ
y quite la ventosadel ensamble.
2. Inserte la almohadilla adhesiva, vuelva
a colocar el ensamble y gire la perilla
2 vueltas.
3. Retire el papel protector de la almohadilla
adhesiva y presione rmemente contra la
supercie de montaje.
4. Quite el ensamble y presione la almohadilla
adhesiva con rmeza para quitar las
burbujas de aire que se hayan formado.
5. Vuelva a jar el ensamble a la
almohadilla adhesiva.
PASO
CRÍTICO
PASO
CRÍTICO
6. Gire la perilla en DIRECCIÓN DE LAS
MANECILLAS DEL RELOJ hasta que esté
apretada. ¡NO APRIETE EN EXCESO!
Fig. 1
Fig. 2
¿Está experimentando problemas? No la devuelva a la tienda. Llame a nuestra línea de servicio al cliente al 1-866-389-8827 para que lo asistan.
Enlace de video de instalación: https://www.zenith-products.com/org-dual-mount-installation-vide
-
 1
1
-
 2
2


Style Selections 7361ALMV Guía de instalación
- Tipo
- Guía de instalación
en otros idiomas
Artículos relacionados

Otros documentos
-
 Zenna Home 7468ALL Instrucciones de operación
-
Zenith 9647W Instrucciones de operación
-
-
Zenith 9114GY Guía de instalación
-
-
-
 Zenna Home 7013W Guía de instalación
-
 Zenna Home 9814WW Guía de instalación
-


