Style Selections 2620KKMV Guía de instalación
- Tipo
- Guía de instalación

1
ITEM #1599758
MODEL #2620KKMV
IS2604-I
Style Selections is a trademark
of LF, LLC. All Rights Reserved.
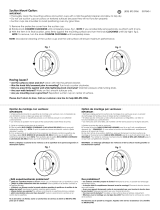
Suction Mount Option:
IMPORTANT:
• Thoroughly clean the mounting surface and suction cups with a mild household cleaner, rinse thoroughly with water, and allow to fully dry.
• Do not use suction cups on porous or textured surfaces because they will not function properly.
• Suction cups are movable to avoid positioning over any grout lines.
1. Insert suction cups into the slots, g 1.
2. With the item in its nal location, press rmly against the mounting surface, g 2.
NOTE: Occasional cleaning of the suction cups and the wall surface will ensure maximum performance.
Fig. 1 Fig. 2
Adhesive Mount Option:
IMPORTANT:
• Thoroughly clean the mounting surface with a mild household cleaner, rinse thoroughly with water, and allow to fully dry.
• Avoid positioning adhesive pad over any grout lines.
1. Insert 3 adhesive pads into the slots, as shown.
2. Remove the plastic backing from the adhesive pads and
rmly press against the mounting surface.
3. Remove assembly and
rmly press DOWN the adhesive pads
to remove air bubbles.
4. Re-attach the assembly to the adhesive pads .
CRITICAL
STEP
CRITICAL
STEP
Having issues? Please don’t return to store. Call our customer care line for help 1-866-389-8827.

2
IS2604-I
Style Selections es una marca registrada de LF,
LLC. Todos los derechos reservados.
ARTÍCULO #1599758
Modelo #2620KKMV
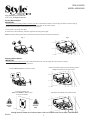
Opción de montaje de succión:
IMPORTANTE:
• Limpie a fondo la supercie de montaje y las ventosas con un producto de limpieza suave, enjuague muy bien con agua y deje secar completamente.
• No use ventosas en supercies porosas o texturizadas porque no funcionarán correctamente.
• Las ventosas son móviles para evitar colocarlas sobre líneas de lechada.
1. Inserte las ventosas en las ranuras (Fig. 1).
2. Con el artículo en su ubicación nal, presione rmemente contra la supercie de montaje (Fig. 2).
NOTA: La limpieza ocasional de las ventosas y la supercie de la pared asegurará el mejor desempeño.
Opción de montaje con adhesivo:
IMPORTANTE:
• Limpie a fondo la supercie de montaje con un producto de limpieza suave, enjuague muy bien con agua y deje secar completamente.
• Evite colocar las almohadillas adhesivas sobre líneas de lechada.
SPANISH
Fig. 1 Fig. 2
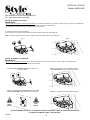
1. Inserte las tres almohadillas adhesivas en las ranuras,
como se muestra.
2. Retire el papel protector de la almohadilla adhesiva y
presione rmemente contra la supercie de montaje.
4. Readjunte el ensamble a las almohadillas adhesivas.
PASO
CRÍTICO
PASO
CRÍTICO
3. Retire el ensamble y presione rmemente las almohadillas
adhesivas HACIA ABAJO para eliminar las burbujas de aire.
¿Tiene problemas? Por favor, no devuelva el artículo a la tienda. Llame a nuestra línea de atención
al cliente para obtener ayuda: 1-866-389-8827.
-
 1
1
-
 2
2