
ES
GR
FR
Manual de instrucciones
Original user guide
Manuel original d´utilisation
Elite 123
SIMA S.A.
Polígono Industrial Juncaril, C/Albuñol, Parcela 250
C. P. 18220 Albolote, Granada (ESPAÑA).
Telf:(+34) 958 490 410. [email protected]
simasa.com

ES
2

ES
3
ÍNDICE
1. INFORMACIÓN GENERAL.
............................................................ 4
2. ESPECIFICACIONES DE PRODUCTO
........................................... 4
2.1 UTILIZACIÓN PREVISTA
.............................................................. 4
2.2. DATOS TÉCNICOS
....................................................................... 4
3. PICTOGRAMAS ............................................................................... 4
4. MONTAJE DE LA MÁQUINA
.......................................................... 5
5. TRANSPORTE Y ALMACENAMIENTO
.......................................... 6
6. CONEXIÓN ELÉCTRICA
................................................................. 6
7. RECOMENDACIONES DE SEGURIDAD ........................................ 7
8. PARTES DE LA MÁQUINA ............................................................. 8
9. POSICIÓN OPERARIO. CONEXIÓN Y DESCONEXIÓN ................ 9
9.1 CORTE A 45º ................................................................................. 9
9.2 CORTE CON DESCENSO DEL CABEZAL .................................. 10
9.3 CORTE DE RANURAS O CORTE DOBLE PASADA ................... 10
9.4 BRAZOS DE APOYO ABATIBLES ............................................... 11
9.5 ASPIRACIÓN ................................................................................. 11
10. MANTENIMIENTO ......................................................................... 12
11. SOLUCIÓN POSIBLES ANOMALÍAS ........................................... 13
12. GARANTÍA ..................................................................................... 14
13. REPUESTOS ................................................................................. 14
14. DECLARACIÓN SOBRE RUIDOS ................................................ 14
15. DECLARACIÓN SOBRE VIBRACIONES MÉCÁNICAS .............. 14
16. PROTECCIÓN DE MEDIO AMBIENTE ......................................... 14

ES
4
1. INFORMACIÓN GENERAL.
La lectura de este manual es obligatoria para cualquier persona que vaya a ser responsable del uso, mantenimiento o reparación
de la citada máquina. Lea y comprenda perfectamente las presentes instrucciones antes de empezar a manejar la máquina.
2. ESPECIFICACIONES DE PRODUCTO
2.1 UTILIZACIÓN PREVISTA
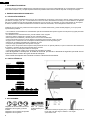
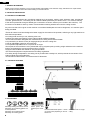
Las Cortadoras están diseñadas para tronzar en seco materiales de construcción como terrazo, mármol, granito, silestone, pizarra,
porcelanato, hormigón, gres, etc... La herramienta de corte es un disco de diamante accionado por un motor eléctrico. El aspirado
del polvo se realiza a través del tubo exible de aspiración que se conecta a un aspirador, el cual no está incluido en la máquina.
El avance del disco se realiza manualmente accionado el volante de transmisión, el cual desplaza la unidad de corte.
Cualquier otro uso que se le pueda dar a esta máquina se considera inadecuado y puede resultar peligroso, por lo que queda
expresamente prohibido.
• Las Cortadoras de materiales han sido diseñadas para las necesidades del operario logrado una máquina muy ligera para facili-
tar su desplazamiento.
• Su cabezal de corte inclinado hasta 45º, permite realizar cortes a inglete.
• Permite la subida y bajada de la unidad de corte a distintas alturas.
• Esta máquina se ha diseñado y fabricado para corte con disco de diamante.
• Como grupo motriz incorpora un motor eléctrico (amoladora) para accionar el disco de corte.
• El grupo motor o cabezal de corte se desplaza mediante patines a través del puente guía.
• Dispone de un sistema regulable para el aspirado de polvo.
• Incorpora regla graduable para cortar piezas en ángulo.
• Algunos de los componentes de la máquina están pintados al horno con pintura poliéster, lo que le conere una alta resistencia a
la supercie y mantiene la estructura protegida de la corrosión.
• Dispone de asas y ruedas para facilitar su transporte.
• La equipación eléctrica cumple con la normativa de seguridad comunitaria.
• Para la seguridad en el transporte, la unidad de corte está provista de un elemento se seguridad, que evita el movi-
miento del mismo a través de la guía durante el transporte.
• Este modelo de máquina está construido conforme a Directivas Comunitarias.
2.2. DATOS TÉCNICOS
3. PICTOGRAMAS
Obligatorio leer el manual de instrucciones.
Obligatorio el uso de gafas y protección
acústica.
Obligatorio el uso de calzado de seguridad.
Obligatorio el uso de guantes.
Nivel de potencia
acústica emitido por la
máquina.
Velocidad en metros por segundo (m/s) a
la que debe ir el disco según el material
que se desee cortar.
Escala graduada para el cor-
te en ángulo.
Voltaje / (Hz)
Potencia
Ø Ext.disco
Ø Int.disco
Ancho maximo disco
Long. corte
Prof.corte 1 pasada
Prof.corte 2 pasadas
Prof.corte 45º grados
L
WA dB (A)
a
hw m/s
2
Peso neto
Peso bruto
Medidas embalaje 1 ud.
1030 mm
20 mm
102
5
35 Kg
40 Kg
1400 x 580 x 450
230 V / (50-60) Hz
1,4Kw / 1,9 Hp
125 mm
22,2 mm
4 mm
1230 mm
22 mm
35 mm
20 mm
102
5
35 Kg
40 Kg
1700 x 580 x 450
1530 mm
20 mm
102
5
35 Kg
40 Kg
2000 x 550 x 450
Elite 103 Elite 123 Elite 153
1380
420
1030
560
2862
19
1,25
4,5 - 5
A
B
C
D
RPM
m/s
A - Vacío
A - Carga
1680
420
1230
560
3424
22
1,5
5,2 - 5,7
1980
420
1530
580
5117
34
1,7
5,2 - 5,7
7000
46
1,95
5,2 - 5,7
8800
59
2,28
5,2 - 5,7
9400
62
2,41
5,2 - 5,7
Elite 103
1
Elite 123
2
Elite 153
3 4 5 6
L
WA
102 dB
PARÁMETROS DE CORTE
m/s Materiales m/s
1
19 Cerámica 25-30
2 22 Granito 25-35
3 34 Porcelánico 20-30
4
46 Pizarra 40-50
5 59 Mármol 40-50
6 62 Terrazo 40-50
Voltaje / (Hz)
Potencia
Ø Ext.disco
Ø Int.disco
Ancho maximo disco
Long. corte
Prof.corte 1 pasada
Prof.corte 2 pasadas
Prof.corte 45º grados
L
WA dB (A)
ahw m/s
2
Peso neto
Peso bruto
Medidas embalaje 1 ud.
Voltage / (Hz)
Power
Ø External blade
Ø Internal blade
Maximun blade width
Maximun Cutting Lenght
Cutting Depth (1 pass)
Cutting Depth (2 pass)
Cutting Depth 45º
L
WA dB (A)
ahw m/s
2
Net Weight
Gross Weight
Packaging Dimensions
1030 mm
20 mm
102
5
35 Kg
40 Kg
1400 x 580 x 450
230 V / (50-60) Hz
1,3Kw / 0,95 Hp
125 mm
22,2 mm
4 mm
1230 mm
22 mm
35 mm
20 mm
102
5
35 Kg
40 Kg
1700 x 580 x 450
230 V / (50-60) Hz
1,3Kw / 0,95 Hp
125 mm
22,2 mm
4 mm
1230 mm
22 mm
35 mm
20 mm
102
5
35 Kg
40 Kg
1700 x 580 x 450
1530 mm
20 mm
102
5
35 Kg
40 Kg
2000 x 550 x 450
Elite 103 Elite 123Elite 123 Elite 153
1380
420
1030
560
2862
19
1,25
4,5 - 5
A
B
C
D
RPM
m/s
A - Vacío
A - Carga
1680
420
1230
560
3424
22
1,5
5,2 - 5,7
1980
420
1530
580
5117
34
1,7
5,2 - 5,7
7000
46
1,95
5,2 - 5,7
8800
59
2,28
5,2 - 5,7
9400
62
2,41
5,2 - 5,7
Elite 103
1
Elite 123
2
Elite 153
3 4 5 6
PARÁMETROS DE CORTE
m/s Materiales m/s
1 19 Cerámica 25-30
2 22 Granito 25-35
3 34 Porcelánico 20-30
4 46 Pizarra 40-50
5 59 Mármol 40-50
6 62 Terrazo 40-50
CUTTING PARAMETRES
m/s Materials m/s
1 19 Ceramic tiles 25-30
2 22 Granits 25-35
3 34 Porcelain tiles 20-30
4 46 Slate 40-50
5 59 Marble 40-50
6 62 Terrazo 40-50
Voltaje / (Hz)
Potencia
Ø Ext.disco
Ø Int.disco
Ancho maximo disco
Long. corte
Prof.corte 1 pasada
Prof.corte 2 pasadas
Prof.corte 45º grados
L
WA dB (A)
ahw m/s
2
Peso neto
Peso bruto
Medidas embalaje 1 ud.
Voltage / (Hz)
Power
Ø External blade
Ø Internal blade
Maximun blade width
Maximun Cutting Lenght
Cutting Depth (1 pass)
Cutting Depth (2 pass)
Cutting Depth 45º
L
WA dB (A)
ahw m/s
2
Net Weight
Gross Weight
Packaging Dimensions
1030 mm
20 mm
102
5
35 Kg
40 Kg
1400 x 580 x 450
230 V / (50-60) Hz
1,3Kw / 0,95 Hp
125 mm
22,2 mm
4 mm
1230 mm
22 mm
35 mm
20 mm
102
5
35 Kg
40 Kg
1700 x 540 x 370
230 V / (50-60) Hz
1,3Kw / 0,95 Hp
125 mm
22,2 mm
4 mm
1230 mm
22 mm
35 mm
20 mm
102
5
35 Kg
40 Kg
1700 x 580 x 450
1530 mm
20 mm
102
5
35 Kg
40 Kg
2000 x 550 x 450
Elite 103 Elite 123
Elite 123
Elite 153
1380
420
1030
560
2862
19
1,25
4,5 - 5
A
B
C
D
RPM
m/s
A - Vacío
A - Carga
1680
420
1230
560
3424
22
1,5
5,2 - 5,7
1980
420
1530
580
5117
34
1,7
5,2 - 5,7
7000
46
1,95
5,2 - 5,7
8800
59
2,28
5,2 - 5,7
9400
62
2,41
5,2 - 5,7
Elite 103
1
Elite 123
2
Elite 153
3 4 5 6
PARÁMETROS DE CORTE
m/s Materiales m/s
1 19 Cerámica 25-30
2 22 Granito 25-35
3 34 Porcelánico 20-30
4 46 Pizarra 40-50
5 59 Mármol 40-50
6 62 Terrazo 40-50
CUTTING PARAMETRES
m/s Materials m/s
1 19 Ceramic tiles 25-30
2 22 Granits 25-35
3 34 Porcelain tiles 20-30
4 46 Slate 40-50
5 59 Marble 40-50
6 62 Terrazo 40-50

ES
5
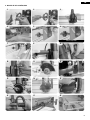
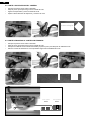
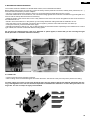
4. MONTAJE DE LA MÁQUINA
01 Montaje / MOUNTING / MONTAGE
simasa.com
1
4
7
10
13
16
2
5
8
11
14
17
3
6
9
12
15
18
Sistema antiperdida

ES
6
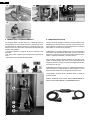
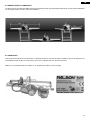
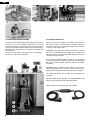
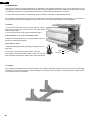
5. TRANSPORTE Y ALMACENAMIENTO
La máquina dispone de dos asas (A) y ruedas (B) para ser
transportada por una o varias personas. Siempre que nece-
site desplazar la máquina bloquee la unidad de corte me-
diante el pomo (C) para evitar movimientos inesperados que
puedan causar daños.
• Almacene siempre la máquina de forma horizontal y bien
apoyada.
• No apoye otras cargas sobre la máquina que puedan da-
ñarla.
• No almacene la máquina de lateralmente.
6. CONEXIÓN ELÉCTRICA
Cuando reciba la máquina y antes de conectar está a la red,
asegúrese que la tensión de la red es la correcta para conec-
tar la máquina. La tensión de funcionamiento de la máquina
esta visible en el motor de la máquina.
ATENCIÓN: no conecte la máquina a la red si no está seguro
de la tensión de alimentación disponible, en caso contrario si
la tensión no fuese la correcta el motor sufriría daños irrepa-
rables o quedaría inutilizado y fuera de servicio.
Una vez haya realizado el paso anterior es necesario com-
probar el sentido de giro del motor como indica la echa del
resguardo del disco. Ponga en marcha la máquina observan-
do la dirección de giro.
ATENCIÓN: No manipule nunca los cables de alimentación
hilos conductores o material eléctrico de la máquina, si no ha
desconectado totalmente la energía eléctrica de la red.
La equipación eléctrica de las cortadoras tiene un grado de
protección IP54.
NUNCA TRABAJE CON AGUA PARA REFRIGERAR EL
DISCO SI NO DISPONE DE LA MANGUERA PRCD.
19
22
20 21
on
on

ES
7
7. RECOMENDACIONES DE SEGURIDAD
MUY IMPORTANTE: La toma de tierra debe estar conectada siempre antes de la puesta en marcha.
• Mantenga limpia el área de trabajo. Un área o un banco de trabajo en desorden aumentan el riesgo de accidentes.
• No exponga las Herramientas Eléctricas a la humedad. Procure
que el área de trabajo esté bien iluminada. No utilice Herramientas.
• Mantenga alejados a los niños No permita que otras personas toquen la herramienta o el cable de prolongación. En caso de uso por
menores de 16 años, se requiere supervisión.
• Respete el nivel máximo de la presión acústica. Tome medidas adecuadas para la protección de los oídos cuando la presión acústica
exceda el valor de 85 dB(A).
• Sujete bien la pieza de trabajo. Utilice abrazaderas o un torno para sujetar la pieza de trabajo. Es más seguro que sujetarla con la mano
y le permite utilizar ambas manos para manejar la herramienta.
• Esté siempre alerta. Mire lo que está haciendo. Use el sentido común. No maneje la herramienta cuando está cansado.
• Utilice la herramienta adecuada. En este manual, se indica para qué uso está destinada la herramienta. No utilice herramienta
s o dispo-
sitivos acoplables de potencia demasiado débil para ejecutar trabajos pesados. La herramienta funcionará mejor y con mayor seguridad al
ser utilizada de acuerdo con sus características técnicas. ATENCION! El uso de accesorios o acoplamientos, o el uso de las herramientas
distintas de las recomendadas en este manual de instrucciones, puede dar lugar a lesiones en las personas.
• Antes de cambiar el disco de corte desconecte la máquina de la red eléctrica. Los discos de corte pueden calentarse tras un intenso
trabajo, esperar que se enfríe antes de manipular.
• Usar cables de extensión normalizados
• Asegúrese de que el voltaje de la red de alimentación a la que va a ser conectada la máquina, coincide con el voltaje que se indica en la
etiqueta adhesiva jada a la máquina.
• Asegúrese que el cable de extensión de alimentación de la máquina, no entre en contacto con puntos de alta temperatura, aceites, agua,
aristas cortantes, evitar que sea pisado o aplastado por el paso de vehículos, así como depositar objetos sobre el mismo.
• No utilizar agua a presión para limpiar la máquina.
• Los cables eléctricos que presenten cortes y roturas deben ser cambiados a la mayor brevedad.
• Mantengan en su posición los elementos y protecciones de seguridad.
• Utilice siempre los elementos de protección homologados (Guantes, casco de seguridad, Gafas, Botas…..)
• Desconecte la máquina de la red y no manipule ni opere sobre los elementos mecánicos y eléctricos de la maquina con el motor en
marcha.
• Las máquinas cortadoras deben ser utilizadas por personas que estén familiarizadas con su funcionamiento.
• Sea precavido y no permita la presencia en el entorno de la máquina cuando está en funcionamiento.
• Prohibir el acceso y manipulación de la máquina a personas que no se hallan familiarizado antes con la máquina.
• La ropa de trabajo no debe incluir prendas sueltas que puedan ser atrapadas por las partes móviles de la máquina.
• Antes de poner en marcha la máquina, lea atentamente las instrucciones y observe el cumplimiento de las normas de seguridad. Aprenda
perfectamente a detener la máquina de una forma rápida y segura.
• Colocar la maquina en una supercie plana y bien iluminada. No conectarla hasta que no esté garantizada su estabilidad.
• Asegúrese que la maquina está en perfecto estado técnico y totalmente operativa.
• No ponga en marcha la máquina si no tiene montadas todas las protecciones y resguardos con que ha sido diseñada.
• Cuando tenga que desplazar la maquina hágalo siempre con el motor parado y las partes móviles bloqueadas.
• Utilizar discos de corte originales de buena calidad.
Reglas de seguridad adicionales para sierras circulares
• Utilice siempre discos alados del tipo adecuado diseñados para la pieza de trabajo. El diámetro recomendado del disco se indica en
los datos técnicos.
• No fuerce el corte. (Si el motor se para totalmente o parcialmente pueden producirse daños importantes. Deje que el motor alcance toda
su velocidad antes de iniciar el corte).
• No coloque las manos en la zona del disco cuando la sierra esté conectada a la red eléctrica.
• No coloque las manos más cerca de 150 mm del disco de sierra cuando esté cortando.
• No utilice discos de corte que estén dañados o agrietados.
Riesgos residuales
El uso de sierras de mampostería presentan los siguientes riesgos:
A pesar del cumplimiento de las normas de seguridad correspondientes y del uso de dispositivos de seguridad, existen determinados
riesgos residuales que no pueden evitarse, tales como:
- Dicultades auditivas.
- Riesgo de accidentes provocados por las partes descubiertas del disco de sierra giratorio.
- Riesgo de lesiones al cambiar el disco de sierra.
- Riesgos para la salud al respirar el polvo que se desprende al cortar y no ha sido aspirado.
Esta máquina, no tiene que ser utilizada bajo la lluvia. Cúbrala con materiales impermeables. Si la maquina ha estado expuesta bajo la
lluvia, compruebe antes de conectarla que las partes eléctricas no estén humeadas o mojadas. Trabajar siempre con buenas condiciones
de iluminación.
Atención: Deben seguirse todas las recomendaciones de seguridad señaladas en este manual y cumplir con la normativa de prevención
de riesgos laborales de cada lugar.
SIMA S.A. no se responsabiliza de las consecuencias que puedan derivar usos inadecuados de la cortadora de materiales.

ES
8
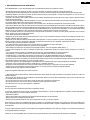
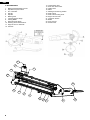
8. PARTES DE LA MÁQUINA
1. Tornillo desmontaje resguardo disco
2. Pulsador bloqueo husillo.
3. Interruptor conexión / desconexión.
4. Empuñadura.
5. Husillo.
6. Resguardo disco.
7. Brida de apoyo interior.
8. Disco de corte.
9. Brida de jación exterior.
10. Volante transmisión.
11. Brazo de apoyo para materiales.
12. Chasis.
13. Correa de la transmisión.
14. Pomo bloqueo descenso cabezal.
15. Cadena portacable.
16. Motor.
17. Puño para elevación y descenso.
18. Regla lateral.
19. Pomo bloqueo regla lateral.
20. Pomo bloqueo corte en ángulo.
21. Ruedas de transporte.
22. Disco de corte.
23. Regla frontal.
24. Tubo de aspiración.
12
11
10
14
13
15
16
17
18
19
20
21
22
23
24

ES
9
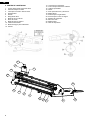
9. POSICIÓN OPERARIO. CONEXIÓN Y DESCONEXIÓN
La máquina debe ser instalada en una supercie plana y estable, libre de obstáculos y bien iluminada.
Antes de poner la máquina en marcha debemos haber realizado las comprobaciones necesarias (conexión eléctrica, estabi-
lidad, protecciones, etc….) que se han mencionado en capítulos anteriores.
Al instalar la maquina debe asegurarse que el plano donde sea colocada para trabajar sea una supercie horizontal y que el
terreno no sea blando.
• Coloque el material a cortar sobre la bancada, haciendo tope contra la regla frontal. Inmovilicelo presioando con una
mano o con las pinzas que se venden como accesorio.
• Ajuste la altura del tubo de aspiración de tal modo que la boca del tubo pase rasante a la supercie del material a cortar.
• Sitúese frente a la máquina, en esta posición podrá manejar con facilidad el cabezal de corte y el material a cortar.
• Una vez conectado el cable de alimentación, conecte la aspiradora, pulse el interruptor del motor y enclávelo para ponerlo
en marcha.
• La parada de la máquina se consigue simplemente pulsando de nuevo el botón interruptor.
• Accione el volante para comenzar el corte, la entrada y salida del corte debe de relaizarlo suave. Dependiendo del mate-
rial a cortar y tipo de disco, la maquina demandará distinto avance de corte.
No fuerce el avance de corte, si el corte se desvía o aparecen chispas es que no esta utilizando un disco adecuado.
(Ver tabla 11. Solución posibles anomalías).
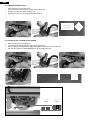
9.1 CORTE A 45º
• Aoje los dos pomos que bloquean los cartabones.
• Incline la unidad de corte los grados deseados y vuelva a bloquear los pomos. Proceda como en el punto anterior para
realizar el corte.
En el corte inglete, cuanto más nos acercamos a los 45º más tiende el disco a absorber el material acortar y provocar
una desalineación en corte, por lo que usted tendrá que inmovilizar el material a cortar con más rmeza que cuando
se realiza el corte 90º. Se recomienda el uso de pinzas.
on

ES
10
9.2 CORTE CON DESCENSO DEL CABEZAL
• Coloque la pieza a cortar sobre la bancada.
• Aoje el pomo que bloquea el giro de la unidad de corte.
• Agarre la empuñadura y eleve la unidad de corte.
• Ajuste la altura del tubo de aspiración y comience el corte.
9.3 CORTE DE RANURAS O CORTE DOBLE PASADA
• Coloque la pieza a cortar sobre la bancada.
• Aoje el pomo que bloquea el giro de la unidad de corte.
• Coloque la unidad de corte a la altura deseada y apriete el pomo para bloquear la unidad de corte.
• Utilice el volante de transmisión o la empuñadura según las necesidades del corte.
Ventana rectangular
Corte 2 pasadas
35mm
Corte 1 pasada
22mm
22
35

ES
11
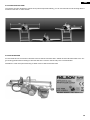
9.4 BRAZOS DE APOYO ABATIBLES
Los brazos de apoyo están diseñados para apoyar aquellas piezas que sobresalgan lateralmente, puede usarlos trabajando
con la máquina sobre el suelo o sobre los caballetes.
9.5 ASPIRACIÓN
Para la aspiración del polvo recomendamos un aspirador domestico con ltro de agua ≥ 1600W. El periodo de aspiración sin
necesidad de limpiar el ltro es mucho mayor que el de un aspirador solo con ltro convencional.
SIMA S.A. ha realizado todas las pruebas con un aspirador de 1600w con ltro de agua.

ES
12
10. MANTENIMIENTO
La Cortadora de materiales requiere un sencillo mantenimiento descrito en las siguientes operaciones, el cual usted podrá
realizar fácilmente. Cualquier manipulación de la maquina debe hacerse siempre con el motor parado y el cable de alimenta-
ción desconectado. No olvide retirar totalmente los útiles y herramientas utilizados.
En caso de observar anomalías o mal funcionamiento, hagan revisar la maquina por un técnico especializado.
Queda prohibido cualquier tipo de modicación en alguna de las piezas, elementos o características de la maquina que el
usuario haga de forma independiente. EL fabricante no será en ningún caso responsable de las consecuencias que se pue-
dan derivar del incumplimiento de estas recomendaciones.
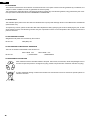
LIMPIEZA
1. Al nal de cada jornada, limpiar restos de suciedad de la ma-
quina con una brocha limpia y las ranuras del puente guía
por donde se deslizan los patines.
2. Aspirar las ranuras del los perles de aluminio del chasis.
SUSTITUCIÓN LIMPIADORES
1. Sustituir los eltros limpiadores cuando aprecie que ha perdido
el poder de limpieza.
SUSTITUCIÓN PATINES
1. Sustituir los patines deslizantes cuando aparezcan holguras
en el cabezal de corte.
No aplique aceite en las ranuras, el sistema de deslizamiento
funciona en seco.
Si el deslizamiento del cabezal se endure, introduzca un paño
limpio en las ranuras y deslícelo varias veces hasta limpiarla y
conseguir un deslizamiento suave.
ALINEACIÓN DE LA MÁQUINA
Si la máquina ha sufrido una caída o golpe y requiere ser alineada, existe una herramienta para alinear el motor, puente guía
y regla frontal en una misma operación, sin necesidad de utilizar escuadras, mediciones o procesos complejos. Póngase en
contacto con nuestro servicio técnico y le informaremos.
Patin
Limpiador

ES
13
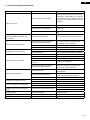
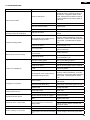
11. SOLUCIÓN POSIBLES ANOMALÍAS
ANOMALÍA POSIBLE CAUSA SOLUCIÓN
Motor no arranca.
Falta de alimentación eléctrica.
Revisar el suministro eléctrico al cuadro
de obra, comprobar la posición del mag-
netotérmico y diferencial en el cuadro de
obra. Revisar el buen estado del cable de
extensión y su encaje correcto en los dos
extremos.
Interruptor averiado. Sustitución.
Escobillas del motor gastadas. Sustitución.
Disco bloqueado.
Eliminar los obstáculos que impiden su
giro.
Motor arranca muy lentamente y
tarda demasiado en alcanzar sus
revoluciones.
Avería eléctrica amoladora. Enviar al servicio técnico del fabricante.
Potencia de corte insuciente.
Embotamiento de los segmentos o
bandas diamantadas del disco.
Dar varios cortes a un material abrasivo
(Arenisca, Hormigón, silestone) para
sacar lo de corte al diamante.
Disco inapropiado. Usar el disco apropiado para el material.
Baja potencia en motor. Revisar motor por Servicio Técnico.
Desgaste prematuro del disco.
Avance excesivo. Disminuir avance.
Disco inapropiado. Usar el disco apropiado para el material.
Corte defectuoso o desviado.
Velocidad de avance excesiva. Reducir la velocidad de avance del corte.
Disco deteriorado o desgastado. Cambiar el disco.
Disco inapropiado. Usar el disco apropiado para el material.
Altura de corte excesiva para material
muy duro.
Cortar en dos pasadas.
Embotamiento de los segmentos o
bandas diamantadas del disco.
Dar varios cortes a un material abrasivo
(Arenisca, Hormigón, silestone) para
sacar lo de corte al diamante.
Aparición de vibraciones.
Oscilación del disco.
Vericar el estado del disco y montarlo
correctamente.
Sujeción del disco defectuosa.
Revisar el correcto ajuste de las bridas y
el eje motor. Apretar bien la tuerca.
Disco alabeado. Cambiar el disco.
Holgura en el cabezal de corte.
Tornillos de los patines ojos. Revisar apriete tornillos 3Nm.
Patines desgastados. Reemplazar patines.
Potencia de aspiración insuciente.
Filtro de aire aspiradora atorado. Limpiar ltro de aire.
Filtro de agua aspiradora saturado. Sustituir agua del ltro.
Volante endurecido / patinamiento
polea.
Guías del puente de aluminio sucias.
Limpiar con un paño las guias.
Utilizar el aspirador para cortar.
La polea patina. Correra destensada. Tensar la correa.
No aspira polvo correctamente. Filtros sucios. Limpiar los ltros del aspirador.
Altura de aspirado inadecuada. Bajar la altura del tubo de aspirado.

ES
14
12. GARANTÍA
13. REPUESTOS
14. DECLARACIÓN SOBRE RUIDOS
15. DECLARACIÓN SOBRE VIBRACIONES MÉCÁNICAS
16. PROTECCIÓN DE MEDIO AMBIENTE
El fabricante de maquinaria, dispone de una red de servicios técnicos. Las reparaciones efectuadas en garantía por nuestra
Red, están sometidas a unas condiciones con objeto de garantizar el servicio y calidad de las mismas.
El fabricante garantiza todos sus fabricados contra cualquier defecto de fabricación, quedando amparados por las condicio-
nes especicadas en el documento adjunto CONDICIONES DE GARANTÍA.
Las condiciones de garantía cesaran en caso de incumplimiento de las condiciones de pago establecidas. El fabricante se
reserva el derecho de modicar sus productos sin previo aviso.
Los repuestos disponibles para las cortadoras de materiales están identicados en los planos de repuestos y podrán visua-
lizarse a través de B2B.
Para solicitar cualquiera de ellos, deberá ponerse en contacto con el departamento de post-venta y especicar claramente el
número con el que está señalado, así como el modelo, numero de fabricación y año de fabricación que aparece en la placa
de características de la máquina a la cual va destinado.
Nivel de potencia acústica emitido por la maquina ponderado es:
MODELO ELITE . LWA (dBa) 102
El nivel de exposición a la vibración transmitida al sistema mano-brazo es:
Mano derecha m/s
2
Mano izquierda m/s
2
ELITE 1,41945043462 1,04855226995
Se deberán recuperar las materias primas en lugar de desechar los restos. Los aparatos, accesorios, uidos
y embalajes deberán ser enviados a sitios indicados para su reutilización ecológica. Los componentes de
plástico están marcados para su reciclaje seleccionado
R.A.E.E. Los residuos de aparatos eléctricos y electrónicos deberán ser depositados en lugares indicados
para su recogida selectiva.

ENG
22

ENG
3
INDEX
1. GENERAL INFORMATION. ..................................................... 5
2. PRODUCTS SPECIFICATION .................................................5
2.1 PUPOSE OF THIS MACHINE ...............................................5
2.2. TECHNICAL FEATURES ......................................................5
3. PICTOGRAMAS .......................................................................5
4. MACHINE SET UP ...................................................................6
5. TRANSPORTATION AND STORAGE ....................................7
6. ELECTRIC CONNECTION ......................................................7
7. SECURYTI RECOMMENDATION ........................................... 8
8. MACHINE PARTS ....................................................................9
9. MACHINE AND OPERATOR POSITION ................................ 10
9.1 CORTE A 45º ..........................................................................10
9.2 BENDING THE HEAD TO CUT ............................................. 11
9.3 CUTTING SLOTS - CUTTING AT TWO PASSES ................11
9.4 FOLDING SUPPORT ARMS .................................................12
9.5 DUST EXTRACTION ..............................................................12
10. MAINTENANCE ......................................................................13
11. TROUBLE SHOOTING ..........................................................14
12. GUARANTEE..........................................................................15
13. SPARE PARTS .......................................................................15
14. DECLARATION ON NOISE ................................................... 15
15. DECLARATION ON MECHANICAL VIBRATIONS ..............15
16. ENVIRONMETAL PROTECTION ..........................................15
3

ENG
44
1. GENERAL INFORMATION.
Reading this manual is mandatory for anyone that will take responsibility of the machine usage, maintenance or repair. Please,
read carefully the present instruction before starting to use this machine.
2. PRODUCTS SPECIFICATION
2.1 PUPOSE OF THIS MACHINE
This tile cutter is designed to dry cut building materials such as terrasso, marble, granit, silestone, slate, porcelanate,
concrete, glazed tiles, etc. The cutting tool is a diamond blade powered by an electric motor. The vacuum cleaning
of the dust is performed through a exible pipe connected to a vacuum cleaner (not included in this machine). The
movement of the blade is done by means of a transmission steering wheel that moves the cutting module.
Any other use that can be given to this machine is considered inadequate and can be dangerous, so it remains speci-
cally prohibited.
•These tile cutters have been designed to better supply for the needs of the operator, achieving a very light machine to
ease their transportation.
•Its cutting head can tilt up to 45º, allowing mitre cuts.
•It allows the raising and lowering of the cutting module at different heights.
•This machine has been designed and manufactured for cutting with a diamond blade.
•It is powered by an electric motor (an angle grinder) to drive the cutting disc.
•It has an adjustable system for dust extraction.
•It incorporates adjustable rule to cut pieces at an angle.
•Some parts of the machine are oven painted with epoxy-polyester paint, providing a high resistance to the machine
surface and keeping the structure protected from corrosion.
•Equipped with handles and wheels for easy transportation
•The electrical equipment complies with the EU safety regulations.
•For safety during transportation, the cutting unit is provided with a safety lock, which prevents the movement of the
cutting module along the guide track.
•This machine model is built in accordance with EU Directives.
3. PICTOGRAMAS
2.2. TECHNICAL FEATURES
Mandatory Reading of the user’s manual.
Mandatory use of protecting glasses and
acoustic protection.
Mandatory use of protecting shoes.
Mandatory use of safety gloves.
Sound power level
emitted by the machi-
ne.
Recommended blade speed in meters
per second (m/s) depending on the ma-
terial to cut.
Graduated scale for angle
cutting.
Voltaje / (Hz)
Potencia
Ø Ext.disco
Ø Int.disco
Ancho maximo disco
Long. corte
Prof.corte 1 pasada
Prof.corte 2 pasadas
Prof.corte 45º grados
L
WA
dB (A)
a
hw m/s
2
Peso neto
Peso bruto
Medidas embalaje 1 ud.
1030 mm
20 mm
102
5
35 Kg
40 Kg
1400 x 580 x 450
230 V / (50-60) Hz
1,4Kw / 1,9 Hp
125 mm
22,2 mm
4 mm
1230 mm
22 mm
35 mm
20 mm
102
5
35 Kg
40 Kg
1700 x 580 x 450
1530 mm
20 mm
102
5
35 Kg
40 Kg
2000 x 550 x 450
Elite 103 Elite 123 Elite 153
1380
420
1030
560
2862
19
1,25
4,5 - 5
A
B
C
D
RPM
m/s
A - Vacío
A - Carga
1680
420
1230
560
3424
22
1,5
5,2 - 5,7
1980
420
1530
580
5117
34
1,7
5,2 - 5,7
7000
46
1,95
5,2 - 5,7
8800
59
2,28
5,2 - 5,7
9400
62
2,41
5,2 - 5,7
Elite 103
1
Elite 123
2
Elite 153
3 4 5 6
L
WA
102 dB
PARÁMETROS DE CORTE
m/s Materiales m/s
1
19 Cerámica 25-30
2 22 Granito 25-35
3 34 Porcelánico 20-30
4 46 Pizarra 40-50
5 59 Mármol 40-50
6 62 Terrazo 40-50
Voltaje / (Hz)
Potencia
Ø Ext.disco
Ø Int.disco
Ancho maximo disco
Long. corte
Prof.corte 1 pasada
Prof.corte 2 pasadas
Prof.corte 45º grados
L
WA dB (A)
ahw m/s
2
Peso neto
Peso bruto
Medidas embalaje 1 ud.
Voltage / (Hz)
Power
Ø External blade
Ø Internal blade
Maximun blade width
Maximun Cutting Lenght
Cutting Depth (1 pass)
Cutting Depth (2 pass)
Cutting Depth 45º
L
WA dB (A)
ahw m/s
2
Net Weight
Gross Weight
Packaging Dimensions
1030 mm
20 mm
102
5
35 Kg
40 Kg
1400 x 580 x 450
230 V / (50-60) Hz
1,3Kw / 0,95 Hp
125 mm
22,2 mm
4 mm
1230 mm
22 mm
35 mm
20 mm
102
5
35 Kg
40 Kg
1700 x 580 x 450
230 V / (50-60) Hz
1,3Kw / 0,95 Hp
125 mm
22,2 mm
4 mm
1230 mm
22 mm
35 mm
20 mm
102
5
35 Kg
40 Kg
1700 x 580 x 450
1530 mm
20 mm
102
5
35 Kg
40 Kg
2000 x 550 x 450
Elite 103 Elite 123Elite 123 Elite 153
1380
420
1030
560
2862
19
1,25
4,5 - 5
A
B
C
D
RPM
m/s
A - Vacío
A - Carga
1680
420
1230
560
3424
22
1,5
5,2 - 5,7
1980
420
1530
580
5117
34
1,7
5,2 - 5,7
7000
46
1,95
5,2 - 5,7
8800
59
2,28
5,2 - 5,7
9400
62
2,41
5,2 - 5,7
Elite 103
1
Elite 123
2
Elite 153
3 4 5 6
PARÁMETROS DE CORTE
m/s Materiales m/s
1 19 Cerámica 25-30
2 22 Granito 25-35
3 34 Porcelánico 20-30
4 46 Pizarra 40-50
5 59 Mármol 40-50
6 62 Terrazo 40-50
CUTTING PARAMETRES
m/s Materials m/s
1 19 Ceramic tiles 25-30
2 22 Granits 25-35
3 34 Porcelain tiles 20-30
4 46 Slate 40-50
5 59 Marble 40-50
6 62 Terrazo 40-50
Voltaje / (Hz)
Potencia
Ø Ext.disco
Ø Int.disco
Ancho maximo disco
Long. corte
Prof.corte 1 pasada
Prof.corte 2 pasadas
Prof.corte 45º grados
L
WA dB (A)
ahw m/s
2
Peso neto
Peso bruto
Medidas embalaje 1 ud.
Voltage / (Hz)
Power
Ø External blade
Ø Internal blade
Maximun blade width
Maximun Cutting Lenght
Cutting Depth (1 pass)
Cutting Depth (2 pass)
Cutting Depth 45º
L
WA dB (A)
ahw m/s
2
Net Weight
Gross Weight
Packaging Dimensions
1030 mm
20 mm
102
5
35 Kg
40 Kg
1400 x 580 x 450
230 V / (50-60) Hz
1,3Kw / 0,95 Hp
125 mm
22,2 mm
4 mm
1230 mm
22 mm
35 mm
20 mm
102
5
35 Kg
40 Kg
1700 x 580 x 450
230 V / (50-60) Hz
1,3Kw / 0,95 Hp
125 mm
22,2 mm
4 mm
1230 mm
22 mm
35 mm
20 mm
102
5
35 Kg
40 Kg
1700 x 580 x 450
1530 mm
20 mm
102
5
35 Kg
40 Kg
2000 x 550 x 450
Elite 103 Elite 123Elite 123 Elite 153
1380
420
1030
560
2862
19
1,25
4,5 - 5
A
B
C
D
RPM
m/s
A - Vacío
A - Carga
1680
420
1230
560
3424
22
1,5
5,2 - 5,7
1980
420
1530
580
5117
34
1,7
5,2 - 5,7
7000
46
1,95
5,2 - 5,7
8800
59
2,28
5,2 - 5,7
9400
62
2,41
5,2 - 5,7
Elite 103
1
Elite 123
2
Elite 153
3 4 5 6
PARÁMETROS DE CORTE
m/s Materiales m/s
1 19 Cerámica 25-30
2 22 Granito 25-35
3 34 Porcelánico 20-30
4 46 Pizarra 40-50
5 59 Mármol 40-50
6 62 Terrazo 40-50
CUTTING PARAMETRES
m/s Materials m/s
1 19 Ceramic tiles 25-30
2 22 Granits 25-35
3 34 Porcelain tiles 20-30
4 46 Slate 40-50
5 59 Marble 40-50
6 62 Terrazo 40-50
Voltaje / (Hz)
Potencia
Ø Ext.disco
Ø Int.disco
Ancho maximo disco
Long. corte
Prof.corte 1 pasada
Prof.corte 2 pasadas
Prof.corte 45º grados
L
WA dB (A)
ahw m/s
2
Peso neto
Peso bruto
Medidas embalaje 1 ud.
Voltage / (Hz)
Power
Ø External blade
Ø Internal blade
Maximun blade width
Maximun Cutting Lenght
Cutting Depth (1 pass)
Cutting Depth (2 pass)
Cutting Depth 45º
L
WA dB (A)
ahw m/s
2
Net Weight
Gross Weight
Packaging Dimensions
1030 mm
20 mm
102
5
35 Kg
40 Kg
1400 x 580 x 450
230 V / (50-60) Hz
1,3Kw / 0,95 Hp
125 mm
22,2 mm
4 mm
1230 mm
22 mm
35 mm
20 mm
102
5
35 Kg
40 Kg
1700 x 540 x 370
230 V / (50-60) Hz
1,3Kw / 0,95 Hp
125 mm
22,2 mm
4 mm
1230 mm
22 mm
35 mm
20 mm
102
5
35 Kg
40 Kg
1700 x 580 x 450
1530 mm
20 mm
102
5
35 Kg
40 Kg
2000 x 550 x 450
Elite 103 Elite 123
Elite 123
Elite 153
1380
420
1030
560
2862
19
1,25
4,5 - 5
A
B
C
D
RPM
m/s
A - Vacío
A - Carga
1680
420
1230
560
3424
22
1,5
5,2 - 5,7
1980
420
1530
580
5117
34
1,7
5,2 - 5,7
7000
46
1,95
5,2 - 5,7
8800
59
2,28
5,2 - 5,7
9400
62
2,41
5,2 - 5,7
Elite 103
1
Elite 123
2
Elite 153
3 4 5 6
PARÁMETROS DE CORTE
m/s Materiales m/s
1 19 Cerámica 25-30
2 22 Granito 25-35
3 34 Porcelánico 20-30
4 46 Pizarra 40-50
5 59 Mármol 40-50
6 62 Terrazo 40-50
CUTTING PARAMETRES
m/s Materials m/s
1 19 Ceramic tiles 25-30
2 22 Granits 25-35
3 34 Porcelain tiles 20-30
4 46 Slate 40-50
5 59 Marble 40-50
6 62 Terrazo 40-50

ENG
55
4. MACHINE SET UP
01 Montaje / MOUNTING / MONTAGE
simasa.com
1
4
7
10
13
16
2
5
8
11
14
17
3
6
9
12
15
18
Sistema antiperdida

ENG
66
5. TRANSPORTATION AND STORAGE
The machine has two handles (A) and wheels (B) to be trans-
ported by one or more operators. Whenever you need to
move the machine, block the cutting unit using the knob (C)
to avoid unexpected movements that could cause damage.
•Remember to always store the machine horizontally and
well supported.
•Do not rest other loads on the machine to avoid damage.
•Do not store the machine sideways
6. ELECTRIC CONNECTION
When you receive the machine and before connecting it to
the network, make sure that the mains voltage is correct to
connect the machine. The operating voltage of the machine
is visible on the angle grinder.
WARNING: Do not plug the machine in the mains if you are
not sure of the available supply voltage: if the voltage is not
correct, the motor will suffer irreparable damage, or it will be
unusable and out of service.
Once the previous step has been carried out, it is necessary
to check the direction of rotation of the motor as indicated by
the arrow on the disk guard. Check the direction of rotation
on starting.
WARNING: Never handle the power cables of the wires or
electrical equipment of the machine unless you have com-
pletely disconnected the electrical power from the network.
The electric equipment of the cutters has a IP54 degree of
protection.
NEVER WORK WITH WATER TO REFRIGERATE THE
DISC IF YOU DO NOT HAVE THE PRCD WIRE.
Optional accessory available upon order request.
19
22
20 21
on
on

ENG
77
7. SECURYTI RECOMMENDATION
VERY IMPORTANT: The earth connection must always be connected before start-up.
• Keep clear and clean the working area. A cluttered work area or workbench increases the risk of accidents.
• Do not expose the Power Tools to moisture. Make sure that the work area is well lit. Do not use Tools.
• Keep children away. Do not allow other people to touch the tool or the extension cord while operating the machine. In case of use
by children under 16, supervision is required.
• Respect the maximum level of acoustic pressure. Take adequate measures to protect the ears when the acoustic pressure ex-
ceeds the value of 85 dB (A).
• Hold the workpiece securely. Use clamps or a lathe to hold the work piece. It is safer than holding it with your hand and allows you
to use both hands to handle the tool.
• Be always alert and aware of what you are doing. Use common sense. Do not handle the tool when you are tired.
• Always use the right tool for every work. In this manual, it is indicated for what specic use this tool is intended. Do not use atta-
chable tools or devices weakly powered to perform heavy work. This tool will work better and provide greater security when used
according to its technical features.
• WARNING! The use of accessories, couplings or tools other than those recommended in this instruction manual may result in
injury to persons.
• Disconnect the machine from the mains before changing the cutting blade. The blade can heat up after intense work: wait for it to
cool before handling.
• Use standardized extension cables.
• Make sure that the voltage of the power supply network to which the machine is to be connected, matches the voltage indicated in
the adhesive label afxed to the machine.
• Make sure that the power extension cord of the machine does not meet high temperature points, oils, water, sharp edges, etc.
Make sure that it will not be stepped on or crushed by passing vehicles. Refrain from depositing objects on it
• Do not use pressurized water to clean the machine.
• Electrical cables shown cuts or peelings must be changed as soon as possible.
• Keep the safety elements and protections in place.
• Always use approved protection elements (gloves, safety helmet, glasses, boots...)
• Disconnect the machine from the mains after using it. Do not manipulate or operate the mechanical and electrical elements of the
machine while the engine is running.
• Cutting machines should be used only by people who are familiar with cutting operations.
• Be cautious and do not allow other people presence around the machine when it is working.
• Keep out people who are not familiar with the machine and do not let them access or handling it..
• Work clothes should not include loose tting garments that could be trapped by moving parts of the machine.
• Before starting the machine, carefully read the instructions and observe compliance with safety regulations. Make sure you master
the way to stop the machine quickly and safely.
• Place the machine on a at, well-lit surface. Do not connect it until its stability is perfect.
• Every time you need to move the machine, make sure to do it with the motor fully stopped and the moving parts blocked.
• Make sure to use best quality original cutting blades.
Additional safety rules for circular saws
• Always use sharpened blades of the appropriate type as designed for the workpiece. The recommended diameter of the blade is
indicated in the technical data shown on this manual.
• Do not force the blade forward to cut. If you push too hard the motor may stalk completely or partially potentially causing severe
damage. Let the motor reach full speed before starting the cut).
• Do not place your hands near the blade area when the saw is connected to the mains.
• Do not place your hands closer than 150 mm to the saw blade when cutting
• Do not use cutting discs that are damaged or cracked.
Residual risks
The use of masonry saws presents the following risks:
Despite compliance with the corresponding safety regulations and the use of safety devices, there are certain residual risks that
cannot be avoided, such as:
- Hearing problems.
- Accidents caused by the uncovered parts of the rotating saw disk.
- Injury when changing the saw blade.
- Health problems when breathing dust from not vacuumed cutting.
This machine must not be used in the rain. Cover it with waterproof materials. If the machine has been exposed to rainfall, check
before connecting that the electrical parts are not wet or damp. Always work in good lighting conditions.
Attention: All the safety recommendations indicated in this manual must be followed and the owner must comply with the occupatio-
nal risk prevention regulations of each place.
Manufacturer will not be held responsible for the consequences that may result from improper use of this masonry cutter.

ENG
88
8. MACHINE PARTS
1. Blade guard dismantling screw
2. Spindle lock push button.
3. On / off switch.
4. Handle.
5. Spindle.
6. Blade guard.
7. Internal support ange.
8. Cutting Blade.
9. External xing ange.
10. Steering wheel transmission.
11. Support arm for materials.
12. Chassis.
13. Transmission belt.
14. Knob lock down head.
15. Cable chain.
16. Motor.
17. Raising and lowering handle.
18. Side screed.
19. Side screed locking knob.
20. Angle cut lock knob.
21. Transport wheels.
22. Blade.
23. Front screed.
24. Suction tube.
12
11
10
14
13
15
16
17
18
19
20
21
22
23
24

ENG
99
9. MACHINE AND OPERATOR POSITION
The machine must be installed on a at and stable surface, free of obstacles and well lit.
Before starting the machine, we must carry out the necessary checks (electrical connection, stability, other protections, etc ...)
that have been mentioned in previous chapters.
• On set up, make sure that it is placed to work on a horizontal surface and that the ground is not soft.
• Place the material to be cut on the bench, one of its sides leaning against the front screed. Immobilise it by pressing with one
hand or with the clamps that are sold as an accessory.
• Adjust the height of the suction tube in such a way that the mouth of the tube moves alongside and close to the surface of
the material to be cut.
• Stand in front of the machine: in this position you can easily handle the cutting head and the material to be cut.
• Once the power cord is connected, connect the vacuum system, press the motor switch and lock it to start it up.
• To stop the machine, press the switch button again.
• Operate the ywheel to start the cut. The cut start and nish must be both smooth. Depending on the material to be cut and
type of blade, the machine will demand different cutting speed.
Do not force the cutting forward, if the cut is deected or sparks appear, it means that you are not using the right
blade. (See table 11. Possible anomalies solution).
9.1 CORTE A 45º
• Loosen up the two knobs locking the squares.
• Tilt the cutting unit to the desired degrees and relock the knobs. Proceed as in the previous point to perform the cutting.
On miter cutting, the closer we get to the 45º tilt the more the disc tends to absorb the material shortening and cau-
sing a misalignment in the cut. It is therefore important to immobilize the material to cut more rmly than when cut-
ting at 90º. The use of clamps is highly recommended
on

ENG
1010
9.2 BENDING THE HEAD TO CUT
• Place the piece to cut on the bench.
• Loosen the knob that blocks the rotation of the cutting unit.
• Grasp the handle and raise the cutting unit.
• Adjust the height of the suction tube and start cutting.
9.3 CUTTING SLOTS - CUTTING AT TWO PASSES
• Place the piece to cut on the bench.
• Loosen the knob that blocks the rotation of the cutting unit.
• Set the cutting unit to the desired height and tighten the knob to lock the cutting unit.
• Use the drive wheel or handle adapting them to the needs of the cut.
Rectangular
windows
2 Pass cut
35mm
1 Pass cut
22mm
22
35

ENG
1111
9.4 FOLDING SUPPORT ARMS
The support arms are designed to support those parts that protrude laterally, you can use them either while working with the
machine on the oor or on the easels.
9.5 DUST EXTRACTION
For dust extraction we recommend a domestic vacuum cleaner with water lter ≥ 1600W. These water lters allow much lon-
ger working periods without needing to clean the lter than a vacuum cleaner with just a conventional lter.
All SIMA S.A. tests were performed using a 1600w vacuum cleaner with water lter.

ENG
1212
10. MAINTENANCE
This tile cutter requires a simple maintenance, as described in the following operations, which you can easily perform. Any
manipulation of the machine must always be done with the engine stopped and the power cable disconnected. Do not forget
to completely remove all the complementary tools that you may be habitually using from the machine.
In case of observing anomalies or malfunctions, have the machine checked by a specialized technician.
Do not perform modications of any kind on any of the pieces, elements or characteristics of the machine. In such case, the
manufacturer declines all responsibility that may result from the non-compliance with these recommendations.
CLEANING
1. At the end of each day having used the machine, remove
debris with a clean brush from the slots of the guide bridge
where the skids slide.
2. Vacuum the grooves of the chassis aluminium proles.
REPLACEMENT OF THE FELT CLEANING WIPES.
3. Replace cleaning wipes when you notice that they have re-
duced or lost their cleaning power.
SKID SUBSTITUTION
1. Replace sliding skids when gaps begin to appear in the cu-
tting head.
Do not put oil in the slots: the sliding system works dry.
If the sliding of the head hardens, insert a clean cloth into the
slots and slide it several times until the slot is clean and smooth
ALIGNMENT
If the machine has suffered a fall or blow and needs to be re-aligned, SIMA has a specic tool to align the motor, guide bridge
and frontal rule in the same operation, without needing to use squares, measurements or complex operations. Please contact
our technical service for information.
Patin
Limpiador

ENG
1313
11. TROUBLE SHOOTING
TROUBLE POSSIBLE CAUSE SOLUTION
Motor does not start.
Electric power failure.
Check the electrical supply to the work
site electric panel; check the position of
the thermal – magnetic breaker on the
panel. Check that the extension cable is
in good conditions and properly tted on
both ends.
Broken switch. Replacement.
Worn out carbon brushes. Replacement.
Blocked blade. Eliminate the blocking obstacles.
Engine starts very slowly and takes
too long to reach its revolutions.
Angle grinder failure.
Contact the manufacturer’s technical
service.
Insufcient cutting power.
The segments or the continuous rim
of the blade has gone blunt.
Perform a few cuts with that blade on an
abrasive material (Sandstone, Concrete,
Silestone) to expose the hidden diamonds
of the blade. The blade will be sharper
now.
Inappropriate blade.
Replace for a blade specically designed
for the material to cut.
Low motor power.
Have the motor revised by the brand
Technical Services.
Blade has worn out too quickly.
Excessive pressure on the bland to
move forward.
Reduce pressure.
Inappropriate blade.
Replace for a blade specically designed
for the material to cut.
Faulty or not straight cut.
Excessive cutting speed.
Reduce the speed by releasing the pres-
sure on the cutting progress.
Broken or worn out blade. Change the blade.
Inappropriate blade. Usar el disco apropiado para el material.
Excessive cutting height for too hard
a slab.
Cut in two passes.
The segments or the continuous rim
of the blade has gone blunt.
Perform a few cuts with that blade on an
abrasive material (Sandstone, Concrete,
Silestone) to expose the hidden diamonds
of the blade. The blade will be sharper
now.
Emergence of vibrations.
Blade wobbles.
Check that the blade is in good conditions
and well set.
Defective blade attachment.
Check the correct adjustment of the an-
ges and the motor shaft. Tighten the nut.
Warped blade. Change the blade.
Cutting head losen up.
Loose skid screws.
Check that the screws are tightened at
about 3Nm.
Worn out skids. Replace skids.
Insufcient suction power.
Vacuum cleaner air lter is clogged. Clean the air lter.
Vacuum cleaner water lter is satu-
rated.
Replace water lter.
Hardened wheel / pulley skids.
Dirt accumulates in the aluminium
bridge guides.
Wipe the guides.
Use the vacuum cleaner to suction the
dust while cutting.
The pulley skids. The belt is slack. Tighten the belt.
Suction capacity is not correct.
Dirty lters. Clean the vacuum cleaner lters.
Suction pipe is too far from the cutting
line.
Low the height of the suction pipe down.

ENG
1414
12. GUARANTEE
13. SPARE PARTS
14. DECLARATION ON NOISE
15. DECLARATION ON MECHANICAL VIBRATIONS
16. ENVIRONMETAL PROTECTION
This machine manufacturer has a network of technical services. The repairs carried out under guarantee by our Network, are
subject to certain conditions in order to guarantee the service quality.
The manufacturer guarantees all its manufactured products against any manufacturing defect, being protected by the condi-
tions specied in the attached document WARRANTY CONDITIONS.
The available spare parts for this tile cutter are identied in the spare parts drawings shown on the B2B section of SIMA site
(www.simasa.com).
To request any of them, please contact the after-sales department clearly specifying the number identifying the part, as well
as the machine model, manufacturing number and year of production shown on the nameplate of the machine for which the
parts are intended.
Weighted sound power level released by the machine
ELITE-123 . LWA (dBa) 102
The level of vibrations transmitted to the hand-arm is:
LEFT HAND m/s
2
LEFT HAND m/s
2
ELITE-123 1,41945043462 1,04855226995
Raw materials must be collected instead of dumped. Instruments, accessories, uids and packages have to
be sent into specic places for ecological recycling. Plastic components are marked for selective recycling.
R.A.E.E. Residuals arising of electrical and electronic instruments have to be stored into specic places for
selective collection.

ENG
1515
-
 1
1
-
 2
2
-
 3
3
-
 4
4
-
 5
5
-
 6
6
-
 7
7
-
 8
8
-
 9
9
-
 10
10
-
 11
11
-
 12
12
-
 13
13
-
 14
14
-
 15
15
-
 16
16
-
 17
17
-
 18
18
-
 19
19
-
 20
20
-
 21
21
-
 22
22
-
 23
23
-
 24
24
-
 25
25
-
 26
26
-
 27
27
-
 28
28


SIMA S.A. Elite Manual de usuario
- Tipo
- Manual de usuario
- Este manual también es adecuado para
en otros idiomas
- English: SIMA S.A. Elite User manual
Artículos relacionados


Otros documentos
-
Sima DAKAR PLUS El manual del propietario
-
 Silestone SS-Q130 Especificación
-
McCulloch B40 BT ELITE El manual del propietario
-
Fagor 957015095 Ficha de datos
-
ESAB PT-19XLS or PT-36 Manual de usuario
-
MC CULLOCH CS410TCS410 ELITE El manual del propietario
-
ESAB ESAB Cutmaster 120 Plasma Cutting System Manual de usuario
-
MQ Multiquip AR14H Parts Manual
-
McCulloch CS 410 ELITE El manual del propietario
-
ESAB ESAB Cutmaster 100 PLASMA CUTTING SYSTEM Manual de usuario
