Silvercrest KH 4300 Operating Instructions Manual
- Tipo
- Operating Instructions Manual

KOMPERNASS GMBH · BURGSTRASSE 21 · D-44867 BOCHUM
www.kompernass.com
ID-Nr.: KH4300-03/09-V3
5
KH 4300
Máquina Overlock
new
Máquina de costura „Overlock“
Manual de instruções
Máquina Overlock
Instrucciones de uso
Overlock Sewing Machine
Operating instructions
Overlock-Nähmaschine
Bedienungsanleitung
CV_KH4300_33077_LB5.qxd 02.06.2009 16:21 Uhr Seite 1

KH 4300
1
2
3
4
5
6
7
8
9
0
q
r
e
w
jhg
u
z
t
k
dsapoi f
CV_KH4300_33077_LB5.qxd 02.06.2009 16:22 Uhr Seite 5

- 1 -
ÍNDICE PÁGINA
Uso conforme al previsto 3
Indicaciones de seguridad 3
Datos técnicos 4
Volumen de suministro 4
Descripción de aparatos 5
Preparativos 5
Ajuste del árbol de hilos..................................................................................................................5
Soportes para bobinas....................................................................................................................5
Topes de carretes .............................................................................................................................6
Conectar el pedal ............................................................................................................................6
Controlar la velocidad de costura..................................................................................................6
Interruptor de seguridad..................................................................................................................6
Colocar el depósito de residuos.....................................................................................................6
Rueda de mano................................................................................................................................6
Tapa frontal.......................................................................................................................................6
Abrir el brazo libre...........................................................................................................................7
Enhebrar el hilo en la lanzadera....................................................................................................7
Enhebrar el hilo en la aguja ...........................................................................................................8
Funcionamiento de prueba .............................................................................................................9
Ajustar la tensión del hilo 10
Ajuste de la tensión del hilo en los hilos de las agujas ............................................................11
Ajuste de la tensión del hilo en los hilos de las lanzaderas .....................................................11
Visión general de los ajustes de la máquina..............................................................................12
Cambio de hilo (anudar) 13
Ajuste de la longitud de puntada 13
Ajustar el ancho de puntada 14
Cambiar las agujas 14
Cambiar la lámpara incandescente 15
Cambiar la cuchilla superior 15
IB_KH4300_33077_LB5.qxd 02.06.2009 16:52 Uhr Seite 1

- 2 -
Remallado con tres hilos estrecho o ancho 16
Costura libre 16
Ajustar el prensatelas 16
Vainica y ribeteado 17
Coser vainica 17
Coser bordes finos 17
Transporte diferencial 18
Modo de funcionamiento..............................................................................................................18
Ajuste del transporte diferencial...................................................................................................18
Bordes de tejido de punto y prensado irregulares ....................................................................19
Evitar el fruncido mediante estiramiento......................................................................................19
Eliminación de fallos 20
Cuidado y limpieza 21
Conservación 21
Evacuación 21
Garantía y asistencia técnica 22
Importador 22
¡Guardar estas instrucciones para preguntas posteriores – e, igualmente entregar éstas, en caso de dar el
aparato a terceras personas!
IB_KH4300_33077_LB5.qxd 02.06.2009 16:52 Uhr Seite 2

- 3 -
MÁQUINA OVERLOCK
KH 4300
Uso conforme al previsto
La máquina Overlock está prevista...
- para su uso como aparato portátil,
– para ribetear bordes de tejidos (remallado) de
textiles comunes en el hogar y...
– sólo para uso en el ámbito privado del hogar.
La máquina de coser no está prevista...
- para una instalación fija,
– para elaborar otros materiales (por ejemplo, piel,
tela de tiendas, velas y tejidos pesados similares),
- para utilizar en los ámbitos comercial e industrial.
Indicaciones de seguridad
Con una máquina de coser pueden sufrirse heridas
e incluso peligro de muerte como con cualquier
otro aparato eléctrico. Para evitarlo y
trabajar de forma segura:
• Extraiga siempre la clavija de red, cuando deje
sola la máquina. De este modo evitará accidentes
debido a la conexión imprevista.
• Desenchufe primero el conector de red, antes de
cambiar la lámpara incandescente o de realizar
trabajos de mantenimiento en la máquina. De este
modo evitará el peligro de muerte por electrocu-
ción.
• No extraiga la clavija de red de la base de en-
chufe tirando del cable. Para sacarla sujete la
clavija y no el cable.
• Utilice siempre la máquina de coser sólo en
espacios secos.
• En caso de una clavija de red dañada o cable
de red dañado, encomiende su sustitución a
personal técnico autorizado o al servicio de
posventa con el fin de evitar riesgos.
• No permita utilizar el aparato a personas (incluidos
los niños) cuyas facultades físicas, sensoriales o
mentales, así como su falta de conocimientos o
de experiencia, les impida hacer un uso seguro
del mismo si no están bajo vigilancia o han sido
instruidos correctamente acerca del uso del apa-
rato.
• Vigile a los niños para asegurarse de que no
juegan con el aparato.
• Nunca accione la máquina con los orificios de
ventilación bloqueados. Mantenga los orificios
de ventilación de la máquina, así como el pedal,
libre de hilos, polvo y restos de tejido.
• Si está dañado el cable de conexión con el que
está conectado el pedal, deberá sustituirlo el
fabricante, el servicio de atención al cliente o
una persona con cualificación similar, para así
evitar peligros.
Advertencia contra daños
personales y materiales:
• Mantenga siempre ordenada su zona de trabajo.
El desorden en la zona de trabajo puede ser
causa de accidentes.
• Durante el trabajo procure una buena ventilación.
• No lleve ropa suelta ni joyas ya que podrían ser
atrapadas por piezas móviles. Por ello también,
si tiene el cabello largo, utilice una redecilla
para el pelo.
• Evite mantener una postura corporal forzada.
Mantenga siempre una posición segura y un
buen equilibrio.
• El fabricante no asume ninguna responsabilidad
por los accidentes que puedan producirse debido
a falta de precaución al manejar el aparato o
por no tenerse en cuenta las instrucciones de
seguridad del manual.
• ¡No tape nunca las ranuras de ventilación!
¡Peligro de sobrecalentamiento!
IB_KH4300_33077_LB5.qxd 02.06.2009 16:52 Uhr Seite 3

- 4 -
Datos técnicos
Cantidad de hilos 4 o 3
Cantidad de agujas 2 o 1
Velocidad de costura 1100 U/min
Ancho de puntada 6 mm con 4 hilos
6 mm o 4 mm con
3 hilos
Longitud de puntada 1 – 5 mm
Agujas HA x 1 nº 11-14 o
130/705 nº 75-90
Consumo de potencia: Motor: 90 W
Lámpara incande-
scente: 15 W
Total: 105 W
Tensión nominal: 230 V
~
, 50Hz
Clase de protección: II
Potencia de la lámpara
incandescente: 15 W
Tensión de la lámpara
incandescente: 230 V /
~
50 Hz
Rosca de la lámpara
incandescente: rosca E14
El nivel de presión sonora en condiciones de
funcionamiento normales es de 78dB(A).
Pedal
Utilice con esta máquina de coser sólo el pedal
suministrado:
- ELECTRONIC FDM Speed Controller
- Tipo KD-2902
Volumen de suministro
Máquina Overlock
Aceite
Depósito de residuos
Caja de accesorios
Instrucciones de uso
Cuchilla de repuesto
(arriba)
2 agujas del nº 11
4 agujas del nº 14
(2 preinstaladas en la
máquina)
4 topes de carretes
4 soportes para
bobinas (preinstalados)
Llave macho
hexagonal
Destornillador de
punta plana
Funda de protección
Pinza
Pincel
IB_KH4300_33077_LB5.qxd 02.06.2009 16:52 Uhr Seite 4

- 5 -
Descripción de aparatos
1 Árbol de hilos
2 Selector de tensión del hilo (lanzadera inferior)
3 Aguja de carrete
4 Ranuras de ventilación
5 Conexión del pedal/conexión de red
6 Rueda de mano
7 Interruptor de red (interruptor On/Off)
8 Tapa frontal
9 Apoyo de brazo
0 Brazo libre
q Selector de tensión del hilo (aguja izquierda)
w Selector de tensión del hilo (aguja derecha)
e Selector de tensión del hilo (lanzadera superior)
r Guía del hilo
t Placa de la guía del hilo
z Rueda de ajuste de la longitud de puntada
u Rueda de ajuste del transporte diferencial
i Rueda de ajuste del ancho de corte
o Prensatelas
p Cuchilla inferior
a Cuchilla superior
s Lanzadera superior
d Lanzadera inferior
f Palanca de desbloqueo PUSH
g Clavija de conexión
h Pedal
j Clavija de red
k Depósito de residuos
Preparativos
Coloque la máquina Overlock sobre una superficie
estable y plana. Observe que haya suficiente ventila-
ción en su lugar de trabajo.
Ajuste del árbol de hilos
Despliegue totalmente el árbol de hilos 1 antes del
enhebrado. Gire el árbol de hilos 1, de modo que
las guías de los hilos se sitúen justamente sobre las
agujas de carretes 3.
Soportes para bobinas
Con esta máquina puede utilizar tanto bobinas in-
dustriales como también carretes convencionales.
Si utiliza bobinas industriales con diámetros grandes,
coloque el soporte para bobinas con el extremo
ancho hacia arriba, para bobinas con un diámetro
pequeño, coloque el soporte con el extremo pequeño
hacia arriba.
IB_KH4300_33077_LB5.qxd 02.06.2009 16:52 Uhr Seite 5

- 6 -
Topes de carretes
Si utiliza carretes no industriales, retire el soporte
para bobinas y coloque el tope para carretes sobre
los carretes de hilo.
Conectar el pedal
Inserte la clavija del pedal g en la conexión para
el pedal 5 y la clavija de red j en una base de
enchufe.
Para conectar la máquina pulse el interruptor de
red 7.
¡Cuidado!
Si abandona la máquina o antes de realizar trabajos
de mantenimiento, extraiga siempre la clavija de
red j de la base de enchufe. ¡Peligro de lesiones!
Controlar la velocidad de costura
La velocidad de costura se controla mediante el
pedal h. La velocidad de costura se puede mo-
dificar aplicando más o menos presión sobre el
pedal h.
Interruptor de seguridad
Esta máquina está equipada con un micro-interruptor
de seguridad. No puede conectar la máquina, si
la tapa frontal 8 está abierta. Cierre la tapa fron-
tal 8 antes de empezar a coser.
Colocar el depósito de residuos
El depósito de residuos k recoge el material cortado
durante la costura, de modo que el puesto de trabajo
permanece siempre limpio. Coloque el depósito de
residuos k entre la máquina y la mesa.
Rueda de mano
Advertencia:
Gire la rueda de mano 6 sólo hacia usted, es decir,
en la misma dirección que en una máquina de coser
tradicional.
Tapa frontal
Para abrir la tapa frontal 8, deslícela tanto como
sea posible hacia la derecha y, al mismo tiempo,
tire de ella hacia usted.
IB_KH4300_33077_LB5.qxd 02.06.2009 16:52 Uhr Seite 6

- 7 -
Abrir el brazo libre
Para enhebrar los hilos, debe abrir el brazo libre 0.
1. Retire a un lado el apoyo de brazo 9.
2. Abra la tapa frontal 8.
3. Presione la palanca de desbloqueo "PUSH" f y,
al mismo tiempo, tire del brazo libre 0 hacia
abajo.
Enhebrar el hilo en la lanzadera
¡Cuidado!
Antes del enhebrado, ponga siempre el interruptor
de red 7 en OFF (apagado) y desenchufe la clavija
de red j. De este modo se evita la conexión acci-
dental del aparato. ¡De otro modo existe peligro de
lesiones!
Es importante que el enhebrado sea correcto para
que las puntadas no sean irregulares y no se rompan
los hilos. En la parte interior de la tapa frontal 8 se
encuentran unas instrucciones para el enhebrado.
Adicionalmente, las guías de los hilos están identifi-
cadas con diferentes colores. En la caja de accesorios
hay unas pinzas, con las que el enhebrado es más
sencillo.
El enhebrado se realiza en el siguiente orden:
1. Primer paso: Lanzadera superior s (verde)
2. Segundo paso: Lanzadera inferior d (azul)
3. Tercer paso: Aguja derecha (amarillo)
4. Cuarto paso: Aguja izquierda (rojo)
Para ofrecer mayor facilidad, cada paso está nume-
rado en las imágenes (1
q
, 2
w
, 3
e
, 4
r
, ...).
1. Abra la tapa frontal 8 y el brazo libre 0.
2. Gire la rueda de mano 6 hacia usted, hasta
que la lanzadera s se encuentre en la mejor
posición para el enhebrado.
3. Guíe los hilos de la lanzadera superior e inferior
tal y como se representa.
Árbol de hilos 1 (lado derecho)
Guía del hilo r/placa de la guía del hilo t
(lado derecho)
Advertencia:
El hilo debe estar correctamente situado entre los
dos discos del dispositivo de tensión del hilo 2/e.
IB_KH4300_33077_LB5.qxd 02.06.2009 16:52 Uhr Seite 7

- 8 -
Selector de tensión del hilo 2/e
4. Saque el extremo del hilo aprox. 10 cm (4”)
del ojal de la lanzadera.
5. Levante el prensatelas o y deslice los hilos por
debajo; a continuación, vuelva a bajar el pren-
satelas o. La palanca para levantar y bajar el
prensatelas o se encuentra en la parte trasera
de la máquina, sobre el varillaje de costura.
Posición de la palanca para elevar el prensatelas o
Guía del hilo detrás de la tapa frontal 8
Guía del hilo desde la placa de la guía del hilo 8
Enhebrar el hilo en la aguja
Para ofrecer mayor facilidad, cada paso está nume-
rado en las imágenes (1
q
, 2
w
, 3
e
, 4
r
, ...).
1. Gire la rueda de mano 6 hacia usted, hasta
que las agujas estén totalmente levantadas.
2. Guíe los hilos de la lanzadera derecha e
izquierda tal y como se representa.
Árbol de hilos 1 (lado izquierdo)
Guía del hilo r/placa de la guía del hilo t
(lado izquierdo)
IB_KH4300_33077_LB5.qxd 02.06.2009 16:52 Uhr Seite 8

- 9 -
Advertencia:
El hilo debe estar correctamente situado entre los
dos discos del dispositivo de tensión del hilo.
Selector de tensión del hilo q/w
Guía del hilo desde la placa de la guía del hilo 8
Guía del hilo detrás de la tapa frontal 8
3. Guíe el hilo tal como se representa, desde
delante hacia atrás, a través de los ojos de
las agujas.
4. Saque el extremo del hilo aprox. 10 cm (4“ ) de
los ojos de las agujas. Levante el prensatelas o
y deslice los hilos por debajo; a continuación,
vuelva a bajar el prensatelas o. La palanca para
levantar y bajar el prensatelas o se encuentra en
la parte trasera de la máquina, sobre el varillaje
de costura.
Posición de la palanca para elevar el prensatelas o
Funcionamiento de prueba
Cuando enhebre hilo por primera vez o lo enhebre
de nuevo tras una rotura del mismo, proceda de la
siguiente manera:
Levante el prensatelas o.
Sostenga los extremos del hilo con las puntas de
los dedos de la mano izquierda, gire la rueda de
mano 6 lentamente dos o tres veces hacia usted
y compruebe de nuevo el hilo.
IB_KH4300_33077_LB5.qxd 02.06.2009 16:52 Uhr Seite 9

- 10 -
Para el funcionamiento de prueba, coloque el tejido
bajo el prensatelas o y comience a coser lenta-
mente. El tejido avanza automáticamente.
Tras finalizar el trabajo, continúe cosiendo hasta
formar una cadena de hilo de aprox. 5 cm (2") de
longitud en el borde del tejido.
Corte los hilos con unas tijeras.
Ajustar la tensión del hilo
La tensión de hilo necesaria cambia en función del
tipo y espesor de los hilos y el tejido.
Compruebe las costuras y ajuste en la máquina la
dureza de hilo correspondiente.
Tensión del hilo
Si gira el dispositivo de tensión a una cifra más
baja, la tensión disminuye.
Si gira el dispositivo de tensión a una cifra más alta,
la tensión aumenta. Las ruedas del dispositivo de
tensión tienen los siguientes colores:
Tensión de hilo correcta:
hilo de la aguja derecha
hilo de la aguja izquierda
hilo de lanzadera inferior
hilo de lanzadera superior
Dorsal
rojo
amarillo
verde
azul
IB_KH4300_33077_LB5.qxd 02.06.2009 16:52 Uhr Seite 10

- 11 -
Ajuste de la tensión del hilo en los
hilos de las agujas
La tensión del hilo en la aguja izquierda
es demasiado holgada.
Vuelva a tensar el hilo izquierdo.
La tensión del hilo en la aguja derecha
es demasiado holgada.
Vuelva a tensar el hilo derecho.
Ajuste de la tensión del hilo en los
hilos de las lanzaderas
El hilo de la lanzadera inferior está firme y/
o el hilo de la lanzadera superior está flojo.
Reduzca la tensión del hilo
de la lanzadera inferior y/o tense el
hilo de la lanzadera superior.
El hilo de la lanzadera superior está firme y/
o el hilo de la lanzadera inferior está flojo.
Reduzca la tensión del hilo
de la lanzadera superior y/o tense el
hilo de la lanzadera inferior.
IB_KH4300_33077_LB5.qxd 02.06.2009 16:52 Uhr Seite 11

- 12 -
Visión general de los ajustes de la máquina
El mejor ajuste de la tensión del hilo para un tejido no tiene por qué ser necesariamente adecuado para
otro tejido.
La tensión de hilo necesaria depende de la rigidez y espesor del tejido, así como el tipo y espesor del hilo.
Si es necesario, ajuste la tensión siguiendo esta tabla:
Tejidos Hilo Agujas
Longitud de punta-
da
Ajuste de la tensión
del hilo
Fino:
• Georgette
• Muselina
• Batista
• Tela de ropa
• Crepe de Chine
• Seda
• Algodón
• Poliéster
Nº 80 - 100
HA x 1
nº 11
130 / 705H
Nº 80
2,0 - 3,5 mm
• Estándar
2,5 mm
Dureza media:
• Algodón
• Popelín
• Algodón salvaje
• Pana
• Algodón
• Poliéster
Nº 60 - 100
HA x 1
Nº 11 - 14
130 / 705H
Nº 80 - 90
2,0 - 3,5 mm
• Estándar
2,5 mm
Grueso:
• Tela vaquera
• Tweed
• Terciopelo
• Algodón
• Poliéster
Nº 50 - 80
HA x 1
Nº 14
130 / 705H
Nº 90
2,5 - 4,0 mm
• Estándar 3 mm
IB_KH4300_33077_LB5.qxd 02.06.2009 16:52 Uhr Seite 12

- 13 -
Cambio de hilo (anudar)
Siguiendo este procedimiento, el cambio de hilo es
muy sencillo:
1. Corte el hilo sobre el carrete y anude los extremos
del hilo antiguo y el nuevo.
2. Ajuste el selector de tensión del hilo 2/q/w/
e a "0" y levante el prensatelas o.
3. Tire del otro extremo del hilo, hasta que los nudos
pasen bajo el prensatelas o.
4. Al enhebrar las agujas, tire de los extremos opues-
tos, hasta que los nudos lleguen a los ojos de las
aguas y corte el hilo a la izquierda y derecha de
los nudos. A continuación, vuelva a enhebrar.
Ajuste de la longitud de puntada
La longitud de puntada se puede ajustar en pasos
de 1,0 a 5,0 mm. La mayoría de los trabajos Over-
lock se realizan con una longitud de puntada de
2,5 – 3,5 mm.
Gire la rueda de ajuste interna para la longitud de
puntada z, para ajustar la longitud de puntada:
Puntadas Longitud de puntada
Costuras normales
2.0 - 5.0 mm
Estándar: 3.0 mm
Ribeteados pequeños 1.0 - 2.0 mm
Vainicas 1.0 - 2.0 mm
IB_KH4300_33077_LB5.qxd 02.06.2009 16:52 Uhr Seite 13

- 14 -
Ajustar el ancho de puntada
El ancho de puntada varía en función del tejido.
Compruebe cada vez las costuras y ajuste el ancho
de puntada de la siguiente manera:
1. Gire la rueda de mano 6 hacia usted, hasta
que las agujas se encuentren en la posición más
baja.
2. Abra la tapa frontal 8.
3. Presione la palanca PUSH f. El brazo libre 0
cae y se puede ver la rueda de ajuste para el
ancho de puntada i.
4. Gire la rueda de ajuste para el ancho de punta-
da i. De este modo mueve la cuchilla inferior p.
Continúe girando hasta que los hilos de las lan-
zaderas alcancen el borde del tejido. Si gira en
la dirección W (wide), el ancho de puntada
aumenta.
Si gira en la dirección N (narrow), el ancho de
puntada disminuye.
Ejemplos:
Seleccione un ancho de puntada pequeño, si se
frunce el borde del tejido durante la costura. Para
hacerlo, gire la rueda de ajuste para el ancho de
puntada i hacia la derecha (N).
Seleccione un ancho de puntada mayor, si durante
la costura el hilo sobrepasa el borde del tejido.
Para hacerlo, gire la rueda de ajuste para el ancho
de puntada i hacia la izquierda (W).
Cambiar las agujas
¡Cuidado!
Antes de cambiar las agujas, desenchufe la clavija
de red. De este modo se evita la conexión no auto-
rizada del aparato. ¡De otro modo existe peligro
de lesiones!
1. Gire la rueda de mano 6 hacia usted, hasta
que las agujas se encuentren en la posición más
alta.
2. Abra la tapa frontal 8 y baje el prensatelas o.
3. Afloje los tornillos de sujeción de las agujas con
la llave macho hexagonal de la caja de acceso-
rios y retire las agujas:
- tornillo superior izquierdo para la aguja izquierda
- tornillo inferior derecho para la aguja derecha.
4. Inserte la aguja nueva con la parte plana hacia
atrás en el soporte de la aguja. Al hacerlo, com-
pruebe que la ha introducido tanto como sea
posible. Apriete el tornillo de sujeción de la aguja.
Si se han colocado correctamente las agujas, la
aguja izquierda queda un poco más alta que la
derecha.
Si no se han colocado correctamente las agujas, se
omitirán ocasionalmente puntadas durante la costura.
Esta máquina está equipada con agujas del tipo
H.Ax1 (sistema de agujas 130H) (para máquinas
domésticas).
IB_KH4300_33077_LB5.qxd 02.06.2009 16:52 Uhr Seite 14

- 15 -
Cambiar la lámpara
incandescente
¡Riesgo por descarga eléctrica!
¡Retire siempre la clavija de red j de la base de
enchufe, cuando cambie la lámpara incandescente!
1. Retire la cubierta pequeña y redonda con una
aguja, o algo similar.
2. Extraiga totalmente el tornillo.
3. Retire la cubierta de la lámpara.
4. Cambie la lámpara incandescente. Utilice una
bombilla del tipo E14, 15 W.
5. Vuelva a montar todas las piezas en orden inverso.
Cambiar la cuchilla superior
¡Cuidado!
Antes de cambiar la cuchilla a extraiga siempre la
clavija de red j de la base de enchufe. De este
modo se evita la conexión no autorizada del apa-
rato. ¡De otro modo existe peligro de lesiones!
Advertencia:
La cuchilla p inferior está compuesta de un material
especial y normalmente no será necesario cambiarla.
Si a pesar de ello resultase dañada en algún mo-
mento, póngase en contacto con el servicio de
atención al cliente.
De este modo puede cambiar la cuchilla a inferior,
si está desafilada:
1. Abra la tapa frontal 8 y gire la rueda de mano 6
hacia usted, hasta que las agujas se encuentren
en la posición más baja.
2. Con el destornillador, afloje el tornillo situado en
el soporte de cuchilla superior y retire la cuchilla
superior a.
3. Coloque una cuchilla superior a nueva y apriete
un poco el tornillo del soporte.
4. Ajuste la cuchilla superior a de modo que su
filo sobrepase en 0,5-1,0 mm el filo de la cuchilla
inferior p.
5. Apriete ahora el soporte de la cuchilla superior a
y cierre la tapa frontal 8.
cuchilla superior a
cuchilla inferior p
Destornillador
IB_KH4300_33077_LB5.qxd 02.06.2009 16:52 Uhr Seite 15

- 16 -
Remallado con tres hilos
estrecho o ancho
Esta máquina se puede ajustar para la costura de
remallado con cuatro a tres hilos.
Retire la aguja derecha o izquierda (véase capítulo
"Cambiar la aguja") y el hilo correspondiente.
Ahora la máquina está preparada para la costura
de remallado con tres hilos.
Si sólo se emplea la aguja derecha, la longitud
de puntada es de 4 mm (0,16“).
Si sólo se emplea la aguja izquierda, la longitud
de puntada es de 6 mm (0,24“).
Costura libre
El modo de funcionamiento con brazo libre es espe-
cialmente adecuado para coser piernas de panta-
lones, mangas, puños, etc.
Retire el apoyo de brazo 9, como se muestra en la
imagen, para cambiar del modo de funcionamiento
de base plana al de brazo libre.
Ajustar el prensatelas
El prensatelas o especial, en el ajuste N en el tor-
nillo avellanado situado delante del prensatelas o,
está ajustado para el funcionamiento de costura de
remallado normal. Si desea coser una vainica, afloje
el tornillo grande un poco y deslice la pequeña
clavija que sobresale del pie a la izquierda, hasta
el tope. Ahora puede ver la letra R en el tornillo.
IB_KH4300_33077_LB5.qxd 02.06.2009 16:52 Uhr Seite 16

- 17 -
Vainica y ribeteado
Proceda de la siguiente manera para realizar estos
trabajos:
1. Lea las instrucciones para ajustar el prensatelas o
recogidas en el capítulo "Ajustar el prensatelas".
2. Gire la rueda de mano 6 hacia usted, hasta
que las agujas estén totalmente levantadas.
3. Abra la tapa frontal 8 y retire la aguja izquierda
(véase capítulo Cambiar las agujas).
4. Ajuste la longitud de puntada a 1,0 - 2,0 mm.
Compruebe que la rueda de ajuste del trasporte
diferencial u está ajustada en “N”.
5. Ajuste el ancho de puntada como se describe
en el capítulo "Ajustar el ancho de puntada".
6. Si no hay ningún hilo enhebrado, enhebre ahora
uno.
7. Coloque el tejido bajo el prensatelas o y
comience a coser.
Advertencia:
En primer lugar compruebe los ajustes de la longitud
de puntada y la tensión del hilo siempre en una
pieza de tejido de prueba, antes de empezar a
coser la pieza real.
Advertencia:
Después de la costura de dobladillos, recuerde volver
a colocar el prensatelas o especial para la costura
normal (funcionamiento de costura de remallado).
Pasador
Coser vainica
Al coser vainicas, los lazos del hilo de la lanzadera
superior deben llevarse hacia la parte inferior del
tejido. Esto se logra ajustando la tensión del hilo,
del modo descrito en el capítulo "Ajustar la tensión
del hilo".
Coser bordes finos
Si desea coser tejidos muy finos o ligeros, seleccione
una tensión del hilo adecuada, como se describe
en el capítulo "Ajustar la tensión del hilo".
hilo de
lanzadera
inferior
hilo de
lanzadera
superior
Hilo de la aguja
hilo de lanzadera
inferior
hilo de lanzadera
superior
IB_KH4300_33077_LB5.qxd 02.06.2009 16:52 Uhr Seite 17

- 18 -
Importante: Si es necesario, ajuste la longitud de
puntada y el ancho de puntada.
Vainicas
Ribeteado
Transporte diferencial
Con el transporte diferencial se evitan las costuras
onduladas en los tejidos de punto, así como el co-
rrimiento de las capas de tejido. Además, las costuras
en tejidos muy ligeros no provocan arrugas.
Modo de funcionamiento
La máquina tiene dos juegos de varillas dentadas de
avance, uno delante y otro detrás. Estos dos juegos
se mueven con independencia el uno del otro. Con
el transporte diferencial, los dos juegos de varillas
dentadas se pueden mover con diferentes velocidades.
Al moverse, las varillas dentadas de avance forman un
movimiento elíptico y transportan de esta manera el
tejido:
Ajuste del transporte diferencial
El transporte diferencial se ajusta girando la rueda
de ajuste para el transporte diferencial u en la
dirección deseada.
"N" ="Posición neutra", las varillas dentadas de
avance mueven el tejido regularmente hacia
delante.
"G" ="Posición Gather" (Gather = fruncir), el juego de
varillas dentadas de avance delantero empuja
el tejido más rápido que el trasero. De este
modo, el tejido elástico no se estira.
"S" ="Posición Strech", el juego de varillas dentadas
trasero empuja el tejido más rápido que el de-
lantero. De este modo, el juego de varillas
dentadas delantero mantiene el tejido tenso.
El transporte diferencial se puede ajustar también
durante la costura.
atrás delante
IB_KH4300_33077_LB5.qxd 02.06.2009 16:52 Uhr Seite 18

- 19 -
Bordes de tejido de punto y prensado
irregulares
Pata mantener bien lisos los bordes durante la cos-
tura de productos de punto elásticos, el juego de
varillas dentadas delantero debe empujar más rápido
que el trasero, para que el producto de punto no
se estire. También para los prensados el juego de
varillas dentadas delantero debe trabajar más rápido
que el trasero. Con longitudes de puntada grandes,
el tejido de punto permanece liso. Ajuste el trans-
porte diferencial en "G".
Evitar el fruncido mediante estiramiento
Para evitar que las costuras en tejidos muy ligeros o
nylon ligero produzcan arrugas, las varillas dentadas
de avance traseras deben trabajar más rápido que
las delanteras. De este modo, las varillas dentadas
delanteras mantienen el tejido tenso y evita el frun-
cido. Ajuste el transporte diferencial en "S".
IB_KH4300_33077_LB5.qxd 02.06.2009 16:52 Uhr Seite 19

- 20 -
Eliminación de fallos
Problema Motivo Reparación
Las agujas se rompen
• Las agujas están torcidas, desafi-
ladas o dañadas en las puntas.
• Coloque agujas nuevas.
• Las agujas no están correcta-
mente colocadas.
• Coloque las agujas correctamente
en el soporte.
• Ha tirado del tejido con de-
masiada fuerza
• Guíe el tejido cuidadosamente con
ambas manos.
El hilo se rompe
• El hilo no está correctamente
enhebrado.
• Enhebre correctamente el hilo.
• La tensión del hilo es excesiva. • Disminuya la tensión del hilo.
• Las agujas no están correcta-
mente colocadas.
• Coloque las agujas correctamente
en el soporte.
Se omiten puntadas
• Las agujas están torcidas, desafi-
ladas o dañadas en las puntas.
• Coloque agujas nuevas.
• Las agujas no están correcta-
mente colocadas.
• Coloque las agujas correctamente
en el soporte.
• El hilo no está correctamente
enhebrado.
• Compruebe el avance de cada
hilo.
• Las agujas colocadas no son las
adecuadas.
• Utilice las agujas adecuadas (HA
x 1 o 130/705H)
Las puntadas no son
regulares
• La tensión del hilo no es correcta. • Corrija la tensión del hilo.
• El hilo se atasca.
• Compruebe el avance de cada
hilo.
Las costuras producen
arrugas
• La tensión del hilo es excesiva. • Vuelva a ajustar la tensión del hilo.
• El hilo no está correctamente
enhebrado.
• Enhebre correctamente el hilo.
• El hilo queda atrapado.
• Compruebe el avance de cada
hilo.
• Transporte diferencial no ajustado. • Ajuste el transporte diferencial en "S".
No se produce un corte
limpio del tejido
• La cuchilla superior a está
desafilada o mal colocada.
• Cambie la cuchilla a o colóquela
correctamente.
Los bordes del tejido se
fruncen
• Demasiado tejido en una punta-
da.
• Cambie el ancho de costura.
IB_KH4300_33077_LB5.qxd 02.06.2009 16:52 Uhr Seite 20

- 21 -
Cuidado y limpieza
Atención:
Extraiga siempre la clavija de red j de la base
de enchufe antes de limpiar la máquina o engrasarla.
¡Existe riesgo de una descarga eléctrica.
Para que la máquina funcione correctamente, debe
limpiarla ocasionalmente con el pincel.
Esta máquina necesita muy poco aceite, pues los
componentes principales están compuestos de un
material especial.
Aplique aceite sólo ocasionalmente en los lugares
indicados:
Conservación
Atención:
Extraiga siempre la clavija de red j de la base
de enchufe antes de guardar la máquina.
De este modo se evita la conexión no autorizada del
aparato.
Si no va a utilizar la máquina, cúbrala siempre con
la funda de protección. Así la protegerá del polvo.
Guarde la máquina en un lugar limpio y seco.
Evacuación
En ningún caso deberá tirar el aparato
con la basura doméstica. Este producto
está sujeto a la directiva europea
2002/96/EC.
Evacue el aparato en un centro de evacuación
autorizado a través de las instalaciones de evacua-
ción comunitarias.
Tenga en cuenta las normativas actuales en vigor.
En caso de dudas póngase en contacto con su
centro de evacuación.
El material de embalaje debe desecharse
de forma ecológica.
IB_KH4300_33077_LB5.qxd 02.06.2009 16:52 Uhr Seite 21

- 22 -
Garantía y asistencia técnica
Con este aparato recibe usted 3 años de garantía
desde la fecha de compra. El aparato ha sido fabri-
cado cuidadosamente y ha sido probado antes de
su entrega. Guarde el comprobante de caja como
justificante de compra. Si necesitara hacer uso de
la garantía, póngase en contacto por teléfono con
su punto de servicio habitual. Éste es el único modo
de garantizar un envío gratuito.
La garantía cubre los defectos de fabricación o del
material, pero no las piezas sujetas a desgaste y
los daños sufridos por las piezas frágiles (p. ej. el
interruptor o las pilas). El producto ha sido diseñado
únicamente para el uso privado y no para el uso
comercial.
En caso de manipulación indebida e incorrecta, uso
de la fuerza y en caso de abrir el aparato personas
extrañas a nuestros centros de asistencia técnica auto-
rizados, la garantía pierde su validez. Sus derechos
legales no se ven limitados por esta garantía.
Kompernass Service España
Tel.: 902/884663
e-mail: support.es@kompernass.com
Importador
KOMPERNASS GMBH
BURGSTRASSE 21
44867 BOCHUM, (ALEMANIA)
www.kompernass.com
IB_KH4300_33077_LB5.qxd 02.06.2009 16:52 Uhr Seite 22

- 23 -
ÍNDICE PÁGINA
Utilização correcta 25
Indicações de segurança 25
Dados técnicos 26
Volume de fornecimento 26
Descrição do aparelho 27
Preparações 27
Ajuste do passador de linhas .......................................................................................................27
Suportes das bobinas....................................................................................................................27
Capas de bobinas .........................................................................................................................28
Ligar o pedal..................................................................................................................................28
Controlo da velocidade de costura.............................................................................................28
Interruptor de segurança...............................................................................................................28
Colocação do recipiente para resíduos......................................................................................28
Roda manual ..................................................................................................................................28
Tampa da frente.............................................................................................................................28
Abrir o braço móvel ......................................................................................................................29
Enfiar a linha na lançadeira.........................................................................................................29
Enfiar a linha nas agulhas ............................................................................................................30
Ensaio..............................................................................................................................................31
Ajuste da tensão da linha 32
Ajuste da tensão da linha para linhas da agulha......................................................................33
Ajuste da tensão da linha para linhas da lançadeira ...............................................................33
Vista geral dos ajustes da máquina.............................................................................................34
Mudança da linha (união) 35
Ajuste do comprimento do ponto 35
Ajuste da largura de corte 36
Substituir as agulhas 36
Substituir a lâmpada incandescente 37
Substituir a lâmina superior 37
IB_KH4300_33077_LB5.qxd 02.06.2009 16:52 Uhr Seite 23

- 24 -
Chulear com malhas apertadas e largas com três linhas 38
Funcionamento com braço móvel 38
Ajustar o calcador 38
Bainha aberta e debruar 39
Coser bainhas abertas 39
Coser cantos estreitos 39
Transporte de tecido 40
Modo de funcionamento ..............................................................................................................40
Ajuste do transporte do tecido.....................................................................................................40
Cantos irregulares de bordados e alisamentos..........................................................................41
Esticar para evitar pregas.............................................................................................................41
Resolução de problemas 42
Limpeza e conservação 43
Armazenamento 43
Eliminação 43
Garantia e assistência técnica 44
Importador 44
Leia cuidadosamente o manual de instruções antes da primeira utilização e guarde-o para consultar
posteriormente. Ao entregar o aparelho a terceiros entregue também o manual.
IB_KH4300_33077_LB5.qxd 02.06.2009 16:52 Uhr Seite 24

- 25 -
MÁQUINA DE COSTURA
OVERLOCK KH 4300
Utilização correcta
A máquina de costura Overlock destina-se ...
- a ser utilizada como aparelho móvel,
- a debruar as orlas do tecido (chulear) de têxteis
convencionais e ...
- apenas ao uso doméstico privado.
A máquina de costura não se destina ...
- a uma instalação permanente,
- à transformação de outros materiais (p. ex. pele,
lonas e tecidos pesados semelhantes),
- ao uso comercial ou industrial.
Indicações de segurança
Tal como em qualquer aparelho eléctrico, também
se pode ferir numa máquina de costura e colocar
a sua vida em perigo. Para o evitar e para trabalhar
de forma segura:
• Retire a ficha da tomada, antes de deixar a máquina
sem vigilância. Desta forma, evita acidentes
provocados por ligações inadvertidas.
• Retire primeiro a ficha de rede, antes de substituir
a lâmpada ou de efectuar trabalhos de manutenção
na máquina. Assim, não coloca a sua vida em
perigo por choque eléctrico.
• Não retire a ficha da tomada puxando pelo cabo.
Agarre a ficha e não o cabo para a retirar.
• Utilize a máquina de costura sempre em espaços
secos.
• No caso de danos, a ficha ou o cabo de rede
devem ser imediatamente substituídos por técnicos
autorizados ou pela Assistência Técnica, de
modo a evitar perigos.
• Este aparelho não deve ser utilizado por pessoas
(incluindo crianças) com capacidades físicas,
sensoriais ou mentais limitadas ou falta de expe-
riência e/ou de conhecimento, a não ser que
estas sejam supervisionadas por uma pessoa
responsável pela sua segurança ou que desta
recebam instruções acerca do funcionamento
do aparelho.
• As crianças devem ser supervisionadas, de modo
a garantir que não brincam com o aparelho.
• Nunca utilize a máquina com as aberturas para
ventilação bloqueadas. Mantenha as aberturas
para ventilação da máquina, assim como o pedal,
livres de fios, pó e restos de tecido.
• Se o cabo de ligação, unido ao pedal, estiver
danificado, deve ser substituído pelo fabricante
ou por um serviço de apoio ao cliente ou outra
pessoa com qualificação semelhante, de forma
a evitar eventuais perigos.
Aviso: perigo de ferimentos e danos
materiais
• Mantenha o seu local de trabalho em ordem.
A desordem no local de trabalho pode provocar
acidentes.
• Procure trabalhar com uma boa iluminação!
• Não use vestuário largo ou ornamentos, porque
estes podem ficar presos em peças em movimento.
Utilize também, por isso, uma rede para o cabelo.
• Evite uma posição do corpo anormal.
Garanta uma paragem segura e um equilíbrio
contínuo.
• Caso ocorram acidentes por descuido no manu-
seamento do aparelho ou por inobservância das
indicações de segurança no manual, o fabricante
não se responsabiliza por tais danos.
• Nunca tape as ranhuras de ventilação!
Perigo de sobreaquecimento!
IB_KH4300_33077_LB5.qxd 02.06.2009 16:52 Uhr Seite 25

- 26 -
Dados técnicos
Número de linhas 4 ou 3
Número de agulhas 2 ou 1
Velocidade de costura 1100 rpm
Largura do ponto 6 mm com 4 linhas
6 mm ou 4 mm com 3
linhas
Comprimento do ponto 1 – 5 mm
Agulhas HA x 1 N.º 11-14 ou
130/705 N.º 75-90
Consumo de energia: Motor: 90 W
Lâmpada
incandescente: 15 W
Total: 105 W
Tensão nominal: 230 V
~
, 50Hz
Classe de protecção: II
Potênciao da lâmpada
incandescente: : 15 W
Tensão da lâmpada
incandescente: : 230 V /
~
50 Hz
Rosca da lâmpada
incandescente : Rosca E14
O nível de intensidade de ruído sob condições
normais de funcionamento é de 78dB(A).
Pedal
Com esta máquina de costura utilize apenas o pedal
fornecido:
- ELECTRONIC FDM Speed Controller
- Tipo KD-2902
Volume de fornecimento
Máquina de costura Overlock
Óleo
Recipiente para resíduos
Caixa de acessórios
Manual de instruções
Lâmina de substituição
(superior)
2 agulhas n.º 11
4 agulhas n.º 14
(2 pré-instaladas na
máquina)
4 capas de bobinas
4 suportes para bobi-
nas (pré-instalados)
Chave para parafusos
sextavados internos
Chave de fendas
Cobertura
Pinça
Pincel
IB_KH4300_33077_LB5.qxd 02.06.2009 16:52 Uhr Seite 26

- 27 -
Descrição do aparelho
1 Passador de linha
2 Selector da tensão da linha (lançadeira inferior)
3 Suporte da bobina
4 Ranhuras de ventilação
5 Ligação do pedal/ligação à rede
6 Roda manual
7 Interruptor manual (interruptor On/Off)
8 Tampa da frente
9 Apoio do braço
0 Braço móvel
q Selector da tensão da linha (agulha esquerda)
w Selector da tensão da linha (agulha direita)
e Selector da tensão da linha (lançadeira superior)
r Guia da linha
t Placa de guia da linha
z Roda de ajuste do comprimento do ponto
u Roda de ajuste do transporte de tecido
i Roda de ajuste da largura de corte
o Calcador
p Lâmina inferior
a Lâmina superior
s Lançadeira superior
d Lançadeira inferior
f Alavanca de desbloqueio PUSH
g Ficha de ligação
h Pedal
j Ficha de rede
k Recipiente para resíduos
Preparações
Coloque a máquina Overlock sobre uma superfície
estável e plana. Assegure a existência de suficiente
iluminação no seu local de trabalho.
Ajuste do passador de linhas
Retire o passador de linhas 1 por completo antes
de enfiar a linha.
Rode o passador de linhas 1 de forma a que a guia
da linha se encontre precisamente por cima do suporte
da bobina 3.
Suportes das bobinas
Nesta máquina podem ser utilizadas bobinas
industriais, bem como bobinas domésticas.
No caso de bobinas industriais de grande diâmetro,
coloque o suporte da bobina com o lado mais largo
para cima; para bobinas de diâmetro pequeno
coloque o suporte com o lado estreito para cima.
IB_KH4300_33077_LB5.qxd 02.06.2009 16:52 Uhr Seite 27

- 28 -
Capas de bobinas
No caso de serem utilizadas bobinas de linha não
industriais, remova o suporte de bobina e coloque
as capas da bobina fornecidas na bobina de linha.
Ligar o pedal
Encaixe a ficha do pedal g na ligação para o pe-
dal 5 e a ficha de rede j numa tomada de rede.
Para ligar a máquina, pressione o interruptor de
rede 7.
Atenção!
Ao abandonar a máquina ou antes de efectuar
trabalhos de manutenção, desligue sempre a ficha
de rede j da tomada. Perigo de ferimentos!
Controlo da velocidade de costura
A velocidade de costura é controlada através do
pedal h. A velocidade de costura pode ser alterada
exercendo mais ou menos pressão sobre o pedal h.
Interruptor de segurança
Esta máquina está equipada com um micro-interruptor
de segurança. Não pode ligar a máquina quando
a tampa da frente 8 se encontra aberta. Feche
a tampa da frente 8 antes de começar a costurar.
Colocação do recipiente para resíduos
O recipiente para resíduos k apanha os restos de
tecido enquanto cose, para deixar o seu local de
trabalho sempre limpo. Coloque o recipiente para
resíduos k entre a máquina e a mesa.
Roda manual
Nota:
Gire a roda manual 6 sempre para o seu lado, ou
seja, na mesma direcção como uma máquina de
costura doméstica.
Tampa da frente
Para abrir a tampa da frente 8 empurre esta o mais
possível para a direita e, em simultâneo, puxe-a na
sua direcção.
IB_KH4300_33077_LB5.qxd 02.06.2009 16:52 Uhr Seite 28

- 29 -
Abrir o braço móvel
Para enfiar as linhas é necessário abrir o braço
móvel 0.
1. Retire o apoio do braço 9 para o lado.
2. Abra a tampa da frente 8.
3. Pressione a alavanca de desbloqueio "PUSH" f
e empurre o braço móvel 0 para baixo.
Enfiar a linha na lançadeira
Atenção!
Antes de enfiar a linha, coloque o interruptor de
rede 7 sempre em OFF (desligado) e desligue
a ficha de rede j. Isto impede um arranque
inadvertido do aparelho. Caso contrário existe
perigo de ferimentos!
É importante enfiar correctamente a linha para
garantir a uniformidade do ponto e evitar que
o fio parta.
No lado interior da tampa da frente 8 encontram-se
indicações sobre como enfiar a linha. Além disso as
guias de linha estão identificadas com cores diferentes.
Na caixa de acessórios encontra-se uma pinça que
facilita o enfiar da linha.
O enfiar da linha acontece nesta sequência:
1. Primeiro passo: Lançadeira superior s (verde)
2. Segundo passo: Lançadeira inferior d (azul)
3. Terceiro passo: Agulha direita (amarelo)
4. Quarto passo: Agulha esquerda (vermelho)
Para simplificar, os passos individuais estão numerados
na figura (1
q
, 2
w
, 3
e
, 4
r
, ...).
1. Abra a tampa da frente 8 e o braço móvel 0.
2. Gire a roda manual 6 na sua direcção até
a lançadeira s se encontrar na posição
adequada para enfiar a linha.
3. Introduza a linha da lançadeira superior e inferior,
tal como representado.
Passador de linhas 1 (lado direito)
Guia da linha r/placa de guia das linhas t
(lado direito)
Nota:
A linha deve passar correctamente entre os dois
discos do dispositivo de tensionamento da linha 2/e.
IB_KH4300_33077_LB5.qxd 02.06.2009 16:52 Uhr Seite 29

- 30 -
Selector da tensão da linha 2/e
4. Puxe a extremidade da linha cerca de 10 cm
dos orifícios da lançadeira.
5. Levante o calcador o e coloque as linhas por
baixo; volte a baixar o calcador o. A alavanca
para levantar e baixar o calcador o encontra-se
na parte de trás da máquina, por cima do tirante
de costura.
Posição da alavanca para levantar o calcador o
Guia da linha atrás da tampa da frente 8
Guia da linha da placa de guia da linha 8 ligada
Enfiar a linha nas agulhas
Para simplificar, os passos individuais estão numerados
na figura (1
q
, 2
w
, 3
e
, 4
r
, ...).
1. Gire a roda manual 6 para si até as agulhas
se encontrarem na posição superior.
2. Introduza a linha direita e esquerda, tal como
representado.
Passador de linhas 1 (lado esquerdo)
Guia da linha r/placa de guia das linhas t
(lado esquerdo)
IB_KH4300_33077_LB5.qxd 02.06.2009 16:52 Uhr Seite 30

- 31 -
Nota:
A linha deve passar correctamente entre os dois
discos do dispositivo de tensionamento da linha.
Selector da tensão da linha q/w
Guia da linha da placa de guia da linha 8 ligada
Guia da linha
3. Introduza a linha nos orifícios da agulha, como
representado, da frente para trás.
4. Puxe a extremidade da linha cerca de 10 cm
dos orifícios da agulha. Levante o calcador o
e coloque as linhas por baixo; volte a baixar
o calcador o. A alavanca para levantar e baixar
o calcador o encontra-se na parte de trás da
máquina, por cima do tirante de costura.
Posição da alavanca para levantar o calcador o
Ensaio
Quando enfiar linha pela primeira vez ou voltar
a enfiar linha após o fio ter rompido, proceda da
seguinte forma:
Levante o calcador o.
Mantenha a extremidade da linha entre as pontas
dos dedos da mão esquerda, gire a roda manual 6
lentamente duas ou três vezes na sua direcção
e verifique se é possível puxar a linha.
IB_KH4300_33077_LB5.qxd 02.06.2009 16:52 Uhr Seite 31

- 32 -
Coloque o tecido sob o calcador o para efectuar
um ensaio e comece a coser lentamente.
O tecido avança automaticamente.
Após terminar o trabalho, continue a coser até se
formar um cordão de linha com aprox. 5cm de
comprimento na extremidade do tecido.
Corte as linhas com uma tesoura.
Ajuste da tensão da linha
A tensão da linha necessária é diferente conforme
o tipo e espessura da linha e do tecido.
Verifique as costuras e ajuste a tensäo de linha na
máquina.
Tensão da linha
Rode o dispositivo de tensionamento para um valor
inferior: a tensão diminui.
Rode o dispositivo de tensionamento para um valor
superior: a tensão aumenta. As rodas do dispositivo
de tensionamento têm as seguintes cores:
Tensão correcta da linha:
enfiar a linha na agulha direita
enfiar a linha na agulha
esquerda
linha da lançadeira inferior
linha da lançadeira superior
Parte de trás
ver-
melho
amarelo
verde
azul
IB_KH4300_33077_LB5.qxd 02.06.2009 16:52 Uhr Seite 32

- 33 -
Ajuste da tensão da linha para linhas
da agulha
A tensão da linha na agulha esquerda está
demasiado solta.
Ajuste a tensão da linha esquerda.
A tensão da linha da agulha direita
está demasiado solta.
Ajuste a tensão da linha direita.
Ajuste da tensão da linha para linhas
da lançadeira
A linha da lançadeira inferior está presa e/
ou a linha da lançadeira superior está solta.
Solte a tensão da linha da
lançadeira inferior e/ou aperte a
linha da lançadeira superior.
A linha da lançadeira superior está presa e/
ou a linha da lançadeira inferior está solta.
Solte a tensão da linha da lançadeira superior
e/ou aperte a
linha da lançadeira inferior.
IB_KH4300_33077_LB5.qxd 02.06.2009 16:52 Uhr Seite 33

- 34 -
Vista geral dos ajustes da máquina
O ajuste favorável da tensão da linha para um tecido não é necessariamente o correcto para outro tecido.
A tensão da linha necessária orienta-se pela rigidez e espessura do tecido, bem como pelo tipo e espessura
da linha.
Se necessário, ajuste a tensão de acordo com esta tabela:
Tecido Linhas Agulhas
Comprimento do
ponto
Ajuste da tensão
da linha
Leve:
• Georgette
• Musselina
• Cambraia
• Tecido de vesti-
dos
• Crepe de China
• Seda
• Algodão
• Poliéster
N.º 80 - 100
HA x 1
N.º 11
130 / 705H
N.º 80
2,0 - 3,5 mm
• Padrão 2,5 mm
Médio:
• Algodão
• Popelina
• Algodão
• Tecido canelado
• Algodão
• Poliéster
N.º 60 - 100
HA x 1
N.º 11 - 14
130 / 705H
N.º 80 - 90
2,0 - 3,5 mm
• Padrão 2,5 mm
Pesado:
• Tecido de ganga
• Tweed
• Velours
• Algodão
• Poliéster
N.º 50 - 80
HA x 1
N.º 14
130 / 705H
N.º 90
2,5 - 4,0 mm
• Padrão 3 mm
IB_KH4300_33077_LB5.qxd 02.06.2009 16:52 Uhr Seite 34

- 35 -
Mudança da linha (união)
De acordo com o seguinte procedimento, a mudança
de linha é muito simples:
1. Corte a linha através da bobina e ate com um
nó as extremidades da linha nova e da linha
antiga.
2. Posicione o selector da tensão da linha 2/q/
w/e em "0" e levante o calcador o.
3. Puxe a outra extremidade da linha, até os nós
ficarem posicionados sob o calcador o.
4. Ao enfiar a linha nas agulhas, puxe a outra
extremidade até os nós chegarem aos orifícios
das agulhas e corte o fio à direita e à esquerda
do nó. De seguida volte a enfiar a linha.
Ajuste do comprimento do
ponto
O comprimento do ponto pode ser ajustado em
intervalos de 1,0 até aos 5,0 mm. Quase todos os
trabalhos Overlock são executados com um compri-
mento de ponto entre 2,5 e 3,5 mm.
Gire a roda de ajuste interior para o comprimento
do ponto z, para ajustar o comprimento do ponto:
Pontos
Comprimento do
ponto
Costuras normais
2.0 - 5.0 mm
Standard: 3.0 mm
Debruados estreitos 1.0 - 2.0 mm
Bainhas 1.0 - 2.0 mm
IB_KH4300_33077_LB5.qxd 02.06.2009 16:52 Uhr Seite 35

- 36 -
Ajuste da largura de corte
A largura de corte adequada difere de tecido para
tecido. Verifique as costuras e ajuste a largura de
corte da seguinte forma:
1. Gire a roda manual 6 para si, até as agulhas
se encontrarem na posição inferior.
2. Abra a tampa da frente 8.
3. Pressione a alavanca PUSH f. O braço móvel 0
desce e a roda de ajuste para largura de corte i
fica visível.
4. Gire a roda de ajuste para largura de corte i.
Para isso desloque a lâmina inferior p.
Rode até as linhas da lançadeira se encontrarem
na extremidade do tecido. Se rodar na direcção
W (wide=largo), a largura de corte aumenta.
Se rodar na direcção N (narrow=estreito), a largura
de corte diminui.
Exemplos:
Escolha uma largura de corte inferior caso as extre-
midades do tecido franzam ao coser. Para isso, gire
a roda de ajuste para a largura de corte i para a
direita (N).
Escolha uma largura de corte maior caso a linha
seja cosida para além do tecido. Para isso, gire
a roda de ajuste para a largura de corte i para
a esquerda (W).
Substituir as agulhas
Atenção!
Antes de mudar as agulhas desligue a ficha de rede.
Isto impede um arranque inadvertido do aparelho.
Caso contrário existe perigo de ferimentos!
1. Gire a roda manual 6 para si, até as agulhas
se encontrarem na posição superior.
2. Abra a tampa frontal 8 e baixe o calcador o.
3. Desaperte os parafusos de aperto das agulhas,
utilizando uma chave para parafusos sextavados
internos da caixa de acessórios e retire as agu-
lhas:
- parafuso superior esquerdo para a agulha
esquerda
- parafuso inferior direito para a agulha direita.
4. Introduza a nova agulha no respectivo suporte
com o lado chato para trás. Certifique-se de que
esta encosta o máximo possível.
Aperte o parafuso de aperto da agulha.
Se as agulhas tiverem sido correctamente aplicadas,
a agulha esquerda fica um pouco mais alta do que
a direita.
Se as agulhas não tiverem sido correctamente
aplicadas, falham pontos ao costurar.
Esta máquina está equipada com agulhas do tipo
H.Ax1 (sistema de agulhas 130H) (para máquinas
de uso doméstico).
IB_KH4300_33077_LB5.qxd 02.06.2009 16:52 Uhr Seite 36

- 37 -
Substituir a lâmpada
incandescente
Perigo de choque eléctrico!
Desligue sempre a ficha de rede j da tomada quando
pretender substituir a lâmpada incandescente!
1. Retire a pequena tampa redonda com uma
agulha ou outro objecto semelhante.
2. Desaperte o parafuso e retire.
3. Retire a tampa da lâmpada.
4. Substitua a lâmpada incandescente. Utilize uma
lâmpada do tipo E14, 15 W.
5. Volte a colocar todas as peças pela ordem inversa.
Substituir a lâmina superior
Atenção!
Antes de substituir a lâmina a desligar sempre a ficha
de rede j da tomada. Isto impede um arranque
inadvertido do aparelho. Caso contrário existe perigo
de ferimentos!
Nota:
A lâmina inferior p é composta por material especial
e geralmente não necessita ser substituída. Se, ainda
assim, esta ficar danificada, dirija-se ao serviço de
apoio ao cliente.
Pode mudar a lâmina superior a da seguinte forma
quando esta estiver gasta:
1. Abra a tampa da frente 8 e gire a roda manual 6
para si até as agulhas se encontrarem na posição
inferior.
2. Com a chave de parafusos desaperte o parafuso
no suporte da lâmina superior e retire a lâmina
superior a.
3. Coloque uma nova lâmina superior a e aperte
ligeiramente o parafuso do suporte.
4. Coloque a lâmina superior a de forma a que
a sua aresta sobreponha a aresta da lâmina
inferior p em 0,5-1,0 mm.
5. Aperte agora bem o suporte da lâmina superior a
e feche a tampa da frente 8.
lâmina superior a
lâmina inferior p
Chave de parafusos
IB_KH4300_33077_LB5.qxd 02.06.2009 16:52 Uhr Seite 37

- 38 -
Chulear com malhas apertadas
e largas com três linhas
Esta máquina pode ser mudada de quatro linhas
para três ao chulear.
Remova a agulha direita ou a esquerda (ver capítulo
"Substituição da agulha") e a respectiva linha.
Agora a máquina está pronta para chulear com
três linhas.
No caso de aplicação única da agulha direita,
o comprimento do ponto é de 4 mm.
No caso de aplicação única da agulha esquerda,
o comprimento do ponto é de 6 mm.
Funcionamento com braço móvel
O funcionamento de braço móvel é especialmente
adequado para coser pernas de calças, mangas,
punhos etc.
Remova o apoio do braço 9, tal como indicado
na figura, para alternar entre o funcionamento
plano e o de braço móvel.
Ajustar o calcador
O calcador o especial encontra-se ajustado na posi-
ção. No parafuso de cabeça escariada à frente no
calcador o para funcionamento normal de chulear.
Se coser uma bainha aberta, basta soltar um pouco
o parafuso grande e apertar o pino pequeno, saliente
no lado esquerdo do calcador, até encostar. Agora
encontra-se a letra R no parafuso.
IB_KH4300_33077_LB5.qxd 02.06.2009 16:52 Uhr Seite 38

- 39 -
Bainha aberta e debruar
Para estes trabalhos proceda da seguinte forma:
1. No capítulo "Ajustar o calcador" leia as instruções
sobre como ajustar o calcador o.
2. Gire a roda manual 6 para si até as agulhas
se encontrarem na posição superior.
3. Abra a tampa da frente 8 e remova a agulha
esquerda (ver capítulo Substituir agulhas).
4. Ajuste o comprimento do ponto para 1,0 - 2,0 mm.
Tenha em atenção que a roda de ajuste para
transporte do tecido u fica posicionada em “N”.
5. Ajuste a largura de corte, tal como descrito no
capítulo "Largura de corte".
6. Se não estiver enfiada nenhuma linha, enfie
agora uma linha nova.
7. Coloque o tecido por baixo do calcador o
e comece a coser.
Nota:
Verifique sempre os ajustes do comprimento do
ponto e da tensão da linha num pedaço de tecido
primeiro, antes de começar a coser a peça em si.
Nota:
Lembre-se de repor o calcador o especial à posição
de costura normal (chulear) depois de terminar
a costura de bainhas.
Pino
Coser bainhas abertas
Ao costurar bainhas abertas, os laços da linha da
lançadeira superior devem ser puxados para a parte
inferior do tecido. Isto é possível ajustando a tensão
da linha, tal como descrito no capítulo "Ajuste da
tensão da linha".
Coser cantos estreitos
Se pretender coser tecidos muito finos ou leves,
escolha uma tensão da linha adequada, como des-
crito no capítulo "Ajuste da tensão da linha".
linha
da
lançadeira
inferior
linha
da
lançadeira
superior
Linha da agulha
linha da
lançadeira inferior
linha
da lançadeira superior
IB_KH4300_33077_LB5.qxd 02.06.2009 16:52 Uhr Seite 39

- 40 -
Importante: Se necessário, ajuste o comprimento do
ponto e a largura do corte.
Bainhas abertas
Debruar
Transporte de tecido
Através do transporte de tecido evitam-se costuras
onduladas em tecidos bordados, bem como o deslizar
das camadas de tecido. Também as costuras em
tecidos muito leves não fazem dobras.
Modo de funcionamento
A máquina possui dois conjuntos de barras denteadas
de avanço, uma à frente e outra atrás. Estes dois
conjuntos deslocam-se independentemente entre si.
Através do transporte do tecido é possível mover os
dois conjuntos de barras denteadas a diferentes ve-
locidades.
As barras denteadas de avanço descrevem um
movimento elíptico, transportando assim o tecido:
Ajuste do transporte do tecido
O transporte de tecido é ajustado rodando a roda
de ajuste para transporte do tecido u na direcção
pretendida.
"N" ="Posição neutra", as barras denteadas de
avanço deslocam o tecido uniformemente
para a frente.
"G" ="Posição Gather" (Gather = Franzir), o conjunto
dianteiro de barras denteadas de avanço faz
o tecido avançar mais rapidamente do que
o conjunto traseiro. Assim o tecido elástico
não é esticado.
"S" ="Posição Strech", o conjunto traseiro de barras
denteadas faz o tecido avançar mais rapidamente
do que o conjunto dianteiro. Assim o conjunto
dianteiro de barras denteadas mantém o tecido
esticado.
O transporte de tecido também pode ser ajustado
durante a costura.
atrás à frente
IB_KH4300_33077_LB5.qxd 02.06.2009 16:52 Uhr Seite 40

- 41 -
Cantos irregulares de bordados
e alisamentos
Para obter cantos planos precisos ao coser peças
elásticas com bordados, o conjunto dianteiro de
barras denteadas deve mover-se mais rapidamente
do que o traseiro, para que a peça não seja esticada.
Também para alisar o conjunto dianteiro de barras
denteadas deve trabalhar mais rapidamente do que
o traseiro. Devido a comprimentos do ponto maiores
o tecido fica ligeiramente liso. Ajuste o transporte de
tecido para "G".
Esticar para evitar pregas
Para evitar que as costuras formem dobras ao costurar
tecidos muito leves ou nylon fino, as barras denteadas
de avanço traseiras devem deslocar-se mais rapida-
mente do que as dianteiras. Assim, as barras dente-
adas dianteiras mantêm o tecido esticado, para
que este não franza. Ajuste o transporte de
tecido para "S".
IB_KH4300_33077_LB5.qxd 02.06.2009 16:52 Uhr Seite 41

- 42 -
Resolução de problemas
Problema Causa Resolução
Agulhas partem
• As agulhas estão tortas, gastas
ou danificadas nas pontas.
• Coloque agulhas novas.
• As agulhas não foram
correctamente colocadas.
• Coloque as agulhas correctamente
no suporte.
• Puxou o tecido com demasiada
força
• Guie o tecido cuidadosamente
com ambas as mãos.
A linha parte
• Linha não está bem enfiada. • Enfie a linha correctamente.
• A linha está demasiado tensionada. • Diminua a tensão da linha.
• As agulhas não foram correcta-
mente colocadas.
• Coloque as agulhas correctamente
no suporte.
Falham pontos
• As agulhas estão tortas, gastas
ou danificadas nas pontas.
• Coloque agulhas novas.
• As agulhas não foram correcta-
mente colocadas.
• Coloque as agulhas correctamente
no suporte.
• Linha não está bem enfiada. • Verifique o decorrer de cada linha.
• Foram colocadas agulhas erradas.
• Utilize as agulhas correctas
(HA x 1 ou 130/705H)
Os pontos são irregulares
• A tensão da linha não está
correcta.
• Corrija a tensão da linha.
• A linha está presa. • Verifique o decorrer de cada linha.
As costuras ficam franzidas
• A linha está demasiado tensionada. • Reajuste a tensão da linha.
• Linha não está bem enfiada. • Enfie a linha correctamente.
• Linha está presa. • Verifique o decorrer de cada linha.
• Transporte de tecido não está
ajustado.
• Ajuste o transporte de tecido para
"S".
O tecido não é cortado de
forma limpa
• A lâmina superior a está gasta
ou mal colocada.
• Substitua a lâmina a ou coloque-a
correctamente.
A extremidade do tecido
franze
• Demasiado tecido num ponto. • Altere a largura da costura.
IB_KH4300_33077_LB5.qxd 02.06.2009 16:52 Uhr Seite 42

- 43 -
Limpeza e conservação
Atenção:
Desligue sempre a ficha de rede j da tomada
antes de limpar ou lubrificar a máquina.
Existe perigo de um choque eléctrico.
Para que a sua máquina funcione na perfeição,
deve limpá-la regularmente com o pincel.
Esta máquina necessita de muito pouco óleo, visto
os componentes principais serem fabricados num
material especial.
Lubrifique apenas ocasionalmente os pontos indicados:
Armazenamento
Atenção:
Desligue sempre a ficha de rede j da tomada
antes de guardar a máquina.
Isto impede um arranque inadvertido do aparelho.
Quando não utilizar a máquina, tape-a sempre
com a cobertura. Desta forma protege a máquina
contra o pó. Guarde a máquina num local seco
e limpo.
Eliminação
Nunca deposite o aparelho no lixo
doméstico comum. Este produto está
em conformidade com a Directiva
Europeia 2002/96/EC.
Elimine o aparelho através de uma instituição de
recolha de resíduos autorizada ou através da instituição
de recolha do seu município.
Tenha em consideração os regulamentos actualmente
em vigor.
Em caso de dúvida, entre em contacto com a entidade
de eliminação de resíduos.
Elimine todos os materiais da embalagem
de modo ecológico.
IB_KH4300_33077_LB5.qxd 02.06.2009 16:52 Uhr Seite 43

- 44 -
Garantia e assistência técnica
Este aparelho tem 3 anos de garantia a partir da
data de compra. Este aparelho foi fabricado com
o maior cuidado e testado escrupulosamente antes
da sua distribuição. Guarde o talão como compro-
vativo da compra. Em caso de reclamação de garantia,
entre em contacto com o seu ponto de assistência
técnica por telefone. Apenas deste modo pode ser
garantido um envio gratuito do seu produto.
A garantia abrange apenas defeitos de material e de
fabrico, não incluindo as peças de desgaste ou danos
em peças frágeis, por ex. interruptores ou baterias.
O produto foi concebido apenas para uso privado
e não para uso comercial.
A garantia extingue-se no caso de utilização incorrecta
e de intervenções que não foram efectuadas pelo
nossa filial de assistência técnica autorizada. Os
seus direitos legais não são limitados por esta garantia.
Kompernass Service Portugal
Tel.: 707 780 707
(0,12 EUR por minuto)
e-mail: support.pt@kompernass.com
Importador
KOMPERNASS GMBH
BURGSTRASSE 21
44867 BOCHUM, GERMANY
www.kompernass.com
IB_KH4300_33077_LB5.qxd 02.06.2009 16:52 Uhr Seite 44

- 45 -
CONTENT PAGE
Intended Usage 47
Safety instructions 47
Technical Data 48
Items supplied 48
Description of the appliance 49
Preparation 49
Adjusting the thread tree...............................................................................................................49
Bobbin supports .............................................................................................................................49
Bobbin caps....................................................................................................................................50
Connecting the foot pedal ...........................................................................................................50
Controlling the sewing speed .......................................................................................................50
Safety switch...................................................................................................................................50
Fitting the waste container ............................................................................................................50
Handwheel .....................................................................................................................................50
Front flap.........................................................................................................................................50
Opening the free arm....................................................................................................................51
Threading yarns into the looper ...................................................................................................51
Threading yarns into the needle...................................................................................................52
Trial run ...........................................................................................................................................53
Setting the thread tension 54
Adjusting thread tension on the needle threads ........................................................................55
Adjusting thread tension on the looper threads..........................................................................55
Overview of the machine adjustments.........................................................................................56
Changing threads (binding together) 57
Setting the stitch length 57
Setting the cutting width 58
Exchanging needles 58
Replacing bulbs 59
Exchanging the upper blade 59
IB_KH4300_33077_LB5.qxd 02.06.2009 16:52 Uhr Seite 45

- 46 -
Close and broad sewing with three threads 60
Sewing freehanded 60
Adjusting the sewing foot 60
Hemstitch and edging 61
Sewing hemstitch 61
Sewing narrow edging 61
Differential feed motion 62
Manner of operation.....................................................................................................................62
Setting the differential feed motion ..............................................................................................62
Uneven material edges and smoothness.....................................................................................63
Avoid ruffles by stretching.............................................................................................................63
Troubleshooting 64
Cleaning and care 65
Storage 65
Disposal 65
Warranty and Service 66
Importer 66
Read the operating instructions carefully before using the appliance for the first time and preserve this
booklet for later reference. Pass the manual on to whomsoever might acquire the appliance at a later date.
IB_KH4300_33077_LB5.qxd 02.06.2009 16:52 Uhr Seite 46

- 47 -
OVERLOCK SEWING
MACHINE KH 4300
Intended Usage
This overlock sewing machine is intended ...
– for use as a portable machine,
– for the trimming of material edges (sewing) of
typical household textiles, and ...
– only for domestic household use.
This overlock sewing machine is not intended ...
- to be installed at a permanent location,
– for the processing of other materials (e.g. leather,
canvas, sailcloth and other heavy materials),
- for commercial or industrial use.
Safety instructions
Like any other electrical device, a sewing machine
can cause serious, even life-threatening injuries.
To avoid these, and to work safely:
• Always disconnect the power supply when leaving
the machine unattended. This will prevent the
risk of accidents if the machine is switched on
accidentally.
• First pull the power plug before changing the bulb
or performing maintenance work on the machine.
This will prevent possibly life-threatening electric
shocks.
• Do not pull the plug out of the wall socket by the
lead. When pulling out the plug, always hold the
plug, not the lead.
• Only use the sewing machine in dry rooms.
• Arrange for defective power plugs and/or cables
to be replaced at once by qualified technicians
or our Customer Service Department.
• This appliance is not intended for use by indivi-
duals (including children) with restricted physical,
physio-logical or intellectual abilities or deficien-
ces in experience and/or knowledge unless they
are supervised by a person responsible for their
safety or receive from this person instruction in
how the appliance is to be used.
• Children should be supervised to ensure that
they do not play with the appliance.
• Never use the machine when the ventilation
apertures are blocked. Keep the ventilation
apertures of the machine and the foot switch
free from fluff, dust and waste material.
• Should the cable connected to the foot pedal
become damaged, to avoid potential risks it must
be replaced by the manufacturer, his customers
services or a similarly qualified person.
Warning about injuries and
material damages:
• Keep your work space tidy. An untidy workplace
can lead to accidents.
• Provide adequate lighting when working!
• Do not wear loose clothing or jewellery, as these
can be caught in moving parts. You should also
wear a hair net if you have long hair.
• Avoid adopting an unusual posture. Remain steady
and in a well-balanced position at all times.
• If accidents occur as a result of handling the ma-
chine with insufficient care, or failure to follow
the safety instructions in this manual, then the
manufacturer cannot accept liability.
• Never cover the ventilation slots! Risk of over-
heating!
IB_KH4300_33077_LB5.qxd 02.06.2009 16:52 Uhr Seite 47

- 48 -
Technical Data
Number of threads 4 or 3
Number of needles 2 or 1
Sewing speed 1100 Revs/min
Stitch width 6 mm with 4 threads
6 mm or 4 mm with 3
threads
Stitch length 1 – 5 mm
Needles HA x 1 Nr. 11-14 or
130/705 Nr. 75-90
Power consumption : Motor: 90 W
Bulb: 15 W
Total: 105 W
Rated voltage: 230 V
~
, 50Hz
Protection class: II
Bulb power: 15 W
Bulb voltage: 230 V /
~
50 Hz
Bulb thread: E14 thread
The sound intensity level under normal operating
conditions amounts to 78dB(A).
Foot pedal
Use only the foot pedal originally supplied with this
sewing machine:
- ELECTRONIC FDM Speed Controller
- Type KD-2902
Items supplied
Overlock Sewing Machine
Oil
Waste container
Accessory box
Operating instructions
Replacement
(upper blade)
2 Needles Nr. 11
4 Needles Nr. 14
(2 in the machine,
pre-installed)
4 Bobbin caps
4 Spool pin
(preinstalled)
Allen key
Flat-headed screw-
driver
Covering hood
Pincers
Brush
IB_KH4300_33077_LB5.qxd 02.06.2009 16:52 Uhr Seite 48

- 49 -
Description of the appliance
1 Thread tree
2 Thread tension selector (lower looper)
3 Spool support
4 Cold air intake
5 Connection Footpedal/Power supply
6 Handwheel
7 Power switch (On/Off switch)
8 Front flap
9 Arm support
0 Free arm
q Thread tension selector (left needle)
w Thread tension selector (right needle)
e Thread tension selector (upper looper)
r Thread guide
t Thread guide plate
z Adjustment wheel for stitch length
u Adjustment wheel for differential feed motion
i Adjustment wheel for cutting width
o Sewing foot
p Lower blade
a Upper blade
s Upper looper
d Lower looper
f Release lever PUSH
g Connection plug
h Foot pedal
j Power plug
k Waste container
Preparation
Place the overlock sewing machine on a stable and
level surface. Ensure there is sufficient illumination at
your workplace.
Adjusting the thread tree
Completely withdraw the thread tree 1 before
threading.
Turn the thread tree 1 so that the thread guides
stand exactly above the spool supports 3.
Bobbin supports
Both industrial bobbins and household bobbins can
be used with this machine.
For industrial bobbins with a large diameter place
the bobbins supports in with the broad end to the
top, for bobbins with a small diameter place the
support in with the narrow end to the top.
IB_KH4300_33077_LB5.qxd 02.06.2009 16:52 Uhr Seite 49

- 50 -
Bobbin caps
If using non-industrial thread bobbins, remove the
bobbin supports and place the bobbin caps on the
thread bobbins.
Connecting the foot pedal
Insert the plug of the footpedal g into the connection
for the footpedal 5 and the power plug j into a
mains power socket.
To switch the machine on, press the power switch 7.
Attention!
During absences from the machine or when doing
maintenance work, always remove the plug j from
the mains power socket. Injury hazard!
Controlling the sewing speed
The sewing speed is controlled by means of the
footpedal h. The sewing speed is changed by ap-
plying more or less pressure to the footpedal h.
Safety switch
This machine is fitted with a micro safety switch. You
cannot start the machine if the front flap 8 is open.
Close the front flap 8 before you start to sew.
Fitting the waste container
The waste container k collects remnants during
sewing, so that your workplace stays tidy. Place the
waste container k between the machine and the
table.
Handwheel
Note:
Always turn the handwheel 6 towards yourself,
that is, in the same direction as with a domestic
sewing machine.
Front flap
To open the front flap 8, slide it as far as possible
to the right and, at the same time, draw it towards
yourself.
IB_KH4300_33077_LB5.qxd 02.06.2009 16:52 Uhr Seite 50

- 51 -
Opening the free arm
For threading the yarns the free arm 0 must be
opened.
1. Pull the arm support 9 off to the side.
2. Open the front flap 8.
3. Press the release lever "PUSH" f and, at the
same time, pull the free arm 0 downwards.
Threading yarns into the looper
Attention!
Before starting to thread yarns, ALWAYS place the
power switch 7 at OFF and remove the plug j.
This will prevent an unintentional starting of the ap-
pliance. If you do not, you run a risk of serious injury!
Correct threading is important, so that the stitches
are not irregular and that the yarn does not break.
On the inner side of the front flap 8 there is a guide
to threading. Additionally, the thread guides are
marked in various colours.
In the accessory box you will find pincers, the use
of which helps make threading easier.
Threading takes place in this sequence:
1. First step: Upper looper s (green)
2. Second step: Lower looper d (blue)
3. Third step: Right needle (yellow)
4. Fourth step: Left needle (red)
For simplification, the individual steps are numbered
on the illustrations (1
q
, 2
w
, 3
e
, 4
r
, ...).
1. Open the front flap 8 and free arm 0.
2. Turn the handwheel 6 to yourself until the looper s
is in the most favourable position for threading.
3. Thread the upper and lower looper yarns as
shown.
Thread tree 1 (on the right)
Thread guide r and thread guide plate t
(on the right)
Note:
The yarn must lie correctly between the two discs of
the thread tension selector 2/e.
IB_KH4300_33077_LB5.qxd 02.06.2009 16:52 Uhr Seite 51

- 52 -
Thread tension selector 2 e
4. Pull the end of the thread about 10 cm (4”) out
from the looper eyelet.
5. Lift the sewing foot o and slide the thread under
it; then lower the sewing foot o back down. The
lever for lifting and lowering the sewing foot o
is located at the rear of the machine, above the
sewing lever rod system.
Position the lever to lift the sewing foot o
Thread routing behind the front flap 8
Thread routing on from the thread guide plate 8
Threading yarns into the needle
For simplification, the individual steps are numbered
on the illustrations (1
q
, 2
w
, 3
e
, 4
r
, ...).
1. Turn the handwheel 6 to yourself until the needles
stand fully at the top.
2. Thread the left and right yarns as shown.
Thread tree 1 (on the left)
Thread guide r and thread guide plate t
(on the left)
IB_KH4300_33077_LB5.qxd 02.06.2009 16:52 Uhr Seite 52

- 53 -
Note:
The yarn must lie correctly between the two discs of
the thread tension selector.
Thread tension selector q w
Thread routing on from the thread guide plate 8
further thread routing
3. Guide the yarn, as shown, from front to back
through the eyes of the needles.
4. Pull the end of the thread about 10 cm (4“ )
out from the eyes of the needles. Lift the sewing
foot o and slide the thread under it; then lower
the sewing foot o back down. The lever for lifting
and lowering the sewing foot o is located at the
rear of the machine, above the sewing lever rod
system.
Position the lever to lift the sewing foot o
Trial run
When yarn has been threaded for the first time,
or after a yarn breakage it must be rethreaded,
proceed as follows:
Lift the sewing foot o.
Hold the ends of the threads between the fingertips
of your left hand, slowly turn the handwheel 6 two
or three times towards yourself and then check the
threads once again.
IB_KH4300_33077_LB5.qxd 02.06.2009 16:52 Uhr Seite 53

- 54 -
Lay the material for a trial run under the sewing
foot o and slowly start to sew.
The material will be automatically fed through.
When the task is complete, continue sewing until an
approximately 5cm (2") long length of threads has
formed at the end of the material.
Cut through the threads with scissors.
Setting the thread tension
The thread tension required is variable, being depen-
dant itself on the type and thickness of the thread
and fabric.
Check the seams and then adjust the appropriate
thread tension on the machine.
Tensioning the thread
When you turn the tensioning device to a lower
number, the tension reduces.
When you turn the tensioning device to a higher
number, the tension increases. The wheels of the
tensioning device have the following colours:
Correct thread tension:
Thread, right needle
Thread, left needle
lower looper thread
upper looper thread
Reverse
red
yellow
green
blue
IB_KH4300_33077_LB5.qxd 02.06.2009 16:52 Uhr Seite 54

- 55 -
Adjusting thread tension on the needle
threads
The tread tension on the left needle
is too loose.
Adjust tension on the left thread.
The tread tension on the right needle
is too loose.
Adjust tension on the right thread.
Adjusting thread tension on the looper
threads
The lower looper thread is firm and/or the
upper looper thread is loose.
Loosen the tension of the lower
looper thread and/or tighten the
upper looper thread.
The upper looper thread is firm and/or the
lower looper thread is loose.
Loosen the tension of the upper
looper thread and/or tighten the
lower looper thread.
IB_KH4300_33077_LB5.qxd 02.06.2009 16:52 Uhr Seite 55

- 56 -
Overview of the machine adjustments
The most appropriate thread tension adjustment for one type of material is not necessarily the ideal adjust-
ment for a different material.
The thread tensions required are dictated by the pliability and thickness of the material as well as the type
and thickness of the thread.
When necessary, adjust thread tensions as per this table:
Fabric Thread Needles Stitch length
Thread tension
adjustment
Light:
• Georgette
• Muslin
• Batiste
• Dress fabric
• Crepe de Chine
• Silk
• Cotton
• Polyester
Nr. 80 - 100
HA x 1
Nr. 11
130 / 705H
Nr. 80
2.0 - 3.5 mm
• Standard
2.5 mm
Medium weight:
• Cotton
• Poplin
• Waterproofed
cotton
• Corduroy
• Cotton
• Polyester
Nr. 60 - 100
HA x 1
Nr. 11 - 14
130 / 705H
Nr. 80 - 90
2.0 - 3.5 mm
• Standard
2.5 mm
Heavy:
• Denim
• Tweed
• Velour
• Cotton
• Polyester
Nr. 50 - 80
HA x 1
Nr. 14
130 / 705H
Nr. 90
2.5 - 4.0 mm
• Standard
3 mm
IB_KH4300_33077_LB5.qxd 02.06.2009 16:52 Uhr Seite 56

- 57 -
Changing threads
(binding together)
With the following procedure, changing threads is
quite simple:
1. Cut the yarn above the spindle and knot the
ends of the new and the old thread together.
2. Place the thread tension selector 2/q/w/e
at "0" and lift the sewing foot o.
3. Pull on the other end of the yarn until the knot
passes under the sewing foot o.
4. For threading it in the needle, pull on the other
end until the knot is in the eye of the needle and
then cut the yarn to the left and right of the knot.
Then carry out the rethreading.
Setting the stitch length
The stitch length can be adjusted in nine steps, from
1.0 to 5.0 mm. Almost all overlock work is
carried out with a stitch length of 2.5 – 3.5 mm.
Turn on the inner adjustment wheel for stitch length
z to adjust the stitch length:
Stitch Stitch length
Normal seams
2.0 - 5.0 mm
Standard: 3.0 mm
Narrow edgings 1.0 - 2.0 mm
Hemstitching 1.0 - 2.0 mm
IB_KH4300_33077_LB5.qxd 02.06.2009 16:52 Uhr Seite 57

- 58 -
Setting the cutting width
The appropriate cutting width is, from material to
material, variable. Each time test the seams and
adjust the cutting width as follows:
1. Turn the handwheel 6 towards yourself until the
needles are in the lowest position.
2. Open the front flap 8.
3. Press the lever PUSH f. The free arm 0 lowers
itself and the adjustment wheel for the cutting
width i can be seen.
4. Turn the djustment wheel for the cutting width i.
With this you move the lower blade p. Continue
turning it until the looper threads are lying at the
edge of the material. When you turn in the direc-
tion W (wide), the cutting width is broader.
When you turn in the direction N (narrow), the
cutting width is narrower.
Examples:
Select a narrower cutting width if the material edges
ruffle during sewing. For this, turn the adjustment
wheel for cutting width i to the right (N).
Select a larger cutting width if the yarn is being sewed
beyond the material edge. For this, turn the adjust-
ment wheel for cutting width i to the left (W).
Exchanging needles
Attention!
Before exchanging the needles, remove the power
plug. This prevents an unintended starting of the ma-
chine. If you do not, you run a risk of serious injury!
1. Turn the handwheel 6 towards yourself until the
needles are in the highest position.
2. Open the front flap 8 and lower the sewing
foot o.
3. Loosen the setscrew against the needle with the
Allen key from the accessories box and then re-
move the needle:
- upper left setscrew for the left needle
- lower right setscrew for the right needle.
4. Insert the new needle, with the flat side to the
rear, into the needle mounting. Ensure that the
needle is inserted as far as is possible. Secure
the needle by retightening its setscrew.
When the needles have been correctly fitted, the
left needle stands a little higher than the right needle.
If the needles have not been correctly inserted, stitches
will occasionally be left out when sewing.
This machine is equipped with needles of the type
H.Ax1 (Needle system 130H) (for household ma-
chines).
IB_KH4300_33077_LB5.qxd 02.06.2009 16:52 Uhr Seite 58

- 59 -
Replacing bulbs
Risk of electric shock
When changing bulbs, ALWAYS remove the plug j
from the mains power socket!
1. Remove the small round cover with a needle or
something similar.
2. Unscrew the screw completely.
3. Remove the lamp cover.
4. Exchange the bulb. Use a bulb of the type E14,
15 W.
5. Reassemble all of the parts in reverse order.
Exchanging the upper blade
Attention!
Before changing the blade a, ALWAYS remove the
plug j from the mains power socket. This prevents
an unintended starting of the machine. If you do
not, you run a risk of serious injury!
Note:
The lower blade p is manufactured from a special
material and normally does not need to be exchanged.
Should it at some time become nonetheless damaged,
please make contact with our Customer Services.
To exchange the upper blade a when it has become
blunt:
1. Open the front flap 8 and turn the handwheel 6
towards yourself until the needles are in the lowest
position.
2. Using the screwdriver, loosen the screw on the
upper blade holder and remove the upper
blade a.
3. Insert a new upper blade a and lightly tighten
the screw on the blade holder.
4. Adjust the upper blade a to that its cutting edge
surmounts the cutting edge of the lower blade p
by about 0.5-1.0 mm.
5. Now firmly tighten the setscrew in the holder for
the upper blade a and close the front flap 8.
upper blade a
lower blade p
Screwdriver
IB_KH4300_33077_LB5.qxd 02.06.2009 16:52 Uhr Seite 59

- 60 -
Close and broad sewing with
three threads
When sewing with this machine you can adjust from
four to three threads.
Remove either the left or the right needle (see section
"Exchanging needles") and the appropriate thread.
The machine is now ready for sewing with three
threads.
With exclusive use of the right needle, the stitching
length amounts to 4 mm (0.16“).
With exclusive use of the left needle, the stitching
length amounts to 6 mm (0.24“).
Sewing freehanded
Freehand operation is excellently suited for the
sewing of trouser legs, sleeves and cuffs etc.
Remove the arm support 9, as shown in the illustra-
tion, to change from flatbed to free arm operation.
Adjusting the sewing foot
The special sewing foot o is adjusted to the posi-
tion N on the countersunk screw at the front of the
sewing foot o for normal sewing operations.
Should you wish to sew a hemstitch, simply loosen
the large screw lightly and slide the small pin, which
protudes from the foot to the left, all the way in.
Now the letter R stands on the screw.
IB_KH4300_33077_LB5.qxd 02.06.2009 16:52 Uhr Seite 60

- 61 -
Hemstitch and edging
For these two tasks proceed as follows:
1. In the section "Adjusting the sewing foot" reread
the instructions for adjusting the sewing foot o.
2. Turn the handwheel 6 to yourself until the needles
stand fully at the top.
3. Open the front flap 8 and remove the left needle
(see section " Exchanging needles").
4. Adjust the stitching length to 1.0 - 2.0 mm. Ensure
that the adjustment wheel for the differential
feed motion u is placed at “N”.
5. Adjust the stitching width as described in the sec-
tion “Setting the cutting width”.
6. If a yarn is not threaded, now rethread a new
yarn.
7. Lay your material under the sewing foot o and
start to sew.
Note:
Before you begin to sew on your actual workpiece,
always check the adjustments for stitching length
and thread tension on a material remnant.
Note:
Always remember to return the adjustment for the
sewing foot o from this special to normal operation
(sewing tasks) after the sewing of hems.
Pin
Sewing hemstitch
With the sewing of hemstitches the loops of the upper
looper thread should be pulled back to the underside
of the material. This is achieved by adjustment of the
thread tension, as described in the section "Setting
the thread tension".
Sewing narrow edging
If you wish to sew very thin or light materials, select
a suitable thread tension, as described in the sec-
tion "Setting the thread tension".
lower
looper thread
upper
looper thread
needle thread
lower
looper thread
upper
looper thread
IB_KH4300_33077_LB5.qxd 02.06.2009 16:52 Uhr Seite 61

- 62 -
Important: If necessary, adjust the stitching length
and cutting width.
Hem stitching
Edging
Differential feed motion
With the differential feed motion uneven seams are
avoided in knitted materials, as well as the slippage
of textile positions. Additionally, the seams cause no
wrinkles in very light materials.
Manner of operation
The machine has two sets of toothed rack feeders,
one to the front and one to the rear. Both sets move
independant of each other. Through the differential
feed motion both toothed rack sets can move them-
selves at various speeds.
The toothed transport racks move themselves in an
elliptical motion and thus transport the material:
Setting the differential feed motion
The differential feed motion is adjusted to the de-
sired direction simply by turning the adjustment
wheel for the differential feed motion u.
"N" = "Neutral Position", the toothed rack feeders
move the material forward evenly.
"G" ="Gather Position", the front toothed rack feeders
push the material forward faster than the rear
ones. Thereby, elasticated material is not ex-
tended.
"S" ="Stretch Position", the rear toothed rack feeders
push the material forward faster than the front
ones. Thereby, the front toothed rack feeders
hold the material tautly.
The differential feed motion can also be adjusted
during sewing.
rear front
IB_KH4300_33077_LB5.qxd 02.06.2009 16:52 Uhr Seite 62

- 63 -
Uneven material edges and smoothness
To obtain precise flat edges when sewing elasticated
materials, the front toothed rack feeders must push
forward faster than the rear ones, so that the material
is not stretched. For smoothness the front toothed
rack feeders must also work faster than the rear
ones. With a larger stitching length the material
stays easily smooth. Place the differential feed
motion at "G".
Avoid ruffles by stretching
To avoid seams casting wrinkles in very light materials
or fine nylons, the rear toothed rack feeders must
work faster than the front ones. Thereby the front
toothed rack feeders hold the material taut so that
it does not ruffle. Place the differential feed motion
at "S".
IB_KH4300_33077_LB5.qxd 02.06.2009 16:52 Uhr Seite 63

- 64 -
Troubleshooting
Problem Cause Solution
Needles break
• Needles are bent, blunt or da-
maged at the points.
• Fit new needles.
• Needles are not correctly inserted.
• Insert the needles into the retainers
correctly.
• You have pulled the material too
heftily.
• Carefully guide the material with
both hands.
Thread breaks
• Yarn has not been correctly
threaded.
• Thread the yarn correctly.
• Thread tension is too high. • Reduce the thread tension.
• Needles are not correctly inserted.
• Insert the needles into the retainers
correctly.
Stitches are omitted
• Needles are bent, blunt or da-
maged at the points.
• Fit new needles.
• Needles are not correctly inserted.
• Insert the needles into the retainers
correctly.
• Yarn has not been correctly
threaded.
• Check the course of the individual
threads.
• Incorrect needles are fitted.
• Use the correct needles (HA x 1
or 130/705H)
Stitches are irregular
• Thread tension is not correct. • Correct the thread tension.
• Thread is trapped.
• Check the course of the individual
threads.
Seams cause wrinkles
• Thread tension is too high. • Adjust the thread tension.
• Yarn has not been correctly
threaded.
• Thread the yarn correctly.
• Thread is blocked.
• Check the course of the individual
threads.
• Differential feed motion not
adjusted.
• Place the differential feed motion
at "S".
Material is not cut off cleanly
• Upper blade a is blunt or in-
correctly inserted.
• Change the blade a or insert it
correctly.
Material edges ruffle them-
selves
• Too much material in a stitch. • Alter the seam width.
IB_KH4300_33077_LB5.qxd 02.06.2009 16:52 Uhr Seite 64

- 65 -
Cleaning and care
Attention:
ALWAYS remove the plug j from the mains power
socket before cleaning or lubricating the machine.
Otherwise there is the risk of you receiving an
electric shock!
To ensure that your machine works faultlessly at all
times, it must occasionally be cleaned with a brush.
This machine requires very little lubrication, as the
main components are manufactured from a special
material.
Only occasionally lubricate the designated positions:
Storage
Attention:
ALWAYS remove the plug j from the mains power
socket before storageing the machine.
This prevents an unintended starting of the machine.
When the machine is not in use, always cover it with
the hood. This will protect the machine from dust.
Store the machine at a clean and dry location.
Disposal
Do not dispose of the appliance in your
normal domestic waste. This product is
subject to the provisions of European
Directive 2002/96/EC.
Dispose of the appliance through an approved dis-
posal centre or at your community waste facility.
Observe the currently applicable regulations.
In case of doubt, please contact your waste dispo-
sal centre.
Dispose of all packaging materials in an
environmentally friendly manner.
IB_KH4300_33077_LB5.qxd 02.06.2009 16:52 Uhr Seite 65

- 66 -
Warranty and Service
This appliance comes with a 3 year warranty Purcha-
se date. This appliance has been manufactured with
care and meticulously examined before delivery.
Please retain your receipt as proof of purchase. In
the case of a warranty claim, please make contact
by telephone with our service department. Only in
this way can a post-free despatch for your goods be
assured.
The warranty covers only claims for material and
maufacturing defects, not for wearing parts or for
damage to fragile components, e.g. buttons or bat-
teries. This product is for private use only and is not
intended for commercial applications.
In the event of misuse and improper handling, use of
force and interference not carried out by our autho-
rized service branch, the warranty will become
void. Your statutory rights are not restricted in any
way by this warranty.
DES Ltd
Units 14-15
Bilston Industrial Estate
Oxford Street
Bilston
WV14 7EG
Tel.: 0870/787-6177
Fax: 0870/787-6168
e-mail: support.uk@kompernass.com
Kompernass Service Ireland
Tel: 1850 930 412
(0,082 EUR/Min.)
Standard call rates apply. Mobile operators may vary.
e-mail: support.ie@kompernass.com
Importer
KOMPERNASS GMBH
BURGSTRASSE 21
44867 BOCHUM, GERMANY
www.kompernass.com
IB_KH4300_33077_LB5.qxd 02.06.2009 16:52 Uhr Seite 66

- 67 -
INHALTSVERZEICHNIS SEITE
Bestimmungsgemäßer Gebrauch 69
Sicherheitshinweise 69
Technische Daten 70
Lieferumfang 70
Gerätebeschreibung 71
Vorbereitungen 71
Einstellung des Fadenbaums.........................................................................................................71
Spulenhalterungen.........................................................................................................................71
Spulenkappen ................................................................................................................................72
Fußpedal anschließen ...................................................................................................................72
Steuern der Nähgeschwindigkeit.................................................................................................72
Sicherheitsschalter..........................................................................................................................72
Anbringen des Abfallbehälters.....................................................................................................72
Handrad..........................................................................................................................................72
Frontklappe.....................................................................................................................................72
Freiarm öffnen ................................................................................................................................73
Faden in die Greifer einfädeln .....................................................................................................73
Faden in die Nadeln einfädeln ....................................................................................................74
Probelauf.........................................................................................................................................75
Einstellen der Fadenspannung 76
Einstellung der Fadenspannung auf die Nadelfäden ...............................................................77
Einstellung der Fadenspannung auf den Greiferfäden..............................................................77
Übersicht der Maschineneinstellungen........................................................................................78
Fadenwechsel (zusammenbinden) 79
Einstellung der Stichlänge 79
Schnittbreite einstellen 80
Nadeln austauschen 80
Glühlampen erneuern 81
Oberes Messer auswechseln 81
IB_KH4300_33077_LB5.qxd 02.06.2009 16:52 Uhr Seite 67

- 68 -
Eng- und weitmaschig mit drei Fäden ketteln 82
Freihandnähen 82
Nähfuß verstellen 82
Hohlsaum und Einfassen 83
Hohlsaum nähen 83
Schmale Kanten nähen 83
Differential Transport 84
Funktionsweise................................................................................................................................84
Einstellen des Differentialtransports..............................................................................................84
Ungrade Strickkanten und Glätten...............................................................................................85
Kräuseln vermeiden durch Dehnen..............................................................................................85
Fehlerbehebung 86
Reinigen und Pflege 87
Aufbewahren 87
Entsorgen 87
Garantie und Service 88
Importeur 88
Lesen Sie die Bedienungsanleitung vor der ersten Verwendung aufmerksam durch und heben Sie diese für
den späteren Gebrauch auf. Händigen Sie bei Weitergabe des Gerätes an Dritte auch die Anleitung aus.
IB_KH4300_33077_LB5.qxd 02.06.2009 16:52 Uhr Seite 68

- 69 -
OVERLOCK-
NÄHMASCHINE
KH 4300
Bestimmungsgemäßer
Gebrauch
Die Overlock-Nähmaschine ist vorgesehen ...
– zur Verwendung als ortsveränderliches Gerät,
– zum Einfassen von Stoffrändern (Ketteln) von
haushaltsüblichen Textilien und ...
– nur zur Verwendung im privaten Hausgebrauch.
Die Nähmaschine ist nicht vorgesehen ...
– zur ortsfesten Aufstellung,
– zur Verarbeitung von anderen Materialien (z. B.
Leder, Zelt-, Segel- und ähnlich schwere Stoffe),
– für eine Verwendung in gewerblichen oder indu-
striellen Bereichen.
Sicherheitshinweise
Bei einer Nähmaschine kann man sich wie mit je-
dem anderen Elektrogerät verletzen und in Lebens-
gefahr geraten. Um dies zu vermeiden und um
sicher zu arbeiten:
• Ziehen Sie stets den Netzstecker, wenn Sie die
Maschine verlassen. Damit verhindern Sie Un-
fallgefahr durch versehentliches Einschalten.
• Ziehen Sie erst den Netzstecker, bevor Sie die
Glühlampe tauschen oder Wartungsarbeiten an
der Maschine vornehmen. Damit verhindern Sie
Lebensgefahr durch elektrischen Schlag.
• Ziehen Sie den Netzstecker nicht am Kabel aus
der Steckdose. Fassen Sie beim Herausziehen
den Stecker und nicht das Kabel an.
• Verwenden Sie die Nähmaschine immer nur in
trockenen Räumen.
• Lassen Sie beschädigte Netzstecker oder Netz-
kabel sofort von autorisiertem Fachpersonal
oder dem Kundenservice austauschen, um Ge-
fährdungen zu vermeiden.
• Dieses Gerät ist nicht dafür bestimmt, durch Per-
sonen (einschließlich Kinder) mit eingeschränk-
ten physischen, sensorischen oder geistigen Fä-
higkeiten oder mangels Erfahrung und/oder
mangels Wissen benutzt zu werden, es sei denn,
sie werden durch eine für ihre Sicherheit zustän-
dige Person beaufsichtigt oder erhielten von ihr
Anweisungen, wie das Gerät zu benutzen ist.
• Kinder sollten beaufsichtigt werden, um sicherzu-
stellen, dass sie nicht mit dem Gerät spielen.
• Betreiben Sie die Maschine niemals mit blockier-
ten Belüftungsöffnungen. Halten Sie die Belüf-
tungsöffnungen der Maschine sowie den Fußpe-
dal frei von Fusseln, Staub und Stoffabfällen.
• Wenn die Anschlussleitung, die mit dem Fußpe-
dal verbunden ist, beschädigt ist, muss sie durch
den Hersteller oder seinen Kundendienst oder
eine ähnliche qualifizierte Person ersetzt werden,
um Gefährdungen zu vermeiden.
Warnung vor Verletzungen und
Sachschäden:
• Halten Sie Ihren Arbeitsbereich in Ordnung. Un-
ordnung im Arbeitsbereich kann Unfälle zur Fol-
ge haben.
• Sorgen Sie für gute Beleuchtung beim Arbeiten!
• Tragen Sie keine weite Kleidung oder Schmuck,
weil diese von beweglichen Teilen erfasst wer-
den können. Tragen Sie deshalb bei langen
Haaren auch ein Haarnetz.
• Vermeiden Sie eine unnormale Körperhaltung.
Sorgen Sie für sicheren Halt und jederzeitiges
Gleichgewicht.
• Wenn Unfälle auf mangelnde Sorgfalt im Um-
gang mit dem Gerät zurück zu führen sind oder
die Sicherheitshinweise in der Anleitung nicht be-
achtet wurden, haftet der Hersteller nicht für sol-
che Schäden.
• Verdecken Sie niemals die Lüftungsschlitze!
Überhitzungsgefahr!
IB_KH4300_33077_LB5.qxd 02.06.2009 16:52 Uhr Seite 69

- 70 -
Technische Daten
Anzahl der Fäden 4 oder 3
Anzahl der Nadeln 2 oder 1
Nähgeschwindigkeit 1100 U/min
Stichbreite 6 mm bei 4 Fäden
6 mm oder 4 mm bei 3
Fäden
Stichlänge 1 – 5 mm
Nadeln HA x 1 Nr. 11-14 oder
130/705 Nr. 75-90
Leistungsaufnahme: Motor: 90 W
Glühlampe: 15 W
Gesamt: 105 W
Nennspannung: 230 V
~
, 50Hz
Schutzklasse: II
Glühlampe Leistung : 15 W
Glühlampe Spannung : 230 V /
~
50 Hz
Glühlampengewinde : E14-Gewinde
Der Schalldruckpegel unter normalen Betriebsbe-
dingungen beträgt 78dB(A).
Fußpedal
Benutzen Sie mit dieser Nähmaschine nur das mit-
gelieferte Fußpedal:
- ELECTRONIC FDM Speed Controller
- Typ KD-2902
Lieferumfang
Overlock-Nähmaschine
Öl
Abfallbehälter
Zubehörbox
Bedienungsanleitung
Ersatzmesser (oben)
2 Nadeln Nr. 11
4 Nadeln Nr. 14
(2 in der Maschine vor-
installiert)
4 Spulenkappen
4 Spulenhalterungen
(vorinstalliert)
Innensechskantschlüssel
Schlitzschraubendreher
Abdeckhaube
Pinzette
Pinsel
IB_KH4300_33077_LB5.qxd 02.06.2009 16:52 Uhr Seite 70

- 71 -
Gerätebeschreibung
1 Fadenbaum
2 Fadenspannungswähler (unterer Greifer)
3 Spulennadel
4 Lüftungsschlitze
5 Anschluss Fußpedal/Netzanschluss
6 Handrad
7 Netzschalter (On-/Off-Schalter)
8 Frontklappe
9 Armauflage
0 Freiarm
q Fadenspannungswähler (linke Nadel)
w Fadenspannungswähler (rechte Nadel)
e Fadenspannungswähler (oberer Greifer)
r Fadenführung
t Fadenführungsplatte
z Einstellrad Stichlänge
u Einstellrad Differentialtransport
i Einstellrad Schnittbreite
o Nähfuß
p unteres Messer
a oberes Messer
s oberer Greifer
d unterer Greifer
f Entriegelungshebel PUSH
g Verbindungsstecker
h Fußpedal
j Netzstecker
k Abfallbehälter
Vorbereitungen
Stellen Sie die Overlock-Maschine auf eine stabile,
ebene Oberfläche. Achten Sie auf ausreichende Be-
leuchtung an Ihrem Arbeitsplatz.
Einstellung des Fadenbaums
Ziehen Sie den Fadenbaum 1 vor dem Einfädeln
ganz heraus.
Drehen Sie den Fadenbaum 1 so, dass die Faden-
führungen genau über den Spulennadeln 3 stehen.
Spulenhalterungen
Bei dieser Maschine können sowohl lndustriespulen
als auch Haushaltsspulen verwendet werden.
Bei Industriespulen mit großem Durchmesser setzen
Sie die Spulenhalterung mit dem breiten Ende nach
oben ein, für Spulen mit kleinem Durchmesser set-
zen Sie die Halterung mit dem schmalen Ende nach
oben ein.
IB_KH4300_33077_LB5.qxd 02.06.2009 16:52 Uhr Seite 71

- 72 -
Spulenkappen
Bei Verwendung von nicht-industriellen Garnspulen
entfernen Sie den Spulenhalter und setzen Sie Spu-
lenkappen auf die Garnspulen.
Fußpedal anschließen
Stecken Sie den Stecker des Fußpedals g in den
Anschluss für das Fußpedal 5 und den Netzstecker
j in eine Netzsteckdose.
Um die Maschine einzuschalten, drücken Sie den
Netzschalter 7.
Achtung!
Beim Verlassen der Maschine oder vor Wartungsar-
beiten, ziehen Sie immer den Netzstecker j aus
der Steckdose heraus. Verletzungsgefahr!
Steuern der Nähgeschwindigkeit
Die Nähgeschwindigkeit wird über das Fußpedal
h gesteuert. Die Nähgeschwindigkeit kann da-
durch verändert werden, dass man mehr oder weni-
ger Druck auf das Fußpedal h ausübt.
Sicherheitsschalter
Diese Maschine ist mit einem Mikro-Sicherheits-
schalter ausgestattet. Sie können die Maschine nicht
starten, wenn die Frontklappe 8 offen steht. Schlie-
ßen Sie die Frontklappe 8, bevor Sie zu nähen be-
ginnen.
Anbringen des Abfallbehälters
Der Abfallbehälter k fängt beim Nähen Schnittgut
auf, so dass lhr Arbeitsplatz sauber bleibt. Stellen
Sie den Abfallbehälter k zwischen Maschine und
Tisch auf.
Handrad
Hinweis:
Drehen Sie das Handrad 6 immer nur zu sich hin,
also in der gleichen Richtung wie bei einer Haus-
haltsnähmaschine.
Frontklappe
Um die Frontklappe 8 zu öffnen, schieben Sie sie
so weit wie möglich nach rechts und ziehen Sie sie
gleichzeitig zu sich hin.
IB_KH4300_33077_LB5.qxd 02.06.2009 16:52 Uhr Seite 72

- 73 -
Freiarm öffnen
Zum Einfädeln der Fäden, müssen Sie den Freiarm
0 öffnen.
1. Ziehen Sie die Armauflage 9 zur Seite ab.
2. Öffnen Sie die Frontklappe 8.
3. Drücken Sie den Entriegelungshebel „PUSH“ f
und ziehen Sie gleichzeitig den Freiarm 0 nach
unten.
Faden in die Greifer einfädeln
Achtung!
Stellen Sie vor dem Einfädeln den Netzschalter 7
immer auf OFF (aus) und ziehen Sie den Netz-
stecker j. Dies verhindert ein unbeabsichtigtes
Starten des Gerätes. Ansonsten besteht Verletzungs-
gefahr!
Richtiges Einfädeln ist wichtig, damit die Stiche nicht
unregelmäßig werden und der Faden nicht abreißt.
Auf der lnnenseite der Frontklappe 8 befindet sich
eine Anleitung zum Einfädeln. Zusätzlich sind die
Fadenführungen verschiedenfarbig gekennzeichnet.
In der Zubehörbox befindet sich eine Pinzette, mit
der das Einfädeln einfacher geht.
Das Einfädeln geschieht in dieser Reihenfolge:
1. Erster Schritt: Oberer Greifer s (grün)
2. Zweiter Schritt: Unterer Greifer d (blau)
3. Dritter Schritt: Rechte Nadel (gelb)
4. Vierter Schritt: Linke Nadel (rot)
Zur Vereinfachung sind die einzelnen Schritte auf den
Abbildungen nummeriert (1
q
, 2
w
, 3
e
, 4
r
, ...).
1. Öffnen Sie Frontklappe 8 und Freiarm 0.
2. Drehen Sie das Handrad 6 zu sich hin, bis sich
der Greifer s in der günstigsten Stellung zum
Einfädeln befindet.
3. Führen Sie oberen und unteren Greiferfaden,
wie abgebildet, ein.
Fadenbaum 1 (rechte Seite)
Fadenführung r und Fadenführungsplatte t
(rechte Seite)
Hinweis:
Der Faden muss korrekt zwischen den beiden Schei-
ben der Fadenspannvorrichtung 2/e liegen.
IB_KH4300_33077_LB5.qxd 02.06.2009 16:52 Uhr Seite 73

- 74 -
Fadenspannungswähler 2e
4. Ziehen Sie das Fadenende etwa 10 cm (4”) aus
den Greiferösen heraus.
5. Heben Sie den Nähfuß o an und schieben Sie
die Fäden darunter; senken Sie dann den Näh-
fuß o wieder ab. Der Hebel zum Anheben und
Absenken des Nähfußes o befindet sich auf der
Rückseite der Machine, oberhalb des Nähge-
stänges.
Position des Hebels zum Anheben des Nähfußes o
Fadenführung hinter der Frontklappe 8
Fadenführung von der Fadenführungsplatte 8 an
Faden in die Nadeln einfädeln
Zur Vereinfachung sind die einzelnen Schritte auf den
Abbildungen nummeriert (1
q
, 2
w
, 3
e
, 4
r
, ...).
1. Drehen Sie das Handrad 6 zu sich hin, bis die
Nadeln ganz oben stehen.
2. Führen Sie rechten und linken Faden, wie abge-
biIdet, ein.
Fadenbaum 1 (linke Seite)
Fadenführung r und Fadenführungsplatte t
(linke Seite)
IB_KH4300_33077_LB5.qxd 02.06.2009 16:52 Uhr Seite 74

- 75 -
Hinweis:
Der Faden muss korrekt zwischen den beiden Schei-
ben der Fadenspannvorrichtung liegen.
Fadenspannungswähler qw
Fadenführung von der Fadenführungsplatte 8 an
weitere Fadenführung
3. Führen Sie das Garn, wie abgebildet, von vorne
nach hinten durch die Nadelöhre.
4. Ziehen Sie das Fadenende etwa 10 cm (4“ ) aus
den Nadelöhren heraus. Heben Sie den Nähfuß
o an und schieben Sie die Fäden darunter; sen-
ken Sie dann den Nähfuß o wieder ab. Der He-
bel zum Anheben und Absenken des Nähfußes
o befindet sich auf der Rückseite der Machine,
oberhalb des Nähgestänges.
Position des Hebels zum Anheben des Nähfußes o
Probelauf
Wenn zum ersten Mal Garn eingefädelt wird oder
nach einem Fadenriss Garn neu eingefädelt werden
muss, gehen Sie wie folgt vor:
Heben Sie den Nähfuß o an.
Halten Sie die Fadenenden zwischen den Finger-
spitzen der linken Hand, drehen Sie das Handrad
6 langsam zwei-oder dreimal zu sich hin und prü-
fen Sie den Faden erneut.
IB_KH4300_33077_LB5.qxd 02.06.2009 16:52 Uhr Seite 75

- 76 -
Legen Sie den Stoff für einen Probelauf unter den
Nähfuß o und beginnen Sie langsam zu nähen.
Der Stoff wird automatisch zugeführt.
Nach beendeter Arbeit nähen Sie weiter, bis sich
eine etwa 5cm (2") lange Fadenkette am Ende des
Stoffes gebildet hat.
Durchschneiden Sie die Fäden mit einer Schere.
Einstellen der Fadenspannung
Die benötigte Fadenspannung ändert sich je nach
Art und Dicke von Faden und Stoff .
Prüfen Sie die Nähte und stellen Sie an der Maschi-
ne die Fadenspannung entsprechend ein.
Fadenspannung
Drehen Sie die Spannvorrichtung auf eine niedrige-
re Zahl, die Spannung wird geringer.
Drehen Sie die Spannvorrichtung auf eine höhere
Zahl, die Spannung wird höher. Die Räder der
Spannvorrichtung haben folgende Farben:
Richtige Fadenspannung:
Faden rechte Nadel
Faden linke Nadel
unterer Greiferfaden
oberer Greiferfaden
Rückseite
rot
gelb
grün
blau
IB_KH4300_33077_LB5.qxd 02.06.2009 16:53 Uhr Seite 76

- 77 -
Einstellung der Fadenspannung auf
die Nadelfäden
Die Fadenspannung auf der linken Nadel
ist zu locker.
Spannen Sie den linken Faden nach.
Die Fadenspannung auf der rechten Nadel
ist zu locker.
Spannen Sie den rechten Faden nach.
Einstellung der Fadenspannung auf
den Greiferfäden
Der untere Greiferfaden ist fest und/oder der
obere Greiferfaden ist locker.
Lockern Sie die Spannung des unteren
Greiferfadens und/oder straffen Sie den
oberen Greiferfaden.
Der obere Greiferfaden ist fest und/oder der
untere Greiferfaden ist locker.
Lockern Sie die Spannung des oberen
Greiferfadens und/oder straffen Sie den
unteren Greiferfaden.
IB_KH4300_33077_LB5.qxd 02.06.2009 16:53 Uhr Seite 77

- 78 -
Übersicht der Maschineneinstellungen
Die günstigste Einstellung der Fadenspannung für einen Stoff muss nicht unbedingt für einen anderen Stoff
richtig sein.
Die erforderliche Fadenspannung richtet sich nach Steifigkeit und Dicke des Stoffes sowie nach Art und
Dicke des Fadens.
Wenn erforderlich, stellen Sie Spannung nach dieser Tabelle ein:
Stoffe Garn Nadeln Stichlänge
Einstellung
Fadenspannung
Leicht:
• Georgette
• Musselin
• Batist
• Kleiderstoff
• Crepe de Chine
• Seide
• Baumwolle
• Polyester
Nr. 80 - 100
HA x 1
Nr. 11
130 / 705H
Nr. 80
2,0 - 3,5 mm
• Standard
2,5 mm
Mittelschwer:
• Baumwolle
• Popelin
• Regenbaumwolle
• Kord
• Baumwolle
• Polyester
Nr. 60 - 100
HA x 1
Nr. 11 - 14
130 / 705H
Nr. 80 - 90
2,0 - 3,5 mm
• Standard
2,5 mm
Schwer:
• Jeans - Stoff
• Tweed
• Velours
• Baumwolle
• Polyester
Nr. 50 - 80
HA x 1
Nr. 14
130 / 705H
Nr. 90
2,5 - 4,0 mm
• Standard
3 mm
IB_KH4300_33077_LB5.qxd 02.06.2009 16:53 Uhr Seite 78

- 79 -
Fadenwechsel
(zusammenbinden)
Nach der folgender Vorgehensweise ist der Faden-
wechsel ganz einfach:
1. Schneiden Sie das Garn über der Fadenspule
ab und knoten Sie die Enden von altem und neu-
em Faden zusammen.
2. Stellen Sie die Fadenspannungswähler
2/q/w/e auf „0“ und heben Sie den Näh-
fuß o an.
3. Ziehen Sie am anderen Ende des Garn, bis die
Knoten unter dem Nähfuß o durchkommen.
4. Beim Einfädeln in die Nadeln ziehen Sie die an-
deren Enden, bis die Knoten in den Nadelöhren
sind und schneiden Sie das Garn links und rechts
der Knoten ab. Fädeln Sie dann neu ein.
Einstellung der Stichlänge
Die Stichlänge kann in neun Schritten von 1,0 bis
5,0 mm eingestellt werden. Fast alle Overlock-Ar-
beiten werden mit einer Stichlänge von
2,5 – 3,5 mm ausgeführt.
Drehen Sie am inneren Einstellrad für die Stichlänge
z, um die Stichlänge einzustellen:
Stiche Stichlänge
Normale Nähte
2.0 - 5.0 mm
Standard: 3.0 mm
Schmale Einfassungen 1.0 - 2.0 mm
Hohlsäume 1.0 - 2.0 mm
IB_KH4300_33077_LB5.qxd 02.06.2009 16:53 Uhr Seite 79

- 80 -
Schnittbreite einstellen
Die geeignete Schnittbreite ist von Stoff zu Stoff ver-
schieden. Prüfen Sie jeweils die Nähte und stellen
Sie die Schnittbreite wie folgt ein:
1. Drehen Sie das Handrad 6 zu Ihnen hin, bis
sich die Nadeln in der untersten Stellung befin-
den.
2. Öffnen Sie Frontklappe 8.
3. Drücken Sie den Hebel PUSH f. Der Freiarm
0 fällt herunter und das Einstellrad für die
Schnittbreite i ist zu sehen.
4. Drehen Sie am Einstellrad für die Schnittbreite
i. Damit bewegen Sie das untere Messer p.
Drehen Sie soweit, bis die Greiferfäden an der
Stoffkante anliegen. Wenn Sie in die Richtung W
(wide) drehen, wird die Schnittbreite breiter.
Wenn Sie in die Richtung N (narrow) drehen,
wird die Schnittbreite geringer.
Beispiele:
Wählen Sie eine geringere Schnittbreite, wenn sich
die Stoffkanten beim Nähen kräuseln. Drehen Sie
dazu das Einstellrad für die Schnittbreite i nach
rechts (N).
Wählen Sie eine größere Schnittbreite, wenn das
Garn über die Stoffkante hinausgenäht wird. Dre-
hen Sie hierzu das Einstellrad für die Schnittbreite
i nach links (W).
Nadeln austauschen
Achtung!
Ziehen Sie vor dem Wechseln der Nadeln den
Netzstecker. Dies verhindert unbeabsichtigtes
Starten des Gerätes. Ansonsten besteht Verletzungs-
gefahr!
1. Drehen Sie das Handrad 6 zu sich hin, bis sich
die Nadeln in oberster Stellung befinden.
2. Öffnen Sie die Frontklappe 8 und senken Sie
den Nähfuß o.
3. Lösen Sie die Klemmschrauben von den Nadeln
mit dem Innensechskantschlüssel aus der Zube-
hörbox und nehmen Sie die Nadeln heraus:
- obere linke Schraube für die linke Nadel
- untere rechte Schraube für die rechte Nadel.
4. Schieben Sie die neue Nadel mit der flachen
Seite nach hinten in die Nadelhalterung. Achten
Sie hierbei darauf, dass sie so weit wie möglich
eingeschoben ist. Drehen Sie die Klemmschrau-
be der Nadel fest.
Wenn die Nadeln richtig eingesetzt worden sind,
steht die linke Nadel ein wenig höher als die rechte.
Wenn die Nadeln nicht richtig eingesetzt wurden,
werden beim Nähen gelegentlich Stiche ausgelas-
sen.
Diese Maschine ist mit Nadeln des Type H.Ax1
(Nadelsystem 130H) ausgestattet (für Haushaltsma-
schinen).
IB_KH4300_33077_LB5.qxd 02.06.2009 16:53 Uhr Seite 80

- 81 -
Glühlampen erneuern
Gefahr eines elektrischen Schlages!
Ziehen Sie immer den Netzstecker j aus der Netz-
steckdose, wenn Sie die Glühlampe wechseln!
1. Entfernen Sie die kleine runde Abdeckung mit ei-
ner Nadel, oder ähnlichem.
2. Drehen Sie die Schraube ganz heraus.
3. Nehmen Sie den Lampenabdeckung ab.
4. Wechseln Sie die Glühlampe aus. Verwenden
Sie ein Leuchtmittel des Types E14, 15 W.
5. Setzen Sie alle Teile in umgekehrter Reihenfolge
wieder zusammen.
Oberes Messer auswechseln
Achtung!
Ziehen Sie immer vor dem Wechseln des Messers
a den Netzstecker j aus der Netzsteckdose. Dies
verhindert ein unbeabsichtigtes Starten des Gerä-
tes. Ansonsten besteht Verletzungsgefahr!
Hinweis:
Das untere Messer p besteht aus speziellem Mate-
rial und braucht normalerweise nicht ausgewechselt
zu werden. Wenn es trotzdem einmal beschädigt
sein sollte, wenden Sie sich bitte an den Kunden-
dienst.
So wechseln Sie das obere Messer a aus, wenn es
stumpf ist:
1. Öffnen Sie die Frontklappe 8 und drehen Sie
das Handrad 6 zu sich hin, bis sich die Nadeln
in der niedrigsten Stellung befinden.
2. Lösen Sie mit dem Schraubendreher die Schrau-
be am oberen Messerhalter und entfernen Sie
das obere Messer a.
3. Setzen Sie ein neues oberes Messer a ein und
ziehen Sie die Schraube der Halterung leicht an.
4. Stellen Sie das obere Messer a so ein, dass sei-
ne Schneide die Schneide des unteren Messers
p um 0,5-1,0 mm überragt.
5. Ziehen Sie nun die Halterung des oberen Mes-
sers a fest an und schließen Sie die Frontklappe
8.
oberes Messer a
unteres Messer p
Schraubendreher
IB_KH4300_33077_LB5.qxd 02.06.2009 16:53 Uhr Seite 81

- 82 -
Eng- und weitmaschig mit drei
Fäden ketteln
Diese Maschine kann man beim Ketteln von vier auf
drei Fäden umstellen.
Entfernen Sie entweder die rechte oder linke Nadel
(siehe Kapitel „Wechseln der Nadel“) und den ent-
sprechenden Faden. Nun ist die Maschine bereit
zum Ketteln mit drei Fäden.
Bei ausschließlichen Einsatz der rechten Nadel be-
trägt die Stichlänge 4 mm (0,16“).
Bei ausschließlichen Einsatz der linken Nadel be-
trägt die Stichlänge 6 mm (0,24“).
Freihandnähen
Freiarmbetrieb eignet sich vorzüglich zum Nähen
von Hosenbeinen, Ärmeln, Manschetten, usw.
Entfernen Sie die Armauflage 9, wie auf der Abbil-
dung gezeigt, um von Flachbett- auf Freiarmbetrieb
zu wechseln.
Nähfuß verstellen
Der spezielle Nähfuß o ist in der Stellung N an
der Senkschraube vorn am Nähfuß o für normalen
Kettelbetrieb eingestellt. Wenn Sie einen Hohlsaum
nähen wollen, lösen Sie einfach die große Schrau-
be leicht und schieben Sie den kleinen Stift, der
links aus dem Fuß heraussteht, bis zum Anschlag.
Jetzt steht der Buchstabe R an der Schraube.
IB_KH4300_33077_LB5.qxd 02.06.2009 16:53 Uhr Seite 82

- 83 -
Hohlsaum und Einfassen
Für diese beiden Arbeiten gehen Sie wie folgt vor:
1. Lesen Sie im Kapitel „Nähfuß verstellen“ die An-
weisungen zum Verstellen des Nähfußes o.
2. Drehen Sie das Handrad 6 zu sich hin, bis die
Nadeln ganz oben stehen.
3. Öffnen Sie die Frontklappe 8 und entfernen Sie
die linke Nadel (siehe Kapitel Nadeln austau-
schen).
4. Stellen Sie die Stichlänge auf 1,0 - 2,0 mm ein.
Bitte achten Sie darauf, dass das Einstellrad für
den Differentialtransport u auf “N” gestellt ist.
5. Stellen Sie die Schnittbreite ein, wie im Kapitel
„Schnittbreite einstellen“ beschrieben.
6. Wenn kein Garn eingefädelt ist, fädeln Sie jetzt
neues ein.
7. Legen Sie lhren Stoff unter den Nähfuß o und
beginnen Sie zu nähen.
Hinweis:
Prüfen Sie die Einstellungen von Stichlänge und Fa-
denspannung zunächst immer an einem Stück Pro-
bestoff, bevor Sie beginnen, das eigentliche Klei-
dungsstück zu nähen.
Hinweis:
Denken Sie immer daran, nach dem Nähen von
Säumen den speziellen Nähfuß o zum normalen
Nähen (Kettelbetrieb) wieder zurück zustellen.
Stift
Hohlsaum nähen
Beim Nähen von Hohlsäumen sollen die Schlingen
des oberen Greiferfadens zur Unterseite des Stoffs
gezogen werden. Dies erreicht man durch Einstellen
der Fadenspannung, wie im Kapitel „Einstellen der
Fadenspannung“ beschrieben.
Schmale Kanten nähen
Wenn Sie sehr dünnen oder leichten Stoff nähen
wollen, wählen Sie eine angemessene Fadenspan-
nung, wie im Kapitel „Einstellen der Fadenspan-
nung“ beschrieben.
unterer
Greiferfaden
oberer
Greiferfaden
Nadelfaden
unterer
Greiferfaden
oberer
Greiferfaden
IB_KH4300_33077_LB5.qxd 02.06.2009 16:53 Uhr Seite 83

- 84 -
Wichtig: Wenn erforderlich, stellen Sie Stichlänge
und Schnittbreite ein.
Hohlsäumen
Einfassen
Differential Transport
Durch den Differentialtransport werden wellige
Nähte in gestrickten Stoffen vermieden, ebenso das
Verrutschen der Stofflagen. Auch werfen die Nähte
in sehr leichtem Stoff keine Falten.
Funktionsweise
Die Maschine hat zwei Sätze von Vorschubzahn-
stangen, einen vorne und einen hinten. Diese bei-
den Sätze bewegen sich unabhängig voneinander.
Durch den Differentialtransport können die beiden
Zahnstangensätze sich mit verschiedenen Ge-
schwindigkeiten bewegen.
Die Vorschubzahnstangen bewegen sich in einer el-
liptischen Bewegung und transportieren so den
Stoff:
Einstellen des Differentialtransports
Der Differentialtransport wird einfach durch Drehen
des Einstellrades für den Differentialtransport u in
die gewünschte Richtung eingestellt.
„N“ =„Neutrale Stellung“, die Vorschubzahnstan-
gen bewegen den Stoff gleichmäßig fort.
„G“ =„Gather Stellung“ (Gather = Kräuseln), der
vordere Vorschubzahnstangensatz schiebt
den Stoff schneller vor, als der hintere. Da-
durch wird elastischer Stoff nicht gestreckt.
„S“ =„Strech-Stellung“, der hintere Vorschubzahn-
stangensatz schiebt den Stoff schneller vor, als
der vordere. Dadurch hält der vordere Vor-
schubzahnstangensatz den Stoff straff.
Der Differentialtransport kann auch während des
Nähens eingestellt werden.
hinten vorne
IB_KH4300_33077_LB5.qxd 02.06.2009 16:53 Uhr Seite 84

- 85 -
Ungrade Strickkanten und Glätten
Um präzise flache Kanten beim Nähen von elasti-
schen Strickwaren zu erhalten, muss der vordere
Zahnstangensatz schneller vorschieben als der hin-
tere, damit das Strickgut nicht gestreckt wird. Auch
zum Glätten muss der vordere Zahnstangensatz
schneller als der hintere arbeiten. Durch größere
Stichlänge bleibt der Strickstoff leicht glatt. Stellen
Sie den Differentialtransport auf „G“ ein.
Kräuseln vermeiden durch Dehnen
Um zu vermeiden, dass die Nähte bei sehr leichtem
Stoff oder feinem Nylon Falten werfen, müssen die
hinteren Vorschubzahnstangen schneller als die vor-
deren arbeiten. Dadurch halten die vorderen Zahn-
stangen den Stoff straff, damit er sich nicht kräuselt.
Stellen Sie den Differentialtransport auf „S“ ein.
IB_KH4300_33077_LB5.qxd 02.06.2009 16:53 Uhr Seite 85

- 86 -
Fehlerbehebung
Problem Ursache Behebung
Nadeln brechen
• Nadeln sind verbogen, stumpf
oder an den Spitzen beschädigt.
• Setzen Sie neue Nadeln ein.
• Nadeln sind nicht richtig einge-
legt.
• Setzen Sie die Nadeln richtig in
die Halterung ein.
• Sie haben zu heftig am Stoff
gezogen
• Führen Sie den Stoff behutsam mit
beiden Händen.
Faden reißt ab
• Garn ist nicht richtig eingefädelt. • Fädeln Sie das Garn richtig ein.
• Fadenspannung ist zu hoch. • Verringern Sie die Fadenspannung.
• Nadeln sind nicht richtig
eingelegt.
• Setzen Sie die Nadeln richtig in
die Halterung ein.
Stiche werden ausgelassen
• Nadeln sind verbogen, stumpf
oder an den Spitzen beschädigt.
• Setzen Sie neue Nadeln ein.
• Nadeln sind nicht richtig einge-
legt.
• Setzen Sie die Nadeln richtig in
die Halterung ein.
• Garn ist nicht richtig eingefädelt.
• Prüfen Sie den Verlauf der
einzelnen Fäden.
• Falsche Nadeln eingelegt.
• Verwenden Sie die richtigen
Nadeln (HA x 1 oder 130/705H)
Stiche sind unregelmäßig
• Fadenspannung ist nicht
korrekt.
• Korrigieren Sie die
Fadenspannung.
• Faden sitzt fest.
• Prüfen Sie den Verlauf der einzel-
nen Fäden.
Nähte werfen Falten
• Fadenspannung ist zu hoch.
• Stellen Sie die Fadenspannung
nach.
• Garn ist nicht richtig
eingefädelt.
• Fädeln Sie das Garn richtig ein.
• Garn hängt fest.
• Prüfen Sie den Verlauf der einzel-
nen Fäden.
• Differentialtransport nicht einge-
stellt.
• Stellen Sie den Differentialtransport
auf „S“ ein.
Stoff wird nicht sauber
abgeschnitten
• Oberes Messer a ist stumpf
oder falsch eingesetzt.
• Wechseln Sie das Messer a aus
oder setzen Sie es richtig ein.
Stoffkanten kräuseln sich • Zuviel Stoff auf einen Stich. • Ändern Sie die Nahtbreite.
IB_KH4300_33077_LB5.qxd 02.06.2009 16:53 Uhr Seite 86

- 87 -
Reinigen und Pflege
Achtung:
Ziehen Sie immer den Netzstecker j aus der
Steckdose bevor Sie die Maschine reinigen oder
ölen. Es besteht die Gefahr eines elektrischen Schla-
ges.
Damit Ihre Maschine einwandfrei arbeitet, müssen
Sie sie gelegentlich mit dem Pinsel reinigen.
Diese Maschine benötigt nur sehr wenig Öl, da die
Hauptkomponenten aus einem speziellen Material
bestehen.
Ölen Sie nur gelegentlich an den bezeichneten Stel-
len:
Aufbewahren
Achtung:
Ziehen Sie immer den Netzstecker j aus der
Steckdose bevor Sie die Maschine verstauen. Dies
verhindert unbeabsichtigtes Starten des Gerätes.
Wenn Sie die Maschine nicht verwenden, decken
Sie sie immer mit der Abdeckhaube ab. So schützen
Sie die Maschine vor Staub. Bewahren Sie die Ma-
schine an einem sauberen und trockenem Ort auf.
Entsorgen
Werfen Sie das Gerät keinesfalls in den
normalen Hausmüll. Dieses Produkt
unterliegt der europäischen Richtlinie
2002/96/EC.
Entsorgen Sie das Gerät über einen zugelassenen
Entsorgungsbetrieb oder über Ihre kommunale
Entsorgungseinrichtung.
Beachten Sie die aktuell geltenden Vorschriften.
Setzen Sie sich im Zweifelsfall mit Ihrer Entsorgungs-
einrichtung in Verbindung.
Führen Sie alle Verpackungsmaterialien
einer umweltgerechten Entsorgung zu.
IB_KH4300_33077_LB5.qxd 02.06.2009 16:53 Uhr Seite 87

- 88 -
Garantie und Service
Sie erhalten auf dieses Gerät 3 Jahre Garantie ab
Kaufdatum. Das Gerät wurde sorgfältig produziert
und vor Anlieferung gewissenhaft geprüft. Bitte be-
wahren Sie den Kassenbon als Nachweis für den
Kauf auf. Bitte setzen Sie sich im Garantiefall mit
Ihrer Servicestelle telefonisch in Verbindung. Nur so
kann eine kostenlose Einsendung Ihrer Ware
gewährleistet werden.
Die Garantieleistung gilt nur für Material- oder Fa-
brikationsfehler, nicht aber für Verschleißteile oder
für Beschädigungen an zerbrechlichen Teilen, z. B.
Schalter oder Akkus. Das Produkt ist lediglich für
den privaten und nicht für den gewerblichen
Gebrauch bestimmt.
Bei missbräuchlicher und unsachgemäßer Behand-
lung, Gewaltanwendung und bei Eingriffen, die
nicht von unserer autorisierten Service-Niederlas-
sung vorgenommen wurden, erlischt die Garantie.
Ihre gesetzlichen Rechte werden durch diese
Garantie nicht eingeschränkt.
Schraven
Service- und Dienstleistungs GmbH
Gewerbering 14
47623 Kevelaer, Germany
Tel.: +49 (0) 180 5 008107
(14 Ct/Min. aus dem dt. Festnetz ggf. abweichende Preise
aus den Mobilfunknetzen)
Fax: +49 (0) 2832 3532
e-mail: support.de@kompernass.com
Kompernaß Service Österreich
Tel.: 0820 899 913 (
0,20 EUR/Min.)
e-mail: support.at@kompernass.com
Kompernaß Service Switzerland
Tel.: 0848 000 525 (
max. 0,0807 CHF/Min.)
e-mail: support.ch@kompernass.com
Importeur
KOMPERNASS GMBH
BURGSTRASSE 21
44867 BOCHUM, GERMANY
www.kompernass.com
IB_KH4300_33077_LB5.qxd 02.06.2009 16:53 Uhr Seite 88
Transcripción de documentos
CV_KH4300_33077_LB5.qxd 02.06.2009 16:21 Uhr Seite 1 5 new Máquina Overlock KH 4300 Máquina Overlock Instrucciones de uso Máquina de costura „Overlock“ Manual de instruções Overlock Sewing Machine Operating instructions Overlock-Nähmaschine Bedienungsanleitung KOMPERNASS GMBH · BURGSTRASSE 21 · D-44867 BOCHUM www.kompernass.com ID-Nr.: KH4300-03/09-V3 CV_KH4300_33077_LB5.qxd 02.06.2009 16:22 Uhr Seite 5 i o p a s d f KH 4300 1 u z q r t w e 2 3 4 0 g 5 9 6 8 7 h j k ÍNDICE PÁGINA Uso conforme al previsto 3 Indicaciones de seguridad 3 Datos técnicos 4 Volumen de suministro 4 Descripción de aparatos 5 Preparativos 5 Ajuste del árbol de hilos..................................................................................................................5 Soportes para bobinas ....................................................................................................................5 Topes de carretes .............................................................................................................................6 Conectar el pedal ............................................................................................................................6 Controlar la velocidad de costura..................................................................................................6 Interruptor de seguridad..................................................................................................................6 Colocar el depósito de residuos.....................................................................................................6 Rueda de mano ................................................................................................................................6 Tapa frontal.......................................................................................................................................6 Abrir el brazo libre...........................................................................................................................7 Enhebrar el hilo en la lanzadera....................................................................................................7 Enhebrar el hilo en la aguja ...........................................................................................................8 Funcionamiento de prueba .............................................................................................................9 Ajustar la tensión del hilo 10 Ajuste de la tensión del hilo en los hilos de las agujas ............................................................11 Ajuste de la tensión del hilo en los hilos de las lanzaderas .....................................................11 Visión general de los ajustes de la máquina ..............................................................................12 Cambio de hilo (anudar) 13 Ajuste de la longitud de puntada 13 Ajustar el ancho de puntada 14 Cambiar las agujas 14 Cambiar la lámpara incandescente 15 Cambiar la cuchilla superior 15 -1- Remallado con tres hilos estrecho o ancho 16 Costura libre 16 Ajustar el prensatelas 16 Vainica y ribeteado 17 Coser vainica 17 Coser bordes finos 17 Transporte diferencial 18 Modo de funcionamiento..............................................................................................................18 Ajuste del transporte diferencial...................................................................................................18 Bordes de tejido de punto y prensado irregulares ....................................................................19 Evitar el fruncido mediante estiramiento......................................................................................19 Eliminación de fallos 20 Cuidado y limpieza 21 Conservación 21 Evacuación 21 Garantía y asistencia técnica 22 Importador 22 ¡Guardar estas instrucciones para preguntas posteriores – e, igualmente entregar éstas, en caso de dar el aparato a terceras personas! -2- MÁQUINA OVERLOCK KH 4300 • En caso de una clavija de red dañada o cable de red dañado, encomiende su sustitución a personal técnico autorizado o al servicio de posventa con el fin de evitar riesgos. • No permita utilizar el aparato a personas (incluidos los niños) cuyas facultades físicas, sensoriales o mentales, así como su falta de conocimientos o de experiencia, les impida hacer un uso seguro del mismo si no están bajo vigilancia o han sido instruidos correctamente acerca del uso del aparato. • Vigile a los niños para asegurarse de que no juegan con el aparato. • Nunca accione la máquina con los orificios de ventilación bloqueados. Mantenga los orificios de ventilación de la máquina, así como el pedal, libre de hilos, polvo y restos de tejido. • Si está dañado el cable de conexión con el que está conectado el pedal, deberá sustituirlo el fabricante, el servicio de atención al cliente o una persona con cualificación similar, para así evitar peligros. Uso conforme al previsto La máquina Overlock está prevista... - para su uso como aparato portátil, – para ribetear bordes de tejidos (remallado) de textiles comunes en el hogar y... – sólo para uso en el ámbito privado del hogar. La máquina de coser no está prevista... - para una instalación fija, – para elaborar otros materiales (por ejemplo, piel, tela de tiendas, velas y tejidos pesados similares), - para utilizar en los ámbitos comercial e industrial. Indicaciones de seguridad Con una máquina de coser pueden sufrirse heridas e incluso peligro de muerte como con cualquier otro aparato eléctrico. Para evitarlo y trabajar de forma segura: Advertencia contra daños personales y materiales: • Mantenga siempre ordenada su zona de trabajo. El desorden en la zona de trabajo puede ser causa de accidentes. • Durante el trabajo procure una buena ventilación. • No lleve ropa suelta ni joyas ya que podrían ser atrapadas por piezas móviles. Por ello también, si tiene el cabello largo, utilice una redecilla para el pelo. • Evite mantener una postura corporal forzada. Mantenga siempre una posición segura y un buen equilibrio. • El fabricante no asume ninguna responsabilidad por los accidentes que puedan producirse debido a falta de precaución al manejar el aparato o por no tenerse en cuenta las instrucciones de seguridad del manual. • ¡No tape nunca las ranuras de ventilación! ¡Peligro de sobrecalentamiento! • Extraiga siempre la clavija de red, cuando deje sola la máquina. De este modo evitará accidentes debido a la conexión imprevista. • Desenchufe primero el conector de red, antes de cambiar la lámpara incandescente o de realizar trabajos de mantenimiento en la máquina. De este modo evitará el peligro de muerte por electrocución. • No extraiga la clavija de red de la base de enchufe tirando del cable. Para sacarla sujete la clavija y no el cable. • Utilice siempre la máquina de coser sólo en espacios secos. -3- Datos técnicos Cantidad de hilos Cantidad de agujas Velocidad de costura Ancho de puntada Longitud de puntada Agujas Consumo de potencia: Tensión nominal: Clase de protección: Potencia de la lámpara incandescente: Tensión de la lámpara incandescente: Rosca de la lámpara incandescente: Volumen de suministro 4o3 2o1 1100 U/min 6 mm con 4 hilos 6 mm o 4 mm con 3 hilos 1 – 5 mm HA x 1 nº 11-14 o 130/705 nº 75-90 Motor: 90 W Lámpara incandescente: 15 W Total: 105 W 230 V ~ , 50Hz II Máquina Overlock Aceite Depósito de residuos Caja de accesorios Instrucciones de uso Cuchilla de repuesto (arriba) 2 agujas del nº 11 4 agujas del nº 14 (2 preinstaladas en la máquina) 4 topes de carretes 15 W 4 soportes para bobinas (preinstalados) 230 V / ~50 Hz rosca E14 Llave macho hexagonal El nivel de presión sonora en condiciones de funcionamiento normales es de 78dB(A). Destornillador de punta plana Pedal Utilice con esta máquina de coser sólo el pedal suministrado: - ELECTRONIC FDM Speed Controller - Tipo KD-2902 Funda de protección Pinza Pincel -4- Descripción de aparatos Preparativos 1 Árbol de hilos 2 Selector de tensión del hilo (lanzadera inferior) 3 Aguja de carrete 4 Ranuras de ventilación 5 Conexión del pedal/conexión de red 6 Rueda de mano 7 Interruptor de red (interruptor On/Off) 8 Tapa frontal 9 Apoyo de brazo 0 Brazo libre q Selector de tensión del hilo (aguja izquierda) w Selector de tensión del hilo (aguja derecha) e Selector de tensión del hilo (lanzadera superior) r Guía del hilo t Placa de la guía del hilo z Rueda de ajuste de la longitud de puntada u Rueda de ajuste del transporte diferencial i Rueda de ajuste del ancho de corte o Prensatelas p Cuchilla inferior a Cuchilla superior s Lanzadera superior d Lanzadera inferior f Palanca de desbloqueo PUSH g Clavija de conexión h Pedal j Clavija de red k Depósito de residuos Coloque la máquina Overlock sobre una superficie estable y plana. Observe que haya suficiente ventilación en su lugar de trabajo. Ajuste del árbol de hilos Despliegue totalmente el árbol de hilos 1 antes del enhebrado. Gire el árbol de hilos 1, de modo que las guías de los hilos se sitúen justamente sobre las agujas de carretes 3. Soportes para bobinas Con esta máquina puede utilizar tanto bobinas industriales como también carretes convencionales. Si utiliza bobinas industriales con diámetros grandes, coloque el soporte para bobinas con el extremo ancho hacia arriba, para bobinas con un diámetro pequeño, coloque el soporte con el extremo pequeño hacia arriba. -5- Topes de carretes Interruptor de seguridad Si utiliza carretes no industriales, retire el soporte para bobinas y coloque el tope para carretes sobre los carretes de hilo. Esta máquina está equipada con un micro-interruptor de seguridad. No puede conectar la máquina, si la tapa frontal 8 está abierta. Cierre la tapa frontal 8 antes de empezar a coser. Colocar el depósito de residuos El depósito de residuos k recoge el material cortado durante la costura, de modo que el puesto de trabajo permanece siempre limpio. Coloque el depósito de residuos k entre la máquina y la mesa. Conectar el pedal Inserte la clavija del pedal g en la conexión para el pedal 5 y la clavija de red j en una base de enchufe. Para conectar la máquina pulse el interruptor de red 7. ¡Cuidado! Si abandona la máquina o antes de realizar trabajos de mantenimiento, extraiga siempre la clavija de red j de la base de enchufe. ¡Peligro de lesiones! Rueda de mano Advertencia: Gire la rueda de mano 6 sólo hacia usted, es decir, en la misma dirección que en una máquina de coser tradicional. Tapa frontal Para abrir la tapa frontal 8, deslícela tanto como sea posible hacia la derecha y, al mismo tiempo, tire de ella hacia usted. Controlar la velocidad de costura La velocidad de costura se controla mediante el pedal h. La velocidad de costura se puede modificar aplicando más o menos presión sobre el pedal h. -6- Es importante que el enhebrado sea correcto para que las puntadas no sean irregulares y no se rompan los hilos. En la parte interior de la tapa frontal 8 se encuentran unas instrucciones para el enhebrado. Adicionalmente, las guías de los hilos están identificadas con diferentes colores. En la caja de accesorios hay unas pinzas, con las que el enhebrado es más sencillo. El enhebrado se realiza en el siguiente orden: 1. Primer paso: Lanzadera superior s (verde) 2. Segundo paso: Lanzadera inferior d (azul) 3. Tercer paso: Aguja derecha (amarillo) 4. Cuarto paso: Aguja izquierda (rojo) Para ofrecer mayor facilidad, cada paso está numerado en las imágenes (1 q, 2 w, 3 e, 4 r, ...). 1. Abra la tapa frontal 8 y el brazo libre 0. 2. Gire la rueda de mano 6 hacia usted, hasta que la lanzadera s se encuentre en la mejor posición para el enhebrado. 3. Guíe los hilos de la lanzadera superior e inferior tal y como se representa. Abrir el brazo libre Para enhebrar los hilos, debe abrir el brazo libre 0. 1. Retire a un lado el apoyo de brazo 9. 2. Abra la tapa frontal 8. 3. Presione la palanca de desbloqueo "PUSH" f y, al mismo tiempo, tire del brazo libre 0 hacia abajo. Árbol de hilos 1 (lado derecho) Enhebrar el hilo en la lanzadera ¡Cuidado! Antes del enhebrado, ponga siempre el interruptor de red 7 en OFF (apagado) y desenchufe la clavija de red j. De este modo se evita la conexión accidental del aparato. ¡De otro modo existe peligro de lesiones! Guía del hilo r/placa de la guía del hilo t (lado derecho) Advertencia: El hilo debe estar correctamente situado entre los dos discos del dispositivo de tensión del hilo 2/e. -7- Selector de tensión del hilo 2/e 4. Saque el extremo del hilo aprox. 10 cm (4”) del ojal de la lanzadera. 5. Levante el prensatelas o y deslice los hilos por debajo; a continuación, vuelva a bajar el prensatelas o. La palanca para levantar y bajar el prensatelas o se encuentra en la parte trasera de la máquina, sobre el varillaje de costura. Guía del hilo desde la placa de la guía del hilo 8 Enhebrar el hilo en la aguja Para ofrecer mayor facilidad, cada paso está numerado en las imágenes (1 q, 2 w, 3 e, 4 r, ...). 1. Gire la rueda de mano 6 hacia usted, hasta que las agujas estén totalmente levantadas. 2. Guíe los hilos de la lanzadera derecha e izquierda tal y como se representa. Posición de la palanca para elevar el prensatelas o Árbol de hilos 1 (lado izquierdo) Guía del hilo detrás de la tapa frontal 8 Guía del hilo r/placa de la guía del hilo t (lado izquierdo) -8- Advertencia: El hilo debe estar correctamente situado entre los dos discos del dispositivo de tensión del hilo. Selector de tensión del hilo q/w 4. Saque el extremo del hilo aprox. 10 cm (4“ ) de los ojos de las agujas. Levante el prensatelas o y deslice los hilos por debajo; a continuación, vuelva a bajar el prensatelas o. La palanca para levantar y bajar el prensatelas o se encuentra en la parte trasera de la máquina, sobre el varillaje de costura. Guía del hilo desde la placa de la guía del hilo 8 Posición de la palanca para elevar el prensatelas o Funcionamiento de prueba Cuando enhebre hilo por primera vez o lo enhebre de nuevo tras una rotura del mismo, proceda de la siguiente manera: Guía del hilo detrás de la tapa frontal 8 Levante el prensatelas o. Sostenga los extremos del hilo con las puntas de los dedos de la mano izquierda, gire la rueda de mano 6 lentamente dos o tres veces hacia usted y compruebe de nuevo el hilo. 3. Guíe el hilo tal como se representa, desde delante hacia atrás, a través de los ojos de las agujas. -9- Ajustar la tensión del hilo La tensión de hilo necesaria cambia en función del tipo y espesor de los hilos y el tejido. Compruebe las costuras y ajuste en la máquina la dureza de hilo correspondiente. Para el funcionamiento de prueba, coloque el tejido bajo el prensatelas o y comience a coser lentamente. El tejido avanza automáticamente. Tensión del hilo Si gira el dispositivo de tensión a una cifra más baja, la tensión disminuye. Si gira el dispositivo de tensión a una cifra más alta, la tensión aumenta. Las ruedas del dispositivo de tensión tienen los siguientes colores: azul verde amarillo rojo Tras finalizar el trabajo, continúe cosiendo hasta formar una cadena de hilo de aprox. 5 cm (2") de longitud en el borde del tejido. Tensión de hilo correcta: Corte los hilos con unas tijeras. hilo de la aguja derecha Dorsal hilo de la aguja izquierda hilo de lanzadera inferior hilo de lanzadera superior - 10 - Ajuste de la tensión del hilo en los hilos de las agujas Ajuste de la tensión del hilo en los hilos de las lanzaderas La tensión del hilo en la aguja izquierda es demasiado holgada. Vuelva a tensar el hilo izquierdo. El hilo de la lanzadera inferior está firme y/ o el hilo de la lanzadera superior está flojo. Reduzca la tensión del hilo de la lanzadera inferior y/o tense el hilo de la lanzadera superior. La tensión del hilo en la aguja derecha es demasiado holgada. Vuelva a tensar el hilo derecho. El hilo de la lanzadera superior está firme y/ o el hilo de la lanzadera inferior está flojo. Reduzca la tensión del hilo de la lanzadera superior y/o tense el hilo de la lanzadera inferior. - 11 - Visión general de los ajustes de la máquina El mejor ajuste de la tensión del hilo para un tejido no tiene por qué ser necesariamente adecuado para otro tejido. La tensión de hilo necesaria depende de la rigidez y espesor del tejido, así como el tipo y espesor del hilo. Si es necesario, ajuste la tensión siguiendo esta tabla: Tejidos Hilo Agujas Longitud de punta- Ajuste de la tensión da del hilo Fino: • Georgette • Muselina • Batista • Tela de ropa • Crepe de Chine • Seda • Algodón • Poliéster Nº 80 - 100 HA x 1 nº 11 130 / 705H Nº 80 2,0 - 3,5 mm • Estándar 2,5 mm Dureza media: • Algodón • Poliéster • Algodón • Popelín • Algodón salvaje Nº 60 - 100 • Pana Grueso: • Tela vaquera • Tweed • Terciopelo • Algodón • Poliéster Nº 50 - 80 HA x 1 Nº 11 - 14 130 / 705H Nº 80 - 90 HA x 1 Nº 14 130 / 705H Nº 90 - 12 - 2,0 - 3,5 mm • Estándar 2,5 mm 2,5 - 4,0 mm • Estándar 3 mm Cambio de hilo (anudar) Ajuste de la longitud de puntada Siguiendo este procedimiento, el cambio de hilo es muy sencillo: La longitud de puntada se puede ajustar en pasos de 1,0 a 5,0 mm. La mayoría de los trabajos Overlock se realizan con una longitud de puntada de 2,5 – 3,5 mm. Gire la rueda de ajuste interna para la longitud de puntada z, para ajustar la longitud de puntada: 1. Corte el hilo sobre el carrete y anude los extremos del hilo antiguo y el nuevo. 2. Ajuste el selector de tensión del hilo 2/q/w/ e a "0" y levante el prensatelas o. 3. Tire del otro extremo del hilo, hasta que los nudos pasen bajo el prensatelas o. 4. Al enhebrar las agujas, tire de los extremos opuestos, hasta que los nudos lleguen a los ojos de las aguas y corte el hilo a la izquierda y derecha de los nudos. A continuación, vuelva a enhebrar. Puntadas Costuras normales Longitud de puntada 2.0 - 5.0 mm Estándar: 3.0 mm Ribeteados pequeños 1.0 - 2.0 mm Vainicas - 13 - 1.0 - 2.0 mm Ajustar el ancho de puntada El ancho de puntada varía en función del tejido. Compruebe cada vez las costuras y ajuste el ancho de puntada de la siguiente manera: 1. Gire la rueda de mano 6 hacia usted, hasta que las agujas se encuentren en la posición más baja. 2. Abra la tapa frontal 8. 3. Presione la palanca PUSH f. El brazo libre 0 cae y se puede ver la rueda de ajuste para el ancho de puntada i. 4. Gire la rueda de ajuste para el ancho de puntada i. De este modo mueve la cuchilla inferior p. Continúe girando hasta que los hilos de las lanzaderas alcancen el borde del tejido. Si gira en la dirección W (wide), el ancho de puntada aumenta. Si gira en la dirección N (narrow), el ancho de puntada disminuye. Ejemplos: Seleccione un ancho de puntada pequeño, si se frunce el borde del tejido durante la costura. Para hacerlo, gire la rueda de ajuste para el ancho de puntada i hacia la derecha (N). Seleccione un ancho de puntada mayor, si durante la costura el hilo sobrepasa el borde del tejido. Para hacerlo, gire la rueda de ajuste para el ancho de puntada i hacia la izquierda (W). Cambiar las agujas ¡Cuidado! Antes de cambiar las agujas, desenchufe la clavija de red. De este modo se evita la conexión no autorizada del aparato. ¡De otro modo existe peligro de lesiones! 1. Gire la rueda de mano 6 hacia usted, hasta que las agujas se encuentren en la posición más alta. 2. Abra la tapa frontal 8 y baje el prensatelas o. 3. Afloje los tornillos de sujeción de las agujas con la llave macho hexagonal de la caja de accesorios y retire las agujas: - tornillo superior izquierdo para la aguja izquierda - tornillo inferior derecho para la aguja derecha. 4. Inserte la aguja nueva con la parte plana hacia atrás en el soporte de la aguja. Al hacerlo, compruebe que la ha introducido tanto como sea posible. Apriete el tornillo de sujeción de la aguja. Si se han colocado correctamente las agujas, la aguja izquierda queda un poco más alta que la derecha. Si no se han colocado correctamente las agujas, se omitirán ocasionalmente puntadas durante la costura. Esta máquina está equipada con agujas del tipo H.Ax1 (sistema de agujas 130H) (para máquinas domésticas). - 14 - Cambiar la lámpara incandescente Advertencia: ¡Riesgo por descarga eléctrica! ¡Retire siempre la clavija de red j de la base de enchufe, cuando cambie la lámpara incandescente! 1. Retire la cubierta pequeña y redonda con una aguja, o algo similar. 2. Extraiga totalmente el tornillo. 3. Retire la cubierta de la lámpara. La cuchilla p inferior está compuesta de un material especial y normalmente no será necesario cambiarla. Si a pesar de ello resultase dañada en algún momento, póngase en contacto con el servicio de atención al cliente. De este modo puede cambiar la cuchilla a inferior, si está desafilada: 1. Abra la tapa frontal 8 y gire la rueda de mano 6 hacia usted, hasta que las agujas se encuentren en la posición más baja. 2. Con el destornillador, afloje el tornillo situado en el soporte de cuchilla superior y retire la cuchilla superior a. Destornillador cuchilla superior a 4. Cambie la lámpara incandescente. Utilice una bombilla del tipo E14, 15 W. 5. Vuelva a montar todas las piezas en orden inverso. Cambiar la cuchilla superior cuchilla inferior p 3. Coloque una cuchilla superior a nueva y apriete un poco el tornillo del soporte. 4. Ajuste la cuchilla superior a de modo que su filo sobrepase en 0,5-1,0 mm el filo de la cuchilla inferior p. 5. Apriete ahora el soporte de la cuchilla superior a y cierre la tapa frontal 8. ¡Cuidado! Antes de cambiar la cuchilla a extraiga siempre la clavija de red j de la base de enchufe. De este modo se evita la conexión no autorizada del aparato. ¡De otro modo existe peligro de lesiones! - 15 - Remallado con tres hilos estrecho o ancho Esta máquina se puede ajustar para la costura de remallado con cuatro a tres hilos. Retire la aguja derecha o izquierda (véase capítulo "Cambiar la aguja") y el hilo correspondiente. Ahora la máquina está preparada para la costura de remallado con tres hilos. Costura libre El modo de funcionamiento con brazo libre es especialmente adecuado para coser piernas de pantalones, mangas, puños, etc. Retire el apoyo de brazo 9, como se muestra en la imagen, para cambiar del modo de funcionamiento de base plana al de brazo libre. Si sólo se emplea la aguja derecha, la longitud de puntada es de 4 mm (0,16“). Si sólo se emplea la aguja izquierda, la longitud de puntada es de 6 mm (0,24“). Ajustar el prensatelas El prensatelas o especial, en el ajuste N en el tornillo avellanado situado delante del prensatelas o, está ajustado para el funcionamiento de costura de remallado normal. Si desea coser una vainica, afloje el tornillo grande un poco y deslice la pequeña clavija que sobresale del pie a la izquierda, hasta el tope. Ahora puede ver la letra R en el tornillo. - 16 - Coser vainica Al coser vainicas, los lazos del hilo de la lanzadera superior deben llevarse hacia la parte inferior del tejido. Esto se logra ajustando la tensión del hilo, del modo descrito en el capítulo "Ajustar la tensión del hilo". Pasador hilo de lanzadera inferior Vainica y ribeteado Proceda de la siguiente manera para realizar estos trabajos: 1. Lea las instrucciones para ajustar el prensatelas o recogidas en el capítulo "Ajustar el prensatelas". 2. Gire la rueda de mano 6 hacia usted, hasta que las agujas estén totalmente levantadas. 3. Abra la tapa frontal 8 y retire la aguja izquierda (véase capítulo Cambiar las agujas). 4. Ajuste la longitud de puntada a 1,0 - 2,0 mm. Compruebe que la rueda de ajuste del trasporte diferencial u está ajustada en “N”. 5. Ajuste el ancho de puntada como se describe en el capítulo "Ajustar el ancho de puntada". 6. Si no hay ningún hilo enhebrado, enhebre ahora uno. 7. Coloque el tejido bajo el prensatelas o y comience a coser. hilo de lanzadera superior Coser bordes finos Si desea coser tejidos muy finos o ligeros, seleccione una tensión del hilo adecuada, como se describe en el capítulo "Ajustar la tensión del hilo". Hilo de la aguja hilo de lanzadera superior Advertencia: En primer lugar compruebe los ajustes de la longitud de puntada y la tensión del hilo siempre en una pieza de tejido de prueba, antes de empezar a coser la pieza real. hilo de lanzadera inferior Advertencia: Después de la costura de dobladillos, recuerde volver a colocar el prensatelas o especial para la costura normal (funcionamiento de costura de remallado). - 17 - Importante: Si es necesario, ajuste la longitud de puntada y el ancho de puntada. Vainicas Transporte diferencial Con el transporte diferencial se evitan las costuras onduladas en los tejidos de punto, así como el corrimiento de las capas de tejido. Además, las costuras en tejidos muy ligeros no provocan arrugas. Modo de funcionamiento Ribeteado La máquina tiene dos juegos de varillas dentadas de avance, uno delante y otro detrás. Estos dos juegos se mueven con independencia el uno del otro. Con el transporte diferencial, los dos juegos de varillas dentadas se pueden mover con diferentes velocidades. Al moverse, las varillas dentadas de avance forman un movimiento elíptico y transportan de esta manera el tejido: atrás delante Ajuste del transporte diferencial El transporte diferencial se ajusta girando la rueda de ajuste para el transporte diferencial u en la dirección deseada. "N" ="Posición neutra", las varillas dentadas de avance mueven el tejido regularmente hacia delante. "G" ="Posición Gather" (Gather = fruncir), el juego de varillas dentadas de avance delantero empuja el tejido más rápido que el trasero. De este modo, el tejido elástico no se estira. "S" ="Posición Strech", el juego de varillas dentadas trasero empuja el tejido más rápido que el delantero. De este modo, el juego de varillas dentadas delantero mantiene el tejido tenso. El transporte diferencial se puede ajustar también durante la costura. - 18 - Bordes de tejido de punto y prensado irregulares Pata mantener bien lisos los bordes durante la costura de productos de punto elásticos, el juego de varillas dentadas delantero debe empujar más rápido que el trasero, para que el producto de punto no se estire. También para los prensados el juego de varillas dentadas delantero debe trabajar más rápido que el trasero. Con longitudes de puntada grandes, el tejido de punto permanece liso. Ajuste el transporte diferencial en "G". Evitar el fruncido mediante estiramiento Para evitar que las costuras en tejidos muy ligeros o nylon ligero produzcan arrugas, las varillas dentadas de avance traseras deben trabajar más rápido que las delanteras. De este modo, las varillas dentadas delanteras mantienen el tejido tenso y evita el fruncido. Ajuste el transporte diferencial en "S". - 19 - Eliminación de fallos Problema Motivo Reparación • Las agujas están torcidas, desafi• Coloque agujas nuevas. ladas o dañadas en las puntas. Las agujas se rompen El hilo se rompe • Las agujas no están correctamente colocadas. • Coloque las agujas correctamente en el soporte. • Ha tirado del tejido con demasiada fuerza • Guíe el tejido cuidadosamente con ambas manos. • El hilo no está correctamente enhebrado. • Enhebre correctamente el hilo. • La tensión del hilo es excesiva. • Disminuya la tensión del hilo. • Las agujas no están correctamente colocadas. • Coloque las agujas correctamente en el soporte. • Las agujas están torcidas, desafi• Coloque agujas nuevas. ladas o dañadas en las puntas. Se omiten puntadas • Las agujas no están correctamente colocadas. • Coloque las agujas correctamente en el soporte. • El hilo no está correctamente enhebrado. • Compruebe el avance de cada hilo. • Las agujas colocadas no son las • Utilice las agujas adecuadas (HA adecuadas. x 1 o 130/705H) Las puntadas no son regulares Las costuras producen arrugas • La tensión del hilo no es correcta. • Corrija la tensión del hilo. • El hilo se atasca. • Compruebe el avance de cada hilo. • La tensión del hilo es excesiva. • Vuelva a ajustar la tensión del hilo. • El hilo no está correctamente enhebrado. • Enhebre correctamente el hilo. • El hilo queda atrapado. • Compruebe el avance de cada hilo. • Transporte diferencial no ajustado. • Ajuste el transporte diferencial en "S". No se produce un corte limpio del tejido • La cuchilla superior a está desafilada o mal colocada. Los bordes del tejido se fruncen • Demasiado tejido en una punta• Cambie el ancho de costura. da. - 20 - • Cambie la cuchilla a o colóquela correctamente. Cuidado y limpieza Evacuación En ningún caso deberá tirar el aparato con la basura doméstica. Este producto está sujeto a la directiva europea 2002/96/EC. Atención: Extraiga siempre la clavija de red j de la base de enchufe antes de limpiar la máquina o engrasarla. ¡Existe riesgo de una descarga eléctrica. Para que la máquina funcione correctamente, debe limpiarla ocasionalmente con el pincel. Esta máquina necesita muy poco aceite, pues los componentes principales están compuestos de un material especial. Aplique aceite sólo ocasionalmente en los lugares indicados: Evacue el aparato en un centro de evacuación autorizado a través de las instalaciones de evacuación comunitarias. Tenga en cuenta las normativas actuales en vigor. En caso de dudas póngase en contacto con su centro de evacuación. El material de embalaje debe desecharse de forma ecológica. Conservación Atención: Extraiga siempre la clavija de red j de la base de enchufe antes de guardar la máquina. De este modo se evita la conexión no autorizada del aparato. Si no va a utilizar la máquina, cúbrala siempre con la funda de protección. Así la protegerá del polvo. Guarde la máquina en un lugar limpio y seco. - 21 - Garantía y asistencia técnica Importador Con este aparato recibe usted 3 años de garantía desde la fecha de compra. El aparato ha sido fabricado cuidadosamente y ha sido probado antes de su entrega. Guarde el comprobante de caja como justificante de compra. Si necesitara hacer uso de la garantía, póngase en contacto por teléfono con su punto de servicio habitual. Éste es el único modo de garantizar un envío gratuito. La garantía cubre los defectos de fabricación o del material, pero no las piezas sujetas a desgaste y los daños sufridos por las piezas frágiles (p. ej. el interruptor o las pilas). El producto ha sido diseñado únicamente para el uso privado y no para el uso comercial. En caso de manipulación indebida e incorrecta, uso de la fuerza y en caso de abrir el aparato personas extrañas a nuestros centros de asistencia técnica autorizados, la garantía pierde su validez. Sus derechos legales no se ven limitados por esta garantía. KOMPERNASS GMBH BURGSTRASSE 21 44867 BOCHUM, (ALEMANIA) www.kompernass.com Kompernass Service España Tel.: 902/884663 e-mail: [email protected] - 22 - ÍNDICE PÁGINA Utilização correcta 25 Indicações de segurança 25 Dados técnicos 26 Volume de fornecimento 26 Descrição do aparelho 27 Preparações 27 Ajuste do passador de linhas .......................................................................................................27 Suportes das bobinas....................................................................................................................27 Capas de bobinas .........................................................................................................................28 Ligar o pedal ..................................................................................................................................28 Controlo da velocidade de costura .............................................................................................28 Interruptor de segurança...............................................................................................................28 Colocação do recipiente para resíduos......................................................................................28 Roda manual ..................................................................................................................................28 Tampa da frente.............................................................................................................................28 Abrir o braço móvel ......................................................................................................................29 Enfiar a linha na lançadeira .........................................................................................................29 Enfiar a linha nas agulhas ............................................................................................................30 Ensaio..............................................................................................................................................31 Ajuste da tensão da linha 32 Ajuste da tensão da linha para linhas da agulha......................................................................33 Ajuste da tensão da linha para linhas da lançadeira ...............................................................33 Vista geral dos ajustes da máquina.............................................................................................34 Mudança da linha (união) 35 Ajuste do comprimento do ponto 35 Ajuste da largura de corte 36 Substituir as agulhas 36 Substituir a lâmpada incandescente 37 Substituir a lâmina superior 37 - 23 - Chulear com malhas apertadas e largas com três linhas 38 Funcionamento com braço móvel 38 Ajustar o calcador 38 Bainha aberta e debruar 39 Coser bainhas abertas 39 Coser cantos estreitos 39 Transporte de tecido 40 Modo de funcionamento ..............................................................................................................40 Ajuste do transporte do tecido .....................................................................................................40 Cantos irregulares de bordados e alisamentos..........................................................................41 Esticar para evitar pregas .............................................................................................................41 Resolução de problemas 42 Limpeza e conservação 43 Armazenamento 43 Eliminação 43 Garantia e assistência técnica 44 Importador 44 Leia cuidadosamente o manual de instruções antes da primeira utilização e guarde-o para consultar posteriormente. Ao entregar o aparelho a terceiros entregue também o manual. - 24 - MÁQUINA DE COSTURA OVERLOCK KH 4300 • No caso de danos, a ficha ou o cabo de rede devem ser imediatamente substituídos por técnicos autorizados ou pela Assistência Técnica, de modo a evitar perigos. • Este aparelho não deve ser utilizado por pessoas (incluindo crianças) com capacidades físicas, sensoriais ou mentais limitadas ou falta de experiência e/ou de conhecimento, a não ser que estas sejam supervisionadas por uma pessoa responsável pela sua segurança ou que desta recebam instruções acerca do funcionamento do aparelho. • As crianças devem ser supervisionadas, de modo a garantir que não brincam com o aparelho. • Nunca utilize a máquina com as aberturas para ventilação bloqueadas. Mantenha as aberturas para ventilação da máquina, assim como o pedal, livres de fios, pó e restos de tecido. • Se o cabo de ligação, unido ao pedal, estiver danificado, deve ser substituído pelo fabricante ou por um serviço de apoio ao cliente ou outra pessoa com qualificação semelhante, de forma a evitar eventuais perigos. Utilização correcta A máquina de costura Overlock destina-se ... - a ser utilizada como aparelho móvel, - a debruar as orlas do tecido (chulear) de têxteis convencionais e ... - apenas ao uso doméstico privado. A máquina de costura não se destina ... - a uma instalação permanente, - à transformação de outros materiais (p. ex. pele, lonas e tecidos pesados semelhantes), - ao uso comercial ou industrial. Indicações de segurança Tal como em qualquer aparelho eléctrico, também se pode ferir numa máquina de costura e colocar a sua vida em perigo. Para o evitar e para trabalhar de forma segura: Aviso: perigo de ferimentos e danos materiais • Retire a ficha da tomada, antes de deixar a máquina sem vigilância. Desta forma, evita acidentes provocados por ligações inadvertidas. • Retire primeiro a ficha de rede, antes de substituir a lâmpada ou de efectuar trabalhos de manutenção na máquina. Assim, não coloca a sua vida em perigo por choque eléctrico. • Não retire a ficha da tomada puxando pelo cabo. Agarre a ficha e não o cabo para a retirar. • Utilize a máquina de costura sempre em espaços secos. • Mantenha o seu local de trabalho em ordem. A desordem no local de trabalho pode provocar acidentes. • Procure trabalhar com uma boa iluminação! • Não use vestuário largo ou ornamentos, porque estes podem ficar presos em peças em movimento. Utilize também, por isso, uma rede para o cabelo. • Evite uma posição do corpo anormal. Garanta uma paragem segura e um equilíbrio contínuo. • Caso ocorram acidentes por descuido no manuseamento do aparelho ou por inobservância das indicações de segurança no manual, o fabricante não se responsabiliza por tais danos. • Nunca tape as ranhuras de ventilação! Perigo de sobreaquecimento! - 25 - Dados técnicos Número de linhas Número de agulhas Velocidade de costura Largura do ponto Comprimento do ponto Agulhas Consumo de energia: Tensão nominal: Classe de protecção: Potênciao da lâmpada incandescente: Tensão da lâmpada incandescente: Rosca da lâmpada incandescente Volume de fornecimento 4 ou 3 2 ou 1 1100 rpm 6 mm com 4 linhas 6 mm ou 4 mm com 3 linhas 1 – 5 mm HA x 1 N.º 11-14 ou 130/705 N.º 75-90 Motor: 90 W Lâmpada incandescente: 15 W Total: 105 W 230 V ~ , 50Hz II Máquina de costura Overlock Óleo Recipiente para resíduos Caixa de acessórios Manual de instruções Lâmina de substituição (superior) 2 agulhas n.º 11 4 agulhas n.º 14 (2 pré-instaladas na máquina) 4 capas de bobinas : 15 W 4 suportes para bobinas (pré-instalados) : 230 V / ~50 Hz : Rosca E14 Chave para parafusos sextavados internos O nível de intensidade de ruído sob condições normais de funcionamento é de 78dB(A). Pedal Com esta máquina de costura utilize apenas o pedal fornecido: - ELECTRONIC FDM Speed Controller - Tipo KD-2902 Chave de fendas Cobertura Pinça Pincel - 26 - Descrição do aparelho Preparações 1 Passador de linha 2 Selector da tensão da linha (lançadeira inferior) 3 Suporte da bobina 4 Ranhuras de ventilação 5 Ligação do pedal/ligação à rede 6 Roda manual 7 Interruptor manual (interruptor On/Off) 8 Tampa da frente 9 Apoio do braço 0 Braço móvel q Selector da tensão da linha (agulha esquerda) w Selector da tensão da linha (agulha direita) e Selector da tensão da linha (lançadeira superior) r Guia da linha t Placa de guia da linha z Roda de ajuste do comprimento do ponto u Roda de ajuste do transporte de tecido i Roda de ajuste da largura de corte o Calcador p Lâmina inferior a Lâmina superior s Lançadeira superior d Lançadeira inferior f Alavanca de desbloqueio PUSH g Ficha de ligação h Pedal j Ficha de rede k Recipiente para resíduos Coloque a máquina Overlock sobre uma superfície estável e plana. Assegure a existência de suficiente iluminação no seu local de trabalho. Ajuste do passador de linhas Retire o passador de linhas 1 por completo antes de enfiar a linha. Rode o passador de linhas 1 de forma a que a guia da linha se encontre precisamente por cima do suporte da bobina 3. Suportes das bobinas Nesta máquina podem ser utilizadas bobinas industriais, bem como bobinas domésticas. No caso de bobinas industriais de grande diâmetro, coloque o suporte da bobina com o lado mais largo para cima; para bobinas de diâmetro pequeno coloque o suporte com o lado estreito para cima. - 27 - Capas de bobinas Interruptor de segurança No caso de serem utilizadas bobinas de linha não industriais, remova o suporte de bobina e coloque as capas da bobina fornecidas na bobina de linha. Esta máquina está equipada com um micro-interruptor de segurança. Não pode ligar a máquina quando a tampa da frente 8 se encontra aberta. Feche a tampa da frente 8 antes de começar a costurar. Colocação do recipiente para resíduos O recipiente para resíduos k apanha os restos de tecido enquanto cose, para deixar o seu local de trabalho sempre limpo. Coloque o recipiente para resíduos k entre a máquina e a mesa. Ligar o pedal Encaixe a ficha do pedal g na ligação para o pedal 5 e a ficha de rede j numa tomada de rede. Para ligar a máquina, pressione o interruptor de rede 7. Atenção! Ao abandonar a máquina ou antes de efectuar trabalhos de manutenção, desligue sempre a ficha de rede j da tomada. Perigo de ferimentos! Roda manual Nota: Gire a roda manual 6 sempre para o seu lado, ou seja, na mesma direcção como uma máquina de costura doméstica. Tampa da frente Para abrir a tampa da frente 8 empurre esta o mais possível para a direita e, em simultâneo, puxe-a na sua direcção. Controlo da velocidade de costura A velocidade de costura é controlada através do pedal h. A velocidade de costura pode ser alterada exercendo mais ou menos pressão sobre o pedal h. - 28 - No lado interior da tampa da frente 8 encontram-se indicações sobre como enfiar a linha. Além disso as guias de linha estão identificadas com cores diferentes. Na caixa de acessórios encontra-se uma pinça que facilita o enfiar da linha. O enfiar da linha acontece nesta sequência: 1. Primeiro passo: Lançadeira superior s (verde) 2. Segundo passo: Lançadeira inferior d (azul) 3. Terceiro passo: Agulha direita (amarelo) 4. Quarto passo: Agulha esquerda (vermelho) Abrir o braço móvel Para enfiar as linhas é necessário abrir o braço móvel 0. 1. Retire o apoio do braço 9 para o lado. 2. Abra a tampa da frente 8. 3. Pressione a alavanca de desbloqueio "PUSH" f e empurre o braço móvel 0 para baixo. Para simplificar, os passos individuais estão numerados na figura (1 q, 2 w, 3 e, 4 r, ...). 1. Abra a tampa da frente 8 e o braço móvel 0. 2. Gire a roda manual 6 na sua direcção até a lançadeira s se encontrar na posição adequada para enfiar a linha. 3. Introduza a linha da lançadeira superior e inferior, tal como representado. Passador de linhas 1 (lado direito) Enfiar a linha na lançadeira Atenção! Antes de enfiar a linha, coloque o interruptor de rede 7 sempre em OFF (desligado) e desligue a ficha de rede j. Isto impede um arranque inadvertido do aparelho. Caso contrário existe perigo de ferimentos! Guia da linha r/placa de guia das linhas t (lado direito) Nota: É importante enfiar correctamente a linha para garantir a uniformidade do ponto e evitar que o fio parta. A linha deve passar correctamente entre os dois discos do dispositivo de tensionamento da linha 2/e. - 29 - Selector da tensão da linha 2/e 4. Puxe a extremidade da linha cerca de 10 cm dos orifícios da lançadeira. 5. Levante o calcador o e coloque as linhas por baixo; volte a baixar o calcador o. A alavanca para levantar e baixar o calcador o encontra-se na parte de trás da máquina, por cima do tirante de costura. Guia da linha da placa de guia da linha 8 ligada Enfiar a linha nas agulhas Para simplificar, os passos individuais estão numerados na figura (1 q, 2 w, 3 e, 4 r, ...). 1. Gire a roda manual 6 para si até as agulhas se encontrarem na posição superior. 2. Introduza a linha direita e esquerda, tal como representado. Posição da alavanca para levantar o calcador o Passador de linhas 1 (lado esquerdo) Guia da linha r/placa de guia das linhas t (lado esquerdo) Guia da linha atrás da tampa da frente 8 - 30 - Nota: A linha deve passar correctamente entre os dois discos do dispositivo de tensionamento da linha. Selector da tensão da linha q/w 4. Puxe a extremidade da linha cerca de 10 cm dos orifícios da agulha. Levante o calcador o e coloque as linhas por baixo; volte a baixar o calcador o. A alavanca para levantar e baixar o calcador o encontra-se na parte de trás da máquina, por cima do tirante de costura. Guia da linha da placa de guia da linha 8 ligada Posição da alavanca para levantar o calcador o Ensaio Quando enfiar linha pela primeira vez ou voltar a enfiar linha após o fio ter rompido, proceda da seguinte forma: Guia da linha 3. Introduza a linha nos orifícios da agulha, como representado, da frente para trás. Levante o calcador o. Mantenha a extremidade da linha entre as pontas dos dedos da mão esquerda, gire a roda manual 6 lentamente duas ou três vezes na sua direcção e verifique se é possível puxar a linha. - 31 - Ajuste da tensão da linha A tensão da linha necessária é diferente conforme o tipo e espessura da linha e do tecido. Verifique as costuras e ajuste a tensäo de linha na máquina. Coloque o tecido sob o calcador o para efectuar um ensaio e comece a coser lentamente. O tecido avança automaticamente. Tensão da linha Rode o dispositivo de tensionamento para um valor inferior: a tensão diminui. Rode o dispositivo de tensionamento para um valor superior: a tensão aumenta. As rodas do dispositivo de tensionamento têm as seguintes cores: azul verde amarelo vermelho Após terminar o trabalho, continue a coser até se formar um cordão de linha com aprox. 5cm de comprimento na extremidade do tecido. Tensão correcta da linha: Corte as linhas com uma tesoura. enfiar a linha na agulha direita Parte de trás enfiar a linha na agulha esquerda linha da lançadeira inferior linha da lançadeira superior - 32 - Ajuste da tensão da linha para linhas da agulha Ajuste da tensão da linha para linhas da lançadeira A tensão da linha na agulha esquerda está demasiado solta. Ajuste a tensão da linha esquerda. A linha da lançadeira inferior está presa e/ ou a linha da lançadeira superior está solta. Solte a tensão da linha da lançadeira inferior e/ou aperte a linha da lançadeira superior. A tensão da linha da agulha direita está demasiado solta. Ajuste a tensão da linha direita. A linha da lançadeira superior está presa e/ ou a linha da lançadeira inferior está solta. Solte a tensão da linha da lançadeira superior e/ou aperte a linha da lançadeira inferior. - 33 - Vista geral dos ajustes da máquina O ajuste favorável da tensão da linha para um tecido não é necessariamente o correcto para outro tecido. A tensão da linha necessária orienta-se pela rigidez e espessura do tecido, bem como pelo tipo e espessura da linha. Se necessário, ajuste a tensão de acordo com esta tabela: Tecido Linhas Agulhas Comprimento do ponto Leve: • Georgette • Algodão • Musselina • Poliéster • Cambraia • Tecido de vestiN.º 80 - 100 dos • Crepe de China • Seda HA x 1 N.º 11 130 / 705H N.º 80 2,0 - 3,5 mm • Padrão 2,5 mm Médio: • Algodão • Poliéster • Algodão • Popelina • Algodão N.º 60 - 100 • Tecido canelado Pesado: • Algodão • Tecido de ganga • Poliéster • Tweed N.º 50 - 80 • Velours HA x 1 N.º 11 - 14 130 / 705H N.º 80 - 90 HA x 1 N.º 14 130 / 705H N.º 90 - 34 - 2,0 - 3,5 mm • Padrão 2,5 mm 2,5 - 4,0 mm • Padrão 3 mm Ajuste da tensão da linha Mudança da linha (união) De acordo com o seguinte procedimento, a mudança de linha é muito simples: 1. Corte a linha através da bobina e ate com um nó as extremidades da linha nova e da linha antiga. 2. Posicione o selector da tensão da linha 2/q/ w/e em "0" e levante o calcador o. 3. Puxe a outra extremidade da linha, até os nós ficarem posicionados sob o calcador o. 4. Ao enfiar a linha nas agulhas, puxe a outra extremidade até os nós chegarem aos orifícios das agulhas e corte o fio à direita e à esquerda do nó. De seguida volte a enfiar a linha. Ajuste do comprimento do ponto O comprimento do ponto pode ser ajustado em intervalos de 1,0 até aos 5,0 mm. Quase todos os trabalhos Overlock são executados com um comprimento de ponto entre 2,5 e 3,5 mm. Gire a roda de ajuste interior para o comprimento do ponto z, para ajustar o comprimento do ponto: Pontos - 35 - Comprimento do ponto Costuras normais 2.0 - 5.0 mm Standard: 3.0 mm Debruados estreitos 1.0 - 2.0 mm Bainhas 1.0 - 2.0 mm Ajuste da largura de corte Substituir as agulhas A largura de corte adequada difere de tecido para tecido. Verifique as costuras e ajuste a largura de corte da seguinte forma: 1. Gire a roda manual 6 para si, até as agulhas se encontrarem na posição inferior. 2. Abra a tampa da frente 8. 3. Pressione a alavanca PUSH f. O braço móvel 0 desce e a roda de ajuste para largura de corte i fica visível. 4. Gire a roda de ajuste para largura de corte i. Para isso desloque a lâmina inferior p. Rode até as linhas da lançadeira se encontrarem na extremidade do tecido. Se rodar na direcção W (wide=largo), a largura de corte aumenta. Se rodar na direcção N (narrow=estreito), a largura de corte diminui. Exemplos: Escolha uma largura de corte inferior caso as extremidades do tecido franzam ao coser. Para isso, gire a roda de ajuste para a largura de corte i para a direita (N). Escolha uma largura de corte maior caso a linha seja cosida para além do tecido. Para isso, gire a roda de ajuste para a largura de corte i para a esquerda (W). Atenção! Antes de mudar as agulhas desligue a ficha de rede. Isto impede um arranque inadvertido do aparelho. Caso contrário existe perigo de ferimentos! 1. Gire a roda manual 6 para si, até as agulhas se encontrarem na posição superior. 2. Abra a tampa frontal 8 e baixe o calcador o. 3. Desaperte os parafusos de aperto das agulhas, utilizando uma chave para parafusos sextavados internos da caixa de acessórios e retire as agulhas: - parafuso superior esquerdo para a agulha esquerda - parafuso inferior direito para a agulha direita. 4. Introduza a nova agulha no respectivo suporte com o lado chato para trás. Certifique-se de que esta encosta o máximo possível. Aperte o parafuso de aperto da agulha. Se as agulhas tiverem sido correctamente aplicadas, a agulha esquerda fica um pouco mais alta do que a direita. Se as agulhas não tiverem sido correctamente aplicadas, falham pontos ao costurar. Esta máquina está equipada com agulhas do tipo H.Ax1 (sistema de agulhas 130H) (para máquinas de uso doméstico). - 36 - Substituir a lâmpada incandescente Perigo de choque eléctrico! Desligue sempre a ficha de rede j da tomada quando pretender substituir a lâmpada incandescente! 1. Retire a pequena tampa redonda com uma agulha ou outro objecto semelhante. 2. Desaperte o parafuso e retire. 3. Retire a tampa da lâmpada. Nota: A lâmina inferior p é composta por material especial e geralmente não necessita ser substituída. Se, ainda assim, esta ficar danificada, dirija-se ao serviço de apoio ao cliente. Pode mudar a lâmina superior a da seguinte forma quando esta estiver gasta: 1. Abra a tampa da frente 8 e gire a roda manual 6 para si até as agulhas se encontrarem na posição inferior. 2. Com a chave de parafusos desaperte o parafuso no suporte da lâmina superior e retire a lâmina superior a. Chave de parafusos lâmina superior a lâmina inferior p 4. Substitua a lâmpada incandescente. Utilize uma lâmpada do tipo E14, 15 W. 5. Volte a colocar todas as peças pela ordem inversa. Substituir a lâmina superior 3. Coloque uma nova lâmina superior a e aperte ligeiramente o parafuso do suporte. 4. Coloque a lâmina superior a de forma a que a sua aresta sobreponha a aresta da lâmina inferior p em 0,5-1,0 mm. 5. Aperte agora bem o suporte da lâmina superior a e feche a tampa da frente 8. Atenção! Antes de substituir a lâmina a desligar sempre a ficha de rede j da tomada. Isto impede um arranque inadvertido do aparelho. Caso contrário existe perigo de ferimentos! - 37 - Chulear com malhas apertadas e largas com três linhas Esta máquina pode ser mudada de quatro linhas para três ao chulear. Remova a agulha direita ou a esquerda (ver capítulo "Substituição da agulha") e a respectiva linha. Agora a máquina está pronta para chulear com três linhas. Funcionamento com braço móvel O funcionamento de braço móvel é especialmente adequado para coser pernas de calças, mangas, punhos etc. Remova o apoio do braço 9, tal como indicado na figura, para alternar entre o funcionamento plano e o de braço móvel. No caso de aplicação única da agulha direita, o comprimento do ponto é de 4 mm. No caso de aplicação única da agulha esquerda, o comprimento do ponto é de 6 mm. Ajustar o calcador O calcador o especial encontra-se ajustado na posição. No parafuso de cabeça escariada à frente no calcador o para funcionamento normal de chulear. Se coser uma bainha aberta, basta soltar um pouco o parafuso grande e apertar o pino pequeno, saliente no lado esquerdo do calcador, até encostar. Agora encontra-se a letra R no parafuso. - 38 - Coser bainhas abertas Ao costurar bainhas abertas, os laços da linha da lançadeira superior devem ser puxados para a parte inferior do tecido. Isto é possível ajustando a tensão da linha, tal como descrito no capítulo "Ajuste da tensão da linha". Pino linha da lançadeira inferior Bainha aberta e debruar Para estes trabalhos proceda da seguinte forma: 1. No capítulo "Ajustar o calcador" leia as instruções sobre como ajustar o calcador o. 2. Gire a roda manual 6 para si até as agulhas se encontrarem na posição superior. 3. Abra a tampa da frente 8 e remova a agulha esquerda (ver capítulo Substituir agulhas). 4. Ajuste o comprimento do ponto para 1,0 - 2,0 mm. Tenha em atenção que a roda de ajuste para transporte do tecido u fica posicionada em “N”. 5. Ajuste a largura de corte, tal como descrito no capítulo "Largura de corte". 6. Se não estiver enfiada nenhuma linha, enfie agora uma linha nova. 7. Coloque o tecido por baixo do calcador o e comece a coser. linha da lançadeira superior Coser cantos estreitos Se pretender coser tecidos muito finos ou leves, escolha uma tensão da linha adequada, como descrito no capítulo "Ajuste da tensão da linha". Linha da agulha linha da lançadeira superior Nota: Verifique sempre os ajustes do comprimento do ponto e da tensão da linha num pedaço de tecido primeiro, antes de começar a coser a peça em si. linha da lançadeira inferior Nota: Lembre-se de repor o calcador o especial à posição de costura normal (chulear) depois de terminar a costura de bainhas. - 39 - Importante: Se necessário, ajuste o comprimento do ponto e a largura do corte. Bainhas abertas Transporte de tecido Através do transporte de tecido evitam-se costuras onduladas em tecidos bordados, bem como o deslizar das camadas de tecido. Também as costuras em tecidos muito leves não fazem dobras. Modo de funcionamento Debruar A máquina possui dois conjuntos de barras denteadas de avanço, uma à frente e outra atrás. Estes dois conjuntos deslocam-se independentemente entre si. Através do transporte do tecido é possível mover os dois conjuntos de barras denteadas a diferentes velocidades. As barras denteadas de avanço descrevem um movimento elíptico, transportando assim o tecido: atrás à frente Ajuste do transporte do tecido O transporte de tecido é ajustado rodando a roda de ajuste para transporte do tecido u na direcção pretendida. "N" ="Posição neutra", as barras denteadas de avanço deslocam o tecido uniformemente para a frente. "G" ="Posição Gather" (Gather = Franzir), o conjunto dianteiro de barras denteadas de avanço faz o tecido avançar mais rapidamente do que o conjunto traseiro. Assim o tecido elástico não é esticado. "S" ="Posição Strech", o conjunto traseiro de barras denteadas faz o tecido avançar mais rapidamente do que o conjunto dianteiro. Assim o conjunto dianteiro de barras denteadas mantém o tecido esticado. O transporte de tecido também pode ser ajustado durante a costura. - 40 - Cantos irregulares de bordados e alisamentos Para obter cantos planos precisos ao coser peças elásticas com bordados, o conjunto dianteiro de barras denteadas deve mover-se mais rapidamente do que o traseiro, para que a peça não seja esticada. Também para alisar o conjunto dianteiro de barras denteadas deve trabalhar mais rapidamente do que o traseiro. Devido a comprimentos do ponto maiores o tecido fica ligeiramente liso. Ajuste o transporte de tecido para "G". Esticar para evitar pregas Para evitar que as costuras formem dobras ao costurar tecidos muito leves ou nylon fino, as barras denteadas de avanço traseiras devem deslocar-se mais rapidamente do que as dianteiras. Assim, as barras denteadas dianteiras mantêm o tecido esticado, para que este não franza. Ajuste o transporte de tecido para "S". - 41 - Resolução de problemas Problema Agulhas partem A linha parte Falham pontos Os pontos são irregulares Causa Resolução • As agulhas estão tortas, gastas ou danificadas nas pontas. • Coloque agulhas novas. • As agulhas não foram correctamente colocadas. • Coloque as agulhas correctamente no suporte. • Puxou o tecido com demasiada força • Guie o tecido cuidadosamente com ambas as mãos. • Linha não está bem enfiada. • Enfie a linha correctamente. • A linha está demasiado tensionada. • Diminua a tensão da linha. • As agulhas não foram correctamente colocadas. • Coloque as agulhas correctamente no suporte. • As agulhas estão tortas, gastas ou danificadas nas pontas. • Coloque agulhas novas. • As agulhas não foram correctamente colocadas. • Coloque as agulhas correctamente no suporte. • Linha não está bem enfiada. • Verifique o decorrer de cada linha. • Foram colocadas agulhas erradas. • Utilize as agulhas correctas (HA x 1 ou 130/705H) • A tensão da linha não está correcta. • Corrija a tensão da linha. • A linha está presa. • Verifique o decorrer de cada linha. • A linha está demasiado tensionada. • Reajuste a tensão da linha. As costuras ficam franzidas • Linha não está bem enfiada. • Enfie a linha correctamente. • Linha está presa. • Verifique o decorrer de cada linha. • Transporte de tecido não está ajustado. • Ajuste o transporte de tecido para "S". O tecido não é cortado de forma limpa • A lâmina superior a está gasta • Substitua a lâmina a ou coloque-a ou mal colocada. correctamente. A extremidade do tecido franze • Demasiado tecido num ponto. - 42 - • Altere a largura da costura. Limpeza e conservação Eliminação Nunca deposite o aparelho no lixo doméstico comum. Este produto está em conformidade com a Directiva Europeia 2002/96/EC. Atenção: Desligue sempre a ficha de rede j da tomada antes de limpar ou lubrificar a máquina. Existe perigo de um choque eléctrico. Para que a sua máquina funcione na perfeição, deve limpá-la regularmente com o pincel. Esta máquina necessita de muito pouco óleo, visto os componentes principais serem fabricados num material especial. Lubrifique apenas ocasionalmente os pontos indicados: Elimine o aparelho através de uma instituição de recolha de resíduos autorizada ou através da instituição de recolha do seu município. Tenha em consideração os regulamentos actualmente em vigor. Em caso de dúvida, entre em contacto com a entidade de eliminação de resíduos. Elimine todos os materiais da embalagem de modo ecológico. Armazenamento Atenção: Desligue sempre a ficha de rede j da tomada antes de guardar a máquina. Isto impede um arranque inadvertido do aparelho. Quando não utilizar a máquina, tape-a sempre com a cobertura. Desta forma protege a máquina contra o pó. Guarde a máquina num local seco e limpo. - 43 - Garantia e assistência técnica Importador Este aparelho tem 3 anos de garantia a partir da data de compra. Este aparelho foi fabricado com o maior cuidado e testado escrupulosamente antes da sua distribuição. Guarde o talão como comprovativo da compra. Em caso de reclamação de garantia, entre em contacto com o seu ponto de assistência técnica por telefone. Apenas deste modo pode ser garantido um envio gratuito do seu produto. A garantia abrange apenas defeitos de material e de fabrico, não incluindo as peças de desgaste ou danos em peças frágeis, por ex. interruptores ou baterias. O produto foi concebido apenas para uso privado e não para uso comercial. A garantia extingue-se no caso de utilização incorrecta e de intervenções que não foram efectuadas pelo nossa filial de assistência técnica autorizada. Os seus direitos legais não são limitados por esta garantia. KOMPERNASS GMBH BURGSTRASSE 21 44867 BOCHUM, GERMANY www.kompernass.com Kompernass Service Portugal Tel.: 707 780 707 (0,12 EUR por minuto) e-mail: [email protected] - 44 - CONTENT PAGE Intended Usage 47 Safety instructions 47 Technical Data 48 Items supplied 48 Description of the appliance 49 Preparation 49 Adjusting the thread tree ...............................................................................................................49 Bobbin supports .............................................................................................................................49 Bobbin caps....................................................................................................................................50 Connecting the foot pedal ...........................................................................................................50 Controlling the sewing speed .......................................................................................................50 Safety switch...................................................................................................................................50 Fitting the waste container ............................................................................................................50 Handwheel .....................................................................................................................................50 Front flap.........................................................................................................................................50 Opening the free arm....................................................................................................................51 Threading yarns into the looper ...................................................................................................51 Threading yarns into the needle...................................................................................................52 Trial run ...........................................................................................................................................53 Setting the thread tension 54 Adjusting thread tension on the needle threads ........................................................................55 Adjusting thread tension on the looper threads..........................................................................55 Overview of the machine adjustments.........................................................................................56 Changing threads (binding together) 57 Setting the stitch length 57 Setting the cutting width 58 Exchanging needles 58 Replacing bulbs 59 Exchanging the upper blade 59 - 45 - Close and broad sewing with three threads 60 Sewing freehanded 60 Adjusting the sewing foot 60 Hemstitch and edging 61 Sewing hemstitch 61 Sewing narrow edging 61 Differential feed motion 62 Manner of operation .....................................................................................................................62 Setting the differential feed motion ..............................................................................................62 Uneven material edges and smoothness.....................................................................................63 Avoid ruffles by stretching.............................................................................................................63 Troubleshooting 64 Cleaning and care 65 Storage 65 Disposal 65 Warranty and Service 66 Importer 66 Read the operating instructions carefully before using the appliance for the first time and preserve this booklet for later reference. Pass the manual on to whomsoever might acquire the appliance at a later date. - 46 - OVERLOCK SEWING MACHINE KH 4300 • Arrange for defective power plugs and/or cables to be replaced at once by qualified technicians or our Customer Service Department. • This appliance is not intended for use by individuals (including children) with restricted physical, physio-logical or intellectual abilities or deficiences in experience and/or knowledge unless they are supervised by a person responsible for their safety or receive from this person instruction in how the appliance is to be used. • Children should be supervised to ensure that they do not play with the appliance. • Never use the machine when the ventilation apertures are blocked. Keep the ventilation apertures of the machine and the foot switch free from fluff, dust and waste material. • Should the cable connected to the foot pedal become damaged, to avoid potential risks it must be replaced by the manufacturer, his customers services or a similarly qualified person. Intended Usage This overlock sewing machine is intended ... – for use as a portable machine, – for the trimming of material edges (sewing) of typical household textiles, and ... – only for domestic household use. This overlock sewing machine is not intended ... - to be installed at a permanent location, – for the processing of other materials (e.g. leather, canvas, sailcloth and other heavy materials), - for commercial or industrial use. Safety instructions Warning about injuries and material damages: Like any other electrical device, a sewing machine can cause serious, even life-threatening injuries. To avoid these, and to work safely: • Always disconnect the power supply when leaving the machine unattended. This will prevent the risk of accidents if the machine is switched on accidentally. • First pull the power plug before changing the bulb or performing maintenance work on the machine. This will prevent possibly life-threatening electric shocks. • Do not pull the plug out of the wall socket by the lead. When pulling out the plug, always hold the plug, not the lead. • Only use the sewing machine in dry rooms. • Keep your work space tidy. An untidy workplace can lead to accidents. • Provide adequate lighting when working! • Do not wear loose clothing or jewellery, as these can be caught in moving parts. You should also wear a hair net if you have long hair. • Avoid adopting an unusual posture. Remain steady and in a well-balanced position at all times. • If accidents occur as a result of handling the machine with insufficient care, or failure to follow the safety instructions in this manual, then the manufacturer cannot accept liability. • Never cover the ventilation slots! Risk of overheating! - 47 - Technical Data Number of threads Number of needles Sewing speed Stitch width Items supplied Rated voltage: Protection class: 4 or 3 2 or 1 1100 Revs/min 6 mm with 4 threads 6 mm or 4 mm with 3 threads 1 – 5 mm HA x 1 Nr. 11-14 or 130/705 Nr. 75-90 Motor: 90 W Bulb: 15 W Total: 105 W 230 V ~ , 50Hz II Bulb power: Bulb voltage: Bulb thread: 15 W 230 V / ~50 Hz E14 thread Stitch length Needles Power consumption : Overlock Sewing Machine Oil Waste container Accessory box Operating instructions Replacement (upper blade) 2 Needles Nr. 11 4 Needles Nr. 14 (2 in the machine, pre-installed) 4 Bobbin caps The sound intensity level under normal operating conditions amounts to 78dB(A). 4 Spool pin (preinstalled) Foot pedal Use only the foot pedal originally supplied with this sewing machine: - ELECTRONIC FDM Speed Controller - Type KD-2902 Allen key Flat-headed screwdriver Covering hood Pincers Brush - 48 - Description of the appliance Preparation 1 Thread tree 2 Thread tension selector (lower looper) 3 Spool support 4 Cold air intake 5 Connection Footpedal/Power supply 6 Handwheel 7 Power switch (On/Off switch) 8 Front flap 9 Arm support 0 Free arm q Thread tension selector (left needle) w Thread tension selector (right needle) e Thread tension selector (upper looper) r Thread guide t Thread guide plate z Adjustment wheel for stitch length u Adjustment wheel for differential feed motion i Adjustment wheel for cutting width o Sewing foot p Lower blade a Upper blade s Upper looper d Lower looper f Release lever PUSH g Connection plug h Foot pedal j Power plug k Waste container Place the overlock sewing machine on a stable and level surface. Ensure there is sufficient illumination at your workplace. Adjusting the thread tree Completely withdraw the thread tree 1 before threading. Turn the thread tree 1 so that the thread guides stand exactly above the spool supports 3. Bobbin supports Both industrial bobbins and household bobbins can be used with this machine. For industrial bobbins with a large diameter place the bobbins supports in with the broad end to the top, for bobbins with a small diameter place the support in with the narrow end to the top. - 49 - Bobbin caps Safety switch If using non-industrial thread bobbins, remove the bobbin supports and place the bobbin caps on the thread bobbins. This machine is fitted with a micro safety switch. You cannot start the machine if the front flap 8 is open. Close the front flap 8 before you start to sew. Fitting the waste container The waste container k collects remnants during sewing, so that your workplace stays tidy. Place the waste container k between the machine and the table. Connecting the foot pedal Insert the plug of the footpedal g into the connection for the footpedal 5 and the power plug j into a mains power socket. To switch the machine on, press the power switch 7. Attention! During absences from the machine or when doing maintenance work, always remove the plug j from the mains power socket. Injury hazard! Handwheel Note: Always turn the handwheel 6 towards yourself, that is, in the same direction as with a domestic sewing machine. Front flap To open the front flap 8, slide it as far as possible to the right and, at the same time, draw it towards yourself. Controlling the sewing speed The sewing speed is controlled by means of the footpedal h. The sewing speed is changed by applying more or less pressure to the footpedal h. - 50 - Opening the free arm For threading the yarns the free arm 0 must be opened. 1. Pull the arm support 9 off to the side. 2. Open the front flap 8. 3. Press the release lever "PUSH" f and, at the same time, pull the free arm 0 downwards. Correct threading is important, so that the stitches are not irregular and that the yarn does not break. On the inner side of the front flap 8 there is a guide to threading. Additionally, the thread guides are marked in various colours. In the accessory box you will find pincers, the use of which helps make threading easier. Threading takes place in this sequence: 1. First step: Upper looper s (green) 2. Second step: Lower looper d (blue) 3. Third step: Right needle (yellow) 4. Fourth step: Left needle (red) For simplification, the individual steps are numbered on the illustrations (1 q, 2 w, 3 e, 4 r, ...). 1. Open the front flap 8 and free arm 0. 2. Turn the handwheel 6 to yourself until the looper s is in the most favourable position for threading. 3. Thread the upper and lower looper yarns as shown. Thread tree 1 (on the right) Threading yarns into the looper Attention! Before starting to thread yarns, ALWAYS place the power switch 7 at OFF and remove the plug j. This will prevent an unintentional starting of the appliance. If you do not, you run a risk of serious injury! Thread guide r and thread guide plate t (on the right) Note: The yarn must lie correctly between the two discs of the thread tension selector 2/e. - 51 - Thread tension selector 2 e 4. Pull the end of the thread about 10 cm (4”) out from the looper eyelet. 5. Lift the sewing foot o and slide the thread under it; then lower the sewing foot o back down. The lever for lifting and lowering the sewing foot o is located at the rear of the machine, above the sewing lever rod system. Thread routing on from the thread guide plate 8 Threading yarns into the needle For simplification, the individual steps are numbered on the illustrations (1 q, 2 w, 3 e, 4 r, ...). 1. Turn the handwheel 6 to yourself until the needles stand fully at the top. 2. Thread the left and right yarns as shown. Position the lever to lift the sewing foot o Thread tree 1 (on the left) Thread guide r and thread guide plate t (on the left) Thread routing behind the front flap 8 - 52 - Note: The yarn must lie correctly between the two discs of the thread tension selector. Thread tension selector q w 4. Pull the end of the thread about 10 cm (4“ ) out from the eyes of the needles. Lift the sewing foot o and slide the thread under it; then lower the sewing foot o back down. The lever for lifting and lowering the sewing foot o is located at the rear of the machine, above the sewing lever rod system. Thread routing on from the thread guide plate 8 Position the lever to lift the sewing foot o Trial run When yarn has been threaded for the first time, or after a yarn breakage it must be rethreaded, proceed as follows: further thread routing 3. Guide the yarn, as shown, from front to back through the eyes of the needles. Lift the sewing foot o. Hold the ends of the threads between the fingertips of your left hand, slowly turn the handwheel 6 two or three times towards yourself and then check the threads once again. - 53 - Setting the thread tension The thread tension required is variable, being dependant itself on the type and thickness of the thread and fabric. Check the seams and then adjust the appropriate thread tension on the machine. Lay the material for a trial run under the sewing foot o and slowly start to sew. The material will be automatically fed through. Tensioning the thread When you turn the tensioning device to a lower number, the tension reduces. When you turn the tensioning device to a higher number, the tension increases. The wheels of the tensioning device have the following colours: blue green yellow red When the task is complete, continue sewing until an approximately 5cm (2") long length of threads has formed at the end of the material. Correct thread tension: Cut through the threads with scissors. Thread, right needle Reverse Thread, left needle lower looper thread upper looper thread - 54 - Adjusting thread tension on the needle threads Adjusting thread tension on the looper threads The tread tension on the left needle is too loose. Adjust tension on the left thread. The lower looper thread is firm and/or the upper looper thread is loose. Loosen the tension of the lower looper thread and/or tighten the upper looper thread. The tread tension on the right needle is too loose. Adjust tension on the right thread. The upper looper thread is firm and/or the lower looper thread is loose. Loosen the tension of the upper looper thread and/or tighten the lower looper thread. - 55 - Overview of the machine adjustments The most appropriate thread tension adjustment for one type of material is not necessarily the ideal adjustment for a different material. The thread tensions required are dictated by the pliability and thickness of the material as well as the type and thickness of the thread. When necessary, adjust thread tensions as per this table: Fabric Thread Needles Stitch length Light: • Georgette • Muslin • Batiste • Dress fabric • Crepe de Chine • Silk • Cotton • Polyester Nr. 80 - 100 HA x 1 Nr. 11 130 / 705H Nr. 80 2.0 - 3.5 mm • Standard 2.5 mm Medium weight: • Cotton • Poplin • Waterproofed cotton • Corduroy • Cotton • Polyester Nr. 60 - 100 Heavy: • Denim • Tweed • Velour • Cotton • Polyester Nr. 50 - 80 HA x 1 Nr. 11 - 14 130 / 705H Nr. 80 - 90 HA x 1 Nr. 14 130 / 705H Nr. 90 - 56 - 2.0 - 3.5 mm • Standard 2.5 mm 2.5 - 4.0 mm • Standard 3 mm Thread tension adjustment Changing threads (binding together) With the following procedure, changing threads is quite simple: 1. Cut the yarn above the spindle and knot the ends of the new and the old thread together. 2. Place the thread tension selector 2/q/w/e at "0" and lift the sewing foot o. 3. Pull on the other end of the yarn until the knot passes under the sewing foot o. 4. For threading it in the needle, pull on the other end until the knot is in the eye of the needle and then cut the yarn to the left and right of the knot. Then carry out the rethreading. Setting the stitch length The stitch length can be adjusted in nine steps, from 1.0 to 5.0 mm. Almost all overlock work is carried out with a stitch length of 2.5 – 3.5 mm. Turn on the inner adjustment wheel for stitch length z to adjust the stitch length: - 57 - Stitch Stitch length Normal seams 2.0 - 5.0 mm Standard: 3.0 mm Narrow edgings 1.0 - 2.0 mm Hemstitching 1.0 - 2.0 mm Setting the cutting width Exchanging needles The appropriate cutting width is, from material to material, variable. Each time test the seams and adjust the cutting width as follows: 1. Turn the handwheel 6 towards yourself until the needles are in the lowest position. 2. Open the front flap 8. 3. Press the lever PUSH f. The free arm 0 lowers itself and the adjustment wheel for the cutting width i can be seen. 4. Turn the djustment wheel for the cutting width i. With this you move the lower blade p. Continue turning it until the looper threads are lying at the edge of the material. When you turn in the direction W (wide), the cutting width is broader. When you turn in the direction N (narrow), the cutting width is narrower. Examples: Select a narrower cutting width if the material edges ruffle during sewing. For this, turn the adjustment wheel for cutting width i to the right (N). Select a larger cutting width if the yarn is being sewed beyond the material edge. For this, turn the adjustment wheel for cutting width i to the left (W). Attention! Before exchanging the needles, remove the power plug. This prevents an unintended starting of the machine. If you do not, you run a risk of serious injury! 1. Turn the handwheel 6 towards yourself until the needles are in the highest position. 2. Open the front flap 8 and lower the sewing foot o. 3. Loosen the setscrew against the needle with the Allen key from the accessories box and then remove the needle: - upper left setscrew for the left needle - lower right setscrew for the right needle. 4. Insert the new needle, with the flat side to the rear, into the needle mounting. Ensure that the needle is inserted as far as is possible. Secure the needle by retightening its setscrew. When the needles have been correctly fitted, the left needle stands a little higher than the right needle. If the needles have not been correctly inserted, stitches will occasionally be left out when sewing. This machine is equipped with needles of the type H.Ax1 (Needle system 130H) (for household machines). - 58 - Replacing bulbs Risk of electric shock When changing bulbs, ALWAYS remove the plug j from the mains power socket! 1. Remove the small round cover with a needle or something similar. 2. Unscrew the screw completely. 3. Remove the lamp cover. Note: The lower blade p is manufactured from a special material and normally does not need to be exchanged. Should it at some time become nonetheless damaged, please make contact with our Customer Services. To exchange the upper blade a when it has become blunt: 1. Open the front flap 8 and turn the handwheel 6 towards yourself until the needles are in the lowest position. 2. Using the screwdriver, loosen the screw on the upper blade holder and remove the upper blade a. Screwdriver upper blade a 4. Exchange the bulb. Use a bulb of the type E14, 15 W. 5. Reassemble all of the parts in reverse order. Exchanging the upper blade lower blade p 3. Insert a new upper blade a and lightly tighten the screw on the blade holder. 4. Adjust the upper blade a to that its cutting edge surmounts the cutting edge of the lower blade p by about 0.5-1.0 mm. 5. Now firmly tighten the setscrew in the holder for the upper blade a and close the front flap 8. Attention! Before changing the blade a, ALWAYS remove the plug j from the mains power socket. This prevents an unintended starting of the machine. If you do not, you run a risk of serious injury! - 59 - Close and broad sewing with three threads Sewing freehanded When sewing with this machine you can adjust from four to three threads. Remove either the left or the right needle (see section "Exchanging needles") and the appropriate thread. The machine is now ready for sewing with three threads. Freehand operation is excellently suited for the sewing of trouser legs, sleeves and cuffs etc. Remove the arm support 9, as shown in the illustration, to change from flatbed to free arm operation. With exclusive use of the right needle, the stitching length amounts to 4 mm (0.16“). With exclusive use of the left needle, the stitching length amounts to 6 mm (0.24“). Adjusting the sewing foot The special sewing foot o is adjusted to the position N on the countersunk screw at the front of the sewing foot o for normal sewing operations. Should you wish to sew a hemstitch, simply loosen the large screw lightly and slide the small pin, which protudes from the foot to the left, all the way in. Now the letter R stands on the screw. - 60 - Sewing hemstitch With the sewing of hemstitches the loops of the upper looper thread should be pulled back to the underside of the material. This is achieved by adjustment of the thread tension, as described in the section "Setting the thread tension". Pin lower looper thread Hemstitch and edging For these two tasks proceed as follows: 1. In the section "Adjusting the sewing foot" reread the instructions for adjusting the sewing foot o. 2. Turn the handwheel 6 to yourself until the needles stand fully at the top. 3. Open the front flap 8 and remove the left needle (see section " Exchanging needles"). 4. Adjust the stitching length to 1.0 - 2.0 mm. Ensure that the adjustment wheel for the differential feed motion u is placed at “N”. 5. Adjust the stitching width as described in the section “Setting the cutting width”. 6. If a yarn is not threaded, now rethread a new yarn. 7. Lay your material under the sewing foot o and start to sew. upper looper thread Sewing narrow edging If you wish to sew very thin or light materials, select a suitable thread tension, as described in the section "Setting the thread tension". needle thread upper looper thread Note: Before you begin to sew on your actual workpiece, always check the adjustments for stitching length and thread tension on a material remnant. lower looper thread Note: Always remember to return the adjustment for the sewing foot o from this special to normal operation (sewing tasks) after the sewing of hems. - 61 - Important: If necessary, adjust the stitching length and cutting width. Hem stitching Differential feed motion With the differential feed motion uneven seams are avoided in knitted materials, as well as the slippage of textile positions. Additionally, the seams cause no wrinkles in very light materials. Manner of operation Edging The machine has two sets of toothed rack feeders, one to the front and one to the rear. Both sets move independant of each other. Through the differential feed motion both toothed rack sets can move themselves at various speeds. The toothed transport racks move themselves in an elliptical motion and thus transport the material: rear front Setting the differential feed motion The differential feed motion is adjusted to the desired direction simply by turning the adjustment wheel for the differential feed motion u. "N" = "Neutral Position", the toothed rack feeders move the material forward evenly. "G" ="Gather Position", the front toothed rack feeders push the material forward faster than the rear ones. Thereby, elasticated material is not extended. "S" ="Stretch Position", the rear toothed rack feeders push the material forward faster than the front ones. Thereby, the front toothed rack feeders hold the material tautly. The differential feed motion can also be adjusted during sewing. - 62 - Uneven material edges and smoothness To obtain precise flat edges when sewing elasticated materials, the front toothed rack feeders must push forward faster than the rear ones, so that the material is not stretched. For smoothness the front toothed rack feeders must also work faster than the rear ones. With a larger stitching length the material stays easily smooth. Place the differential feed motion at "G". Avoid ruffles by stretching To avoid seams casting wrinkles in very light materials or fine nylons, the rear toothed rack feeders must work faster than the front ones. Thereby the front toothed rack feeders hold the material taut so that it does not ruffle. Place the differential feed motion at "S". - 63 - Troubleshooting Problem Needles break Cause Solution • Needles are bent, blunt or damaged at the points. • Fit new needles. • Needles are not correctly inserted. • Insert the needles into the retainers correctly. • You have pulled the material too • Carefully guide the material with heftily. both hands. • Yarn has not been correctly threaded. • Thread the yarn correctly. • Thread tension is too high. • Reduce the thread tension. • Needles are not correctly inserted. • Insert the needles into the retainers correctly. • Needles are bent, blunt or damaged at the points. • Fit new needles. • Needles are not correctly inserted. • Insert the needles into the retainers correctly. • Yarn has not been correctly threaded. • Check the course of the individual threads. • Incorrect needles are fitted. • Use the correct needles (HA x 1 or 130/705H) • Thread tension is not correct. • Correct the thread tension. • Thread is trapped. • Check the course of the individual threads. • Thread tension is too high. • Adjust the thread tension. • Yarn has not been correctly threaded. • Thread the yarn correctly. • Thread is blocked. • Check the course of the individual threads. • Differential feed motion not adjusted. • Place the differential feed motion at "S". Material is not cut off cleanly • Upper blade a is blunt or incorrectly inserted. • Change the blade a or insert it correctly. Material edges ruffle themselves • Too much material in a stitch. • Alter the seam width. Thread breaks Stitches are omitted Stitches are irregular Seams cause wrinkles - 64 - Cleaning and care Disposal Do not dispose of the appliance in your normal domestic waste. This product is subject to the provisions of European Directive 2002/96/EC. Attention: ALWAYS remove the plug j from the mains power socket before cleaning or lubricating the machine. Otherwise there is the risk of you receiving an electric shock! Dispose of the appliance through an approved disposal centre or at your community waste facility. Observe the currently applicable regulations. In case of doubt, please contact your waste disposal centre. To ensure that your machine works faultlessly at all times, it must occasionally be cleaned with a brush. This machine requires very little lubrication, as the main components are manufactured from a special material. Only occasionally lubricate the designated positions: Dispose of all packaging materials in an environmentally friendly manner. Storage Attention: ALWAYS remove the plug j from the mains power socket before storageing the machine. This prevents an unintended starting of the machine. When the machine is not in use, always cover it with the hood. This will protect the machine from dust. Store the machine at a clean and dry location. - 65 - Warranty and Service Importer This appliance comes with a 3 year warranty Purchase date. This appliance has been manufactured with care and meticulously examined before delivery. Please retain your receipt as proof of purchase. In the case of a warranty claim, please make contact by telephone with our service department. Only in this way can a post-free despatch for your goods be assured. The warranty covers only claims for material and maufacturing defects, not for wearing parts or for damage to fragile components, e.g. buttons or batteries. This product is for private use only and is not intended for commercial applications. In the event of misuse and improper handling, use of force and interference not carried out by our authorized service branch, the warranty will become void. Your statutory rights are not restricted in any way by this warranty. KOMPERNASS GMBH BURGSTRASSE 21 44867 BOCHUM, GERMANY www.kompernass.com DES Ltd Units 14-15 Bilston Industrial Estate Oxford Street Bilston WV14 7EG Tel.: 0870/787-6177 Fax: 0870/787-6168 e-mail: [email protected] Kompernass Service Ireland Tel: 1850 930 412 (0,082 EUR/Min.) Standard call rates apply. Mobile operators may vary. e-mail: [email protected] - 66 - INHALTSVERZEICHNIS SEITE Bestimmungsgemäßer Gebrauch 69 Sicherheitshinweise 69 Technische Daten 70 Lieferumfang 70 Gerätebeschreibung 71 Vorbereitungen 71 Einstellung des Fadenbaums.........................................................................................................71 Spulenhalterungen .........................................................................................................................71 Spulenkappen ................................................................................................................................72 Fußpedal anschließen ...................................................................................................................72 Steuern der Nähgeschwindigkeit .................................................................................................72 Sicherheitsschalter..........................................................................................................................72 Anbringen des Abfallbehälters.....................................................................................................72 Handrad..........................................................................................................................................72 Frontklappe.....................................................................................................................................72 Freiarm öffnen ................................................................................................................................73 Faden in die Greifer einfädeln .....................................................................................................73 Faden in die Nadeln einfädeln ....................................................................................................74 Probelauf.........................................................................................................................................75 Einstellen der Fadenspannung 76 Einstellung der Fadenspannung auf die Nadelfäden ...............................................................77 Einstellung der Fadenspannung auf den Greiferfäden ..............................................................77 Übersicht der Maschineneinstellungen ........................................................................................78 Fadenwechsel (zusammenbinden) 79 Einstellung der Stichlänge 79 Schnittbreite einstellen 80 Nadeln austauschen 80 Glühlampen erneuern 81 Oberes Messer auswechseln 81 - 67 - Eng- und weitmaschig mit drei Fäden ketteln 82 Freihandnähen 82 Nähfuß verstellen 82 Hohlsaum und Einfassen 83 Hohlsaum nähen 83 Schmale Kanten nähen 83 Differential Transport 84 Funktionsweise................................................................................................................................84 Einstellen des Differentialtransports..............................................................................................84 Ungrade Strickkanten und Glätten...............................................................................................85 Kräuseln vermeiden durch Dehnen ..............................................................................................85 Fehlerbehebung 86 Reinigen und Pflege 87 Aufbewahren 87 Entsorgen 87 Garantie und Service 88 Importeur 88 Lesen Sie die Bedienungsanleitung vor der ersten Verwendung aufmerksam durch und heben Sie diese für den späteren Gebrauch auf. Händigen Sie bei Weitergabe des Gerätes an Dritte auch die Anleitung aus. - 68 - OVERLOCKNÄHMASCHINE KH 4300 Bestimmungsgemäßer Gebrauch Die Overlock-Nähmaschine ist vorgesehen ... – zur Verwendung als ortsveränderliches Gerät, – zum Einfassen von Stoffrändern (Ketteln) von haushaltsüblichen Textilien und ... – nur zur Verwendung im privaten Hausgebrauch. Die Nähmaschine ist nicht vorgesehen ... – zur ortsfesten Aufstellung, – zur Verarbeitung von anderen Materialien (z. B. Leder, Zelt-, Segel- und ähnlich schwere Stoffe), – für eine Verwendung in gewerblichen oder industriellen Bereichen. Sicherheitshinweise Bei einer Nähmaschine kann man sich wie mit jedem anderen Elektrogerät verletzen und in Lebensgefahr geraten. Um dies zu vermeiden und um sicher zu arbeiten: • Ziehen Sie stets den Netzstecker, wenn Sie die Maschine verlassen. Damit verhindern Sie Unfallgefahr durch versehentliches Einschalten. • Ziehen Sie erst den Netzstecker, bevor Sie die Glühlampe tauschen oder Wartungsarbeiten an der Maschine vornehmen. Damit verhindern Sie Lebensgefahr durch elektrischen Schlag. • Ziehen Sie den Netzstecker nicht am Kabel aus der Steckdose. Fassen Sie beim Herausziehen den Stecker und nicht das Kabel an. • Verwenden Sie die Nähmaschine immer nur in trockenen Räumen. • Lassen Sie beschädigte Netzstecker oder Netzkabel sofort von autorisiertem Fachpersonal oder dem Kundenservice austauschen, um Gefährdungen zu vermeiden. • Dieses Gerät ist nicht dafür bestimmt, durch Personen (einschließlich Kinder) mit eingeschränkten physischen, sensorischen oder geistigen Fähigkeiten oder mangels Erfahrung und/oder mangels Wissen benutzt zu werden, es sei denn, sie werden durch eine für ihre Sicherheit zuständige Person beaufsichtigt oder erhielten von ihr Anweisungen, wie das Gerät zu benutzen ist. • Kinder sollten beaufsichtigt werden, um sicherzustellen, dass sie nicht mit dem Gerät spielen. • Betreiben Sie die Maschine niemals mit blockierten Belüftungsöffnungen. Halten Sie die Belüftungsöffnungen der Maschine sowie den Fußpedal frei von Fusseln, Staub und Stoffabfällen. • Wenn die Anschlussleitung, die mit dem Fußpedal verbunden ist, beschädigt ist, muss sie durch den Hersteller oder seinen Kundendienst oder eine ähnliche qualifizierte Person ersetzt werden, um Gefährdungen zu vermeiden. Warnung vor Verletzungen und Sachschäden: • Halten Sie Ihren Arbeitsbereich in Ordnung. Unordnung im Arbeitsbereich kann Unfälle zur Folge haben. • Sorgen Sie für gute Beleuchtung beim Arbeiten! • Tragen Sie keine weite Kleidung oder Schmuck, weil diese von beweglichen Teilen erfasst werden können. Tragen Sie deshalb bei langen Haaren auch ein Haarnetz. • Vermeiden Sie eine unnormale Körperhaltung. Sorgen Sie für sicheren Halt und jederzeitiges Gleichgewicht. • Wenn Unfälle auf mangelnde Sorgfalt im Umgang mit dem Gerät zurück zu führen sind oder die Sicherheitshinweise in der Anleitung nicht beachtet wurden, haftet der Hersteller nicht für solche Schäden. • Verdecken Sie niemals die Lüftungsschlitze! Überhitzungsgefahr! - 69 - Technische Daten Lieferumfang Anzahl der Fäden Anzahl der Nadeln Nähgeschwindigkeit Stichbreite Overlock-Nähmaschine Öl Abfallbehälter Zubehörbox Bedienungsanleitung Nennspannung: Schutzklasse: 4 oder 3 2 oder 1 1100 U/min 6 mm bei 4 Fäden 6 mm oder 4 mm bei 3 Fäden 1 – 5 mm HA x 1 Nr. 11-14 oder 130/705 Nr. 75-90 Motor: 90 W Glühlampe: 15 W Gesamt: 105 W 230 V ~ , 50Hz II Glühlampe Leistung Glühlampe Spannung Glühlampengewinde : 15 W : 230 V / ~50 Hz : E14-Gewinde Stichlänge Nadeln Leistungsaufnahme: Ersatzmesser (oben) 2 Nadeln Nr. 11 4 Nadeln Nr. 14 (2 in der Maschine vorinstalliert) 4 Spulenkappen Der Schalldruckpegel unter normalen Betriebsbedingungen beträgt 78dB(A). 4 Spulenhalterungen (vorinstalliert) Fußpedal Benutzen Sie mit dieser Nähmaschine nur das mitgelieferte Fußpedal: - ELECTRONIC FDM Speed Controller - Typ KD-2902 Innensechskantschlüssel Schlitzschraubendreher Abdeckhaube Pinzette Pinsel - 70 - Gerätebeschreibung Vorbereitungen 1 Fadenbaum 2 Fadenspannungswähler (unterer Greifer) 3 Spulennadel 4 Lüftungsschlitze 5 Anschluss Fußpedal/Netzanschluss 6 Handrad 7 Netzschalter (On-/Off-Schalter) 8 Frontklappe 9 Armauflage 0 Freiarm q Fadenspannungswähler (linke Nadel) w Fadenspannungswähler (rechte Nadel) e Fadenspannungswähler (oberer Greifer) r Fadenführung t Fadenführungsplatte z Einstellrad Stichlänge u Einstellrad Differentialtransport i Einstellrad Schnittbreite o Nähfuß p unteres Messer a oberes Messer s oberer Greifer d unterer Greifer f Entriegelungshebel PUSH g Verbindungsstecker h Fußpedal j Netzstecker k Abfallbehälter Stellen Sie die Overlock-Maschine auf eine stabile, ebene Oberfläche. Achten Sie auf ausreichende Beleuchtung an Ihrem Arbeitsplatz. Einstellung des Fadenbaums Ziehen Sie den Fadenbaum 1 vor dem Einfädeln ganz heraus. Drehen Sie den Fadenbaum 1 so, dass die Fadenführungen genau über den Spulennadeln 3 stehen. Spulenhalterungen Bei dieser Maschine können sowohl lndustriespulen als auch Haushaltsspulen verwendet werden. Bei Industriespulen mit großem Durchmesser setzen Sie die Spulenhalterung mit dem breiten Ende nach oben ein, für Spulen mit kleinem Durchmesser setzen Sie die Halterung mit dem schmalen Ende nach oben ein. - 71 - Spulenkappen Sicherheitsschalter Bei Verwendung von nicht-industriellen Garnspulen entfernen Sie den Spulenhalter und setzen Sie Spulenkappen auf die Garnspulen. Diese Maschine ist mit einem Mikro-Sicherheitsschalter ausgestattet. Sie können die Maschine nicht starten, wenn die Frontklappe 8 offen steht. Schließen Sie die Frontklappe 8, bevor Sie zu nähen beginnen. Anbringen des Abfallbehälters Der Abfallbehälter k fängt beim Nähen Schnittgut auf, so dass lhr Arbeitsplatz sauber bleibt. Stellen Sie den Abfallbehälter k zwischen Maschine und Tisch auf. Fußpedal anschließen Stecken Sie den Stecker des Fußpedals g in den Anschluss für das Fußpedal 5 und den Netzstecker j in eine Netzsteckdose. Um die Maschine einzuschalten, drücken Sie den Netzschalter 7. Achtung! Beim Verlassen der Maschine oder vor Wartungsarbeiten, ziehen Sie immer den Netzstecker j aus der Steckdose heraus. Verletzungsgefahr! Handrad Hinweis: Drehen Sie das Handrad 6 immer nur zu sich hin, also in der gleichen Richtung wie bei einer Haushaltsnähmaschine. Frontklappe Um die Frontklappe 8 zu öffnen, schieben Sie sie so weit wie möglich nach rechts und ziehen Sie sie gleichzeitig zu sich hin. Steuern der Nähgeschwindigkeit Die Nähgeschwindigkeit wird über das Fußpedal h gesteuert. Die Nähgeschwindigkeit kann dadurch verändert werden, dass man mehr oder weniger Druck auf das Fußpedal h ausübt. - 72 - Richtiges Einfädeln ist wichtig, damit die Stiche nicht unregelmäßig werden und der Faden nicht abreißt. Auf der lnnenseite der Frontklappe 8 befindet sich eine Anleitung zum Einfädeln. Zusätzlich sind die Fadenführungen verschiedenfarbig gekennzeichnet. In der Zubehörbox befindet sich eine Pinzette, mit der das Einfädeln einfacher geht. Das Einfädeln geschieht in dieser Reihenfolge: 1. Erster Schritt: Oberer Greifer s (grün) 2. Zweiter Schritt: Unterer Greifer d (blau) 3. Dritter Schritt: Rechte Nadel (gelb) 4. Vierter Schritt: Linke Nadel (rot) Freiarm öffnen Zum Einfädeln der Fäden, müssen Sie den Freiarm 0 öffnen. 1. Ziehen Sie die Armauflage 9 zur Seite ab. 2. Öffnen Sie die Frontklappe 8. 3. Drücken Sie den Entriegelungshebel „PUSH“ f und ziehen Sie gleichzeitig den Freiarm 0 nach unten. Zur Vereinfachung sind die einzelnen Schritte auf den Abbildungen nummeriert (1 q, 2 w, 3 e, 4 r, ...). 1. Öffnen Sie Frontklappe 8 und Freiarm 0. 2. Drehen Sie das Handrad 6 zu sich hin, bis sich der Greifer s in der günstigsten Stellung zum Einfädeln befindet. 3. Führen Sie oberen und unteren Greiferfaden, wie abgebildet, ein. Fadenbaum 1 (rechte Seite) Faden in die Greifer einfädeln Achtung! Stellen Sie vor dem Einfädeln den Netzschalter 7 immer auf OFF (aus) und ziehen Sie den Netzstecker j. Dies verhindert ein unbeabsichtigtes Starten des Gerätes. Ansonsten besteht Verletzungsgefahr! Fadenführung r und Fadenführungsplatte t (rechte Seite) Hinweis: Der Faden muss korrekt zwischen den beiden Scheiben der Fadenspannvorrichtung 2/e liegen. - 73 - Fadenspannungswähler 2e 4. Ziehen Sie das Fadenende etwa 10 cm (4”) aus den Greiferösen heraus. 5. Heben Sie den Nähfuß o an und schieben Sie die Fäden darunter; senken Sie dann den Nähfuß o wieder ab. Der Hebel zum Anheben und Absenken des Nähfußes o befindet sich auf der Rückseite der Machine, oberhalb des Nähgestänges. Fadenführung von der Fadenführungsplatte 8 an Faden in die Nadeln einfädeln Zur Vereinfachung sind die einzelnen Schritte auf den Abbildungen nummeriert (1 q, 2 w, 3 e, 4 r, ...). 1. Drehen Sie das Handrad 6 zu sich hin, bis die Nadeln ganz oben stehen. 2. Führen Sie rechten und linken Faden, wie abgebiIdet, ein. Position des Hebels zum Anheben des Nähfußes o Fadenbaum 1 (linke Seite) Fadenführung r und Fadenführungsplatte t (linke Seite) Fadenführung hinter der Frontklappe 8 - 74 - Hinweis: Der Faden muss korrekt zwischen den beiden Scheiben der Fadenspannvorrichtung liegen. Fadenspannungswähler qw 4. Ziehen Sie das Fadenende etwa 10 cm (4“ ) aus den Nadelöhren heraus. Heben Sie den Nähfuß o an und schieben Sie die Fäden darunter; senken Sie dann den Nähfuß o wieder ab. Der Hebel zum Anheben und Absenken des Nähfußes o befindet sich auf der Rückseite der Machine, oberhalb des Nähgestänges. Fadenführung von der Fadenführungsplatte 8 an Position des Hebels zum Anheben des Nähfußes o Probelauf Wenn zum ersten Mal Garn eingefädelt wird oder nach einem Fadenriss Garn neu eingefädelt werden muss, gehen Sie wie folgt vor: weitere Fadenführung 3. Führen Sie das Garn, wie abgebildet, von vorne nach hinten durch die Nadelöhre. Heben Sie den Nähfuß o an. Halten Sie die Fadenenden zwischen den Fingerspitzen der linken Hand, drehen Sie das Handrad 6 langsam zwei-oder dreimal zu sich hin und prüfen Sie den Faden erneut. - 75 - Einstellen der Fadenspannung Die benötigte Fadenspannung ändert sich je nach Art und Dicke von Faden und Stoff . Prüfen Sie die Nähte und stellen Sie an der Maschine die Fadenspannung entsprechend ein. Legen Sie den Stoff für einen Probelauf unter den Nähfuß o und beginnen Sie langsam zu nähen. Der Stoff wird automatisch zugeführt. Fadenspannung Drehen Sie die Spannvorrichtung auf eine niedrigere Zahl, die Spannung wird geringer. Drehen Sie die Spannvorrichtung auf eine höhere Zahl, die Spannung wird höher. Die Räder der Spannvorrichtung haben folgende Farben: blau grün gelb rot Nach beendeter Arbeit nähen Sie weiter, bis sich eine etwa 5cm (2") lange Fadenkette am Ende des Stoffes gebildet hat. Richtige Fadenspannung: Durchschneiden Sie die Fäden mit einer Schere. Faden rechte Nadel Rückseite Faden linke Nadel unterer Greiferfaden oberer Greiferfaden - 76 - Einstellung der Fadenspannung auf die Nadelfäden Einstellung der Fadenspannung auf den Greiferfäden Die Fadenspannung auf der linken Nadel ist zu locker. Spannen Sie den linken Faden nach. Der untere Greiferfaden ist fest und/oder der obere Greiferfaden ist locker. Lockern Sie die Spannung des unteren Greiferfadens und/oder straffen Sie den oberen Greiferfaden. Die Fadenspannung auf der rechten Nadel ist zu locker. Spannen Sie den rechten Faden nach. Der obere Greiferfaden ist fest und/oder der untere Greiferfaden ist locker. Lockern Sie die Spannung des oberen Greiferfadens und/oder straffen Sie den unteren Greiferfaden. - 77 - Übersicht der Maschineneinstellungen Die günstigste Einstellung der Fadenspannung für einen Stoff muss nicht unbedingt für einen anderen Stoff richtig sein. Die erforderliche Fadenspannung richtet sich nach Steifigkeit und Dicke des Stoffes sowie nach Art und Dicke des Fadens. Wenn erforderlich, stellen Sie Spannung nach dieser Tabelle ein: Stoffe Garn Nadeln Stichlänge Leicht: • Georgette • Musselin • Batist • Kleiderstoff • Crepe de Chine • Seide • Baumwolle • Polyester Nr. 80 - 100 HA x 1 Nr. 11 130 / 705H Nr. 80 2,0 - 3,5 mm • Standard 2,5 mm Mittelschwer: • Baumwolle • Polyester • Baumwolle • Popelin • Regenbaumwolle Nr. 60 - 100 • Kord Schwer: • Jeans - Stoff • Tweed • Velours • Baumwolle • Polyester Nr. 50 - 80 HA x 1 Nr. 11 - 14 130 / 705H Nr. 80 - 90 HA x 1 Nr. 14 130 / 705H Nr. 90 - 78 - 2,0 - 3,5 mm • Standard 2,5 mm 2,5 - 4,0 mm • Standard 3 mm Einstellung Fadenspannung Fadenwechsel (zusammenbinden) Einstellung der Stichlänge Nach der folgender Vorgehensweise ist der Fadenwechsel ganz einfach: 1. Schneiden Sie das Garn über der Fadenspule ab und knoten Sie die Enden von altem und neuem Faden zusammen. 2. Stellen Sie die Fadenspannungswähler 2/q/w/e auf „0“ und heben Sie den Nähfuß o an. 3. Ziehen Sie am anderen Ende des Garn, bis die Knoten unter dem Nähfuß o durchkommen. 4. Beim Einfädeln in die Nadeln ziehen Sie die anderen Enden, bis die Knoten in den Nadelöhren sind und schneiden Sie das Garn links und rechts der Knoten ab. Fädeln Sie dann neu ein. Die Stichlänge kann in neun Schritten von 1,0 bis 5,0 mm eingestellt werden. Fast alle Overlock-Arbeiten werden mit einer Stichlänge von 2,5 – 3,5 mm ausgeführt. Drehen Sie am inneren Einstellrad für die Stichlänge z, um die Stichlänge einzustellen: Stiche Normale Nähte Stichlänge 2.0 - 5.0 mm Standard: 3.0 mm Schmale Einfassungen 1.0 - 2.0 mm Hohlsäume - 79 - 1.0 - 2.0 mm Schnittbreite einstellen Nadeln austauschen Die geeignete Schnittbreite ist von Stoff zu Stoff verschieden. Prüfen Sie jeweils die Nähte und stellen Sie die Schnittbreite wie folgt ein: 1. Drehen Sie das Handrad 6 zu Ihnen hin, bis sich die Nadeln in der untersten Stellung befinden. 2. Öffnen Sie Frontklappe 8. 3. Drücken Sie den Hebel PUSH f. Der Freiarm 0 fällt herunter und das Einstellrad für die Schnittbreite i ist zu sehen. 4. Drehen Sie am Einstellrad für die Schnittbreite i. Damit bewegen Sie das untere Messer p. Drehen Sie soweit, bis die Greiferfäden an der Stoffkante anliegen. Wenn Sie in die Richtung W (wide) drehen, wird die Schnittbreite breiter. Wenn Sie in die Richtung N (narrow) drehen, wird die Schnittbreite geringer. Beispiele: Wählen Sie eine geringere Schnittbreite, wenn sich die Stoffkanten beim Nähen kräuseln. Drehen Sie dazu das Einstellrad für die Schnittbreite i nach rechts (N). Wählen Sie eine größere Schnittbreite, wenn das Garn über die Stoffkante hinausgenäht wird. Drehen Sie hierzu das Einstellrad für die Schnittbreite i nach links (W). Achtung! Ziehen Sie vor dem Wechseln der Nadeln den Netzstecker. Dies verhindert unbeabsichtigtes Starten des Gerätes. Ansonsten besteht Verletzungsgefahr! 1. Drehen Sie das Handrad 6 zu sich hin, bis sich die Nadeln in oberster Stellung befinden. 2. Öffnen Sie die Frontklappe 8 und senken Sie den Nähfuß o. 3. Lösen Sie die Klemmschrauben von den Nadeln mit dem Innensechskantschlüssel aus der Zubehörbox und nehmen Sie die Nadeln heraus: - obere linke Schraube für die linke Nadel - untere rechte Schraube für die rechte Nadel. 4. Schieben Sie die neue Nadel mit der flachen Seite nach hinten in die Nadelhalterung. Achten Sie hierbei darauf, dass sie so weit wie möglich eingeschoben ist. Drehen Sie die Klemmschraube der Nadel fest. Wenn die Nadeln richtig eingesetzt worden sind, steht die linke Nadel ein wenig höher als die rechte. Wenn die Nadeln nicht richtig eingesetzt wurden, werden beim Nähen gelegentlich Stiche ausgelassen. Diese Maschine ist mit Nadeln des Type H.Ax1 (Nadelsystem 130H) ausgestattet (für Haushaltsmaschinen). - 80 - Glühlampen erneuern Hinweis: Das untere Messer p besteht aus speziellem Material und braucht normalerweise nicht ausgewechselt zu werden. Wenn es trotzdem einmal beschädigt sein sollte, wenden Sie sich bitte an den Kundendienst. Gefahr eines elektrischen Schlages! Ziehen Sie immer den Netzstecker j aus der Netzsteckdose, wenn Sie die Glühlampe wechseln! So wechseln Sie das obere Messer a aus, wenn es stumpf ist: 1. Öffnen Sie die Frontklappe 8 und drehen Sie das Handrad 6 zu sich hin, bis sich die Nadeln in der niedrigsten Stellung befinden. 2. Lösen Sie mit dem Schraubendreher die Schraube am oberen Messerhalter und entfernen Sie das obere Messer a. 1. Entfernen Sie die kleine runde Abdeckung mit einer Nadel, oder ähnlichem. 2. Drehen Sie die Schraube ganz heraus. 3. Nehmen Sie den Lampenabdeckung ab. Schraubendreher oberes Messer a 4. Wechseln Sie die Glühlampe aus. Verwenden Sie ein Leuchtmittel des Types E14, 15 W. 5. Setzen Sie alle Teile in umgekehrter Reihenfolge wieder zusammen. unteres Messer p 3. Setzen Sie ein neues oberes Messer a ein und ziehen Sie die Schraube der Halterung leicht an. 4. Stellen Sie das obere Messer a so ein, dass seine Schneide die Schneide des unteren Messers p um 0,5-1,0 mm überragt. 5. Ziehen Sie nun die Halterung des oberen Messers a fest an und schließen Sie die Frontklappe 8. Oberes Messer auswechseln Achtung! Ziehen Sie immer vor dem Wechseln des Messers a den Netzstecker j aus der Netzsteckdose. Dies verhindert ein unbeabsichtigtes Starten des Gerätes. Ansonsten besteht Verletzungsgefahr! - 81 - Eng- und weitmaschig mit drei Fäden ketteln Diese Maschine kann man beim Ketteln von vier auf drei Fäden umstellen. Entfernen Sie entweder die rechte oder linke Nadel (siehe Kapitel „Wechseln der Nadel“) und den entsprechenden Faden. Nun ist die Maschine bereit zum Ketteln mit drei Fäden. Freihandnähen Freiarmbetrieb eignet sich vorzüglich zum Nähen von Hosenbeinen, Ärmeln, Manschetten, usw. Entfernen Sie die Armauflage 9, wie auf der Abbildung gezeigt, um von Flachbett- auf Freiarmbetrieb zu wechseln. Bei ausschließlichen Einsatz der rechten Nadel beträgt die Stichlänge 4 mm (0,16“). Bei ausschließlichen Einsatz der linken Nadel beträgt die Stichlänge 6 mm (0,24“). Nähfuß verstellen Der spezielle Nähfuß o ist in der Stellung N an der Senkschraube vorn am Nähfuß o für normalen Kettelbetrieb eingestellt. Wenn Sie einen Hohlsaum nähen wollen, lösen Sie einfach die große Schraube leicht und schieben Sie den kleinen Stift, der links aus dem Fuß heraussteht, bis zum Anschlag. Jetzt steht der Buchstabe R an der Schraube. - 82 - Hohlsaum nähen Beim Nähen von Hohlsäumen sollen die Schlingen des oberen Greiferfadens zur Unterseite des Stoffs gezogen werden. Dies erreicht man durch Einstellen der Fadenspannung, wie im Kapitel „Einstellen der Fadenspannung“ beschrieben. Stift unterer Greiferfaden Hohlsaum und Einfassen Für diese beiden Arbeiten gehen Sie wie folgt vor: 1. Lesen Sie im Kapitel „Nähfuß verstellen“ die Anweisungen zum Verstellen des Nähfußes o. 2. Drehen Sie das Handrad 6 zu sich hin, bis die Nadeln ganz oben stehen. 3. Öffnen Sie die Frontklappe 8 und entfernen Sie die linke Nadel (siehe Kapitel Nadeln austauschen). 4. Stellen Sie die Stichlänge auf 1,0 - 2,0 mm ein. Bitte achten Sie darauf, dass das Einstellrad für den Differentialtransport u auf “N” gestellt ist. 5. Stellen Sie die Schnittbreite ein, wie im Kapitel „Schnittbreite einstellen“ beschrieben. 6. Wenn kein Garn eingefädelt ist, fädeln Sie jetzt neues ein. 7. Legen Sie lhren Stoff unter den Nähfuß o und beginnen Sie zu nähen. oberer Greiferfaden Schmale Kanten nähen Wenn Sie sehr dünnen oder leichten Stoff nähen wollen, wählen Sie eine angemessene Fadenspannung, wie im Kapitel „Einstellen der Fadenspannung“ beschrieben. Nadelfaden oberer Greiferfaden Hinweis: Prüfen Sie die Einstellungen von Stichlänge und Fadenspannung zunächst immer an einem Stück Probestoff, bevor Sie beginnen, das eigentliche Kleidungsstück zu nähen. unterer Greiferfaden Hinweis: Denken Sie immer daran, nach dem Nähen von Säumen den speziellen Nähfuß o zum normalen Nähen (Kettelbetrieb) wieder zurück zustellen. - 83 - Wichtig: Wenn erforderlich, stellen Sie Stichlänge und Schnittbreite ein. Hohlsäumen Differential Transport Durch den Differentialtransport werden wellige Nähte in gestrickten Stoffen vermieden, ebenso das Verrutschen der Stofflagen. Auch werfen die Nähte in sehr leichtem Stoff keine Falten. Funktionsweise Einfassen Die Maschine hat zwei Sätze von Vorschubzahnstangen, einen vorne und einen hinten. Diese beiden Sätze bewegen sich unabhängig voneinander. Durch den Differentialtransport können die beiden Zahnstangensätze sich mit verschiedenen Geschwindigkeiten bewegen. Die Vorschubzahnstangen bewegen sich in einer elliptischen Bewegung und transportieren so den Stoff: hinten vorne Einstellen des Differentialtransports Der Differentialtransport wird einfach durch Drehen des Einstellrades für den Differentialtransport u in die gewünschte Richtung eingestellt. „N“ =„Neutrale Stellung“, die Vorschubzahnstangen bewegen den Stoff gleichmäßig fort. „G“ =„Gather Stellung“ (Gather = Kräuseln), der vordere Vorschubzahnstangensatz schiebt den Stoff schneller vor, als der hintere. Dadurch wird elastischer Stoff nicht gestreckt. „S“ =„Strech-Stellung“, der hintere Vorschubzahnstangensatz schiebt den Stoff schneller vor, als der vordere. Dadurch hält der vordere Vorschubzahnstangensatz den Stoff straff. Der Differentialtransport kann auch während des Nähens eingestellt werden. - 84 - Ungrade Strickkanten und Glätten Um präzise flache Kanten beim Nähen von elastischen Strickwaren zu erhalten, muss der vordere Zahnstangensatz schneller vorschieben als der hintere, damit das Strickgut nicht gestreckt wird. Auch zum Glätten muss der vordere Zahnstangensatz schneller als der hintere arbeiten. Durch größere Stichlänge bleibt der Strickstoff leicht glatt. Stellen Sie den Differentialtransport auf „G“ ein. Kräuseln vermeiden durch Dehnen Um zu vermeiden, dass die Nähte bei sehr leichtem Stoff oder feinem Nylon Falten werfen, müssen die hinteren Vorschubzahnstangen schneller als die vorderen arbeiten. Dadurch halten die vorderen Zahnstangen den Stoff straff, damit er sich nicht kräuselt. Stellen Sie den Differentialtransport auf „S“ ein. - 85 - Fehlerbehebung Problem Ursache Behebung • Nadeln sind verbogen, stumpf • Setzen Sie neue Nadeln ein. oder an den Spitzen beschädigt. Nadeln brechen • Nadeln sind nicht richtig eingelegt. • Setzen Sie die Nadeln richtig in die Halterung ein. • Sie haben zu heftig am Stoff gezogen • Führen Sie den Stoff behutsam mit beiden Händen. • Garn ist nicht richtig eingefädelt. • Fädeln Sie das Garn richtig ein. Faden reißt ab • Fadenspannung ist zu hoch. • Verringern Sie die Fadenspannung. • Nadeln sind nicht richtig eingelegt. • Setzen Sie die Nadeln richtig in die Halterung ein. • Nadeln sind verbogen, stumpf • Setzen Sie neue Nadeln ein. oder an den Spitzen beschädigt. • Nadeln sind nicht richtig eingelegt. • Setzen Sie die Nadeln richtig in die Halterung ein. • Garn ist nicht richtig eingefädelt. • Prüfen Sie den Verlauf der einzelnen Fäden. • Falsche Nadeln eingelegt. • Verwenden Sie die richtigen Nadeln (HA x 1 oder 130/705H) • Fadenspannung ist nicht korrekt. • Korrigieren Sie die Fadenspannung. • Faden sitzt fest. • Prüfen Sie den Verlauf der einzelnen Fäden. • Fadenspannung ist zu hoch. • Stellen Sie die Fadenspannung nach. • Garn ist nicht richtig eingefädelt. • Fädeln Sie das Garn richtig ein. • Garn hängt fest. • Prüfen Sie den Verlauf der einzelnen Fäden. • Differentialtransport nicht eingestellt. • Stellen Sie den Differentialtransport auf „S“ ein. Stoff wird nicht sauber abgeschnitten • Oberes Messer a ist stumpf oder falsch eingesetzt. • Wechseln Sie das Messer a aus oder setzen Sie es richtig ein. Stoffkanten kräuseln sich • Zuviel Stoff auf einen Stich. • Ändern Sie die Nahtbreite. Stiche werden ausgelassen Stiche sind unregelmäßig Nähte werfen Falten - 86 - Reinigen und Pflege Entsorgen Werfen Sie das Gerät keinesfalls in den normalen Hausmüll. Dieses Produkt unterliegt der europäischen Richtlinie 2002/96/EC. Achtung: Ziehen Sie immer den Netzstecker j aus der Steckdose bevor Sie die Maschine reinigen oder ölen. Es besteht die Gefahr eines elektrischen Schlages. Damit Ihre Maschine einwandfrei arbeitet, müssen Sie sie gelegentlich mit dem Pinsel reinigen. Diese Maschine benötigt nur sehr wenig Öl, da die Hauptkomponenten aus einem speziellen Material bestehen. Ölen Sie nur gelegentlich an den bezeichneten Stellen: Entsorgen Sie das Gerät über einen zugelassenen Entsorgungsbetrieb oder über Ihre kommunale Entsorgungseinrichtung. Beachten Sie die aktuell geltenden Vorschriften. Setzen Sie sich im Zweifelsfall mit Ihrer Entsorgungseinrichtung in Verbindung. Aufbewahren Achtung: Ziehen Sie immer den Netzstecker j aus der Steckdose bevor Sie die Maschine verstauen. Dies verhindert unbeabsichtigtes Starten des Gerätes. Wenn Sie die Maschine nicht verwenden, decken Sie sie immer mit der Abdeckhaube ab. So schützen Sie die Maschine vor Staub. Bewahren Sie die Maschine an einem sauberen und trockenem Ort auf. - 87 - Führen Sie alle Verpackungsmaterialien einer umweltgerechten Entsorgung zu. Garantie und Service Importeur Sie erhalten auf dieses Gerät 3 Jahre Garantie ab Kaufdatum. Das Gerät wurde sorgfältig produziert und vor Anlieferung gewissenhaft geprüft. Bitte bewahren Sie den Kassenbon als Nachweis für den Kauf auf. Bitte setzen Sie sich im Garantiefall mit Ihrer Servicestelle telefonisch in Verbindung. Nur so kann eine kostenlose Einsendung Ihrer Ware gewährleistet werden. Die Garantieleistung gilt nur für Material- oder Fabrikationsfehler, nicht aber für Verschleißteile oder für Beschädigungen an zerbrechlichen Teilen, z. B. Schalter oder Akkus. Das Produkt ist lediglich für den privaten und nicht für den gewerblichen Gebrauch bestimmt. Bei missbräuchlicher und unsachgemäßer Behandlung, Gewaltanwendung und bei Eingriffen, die nicht von unserer autorisierten Service-Niederlassung vorgenommen wurden, erlischt die Garantie. Ihre gesetzlichen Rechte werden durch diese Garantie nicht eingeschränkt. KOMPERNASS GMBH BURGSTRASSE 21 44867 BOCHUM, GERMANY www.kompernass.com Schraven Service- und Dienstleistungs GmbH Gewerbering 14 47623 Kevelaer, Germany Tel.: +49 (0) 180 5 008107 (14 Ct/Min. aus dem dt. Festnetz ggf. abweichende Preise aus den Mobilfunknetzen) Fax: +49 (0) 2832 3532 e-mail: [email protected] Kompernaß Service Österreich Tel.: 0820 899 913 (0,20 EUR/Min.) e-mail: [email protected] Kompernaß Service Switzerland Tel.: 0848 000 525 (max. 0,0807 CHF/Min.) e-mail: [email protected] - 88 --
 1
1
-
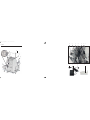 2
2
-
 3
3
-
 4
4
-
 5
5
-
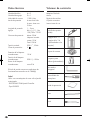 6
6
-
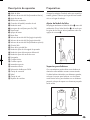 7
7
-
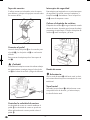 8
8
-
 9
9
-
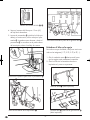 10
10
-
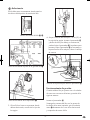 11
11
-
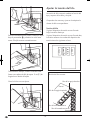 12
12
-
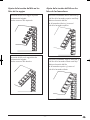 13
13
-
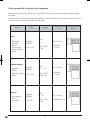 14
14
-
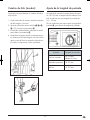 15
15
-
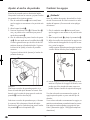 16
16
-
 17
17
-
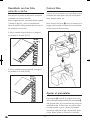 18
18
-
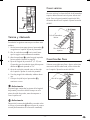 19
19
-
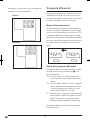 20
20
-
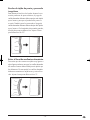 21
21
-
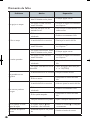 22
22
-
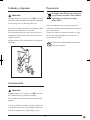 23
23
-
 24
24
-
 25
25
-
 26
26
-
 27
27
-
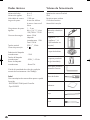 28
28
-
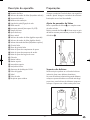 29
29
-
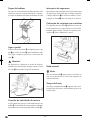 30
30
-
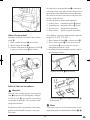 31
31
-
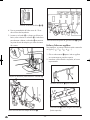 32
32
-
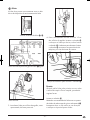 33
33
-
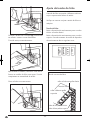 34
34
-
 35
35
-
 36
36
-
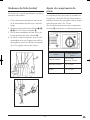 37
37
-
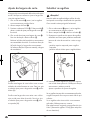 38
38
-
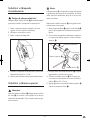 39
39
-
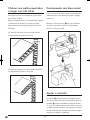 40
40
-
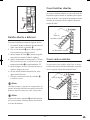 41
41
-
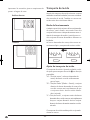 42
42
-
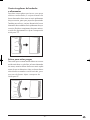 43
43
-
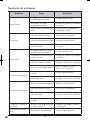 44
44
-
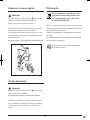 45
45
-
 46
46
-
 47
47
-
 48
48
-
 49
49
-
 50
50
-
 51
51
-
 52
52
-
 53
53
-
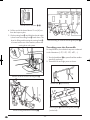 54
54
-
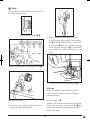 55
55
-
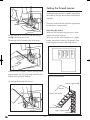 56
56
-
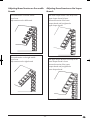 57
57
-
 58
58
-
 59
59
-
 60
60
-
 61
61
-
 62
62
-
 63
63
-
 64
64
-
 65
65
-
 66
66
-
 67
67
-
 68
68
-
 69
69
-
 70
70
-
 71
71
-
 72
72
-
 73
73
-
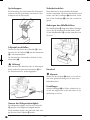 74
74
-
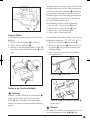 75
75
-
 76
76
-
 77
77
-
 78
78
-
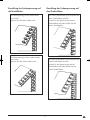 79
79
-
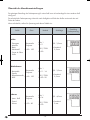 80
80
-
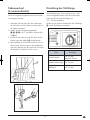 81
81
-
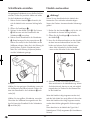 82
82
-
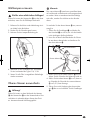 83
83
-
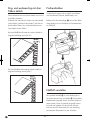 84
84
-
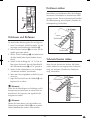 85
85
-
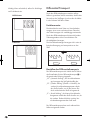 86
86
-
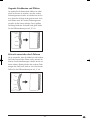 87
87
-
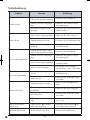 88
88
-
 89
89
-
 90
90


Silvercrest KH 4300 Operating Instructions Manual
- Tipo
- Operating Instructions Manual
en otros idiomas
- English: Silvercrest KH 4300
- Deutsch: Silvercrest KH 4300
- português: Silvercrest KH 4300
Artículos relacionados
Otros documentos
-
Alfa Network ORION Series Manual de usuario
-
Bernina 740 El manual del propietario
-
Brother PS-2500 Manual de usuario
-
Bernina 475 QE El manual del propietario
-
-
-
-
-
Alfa Style Manual de usuario
-
Kompernass KH 4169 Manual de usuario