STIHL FSE 60 Manual de usuario
- Categoría
- Podadoras de césped
- Tipo
- Manual de usuario

STIHL FSE 60
WARNING
Read Instruction Manual thoroughly
before use and follow all safety
precautions – improper use can
cause serious or fatal injury.
ADVERTENCIA
Antes de usar la máquina lea y siga
todas las precauciones de
seguridad dadas en el manual de
instrucciones – el uso incorrecto
puede causar lesiones graves o
mortales.
Instruction Manual
Manual de instrucciones


Original Instruction ManualPrinted on chlorine-free paper
Printing inks contain vegetable oils, paper can be recycled.
© ANDREAS STIHL AG & Co. KG, 2020
0458-238-8621-A. VA3.G20.
0000000133_012_GB
FSE 60
English
1
This instruction manual is protected by copyright. All rights reserved, especially the rights to reproduce, translate and process
with electronic systems.
Contents
Allow only persons who fully understand
this manual to operate your trimmer.
To receive maximum performance and
satisfaction from your STIHL trimmer, it
is important that you read, understand
and follow the safety precautions and
the operating and maintenance
instructions in chapter "Safety
Precautions and Working Techniques"
before using your trimmer. For further
information you can go to
www.stihlusa.com.
Contact your STIHL dealer or the STIHL
distributor for your area if you do not
understand any of the instructions in this
manual.
WARNING
Because a trimmer is a high-speed
cutting tool some special safety
precautions must be observed to reduce
the risk of personal injury. Careless or
improper use may cause serious or even
fatal injury.
Make sure your unit is equipped with the
proper deflector, handle and harness for
the type of cutting attachment being
used. Always wear proper eye
protection.
Guide to Using this Manual 2
IMPORTANT SAFETY
INSTRUCTIONS 2
Safety Precautions and Working
Techniques 4
Approved Combinations of Cutting
Attachment, Deflector, Handle and
Harness 12
Mounting the Drive Tube 13
Mounting the Loop Handle 13
Mounting the Deflector 14
Mounting the Cutting Attachment 14
Connecting to Power Supply 15
Fitting the Harness 16
Switching On 16
Switching Off 17
Storing the Machine 17
Maintaining the Mowing Head 17
Maintenance and Care 22
Main Parts 23
Specifications 24
Maintenance and Repairs 25
Disposal 25
Limited Warranty 26
Trademarks 26
Addresses 27

FSE 60
English
2
Pictograms
All the pictograms attached to or
embossed on the machine are shown
and explained in this manual.
Symbols in Text
Many operating and safety instructions
are supported by illustrations.
The individual steps or procedures
described in the manual may be marked
in different ways:
N A bullet marks a step or procedure.
A description of a step or procedure that
refers directly to an illustration may
contain item numbers that appear in the
illustration. Example:
N Loosen the screw (1).
N Lever (2) ...
In addition to the operating instructions,
this manual may contain paragraphs
that require your special attention. Such
paragraphs are marked with the
following symbols and signal words:
DANGER
Indicates a hazardous situation that, if
not avoided, will result in death or
serious injury.
WARNING
Indicates a hazardous situation that, if
not avoided, could result in death or
serious injury.
NOTICE
Indicates a risk of property damage,
including damage to the machine or its
individual components.
Engineering Improvements
STIHL’s philosophy is to continually
improve all of its products. As a result,
engineering changes and improvements
are made from time to time. Therefore,
some changes, modifications and
improvements may not be covered in
this manual. If the operating
characteristics or the appearance of
your machine differs from those
described in this manual, please contact
your STIHL dealer or the STIHL
distributor for your area for assistance.
WARNING
To reduce the risk of serious or fatal
injury from electrocution, follow basic
precautions, including the following:
READ ALL INSTRUCTIONS
1. Avoid Dangerous Environment –
Don't use appliance in damp or wet
locations.
2. Don't Use In Rain.
3. Keep Children Away – All visitors
should be kept at a distance from
work area.
4. Dress Properly – Do not wear loose
clothing or jewelry. They can be
caught in moving parts. Use of
rubber gloves and substantial
footwear is recommended when
working outdoors.
5. Use Safety Glasses – Always use
face or dust mask if operation is
dusty.
6. Use Right Appliance – Do not use
appliance for any job except that for
which it is intended.
7. Ground Fault Circuit interrupter
(GFCI) protection should be
provided on the circuit(s) or outlet(s)
to be used for the gardening
appliance. Receptacles are
available having built-in GFCI
protection and may be used for this
measure of safety.
Guide to Using this Manual
IMPORTANT
SAFETY
INSTRUCTIONS

FSE 60
English
3
8. Warning: To reduce the risk of
electric shock, use only with an
extension cord intended for outdoor
use, such as an extension cord of
cord type
SW
-
A, SOW
-
A, STW
-
A, STOW
-
A,
SJW
-
A, SJOW
-
A, SJTW
-
A, or
SJTOW
-
A.
9. Cord Sets – Make sure your cord set
is in good condition. When using an
extension cord set, be sure to use
one heavy enough to carry the
current your product will draw. An
undersized extension cord set will
cause a drop in line voltage
resulting in loss of power and
overheating. Table below shows the
correct size to use depending on
cord length and nameplate ampere
rating. If in doubt, use the next
heavier gage. The smaller the gage
number, the heavier the cord.
Appropriate extension cords are
available in special stores for electrical
equipment or from your STIHL dealer.
To reduce the risk of disconnection of
appliance cord form the extension cord
set during operating:
N Insert unit's plug (1) into extension
cord coupling (2).
Strain relief
N Make a loop (3) in the extension
cord and pass it through the
opening (4).
N Slip the loop over the hook (5) and
pull it tight.
10. Avoid Unintentional Starting – Don´t
carry plugged-in appliance with
finger on switch. Be sure switch is
off when plugging in.
11. Don´t Abuse Cord – Never carry
appliance by cord or yank it to
disconnect from receptacle. Keep
cord from heat, oil, and sharp
edges.
12. Don´t grasp the cutting tool when
picking up or holding the appliance.
Minimum wire gauge for extension
cords for 120 Volt appliances using
0
-
6amps
Cord length (ft) 25 50 100 150
Wire size (AWG) 18 16 16 14
238BA008 KN
1
2
4
238BA009 KN
5
3

FSE 60
English
4
13. Don´t Force Appliance – It will do
the job better and with less
likelihood of a risk of injury at the
rate for which it was designed.
14. Don´t Overreach – Keep proper
footing and balance at all times.
15. Stay Alert – Watch what you are
doing. Use common sense. Do not
operate appliance when you are
tired.
16. Disconnect Appliance – Disconnect
the appliance from the power supply
when not in use, before servicing,
when changing accessories such as
blades, and the like.
17. Store Idle Appliance indoors –
When not in use, appliances should
be stored indoors in dry, high or
locked-up place – out of reach of
children.
18. Maintain appliance with care.
Follow instructions for lubricating
and changing accessories. Inspect
appliance cord periodically, and if
damaged, have it repaired by an
authorized service facility. Inspect
extension cords periodically and
replace if damaged. Keep hands
dry, clean and free from oil and
grease.
19. Check damaged parts – before
further use of the appliance, a guard
or other part that is damaged should
be carefully checked to determine
that it will operate properly and
perform its intended function. Check
for alignment of moving parts,
binding of moving parts, breakage
of parts, mounting, and any other
condition that may affect its
operation. A guard or other part that
is damaged should be properly
repaired or replaced by an
authorized service center unless
indicated elsewhere in this manual.
Replacement Parts
When servicing use only identical
replacement parts. Replace damaged
cords or have them repaired by
authorized STIHL Servicing dealer only.
To reduce the risk of electric shock, this
equipment has a polarized plug (one
blade is wider than the other). This plug
will fit in a polarized outlet one way. If the
plug does not fit fully in the outlet,
reverse the plug. If it still does not fit,
contact a qualified electrician to install
the proper outlet. Do not change the
plug in any way.
SAVE THESE INSTRUCTIONS
WARNING!
READ ALL
INSTRUCTIONS!
Careless or improper use of any trimmer
may cause serious or fatal injury. Have
your STIHL dealer show you how to
operate your electric trimmer. Observe
all applicable local safety regulations,
standards and ordinances.
Safety Precautions and
Working Techniques
Because your trimmer is
a high-speed, fast-cut
-
ting electric power tool,
special safety precau
-
tions must be observed to
reduce the risk of fire,
electric shock and per
-
sonal injury.
It is important that you
read, fully understand
and observe the following
safety precautions and
warnings. Save this
instruction manual and
read the safety instruc
-
tions periodically. Be
thoroughly familiar with
the controls and the
proper use of the equip
-
ment. Know how to stop
the unit and disengage
the controls quickly.

FSE 60
English
5
WARNING
Do not lend or rent your trimmer without
the instruction manual. Be sure that
anyone using your trimmer understands
the information contained in this manual.
WARNING
The use of any trimmer may be
hazardous. If the rotating cutting tool
comes in contact with your body, it will
cut you. When it comes in contact with
solid foreign objects such as rocks or
bits of metal, it may fling them directly or
by ricochet in the direction of bystanders
or the operator. Striking such objects
could also damage the cutting
attachment. Thrown objects or damaged
cutting tools may result in serious or fatal
injury to the operator or bystanders.
WARNING
Minors should never be allowed to use
an electric trimmer. Bystanders,
especially children, and animals should
not be allowed in the area where a
power trimmer is in use.
Never let the trimmer run unattended.
Most of these safety precautions and
warnings apply to the use of all STIHL
electric trimmers. Different models may
have different parts and controls. See
the appropriate section of your
instruction manual for a description of
the controls and the function of the parts
of your model electric trimmer.
Safe use of an electric trimmer involves
1. the operator
2. the trimmer
3. the use of the trimmer
THE OPERATOR
Physical Condition
You must be in good physical condition
and mental health and not under the
influence of any substance (drugs,
alcohol, etc.) which might impair vision,
dexterity or judgment. Do not operate an
electric trimmer when you are fatigued.
WARNING
Be alert. Watch what you are doing. Use
common sense. If you get tired while
operating your electric trimmer, take a
break. Tiredness may result in loss of
control. Working with any trimmer can
be strenuous. If you have any condition
that might be aggravated by strenuous
work, check with your doctor before
operating a trimmer.
WARNING
Prolonged use of an electric trimmer (or
other machines) exposing the operator
to vibrations may produce whitefinger
disease (Raynaud's phenomenon) or
carpal tunnel syndrome.
These conditions reduce the hand's
ability to feel and regulate temperature,
produce numbness and burning
sensations and may cause nerve and
circulation damage and tissue necrosis.
All factors which contribute to
whitefinger disease are not known, but
cold weather, smoking and diseases or
physical conditions that affect blood
vessels and blood transport, as well as
high vibration levels and long periods of
exposure to vibration are mentioned as
factors in the development of whitefinger
disease. In order to reduce the risk of
whitefinger disease and carpal tunnel
syndrome, please note the following:
– Wear gloves and keep your hands
warm.
– Maintain a firm grip at all times, but
do not squeeze the handles with
constant, excessive pressure. Take
frequent breaks.
All the above-mentioned precautions do
not guarantee that you will not sustain
whitefinger disease or carpal tunnel
syndrome. Therefore, continual and
regular users should closely monitor the
condition of their hands and fingers. If
any of the above symptoms appear,
seek medical advice immediately.
WARNING
According to STIHL’s current
knowledge, the electric motor of this unit
should not interfere with a pacemaker.
When in doubt, however, consult your
physician and pacemaker manufacturer
before operating this tool.
Proper Clothing
WARNING
To reduce the risk of injury, the operator
should wear proper protective apparel.

FSE 60
English
6
WARNING
Therefore, to reduce the risk of injury to
your eyes never operate a trimmer
unless wearing goggles or properly fitted
safety glasses with adequate top and
side protection complying with ANSI
Z 87 "+" (or your applicable national
standard).
To reduce the risk of injury to your face
STIHL recommends that you also wear
a face shield or face screen over your
goggles or safety glasses.
WARNING
Avoid loose-fitting jackets, scarfs,
neckties, jewelry, flared or cuffed pants,
unconfined long hair or anything that
could become caught on branches,
brush or moving parts of the unit. Wear
long pants made of heavy material to
protect your legs. Do not wear shorts,
pants, sandals or go barefoot. Secure
hair so it is above shoulder level.
Always use face or dust mask if
operation is dusty.
THE TRIMMER
For illustrations and definitions of the
electric trimmer parts see the chapter on
"Main Parts."
WARNING
Never modify a trimmer in any way. Only
attachments supplied by STIHL or
expressly approved by STIHL for use
with the specific STIHL electric trimmer
model are authorized. Although certain
unauthorized attachments are useable
with the STIHL electric trimmer, their use
may, in fact, be extremely dangerous.
WARNING
THE USE OF THE ELECTRIC
TRIMMER
Electrical Precautions
Special precautions for electric trimmers
must be observed to reduce the risk of
serious or fatal injury and property
damage from fire and electric shock.
WARNING
The voltage of the power supply must
agree with the voltage specified on the
trimmer's machine label. Improper
voltage will damage the trimmer and
may cause personal injury.
Polarized Plugs: To reduce the risk of
electric shock, this trimmer has a
polarized plug (one blade is wider than
the other and will require the use of a
polarized extension cord. The trimmer
Trimmer operation can
cause serious injury to
eyes and person. The
deflector provided with
your trimmer may not
protect the operator from
all foreign objects (gravel,
glass, wire, etc.) thrown
by the rotating cutting
tool. Thrown objects may
also ricochet and strike
the operator.
Trimmer noise may dam
-
age your hearing. Wear
sound barriers (ear plugs
or ear mufflers) to pro
-
tect your hearing.
Continual and regular
users should have their
hearing checked
regularly.
Always wear heavy duty
work gloves (e.g. made of
leather or other wear
resistant material) when
handling the trimmer and
the cutting tool. Heavy-
duty, nonslip gloves
improve your grip and
help to protect your
hands.
Clothing must be sturdy
and snug-fitting, but allow
complete freedom of
movement.
Good footing is most
important in trimmer
work. Wear sturdy boots
with nonslip soles. Steel-
toed safety boots are
recommended.
To reduce the risk
of injury to opera
-
tor from blade
contact, never use
any metal cutting
attachment on this
trimmer model.

FSE 60
English
7
plug will fit into a polarized extension
cord only one way. If the plug does not fit
fully into the extension cord, reverse the
plug. If the plug still does not fit, obtain a
correct polarized extension cord. A
polarized extension cord will require the
use of a polarized wall outlet. This plug
will fit into the polarized wall outlet only
one way. If the plug does not fit fully into
the wall outlet, reverse the plug. If the
plug still does not fit, contact a qualified
electrician to install the proper wall
outlet. Do not change the trimmer plug,
extension cord receptacle, or extension
cord plug in any way.
Ground Fault Circuit Interrupter (GFCI)
protection should be provided on the
circuit(s) of outlet(s) to be used for the
gardening appliance. Receptacles are
available having built-in GFCI protection
and may be used for this measure of
safety.
Extension Cord: Make sure your
extension cord is in good condition.
When using an extension cord, be sure
to use one heavy enough to carry the
current your product will draw. An
undersized extension cord will cause a
drop in line voltage resulting in loss of
power and overheating. The table below
shows the correct size to use depending
on cord length and nameplate ampere
rating. If in doubt, use the next heavier
gage. The smaller the gage number, the
heavier the cord.
Appropriate extension cords are
available in special stores for electrical
equipment.
WARNING
To reduce the risk of electric shock, use
only with an extension cord intended for
outdoor use, such as an extension cord
of cord type SW-A, SOW-A, STW-A,
STOW-A, SJW-A, SJOW-A, SJTW-A, or
SJTOW-A.
Strain Relief
To reduce the risk of disconnection of
appliance cord from the extension cord
during operating:
Insert unit's plug (1) into extension cord
coupling (2).
Make a loop (3) in the extension cord
and pass it through the opening (4). Slip
the loop over the hook (5) and pull it
tight.
WARNING
Minimum wire gage for extension cords
for 120 Volt appliances using
0
-
6amps
Cord length (ft) 25 50 100 150
Wire size (AWG) 18 16 16 14
238BA008 KN
1
2
Inspect the power supply
cord, plug and extension
cord before use and peri
-
odically during use. In
order to reduce the risk of
serious injury from elec
-
trocution, never use your
trimmer if the power sup
-
ply cord or plug is cut,
cracked, worn or dam
-
aged. Disconnect the
plug from the power sup
-
ply and have a dealer
replace the power supply
cord. Immediately
replace any damaged
extension cords.
4
238BA009 KN
5
3

FSE 60
English
8
WARNING
WARNING
Be sure switch is off when plugging the
unit into the power supply in order to
reduce the risk of fire or electrical shock
from arcing and the risk of injury from
contact with a revolving cutting tool.
WARNING
When using the electric trimmer, always
keep the power supply cord and
extension cord behind you and away
from the cutting tool. Always ensure that
your power cords do not become
entangled with obstacles or objects.
Damaged cords may cause
electrocution. Always disconnect the
plug from the power supply when you
take a break.
WARNING
Avoid damage to the power cords. Keep
cords away from heat, oil and sharp
edges. Never carry trimmer by power
cable or yank power cable or extension
cord to disconnect the plug from the wall
outlet. To unplug, grasp the plug not the
cord.
WARNING
Always switch off the motor and make
sure the cutting attachment has stopped
before putting an electric trimmer down.
Disconnect the trimmer from the power
supply when not in use, before servicing,
when changing accessories such as
trimmer line, and the like.
To reduce the risk of unintentional
starting, never carry a plugged in unit
with your finger on the switch. Be sure
the switch is off when plugged in.
Transporting the Electric Trimmer
When transporting your electric trimmer
in a vehicle, properly secure it to prevent
turnover and damage to the electric
trimmer.
Preparation for the Use of the Electric
Trimmer
Adjust hand grip to suit your size before
starting work. The machine should be
properly balanced as specified in your
instruction manual for proper control and
less fatigue in operation. Always check
your electric trimmer for proper condition
and operation before starting,
particularly the power supply cord, plug,
switch, cutting tool and deflector.
WARNING
Inspect the power supply cord plug, and
extension cord before and after each
use for signs of damage or aging.
An arrow on the deflector shows the
correct direction of rotation of the cutting
tool.
The cutting tool must be properly
tightened and in safe operating
condition. Inspect for loose parts (nuts,
screws, etc.) and for cracked, bent,
warped or damaged parts.
Follow the instructions in the appropriate
section of this instruction manual when
changing cutting attachments.
To reduce the risk of eye and other injury
always wear proper eye protection (see
the chapter on "Proper Clothing") and
ensure that bystanders are at least
50 feet (15 m) away. To reduce the risk
Avoid dangerous environ
-
ments. Do not use the
trimmer in damp or wet
locations. Do not expose
or use in rain. To reduce
the risk of electric shock,
do not handle the plug or
the unit with wet hands.
A
002BA051 KN
15m (50ft)

FSE 60
English
9
of damage to property, also maintain this
distance from such objects as vehicles
or windows. Even maintaining a
minimum distance of 15 meters cannot
exclude the potential danger. Any
coworkers who must be in the restricted
area should also wear goggles or
protective glasses. Stop the engine
immediately if you are approached.
WARNING
Your electric trimmer is a one-person
machine. Do not allow other persons in
the general work area, even when
starting.
Working Conditions
WARNING
Never attempt to use an electric trimmer
in locations where there is a potential for
explosive or flammable atmospheres.
Operate the electric trimmer under good
visibility and daylight conditions only.
Work carefully.
Do not cut any material other than weed
or similar soft vegetation. The cutting
tools may be used only for the
operations described in your manual.
Always hold the trimmer firmly with both
hands. Wrap your fingers tightly around
the handles, keeping the handles
cradled between your thumb and fore-
finger. Keep your hands in this position
to have your trimmer under control at all
times. Make sure that your trimmer
handles and grip are in good condition
and that they and your hands are clean
and free of moisture, pitch, oil or grease.
WARNING
Never attempt to operate any trimmer
with one hand. Loss of control of the
trimmer resulting in serious or fatal injury
may result.
WARNING
Do not overreach. Keep proper footing
and balance at all times. Special care
must be taken in slippery conditions and
in difficult, overgrown terrain. Watch for
hidden obstacles such as tree stumps,
roots and ditches to avoid stumbling. Be
extremely cautious when working on
slopes or uneven ground.
WARNING
WARNING
This trimmer is normally to be used at
ground level with the cutting attachment
parallel to the ground. Use of a trimmer
above ground level or with the cutting
attachment perpendicular to the ground
may increase the risk of injury, since the
cutting attachment is more fully exposed
and the trimmer may be more difficult to
control. Use the correct tool for the job.
Never use your trimmer as a hedge
trimmer. Do not use trimmer for any job
except that for which it is intended.
Do not force trimmer. It will do the job
better and with less likelihood of a risk of
injury at the rate for which it was
designed.
If the cutting tool or deflector becomes
clogged or stuck, always switch off the
motor, disconnect the plug, and make
sure the cutting tool has stopped, before
cleaning. Grass, weeds, etc. should be
cleaned off the cutting tool at regular
intervals.
Check damaged parts. Before further
use of the trimmer, a guard or other part
that is damaged should be carefully
002BA056 KN
To reduce the risk
of injury from
thrown objects and
blade contact,
never operate a
trimmer without a
properly mounted
deflector. Keep the
deflector (and the
skirt where appro
-
priate) adjusted
properly at all
times (see chap
-
ter on mounting
the cutting tool of
your instruction
manual).
Inspect the work area: To
reduce the risk of injury,
remove stones, pieces of
metal and other solid
objects which could be
thrown 15 meters or more
by the cutting attachment
or damage the cutting
attachment and property
(e.g. parked vehicles,
windows).

FSE 60
English
10
checked to determine that it will operate
properly and perform its intended
function. Check for alignment of moving
parts, binding of moving parts, breakage
of parts, mounting, and any other
condition that my affect its operation. A
guard or other part that is damaged
should be properly repaired or replaced
by an authorized service center unless
indicated elsewhere in this manual.
WARNING
During cutting, check the tightness and
the condition of the cutting tool at regular
intervals. If the behavior of the tool
changes, stop the engine immediately,
and check the nut securing the tool for
tightness and the cutting tool for cracks
and damage. Replace damaged cutting
tools immediately. Such tools may
shatter at high speed and cause serious
or fatal injury.
WARNING
MAINTENANCE, REPAIR AND
STORING
Servicing of Double-Insulated Appliance
This electric trimmer is double-insulated.
In such an appliance, two systems of
insulation are provided instead of
grounding. No grounding means are
provided, nor should means for
grounding be added to the appliance.
Servicing a double-insulated appliance
requires extreme care and knowledge of
the system, and should be done only by
qualified service personnel.
WARNING
Use only identical STIHL replacement
parts for maintenance and repair. Use of
non-STIHL parts may cause serious or
fatal injury.
Maintain your trimmer with care. Follow
the maintenance, lubrication and repair
instructions in the appropriate section of
your instruction manual. Never attempt
unauthorized repairs or open
powerhead.
WARNING
Always disconnect the plug from the
power supply and make sure that the
cutting tool is stopped before doing any
maintenance or repair work or cleaning
the electric trimmer. Do not attempt any
maintenance or repair work not
described in your instruction manual.
Have such work performed at your
STIHL service shop only.
Only authorized personnel may replace
the power supply cord. A damaged
power supply cord must be replaced by
an identical STIHL replacement part.
Check cooling air inlets about every ten
hours of operation and clean if
necessary. Do not use any strong
detergents on the plastic housing or
handle. They can be attacked by certain
house-hold cleaners containing
aromatic oils such as pine or lemon, or
by solvents such as kerosene.
WARNING
Do not spray water on the trimmer,
moisture can cause an electric shock
hazard. Wipe the unit with a cloth.
WARNING
Never repair damaged cutting
attachments by welding, straightening or
modifying the shape. This may cause
parts of the cutting tool to come off and
result in serious or fatal injuries.
WARNING
Check condition of cutting tool at regular
short intervals. If behavior of tool
changes, check it immediately for
tightness or any signs of cracks in
particular. Replace damaged or dull
cutting tools immediately, even if they
have only superficial cracks. If the tool
loosens after being properly tightened,
the retaining nut may be worn or
damaged and should be replaced. If the
tool continues to loosen, see your STIHL
dealer.
Tighten all nuts, bolts and screws before
and after each use.
For any maintenance please refer to the
maintenance chart and to the warranty
statement near the end of this manual.
Keep hands and feet
away from cutting tool.
Do not grasp it when
picking up or holding the
trimmer. Never touch a
rotating cutting tool with
your hand or any part of
your body. It continues to
rotate for a short period
after the throttle trigger is
released (flywheel effect).

FSE 60
English
11
Store electric trimmer indoors in a dry,
high or locked location and out of reach
of children.
SAVE THESE
INSTRUCTIONS!
Using the Cutting Tools
For an illustration of the various cutting
tools and instructions on proper mount-
ing see the chapter on "Mounting the
Mowing Head" in your instruction
manual.
Using the Mowing Heads
The STIHL Autocut mowing head
produces a clean and tidy finish. It is to
be used only on trimmers equipped with
a line-limiting blade in the deflector in
order to keep the line at the proper
length (see "Main Parts" chapter of this
manual).
WARNING
To reduce the risk of serious injury,
never use wire or metal-reinforced line
or other material in place of the nylon
cutting lines. Pieces of wire could break
off and be thrown at high speed toward
the operator or bystanders.
STIHL Autocut 5-2 Mowing Head
Nylon cutting line advances auto-
matically when tapped against the
ground.
WARNING
Do not use with mowing line larger than
the intended diameter. With a properly
mounted guard, the built-in cutter will
automatically adjust the line to its proper
length. Overly long lines can overload
the motor, resulting in damage to the
motor and nearby parts.
000BA019 KN

FSE 60
English
12
Approved Combinations
The complete combination includes:
– Cutting attachment
– Deflector
– Handle
– Harness
Select correct combination from the
table according to the cutting
attachment you intend to use.
WARNING
To reduce the risk of injury, no other
combinations are permitted.
Only mowing heads (1, 2) may be used
on trimmers with a curved drive tube and
loop handle.
Cutting Attachments
Mowing heads
1 STIHL AutoCut C 52
2 STIHL AutoCut C 6
-
2
Deflector
3 Deflector with blade for mowing
heads
Handle
4 Loop handle
Harness
5 Shoulder strap may be used
WARNING
Based on the cutting attachment being
used:
Choose the proper deflector in order to
reduce the risk of injury from thrown
objects and contact with the cutting
attachment.
Make sure your unit is equipped with the
proper handle and harness in order to
reduce the risk of injury from loss of
control and contact with the cutting
attachment.
Do not use rigid polymer blades, metal
cutting attachments or circular saw
blades on this unit.
Only mowing heads may be used on
loop-handled trimmers with a curved
drive tube.
Approved Combinations of Cutting Attachment, Deflector, Handle and Harness
Cutting Attachment Defector Handle Harness
282BA010-A1
1
4
5
3
Schnur/LINE 2
Schnur/LINE 1
2

FSE 60
English
13
N Pull the protective cap off the drive
tube.
N Push the drive tube (1) into the
motor housing (2) as far as the mark
(A), turning the drive tube back and
forth at the same time.
N Tighten down the screw (3) in the
housing firmly.
Mounting the Loop Handle
N Fit the loop handle (1) on the drive
tube about 12 in (30 cm) (distance
A) from the control handle (2).
N Insert the hex nut (3) in the loop
handle (1).
N Squeeze the ends of the clamp
together, fit the screw (4) with
washer (5) from the other side and
tighten down firmly.
Adjusting loop handle to most
comfortable position
N Loosen the screw (4).
N Move the loop handle (1) along the
drive tube to the required position –
tighten down the screw (4) firmly.
Mounting the Drive Tube
1
238BA016 KN
3
A
2
A
Mounting the Loop Handle
4
1
2
3
5
A
238BA002 KN
40 mm
(1.57 in)

FSE 60
English
14
N Push the deflector (1) over the
clamp (2) as far as stop.
N Fit the locknut (3) in the hex recess
on the deflector.
N Make sure the holes line up.
N Insert the M6x30 screw (4) and
tighten it down firmly.
Placing Power Tool on the Ground
N Switch off the power tool.
N Lay your trimmer on its back with
the loop handle facing down and the
output shaft facing up.
Fitting Mowing Head without Screw
Mounting
Keep the instruction leaflet for the
mowing head in a safe place.
STIHL AutoCut C 5-2
N Slip the mowing head (2) on to the
shaft – as AutoCut 5-2.
N Turn the spool (9) clockwise until
the two arrow heads line up –
secure the spool in this position.
N Insert the cap (8) in the spool, press
it down as far as stop and turn it
clockwise at the same time.
N Turn the cap until you feel
resistance and then tighten it down
firmly by hand.
Mounting the Deflector
1
238BA003 KN
2
238BA004 KN
4
3
Mounting the Cutting
Attachment
238BA021 KN
9
681BA018 KN
Schnur/LINE 2
Schnur/LINE 1
2
8

FSE 60
English
15
STIHL AutoCut C 6-2
N Slip the mowing head (2) over the
shaft (3) and engage its hex recess
on the external hexagon (4).
N Hold mowing head (2) steady with
one hand.
N Turn the cap (1) clockwise and
tighten it down firmly by hand.
Removing the Mowing Head
N Hold the mowing head steady.
N Unscrew the cap counterclockwise.
The voltage and frequency of your
power supply and the voltage and
frequency specified on the unit must be
the same. Use an extension cord
specifically approved for outdoor
applications.
Extension Cords
120 V version
230 V version
N Insert the plug (1) into the extension
cord coupling (2).
Strain Relief
The strain relief (cord retainer) protects
the appliance cord against damage.
0000-GXX-3937-A0
2
1
3
4
Connecting to Power Supply
Minimum wire gauge for extension
cords for 120 Volt appliances using
0
-
6amps:
Cord length (ft) 25 50 100 150
Wire size (AWG) 18 16 16 14
Minimum cross sectional area of wires:
Cord lengths of 6,5 ft (2 m) or more:
1,5 mm
2
, type H07 RN
-
F
238BA008 KN
1
2

FSE 60
English
16
N Make a loop (3) in the extension
cord.
N Pass the loop (3) through the
opening (4).
N Slip the loop (3) over the hook (5)
and pull it tight.
N Connect the extension cord plug to
a properly installed wall outlet.
A shoulder strap is available as a special
accessory.
Wear the shoulder strap over your left
shoulder and adjust its length so that the
spring hook lies against your right hip.
The open side of the hook should face
away from your body. Attach the spring
hook to the carrying ring (see "Main
Parts").
N Make sure you have a secure and
balanced footing.
N Hold your trimmer with both hands –
right hand on the control handle –
left hand on the loop handle.
N Stand upright – hold the trimmer in a
relaxed position and always on right
side of your body.
N The cutting attachment must not
touch the ground or any other
objects.
N Press down the starting lockout
lever (1) and hold it in that position.
N Squeeze the trigger switch (2).
4
238BA009 KN
5
3
Fitting the Harness Switching On
2
1
238BA010 KN

FSE 60
English
17
N Release the trigger switch and
starting lockout lever.
WARNING
Note that the cutting attachment
continues to run for a short period after
you let go of the throttle trigger and
starting lockout lever – flywheel effect.
During longer work breaks – disconnect
the plug from the power supply.
When the machine is not in use, shut it
off so that it does not endanger others.
Secure it against unauthorized use.
For periods of 3 months or longer
N Thoroughly clean the machine,
especially the cooling air inlets.
N Take out the spool with nylon lines
and engage the ends of the lines in
the spool's notches. Clean and
inspect the spool.
The resilience and service life of the
nylon line can be increased by storing it
in a container filled with water.
N Store the machine in a dry, high or
locked location, out of the reach of
children and other unauthorized
persons.
Placing Power Tool on the Ground
N Switch off the power tool.
N Lay your trimmer on its back with
the loop handle facing down and the
output shaft facing up.
Switching Off Storing the Machine Maintaining the Mowing
Head
238BA021 KN

FSE 60
English
18
Re-Adjusting the Mowing Line
N Hold the rotating mowing head
above the ground – tap it on the
ground once – about 3 cm (1.2 in) of
fresh mowing line is advanced
N The blade (1) on the deflector (2)
trims surplus mowing line to the
correct length – avoid tapping the
mowing head more than once at a
time!
The mowing line feed operates only if
both lines still have a minimum length of
2.5 cm (1 in).
If the mowing line is shorter than 2.5 cm
(1 in):
WARNING
To reduce the risk of injury, always shut
off the engine before adjusting the
mowing line by hand.
N Turn over the machine
N Press down the cap on the line
spool as far as it will go
N Pull the ends of the lines out of the
line spool
If the spool is empty, refill with mowing
line
Replacing the Mowing Line
Always check the mowing head for wear
before replacing the mowing line.
WARNING
If signs of heavy wear are visible, the
mowing head must be completely
replaced.
The mowing line is referred to as ‘line’ in
the following.
An illustrated guide to replacing lines is
supplied with the mowing head. You
should therefore keep the instructions
for the mowing head in a safe place.
N Remove the mowing head if
necessary
STIHL AutoCut C 5
-
2
Disassembling the mowing head and
removing remaining nylon line
In normal operation, the supply of nylon
line in the head is used up almost
completely.
N Hold the mowing head steady and
rotate the cap (1) counterclockwise
until it can be removed.
N Pull the spool (2) out of the mowing
head (3) and remove the remaining
line.
1
232BA007 KN
2
Schnur/LINE 1
681BA021 KN
1
2
3

FSE 60
English
19
Assembling the mowing head
N Fit the empty spool in the mowing
head.
If the spring (4) has popped out:
N push it into the spool (2) until it
engages in position with an audible
click.
N Mount the mowing head – see
"Mounting the Mowing Head".
Winding line onto spool
N Use green-coded nylon line with a
diameter of 2 mm (0.08 in).
N Cut two 2 m (6ft 6in) lengths of
nylon line from the reel (special
accessory).
N Rotate the spool (2)
counterclockwise until the two arrow
points are in alignment.
N Push the straight end of each line
through one of the sleeves (5) in the
mowing head (3) until you feel a
noticeable resistance – and then
continue pushing as far as stop.
N Hold the mowing head steady.
N Rotate the spool counterclockwise
until the shortest line is about 10 cm
(4 in).
N If necessary, cut the longer line to a
length of about 10 cm (4 in).
The mowing head is now full.
Schnur/LINE 1
681BA022 KN
2
4
Schnur/LINE 2
681BA023 KN
5
Schnur/LINE 1
3
3
2
681BA024 KN
Schnur/LINE 2
Schnur/LINE 1

FSE 60
English
20
STIHL AutoCut 5
-
2
Removing remaining nylon line
N Open the mowing head – hold it
steady with one hand and turn the
cap (1) counterclockwise.
N Disengage the spool (2), take it out
of the mowing head and remove the
remaining line.
Winding line onto spool
A prewound spool (special accessory)
may be used as an alternative to the
following procedure.
N Use green-coded nylon line with a
diameter of 2.0 mm (0.08 in).
N Cut two 3 m (9ft 9in) lengths of
nylon line from the reel (special
accessory).
N Insert the ends of each line (3) in the
holes (4) in the spool.
N Bend the ends of the lines over the
edge of the holes to form a hook.
N Straighten out the nylon lines and
wind them tightly on to the spool –
one nylon line in each chamber.
N Engage the ends of the lines in the
notches (2).
Assembling the mowing head
NOTICE
Check that the spring is installed (see
"Mounting the Mowing Head").
681BA008 KN
1
2
681BA009 KN
4
3
3
681BA010 KN
5
5

FSE 60
English
21
N Thread the ends of the lines (6)
through the sleeves (7) and push
the spool (2) into the head so that it
snaps into position.
The nylon lines must disengage from the
notches (5) as the spool is pushed into
position.
N Pull out the ends of the lines as far
as stop.
N Mount the mowing head on the
machine.
7
681BA011 KN
2
6
6

FSE 60
English
22
Maintenance and Care
The following intervals apply to normal operating conditions only. If your daily working time is longer or
operating conditions are difficult (very dusty work area, etc.), shorten the specified intervals
accordingly.
before starting work
after finishing work or daily
weekly
monthly
if problem
if damaged
if required
Complete machine
Visual inspection (condition) X
Clean X
Power cord
Check X
Have replaced by dealer
1)
X
Switch, starting lockout
Check operation X
Have replaced by dealer
1)
XX
Cooling inlets Clean X
All accessible screws and nuts Retighten X
Cutting attachment (mowing head)
Visual Inspection X
Replace X
Check tightness X
Safety labels Replace X
1)
STIHL recommends a STIHL servicing dealer.

FSE 60
English
23
1 Power Supply Cord
2 Cooling air intake slots
3 Trigger Switch
4 Starting Lockout Lever
5 Carrying Loop
6 Loop Handle
7 Drive Tube
8 Mowing Head
9 Line Length Limiter Blade
10 Deflector
11 Strain Relief
# Serial Number
Main Parts
2
#
1
7
6
3
5
4
11
9
8
10
238BA020 KN

FSE 60
English
24
Definitions
1 Power Supply Cord
Supplies electric to current motor.
2 Cooling air intake slots
Cooling air flows to the motor
through the slots.
3 Trigger Switch
To switch the machine "on" and
"off".
4 Starting Lockout Lever
Must be depressed before the
trigger switch can be activated.
5 Carrying Loop
The device to connect the trimmer
to the harness.
6 Loop Handle
For easy control of machine during
cutting work.
7 Drive Tube
Device to connect the engine with
the gearbox.
8 Mowing Head
The mowing head is intended to
supplement a lawn mower.
9 Line Length Limiter Blade
Metal piece in the deflector for
cutting off excess nylon line.
10 Deflector
The deflector is designed to reduce
the risk of injury from foreign objects
flung backwards toward the
operator by the cutting tool and from
contact with the cutting tool.
11 Strain Relief
Supports extension cord and
reduces the likelihood of
disconnection of extension cord
receptacles and trimmer plug.
Motor
FSE 60, 120 V version
FSE 60, 230 V version
Length
Specifications
Voltage: 120 V
Frequency: 60 Hz
Rated current: 5 A
Power rating: 600 W
Rated speed at mowing
line diameter of 14 in
(350 mm): 8,400 rpm
Maximum motor speed
(without nylon line): 10,800 rpm
Fuse: min. 15 A
Insulation: II, E
Voltage: 230 V
Frequency: 50 Hz
Rated current: 2.6 A
Power rating: 600 W
Rated speed at mowing
line diameter of 14 in
(350 mm): 8,000 rpm
Maximum motor speed
(without nylon line): 10,000 rpm
Fuse: min. 10 A
Insulation: II, E
FSE 60: 60.2 in (1530 mm)

FSE 60
English
25
Weight
Users of this unit should carry out only
the maintenance operations described
in this manual. STIHL recommends that
other repair work be performed only by
authorized STIHL servicing dealers
using genuine STIHL replacement parts.
Genuine STIHL parts can be identified
by the STIHL part number, the
{ logo and, in some cases, by
the STIHL parts symbol K. The
symbol may appear alone on small
parts.
For repairs of any component of this
unit’s air emissions control system,
please refer to the air emissions
systems warranty in this manual.
Observe all country-specific waste
disposal rules and regulations.
STIHL products must not be thrown in
the garbage can. Take the product,
accessories and packaging to an
approved disposal site for environment-
friendly recycling.
Contact your STIHL servicing dealer for
the latest information on waste disposal.
complete with cutting attachment and
deflector
FSE 60: 8.6 lbs (4.0 kg)
Maintenance and Repairs Disposal
000BA073 KN

FSE 60
English
26
STIHL Incorporated Limited Warranty
Policy for Non-Emission-Related Parts
and Components
This product is sold subject to the STIHL
Incorporated Limited Warranty Policy,
available at
www.stihlusa.com/warranty.html.
It can also be obtained from your
authorized STIHL dealer or by calling
1
-
800
-
GO
-
STIHL (1
-
800
-
467
-
8445).
A separate emissions control system
warranty is provided for emission-
related components.
STIHL Registered Trademarks
STIHL
®
{
K
The color combination orange-grey
(U.S. Registrations #2,821,860;
#3,010,057, #3,010,058, #3,400,477;
and #3,400,476)
AutoCut
®
FARM BOSS
®
iCademy
®
MAGNUM
®
MasterWrench Service
®
MotoMix
®
OILOMATIC
®
ROCK BOSS
®
STIHL Cutquik
®
STIHL DUROMATIC
®
STIHL Quickstop
®
STIHL ROLLOMATIC
®
STIHL WOOD BOSS
®
TIMBERSPORTS
®
WOOD BOSS
®
YARD BOSS
®
Some of STIHL’s Common Law
Trademarks
4-MIX ™
BioPlus ™
Easy2Start ™
EasySpool ™
ElastoStart ™
Ematic ™
FixCut ™
IntelliCarb ™
Master Control Lever ™
Micro ™
Pro Mark ™
Quiet Line ™
STIHL M-Tronic ™
Limited Warranty Trademarks
TM
STIHL
Injection

FSE 60
English
27
STIHL OUTFITTERS ™
STIHL PICCO ™
STIHL PolyCut ™
STIHL PowerSweep ™
STIHL Precision Series ™
STIHL RAPID ™
STIHL SuperCut ™
TapAction ™
TrimCut ™
This listing of trademarks is subject to
change.
Any unauthorized use of these
trademarks without the express written
consent of
ANDREAS STIHL AG & Co. KG,
Waiblingen is strictly prohibited.
STIHL Inc.
536 Viking Drive
P.O. Box 2015
Virginia Beach, VA
23452-2015
Addresses

Manual de instrucciones original Impreso en papel libre de cloro.
Las tintas contienen aceites vegetales, el papel es reciclable.
© ANDREAS STIHL AG & Co. KG, 2020
0458-238-8621-A. VA3.G20.
0000000133_012_EA
FSE 60
español / EE.UU
28
Este manual de instrucciones está protegido por derechos de propiedad intelectual. Todos los derechos reservados, especial
-
mente los derechos de reproducción, traducción y procesamiento con sistemas electrónicos.
Contenido
Permita que solamente las personas
que comprenden la materia tratada en
este manual manejen su motoguadaña.
Para obtener el rendimiento y
satisfacción máximos de la
motoguadaña STIHL, es importante que
lea, obedezca y comprenda las
precauciones de seguridad y las
instrucciones de uso y mantenimiento
dadas en el capítulo "Precauciones de
seguridad y técnicas de uso", antes de
usar la motoguadaña. Para información
adicional, puede acudir a
www.stihlusa.com.
Comuníquese con su representante de
STIHL o el distribuidor de STIHL para su
zona si no se entiende alguna de las
instrucciones dadas en el presente
manual.
ADVERTENCIA
Dado que la motoguadaña es una
herramienta de corte motorizada de
gran velocidad, es necesario tomar
medidas especiales de seguridad para
reducir el riesgo de lesiones. El uso
descuidado o inadecuado puede causar
lesiones graves e incluso mortales.
Asegúrese que su máquina esté
equipada con el deflector, mango y
arnés adecuados para el tipo de
accesorio de corte que se está
utilizando. Siempre protéjase
adecuadamente los ojos.
Acerca de este manual de
instrucciones 29
INSTRUCCIONES IMPORTANTES
DE SEGURIDAD 29
Medidas de seguridad y técnicas
de manejo 32
Combinaciones aprobadas de
accesorio de corte, deflector,
mango y arnés 41
Montaje del tubo de mando 42
Montaje del mango tórico 42
Montaje de la barra de defensa 43
Montaje del accesorio de corte 43
Conexión eléctrica de la máquina 44
Uso de la correa para hombro 45
Encendido de la máquina 45
Apagado de la máquina 46
Almacenamiento de la máquina 46
Mantenimiento de la cabeza
segadora 46
Información para mantenimiento 51
Componentes importantes 52
Especificaciones 53
Información de reparación 54
Desecho 54
Garantía limitada 55
Marcas comerciales 55
Direcciones 56

FSE 60
español / EE.UU
29
Pictogramas
Todos los pictogramas que se
encuentran fijados o grabados en la
máquina se muestran y explican en este
manual.
Símbolos en el texto
Muchas de las instrucciones de uso y
seguridad vienen acompañadas de
ilustraciones.
Los pasos individuales o
procedimientos descritos en el manual
pueden estar señalados en diferentes
maneras:
N Se usa un punto para denotar un
paso o procedimiento.
Una descripción de un paso o
procedimiento que se refiere
directamente a una ilustración puede
contener números de referencia que
aparecen en la ilustración. Ejemplo:
N Suelte el tornillo (1).
N Palanca (2)...
Además de las instrucciones de uso, en
este manual pueden encontrarse
párrafos a los que usted debe prestar
atención especial. Tales párrafos están
marcados con los símbolos y las
palabras identificadoras:
PELIGRO
Identifica una situación de peligro que,
de no evitarse, causará lesiones graves
o mortales.
ADVERTENCIA
Identifica una situación de peligro que,
de no evitarse, podría causar lesiones
graves o mortales.
INDICACIÓN
Indica el riesgo de daños a la propiedad,
incluidos la máquina o sus
componentes.
Mejoramientos técnicos
La filosofía de STIHL es mejorar
continuamente todos sus productos.
Como resultado de ello, periódicamente
se introducen cambios de diseño y
mejoras. Por lo tanto, es posible que
algunos cambios, modificaciones y
mejoras no se describan en este
manual. Si las características de
funcionamiento o la apariencia de su
máquina difieren de las descritas en
este manual, comuníquese con el
concesionario STIHL para obtener la
ayuda que requiera.
ADVERTENCIA
Para reducir el riesgo de sufrir lesiones
graves o mortales causadas por
electrocución, siga las precauciones
básicas, incluyendo las siguientes:
LEA TODAS LAS INSTRUCCIONES
1. Evite los entornos peligrosos - No
utilice el aparato en lugares
húmedos ni mojados.
2. No lo use bajo la lluvia.
3. Mantenga alejados a los niños - Las
demás personas deben
mantenerse alejadas de la zona de
trabajo.
4. Use vestimenta apropiada - No use
ropa suelta ni artículos de joyería.
Estos pueden ser atrapados por las
piezas en movimiento. Se
recomienda usar guantes de
caucho y calzado de seguridad al
trabajar a la intemperie.
5. Use gafas de seguridad - Siempre
utilice una máscara o mascarilla
contra polvo al trabajar en un lugar
polvoriento.
6. Utilice el aparato apropiado para el
trabajo - No lo use para ningún
propósito diferente al de su diseño.
Acerca de este manual de
instrucciones
INSTRUCCIONES
IMPORTANTES
DE SEGURIDAD

FSE 60
español / EE.UU
30
7. Los circuitos o tomacorrientes que
se usen para el aparato de
jardinería deberán tener
interruptores por pérdidas a tierra
(GFCI). Hay tomacorrientes que
incorporan protección por medio de
un interruptor diferencial (GFCI) y
que pueden usarse como medida
de seguridad.
8. Advertencia: Para reducir el riesgo
de sacudidas eléctricas, utilice la
máquina solamente con un
alargador diseñado para usar al
intemperie, tal como alargadores
tipo
SW
-
A, SOW
-
A, STW
-
A, STOW
-
A,
SJW
-
A, SJOW
-
A, SJTW
-
A o
SJTOW
-
A.
9. Juegos de cordones - Compruebe
que el juego de cordones se
encuentre en buenas condiciones.
Cuando se usa un conjunto de
alargadores, asegúrese de usar
uno suficientemente grueso para
transportar la corriente que el
producto consumirá. Un alargador
de capacidad insuficiente causará
una caída de voltaje de línea, lo cual
produce una pérdida de potencia y
sobrecalentamiento. La tabla
siguiente muestra el tamaño
correcto de cordón a usarse, según
el largo del cordón y la capacidad
de corriente de la placa de
identificación. En caso de duda,
utilice el calibre inmediatamente
más grueso. Cuanto menor el
número de calibre, tanto más
grueso el cordón.
Se pueden obtener alargadores
apropiados en establecimientos de
equipos eléctricos, o a través del
concesionario STIHL.
Para reducir el riesgo de desconectar el
cordón del aparato del cordón de
extensión cuando se trabaja con el
aparato:
N Inserte el enchufe de la máquina (1)
en el receptáculo (2) del cordón de
extensión.
Protector contra tirones
N Forme un lazo (3) con el cordón de
extensión y páselo a través de la
abertura (4).
N Deslice el lazo sobre el gancho (5) y
tire del cordón para dejarlo
ajustado.
10. Evite los arranques inesperados -
No transporte un aparato
enchufado con el dedo sobre el
interruptor. Asegúrese que el
interruptor esté en posición de
apagado antes de enchufarlo.
11. No maltrate el cordón - Nunca
levante el aparato por el cordón ni
tire del mismo para desconectarlo
del receptáculo. Mantenga el
cordón alejado de fuentes de calor,
aceite y bordes afilados.
Calibre mínimo de alargadores para
aparatos de 120 voltios y 0
-
6amperios
Largo del cordón
(pies)
25 50 100 150
Calibre de alam
-
bre (AWG)
18 16 16 14
238BA008 KN
1
2
4
238BA009 KN
5
3

FSE 60
español / EE.UU
31
12. No agarre la herramienta de corte
para transportar o sujetar el
aparato.
13. No fuerce el aparato - Funciona
mejor y con menos riesgo de
lesiones si se usa al ritmo para el
cual fue diseñado.
14. No se sobreextienda - Mantenga los
pies bien apoyados y equilibrados
en todo momento.
15. Permanezca alerta - Esté atento a
lo que está haciendo. Use buen
criterio. No maneje el aparato
cuando está fatigado.
16. Desconecte el aparato -
Desconecte el aparato del
suministro de energía eléctrica
cuando no esté en uso, antes de
darle mantenimiento y al cambiar
accesorios tales como cuchillas y
piezas similares.
17. Guarde el aparato bajo techo -
Cuando no se usa el aparato,
guárdelo puertas adentro en un
lugar seco y elevado o bajo llave -
fuera del alcance de niños.
18. Mantenga su aparato con esmero.
Siga las instrucciones para lubricar
la máquina y cambiar sus
accesorios. Inspeccione el cordón
eléctrico del aparato
periódicamente. Si está dañado,
solicite a un taller autorizado que lo
repare. Inspeccione los alargadores
periódicamente y reemplácelos si
están dañados. Mantenga las
manos secas, limpias y sin aceite ni
grasa.
19. Revise las piezas dañadas - antes
de seguir usando el aparato, revise
minuciosamente su protector u
otras piezas que se hayan dañado
para verificar que funcionarán
correctamente y cumplirán su
función. Compruebe la alineación
de las piezas móviles y si éstas
tienen agarrotamiento, si hay
piezas rotas, el montaje de las
piezas y toda condición que pueda
afectar su funcionamiento. Si un
protector u otra pieza tiene daños,
deberá ser sustituido o reparado
por un taller de servicio autorizado,
salvo indicación contraria en este
manual.
Repuestos
Al darle mantenimiento a la máquina,
utilice únicamente repuestos genuinos.
Reemplace los cordones dañados o
solicite al concesionario autorizado
STIHL que los repare.
Para reducir el riesgo de sacudidas
eléctricas, este equipo tiene un enchufe
polarizado (una clavija es más ancha
que la otra). Este enchufe sólo puede
conectarse a un tomacorriente
polarizado en una posición. Si el
enchufe no puede conectarse al
tomacorriente, inviértalo. Si todavía no
puede conectarse, solicite a un
electricista calificado que instale un
tomacorriente adecuado. No modifique
el enchufe en modo alguno.
GUARDE ESTAS INSTRUCCIONES

FSE 60
español / EE.UU
32
¡ADVERTENCIA!
¡LEA TODAS LAS
INSTRUCCIONES!
El uso descuidado o inadecuado de
cualquier orilladora puede causar
lesiones graves e incluso mortales. Pida
a su concesionario STIHL que le enseñe
el manejo de la orilladora eléctrica.
Respete todas las disposiciones,
reglamentos y normas de seguridad
locales del caso.
ADVERTENCIA
No preste ni alquile nunca su orilladora
sin entregar el manual de instrucciones.
Asegúrese que todas las personas que
utilicen la orilladora lean y comprendan
la información contenida en este
manual.
ADVERTENCIA
El uso de cualquier orilladora puede ser
peligroso. Si la herramienta de corte
giratoria llega a quedar en contacto con
su cuerpo, le ocasionará una cortadura.
Cuando choca con algún objeto extraño
sólido tal como rocas o pedazos de
metal, puede arrojarlo directamente o
por rebote en dirección de personas que
se encuentren en la cercanía o del
operador. El chocar contra este tipo de
objetos también puede dañar el
accesorio de corte. Los objetos
lanzados o las herramientas de corte
dañadas pueden ocasionar lesiones
graves o mortales al operador o a
personas que se encuentren en la
cercanía.
ADVERTENCIA
Nunca permita a los niños que usen una
orilladora eléctrica. No se debe permitir
la proximidad de otros, especialmente
niños y animales, donde se esté
utilizando la orilladora.
Nunca deje la orilladora funcionando sin
vigilancia.
Las medidas de seguridad y avisos
contenidos en este manual se refieren al
uso de todas las orilladoras eléctricas de
STIHL. Los distintos modelos pueden
contar con piezas y controles diferentes.
Vea la sección correspondiente de su
manual de instrucciones para tener una
descripción de los controles y la función
de los componentes de su modelo de
orilladora eléctrica.
El uso seguro de una orilladora eléctrica
atañe a
1. el operador
2. la orilladora
3. el uso de la orilladora
EL OPERADOR
Condición física
Usted debe estar en buenas
condiciones físicas y psíquicas y no
encontrarse bajo la influencia de
ninguna sustancia (drogas, alcohol,
etc.) que le pueda restar visibilidad,
destreza o juicio. No maneje la orilladora
eléctrica cuando está fatigado.
ADVERTENCIA
Esté alerta. Preste atención a su trabajo.
Use buen criterio. Si se cansa durante el
manejo de su orilladora eléctrica,
tómese un descanso. El cansancio
puede provocar una pérdida del control.
El uso de cualquier orilladora es
fatigoso. Si usted padece de alguna
dolencia que pueda ser agravada por la
fatiga, consulte a su médico antes de
utilizar la orilladora.
Medidas de seguridad y
técnicas de manejo
Dado que la orilladora es
una herramienta de corte
eléctrica que funciona a
gran velocidad, es nece
-
sario tomar medidas
especiales de seguridad
para reducir el riesgo de
incendios, sacudidas
eléctricas y lesiones.
Es importante que usted
lea, comprenda bien y
respete las siguientes
advertencias y medidas
de seguridad. Guarde
este manual de instruc
-
ciones y lea las
instrucciones de seguri
-
dad periódicamente.
Familiarícese completa
-
mente con los controles y
con el modo de empleo
adecuado del equipo.
Sepa cómo apagar la
máquina y desengranar
los controles con rapidez.

FSE 60
español / EE.UU
33
ADVERTENCIA
El uso prolongado de una orilladora
eléctrica (u otras máquinas) expone al
operador a vibraciones que pueden
provocar el fenómeno de Raynaud
(dedos blancos) o el síndrome del túnel
del carpio.
Estas condiciones reducen la capacidad
de las manos de sentir y regular la
temperatura, producen entumecimiento
y ardor y pueden provocar trastornos
nerviosos y circulatorios, así como
necrosis de los tejidos.
No se conocen todos los factores que
contribuyen a la enfermedad de
Raynaud, pero el clima frío, el fumar y
las enfermedades o condiciones físicas
que afectan los vasos sanguíneos y la
circulación de la sangre, como asimismo
los niveles altos de vibración y períodos
prolongados de exposición a la
vibración son mencionados como
factores en el desarrollo de la
enfermedad de Raynaud. Por lo tanto,
para reducir el riesgo de la enfermedad
de dedos blancos y del síndrome del
túnel carpiano, sírvase notar lo
siguiente:
– Use guantes y mantenga las manos
abrigadas.
– Agarre firmemente los mangos en
todo momento, pero no los apriete
con fuerza constante y excesiva.
Tómese descansos frecuentes.
Todas las precauciones antes
mencionadas no le garantizan que va a
estar totalmente protegido contra la
enfermedad de Raynaud o el síndrome
del túnel carpiano. Por lo tanto, los
operadores constantes y regulares
deben revisar con frecuencia el estado
de sus manos y dedos. Si aparece
alguno de los síntomas arriba
mencionados, consulte inmediatamente
al médico.
ADVERTENCIA
Según los datos obtenidos por STIHL en
la actualidad, el motor eléctrico de esta
máquina no debe interferir con un
marcapasos. No obstante, en caso de
duda, consulte con su médico y con el
fabricante de su marcapasos antes de
usar esta herramienta.
Vestimenta adecuada
ADVERTENCIA
Para reducir el riesgo de lesiones el
operador debe usar el equipo protector
adecuado.
ADVERTENCIA
Por lo tanto, para reducir el riesgo de
lesionarse los ojos, nunca maneje la
orilladora si no tiene puestas gafas o
anteojos de seguridad bien ajustados
con una protección adecuada en las
partes superior y laterales que
satisfagan la norma ANSI Z 87 "+" (o la
norma nacional correspondiente).
Para reducir el riesgo de lesionarse la
cara, STIHL recomienda usar también
una careta o protector facial adecuado
sobre las gafas o anteojos de seguridad.
ADVERTENCIA
El manejo de la orilladora
puede causar lesiones
graves a los ojos y el
cuerpo. El deflector pro
-
visto con su orilladora no
siempre protege al ope
-
rador contra todos los
objetos extraños (gravilla,
vidrio, alambre, etc.)
arrojados por la herra
-
mienta de corte giratoria.
Los objetos arrojados o
lanzados por el accesorio
también pueden rebotar y
golpear al operador.
El ruido de la orilladora
puede dañar los oídos.
Siempre use amortigua
-
dores del ruido (tapones
u orejeras) para prote
-
gerse los oídos. Los
usuarios constantes y
regulares deben some
-
terse con frecuencia a un
examen o control
auditivo.
Siempre use guantes
gruesos (por ejemplo,
fabricados de cuero u
otro material resistente al
desgaste) cuando mani
-
pule la orilladora y la
herramienta de corte. Los
guantes gruesos y anti
-
deslizantes mejoran el
manejo y ayudan a prote
-
ger las manos.
La ropa debe ser de con
-
fección fuerte y ajustada,
pero no tanto que impida
la completa libertad de
movimiento.

FSE 60
español / EE.UU
34
Evite el uso de chaquetas sueltas,
bufandas, corbatas, joyas, pantalones
acampanados o con vueltas, pelo largo
suelto o cualquier cosa que pueda
engancharse en las ramas, matorrales o
piezas en movimiento de la máquina.
Use pantalones largos hechos de un
material grueso para protegerse las
piernas. No use pantalones cortos,
sandalias o pies descalzos. Sujétese el
pelo de modo que quede sobre los
hombros.
Siempre utilice una máscara contra
polvo si se trabaja en un lugar
polvoriento.
LA ORILLADORA
Para las ilustraciones y definiciones de
los componentes de la orilladora
eléctrica, vea el capítulo sobre "Piezas
principales".
ADVERTENCIA
Nunca modifique, de ninguna manera,
una orilladora. Utilice únicamente los
accesorios y repuestos suministrados
por STIHL o expresamente autorizados
por STIHL para usarse con los modelos
específicos de orilladoras eléctricas de
STIHL. Si bien es posible conectar a la
orilladora eléctrica de STIHL ciertos
accesorios no autorizados, su uso
puede ser, en la práctica,
extremadamente peligroso.
ADVERTENCIA
USO DE LA ORILLADORA
ELECTRICA
Precauciones eléctricas
Es necesario tomar precauciones
especiales al usar orilladoras eléctricas
para reducir el riesgo de sufrir lesiones
graves o mortales y causar daños a la
propiedad como resultado de incendios
y sacudidas eléctricas.
ADVERTENCIA
El voltaje del suministro de energía
eléctrica debe corresponder con el
voltaje especificado en la etiqueta de la
orilladora. El voltaje incorrecto dañará a
la orilladora y puede causar lesiones
personales.
Enchufes polarizados: Para reducir el
riesgo de sacudidas eléctricas, esta
orilladora tiene un enchufe polarizado
(una clavija es más ancha que la otra) y
requiere el uso de un cordón de
extensión con enchufes polarizados. El
enchufe de la orilladora encaja en el
cordón de extensión polarizado en una
posición solamente. Si el enchufe no
puede conectarse al alargador,
inviértalo. Si el enchufe todavía no
encaja, obtenga un alargador
polarizado. El uso de un alargador
polarizado requiere el uso de un
tomacorriente polarizado. Este enchufe
sólo puede conectarse a un
tomacorriente polarizado en una
posición. Si el enchufe no puede
conectarse al tomacorriente, inviértalo.
Si todavía no puede conectarse, solicite
a un electricista calificado que instale un
tomacorriente adecuado. No modifique
el enchufe de la orilladora, ni el
receptáculo o enchufe del cordón de
extensión, en modo alguno.
Los circuitos de los tomacorrientes que
se usen para el aparato de jardinería
deberán tener interruptores por
pérdidas a tierra (GFCI). Hay
tomacorrientes que incorporan
protección por medio de un interruptor
diferencial (GFCI) y que pueden usarse
como medida de seguridad.
Alargador: Compruebe que el cordón de
extensión se encuentre en buenas
condiciones. Cuando se usa un
alargador, asegúrese de que sea
suficientemente grueso para conducir la
corriente que el producto consumirá. Un
alargador de capacidad insuficiente
causará una caída de voltaje de línea, lo
cual produce una pérdida de potencia y
sobrecalentamiento. La tabla siguiente
muestra el tamaño correcto de cordón a
usarse, según el largo del cordón y la
capacidad de corriente de la placa de
identificación. En caso de duda, utilice el
Una buena base de
apoyo es indispensable
cuando se maneja la ori
-
lladora. Póngase botas
gruesas con suela anti
-
deslizante.
Recomendamos las
botas de seguridad con
puntera de acero.
Para reducir el
riesgo de que el
operador sufra
lesiones como
resultado del con
-
tacto con las
cuchillas, nunca
use accesorios
metálicos de corte
con este modelo
de orilladora.

FSE 60
español / EE.UU
35
calibre inmediatamente más grueso.
Cuanto menor el número de calibre,
tanto más grueso el cordón.
Se pueden obtener cordones de
extensión apropiados en
establecimientos de venta de equipos
eléctricos.
ADVERTENCIA
Para reducir el riesgo de sufrir
sacudidas eléctricas, utilice únicamente
un alargador apropiado para uso a la
intemperie, tal como los cordones tipo
SW-A, SOW-A, STW-A, STOW-A, SJW-
A, SJOW-A, SJTW-A o SJTOW-A.
Protector contra tirones
Para reducir el riesgo de desconectar el
cordón del aparato del alargador
cuando se está trabajando:
Inserte el enchufe de la máquina (1) en
el receptáculo (2) del alargador.
Forme un lazo (3) con el alargador y
páselo a través de la abertura (4).
Deslice el lazo sobre el gancho (5) y tire
del cordón para dejarlo ajustado.
Calibre mínimo de alargadores para
aparatos de 120 voltios y 0
-
6amperios
Largo del cordón
(pies)
25 50 100 150
Calibre de alam
-
bre (AWG)
18 16 16 14
238BA008 KN
1
2
4
238BA009 KN
5
3

FSE 60
español / EE.UU
36
ADVERTENCIA
ADVERTENCIA
ADVERTENCIA
Asegúrese que el interruptor esté en
posición de apagado al enchufar la
máquina al suministro de energía
eléctrica para evitar los riesgos de
incendios y sacudidas eléctricas
causados por los arcos eléctricos y para
evitar las lesiones causadas por el
contacto con una herramienta giratoria
de corte.
ADVERTENCIA
Al usar la orilladora eléctrica, siempre
mantenga el cordón eléctrico y el cordón
de extensión detrás suyo y alejados de
la herramienta de corte. Asegúrese que
los cordones eléctricos no se enreden
con obstáculos ni objetos. Los cordones
dañados pueden causar la
electrocución. Siempre desconecte el
enchufe del tomacorriente eléctrico al
tomar un descanso.
ADVERTENCIA
Evite los daños a los cordones
eléctricos. Mantenga los cordones
alejados de fuentes de calor, aceite y
bordes afilados. Nunca transporte la
orilladora por su cable ni tire del cordón
eléctrico o del cordón de extensión para
desconectar el enchufe del
tomacorriente. Para desenchufarlo,
sujete el enchufe y no el cordón.
ADVERTENCIA
Siempre apague el motor y compruebe
que el accesorio de corte se haya
detenido antes de poner la orilladora
eléctrica en el suelo. Desconecte la
orilladora del suministro de energía
eléctrica cuando no esté en uso, antes
de darle mantenimiento y al cambiar
accesorios tales como el hilo y piezas
similares.
Para reducir el riesgo del arranque
accidental, nunca transporte una
máquina enchufada con el dedo sobre el
interruptor de encendido. Asegúrese
que el interruptor esté en posición de
apagado antes de enchufar la máquina.
Transporte de la orilladora eléctrica
Cuando transporte la orilladora eléctrica
en un vehículo, sujétela firmemente
para impedir su vuelco y los daños.
Preparación para el uso de la orilladora
eléctrica
Ajuste la empuñadura de modo
correspondiente a su estatura antes de
empezar a trabajar. La máquina debe
estar correctamente equilibrada de la
forma especificada en el manual de
instrucciones para un control correcto y
menos fatiga de trabajo. Siempre
compruebe que la orilladora eléctrica se
encuentre en buenas condiciones y que
funcione debidamente antes de
arrancarla, en particular el cordón y
enchufe eléctricos, el interruptor, la
herramienta de corte y el deflector.
ADVERTENCIA
Inspeccione el enchufe del cordón
eléctrico y el cordón de extensión antes
y después de usar la máquina en busca
de desgaste y daños.
Inspeccione el cordón
eléctrico, su enchufe y el
alargador antes de usar
-
los, y periódicamente
durante el uso de la
máquina. Para reducir el
riesgo de sufrir lesiones
graves causadas por las
sacudidas eléctricas,
nunca use la orilladora si
el cordón o enchufe eléc
-
trico está cortado,
agrietado, desgastado o
dañado. Desconecte el
enchufe del suministro de
energía eléctrica y soli
-
cite al concesionario que
reemplace el cordón
eléctrico. Sustituya los
alargadores dañados de
inmediato.
Evite los entornos peli
-
grosos. No use la
orilladora en lugares
húmedos o mojados. No
exponga ni use la
máquina bajo la lluvia.
Para reducir el riesgo de
sacudidas eléctricas, no
manipule el enchufe ni la
máquina con las manos
mojadas.

FSE 60
español / EE.UU
37
Una flecha en el deflector indica el
sentido correcto de giro de la
herramienta de corte.
La herramienta de corte debe estar
correctamente apretada y en buenas
condiciones de trabajo. Busque piezas
sueltas (tuercas, tornillos, etc.) y piezas
agrietadas, dobladas, deformadas o
dañadas.
Siga las instrucciones dadas en la
sección correspondiente de este
manual de instrucciones antes de
cambiar los accesorios de corte.
Para reducir el riesgo de ocasionar
lesiones a los ojos u otras partes del
cuerpo (vea el capítulo "Vestimenta
adecuada"), asegúrese que las
personas estén a por lo menos 15 m
(50 pies) de distancia de la máquina.
Para reducir el riesgo de ocasionar
daños a la propiedad, mantenga esta
distancia con respecto a los vehículos y
las ventanas. Aun si se mantiene una
distancia mínima de 15 metros, esto no
elimina el peligro potencial. Los
trabajadores que deben quedar en la
zona prohibida también deben usar
gafas o protección ocular. Apague el
motor inmediatamente si se le aproxima
alguna persona.
ADVERTENCIA
Su orilladora eléctrica es una máquina
que debe ser manejada por solamente
una persona. No deje que otras
personas estén en el lugar de trabajo,
aun durante el arranque.
Condiciones de trabajo
ADVERTENCIA
Nunca intente usar una orilladora
eléctrica en lugares en donde exista la
posibilidad de gases explosivos o
inflamables en el entorno.
Maneje la orilladora eléctrica solamente
cuando tenga buena visibilidad y a la luz
del día. Trabaje con mucho cuidado.
No corte ningún material que no sea
maleza o vegetación blanda similar. Las
herramientas de corte pueden usarse
solamente para las operaciones
descritas en su manual.
Siempre sujete la orilladora firmemente
con ambas manos. Cierre firmemente
los dedos alrededor de los mangos,
manteniéndolos bien apoyados entre el
pulgar y dedo índice. Mantenga las
manos en esta posición, para que
siempre tenga la orilladora bien
controlada. Asegúrese que los mangos
de la orilladora y el mango de arranque
estén en buenas condiciones y que
éstos y las manos estén sin humedad,
resina, aceite o grasa.
ADVERTENCIA
Nunca intente manejar ninguna
orilladora con una sola mano. La
pérdida de control de la orilladora puede
ocasionar lesiones graves o mortales.
A
002BA051 KN
15m (50ft)
002BA056 KN

FSE 60
español / EE.UU
38
ADVERTENCIA
No trate de alcanzar más lejos de lo
debido. Mantenga los pies bien
apoyados y equilibrados en todo
momento. Se debe tener cuidado
especial cuando las condiciones del
suelo son resbaladizas y en terreno
difícil y con mucha vegetación. Para
evitar tropezarse, esté atento a los
obstáculos ocultos tales como tocones,
raíces y zanjas. Sea sumamente
precavido cuando trabaje en declives o
terreno irregular.
ADVERTENCIA
ADVERTENCIA
La motoguadaña normalmente se usa a
nivel del suelo con el accesorio de corte
paralelo al suelo. El uso de la orilladora
sobre el nivel del suelo o con el
accesorio de corte perpendicular al
suelo puede incrementar el riesgo de
lesiones, dado que el accesorio de corte
queda casi totalmente expuesto y la
orilladora es más difícil de controlar.
Utilice la herramienta correcta para la
tarea a realizarse. No use nunca la
orilladora para recortar setos. No utilice
la orilladora eléctrica para ninguna tarea
diferente a la que fue diseñada a
desempeñar.
No fuerce la orilladora. Funciona mejor y
con menos riesgo de lesiones si se usa
al ritmo para el cual fue diseñado.
Si la herramienta de corte o el deflector
se atasca o queda pegado, siempre
apague el motor, desconecte el enchufe
eléctrico y asegúrese que la
herramienta de corte está detenida
antes de limpiarla. Limpie el pasto, las
malezas, etc. de la herramienta de corte
en intervalos regulares.
Revise la máquina en busca de piezas
dañadas. Antes de seguir usando la
motoguadaña, revise minuciosamente
su protector u otras piezas que se hayan
dañado para verificar que funcionarán
correctamente y cumplirán su función.
Compruebe la alineación de las piezas
móviles y si éstas tienen
agarrotamiento, si hay piezas rotas, el
montaje de las piezas y toda condición
que pueda afectar su funcionamiento. Si
un protector u otra pieza tiene daños,
deberá ser sustituido o reparado por un
taller de servicio autorizado, salvo
indicación contraria en este manual.
ADVERTENCIA
Durante el corte, revise el apriete y la
condición de la herramienta de corte en
intervalos regulares. Si nota un cambio
en el comportamiento de la herramienta,
apague el motor inmediatamente, y
revise el apriete de la tuerca que sujeta
la herramienta y busque si hay grietas y
daños en la herramienta de corte.
Sustituya las herramientas de corte
inmediatamente si están dañadas. Las
herramientas en esas condiciones
pueden romperse a alta velocidad y
causar lesiones graves o mortales.
Para reducir el
riesgo de lesiones
causadas por
objetos arrojados
y contacto con la
cuchilla, nunca
maneje la orilla
-
dora sin que tenga
instalado debida
-
mente el deflector.
Mantenga siem
-
pre el deflector (y
la faldilla en su
caso) bien ajus
-
tado (vea en su
manual de instruc
-
ciones el capítulo
sobre montaje de
las herramientas
de corte).
Revise la zona de tra
-
bajo: Para reducir el
riesgo de lesionarse,
retire las piedras, piezas
metálicas y otros objetos
sólidos que pudieran ser
lanzados a una distancia
de 15 metros o más por
el accesorio de corte, o
que pudieran dañar el
accesorio de corte y la
propiedad (por ejemplo:
vehículos estacionados,
ventanas)

FSE 60
español / EE.UU
39
ADVERTENCIA
MANTENIMIENTO, REPARACIÓN Y
ALMACENAMIENTO
Mantenimiento de un aparato con
aislamiento doble
Este orilladora eléctrica tiene
aislamiento doble. Tales aparatos
tienen dos sistemas de aislamiento en
lugar de puesta a tierra. Este aparato no
incluye medios de puesta a tierra, ni se
deben agregar medios para poner este
aparato a tierra. El mantenimiento de un
aparato con aislamiento doble requiere
cuidado adicional y buen conocimiento
del sistema, y debe ser efectuado
únicamente por personal calificado de
mantenimiento.
ADVERTENCIA
Utilice solamente las piezas de repuesto
idénticas de STIHL para el
mantenimiento y la reparación. El uso
de piezas no fabricadas por STIHL
puede causar lesiones graves o
mortales.
Mantenga su orilladora con esmero.
Siga las instrucciones de
mantenimiento, lubricación y reparación
dadas en la sección correspondiente del
manual de instrucciones. Nunca intente
hacer reparaciones no autorizadas ni
abrir el mecanismo.
ADVERTENCIA
Siempre desconecte el enchufe del
suministro de energía eléctrica y
asegúrese que la herramienta de corte
está detenida antes de hacer cualquier
trabajo de mantenimiento, reparación o
limpieza de la orilladora eléctrica. No
intente hacer ningún trabajo de
mantenimiento o reparación que no esté
descrito en su manual de instrucciones.
Este tipo de trabajo debe realizarse
únicamente en el taller de servicio de
STIHL.
El cordón eléctrico sólo debe ser
sustituido por personal autorizado para
ello. Un cordón eléctrico dañado debe
ser reemplazado por un repuesto STIHL
de tipo idéntico. Revise las entradas de
aire de enfriamiento aproximadamente
cada diez horas de funcionamiento y
límpielas de ser necesario. No use
detergentes fuertes para limpiar la caja
de plástico ni el mango. Estos pueden
verse atacados por ciertos limpiadores
domésticos que contienen aceites
aromáticos, tales como el pino o el
limón, o por disolventes tales como el
keroseno.
ADVERTENCIA
No rocíe la orilladora con agua, la
humedad puede crear riesgos de
sacudidas eléctricas. Limpie la máquina
con un trapo.
ADVERTENCIA
Nunca repare los accesorios de corte
dañados aplicándoles soldadura,
enderezándolos o modificándoles su
forma. Esto puede causar el
desprendimiento de alguna pieza de la
herramienta de corte y producir lesiones
graves o mortales.
ADVERTENCIA
Revise la condición de la herramienta de
corte en intervalos cortos regulares. Si
nota algún cambio en el
comportamiento de la herramienta,
revise inmediatamente el apriete y
busque señales de agrietamiento.
Sustituya las herramientas de corte
dañadas o desafiladas inmediatamente,
incluso si tienen sólo alguna grieta
superficial. Si la herramienta se afloja
después de haber sido debidamente
apretada, la tuerca de retención puede
estar desgastada o dañada y es
necesario reemplazarla. Si la
herramienta continúa floja, consulte al
concesionario STIHL.
Apriete todas las tuercas, pernos y
tornillos antes y después de haber
usado la máquina.
Para todo trabajo de mantenimiento,
sírvase consultar la tabla de
mantenimiento y la declaración de
garantía que se encuentra al final de
este manual.
Mantenga las manos y
los pies lejos de la herra
-
mienta de corte. No la
sujete al recoger o suje
-
tar la orilladora. No toque
nunca con las manos o
cualquier parte del
cuerpo una herramienta
de corte que está
girando. La herramienta
sigue girando por un rato
después que se suelta el
gatillo de aceleración
(efecto de volante).

FSE 60
español / EE.UU
40
Guarde la orilladora eléctrica en un lugar
seco, elevado o con llave y fuera del
alcance de los niños.
¡GUARDE ESTAS
INSTRUCCIONES!
Uso de las herramientas de corte
Para una ilustración de las diversas
herramientas de corte y las
instrucciones sobre el montaje correcto,
vea el capítulo sobre "Montaje de la
cabeza segadora" en su manual de
instrucciones.
Uso de las cabezas segadoras
La cabeza segadora Autocut de STIHL
produce una terminación limpia y
ordenada. Se usa solamente en las
orilladoras equipadas con una cuchilla
limitadora del hilo en el deflector para
poder mantener el hilo al largo correcto
(vea el capítulo "Piezas y controles" en
este manual).
ADVERTENCIA
Para reducir el riesgo de lesiones
graves, nunca use un hilo de alambre o
reforzado con metal ni ningún otro
material en lugar de los hilos de corte de
nilón. Es posible que unos pedazos de
alambre sean desprendidos y arrojados
a gran velocidad contra el operador o
terceros.
Cabeza segadora AutoCut 5-2 de
STIHL
El hilo de corte de nilón avanza
automáticamente cuando se le golpea
contra el suelo.
ADVERTENCIA
No use un hilo de segado con un
diámetro mayor que el indicado. Con un
protector debidamente instalado, la
cortadora integral automáticamente
ajusta el hilo al largo adecuado. Los
hilos excesivamente largos pueden
sobrecargar al motor, dañando el motor
y las piezas relacionadas.
000BA019 KN

FSE 60
español / EE.UU
41
Combinaciones aprobadas
La combinación completa consta de:
– Accesorio de corte
– Deflector
– Mango
– Arnés
Con ayuda de la tabla, seleccione la
combinación adecuada para el
accesorio de corte que va a utilizar.
ADVERTENCIA
Para reducir el riesgo de lesiones, no
están permitidas otras combinaciones.
Solo las cabezas segadoras (1, 2)
pueden usarse en orilladoras con tubo
de mando curvo y mango circular.
Accesorios de corte
Cabezas segadoras
1 STIHL AutoCut C 52
2 STIHL AutoCut C 6
-
2
Deflector
3 Deflector con cuchilla para cabezas
segadoras
Mango
4 Mango tipo lazo
Arnés
5 Se puede usar la correa para el
hombro
ADVERTENCIA
Basado en el accesorio de corte en uso:
Seleccione un deflector adecuado para
reducir el riesgo de lesiones causadas
por los objetos lanzados y por el
contacto con el accesorio de corte.
Para reducir el riesgo de sufrir lesiones
debido a la pérdida de control y al
contacto con el accesorio de corte,
asegúrese que su máquina está
equipada con el mango y arnés
correctos.
No utilice cuchillas de polímero rígido,
accesorios de corte metálicos ni discos
de sierra con esta máquina.
Solamente las cabezas segadoras
pueden usarse en las motoguadañas
con mango tórico equipadas con un tubo
de mando curvo.
Combinaciones aprobadas de accesorio de corte, deflector, mango y arnés
Accesorio de corte Deflector Mango Arnés
282BA010-A1
1
4
5
3
Schnur/LINE 2
Schnur/LINE 1
2

FSE 60
español / EE.UU
42
N Extraiga la tapa protectora del tubo
de mando.
N Empuje el tubo de mando (1) en la
caja del motor (2) hasta la marca
(A), girando el tubo de mando en
uno y otro sentido al mismo tiempo.
N Apriete firmemente el tornillo (3) en
la caja.
Montaje del mango tórico
N Instale el mango tórico (1) en el eje
del tubo de mando aprox.
30 cm (12pulg) (distancia A) del
mando de control (2).
N Inserte la tuerca hexagonal (3) en el
mango tórico (1).
N Comprima los extremos de la
abrazadera, instale el tornillo (4)
con la arandela (5) por el otro lado y
apriételos firmemente.
Ajuste del mango tórico a la posición
más cómoda
N Afloje el tornillo (4).
N Mueva el mango tórico (1) a lo largo
del tubo de mando a la posición
requerida – apriete firmemente el
tornillo (4).
Montaje del tubo de mando
1
238BA016 KN
3
A
2
A
Montaje del mango tórico
4
1
2
3
5
A
238BA002 KN
40 mm
(1.57 in)

FSE 60
español / EE.UU
43
N Empuje el deflector (1) sobre la
abrazadera (2) hasta el tope.
N Instale la contratuerca (3) en el
rebajo hexagonal del deflector.
N Asegúrese que los agujeros estén
alineados.
N Inserte el tornillo M6 x 30 (4) y
apriételo firmemente.
Colocación de la herramienta
motorizada en el suelo
N Apague la herramienta motorizada.
N Apoye la orilladora sobre su parte
trasera con el mango tórico
orientado hacia abajo y el eje de
salida vuelto hacia arriba.
Colocación de cabeza segadora sin
tornillo de montaje
Guarde la hoja de instrucciones de la
cabeza segadora en un lugar seguro.
STIHL AutoCut C 5-2
N Deslice la cabeza segadora (2)
para colocarla sobre la varilla –
como AutoCut 5-2.
N Gire el carrete (9) en sentido horario
hasta que las dos puntas de flecha
queden alineadas y asegure el
carrete en esta posición.
N Coloque la tapa (8) en el carrete,
presionándola hacia abajo hasta el
tope y girándola en sentido horario
al mismo tiempo.
N Gire la tapa hasta que se siente
resistencia y luego apriétela bien
firme con la mano.
Montaje de la barra de
defensa
1
238BA003 KN
2
238BA004 KN
4
3
Montaje del accesorio de
corte
238BA021 KN
9
681BA018 KN
Schnur/LINE 2
Schnur/LINE 1
2
8

FSE 60
español / EE.UU
44
STIHL AutoCut C 6-2
N Deslice la cabeza segadora (2)
sobre la varilla (3) y engrane el
orificio hexagonal en el vástago
hexagonal (4).
N Sujete la cabeza segadora (2) firme
con una mano.
N Gire la tapa (1) en sentido horario y
apriétela firmemente con la mano.
Retiro de la cabeza segadora
N Sujete la cabeza segadora
firmemente.
N Destornille la tapa en sentido
contrahorario.
El voltaje y la frecuencia de la fuente de
alimentación eléctrica y el voltaje y la
frecuencia especificados en la máquina
deberán corresponder. Utilice un
alargador específicamente aprobado
para uso a la intemperie.
Alargadores
Versión de 120 V
Versión de 230 V
N Inserte el enchufe (1) en el
receptáculo del alargador (2).
Protector contra tirones
El protector contra tirones (retenedor de
cordón) protege el cordón eléctrico del
aparato contra el daño.
0000-GXX-3937-A0
2
1
3
4
Conexión eléctrica de la
máquina
Calibre mínimo de alargadores para
aparatos de 120 voltios y 0
-
6amperios
Largo del
cordón (pies)
25 50 100 150
Calibre de
alambre (AWG)
18 16 16 14
Superficie transversal mínima de los
alambres:
Cordones de 2 m (6,5 pies) o más de
largo: 1,5 mm
2
, tipo H07 RN
-
F
238BA008 KN
1
2

FSE 60
español / EE.UU
45
N Forme un lazo (3) en el alargador.
N Pase el lazo (3) por la abertura (4).
N Deslice el lazo (3) sobre el
gancho (5) y tire del cordón para
dejarlo ajustado.
N Conecte el enchufe del alargador a
un tomacorriente de pared
correctamente instalado.
Una correa para hombro se suministra
como un accesorio especial.
Colóquese la correa para el hombro
sobre el hombro izquierdo y ajuste su
largo para que el gancho de resorte
quede apoyada en su cadera derecha.
El lado abierto del gancho debe mirar
fuera de su cuerpo. Conecte el gancho
de resorte a la argolla de transporte (vea
"Piezas principales").
N Asegúrese de tener los pies bien
apoyados y de estar bien
equilibrado.
N Sujete la unidad con ambas manos
– una mano sobre el mango de
control y la otra sobre el mango
tórico.
N Párese en posición vertical,
sostenga la orilladora en una
posición relajada, siempre
colocándola hacia la derecha de su
cuerpo.
N El accesorio de corte no deberá
tocar el suelo ni ningún otro objeto.
N Presione la palanca de bloqueo de
estacionamiento (1) y manténgala
en esa posición.
N Comprima el gatillo (2).
4
238BA009 KN
5
3
Uso de la correa para
hombro
Encendido de la máquina
2
1
238BA010 KN

FSE 60
español / EE.UU
46
N Suelte el gatillo y la palanca de
bloqueo de arranque.
ADVERTENCIA
Observe que el accesorio de corte siga
girando por un período breve después
que se suelte el gatillo de aceleración y
la palanca de bloqueo de arranque –
este es el efecto de volante.
Durante los descansos prolongados –
desconecte el enchufe de la fuente de
alimentación.
Cuando la máquina no está en uso,
apáguela para no poner en peligro los
terceros.
Tome medidas para proteger la
máquina contra el uso no autorizado.
Para intervalos de 3 meses o más
N Limpie la máquina a fondo,
especialmente las entradas de aire
de enfriamiento.
N Quite el carrete con los hilos de
nilón y enganche los extremos de
los hilos en las muescas del carrete.
Limpie e inspección el carrete.
Se puede aumentar la resistencia y la
vida útil del hilo de nilón guardándolo en
un contenedor lleno de agua.
N Guarde la máquina en un lugar seco
y elevado, o bajo llave, fuera del
alcance de los niños y de otras
personas no autorizadas.
Colocación de la herramienta
motorizada en el suelo
N Apague la herramienta motorizada.
N Apoye la orilladora sobre su parte
trasera con el mango tórico
orientado hacia abajo y el eje de
salida vuelto hacia arriba.
Apagado de la máquina Almacenamiento de la
máquina
Mantenimiento de la cabeza
segadora
238BA021 KN

FSE 60
español / EE.UU
47
Reajuste del hilo de segado
N Mantenga la cabeza segadora en
movimiento a unos centímetros del
suelo y golpéela contra el suelo una
vez; avanzarán aproximadamente
3 cm (1,2 in) de hilo de segado
nuevo.
N La cuchilla (1) del deflector (2) corta
el hilo de segado sobrante a la
longitud correcta. Evite golpear la
cabeza contra el suelo más de una
vez en cada ocasión.
El avance del hilo de segado funciona
solamente si los dos hilos aún tienen,
como mínimo, una longitud de 2,5 cm
(1 in).
Si el hilo de segado mide menos de
2,5 cm (1 in):
ADVERTENCIA
Para reducir el riesgo de lesiones,
apague siempre el motor antes de
ajustar el hilo de segado a mano.
N Voltee la máquina.
N Apriete hacia abajo la tapa del
carrete de hilo, hasta que haga
tope.
N Saque los extremos de los hilos del
carrete.
Si el carrete está vacío, coloque nuevo
hilo de segado.
Cambio del hilo de segado
Compruebe siempre si la cabeza
segadora presenta signos de desgaste
antes de cambiar el hilo de segado.
ADVERTENCIA
Si se ven signos de desgaste severo, se
debe cambiar la cabeza de segado
completa.
En las siguientes páginas, nos
referiremos al hilo de segado como
"hilo".
Con la cabeza segadora se adjunta una
guía ilustrada en la que se explica cómo
se cambian los hilos. Por eso, es
importante que guarde las instrucciones
de la cabeza segadora en un lugar
seguro.
N Si fuera necesario, retire la cabeza
segadora.
STIHL AutoCut C 5
-
2
Desarmado de la cabeza segadora y
retirada del hilo de nilón restante
En el funcionamiento normal, se utiliza
casi todo el hilo de nilón disponible en la
cabeza segadora.
N Sujete con firmeza la cabeza
segadora y gire la tapa (1) en
sentido contrahorario hasta que la
pueda retirar.
N Extraiga el carrete (2) de la cabeza
segadora (3) y saque el hilo que
quede.
1
232BA007 KN
2
Schnur/LINE 1
681BA021 KN
1
2
3

FSE 60
español / EE.UU
48
Armado de la cabeza segadora
N Coloque el carrete vacío en la
cabeza segadora.
Si el resorte (4) se ha salido de su lugar:
N Métalo en el carrete (2) hasta que
encaje en su posición con un
chasquido audible.
N Monte la cabeza segadora.
Consulte el apartado "Montaje de la
cabeza segadora".
Enrollado del hilo en el carrete
N Use hilo de nilón con código verde
de 2 mm (0,08 in) de diámetro.
N Corte dos trozos de hilo de nilón de
2 m (6 ft 6 in) de largo del carrete
(accesorio especial).
N Gire el carrete (2) en sentido
contrahorario hasta que las dos
puntas de flecha queden alineadas.
N Meta el extremo recto de cada hilo a
través de los manguitos (5) de la
cabeza segadora (3) hasta que
note resistencia, y luego siga
metiendo el hilo hasta que haga
tope.
N Mantenga la cabeza segadora
sujeta firmemente.
N Gire el carrete en sentido
contrahorario hasta que el hilo más
corto mida aproximadamente 10 cm
(4 in).
N Si fuera necesario, corte el hilo más
largo a una longitud de
aproximadamente 10 cm (4 in).
Ahora, la cabeza segadora está llena.
Schnur/LINE 1
681BA022 KN
2
4
Schnur/LINE 2
681BA023 KN
5
Schnur/LINE 1
3
3
2
681BA024 KN
Schnur/LINE 2
Schnur/LINE 1

FSE 60
español / EE.UU
49
STIHL AutoCut 5
-
2
Retiro del hilo de nilón restante
N Abra la cabeza segadora - sujétela
bien firme con una mano y gire la
tapa (1) en sentido contrahorario.
N Desenganche el carrete (2),
sáquelo de la cabeza segadora y
retire el hilo de nilón restante.
Enrollado del hilo en el carrete
Se puede usar un carrete preenrollado
(accesorio especial) en vez del
procedimiento siguiente.
N Use hilo de nilón codificado verde
de 2,0 mm (0,08 pulg) de diámetro.
N Corte dos trozos de hilo de nilón de
3 m (9 pies 9 pulg) de largo del
carrete (accesorio especial).
N Inserte el extremo de cada hilo (3)
en los agujeros (4) del carrete.
N Doble los extremos de los hilos por
encima del borde de los agujeros
para formar un gancho.
N Enderece los hilos de nilón y
enróllelos bien apretados en el
carrete - un hilo en cada cámara.
N Enganche los extremos de los hilos
de nilón en las muescas (2).
Armado de la cabeza segadora
INDICACIÓN
Verifique que el resorte esté instalado
(vea "Montaje de la cabeza segadora").
681BA008 KN
1
2
681BA009 KN
4
3
3
681BA010 KN
5
5

FSE 60
español / EE.UU
50
N Enhebre los extremos de los
hilos (6) en los manguitos (7) e
inserte el carrete (2) en la cabeza
para que encaje en su lugar.
Los hilos de nilón deben
desengancharse de las muescas (5)
cuando se inserta el carrete en su lugar.
N Tire de los extremos de los hilos
hasta que paren.
N Instale la cabeza segadora en la
máquina.
7
681BA011 KN
2
6
6

FSE 60
español / EE.UU
51
Información para mantenimiento
Los intervalos dados a continuación corresponden únicamente a condiciones normales de trabajo. Si
el tiempo de trabajo por jornada es más largo que lo normal, o si las condiciones son extremas (zonas
polvorientas, etc.), acorte los intervalos indicados de modo correspondiente.
antes de comenzar el trabajo
después de terminar el tra
-
bajo o diariamente
semanalmente
mensualmente
si hay problema
si tiene daños
si se requiere
Máquina completa
Inspección visual (condición general) X
Limpiar X
Cordón eléctrico
Revisar X
Solicitar al concesionario de servicio su
sustitución
1)
X
Interruptor de bloqueo de arranque
Comprobar el funcionamiento X
Solicitar al concesionario de servicio su
sustitución
1)
XX
Entradas de enfriamiento Limpiar X
Todos los tornillos y tuercas accesibles Volver a apretar X
Accesorio de corte (cabeza de segado)
Inspección visual X
Reemplazar X
Revisar el apriete X
Etiquetas de seguridad Reemplazar X
1)
STIHL recomienda acudir a un concesionario STIHL para servicio.

FSE 60
español / EE.UU
52
1 Cordón eléctrico
2 Aberturas de admisión de aire de
enfriamiento
3 Gatillo
4 Palanca de bloqueo de arranque
5 Argolla de transporte
6 Mango tórico
7 Tubo de mando
8 Cabeza segadora
9 Cuchilla limitadora del largo del hilo
10 Deflector
11 Protector contra tirones
# Número de serie
Componentes importantes
2
#
1
7
6
3
5
4
11
9
8
10
238BA020 KN

FSE 60
español / EE.UU
53
Definiciones
1 Cordón eléctrico
Suministra energía eléctrica al
motor.
2 Aberturas de admisión de aire de
enfriamiento
El aire de enfriamiento pasa al
motor por vía de las ranuras.
3 Gatillo
Para encender y apagar la
máquina.
4 Palanca de bloqueo de arranque
Hay que oprimirla antes de poder
activar el gatillo.
5 Argolla de transporte
Un dispositivo para conectar la
orilladora al arnés.
6 Mango tórico
Para facilitar el control de la
máquina durante el proceso de
corte.
7 Tubo de mando
Dispositivo que conecta el motor
con la caja de engranajes.
8 Cabeza segadora
La cabeza segadora ha sido
diseñada para complementar de
una cortadora de césped.
9 Cuchilla limitadora del largo del hilo
Pieza metálica en el deflector para
cortar el exceso del hilo de nilón.
10 Deflector
El deflector tiene por objeto reducir
el riesgo de lesiones causadas por
objetos extraños arrojados contra el
operador por la herramienta de
corte y por el contacto con la
herramienta de corte.
11 Protector contra tirones
Sostiene al cordón de extensión y
reduce la posibilidad de que el
cordón se desconecte del enchufe
de la orilladora.
Motor
FSE 60, versión de 120 V
FSE 60, versión de 230 V
Largo
Especificaciones
Voltaje: 120 V
Frecuencia: 60 Hz
Corriente nominal: 5 A
Potencia nominal: 600 W
Velocidad nominal con
hilo de 350 mm (14 pulg)
de diámetro: 8400 rpm
Velocidad máxima del
motor (sin hilo de nilón): 10 800 rpm
Fusible: mín. 15 A
Aislamiento: II, E
Voltaje: 230 V
Frecuencia: 50 Hz
Corriente nominal: 2,6 A
Potencia nominal: 600 W
Velocidad nominal con
hilo de 350 mm (14 pulg)
de diámetro: 8000 rpm
Velocidad máxima del
motor (sin hilo de nilón): 10 000 rpm
Fusible: mín. 10 A
Aislamiento: II, E
FSE 60: 1530 mm
(60,2 pulg)

FSE 60
español / EE.UU
54
Peso
Los usuarios de esta máquina deben
efectuar únicamente los trabajos de
mantenimiento descritos en este
manual. STIHL recomienda que un
concesionario de servicio STIHL efectúe
los demás trabajos de reparación
utilizando piezas de repuesto genuinas
de STIHL.
Es posible identificar las piezas
originales de STIHL por el número de
pieza STIHL, el logotipo de { y,
en ciertos casos, el símbolo K de
piezas STIHL. En las piezas pequeñas
el símbolo puede aparecer solo.
Para reparar algún componente del
sistema de control de emisiones de aire,
consulte la garantía de sistemas de
emisiones dada en este manual.
Respete todas las leyes y los
reglamentos sobre eliminación de
desechos que correspondan a su país.
No se debe botar los aparatos STIHL en
el basurero. Lleve el producto, los
accesorios y el embalaje a un vertedero
autorizado para reciclarlos y contribuir al
cuidado del medio ambiente.
Comuníquese con un concesionario de
servicio de STIHL para obtener la
información más actualizada sobre la
eliminación de desechos.
completo, con accesorio de corte y
deflector
FSE 60: 4,0 kg (8,6 lb)
Información de reparación Desecho
000BA073 KN

FSE 60
español / EE.UU
55
Política de garantía limitada de STIHL
Incorporated para piezas y
componentes no relacionados con las
emisiones
Este producto se vende sujeto a la
Política de garantía limitada de STIHL
Incorporated, disponible en
www.stihlusa.com/warranty.html.
También puede obtenerlo de un
concesionario de servicio STIHL
autorizado o llamando al 1-800-GO-
STIHL (1-800-467-8445).
Se proporciona una garantía aparte
para el sistema de control de emisiones
y para los componentes relacionados
con el sistema de emisiones.
Marcas registradas de STIHL
STIHL
®
{
K
La combinación de colores anaranjado-
gris (Números de registro EE.UU.
2,821,860; 3,010,057, 3,010,058,
3,400,477; y 3,400,476)
AutoCut
®
FARM BOSS
®
iCademy
®
MAGNUM
®
MasterWrench Service
®
MotoMix
®
OILOMATIC
®
ROCK BOSS
®
STIHL Cutquik
®
STIHL DUROMATIC
®
STIHL Quickstop
®
STIHL ROLLOMATIC
®
STIHL WOOD BOSS
®
TIMBERSPORTS
®
WOOD BOSS
®
YARD BOSS
®
Algunos de las marcas comerciales de
STIHL por ley común
4-MIX ™
BioPlus ™
Easy2Start ™
EasySpool ™
ElastoStart ™
Ematic ™
FixCut ™
IntelliCarb ™
Master Control Lever ™
Micro ™
Pro Mark ™
Quiet Line ™
STIHL M-Tronic ™
Garantía limitada Marcas comerciales
TM
STIHL
Injection

FSE 60
español / EE.UU
56
STIHL OUTFITTERS ™
STIHL PICCO ™
STIHL PolyCut ™
STIHL PowerSweep ™
STIHL Precision Series ™
STIHL RAPID ™
STIHL SuperCut ™
TapAction ™
TrimCut ™
Esta lista de marcas comerciales está
sujeta a cambios.
Queda terminantemente prohibido todo
uso de estas marcas comerciales sin el
consentimiento expreso por escrito de
ANDREAS STIHL AG & Co. KG,
Waiblingen.
STIHL Inc.
536 Viking Drive
P.O. Box 2015
Virginia Beach, VA
23452-2015
Direcciones


www.stihl.com
*04582388621A*
0458-238-8621-A
0458-238-8621-A
englisch / spanisch USA
GU
englisch / spanisch USA
U
WARNING
This product contains chemicals
known to the State of California to cause
cancer, birth defects
or other reproductive harm.
ADVERTENCIA
Este producto contiene sustancias químicas
consideradas por el Estado de California como
causantes de cáncer, defectos de nacimiento u
otra toxicidad reproductora.
-
 1
1
-
 2
2
-
 3
3
-
 4
4
-
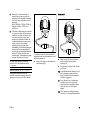 5
5
-
 6
6
-
 7
7
-
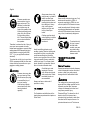 8
8
-
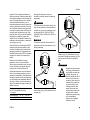 9
9
-
 10
10
-
 11
11
-
 12
12
-
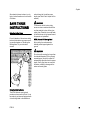 13
13
-
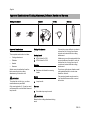 14
14
-
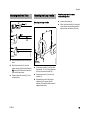 15
15
-
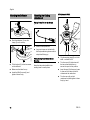 16
16
-
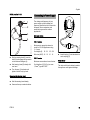 17
17
-
 18
18
-
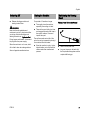 19
19
-
 20
20
-
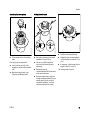 21
21
-
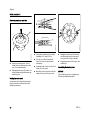 22
22
-
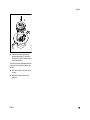 23
23
-
 24
24
-
 25
25
-
 26
26
-
 27
27
-
 28
28
-
 29
29
-
 30
30
-
 31
31
-
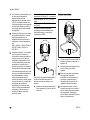 32
32
-
 33
33
-
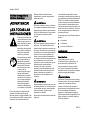 34
34
-
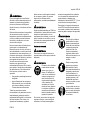 35
35
-
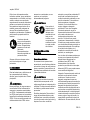 36
36
-
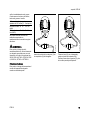 37
37
-
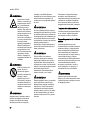 38
38
-
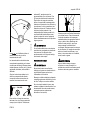 39
39
-
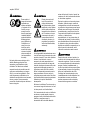 40
40
-
 41
41
-
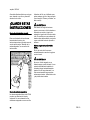 42
42
-
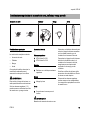 43
43
-
 44
44
-
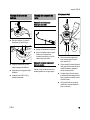 45
45
-
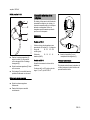 46
46
-
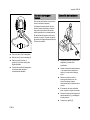 47
47
-
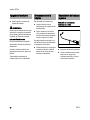 48
48
-
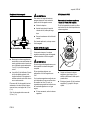 49
49
-
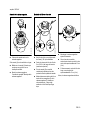 50
50
-
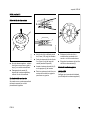 51
51
-
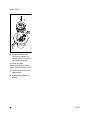 52
52
-
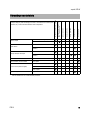 53
53
-
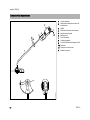 54
54
-
 55
55
-
 56
56
-
 57
57
-
 58
58
-
 59
59
-
 60
60


STIHL FSE 60 Manual de usuario
- Categoría
- Podadoras de césped
- Tipo
- Manual de usuario
en otros idiomas
- English: STIHL FSE 60 User manual
