
MANUALE ISTRUZIONI CASSETTO FRONTALE INSERTI
INSTRUCTIONS MANUAL FOR FRONT DRAWER INSERTS
MANUEL D’INSTRUCTION DES PIÈCES ENCASTRABLES DU TIROIR FRONTAL
BEDIENUNGSANLEITUNG VORDERE SCHUBLADE EINSATZSTÜCKE
MANUAL DE INSTRUCCIONE CAJÓN FRONTAL INSERCIONES
Compatibile per - Compatible for - Compatible avec - Kompatibel für - Compatible con:
COMFORT IDRO L80 INSERTO IDRO 800
004276709-REV001

2
ITALIANO ....................................................................................................................................................................................3
KIT OPZIONALE CARICAMENTO PELLET FRONTALE.............................................................................................................. 3
COMPONENTI DEL KIT ............................................................................................................................................................... 4
UTILIZZO DEL CASSETTO ..........................................................................................................................................................9
ENGLISH .................................................................................................................................................................................... 13
OPTIONAL FRONTAL PELLET FEEDING KIT ........................................................................................................................... 13
COMPONENTS OF THE KIT ......................................................................................................................................................14
HOW TO USE THE TRAY ............................................................................................................................................................19
UTILIZZO DEL CASSETTO ........................................................................................................................................................ 19
FRANÇAIS .................................................................................................................................................................................23
KIT EN OPTION CHARGEMENT FRONTAL DU PELLET ..........................................................................................................23
COMPOSANT DU KIT................................................................................................................................................................24
UTILISATION DU TIROIR ..........................................................................................................................................................29
UTILIZZO DEL CASSETTO ........................................................................................................................................................ 29
DEUTSCH ...................................................................................................................................................................................33
OPTIONALES KIT ZUM FRONTALEN LADEN DER PELLETS ..................................................................................................33
KOMPONENTEN DES KIT ......................................................................................................................................................... 34
GEBRAUCH DER SCHUBLADE .................................................................................................................................................39
UTILIZZO DEL CASSETTO ........................................................................................................................................................ 39
ESPAÑOL ................................................................................................................................................................................... 43
KIT OPCIONAL CARGA PELLET FRONTAL ..............................................................................................................................43
COMPONENTES DEL KIT ..........................................................................................................................................................44
UTILIZACIÓN DEL CAJÓN ........................................................................................................................................................49
UTILIZZO DEL CASSETTO ........................................................................................................................................................ 49

ITALIANO
KIT OPZIONALE CARICAMENTO PELLET FRONTALE
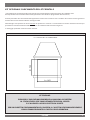
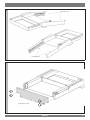
Il kit opzionale di caricamento pellet consente di caricare frontalmente il pellet all’interno del serbatoio senza
dover procedere con l’estrazione dell’inserto (operazione che richiede lo spegnimento della macchina).
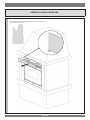
Prima di procedere con l’installazione dell’apparecchio è necessario assicurarsi che la struttura che rivestirà l’inserto garantisca
un foro con le misure minime indicate nella gure sotto.
Nell’immagini sono riportate le misure minime da rispettare tra l’inserto e il rivestimento: tali misure risultano necessarie per
permettere il corretto movimento della cornice e la sua rimozione dalla locazione originaria.
Il montaggio è possibile anche da inserto montato.
COMFORT L80 - IDRO 800
700 X 841 MM CON CASSETTO OPTIONAL
H=
700
L=
841
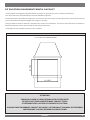
ATTENZIONE:
ESEGUIRE LE INDICAZIONI SEMPRE NELLA MASSIMA SICUREZZA!
LA STUFA DEVE ESSERE COMPLETAMENTE FREDDA, SPENTA
E SCOLLEGATA LA PRESA ELETTRICA DI RETE.
PER UN CORRETTO FUNZIONAMENTO DELL’INSERTO, IL CASSETTO DEVE RIMANERE SEMPRE
CHIUSO TRANNE DURANTE LA FASE DI CARICO SERBATOIO.
3

ITALIANO
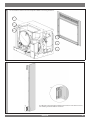
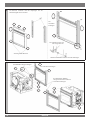
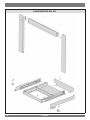
COMPONENTI DEL KIT
4

1
2
ITALIANO
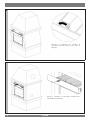
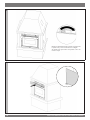
Togliere le 6 viti, e rimuovere la cornice completa con attenzione.
Smontare il magnete dalla corince originale, e montarlo sulla cornice destra
fornita nel kit.
5

3
4
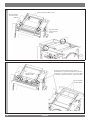
ITALIANO
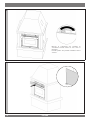
Togliere le cornici e sostituirle con quelle in dotazione per
il kit
Attenzione alle bussole
La vite deve essere
inserita dentro l’asola
Inserire la bussola e ssare la vite
Fissare le viti
Fissare le squadrette
Fissare le viti
Appoggiare la cornice completa
e ssare le viti laterali
6

5
6
ITALIANO
Inserire le rotaie
Inserire le rotaie
Fissare le viti
7

7
8
ITALIANO
Fissare le viti
autolettanti
4.2x9.5
Fissare le viti
autolettanti 4.2x9.5
Fissare le viti TE M5 x 20 ZN
Fissare le viti TE
M5 x 20 ZN
Fissare le viti TE
M5 x 16 ZN
Dopo avere ssato il frontale, regolare lo
scorrimento e il centraggio attraverso le stae di
ssaggio. Le stae sono asolate, allentare le viti e
regolare tutto il kit. - Fissare le viti.
8

A
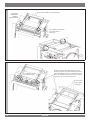
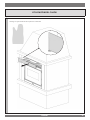
UTILIZZO DEL CASSETTO
ITALIANO
Estrarre il cassetto mediante l'uso dei due attizzatoi in dotazione
9

B
C
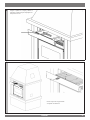
ITALIANO
Sbloccare lo scorrimento del cassettino di
caricamento facendo ruotare la leva come in
immagine
Estrarre il cassettino di caricamento mediante l'uso
dell’attizzatoio in dotazione
10

D
E
ITALIANO
Chiudere il cassettino di caricamento mediante l'uso
dell’attizzatoio in dotazione
Caricare il pellet sul cassettino e
utilizzare il raschietto in dotazione per
spingerlo nel serbatoio retrostante
11

F
G
ITALIANO
Bloccare lo scorrimento del cassettino di
caricamento facendo ruotare la leva come in
immagine.
Facendo questo sarà possibile richiudere l’intero
cassetto
12

ENGLISH
OPTIONAL FRONTAL PELLET FEEDING KIT
The optional frontal pellet feeding kit allows feeding pellets inside the tank without
having to remove the insert (which requires the shutdown of the machine).
Before proceeding with the installation you must ensure that the structure that will cover the insert ensures a hole with the
minimum dimensions shown in the gure below.
The images shows the minimum sizes to be observed between the insert and the cover: these sizes are necessary to enable the
correct movement of the frame and the removal of the same from its original place.
You can also assemble it with the insert tted.
COMFORT L80 - IDRO 800
700 X 800 MM WITH OPTIONAL TRAY
H=
700
L=
841
ATTENTION:
FOLLOW THE INSTRUCTIONS ALWAYS IN COMPLETE SAFETY!
THE STOVE MUST BE COMPLETELY COLD, SWITCHED OFF
AND UNPLUGGED FROM THE POWER OUTLET.
TO ENSURE THE PROPER OPERATION OF THE INSERT, THE TRAY MUST ALWAYS REMAIN CLOSED
EXCEPT DURING THE RESERVOIRE LOADING PHASE.
13

ENGLISH
COMPONENTS OF THE KIT
14

1
2
ENGLISH
Remove the 6 screws, and remove the complete frame carefully.
Remove the magnet from the original frame, and mount it on the right frame
supplied with the kit.
15

3
4
ENGLISH
Remove the frames and replace them with the ones
supplied with the kit
Be careful with the bushes
The screw should be
inserted in the slot
Insert the bush and fasten the screw
Tighten the
screws
Fix the brackets
Tighten the screws
Place the complete frame and
tighten the side screws
16

5
6
ENGLISH
Insert the rails
Insert the rails
Tighten the screws
17

7
8
ENGLISH
Fasten the self-
tapping screws
4.2 x 9.5
Fasten the self-
tapping screws 4.2
x 9.5
Fix the screws TE M5 x 20 ZN
Fix the screws
TE M5 x 20 ZN
Fix the screws
TE M5 x 16 ZN
After xing the front panel, adjust the sliding
degree and the centre of distance by means of the
xing brackets. The brackets are slotted; loosen
the screws and adjust the entire kit. -Tighten the
screws.
18

A
UTILIZZO DEL CASSETTO
ENGLISH
Pull out the tray using the two pokers supplied
HOW TO USE THE TRAY
19

B
C
ENGLISH
Unlock the slide of the feeding tray by turning the
lever as shown in the picture
Pull out the feeding tray using the poker supplied
20

D
E
ENGLISH
Close the feeding tray using the
poker supplied
Load the pellets on the tray and use
the scraper provided to push it into the
reservoir behind it
21

F
G
ENGLISH
Lock the slide of the feeding tray by turning the
lever as shown in the picture.
In this way you will be able to close the entire tray
22

FRANCAIS
KIT EN OPTION CHARGEMENT FRONTAL DU PELLET
Le kit en option de chargement du pellet permet de charger les granulés par l'avant, à l'intérieur du réservoir
sans devoir extraire l'insert (opération qui nécessite d'éteindre l'appareil).
Avant de procéder à l'installation de l'appareil, il est nécessaire de s'assurer que la structure qui couvrira l'insert garantit un trou
ayant les dimensions minimum indiquées dans la gure ci-dessous.
L'image indique les mesures minimum à respecter entre l'insert et le revêtement : ces mesures sont nécessaires à permettre le
bon mouvement du cadre et son extraction de son emplacement initial.
Le montage est aussi possible à partir de l'insert assemblé.
COMFORT L80 - IDRO 800
700 X 800 MM AVEC TIROIR EN OPTION
H=
700
L=
841
ATTENTION:
TOUJOURS SUIVRE LES INDICATIONS EN TOUTE SÉCURITÉ !
LE POÊLE DOIT ÊTRE COMPLÈTEMENT FROID ET ÉTEINT
ET DÉBRANCHÉ DE LA PRISE DE COURANT DU SECTEUR.
POUR UN FONCTIONNEMENT CORRECT DE L'INSERT, LE TIROIR DOIT TOUJOURS RESTER FERME
SAUF PENDANT LA PHASE DE REMPLISSAGE DU TIROIR.
23

FRANCAIS
COMPOSANT DU KIT
24

1
2
FRANCAIS
Retirer les 6 vis et retirer le cadre complet, avec précaution.
Démonter l'aimant du cadre original et le monter sur le cadre de droite fournie
dans le kit.
25

3
4
FRANCAIS
Retirer les cadres et les remplacer par ceux fournis pour le kit.
Attention aux bagues.
La vis doit être enlée
dans la fente.
Enler la bague puis xer la vis.
Fixer les vis
Fixer les équerres
Fixer les vis
Poser le cadre complet et xer les
vis latérales.
26

5
6
FRANCAIS
Insérer les rails.
Insérer les rails.
Fixer les vis
27

7
8
FRANCAIS
Fixer les vis
autotarau-
deuses 4,2x9,5
Fixer les vis
autotaraudeuses
4,2x9,5
Fixer les vis à tête hexagonale M5 x 20 ZN
Fixer les vis à tête
hexagonale M5 x 20 ZN
Fixer les vis à
tête hexagonale
M5 x 16 ZN
Après avoir xer le panneau frontal, régler le
glissement et le centrage à l'aide des étriers de
xation. Les étriers sont fendus ; desserrer les vis
et régler tout le kit. - Fixer les vis
28

A
UTILIZZO DEL CASSETTO
FRANCAIS
Retirer le tiroir à l'aide des deux tisonniers fournis.
UTILISATION DU TIROIR
29

B
C
FRANCAIS
Déloquer le glissement du tiroir de chargement
en faisant tourner le levier comme indiqué dans
l'image.
Extraire le petit tiroir de chargement à l'aide du tisonnier
fourni.
30

D
E
FRANCAIS
D
E
Fermer le tiroir de chargement à l'aide du
tisonnier fourni
Charger le pellet dans le tiroir et utiliser
le racloir pour le pousser dans le
réservoir situé derrière.
31

F
G
FRANCAIS
F
G
Bloquer le glissement du tiroir de chargement
en faisant tourner le levier comme indiqué dans
l'image.
En faisant cela, il sera possible de refermer tout le
tiroir.
32

DEUTSCH
OPTIONALES KIT ZUM FRONTALEN LADEN DER PELLETS
Das optionale Kit zum Laden der Pellets erlaubt, sie in das Innere des Tanks zu laden, ohne
den Einsatz herausnehmen zu müssen (Vorgang, der das Abschalten des Geräts erfordert).
Bevor die Installation des Geräts vorgenommen wird, ist es notwendig, sich zu versichern, dass die Struktur, die den Einsatz
umgeben wird, eine Önung mit den in der folgenden Abbildung angegebenen Mindestausmaßen gewährleistet.
In den Abbildungen werden die zu beachtenden Mindestmaße zwischen Einsatz und Verkleidung aufgeführt: Diese Maße sind
notwendig, um die korrekte Bewegung des Rahmens und seine Entfernung von der ursprünglichen Position zu erlauben.
Die Montage ist auch bei montiertem Einsatz möglich.
COMFORT L80 - IDRO 800
700 X 800 MM MIT OPTIONALER SCHUBLADE
H=
700
L=
841
ACHTUNG:
DIE ANWEISUNGEN IMMER IN GRÖSSTMÖGLICHER SICHERHEIT AUSFÜHREN!
DER OFEN MUSS VOLLKOMMEN KALT, ABGESCHALTET
UND VOM STROMNETZ ABGETRENNT SEIN.
FÜR EINE KORREKTE FUNKTIONSWEISE DES EINSATZES, MUSS DIE SCHUBLADE IMMER
GESCHLOSSEN BLEIBEN, MIT AUSNAHME DER LADEPHASE DES TANKS.
33

DEUTSCH
KOMPONENTEN DES KIT
34

1
2
DEUTSCH
Die 6 Schrauben entfernen und den kompletten Rahmen vorsichtig abnehmen.
Den Magnet vom ursprünglichen Rahmen abmontieren und auf dem rechten,
mit dem Kit gelieferten Rahmen montieren.
35

3
4
DEUTSCH
Die Rahmen entfernen und mit denjenigen aus der
Ausstattung für das Kit ersetzen.
Achtung auf die Buchsen.
Die Schraube muss in der
Öse eingesetzt sein.
Die Buchse einsetzen und die Schraube befestigen.
Die
Schrauben
befestigen
Die Winkelbeschläge befestigen
Die Schrauben befestigen
Den kompletten Rahmen
anlegen und mit den seitlichen
Schrauben befestigen
36

5
6
DEUTSCH
Die Schienen einsetzen
Die Schienen einsetzen
Die Schrauben
befestigen
37

7
8
DEUTSCH
Die gewinde-
schneidenden
Schrauben
4.2x9.5 befestigen
Die gewindeschneidenden
Schrauben 4.2x9.5
befestigen
Die Schrauben TE M5 x 20 ZN befestigen.
Die Schrauben TE M5
x 20 ZN befestigen.
Die Schrauben
TE M5 x 16 ZN
befestigen.
Nachdem das Vorderteil befestigt wurde, den
Gleitmechanismus und die Zentrierung durch die
Befestigungsbügel regulieren. Die Bügel besitzen
Ösen, die Schrauben lockern und das gesamte Kit
regulieren. - Die Schrauben befestigen.
38

A
UTILIZZO DEL CASSETTO
DEUTSCH
Die Schublade unter Verwendung der beiden Schürhaken in der
Ausstattung herausziehen.
GEBRAUCH DER SCHUBLADE
39

B
C
DEUTSCH
Den Gleitmechanismus der Befüllungsschublade
entriegeln, indem man den Hebel, wie in der
Abbildung angezeigt, dreht.
Die Befüllungsschublade unter Verwendung des
Schürhakens in der Ausstattung herausziehen.
40

D
E
DEUTSCH
Die Befüllungsschublade unter Verwendung
des Schürhakens in der Ausstattung schließen.
Die Pellets in die Schublade laden
und den Schaber in der Ausstattung
verwenden, um sie in den dahinter
liegenden Tank zu schieben.
41

F
G
DEUTSCH
Den Gleitmechanismus der Befüllungsschublade
blockieren, indem man den Hebel, wie in der
Abbildung angezeigt, dreht.
Durch diesen Vorgang ist es möglich, die ganze
Schublade zu schließen.
42

ESPAÑOL
KIT OPCIONAL CARGA PELLET FRONTAL
El kit opcional de carga pellet permite cargar frontalmente el pellet dentro del depósito sin
necesidad de extraer la inserción (operación que requiere el apagado de la máquina).
Antes de proceder con la instalación del aparato es preciso asegurarse de que la estructura que revestirá la inserción garantice
un agujero que cuente con las medidas mínimas indicadas en las guras a continuación.
En las imágenes se indican las medidas mínimas que deben respetarse entre la inserción y el revestimiento: estas medidas son
necesarias para permitir el correcto funcionamiento del marco y su desplazamiento de la ubicación de origen.
El montaje se puede realizar también con la inserción montada.
COMFORT L80 - IDRO 800
700 X 800 MM CON CAJÓN OPCIONAL
H=
700
L=
841
ATENCIÓN:
¡SIGA LAS INDICACIONES SIEMPRE CON LA MÁXIMA SEGURIDAD!
LA ESTUFA DEBE ESTAR TOTALMENTE FRÍA, APAGADA
Y LA TOMA ELÉCTRICA DE RED DEBE ESTAR DESCONECTADA.
PARA EL CORRECTO FUNCIONAMIENTO DE LA INSERCIÓN, EL CAJÓN DEBE PERMANECER SIEMPRE
CERRADO EXCEPTO DURANTE LA FASE DE CARGA DEL DEPÓSITO.
43

ESPAÑOL
COMPONENTES DEL KIT
44

1
2
ESPAÑOL
Quitar con cuidado los 6 tornillos y el marco completo.
Desmontar el imán del marco original y montarlo en el marco derecho
entregado junto con el kit.
45

3
4
ESPAÑOL
Quitar los marcos y sustituirlos por aquellos en dotación
para el kit
Preste atención a los casquillos
El tornillo debe
introducirse en la ranura
Introducir el casquillo y jar el tornillo
Fijar los tornillos
Fijar las escuadras
Fijar los tornillos
Apoyar el marco completo y jar
los tornillos laterales
46

5
6
ESPAÑOL
Introducir los carriles
Introducir los carriles
Fijar los tornillos
47

7
8
ESPAÑOL
Fijar los tornillos
autorroscantes
4.2x9.5
Fijar los tornillos
autorroscantes
4.2x9.5
Fijar los tornillos TE M5 x 20 ZN
Fijar los tornillos
TE M5 x 20 ZN
Fijar los tornillos
TE M5 x 16 ZN
Después de haber jado el frente, ajustar el
deslizamiento y el centrado mediante los estribos
de jación. Los estribos cuentas con ranuras, aojar
los tornillos y ajustar todo el kit. - Fijar los tornillos.
48

A
UTILIZZO DEL CASSETTO
ESPAÑOL
Extraiga el cajón usando los dos espetones en dotación
UTILIZACIÓN DEL CAJÓN
49

B
C
ESPAÑOL
Desbloquee el deslizamiento del cajón de carga
girando la palanca tal y como se muestra en la
imagen.
Extraiga el cajón de carga usando el espetón en dotación
50

D
E
ESPAÑOL
Cierre el cajón de carga usando
el espetón en dotación
Cargue el pellet en el cajón y utilice el
raspador en dotación para empujarlo en
el depósito trasero
51

F
G
Bloquee el deslizamiento del cajón de carga girando
la palanca tal y como se muestra en la imagen.
Al realizar esta operación será posible cerrar de
nuevo el cajón
004276709-MANUALE ISTR.KIT.CARIC.FRONT.L80-I800-00152
Transcripción de documentos
MANUALE ISTRUZIONI CASSETTO FRONTALE INSERTI INSTRUCTIONS MANUAL FOR FRONT DRAWER INSERTS MANUEL D’INSTRUCTION DES PIÈCES ENCASTRABLES DU TIROIR FRONTAL BEDIENUNGSANLEITUNG VORDERE SCHUBLADE EINSATZSTÜCKE MANUAL DE INSTRUCCIONE CAJÓN FRONTAL INSERCIONES Compatibile per - Compatible for - Compatible avec - Kompatibel für - Compatible con: COMFORT IDRO L80 - INSERTO IDRO 800 004276709-REV001 ITALIANO..................................................................................................................................................................................... 3 KIT OPZIONALE CARICAMENTO PELLET FRONTALE.............................................................................................................. 3 COMPONENTI DEL KIT................................................................................................................................................................ 4 UTILIZZO DEL CASSETTO........................................................................................................................................................... 9 ENGLISH.....................................................................................................................................................................................13 OPTIONAL FRONTAL PELLET FEEDING KIT............................................................................................................................13 COMPONENTS OF THE KIT.......................................................................................................................................................14 HOW TO USE THE TRAY.............................................................................................................................................................19 UTILIZZO DEL CASSETTO.........................................................................................................................................................19 FRANÇAIS..................................................................................................................................................................................23 KIT EN OPTION CHARGEMENT FRONTAL DU PELLET...........................................................................................................23 COMPOSANT DU KIT................................................................................................................................................................24 UTILISATION DU TIROIR...........................................................................................................................................................29 UTILIZZO DEL CASSETTO.........................................................................................................................................................29 DEUTSCH....................................................................................................................................................................................33 OPTIONALES KIT ZUM FRONTALEN LADEN DER PELLETS...................................................................................................33 KOMPONENTEN DES KIT..........................................................................................................................................................34 GEBRAUCH DER SCHUBLADE..................................................................................................................................................39 UTILIZZO DEL CASSETTO.........................................................................................................................................................39 ESPAÑOL....................................................................................................................................................................................43 KIT OPCIONAL CARGA PELLET FRONTAL...............................................................................................................................43 COMPONENTES DEL KIT...........................................................................................................................................................44 UTILIZACIÓN DEL CAJÓN.........................................................................................................................................................49 UTILIZZO DEL CASSETTO.........................................................................................................................................................49 2 KIT OPZIONALE CARICAMENTO PELLET FRONTALE Il kit opzionale di caricamento pellet consente di caricare frontalmente il pellet all’interno del serbatoio senza dover procedere con l’estrazione dell’inserto (operazione che richiede lo spegnimento della macchina). Prima di procedere con l’installazione dell’apparecchio è necessario assicurarsi che la struttura che rivestirà l’inserto garantisca un foro con le misure minime indicate nella figure sotto. Nell’immagini sono riportate le misure minime da rispettare tra l’inserto e il rivestimento: tali misure risultano necessarie per permettere il corretto movimento della cornice e la sua rimozione dalla locazione originaria. Il montaggio è possibile anche da inserto montato. COMFORT L80 - IDRO 800 H= 700 700 X 841 MM CON CASSETTO OPTIONAL L= 841 ATTENZIONE: ESEGUIRE LE INDICAZIONI SEMPRE NELLA MASSIMA SICUREZZA! LA STUFA DEVE ESSERE COMPLETAMENTE FREDDA, SPENTA E SCOLLEGATA LA PRESA ELETTRICA DI RETE. PER UN CORRETTO FUNZIONAMENTO DELL’INSERTO, IL CASSETTO DEVE RIMANERE SEMPRE CHIUSO TRANNE DURANTE LA FASE DI CARICO SERBATOIO. ITALIANO 3 COMPONENTI DEL KIT 4 ITALIANO 1 Togliere le 6 viti, e rimuovere la cornice completa con attenzione. 2 Smontare il magnete dalla corince originale, e montarlo sulla cornice destra fornita nel kit. ITALIANO 5 3 Togliere le cornici e sostituirle con quelle in dotazione per il kit Fissare le viti La vite deve essere inserita dentro l’asola Attenzione alle bussole Inserire la bussola e fissare la vite 4 Fissare le squadrette Fissare le viti Appoggiare la cornice completa e fissare le viti laterali 6 ITALIANO 5 Inserire le rotaie Inserire le rotaie 6 Fissare le viti ITALIANO 7 7 Fissare le viti TE M5 x 20 ZN Fissare le viti autofilettanti 4.2x9.5 Fissare le viti autofilettanti 4.2x9.5 8 Dopo avere fissato il frontale, regolare lo scorrimento e il centraggio attraverso le staffe di fissaggio. Le staffe sono asolate, allentare le viti e regolare tutto il kit. - Fissare le viti. Fissare le viti TE M5 x 20 ZN Fissare le viti TE M5 x 16 ZN 8 ITALIANO UTILIZZO DEL CASSETTO A Estrarre il cassetto mediante l'uso dei due attizzatoi in dotazione ITALIANO 9 B Sbloccare lo scorrimento del cassettino di caricamento facendo ruotare la leva come in immagine C Estrarre il cassettino di caricamento mediante l'uso dell’attizzatoio in dotazione 10 ITALIANO D Caricare il pellet sul cassettino e utilizzare il raschietto in dotazione per spingerlo nel serbatoio retrostante E Chiudere il cassettino di caricamento mediante l'uso dell’attizzatoio in dotazione ITALIANO 11 F Bloccare lo scorrimento del cassettino di caricamento facendo ruotare la leva come in immagine. Facendo questo sarà possibile richiudere l’intero cassetto G 12 ITALIANO OPTIONAL FRONTAL PELLET FEEDING KIT The optional frontal pellet feeding kit allows feeding pellets inside the tank without having to remove the insert (which requires the shutdown of the machine). Before proceeding with the installation you must ensure that the structure that will cover the insert ensures a hole with the minimum dimensions shown in the figure below. The images shows the minimum sizes to be observed between the insert and the cover: these sizes are necessary to enable the correct movement of the frame and the removal of the same from its original place. You can also assemble it with the insert fitted. COMFORT L80 - IDRO 800 H= 700 700 X 800 MM WITH OPTIONAL TRAY L= 841 ATTENTION: FOLLOW THE INSTRUCTIONS ALWAYS IN COMPLETE SAFETY! THE STOVE MUST BE COMPLETELY COLD, SWITCHED OFF AND UNPLUGGED FROM THE POWER OUTLET. TO ENSURE THE PROPER OPERATION OF THE INSERT, THE TRAY MUST ALWAYS REMAIN CLOSED EXCEPT DURING THE RESERVOIRE LOADING PHASE. ENGLISH 13 COMPONENTS OF THE KIT 14 ENGLISH 1 Remove the 6 screws, and remove the complete frame carefully. 2 Remove the magnet from the original frame, and mount it on the right frame supplied with the kit. ENGLISH 15 3 Remove the frames and replace them with the ones supplied with the kit Tighten the screws The screw should be inserted in the slot Be careful with the bushes Insert the bush and fasten the screw 4 Fix the brackets Tighten the screws Place the complete frame and tighten the side screws 16 ENGLISH 5 Insert the rails Insert the rails 6 Tighten the screws ENGLISH 17 7 Fix the screws TE M5 x 20 ZN Fasten the selftapping screws 4.2 x 9.5 Fasten the selftapping screws 4.2 x 9.5 8 After fixing the front panel, adjust the sliding degree and the centre of distance by means of the fixing brackets. The brackets are slotted; loosen the screws and adjust the entire kit. -Tighten the screws. Fix the screws TE M5 x 20 ZN Fix the screws TE M5 x 16 ZN 18 ENGLISH UTILIZZO HOW TO USE DEL THE CASSETTO TRAY A Pull out the tray using the two pokers supplied ENGLISH 19 B Unlock the slide of the feeding tray by turning the lever as shown in the picture C Pull out the feeding tray using the poker supplied 20 ENGLISH D Load the pellets on the tray and use the scraper provided to push it into the reservoir behind it E Close the feeding tray using the poker supplied ENGLISH 21 F Lock the slide of the feeding tray by turning the lever as shown in the picture. In this way you will be able to close the entire tray G 22 ENGLISH KIT EN OPTION CHARGEMENT FRONTAL DU PELLET Le kit en option de chargement du pellet permet de charger les granulés par l'avant, à l'intérieur du réservoir sans devoir extraire l'insert (opération qui nécessite d'éteindre l'appareil). Avant de procéder à l'installation de l'appareil, il est nécessaire de s'assurer que la structure qui couvrira l'insert garantit un trou ayant les dimensions minimum indiquées dans la figure ci-dessous. L'image indique les mesures minimum à respecter entre l'insert et le revêtement : ces mesures sont nécessaires à permettre le bon mouvement du cadre et son extraction de son emplacement initial. Le montage est aussi possible à partir de l'insert assemblé. COMFORT L80 - IDRO 800 H= 700 700 X 800 MM AVEC TIROIR EN OPTION L= 841 ATTENTION: TOUJOURS SUIVRE LES INDICATIONS EN TOUTE SÉCURITÉ ! LE POÊLE DOIT ÊTRE COMPLÈTEMENT FROID ET ÉTEINT ET DÉBRANCHÉ DE LA PRISE DE COURANT DU SECTEUR. POUR UN FONCTIONNEMENT CORRECT DE L'INSERT, LE TIROIR DOIT TOUJOURS RESTER FERME SAUF PENDANT LA PHASE DE REMPLISSAGE DU TIROIR. FRANCAIS 23 COMPOSANT DU KIT 24 FRANCAIS 1 Retirer les 6 vis et retirer le cadre complet, avec précaution. 2 Démonter l'aimant du cadre original et le monter sur le cadre de droite fournie dans le kit. FRANCAIS 25 3 Retirer les cadres et les remplacer par ceux fournis pour le kit. Fixer les vis La vis doit être enfilée dans la fente. Attention aux bagues. Enfiler la bague puis fixer la vis. 4 Fixer les équerres Fixer les vis Poser le cadre complet et fixer les vis latérales. 26 FRANCAIS 5 Insérer les rails. Insérer les rails. 6 Fixer les vis FRANCAIS 27 7 Fixer les vis à tête hexagonale M5 x 20 ZN Fixer les vis autotaraudeuses 4,2x9,5 Fixer les vis autotaraudeuses 4,2x9,5 8 Après avoir fixer le panneau frontal, régler le glissement et le centrage à l'aide des étriers de fixation. Les étriers sont fendus ; desserrer les vis et régler tout le kit. - Fixer les vis Fixer les vis à tête hexagonale M5 x 20 ZN Fixer les vis à tête hexagonale M5 x 16 ZN 28 FRANCAIS UTILIZZO UTILISATION DEL DU CASSETTO TIROIR A Retirer le tiroir à l'aide des deux tisonniers fournis. FRANCAIS 29 B Déloquer le glissement du tiroir de chargement en faisant tourner le levier comme indiqué dans l'image. C Extraire le petit tiroir de chargement à l'aide du tisonnier fourni. 30 FRANCAIS D Charger le pellet dans le tiroir et utiliser le racloir pour le pousser dans le réservoir situé derrière. E Fermer le tiroir de chargement à l'aide du tisonnier fourni FRANCAIS 31 F Bloquer le glissement du tiroir de chargement en faisant tourner le levier comme indiqué dans l'image. En faisant cela, il sera possible de refermer tout le tiroir. G 32 FRANCAIS OPTIONALES KIT ZUM FRONTALEN LADEN DER PELLETS Das optionale Kit zum Laden der Pellets erlaubt, sie in das Innere des Tanks zu laden, ohne den Einsatz herausnehmen zu müssen (Vorgang, der das Abschalten des Geräts erfordert). Bevor die Installation des Geräts vorgenommen wird, ist es notwendig, sich zu versichern, dass die Struktur, die den Einsatz umgeben wird, eine Öffnung mit den in der folgenden Abbildung angegebenen Mindestausmaßen gewährleistet. In den Abbildungen werden die zu beachtenden Mindestmaße zwischen Einsatz und Verkleidung aufgeführt: Diese Maße sind notwendig, um die korrekte Bewegung des Rahmens und seine Entfernung von der ursprünglichen Position zu erlauben. Die Montage ist auch bei montiertem Einsatz möglich. COMFORT L80 - IDRO 800 H= 700 700 X 800 MM MIT OPTIONALER SCHUBLADE L= 841 ACHTUNG: DIE ANWEISUNGEN IMMER IN GRÖSSTMÖGLICHER SICHERHEIT AUSFÜHREN! DER OFEN MUSS VOLLKOMMEN KALT, ABGESCHALTET UND VOM STROMNETZ ABGETRENNT SEIN. FÜR EINE KORREKTE FUNKTIONSWEISE DES EINSATZES, MUSS DIE SCHUBLADE IMMER GESCHLOSSEN BLEIBEN, MIT AUSNAHME DER LADEPHASE DES TANKS. DEUTSCH 33 KOMPONENTEN DES KIT 34 DEUTSCH 1 Die 6 Schrauben entfernen und den kompletten Rahmen vorsichtig abnehmen. 2 Den Magnet vom ursprünglichen Rahmen abmontieren und auf dem rechten, mit dem Kit gelieferten Rahmen montieren. DEUTSCH 35 3 Die Rahmen entfernen und mit denjenigen aus der Ausstattung für das Kit ersetzen. Die Schrauben befestigen Die Schraube muss in der Öse eingesetzt sein. Achtung auf die Buchsen. Die Buchse einsetzen und die Schraube befestigen. 4 Die Winkelbeschläge befestigen Die Schrauben befestigen Den kompletten Rahmen anlegen und mit den seitlichen Schrauben befestigen 36 DEUTSCH 5 Die Schienen einsetzen Die Schienen einsetzen 6 Die Schrauben befestigen DEUTSCH 37 7 Die Schrauben TE M5 x 20 ZN befestigen. Die gewindeschneidenden Schrauben 4.2x9.5 befestigen Die gewindeschneidenden Schrauben 4.2x9.5 befestigen 8 Nachdem das Vorderteil befestigt wurde, den Gleitmechanismus und die Zentrierung durch die Befestigungsbügel regulieren. Die Bügel besitzen Ösen, die Schrauben lockern und das gesamte Kit regulieren. - Die Schrauben befestigen. Die Schrauben TE M5 x 20 ZN befestigen. Die Schrauben TE M5 x 16 ZN befestigen. 38 DEUTSCH GEBRAUCH UTILIZZO DER DEL CASSETTO SCHUBLADE A Die Schublade unter Verwendung der beiden Schürhaken in der Ausstattung herausziehen. DEUTSCH 39 B Den Gleitmechanismus der Befüllungsschublade entriegeln, indem man den Hebel, wie in der Abbildung angezeigt, dreht. C Die Befüllungsschublade unter Verwendung Schürhakens in der Ausstattung herausziehen. 40 DEUTSCH des D Die Pellets in die Schublade laden und den Schaber in der Ausstattung verwenden, um sie in den dahinter liegenden Tank zu schieben. E Die Befüllungsschublade unter Verwendung des Schürhakens in der Ausstattung schließen. DEUTSCH 41 F Den Gleitmechanismus der Befüllungsschublade blockieren, indem man den Hebel, wie in der Abbildung angezeigt, dreht. Durch diesen Vorgang ist es möglich, die ganze Schublade zu schließen. G 42 DEUTSCH KIT OPCIONAL CARGA PELLET FRONTAL El kit opcional de carga pellet permite cargar frontalmente el pellet dentro del depósito sin necesidad de extraer la inserción (operación que requiere el apagado de la máquina). Antes de proceder con la instalación del aparato es preciso asegurarse de que la estructura que revestirá la inserción garantice un agujero que cuente con las medidas mínimas indicadas en las figuras a continuación. En las imágenes se indican las medidas mínimas que deben respetarse entre la inserción y el revestimiento: estas medidas son necesarias para permitir el correcto funcionamiento del marco y su desplazamiento de la ubicación de origen. El montaje se puede realizar también con la inserción montada. COMFORT L80 - IDRO 800 H= 700 700 X 800 MM CON CAJÓN OPCIONAL L= 841 ATENCIÓN: ¡SIGA LAS INDICACIONES SIEMPRE CON LA MÁXIMA SEGURIDAD! LA ESTUFA DEBE ESTAR TOTALMENTE FRÍA, APAGADA Y LA TOMA ELÉCTRICA DE RED DEBE ESTAR DESCONECTADA. PARA EL CORRECTO FUNCIONAMIENTO DE LA INSERCIÓN, EL CAJÓN DEBE PERMANECER SIEMPRE CERRADO EXCEPTO DURANTE LA FASE DE CARGA DEL DEPÓSITO. ESPAÑOL 43 COMPONENTES DEL KIT 44 ESPAÑOL 1 Quitar con cuidado los 6 tornillos y el marco completo. 2 Desmontar el imán del marco original y montarlo en el marco derecho entregado junto con el kit. ESPAÑOL 45 3 Quitar los marcos y sustituirlos por aquellos en dotación para el kit Fijar los tornillos El tornillo debe introducirse en la ranura Preste atención a los casquillos Introducir el casquillo y fijar el tornillo 4 Fijar las escuadras Fijar los tornillos Apoyar el marco completo y fijar los tornillos laterales 46 ESPAÑOL 5 Introducir los carriles Introducir los carriles 6 Fijar los tornillos ESPAÑOL 47 7 Fijar los tornillos TE M5 x 20 ZN Fijar los tornillos autorroscantes 4.2x9.5 Fijar los tornillos autorroscantes 4.2x9.5 8 Después de haber fijado el frente, ajustar el deslizamiento y el centrado mediante los estribos de fijación. Los estribos cuentas con ranuras, aflojar los tornillos y ajustar todo el kit. - Fijar los tornillos. Fijar los tornillos TE M5 x 20 ZN Fijar los tornillos TE M5 x 16 ZN 48 ESPAÑOL UTILIZACIÓN UTILIZZO DELDEL CASSETTO CAJÓN A Extraiga el cajón usando los dos espetones en dotación ESPAÑOL 49 B Desbloquee el deslizamiento del cajón de carga girando la palanca tal y como se muestra en la imagen. C Extraiga el cajón de carga usando el espetón en dotación 50 ESPAÑOL D Cargue el pellet en el cajón y utilice el raspador en dotación para empujarlo en el depósito trasero E Cierre el cajón de carga usando el espetón en dotación ESPAÑOL 51 F Bloquee el deslizamiento del cajón de carga girando la palanca tal y como se muestra en la imagen. Al realizar esta operación será posible cerrar de nuevo el cajón G 52 004276709-MANUALE ISTR.KIT.CARIC.FRONT.L80-I800-001-
 1
1
-
 2
2
-
 3
3
-
 4
4
-
 5
5
-
 6
6
-
 7
7
-
 8
8
-
 9
9
-
 10
10
-
 11
11
-
 12
12
-
 13
13
-
 14
14
-
 15
15
-
 16
16
-
 17
17
-
 18
18
-
 19
19
-
 20
20
-
 21
21
-
 22
22
-
 23
23
-
 24
24
-
 25
25
-
 26
26
-
 27
27
-
 28
28
-
 29
29
-
 30
30
-
 31
31
-
 32
32
-
 33
33
-
 34
34
-
 35
35
-
 36
36
-
 37
37
-
 38
38
-
 39
39
-
 40
40
-
 41
41
-
 42
42
-
 43
43
-
 44
44
-
 45
45
-
 46
46
-
 47
47
-
 48
48
-
 49
49
-
 50
50
-
 51
51
-
 52
52


Extraflame COMFORT IDRO L80 FRONTAL FEEDING DRAWER El manual del propietario
- Tipo
- El manual del propietario
- Este manual también es adecuado para
En otros idiomas
- français: Extraflame COMFORT IDRO L80 FRONTAL FEEDING DRAWER Le manuel du propriétaire
- italiano: Extraflame COMFORT IDRO L80 FRONTAL FEEDING DRAWER Manuale del proprietario
- English: Extraflame COMFORT IDRO L80 FRONTAL FEEDING DRAWER Owner's manual
- Deutsch: Extraflame COMFORT IDRO L80 FRONTAL FEEDING DRAWER Bedienungsanleitung
Documentos relacionados
-
Extraflame FRONT PELLET LOADING BOX - L=200mm El manual del propietario
-
-
-
-
-
Extraflame Comfort P85 El manual del propietario
-
-
-
-
Extraflame Upper / lateral pellet loading kit for Comfort P70 Air El manual del propietario