Swann pro 842 Manual de usuario
- Categoría
- Cámaras de seguridad
- Tipo
- Manual de usuario

1
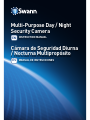
Multi-Purpose Day / Night
Security Camera
INSTRUCTION MANUAL
MANUAL DE INSTRUCCIONES
EN
ES
Cámara de Seguridad Diurna
/ Nocturna Multipropósito

2
ENGLISH
Limited Warranty Terms & Conditions
Swann Communications warrants this product against defects in workmanship and material for a
period of one (1) year from its original purchase date. You must present your receipt as proof of date
of purchase for warranty validation. Any unit which proves defective during the stated period will be
repaired without charge for parts or labour or replaced at the sole discretion of Swann. The end user
is responsible for all freight charges incurred to send the product to Swann’s repair centres. The end
user is responsible for all shipping costs incurred when shipping from and to any country other than
the country of origin.
The warranty does not cover any incidental, accidental or consequential damages arising from the use
of or the inability to use this product. Any costs associated with the fitting or removal of this product by
a tradesman or other person or any other costs associated with its use are the responsibility of the end
user. This warranty applies to the original purchaser of the product only and is not transferable to any
third party. Unauthorized end user or third party modifications to any component or evidence of misuse
or abuse of the device will render all warranties void.
By law some countries do not allow limitations on certain exclusions in this warranty. Where applicable
by local laws, regulations and legal rights will take precedence.
For Australia: Our goods come with guarantees which cannot be excluded under Australian Consumer
Law. You are entitled to a replacement or refund for a major failure and for compensation for any other
reasonably foreseeable loss or damage. You are also entitled to have the goods repaired or replaced if
the goods fail to be of acceptable quality and the failure does not amount to major failure.
FCC Verification
NOTE: This equipment has been tested and found to comply with the limits for Class B digital device,
pursuant to part 15 of the FCC Rules. These limits are designed to provide reasonable protection against
harmful interference in a residential installation. This equipment generates, uses and can radiate radio
frequency energy and, if not installed and used in accordance with the instructions, may cause harmful
interference to radio or television reception, which can be determined by turning the equipment off and
on, the user is encouraged to try to correct the interference by one or more of the following measures:
• Reorient or relocate the receiving antenna
• Increase the separation between the equipment and the receiver
• Connect the equipment into an outlet on a circuit different from that to which the receiver is
connected
• Consult the dealer or an experienced radio/TV technician for help
These devices comply with part 15 of the FCC Rules. Operation is subject to the following two conditions:
• These devices may not cause harmful interference, and
• These devices must accept any interference received, including interference that may cause
undesired operation.
Important Note:
All jurisdictions have specific laws and regulations relating to the use of cameras. Before using any
camera for any purpose, it is the buyer’s responsibility to be aware of all applicable laws and regulations
that prohibit or limit the use of cameras and to comply with the applicable laws and regulations.
WARNING
Modifications not approved by the party responsible for compliance could void user’s authority to
operate the equipment.
IMPORTANT SAFETY INSTRUCTIONS
• Make sure product is fixed correctly and stable if fastened in place.
• Do not operate if wires and terminals are exposed.
Before you begin

3
ENGLISH
Congratulations on your purchase of this Swann Multi-Purpose Day / Night Security Camera!
This instruction manual will walk you through the basics of installing and connecting your
camera.
This camera is very sensitive to light and therefore can make use of even the smallest
amount of light to provide an image of what it sees. In low light, this comes through as
a black and white image. In complete or near-total darkness, the camera uses built-in
infrared LEDs to illuminate the area in front of it. This light is invisible to the human eye,
although you might notice a faint red glow coming from the front of the camera - this is
normal.
Installation and Connection
Choosing the Location for the Camera
The camera is very flexible, and can be installed practically anywhere. Some of the things
you’ll have to consider when choosing a location are:
• What you want to monitor, and where you’ll get the best view of it.
• How you’re going to connect the camera to your monitoring system. Remember that
cables and connections should be kept out of the weather.
• How to keep the camera out of harm’s way.
✐ General Guidelines
• Place the camera in an position that a potential security threat will find it difficult to
avoid. A strategy which is often effective is to monitor entrances and exits - after all,
a security threat has to get in somewhere.
• Install the camera where it’s out of reach or not easily accessible by vandals. For
example, under the eaves of a roof or high up in protected corners of a wall. The higher
the camera is mounted, the harder it’ll be for vandals to interfere with it.
• Typically, the best view is obtained approximately 7ft (2m) to 10ft (3m) high, looking
slightly downwards. Try to aim the camera at an area which is evenly lit, as objects
or people in shadows near brightly lit objects are very hard to see.
• The internal components of the camera can be damaged by prolonged exposure to
direct sunlight. Don’t let direct sunlight into the lens!
• Avoid having bright light sources in your image. This includes the obvious (such as
the sun or an artificial light source) but also things such as reflections. Cars are
notorious for reflected light sources, as are buildings with a lot of windows, mirrors
and so forth.
• The camera’s night vision will give well-exposed images if the area is dark. However,
if there’s a bright point source in the camera’s view (a streetlight, car headlights or
similar) then it might not engage night vision mode.
About the Camera

4
ENGLISH
Mounting the Camera
The camera can be mounted onto a flat surface using screws. The surface must have
sufficient strength to hold the camera. Materials such as hardwood, brick or masonry are
good options, and we’ve included all the gear you’ll need to mount it there (except the tools
- sorry, you’ll still need your own drill). You can mount the camera onto a metal surface, but
you’ll need to supply your own mounting hardware.
To mount the camera:
• Position the camera in the location you want to mount it, and mark the screw holes
on the surface to position the screws. Then, using appropriate screws for the surface
you’re fixing the camera to, screw the camera into place.
• If you’re mounting to a wooden surface, then screw the camera directly to the surface.
• If you’re mounting to a masonry surface (bricks, concrete or similar) then you’ll need
to use the included wall plugs.
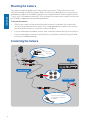
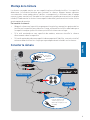
VIDEO IN
AUDIO
OUT
VGA
eSATA
HDMI LAN USB B A
PTZ
DC 12V
IN
VIDEO INAUDIO IN
1 3
2 4
1 3 5 7
2 4 6 8
DVR
Power Adapter
Extension Cable
Video Out
Power
Twist to lock
connectors
For 2 & 4 camera packs,
use the power splitter (if
included).
Connecting the Camera

5
ENGLISH
1
2
3
Adjusting the Camera Angle
• Loosening screw 1 will allow you to tilt the camera up
and down. Tighten the screw when you have finished.
• Loosening screw 2 will adjust the camera, so it can look
left or right. Tighten the screw when you have finished.
• Loosening the locking ring (3) will allow you to rotate
the barrel of the camera, so no matter what direction it
faces, you can rotate the camera so that your images are
correctly oriented.
Cable Management
• When running your cable, try to avoid bending it at sharp angles.
• Don’t put your cable near live electrical wiring. AC electricity generates radio “noise”
which can interfere with the signal from your camera.
Weather & Tampering
The camera’s casing is resistant to water, different weather conditions and tampering.
It would take an overwhelming event of this kind to damage the housing of the camera
(severe weather such as hurricanes or someone intentionally damaging the lens would be
enough). However, the cable and connector are vulnerable and require protection.
Troubleshooting
Q: On my Swann DVR, ‘Video Loss’ appears where the image from my camera should be.
A: Check the extension cable (power and video) is securely connected to the camera. Check
the video output from the camera is securely connected to a video input channel on the DVR.
Check the power from the camera is securely connected to a power supply.
Q: When I view an image from the camera at night I only see a bright spot and no image.
A: A reflection can be caused in night vision mode if the camera is looking through a window.
At night, the infrared light the camera uses to see in the dark can ‘bounce back’ off a reflective
surface (such as glass, water, spider webs, some ceramics and so on) and effectively blind
the camera. If you want to see outside, mount the camera outside - we made it weatherproof
for a reason!
Q: The BNC extension cable will not connect to my TV.
A: Many TV’s and monitors do not have a BNC connector but do have an RCA connector.
Connect a BNC to RCA adapter (not supplied) to the end of the extension cable and then plug
into the RCA socket on your TV or monitor.

Technical Support Details
Telephone Helpdesk
USA toll free 1-800-627-2799
USA Parts & Warranty 1-800-627-2799
(M-F, 9am-5pm US PT)
AUSTRALIA 1300 138 324
NEW ZEALAND toll free 0800 479 266
UK 0203 027 0979
Swann Technical Support
All Countries E-mail: tech@swann.com
ENGLISH

7
ESPAÑOL
7
Antes de comenzar
Términos y condiciones de la garantía limitada
Swann Communications garantiza que este producto no posee defectos de mano de obra y material por
un período de un (1) año desde su fecha de compra original. Deberá presentar su recibo como prueba
de la fecha de compra para la validación de la garantía. Cualquier unidad que resulte ser defectuosa
durante el período establecido será reparada sin costo de materiales o mano de obra o reemplazada
según el exclusivo criterio de Swann. El usuario final es responsable por todos los cargos de envío
incurridos para enviar el producto al centro de reparación de Swann. El usuario final es responsable de
todos los costos de envío incurridos cuando se envíe desde o a cualquier país diferente al país de origen.
La garantía no cubre ningún daño incidental, accidental o consecuente que resulte del uso de o
imposibilidad de uso de este producto. Cualquier costo asociado con el ajuste o remoción de este
producto por un comerciante u otra persona o cualquier otro costo asociado a su uso es responsabilidad
del usuario final. Esta garantía es aplicable únicamente al comprador original del producto y no es
transferible a ninguna tercera parte. Las modificaciones sin autorización por parte del usuario final
o una tercera parte de cualquier componente o evidencia de uso indebido o abuso del dispositivo
anularán todas las garantías.
Por ley algunos países no permiten las limitaciones en ciertas exclusiones en esta garantía. Donde
apliquen por leyes, regulaciones y derechos legales locales se sentará precedente.
Verificación FCC
NOTA:Se ha comprobado que este equipo cumple con los límites de dispositivo digital Clase B,
de conformidad con la parte 15 de las Reglas FCC. Estos límites son diseñados para proporcionar
protección razonable contra interferencia en una instalación residencial. Este equipo genera, utiliza e
irradia energía de frecuencia de radio y si no se instala y utiliza de acuerdo a las instrucciones, podría
causar interferencia dañina en la recepción de radio o televisión, que puede determinarse al apagar y
encender el equipo. Se recomienda que el usuario trate de corregir la interferencia por una o más de
las siguientes acciones:
• Reorientar o ubicar en otro lado la antena receptora
• Incrementar la separación entre el equipo y el receptor
• Conectar el equipo a una toma de corriente en un circuito diferente al que está conectado el
receptor
• Para ayuda consulte con el representante o un técnico de radio/TV experimentado
Estos dispositivos cumplen con la parte 15 de las Reglas FCC. Su operación está sujeta a las dos
siguientes condiciones:
• Estos dispositivos pueden causar interferencia dañina y
• Estos dispositivos deben aceptar cualquier interferencia recibidida, inlcluidas las interferencias
que puedan provocar un funcionamiento no deseado.
NOTA IMPORTANTE:
Todas las jurisdicciones poseen leyes y regulaciones específicas con respecto al uso de cámaras.
Antes de utilizar cualquier cámara para cualquier propósito, es responsabilidad del comprador tener
conocimiento de todas las leyes y regulaciones aplicables que prohíben o limitan el uso de cámaras y
cumplir con las leyes y regulaciones aplicables.
Advertencia
Las modificaciones no aprobadas por la parte responsable de cumplimiento podría anular la
autorización del usuario a operar el equipo.
INSTRUCCIONES DE SEGURIDAD IMPORTANTES
• Asegúrese de que el producto esté fijado correctamente en su lugar y de que esté estable.
• No la opere si los cables y terminales están expuestos.

8
ESPAÑOL
8
Sobre la cámara
¡Felicitaciones por su compra de esta SWANN Cámara de seguridad diurna / nocturna
multipropósito! Esta manual de instrucciones lo guiará por los aspectos básicos de montar
su cámara y conectar la cámara.
La cámara es muy sensible a la luz y por lo tanto puede utilizar hasta la menor cantidad
de luz para proporcionar una imagen de lo que ve. Con poca luz, la imagen se presenta en
blanco y negro.
En la oscuridad total o casi total, la cámara utiliza luz de LED infrarroja integrada para
iluminar el área que se halla frente a ella. Esta luz es invisible al ojo humano, aunque podría
notar un ligero resplandor rojo proveniente del frente de la cámara, esto es normal.
Instalación y Conexión
Elección de la ubicación de su cámara
La cámara es muy flexible y puede instalarse prácticamente en cualquier lugar. Algunas de
las cosas que deberá considerar al elegir la ubicación son:
• Qué desea monitorear y desde dónde obtendrá la mejor vista de ello.
• Cómo conectará la cámara a su sistema de monitoreo. Recuerde que los cables y
conexiones deberán estar protegidos de la intemperie.
• Cómo proteger la cámara de cualquier daño.
✐ Recomendaciones generales
• Coloque la cámara en una posición tal que una amenaza potencial a la seguridad
no pueda evitar fácilmente ser detectada. Una estrategia que suele funcionar es
monitorear entradas y salidas. Después de todo, una amenaza a la seguridad tiene
que entrar de alguna forma.
• Instale la cámara en un lugar que esté fuera de alcance o no sea de acceso fácil para
vándalos. Por ejemplo bajo el alero de un techo o en lo alto de las esquinas protegidas
de una pared. Cuanto más alta esté montada la cámara, será más complicado para los
vándalos interferir con ella.
• Normalmente, la mejor vista es obtenida aproximadamente de 7ft (2m) a 10ft (3m) de
altura, apuntando ligeramente hacia abajo. Intente orientar la cámara hacia un área
que esté iluminada de forma uniforme. Los objetos o personas en las sombras cerca
de objetos muy iluminados son muy difíciles de ver.
• Los componentes internos de la cámara pueden dañarse por la exposición prolongada
a la luz solar directa. ¡No permita la luz solar directa dentro de las lentes!
• Evite las fuentes de luz brillante en su imagen. Esto incluye fuentes obvias como el solo
una luz artificial, pero también los reflejos. Los automóviles son fuentes reflectoras
notables, como los edificios con muchas ventanas, los espejos, entre otros.
• La visión nocturna de la cámara proporcionará imágenes bien expuestas si el área es
oscura. Sin embargo, si hay una fuente de luz brillante en la vista de la cámara (una
luz de la calle, luces de automóviles o similares) quizás no se active el modo de visión
nocturna.

9
ESPAÑOL
9
Montaje de la Cámara
La cámara se puede montar en una superficie plana utilizando tornillos. La superficie
debe tener la suficiente fortaleza para sostener la cámara. Algunas buenas opciones
son materiales como madera dura, ladrillos o mampostería, e incluimos todo el equipo
necesario para montarla allí (excepto las herramientas, perdón pero necesitará su propio
taladro). Puede montar la cámara a una superficie de metal, pero necesitará contar con su
propio equipo de montaje.
Para montar la cámara:
• Ubique la cámara en la posición en que querrá montarla y marque los agujeros de los
tornillos en la superficie para ubicarlos. Luego, utilizando los tornillos adecuados para
la superficie en que ajustará la cámara, atornille la cámara en su lugar.
• Si la está montando en una superficie de madera, entonces atornille la cámara
directamente sobre la superficie.
• Si la está montando sobre una superficie de mampostería (ladrillos, concreto o similar)
entonces deberá utilizar las clavijas para pared que vienen incluidas con la cámara.
VIDEO IN
AUDIO
OUT
VGA
eSATA
HDMI LAN USB B A
PTZ
DC 12V
IN
VIDEO INAUDIO IN
1 3
2 4
1 3 5 7
2 4 6 8
DVR
Adaptador de
corriente
Cable de extensión
Salida de vídeo
Interruptor
Gire para
trabar los
conectores
Para los paquetes de
cámara 2 y 4, use un
divisor de energía (si está
incluido).
Conectar la cámara

10
ESPAÑOL
10
2
Ajuste del ángulo de la cámara
• Aflojar el tornillo 1 le permitirá inclinar la cámara hacia
arriba y abajo. Ajuste el tornillo cuando haya finalizado.
• Aflojar el tornillo 2 le permitirá ajustar la cámara para
que pueda enfocar hacia la izquierda o derecha. Ajuste el
tornillo cuando haya finalizado.
• Aflojar el anillo de cierre (3) le permitirá rotar el barril
de la cámara, para que sin importar a que dirección está
enfocada, pueda girar la cámara para que sus imágenes
estén correctamente orientadas.
Manejo del cable
• Al colocar el cable, intente evitar doblarlo en ángulos pronunciados.
• No coloque el cable cerca de cables con electricidad. La electricidad CA genera
“ruidos” de radio que pueden interferir con la señal de la cámara.
Intemperie y manipulación
La carcasa de la cámara es resistente al agua, condiciones climáticas diferentes y
manipulación. Solo un evento de este tipo fuera de lo común dañaría la carcasa de la
cámara (condiciones climáticas severas como huracanes o alguien que intencionalmente
dañara las lentes). Sin embargo, el cable y el conector son vulnerables y requieren
protección.
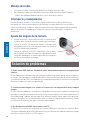
Solución de problemas
P: En mi Swann DVR, aparece ‘Pérdida de vídeo’ donde debería aparecer la imagen de mi
cámara.
R: Verifique que el cable de extensión (energía y vídeo) esté conectado de manera segura a
la cámara. Verifique que la salida de vídeo de la cámara esté conectada de manera segura al
canal de entrada del DVR. Verifique que la entrada de energía de la cámara esté conectada
de manera segura al suministro de energía.
P: Cuando veo una imagen en la cámara a la noche solo veo un punto brillante y ninguna
imagen.
R: Una reflexión puede ser causado en el modo de visión nocturna cuando la cámara está
mirando a través de una ventana. De noche, la luz infrarroja que usa la cámara para ver en la
oscuridad puede “rebotar” en una superficie reflexiva (como el vidrio, agua, telas de araña,
algunas cerámicas, etc.) y efectivamente cegar la cámara. Si desea ver hacia afuera, monte
la cámara en el exterior, ¡por algo la hicimos impermeable!
P: El cable de extensión BNC no se conecta a mi TV.
R: Muchos TV y monitores no poseen un conector BNC pero sí poseen un conector RCA.
Conecte el adaptador BCN a RCA (No provisto) en el extremo del cable de extensión y luego
enchufe el conector RCA en su TV o monitor.
1
3

11
ESPAÑOL
11
Detalles del servicio de asistencia
Teléfono del servicio de asistencia
EE.UU. (Número de llamada sin cargo) 1-800-627-2799
Piezas y garantía EE. UU. 1-800-627-2799
(L-V, 9am-5pm EE. UU. PT)
AUSTRALIA 1300 138 324
NUEVA ZELANDA (Número de llamada sin cargo) 0800 479 266
REINO UNIDO 0203 027 0979
Soporte Técnico Swann
Correo electrónico para todos los países: tech@swann.com

12
© Swann Communications 2014
M842CAM27062014ES
-
 1
1
-
 2
2
-
 3
3
-
 4
4
-
 5
5
-
 6
6
-
 7
7
-
 8
8
-
 9
9
-
 10
10
-
 11
11
-
 12
12


Swann pro 842 Manual de usuario
- Categoría
- Cámaras de seguridad
- Tipo
- Manual de usuario
En otros idiomas
- English: Swann pro 842 User manual
Documentos relacionados
-
Swann MWABCAM150514T Manual de usuario
-
-
-
-
-
-
-
-