Beautiful 19270 Manual de usuario
- Categoría
- Fabricantes de helados
- Tipo
- Manual de usuario
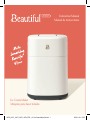
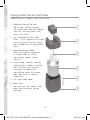
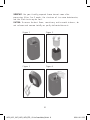
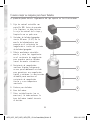
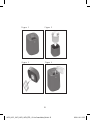
La Beautiful 19270 es una máquina para hacer helados con un potente motor y una capacidad de 1,5 litros, que te permitirá preparar deliciosos helados, sorbetes y yogur helado en casa. Gracias a su función de enfriamiento rápido y su temporizador ajustable, podrás tener tus postres listos en poco tiempo. Además, su diseño compacto y elegante hará que quede perfecta en cualquier cocina.
La Beautiful 19270 es una máquina para hacer helados con un potente motor y una capacidad de 1,5 litros, que te permitirá preparar deliciosos helados, sorbetes y yogur helado en casa. Gracias a su función de enfriamiento rápido y su temporizador ajustable, podrás tener tus postres listos en poco tiempo. Además, su diseño compacto y elegante hará que quede perfecta en cualquier cocina.


-
 1
1
-
 2
2
-
 3
3
-
 4
4
-
 5
5
-
 6
6
-
 7
7
-
 8
8
-
 9
9
-
 10
10
-
 11
11
-
 12
12
-
 13
13
-
 14
14
-
 15
15
-
 16
16
-
 17
17
-
 18
18
-
 19
19
-
 20
20
-
 21
21
-
 22
22
-
 23
23
-
 24
24
-
 25
25
-
 26
26
-
 27
27
-
 28
28
-
 29
29
-
 30
30
-
 31
31
-
 32
32
-
 33
33
-
 34
34
-
 35
35
-
 36
36
-
 37
37
-
 38
38
-
 39
39
-
 40
40
-
 41
41
-
 42
42
-
 43
43
-
 44
44


Beautiful 19270 Manual de usuario
- Categoría
- Fabricantes de helados
- Tipo
- Manual de usuario
La Beautiful 19270 es una máquina para hacer helados con un potente motor y una capacidad de 1,5 litros, que te permitirá preparar deliciosos helados, sorbetes y yogur helado en casa. Gracias a su función de enfriamiento rápido y su temporizador ajustable, podrás tener tus postres listos en poco tiempo. Además, su diseño compacto y elegante hará que quede perfecta en cualquier cocina.
en otros idiomas
- English: Beautiful 19270 User manual
Otros documentos
-
Bella ICE CREAM MAKER Instruction Manual & Recipe Manual
-
-
-
Cuisinart ICE31GE El manual del propietario
-
Cuisinart ICE-21 El manual del propietario
-
-
Hamilton Beach 68881Z Guía del usuario
-
Hamilton Beach 68881 Manual de usuario
-