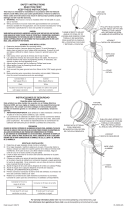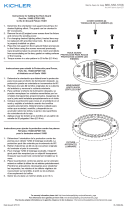
1. Loosen screw holding cowl in place and remove cowl.
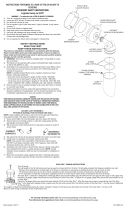
2. Carefully place new colored or textured lens into cowl. The lens
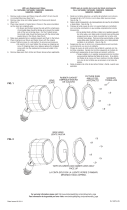
mustbelyingatonthelenssupportribs,seegure1.
NOTE:Forlenses,partnumbersGreen,16071GRNand
16072GRN,Amber16071AMBand16072AMB,HolidayGreen,
16071HGNand16072HGNandRed,16071RDand16072RD,
the side with the small piece of removable tape should be facing
up to ensure the coated side of the lens is facing down. For the
FrostedLenses,partnumbers16071FROand16072FROthe
smooth side should be facing down with the etched side facing up
inthexture.(Seegure1.)
3. Inspectxturegaskettoensureitisfreeofwater,dirtorresidue.
4. Reassemblecowltoxturemakingsurethatthecowlisfully
engagedonthexture.Makesurethecowl,surfaceA,makes
completecontactwithxturesurfaceB.(SeeFigure2.)
5. Securecowlinplacebytighteningscrew.
6. RemovetapepiecefromAmber,Green,HolidayGreenandRed
lenses where applicable.
DateIssued:10/20/17 IS-16072-US
For warranty information please visit: http://www.landscapelighting.com/portal/warranty_page
Para informacion de la garantia por favor visite: www.landscapelighting.com/portal/warranty_page
Instructions for Adding Colored and Textured Lenses to LED Accent Lights
Instrucciones para Agregar Lentes de Color o Con Textura a las Luces LED de Destaque
FIGURE 1
FIGURE 2
LENSSUPPORT
RIBS
SOPORTEPARA
LENTES
LENSACCESSORY
LENTEDEACCESORIOS
TAPEONGREEN,AMBER,
HOLIDAYGREENANDREDLENSONLY
FACEUP
CINTASOBREVERDE,ÁMBAR,VERDEDE
VACACIONESYLENTEROJASOLAMENTE
HACIAARRIBA
1. Aojeeltornilloquesostienelacapuchayretirelacapucha.
2. Concuidado,coloquelaslentesdecolorocontexturaenla
capucha. Las lentes deben apoyarse de manera completamente
horizontalsobreelsoporteparalentes.Observelagura1.
NOTA:Paralaslentes,losnúmerosdereferenciaVerde,
16071GRNy16072GRN,Amber16071AMBy16072AMB,Verde
deVacaciones,16071HGNy16072HGNyRojo,16071RDy
16072RD,elladoconlapequeñapiezadecintaextraíbledebe
estarorientadohaciaarribaparaasegurarqueelladorecubierto
delalenteestáhaciaabajo.Paralaslentesheladas,losnúmeros
dereferencia16071FROy16072FRO,elladolisodebeestar
haciaabajoconelladograbadohaciaarribaeneldispositivo.
(Verlagura1.)
3. Reviselajuntadelartefactoparaasegurarsedequenotenga
agua,suciedadnialgúnresiduo.
4. Vuelvaamontarlacapuchaenelartefactoasegurándosede
queencajebien.Veriquequelacapucha,supercieA,esté
totalmenteencontactoconlasupercieBdelartefacto.
Observelagura2.
5. Fijelacapuchaensulugarapretandoeltornillo.
6. Retirelapiezadecintadelaslentesámbar,verde,verdede
vacacionesyrojo,segúncorresponda.
GASKET
JAULA
COWL
CAPUCHA
SCREW
TORNILLO
COWLSURFACEA
CAPUCHA,SUPERFICIEA
FIXTURESURFACEB
SUPERFICIEBDEL
ARTEFACTO
We’reheretohelp866-558-5706
Hrs:M-F9amto5pmEST
La página se está cargando...
/
