Kichler Lighting 15093WHT Manual de usuario
- Tipo
- Manual de usuario

INSTRUCTIONS PERTAINING TO A RISK OF FIRE,OR INJURY TO
PERSONS
IMPORTANT SAFETY INSTRUCTIONS
Lighted lamp is HOT!
WARNING — To reduce the risk of FIRE OR INJURY TO PERSONS.
1) Turn off / unplug and allow to cool before replacing lamp.
2) Lamp gets HOT quickly! Contact only switch / plug when turning on.
3) Do not touch hot lens or cowl.
4) Do not remain in light if skin feels warm. (Light is intense, it may cause
“sunburn”.)
5) Do not look directly at lighted lamp.
6) Keep lamp away from materials that may burn.
7) Useonlywithwattageandlampmarkedonxture.
8) Do not touch the inner glass envelope of the lamp at any time. Use a soft cloth.
Oil from skin may damage lamp.
9) Donotoperatethexturewithadamagedormissinglens.
SAFETY INSTRUCTIONS
READ THIS FIRST
KEEP THESE INSTRUCTIONS
This xture is intended for installation in accordance with the National
Electric Code (NEC) and Local code specications. Failure to adhere to
these codes and instructions may result in serious injury and/or property
damage and will void the warranty.
1) WARNING: Thisxtureisnottobeinstalledwithin10feet(3M)ofapool,
spa or fountain.
2) Thisxtureistobeusedonlywithapowerunit(transformer)ratedamaximum
of300W(25AMPS)15volts.
3) AccordingtotherequirementsoftheNationalElectricCode(NEC),direct
burial rated wire is to be buried a minimum of 6” [152mm] beneath the
surface of the ground.
NOTE: If additional Direct Burial wire is needed, contact your local
Kichler
®
landscape distributor.
•8GAwirecanbepurchasedinlengthof250’(76M),15503-BK.
•10GAwirecanbepurchasedinlengthof250’(76M),15504-BK.
•12GAwirecanbepurchasedinlengthsof100’(30M),15501-BK;250’
(76M),15502-BK;500’(152M),15505-BK;and1000’(304M),15506-BK.
4) Fixtureshallnotuseatungstenhalogenlampunlessthextureismarked
for use with such lamps.
5) Wiringconnectionsmustbemadewithapproved/listedwireconnection
device(s)suitablefortheapplication.Donotexceedmanufacturers’wiring
combinationspecicationsforsizeandquantityofconductors.
CAUTION
WHEN INSTALLING KICHLER LANDSCAPE LIGHTING (LINE VOLTAGE OR LOW VOLTAGE),
CARE SHOULD BE TAKEN TO KEEP CLEAR OF POTENTIALLY COMBUSTIBLE MATERIALS.
WHEN MAINTAINING THE FIXTURES, BE SURE TO REMOVE LEAVES, PINE NEEDLES,
GRASS CLIPPINGS, MULCH, OR ANY DEBRIS THAT HAS ACCUMULATED ON THE LIGHT
BULB, LENS, OR BODY OF THE FIXTURE.
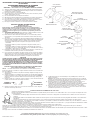
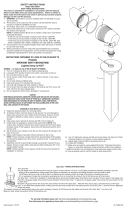
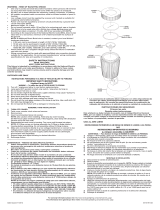
ACCENT LIGHT ASSEMBLY -
FIXTURE IS SUITABLE FOR OUTDOOR USE ONLY
NOTE:Cablesuppliedwithxtureisnottoberunthroughwall.Reference
local electrial codes if this type of installation is required.
1) Screwaccentlightintomountingplate.Secureinplacewithlocknut.
2) Securexturetomountingsurfaceoroutletboxusinggasketandthe
appropriate screws (provided).
3) SlipO-ringoveraccentbodyandintoO-ringgrooveclosesttocenterof
accent body.
4) SlipsecondO-ringintoO-ringgroovefarthestfromcenterofaccentbody.
5) Install lamp (not supplied) into socket inside accent light.
NOTE: Use caution when assembling. Hold lamp by outer housing.
DONOTtouchglassenvelopeinside.Ifthishappens,cleanbulbwith
denatured alcohol and a lint free cloth.
6) Assemblecowlwithscreentoaccentbody.Secureinplaceusingeither
the provided thumb screw or vandal resistant screw. NOTE: Vandal
resistantscrewsrequiresa3/32hexkey(notprovided)forinstallationor
removal.
7) MakewireconnectionsusingsuppliedQuicDisc
™
following instructions
below, or using other approved wiring connection method (not supplied.)
Date Issued: 12/2/11 IS-15093-US
For warranty information please visit: http://www.landscapelighting.com/portal/warranty_page
Para informacion de la garantia por favor visite: www.landscapelighting.com/portal/warranty_page
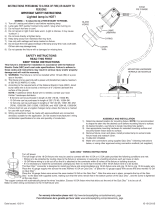
QUIC DISC
™
WIRING INSTRUCTIONS
Turn off power.
Thefulllengthofthe18GAxturewiremaybeusedtoconnectwiththe10GAor12GAcableprovidedthefollowingconditionsaremet:
•Wiringistobeprotectedbyroutingclosetothextureoraccessoryorsecuredtoabuildingstructuresuchashouseordeck.
• 18GAxturewiringistobecutoffsothatitisattachedtotheconnectorwithin6inchesofthextureorbuildingstructure.
• Ifitisnecessarytomaketheconnectionsunderground,thennomorethan6inchesofthe18GAxturewireistobeburied.
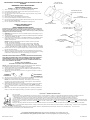
TheQuicDisc
™
connector is designed to install onextureandaccommodatesone18GAxturewireandone10GAorone12GAsupplywire.
Placethe10gaugesupplywireacrosstheareamarked10GAonQuicDisc
™
orplacethe12gaugesupplywireacrosstheareamarked12GA
onQuicDisc
™
.
Placethe18gaugexturewireacrosstheareamarked18GAontheQuicDisc
™
.Afterthewiresareinplace,connectathetopoftheQuic
Disc
™
tothebasewithsuppliedscrew,makingsurethatthewiresremainatinthebottomportionoftheQuicDisc
™
, and the screw is tightened
all the way down.
Thecoppercontactswillautomaticallypiercethewires’insulation.Excess18GAxturewirethatsticksouttheendoftheQuicDisc
™
is to be cut off.
Makenootherwiringconnectionstothe18GAxturewire.
OUTLETBOX
CAJADESALIDA
GASKET
EMPAQUETADURA
LOCKNUT
TUERCADESEGURIDAD
ACCENTLIGHT
LUZDEACENTO
O-RING
ANILLOENO
THUMBSCREW
TORNILLODEAPRIETE
MANUAL
COWL
CAPUCHA
INCORRECT
INCORRECTO
CORRECT
CORRECTO
MOUNTINGPLATE
PLACADEMONTAJE

INSTRUCCIONES PERTINENTES A UN RIESGO DE ICENDIO O LESION A
LAS PERSONAS
INSTRUCCIONES IMPORTANTES DE SEGURIDAD
¡La lámpara encendida es CALIENTE!
ADVERTENCIA — Para disminuir el riesgo de INCENDIO O LESION A LAS PERSONAS.
1) Apague/desenchufeydejequeseenfríeantesdecambiarlalámpara.
2) ¡LalámparaseCALIENTArápidamente!Hagacontactodelconmutador/
enchufe sólo cuando encienda.
3) Notoquelalenteolacapuchacaliente.
4) Nopermanezcaenlaluzsisientetibialapiel.(Laluzesintensa,puede
causar “quemaduras de sol”).
5) Nomiredirectamentealalámparaencendida.
6) Mantengalalámparaalejadadelosmaterialesquepuedanencenderse.
7) Usesolamenteconelvatiajeylalámparamarcadosenelartefacto.
8) Notoqueelvidriodelinteriordelalámparaenningúnmomento.Useun
pañosuave.Elaceitedelcuerpopuededañarlalámpara.
9) Nohagafuncionarelartefactoconunalentedañadaofaltante.
INSTRUCCIONES DE SEGURIDAD
Primero lea esto
Guarde estas instrucciones
Este artefacto se debe instalar de acuerdo con el Código Eléctrico
Nacional (NEC, por sus siglas en inglés) y con las especicaciones del
código local. No cumplir con estos códigos e instrucciones puede
resultar en lesiones graves y/ o en daños a la propiedad y anulará la
garantía.
1) ADVERTENCIAERTENCIA:Esteartefactonodebeinstalarseamenosde
10pies(3m)deunapiscina(alberca),spaofuente.
2) Esteartefactodebeutilizarsesolamenteconunaunidaddepotencia
(tranformador)concapacidadnominalmáximade300vatios(25amp.)
15 voltios.
3) DeacuerdoconlosrequisitosdelCódigoEléctricoNacional(NECporsus
siglaseninglés),elalambreclasicadoparasoterradodirectosedebeenterrar
unmínimode6pulgadas[152mm.]debajodelasuperciedelterreno.
•Elalambrecalibre8puedecomprarseenlongitudde250’(76m.),
15503-BK
•Elalambrecalibre10puedecomprarseenlongitudde250’(76m.),
15504-BK
•Elalambrecalibre12puedecomprarseenlongitudesde75’(22m.),
15550-BK;100’(30m.),15501-BK;250’(76m.),15502-BK;500’(152m.),
15505-BK;y1000’(304m.),15506-BK.
4) Elartefactonodebeutilizarseconlámparasdehalógeno,amenossque
elartefactoestémarcadoparausarcontaleslámparas.
5) Lasconexionesdecableadosedebenhacerconlasconexionesdel(los)
dispositivos)deconexióndecableadoaprobados/delalista,adecuados
paralaaplicación.Noexcedalasespecicacionesdecombinaciónde
cableado del fabricante para el tamaño y cantidad de conductores.
PRECAUCION
CUANDO SE INSTALE SISTEMAS DE ALUMBRADO KICHLER PARA JARDINES (YA SEA DE
VOLTAJE DE LINEA O CON VOLTAJE BAJO) SE DEBE TENER CUIDADO DE MAINTNERLOS
ALEJADOS DE MATERIALES QUE PUEDAN SER COMBUSTIBLES EN POTENCIA.
AL DAR SERVICIO DE MANTENIMIENTO A ESTOS SISTEMAS, ASEGURESE DE DESPEJAR
LAS HOJAS, CONOS DE PINO, RECORTES DEL PASTO, CUBIERTA DE PAJA O CUALQUIER
BASURA QUE SE HAYA ACUMULADO EN LA BOMBILLA DE LUZ, EL LENTE O EL SOPORTE
DE LA BOMBILLA.
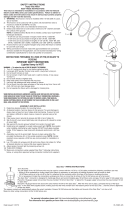
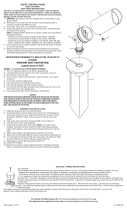
CONJUNTO DE LUZ DE ACENTO - EL ARTEFACTO ES APROPIADO
SÓLO PARA UTILIZACIÓN AL AIRE LIBRE
NOTA: Elcablesuministradoconelartefactonodebehacersepasara
travésdelapared.Consulteloscódigoseléctricoslocalessisenecesitaeste
tipo de instalación.
1) Atornillelaluzdeacentoenlaplacademontaje.Sujeteenellugarconla
contratuerca.
2) Sujeteelartefactoalasuperciedemontajeolacajadesalidautilizando
la empa quetadura y los tornillos apropiados (que se proveen). NOTA: La
direccióndelaluzdeacentodebesermirandohaciaabajo,abajodela
horizontal.
3) Deslice el anillo en O sobre el cuerpo de acento y en la ranura de anillo en
Omáscercanaalcentrodelcuerpodeacento.
4) DesliceelsegundoanilloenOenlaranuradeanilloenOmásalejada
del centro del cuerpo de acento.
Date Issued: 12/2/11 IS-15093-US
For warranty information please visit: http://www.landscapelighting.com/portal/warranty_page
Para informacion de la garantia por favor visite: www.landscapelighting.com/portal/warranty_page
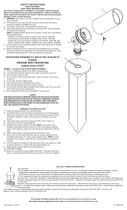
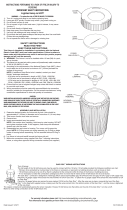
INSTRUCCIONES DE ALAMBRADO DE QUIC DISC
™
Apaguelaalimentacióndeenergía.
Ellargototaldelalambrecalibre18delartefactosepuedeutilizarparaconectarconuncablecalibre10ó12,contalquesecumplanlascondi-
ciones siguientes:
• Elalambradosedebeprotegerencaminandocercaalartefactooaccesoriooaseguradoalaestructuradeunedicio,talcomounacasao
cubierta.
• Elalambradocalibre18delartefactodebecortarsedemaneraqueseunaalconectordentrodelas6pulgadasdelartefactoodelaestructura
deledicio.
• Sifuerenecesariohacerlasconexionesbajotierra,comomáximo6pulgadasdelalambrecalibre18delartefactosedebeenterrar.
ElconectorQuicDisc
™
estádiseñadoparainstalarunartefactoyacomodarunalambredeartefactodecalibre18yotrodecalibre10,obienun
alambre de alimentación de calibre 12.
Coloqueelalambredealimentacióncalibre10atravésdeláreamarcadacalibre10enelQuicDisc
™
o ponga el alambre de alimentación calibre
12atravésdeláreamarcadacalibre12enelQuicDisc
™
.
Pongaelalambrecalibre18delartefactoatravésdeláreamarcadacalibre18enelQuicDisc
™
.
Despuésquelosalambresesténensulugar,conecteeltopedelQuicDisc
™
alabaseconeltornilloqueseprovee,asegurándosedequelosalambres
permanezcanenlaporcióninferiordelQuicDisc
™
,yeltornilloestétodoapretadohaciaabajo.
Loscontactosautomáticamenteperforaránlaaislacióndelosalambres.Elexcesodealambrecalibre18delartefactoquesobresaledelextremoQuicDisc
™
debe
cortarse.
Nohagaotrasconexionesdecableadoalalambredelartefactodecalibre18.
5) Instalelalámpara(nosuministrada)enelportalámparas,adentrodel
cuerpo de acento.
NOTA: tengacuidadoalensamblar.Sostengalalámparaporlacubierta
exterior.NOtoqueadentrodelvidrioqueenvuelve.Sisucedeesto,limpie
labombillaconalcoholdesnaturalizadoyunpañosinpelusas.
6) Montelacapuchaconlapantallaparadestacarelcuerpo.Sujeteensu
lugarutilizandoeltornillodemariposaproporcionadooeltornillo
resistente al vandalismo. NOTA:Eltornilloresistentealvandalismorequiere
unallavehexagonalde3/32”(noseproporciona)parainstalaroquitar.
7) HagalasconexionesdecableadousandoelQuicDisc
™
suministrado y
siguiendolasinstruccionesdeabajo,ousandootrométododeconexión
de cableado aprobado (no se suministra.)
OUTLETBOX
CAJADESALIDA
GASKET
EMPAQUETADURA
LOCKNUT
TUERCADESEGURIDAD
ACCENTLIGHT
LUZDEACENTO
O-RING
ANILLOENO
THUMBSCREW
TORNILLODEAPRIETE
MANUAL
COWL
CAPUCHA
INCORRECT
INCORRECTO
CORRECT
CORRECTO
MOUNTINGPLATE
PLACADEMONTAJE
-
 1
1
-
 2
2


Kichler Lighting 15093WHT Manual de usuario
- Tipo
- Manual de usuario
en otros idiomas
Artículos relacionados
-
 Kichler Lighting 15381AZT Manual de usuario
-
 Kichler Lighting 15384AZT Manual de usuario
-
 Kichler Lighting 15382BK Manual de usuario
-
Kichler Lighting 15087AZT Manual de usuario
-
 Kichler Lighting 15123BK Manual de usuario
-
 Kichler Lighting 15398AZT Manual de usuario
-
Kichler Lighting 15395AZT Manual de usuario
-
Kichler Lighting 15494AZT Manual de usuario
-
 Kichler Lighting 15190BK Manual de usuario
-
 Kichler Lighting 15192BK Manual de usuario


