
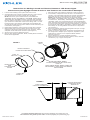
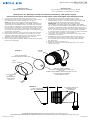
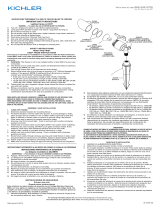
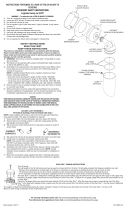
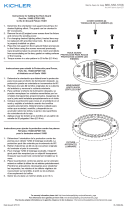
1. Loosen screw holding cowl in place and remove cowl.
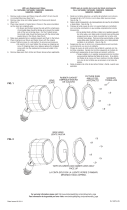
2. Carefully place new colored or textured lens into cowl. The lens
mustbelyingatonthelenssupportribs,seegure1.
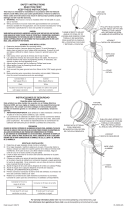
NOTE:Forlenses,partnumbersGreen,16071GRNand
16072GRN,Amber16071AMBand16072AMB,HolidayGreen,
16071HGNand16072HGNandRed,16071RDand16072RD,
the side with the small piece of removable tape should be facing
up to ensure the coated side of the lens is facing down. For the
FrostedLenses,partnumbers16071FROand16072FROthe
smooth side should be facing down with the etched side facing up
inthexture.(Seegure1.)
3. Inspectxturegaskettoensureitisfreeofwater,dirtorresidue.
4. Reassemblecowltoxturemakingsurethatthecowlisfully
engagedonthexture.Makesurethecowl,surfaceA,makes
completecontactwithxturesurfaceB.(SeeFigure2.)
5. Securecowlinplacebytighteningscrew.
6. RemovetapepiecefromAmber,Green,HolidayGreenandRed
lenses where applicable.
DateIssued:10/20/17 IS-16072-US
For warranty information please visit: http://www.landscapelighting.com/portal/warranty_page
Para informacion de la garantia por favor visite: www.landscapelighting.com/portal/warranty_page
Instructions for Adding Colored and Textured Lenses to LED Accent Lights
Instrucciones para Agregar Lentes de Color o Con Textura a las Luces LED de Destaque
FIGURE 1
FIGURE 2
LENSSUPPORT
RIBS
SOPORTEPARA
LENTES
LENSACCESSORY
LENTEDEACCESORIOS
TAPEONGREEN,AMBER,
HOLIDAYGREENANDREDLENSONLY
FACEUP
CINTASOBREVERDE,ÁMBAR,VERDEDE
VACACIONESYLENTEROJASOLAMENTE
HACIAARRIBA
1. Aojeeltornilloquesostienelacapuchayretirelacapucha.
2. Concuidado,coloquelaslentesdecolorocontexturaenla
capucha. Las lentes deben apoyarse de manera completamente
horizontalsobreelsoporteparalentes.Observelagura1.
NOTA:Paralaslentes,losnúmerosdereferenciaVerde,
16071GRNy16072GRN,Amber16071AMBy16072AMB,Verde
deVacaciones,16071HGNy16072HGNyRojo,16071RDy
16072RD,elladoconlapequeñapiezadecintaextraíbledebe
estarorientadohaciaarribaparaasegurarqueelladorecubierto
delalenteestáhaciaabajo.Paralaslentesheladas,losnúmeros
dereferencia16071FROy16072FRO,elladolisodebeestar
haciaabajoconelladograbadohaciaarribaeneldispositivo.
(Verlagura1.)
3. Reviselajuntadelartefactoparaasegurarsedequenotenga
agua,suciedadnialgúnresiduo.
4. Vuelvaamontarlacapuchaenelartefactoasegurándosede
queencajebien.Veriquequelacapucha,supercieA,esté
totalmenteencontactoconlasupercieBdelartefacto.
Observelagura2.
5. Fijelacapuchaensulugarapretandoeltornillo.
6. Retirelapiezadecintadelaslentesámbar,verde,verdede
vacacionesyrojo,segúncorresponda.
GASKET
JAULA
COWL
CAPUCHA
SCREW
TORNILLO
COWLSURFACEA
CAPUCHA,SUPERFICIEA
FIXTURESURFACEB
SUPERFICIEBDEL
ARTEFACTO
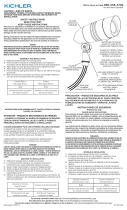
We’reheretohelp866-558-5706
Hrs:M-F9amto5pmEST
La página se está cargando...
Transcripción de documentos
We’re here to help 866-558-5706 Hrs: M-F 9am to 5pm EST Instructions for Adding Colored and Textured Lenses to LED Accent Lights Instrucciones para Agregar Lentes de Color o Con Textura a las Luces LED de Destaque 1. Loosen screw holding cowl in place and remove cowl. 2. Carefully place new colored or textured lens into cowl. The lens must be lying flat on the lens support ribs, see figure 1. NOTE: For lenses, part numbers Green, 16071GRN and 16072GRN, Amber 16071AMB and 16072AMB, Holiday Green, 16071HGN and 16072HGN and Red, 16071RD and 16072RD, the side with the small piece of removable tape should be facing up to ensure the coated side of the lens is facing down. For the Frosted Lenses, part numbers 16071FRO and 16072FRO the smooth side should be facing down with the etched side facing up in the fixture. (See figure 1.) 3. Inspect fixture gasket to ensure it is free of water, dirt or residue. 4. Reassemble cowl to fixture making sure that the cowl is fully engaged on the fixture. Make sure the cowl, surface A, makes complete contact with fixture surface B. (See Figure 2.) 5. Secure cowl in place by tightening screw. 6. Remove tape piece from Amber, Green, Holiday Green and Red lenses where applicable. 1. Afloje el tornillo que sostiene la capucha y retire la capucha. 2. Con cuidado, coloque las lentes de color o con textura en la capucha. Las lentes deben apoyarse de manera completamente horizontal sobre el soporte para lentes. Observe la figura 1. NOTA: Para las lentes, los números de referencia Verde, 16071GRN y 16072GRN, Amber 16071AMB y 16072AMB, Verde de Vacaciones, 16071HGN y 16072HGN y Rojo, 16071RD y 16072RD, el lado con la pequeña pieza de cinta extraíble debe estar orientado hacia arriba para asegurar que el lado recubierto de la lente está hacia abajo. Para las lentes heladas, los números de referencia 16071FRO y 16072FRO, el lado liso debe estar hacia abajo con el lado grabado hacia arriba en el dispositivo. (Ver la figura 1.) 3. Revise la junta del artefacto para asegurarse de que no tenga agua, suciedad ni algún residuo. 4. Vuelva a montar la capucha en el artefacto asegurándose de que encaje bien. Verifique que la capucha, superficie A, esté totalmente en contacto con la superficie B del artefacto. Observe la figura 2. 5. Fije la capucha en su lugar apretando el tornillo. 6. Retire la pieza de cinta de las lentes ámbar, verde, verde de vacaciones y rojo, según corresponda. GASKET JAULA FIGURE 1 LENS ACCESSORY LENTE DE ACCESORIOS COWL CAPUCHA TAPE ON GREEN, AMBER, HOLIDAY GREEN AND RED LENS ONLY FACE UP CINTA SOBRE VERDE, ÁMBAR, VERDE DE VACACIONES Y LENTE ROJA SOLAMENTE HACIA ARRIBA LENS SUPPORT RIBS SOPORTE PARA LENTES SCREW TORNILLO FIGURE 2 COWL SURFACE A CAPUCHA, SUPERFICIE A FIXTURE SURFACE B SUPERFICIE B DEL ARTEFACTO For warranty information please visit: http://www.landscapelighting.com/portal/warranty_page Para informacion de la garantia por favor visite: www.landscapelighting.com/portal/warranty_page Date Issued: 10/20/17 IS-16072-US-
 1
1
-
 2
2


Kichler Lighting 16071AMB Manual de usuario
- Tipo
- Manual de usuario
- Este manual también es adecuado para
en otros idiomas
Artículos relacionados
-
 Kichler Lighting 15875AMB Manual de usuario
-
 Kichler Lighting 16212AZT30 Manual de usuario
-
 Kichler Lighting 15397AZT Manual de usuario
-
Kichler Lighting 15476CBR Manual de usuario
-
Kichler Lighting 15087AZT Manual de usuario
-
 Kichler Lighting 15475CBR Manual de usuario
-
 Kichler Lighting 15093WHT Manual de usuario
-
 Kichler Lighting 16200BBR30 Manual de usuario
-
Kichler Lighting 15494AZT Manual de usuario
-
 Kichler Lighting 15482CBR Manual de usuario


