LG LSC27937ST El manual del propietario
- Categoría
- Neveras
- Tipo
- El manual del propietario
Este manual también es adecuado para

Life's Good
OWNER'S MANUA
SIDE BY SIDE
REFRIGERATOR
Please read this manual carefully before operat
and retain it for future reference.
MANUAL DE USUARIO
REFRIGERADOR
DE DOS PUERTAS
Lea detenidamente este manual antes de empezar a utilizar
el refrigerador y gu_rdelo como referencia para el futuro.
Model Name/Nombre de Modelo_=color number/nOmero de color
LSC27935 _
LSC27937 _
P!No. MFL63719709

Warranty(USA) 3-33
Warranty(Canada) 4
EnglishVersion
Spanish Version
Important Safety Instructions
Requirements for Ground Connection
Ice maker Operation 16
Food Storage Guide 16
Storing Frozen Food 17
3-28 Water and Ice Dispenser 17
Ice Storage Bin 17
Door and Rack Support 18
29-54 Snack Pan 18
Crisper and Crisper Cover 18
Humidity Controls 18
5-6 Refrigerator Shelves 18-19
6 Freezer Shelf 19
Refrigerator Installation 7-12
Unpacking your Refrigerator 7
Installation 7
Base Grille Installation 7
Handle Removal 8
Handle Installation 8
Removing and Replacing
Refrigerator Doors 8-9
Door Alignment 9-10
Connecting the Water Line 10-12
Refrigerator Features 13
Using your Refrigerator
Ensuring Proper Air Circulation
Prior to Use
Control Panel Features
Refrigerator and Freezer Controls
Adjusting Control Settings
14-19
14
14
14-15
14 -15
15-16
Filter (Water Filter) 20-22
Care and Cleaning 23-24
General Cleaning Tips 23
Outside 23
Inside Walls 23
Door Liners & Gaskets 23
Plastic Parts (Covers and Panel) 23
Back Cover 23
Lamp Replacement 23
Power Interruptions 23-24
When you go on Vacation 24
When you Move 24
When you should set the Ice maker
Power Switch to off 24
Normal Sounds you May Hear 24
Troubleshooting Guide
25-28

LG ELECTRONmCS U.S.AJNC.
LG REFRIGERATOR LIMmTED WARRANTY - U.S.A.
Should your LG Refrigerator ("Product") fail due to a defect in materials or workmanship under normal home use, during the
warranty period set forth below, LG will at its option repair or replace the product. This limited warranty is vaOid only to the
original retail purchaser of the product and applies only when purchased and used within the United States including U.S.
Territories. Proof of original retail purchase is required to obtain warranty service under this limited warranty.
WARRANTY PERIOD
Refrigerator / Freezer Sealed System (Compressor, Condensor, and Evaporator only)
One(1) yearfrom the date of original One (1) year from the date of Seven (7) years from the date of
retail purchase original retail purchase original retail purchase
Parts only
Parts and Labor Parts and Labor
(Consumer will be charged for
(internal/functional parts only) labor).
Noises associated with normal operation and failure to follow instructions found in the use and care and installation guides
or operating the unit in an unsuitable environment will not be covered under this warranty.
Replacement products and parts are warranted for the remaining portion of the original warranty period or ninety (90) days,
whichever is greater.
Replacement products and parts may be new or remanufactured.
THINS WARRANTY mSmN LIEU OF ANY OTHER WARRANTY, EXPRESS OR mMPLOED, INCLUDING WOTHOUT LIMITATION,
ANY WARRANTY OF MERCHANTABILITY OR FmTNESS FOR A PARTICULAR PURPOSE. TOTHE EXTENT ANY OMPLIED
WARRANTY mSREQUmRED BY LAW, IT OSLIMmTED IN DURATOONTOTHE EXPRESS WARRANTY PERIOD ABOVE. NEITHER
THE MANUFACTURER NOR roTS U.S. DISTRIBUTOR SHALL BE LIABLE FOR ANY INCIDENTAL, CONSEQUENTOAL,
INDIRECT, SPECIAL, OR PUNITIVE DAMAGES OF ANY NATURE, INCLUDING WITHOUT LIMITATION, LOST REVENUES
OR PROFITS, SPECIAL, OR PUNITIVE DAMAGES OFANY NATURE, INCLUDING WITHOUT LIMITATION, LOST REVENUES
OR PROFITS, OR ANY OTHER DAMAGE WHETHER BASED IN CONTRACT, TORT, OR OTHERWISE. Some states do not
allow the exclusion or limitation of incidental or consequential damages or limitations on how long an implied warranty lasts,
so the above exclusion or limitation may not apply to you.This warranty gives you specific legal rights and you may also have
other rights that vary from state to state.
THIS LIMITED WARRANTY DOES NOT COVER:
1. Service trips to deliver, pick up, install, or repair the product;
instruct the customer on operation of the product; repair or
replace fuses or correct wiring or plumbing, or correction of
unauthorized repairs/ installation.
2. Failure of product to perform during power failures and
interruptions or inadequate electrical service.
3. Damage caused by leaky or broken water pipes, frozen
water pipes, restricted drain lines, inadequate or interrupted
water supply or inadequate supply of air.
4. Damage resulting from operating the product in a corrosive
atmosphere or contrary to the instructions outlined in the
product owner's manual.
5. Damage to the product caused by accidents, pests and
vermin, lightning, wind, fire, floods, or acts of God.
6. Damage resulting from misuse, abuse, improper installation,
repair, or maintenance. Improper repair includes use of
parts not approved or specified by LG.
7. Damage or failure caused by unauthorized modification
or alteration, or if it is used for other than the intended
purpose, or any water leakage where the unit was not
properly installed.
8. Damage or failure caused by incorrect electrical current,
voltage, or plumbing codes, commercial or industrial
use, or use of accessories, components, or consumable
cleaning products that are not approved by LG.
9. Damage caused by transportation and handling
including scratches, dents, chips, and/or other damage
to the finish of your product, unless such damage results
from defects in materials or workmanship and is reported
within one (1) week of delivery (Call: 1-800-243-0000).
10. Damage or missing items to any display, open box,
discounted, or refurbished product.
11. Products with original serial numbers that have been
removed, altered, or can not be readily determined.
Model and Serial numbers, along with original retail sales
receipt, are required for warranty validation.
12. Increases in utility costs and additional utility expenses.
13. Replacement of light bulbs, filters, or any consumable
parts.
14. Repairs when your product is used in other than normal
and usual household use (e.g. commercial use, offices,
and recreational facilities) or contrary to the instructions
outlined in the product owner's manual.
15. Costs associated with removal of your product from your
home for repairs.
16. The removal and reinstallation of the product if it is
installed in an inaccessible location or is not installed
in accordance with published installation instructions,
including LG's owner's and installation manuals.
17. Shelves, door bins, drawers, handles, accessories, and
other parts besides those that were originally included
with this particular model.
The cost of replacement under these excluded circumstances shall be borne by the consumer.
For complete warranty details and customer assistance, Write your warranty information below:
please call or visit our website:
Call 1-800-243-0000 (24 hours a day, 365 days a year) and
select the appropriate option from the menu, or visit our website
at www.lg.com
Or by mail: LG Customer Information Center:
P O. Box 240007, 201 James Record Road Huntsville, Alabama
35813
ATTN: CIC
Product Registration Information:
Model:
Serial Number:
Date of Purchase:

LGELECTRONICSCANADA,INC.
LGREFRIGERATORLIMITEDWARRANTY-Canada
WARRANTY." Should your LG Refrigerator ("Product") fail due to a defect in material or workmanship under normal home use during the warranty
period set forth below, LG Canada will at its option repair or replace the Product upon reeeipt of proof of original retail purchase
This warranty is valid only to the original retail purchaser of the product and applies only to a Product distributed in Canada by LG Canada or an
authorized Canadian distributor thereof The warranty only applies to Products located and used within Canada
WARRANTY PERIOD: (Note: If the original date of purchase can not be verified, the warranty
will begin sixty (60) days from the date of manufacture).
Refrigerator/Freezer Sealed System (Compressor, Condenser, and Evaporator only)
One (1) year from the date of original One (1) year from the date of original Seven (7) years from the date of
retail purchase retail purchase original retail purchase
Parts and Labor Parts and Labor Parts only
(internal/functional parts only) (Consumer will be charged for labor).
Noises associated with normal operation and failure to follow instructions found in the use and care and installation guides or
operating the unit in an unsuitable environment will not be covered under this warranty.
Replacement products and parts are warranted for the remaining portion of the original warranty period or ninety (90) days,
whichever is greater.
Replacementproducts and parts may be new or remanufactured.
LG AuthorizedService Center warranties their repair work for thirty (30) days.
LG CANADA'S SOLE LIABILITY IS LIMITED TO THE WARRANTY SET OUT ABOVE. EXCEPT AS EXPRESSLY PROVIDED
ABOVE, LG CANADA MAKES NO AND HEREBY DISCLAIMS ALL OTHER WARRANTIES AND CONDITIONS RESPECTING THE
PRODUCT WHETHER EXPRESS OR IMPLIED INCLUDING BUT NOTLIMITEDTO ANY IMPLIED WARRANTY OR CONDITION
OF MERCHANTABILITY OR FITNESS FOR A _ARTICULAR'PURPOSE AND NO R_PRESENTATIONS SHALL BE BINDING ON
LG CANADA. LG CANADA DOES NOT AUTHORIZE ANY PERSON TO _REATE OR ASSUME FOR IT ANY OTHER WARRANTY
OBLIGATION OR LIABILITY IN CONNECTION WITH THE PRODUCT. TO THE EXTENT THAT ANY WARRANTY OR CONDITION
IS IMPLIED BY LAW IT IS LIMITED TO THE EXPRESS WARRANTY PERIOD ABOVE. LG CANADA THE MANUFACTURER OR
DISTRIBUTOR sHALL NOT BE LIABLE FOR ANY INCIDENTAL CONSEQUENTIAL SPECIAL DIRECT OR INDIRECT DAMAGES
LOSS OF GOODWILL LOST PROFITS PUNITIVE OR EXEMPL'ARY DAMAGES OR'ANY OTH'ER DAMAGE WHETHER ARISING'
DIRECTLY OR INDIR_C_TLY FROM AN_ CONTRACTUAL BREACH FUNDAMENTAL OR OTHERWISE OR _'ROM ANY ACTS OR
OMISSIONS, TORT, OR OTHERWISE. This warranty gives you specific legal rights. You may have other rights which may vary from
province to province depending on applicable provincial laws. Any term of-this warranty that negates or varies any implied condition
or warranty under provincial law is severable where it conflicts with provincial law without affect]ng the remainder of this warranfy's
terms.
THIS LIMITED WARRANTY DOES NOT COVER:
1 Service trips to deliver, pick up, install, or repair the product; instruct the
customer on operation of the product; repair or replace fuses or correct
wiring or plumbing, or correction of unauthorized repairs/installation
2 Failure of product to perform during power failures and interruptions or
inadequate electrical service
3 Damage caused by leaky or broken water pipes, frozen water pipes,
restricted drain lines, inadequate or interrupted water supply or
inadequate supply of ain
4 Damage resulting from operating the product in a corrosive atmosphere
or contrary to the instructions outlined in the product owner's manual
.5 Damage to the product caused by accidents, pests and vermin,
lightning, wind, fire, floods, or acts of God
6 Damage resulting from misuse, abuse, improper installation, repair, or
maintenance Improper repair includes use of parts not approved or
specified by LG
7 Damage or failure caused by unauthorized modification or alteration, or
if it is used for other than the intended purpose, or any water leakage
where the unit was not properly installed
8 Damage or failure caused by incorrect electrical current, voltage, or
plumbing codes, commercial or industrial use, or use of accessories,
components, or consumable cleaning products that are not approved
by LG
9 Damage caused by transportation and handling, including scratches,
dents, chips, and/or other damage to the finish of your product, unless
such damage results from defects in materials or workmanship and is
reported within one (1) week of delivery (Call: 1 SO0 243 0000)
10 Damage or missing items to any display, open box, discounted, or
refurbished product
11 Products with original serial numbers that have been removed, altered,
or can not be readily determined Model and Serial numbers, along with
original retail sales receipt, are required for warranty validation
12 Increases in utility costs and additional utility expenses
13 Replacement of light bulbs, filters, or any consumable parts
14 Repairs when your product is used in other than normal and usual
household use (eg commercial use, offices, and recreational facilities)
or contrary to the instructions outlined in the product owner's manual
1.5 Costs associated with removal of your product from your home for
repairs
1@ The removal and reinstallation of the product if it is installed in an
inaccessible location or is not installed in accordance with published
installation instructions, including LG's owner's and installation manuals
17 Shelves, door bins, drawers, handles, accessories, and other parts
besides those that were originally included with this particular model
The cost of repair or replacement under these excluded circumstances shah be borne by the consumer.
For complete warranty details and
customer assistance, please call or visit
our website: Call 1-888-542-2623 (24 hours
a day, 365 days a year) and select the
appropriate option from the menu, or visit our
websife at www.lg.com
Write your warranty information below:
Product Registration Information:
Model:
Serial Number:
Date of Purchase:
4

This manual contains several important safety notices. Always read and obey all of the following safety messages.
This is the safety alert symbol. This symbol is a warning to potential dangers that could cause death, injury or
damage to you, others or the product. All safety messages will follow after this warning symbol and the word
"DANGER", "CAUTION" or "WARNING't These words mean:
You may be killed or suffer fatal damage if you do not follow instructions.
You may be killed or seriously injured if you do not follow instructions.
Indicates a potentially hazardous situation which, if not avoided, may result in minor injury
-- or damage to the product.
All safety messages inform you of potential danger, advise you on how to reduce the risk of injury and tell you what can
occur if the instructions are not followed.
To reduce the risk of fire, elecfrical shock or personal
injury, the following precaufion measures should be
followed:
. NEVER disconnect the refrigerator by pulling the power
cord, always grip the plug firmly and disconnect it
directly from the outlet.
Immediately repair or replace all faulty or damaged
service cables. Do not use cords that have cracks or
abrasion damage on the length of the cord or on the
plug.
. When moving your refrigerator, take care not to roll over
the electrical cord.
DO NOT store, use on it or in proximity, explosive and/
or flammable propellent substances such as; gasoline,
aerosol cans or other combustible liquids or vapors in
this or any other electrical applience.
• DO NOT permit children to climb, stand or swing from
the doors or shelves of the refrigerator. This can cause
serious injury to them and damage to the product.
Keep your fingers away from areas in which they
can become caught, such as the doors, hinges and
cabinets. Be careful closing the doors when children
are near.
. Unplug the refrigerator before cleaning or repairing.
NOTE: We strongly recommend that any repair services
be performed by a qualified professional.
Before replacing a burned-out light bulb, unplug the
refrigerator or shut down the circuit breaker to avoid
contact with a live wire (the bulb could break while
being replaced). NOTE: Setting the control to the OFF
position does not disconnect the power from the light
bulb circuit.
could explode after freezing and cause damage.
For your safety, this product should be properly
grounded. Have a qualified professional check the
electrical circuit and outlet to ensure a proper ground
connection.
. Read all instructions before utilizing the product. Utilize
this product only as explicitly expressed in this guide.
. Once the refrigerator is operating, avoid touching cold
surfaces of the freezer with damp or wet hands; the
skin could become adhered to these surfaces.
In refrigerators with an automatic ice dispenser, avoid
contact with moving parts of the ejector mechanism
or with the heating mechanism that discharges the
cubes. DO NOT place your fingers or hands in the
ice dispenser mechanism while the refrigerator is
connected.
• DO NOT refreeze foods which have already thawed. The
Department of Agriculture of the United States, in your
Bulletin of Home and Gardens No..69 establishes that:
't.You can refreeze food that has thawed if they contain
ice crystals or are cold and below 40 °F (4 °C)'t
't..Ground beef, perishable food or seafood that is
discolored or has an unpleasant odor should not be
frozen or consumed. Consumption of melted ice cream
should also be avoided. If the odor or color of food is
questionable, discard it. The food may be dangerous to
consume".
"Partial thawing or refreezing reduces the quality of the
food, especially fruit, vegetables and prepared meals.
The quality of red meat is less affected than other foods.
Use refrozen products as soon as possible in order to
maintain their quality'(
. Do not keep bottles in the freezer compartment, they
SAVE THESE INSTRUCTIONS

This appliance is not intended for use by children, persons with physical or mental disabilities, persons with reduced
sensory or mental capacity, or persons with lack of experience or know-how, unless they have supervision or instruction
in relation to the use of the appliance by the person responsible for their safety. Children should be supervised to
assure that they do not play with the appliance.
Children becoming trapped or suffocated is not
a problem of the past. Discarded and abandoned
refrigerators are a hazard, even if they remain there
"for just a few days'1 If you would like to dispose of
your old refrigerator, please follow the instructions
below to prevent any accidents.
BEFORE DISPOSING YOUR REFRIGERATOR OR
FREEZER WHEN NO LONGER IN USE:
, Remove the doors.
, Leave the shelves in place so that children cannot
easily become stuck in them.
Your old refrigerator may have a cooling system that If you decide to throw out your old refrigerator, ensure
uses CFC's (chlorofluorocarbons). CFC affects the that CFC contaminants are properly disposed of by a
stratospheric layer of the ozone, qualified professional. If you intentionally remove the
CFC refrigerant, you could be subject to fines or prison in
accordance with environmental legislation in effect.
IMPORTANT: Attentively read the following.
TO CONNECT ELECTRICITY
ELECTRICAL SHOCK HAZARD
FOR YOUR PERSONAL SAFETY, this appliance must
be properly grounded. Have a qualified electrician
check your wall outlet to ensure that the plug is
grounded properly.
Type 1
3 prong
_ grounding type wall
L // ground exlsts bet ......
Type 3
3 prong
dex,s
Type 2
3 prong Ensure
grounding type wall proper
receptacle, ground
exists
before
use.
Type 4
2 prong _--_'_..............
grounding type wall I I I
I _receptacle.
2 prong
grounding
er
k ,/_ ground exists be, ....... )
RECOMMENDED GROUNDING METHOD
Your refrigerator must always be plugged to its own outlet
which is adequately grounded. The energy current should
be 115 V- 60 Hz, 127 V- 60 Hz or 220 V- 50/60 Hz
(according to the national rating type) with a 15 A fuse
for voltages between 115 and 127 V or 10 A to 220 V
independent voltage protection system from the main
supply of your home. (The electrical installation must be
verified by a qualified technician.).
This provides the best performance and prevents an
overload which could cause a fire from the overheating
of the cords. It is recommended that a separate circuit
be used for this appliance, as well as a receptacle that
cannot be disconnected with a switch.
Do not use an extension cord.
It is your responsibility and obligation to replace two-
prong outlets with that of an adequately grounded three-
prong outlet.
Do not, under any circumstance, cut or extract the third
prong from the plug.
NOTE: Before installation, cleaning or replacing light
bulbs, you must disconnect the appliance from
the power source. When finished, plug the
appliance back in and adjust the thermostat to
the desired position.
USE OF EXTENSION CORD
We do not recommend the use of extension cord.
However, if you still choose to utilize an extension cord,
it is absolutely necessary that it is listed in the UL (in the
United States) or CSA (in Canada), that it supports three-
pronged plugs and that the electrical current support with
a 15 A fuse for voltages between 115 and 127 V or 10 A to
220 V. (Verify the electric specification of your country.).
The use of an extension cord will increase the amount of
space needed behind the refrigerator.
REPLACING ELECTRICAL CABLE
If the power cord is damaged, it must be replaced by
our service center or qualified LG technician to avoid
any risk.
DO NOT USE MECHANICAL DEVICES
Do not use mechanical devices or other means to
accelerate the defrosting process, only those recom-
mended by the manufacturer.

"This appliance is intended to be used in household and
similar applications such as:
Staff kitchen areas in shops, offices and other working
enviroments; farm houses and by clients in hotels,
motels and other residential type environments.
Bed and breakfast type enviroments; catering and
similar non-retail applications."
EXCESSIVE WEIGHT HAZARD
Use the assistance of two or more persons to move or
install the refrigerator. Not following these instructions
may cause injury to the back and other parts of the
body.
UNPACKING YOUR REFRIGERATOR
Before installing your refrigerator, remove any tape or
temporary stickers. Do not remove any stickers that feature
warnings, the model serial number or the technical label
of the product located on the back of the refrigerator.
4.NEVER install the refrigerator on a platform or a weakly
supported structure.
5. Install this appliance in an area where the temperature
is between 41 °F (5 °C) and 110 °F (43 °C). If the
temperature around the appliance is too low or high,
cooling ability may be adversely affected.
NOTE: For proper air circulation, and best _---]lJ
cooling and energy consumption
U
results, maintain a minimum distance
of 2 inches (5,08 cm) from adjacent
items and surfaces.
2"(,
Be careful when you work with the hinge, base grille,
stopper, etc. You may be injured.
Do not put hands or metal sticks into air vents, base
grille or bottom of the refrigerator. You may be injured
or receive an electrical shock.
To remove adhesive tape residue, rub it well with your
fingers and a little liquid detergent. Clean with warm water
and let dry.
Do not use sharp instruments, rubbing alcohol, flammable
liquids or abrasive cleaning products to remove the
adhesive tape or glue. These products can damage the
surface of your refrigerator. For more information, see the
section on "important Safety Instructions".
The shelves come already installed in their factory position.
Remove the shelves and replace them according to your
spacing needs.
WHEN MOVING YOUR REFRIGERATOR
Your refrigerator is extremely heavy. Make sure you
protect the floor when moving your refrigerator for
cleaning or servicing. Always pull your refrigerator
straight out when moving it. Do not shift from side to
side or "walk" the refrigerator when attempting to move
it as this can cause damage to the floor.
BASE GRILLE INSTALLATION
To install or replace base grille:
1. Remove the 2 screws from the bottom front part of
refrigerator.
2. Place base grille into position and insert and tighten
screws.
To remove the base grille:
1. Open the doors (Refrigerator and Freezer).
2.Once doors are open, remove screws from base grille
and remove.
3. Reattach screws to the base of refrigerator.
EXPLOSION HAZARD
Keep all flammable materials and vapors (such as
gasoline) away from the refrigerator. Not following
these instructions may cause death, explosion or fire
INSTALLATION
1. Avoid placing the unit near heat sources, direct sunlight
or humidity.
2.To minimize noise and vibration, the refrigerator MUST
be installed on a solidly constructed floor.
3.Carpeting and soft tile surfaces are not recommended.

HANDLEREMOVAL REMOVINGAND REPLACONGREFROGERATOR
Youmayhavetoremovethedoorhandlestomovethe DOORS
refrigeratorthroughanarrowopening.SeeinstructionsBeforeremovingthedoors,removethebasegrille.See
below. "BaseGrilleInstallation"forreference.
NOTE: To avoid damaging door surfaces when moving
the refrigerator through narrow openings, it is
ALWAYS recommended to remove the doors as
instructed in the next two pages.
, Loosen the set screws with a 3/32" (2,5 ram) Allen
wrench and remove the handle.
NOTE: If the handle mounting fasteners need to be
tightened or moved, use a 1/4" (6 ram) Allen
wrench.
To remove the right (refrigerator) door:
1. Open the door. Remove the top hinge cover screw (1).
2.Use a flat blade screwdriver to pry back the hooks
(not shown) of the hinge cover (2) from the top of the
refrigerator cabinet. Lift up the cover.
3. Rotate the hinge lever (3) clockwise. Lift the top hinge
(4) free of the hinge lever latch (5).
NOTE: Regardless of hinge lever type, removal process
is the same.
Set
4. Lift the door from the lower hinge pin.
5. Place the door, inside facing up, on a non scratching
surface.
/
Type 1 i(4I (51_
, Type 2
HANDLE iNSTALLATiON
Place the handle on the door by adjusting handle
footprints to fit mounting fasteners and tighten the set
screws with a 3/32" (2,5 ram) Allen wrench .
NOTE: If the handle mounting fasteners need to be
tightened or removed use a 1/4" (6 ram) Allen
wrench.
ELECTRIC SHOCK HAZARD
° Disconnect electrical supply to the refrigerator before
installing. Failure to do so could result in death or
serious injury.
° Do not put hands, feet or other objects into the air
vents, base grille, or bottom of the refrigerator. You
may be injured or receive an electrical shock.
° Be careful when you work with the hinge, base grille
and stopper. You may be injured. Before removing
the doors, remove the base grille.
CAUTION
When lifting the hinge free of the latch, be careful
that the door does not fall forward.
Removing the left (freezer) door with water line
connection:
Pull up the water feed tube while pressing the area (Figure
1) as shown in the figure below.
NOTE: If a tube end is deformed oF abraded, trim the
part away. Disconnecting the tube under the door
causes about 0,13 gallons (0,5 liters) water to
flow out. Put a large container at end of tube to
prevent water from draining onto the floor.
1. Open the door. Remove the top hinge cover screw (1).
2.Use a flat blade screwdriver to pry back the hooks
(not shown) of the hinge cover (2) from the top of the
refrigerator cabinet (2). Lift up the cover.
3. Disconnect all the wire harnesses (3).
4. Remove the grounding screw (4).
5. Rotate hinge lever (5) counterclockwise. Lift the top
hinge (6) free of the hinge lever latch (7).
NOTE: Regardless of hinge lever type, removal process
is the same.

1. Feed the water tubes through the lower hinge pin and
_ place the door onto the lower hinge pin.
2. Fit top hinge (.6) over hinge lever latch (7) and into
place. Rotate lever (5) clockwise to secure hinge.
Type 2
CAUTION
When lifting the hinge free of the latch, be careful
that the door does not fall forward.
NOTE: Regardless of hinge lever type, reJnstallation
process is the same.
3. Install the grounding screw (4) and connect all the wire
harnesses (3).
4. Hook tab on door switch side of cover (2) under edge
of wire opening in cabinet top. Position cover into place.
Insert and tighten cover screw (1).
5. Reconnect the water tubes by inserting the tubes into
the connectors.
CoHet --
Tube
Insert Line
6. Lift the door from the lower hinge pin being careful to
pull the water lines through the lower hinge pin.
7. Place the door, inside facing up, on a non scratching
surface.
Reinstalling the right (refrigerator) door:
1. Place the door onto the lower hinge pin.
2. Fit top hinge (4) over hinge lever latch (5) into place.
Rotate lever (3) counterclockwise to secure hinge.
NOTE: Regardless of hinge lever type, reinstallation
process is the same.
DOOR ALIGNMENT
Remove the base grille before adjusting the doors. See
"Base Grille Installation" for reference. Two methods of
door alignment are available based on the amount of
adjustment needed and installation requirements.
Type 1
Adjusting tool: Flat blade screwdriver. If the freezer
compartment door is lower than the refrigerator
compartment door, level them by inserting a flat blade
screwdriver into the groove of the left leveling leg and
rotating it clockwise.
3. Hook tab on switch side of corner under edge of wire
opening in cabinet top. Position cover (2) into place.
Insert and tighten cover screw (1).
Type 1 • Type 2
Reinstalling the left (freezer) door:
(7)
Type 1 Type 2
H
If the freezer compartment door is higher than the
refrigerator compartment door, level them by inserting a
flat blade screwdriver into the groove of the right leveling
leg and rotating it clockwise.
_, /H g
"......................% Height leveling leg
N
''" ...................;'

Type 2 When using any electrical device (such as a power drill)
Adjusting fools: 5/16" (8 ram) wrench and 3/4" (19 ram) during installation, be sure the device is double insulated
wrench, or grounded in a manner to prevent the hazard of electric
shock, or is battery-powered. All installations MUST be in
accordance with local plumbing code requirements.
NOTE: Wear eye protection.
Using a 3/4" (19 ram) wrench, turn the keeper nut
clockwise to loosen the keeper nut.
Using a 5/16" (8 ram) wrench, turn the adjustment hinge
pin clockwise or counterclockwise to level the refrigerator
and freezer door.
If a reverse osmosis wafer filtration system is
connected to your cold water supply, the water line
installation is not warranted by the refrigerator or ice
maker manufacturer or seller. Follow next instruction
carefully to minimize the risk of expensive water
damage.
if a reverse osmosis wafer filtration system is
connected to your cold water supply, the water pressure
to the reverse osmosis system needs to be a minimum
of 40 to 60 PSI (0,28 MPa - 0,41 MPa), less than 2-3
sec to fill a cup of 7 oz. capacity. (0,2 L).
After setting level door, turn the keeper nut
counterclockwise to tighten.
CAUTION
Do not over tight the door adjustment screw. The
hinge pin can be pulled out. (Adjustable range of
height is a maximum of 1/2" (13 ram)).
AFTER LEVELING THE DOOR HEIGHT
Confirm all legs are in contact with the floor.
CONNECTING THE WATER LINE
NOTE: Water line installation is needed when the
Automatic Ice maker and/or Water Dispenser
features are available on your product.
BEFORE YOU BEGIN
This water line installation is not warranted by the
refrigerator or ice maker manufacturer or seller.
Follow these instructions carefully to minimize the risk of
expensive water damage.
Water hammer (water banging in the pipes) in house
plumbing can cause damage to refrigerator parts
and lead to water leakage or flooding. Call a qualified
plumber to correct water hammer before installing the
water supply line to the refrigerator.
To prevent burns and product damage, do not hook up
the water line to the hot water line.
If you use your refrigerator before connecting the water
line, make sure the ice maker power switch is in the OFF
(0) position.
If the wafer pressure from the reverse osmosis system is
less than 21 PSI (0,14 MPa), more than 4 sec to fill a cup
of 7 oz. capacity (0,2L):
0 Check to see whether the sediment filter in the reverse
osmosis system is blocked. Replace the filter if necessary.
0 Allow the storage tank on the reverse osmosis system to
refill after heavy usage.
0 If the issue about water pressure from reverse osmosis
remains, call a licensed, qualified plumber.
WHAT YOU WILL NEED
• Copper Tubing, 1/4" (6,35 mm) outer
diameter to connect the refrigerator to
the water supply. Be sure both ends of
the tubing are cut square.
To determine how much tubing you need, mea su re
the distance from the water valve on the back of the
refrigerator to the water supply pipe. Then add S feet
(2,4 m). Be sure there is sufficient extra tubing (about
8 feet [2,4 m] coiled into 3 turns of about 10" [25 cm]
diameter) to allow the refrigerator to move out from the
wall after installation.
Be sure that the kit you select allows at least S feet
(2,4 m) as described above.
• A cold wafer supply. The water pressure MUST be
between 20 and 120 PSI (0,14 and 0,$3 MPa) on
models without a water filter and between 40 and 120
PSI (0,28 and 0,83 MPa) on models with a water filter.
• Power drill.
• 1/2" (13 ram) or Adjustable Wrench.
Do not install the ice maker tubing in areas where • Flat head and Phillips screwdrivers.
temperatures fall below freezing.
10

• Two 1/4" (6 ram) outer
diameter compression nuts
and 2 ferrules (sleeves) to
connect the copper tubing
to the shutoff valve and the
4. FASTEN THE SHUTOFF VALVE
Fasten the shutoff valve to the cold water pipe with the
pipe clamp.
Pipe Clamp
refrigerator water valve.
If your existing copper water line has a
flared
fitting at the end, you will need __f'_'_
an adapter (available at plumbing "_v
supply stores) to connect the water
line to the refrigerator OR you can cut
off the flared fitting with a tube cutter and then use a
compression fitting.
Saddle-Type jj_ Vertical Cold
Shutoff Valve Water Pipe
Shutoff valve fo connect
t"o the cold water line. The
shutoff valve should have a
water inlet with a minimum
inside diameter of 5/32"
(3,96 ram) at the point of
connection to the COLD WATER LINE. Saddle-type
shutoff valves are included in many water supply kits.
Before purchasing, make sure a saddle-type valve
complies with your local plumbing codes.
NOTE:
Commonwealth of Massachusetts Plumbing
Codes 248CMR shall be adhered to. Saddle
valves are illegal and use is not permitted in
Massachusetts. Consult with your licensed
plumber.
5. TIGHTEN THE PIPE CLAMP
Tighten the clamp screws until the sealing washer begins
to swell.
INSTALLATION INSTRUCTIONS
[] WARNING
Connect to potable water supply only.
1. SHUTOFFTHE MAIN WATER SUPPLY
Turn on the nearest faucet to relieve the pressure on the
line.
2. CHOOSE THE VALVE LOCATION
Choose a location for the valve that is
easily accessible. It is best to connect into
the side of a vertical water pipe. When it
is necessary to connect into a horizontal
water pipe, make the connection to the
top or side, rather than at the bottom, to
avoid drawing off any sediment from the
water pipe.
3. DRILLTHE HOLE FORTHE VALVE
Drill a 1/4" (6 ram) hole in the
water pipe using a sharp bit.
Remove any burrs resulting from
drilling the hole in the pipe. Take
care not to allow water to drain
into the drill. Failure to drill a
1/4" (6 ram) hole may result in
reduced ice production or smaller
cubes.
NOTE: Licensed plumbers MUST use only cooper tubing
NDA tubing #49595 or 49499 or Cross Link
Polyethylene (PEX) tubing.
NOTE: Do not overtighten or you may crush the tubing.
vvasner
__ _n_et End
Pipe Clamp
Clamp Screw_
)
6. ROUTE THE TUBING
Route the tubing between the cold water line and the
refrigerator.
Route the tubing through a hole drilled in the wall or
floor (behind the refrigerator or adjacent base cabinet) as
close to the wall as possible.
NOTE:
Be sure there is sufficient extra tubing [about
8 feet (2,4 m) coiled into 3 turns of about 10"
(25 cm) diameter] to allow the refrigerator to
move out from the wall after installation.
7. CONNECT THE TUBING TO THE VALVE
Place the compression nut and ferrule (sleeve) for copper
tubing onto the end of the tubing and connect it to the
shutoff valve. Make sure the tubing is fully inserted into
the valve. Tighten the compression nut securely.
11

Back of Refrigerafor
0 U'_'_e'_"
Valve
Tubing
Compression
_/ Nuf 1/4"(6mm)
Compression
_F_r Ferrulej :,_
ule (Sleeve)
(sleeve) Figure ]
1/4" (6 mm)Tubing
Refrigerat'or
Connecfion
NOTE: Commonwealth of Massachusetts Plumbing
Codes 24SCMR shall be adhered to. Saddle valves are
illegal and use is not permitted in Massachusetts. Consult
with your licensed plumber.
8. FLUSH OUTTHETUBING
Turn the main water supply on and
flush out the tubing until the water is
clear Shut the water off at the water
valve after about one quart (1 L) of
water has been flushed through the
tubing.
9. CONNECT THE TUBING TO THE REFRIGERATOR
NOTES:
, Before making the connection to the refrigerator, be
sure the refrigerator power cord is not plugged into the
wall outlet
, If your refrigerator does not have a water filter, we
recommend installing one If your water supply has
sand or particles that could clog the screen of the
refrigerator's water valve, install the filter in the water
line near the refrigerator.
, Do not uses old hoses; only use new hoses provided by
the manufacturer.
1. Remove the plastic flexible cap from the refrigerator
connection.
2. Place the compression nut and ferrule (sleeve) onto the
end of the tubing. (See figure 1).
3. Insert the end of the tubing into the connection as
far as possible. While holding the tubing, tighten the
fitting.
CAUTION
Check to make sure that leaks are not occurring in
the water line.
Fasten the tubing into the tubing clamp attached to the
back of the refrigerator.
First, loosen the screw fastening the clamp. Next, insert
the tubing in the groove. Finally, re-fasten the screw.
10. PLUG IN THE
REFRIGERATOR
Arrange the coil of tubing so
that it does not vibrate against
the back of the refrigerator
or against the wall Push the
refrigerator back to the wall.
(Picture just for reference.)
11. START THE ICE MAKER
Set the ice maker power switch to the ON (I) position.
The ice maker will not begin to operate until it reaches
its operating temperature of 15 °F (-9 °C) or below. It will
then begin operation automatically if the ice maker power
switch is in the ON (I) position.
12

J
............
............. O
.................. O
Use this page to become more familiar with the parts and features.
NOTE: This guide covers several different models. The refrigerator you have purchased may have some or all of the
items listed below. The locations of the features shown below may not match your model.
Automatic Ice maker @ Dairy Corner
The ice is produced in the ice maker and sent to the For storage of dairy products such as butter and cheese.
dispenser.
O Water Filter
O Freezer Shelf O Refrigerator Shelf
Freezer Light (LED) O Snack Pan
O Freezer Door Rack For storage of meat or fresh food.
O Drawer _ Refrigerator Door Rack
O Base Grille @ Vegetable Drawer
_1 Refrigerator Light (LED)
13

ENSURING PROPER AIR CIRCULATION
In order to ensure proper temperatures, air MUST flow
between the refrigerator and freezer sections.
, Cool air enters the freezer through the vents located
at the top of the compartment and exits through the
vents located behind the freezer drawers.
, Cool air from the freezer section enters the fresh
food section through vents located at the top of the
compartment. The air moves down throughout the
compartment and exits through the vents located
behind the crisper drawers.
• Do not block any of these vents with food packages.
If the vents are blocked, airflow will be interrupted and
temperature and moisture problems may occur.
IMPORTANT: Because air circulates between both
sections, any odors formed in one section will transfer to
the other.
You MUST thoroughly clean both sections to eliminate
odors. To prevent odor transfer and dried out food, wrap
or cover foods tightly. (See the "Food Storage Guide"
section for details).
NOTE: If you close the
refrigerator door, you may see /
the freezer door open and ,,/ ;, ',_
close again due to pressure _/ _ _ _ l:
from internal air flow. f
freezer compartment to ensure proper cooling. Your
refrigerator is now ready for use.
CONTROL PANEL FEATURES
Press the button for the desire function to review and
select other settings.
LED DISPLAY
The LED display shows the temperature
settings, dispenser options, and the
water filter door alarm and status
messages.
ICE TYPE
The ICE TYPE is used to select cube,
ice or crushed ice.
NOTE: Hold the glass or other container
in place for a couple of seconds after
dispensing ice or water to catch the last
few cubes or drops.
The dispenser is designed not operate
while either refrigerator door is open.
FREEZER
Press the FREEZER button to adjust
the temperature in the freezer
compartment.
REFRIGERATOR
Press the REFRIGERATOR button
to adjust the temperature in the
refrigerator compartment.
NOTE: The actual inner temperature
varies depending on the food status,
since the indicated temperature setting
is the target temperature an not the actual temperature
within the refrigerator.
Initially set the REFRIGERATOR CONTROL at 37 °F
(3°C). Leave it at these settings for 24 hours (one day)
to stabilize. Then adjust the compartment temperature
as illustrates above.
NOTE: When press simultaneously the FREEZER button
and the REFRIGERATOR button for more than 5
seconds, the temperature display will change from
Fahrenheit to Celsius or vice versa.
PRIOR TO USE
1. Clean your refrigerator thoroughly and wipe off dust
accumulated during shipping.
2. Install accessories such as ice cube bin, drawers,
shelves, etc., in their proper places. They are packed
together to prevent possible damage during shipment.
3. Let your refrigerator run for at least 2 or 3 hours before
putting food in it. Check the flow of cold air in the
ICE PLUS
Press this button once to activate the increased ice
making function. The ICE PLUS icon on the display panel
will illuminate when activated. The Ice Plus function runs
the freezer compartment at the coldest settings for a 24
hours period to increase ice making. Press the button
again to cancel the Ice Plus function.
14

LIGHT/FILTER
The LIGHT/FILTER button controls the lamp in the
dispenser, resets the water filter replacement indicator
when the filter has been replaced.
The water filter needs replacement once every six months.
Filter month indicator becomes "0" to let you know when
replace filter.
Press and hold the LIGHT/FILTER button for more than 3
seconds to reset the filter month indicator to six after the
water filter has been replaced.
ALARM/LOCK
Press this button to control the door-open alarm. Press
and hold the ALARM/LOCK bu,tfon for .3 seconds to lock
the dispenser and all the other control panel functions.
Press and hold again for 3 seconds to unlock. The
ALARM/LOCK button also controls the door alarm
that sounds three times in 30 seconds intervals when a
compartment door is left open for more than 60 seconds.
The alarm stop sounding when the door is closed. Press
the ALARM/LOCK button once to activate or deactivate
the door alarm function.
DISPLAY OFF MODE
To activated Display Off Mode press and hold iCE PLUS
and FREEZER key over 5 seconds until lights will turn on
and after 20 seconds of inactivity the lights will turn off
automatically.
To exit Display Off Mode press and hold ICE PLUS and
FREEZER key over 5 seconds until lights will tilt. Display
Off Mode does not affect the temperature control
settings of the unit.
A
Door Alarm Indicator
This indicator shows that the door-open warning alarm
is activated.
0 Water Filter Status
This light shows the filter's status. See the filter's
configurations.
0 Lock S,ta,tus
This light shows the actual status of the control panel, in
which the lock function is on.
DIAGNOSIS FUNCTION (FAILURE DETECTION)
Diagnosis function automatically detects failure during
the normal use of refrigerator.
If you refrigerator fails, do not turn off the power. Instead,
contact a local Authorized service center or call our
support line for assistance. Turning off the appliance
will make it more difficult for the service technician to
determine the problem.
ADJUSTING CONTROL SETTINGS
Give the refrigerator time to cool down completely
before making final adjustments. It is best to wait 24
hours before doing this. The initial settings mentioned
in "Control Panel Features" section should be correct for
normal household refrigerator use.
The refrigerator control functions as the thermostat for
the entire appliance (refrigerator and freezer sections).
The colder the setting, compressor will the longer the
run to keep the temperature colder. The freezer control
adjusts the cold air flow from the freezer to the refrigerator.
Setting the freezer control to a lower temperature keeps
more cold air in the freezer compartment to make it
colder.
0 Ice Type Indicator
Shows the type of ice,
crushed or cube, or water that
the dispenser will dispense.
O Freezer Temperature
Shows the temperature in the
freezer, Celsius or Fahrenheit.
Refrigera,tor Temperatu re
Shows the temperature in
the refrigerator, Celsius or
Fahrenheit.
Ice Plus
When this button is on the screen will show this has been
activated.
0 Dispenser Light
When this button is in function on the light will show this
has been activated. When the dispenser light is on the
display will indicate this feature.
If you need to adjust temperatures in the refrigerator or
freezer, start by adjusting the refrigerator and allow 24
hours for the temperature to stabilize. If it is too warm or
too cold, then adjust the freezer control. Use the settings
listed in the chart below as a guide. Always remember to
wait at least 24 hours between adjustments.
CONDITION/REASON: RECOMMENDED
ADJUSTMENT:
REFRIGERATOR section
is ,too cold
0 Controls not set
correctly for your
conditions
Adjust ,the
REFRIGERATOR setting
to ,the next lowest number
and waif 24 hours, then
check.
FREEZER section is too
cold
0 Controls not set
correctly for your
conditions
Adjust the FREEZER
se,t,ting ,to "the next lowest
number and waif 24
hours, then check.
15

CONDITION/REASON: RECOMMENDED
ADJUSTMENT:
REFRIGERATOR section
is 1,oowarm
, Opening the door often
° Adding a large amount
of food
° Room temperature is
very warm
FREEZER section is 1,oo
warm/ ice is made t'oo
slowly
, Opening the door often
, Adding a large amount
of food
, Room temperature is
very low (not cycling
often enough)
, Using ice frequently
, Air vents blocked by
objects
Adjust the
REFRIGERATOR se1,1,ing
1,o 1,he next highest
number and waft 24
hours, 1,hen check.
Adjust, 1,he FREEZER
setting 1,o 1,he next
highest number and wait
24 hours, then check.
Remove any objects
blocking air flow,
ICE MAKER OPERATION
PERSONAL iNJURY HAZARD
Avoid contact with the moving parts of the ejector
mechanism, or with the heating element that releases
the cubes. DO NOT place fingers or hands on the
automatic ice making mechanism while the refrigerator
is plugged in.
A newly-installed refrigerator may take 12 1,o24 hours 1,o
begin making ice.
Cube Size Light
Be sure nothing interferes with the sweep of the feeler
arm. When the bin fills to the level of the feeler arm, the
ice maker will stop producing ice.
It is normal for several cubes to be stuck together. If ice
is not used frequently, old ice cubes will become cloudy,
taste stale and shrink.
FOOD STORAGE GUIDE
Wrap or store food in the refrigerator in airtight and
moisture-proof material unless otherwise noted. This
prevents food odor and taste transfer throughout the
refrigerator. For dated products, check date code to
ensure freshness.
ITEMS HOW TO STORE
Storing Fresh Food Wrap or store food in the
refrigerator in airtight and
moisture-proof material unless
otherwise noted. This prevents
food odor and taste transfer
throughout the refrigerator. For
dated products, check date code
to ensure freshness.
Buffer or
margarine
Store opened butter in a covered
dish or in a closed compartment.
When storing a larger quantity,
wrap in freezer packing and
freeze.
Cheese
Vegetables with
skins (carrots,
peppers)
Fruit,
Store in original packaging until
you are ready to use it. Once
opened, tightly rewrap with plastic
wrap or aluminum foil.
Place in bags or plastic containers
inside the crisper.
Wash and let dry; store in plastic
bags in the refrigerator. Do not
wash or pit berries until you are
ready to eat them. Berries should
be selected and kept in their
original packaging (if there is any)
or in a paper bag closed halfway
and set on a shelf.
Shutoff Arm
Power Switch
The ice maker produces 5 cubes per cycle (in between
60 and SO cubes in a 24 hour period), depending on the
temperature of the freezer, the times in which the door
opens, and other using conditions (amount of food in the
freezer, etc).
If the refrigerator is used before the water connection is
made to the ice maker, set the power switch to OFF (0).
Throw away the first few batches of ice to allow the water
line to clear.
Leafy Vegetables
Fish
Chef Fresh
Leftovers
Remove original packaging and
trim any dirty or discolored parts.
Wash in cold water and drain.
Place in a plastic bag or plastic
container and store in the crisper.
Consume fish or seafood the
same day purchased.
Store any meat in original airtight,
moisture-proof packaging.
Rewrap if it is necessary.
Cover leftovers with plastic
wrap or aluminum foil. Plastic
containers with airtight lids can
also be used.
16

STORING FROZEN FOOD . Tilt up the front of tray slightly and snap the ribs into
NOTE: For further information about preparing food for the holes to reinstall the tray.
freezing or food storage times, check a freezer
guide or a reliable cookbook.
Packaging
Successful freezing depends on correct packaging.
When you close and seal the package, it must not allow
air or moisture in or out. If it does, you could have food
odor and taste transfer throughout the refrigerator and
also dry out frozen food.
Holes
Packaging Recommendations=
Rigid plastic containers with "tight-fitting lids".
Straight-sided canning/freezing jars.
Heavy-duty aluminum foil.
Plastic-coated paper.
Non-permeable plastic wraps.
Specified freezer-grade self-sealing plastic bags.
Follow package or container instructions for proper
freezing methods.
WARNING
Do not put your hands into the
water & ice dispenser opening.
Doing so may cause an injury to
your hand.
Do not use:
. Bread wrappers
. Containers without tight lids
. Wax paper or wax-coated freezer wrap
. Thin, semi-permeable wrap
CAUTION
Do not keep beverage cans or plastic food containers
in the freezer compartment. They may burst if they
freeze.
Freezing
Your freezer will not quick-freeze any large quantity of
food. Do not put more unfrozen food into the freezer than
will freeze within 24 hours [no more than 2 to 3 Ibs of
food per cubic foot (0,9 to 1,35 kg per cubic meter) of
freezer space]. Leave enough space in the freezer for air
to circulate around packages. Be careful to leave enough
room at the front so the door can close tightly.
Food storage times will vary according to the quality and
type of food, the type of packaging or wrap used (airtight
and moisture-proof) and the storage temperature. Ice
crystals inside a sealed package are normal. This simply
means that moisture in the food and air inside the
package have condensed, creating ice crystals.
CAUTION
When opening the container with the small opening,
use it near the opening of the water or ice dispenser
as close as possible.
Water Switch
Press the push water switch or
activate water button with a plass or
the water container and chilled water
will be dispensed. When the water
switch or water button is pressed, the
light will be illuminated.
m
NOTE: Allow hot foods to cool at room temperature for
30 minutes, then package and freeze. Cooling
hot foods before freezing saves energy.
WATER AND ICE DISPENSER
Your refrigerator has a mechanism
that dispatch cool water and ice
cubes without open the door.
, Tray can be easily removed by
pressing and pulling it.
J/
ICE STORAGE BIN
The ice bin stores the ice cubes
made by the ice maker. If you need
to remove the ice storage bin, do
so as follows:
NOTE: Use both hands to remove
the ice bin to avoid
dropping it.
Lift the ice storage bin slightly
(1) and pull it out (2} as shown in
the figure.
17
@

DOOR RACK AND SUPPORT _ CAUTION
Your refrigerator and freezer features racks which can When removing the crisper compartment you will see
easily be arranged for packaged products, the water tank. Do not remove it, or water leakage
0 Lift the door rack holding both sides _1_and pull it out
may result. The water tank is not a removable part.
in (29direction.
SNACK PAN
0 To remove the snack pan cover, pull out the snack pan
compartment a bit to the front(I}, then lift the front part
of the snack pan compartment later raises a little the
snack pan compartment until it leaves the top of the
shelf as shown in _2}, and take it out.
!
@
CRISPER AND CRISPER COVER
The crisper allows for better conservation of fruits and
vegetables.
, To remove the crisper compartment cover, pull out the
crisper compartment a bit to the front (i7, lift the front
part of the cover as shown in _2_,and take it out (3_.
To remove the crisper compartment, pull the crisper
compartment to the front _1} until it stops. Then slightly
lift the crisper compartment {2} while pulling it out {3}.
18
HUMIDITY CONTROLS
You can control the amount of humidity in the moisture
sealed crispers. Adjust the control to any setting between
"HIGH" and "LOW't
"HIGH": Keeps moist air in the crisper for best storage of
fresh, leafy vegetables.
"LOW": Keeps moist air out of the crisper for best storage
of fruits or vegetables with skins.
REFRIGERATOR SHELVES
CAUTION
Make sure to keep shelf horizontal while removing;
otherwise it may drop.
The refrigerator compartment shelf is adjustable so
that you can place it at a height according to space
requirement of foods.
Sliding out Shelf:
Pull the shelf towards you (1_, then lift both front and rear
_2)while taking it out _3_.

CAUTION
Becarefulwhenpullingouttheshelf.Ifyouapply
toomuchforce,it mayhittherefrigeratordoorand
damageitoryoucouldhurtyourself.
Door
Fixed Shelf:
0 Lightly lift up the front part of the shelf ,_1_,to pull it
_2_l-
towards you _',Tnen take it out while lifting the rear part
of shelf _3_.
®
FREEZER SHELF
To assemble or disassemble the freezer shelf, follow the
next steps:
0 Lift the left part of the shelf a bit. Lift it to the direction
,_1_,push the right part to the direction _2_'and take it out.
ot
il ......................................................
19

WATER FILTER
The water control panel shows in months
the time to be left to change the filter;
from the first turn on of the refrigerator or
.6 months or the water dispenser has been
used.
If you have changed the filter after 6
months of use or you wish to reset the filter
indicator screen, press the FILTER button
more than 3 seconds until you hear a
beep, this will let you know that the screen
has been reseted.
NOTE: The average life of the filter is 6
months.
It's highly recommended to change the filter when the
indicator light is on or the water dispenser or the ice
dispenser changes drastically. After changing the water
filter cartridge, reset the water filter status display and
indicator light by pressing and holding the BUTTON for
3 seconds.
How to change the old cartridge.
1. Turn the shutoff valve off (house valve).
4. Replace with a new cartridge. Take the new cartridge
out of its packaging and remove protective cover from
the o-rings. With cartridge knob in the vertical position,
push the new filter cartridge into the cover until it stops.
If you can't turn the filter from side to side, it is not fully
inserted. Push it in firmly and twist it into place. You will
hear it click into place. Using its handle, twist the cartridge
clockwise about 1/4 turn. You will hear when it clicks into
place.
2. Dispense water from the system to
empty the tubing (approximately for
50 seconds).
3. Remove the old cartridge. Rotate the knob of the
cartridge counter clockwise.
When the cartridge is removed, it will click out of place.
Pull out the cartridge.
NOTE: There will be water in the cartridge. Some spilling
may occur through the hole at rear bottom side of
cover. You may use a cup or something like that to
prevent split water drop into food.
5.Turn the shut off valve on (house valve).
6. Flush water out from the system
until air gets eliminated and water
start to dispense (approximately for
60 seconds). Flush 2,5 gallons (9,5
liters) of water through filter.
NOTE: To purchase replacement water filter cartridges,
visit your local appliance dealer or part distributor.
2O

Performance Data Sheet
Models Number 5231JA2006E
Use with replacement cartridge 5231JA2006E
This system has been tested according to NSF/ANSI Standards 42 for the reduction of the substances listed below.
The concentration of the indicated substances in water entering the system was reduced to a concentration less than
or equal to the permissible limit for water leaving the system as specified in NSF/ANSI 42.
j ystem tested and certified by NSF International against NSF/ANSI Standard 42 for the reduction
of Chlorine Taste and Odor and Nominal Particulate Class III.
Contaminant
Reduction
Nominal Particulate
Class I Particle size:
>0.5 to <1 um
Chlorine taste and
odor
Average
Influent
5600000
1,9 mg/L
Influent Challenge
Average
Concentration. Product
%
Units apply to Water
Reduction
each row
At least 10,000
particles/ml
915 96
2,0 mg/L ::_10% 0,07 96,4
NSF
Reduction
Requirements
85%
5O%
Max
Effluent
mg/L
470000
0.05 mg/L
Min %
Reduction
91.6%
97.4%
NSF Te.st
511032--03
511032-03
To a capacity of 300 gallons (1.135 L).
Note that while the testing was performed under standard laboratory conditions, actual performance may vary.
Application Guidelines / Water Supply Parameters
Water Pressure 20 - 120 psi (0,14 - 0,83 MPa)
Water Temperature 33 °F- 100 °F (0,6°C- 38 °C)
Service Flow 0,5 gpm (1,9 Ipm)
To reduce the risk associated with ingestion of
contaminants due to use with water that is micro
biologically unsafe or of unknown quality. Do not
use with water that is micro biologically unsafe or of
unknown quality without adequate disinfection before
or after the system.
Systems must be installed and operated in accordance
with manufacturer's recommended procedures and
guidelines.
To reduce the risk of property damage due to water
leakage:
• Read and follow Use instructions before installation
and use of this system.
• Install on COLD water lines only. Comply with all
state and local plumbing codes.
• Company with all state and local plumbing codes.
Never install or operate where inlet water pressure
may exceed 125 psi (862 kPa).
• Protect filter from freezing. Remove filter in
temperatures below 34 °F (1 °C).
• Replace cartridge at specified service interval.
Cartridge MUST be replaced at least every 6 months.
• After replacing the water filter cartridge, dispense
2,5 gallons (9,46 liters) of water to purge the system,
depressing and releasing the dispenser pad in cycles
of 30 seconds ON and 60 seconds OFR Discard
the purged water.
To purchase or replace water filters call your Service
Center. Refer to the Warranty Card to obtain the
telephone number of the Service Center near you and
ask for part no. 5231JA2006E.
21

State of California
Department of Public Health
Water Treatment Device
Certificate Number
09-2018
Date Issued: December 15, 2009
Trademark/Model Desiqnafion
ADQ36006101-S
_acemenf Elements
ADO36006101
Manufacturer: Cuno nc
The water treatment device(s}: listed on this _e[_i{icat e ha_e met the testing requirements pursuant to Section
116830 of the Health and Safety Code for the following health rei_ted contaminants:
Microbioloqic ants and Turbidity
C_, STS
Organic Contaminants
2 z_-D Reduction
Atrazin÷
Benzena
Carbofurar
Llndane
#- DichloroDenzene
ToxsDnene
Rated Service Capacity: 200 ga Rated:Service FloW: 0.5 gem
Co,,di_i0._o{iCe_mCatio,':
22

EXPLOSION HAZARD
Use non-flammable cleaner. Failure to do so can result
in death, explosion, or fire.
Both the refrigerator and freezer sections defrost
automatically. However, clean both sections about once
a month to prevent odors. Wipe up spills immediately.
PLASTIC PARTS (covers and panels)
Do not use window sprays, abrasive cleaners or flammable
fluids. These can scratch or damage the material. Use a
clean sponge or soft cloth and a mild detergent in warm
water. Wash, rinse and dry all surfaces thoroughly.
BACK COVER
ELECTRICAL SHOCK HAZARD
Before you begin, either unplug the refrigerator or turn
off power at the circuit breaker or fuse box. Failure to
do so could result in death or serious injury.
GENERAL CLEANING TIPS
' Unplug refrigerator or disconnect power.
, Remove all removable parts, such as shelves, crispers,
etc. Refer to sections in "Using Your Refrigerator" for
removal instructions.
, Use a clean sponge or soft cloth and a mild detergent
in warm water. Do not use abrasive or harsh cleaners.
, Hand wash, rinse and dry all surfaces thoroughly.
, Plug in refrigerator or reconnect power.
NOTE: Back Cover should only be removed by a qualified
technician.
Clean the vents on the back cover.
Use a vacuum cleaner with the
brush attachment, at least twice
a year to keep your refrigerator
working efficiently.
OUTSIDE
Waxing external painted metal surfaces helps provide
rust protection. Do not wax plastic parts. Wax painted
metal surfaces at least twice a year using appliance wax
(or auto paste wax). Apply wax with a clean, soft cloth.
Do not use wax on stainless steel exteriors. Use a product
specially designed for polishing stainless steel appliances,
or clean with a soft cloth or clean sponge and a mild
detergent dissolved in warm water. Dry thoroughly with a
soft cloth.
NOTE: Avoid door surface contact with chemical
products that contain Phosphate or Chlorine,
such as degraders, detergents (containing TSP)
and bleaches.
INSIDE WALLS
NOTE: Allow freezer to warm up so cloth will not stick.
To help remove odors, you can wash the inside of the
refrigerator with a mixture of baking soda and warm
water. Mix 2 tablespoons baking soda to 1 quart of water
(26 g soda to 1 liter water.) Be sure the baking soda is
completely dissolved so it does not scratch the surfaces
of the refrigerator.
DOOR LINERS AND GASKETS
Do not use cleaning waxes, concentrated detergent,
bleaches, or cleaners containing petroleum on plastic
refrigerator parts. Use a clean sponge or soft cloth and
a mild detergent in warm water. Wash, rinse and dry all
surfaces thoroughly.
LIGHT (LED) REPLACEMENT
NOTE: Do not remove the LED, it is only to be removed
by a qualified technician.
POWER INTERRUPTIONS
1. If the power will be out for 24 hours or less, keep all
refrigerator doors closed to help foods stay cold and
frozen.
2. If the power will be out for more than 24 hours:
a) Remove all frozen food and store it in a frozen food
locker.
OR
b) Place 2 Ibs. (1 kg) of dry ice in the freezer for every
cubic foot (28 L) of freezer space. This will keep the food
frozen for two to four days. While handling dry ice, wear
gloves to protect your hands from frostbite.
SUFFOCATION HAZARD
When using dry ice, provide adequate ventilation, Dry ice
is frozen carbon dioxide (C02). When it vaporizes, it can
displace oxygen, causing dizziness, light-headedness,
unconsciousness and death by suffocation. Open a
window and do not breathe the vapors.
OR
c) If neither a food locker nor dry ice is available, consume
or dispose of food at once.
23

REMEMBER: In a power failure, a full freezer stays cold
longer than a partially filled one. If you see that food
contains ice crystals, it may be affected. If the condition
of the food is poor, or if you feel it is unsafe, dispose of it.
DO NOT refreeze frozen foods which have thawed
completely. The United States Department of
Agriculture in Home and Garden Bulletin No. 69 says:
..You may safely refreeze frozen foods that have thawed
if they still contain ice crystals or if they are still cold-
below 40 °F (4 °C)....Thawed ground meats, poultry
or fish that have any off-odor or off-color should not
be frozen and should not be eaten. Thawed ice cream
should be discarded.
If the odor or color of any food is poor or questionable,
dispose of it. The food may be dangerous to eat. Even
partial thawing and refreezing reduces the eating
quality of foods, particularly fruits, vegetables and
prepared foods.
The eating quality of red meats is affected less than
that of many other foods. Use refrozen foods as soon
as possible to save as much of their quality as you can.
refrigerator so it rolls more easily OR screw in the
leveling legs all the way so they don't scrape the floor.
See the "Door Alignment" section.
8.Tape the doors shut and tape the power cord to the
refrigerator cabinet.
When you get to your new home, put everything back and
refer to the "Refrigerator Installation" section for setup
instructions.
WHEN YOU SHOULD SET THE iCE MAKER
POWER SWITCH TO OFF (O)
0 When the water supply will be shut off for several hours.
0 When the ice storage bin is removed for more than a
minute or two.
0 When the refrigerator will not be used for several days.
NORMAL SOUNDS YOU MAY HEAR
° The ice maker water valve will buzz as the ice maker fills
with water. If the power switch is in the ON position, it
will buzz even if it has not yet been hooked up to water.
To stop the buzzing, move the power switch to OFF
position.
WHEN YOU GO ON VACATION
If you choose t"o leave the refrigerator ON while you
are away, follow these steps to prepare your refrigerator
before you leave.
1. Use up any perishables and freeze other items.
2. Empty the ice bin.
3.Turn OFF the Ice maker. NOTE: If the ambient
temperature will drop below freezing, have a qualified
service technician drain the water supply system (on
some models) to prevent serious property damage
due to possible flooding from ruptured water lines or
connections.
NOTE: Keep the power switch in the ON position before
the water line is connected can damage the ice
maker.
0 You will hear the sound of cubes dropping into the bin
and water running in the pipes as the ice maker refills.
If you choose to turn the refrigerator OFF before you
leave, follow these steps:
1. Remove all food from the refrigerator and empty ice
bin.
2.Unplug refrigerator.
3.Clean refrigerator, wipe and dry well.
4.Tape rubber or wood blocks to the tops of both doors
to prop them open far enough for air to get in. This
stops odor and mold from building up.
WHEN YOU MOVE
When you are moving your refrigerator to a new home,
follow these steps to prepare it for the move.
1. Remove all food from the refrigerator and pack all
frozen food in dry ice.
2.Unplug refrigerator.
3.Clean refrigerator, wipe, and dry well.
4. Empty water from the defrost pan.
5.Clean, wipe and dry thoroughly.
6.Take out all removable parts, wrap them well and tape
together so they don't shift and rattle during the move.
Refer to sections in "Using your Refrigerator" for
removal instructions.
7. Depending on the model, raise the front of the
24

UNDERSTANDINGSOUNDSYOUMAYHEAR
Your new refrigerator may make sounds that your old
one did not make. Because the sounds are new to you,
you might be concerned about them. Most of the new
sounds are normal. Hard surfaces, like the floor, walls
and cabinets, can make the sounds seem louder than
they actually are. The following list describes the kinds of
sounds and what may be making them.
The defrost timer will click when the automatic defrost
cycle begins and ends. The thermostat control (or
refrigerator control, depending on the model) will also
click when cycling on and off.
Rattling noises may come from the flow of refrigerant,
the water line, or items stored on top of the refrigerator.
Your refrigerator is designed to run more efficiently
to keep your food items at the desired temperature.
The high efficiency compressor may cause your new
refrigerator to run longer than your old one, and you
may hear a pulsating or high-pitched sound.
You may hear the evaporator fan motor circulating the
air through the refrigerator and freezer compartments.
As each cycle ends, you may hear a gurgling sound
due to the refrigerant flowing in your refrigerator.
Contraction and expansion of the inside walls may
cause a popping noise.
Water dripping on the defrost heater during a defrost
cycle may cause a sizzling sound.
You may hear air being forced over the condenser by
the condenser fan.
You may hear water running into the drain pan during
the defrost cycle.
Problem , Possible Causes . Solutions ......
REFRIGERATOR
DOES NOT
OPERATE
0The power supply cord is unplugged.
.A household fuse has blown or
circuit breaker tripped.
0 The refrigerator control is set to the
OFF position.
0 Refrigerator is in the defrost cycle.
0 The refrigerator is not resting solidly
on the floor.
VIBRATION OR
RATTLING NOISE
0The power supply cord is unplugged.
LED (LAMP) DO
NOT WORK
COMPRESSOR
MOTOR SEEMS TO
RUN TOO MUCH
0 LED Light has burned out.
0The refrigerator that was replaced
was an older model.
0The room temperature is hotter than
normal.
0 The refrigerator was recently
plugged in and the refrigerator
control was set correctly.
0 The door is opened often or a large
amount has just been added.
0 The refrigerator control was not
set correctly for the surrounding
conditions.
0 Firmly plug the cord into a live outlet with proper
voltage.
0 Replace the fuse or reset the circuit breaker.
0 Refer to the "Control Panel Features" section.
0 Wait about 30 minutes for defrost cycle to end.
0 Floor is weak or uneven or leveling legs need
adjusting. See "Door Alignment" Section.
0 Firmly plug the cord into a live outlet with proper
voltage.
0 See the "Light (LED) Replacement" section.
0 Modern refrigerators with more storage space
require more operating time.
0 The motor will run longer under warm conditions.
At normal room temperatures, expect your motor
to run about 40% to S0% of the time. Under
warmer conditions, expect it to run even more
often.
0 The refrigerator will take up to 24 hours to cool
completely.
0Adding food and opening the door warms the
refrigerator. It is normal for the refrigerator to
run longer in order to conserve energy, try to get
everything you need out of the refrigerator at once,
keep food organized so it is easy to find and close
the door as soon as the food is removed. See the
"Food Storage Guide" section.
0 See the "Adjusting Control Settings" Section.
25

COMPRESSOR
MOTOR SEEMS TO
RUN TOO MUCH
DOORS WILL NOT
CLOSE
COMPLETELY
THE DOORS ARE
DiFFiCULT TO
OPEN
, The doors are not closed completely.
, The condenser coils are dirty.
. The refrigerator is not level.
, Food packages are blocking the
door open.
, The ice bin, crisper cover, pans,
shelves, door bins or baskets are out
of position.
, The gaskets are sticking.
,The refrigerator wobbles or seems
unstable.
,The doors were removed during
product installation and not properly
replaced.
, The gaskets are dirty or sticky.
, The door is reopened within a short
time after having been opened.
, The doors are opened often.
. The control is not set correctly for
the surrounding conditions.
,A large amount of food has just
been added to the refrigerator or
freezer.
, The food is not packaged correctly.
, The doors are not closing completely.
, The weather is humid.
, A self-defrost cycle was completed.
. The air vents are blocked. Cold air
circulates from the freezer to the
fresh food section and back again
through air vents in the wall dividing
the two sections.
TEMPERATURE IS
TOO WARM OR
THERE IS
INTERIOR
MOISTURE
BUILDUP
. Push the doors firmly shut. If they will not shut all
the way, see Doors will not close completely below.
.This prevents air transfer and makes the motor
work harder. Clean the condenser coils. Refer to
the "Care and Cleaning" section.
. See the "Refrigerator Installation" and "Door
Alignment" sections to level refrigerator.
. Rearrange food containers to clear door and door
shelves.
. Push bins all the way in and put crisper cover, pans,
shelves and baskets into their correct positions.
See the "Using your Refrigerator" Section.
. Clean gaskets and the surface that they touch.
Rub a thin coat of paraffin wax on the gaskets after
cleaning.
. Level the refrigerator. Refer to the "Door
Alignment" section.
. Remove and replace the doors according to the
"Removing and Replacing Refrigerator Doors"
section or call qualified service technician.
. Clean gaskets and the surfaces that they touch.
Rub a thin coat of appliance polish or kitchen wax
on the gaskets after cleaning.
.When you open the door, warmer air enters the
refrigerator. As the warm air cools, it can create a
vacuum. If the door is hard to open, wait 5 minutes
to allow the air pressure to equalize, then see if it
opens more easily.
.When the door is opened, warm humid air is
allowed into the refrigerator. The more the door is
opened, the faster the humidity builds up, and the
more warm air the refrigerator must cool. In order
to keep the refrigerator cool, try to get everything
you need out of the refrigerator at once, keep food
organized so it is easy to find and close the door
as soon as the food is removed.
. Refer to the "Control Panel Features". Wait 24
hours for temperatures to stabilize or even out. If
the temperature is too cold or too warm, adjust the
setting one level at a time.
. Adding food warms the refrigerator. It can take a
few hours for the refrigerator to return to normal
temperature.
. Wrap food tightly and wipe off damp containers
prior to storing in the refrigerator to avoid moisture
accumulation. If necessary, repackage food
according to the guidelines in the "Food Storage
Guide" section.
. See "Doors will not close completely':
. In humid weather, air carries moisture into
refrigerator when doors are opened.
. It is normal for droplets to form on the back wall
after the refrigerator self-defrosts.
. Locate air vents by using your hand to sense
airflow and move all packages that block vents
and restrict airflow. Refer to "Ensuring Proper Air
Circulation" section for the location of air vents.
26

Problem • Possible causes Solufions
CUBES
PRODUCED BY
ICE MAKER ARE
TOO SMALL
ICE HAS BAD
TASTE OR ODOR
THERE IS WATER
IN THE DEFROST
DRAIN PAN
THE
REFRIGERATOR
SEEMS TO MAKE
TOO MUCH NOISE
FROST OR ICE
CRYSTALS ON
FROZEN FOOD
THE ICE MAKER IS
NOT PRODUCING
ICE OR ICE CUBES
ARE FREEZING
TOO SLOWLY
AUTOMATIC ICE
MAKER DOES
NOT WORK
NOT DISPENSING
ICE
0 Water shutoff valve connecting
refrigerator to water line may be
clogged.
0 The ice maker was recently installed.
0 The ice has been stored for too long.
0The food has not been wrapped
tightly in either compartment.
0 The water supply contains minerals
such as sulfur.
0 The interior of refrigerator needs
cleaning.
, Ice storage bin needs cleaning.
0 The refrigerator is defrosting.
0 It is more humid than normal.
0The sounds may be normal for your
refrigerator.
, The door is not closing properly.
0The door is opened often.
0 The freezer temperature is cold
enough to produce ice.
° Door left open.
0 Ice maker power switch on OFF (0)
position.
0Water supply turned off or not
connected.
0 Freezer compartment too warm.
0 Piled up the cubes in the storage
bin cause the ice maker to shut off.
0All the doors are not closed
completely.
0The dispenser display is locked.
0 Ice is not selected on the dispenser
0 The ice dispenser is not used often.
0 Ice bin is not installed correctly.
0 New installation.
0 Ice cubes are stuck in the delivery
chute.
0Call a plumber to clear the valve.
0 Discard first few batches of ice to avoid discolored
or off-flavored ice.
0 Throw away old ice and make new supply.
0 Rewrap foods since odors may migrate to the ice if
food is not wrapped properly.
0 A new filter may need to be installed to eliminate
taste and odor problems.
0 See "Care and Cleaning" section.
° Empty and wash bin. Discard old cubes.
0 The water will evaporate. It is normal for water to
drip into the defrost pan.
0 Expect that the water in the defrost pan will take
longer to evaporate. This is normal when it is hot
or humid.
. Refer to the "Understanding sounds you may
hear" section.
0 See "Doors will not close completely" above.
0When the door is opened, warm, humid air is
allowed in the freezer resulting in frost.
0 Wait 24 hours after hook-up for ice production.
See the "Control Panel Features" section.
0Check to see if something is holding the door
open.
0 Move the switch to the ON (I) position.
0 See the "Connecting the Water Line" section.
0 Wait 24 hours for the freezer to reach its ideal
temperature.
° Level cubes by hand or shake the bin occasionally.
0 Ice will not dispense if any of the refrigerator doors
are left open.
0 Press and hold the Lock button for 3 seconds to
unlock the control panel and dispenser.
0The dispenser can be set for ice or water. Make
certain that the control panel is set for the proper
operation. Press the dispenser button on the
control panel to cycle through the ice and water
options.
0 Check the ice bin for ice cubes clumping/ sticking
together. If they are, break up the ice cubes allow
for proper operation.
0 Be sure to install the ice bin firmly into position.
0 Wait 24 hours after ice maker installation for ice
production to begin. Wait 72 hours for full ice
production.
0 Use a plastic utensil to clear the delivery chute.
27

NOT DiSPENSiNG
iCE
NOT DiSPENSiNG
WATER
o The ice dispenser is stalling while
dispensing "crushed" ice.
. Ice maker power switch in the OFF
(0) position.
.Water supply turned off or not
connected.
. The dispenser display is locked.
. New installation.
. Refrigerator or freezer doors are not
closed properly.
,Water supply turned off or not
connected.
, The water pressure is less than 40
PSI (0,27 MPa).
, Home filter or reverse osmosis
system is used.
, The dispenser is not set for water
dispensing.
0
0
Change the ice button from "crushed" to "cubed". If
cubed ice dispenses correctly, depress the button
for"crushed" ice and begin dispensing again.
Move the switch to the ON (I) position.
See the "Connecting the Water Line" section.
0
0
0
0
0
0
Press and hold the Lock button for 3 seconds to
unlock the control panel and dispenser.
Flush and fill the water system.
Water will not dispense if any of the refrigerator
doors are left open.
See the "Connecting the Water Line" section.
The water pressure to the home affects the flow
from the dispenser.
This can decrease water pressure. It is
recommended not to connect the supply line to
a reverse osmosis system for optimal operation.
The dispenser can be set for ice or water. Make
certain that the control panel is set for the proper
operation. Press the dispenser button on the
control panel to cycle through the ice and water
options.
28

Life's Good
MANUAL DE USUARI
REFRIGERADOR
DE DOS PUERTAS
Lea detenidamente este manual antes de empezar a utiliza
el refrigerador y gu&rdelo como referencia para el futuro.
29

Garanfia (USA) 3-31
Garanfia (USA) 4
Versi6n en Ingl_s 3-28
Versi6n en Espafiol 29-56
Insfrucciones Import"anfes de Seguridad 33-34
Requerimientos de Conexi6n a Tierra 33
Instalaci6n del Refrigerador
Desempaque del Refrigerador
Instalaci6n
Instalaci6n de la Cubierta Inferior
Desinstalaci6n de la Manija
Desinstalaci6n y Reemplazo de las
Puertas del Refrigerador
Alineamiento de Puertas
Conexi6n de la tuberia de Agua
35-40
35
35
35
36
36-37
37-38
38-40
Partes y Funciones 41
Uso del Refrigerador 42-47
Aseguramiento de Flujo de Aire Adecuado 42
Antes de Usarse 42
Panel de Control 42-43
Control de Temperatura del
Refrigerador y Congelador 42
Ajuste de los Controles 43-44
Instrucciones de Operaci6n
Guia para Almacenar Alimentos
Almac&n de Alimentos Congelados
Dispensador de Agua y Hielo
Dep6sito de Almacenamiento de Hielo
Anaqueles de la Puerta
Gaveta de Meriendas
"Charola para Carnes Frias"
Compartimentos y Tapa para Verduras
Controles de Humedad
Estantes del Refrigerador
Estantes del Congelador
Filtro (Filtro de Agua)
Cuidado y Limpieza
Consejos Generales de Limpieza
Exterior
Paredes Internas
Revestimientos de las Puertas
Partes Pl_sticas
Tapa Posterior
Cambio de Luz (LED)
Interrupciones de Electricidad
Cuando se vaya de Vacaciones
Cuando se Mude
Cuando debe cambiar a Modo
Apagado (Off) a la F_brica de Hielo
Sonidos Normales que Puede Escuchar
Guia de Soluci6n de Problemas
44
45
45
45
46
46
46
46
46
46
46
47-49
50-51
5O
5O
5O
5O
5O
5O
5O
50-51
51
51
51
51
52-55
3O

LG ELECTRONICS U.S.AJNC.
FRmGORmFmCO LG GARANTmA LIMmTADA - U.S.A.
En caso de que su FrigoHfico LG ('Producto") falle por defectos de material o mano de obra bajo circunstancias de uso
dom_stico normal durante el per_odo de garant_a descrito a continuaci6n, LG, a su criterio, reparar_ o reemplazar_ el producto.
Esta garanf_a 0imitada es s61o v_lida para el comprador origina0 del producfo y se aplicar_ s61o cuando 0a compra y el uso se
haya realizado denfro de 0os Estados Unidos, induyendo los ferritorios de EE.UU. Para solicitar un servicio cubierto pot esta
garant_a limitada, ser_ necesario presentar el comprobante de compra original
PERmODO DE GARANTmA
FrigoHfico
Un (1) aBo a partir de la fecha
original de compra.
Piezas y mano de obra
(s61o piezas internas/funcionales)
(Compresor, Consensador, y Evaporador solamente)
Un (1) a_o a parfir de la Siefe (7) a_os a parfir de la fecha
fecha original de compra, original de compra.
$61o piezas (Se le
Piezas y mano de obra
cobrar_ mano de obra al
consumidor)
Ruidos asociados con operaciones y fallas normales encontradas en las instruccionesde uso y cuidado y las guias de instalacion
u operacion de la unidad en un ambiente inapropiado no seran cubiertas bajo esta garantia.
_- Los productos y piezas reemplazados est_n garantizados pot la parte que reste del perlodo original de la garantla o pot
noventa (90) dlas, el perlodo que sea m_s 0argo de los dos.
Los productos y piezas reemplazados pueden set nuevos o reacondicionados.
ESTA GARANTIA SUSTITUYE A CUALQUIER OTRA GARANTiA, EXPRESA O IMPLiCITA, INCLUYENDO, SON
LIMITACIONES, CUALQUOER GARANTiA DE COMERCIABILODAD O ADECUACION A UN FIN PARTICULAR. HASTA
EL EXTREMO PERMOTIDO POR LA LEY PARA UNA GARANTiA IMPLiCITA, LA DURACION SE LIMITA AL PERIODO
DE GARANTiA EXPRESA INDICADO ANTERIORMENTE. NI EL FABRICANTE NI EL DISTRIBUODOR DE EE.UU. SERAN
RESPONSABLES DE CUALQUIER DAI_IO EXTRAORDINARIO POR MOTIVOS AJENOS, IN DIRECTOS, ESPECIALES, O
DA_IOS PUNITIVOS DE CUALQUIER NATURALEZA, 0NCLUYENDO SIN LIMITACOONES, PERDIDAS DE BENEFICIOS, O
CUALQUIER OTRO DANO YA SEA MENCIONADO EN EL CONTRATO, ACUERDO, O CUALQUOER OTRO SUPUESTO.
AIgunos estados no permiten la exclusi6n o limitaci6n de da_os extraordinarios o ajenos o 0imitaciones sobre la duraci6n de
una garantla impllcifa,por lotanto laexclusi6n o limifaci6ncifada arriba puede que no se leaplique a usfed. Esfa garantla
le otorga derechos legales espec_ficos y podHa tenet otros derechos que variar_n dependiendo del estado.
otro daho al acabado de su producto, a menos que tales
daSos sean producto de defectos en los materiales o
en la fabricaci6n y sea informado en el plazo de una
(1) semana desde su entrega (Llame al: 1-800- 243-
oooo).
10. DaSos u objetos desaparecidos de cualquier producto de
presentaci6n, con la caja abierta o productos rebajados o
reacondicionados.
11. Productos cuyo nOmero de serie original haya sido
retirado alterado o no sea legible con claridad. Para la
validaci6n de la garant a ser_n necesarios el recibo de
compra original, el nOmer o de serie y el nOmero del
4. modelo.
12. Incrementos de los costes de utilidad y gastos de utilidad
adicionales.
5. 13. Sustituci6n de bombillas, filtros o cualquier otra pieza
desechable.
14. Reparaciones cuando su producto haya sido usado
6. de forma diferente al uso dom6stico normal ( p.ej. uso
comercial, en oficinas y lugares de ocio) o contrario alas
instrucciones enmarcadas en el manual del propietario
del producto.
7. 15. Costes asociados a la retirada del producto de su hogar
para reparaciones.
16. La retirada y reinstalaci6n del producto si se encuentra
instalado en un lugarinaccesible o no est_ instalado de
acuerdo con Io publicado en el manual de instalaci6n
del producto, incluyendo los manuales LG del propietario
y de instalaci6n.
de limpieza desechables que no est6n aprobados por LG. 17. Las estanter_as, cestas de las puertas, cajones, manillas,
9. DaSos provocados por transporte y manipulaci6n, y otras piezas a parte de aquellas que ven_an incluidas
incluyendo araSazos, limaduras, astillados y/o cualquier con este modelo en particular.
El costo de lareparaci6n o susfifuci6n bajo esfas circunsfancias excluidas ser_ asumido pot el cliente.
ESTA GARANTiA LIMITADA NO CUBRE:
1. Desplazamientos del servicio para entregar, recoger, instalar
o reparar el producto, instruir al cliente en el funcionamiento
del producto, reparar o reemplazar fusibles o corregir
cableados o fontaner_a o para realizar correcciones de
reparaciones o instalaciones no autorizadas.
2. Aver_as de funcionamiento del producto durante cortes
el6ctricos e interrupciones del servicio el6ctrico.
3. DaSos causados por tuber_as de agua con fugas o rotas,
tuber_as de agua congeladas, conductos de drenaje
bloqueados, suministros de agua inapropiados o int
errumpidos o suministros de aire inadecuados.
DaSos provocados por un uso del producto en una
atm6sfera corrosiva o contraria a las instrucciones
enmarcadas en el manual del propietario del producto.
DaSos al producto provocados por accidentes, plagas y
par_sitos, rayos, viento, fuego, inundaciones o actos de la
Naturaleza.
DaSos provocados por un uso indebido, abuso,
instalaci6n, reparaci6n o mantenimiento inadecuados. Una
reparaci6n inadecuada que incluya piezas no aprobadas o
especificadas por LG.
DaSos o fallos provocados por una modificaci6n o
alteraci6n no autorizada, o por un uso m_s all_ de su
prop6sito o cualquier fuga de agua causada por una
incorrecta instalaci6n de la unidad.
8. DaSos o fallos provocados por una incorrecta corriente
el6ctrica, voltaje, normativas de fontaner[a, uso comercial o
indus trial, o uso de accesorios, componentes, o productos
For complete warranty details and customer assistance,
please call or visit our website:
Call 1-800-243-0000 (24 hours a day, 365 days a year) and
select the appropriate option from the menu, or visit our website
at www.lg.com
Or by mail: LG Customer Information Center:
P O. Box 240007, 201 James Record Road Huntsville, Alabama
35813
ATTN: CIC
Write your warranty information below:
Product Registration Information:
Model:
Serial Number:
Date of Purchase:
31

Es1,a guia con1,iene muchos mensajes impor1,an1,es de seguridad. Siempre lea y obedezca 1,odos los mensajes de
seguridad.
Es1,e es el simbolo de adver1,encia de seguridad. Le avisa de mensajes de seguridad que le informan sobre
peligros po1,enciales que pueden ocasionar la muer1,e o una lesi6n a us1,ed y a los demas, o causar dano
al produc1,o. Todos los mensajes seran precedidos por el simbolo de aler1,a de seguridad y de la palabra
PELIGRO, ADVERTENCIA o PRECAUCION. Es1,as palabras significan
Si no sigue las ins1,rucciones, de inmedia1,o, us1,ed puede morir o sufrir una lesi6n grave.
Si no sigue las ins1,rucciones, us1,ed puede morir o sufrir una lesi6n grave.
Indica una situaci6n de peligro inminente, la cual si no se evita puede resultar en heridas
medianas o pequeBas, o solamen1,e en el daBo del produc1,o.
Todos los mensajes de seguridad le diran el peligro po1,encial, le diran c6mo reducir las posibilidades de sufrir una
lesi6n y Io que puede suceder si no se siguen las ins1,rucciones.
Para reducir el riesgo de incendio, choque el_ctrico o
lesiones personales al usar su producfo, debe seguir .
precauciones b_sicas de seguridad, incluyendo las
siguienfes: .
. Nunca desconec1,e su refrigerador jalando el cable de
elec1,ricidad. Siempre sujel-e el enchufe firmemen1,e y
jale direc1,amen1,e del enchufe. '
. Repare o reemplace inmedia1,amen1,e 1,odos los cables
el_c1,ricos que se han dahado o ro1,o. No ul-ilice un
cable que _s1,e desgas1,ado o con abrasiones en la '
par1,e del cable o en su enchufe.
. Cuando mueva su refrigerador de la pared 1-enga
cuidado en no pasarle por encima o daBar el cable
de elec1,ricidad. '
NO almacene, ul-ilice en _1 o en sus inmediaciones,
sus1,ancias explosivas propelen1,es y/o inflamables,
tales como: gasolina, aerosoles u o1,ros liquidos o
vapores combustibles en es1,e o cualquier o1,ro apara1,o
elect,rico.
NO permi1,a que los ninos se 1,repen, paren o cuelguen
de las puer1,as o es1,an1,es del refrigerador. Puede
da_arlo y ocasionarse alguna herida seria.
Man1,enga sus dedos fuera de esas areas peligrosas
de pinchazos; los espacios entre las puer1,as y entre
las puer1,as de los gabine1,es son pequenos. Tenga
cuidado al cerrar las puerl-as cuando haya ni_os en
el area.
' Desconecte su refrigerador antes de limpiarlo o de
hacer cualquier reparaci6n.
NOTA: Le recomendamos que cualquier servicio sea
realizado por personal capaci1,ado.
. No almacene bo1,ellas en el comparl-imen1,o del
congelador pueden quebrarse al es1,ar congeladas y
causar dar_os.
Por seguridad personal, es1,e produc1,o 1-iene que es1,ar
debidamen1,e conec1,ado a la 1,erminal de conexi6n de
1-ierra. Haga que un elec1,ricis1,a le revise el circui1,o y el
enchufe de la pared para confirmar que la salida es1,a
debidamen1,e conec1,ada.
Lea 1-odas las ins1,rucciones antes de ul-ilizar es1,e
produc1,o.
U1,ilice es1,e produc1,o para su uso adecuado segOn las
ins1,rucciones de la guia de uso y cuidado.
Es1,e refrigerador debe es1,ar debidamen1,e ins1,alado
de acuerdo alas Ins1,rucciones que es1,an pegadas en
la par1,e de enfren1,e del refrigerador.
Una vez que su refrigerador se encuen1,re en operaci6n,
no toque con las manos hOmedas o mojadas las
superficies frias den1,ro del congelador. La piel puede
pegarse alas superficies ex1,remadamen1,e frias.
En aquellos refrigeradores con fabrica au1,oma1,ica
de hielo, evi1,e el con1,ac1,o de las par1,es m6viles
del mecanismo expulsor, o con el mecanismo de
calen1,amien1,o que libera los cubos. NO coloque sus
dedos o manos en es1,os mecanismos cuando el
refrigerador es1,_ conec1,ado.
NO vuelva a congelar alimen1,os que han sido
descongelados comple1,amen1,e. El Depar1,amen1,o de
Agricul1,ura de los Es1,ados Unidos en el Bole1,in #69
de Hogar y Jardineria es1,ablece que:
't..Us1,ed puede volver a congelar de manera segura,
alimen1,os que han sido descongelados si _s1,os aOn
con1,ienen cris1,ales de hielo o si aOn es1,an frios por
debajo de 40 °F (4 °C)."
"Carnes picadas, aves o pescados que 1-engan un
olor o color raro no deben consumirse. El helado
derre1,ido debe desecharse. Si el color u olor de
cualquier alimen1,o es dudoso o de mala apariencia,
eliminelo. Los alimen1,os puede que sean daBinos para
el consumo."
"Descongelar parcialmen1,e y volver a congelar
reduce la calidad de consumo de los alimen1,os,
par1,icularmen1,e en las frul-as, vegel-ales y alimen1,os
preparados. La calidad de consumo de las carnes rojas
puede man1,enerse mayor 1-iempo que los demas. Use
los produc1,os que vuelva a congelar 1,an pronto como
le sea posible para man1,ener su calidad."
GUARDE ESTAS INSTRUCCIONES
32

Es1,e apara1,o no es1,8 des1,inado para su uso por las personas (incluidos ninos) con capacidad fisica, sensorial o mental
reducida, o fal1,a de experiencia y conocimien1,os, a menos que se les haya dado la supervisi6n o ins1,rucci6n en
relaci6n con el uso del apara1,o por la persona responsable de su seguridad. Los niF/os deben ser supervisados para
asegurar que no juegan con el apara1,o.
El quedar atrapado y asfixia de nihos no es un
problema del pasado. Los refrigeradores tirados y
abandonados son un peligro, aOn si van a quedar
ahi "por unos cuantos dias". Si Ud. est5 por
deshacerse de su refrigerador viejo, por favor siga
las ins1,rucciones que se dan a con1,inuaci6n para
prevenir acciden1,es.
Antes de tJrar su refrigerador o congelador cuando ya
no se use:
0 Saque las puer1,as.
0 Deje los es1,an1,es en su lugar, asi los niF/os no pueden
mel-erse al refrigerador con facilidad.
Su refrigerador viejo tiene un sistema de refrigeraci6n por personal calificado. Si usted libera intencionalmente
que ul-iliza CFC (clorofluorocarbonos). Los CFC afec1,an el refrigeran1,e con CFC puede es1,ar suje1,o a mull,as
a la capa es1,ra1,osf6rica de ozono. Si us1,ed es1,a por o prisi6n de acuerdo alas legislaciones ambient,ales
deshacerse de su refrigerador viejo, asegOrese que el vigen1,es. Con1,ac1,e a la agencia de su Iocalidad para
refrigeran1,e CFC sea eliminado de la manera apropiada desechar su refrigerador.
IMPORTANTE: Lea con atenci6n Io siguiente.
PARA CONECTAR LA ELECTRICIDAD
PELIGRO DE CHOQUE ELECTRICO
PARA SU SEGURIDAD PERSONAL, este aparato
debe es1,ar a1,errizado apropiadamen1,e. Haga revisar
por personal exper1,o sus con1,ac1,os de pared para
asegurarse de que el enchufe es1,_ conec1,ado a 1-ierra
apropiadamen1,e.
Tipo 1
Recept_eulo de pared
de conexi6n a tlerra
de 3 termlnales.
a tlerra de 3 segerese que e_
termlnales, la conexi6n a tlerra adecua
\ antes de utillzarla.
Tipo 3
Tipo 2
Recept_culo de pared Aseg_rese
de eonexi6n a tlerra que exlste
de 3 termlnales, la conexi6_,
deeuada
antes de
td*zarla'" .
Asegdrese que exlste
la conexi6n a tierra adecuad_
, antes de utillzarla, j
Tipo 4
Recept_culo de pared ......... Recept_culo de pared ..........
de conexi6n a tierra de conexi6n a tierra
de 3 terrninales, de 2 terminales.
Enchufe
de conexi6n
//at'er..e
/F t.....
d...... 16.// ....._l 1 // q
a tierra de _ AsegQrese que existe / / z_Aseg(_rese clue existe |
3 terminales, antesdelaconexi6nutilizarla.a tierra adecuada J__la conexi6n a tlerra adecuada
UTIUZANDO CABLES DE EXTENSION
No se recomienda el uso de cable de ex1,ensi6n. Sin
embargo, si us1,ed desea ul-ilizar un cable de ex1,ensi6n,
es absolul-amen1,e necesario que se 1-enga 3 1-erminales y
que sopor1,e una carga de energia de 15 A para vol1,ajes
entre 115 y 127 V 6 de 10 A para vol1,ajes de 220 V.
(Verifique las especificaciones elec1,ricas del pais donde
se encuen1,re.).
El uso de un cable de ex1,ensi6n aumen1,a el espacio que
se necesi1,a del-r_s del refrigerador.
REEMPLAZO DE CABLE DE CORRIENTE
Si el cord6n de alimentaci6n se daSa, 6ste debe ser
reemplazado por el fabricante, por nuestro centro de
servicio o personal calificado por LG para evitar algOn
riesgo.
NO USAR DISPOSITIVOS MECANICOS
No use dJspositivos mec_nJcos u otros medios para
acelerar el proceso de descongelamien1,o, solo aquellos
recomendados por el fabrican1,e.
MI_TODO RECOMENDADO PARA LA CONEXION
A TIERRA
Su refrigerador debe es1,arsiempre conectado a un circuito
propio que es1,6 conectado adecuadamente a tierra. La
alimentaci6n de energ_a debe set 0nicamente de 115 V - 60
Hz, 127 V - 60 Hz 6 220 V - 50/60 Hz (de acuerdo alas
especificaciones del pa_s donde se encuentre) y con fusibles de
15 A para voltajesentre 115 y 127 V 6 de 10 A para voltajesde
220 V independientes al sis1,ema de pro1,ecci6ndel suminis1,ro
principal de su hogar. (La ins1,alaci6nelectrica debe ser
verificadapor personal tecnico especializado.).
Es1,o brinda el mejor desempeno y previene de las
sobrecargas de energias que pueden provocar un
incendio debido al sobrecalen1,amien1,o de los cables.
Se recomienda que se utilice un circuito separado para
este producto, asi como un recept_culo que no pueda
ser conectado con un interruptor. No utilice cable de
extensi6n.
Es su responsabilidad y obligaci6n reemplazar aquellos
recep1,_culos de 2 1-erminales por uno de 3 1-erminales
conec1,ado debidamen1,e a 1-ierra.
Bajo ninguna circuns1,ancia cor1,e o arranque la 1-ercera
1,erminal (1,ierra) del enchufe.
NOTA: Antes de Jnstalar o IJmpJar, apague el Control
(del 1-ermos1,a1,o, refrigerador o congelador, segOn
su model@ a la posici6n de OFR Cuando haya
1-erminado, vuelva a conec1,ar el refrigerador y
ajus1,e el control (de 1-ermos1,a1,o, refrigerador o
congelador segOn su modelo) a la posici6n.
33

"Este aparato esta destinado a ser usado en aplicaciones
dom6sticas y similares, tales como:
_Areas de personal de cocina en tiendas, oficinas y
otros ambientes de trabajo; Casas de campo y por
clientes en hoteles, moteles y otros ambientes de tipo
residencial.
Entornos de alojamiento y desayuno de tipo; Hosteleria
y similares aplicaciones no comerciales."
PELIGRO DE PESO EXCESIVO
Mueva o instale el refrigerador entre dos o mas
personas. No seguir estas instrucciones puede
ocasionar una lesi6n en la espalda u otro tipo de
lesiones.
DESEMPAQUE DEL REFRIGERADOR
Remueva la cinta adhesiva y cualquier etiqueta temporal
de su refrigerador antes de usarlo. No quite ninguna
etiqueta de advertencia, tampoco la etiqueta del modelo
y nOmero de serie.
Para remover cualquier residuo de pegamento o cinta
adhesiva, frote el area en@rgicamente con su dedo. El
pegamento o la cinta adhesiva tambi&n salen facilmente
frotando un poco de jab6n liquido para fregar con los
dedos sobre la parte adhesiva. Limpie con agua tibia y
seque.
No utilice instrumentos filosos, alcohol para fricciones,
liquidos inflamables, o productos de limpieza abrasivos
para eliminar los restos de pegamento o cinta adhesiva.
Estos productos pueden dahar la superficie de su
refrigerador. Para mas informaci6n, vea la Secci6n de
"lnsfrucciones Imporfanfes de Seguridad"
Los estantes del refrigerador estan instalados en la
posicidn de envio. Por favor reinstale los estantes de
acuerdo a sus necesidades de almacenamiento.
CUANDO MUEVA SU REFRIGERADOR
Su refrigerador es muy pesado. Cuando mueva el
refrigerador para limpiarlo o darle servicio, proteja el
piso. AI mover el refrigerador, siempre tire directamente
hacia afuera. No mueva el refrigerador de lado a lado
ni Io arrastre cuando Io trate de mover ya que podra
danar el piso.
INSTALACION
1. Evite colocar la unidad cerca de fuentes de calor, sol
directo o humedad.
2.Para minimizar el ruido y la vibraci6n, el refrigerador
TIENE que estar instalado sobre un piso s61idamente
construido.
3. No se recomiendan superficies con alfombras o de
Iosas suaves,
4.NUNCA instale el refrigerador sobre una rr----_n
plataforma o una estructura con soporte
U
d@bil.
5.1nstale este producto en un area donde la
temperatura este entre 41 °F (5 °C) y 110
°F (43 °C). Si la temperatura alrededor del
producto es muy baja o alta, la habilidad 2"(,
de enfriamiento del producto podra verse
afectada.
NOTA: Para una circulaci6n de aire apropiada, mejores
resultados de enfriamiento y consumo de energia,
mantenga los articulos y superficies adyacentes a
una distancia minima de 2 pulgadas (5,08 cm).
0 Tenga cuidado cuando trabaje con bisagras, cubierta
inferior, tapones, etc. Puede lastimarse.
0 No coloque las manos o varas de metal dentro de
conductos de aire, cubierta inferior o la parte de
abajo del refrJgerador. Podra lastimarse o recibir un
choque el&ctrico.
INSTALACION DE LA CUBIERTA INFERIOR
Insfalaci6n o reemplazo de la cubierta interior:
1. Remueva los 2 tornillos de la parte inferior de su
refrigerador (AI frente).
2.Coloque la cubierta inferior en posici6n correcta e
instale los tornillos.
Desinsfalaci6n o reemplazo de la cubierta interior:
1. Abra las puertas (refrigerador y congelador).
2.Una vez que las puertas est&n abiertas, remueva los
tornillos que sujetan la cubierta.
3.Coloque nuevamente los tornillos en la parte inferior
del refrigerador.
PELIGRO DE EXPLOSION
Mantenga los materiales y vapores inflamables, tales
como gasolina, alejados del refrigerador. No seguir
estas instrucciones puede ocasionar la muerte,
explosidn o incendio.
34

DESINSTALACIONDELAMANOJA
Es probable que usted necesite remover las manijas
de las puertas para poder mover el refrigerador por un
espacio reducido. Siga las instrucciones mostradas abajo.
NOTA: Para evitar daF/ar la superficie de las puertas
cuando se mueva el refrigerador por espacios
reducidos, es recomendable remover las puertas
como se indica en las siguientes dos p_ginas.
° Afloje los tornillos de fijaci6n con Ilave Allen de 3/32"
(2,5 ram) y retire la manija.
NOTA: Para ajustar o retirar los tornillos de montaje de la
manija utilice una Ilave Allen de 1/4" (6 ram).
Tornillos de
Monfaje
DESINSTALACION Y REEMPLAZO DE LAS
PUERTAS DEL REFROGERADOR
Antes de desinstalar las puertas, remueva la cubierta
inferior. Para referencia vea la secci6n "lnsfalaci6n de la
Cubierfa Inferior':
Remueva la puerta derecha (refrigerador):
1. Abra la puerta. Remueva el tornillo de la cubierta de la
bisagra superior (1).
2.Utilice un destornillador de cabeza plana para hacer
palanca y desenganchar la cubierta de la bisagra
(gancho no se muestra) del gabinete (2). Tire la
cubierta hacia arriba.
3.Gire el ajustador de la bisagra (3) en direcci6n de las
manecillas del reloj. Levante la bisagra superior (4)
retire la palanca de la bisagra (5).
NOTA: Independientemente del tipo de ajustador de
bisagra que tenga el proceso de desensamble
es el mismo.
Tornillos
Fijaci6n
4. Levante la puerta del perno de la bisagra inferior y
retire la puerta.
5.Coloque la puerta con la parte exterior hacia arriba,
sobre una superficie lisa para evitar rayarla.
Mave
Allen
INSTALAClON DE LA MANIJA
, Coloque la manija en la puerta ajustando los agujeros
de la parte posterior de la manija en los tornillos de
montaje y apriete los tornillos con una Ilave Allen de
3/32" (2,5 ram).
NOTA: Si los tornillos de ajuste necesitan ser apretados
o removidos utilice una Ilave Allen 1/4" (6 ram).
PELIGRO DE DESCARGA EL¢CTRICA
, Desconecte el suministro el&ctrico al refrigerador
antes de instalar. El no hacerlo puede dar como
resultado una lesidn seria o la muerte.
, No ponga las manos, los pies u otros objetos en
las salidas de aire, la cubierta inferior, o debajo del
refrigerador. Usted podria lesionarse o recibir un
choque el&ctrico.
0 Tenga cuidado al trabajar con la bisagra, la cubierta
inferior y el tope. Podria lesionarse.
: Tipo 2
PRECAUCION
Cuando levante y libere la bisagra, tenga cuidado de
que la puerta no caiga hacia adelante.
Remueva la puerta izquierda (congelador) con la linea de
conexidn de agua:
Desconecte el tubo de alimentaci6n de agua presionando
el extremo del tubo (Figura 1) como muestra la figura de
abajo.
NOTA: Si el extremo del tubo est5 deformado o
desgastado, corte la parte daF/ada. Desconecte
el tubo que est5 bajo la cubierta inferior bajo las
puertas. Drene 0,13 galones (0,5 litros) de agua.
Coloque un recipiente grande al extremo del
tubo para prevenir un derrame de agua.
35

1. Abra la puerta. Remueva el tornillo de la cubierta de la
bisagra superior (1).
2.Utilice un destomillador de cabeza plana para hacer
palanca y desenganchar la cubierta de la bisagra
(gancho no se muestra) del gabinete (2). Tire la
cubierta hacia arriba.
3. Desconecte todos los cables de conexi6n (3).
4. Remueva el tornillo de tierra (4).
5.Gire el ajustador de la bisagra (5) en contra de las
manecillas del reloj. Levante la bisagra superior (.6)
retire la palanca de la bisagra (7).
Reinstale la puerta izquierda (congelador):
(7) i
Tipo 1 i Tipo 2
1. Pase el tubo de alimentaci6n de agua a trav_s del
perno de la bisagra inferior y coloque la puerta sobre el
perno de la bisagra inferior.
2.Coloque la bisagra superior (6) sobre la palanca de la
bisagra (7) en su lugar. Gire el ajustador (5) a favor de
las manecillas del reloj para asegurar la bisagra.
NOTA: Independientemente del tipo de ajustador de
bisagra que tenga el proceso de desensamble
es el mismo.
PRECAUCION
Cuando levante y libere la bisagra, tenga cuidado de
que la puerta no caiga hacia adelante.
6. Levante la puerta del perno de la bisagra inferior y
retire la puerta.
7. Coloque la puerta con la parte exterior hacia arriba,
sobre una superficie lisa para evitar rayarla.
NOTA: Independientemente del tipo de ajustador de
bisagra que tenga el proceso de instalaci6n es
el mismo.
3.1nstale el tornillo de tierra (4) y conecte todas las
conexiones (3).
4.Coloque el gancho de la cubierta por la esquina del
interruptor bajo las conexiones. Coloque la cubierta (2)
en su lugar. Inserte y apriete el tornillo de la cubierta (1).
5.Vuelva a conectar el tubo de agua insert_ndolo dentro
del conector.
Abrazadera
TubeHa
Reinstale la puerta derecha (refrigerador): L_nea --
Tipo 1 • Tipo 2
1. Coloque la puerta sobre el perno de la bisagra inferior.
2.Coloque la bisagra superior (4) sobre la palanca de la
bisagra (5) en su lugar. Gire el ajustador (3) en contra
de las manecillas del reloj para asegurar la bisagra.
NOTA: Independientemente del tipo de ajustador de
bisagra que tenga el proceso de instalaci6n es
el mismo.
3.Coloque el gancho de la cubierta por la esquina del
interruptor bajo las conexiones. Coloque la cubierta (2)
en su lugar. Inserte y apriete el tornillo de la cubierta (1).
36
ALINEAMIENTO DE PUERTAS
Antes de ajustar las puertas, remueva la cubierta inferior.
Para referencia yea la secci6n "lnsfalaci6n de la Cubierta
Inferior': Los dos m@todos de alineamiento de puertas
disponibles est&n basados en la cantidad de ajustes
necesarios y los requerimientos de instalaci6n.
Tipo I
Herramienfa para ajuste: desfornillader de cabeza plana
Si la puerta del compartimento del congelador es inferior
a la puerta del compartimento del refrigerador, nivele las
puertas insertando un destornillador de cabeza plana en
la ranura del tornillo de ajuste de altura izquierdo, y girelo
hacia la derecha.
,/_,.................,,,,%,
de Alfura _
Ajusfe de /,_, / /
.... Diferencia_ .... / /
_osca izqu=errsa } ,/
, ,.-.--. de Altura £_.............................

Si la puerta del compar1,imen1,o del congelador es
superior a la puer1,a del compar1,imen1,o del refrigerador,
nivele las puer1,as inser1,ando un des1,ornillador de
cabeza plana en la ranura del 1-ornillo de ajus1,e de al1,ura
derecha, y girelo hacia la derecha.
Ajuste de
)iferencia Rosca Derecha
ANTES DE COMENZAR
La ins1,alacidn de la 1-uberia de agua no es1,_ garan1,izada
por el fabrican1,e del refrigerador o de la fSbrica de hielos.
Siga las ins1,rucciones cuidadosamen1,e para minimizar
el riesgo de danos al produc1,o.
El aire en la 1,uberia de agua puede provocar mar1,illeos
en las conexiones, Io que puede causar daF/os alas
1-uberias in1,ernas del refrigerador o derrame de agua al
interior del refrigerador. Llame a un plomero calificado
para corregir los mar1,illeos en las conexiones antes de
ins1,alar la 1-uberia de agua.
Para evi1,ar quemaduras y dahos al product,o, no conec1,e
su refrigerador a las 1-uberias de agua calien1,e. Si usa su
refrigerador antes de conec1,ar el suminis1,ro de agua,
asegOrese de que la f_brica de hielo se encuen1,ra en la
posici6n APAGADO (0).
Tipo 2
Herramienta para ajuste: Ilave de tuercas de 5/16 "
(8 ram) y Ilave de tuercas de 3/4" (19 ram). Ajus1,e el
nivel cuando la puer1,a del refrigerador es1,e m_s abajo
que la puer1,a del congelador duran1,e la ins1,alaci6n del
refrigerador.
No ins1,ale las 1,uberias de la fSbrica de hielos en areas
en las cuales la 1-empera1,ura ambien1,e se encuen1,re
bajo el pun1,o de congelaci6n del agua. Cuando ul-ilice
cualquier disposi1,ivo el&c1,rico (como un 1-aladro) duran1,e
la ins1,alaci6n, asegOrese de que el disposi1,ivo es1,&
doblemen1,e aislado o conec1,ado a 1-ierra para prevenir
el riesgo de choque el6c1,rico. Todas las ins1,alaciones
deben ir acorde al c6digo de requisi1,os de la fon1,aneria
local.
NOTA: Use protecci6n para los ojos.
Use una Ilave de 1-uercas de 3/4" (19 ram), gire la 1-uerca
de sujecidn a la derecha para aflojarla. Use una Ilave de
1,uercas de 5/16" (8 ram), gire el perno de la bisagra
a la derecha o a la izquierda para nivelar la puer1,a
del refrigerador y del congelador. Una vez nivelada la
puer1,a, gire la 1-uerca de sujeci6n hacia la izquierda para
aprel-arla.
PRECAUCION
No apriel-e demasiado el 1-ornillo de ajus1,e de la
puer1,a. El perno de la bisagra puede barrerse.
(El rango de ajus1,e de al1,ura es de mSximo 1/2"
(13 ram)).
DESPUES DE AJUSTAR EL NIVEL DE LAS
PUERTAS
Aseg0rese que los 1,ornillosde ajus1,ees1,6n en con1,ac1,o
con el piso.
CONEXK)N DE LA TUBERJA DE AGUA
NOTA: La ins1,alacidnde la linea de agua es necesaria
cuando su refrigerador es1,a equipado con
f_brica de hielo y/o dispensador de agua.
• Si un sistema de filtraci6n de agua de 6smosis
inversa es1,_ conec1,ado a su abas1,ecimien1,o de agua
fria. Es1,a ins1,alaci6n no suminis1,ra el agua necesaria
al refrigerador o la fabrica de hielo. Siga la siguien1,e
ins1,rucci6n cuidadosamen1,e para minimizar el riesgo
de danos cos1,osos por agua.
• Si un sistema de filtra¢i6n de agua de 6smosis inversa
es1,_ conec1,ado a su abas1,ecimien1,o de agua fria, la
presi6n de agua para el sis1,ema de osmosis inversa
debe ser un minimo de 40 a 60 PSI (0,28 - 0,41
MPa), menos de 2 - 3 segundos para rellenar 2 una
1-aza de capacidad de 7 onzas (0,2 li1,ros).
Si la presi6n de agua del sistema de 6smosis inversa es
menos de 21 PSI (0,14 MPa), ross de 4 segundos para
rellenar una 1-aza de capacidad de 7 onzas (0,2 li1,ros):
0 Revise si el fill,to de sedimen1,os en el sis1,ema de
osmosis inversa es1,_ bloqueado. Reemplace el fill,to
si es necesario.
0 Permit,it que el 1-anque de almacenamien1,o del
sis1,ema de 6smosis inversa se rellene despu_s de un
uso in1,enso.
0 Si sigue 1-eniendo el mismo problema de presidn
de agua de 6smosis inversa, Ilame a un fon1,anero
calificado.
QU¢ NECESITARA
° Tubos de cobre, de 1/4" (6 ram) de di_me1,ro#
ex1,erno para conec1,ar el refrigerador al suminis1,ro //
de agua. AsegOrese que ambos lados del 1,ubo //
est_n cortados equitativamente. //
Y
37

Para determinar la Iongitud de cu_nta tuberia va a
necesitar: mida la distancia desde la v_lvula de agua en
la parte trasera del refrigerador hasta la tuberia de agua.
Agregue 8 pies (2,4 m). AsegOrese que haya suficiente
tuberia adicional [como 8 pies (2,4 m) enrollada en 3
espirales de 10" (25 cm) de di_metro] para permitir que
el refrigerador se pueda mover fuera de la pared luego
de la instalaci6n.
• Un suminisfro de agua fria. La presi6n de agua debe
estar entre 20 y 120 PSI (0,14 y 0,83 MPa) en los
modelos que no cuenten con filtro de agua y entre
40 y 120 PSI (0,28 y 0,83 MPa) en los modelos que
cuenten con filtro de agua.
" Taladro El_cfrico. i_f___
• 1/2" (13 ram) o Ilave ajustable.
" Destornillador de cabeza plana y destornilladores
Phillips.
Dos tuercas de compresi6n
1/4" (6 ram) de all,metro t'z/'/_.__
externo y 2 f_rulas (mangas)
para conectar la tuberia de
cobre a la vSIvula de cierre
y a la vSIvula de agua del
refrigerador.
' Si su tuberia de cobre actual
cuenta con alguna reducci&n
en los extremos, necesitar_ un
adaptador (disponible en las
ferreterias) para conectar la linea
de agua al refrigerador. Tambi&n puede cortar la
reducci6n con un cortador de tubo y despu&s utilizar
las conexiones de compresi6n arriba mencionadas.
Cierre la v_lvula para
conecfar a la linea de agua
fria. La v_lvula debe tener
una entrada de agua con
un di_metro minimo interior
de 5/32" (3,96 ram) en el
punto de conexi&n de el
AGUA FRiA. Estas vSIvulas se pueden encontrar en
cualquier paquete de conexi&n de agua. Antes de
comprar, asegOrese de que la vSIvula cumpla con los
reglamentos locales.
2. SELECCIONE LA UBICACION DE LA VJkLVULA
Seleccione la ubicaci&n para la v_lvula,
que sea f_cilmente accesible. Es
recomendable conectar por el lado
de una tuberia vertical. Cuando sea
necesario hacer una conexi&n a una
tuberia de agua horizontal, debe hacer
la conexi6n desde la parte de superior o
el lado, en vez de la parte inferior, para
evitar atraer sedimentos a la tuberia de
agua.
3. PERFORE UN ORIFICIO PARA LA VJkLVULA
Perfore un orificio de 1/4" (6 ram) en la tuberia de
agua usando el taladro Elimine
cualquier residuo resultado de
taladrar en la tuberia. Tenga
cuidado de no dejar que caiga
elaguaeneltaladro El nolograr
hacer un orificio de 1/4" (6 ram)
puede resultar en la reducci6n
de la producci6n de hielos o de
cubos m_s pequeSos.
NOTA: Fontaneros con licencias deben usar solamente
tubos de cobre #49595 6 49599 6 tubos de
Polietileno Reticulado (PEX).
4. AJUSTE LA V_,LVULA DE CIERRE
Ajuste la v_lvula de cierre a la tuberia de agua fria con la
abrazadera para tuberia.
Abrazadera
para la Tuber_a
V_lvula de Cier.._/_
Tipo Silla
Tuber_a Vertical
de Agua Frla
NOTA: Se adjudica el C6digo de Fontaneria 248CMR del
Estado de Massachusetts. Las v_lvulas tipo silla
son ilegales y no se permiten en Massachusetts.
Consulte a un fontanero con licencia.
INSTRUCCIONES DE INSTALACION
ADVERTENCIA
Conecte solamente a un suminstro de agua potable.
1. CIERRE EL SUMINISTRO DE AGUA PRINCIPAL
Abra el grifo de agua ross cercano para aliviar la presi6n
en la tuberia.
3S

5. APRIETE LA ABRAZADERA PARA TUBERJA I/4 de gal6n de agua (I L) haya sido drenada a trav@s de
Apriete los tornillos de la abrazadera para tuberfa hasta la tuberfa.
que la arandela provea un cierre herm@ico.
NOTA: No apriete demasiado porque se puede quebrar
la tuberia.
Abrazadera
para laTubeHa "x_
Tornillos de la_
Abrazadera_
)
Arandela
Exfremo de
la Enfrada
6. ABRA LA VALVULA DE PASO
Direccione la tuberia entre la tuberia de agua fria
y el refrigerador. Cree una ruta a trav@s de un orificio
perforado en la pared o piso (detr_s del refrigerador o
gabinete adyacente) tan cerca de la pared como sea
posible.
NOTA: Aseg0rese que haya sufJcJente tuberia adicional
[cerca de 8 pies (2,4 m) enrollado en .3 espirales
de aproximadamente 10" (254 ram) de diSmetro]
para permitir mover el refrigerador de la pared
luego de la instalaci6n.
7.CONECTANDO LA TUBERIA A LA VALVULA
Coloque la tuerca de compresi6n y la f&rula (manga)
para la tuberia de cobre sobre la parte final del tubo y
con@ctelo a lav_Ivula de cierre.AsegOrese de que el tubo
se inserte completamente en la v_Ivula. Atore la tuerca
de compresi6n firmemente.
V_lvula de Cierre
TipoSilla _
Tuerca de j
Presi6n
V_lvula
Exferna
Tuerca de
resi6n
\-- F_rula
(Manga)
9. CONECTE LA TUBERIA AL REFRIGERADOR
NOTA:
' Antes de realizarla conexi6nal ._frigerador, asegOrese
de que el cable de electricidad del refrigerador no est@
conectado al receptSculo en la pared.
, Si su refrigerador no tiene un filtro de agua, le
recomendamos que instale uno si su suministro de
agua contiene arena o partfculas que puedan tapar la
capa de la vSIvula de agua del refrigerador. Instale el
filtro en la tuberfa de agua cerca del refrigerador.
, No deben utilizarse mangueras usadas, solo utilice las
mangueras nuevas suministradas pot el fabricante.
1. Saque la tapa plSstica flexible de la v&lvula de agua.
2.Coloque la tuerca de compresi6n y la f@rula (manga) al
final del tubo como se muestra en la ilustraci6n. (Vet
figura 1).
3.1nserte la parte final del tubo de cobre en la conexi6n
Io m_s que pueda. Mientras sujeta el tubo, ajuste la
uni6n.
PRECAUCION
Revise que no ocurran fugas en la conexi6n de la
tuberia de agua.
Par'l'e Posferior del Refrigerador
Abrazadera_ _
para TubeHa
Tuerca de _:
Compresi6n _%_.
I/4" (6 mm) \
c 7_
F@rula
(Manga) !_,_
Figura 1
Tubo de 1/4" (6 mm)
i _f_iD:#},:;;;
Conexi6n del
Refrigerador
Sujete la tuberfa en la abrazadera de la tuberia ubicada
en la parte posterior del refrigerador. Primero, afloje los
tornillos de la abrazadera. Despu_s, inserte la tuberia en
el surco. Finalmente, re-ajuste el tornillo.
10. CONECTE EL REFRIGERADOR
Acomode los espirales de tuberia
para que no vibren con la parte
de atr_s del refrigerador o con
la pared. Empuje el refrigerador
hacia la pared.
NOTA: Se adjudica el C6digo de Fontanerfa 248CMR del
Estado de Massachusetts. Las v&lvulas tipo silla
son en ilegales y no se permiten Massachusetts.
Consulte a un fontanero calificado.
8. ENJUAGANDO LA TUBERIA
Gire el suministro principal de agua
hacia la derecha y drene la tuberia
hasta que el agua est_ clara. Cierre el
paso de agua con la vSIvula hasta que
(Imagen solo de referencia)
11.COMIENCE A USAR LA F_,BRICA DE HIELO
Coloque el interruptor de electricidad de la f_brica de
hielo en la posicidn de ENCENDIDO (I).La fSbrica de
hielo no comenzar_ a operar hasta que alcance su
temperatura operacional de 15 °F (-9 °C) o menos. En
eso momento comenzar_ a operar autom_ticamente
si el interruptor de electricidad est_ en la posici6n de
ENCENDIDO (I).
39

............. O
........................ O
Ul-ilice esta secci6n para familiarizarse con las parl-es y funciones.
NOTA: Esta guia cubre varios modelos distintos. El refrigerador que se ha comprado puede contener algunos o todos
los articulos mencionados abajo. La ubicaci6n de las funciones presentadas puede que no sean iguales que
su modelo.
O brica de Hielo Autom_tica
El hielo es producido en la f_brica de hielo y enviado al
dispensador.
O Estantes del Congelador
LSmpara del Congelador (LED)
O Anaqueles del Congelador
O Caj6n
O Cubierta inferior
Compartimento para productos I_cteos
Almacen de productos I_cteos como mantequilla y queso.
O Filtro de Agua
O Estantes del Refrigerador
O Gaveta para Meriendas (Charola para carnes frias)
Almacen de came y comida fresca.
Ot Anaqueles del Refrigerador
Compartimento para Verduras
LSmpara del Refrigerador (LED)
4O

ASEGURANDOELFLUJODEAIREADECUADO
Para asegurar las temperaturas adecuadas, el aire debe
fluir entre las secciones del refrigerador y congelador.
En el compartimento del congelador, el aire frio entra
pot las rendijas Iocalizadas en la parte superior y
sale pot las rendijas Iocalizadas detr_s del caj6n del
congelador.
En el compartimento del refrigerador, el aire frio entra
a la secci6n de alimentos frescos pot las rendijas
Iocalizadas en la parte superior del compartimento. El
aire fluye hacia abajo y sale pot las rendijas Iocalizadas
detr&s del caj6n de productos frescos.
5,_s91.
1
Lmx_
0 No bloquee ninguno de estos conductos con paquetes
de alimentos. Si los conductos estSn bloqueados, el flujo
de aire ser_ interrumpido y puede ocurrir problemas de
temperatura y humedad.
IMPORTANTE: Porque el aire circula entre ambas
secciones, cualquier olor formado en una secci6n se
transfiere a la otra. Usted debe limpiar completamente
ambas secciones para eliminar olores. Para prevenir la
transferencia de olores y que los alimentos se sequen,
envuelva o cubra los alimentos completamente (Vea
la secci6n de "Guia para Almacenar Alimenfos" para
detalles).
NOTA:
Si cierra la puerta
del refrigerador
fuertemente, la puerta
del congelador puede
abrirse y cerrarse a
causa de la presi6n del
flujo de aire.
ANTES DE USARSE
1. Limpie su refrigerador completamente y saque todo el
polvo acumulado durante el envio.
2.1nstale los accesorios como el recipiente para hielo,
gavetas, estantes, etc. en los lugares correspondientes.
Los mismos vienen empacados juntos para evitar que
se danen durante el envio.
3. Deje que su refrigerador corra al menos pot 2 6 3
horas antes de colocar alimentos. Verifique el flujo
de aire frio en el compartimento del congelador para
asegurarse que est_ enfriando. Su refrigerador ya est_
listo para usarse.
PANEL DE CONTROL
Presione el b6ton para ver la funci6n deseada y
seleccionar otras funciones.
PANTALLA LED
La pantalla LED muestra las
configuraciones de temperatura,
opciones del dispensador y del filtro
para agua, alarma de puerta y mensajes
de estado de bloqueo.
ICE TYPE (Tipo de Hielo)
El bot6n ICE TYPE es usado para
seleccionar entre cubos de hielo y hielo
triturado.
NOTA: Sostenga el vaso u otro
recJpJente en su lugar durante unos
segundos despu_s de servirse hielo
o agua para no dejar caer las Oltimas
gotas de agua o cubos de hielo.
FREEZER (Congelador)
Presione el bot6n FREEZER para ajustar
la temperatura del compartimento del
congelador.
REFRIGERATOR
(Refrigerador)
Presione el bot6n REFRIGERATOR
para ajustar la temperatura del
compartimento del refrigerador.
NOTA: La temperatura actual varia en relaci6n al estado
de los alimentos ya que la configuraci6n de la
temperatura indicada es la temperatura a alcanzar
no la temperatura real dentro del refrigerador.
Inicialmente configure el Control de Temperatura del
Refrigerador a 37 °F (3 °C). Mantenga esta configuraci6n
durante 24 horas (un dia) para estabilizar, luego ajuste la
temperatura como se indica.
NOTA:
AI presionar simultaneamente los botones
FREEZER y REFRIGERATOR por m_s de 5
segundos, la temperatura cambia de Fahrenheit
a Celsius o viceversa.
41

ICE PLUS (Congelaci6n R_pida)
Presione el bot6n ICE PLUS una vez para activar esta
funci6n. La figura de ICE PLUS del panel de visualizaci6n
se iluminar_ cuando se active. La secci6n del congelador
funcionar_ a la temperatura m_s baja durante 24 horas
para aumentar la producci6n de hielo. Presione el bot6n
nuevamente para cancelar esta funci6n.
UGHT/FILTER (Luz/Filfro)
El bof6n LIGHT/FILTER controla la I&mpara del
dispensador. Reestablece el indicador de sustituci6n del
filtro de agua cuando @ste ha sido reemplazado.
El filtro de agua necesita ser cambiado cada 6 meses. El
indicador de meses del filtro marcar_ "0" para indicarle
que hay que cambiar el filtro. Presione y sostenga el
bot6n LIGHT/FILTER por m_s de 3 segundos para
reconfigurar el indicador del filtro despu_s de que haya
sido cambiado.
ALARM/LOCK (Alarma/Bloqueo)
Presione y sostenga el bot6n ALARM/LOCK durante
3 segundos para bloquear el dispensador y todas las
funciones del Panel de Control. Presione y sostenga de
nuevo por 3 segundos para desbloquear.
El bot6n ALARM/LOCK tambi&n controla la alarma de
la puerta cuando est_ abierta que suena 5 veces en
intervalos de 50 segundos cuando se deja abierta por
mas de .60 segundos. La alarma deja de sonar cuando
se cierra la puerta. Presione el bot6n ALARM/LOCK una
vez para activar o desactivar la funci6n de alarma en la
puerta.
MODO DE APAGADO DEL CONTROL DE
TEMPERATURA
Para activar esta funcion presione simult_neamente los
botones FREEZER y ICE PLUS por ross de 5 segundos
hasta que las luces de la pantalla se apaguen.
Si algOn bot6n es presionado o alguna puerta se abre,
las luces permanecerSn encendidas y despu@s de 20
segundos de inactividad las luces volverSn a apagarse
autom_ticamente.
Para mantener encendido el control de temperatura
presione nuevamente (simult_neamente)los botones
FREEZER y ICE PLUS por ross de 5 segundos hasta
que las luces se enciendan y apaguen r_pidamente. El
modo de apagado del control de temperatura no afecta
el desempe_o t_rmico de la unidad.
AJUSTE DE LOS CONTROLES
De tiempo a su refrigerador de enfriar completamente
antes de hacer ajustes. Es mejor esperar 24 horas
antes de hacer algOn cambio. Las configuraciones
recomendadas en la secci6n de "Panel de Control"
deber_n ser apropiadas para el uso normal de un
refrigerador de casa.
El control del refrigerador funciona como el termostato
de toda la unidad (refrigerador y congelador). Mientras
m_s alto el nivel de temperatura, m_s tiempo estar_
accionado el compresor para mantener la temperatura.
El control del congelador ajusta el flujo de aire del
congelador al refrigerador. Ajustando el control de
congelador a una temperatura m_s baja mantendr_ m_s
aire frio para mantenerlo a la temperatura elegida.
Si necesita ajustar las temperaturas en el refrigerador o
congelador, comience por ajustar el refrigerador. Permita
que transcurran 24 horas para que la temperatura se
estabilice. Si est_ muy caliente o muy fria, entonces ajuste
el control del congelador. Utilice las configuraciones
que aparecen en la tabla de abajo como guia. Siempre
recuerde esperar al menos 24 horas entre los ajustes.
CONDICION/RAZON: AJUSTE/
RECOMENDACION:
Secci6n del
REFRIGERADOR muy fria
. Controles no ajustados
correctamente para sus
condiciones
Seccibn del CONGELADOR
muy fria
. Controles no ajustados
correctamente para sus
condiciones
Secci6n del
REFRIGERADOR muy
caliente
. Puerta abierta muy
frecuente.
. Se ha ahadido muchos
alimentos.
. La temperatura en
la habitaci6n es muy
caliente.
Coloque el control del
REFRIGERADOR al
pr6ximo nivel m_s bajo,
espere 24 horas para
realizar el siguiente
ajuste.
Coloque el control del
CONGELADOR al
pr6ximo nivel m_s bajo,
espere 24 horas para
realizar el siguiente
ajusfe.
Coloque el control del
REFRIGERADOR al
pr6ximo nivel m_s alto,
espere 24 horas para
realizar el siguiente
ajuste.
Secci6n del CONGELADOR
muy caliente/el hielo no se
hace r_pido
. Puerta abierta muy
frecuente.
. Se han ahadido muchos
alimentos.
Coloque el control
del CONGELADOR al
pr6ximo nivel m_s alto,
espere 24 horas para
realizar elsiguiente
ajuste.
42

CONDICION/RAZON: AJUSTE/
RECOMENDACION:
Secci6n del
CONGELADOR muy
calienfe/el hielo no se
hate r_pido
, La 1,empera1,ura en
la habi1,aci6n es muy
fria [55 °F (13 °C)], (El
compresor no hace
suficien1,es ciclos).
, Use de touche hielo.
, Conduc1,os de aire
bloqueados per
ar1,iculos.
Coloque el confrol
del CONGELADOR al
pr6ximo nivel m_s alfo,
espere 24 horas para
realizar elsiguienfe ajusfe,
Mueva los articulos fuera
de los conductos.
GUiA PARA ALMACENAMIENTO ALIMENTOS
Envuelva o almacene alimen1,os en el refrigerador dent,re
de ma1,eriales herm&1,icamen1,e cerrados o a prueba de
humedad, a menos que se indique Io con1,rario. Es1,o
previene que los olores y el saber de los alimen1,os se
1,ransfieran a 1,raves del refrigerador. Para produc1,os con
fechas de caducidad, reviselas para asegurarse que
es1,_n frescos.
ARTiCULOS COMe MANTENERLOS
Manfequilla o
Margarina
Mantenga mantequilla descubier1,a
en un plato con 1-apa o en un
compar1,imen1,o cerrado. Cuando
almacene provisiones, envu_lvalos en
material para el congelador y congele.
INSTRUCCOONES DE OPERACION
PELIGRO DE LESION PERSONAL
Evite el contacto con las par1,es en movimiento del
mecanismo expulsor o del elemen1,o calen1,ador que
libera los cubes de hielo. NO coloque los dedos o las
manes en el mecanismo au11.om_1,ico de hacer hielo
cuando el refrigerador es1,&conec1,ado.
Un refrigerador reci6n ins1,alado puede que 1,arde de 12 a
24 horas en hacer hielo.
Luz Indicadora del
Tama_o del Cube
Queso
Lethe
H uevos
Frufas
Almac&nelo en su envol1,ura original
has1,a que Io use. Una vez que Io abra,
vuelva a envolverlo con plSs1,ico o papel
aluminio.
Limpie el envase de leche. Para un
mejor almacenamien1,o, col6quela en
uno de los es1,an1,es in1,eriores, no en la
puer1,a.
Almacene en el car1,6n original o en
uno de los es1,an1,es in1,eriores y no en
la puer1,a.
Enjuague, deje secar y almacene en
el refrigerador en bolsas pl_s1,icas
o en el caj6n de produc1,os frescos.
No enjuague ni envase las fresas o
frambuesas has1,a que las vaya a usar.
Man1,&ngalas en su envase original en el
caj6n de produc1,os frescos o almacene
en una bolsa cerrada y sellada de papel
en uno de los es1,an1,es del refrigerador.
Braze de Apagado
Aufom_fico
Inferrupfor
(ON/OFF)
La m_quina de hielo producir_ 5 cubes per ciclo
aproximadamen1,e 60-80 cubes en un periodo de 24
horas, dependiendo de la 1,empera1,ura del compar1,imen1,o
del congelador, de la 1,empera1,ura en la habi1,aci6n, la
can1,idad de veces que se abra el refrigerador y o1,ras
condiciones de operaci6n. Si el refrigerador se ul-iliza
antes de hacer la conexi6n de agua a la m_quina de hielo,
coloque el in1,errup1,or de elec1,ricidad a OFF (apagado).
Elimine las primeras tandas de hielo para permitir que el
agua corra limpia. AsegOrese que nada in1,erfiera con la
ex1,ensi6n del braze de apagado au1,om81,ico.
Cuando se Ilene el recipien1,e al nivel del braze de apagado
au11.om_1,ico, la m_quina de hielo dejar_ de producir hielo.
Vegefales
con hojas
Remueva de la envol1,ura y recor1,e o
saque areas danadas o descoloridas.
Enjuague en agua fria y cuele. Coloque
en bolsas pl_s1,icas o en envases
pl_s1,icos y guarde en el caj6n para
produc1,os frescos.
Coloque en bolsas pl_s1,icas o en
envases pl_s1,icos y guarde en el caj6n
para produc1,os frescos.
Vegefales
con c_scara
(zanahorias,
pimientos)
Pescado Utilice el pescado fresco y mariscos el
mismo dia de compra.
Huevos Almacene en el car1,6n original o en
uno de los es1,an1,es in1,eriores y no en
la puer1,a.
Sobras Cubra el sobran1,e con envol1,ura
pl_s1,ica o papel aluminio. Pueden
ser ul-ilizados con1,enedores pl_s1,icos
1-apados complel-a men1,e.
Es normal que varies cubes se peguen. Si no se ul-iliza
el hielo frecuen1,emen1,e, los cubes de hielo viejos se
pondr_n nebulosos, l-endr_n un real sabory se encoger_n.
43

ALMACENAMiENTODEALiMENTOS
CONGELADOS
NOTA: Para m&s informaci6n sobre como congelar
alimentos o tiempos para almacenar alimentos,
revise una guia para el congelador o un libro de
cocina confiable.
Empaque
Congelar exitosamente depende del empaque correcto.
Cierre y selle los paquetes para que no entre aire o
humedad. Si entra, entonces podr_ tener olor y sabor
de alimentos transferidos a trav@s del refrigerador y
congelador y los alimentos en el empaque para el
congelador podr_n secarse.
tener agua fria y hielos sin
necesidad de abrir la puerta del
refrigerador.
La bandeja se remueve
f_cilmen1,e presionando y
ex1,ray_ndola.
° Incline la bandeja hacia abajo levemente e incerte a
presi6n las costillas en las ranuras.
Recomendaciones para empaque:
0 Envases de pl_stico rigidos con "tapas ajustadas".
0 La1,as para congelar.
0 Papel con plSs1,ico.
0 Envol1,ura plSs1,ica impermeable.
0 Bolsa plSs1,ica con cierres especificamen1,e para el
congelador. Siga las ins1,rucciones en el paquel-e o
envase para el m_1,odo adecuado de congelar.
Ranura$
No ufilice:
0 Envolturas para pan.
0 Envases sin tapas.
0 Papel de cera o envol1,uras enceradas para congelador.
0 Envol1,uras muy delgadas, semipermeables.
ADVERTENCIA
No mantenga bebidas en latas o en envases pl_sticos
en el congelador. Pueden romperse si se congelan.
ADVERTENCIA
No Jntroduzca sus manos por
la abertura del dispensador de
hielo y agua. Hacerlo puede
causarle heridas en sus manos.
Congelando
Su congelador no congelar_ r_pidamente una gran
can1,idad de alimen1,os. No coloque m_s alimen1,os sin
congelar de los que se pueden congelar en 24 horas
[no ross de 2 6 3 Ibs. de comida por pie cObico (0,9 a
1,35 kg por metro cObico) en el espacio del congelador].
Deje suficien1,e espacio para que el aire circule entre los
paque1,es. Tenga cuidado en dejar suficien1,e espacio al
fren1,e para que la puerl-a pueda cerrar complel-amen1,e.
El tiempo para congelar varia de acuerdo a la calidad y
tipo de alimento, el tipo de empaque o envoltura que
tiene (sellado herm_ticamente y a prueba de humedad)
y la temperatura de almacenaje. Cristales de hielo dentro
de un paquete sellado son normales. Esto simplemente
significa que la humedad en los alimentos y el aire dentro
del paquete se ha condensado, creando cristales de hielo.
NOTA: Permita que los alimentos calientes se enfrien
a 1-empera1,ura ambien1,e por 30 minul-os, para
luego empacarlos y congelarlos. Enfriar alimen1,os
calien1,es antes de congelarlos ahorra energia.
DISPENSADOR DE AGUA Y HIELO
Su refrigerador cuen1,a con un sis1,ema que le permi1,e
44
PRECAUCION
Cuando use el dispensador para dispensar en un
con1,enedor con un aberl-ura angos1,a, man1,&ngase
Io m_s cerca posible de la salida del agua o del
dispensador de hielo.
Inferrupfor del Dispensador de Agua
Presione el interruptor de agua
o active el bo1,6n de agua con
un vaso u o1,ro recipien1,e y se
dispensar_ agua fria. Cuando el
in1,errup1,or de agua o el bo1,6n de
agua sea presionado, es1,_ se
iluminar_.
N

DEPOSITO DE ALMACENAMIENTO DE HIELO
El dep6siTo de almacenamienTo de hielo almacena los
cubos de hielo hechos por la f_brica de hielo, Si necesita
remover la bandeja para hielo, favor de seguir los
siguienTes pasos:
NOTA:
Use ambas manos para
remover el dep6sito de
almacenamiento de hielo y
asi evitar dejarlo caer.
0 Sujete el dep6sito de
almacenamiento de hielo como se
muestra, lev_ntelo ligeramente (1} y
extraiga ,_.
ANAQUELES DE LA PUERTA
Su refrigerador y congelador cuentan con anaqueles
que pueden ser f_cilmente organizados para productos
envasados.
0 Levante el anaquel de la puerta sosteni@ndolo de
ambos lados (19 y sSquelo_2}.
• Para retirar el compartimento de verduras, extraiga el
compartimento de verduras hacia el frente (TO hasta
que se detenga. Despu@s levante ligeramente el
compartimento de verduras '{2) y extraiga (3_.
_ '
PRECAUCl6N
Cuando remueva el compartimento de verduras
usted ver_ el tanque de agua. No Io remueva, esto
puede producir fuga de agua. El tanque de agua no
es una parte removible.
GAVETA DE MERIENDAS
"CHAROLA PARA CARNES FRIAS"
• Para remover la Gaveta de meriendas, saque un poco
la gaveta de meriendas (i_, despu&s levante un poco
la cubierta, como se muestra en la figura _2_,y retirela.
Tanque
!
@
bt'.
COMPARTIMENTO Y TAPA PARA VERDURAS
Este compartimento permite una mejor conservaci6n de
las frutas y verduras. Conservando la humedad en su
interior.
• Para retirar la cubierta del compartimento de verduras
saque un poco el compartimento para verduras (1],
levante un poco la cubierta por la parte de enfrente
'(2_como se muestra en la figura y retirela q3) .
CONTROLES DE HUMEDAD
Ud. puede controlar la cantidad de humedad en los
cajones, ajustando el control en cualquier posici6n entre
"HIGH" y "LOW't
"HIGH": Mantiene la mayor cantidad de aire en el caj6n
para la mejor conservaci6n de vegetales.
"lOW": Permite que el aire salga del caj6n para la mejor
conservaci6n de frutas.
45

ESTANTES DEL REFRIGERADOR
PRECAUCION
Oerci6rese de que el estante este en posici6n
horizontal mientras Io extrae. De Io contrado puede
caerse.
El estante del refrigerador es ajustable para que usted
pueda colocarlo a una altura adecuada de acuerdo alas
necesidades de espacio de los alimentos.
Estanfe Deslizable:
, dale el estante hacia enfrente _ljX', luego levante de la
parte de atr_s q2]y del frente mientras Io extrae (3]
ESTANTES DEL CONGELADOR
, Eleve ligeramente la parte izquierda del estante.
Emp0jelo en la direcci6n (i], eleve la parte derecha en
la direcci6n _2) y tire hacia afuera.
i ...................................................
t
®
PRECAUCI6N
Tenga cuidado al sacar el estante, si ejerce demasiada
fuerza, este puede chocar contra la puerta del
refrigerador y daharla ousted podrfa lastimarse.
Estante Fijo:
, Levante ligeramente pot la parte del frente del estante,
(i_ a continuaci6n tire de el (2_,s_quelo mientras levanta
ligeramente de la parte de atr_s de 6ste _3_.
46

FILTRODEAGUA
El control de temperatura muestra (en
meses), el tiempo restante para cambiar
el filtro; desde el primer encendido del
refrigerador 6 6 meses despu_s de usar el
dispensador de agua.
Si ha cambiado el filtro despu_s de 6
meses de uso o desea reiniciar la pantalla
del filtro, presione el bot6n FILTER
(FILTRO) durante ross de 3 segundos
hasta que escuche un sonido, esto indica
que se reinicio la pantalla.
NOTA: La vida promedio del filtro es de
6 meses.
Es recomendable que reemplace el filtro cuando el
indicador se encienda o el servidor de agua o fSbrica de
hielos cambien notablemente.
4.Coloque el nuevo cartucho. Saque el nuevo cartucho
de su empaque y retire la cubierta protectora de los
anillos. Con la perilla del cartucho en posici6n vertical,
presione el nuevo cartucho hasta el rondo.
Despu_s de cambiar el cartucho del filtro,
presione durante 3 segundos el bot6n
para reestablecer el indicador del filtro.
Como cambiar el cartucho viejo.
1. Cierre la Ilave de alimentaci6n de
agua (V_lvula de Casa).hasta [____ " °}_
por completo el sistema
(aproximadamente durante 50
segundos).
3. Retire el cartucho viejo. Gire la perilla del cartucho
hacia la izquierda.
Cuando el cartucho ha sido removido, Ud. sentir_ un
"click", Io que indica que ya esta fuera de lugar. Jale hacia
afuera el cartucho.
NOTA: Puede haber agua en el cartucho, por Io que
esta se puede escurrir a trav_s de alg0n agujero. Puede
usar un vaso o algo similar, para prevenir que el agua se
derrame en todo el refrigerador.
Si no puede girar el filtro de lado a lado, significa que
no se encuentra colocado correctamente. Empuje
firmemente y girelo hasta que escuche un "click".
Gire el cartucho hacia la derecha 1/4 de vuelta. Ud.
escuchar_ un "click", Io que significa que el filtro est_ en
posici6n.
5.Gire para abrir la Ilave de alimentaci6n de agua (vSIvula
de casa).
6. Deje correr 2,5 galones (9,5 litros) de agua a trav&s del
filtro antes de su uso (prescindir de aproximadamente
5 minutos). Drene el sistema de agua despues de
reemplazar el filtro. Esto es necesario para evitar
posibles fugas o problemas cuando dispense agua.
NOTA: Para comprar un nuevo cartucho de filtro de agua,
visite a su distribuidor local.
47

Hoja de Datos de Funcionamiento
NSmero de Modelos 5231JA2006E
Usese con el cartucho de reemplazo 5231JA2006E
El sistema ha sido probado de acuerdo a NSF/ANSI Standards 42 para la reducci6n de las sustancias enlistadas
debajo. La concentraci6n de las sustancias indicadas en el agua entrando al sistema fue reducida a una concentraci6n
menor o igual al limite permitido de agua saliendo del sistema como se especifica en NSF/ANSI 42.
Sistema probado y certificado por NSF Internacional contra NSF/ANSI Standard 42 para la
reducci6n de sabor y olor de Cloro y Particula Nominal Clase I.
Reducci6n de
Contaminante
Part/cula Ciase
I 1amarSo
parficula: > 05
a<l urn
Sabor y olor a
CIoro
Promedio
Concentraci6n
de Influente
5600000
1,9 mg/L
Concentraci6n
%
influente Las Agua
Reducci6n
unidades se Producto
Promedio
aplican a cada fila
AI menos 10,000
parficulas/ml
915 96
2,0 mg/L ! 10% O,OT 96,4
NSF
Requerimientos
de Reducci6n
85%
50%
Msx
Descarga
mg/L
470000
005 mg/L
Min %
Reducci6n
916%
974%
Prueba
NSF
511032_03
511032_03
Capacidad de 300 galones (1,892 L).
Note que mientras la prueba fue realizada bajo condiciones est_ndares de laboratorio, el rendimiento real puede
variar.
Guias de Aplicaci6n/ Par_metros de Suministro de
Agua
Presi6n del Agua 20 - 120 psi (0,14 - 0,83 MPa)
Temperatura del
33 °F- 100 °F (0,6 °C - 38 °C)
Agua
Flujo de Servicio 0,5 gpm (1,9 Ipm)
Para reducir el riesgo asociado con la ingesti6n
de contaminantes debido al uso de agua
microbiol6gicamente insegura o de calidad
desconocida.
No use con agua microbiol6gicamente insegura o de
calidad desconocida sin una desinfecci6n adecuada
antes o despu&s del sistema.
Los sistemas deben ser instalados y operados de acuerdo
con las guias y los procedimientos recomendados por el
fabricante.
Para reducir el riesgo de da_os debido a una fuga de
agua:
• Lea y siga las instrucciones antes de la instalaci6n y
el uso de este sistema.
• Instale solamente en lineas de agua FRiA.
• Siga los c6digos de plomeria locales y estatales.
No instale u opere en una toma de agua donde la
presi6n pueda exceder 125 psi (862 kPa).
• Proteja el filtro de posible congelaci6n. Remueva el
filtro en temperaturas por debajo de 34 °F (1 °C).
° Reemplace el cartucho en los intervalos
especificados. El cartucho debe reemplazarse al
menos cada 6 meses.
• Despu&s de reemplazar el cartucho, dispense 2,5
galones (9,46 L) de agua a trav6s del dispensador
para purgar el sistema, optima y libere el bot6n
del dispensador [30 segundos en funci6n ON
(encendido), 60 segundos en funci6n OFF
(apagado)].
Para comprar o reemplazar el filtro de agua Ilame a su
Centro de Servicio. Haga referencia a la Hoja de Garantia
para obtener el nOmero telef6nico del Centro de Servicio
m_s cercano a Usted y pregunte pot el nOmero de parte
5231dA2OO6E
48

State of California
Department of Public Health
Water Treatment Device
Certificate Number
09-2018
Date Issued: December 15, 2009
Trademark/Model Desiqnafion
ADQ36006101-S
_acement Elements
ADO36006101
Manufacturer: Cuno nc
The water treatment device(s) l!sted on this _ertificafe haye met the testing requirements pursuant t'o Section
116830 of 1'heHealth and Safety Code'for 1.hef'ollowing
health
related contaminants:
Microbiolo ants and Turbidity
C_ STS
S
Organic Co
Carbofurar
Llndane
_-Dich oroDenzene
Toxa Dnene
Rated Service Capacity: 200 gal Rated Se:rvice Flow: 0.5 gore
ConditiOns bf CertifiCation:
49

PELIGRO DE EXPLOSION
Use un limpiador no inflamable. No seguir estas
instrucciones puede ocasionar la muerte, explosi6n o
incendio.
agua (26 g de sodio a I litro de agua), Aseg0rese que el
bicarbonato de sodio se disuelva completamente para
que no raye las superficies del refrigerador.
REVESTIMIENTOS DE LAS PUERTAS
No utilicelimpiadores de ceras, detergentes concentrados,
blanqueadores o limpiadores que contengan petr61eo en
partes pl&sticas. Utilice una esponja limpia o un pano
suave con detergente suave en agua tibia.Lave, enjuague
y seque todas las superficies completamente.
Tanto la secci6n del refrigerador como la del congelador
se descongelan autom&ticamente. No obstante, limpie
ambas secciones m_s o menos una vez al rues para
evitar olores. Limpie los derrames de inmediato.
CONSEJOS GENERALES DE LIMPIEZA
0 Desenchufe el refrigerador o desconecte el suministro
de energia.
0 Saque todas las partes desmontables como estantes,
cajones de productos frescos, etc. Refi@rase a la
secci6n "Uso del Refrigerador':
0 Para limpiar estantes, compartimentos y otras partes
desmontables, utilice una esponja limpia o un paF/o
suave y un detergente suave en agua tibia. No use
detergentes fuertes o abrasivos.
0 Lave a mano, enjuague y seque todas las superficies
completamente.
• Cuando ten-nine de lirnpiar, no se olvide de enchufar
el refrigerador o reconectar el suministro de energia.
PARTES PLASTICAS (fapas y paneles)
No use toallas de papel, aerosoles para ventanas,
productos de limpieza abrasivos o liquidos inflamables.
Los mismos pueden rayar o daF/ar el material. Utilice una
esponja limpia o un paF/o suave con detergente suave
enagua tibia. Lave, enjuague y seque todas las superficies
completamente.
TAPA POSTERIOR
PELIGRO DE CHOQUE ELEZCTRICO
Antes de comenzar, desenchufe el refrigerador
o desconecte la corriente de electricidad en el
cortacorriente o caja de fusibles. No seguir estas
instrucciones puede ocasionar la muerte o una lesi6n
severa.
NOTA: La tapa posterior solo debe ser retJrada por un
t6cnico calificado.
EXTERIOR
Encerar superficies met_licas pintadas ayuda a proveer
protecci6n contra el moho. No encere partes pl&sticas.
Encere superficies met_licas pintadas al menos dos
veces por aF/o utilizando cera para enseres (o pasta de
cera para autos). Aplique la cera con un paF/o suave
limpio.
No utilice cera en exteriores de acero inoxidable. Utilice
un producto especialmente diseF/ado para pulir enseres
de acero inoxidable, o limpie con un paF/o suave o
esponja limpia y detergente suave disuelto en agua tibia.
Seque completamente con un paF/o suave.
NOTA: Evite el contacto de la superfJcJe de la puerta
con productos quimicos que contenga Fosfato y
Cloro; tales como desengrasantes, detergentes
(que contengan TSP) y blanqueadores.
PAREDES INTERNAS
NOTA: Permita que el congelar se calienteun poco para
que no se pegue el paso.
Para ayudar a eliminar los olores, usted puede lavar el
interior del refrigerador y congelador con una mezcla de
bicarbonato de sodio y agua tibia.
Limpie los conductos en la parte
posterior. Utilice una aspiradora
con la parte del cepillo, al menos
dos veces por aF/o para mantener
su refrigerador funcionando
efectivamente.
CAMBIO DE LUZ (LED)
NOTA: No remueva el LED, s61o debe de ser removido
por un t6cnico calificado.
INTERRUPCIONES DE ELECTRICIDAD
1. Si la electricidad se va pot 24 horas o menos, mantenga
las puertas del refrigerador cerradas para ayudar a
mantener los alimentos frios y congelados.
2.Si la electricidad se va por ross de 24 horas:
a) Saque todos los alimentos congelados y gu_rdelos en
un casillero para alimentos congelados.
0
b) Coloque 2 Ibs. (1 kg) de hielo seco en el congelador
por cada pie cObico (28 L) de espacio en el congelador.
Este mantendr_ los alimentos congelados de dos a
cuatro dias. AI manejar hielo seco, utilice guantes para
proteger sus manos de congelaci6n.
Mezcle 2 cucharadas de bicarbonato de sodio a 1/4 de
5O

Cuando utilice hielo seco, procure tener ventilaci6n
adecuada. El hielo seco es di6xido de carb6n congelado
(CO£). Cuando se evapora, puede desplazar el oxigeno
causando mareos, dolores de cabeza leves, p6rdida
de conocimiento y muerte por sofocaci6n. Abra una
ventana y no respire los vapores.
O
c) Si no tiene acceso a un casillero para alimentos o hielo
seco, consuma o deseche los alimentos de inmediato.
o conexiones.
Si decide apagar su refrigerador antes de irse, siga estos
pasos.
1. Saque todos los alimentos del refrigerador y vacie el
recipiente de hielo.
2. Desconecte el refrigerador.
3. Limpie el refrigerador y s6quelo bien.
4. Pegue goma o bloques de madera en la parte superior
de ambas puertas para dejarlas Io suficientemente
abiertas para que entre aire. Esto evita que se formen
olores y moho.
RECUERDE: En una falla de electricidad, un congelador
Ileno se mantiene trio por m_s tiempo que uno
parcialmente Ileno. Un congelador Ileno de carnes se
mantiene trio por m_s tiempo que un congelador Ileno
de cosas horneadas. Si ve que los alimentos contienen
cristales de hielo, puede que todavia sea seguro volverlos
a congelar, aunque la calidad y el sabor pueden afectarse.
Si la condici6n de los alimentos es pobre o si usted
considera que no es seguro, des6chelo.
NO vuelva a congelar la comida que se ha descongelado
completamente. El Departamento de Agricultura en
Casa de los Estados Unidos en su bolefin No. 69
indica: ...
Usted puede congelar nuevamente comida que se ha
descongelado pero que todavia contiene cristales de
hielo o si aOn est_ a una temperatura por abajo de los
40 °F(4 °C).
... Came, polio y pescado que contengan un olor o
color desconfiable no deben volver a congelarse y no
deben de consumirse. La nieve descongelada debe ser
desechada.
Si el olor o color de cualquier comida es cuestionable,
firela. El consumirla puede ser peligroso. Incluso
el descongelamiento parcial o el volver a congelar
reduce la calidad de la comida, particularmente frutas,
vegetables y comidas preparadas.
La calidad de la came roja es afectada menos en
comparaci6n con otros alimentos. Use comidas
congeladas Io ross rSpido posible para salvar la calidad
que contienen.
CUANDO SE VAYA DE VACACIONES
Si decide dejar su refrigerador encendido mientras est_
de viaje, siga estos pasos para preparar su refrigerador
antes de irse.
1. Utilice cualquier alimento perecedero y congele otros
articulos.
2.Vacie el recipiente de hielo.
3.Apague la fSbrica de hielo (OFF). NOTA: Si la
temperatura ambiente bajar_ m_s del punto de
congelaci6n, haga que t6cnico de servicio drene el
sistema de reserva de agua (en algunos modelos)
para prevenir serios daSos a la propiedad debido a
posible inundaci6n por rupturas en las lineas de agua
CUANDO SE MUDE
Cuando mude su refrigerador a un nuevo hogar, siga los
siguientes pasos para prepararlo para la mudanza.
1. Saque todos los alimentos del refrigerador y empaque
todos los alimentos congelados en hielo seco.
2. Desconecte el refrigerador.
3. Limpie el refrigerador y s6quelo bien.
4.Vacie el agua de la bandeja de descongelar.
5. Limpie y seque completamente.
6.Saque todas las partes desmontables, envu_lvalas bien
yjOntelas para que no se muevan durante la mudanza.
Para referencia yea la secci6n "Uso del Refrigerador':
7. Dependiendo del modelo, levante la parte frontal del
refrigerador para que ruede m_s f_cilmente o atornille
las patas niveladoras completamente para que no rayen
el piso. Para referencia vea la secci6n "Alineamiento de
Puertas':
8.Coloque cinta adhesiva en las puertas para cerrarlas y
pegue el cable de electricidad al refrigerador. Cuando
Ilegue a su nuevo hogar, coloque todo de vuelta
y haga referencia a la secci6n de "lnstalaci6n del
Refrigerador" para instrucciones.
CUANDO DEBE CAMBIAR A MODO APAGADO
(OFF) A LA FABRICA DE HIELO
0 Cuando vayan a cortar el suministro de agua por varias
de horas.
0 Cuando se saca el recipiente de hielo por ross de uno
o dos minutos.
0 Cuando el refrigerador no se utilizar8 por varios dias.
SONIDOS NORMALES QUE PUEDE ESCUCHAR
La v_lvula de agua de la f_brica de hielo sonar_ cuando
la maquina se est& Ilenando de agua. Si el interruptor
de electricidad est_ en la posici6n de ON (encendido),
sonar_ aunque aOn no est& conectado al agua. Para
detener el ruido, mueva el interruptor de electricidad a la
posici6n de OFF (apagado).
NOTA: Mantener el Jnterruptor de electricidad en la
posici6n de ON (encendido) antes de tener
la tuberia de agua conectada puede da_ar la
fSbrica de hielo.
0 Escuchar_ el sonido de los hielos cuando caen en el
recipiente y del agua cuando corre por las tuberias al
momento que la f_brica de hielo se cargue de agua.
51

ENTENDIENDO LOS SONIDOS QUE ESCUCHA
Su nuevo refrigerador puede que haga sonidos que su
viejo refrigerador no hacia. Porque los sonidos son nuevos
para usted, puede que se preocupe. La mayoria de estos
nuevos sonidos son normales. Superficies s61idas, como
el piso, las paredes y los gabinetes pueden acrecentar
los sonidos. Lo siguiente describe los tipos de sonido y
qu@ los crea.
El cron6metro de descongelaci6n suena cuando el ciclo
autom_tico de descongelaci6n comienza y termina.
El control del termostato (o control del refrigerador,
dependiendo el modelo) tambi_n sonar_ cuando el
ciclo comience y termine.
Sonidos ruidosos puede venir del flujo del refrigerante,
de la tuberia de agua o de articulos almacenados
encima del refrigerador.
Su refrigerador est_ disenado para que funcione
efectivamente para mantener sus alimentos en la
temperatura deseada. El compresor de alta eficiencia
puede causar que su refrigerador corra por m_s tiempo
que su antiguo refrigerador, pero utilizar_ menos
energia. Puede que escuche un sonido pulsante o
rechinido.
Puede que escuche el motor del abanico evaporador
circulando el aire entre los compartimentos del
refrigerador y congelador.
Cuando cada ciclo termina, puede que escuche un
sonido de agua corriente debido al flujo del refrigerante
en su refrigerador.
La contracci6n y expansi6n de las paredes internas
puede que cause un ruido como de estallido.
El goteo de agua en el calentador de descongelaci6n
durante el ciclo de descongelaci6n puede causar un
sonido como de algo friendo.
Puede que escuche el aire siendo forzado pot el
condensador pot el abanico de condensaci6n.
Puede que escuche agua corriendo por el recipiente
de desagOe durante el ciclo de descongelaci6n.
Probl_ma
REFRIGERADOR
NO FUNCIONA ,
Posiblescausas I SOluCiones
El cable de electricidad est8
desconectado.
Un fusible del hogar se ha fundido o
el cortacircuito se dispar6.
El control del refrigerador esta en
opci6n de OFF (apagado).
El refrigerador est8 en el ciclo de
descongelaci6n.
El refrigerador no est_ firmemente
en el suelo.
. Firmemente conecte el cable en un recept_culo
con el voltaje adecuado.
. Cambie el fusible o reajuste el cortacircuito.
. Revise la secci6n "Panel de Control".
. . Espere como 30 minutos para que el ciclo de
descongelaci6n termine.
SONIDOS DE . . El piso es d&bil o desnivelado o necesita ajustar
VIBRACI6NO las patas niveladoras. Referirse a la secci6n de
RUIDOS "Alineamiento de Puertas':
. El cable de electricidad est_ . Firmemente conecte el cable en un recept_culo
LAMPARA (LED) NO
desconectado, con el voltaje adecuado.
FUNCIONA
EL MOTOR DEL
COMPRESOR
PARECE QUE
FUNCIONA
EXCESIVAMENTE
La 18mpara LED se ha fundido.
El refrigerador que se cambi6 era un
modelo m_s viejo.
La temperatura en la habitaci6n es
m_s caliente que Io normal.
, Vea la secci6n "Carnbio de Luz (LED)".
. Refrigeradores modernos con m_s espacio para
almacenaje requieren m_s tiempo operacional.
. El motor correr_ pot m_s tiempo en condiciones
c_lidas. A temperaturas normales de la habitaci6n,
espere que el motor corra aproximadamente de
40% a SO% del tiempo. Bajo condiciones m_s
c_lidas, espere que corra a0n m_s seguido.
52

ProbJ_m_. PO_ibJ_c_,Sa_ ......................I soJ_iO_eS
EL MOTOR DEL
COMPRESOR
PARECE QUE
FUNCIONA
EXCESIVAMENTE
LAS PUERTAS
NO CIERRAN
COMPLETAMENTE
SE DIFICULTA
ABRIR LAS
PUERTAS
0 La puerta se abre frecuentemente o
se ha ahadido una gran cantidad de
alimentos.
TEMPERATURA
MUY CALIENTE O
ACUMULACION DE
HUMEDAD EN EL
INTERIOR
0 El refrigerador se conect6
recientemente y se ajust6
correctamente el control del
refrigerador.
0 El control del refrigerador no se fija
correctamente para las condiciones
circundantes.
0 Las puertas no cierran
completamente.
0 Las bobinas del condensador estSn
sucias.
0 El refrigerador no est8 nivelado.
0 Paquetes de alimentos est_n
bloqueando la puerta.
0 El recipiente de hielo, la tapa
del compartimento de verduras,
estantes, anaqueles de las puertas
est_n fuera de posici6n.
0 Los empaques de las puertas est_n
sucios.
0 El refrigerador se tambalea o parece
inestable.
0 Las puertas se sacaron durante
la instalaci6n del producto y no se
colocaron correctamente de vuelta.
o Los empaques est_n sucios o
pegajosos.
0 La puerta fue abierta nuevamente
despu&s de haber estado abierta
recientemente.
o Los conductos de aire estSn
bloqueados, El aire frio fluye
desde el congelador a la secci6n
de alimentos frescos y de vuelta a
trav&s de los conductos de aire en la
pared que divide las dos secciones.
o AF/adJr alJmentos y abrir la puerta del refrigerador,
calienta el refrigerador. Es normal que el
refrigerador funcione por m&s tiempo para poder
enfriar. Referirse a la secci6n "Guia para Almacenar
Alimenfos': Para conservar la energia, trate de
sacar del refrigerador todo Io que necesita de una
sola vez mantenga los alimentos organizados para
que sea f_cil encontrarlos y cierre la perta una vez
que haya terminado.
0 El refrigerador tarda hasta 24 horas para enfriarse
completamente.
0 Vea la secci6n "Ajuste de los Controles':
0 Cierre las puertas firmemente. Si no cierran
correctamente vea la secci6n "Las Puertas no
cierran completamente':
o Esto previene la transferencia se aire y hace que el
motor trabaje fuertemente. Limpie las bobinas del
condensador. Vea la secci6n "Cuidado y Limpieza".
0Vea la secci6n "lnsfalaci6n del Refrigerador" y
"Alineamiento de Puerfas':
0 Reorganice los envases de comida para limpiar un
poco la puerta y los anaqueles de la puerta.
0 Empuje los recipientes hasta el fondo y coloque
la tapa del compartimento de verduras y estantes
en su posici6n correcta. Vea la secci6n "Uso del
Refrigerador':
0 Limpie los empaques de las puertas y la superficie
que tocan, pase una capa fina de cera de parafina
en los empaques luego de limpiarlos.
0 Nivele el refrigerador. Use de referencia la secci6n
de "Alineamiento de Puertas':
0 Saque y vuelva a colocar las puertas de acuerdo
a la secci6n de "Desinstalaci6n y Reemplazo de
las Puertas del Refrigerador" o Ilame a un t&cnico
calificado de servicio.
0 Limpie los empaques de la puerta y las superficies
que ha tocado. Pase una capa fina de cera de
parafina en los empaques luego de limpiarlos.
0 Cuando usted abre la puerta, entra aire caliente
al refrigerador. Mientras el aire caliente se enfria
crea un vacio. Si se torna dificil de abrir la puerta
espere 5 minutos y permita que la presi6n de aire
se equilibre y vea si abre m_s f_cilmente.
0 Localice los conductos de aire con su mano para
sentir el flujo de aire y mueva los paquetes que
bloquean los conductos e impiden el flujo de aire.
Haga referencia a la secci6n "Asegurando el Flujo
de Aire"
53

PrOblema I Posibles Causas Soluciones
TEMPERATURA
MUY CALIENTE 0
ACUMULACI6N DE
HUMEDAD EN EL
iNTERiOR
LOS CUBOS DE
HIELO SON MUY
PEQU EI_,IOS
EL HIELO TIENE
MAL OLOR 0
SABOR
HAY AGUA EN EL
RECIPIENTE DE
DESAGUE DE
DESCONGELACION
o Las puertas se abren con frecuencia.
0 El control no est8 ajustado
correctamente tomando en cuenta
las condiciones del entorno.
o Gran cantidad de alimentos se
ha puesto en el refrigerador o
congelador.
0 Los alimentos no est_n envueltos
correctamente.
0 Las puertas no
completamente.
0 El clima est8 hOmedo.
cierran
0 Un ciclo de descongelaci6n
autom_tica ha terminado.
0 La vSIvula de cierre conectada
desde el refrigerador a la tuberia de
agua puede que este tapada.
0 La m&quina de hielo se instal6
recientemente.
0 El hielo Ileva almacenado mucho
tiempo.
0 Los alimentos no se han envuelto
correctamente en ninguno de los
compartimentos.
0 El suministro de agua contiene
minerales como azufre.
0 El interior del refrigerador necesita
limpieza.
0 El recipiente de hielo est_ sucio.
0 El refrigerador esta descongelando.
° Est_ m_s hOmedo de Io normal.
0 Los sonidos son normales para su
refrigerador.
EL
REFRIGERADOR
HACE MUCHO
RUIDO
0Cuando la puerta se abre, entra aire h0medo y
caliente al refrigerador. Mientras ross se abre la
puerta, ross rSpido se acumula la humedad yes
ross la cantidad de aire caliente que el refrigerador
tiene que enfriar. Para mantener el refrigerador frio,
trate de sacar todo Io que necesita del refrigerador
de una sola vez; tambi&n mantenga los alimentos
organizados para que sea fScil encontrarlos y
cierre la puerta una vez haya terminado.
0 Haga referencia a la secci6n de "Panel de Confrol '/
Espere 24 horas para que las temperaturas se
estabilicen. Si la temperatura est5 muy fria o muy
caliente, cambie el control de temperartura un
nivel a la vez.
0 A_adir alimentos calienta el refrigerador. Puede
tardar varias horas en Io que el refrigerador regresa
a su temperatura normal.
0 Envuelva los alimentos herm@ticamente y
limpie envases hOmedos antes de colocarlos
en el refrigerador para evitar la acumulaci6n de
humedad. Si es necesario, vuelva a empacar los
alimentos segOn los consejos en la secci6n "Guia
para Almacenar Alimentos't
0yea la parte de "Las puertas no cierran
complefamenfe':
0 En climas hOmedos, el aire carga particulas de
humedad que entran al refrigerador cuando las
puertas est_n abiertas.
0 Es normal que se formen gotas de agua en la
pared del fondo despues de que el refrigerador ha
pasado por el ciclo de descongelaci6n.
0 Llame a un fontanero para que limpie la vSIvula.
0 Elimine las primeras tandas de hielo para evitar
hielos con real sabor y descoloraci6n.
0 Elimine el hielo viejo y haga nuevas provisiones.
0Vuelva a envolver los alimentos, ya que los olores
emigran al hielo si los alimentos no se cubren
correctamente.
0 Puede que necesite instalar un filtro para eliminar
los problemas de sabor y olor.
0Vea la secci6n de "Cuidado y Limpieza':
0Vacie y lave el recipiente. Elimine los viejos cubos
de hielo.
0 El agua se evaporarS. Es normal que caiga agua
en el recipiente de descongelaci6n.
0 Espere que el agua en el recipiente de
descongelaci6n tarde m_s en evaporarse. Esto es
normal cuando est_ muy caliente o hOmedo.
0 Referenciarse a la secci6n "Enfendiendo los
sonidos que Escucha':
54

Problema I Posibles Causas Soluciones
ESCARCHA O
CRISTALES DE
HIELO EN LOS
ALIMENTOS
CONGELADOS
LA FABRICA DE
HIELO NO LO
PRODUCE O LOS
CUBOS DE HIELO
SE FABRICAN
LENTAMENTE
NO SE DISPENSA
HIELO
. La puerta no est_ cerrando.
. La puer1,a es1,_ a bier1,a
frecuen1,emen1,e
, La temperatura del congelador est8
Io suficientemente fria para producir
hielo.
, La puer1,a se qued6 abier1,a.
° Las puertas no est_n cerradas
completamente.
° La funci6n del dispensador aparece
bloqueada en el panel de control.
, La opci6n de hielo no est_
seleccionada en el dispensador.
, El dispensador de hielo no se usa
con frecuencia.
' La bandeja para hielo
instalada correctamente.
, Nueva ins1,alaci6n.
, Los cubos de hielo se a1,oran.
no es1,_
° El dispensador de hielo es ins1,alado
mJen1,ras se dispensa hielo
"1,ri1,urado't
, El interruptor de la fSbrica de hielo
est_ APAGADO (0).
, La conexi6n de agua es1,_ cerrada o
no es1,_ conec1,ada.
, La opci6n de dispensador es1,8
bloqueada.
, Nueva instalaci6n.
, Las puertas del refrigerador o
del congelador no es1,_n cerradas
apropiadamen1,e.
° La conexi6n de agua es1,_ cerrada o
no es1,_ conec1,ada.
° La presi6n del agua es menor a
40 PSI (0,27 MPa).
° El fill,to de la casa o el sis1,ema de
6smosis reversible es1,_ en uso.
, El dispensador no tiene la
seleccionada la opci6n para
dispensar agua.
NO SE DISPENSA
AGUA
' Vea la secci6n "Las puertas no cierran
completamente':
, Cuando la puer1,a es1,_ abier1,a, en1,ra aire calien1,e y
hOmedo al congelador causando la escarcha.
° Espere 24 horas luego de ins1,alar la mSquina, para
la producci6n de hielo. Vea la secci6n de "Panel
de Control':
° Verifique si algo man1,iene la puer1,a abier1,a.
° No se dispensar_ hielo si alguna de las puer1,as se
man1,iene abierl-a.
° Presione el bo1,6n de Bloqueo (Lock) por 3
segundos de para desbloquear el Panel de Control
y dispensar.
° El dispensador se puede seleccionar para agua
o hielo. Aseg0rese de que es1,_ seleccionada
la operaci6n apropiada. Presione el bo1,6n del
dispensador en el panel de control para comple1,ar
un ciclo con las opciones del hielo y del agua.
° Revise la bandeja para hielo por si 1-iene cubos
de hielo pegados o agrupados. Si es1,o sucede,
quiebre los hielos con una apropiada operaci6n.
' AsegOrese de instalar firmenme en su posici6n la
bandeja para hielo.
, Espere 24 horas despu_s de haber ins1,alado la
f_brica de hielo para ernpezar a producir hielo,
Espere 72 horas para una producci6n completa
de hielo.
, Use un ul-ensilio de pl_s1,ico para limpiar el canal
de alimen1,aci6n de hielo.
, Cambie la opci6n de "hielo 1,ri1,urado" a" cubos de
hielo". Si los cubos de dispensan correc1,amen1,e,
cambie la selecci6n "hielo 1-ri1,urado" y empiece a
dispensar nuevamen1,e.
, Cambie de modo el in1,errup1,or a la posici6n de
ENCENDIDO (I).
, Vea la secci6n "Conectando la Linea de Agua':
° Presione el bot6n de Bloqueo (Lock) por 3
segundos para desbloquear el Panel de Control
y dispensar.
° Deje fluir agua en el sis1,ema y II&nelo.
° El agua no se dispensa si alguna de las puer1,as
del refrigerador permanece abier1,a.
, Vea la secci6n "Conectando la Linea de Agua".
, La presi6n del agua de la casa afecta el flujo del
agua del dispensador.
, Es1,o puede disminuir la presi6n del agua. Para
es1,o es recomendable no conec1,ar la linea de
alimen1,aci6n de agua al sis1,ema de 6smosis
inversa para una 6p1,ima operaci6n.
, El dispensador se puede seleccionar para agua
o hielo. AsegOrese de que es1,_ seleccionada
la operaci6n apropiada. Presione el bo1,6n del
dispensador en el panel de control para comple1,ar
un ciclo con las opciones del hielo y del agua.
55

56

57

Life's Good
www.lg.¢om
-
 1
1
-
 2
2
-
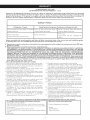 3
3
-
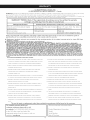 4
4
-
 5
5
-
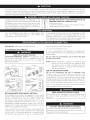 6
6
-
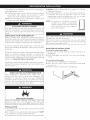 7
7
-
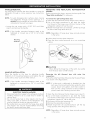 8
8
-
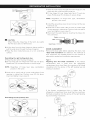 9
9
-
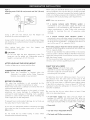 10
10
-
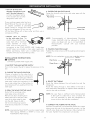 11
11
-
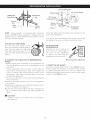 12
12
-
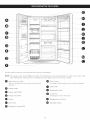 13
13
-
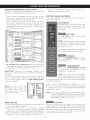 14
14
-
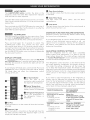 15
15
-
 16
16
-
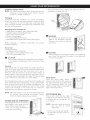 17
17
-
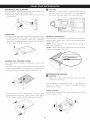 18
18
-
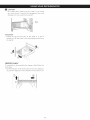 19
19
-
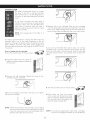 20
20
-
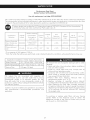 21
21
-
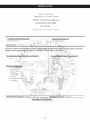 22
22
-
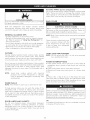 23
23
-
 24
24
-
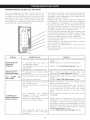 25
25
-
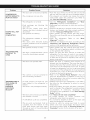 26
26
-
 27
27
-
 28
28
-
 29
29
-
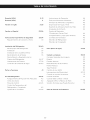 30
30
-
 31
31
-
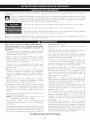 32
32
-
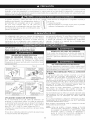 33
33
-
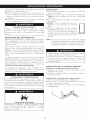 34
34
-
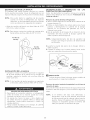 35
35
-
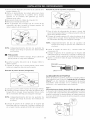 36
36
-
 37
37
-
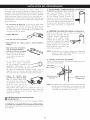 38
38
-
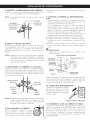 39
39
-
 40
40
-
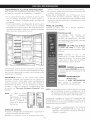 41
41
-
 42
42
-
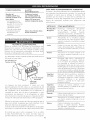 43
43
-
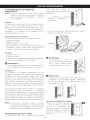 44
44
-
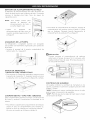 45
45
-
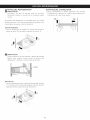 46
46
-
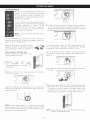 47
47
-
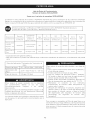 48
48
-
 49
49
-
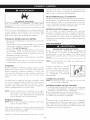 50
50
-
 51
51
-
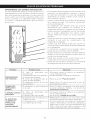 52
52
-
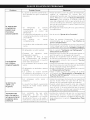 53
53
-
 54
54
-
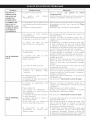 55
55
-
 56
56
-
 57
57
-
 58
58


LG LSC27937ST El manual del propietario
- Categoría
- Neveras
- Tipo
- El manual del propietario
- Este manual también es adecuado para
en otros idiomas
- English: LG LSC27937ST Owner's manual
Artículos relacionados
Otros documentos
-
LG Electronics LSXS22423S Guía del usuario
-
-
-
White-Westinghouse 218954301 Manual de usuario
-
-
Frigidaire BGHS2634KP0 Guía de instalación
-
 Premium Levella PRFIM1256DX Manual de usuario
-
White-Westinghouse FFHT1814QB2 Guía de instalación
-
 Premium Levella PRFIM1256DX Manual de usuario
-
Sharper Image Deluxe Foot Heater El manual del propietario

