
MANUAL DE INSTRUCCIONES
OPERATING INSTRUCTIONS
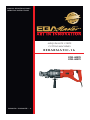
REBARMATIC-16
MÁQUINAS DE CORTE
CUTTING MACHINES
GARANTIA / GUARANTEE... . 9
COD. 60270
COD. 60272

- 2 -
CARACTERÍSTICAS TÉCNICAS
.::Máximo Ø de corte: 16mm
.::Mímimo Ø de corte: 4mm
.::Sistema electrohidráulico: 690W
(230V/50-60 Hz or 110V/50-60 Hz)
.::Máxima dureza de corte: varilla de
650N/mm2 de resistencia a la tracción
.::Dimensiones: 460x150x115mm
.::Peso = 8Kg.
EQUIPACIÓN DE LA MÁQUINA
- Máquina de corte electrohidráulico
- Mango para sujeción
- Llave fija de 14x17mm
- Aceitera
IMPORTANTE
Para el pedido de repuestos indique el
código de éstos y el número de serie de
la máquina.
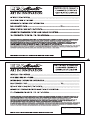
GARANTÍA
El fabricante garantiza al
comprador de ésta máquina la garantía
total durante 12 meses de las piezas
con defectos de fabricación.
Esta garantía no cubre aquellas
piezas que por su uso normal tienen un
desgaste.
NOTA
Para obtener la validez de la
garantía, es absolutamente
imprescindible que complete y remita a
Egamaster el documento de
“CERTIFICADO DE GARANTIA”, dentro
de los siete dias a partir de la fecha de
compra.
TECHNICAL SPECIFICATIONS
.::Maximum cutting Ø: 16mm
.::Minimum cutting Ø: 4mm
.::Electrohydraulic system: 690W
(230V/50-60 Hz or 110V/50-60 Hz)
.::Maximum cutting hardness: rebar with
650N/mm2 tensile strenght
.::Size: 460x150x115mm
.::Weight = 8Kg.
EQUIPMENT
- Electrohydraulic cutting machine
- Holding handle
- 14x17mm double open-end spanner
- Oil plastic can
IMPORTANT
When ordering spare parts please
indicate its code number and the serial
number of the machine.
GUARANTEE
The manufacturer guarantees to
the machine owner 12 months against
any manifacture defect.
This guaranteee do not cover the
parts wich are consumables.
NOTE
To apply the guarantee its necesary
to send the “GUARANTEE
CERTIFICATE” duly filled within one
week after purchased the machine to
Egamaster.

- 3 -
CORTAVARILLAS
ELECTROHIDRÁULICO
Cortavarillas electrohidráulico capaz de
cortar varilla con resistencia a tracción hasta
650N/mm2. Además de una compacta estructura, fácil
manejo y gran eficacia de trabajo, le caracteriza la
capacidad de cortar variila en horizontal, vertical o
diagonal. Esto hace posible su uso en el lugar de
trabajo y en varillas ya fijadas. Consigue un corte
rápido y limpio sin esfuerzo. Por lo tanto, proporciona
calidad, rapidez y comodidad.
Dispone de un sistema electrohidráulica que
hace que la cuchilla de ataque se retire una vez haya
efectuado el corte.
Estas máquinas han sido extensamente
aplicadas en ámbitos de construcción.
GUIA DE UTILIZACIÓN
A) PREPARACIÓN ANTERIOR AL CORTE
A1.- Comprobar que ambas cuchillas está
perfectamente fijas y los tornillos de sujeción
apretados.
A2.- Chequear que la alimentación es apropiada a la
máquina (230V o 110V).
A3.- Chequear que el cable no está dañado.
A4.- Antes de enchufar, comprobar que el interruptor
no esté presionado.
B) CALENTAMIENTO
B1.- En ambiente frío, calentar la unidad durante 30-
60 segundos para que el aceite alcance la viscosidad
adecuada. Para ello realizar 15-20 avances de la
cuchilla sin realizar ningún corte.
C) PREPARACIÓN PARA CORTAR
C1.- Insertar la varilla entre ambas cuchillas
totalmente asentada en el soporte en U.
C2.- La varilla debe estar totalmente perpendicular al
movimiento de ataque de las cuchillas.
C3.- Sacar el tornillo-tope hasta que toque a la varilla
manteniéndola en ángulo recto (90º).
D) CORTE
D1.- Una vez que la varilla esté colocada como indica
el anterior apartado pulsar el interruptor,
manteniéndolo pulsado mientras avanza la cuchilla
hasta que la varilla haya sido cortada.
D2.- Cuando el corte haya concluido, soltar el
interruptor. La cuchilla retornará automáticamente.
D3.- No volver a presionar el interruptor hasta que la
cuchilla no haya vuelto totalmente.
● ELECTROHYDRAULIC REBAR CUTTER
This electrohydraulic cutter is able to cut rebars with
650N/mm2 maximum tensile strenght. Besides having
compact structure, simple operation and high efficiency, it
is characterized by the ability to cut horizontal, vertical
and diagonal rebars. This property makes it specially
suitable for job-site use and to cut fixed rebars. It gets a
rapid and clean cut without any effort. So, it provides
quality, rapidness and comfort.
It also has an electrohydraulic system which makes the
attack blade return once the cut has been done.
These machines have been widely applied in building
companies.
OPERATION GUIDE
A) PREPARATION BEFOR THE CUT
A1.- Check both blades are perfectly fixed and that block
bolts are totally tightened.
A2.- Check that power source is suitable for the machine
(230V or 110V)
A3.- Check that the wire is not damaged.
A4.- Before plugging in, make sure that the switch lock is
not pushed.
B) WARM-UP
B1.- In cold weather, warm-up the unit during 30-60
seconds to let the hydraulic oil reach the proper viscosity,
by making 15-20 attack blade progresses without cutting.
C) PREPARATION FOR CUTTING
C1.- Insert the bar between both blades perfectly seated
in U-shaped support.
C2.- The bar must be totally perpendicualr to direction of
attack movement.
C3.- Unscrew stopper screw until it is just touching the
rebar, keeping it at right angle (90º).
D) CUTTING
D1.- Once the bar is perfectly set as shown in last
paragraph, push the switch, keeping it pushed while
blade advances, until the rebar has been cut.
D2.- When cutting is finished, release the switch. The
blade will retract automatically
D3.- Don´t reactivate the piston until the blade is fully
retracted.

- 4 -
PRECAUCIÓN
E) CORTES MENORES A 30cm.
E1.- Tener especial cuidado al cortar
longitudes inferiores a 30cm porque
puede que el trozo cortado salte.
F) VENTILACIÓN
F1.- No tapar las zonas de ventilación
para evitar el sobrecalentamiento del
sistema.
F2.- Si el sistema excede los 70ºC,
puede fallar el poder de corte. Permitir
la ventilación del aparato (especial
cuidado en verano y en ambientes
cálidos).
MANTENIMIENTO
G) CUCHILLAS
G1.- Cuando los 4 cuatro filos de corte
estén desgastados, proceder al cambio
de cuchillas.
G2.- Soltar los tornillos de apriete,
cambiar de cuchillar y apretar tornillos
de apriete.
H) LIMPIEZA
H1.- Mantener limpias tras cada uso
las cuchillas y el pistón de avance.
CAUTION
E) SHORT LENGHTS CUTTING (< 30cm)
E1.- Be specially careful when cutting
short lenghts (30cm or less) as the cut
end can fly out.
F) VENTILATION
F1.- Do not cover air vents to avoid
overheating the system.
F2.- If the system exceeds 70ºC, power
may drop. Allow unit to cool before
resuming operation (special care in
summer and hot weather).
MAINTENANCE
G) BLADES
G1.- When all 4 cutting edges are
unsharpened, proceed to change the
blades.
G2.- Unscrew the bolts, change the
blades and get the screws totally
tightened.
H) CLEANING
H1.- Clean after each use both blades
and attack piston.

- 5 -
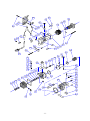
17
18
68
41
19
20
9
33
46
37
2
14
15
16
10
11
13
12
6
4
3
5
7
8
1
29
28
30
21
24
27
25
26
22
47
38
44
36
31
32
45
39
40
43
42
73
58
76
74
56
57
64
75
72
67
69
71
63
77
78
70
59
60
61
65
62
54
66
80
79
50
35
55
34
52
53
51
49

- 6 -
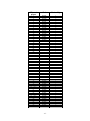
Pieza /
piece
Cod
Cant – Qty
1
83787
1
2
83788
1
3
83789
3
4
83790
3
5
83791
3
6
83792
3
7
83793
3
8
83794
3
9
83795
2
10
83796
1
11
83797
1
12
83798
1
13
83799
1
14
83800
1
15
83801
1
16
83802
1
17
83803
1
18
83804
1
19
83805
1
20
83806
1
21
83807
1
22
83808
1
24
83809
1
25
83810
1
26
83811
1
27
83812
1
28
83813
1
29
83814
1
30
83815
1
31
83816
2
32
83817
1
33
83818
1
34
83819
1
35
83820
1
36
83821
15
37
83822
4
38
83823
1
39
83824
2
40
83825
2
41
83826
1
42
83827
2
43
83828
2
44
83829
1
45
83830
1
46
83831
1
47
83832
1
49 – 230 V
83833
1
49 – 110 V
80426
1
50
83834
1
51
83835
1
52
83836
1
53
83837
2
54 – 230 V
83838
1
54 – 110 V
80428
1
55
83839
1
56
83840
4
57
83841
1
58
83842
4
59
83843
2
60
83844
2
61
83845
1

- 7 -
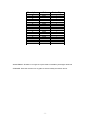
ALMACENAJE: Guardar en un lugar seco para evitar humedades y descargas eléctricas
STORAGE: Store the machine in a dry place to avoid humidity and electric shock.
Pieza / piece
Cod
Cant – Qty
62
83846
1
63
83847
1
64
83848
1
65
83849
1
66
83850
1
67
83851
1
68
83852
5
69
84015
1
70
84016
1
71
83853
1
72
83854
1
73
83855
1
74
83856
2
75
83857
1
76
83858
1
77
83859
1
78
83860
1
79
83861
1
80
83862
2


-
 1
1
-
 2
2
-
 3
3
-
 4
4
-
 5
5
-
 6
6
-
 7
7
-
 8
8
-
 9
9
-
 10
10
-
 11
11
-
 12
12


Ega Master 60270 El manual del propietario
- Tipo
- El manual del propietario
- Este manual también es adecuado para
en otros idiomas
- English: Ega Master 60270 Owner's manual
