Hitachi H 41SC Handling Instructions Manual
- Categoría
- Herramientas eléctricas
- Tipo
- Handling Instructions Manual
Este manual también es adecuado para

Demolition Hammer
Martillo demoledor
파괴햄머
Máy đục phá
H 41SC
Handling instructions
Instrucciones de manejo
취급 설명서
Hướng dẫn sử dụng
Read through carefully and understand these instructions before use.
Leer cuidadosamente y comprender estas instrucciones antes del uso.
본 설명서를 자세히 읽고 내용을 숙지한 뒤 제품을 사용하십시오.
Đọc kỹ và hiểu rõ các hướng dẫn này trước khi sử dụng.

2
5
6
17 mm
a
12
34
English Español
1
Tool shank Barrena
2
Slide grip Cubierta delantera
3
Front cover Empuñadura deslizable
4
Crank cover Cubierta del motor
5
Wear limit Límite de desgaste
6
No. of carbon brush No. de contacto de carbón
7
Usual carbon brush Escobilla de carbón usual
8
Auto-stop carbon brush
Escobilla de carbón de parada
automática
한국어
Tiếng Việt
1
툴 섕크
Thân dụng cụ
2
슬라이드 그립
Tay nắm trượt
3
앞 커버
Nắ p đậ y trướ c
4
크랭크 커버
Nắp trục quay
5
마모 한도
Giới hạn mài mòn
6
카본 브러시 번호
Mã số chổi than
7
일반적인 카본 브러시
Chổ i than thông thườ ng
8
자동 정지 카본 브러시
Chổ i than dừ ng tự độ ng
1
2
3
4
6
a
7
43 6 mm
8
73 7 mm
A

3
English
GENERAL SAFETY RULES
WARNING!
Read all instructions
Failure to follow all instructions listed below may result in
electric shock, fi re and/or serious injury.
The term “power tool” in all of the warnings listed below
refers to your mains operated (corded) power tool or
battery operated (cordless) power tool.
SAVE THESE INSTRUCTIONS
1) Work area
a) Keep work area clean and well lit.
Cluttered and dark areas invite accidents.
b) Do not operate power tools in explosive
atmospheres, such as in the presence of
fl ammable liquids, gases or dust.
Power tools create sparks which may ignite the
dust of fumes.
c) Keep children and bystanders away while
operating a power tool.
Distractions can cause you to lose control.
2)
Electrical safety
a) Power tool plugs must match the outlet.
Never modify the plug in any way.
Do not use any adapter plugs with earthed
(grounded) power tools.
Unmodifi ed plugs and matching outlets will reduce
risk of electric shock.
b) Avoid body contact with earthed or grounded
surfaces such as pipes, radiators, ranges and
refrigerators.
There is an increased risk of electric shock if your
body is earthed or grounded.
c) Do not expose power
tools to rain or wet
conditions.
Water entering a power tool will increase the risk of
electric shock.
d) Do not abuse the cord. Never use the cord for
carrying, pulling or unplugging the power tool.
Keep cord away from heat, oil, sharp edges or
moving parts.
Damaged or entangled cords increase the risk of
electric shock.
e) When operating a power tool outdoors, use an
extension cord suitable for outdoor
use.
Use of a cord suitable for outdoor use reduces the
risk of electric shock.
3) Personal safety
a) Stay alert, watch what you are doing and use
common sense when operating a power tool.
Do not use a power tool while you are tired
or under the infl uence of drugs, alcohol or
medication.
A moment of inattention while operating power
tools may result in serious personal injury.
b) Use safety equipment. Always wear eye
protection.
Safety equipment such as dust mask, non-skid
safety shoes, hard hat, or hearing protection used
for appropriate conditions will reduce personal
injuries.
c) Avoid accidental starting. Ensure the switch is
in the off position before plugging in.
Carrying power tools with your fi nger on the switch
or plugging in power tools that have the switch on
invites accidents.
d) Remove any adjusting key or wrench before
turning the power tool on.
A wrench or a key left attached to a rotating part of
the power tool may result in personal injury.
e) Do not overreach. Keep proper footing and
balance at all times.
This enables better control of the power tool in
unexpected situations.
f) Dress properly. Do not wear
loose clothing or
jewellery. Keep your hair, clothing and gloves
away from moving parts.
Loose clothes, jewellery or long hair can be caught
in moving parts.
g) If devices are provided for the connection of
dust extraction and collection facilities, ensure
these are connected and properly used.
Use of these devices can reduce dust related
hazards.
4) Power tool use and care
a) Do not force the power tool. Use the
correct
power tool for your application.
The correct power tool will do the job better and
safer at the rate for which it was designed.
b) Do not use the power tool if the switch does
not turn it on and off .
Any power tool that cannot be controlled with the
switch is dangerous and must be repaired.
c) Disconnect the plug from the power source
before making any adjustments, changing
accessories, or storing power tools.
Such preventive safety measures reduce the risk of
starting the power tool accidentally.
d) Store idle power tools out
of the reach of
children and do not allow persons unfamiliar
with the power tool or these instructions to
operate the power tool.
Power tools are dangerous in the hands of
untrained users.
e) Maintain power tools. Check for misalignment
or binding of moving parts, breakage of parts
and any other condition that may aff ect the
power tools’
operation.
If damaged, have the power tool repaired
before use.
Many accidents are caused by poorly maintained
power tools.
f) Keep cutting tools sharp and clean.
Properly maintained cutting tools with sharp cutting
edges are less likely to bind and are easier to
control.
g) Use the power tool, accessories and tool bits
etc., in accordance with these instructions and
in the manner intended for the particular type
of power tool, taking into account the working
conditions
and the work to be performed.
Use of the power tool for operations diff erent from
intended could result in a hazardous situation.
5) Service
a) Have your power tool serviced by a qualifi ed
repair person using only identical replacement
parts.
This will ensure that the safety of the power tool is
maintained.
PRECAUTION
Keep children and infi rm persons away.
When not in use, tools should be stored out of reach
of children and infi
rm persons.

4
English
PRECAUTIONS ON USING DEMOLITION
HAMMER
1. Wear ear protectors
Exposure to noise can cause hearing loss.
2. Use auxiliary handles supplied with the tool.
Loss of control can cause personal injury.
SPECIFICATIONS
Voltage (by areas)* (110 V, 115 V, 120 V, 127 V, 220 V, 230 V, 240 V)
Power Input* 1050 W
Full-load Impact Rate 3000/min
Weight (without cord, side handle) 5.0 kg
* Be sure to check the nameplate on product as it is subject to change by areas.
STANDARD ACCESSORIES
(1) Case ..........................................................................1
(2) Bull Point ......................................................................1
(3) Side Handle ..................................................................1
Standard accessories are subject to change without
notice.
OPTIONAL ACCESSORIES (sold separately)
NOTE
The round type bit with a collar cannot be attached.
○ Crushing
(1) Bull Point
Overall Length: 280, 450 mm
○ Asphalt Cutting
(1) Cutter
○ Surface Roughing
(1) Bushing Tool (2) Shank
○ Tamp ing
(1) Rammer (2) Shank
○ Syringe (for chip removal)
○ Scooping Work
(1) Scoop
○ Cylinder case cover (For heat insulation of cylinder
case)
Cylinder case cover (rubber)
○ Hammer Grease A
500 g (in a can)
70 g (in a tube)
30 g (in a tube)
Optional accessories are subject to change without
notice.
APPLICATIONS
Breaking concrete, chipping off concrete, grooving, bar
cutting, and driving piles.
Application examples:
Installation of piping and wiring, sanitary facility
installation, machinery installation, water supply and
drainage work, interior jobs, harbor facilities and other civil
engineering work.
3. Do not touch the bit during or immediately after
operation. The bit becomes very
hot during operation
and could cause serious burns.
4. Before starting to break, chip or drill into a wall, fl oor or
ceiling, thoroughly confi rm that such items as electric
cables or conduits are not buried inside.

5
English
PRIOR TO OPERATION
1. Power source
Ensure that the power source to be utilized conforms
to the power requirements specifi ed on the product
nameplate.
2. Power switch
Ensure that the power switch is in the OFF position. If
the plug is connected to a receptacle while the power
switch is in the ON
position, the power tool will start
operating immediately, which could cause a serious
accident.
3. Extension cord
When the work area is removed from the power source,
use an extension cord of suffi cient thickness and rated
capacity. The extension cord should be kept as short
as practicable.
4. Installing tools
CAUTION
Be sure to switch power OFF and disconnect the plug
from the receptacle to avoid serious trouble.
NOTE
Concerning the tools such as bull points and cutters,
be sure to use separately sold genuine parts that are
designated by HITACHI.
(1) Wipe off and clean up the shank section of the
tool,
and apply grease or machine oil onto it.
(2) Insert the shank section of the tool completely into the
hexagonal hole of the front cover at a state where the
slide grip is fully pulled in the direction of
as shown
in Fig. 1.
(3) Return the slide grip to its home position and make
sure that the tool is pulled and locked securely.
(4) Removal is carried out at a state where the slide grip is
fully pulled in the directon of
in a manner similar to
the case of installing the tool.
CAUTION
Be sure to grip the handle and side handle during work.
Do not hold by the slide grip during work: If you pull it
by mistake, the bull point could jump out.
HOW TO USE THE DEMOLITION HAMMER
(Fig. 2)
1. After placing the tip of the tool on concrete surface,
switch ON.
2. By utilizing the weight of the machine and by fi rmly
holding the demolition hammer with both hands, one
can eff ectively control the subsequent recoil motion.
Proceed at a moderate work-rate, the use of too much
force
will impair effi ciency.
GREASE REPLACEMENT
This machine is of full air-tight construction to protect
against dust and to prevent lubricant leakage. This
machine can be used without grease supplement for an
extended period of time. However, perform the grease
replacement to maintain the service life. Replace the
grease as described below.
1. Grease replacement period
Inspect
the grease amount according to the timing
replacement period of the carbon brush. (See the
section MAINTENANCE AND INSPECTION.) Ask for
grease replacement at the nearest authorized Hitachi
Service Center.
In the case that you are forced to change the grease by
yourself, please follow the following points.
2. How to replace grease
CAUTION
Before replacing the grease, turn the power off and pull
out the plug from the receptacle.
(1) Remove the crank cover and wipe off the old grease
inside. (Fig. 3)
(2) Supply 30 g (the standard volume to cover the
connecting rod) of Hitachi Electric
Hammer Grease A
to the crank case.
(3) After replacing the grease, install the crank cover
securely.
NOTE
The Hitachi Electric Hammer Grease A is of the
low viscosity type. When the grease is consumed,
purchase from an authorized Hitachi Service
Center.
MAINTENANCE AND INSPECTION
CAUTION
Be sure to switch power OFF and disconnect the plug
from the receptacle to avoid serious trouble.
1. Inspecting the tool
Since use of a dull tool will degrade effi ciency and
cause possible motor malfunction, sharpen or replace
the tool as soon as abrasion is noted.
2. Inspecting the
mounting screws
Regularly inspect all mounting screws and ensure that
they are properly tightened. Should any of the screws
be loose, retighten them immediately. Failure to do so
could result in serious hazard.
3. Maintenance of the motor
The motor unit winding is the very “heart” of the power
tool. Exercise
due care to ensure the winding does not
become damaged and/or wet with oil or water.
4. Inspecting the carbon brushes (Fig. 6)
The Motor employs carbon brushes which are
consumable parts. When they become worn to or near
the “wear limit”, it could result in motor trouble. When
an auto-stop
carbon brush is equipped, the motor will
stop automatically. At that time, replace both carbon
brushes with new ones which have the same carbon
brush Numbers shown in the fi gure. In addition, always
keep carbon brushes clean and ensure that they slide
freely within the brush holders.
5. Replacing carbon brushes
Loosen the set screw and remove the tail cover.
Remove the brush caps and carbon brushes. After
replacing the carbon brushes, do not forget to tighten
the brush caps securely and to install the tail cover.
6. Service parts list
A: Item No.
B: Code No.
C: No. Used
D: Remarks
CAUTION
Repair, modifi cation and inspection of Hitachi Power
Tool s must be carried out by a Hitachi Authorized
Service Center.
This Parts List will be helpful if presented with the
tool to the Hitachi Authorized Service Center when
requesting repair or other maintenance.
In the operation and maintenance of power tools,
the
safety regulations and standards prescribed in each
country must be observed.

6
English
MODIFICATIONS
Hitachi Power To ols are constantly being improved
and modifi ed to incorporate the latest technological
advancements.
Accordingly, some parts (i.e. code numbers and/or
design) may be changed without prior notice.
NOTE
Due to HITACHI’s continuing program of research and
development, the specifi cations herein are subject to
change without prior notice.

7
Español
NORMAS GENERALES DE SEGURIDAD
¡ADVERTENCIA!
Lea todas las instrucciones
Si no se siguen las instrucciones de abajo podría producirse
una descarga eléctrica, un incendio y/o daños graves.
El término “herramienta eléctrica” en todas las advertencias
indicadas a continuación hace referencia a la herramienta
eléctrica que funciona con la red de suministro (con cable)
o a la herramienta eléctrica que funciona con pilas (sin
cable).
CONSERVE ESTAS INSTRUCCIONES
1) Área de trabajo
a) Mantenga la zona de trabajo limpia y bien
iluminada.
Las zonas desordenadas y oscuras pueden
provocar accidentes.
b) No utilice las herramientas eléctricas en
entornos explosivos como, por ejemplo, en
presencia de líquidos infl amables, gases o
polvo.
Las herramientas eléctricas crean chispas que
pueden hacer que el polvo desprenda humo.
c) Mantenga a los niños y transeúntes alejados
cuando utilice una herramienta eléctrica.
Las distracciones pueden hacer que pierda el
control.
2) Seguridad eléctrica
a) Los enchufes de las herramientas eléctricas
tienen que ser adecuados a la toma de
corriente.
No modifi que el enchufe.
No utilice enchufes adaptadores con
herramientas eléctricas conectadas a tierra.
Si no se modifi can los enchufes y se utilizan tomas
de corriente adecuadas se reducirá el riesgo de
descarga eléctrica.
b) Evite el contacto corporal con superfi cies
conectadas
a tierra como tuberías, radiadores
y frigorífi cos.
Hay mayor riesgo de descarga eléctrica si su cuerpo
está en contacto con el suelo.
c) No exponga las herramientas eléctricas a la
lluvia o a la humedad.
La entrada de agua en una herramienta eléctrica
aumentará el riesgo de descarga eléctrica.
d) No utilice el cable incorrectamente. No utilice el
cable para transportar, tirar de la herramienta
eléctrica o desenchufarla.
Mantenga el cable alejado del calor, del aceite,
de
bordes afi lados o piezas móviles.
Los cables dañados o enredados aumentan el
riesgo de descarga eléctrica.
e) Cuando utilice una herramienta eléctrica al aire
libre, utilice un cable prolongador adecuado
para utilizarse al aire libre.
La utilización de un cable adecuado para usarse al
aire libre reduce el riesgo de descarga eléctrica.
3) Seguridad personal
a) Esté atento, preste atención a lo que hace y
utilice el sentido común cuando utilice una
herramienta eléctrica.
No utilice
una herramienta eléctrica cuando
esté cansado o esté bajo la infl uencia de
drogas, alcohol o medicación.
La distracción momentánea cuando utiliza
herramientas eléctricas puede dar lugar a
importantes daños personales.
b) Utilice equipo de seguridad. Utilice siempre
una protección ocular.
El equipo de seguridad como máscara para el
polvo, zapatos de seguridad antideslizantes, casco
o protección para oídos utilizado para condiciones
adecuadas reducirá los daños personales.
c) Evite un inicio accidental. Asegúrese de que el
interruptor está en “off ” antes de enchufarlo.
El transporte de herramientas eléctricas con el
dedo en el interruptor o el enchufe de herramientas
eléctricas con el interruptor encendido puede
provocar accidentes.
d) Retire las llaves
de ajuste antes de encender la
herramienta eléctrica.
Si se deja una llave en una pieza giratoria de la
herramienta eléctrica podrían producirse daños
personales.
e) No se extralimite. Mantenga un equilibrio
adecuado en todo momento.
Esto permite un mayor control de la herramienta
eléctrica en situaciones inesperadas.
f) Vístase adecuadamente. No lleve prendas
sueltas o joyas. Mantenga el pelo, la ropa y los
guantes alejados de las piezas móviles.
La ropa suelta, las joyas y el pelo largo pueden
pillarse en las piezas móviles.
g) Si se proporcionan dispositivos para
la conexión
de extracción de polvo e
instalaciones de recogida, asegúrese
de que están conectados y se utilizan
adecuadamente.
La utilización de estos dispositivos puede reducir
los riesgos relacionados con el polvo.
4) Utilización y mantenimiento de las herramientas
eléctricas
a) No fuerce la herramienta eléctrica. Utilice
la herramienta eléctrica correcta para su
aplicación.
La herramienta eléctrica correcta trabajará mejor y
de forma más segura si se utiliza a la velocidad para
la que fue diseñada.
b) No utilice la herramienta eléctrica si el
interruptor no la enciende
y apaga.
Las herramientas eléctricas que no pueden
controlarse con el interruptor son peligrosas y
deben repararse.
c) Desconecte el enchufe de la fuente eléctrica
antes de hacer ajustes, cambiar accesorios o
almacenar herramientas eléctricas.
Estas medidas de seguridad preventivas reducen el
riesgo de que la herramienta eléctrica se ponga en
marcha accidentalmente.
d) Guarde las herramientas eléctricas que no
se utilicen para que no las cojan los niños
y no permita que utilicen las herramientas
eléctricas personas no familiarizadas con las
mismas o con estas instrucciones.
Las herramientas eléctricas son peligrosas si son
utilizadas por usuarios sin formación.
e) Mantenimiento de las herramientas eléctricas.
Compruebe si las piezas móviles están mal
alineadas o unidas, si hay alguna pieza
rota u otra condición que pudiera afectar
al funcionamiento de las herramientas
eléctricas.
Si la herramienta eléctrica está dañada, llévela
a reparar antes de utilizarla.
Se producen muchos accidentes por no realizar
un mantenimiento correcto de las herramientas
eléctricas.

8
Español
f) Mantenga las herramientas de corte afi ladas y
limpias.
Las herramientas de corte correctamente
mantenidas con los bordes de corte afi lados son
más fáciles de controlar.
g) Utilice la herramienta eléctrica, los accesorios
y las brocas de la herramienta, etc., de acuerdo
con estas instrucciones y de la manera
adecuada para el tipo de herramienta eléctrica,
teniendo en cuenta las condiciones laborales y
el
trabajo que se va a realizar.
La utilización de la herramienta eléctrica para
operaciones diferentes a pretendidas podría dar
lugar a una situación peligrosa.
5) Revisión
a) Lleve su herramienta a que la revise un experto
cualifi cado que utilice sólo piezas de repuesto
idénticas.
Esto garantizará el mantenimiento de la seguridad
de la herramienta eléctrica.
PRECAUCIÓN
Mantenga a los niños y a las personas enfermas
alejadas.
Cuando no se utilicen, las herramientas deben
almacenarse fuera del alcance de los niños y de las
personas enfermas.
PRECAUCIONES AL USAR EL MARTILLO
DEMOLEDOR
1. Utilice protectores de oídos
La exposición al ruido puede causar daños auditivos.
2. Utilice los mangos auxiliares proporcionados con
la herramienta.
La pérdida de control puede causar daños personales.
3. No tocar la broca durante ni inmediatamente después
de trabajar, puesto que se pone ardiente y puede
causar quemaduras serias.
4.
Antes de empezar a romper, picar o perforar en una
pared, suelo o techo, comprobar cuidadosamente
que no hayan objetos empotrados, tales como cables
o conductos eléctricos.
ESPECIFICACIONES
Voltage (por áreas)* (110 V, 115 V, 120 V, 127 V, 220 V, 230 V, 240 V)
Entrada* 1050 W
Impacto a carga plena 3000/min
Peso (sin cable, ni mango lateral) 5,0 kg
* Verifi car indefectiblemente los datos de la placa de características de la máquina, pués varian de acuerdo al país de
destino.
ACCESORIOS NORMALES
(1) Caja ..........................................................................1
(2) Punta ..........................................................................1
(3) Mango Lateral ..............................................................1
Los accessorios normales están sujetos a cambio sin
previo aviso.
ACCESORIOS OPCIONALES
(de venta por separado)
NOTA
La broca de tipo redondo con collar no podrá fi jarse.
○ Para romper
(1) Punta
Largo total: 280, 450 mm
○ Cortadora de asfalto
(1) Cargadora
○ Desbastadora de superfi cies
(1) Desbastadora (2) Barrena
○ Apisonamiento
(1) Pisón (2) Barrena
○ Jeringa (extracción de resíduos)
○ Trabaj os con cuchara
(1) Cuchara
○ Cubierta de la caja del cilindro (Para aislamiento
térmico de la caja del cilindro)
Cubierta de la caja del cilindro (caucho)

9
Español
○ Grasa A para martillo
500 g (en una lata)
70 g (en un tubo)
30 g (en un tubo)
Los accesorios facultativos están sujetos a cambio sin
previo aviso.
APLICACIONES
Romper hormigón armado, cortar o picar hormigón, hacer
ranuras, cortes y colocar pilotes.
Ejemplo de aplicación:
Instalación de tuberia y artículos sanitarios, instalación
de maquinaria, trabajos de suministro de agua y drenaje,
trabajos en interiores, instalaciones portuarias y demás
trabajos propios de ingenieria civil.
ANTES DE LA PUESTA EN MARCHA
1. Alimentación
Asegurarse de que la alimentación de red que ha de
ser utilizada responda a las exigencias de corriente
especifi cadas en la placa de características del
producto.
2. Conmutador de alimentación
Asegurarse de que el conmutador de alimentación
esté en la posición OFF (desconectado). Si la clavija
está conectada
en la caja del enchufe mientras el
conmutador de alimentación esté en posición ON
(conectado) las herramientas eléctricas empezarán
a trabajar inmediatamente, provocando un serio
accidente.
3. Cable de prolongación
Cuando está alejada el área de trabajo de la red
de alimentación, usar un cable de prolongación
de un grosor y
potencia normal sufi ciente. El cable
de prolongación debe ser mantenido lo más corto
posible.
4. Instalación de herramientas
PRECAUCIÓN
Asegúrese de desconectar la alimentación y de
desenchufar la clavija del tomacorriente.
NOTA
Con respecto a herramientas tales como barretas
de punta y cortadores, cerciórese de utilizar piezas
genuinas vandidas aparte diseñadas
por HITACHI.
(1) Frote la sección de la espiga de la herramienta, y
aplíquele grasa o aceite para máquinas.
(2) Inserte la sección de la espiga de la herramienta
completamente en el orifi cio hexagonal de la cubierta
frontal en un estado en el que la empuñadura deslizable
esté completamente extraída en
el sentido de , como
se muestra en la Fig. 1.
(3) Devuelva la empuñadura a su posición inicial y
cerciórese de que la herramienta esté extraída y
bloqueada con seguridad.
(4) La extracción deberá realizarse en un estado en el
que la empuñadura deslizable esté completamente
insertada en el sentido de
de forma similar al caso
de instalación de la herramienta.
PRECAUCIÓN
Asegúrese de asir la manija y la manija lateral durante
el trabajo. No lo tome por la empuñadura deslizable
durante el trabajo: Si la toma por equivocación, podría
saltar afuera la punta.
FORMA DE USAR EL MARTILLO DEMOLEDOR
(Fig. 2)
1. Conecte la alimentación después de colocar la punta
de la herramienta sobre una superfi cie de hormigón.
2. Utilizando el peso de la máquina y sujetándola
fi rmemente con ambas manos, uno puede controlar
perfectamente el movimiento de reculada.
Luego usar el martillo demoledor moderadamente,
ya que al aplicar con
fuerza y exceso desmejora la
efi ciencia de la herramienta.
CAMBIO DE GRASA
Esta máquina es de construcción completamente
cerrada, para evitar que entre el polvo y que hayan fugas
de lubricante. Esta unidad podrá utilizarse sin grasa
suplemantaria durante mucho tiempo. Sin embargo,
reemplace la grasa para mantener la duración de servicio.
Cuando se requiere cambiar la grasa, proceder como
sigue.
1. Periodo de
cambio de grasa
Inspeccione ia candidad de grasa en el momento
de reemplazar las escobillas. (Consulte la sección
MANTENIMIENTO E INSPECCION.) Consultar para
ello al Agente de Servicio Hitachi autorizado.
En caso de tener que cambiar la grasa por sí mismo,
hágalo de acuerdo con los puntos siguientes.
2. Cambio de
grasa
PRECAUCIÓN
Antes de cambiar la grasa, desconectar el aparato y
desenchufarlo del tomacorriente.
(1) Quitar la cubierta del motor y limpiar la grase vieja
interna. (Fig. 3)
(2) Aplicar 30 g (la cantidad estándar para cubrir la biela)
de grasa para Martillo Eléctrico Hitachi de tipo A en el
cárter.
(3)
Luego de cambiar la grasa, instalar el cárter
fi rmemente.
NOTA
La grasa A del Martillo Eléctrico Hitachi es del tipo de
baja densidad. Cuando se acabe la grasa adquirir más
a un Agente se Servicio Hitachi autorizado.
MANTENIMIENTO E INSPECCION
PRECAUCIÓN
Cerciórese de desconectar la alimentación y
desenchufe el enchufe de la toma de alimentación de
la red para evitar averás serias.
1. Inspección d la herramienta
Ya que la utilización de una herramienta de corte
embotada disminuirá la efi ciencia de trabajo y podría
causar desperfectos en el motor, afi
lar o cambiar las
herramientas de corte tan pronto como se note abrasión
en éstas.
2. Inspeccionar los tornillos de montaje
Regularmente inspeccionar todos los tornillos de
montaje y asegurarse de que estén apretados
fi rmemente. Si cualquier tornillo estuviera suelto,
volver a apretarlo inmediatamente. El no hacer esto
provocaría un riesgo
serio.
3. Mantenimiento de motor
La unidad de bobinado del motor es el verdadero
“corazón” de las herramientas eléctricas. Prestar el
mayor cuidado y asegurarse de que el bobinado no se
dañe y/o se humedezca con aceite o agua.

10
Español
4. Inspeccionar los carbones de contacto (Fig. 6)
El motor emplea escobillas de carbón que son partes
consumibles. Cuando se gastan o están cerca del
“limite de desgaste” pueden causar problemas al
motor. Al equiparse la escobilla de carbón de parada
automática, el motor se detendrá automáticamente
en ese momento hay
que proceder a cambiar ambas
escobillas de carbón por la nuevas, que tienen los
mismos números de escobillas de carbón como se
muestra en la fi gura. Además siempre hay hay que
mantener las escobillas de carbón limpias y asegurarse
de que se muevan libremente en sus porta-escobillas.
5. Reemplazar el carbón
de contacto
Quitar la cubierta de trasera y luego afl ojar el tornillo de
fi jactón. Afl ojando la tapa de escobilla, pueden quitarse
las excobillas de carbón. Al colocar las escobillas,
apretar fi rmemente la tapa de escobillas y recolocar la
cubierta de trasera.
6. Lista de repuestos
A: N°. ítem
B: N°. código
C: N°. usado
D: Observaciones
PRECAUCIÓN
La reparación, modifi cación e inspección de las
herramientas eléctricas Hitachi deben ser realizadas
por un Centro de Servicio Autorizado de Hitachi.
Esta lista de repuestos será de utilidad si es presentada
junto con la herramienta al Centro de Servicio
Autorizado de Hitachi,
para solicitar la reparación o
cualquier otro tipo de mantenimiento.
En el manejo y el mantenimiento de las herramientas
eléctricas, se deberán observar las normas y
reglamentos vigentes en cada país.
MODIFICACIONES
Hitachi Power To ols introduce constantemente mejoras
y modifi caciones para incorporar los últimos avances
tecnológicos.
Por consiguiente, algunas partes
(por ejemplo, números
de códigos y/o diseño) pueden ser modifi cadas sin
previo aviso.
NOTA
Debido al programa continuo de investigación y desarollo
de HITACHI estas especifi caciones están sujetas a cambio
sin preaviso.

11

12

13

14

15
한국어
일반적인 안전 수칙
경고!
설명서를 자세히 읽으십시오.
설명서의 내용에 따르지 않을 시에는 감전 사고나 화재가 발
생할 수 있으며 심각한 부상을 입을 수도 있습니다.
아래에 나오는‘전동 툴이란 용어는 플러그를 콘센트에 연결
해 유선 상태로 사용하는 제품 또는 배터리를 넣어 무선 상
태로 사용하는 제품을 가리킵니다.
설명서의 내용을 숙지하십시오.
1) 작업 공간
a) 작업 공간을 깨끗하게 청소하고 조명을 밝게 유지하
십시오.
작업 공간이 정리되어 있지 않거나 어두우면 사고가
날 수 있습니다.
b) 인화성 액체나 기체 또는 먼지 등으로 인해 폭발 위
험이 있는 환경에서는 전동 툴을 사용하지 마십시오.
전동 툴을 사용하다 보면 불꽃이 튀어서 먼지나 기체
에 불이 붙을 수 있습니다.
c) 어린이를 비롯하여 사용자 외에는 작업장소에 접근
하지 못하도록 하십시오.
주의가 산만해지면 문제가 생길 수 있습니다.
2) 전기 사용시 주의사항
a) 전동 툴 플러그와 콘센트가 일치해야 합니다.
플러그를 절대로 변형하지 마십시오.
접지된 전동 툴에는 어댑터 플러그를 사용하지 마십
시오.
플러그를 변형하지 않고 알맞은 콘센트에 꽂아 사용
하면, 감전 위험을 줄일 수 있습니다.
b) 파이프, 라디에이터, 레인지, 냉장고 등 접지된 표면
에 몸이 닿지 않도록 주의하십시오.
작업자의 몸이 접지되면, 감전될 위험이 있습니다.
c) 전동 툴에 비를 맞히거나 젖은 상태로 두지 마십시
오.
물이 들어가면 감전될 위험이 있습니다.
d) 코드를 조심해서 다루십시오. 전동 툴을 들거나 당기
거나 콘센트에서 뽑으려고 할 때 코드를 잡아당기면
안 됩니다.
열, 기름, 날카로운 물건, 움직이는 부품 등으로부터
코드를 보호하십시오.
코드가 파손되거나 엉키면 감전될 위험이 높아집니
다.
e) 실외에서 전동 툴을 사용할 때는 실외 용도에 적합한
연장선을 사용하십시오.
실외 용도에 적합한 코드를 사용해야 감전 위험이 줄
어듭니다.
3) 사용자 주의사항
a) 전동 툴을 사용할 때는 작업에 정신을 집중하고, 상
식의 범위 내에서 사용하십시오.
약물을 복용하거나 알코올을 섭취한 상태 또는 피곤
한 상태에서는 전동 툴을 사용하지 마십시오.
전동 툴을 사용할 때 주의가 흐트러지면 심각한 부상
을 입을 수 있습니다.
b) 안전 장비를 사용하십시오. 항상 눈 보호 장구를 착
용해야 합니다.
먼지 보호 마스크, 미끄럼 방지 신발, 안전모, 청각 보
호 장비 등을 사용하면 부상을 줄일 수 있습니다.
c) 전동 툴이 갑자기 작동되지 않도록 합니다. 플러그를
꽂기 전에 스위치가 ‘OFF’ 위치에 있는지 확인하십
시오.
손가락을 스위치에 접촉한 채 전동 툴을 들거나 스위
치가 켜진 상태로 플러그를 꽂으면 사고가 날 수 있습
니다.
d) 전원을 켜기 전에 조정 키 또는 렌치를 반드시 제거
해야 합니다.
전동 툴의 회전 부위에 키 또는 렌치가 부착되어 있으
면, 부상을 입을 수 있습니다.
e) 작업 대상과의 거리를 잘 조절하 십시오. 알맞은 발판
을 사용하고 항상 균형을 잡고 있어야 합니다.
그렇게 하면 예기치 못한 상황에서도 전동 툴을 잘 다
룰 수 있습니다.
f) 알맞은 복장을 갖추십시오. 헐렁한 옷이나 장신구를
착용하면 안 됩니다. 머리카락, 옷, 장갑 등을 움직이
는 부품으로부터 보호하십시오.
헐렁한 옷이나 장신구, 긴 머리카락이 부품에 딸려 들
어갈 수도 있습니다.
g) 분진 추출 및 집진 장비에 연결할 수 있는 장치가 제
공되는 경우, 그러한 장치가 잘 연결되어 있고 제대로
작동하는지 확인하십시오.
이러한 장치를 사용하면, 먼지와 관련된 사고를 줄일
수 있습니다.
4) 전동 툴 사용 및 관리
a) 전동 툴을 아무 곳에나 사용하지 마십시오. 용도에
알맞은 전동 툴을 사용하십시오.
적절한 전동 툴을 사용하면, 정상 속도로 안전하고 효
과적으로 작업을 수행할 수 있습니다.
b) 스위치를 눌렀을 때 전동 툴이 켜지거나 꺼지지 않으
면 사용하지 마십시오.
스위치로 작동시킬 수 없는 전동 툴은 위험하므로, 수
리를 받아야 합니다.
c) 전동 툴을 조정하거나 부속품을 바꾸거나 보관할 때
는 반드시 전원에서 플러그를 빼야 합니다.
이러한 안전 조치를 취해야 전동 툴이 갑자기 켜지는
위험을 피할 수 있습니다.
d) 사용하지 않는 전동 툴은 어린이의 손이 닿지 않는
곳에 보관하고, 사용법을 잘 모르는 사람이 사용하지
못하도록 하십시오.
전동 툴은 미숙련자가 다루기에는 매우 위험한 물건
입니다.
e) 전동 툴을 잘 관리하십시오. 움직이는 부품이 잘못
결합되어 있거나 꽉 끼어 움직이지 못하게 되어 있지
않은지 점검하십시오. 또한 전동 툴의 작동에 영향을
미칠 수 있는 기타 파손이 없는지 확인하십시오.
파손된 부분이 있는 경우, 사용하기 전에 수리하십시
오.
전동 툴을 제대로 관리하지 못해서 생기는 사고가 많
습니다.
f) 절삭 툴은 날카롭고 청결한 상태로 관리하십시오.
절삭 날을 날카로운 상태로 잘 관리하면, 원활하게
잘 움직이며 다루기도 훨씬 편합니다.
g) 설명서를 참조하여 전동 툴과 부속품, 툴 비트 등을
사용하십시오. 또한 작업 환경과 수행할 작업의 성격
을 고려해서 알맞은 종류의 전동 툴을 선택하고, 적
절한 방식으로 사용하십시오.
원래 목적과 다른 용도로 전동 툴을 사용하면 위험한
사고가 날 수 있습니다.
5) 서비스
a) 자격을 갖춘 전문가에게 서비스를 받고, 항상 원래
부품과 동일한 것으로 교체해야 합니다.
그렇게 하면 전동 툴을 보다 안전하게 사용할 수 있습
니다.
주의사항
어린이나 노약자가 가까이 오지 못하도록 하십시오.
전동 툴을 사용하지 않을 때는 어린이나 노약자의 손이 닿지
않는 곳에 보관해야 합니다.

16
한국어
파괴햄머 사용 시 주의사항
1. 귀 보호 장구를 착용하십시오.
소음으로 인해 청력을 잃을 수 있습니다.
2. 함께 제공되는 보조 핸들을 사용하십시오.
장비를 제대로 다루지 못하면 부상을 입을 수 있습니다.
사양
전압(지역별로 차이가 있음)*
(110V, 115V, 120V, 127V, 220V, 230V, 240V)
소비 전력* 1050W
분당 타격수 3000/분
중량(코드, 사이드 핸들 제외) 5.0kg
*지역별로 차이가 있을 수 있으므로, 제품 명판의 기재내용을 반드시 확인하십시오.
기본 부속품
(1) 케이스 .......................................................1
(2) 불 포인트 ....................................................1
(3) 사이드 핸들 .................................................1
기본 부속품은 예고 없이 변경될 수 있습니다.
옵션 부속품(별도 판매)
참고
칼러가 달린 원형 비트는 부착할 수 없습니다.
○ 파쇄
(1) 불 포인트
전체 길이: 280, 450mm
○ 아스팔트 절삭
(1) 커터
○ 황삭
(1) 부싱 툴 (2) 섕크
○ 평탄 작업
(1) 다짐판 (2) 섕크
○ 시린지(부스러기 제거용)
○ 퍼내기 작업
(1) 삽
○ 실린더 케이스 커버(실린더 케이스 단열용)
실린더 케이스 커버(고무)
○ 햄머 윤활제 A
500g (캔)
70g (튜브형)
30g (튜브형)
옵션 부속품은 예고 없이 변경될 수 있습니다.
용도
콘크리트 파쇄 및 분쇄, 홈 파기, 봉 절삭, 항타(콘크리트 말
뚝을 박는 것) 등.
활용 예:
배관 설치 및 배선, 위생 시설 설치, 기계류 설치, 상하수도
관 작업, 인테리어 작업, 항만 시설 및 토목 관련 작업 등.
사용 전 주의사항
1. 전원
사용 전원이 제품 명판에 표시된 전원 요건과 부합하는지
확인하십시오.
2. 전원 스위치
전원 스위치가 OFF 위치에 있는지 확인하십시오. 전원
스위치가 ON 위치에 있는 상태로 플러그를 꽂으면, 제
품이 갑자기 작동하기 시작해서 심각한 사고가 날 수 있
습니다.
3. 작동 중 혹은 작동 직후에 비트를 만지지 마십시오. 작동
중에는 비트가 몹시 뜨거워지므로 화상을 입을 수 있습
니다.
4. 벽, 바닥, 천장 등을 부수거나 깎거나 구멍을 뚫기 전에,
전기선이나 배관 같은 것이 묻혀 있지 않은지 철저히 확
인하십시오.

17
한국어
3. 연장선
작업 공간에 전원이 없으면, 두께가 충분한 정격 용량의
연장선을 사용하십시오. 연장선은 가능한 한 짧을수록
좋습니다.
4. 툴 조립
주의
전원 스위치를 OFF 상태에 두고 플러그를 뽑은 뒤 조립
해야 사고를 예방할 수 있습니다.
참고
불 포인트나 커터 등과 같이 별도 판매되는 부속품은
HITACHI에서 지정한 순정부품만을 사용해야 합니다.
(1) 섕크 부분을 깨끗이 닦고 윤활제나 기계유를 바릅니다.
(2) 슬라이드 그립을
방향으로 완전히 당긴 상태에서, 앞
커버의 육각형 구멍에 섕크 부분을 완전히 끼웁니다(그
림 1 참조).
(3) 슬라이드 그립을 원래 상태로 돌려놓고, 툴이 꽉 끼워졌
는지 확인합니다.
(4) 툴을 뺄 때도 조립할 때와 마찬가지로, 슬라이드 그립을
방향으로 완전히 당긴 상태에서 해야 합니다.
주의
작업 중에는 반드시 핸들과 사이드 핸들을 잡아야 합니
다. 작업 중 슬라이드 그립을 잡지 마십시오. 실수로 잘
못 당기면, 불 포인트가 튀어나갈 수 있습니다.
파괴햄머 사용법(그림 2)
1. 콘크리트 표면에 툴 끝을 갖다댄 후, 스위치를 켭니다.
2. 양손으로 파괴햄머를 꽉 잡고 기기의 무게를 이용하면,
기기의 반동을 효과적으로 제어할 수 있습니다.
중간 정도 속도로 작업을 진행합니다. 기기 힘이 너무 강
해도 작업 효율이 떨어집니다.
윤활제 보충
본 기기는 먼지가 들어가지 않게 보호하고 윤활제가 새지 않
도록 하기 위해, 완전 진공 제작되었습니다. 일정 기간 동안
은 윤활제를 보충하지 않고 기기를 사용할 수 있습니다. 그
러나 기기의 수명을 유지하기 위해서는 윤활제를 보충해야
합니다. 아래 설명대로 윤활제를 보충하십시오.
1. 윤활제 보충 시기
카본 브러시 교체 시기에 맞춰 윤활제 양을 검사합니
다. (관리 및 검사 부분을 참조합니다.) 인근의 공식
Hitachi 서비스 센터에 가서 윤활제 보충을 요청하십시
오.
직접 윤활제를 보충해야 하는 상황이라면, 다음 절차대
로 하십시오.
2. 윤활제 보충 방법
주의
윤활제를 보충하기 전에 반드시 전원을 끄고 플러그를 뽑
아야 합니다.
(1) 크랭크 커버를 제거하고 안에 있는 윤활제 잔여분을 닦
아냅니다. (그림 3 참조)
(2) Hitachi 전동햄머 윤활제 A 30g(커넥팅 로드를 커버하
는데 필요한 표준 분량)을 크랭크 케이스에 보충합니다.
(3) 윤활제를 보충한 후, 크랭크 커버를 원래대로 꽉 끼웁니
다.
참고
Hitachi 전동햄머 윤활제 A는 점성이 낮은 유형입니다.
윤활제를 다 쓰면, 공식 Hitachi 서비스 센터에서 구입하
십시오.
관리 및 검사
주의
전원 스위치를 OFF 상태에 두고 플러그를 뽑은 뒤 작업
을 수행해야 사고를 예방할 수 있습니다.
1. 툴 검사
무뎌진 툴을 사용하면 작업 효율이 떨어지고 모터가 고
장날 수 있으므로, 무뎌진 것을 발견하면 최대한 빨리 날
카롭게 갈거나 툴을 교체해야 합니다.
2. 부착 나사 검사
정기적으로 모든 부착 나사를 검사하고 잘 고정되어 있는
지 확인합니다. 느슨한 나사가 있는 경우, 즉시 꽉 조여야
합니다. 그렇게 하지 않으면 심각한 사고가 날 수 있습니
다.
3. 모터 관리
모터부 권선은 전동 툴의 심장부입니다. 권선이 손상되
거나 물 또는 기름에 젖지 않도록 주의를 기울여야 합니
다.
4. 카본 브러시 검사(그림 6)
모터의 카본 브러시는 소모품입니다. 카본 브러시가 마
모되거나 마모 한도에 가까워지면, 모터가 고장날 수 있
습니다. 자동 정지 카본 브러시를 장착한 경우에는 모터
가 자동으로 멈춥니다. 그러면 그림과 같이 카본 브러시
번호가 같은 새 것으로 둘 다 교체하면 됩니다. 카본 브러
시는 항상 청결하게 유지하고, 브러시 홀더 안에서 원활
하게 움직이도록 해야 합니다.
5. 카본 브러시 교체
나사를 풀고 뒷 커버를 떼어냅니다. 브러시 캡과 카본 브
러시를 떼어냅니다. 카본 브러시를 교체한 후에는 반드시
브러시 캡을 끼우고 뒷 커버를 장착해야 합니다.
6. 서비스 부품 정보
A: 품목 번호
B: 코드 번호
C: 사용 개수
D: 비고
주의
Hitachi 전동 툴의 수리, 변경 및 검사는 반드시 공식
Hitachi 서비스 센터를 통해서 해야 합니다.
공식 Hitachi 서비스 센터에 수리 또는 기타 점검을 요청
할 때 툴과 함께 부품 정보를 제공하면 도움이 됩니다.
전동 툴을 사용하거나 점검할 때는 각국의 안전 수칙 및
규정을 준수해야 합니다.
변경
Hitachi 전동 툴은 개선 및 수정을 통해 끊임없이 최신
기술 발전을 반영하고 있습니다.
따라서 일부 부품(코드 번호 및/또는 디자인)은 사전 예
고 없이 변경될 수 있습니다.
참고
HITACHI는 지속적인 연구개발 프로그램을 진행하고 있으므
로, 본 설명서의 사양은 사전 예고 없이 변경될 수 있습니다.

18
Tiếng Việt
CÁC NGUYÊN TẮC AN TOÀN CHUNG
CẢNH BÁO!
Đọc kỹ tất cả hướng dẫn
Việc không tuân theo mọi hướng dẫn được liệt kê dưới đây
có thể dẫn đến bị điện giật, cháy và/hoặc bị chấn thương
nghiêm trọng.
Thuật ngữ "dụng cụ điện” có trong tất cả các cảnh báo dưới
đây đề cập đến dụng cụ điện (có dây) điều khiển b
ằng tay
hoặc dụng cụ điện (không dây) vận hành bằng pin.
GHI NHỚ CÁC HƯỚNG DẪN NÀY
1) Khu vực làm việc
a) Giữ khu vực làm việc sạch và đủ ánh sáng.
Khu vực làm việc tối tăm và bừa bộn dễ gây tai nạn.
b) Không vận hành dụng dụ điện trong khu vực
dễ cháy nổ, chẳng hạn như nơi có chất lỏng dễ
cháy, khí đốt hoặc bụi khói.
Các dụng dụ
điện tạo tia lửa nên có thể làm bụi khói
bén lửa.
c) Không để trẻ em và những người không phận sự
đứng gần khi vận hành dụng dụ điện.
Sự phân tâm có thể khiến bạn mất kiểm soát.
2) An toàn về điện
a) Phích cắm dụng cụ điện phải phù hợp với ổ cắm.
Không bao giờ được cải biến phích cắm dưới
mọi hình thức. Không
được sử dụng phích tiếp
hợp với dụng cụ điện nối đất (tiếp đất).
Phích cắm nguyên bản và ổ cắm điện đúng loại sẽ
giảm nguy cơ bị điện giật.
b) Tránh để cơ thể tiếp xúc với các bề mặt nối đất
hoặc tiếp đất như đường ống, lò sưởi, bếp ga và
tủ lạ
nh.
Có nhiều nguy cơ bị điện giật nếu cơ thể bạn nối
hoặc tiếp đất.
c) Không để các dụng cụ điện tiếp xúc với nước
mưa hoặc ẩm ướt.
Nước thấm vào dụng cụ điện sẽ làm tăng nguy cơ bị
điện giật.
d) Không được lạm dụng dây dẫn điện. Không bao
giờ nắ
m dây để xách, kéo hoặc rút dụng cụ điện.
Để dây cách xa nơi có nhiệt độ cao, trơn trượt,
vật sắc cạnh hoặc bộ phận chuyển động.
Dây bị hư hỏng hoặc rối sẽ làm tăng nguy cơ bị điện
giật.
e) Khi vận hành dụng cụ điện ở ngoài trời, hãy sử
dụng dây nối thích hợp cho việc sử dụng ngoài
trời.
Sử dụng dây nối ngoài trời thích hợp làm giảm nguy
cơ bị điện giật.
3) An toàn cá nhân
a) Luôn cảnh giác, quan sát những gì bạn đang làm
và phán đoán theo kinh nghiệm khi vận hành
dụng dụ điện.Không được sử dụng dụng cụ điện
khi mệt mỏi hoặc dưới ảnh hưởng của rượu, ma
túy hoặc dược phẩm.
Một thoáng mất tập trung khi vận hành dụng cụ
điện
có thể dẫn đến chấn thương cá nhân nghiêm trọng.
b) Sử dụng thiết bị bảo hộ. Luôn đeo kính bảo vệ
mắt.
Trang thiết bị bảo hộ như khẩu trang, giày an toàn
chống trượt, nón bảo hộ, hoặc dụng cụ bảo vệ tai
được sử dụng trong các điều kiện thích hợp sẽ làm
giảm nguy cơ thương tích cá nhân.
c) Tránh để máy khởi động b
ất ngờ. Đảm bảo công
tắc ở vị trí tắt trước khi cắm điện.
Đặt ngón tay trên công tắc khi xách dụng cụ điện
hoặc cắm điện lúc công tắc ở vị trí bật rất dễ dẫn đến
tai nạn.
d) Tháo mọi khóa điều chỉnh hoặc chìa vặn đai ốc ra
trước khi bật dụng cụ điện.
Chìa vặn đai
ốc hoặc chìa khóa còn cắm trên một bộ
phận quay của dụng dụ điện có thể gây thương tích
cá nhân.
e) Không với tay quá xa. Luôn luôn đứng vững và
cân bằng.
Điều này giúp kiểm soát dụng cụ điện trong tình
huống bất ngờ tốt hơn.
f) Trang phục phù hợp. Không mặc quần áo rộng
lùng thùng hoặc đeo trang sức. Giữ tóc, quần áo
và găng tay tránh xa các bộ phận chuyển động.
Quần áo rộ
ng lùng thùng, đồ trang sức hoặc tóc dài
có thể bị cuốn vào các bộ phận chuyển động.
g) Nếu có các thiết bị đi kèm để nối máy hút bụi và
các phụ tùng chọn lọc khác, hãy đảm bảo các
thiết bị này được nối và sử dụng đúng cách.
Việc sử dụng các thiết bị này có thể làm giảm độc hại
do bụi gây ra.
4) Sử dụng và bảo dưỡng dụng cụ điệ
n
a) Không được ép máy hoạt động quá mức. Sử
dụng đúng loại dụng cụ điện phù hợp với công
việc của bạn.
Dụng cụ điện đúng chủng loại sẽ hoàn thành công
việc tốt và an toàn hơn theo đúng tiêu chí mà máy
được thiết kế.
b) Không sử dụng dụng cụ điện nếu công tắc
không tắt hoặc bật được.
Bất kỳ d
ụng cụ điện nào không thể điều khiển được
bằng công tắc đều rất nguy hiểm và phải được sửa
chữa.
c) Luôn rút phích cắm ra khỏi nguồn điện trước khi
điều chỉnh, thay phụ tùng, hoặc cất dụng cụ điện.
Những biện pháp ngăn ngừa như vậy giúp giảm
nguy cơ dụng cụ điện khởi động b
ất ngờ.
d) Cất giữ dụng cụ điện không sử dụng ngoài tầm
tay trẻ em và không được cho người chưa quen
sử dụng dụng cụ điện hoặc chưa đọc hướng dẫn
sử dụng này vận hành dụng cụ điện.
Dụng cụ điện rất nguy hiểm khi ở trong tay người
chưa được đào tạo cách sử dụng.
e) B
ảo dưỡng dụng cụ điện. Kiểm tra đảm bảo các
bộ phận chuyển động không bị xê dịch hoặc mắc
kẹt, các bộ phận không bị rạn nứt và kiểm tra các
điều kiện khác có thể ảnh hưởng đến quá trình
vận hành máy. Nếu bị hư hỏng, phải sửa chữa
dụng cụ điện trước khi sử dụng.
Nhiều tai nạn x
ảy ra do bảo quản dụng dụ điện kém.
f) Giữ các dụng cụ cắt sắc bén và sạch sẽ.
Dụng cụ cắt có cạnh cắt bén được bảo quản đúng
cách sẽ ít khi bị kẹt và dễ điều khiển hơn.
g) Sử dụng dụng cụ điện, phụ tùng và đầu cài v.v...
đúng theo những chỉ dẫn này và tập trung vào
loại dụng cụ đi
ện cụ thể, lưu ý đến điều kiện làm
việc và công việc phải thực hiện.
Vận hành dụng cụ điện khác với mục đích thiết kế có
thể dẫn đến các tình huống nguy hiểm.
5) Bảo dưỡng
a) Đem dụng cụ điện của bạn đến thợ sửa chữa
chuyên nghiệp để bảo dưỡng, chỉ sử dụ
ng các
phụ tùng đúng chủng loại để thay thế.
Điều này giúp đảm bảo duy trì tính năng an toàn của
dụng cụ điện.
PHÒNG NGỪA
Giữ trẻ em và những người không phận sự tránh xa
dụng cụ.
Khi không sử dụng, các dụng cụ điện phải được cất giữ
tránh xa tầm tay trẻ em và người không phận sự.

Tiếng Việt
19
ĐỀ PHÒNG KHI SỬ DỤNG BÚA PHÁ DỠ
1. Mang dụ ng cụ bả o vệ tai.
Tác động của tiếng ồn có thể gây điếc tai.
2. Sử dụng tay nắm phụ kèm theo máy.
Mất kiểm soát máy có thể gây ra thương tích cá nhân.
THÔNG SỐ KỸ THUẬT
Điện áp (theo khu vực)* (110 V, 115 V, 120 V, 127 V, 220 V, 230 V, 240 V)
Công suất* 1.050 W
Mức động lực tải tối đa 3.000/phút
Trọng lượng (không kể dây và tay nắm phụ)
5,0 kg
* Lưu ý luôn kiểm tra nhãn mác trên sản phẩm vì thông số này có thể thay đổi theo khu vực.
CÁC PHỤ TÙNG TIÊU CHUẨN
(1) Hộp ...............................................................................1
(2) Điểm bull .......................................................................1
(3) Tay nắm phụ .................................................................1
Phụ tùng tiêu chuẩn có thể thay đổi mà không báo trước.
CÁC PHỤ TÙNG TÙY CHỌN (bán riêng)
CHÚ Ý
Không thể lắp được loại mũi tròn có vành.
○ Nghiền
(1) Điểm bull
Chiều dài tổng: 280, 450 mm
○ Cắt nhựa atphan
(1) Mũi cắt
○ Xử lý thô bề mặt
(1) Dụng cụ lót (2) Thân búa
○ Đầm
(1) Búa đầm (2) Thân búa
○ Ống bơm (để loại bỏ phoi mảnh)
○ Mũi xúc
(1) Xúc
○ Nắp vỏ xi-lanh (để cách nhiệt cho vỏ xi lanh)
Nắp vỏ xi lanh (cao su)
○ Mỡ loại A dùng cho búa
500 g (trong một hộp)
70 g (trong một tuýp)
30 g (trong một tuýp)
Các phụ tùng tùy chọn có thể thay đổi mà không báo trước.
ỨNG DỤNG
Phá bê tông, rã bê tông, xoi rãnh, cắt sắt thanh, đóng cọc.
Cá c ví dụ ứ ng dụ ng:
Lắp đặ t hệ thố ng ố ng dẫ n và dây dẫ n, lắ p đặ t thiế t bị vệ sinh,
lắ p đặ t thiế t bị , cung cấ p nướ c và công tá c thoá t nướ c, cá c
công việ c nộ i thấ t, cá c cơ sở bế n cả ng và cá c công tá c xây
dự ng dân dụ ng khá c.
3. Không chạm vào mũi búa trong khi hoặc ngay sau khi
máy hoạt động. Mũ
i búa rất nóng trong thời gian vận
hành và có thể gây bỏng nghiêm trọng.
4. Trước khi bắt đầu phá, rã hoặc khoan tường, sàn nhà
hay trần nhà, cần phải xác định được chắc chắn rằng có
các vật như cáp điện hoặc đường ống chôn ngầm bên
trong hay không.

20
Tiếng Việt
TRƯỚC KHI VẬN HÀNH
1. Nguồn điệne
Đảm bảo rằng nguồn điện sử dụng phù hợp với yêu cầu
nguồn điện có trên nhãn mác sản phẩm.
2. Công tắc điện
Đảm bảo rằng công tắc điện nằm ở vị trí OFF. Nếu nối
phích cắm với ổ cắm trong khi công tắc điện ở vị trí ON,
dụng cụ điện sẽ b
ắt đầu hoạt động ngay lập tức và có
thể gây tai nạn nghiêm trọng.
3. Dây nối dài
Khi khu vực làm việc ở cách xa nguồn điện, sử dụng một
dây nối đủ dày và điện dung phù hợp. Kéo dây nối càng
ngắn càng tốt.
4. Lắp đặt dụng cụ
CẢNH BÁO
Phải chắc chắn đã tắt điện và rút phích cắm ra khỏi ổ
cắm để tránh gặp phải rắ
c rối nguy hiểm.
CHÚ Ý
Đối với các dụng cụ như điểm bull và mũi cắt, phải mua
và sử dụng các sản phẩm chính hiệu do Hitachi chỉ định.
(1) Lau và làm sạch phần thân của dụng cụ, và tra mỡ hoặc
dầu máy vào máy.
(2) Lắp phần thân của dụng cụ vào hết lỗ hình lục giác của
nắp trước mặt với tình trạng tay nắm trượt được kéo hết
về hướ
ng như trong Hình 1.
(3) Trả tay nắm trượt về vị trí cũ và phải chắc chắn rằng búa
được kéo lại và khóa hãm an toàn.
(4) Việc tháo búa được thực hiện khi tay nắm trượt được
kéo hết về hướng
tương tự như khi lắp búa.
CẢNH BÁO
Phải nắm chắc tay cầm và tay nắm phụ trong khi làm
việc. Không giữ tay nắm trượt trong khi làm việc: Nếu bị
kéo do sơ ý, điểm bull có thể bật ra ngoài.
CÁCH SỬ DỤNG BÚA PHÁ DỠ (HÌNH 2)
1. Sau khi đặt đầu búa lên mặt bêtông, bật công tác điện.
2. Lợi dụng trọng lượng của máy và giữ chắc búa bằng cả
hai tay, ta có thể kiểm soát được chuyển động phản lực
của búa.
Tiếp tục với một tốc độ làm việc vừa phải, dùng lực
nhiều quá sẽ làm giảm hiệu quả của búa.
THAY MỠ
Búa có kết cấu kín khí hoàn toàn để chống bụi lọt vào và
tránh rò rỉ dầu mỡ bôi trơn. Búa này có thể sử dụng mà
không cần tra thêm dầu mỡ trong một thời gian dài. Tuy
nhiên, hãy thay dầu mỡ để duy trì được tuổi thọ của búa.
Việc thay dầu mỡ như miêu tả dưới đây.
1. Khoảng thời gian thay dầu mỡ
Kiểm tra lại lượng dầu mỡ theo thời gian thay thế định
kỳ của chổi than. (Xem ph
ần BẢO TRÌ VÀ KIỂM TRA.)
Hãy đề nghị thay dầu mỡ tại một Trung tâm Dịch vụ Ủy
quyền của Hitachi gần nhất.
Trong trường hợp bạn phải tự thay dầu mỡ, hãy làm
theo các mục sau đây.
2. Cách thay dầu mỡ
CẢNH BÁO
Trước khi thay dầu mỡ, tắt nguồn điện và rút phích cắm
ra khỏi ổ cắm.
(1) Tháo nắp trục quay và lau sạch dầu mỡ cũ bên trong.
(Hình 3)
(2) Bôi 30 g (khối lượng tiêu chuẩn để phủ lên thanh nối) mỡ
Mỡ loại A dùng cho búa điện Hitachi vào hộp trục này.
(3) Sau khi thay, lắp lại chắc chắn nắp trục quay.
CHÚ Ý
Mỡ loại A dùng cho búa điện Hitachi là loại có độ nhớt
thấp. Khi hết mỡ, hãy mua từ một Trung tâm Dịch vụ Ủy
quyền của Hitachi.
BẢ O DƯỠ NG VÀ KIỂ M TRA
CẢNH BÁÓ
Đả m bả o bậ t nú t OFF và ngắ t kế t nố i phí ch cắ m nố i khỏ i
ổ cắ m điệ n để trá nh tai nạ n nghiêm trọ ng.
1. Kiể m tra dụ ng cụ
Vì sử dụ ng dụ ng cụ cùn sẽ là m giả m sú t hiệ u suấ t và
khiế n cho tì nh trạ ng hỏ ng hó c độ ng cơ có thể xả y ra nên
cầ n là m sắ c hoặ c thay thế dụ ng cụ
ngay sau khi để ý
thấ y có mà i mò n.
2. Kiểm tra các đinh ốc đã lắp
Thường xuyên kiểm tra tất cả các đinh ốc đã lắp và đảm
bảo rằng chúng được siết chặt. Nếu có bất kỳ đinh ốc
nào bị nới lỏng, siết chặt lại ngay lập tức. Nếu không làm
như vậy có thể gây nguy hiểm nghiêm trọng.
3. Bảo dưỡng động cơ
Cuộ
n dây động cơ là "trái tim" của dụng cụ điện. Kiểm
tra và bảo dưỡng để đảm bảo cuộn dây không bị hư
hỏng và/hoặc ẩm ướt do dính dầu nhớt hoặc nước.
4. Kiể m tra chổ i than (Hì nh 6)
Độ ng cơ sử dụ ng chổ i than dướ i dạ ng cá c thà nh phầ n
tiêu hao. Khi chú ng bị bà o mò n hoặ c gầ n đế n “giớ i hạ n
mà i mò n” thì có thể dẫ n đế
n nhữ ng vấn đề về độ ng cơ.
Khi có trang bị mộ t chổ i than dừ ng tự độ ng, độ ng cơ sẽ
dừ ng lạ i tự độ ng. Tạ i thờ i điể m đó , hã y thay thế cả hai
chổ i than bằ ng cá c chổ i mớ i có mã số chổ i than tương
tự như đã chỉ trên hì nh. Ngoà i ra, luôn giữ chổ i than
sạ ch sẽ và đả m bả
o là chú ng trượ t tự do bên trong cá c
kẹ p chổ i than.
5. Thay chổ i than
Nới lỏng vít hãm và tháo nắp ở đuôi.
Tháo các mũ và chổi than. Sau khi thay chổi than, đừng
quên xiết chặt lại các mũ chổi và lắp lại nắp ở đuôi máy.
6. Danh sách phụ tùng bảo dưỡng
A: Số linh kiện
B: Mã số
C: Số đã sử dụng
D: Ghi chú
CẢNH BÁO
Sửa chữa, biến cải và kiểm tra Dụng cụ đ
iện Hitachi phải
được thực hiện bởi một Trung tâm Dịch vụ Ủy quyền
của Hitachi.
Cung cấp Danh sách phụ tùng kèm theo dụng cụ cho
Trung tâm dịch vụ ủy quyền Hitachi là rất hữu ích khi yêu
cầu sửa chữa hoặc bảo dưỡng.
Trong khi vận hành và bảo trì dụng cụ điện, phải tuân
theo các nguyên tắc an toàn và tiêu chuẩn quy định của
từng quốc gia.
SỬA ĐỔI
Dụng cụ đ
iện Hitachi không ngừng được cải thiện và
sửa đổi để thích hợp với các tiến bộ kỹ thuật mới nhất.
Theo đó, một số bộ phận (vd: mã số và/hoặc thiết kế) có
thể được thay đổi mà không cần thông báo trước..
CHÚ Ý
Do chương trình nghiên cứu và phát triển liên tục của
Hitachi, các thông số kỹ thuật nêu trong tài liệu này có thể
thay đổi mà không thông báo trư

21

22

23
ABCD
1993-0404 M7×25
2316-0411D5×30
3991-7081
4991-6951
5983-2352”3, 4, 18-21”
6983-2361
7310-1091“8, 10”
8983-2342
9993-0414M6×25
10 310-110 1
11 9 80 -715 1 S - 48
12 310-112 1
13 986-104 2 110V-120V “9, 11, 34, 38”
14 980-706 1 220V-240V
15 310-113 1
16 939-540 1 D5×60
17 310 -114 1 11 0V “17”
18 983-162 4 M4×12
19 310-115 1
20 980-744 1 S-55
21 310-116 1
22 930-511 1 4×4×10
23 948-391 1
24 996-363 1 S-40
25 620-3DD 1 6203DDUCMAV2S
26 310-119 1
27 ———— 1 6202DDCMPS2L
28 310-117 1 3×3×10
29 310-124 8
30 310-123 2
31 310-126 1
32 310-120 1
33 ———— 1 M5×14
34 939-299 1 M661
35 310-129 1 “34”
36 620-1VV 1 6201VVCMPS2S
37 971-736 1 “39, 41, 47, 48”
38 981-870 1
39 972-612 1
40 980-657 1 “41-43”
41 980- 659 1
42 980-658 1
43 949-875 1
44 971-785 1
45 310-130 1 “GBR (110V)”
46 1 360-360U 1 110V-115V “36, 37, 45, 52, 53”
46 2 360-360E 1 220V-230V “45”
46 3 360-360F 1 240V “45”
47 980-931 1
48 953-121 2 D5×50
49 1340-317C 1110V “50, 51”
49
2 340-317E 1 220V-230V “50, 51”
49 3340-317F 1240V “50, 51”
50 930-703 2 D5×20
51 930 -804 1 D4×20
52 982-631 1 D4×16
53 608-VVM 1 608VVMC2EPS2L
54 310-146 1 “58, 59”
55 980-951 4 M5×45
56 935-829 2 8MM
57 999-043 2
58 971-001 2
59 938-477 2 M5×8
6 0 310 -111 1 M10 ×2 0
ABCD
61 314-130 1 “62”
62 314-262 1
63 307-811 2 D4×16
64 980-754 1
65 310-125 1
66 985-480 2 D5×20
67 991-690 4 M5×12
68 991-711 4
69 310-142 1
70 774-273 1
71 938-307 1
72 981-974Z 1
73 992-891 1
74 310 -141 1
75 307-028 3 D4×25
76 959-141 2
77 1938-051 1D10.1
77 2953-327 1D8.8
78 980-063 1
79 984-750 2 D4×16
80 960-266 1
81 ———— 1
82 930-153 1
83 959-140 1
84 990-861 1
501 980-752 1 280MM
505 310-131 1

103
Code No. C99087636 M
Printed in Malaysia
Hitachi Koki Co., Ltd.
Shinagawa Intercity Tower A, 15-1, Konan 2-chome,
Minato-ku, Tokyo, Japan
Transcripción de documentos
Demolition Hammer Martillo demoledor 電動鎚 파괴햄머 Máy đục phá H 41SC Handling instructions Instrucciones de manejo 使用說明書 취급 설명서 Hướng dẫn sử dụng Read through carefully and understand these instructions before use. Leer cuidadosamente y comprender estas instrucciones antes del uso. 使用前務請詳加閱讀。 본 설명서를 자세히 읽고 내용을 숙지한 뒤 제품을 사용하십시오. Đọc kỹ và hiểu rõ các hướng dẫn này trước khi sử dụng. 000Book̲H41SC̲ChKV.indb 1 2011/02/17 15:26:21 1 2 1 3 2 A 3 4 4 5 a 17 mm English 1 Tool shank 6 Español Barrena 6 mm 8 73 7 mm 中國語 Slide grip Cubierta delantera 滑動把手 3 Front cover Empuñadura deslizable 前罩 4 Crank cover Cubierta del motor 曲柄蓋 5 Wear limit Límite de desgaste 磨損極限 6 No. of carbon brush No. de contacto de carbón 碳刷號 7 Usual carbon brush Escobilla de carbón usual 通常碳刷 Auto-stop carbon brush Escobilla de carbón de parada 自動停止碳刷 automática 한국어 a 43 工具柄 2 8 6 7 Tiếng Việt 1 툴 섕크 Thân dụng cụ 2 슬라이드 그립 Tay nắm trượt 3 앞 커버 Nắp đậy trước 4 크랭크 커버 Nắp trục quay 5 마모 한도 Giới hạn mài mòn 6 카본 브러시 번호 Mã số chổi than 7 일반적인 카본 브러시 Chổi than thông thường 8 자동 정지 카본 브러시 Chổi than dừng tự động 2 000Book̲H41SC̲ChKV.indb 2 2011/02/17 15:26:22 English GENERAL SAFETY RULES WARNING! Read all instructions Failure to follow all instructions listed below may result in electric shock, fire and/or serious injury. The term “power tool” in all of the warnings listed below refers to your mains operated (corded) power tool or battery operated (cordless) power tool. SAVE THESE INSTRUCTIONS 1) Work area a) Keep work area clean and well lit. Cluttered and dark areas invite accidents. b) Do not operate power tools in explosive atmospheres, such as in the presence of flammable liquids, gases or dust. Power tools create sparks which may ignite the dust of fumes. c) Keep children and bystanders away while operating a power tool. Distractions can cause you to lose control. 2) Electrical safety a) Power tool plugs must match the outlet. Never modify the plug in any way. Do not use any adapter plugs with earthed (grounded) power tools. Unmodified plugs and matching outlets will reduce risk of electric shock. b) Avoid body contact with earthed or grounded surfaces such as pipes, radiators, ranges and refrigerators. There is an increased risk of electric shock if your body is earthed or grounded. c) Do not expose power tools to rain or wet conditions. Water entering a power tool will increase the risk of electric shock. d) Do not abuse the cord. Never use the cord for carrying, pulling or unplugging the power tool. Keep cord away from heat, oil, sharp edges or moving parts. Damaged or entangled cords increase the risk of electric shock. e) When operating a power tool outdoors, use an extension cord suitable for outdoor use. Use of a cord suitable for outdoor use reduces the risk of electric shock. 3) Personal safety a) Stay alert, watch what you are doing and use common sense when operating a power tool. Do not use a power tool while you are tired or under the influence of drugs, alcohol or medication. A moment of inattention while operating power tools may result in serious personal injury. b) Use safety equipment. Always wear eye protection. Safety equipment such as dust mask, non-skid safety shoes, hard hat, or hearing protection used for appropriate conditions will reduce personal injuries. c) Avoid accidental starting. Ensure the switch is in the off position before plugging in. Carrying power tools with your finger on the switch or plugging in power tools that have the switch on invites accidents. d) Remove any adjusting key or wrench before turning the power tool on. A wrench or a key left attached to a rotating part of the power tool may result in personal injury. e) Do not overreach. Keep proper footing and balance at all times. This enables better control of the power tool in unexpected situations. f) Dress properly. Do not wear loose clothing or jewellery. Keep your hair, clothing and gloves away from moving parts. Loose clothes, jewellery or long hair can be caught in moving parts. g) If devices are provided for the connection of dust extraction and collection facilities, ensure these are connected and properly used. Use of these devices can reduce dust related hazards. 4) Power tool use and care a) Do not force the power tool. Use the correct power tool for your application. The correct power tool will do the job better and safer at the rate for which it was designed. b) Do not use the power tool if the switch does not turn it on and off. Any power tool that cannot be controlled with the switch is dangerous and must be repaired. c) Disconnect the plug from the power source before making any adjustments, changing accessories, or storing power tools. Such preventive safety measures reduce the risk of starting the power tool accidentally. d) Store idle power tools out of the reach of children and do not allow persons unfamiliar with the power tool or these instructions to operate the power tool. Power tools are dangerous in the hands of untrained users. e) Maintain power tools. Check for misalignment or binding of moving parts, breakage of parts and any other condition that may affect the power tools’ operation. If damaged, have the power tool repaired before use. Many accidents are caused by poorly maintained power tools. f) Keep cutting tools sharp and clean. Properly maintained cutting tools with sharp cutting edges are less likely to bind and are easier to control. g) Use the power tool, accessories and tool bits etc., in accordance with these instructions and in the manner intended for the particular type of power tool, taking into account the working conditions and the work to be performed. Use of the power tool for operations different from intended could result in a hazardous situation. 5) Service a) Have your power tool serviced by a qualified repair person using only identical replacement parts. This will ensure that the safety of the power tool is maintained. PRECAUTION Keep children and infirm persons away. When not in use, tools should be stored out of reach of children and infirm persons. 3 000Book̲H41SC̲ChKV.indb 3 2011/02/17 15:26:25 English 3. Do not touch the bit during or immediately after operation. The bit becomes very hot during operation and could cause serious burns. 4. Before starting to break, chip or drill into a wall, floor or ceiling, thoroughly confirm that such items as electric cables or conduits are not buried inside. PRECAUTIONS ON USING DEMOLITION HAMMER 1. Wear ear protectors Exposure to noise can cause hearing loss. 2. Use auxiliary handles supplied with the tool. Loss of control can cause personal injury. SPECIFICATIONS Voltage (by areas)* (110 V, 115 V, 120 V, 127 V, 220 V, 230 V, 240 V) Power Input* 1050 W Full-load Impact Rate 3000/min Weight (without cord, side handle) 5.0 kg * Be sure to check the nameplate on product as it is subject to change by areas. STANDARD ACCESSORIES (1) Case ..........................................................................1 (2) Bull Point ......................................................................1 (3) Side Handle..................................................................1 Standard accessories are subject to change without notice. ○ Syringe (for chip removal) ○ Scooping Work OPTIONAL ACCESSORIES (sold separately) NOTE The round type bit with a collar cannot be attached. ○ Crushing (1) (1) Scoop ○ Cylinder case cover (For heat insulation of cylinder case) Cylinder case cover (rubber) Bull Point Overall Length: 280, 450 mm ○ Asphalt Cutting (1) Cutter ○ Surface Roughing ○ Hammer Grease A 500 g (in a can) 70 g (in a tube) 30 g (in a tube) Optional accessories are subject to change without notice. (1) Bushing Tool (2) Shank ○ Tamping (1) Rammer APPLICATIONS Breaking concrete, chipping off concrete, grooving, bar cutting, and driving piles. Application examples: Installation of piping and wiring, sanitary facility installation, machinery installation, water supply and drainage work, interior jobs, harbor facilities and other civil engineering work. (2) Shank 4 000Book̲H41SC̲ChKV.indb 4 2011/02/17 15:26:25 English PRIOR TO OPERATION 1. Power source Ensure that the power source to be utilized conforms to the power requirements specified on the product nameplate. 2. Power switch Ensure that the power switch is in the OFF position. If the plug is connected to a receptacle while the power switch is in the ON position, the power tool will start operating immediately, which could cause a serious accident. 3. Extension cord When the work area is removed from the power source, use an extension cord of sufficient thickness and rated capacity. The extension cord should be kept as short as practicable. 4. Installing tools CAUTION Be sure to switch power OFF and disconnect the plug from the receptacle to avoid serious trouble. NOTE Concerning the tools such as bull points and cutters, be sure to use separately sold genuine parts that are designated by HITACHI. (1) Wipe off and clean up the shank section of the tool, and apply grease or machine oil onto it. (2) Insert the shank section of the tool completely into the hexagonal hole of the front cover at a state where the slide grip is fully pulled in the direction of as shown in Fig. 1. (3) Return the slide grip to its home position and make sure that the tool is pulled and locked securely. (4) Removal is carried out at a state where the slide grip is fully pulled in the directon of in a manner similar to the case of installing the tool. CAUTION Be sure to grip the handle and side handle during work. Do not hold by the slide grip during work: If you pull it by mistake, the bull point could jump out. HOW TO USE THE DEMOLITION HAMMER (Fig. 2) 1. After placing the tip of the tool on concrete surface, switch ON. 2. By utilizing the weight of the machine and by firmly holding the demolition hammer with both hands, one can effectively control the subsequent recoil motion. Proceed at a moderate work-rate, the use of too much force will impair efficiency. GREASE REPLACEMENT This machine is of full air-tight construction to protect against dust and to prevent lubricant leakage. This machine can be used without grease supplement for an extended period of time. However, perform the grease replacement to maintain the service life. Replace the grease as described below. 1. Grease replacement period Inspect the grease amount according to the timing replacement period of the carbon brush. (See the section MAINTENANCE AND INSPECTION.) Ask for grease replacement at the nearest authorized Hitachi Service Center. In the case that you are forced to change the grease by yourself, please follow the following points. 2. How to replace grease CAUTION Before replacing the grease, turn the power off and pull out the plug from the receptacle. (1) Remove the crank cover and wipe off the old grease inside. (Fig. 3) (2) Supply 30 g (the standard volume to cover the connecting rod) of Hitachi Electric Hammer Grease A to the crank case. (3) After replacing the grease, install the crank cover securely. NOTE The Hitachi Electric Hammer Grease A is of the low viscosity type. When the grease is consumed, purchase from an authorized Hitachi Service Center. MAINTENANCE AND INSPECTION CAUTION Be sure to switch power OFF and disconnect the plug from the receptacle to avoid serious trouble. 1. Inspecting the tool Since use of a dull tool will degrade efficiency and cause possible motor malfunction, sharpen or replace the tool as soon as abrasion is noted. 2. Inspecting the mounting screws Regularly inspect all mounting screws and ensure that they are properly tightened. Should any of the screws be loose, retighten them immediately. Failure to do so could result in serious hazard. 3. Maintenance of the motor The motor unit winding is the very “heart” of the power tool. Exercise due care to ensure the winding does not become damaged and/or wet with oil or water. 4. Inspecting the carbon brushes (Fig. 6) The Motor employs carbon brushes which are consumable parts. When they become worn to or near the “wear limit”, it could result in motor trouble. When an auto-stop carbon brush is equipped, the motor will stop automatically. At that time, replace both carbon brushes with new ones which have the same carbon brush Numbers shown in the figure. In addition, always keep carbon brushes clean and ensure that they slide freely within the brush holders. 5. Replacing carbon brushes Loosen the set screw and remove the tail cover. Remove the brush caps and carbon brushes. After replacing the carbon brushes, do not forget to tighten the brush caps securely and to install the tail cover. 6. Service parts list A: Item No. B: Code No. C: No. Used D: Remarks CAUTION Repair, modification and inspection of Hitachi Power Tools must be carried out by a Hitachi Authorized Service Center. This Parts List will be helpful if presented with the tool to the Hitachi Authorized Service Center when requesting repair or other maintenance. In the operation and maintenance of power tools, the safety regulations and standards prescribed in each country must be observed. 5 000Book̲H41SC̲ChKV.indb 5 2011/02/17 15:26:26 English MODIFICATIONS Hitachi Power Tools are constantly being improved and modified to incorporate the latest technological advancements. Accordingly, some parts (i.e. code numbers and/or design) may be changed without prior notice. NOTE Due to HITACHI’s continuing program of research and development, the specifications herein are subject to change without prior notice. 6 000Book̲H41SC̲ChKV.indb 6 2011/02/17 15:26:26 Español NORMAS GENERALES DE SEGURIDAD ¡ADVERTENCIA! Lea todas las instrucciones Si no se siguen las instrucciones de abajo podría producirse una descarga eléctrica, un incendio y/o daños graves. El término “herramienta eléctrica” en todas las advertencias indicadas a continuación hace referencia a la herramienta eléctrica que funciona con la red de suministro (con cable) o a la herramienta eléctrica que funciona con pilas (sin cable). CONSERVE ESTAS INSTRUCCIONES 1) Área de trabajo a) Mantenga la zona de trabajo limpia y bien iluminada. Las zonas desordenadas y oscuras pueden provocar accidentes. b) No utilice las herramientas eléctricas en entornos explosivos como, por ejemplo, en presencia de líquidos inflamables, gases o polvo. Las herramientas eléctricas crean chispas que pueden hacer que el polvo desprenda humo. c) Mantenga a los niños y transeúntes alejados cuando utilice una herramienta eléctrica. Las distracciones pueden hacer que pierda el control. 2) Seguridad eléctrica a) Los enchufes de las herramientas eléctricas tienen que ser adecuados a la toma de corriente. No modifique el enchufe. No utilice enchufes adaptadores con herramientas eléctricas conectadas a tierra. Si no se modifican los enchufes y se utilizan tomas de corriente adecuadas se reducirá el riesgo de descarga eléctrica. b) Evite el contacto corporal con superficies conectadas a tierra como tuberías, radiadores y frigoríficos. Hay mayor riesgo de descarga eléctrica si su cuerpo está en contacto con el suelo. c) No exponga las herramientas eléctricas a la lluvia o a la humedad. La entrada de agua en una herramienta eléctrica aumentará el riesgo de descarga eléctrica. d) No utilice el cable incorrectamente. No utilice el cable para transportar, tirar de la herramienta eléctrica o desenchufarla. Mantenga el cable alejado del calor, del aceite, de bordes afilados o piezas móviles. Los cables dañados o enredados aumentan el riesgo de descarga eléctrica. e) Cuando utilice una herramienta eléctrica al aire libre, utilice un cable prolongador adecuado para utilizarse al aire libre. La utilización de un cable adecuado para usarse al aire libre reduce el riesgo de descarga eléctrica. 3) Seguridad personal a) Esté atento, preste atención a lo que hace y utilice el sentido común cuando utilice una herramienta eléctrica. No utilice una herramienta eléctrica cuando esté cansado o esté bajo la influencia de drogas, alcohol o medicación. La distracción momentánea cuando utiliza herramientas eléctricas puede dar lugar a importantes daños personales. b) Utilice equipo de seguridad. Utilice siempre una protección ocular. El equipo de seguridad como máscara para el polvo, zapatos de seguridad antideslizantes, casco o protección para oídos utilizado para condiciones adecuadas reducirá los daños personales. c) Evite un inicio accidental. Asegúrese de que el interruptor está en “off ” antes de enchufarlo. El transporte de herramientas eléctricas con el dedo en el interruptor o el enchufe de herramientas eléctricas con el interruptor encendido puede provocar accidentes. d) Retire las llaves de ajuste antes de encender la herramienta eléctrica. Si se deja una llave en una pieza giratoria de la herramienta eléctrica podrían producirse daños personales. e) No se extralimite. Mantenga un equilibrio adecuado en todo momento. Esto permite un mayor control de la herramienta eléctrica en situaciones inesperadas. f) Vístase adecuadamente. No lleve prendas sueltas o joyas. Mantenga el pelo, la ropa y los guantes alejados de las piezas móviles. La ropa suelta, las joyas y el pelo largo pueden pillarse en las piezas móviles. g) Si se proporcionan dispositivos para la conexión de extracción de polvo e instalaciones de recogida, asegúrese de que están conectados y se utilizan adecuadamente. La utilización de estos dispositivos puede reducir los riesgos relacionados con el polvo. 4) Utilización y mantenimiento de las herramientas eléctricas a) No fuerce la herramienta eléctrica. Utilice la herramienta eléctrica correcta para su aplicación. La herramienta eléctrica correcta trabajará mejor y de forma más segura si se utiliza a la velocidad para la que fue diseñada. b) No utilice la herramienta eléctrica si el interruptor no la enciende y apaga. Las herramientas eléctricas que no pueden controlarse con el interruptor son peligrosas y deben repararse. c) Desconecte el enchufe de la fuente eléctrica antes de hacer ajustes, cambiar accesorios o almacenar herramientas eléctricas. Estas medidas de seguridad preventivas reducen el riesgo de que la herramienta eléctrica se ponga en marcha accidentalmente. d) Guarde las herramientas eléctricas que no se utilicen para que no las cojan los niños y no permita que utilicen las herramientas eléctricas personas no familiarizadas con las mismas o con estas instrucciones. Las herramientas eléctricas son peligrosas si son utilizadas por usuarios sin formación. e) Mantenimiento de las herramientas eléctricas. Compruebe si las piezas móviles están mal alineadas o unidas, si hay alguna pieza rota u otra condición que pudiera afectar al funcionamiento de las herramientas eléctricas. Si la herramienta eléctrica está dañada, llévela a reparar antes de utilizarla. Se producen muchos accidentes por no realizar un mantenimiento correcto de las herramientas eléctricas. 7 000Book̲H41SC̲ChKV.indb 7 2011/02/17 15:26:26 Español f) Mantenga las herramientas de corte afiladas y limpias. Las herramientas de corte correctamente mantenidas con los bordes de corte afilados son más fáciles de controlar. g) Utilice la herramienta eléctrica, los accesorios y las brocas de la herramienta, etc., de acuerdo con estas instrucciones y de la manera adecuada para el tipo de herramienta eléctrica, teniendo en cuenta las condiciones laborales y el trabajo que se va a realizar. La utilización de la herramienta eléctrica para operaciones diferentes a pretendidas podría dar lugar a una situación peligrosa. 5) Revisión a) Lleve su herramienta a que la revise un experto cualificado que utilice sólo piezas de repuesto idénticas. Esto garantizará el mantenimiento de la seguridad de la herramienta eléctrica. ESPECIFICACIONES Voltage (por áreas)* PRECAUCIÓN Mantenga a los niños y a las personas enfermas alejadas. Cuando no se utilicen, las herramientas deben almacenarse fuera del alcance de los niños y de las personas enfermas. PRECAUCIONES AL USAR EL MARTILLO DEMOLEDOR 1. Utilice protectores de oídos La exposición al ruido puede causar daños auditivos. 2. Utilice los mangos auxiliares proporcionados con la herramienta. La pérdida de control puede causar daños personales. 3. No tocar la broca durante ni inmediatamente después de trabajar, puesto que se pone ardiente y puede causar quemaduras serias. 4. Antes de empezar a romper, picar o perforar en una pared, suelo o techo, comprobar cuidadosamente que no hayan objetos empotrados, tales como cables o conductos eléctricos. (110 V, 115 V, 120 V, 127 V, 220 V, 230 V, 240 V) Entrada* 1050 W Impacto a carga plena 3000/min Peso (sin cable, ni mango lateral) 5,0 kg * Verificar indefectiblemente los datos de la placa de características de la máquina, pués varian de acuerdo al país de destino. ACCESORIOS NORMALES ○ Apisonamiento (1) Caja ..........................................................................1 (2) Punta ..........................................................................1 (3) Mango Lateral ..............................................................1 Los accessorios normales están sujetos a cambio sin previo aviso. ACCESORIOS OPCIONALES (de venta por separado) NOTA La broca de tipo redondo con collar no podrá fijarse. (1) Pisón (2) Barrena ○ Jeringa (extracción de resíduos) ○ Para romper ○ Trabajos con cuchara (1) Punta Largo total: 280, 450 mm ○ Cortadora de asfalto (1) Cuchara (1) Cargadora ○ Desbastadora de superficies (1) Desbastadora ○ Cubierta de la caja del cilindro (Para aislamiento térmico de la caja del cilindro) Cubierta de la caja del cilindro (caucho) (2) Barrena 8 000Book̲H41SC̲ChKV.indb 8 2011/02/17 15:26:26 Español ○ Grasa A para martillo 500 g (en una lata) 70 g (en un tubo) 30 g (en un tubo) Los accesorios facultativos están sujetos a cambio sin previo aviso. APLICACIONES Romper hormigón armado, cortar o picar hormigón, hacer ranuras, cortes y colocar pilotes. Ejemplo de aplicación: Instalación de tuberia y artículos sanitarios, instalación de maquinaria, trabajos de suministro de agua y drenaje, trabajos en interiores, instalaciones portuarias y demás trabajos propios de ingenieria civil. ANTES DE LA PUESTA EN MARCHA 1. Alimentación Asegurarse de que la alimentación de red que ha de ser utilizada responda a las exigencias de corriente especificadas en la placa de características del producto. 2. Conmutador de alimentación Asegurarse de que el conmutador de alimentación esté en la posición OFF (desconectado). Si la clavija está conectada en la caja del enchufe mientras el conmutador de alimentación esté en posición ON (conectado) las herramientas eléctricas empezarán a trabajar inmediatamente, provocando un serio accidente. 3. Cable de prolongación Cuando está alejada el área de trabajo de la red de alimentación, usar un cable de prolongación de un grosor y potencia normal suficiente. El cable de prolongación debe ser mantenido lo más corto posible. 4. Instalación de herramientas PRECAUCIÓN Asegúrese de desconectar la alimentación y de desenchufar la clavija del tomacorriente. NOTA Con respecto a herramientas tales como barretas de punta y cortadores, cerciórese de utilizar piezas genuinas vandidas aparte diseñadas por HITACHI. (1) Frote la sección de la espiga de la herramienta, y aplíquele grasa o aceite para máquinas. (2) Inserte la sección de la espiga de la herramienta completamente en el orificio hexagonal de la cubierta frontal en un estado en el que la empuñadura deslizable esté completamente extraída en el sentido de , como se muestra en la Fig. 1. (3) Devuelva la empuñadura a su posición inicial y cerciórese de que la herramienta esté extraída y bloqueada con seguridad. (4) La extracción deberá realizarse en un estado en el que la empuñadura deslizable esté completamente insertada en el sentido de de forma similar al caso de instalación de la herramienta. PRECAUCIÓN Asegúrese de asir la manija y la manija lateral durante el trabajo. No lo tome por la empuñadura deslizable durante el trabajo: Si la toma por equivocación, podría saltar afuera la punta. FORMA DE USAR EL MARTILLO DEMOLEDOR (Fig. 2) 1. Conecte la alimentación después de colocar la punta de la herramienta sobre una superficie de hormigón. 2. Utilizando el peso de la máquina y sujetándola firmemente con ambas manos, uno puede controlar perfectamente el movimiento de reculada. Luego usar el martillo demoledor moderadamente, ya que al aplicar con fuerza y exceso desmejora la eficiencia de la herramienta. CAMBIO DE GRASA Esta máquina es de construcción completamente cerrada, para evitar que entre el polvo y que hayan fugas de lubricante. Esta unidad podrá utilizarse sin grasa suplemantaria durante mucho tiempo. Sin embargo, reemplace la grasa para mantener la duración de servicio. Cuando se requiere cambiar la grasa, proceder como sigue. 1. Periodo de cambio de grasa Inspeccione ia candidad de grasa en el momento de reemplazar las escobillas. (Consulte la sección MANTENIMIENTO E INSPECCION.) Consultar para ello al Agente de Servicio Hitachi autorizado. En caso de tener que cambiar la grasa por sí mismo, hágalo de acuerdo con los puntos siguientes. 2. Cambio de grasa PRECAUCIÓN Antes de cambiar la grasa, desconectar el aparato y desenchufarlo del tomacorriente. (1) Quitar la cubierta del motor y limpiar la grase vieja interna. (Fig. 3) (2) Aplicar 30 g (la cantidad estándar para cubrir la biela) de grasa para Martillo Eléctrico Hitachi de tipo A en el cárter. (3) Luego de cambiar la grasa, instalar el cárter firmemente. NOTA La grasa A del Martillo Eléctrico Hitachi es del tipo de baja densidad. Cuando se acabe la grasa adquirir más a un Agente se Servicio Hitachi autorizado. MANTENIMIENTO E INSPECCION PRECAUCIÓN Cerciórese de desconectar la alimentación y desenchufe el enchufe de la toma de alimentación de la red para evitar averás serias. 1. Inspección d la herramienta Ya que la utilización de una herramienta de corte embotada disminuirá la eficiencia de trabajo y podría causar desperfectos en el motor, afilar o cambiar las herramientas de corte tan pronto como se note abrasión en éstas. 2. Inspeccionar los tornillos de montaje Regularmente inspeccionar todos los tornillos de montaje y asegurarse de que estén apretados firmemente. Si cualquier tornillo estuviera suelto, volver a apretarlo inmediatamente. El no hacer esto provocaría un riesgo serio. 3. Mantenimiento de motor La unidad de bobinado del motor es el verdadero “corazón” de las herramientas eléctricas. Prestar el mayor cuidado y asegurarse de que el bobinado no se dañe y/o se humedezca con aceite o agua. 9 000Book̲H41SC̲ChKV.indb 9 2011/02/17 15:26:27 Español 4. Inspeccionar los carbones de contacto (Fig. 6) El motor emplea escobillas de carbón que son partes consumibles. Cuando se gastan o están cerca del “limite de desgaste” pueden causar problemas al motor. Al equiparse la escobilla de carbón de parada automática, el motor se detendrá automáticamente en ese momento hay que proceder a cambiar ambas escobillas de carbón por la nuevas, que tienen los mismos números de escobillas de carbón como se muestra en la figura. Además siempre hay hay que mantener las escobillas de carbón limpias y asegurarse de que se muevan libremente en sus porta-escobillas. 5. Reemplazar el carbón de contacto Quitar la cubierta de trasera y luego aflojar el tornillo de fijactón. Aflojando la tapa de escobilla, pueden quitarse las excobillas de carbón. Al colocar las escobillas, apretar firmemente la tapa de escobillas y recolocar la cubierta de trasera. 6. Lista de repuestos A: N°. ítem B: N°. código C: N°. usado D: Observaciones PRECAUCIÓN La reparación, modificación e inspección de las herramientas eléctricas Hitachi deben ser realizadas por un Centro de Servicio Autorizado de Hitachi. Esta lista de repuestos será de utilidad si es presentada junto con la herramienta al Centro de Servicio Autorizado de Hitachi, para solicitar la reparación o cualquier otro tipo de mantenimiento. En el manejo y el mantenimiento de las herramientas eléctricas, se deberán observar las normas y reglamentos vigentes en cada país. MODIFICACIONES Hitachi Power Tools introduce constantemente mejoras y modificaciones para incorporar los últimos avances tecnológicos. Por consiguiente, algunas partes (por ejemplo, números de códigos y/o diseño) pueden ser modificadas sin previo aviso. NOTA Debido al programa continuo de investigación y desarollo de HITACHI estas especificaciones están sujetas a cambio sin preaviso. 10 000Book̲H41SC̲ChKV.indb 10 2011/02/17 15:26:27 中國語 一般安全規則 警告! 閱讀所有說明,未遵守下列之說明可能導致電擊、火 災及/或嚴重傷害。 「電動工具」一詞在下列警告中,關係到電源操作 (有線)之電動工具或電池操作(無線)之電動工 具。 記住這些說明 1) 工作場所 a) 保持工作場所清潔及明亮。 雜亂及昏暗區域易發生意外。 b) 勿在易產生爆炸之環境中操作,譬如有易燃液 體、瓦斯或粉塵存在之處。 電動工具產生火花會引燃粉塵或煙氣。 c) 當操作電動工具時,保持兒童及過往人員遠 離。 分神會讓你失去控制。 2) 電氣安全 a) 電動工具插頭必須與插座配合,絕不可以任何 方法修改插頭,且不得使用任何轉接插頭於有 接地之電動工具。 不修改插頭及所結合之插座可減少電擊。 b) 避免身體接觸到接地面諸如管子、散熱器、爐 灶及冰箱。 如果你的身體接地或搭地,會增加電擊的危 險。 c) 勿讓電動工具淋雨或曝露在潮濕的環境下。 電動工具進水會增加電繫的危險。 d) 勿濫用電源線。絕勿使用電源線去纏繞、拖拉 電動工具或拔插頭,保持電源線遠離熱氣、油 氣、尖角或可動零件。 損壞或纏繞的電源線會增加電繫之危險。 e) 電動工具在室外操作時要使用一適合室外用的 延長線。 使用合適之室外用延長線會減少電擊的危險。 3) 人員安全 a) 保持機警,注意你正在做什麼,並運用普通常 識操作電動工具。 當你感到疲勞或受藥品、酒精或醫療影響時, 勿操作電動工具。 操作中瞬間的不注意可能造成人員嚴重的傷 害。 b) 使用安全裝備,常時佩戴安全眼鏡。 安全裝備有防塵口罩、防滑安全鞋、硬帽,或 在適當情況下使用聽覺防護,可減少人員傷 害。 c) 避 免 意 外 地 啟 動 。 在 插 電 前 確 認 開 關 是 在 “off”的位置。 以手指放在開關握持電動工具,或在電動工具 的開關於“on”的狀況下插上插頭,都會導致 意外發生。 d) 在將電動工具啟動前,先卸下任何調整用鑰匙 或扳手。 扳手或鑰匙遺留在電動工具的轉動部位時,可 能導致人員傷害。 e) 身體勿過度伸張,任何時間要保持站穩及平 衡。 以便在不預期的狀態下,能對電動工具有較好 的控制。 f) 衣著要合宜,別穿太鬆的衣服或戴首飾。 保持你的頭髮、衣服及手套遠離轉動部位。 寬鬆的衣服、手飾及長髮會被捲入轉動部位。 g) 如果裝置要用於粉塵抽取及集塵設施,要確保 其連接及正當使用。 使用此類裝置能減少與粉塵有關之危害。 4) 電動工具之使用及注意事項 a) 勿強力使用電動工具,使用正確之電動工具為 你所需。 正確使用電動工具會依其設計條件使工作做得 更好更安全。 b) 如果開關不能轉至開及關的位置,勿使用電動 工具。 任何電動工具不能被開關所控制是危險的,必 須要修理。 c) 在做任何調整、更換配件或收存電動工具時, 要將插頭與電源分開,且/或將電池從電動工 具中取出。 此種預防安全措施可減少意外開啟電動機之危 險。 d) 收存停用之電動工具,遠離兒童,且不容許不 熟悉電動工具或未瞭解操作電動工具說明書的 人操作電動工具。 在未受過訓練的人手裡,電動工具極為危險。 e) 保養電動工具,檢核是否有可動零件錯誤的結 合或卡住、零件破裂及可能影響電動工具操作 的任何其他情形。 電動工具如果損壞,在使用前要修好。許多意 外皆肇因於不良的保養。 f) 保持切割工具銳利清潔。 適當的保養切割工具,保持銳利之切削鋒口, 可減少卡住並容易控制。 g) 按照說明書使用電動工具、配件及刀具等,使 用特殊型式之電動工具時要考量工作條件及所 執行之工作。 使用電動工具未如預期用途之操作時,會導致 危害。 11 000Book̲H41SC̲ChKV.indb 11 2011/02/17 15:26:27 中國語 5)維修 a) 讓你的電動工具由合格修理人員僅使用相同的 維修零件更換。 如此可確保電動工具的安全得以維持。 注意事項 不可讓孩童和體弱人士靠近工作場所。 應將不使用的工具存放在孩童和體弱人士伸手不及的 地方。 規 電 使用電動鎚時的注意事項 1. 佩戴護耳罩 噪音會導致聽力喪失。 2. 使用工具附帶的輔助把手。 失去控制會導致人身傷害。 3. 作業直後的鑽頭仍處在高熱狀態下,切不可摸 觸,以免灼傷。 4. 纘盤牆壁,天花板,地板時,應先確認有無理設 電纜或電管道類。 格 壓(按地區)* (110 V, 115 V, 120 V, 127 V, 220 V, 230 V, 240 V) 輸入功率 * 1050 W 滿載衝擊率 3000 /分 重 量(不帶電源線、側柄) 5.0 kg * 當須改變地區時應檢查產品上的銘牌。 標 準 附 件 (1) 箱子 ...................................................................1 (2) 尖鑽頭 ................................................................1 (3) 側柄 ...................................................................1 標準附件可能不預先通告而徑予更改。 ○ 表面粗加工頭 (1) 套筒 (2) 柄 ○ 夯具 選購附件(分開銷售) 註: 無法安裝帶凸緣的圓形鑽子。 (1) 撞錘 ○ 擠壓頭 (2) 柄 ○ 噴射器(用於毉眼清屑) (1) 尖鑽頭 總長:280,450 mm ○ 鏟子 ○ 瀝青刮刀 (1) 刀具 (1) 鏟子 12 000Book̲H41SC̲ChKV.indb 12 2011/02/17 15:26:28 中國語 ○ 機筒盒蓋(用於機筒的熱絕緣) 機筒盒蓋(橡膠) (3) 將滑動把手復歸原處,拉動工具確認其已確實固 定住。 (4) 拆卸工具時,與安裝工具時一樣,需將滑動把手 向 方向拉出。 注意 工作中務必握住工具柄部和邊柄。 工作中請勿握住滑動把手,否則,當您誤將其拉 動時,會發生尖鑽頭彈出事故。 ○ 日立牌電動鎚潤滑油 A 500 g (在油罐內) 70 g (在管內) 30 g (在管內) 選購附件可能不預先通告而徑予更改。 用途 混凝土破碎、混凝土切削、開槽、棒切割與打樁。 應用例: 裝配管道、敷設線纜、衛生設備安裝、機械安裝、給 排水設施建設、室內裝修、港口設施建設、其它土木 工程施工。 作業之前 1. 電源 確認所使用的電源與工具銘牌上標示的規格是否 相符。 2. 電源開關 確認電源開關是否切斷。若電源開關接通,則插 頭插入電源插座時電動工具將出其不意地立刻轉 動,從而招致嚴重事故。 3. 延伸電纜 若作業場所移到離開電源的地點,應使用容易足 夠、鎧裝合適的延伸線纜,並且要盡可能地短 些。 4. 安裝工具 注意 請務必關閉電源並從電源插座上拔下電源插頭, 以避免嚴重事故。 註 使用強力轉轍器及截斷器等工具時,請使用敝公 司指定的另售零件。 (1) 擦淨工具柄部,塗上潤滑油或機油。 (2) 如圖 1所示將滑動把手向 方向完全拉出,將工 具柄部牢固插入前蓋的六角形孔中。 000Book̲H41SC̲ChKV.indb 13 電動鎚的使用方法(圖 2) 1. 把鑽頭的尖端放入底座孔內之後,打開開關。有 時,要使鑽朝衝擊位置相反的方向強制跳起,以 開始衝擊行程。 2. 這並不是電動鎚有毛病,而是無負荷衝擊保護機 構起作用的緣故。 利用機器重量,用兩隻手緊緊握住電動鎚,就可 以有效地控制反衝運動。 要以適當的速度開始工作,用力過猛將會降低效 率。 更換潤滑油 該機具有全氣密結構以防塵和潤滑油漏失。因此,即 使長期不更換潤滑油也能使用本機。但是,為維持本 機的使用壽命,請更換潤滑油。更換潤滑油方法如 下。 1. 潤滑油更換周期 更換碳刷時(請參照維護和檢查的第4項)、請順 便檢查一下潤滑油的剩余量。請找離你最近的指 定的日立代理店更換潤滑油。 不得不自己更換潤滑油時,請按下列順序進行。 2. 潤滑油的更換方法 注意 更換潤滑油前應先關上電源並拔下電源插頭。 (1) 卸下曲柄蓋並擦掉內部的舊潤滑油。(圖 3) (2) 向曲柄室加入 30 克(以能遮蓋住連接桿為基 準)日立牌電動鎚潤滑油 A 。 (3) 更換潤滑油後,請將曲柄室安裝牢固。 註 電動鎚潤滑油 A 為低黏度型。當潤滑油損耗時請 向指定的日立代理店購買。 13 2011/02/17 15:26:28 中國語 維護和檢查 註 為求改進,本手冊所載規格可能不預先通告而徑 予更改。 注意 確認開關已斷開並且從電源插座中拔去電源插頭 以避免嚴重事故。 1. 工具檢修 當使用變鈍的工具時會降低效率並可能使電動機 出現故障,因此剛一發現就立即磨快或更換該工 具。 2. 檢查安裝螺釘 要經常檢查安裝螺釘是否緊固妥善。若發現螺釘 鬆了,應立即重新扭緊,否則會導致嚴重的事 故。 3. 電動機的維護 電動機繞線是電動工具的“心臟部”。應仔細檢 查有無損傷,是否被油液或水沾濕。 4. 檢查碳刷(圖 6) 電動機裏的碳刷是一種消耗品。碳刷一旦使用到 “磨損極限”,電動機就會出現各種障礙;如果 所使用的碳刷是“自停式”,電動機將自動地停 止轉動。遇到上述情況,應立即換上與圖上代號 一致的新碳刷。 此外,碳刷應經常保持乾淨狀 態,以保證能在刷握裏自由滑動。 5. 更換步驟 鬆開固定螺絲拆下尾罩,拆下碳刷罩和碳刷,更 換碳刷後不要忘記擰緊碳刷罩和尾罩。 6. 維修部件目錄 A: 項目號碼 B: 代碼號碼 C: 所使用號碼 D: 備注 注意 日立電動工具的修理、維護和檢查必須由日立所 認可的維修中心進行。 當尋求修理或其他維護時,將本部件目錄與工具 一起提交給日立所認可的維修中心會對您有所幫 助。 在操作和維護電動工具中,必須遵守各國的安全 規則和標准規定。 改進: 日立電動工具隨時都在進行改進以適應最新的技 術進步。 因此,有些部件(如,代碼號碼和 或設計)可 能未預先通知而進行改進。 14 000Book̲H41SC̲ChKV.indb 14 2011/02/17 15:26:28 한국어 일반적인 안전 수칙 경고! 설명서를 자세히 읽으십시오. 설명서의 내용에 따르지 않을 시에는 감전 사고나 화재가 발 생할 수 있으며 심각한 부상을 입을 수도 있습니다. 아래에 나오는‘전동 툴 이란 용어는 플러그를 콘센트에 연결 해 유선 상태로 사용하는 제품 또는 배터리를 넣어 무선 상 태로 사용하는 제품을 가리킵니다. 설명서의 내용을 숙지하십시오. 1) 작업 공간 a) 작업 공간을 깨끗하게 청소하고 조명을 밝게 유지하 십시오. 작업 공간이 정리되어 있지 않거나 어두우면 사고가 날 수 있습니다. b) 인화성 액체나 기체 또는 먼지 등으로 인해 폭발 위 험이 있는 환경에서는 전동 툴을 사용하지 마십시오. 전동 툴을 사용하다 보면 불꽃이 튀어서 먼지나 기체 에 불이 붙을 수 있습니다. c) 어린이를 비롯하여 사용자 외에는 작업장소에 접근 하지 못하도록 하십시오. 주의가 산만해지면 문제가 생길 수 있습니다. 2) 전기 사용시 주의사항 a) 전동 툴 플러그와 콘센트가 일치해야 합니다. 플러그를 절대로 변형하지 마십시오. 접지된 전동 툴에는 어댑터 플러그를 사용하지 마십 시오. 플러그를 변형하지 않고 알맞은 콘센트에 꽂아 사용 하면, 감전 위험을 줄일 수 있습니다. b) 파이프, 라디에이터, 레인지, 냉장고 등 접지된 표면 에 몸이 닿지 않도록 주의하십시오. 작업자의 몸이 접지되면, 감전될 위험이 있습니다. c) 전동 툴에 비를 맞히거나 젖은 상태로 두지 마십시 오. 물이 들어가면 감전될 위험이 있습니다. d) 코드를 조심해서 다루십시오. 전동 툴을 들거나 당기 거나 콘센트에서 뽑으려고 할 때 코드를 잡아당기면 안 됩니다. 열, 기름, 날카로운 물건, 움직이는 부품 등으로부터 코드를 보호하십시오. 코드가 파손되거나 엉키면 감전될 위험이 높아집니 다. e) 실외에서 전동 툴을 사용할 때는 실외 용도에 적합한 연장선을 사용하십시오. 실외 용도에 적합한 코드를 사용해야 감전 위험이 줄 어듭니다. 3) 사용자 주의사항 a) 전동 툴을 사용할 때는 작업에 정신을 집중하고, 상 식의 범위 내에서 사용하십시오. 약물을 복용하거나 알코올을 섭취한 상태 또는 피곤 한 상태에서는 전동 툴을 사용하지 마십시오. 전동 툴을 사용할 때 주의가 흐트러지면 심각한 부상 을 입을 수 있습니다. b) 안전 장비를 사용하십시오. 항상 눈 보호 장구를 착 용해야 합니다. 먼지 보호 마스크, 미끄럼 방지 신발, 안전모, 청각 보 호 장비 등을 사용하면 부상을 줄일 수 있습니다. c) 전동 툴이 갑자기 작동되지 않도록 합니다. 플러그를 꽂기 전에 스위치가 ‘OFF’ 위치에 있는지 확인하십 시오. 손가락을 스위치에 접촉한 채 전동 툴을 들거나 스위 치가 켜진 상태로 플러그를 꽂으면 사고가 날 수 있습 니다. d) 전원을 켜기 전에 조정 키 또는 렌치를 반드시 제거 해야 합니다. 전동 툴의 회전 부위에 키 또는 렌치가 부착되어 있으 면, 부상을 입을 수 있습니다. e) 작업 대상과의 거리를 잘 조절하십시오. 알맞은 발판 을 사용하고 항상 균형을 잡고 있어야 합니다. 그렇게 하면 예기치 못한 상황에서도 전동 툴을 잘 다 룰 수 있습니다. f) 알맞은 복장을 갖추십시오. 헐렁한 옷이나 장신구를 착용하면 안 됩니다. 머리카락, 옷, 장갑 등을 움직이 는 부품으로부터 보호하십시오. 헐렁한 옷이나 장신구, 긴 머리카락이 부품에 딸려 들 어갈 수도 있습니다. g) 분진 추출 및 집진 장비에 연결할 수 있는 장치가 제 공되는 경우, 그러한 장치가 잘 연결되어 있고 제대로 작동하는지 확인하십시오. 이러한 장치를 사용하면, 먼지와 관련된 사고를 줄일 수 있습니다. 4) 전동 툴 사용 및 관리 a) 전동 툴을 아무 곳에나 사용하지 마십시오. 용도에 알맞은 전동 툴을 사용하십시오. 적절한 전동 툴을 사용하면, 정상 속도로 안전하고 효 과적으로 작업을 수행할 수 있습니다. b) 스위치를 눌렀을 때 전동 툴이 켜지거나 꺼지지 않으 면 사용하지 마십시오. 스위치로 작동시킬 수 없는 전동 툴은 위험하므로, 수 리를 받아야 합니다. c) 전동 툴을 조정하거나 부속품을 바꾸거나 보관할 때 는 반드시 전원에서 플러그를 빼야 합니다. 이러한 안전 조치를 취해야 전동 툴이 갑자기 켜지는 위험을 피할 수 있습니다. d) 사용하지 않는 전동 툴은 어린이의 손이 닿지 않는 곳에 보관하고, 사용법을 잘 모르는 사람이 사용하지 못하도록 하십시오. 전동 툴은 미숙련자가 다루기에는 매우 위험한 물건 입니다. e) 전동 툴을 잘 관리하십시오. 움직이는 부품이 잘못 결합되어 있거나 꽉 끼어 움직이지 못하게 되어 있지 않은지 점검하십시오. 또한 전동 툴의 작동에 영향을 미칠 수 있는 기타 파손이 없는지 확인하십시오. 파손된 부분이 있는 경우, 사용하기 전에 수리하십시 오. 전동 툴을 제대로 관리하지 못해서 생기는 사고가 많 습니다. f) 절삭 툴은 날카롭고 청결한 상태로 관리하십시오. 절삭 날을 날카로운 상태로 잘 관리하면, 원활하게 잘 움직이며 다루기도 훨씬 편합니다. g) 설명서를 참조하여 전동 툴과 부속품, 툴 비트 등을 사용하십시오. 또한 작업 환경과 수행할 작업의 성격 을 고려해서 알맞은 종류의 전동 툴을 선택하고, 적 절한 방식으로 사용하십시오. 원래 목적과 다른 용도로 전동 툴을 사용하면 위험한 사고가 날 수 있습니다. 5) 서비스 a) 자격을 갖춘 전문가에게 서비스를 받고, 항상 원래 부품과 동일한 것으로 교체해야 합니다. 그렇게 하면 전동 툴을 보다 안전하게 사용할 수 있습 니다. 주의사항 어린이나 노약자가 가까이 오지 못하도록 하십시오. 전동 툴을 사용하지 않을 때는 어린이나 노약자의 손이 닿지 않는 곳에 보관해야 합니다. 15 000Book̲H41SC̲ChKV.indb 15 2011/02/17 15:26:29 한국어 파괴햄머 사용 시 주의사항 1. 귀 보호 장구를 착용하십시오. 소음으로 인해 청력을 잃을 수 있습니다. 2. 함께 제공되는 보조 핸들을 사용하십시오. 장비를 제대로 다루지 못하면 부상을 입을 수 있습니다. 3. 작동 중 혹은 작동 직후에 비트를 만지지 마십시오. 작동 중에는 비트가 몹시 뜨거워지므로 화상을 입을 수 있습 니다. 4. 벽, 바닥, 천장 등을 부수거나 깎거나 구멍을 뚫기 전에, 전기선이나 배관 같은 것이 묻혀 있지 않은지 철저히 확 인하십시오. 사양 전압(지역별로 차이가 있음)* (110V, 115V, 120V, 127V, 220V, 230V, 240V) 소비 전력* 1050W 분당 타격수 3000/분 중량(코드, 사이드 핸들 제외) 5.0kg *지역별로 차이가 있을 수 있으므로, 제품 명판의 기재내용을 반드시 확인하십시오. ○ 시린지(부스러기 제거용) 기본 부속품 (1) 케이스 .......................................................1 (2) 불 포인트 ....................................................1 (3) 사이드 핸들 .................................................1 기본 부속품은 예고 없이 변경될 수 있습니다. ○ 퍼내기 작업 옵션 부속품(별도 판매) 참고 칼러가 달린 원형 비트는 부착할 수 없습니다. ○ 파쇄 (1) 삽 ○ 실린더 케이스 커버(실린더 케이스 단열용) 실린더 케이스 커버(고무) (1) 불 포인트 전체 길이: 280, 450mm ○ 아스팔트 절삭 (1) 커터 ○ 햄머 윤활제 A 500g (캔) 70g (튜브형) 30g (튜브형) ○ 황삭 옵션 부속품은 예고 없이 변경될 수 있습니다. 용도 (1) 부싱 툴 (2) 섕크 ○ 평탄 작업 콘크리트 파쇄 및 분쇄, 홈 파기, 봉 절삭, 항타(콘크리트 말 뚝을 박는 것) 등. 활용 예: 배관 설치 및 배선, 위생 시설 설치, 기계류 설치, 상하수도 관 작업, 인테리어 작업, 항만 시설 및 토목 관련 작업 등. 사용 전 주의사항 (1) 다짐판 16 000Book̲H41SC̲ChKV.indb 16 (2) 섕크 1. 전원 사용 전원이 제품 명판에 표시된 전원 요건과 부합하는지 확인하십시오. 2. 전원 스위치 전원 스위치가 OFF 위치에 있는지 확인하십시오. 전원 스위치가 ON 위치에 있는 상태로 플러그를 꽂으면, 제 품이 갑자기 작동하기 시작해서 심각한 사고가 날 수 있 습니다. 2011/02/17 15:26:29 한국어 3. 연장선 작업 공간에 전원이 없으면, 두께가 충분한 정격 용량의 연장선을 사용하십시오. 연장선은 가능한 한 짧을수록 좋습니다. 4. 툴 조립 주의 전원 스위치를 OFF 상태에 두고 플러그를 뽑은 뒤 조립 해야 사고를 예방할 수 있습니다. 참고 불 포인트나 커터 등과 같이 별도 판매되는 부속품은 HITACHI에서 지정한 순정부품만을 사용해야 합니다. (1) 섕크 부분을 깨끗이 닦고 윤활제나 기계유를 바릅니다. 방향으로 완전히 당긴 상태에서, 앞 (2) 슬라이드 그립을 커버의 육각형 구멍에 섕크 부분을 완전히 끼웁니다(그 림 1 참조). (3) 슬라이드 그립을 원래 상태로 돌려놓고, 툴이 꽉 끼워졌 는지 확인합니다. (4) 툴을 뺄 때도 조립할 때와 마찬가지로, 슬라이드 그립을 방향으로 완전히 당긴 상태에서 해야 합니다. 주의 작업 중에는 반드시 핸들과 사이드 핸들을 잡아야 합니 다. 작업 중 슬라이드 그립을 잡지 마십시오. 실수로 잘 못 당기면, 불 포인트가 튀어나갈 수 있습니다. 파괴햄머 사용법(그림 2) 1. 콘크리트 표면에 툴 끝을 갖다댄 후, 스위치를 켭니다. 2. 양손으로 파괴햄머를 꽉 잡고 기기의 무게를 이용하면, 기기의 반동을 효과적으로 제어할 수 있습니다. 중간 정도 속도로 작업을 진행합니다. 기기 힘이 너무 강 해도 작업 효율이 떨어집니다. 윤활제 보충 본 기기는 먼지가 들어가지 않게 보호하고 윤활제가 새지 않 도록 하기 위해, 완전 진공 제작되었습니다. 일정 기간 동안 은 윤활제를 보충하지 않고 기기를 사용할 수 있습니다. 그 러나 기기의 수명을 유지하기 위해서는 윤활제를 보충해야 합니다. 아래 설명대로 윤활제를 보충하십시오. 1. 윤활제 보충 시기 카본 브러시 교체 시기에 맞춰 윤활제 양을 검사합니 다. ( 관리 및 검사 부분을 참조합니다.) 인근의 공식 Hitachi 서비스 센터에 가서 윤활제 보충을 요청하십시 오. 직접 윤활제를 보충해야 하는 상황이라면, 다음 절차대 로 하십시오. 2. 윤활제 보충 방법 주의 윤활제를 보충하기 전에 반드시 전원을 끄고 플러그를 뽑 아야 합니다. (1) 크랭크 커버를 제거하고 안에 있는 윤활제 잔여분을 닦 아냅니다. (그림 3 참조) (2) Hitachi 전동햄머 윤활제 A 30g(커넥팅 로드를 커버하 는데 필요한 표준 분량)을 크랭크 케이스에 보충합니다. (3) 윤활제를 보충한 후, 크랭크 커버를 원래대로 꽉 끼웁니 다. 참고 Hitachi 전동햄머 윤활제 A는 점성이 낮은 유형입니다. 윤활제를 다 쓰면, 공식 Hitachi 서비스 센터에서 구입하 십시오. 관리 및 검사 주의 전원 스위치를 OFF 상태에 두고 플러그를 뽑은 뒤 작업 을 수행해야 사고를 예방할 수 있습니다. 1. 툴 검사 무뎌진 툴을 사용하면 작업 효율이 떨어지고 모터가 고 장날 수 있으므로, 무뎌진 것을 발견하면 최대한 빨리 날 카롭게 갈거나 툴을 교체해야 합니다. 2. 부착 나사 검사 정기적으로 모든 부착 나사를 검사하고 잘 고정되어 있는 지 확인합니다. 느슨한 나사가 있는 경우, 즉시 꽉 조여야 합니다. 그렇게 하지 않으면 심각한 사고가 날 수 있습니 다. 3. 모터 관리 모터부 권선은 전동 툴의 심장부 입니다. 권선이 손상되 거나 물 또는 기름에 젖지 않도록 주의를 기울여야 합니 다. 4. 카본 브러시 검사(그림 6) 모터의 카본 브러시는 소모품입니다. 카본 브러시가 마 모되거나 마모 한도 에 가까워지면, 모터가 고장날 수 있 습니다. 자동 정지 카본 브러시를 장착한 경우에는 모터 가 자동으로 멈춥니다. 그러면 그림과 같이 카본 브러시 번호가 같은 새 것으로 둘 다 교체하면 됩니다. 카본 브러 시는 항상 청결하게 유지하고, 브러시 홀더 안에서 원활 하게 움직이도록 해야 합니다. 5. 카본 브러시 교체 나사를 풀고 뒷 커버를 떼어냅니다. 브러시 캡과 카본 브 러시를 떼어냅니다. 카본 브러시를 교체한 후에는 반드시 브러시 캡을 끼우고 뒷 커버를 장착해야 합니다. 6. 서비스 부품 정보 A: 품목 번호 B: 코드 번호 C: 사용 개수 D: 비고 주의 Hitachi 전동 툴의 수리, 변경 및 검사는 반드시 공식 Hitachi 서비스 센터를 통해서 해야 합니다. 공식 Hitachi 서비스 센터에 수리 또는 기타 점검을 요청 할 때 툴과 함께 부품 정보를 제공하면 도움이 됩니다. 전동 툴을 사용하거나 점검할 때는 각국의 안전 수칙 및 규정을 준수해야 합니다. 변경 Hitachi 전동 툴은 개선 및 수정을 통해 끊임없이 최신 기술 발전을 반영하고 있습니다. 따라서 일부 부품(코드 번호 및/또는 디자인)은 사전 예 고 없이 변경될 수 있습니다. 참고 HITACHI는 지속적인 연구개발 프로그램을 진행하고 있으므 로, 본 설명서의 사양은 사전 예고 없이 변경될 수 있습니다. 17 000Book̲H41SC̲ChKV.indb 17 2011/02/17 15:26:30 Tiếng Việt CÁC NGUYÊN TẮC AN TOÀN CHUNG CẢNH BÁO! Đọc kỹ tất cả hướng dẫn Việc không tuân theo mọi hướng dẫn được liệt kê dưới đây có thể dẫn đến bị điện giật, cháy và/hoặc bị chấn thương nghiêm trọng. Thuật ngữ "dụng cụ điện” có trong tất cả các cảnh báo dưới đây đề cập đến dụng cụ điện (có dây) điều khiển bằng tay hoặc dụng cụ điện (không dây) vận hành bằng pin. GHI NHỚ CÁC HƯỚNG DẪN NÀY 1) Khu vực làm việc a) Giữ khu vực làm việc sạch và đủ ánh sáng. Khu vực làm việc tối tăm và bừa bộn dễ gây tai nạn. b) Không vận hành dụng dụ điện trong khu vực dễ cháy nổ, chẳng hạn như nơi có chất lỏng dễ cháy, khí đốt hoặc bụi khói. Các dụng dụ điện tạo tia lửa nên có thể làm bụi khói bén lửa. c) Không để trẻ em và những người không phận sự đứng gần khi vận hành dụng dụ điện. Sự phân tâm có thể khiến bạn mất kiểm soát. 2) An toàn về điện a) Phích cắm dụng cụ điện phải phù hợp với ổ cắm. Không bao giờ được cải biến phích cắm dưới mọi hình thức. Không được sử dụng phích tiếp hợp với dụng cụ điện nối đất (tiếp đất). Phích cắm nguyên bản và ổ cắm điện đúng loại sẽ giảm nguy cơ bị điện giật. b) Tránh để cơ thể tiếp xúc với các bề mặt nối đất hoặc tiếp đất như đường ống, lò sưởi, bếp ga và tủ lạnh. Có nhiều nguy cơ bị điện giật nếu cơ thể bạn nối hoặc tiếp đất. c) Không để các dụng cụ điện tiếp xúc với nước mưa hoặc ẩm ướt. Nước thấm vào dụng cụ điện sẽ làm tăng nguy cơ bị điện giật. d) Không được lạm dụng dây dẫn điện. Không bao giờ nắm dây để xách, kéo hoặc rút dụng cụ điện. Để dây cách xa nơi có nhiệt độ cao, trơn trượt, vật sắc cạnh hoặc bộ phận chuyển động. Dây bị hư hỏng hoặc rối sẽ làm tăng nguy cơ bị điện giật. e) Khi vận hành dụng cụ điện ở ngoài trời, hãy sử dụng dây nối thích hợp cho việc sử dụng ngoài trời. Sử dụng dây nối ngoài trời thích hợp làm giảm nguy cơ bị điện giật. 3) An toàn cá nhân a) Luôn cảnh giác, quan sát những gì bạn đang làm và phán đoán theo kinh nghiệm khi vận hành dụng dụ điện.Không được sử dụng dụng cụ điện khi mệt mỏi hoặc dưới ảnh hưởng của rượu, ma túy hoặc dược phẩm. Một thoáng mất tập trung khi vận hành dụng cụ điện có thể dẫn đến chấn thương cá nhân nghiêm trọng. b) Sử dụng thiết bị bảo hộ. Luôn đeo kính bảo vệ mắt. Trang thiết bị bảo hộ như khẩu trang, giày an toàn chống trượt, nón bảo hộ, hoặc dụng cụ bảo vệ tai được sử dụng trong các điều kiện thích hợp sẽ làm giảm nguy cơ thương tích cá nhân. c) Tránh để máy khởi động bất ngờ. Đảm bảo công tắc ở vị trí tắt trước khi cắm điện. Đặt ngón tay trên công tắc khi xách dụng cụ điện hoặc cắm điện lúc công tắc ở vị trí bật rất dễ dẫn đến tai nạn. d) Tháo mọi khóa điều chỉnh hoặc chìa vặn đai ốc ra trước khi bật dụng cụ điện. Chìa vặn đai ốc hoặc chìa khóa còn cắm trên một bộ phận quay của dụng dụ điện có thể gây thương tích cá nhân. e) Không với tay quá xa. Luôn luôn đứng vững và cân bằng. Điều này giúp kiểm soát dụng cụ điện trong tình huống bất ngờ tốt hơn. f) Trang phục phù hợp. Không mặc quần áo rộng lùng thùng hoặc đeo trang sức. Giữ tóc, quần áo và găng tay tránh xa các bộ phận chuyển động. Quần áo rộng lùng thùng, đồ trang sức hoặc tóc dài có thể bị cuốn vào các bộ phận chuyển động. g) Nếu có các thiết bị đi kèm để nối máy hút bụi và các phụ tùng chọn lọc khác, hãy đảm bảo các thiết bị này được nối và sử dụng đúng cách. Việc sử dụng các thiết bị này có thể làm giảm độc hại do bụi gây ra. 4) Sử dụng và bảo dưỡng dụng cụ điện a) Không được ép máy hoạt động quá mức. Sử dụng đúng loại dụng cụ điện phù hợp với công việc của bạn. Dụng cụ điện đúng chủng loại sẽ hoàn thành công việc tốt và an toàn hơn theo đúng tiêu chí mà máy được thiết kế. b) Không sử dụng dụng cụ điện nếu công tắc không tắt hoặc bật được. Bất kỳ dụng cụ điện nào không thể điều khiển được bằng công tắc đều rất nguy hiểm và phải được sửa chữa. c) Luôn rút phích cắm ra khỏi nguồn điện trước khi điều chỉnh, thay phụ tùng, hoặc cất dụng cụ điện. Những biện pháp ngăn ngừa như vậy giúp giảm nguy cơ dụng cụ điện khởi động bất ngờ. d) Cất giữ dụng cụ điện không sử dụng ngoài tầm tay trẻ em và không được cho người chưa quen sử dụng dụng cụ điện hoặc chưa đọc hướng dẫn sử dụng này vận hành dụng cụ điện. Dụng cụ điện rất nguy hiểm khi ở trong tay người chưa được đào tạo cách sử dụng. e) Bảo dưỡng dụng cụ điện. Kiểm tra đảm bảo các bộ phận chuyển động không bị xê dịch hoặc mắc kẹt, các bộ phận không bị rạn nứt và kiểm tra các điều kiện khác có thể ảnh hưởng đến quá trình vận hành máy. Nếu bị hư hỏng, phải sửa chữa dụng cụ điện trước khi sử dụng. Nhiều tai nạn xảy ra do bảo quản dụng dụ điện kém. f) Giữ các dụng cụ cắt sắc bén và sạch sẽ. Dụng cụ cắt có cạnh cắt bén được bảo quản đúng cách sẽ ít khi bị kẹt và dễ điều khiển hơn. g) Sử dụng dụng cụ điện, phụ tùng và đầu cài v.v... đúng theo những chỉ dẫn này và tập trung vào loại dụng cụ điện cụ thể, lưu ý đến điều kiện làm việc và công việc phải thực hiện. Vận hành dụng cụ điện khác với mục đích thiết kế có thể dẫn đến các tình huống nguy hiểm. 5) Bảo dưỡng a) Đem dụng cụ điện của bạn đến thợ sửa chữa chuyên nghiệp để bảo dưỡng, chỉ sử dụng các phụ tùng đúng chủng loại để thay thế. Điều này giúp đảm bảo duy trì tính năng an toàn của dụng cụ điện. PHÒNG NGỪA Giữ trẻ em và những người không phận sự tránh xa dụng cụ. Khi không sử dụng, các dụng cụ điện phải được cất giữ tránh xa tầm tay trẻ em và người không phận sự. 18 000Book̲H41SC̲ChKV.indb 18 2011/02/17 15:26:31 Tiếng Việt ĐỀ PHÒNG KHI SỬ DỤNG BÚA PHÁ DỠ 1. Mang dụng cụ bảo vệ tai. Tác động của tiếng ồn có thể gây điếc tai. 2. Sử dụng tay nắm phụ kèm theo máy. Mất kiểm soát máy có thể gây ra thương tích cá nhân. 3. Không chạm vào mũi búa trong khi hoặc ngay sau khi máy hoạt động. Mũi búa rất nóng trong thời gian vận hành và có thể gây bỏng nghiêm trọng. 4. Trước khi bắt đầu phá, rã hoặc khoan tường, sàn nhà hay trần nhà, cần phải xác định được chắc chắn rằng có các vật như cáp điện hoặc đường ống chôn ngầm bên trong hay không. THÔNG SỐ KỸ THUẬT Điện áp (theo khu vực)* (110 V, 115 V, 120 V, 127 V, 220 V, 230 V, 240 V) Công suất* 1.050 W Mức động lực tải tối đa 3.000/phút Trọng lượng (không kể dây và tay nắm phụ) 5,0 kg * Lưu ý luôn kiểm tra nhãn mác trên sản phẩm vì thông số này có thể thay đổi theo khu vực. CÁC PHỤ TÙNG TIÊU CHUẨN ○ Ống bơm (để loại bỏ phoi mảnh) (1) Hộp ...............................................................................1 (2) Điểm bull .......................................................................1 (3) Tay nắm phụ .................................................................1 Phụ tùng tiêu chuẩn có thể thay đổi mà không báo trước. ○ Mũi xúc CÁC PHỤ TÙNG TÙY CHỌN (bán riêng) CHÚ Ý Không thể lắp được loại mũi tròn có vành. (1) Xúc ○ Nghiền ○ Nắp vỏ xi-lanh (để cách nhiệt cho vỏ xi lanh) Nắp vỏ xi lanh (cao su) (1) Điểm bull Chiều dài tổng: 280, 450 mm ○ Cắt nhựa atphan (1) Mũi cắt ○ Xử lý thô bề mặt ○ Mỡ loại A dùng cho búa 500 g (trong một hộp) 70 g (trong một tuýp) 30 g (trong một tuýp) Các phụ tùng tùy chọn có thể thay đổi mà không báo trước. (1) Dụng cụ lót (2) Thân búa Phá bê tông, rã bê tông, xoi rãnh, cắt sắt thanh, đóng cọc. Các ví dụ ứng dụng: Lắp đặt hệ thống ống dẫn và dây dẫn, lắp đặt thiết bị vệ sinh, lắp đặt thiết bị, cung cấp nước và công tác thoát nước, các công việc nội thất, các cơ sở bến cảng và các công tác xây dựng dân dụng khác. ○ Đầm (1) Búa đầm ỨNG DỤNG (2) Thân búa 19 000Book̲H41SC̲ChKV.indb 19 2011/02/17 15:26:31 Tiếng Việt TRƯỚC KHI VẬN HÀNH 1. Nguồn điệne Đảm bảo rằng nguồn điện sử dụng phù hợp với yêu cầu nguồn điện có trên nhãn mác sản phẩm. 2. Công tắc điện Đảm bảo rằng công tắc điện nằm ở vị trí OFF. Nếu nối phích cắm với ổ cắm trong khi công tắc điện ở vị trí ON, dụng cụ điện sẽ bắt đầu hoạt động ngay lập tức và có thể gây tai nạn nghiêm trọng. 3. Dây nối dài Khi khu vực làm việc ở cách xa nguồn điện, sử dụng một dây nối đủ dày và điện dung phù hợp. Kéo dây nối càng ngắn càng tốt. 4. Lắp đặt dụng cụ CẢNH BÁO Phải chắc chắn đã tắt điện và rút phích cắm ra khỏi ổ cắm để tránh gặp phải rắc rối nguy hiểm. CHÚ Ý Đối với các dụng cụ như điểm bull và mũi cắt, phải mua và sử dụng các sản phẩm chính hiệu do Hitachi chỉ định. (1) Lau và làm sạch phần thân của dụng cụ, và tra mỡ hoặc dầu máy vào máy. (2) Lắp phần thân của dụng cụ vào hết lỗ hình lục giác của nắp trước mặt với tình trạng tay nắm trượt được kéo hết về hướng như trong Hình 1. (3) Trả tay nắm trượt về vị trí cũ và phải chắc chắn rằng búa được kéo lại và khóa hãm an toàn. (4) Việc tháo búa được thực hiện khi tay nắm trượt được kéo hết về hướng tương tự như khi lắp búa. CẢNH BÁO Phải nắm chắc tay cầm và tay nắm phụ trong khi làm việc. Không giữ tay nắm trượt trong khi làm việc: Nếu bị kéo do sơ ý, điểm bull có thể bật ra ngoài. CÁCH SỬ DỤNG BÚA PHÁ DỠ (HÌNH 2) 1. Sau khi đặt đầu búa lên mặt bêtông, bật công tác điện. 2. Lợi dụng trọng lượng của máy và giữ chắc búa bằng cả hai tay, ta có thể kiểm soát được chuyển động phản lực của búa. Tiếp tục với một tốc độ làm việc vừa phải, dùng lực nhiều quá sẽ làm giảm hiệu quả của búa. THAY MỠ Búa có kết cấu kín khí hoàn toàn để chống bụi lọt vào và tránh rò rỉ dầu mỡ bôi trơn. Búa này có thể sử dụng mà không cần tra thêm dầu mỡ trong một thời gian dài. Tuy nhiên, hãy thay dầu mỡ để duy trì được tuổi thọ của búa. Việc thay dầu mỡ như miêu tả dưới đây. 1. Khoảng thời gian thay dầu mỡ Kiểm tra lại lượng dầu mỡ theo thời gian thay thế định kỳ của chổi than. (Xem phần BẢO TRÌ VÀ KIỂM TRA.) Hãy đề nghị thay dầu mỡ tại một Trung tâm Dịch vụ Ủy quyền của Hitachi gần nhất. Trong trường hợp bạn phải tự thay dầu mỡ, hãy làm theo các mục sau đây. 2. Cách thay dầu mỡ CẢNH BÁO Trước khi thay dầu mỡ, tắt nguồn điện và rút phích cắm ra khỏi ổ cắm. (1) Tháo nắp trục quay và lau sạch dầu mỡ cũ bên trong. (Hình 3) (2) Bôi 30 g (khối lượng tiêu chuẩn để phủ lên thanh nối) mỡ Mỡ loại A dùng cho búa điện Hitachi vào hộp trục này. (3) Sau khi thay, lắp lại chắc chắn nắp trục quay. CHÚ Ý Mỡ loại A dùng cho búa điện Hitachi là loại có độ nhớt thấp. Khi hết mỡ, hãy mua từ một Trung tâm Dịch vụ Ủy quyền của Hitachi. BẢO DƯỠNG VÀ KIỂM TRA CẢNH BÁÓ Đảm bảo bật nút OFF và ngắt kết nối phích cắm nối khỏi ổ cắm điện để tránh tai nạn nghiêm trọng. 1. Kiểm tra dụng cụ Vì sử dụng dụng cụ cùn sẽ làm giảm sút hiệu suất và khiến cho tình trạng hỏng hóc động cơ có thể xảy ra nên cần làm sắc hoặc thay thế dụng cụ ngay sau khi để ý thấy có mài mòn. 2. Kiểm tra các đinh ốc đã lắp Thường xuyên kiểm tra tất cả các đinh ốc đã lắp và đảm bảo rằng chúng được siết chặt. Nếu có bất kỳ đinh ốc nào bị nới lỏng, siết chặt lại ngay lập tức. Nếu không làm như vậy có thể gây nguy hiểm nghiêm trọng. 3. Bảo dưỡng động cơ Cuộn dây động cơ là "trái tim" của dụng cụ điện. Kiểm tra và bảo dưỡng để đảm bảo cuộn dây không bị hư hỏng và/hoặc ẩm ướt do dính dầu nhớt hoặc nước. 4. Kiểm tra chổi than (Hình 6) Động cơ sử dụng chổi than dưới dạng các thành phần tiêu hao. Khi chúng bị bào mòn hoặc gần đến “giới hạn mài mòn” thì có thể dẫn đến những vấn đề về động cơ. Khi có trang bị một chổi than dừng tự động, động cơ sẽ dừng lại tự động. Tại thời điểm đó, hãy thay thế cả hai chổi than bằng các chổi mới có mã số chổi than tương tự như đã chỉ trên hình. Ngoài ra, luôn giữ chổi than sạch sẽ và đảm bảo là chúng trượt tự do bên trong các kẹp chổi than. 5. Thay chổi than Nới lỏng vít hãm và tháo nắp ở đuôi. Tháo các mũ và chổi than. Sau khi thay chổi than, đừng quên xiết chặt lại các mũ chổi và lắp lại nắp ở đuôi máy. 6. Danh sách phụ tùng bảo dưỡng A: Số linh kiện B: Mã số C: Số đã sử dụng D: Ghi chú CẢNH BÁO Sửa chữa, biến cải và kiểm tra Dụng cụ điện Hitachi phải được thực hiện bởi một Trung tâm Dịch vụ Ủy quyền của Hitachi. Cung cấp Danh sách phụ tùng kèm theo dụng cụ cho Trung tâm dịch vụ ủy quyền Hitachi là rất hữu ích khi yêu cầu sửa chữa hoặc bảo dưỡng. Trong khi vận hành và bảo trì dụng cụ điện, phải tuân theo các nguyên tắc an toàn và tiêu chuẩn quy định của từng quốc gia. SỬA ĐỔI Dụng cụ điện Hitachi không ngừng được cải thiện và sửa đổi để thích hợp với các tiến bộ kỹ thuật mới nhất. Theo đó, một số bộ phận (vd: mã số và/hoặc thiết kế) có thể được thay đổi mà không cần thông báo trước.. CHÚ Ý Do chương trình nghiên cứu và phát triển liên tục của Hitachi, các thông số kỹ thuật nêu trong tài liệu này có thể thay đổi mà không thông báo trư 20 000Book̲H41SC̲ChKV.indb 20 2011/02/17 15:26:31 21 000Book̲H41SC̲ChKV.indb 21 2011/02/17 15:26:32 22 000Book̲H41SC̲ChKV.indb 22 2011/02/17 15:26:32 A 1 2 3 4 5 6 7 8 9 10 11 12 13 14 15 16 17 18 19 20 21 22 23 24 25 26 27 28 29 30 31 32 33 34 35 36 37 38 39 40 41 42 43 44 45 46 1 46 2 46 3 47 48 49 1 49 2 49 3 50 51 52 53 54 55 56 57 58 59 60 B 993-040 316-041 991-708 991-695 983-235 983-236 310-109 983-234 993-041 310-110 980-715 310-112 986-104 980-706 310-113 939-540 310-114 983-162 310-115 980-744 310-116 930-511 948-391 996-363 620-3DD 310-119 ———— 310-117 310-124 310-123 310-126 310-120 ———— 939-299 310-129 620-1VV 971-736 981-870 972-612 980-657 980-659 980-658 949-875 971-785 310-130 360-360U 360-360E 360-360F 980-931 953-121 340-317C 340-317E 340-317F 930-703 930-804 982-631 608-VVM 310-146 980-951 935-829 999-043 971-001 938-477 310-111 C 4 1 1 1 2 1 1 2 4 1 1 1 2 1 1 1 1 4 1 1 1 1 1 1 1 1 1 1 8 2 1 1 1 1 1 1 1 1 1 1 1 1 1 1 1 1 1 1 1 2 1 1 1 2 1 1 1 1 4 2 2 2 2 1 D M7×25 D5×30 ”3, 4, 18-21” “8, 10” M6×25 S-48 110V-120V “9, 11, 34, 38” 220V-240V D5×60 110V “17” M4×12 S-55 4×4×10 S-40 6203DDUCMAV2S 6202DDCMPS2L 3×3×10 A 61 62 63 64 65 66 67 68 69 70 71 72 73 74 75 76 77 1 77 2 78 79 80 81 82 83 84 501 505 B 314-130 314-262 307-811 980-754 310-125 985-480 991-690 991-711 310-142 774-273 938-307 981-974Z 992-891 310-141 307-028 959-141 938-051 953-327 980-063 984-750 960-266 ———— 930-153 959-140 990-861 980-752 310-131 C 1 1 2 1 1 2 4 4 1 1 1 1 1 1 3 2 1 1 1 2 1 1 1 1 1 1 1 D “62” D4×16 D5×20 M5×12 D4×25 D10.1 D8.8 D4×16 280MM M5×14 M661 “34” 6201VVCMPS2S “39, 41, 47, 48” “41-43” “GBR (110V)” 110V-115V “36, 37, 45, 52, 53” 220V-230V “45” 240V “45” D5×50 110V “50, 51” 220V-230V “50, 51” 240V “50, 51” D5×20 D4×20 D4×16 608VVMC2EPS2L “58, 59” M5×45 8MM M5×8 M10×20 23 000Book̲H41SC̲ChKV.indb 23 2011/02/17 15:26:32 Hitachi Koki Co., Ltd. Shinagawa Intercity Tower A, 15-1, Konan 2-chome, Minato-ku, Tokyo, Japan 103 Code No. C99087636 M Printed in Malaysia 000Book̲H41SC̲ChKV.indb 24 2011/02/17 15:26:32-
 1
1
-
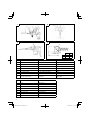 2
2
-
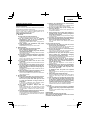 3
3
-
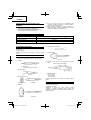 4
4
-
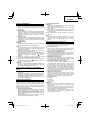 5
5
-
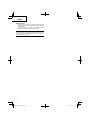 6
6
-
 7
7
-
 8
8
-
 9
9
-
 10
10
-
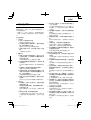 11
11
-
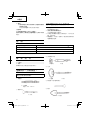 12
12
-
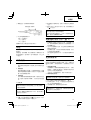 13
13
-
 14
14
-
 15
15
-
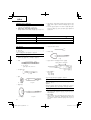 16
16
-
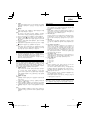 17
17
-
 18
18
-
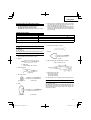 19
19
-
 20
20
-
 21
21
-
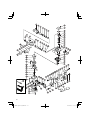 22
22
-
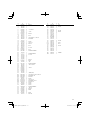 23
23
-
 24
24


Hitachi H 41SC Handling Instructions Manual
- Categoría
- Herramientas eléctricas
- Tipo
- Handling Instructions Manual
- Este manual también es adecuado para
en otros idiomas
- English: Hitachi H 41SC
Artículos relacionados
-
Hikoki H41MB Manual de usuario
-
Hitachi H 45MRY Manual de usuario
-
Hitachi H 65SD2 Manual de usuario
-
-
Hitachi H 30PV Safety Instructions And Instruction Manual
-
-
-
-
-