Good Earth Lighting BO1191-WHG-03LF3 Instrucciones de operación
- Tipo
- Instrucciones de operación

LED Color Changing Tap Light with Auto-off Timer
Luz LED que cambia de color con pulsador y temporizador de apagado automático
BO1191-WHG-03LF3-E
Distributed by / Distribuido por: Good Earth Lighting® 1400 East Business Center Drive, Ste. 108 Mount Prospect, IL 60056
Printed in China/ Impreso en China
Recycle
Recicle
1
1
2
2
1
2
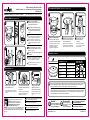
Remove cover by rotating
counterclockwise.Remove clear
plastic tab before rst use.
Clean surface with rubbing alcohol.
Remove red liner. Insert tab into the
slot. Press strip to the back of the
cover.
Retire la cubierta rotándola en sentido contrario
al de las agujas del reloj. Retire lalengüeta de
plástico transparente antes del primer uso.
Limpie la supercie con alcohol. Retire el
protector rojo. Inserte la lengüeta en la ranura.
Presione la tira hasta la parte de atrás de la
cubierta.
2318INSBO1191
Removal
/ Remocíon
Need Help?
Questions? Call our Customer
Service Center 1-800-291-8838.
www.goodearthlighting.com
¿Necesita ayuda?
¿Preguntas? Llame a nuestro
Centro de Servicio al Cliente al
1-800-291-8838.
www.goodearthlighting.com
by Good Earth Lighting
Easy installation
/
Instalación fácil
Screw mount installation /Instalación de la montura roscada
12
4
3
3
4
3
4
Remove black liner. Press cover to
surface with tab towards you. Press
rmly for 30 sec.
To attach light, align notches and turn
clockwise.
Retire el protector negro. Presione el cubierto a
la supercie con la lengüeta hacia usted.
Presione con rmeza por 30 segundos.
Para instalar la luz, alinee las muescas y gire en
el sentido de las agujas del reloj.
Rotate counter-clockwise to
release light from cover.
Rote la unidad en sentido contrario al de
las agujas del reloj para soltar la luz de la
cubierta.
Never pull the strip away from
the surface! Always pull along
the surface.
Nunca jale la tira perpendicularmente
a la supercie! Siempre jale la tira
paralelamente a la supercie.
Stretch the strip slowly
against the surface at
least 12 inches to release.
Estire la tira lentamente contra la
pared por lo menos 30 cm para
soltar.
3
seconds
30
12
IMPORTANT:
Failure to follow instructions carefully may cause damage.
CAUTION: Do not hang over beds or on wallpaper.
Mount again with Command
®
Medium Refill Strips.
If planning to dispose after use, please locate
local recycling center @ call2recycle.org
IMPORTANTE: Si no sigue las instrucciones pueden producirse daños. PRECAUCIÓN: No cuelgue sobre
camas o utilice en papel tapiz. Cuelgue de neuvo con las tiras medianas de repuesto Command
®
. Si
piensa desechar el producto después de usarlo, sírvase localizar el centro de reciclaje local en
call2recycle.org
INDOOR USE ONLY/
Uso en interiores solamente
Operation/
Utilización
AUTO-SHUT OFF
APAGADO AUTOMÁTICO
Touch activated power button
Botón de encendido táctil
First press
Primera pulsación
Press and HOLD
Presione y MANTENGA PRESIONADO
Second press
Segunda pulsación
Third press
Tercera pulsación
Fourth press
Cuarta pulsación
Light turns ON to bright white light
La luz se ENCIENDE hasta un blanco brillante
White light dimming
Regulación de la intensidad de la luz blanca
Color changing light
Luz que cambia de color
Stop on desired color
Pare en el color deseado
Light turns OFF
La luz se APAGA
LIGHT SETTINGS /
AJUSTES DE LA LUZ
Batteries may leak harmful liquids or ignitable materials or explode causing injury and product damage. Do not mix old
and new, or different types of batteries. Replace all batteries at the same time. Remove batteries from product if
unused for an extended amount of time. Replaced batteries should be disposed of properly.
Es posible que las baterías dejen escapar líquidos nocivos o materiales inflamables, o que exploten y causen lesiones
y daños al producto. No mezcle baterías viejas y nuevas, ni tipos diferentes de baterías. Reemplace todas las baterías
al mismo tiempo. Retire las baterías del producto si éste no se va a usar durante un período de tiempo prolongado.
Las baterías remplazadas se deberán desechar apropiadamente
Ecolight
®
is a registered trademark of Good Earth Lighting, Inc. All rights
Reserved. 3M and Command are trademarks of 3M.
Ecolight
®
es un marca registrada de Good Earth Lighting, Inc. Todos los derechos
reservados. 3M y Command son marcas registradas de 3M.
Light and batteries are made in China. Command
®
Strips by
3M made in Singapore with globally sourced materials.
La luz y las bateríasestán fabricadas en China. Tiras Command® de
3M fabricadas en Singapur con insumos importados.
For more product and warranty information, go
to: www.goodearthlighting.com
Para obtener más información sobre el producto y su
garantía, visite: www.goodearthlighting.com
Please save instructions./ Guarde las instrucciones.
SLOWLY
Lentamente
3
Remove cover by rotating
counter-clockwise. Remove
clear plastic tab before rst use.
Retire la cubierta rotándola en sentido
contrario al de las agujas del reloj.
Retire la lengüeta de plástico
transparente antes del primer uso.
Mark the center mounting hole
in the cover, drive screw into
the mounting surface.
Marque la ubicación de la luz y del
tornillo. Apriete el tornillo de manera
que entre en la supercie de montaje.
To attach light, align
notches and turn
clockwise.
Para instalar la luz, alinee las
muescas y gire en el sentido de
las agujas del reloj.
123
AA
AA

LED Color Changing Tap Light with Auto-off Timer
Luz LED que cambia de color con pulsador y temporizador de apagado automático
BO1191-WHG-03LF3-E
Distributed by / Distribuido por: Good Earth Lighting® 1400 East Business Center Drive, Ste. 108 Mount Prospect, IL 60056
Printed in China/ Impreso en China
Recycle
Recicle
1
1
2
2
1
2
Remove cover by rotating
counterclockwise.Remove clear
plastic tab before rst use.
Clean surface with rubbing alcohol.
Remove red liner. Insert tab into the
slot. Press strip to the back of the
cover.
Retire la cubierta rotándola en sentido contrario
al de las agujas del reloj. Retire lalengüeta de
plástico transparente antes del primer uso.
Limpie la supercie con alcohol. Retire el
protector rojo. Inserte la lengüeta en la ranura.
Presione la tira hasta la parte de atrás de la
cubierta.
2318INSBO1191
Removal
/ Remocíon
Need Help?
Questions? Call our Customer
Service Center 1-800-291-8838.
www.goodearthlighting.com
¿Necesita ayuda?
¿Preguntas? Llame a nuestro
Centro de Servicio al Cliente al
1-800-291-8838.
www.goodearthlighting.com
by Good Earth Lighting
Easy installation
/
Instalación fácil
Screw mount installation /Instalación de la montura roscada
12
4
3
3
4
3
4
Remove black liner. Press cover to
surface with tab towards you. Press
rmly for 30 sec.
To attach light, align notches and turn
clockwise.
Retire el protector negro. Presione el cubierto a
la supercie con la lengüeta hacia usted.
Presione con rmeza por 30 segundos.
Para instalar la luz, alinee las muescas y gire en
el sentido de las agujas del reloj.
Rotate counter-clockwise to
release light from cover.
Rote la unidad en sentido contrario al de
las agujas del reloj para soltar la luz de la
cubierta.
Never pull the strip away from
the surface! Always pull along
the surface.
Nunca jale la tira perpendicularmente
a la supercie! Siempre jale la tira
paralelamente a la supercie.
Stretch the strip slowly
against the surface at
least 12 inches to release.
Estire la tira lentamente contra la
pared por lo menos 30 cm para
soltar.
3
seconds
30
12
IMPORTANT:
Failure to follow instructions carefully may cause damage.
CAUTION: Do not hang over beds or on wallpaper.
Mount again with Command
®
Medium Refill Strips.
If planning to dispose after use, please locate
local recycling center @ call2recycle.org
IMPORTANTE: Si no sigue las instrucciones pueden producirse daños. PRECAUCIÓN: No cuelgue sobre
camas o utilice en papel tapiz. Cuelgue de neuvo con las tiras medianas de repuesto Command
®
. Si
piensa desechar el producto después de usarlo, sírvase localizar el centro de reciclaje local en
call2recycle.org
INDOOR USE ONLY/
Uso en interiores solamente
Operation/
Utilización
AUTO-SHUT OFF
APAGADO AUTOMÁTICO
Touch activated power button
Botón de encendido táctil
First press
Primera pulsación
Press and HOLD
Presione y MANTENGA PRESIONADO
Second press
Segunda pulsación
Third press
Tercera pulsación
Fourth press
Cuarta pulsación
Light turns ON to bright white light
La luz se ENCIENDE hasta un blanco brillante
White light dimming
Regulación de la intensidad de la luz blanca
Color changing light
Luz que cambia de color
Stop on desired color
Pare en el color deseado
Light turns OFF
La luz se APAGA
LIGHT SETTINGS /
AJUSTES DE LA LUZ
Batteries may leak harmful liquids or ignitable materials or explode causing injury and product damage. Do not mix old
and new, or different types of batteries. Replace all batteries at the same time. Remove batteries from product if
unused for an extended amount of time. Replaced batteries should be disposed of properly.
Es posible que las baterías dejen escapar líquidos nocivos o materiales inflamables, o que exploten y causen lesiones
y daños al producto. No mezcle baterías viejas y nuevas, ni tipos diferentes de baterías. Reemplace todas las baterías
al mismo tiempo. Retire las baterías del producto si éste no se va a usar durante un período de tiempo prolongado.
Las baterías remplazadas se deberán desechar apropiadamente
Ecolight
®
is a registered trademark of Good Earth Lighting, Inc. All rights
Reserved. 3M and Command are trademarks of 3M.
Ecolight
®
es un marca registrada de Good Earth Lighting, Inc. Todos los derechos
reservados. 3M y Command son marcas registradas de 3M.
Light and batteries are made in China. Command
®
Strips by
3M made in Singapore with globally sourced materials.
La luz y las bateríasestán fabricadas en China. Tiras Command® de
3M fabricadas en Singapur con insumos importados.
For more product and warranty information, go
to: www.goodearthlighting.com
Para obtener más información sobre el producto y su
garantía, visite: www.goodearthlighting.com
Please save instructions./ Guarde las instrucciones.
SLOWLY
Lentamente
3
Remove cover by rotating
counter-clockwise. Remove
clear plastic tab before rst use.
Retire la cubierta rotándola en sentido
contrario al de las agujas del reloj.
Retire la lengüeta de plástico
transparente antes del primer uso.
Mark the center mounting hole
in the cover, drive screw into
the mounting surface.
Marque la ubicación de la luz y del
tornillo. Apriete el tornillo de manera
que entre en la supercie de montaje.
To attach light, align
notches and turn
clockwise.
Para instalar la luz, alinee las
muescas y gire en el sentido de
las agujas del reloj.
123
AA
AA
-
 1
1
-
 2
2


Good Earth Lighting BO1191-WHG-03LF3 Instrucciones de operación
- Tipo
- Instrucciones de operación
en otros idiomas
Artículos relacionados
-
Good Earth Lighting BO1308-RGB-03LF3 Instrucciones de operación
-
-
-
-
-
-
-
-
-