
SAVE THIS INSTRUCTION MANUAL FOR FUTURE REFERENCE.
© 2014 Baccus Global LLC
,
Boca Raton, FL 33432
(877) 571-2391
x
3 WATT HIGH-POWERED LED
HEADLAMP WITH LED AREA LIGHTS
INSTRUCTION MANUAL
HL1S
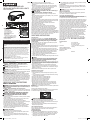
FEATURES
1. Power/light mode button
2. Headlamp body
3. Adjustable head strap
4. Two white LED area lights
5. Two red LED area lights
6. 3 watt LED bulb
7. Back cover latch release groove
8. Back cover latch
9. Integrated connector tape (connects the
back cover to the battery compartment)
10. Back cover fastening buckles
11. Battery compartment fastening buckle
12. Battery compartment
1 2
3
4
5
6
8
7
9
Back cover
12
10
11
This device complies with part 15 of the FCC rules. Operation is subject to the following
two conditions: (1) this device may not cause harmful interference, and (2) this device
must accept any interference received, including interference that may cause undesired
operation.
This equipment has been tested and found to comply with the limits for a Class B
digital device, pursuant to part 15 of the FCC Rules. These limits are designed to provide
reasonable protection against harmful interference in a residential installation. This
equipment generates, uses and can radiate radio frequency energy and, if not installed
and used in accordance with the instructions, may cause harmful interference to radio
communications. However, there is no guarantee that interference will not occur in a
particular installation. If equipment does cause harmful interference to radio or television
reception, which can be determined by turning the equipment off and on, the user is
encouraged to try to correct the interference by one or more of the following measures:
• Reorient or relocate the receiving antenna.
• Increase the separation between equipment and receiver.
• Connect the equipment into an outlet on a circuit different from that to which the
receiver is connected.
• Consult the dealer or an experienced radio/TV technician for help.
Changes or modifications not approved by the party responsible for compliance could void
user’s authority to operate the equipment.
SAFETY GUIDELINES / DEFINITIONS
DANGER: Indicates an imminently hazardous situation which, if not
avoided, will result in death or serious injury.
WARNING: Indicates a potentially hazardous situation which, if not
avoided, could result in death or serious injury.
CAUTION: Indicates a potentially hazardous situation which, if not avoided,
may result in minor or moderate injury.
CAUTION: Used without the safety alert symbol indicates potentially hazardous
situation which, if not avoided, may result in property damage.
RISK OF UNSAFE OPERATION. When using tools or equipment, basic safety
precautions should always be followed to reduce the risk of personal injury.
Improper operation, maintenance or modification of tools or equipment could
result in serious injury and property damage. There are certain applications for
which tools and equipment are designed. Manufacturer strongly recommends
that this product NOT be modified and/or used for any application other than
for which it was designed. Read and understand all warnings and operating
instructions before using any tool or equipment.
IMPORTANT SAFETY INSTRUCTIONS
READ ALL INSTRUCTIONS
WARNING: Read all instructions before operating headlamp. Failure
to follow all instructions listed below may result in electric shock, fire
and/or serious injury.
GENERAL SAFETY WARNINGS AND INSTRUCTIONS
WARNING: This product or its power cord contains lead, a chemical known
to the State of California to cause cancer and birth defect or other reproductive
harm. Wash hands after handling.
WARNING – WHEN USING THIS HEADLAMP, BASIC PRECAUTIONS
SHOULD ALWAYS BE FOLLOWED, INCLUDING THE FOLLOWING, TO
REDUCE THE RISK OF ELECTRIC SHOCK OR INJURY TO PERSONS:
• Use in a dry location only.
• To reduce the risk of injury, close supervision is necessary when the headlamp
is used near children.
• Do not put the headlamp in water or other liquid. Do not place or store
where it can fall or be pulled into water or become wet.
• Use only attachments recommended or sold by the manufacturer.
• Never look directly into the light or shine the light into another person’s eyes.
• Keep sharp objects away from lens — it can crack or break.
• Do not drop or throw this headlamp. It contains alkaline batteries.
• Do not operate the light near flammable liquids or in gaseous or explosive
atmospheres. Internal sparks may ignite fumes causing personal injury.
• When not in use, the appliance should be stored in a dry, well ventilated
place out of the reach of children.
WARNING: FIRE HAZARD:
• Keep headlamp away from materials that may burn.
• Do not expose this unit to extremely high temperatures, sparks or flames.
Inspection and repairs
• Before use, check the unit for damaged or defective parts. Check for
breakage of parts, damage to switches and any other conditions that may
affect its operation.
• Do not use the unit if any part is damaged or defective.
• Have any damaged or defective parts repaired or replaced by the
manufacturer.
• Never attempt to remove or replace any parts other than those specified
in this manual or disassemble the main body of the unit. Other than the 3
“AAA” size dry cell batteries, there are no user-replaceable parts.
• Do not operate this unit with a missing or damaged lens.
ALKALINE BATTERY SAFETY INSTRUCTIONS
WARNING: Batteries can explode, or leak, and can cause injury or
fire. To reduce this risk:
• Use only “AAA” alkaline dry cell batteries in this unit.
• Carefully follow all instructions and warnings on the battery label and
package.
• Always insert batteries correctly with regard to polarity (+ and –), marked on
the battery and the equipment.
• Do not short battery terminals.
• Do not charge batteries.
• Do not mix old and new or alkaline, standard (carbon-zinc) and rechargeable
(nickel cadmium or nickel metal hydride) batteries. Replace all of them at the
same time with new batteries of the same brand and type.
• Remove dead batteries immediately and dispose of per local codes.
• Do not dispose of batteries in fire.
• Keep batteries out of reach of children.
• Remove batteries if the device will not be used for several months.
“Transporting batteries can possibly cause fires if the battery terminals
inadvertently come in contact with conductive materials such as keys, coins,
hand tools and the like. The US Department of Transportation Hazardous
Material Regulations (HMR) actually prohibit transporting batteries in
commerce or on airplanes (i.e. packed in suitcases and carryon luggage) UNLESS
they are properly protected from short circuits. So when transporting individual
batteries, make sure that the battery terminals are protected and well insulated
from materials that could contact them and cause a short circuit.”
SAVE THESE INSTRUCTIONS
INTRODUCTION
Congratulations on purchasing your new Stanley 3 Watt High-Powered
LED Headlamp with LED Area Lights. Read this Instruction Manual and
follow the instructions carefully before using your new headlamp.
POWER SUPPLY
The unit is powered by three “AAA” alkaline dry cell batteries (may be sold
separately) inside the battery compartment.
Battery replacement/disposal
The battery compartment is located on the back of the head lamp. Refer to the
illustrations at the beginning of these instructions and the steps that follow to
replace the batteries:
1. Use one hand to hold the head lamp body and place the thumb of the
other hand into the back cover latch release groove. Gently lift up the back
cover and push it out by lightly applying force on the back cover latch.
2. Insert the batteries correctly according to the symbols shown inside the
battery compartment, observing the cautions that follow.
3. Replace the back cover by aligning the fastening buckles between the
battery compartment and back cover.
4. Snap the back cover into the head lamp body through the back cover latch.
CAUTIONS:
• Always read and follow all warnings in the Alkaline Battery Safety
Instructions section of this Instruction Manual before replacing/
disposing of the batteries in this unit.
• The battery compartment inside the headlamp body is connected to the back
cover by integrated connector tape. Do not damage the integrated connector
tape or attempt to disconnect it from either the back cover or the battery
compartment at any time.
• This unit may be delivered with the 3 “AAA” alkaline dry cell batteries
already installed in the battery compartment. If so, they are protected by an
insulation sheet. Make sure this insulation sheet is removed before using the
headlamp for the first time.
• Remove batteries if the headlamp will not be used for a period of time.
OPERATING INSTRUCTIONS
Operating the headlamp
1. Place the headlamp on your head and adjust the strap to fit your head
securely.
2. Turn the headlamp on by pressing the power/light mode button, choosing
the desired light mode as follows:
• Press once for high intensity on the 3W LED light bulb.
• Press again for low intensity on the 3W LED light bulb.
• Press a third time for the two white LED area lights.
• Press a fourth time for the two red LED area lights.
• Press a fifth time for to turn the headlamp off.
• Press and hold the power/light mode button for about two seconds for
flashing (SOS) mode (a continuous sequence of three short flashes/three
longer flashes/three short flashes). Press and hold it again for about two
seconds to return to the previous operating intensity.
IMPORTANT: When the headlamp dims, the 3 “AAA” alkaline dry cell batteries
need to be replaced.
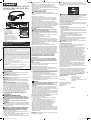
Pivoting the headlamp main body
The headlamp body is adjustable, allowing the headlamp to be tilted forward
and backward to adjust the area of illumination, as shown below:
CAUTION: TO REDUCE THE RISK OF PROPERTY DAMAGE
• The headlamp was designed to tilt forward and backward only. Do not
attempt to “force” the headlamp beyond its maximum angle.
• The headlamp body is not designed to be detached from the head strap. Do
not attempt to detach it at any time.
• Forcibly and repeatedly tilting the headlamp forward and backward may
damage the pivoting mechanism.
CARE AND MAINTENANCE
If the unit gets dirty, gently clean the outer surfaces of the headlamp with a
soft cloth moistened with a mild solution of water and detergent.
TROUBLESHOOTING
The light will not operate
1. Make sure the Power/Light Mode Button is not pressed to the Off mode.
2. The batteries may be installed with incorrect polarity (+ and –). Follow the
directions marked on the batteries and inside the battery compartment.
3. The batteries may be completely discharged. Replace the batteries
following the directions given in this manual.
4 If the headlamp does not operate after replacing the batteries as directed,
contact manufacturer at 877-571-2391.
ACCESSORIES
Recommended accessories for use with your tool may be available from the
manufacturer. If you need assistance regarding accessories, please contact the
manufacturer at (877) 571-2391.
WARNING: The use of any accessory not recommended for use with this
appliance could be hazardous.
SERVICE INFORMATION
Whether you need technical advice, repair, or genuine factory replacement
parts, contact the manufacturer at (877) 571-2391.
ONE-YEAR LIMITED WARRANTY
The manufacturer warrants this product against defects in materials and
workmanship for a period of ONE (1) YEAR from the date of retail purchase by
the original end-user purchaser (“Warranty Period”).
If there is a defect and a valid claim is received within the Warranty Period, the
defective product can be replaced or repaired in the following ways: (1) Return
the product to the manufacturer for repair or replacement at manufacturer’s
option. Proof of purchase may be required by manufacturer. (2) Return
the product to the retailer where product was purchased for an exchange
(provided that the store is a participating retailer). Returns to retailer should be
made within the time period of the retailer’s return policy for exchanges only
(usually 30 to 90 days after the sale). Proof of purchase may be required. Please
check with the retailer for their specific return policy regarding returns that are
beyond the time set for exchanges.
This warranty does not apply to accessories, bulbs, fuses and batteries; defects
resulting from normal wear and tear, accidents; damages sustained during
shipping; alterations; unauthorized use or repair; neglect, misuse, abuse; and
failure to follow instructions for care and maintenance for the product.
This warranty gives you, the original retail purchaser, specific legal rights
and you may have other rights which vary from state to state or province to
province. This product is not intended for commercial use.
Please complete the Product Registration Card and return within 30 days
from purchase of the product to: Baccus Global LLC, 595 S. Federal Highway,
Suite 210, Boca Raton, FL 33432. Baccus Global LLC, toll-free number:
(877) 571-2391.
SPECIFICATIONS
Light: One 3 watt LED bulb
Two white LED area lights
Two red LED area lights
Power source: 3 “AAA” alkaline batteries (may be sold
separately)
Imported by Baccus Global LLC
595 S. Federal Highway, Suite 210
Boca Raton, FL 33432
(877) 571-2391
RD031314
HL1S_ManualENSP_031314.indd 1 3/13/2014 10:24:53 AM

x
3 VATIOS LINTERNA DE LED DE ALTA
POTENCIA CON LUCES LED DE ÁREA
MANUAL DE INSTRUCCIÓN
HL1S
CARACTERÍSTICAS
1. Botón de encendido/de modo de luz
2. Cuerpo de la linterna
3. Correa cabezal ajustable
4. Dos luces de área LED blancos
5. Dos luces de área LED rojos
6. Bombilla de 3 vatios LED
7. Pestillo de la cubierta posterior ranura de
liberación
8. Pestillo de la cubierta posterior
9. Conector integrado de cinta (conecta la
cubierta posterior al compartimiento de la
batería)
10. Hebillas de fijación de la cubierta posterior
11. Hebilla de fijación del compartimiento de la
batería
12. Compartimiento de la batería
1 2
3
4
5
6
8
7
9
Back cover
12
10
11
CONSERVE ESTE MANUAL PARA FUTURAS CONSULTAS.
Derechos Reservados © 2014
Baccus Global LLC
Boca Raton, FL 33432
(877) 571-2391
Este dispositivo cumple con la parte 15 de las normas de la Comisión Federal de
Comunicaciones de Estados Unidos (FCC). La operación está sujeta a las dos condiciones
siguientes: (1) este dispositivo no puede causar interferencia perjudicial y (2) este
mecanismo debe aceptar cualquier interferencia recibida, incluida la in-terferencia que
puede provocar una operación no deseada.
Este equipo ha sido probado y se encontró que cumple con los límites para dispositivo
digital Clase B, según la parte 15 de las normas de la FCC. Estos límites están diseñados
para brindar protección razonable contra interferencia perjudicial en una instalación
residencial. Este equipo genera, usa y puede irradiar energía en frecuencia de radio y,
si no se instala y se usa de acuerdo con las instrucciones, puede provocar interferencia
perjudicial en las comunicaciones de radio. Sin embargo, no hay garantía de que la
interferencia no ocurra en una instalación en particular. Si el equipo provoca interferencia
perjudicial en la recepción de radio o televisión, lo que se puede determinar al apagar y
encender el equipo, el usuario debe tratar de corregir la interferencia mediante una o
más de las siguientes medidas:
• Cambiar la orientación o la ubicación de la antena de recepción.
• Aumentar la separación entre el equipo y el receptor.
• Conectar el equipo a un tomacorriente sobre un circuito diferente de aquel al que está
conectado el receptor.
• Consultar al vendedor o pedir la ayuda de un técnico en radio y televisión con
experiencia.
Los cambios o las modificaciones no aprobados por el partido responsable de conformidad
podían anular la autoridad del usuario para funcionar el equipo.
NORMAS DE SEGURIDAD /
DEFINICIONES
PELIGRO: Indica una situación de peligro inminente que, si no se evita,
provocará la muerte o lesiones graves.
ADVERTENCIA: Indica una situación de peligro inminente que, si no se
evita, provocará la muerte o lesiones graves.
PRECAUCIÓN: Indica una situación de peligro potencial que, si no se evita,
puede provocar lesiones leves o moderadas.
PRECAUCIÓN: Utilizado sin el símbolo de alerta de seguridad indica una
situación de peligro potencial que, si no se evita, puede provocar daños a la
propiedad.
RIESGO DE OPERACIÓN INSEGURA. Cuando se utilizan herramientas
o equipos, siempre se deben respetar las precauciones de seguridad para
reducir el riesgo de lesiones personales. La operación, el mantenimiento o la
modificación incorrectos de herramientas o equipos pueden provocar lesiones
graves y daños a la propiedad. Las herramientas y los equipos están diseñados
para usos determinados. Fabricante recomienda encarecidamente que NO se
modifique este producto y que NO se utilice para ningún otro uso que aquél
para el que fue diseñado. Lea y comprenda todas las instrucciones operativas y
las advertencias antes de utilizar cualquier herramienta o equipo.
INSTRUCCIONES IMPORTANTES DE
SEGURIDAD
LEA TODAS LAS INSTRUCCIONES
ADVERTENCIA: Lea todas las instrucciones antes de operar la
linterna. El incumplimiento de todas las instrucciones enumeradas a
continuación puede provocar una descarga eléctrica, un incendio o
lesiones graves.
ADVERTENCIAS E INSTRUCCIONES DE SEGURIDAD
GENERALES
ADVERTENCIA: Este producto o su cable de alimentación contiene plomo,
una sustancia química reconocida por el Estado de California como causante
de cáncer, defectos de nacimiento u otros problemas reproductivos. Lávese las
manos después de utilizarlo.
ADVERTENCIA - AL UTILIZAR ESTA LINTERNA, SIEMPRE TOME LAS
PRECAUCIONES, INCLUYENDO LAS SIGUIENTES, PARA REDUCIR EL
RIESGO DE DESCARGA ELÉCTRICA O LESIONES A LAS PERSONAS:
• Utilizar en un lugar seco solamente.
• Reducir el riesgo de lesión, la supervisión cercana es necesaria cuando la
linterna se utiliza cerca de niños.
• No coloque la linterna en agua u otro líquido. No coloque ni guarde donde
pueda caer o ser empujado a agua o llegar a ser mojado.
• Utilice solamente los accesorios recomendados o vendidos por el fabricante.
• Nunca mire directamente a la luz ni la apunte directamente a los ojos de otra
persona.
• Proteja la lente contra objetos agudos. Puede agrietarse o romperse.
• No deje caer o tirar la linterna. Contiene las baterías alcalinas.
• No haga funcionar la luz cerca de líquidos inflamables o en atmósferas
gaseosas o explosivas. Chispas internas pueden encender los vapores causantes
de lesiones personales.
• Cuando el aparato no esté en uso, deberá guardarse en un lugar seco, bien
ventilado, y lejos del alcance de los niños.
ADVERTENCIA: RIESGO DE INCENDIO:
• Guarde la linterna lejos de los materiales que pueden quemar.
• No exponga esta unidad extremadamente a las temperaturas altas, chispas
o llamas.
Inspecciones y reparaciones
• Antes de utilizarlo, compruebe que el aparato no tiene piezas dañadas o
defectuosas. Compruebe que no hay piezas rotas, que los interruptores
no están dañados y que no existen otros defectos que puedan afectar al
funcionamiento del aparato.
• No utilice el aparato si presenta alguna pieza dañada o defectuosa.
• Haga que las partes dañadas o reparado o reemplazado por el fabricante.
• Nunca intente extraer o sustituir piezas no especificadas en este manual. No
desmonte el cuerpo principal de la unidad. Con excepción de las 3 baterías de
celda seca del tamaño del “AAA”, no hay piezas usuario-reemplazables.
• No opere esta unidad con una lente que falta o dañado.
INSTRUCCIONES DE SEGURIDAD DE LAS BATERÍAS
ALCALINOS
ADVERTENCIA: Las baterías pueden estallar, o escape, y pueden
causar lesión o fuego. Para reducir este riesgo:
• Utilice solamente las “AA” baterías alcalinas seca en esta unidad.
• Siga cuidadosamente todas las instrucciones y advertencias en la etiqueta y el
paquete de la batería.
• Inserte siempre las baterías correctamente con respecto a la polaridad (+ y -),
marcada en la batería y el equipo.
• No ponga en cortocircuito los terminales de la batería.
• No cargue las baterías.
• No mezcle baterías viejas con nuevas, o alcalinas, estándar (carbón-cinc) y
recargables (níquel-cadmio o níquel metal hidruro). Substituya todos al mismo
tiempo por baterías nuevas de la misma marca de fábrica y mecanografíe.
• Quite las baterías muertas inmediatamente y disponga por códigos locales.
• No disponga de las baterías en fuego.
• Mantenga baterias fuera del alcance de los niños.
• Quite las baterías si el dispositivo no es utilizado por varios meses.
“Transportar baterías puede provocar incendios si las terminales de la batería
entran en contacto accidentalmente con materiales conductivos como llaves,
monedas, herramientas de mano y similares. El Departamento de Transporte
y Normas para Materiales Peligrosos EE.UU. (HMR) concretamente prohíben
transportar baterías comercialmente o en aviones (es decir, empacadas en
maletas y equipaje de mano) A MENOS que estén debidamente protegidas
contra cortocircuitos. Tanto, cuando transporte baterías individuales, asegúrese
de que las terminales de la batería estén protegidos y bien aislados de
materiales que pudieran entrar en contacto y causar un cortocircuito.”
CONSERVE ESTAS INSTRUCCIONES
INTRODUCCIÓN
Felicitaciones por adquirir su Stanley 3 vatios linterna de LED de alta
potencia con luces LED de área nueva. Lea el manual de instrucción y
siga las instrucciones cuidadosamente antes de utilizar su linterna
nueva.
FUENTE DE ENERGÍA
La unidad es accionada por tres baterías alcalinas“AAA” (puede ser vendido
por separado) en el compartimento de la batería.
Reemplazo/desecho de las baterías
El compartimiento de la batería se encuentra en la parte posterior de la
linterna. Consulte las ilustraciones al principio de estas instrucciones y de los
pasos que siguen para reemplazar las baterías:
1. Utilice una mano para sujetar el cuerpo de la linterna y coloque el pulgar
de la otra mano dentro la pestillo de la cubierta posterior ranura de
liberación. Levante ligeramente la tapa trasera y empujarlo fuera aplicando
ligeramente vigor el pestillo de la cubierta trasera.
2. Inserte las baterías correctamente de acuerdo con los símbolos que
aparecen en el interior del compartimento de la batería, observando las
precauciones que siguen.
3. Reemplace el cubierta posterior, alineando la de ajustar las hebillas entre el
compartimiento de la batería y la cubierta posterior.
4. Encajar la cubierta posterior de nuevo en el cuerpo de la lámpara de cabeza
a través del pestillo de la cubierta posterior.
PRECAUCIONES:
• Siempre lea y siga todas las advertencias de la sección Instrucciones
de seguridad de las baterías alcalinos de este manual de
instrucciones antes de reemplazar / eliminación de las baterías de
esta unidad.
• El compartimento de la batería en el interior del cuerpo de la linterna está
conectado a la carcasa trasera con cinta conector integrado. No dañe la
cinta conector integrado o intentar separarlo ya sea de la tapa posterior o el
compartimento de la batería en cualquier momento.
• Esta unidad puede ser entregado con las 3 alcalinas “AAA” baterías secas ya
instalados en el compartimiento de la batería. Si es así, que están protegidos
por una capa de aislamiento. Asegúrese de que esta hoja de aislamiento se
retira antes de utilizar el proyector por primera vez.
• Quite las baterías si la linterna no se utilizará durante un periodo de tiempo.
INSTRUCCIONES PARA EL FUNCIONAMIENTO
Funcionamiento de la linterna
1. Coloque la linterna en tu cabeza y ajuste la correa para ajustarse a su
cabeza de forma segura.
2. Encienda la lámpara pulsando el botón de modo de encendido / luz,
eligiendo el modo de luz deseado de la siguiente manera:
• Oprima una vez para alta intensidad de la bombilla de luz LED de 3W.
• Oprima de nuevo para baja intensidad en la bombilla LED de 3W.
• Oprima una tercera vez para las dos luces de área LED blancos.
• Oprima una cuarta vez para las dos luces de área LED rojos.
• Oprima una quinta vez para dar vuelta la linterna apagada.
• Oprima y sostenga el botón de encendido / de modo luz durante unos dos
segundos para el modo parpadeando (SOS) (una secuencia continua de tres
parpadeos cortos / tres parpadeos largos / tres parpadeos cortos). Oprima y
sostenga de nuevo durante unos dos segundos para volver a la intensidad de
funcionamiento anterior.
IMPORTANTE: Cuando la linterna se atenúa, los 3 alcalinas “AAA” baterías
secas necesitan ser reemplazados.
Ajuste del eje del cuerpo principal de la linterna
El cuerpo de linterna es ajustable, lo que permite la linterna a inclinarse hacia
delante y hacia atrás para ajustar el área de la iluminación, como se muestra a
continuación:
PRECAUCIÓN: PARA REDUCIR EL RIESGO DE DAÑOS A LA PROPIEDAD
• La linterna fue diseñado para inclinarse hacia delante y hacia atrás solamente.
No trate de “forzar” la linterna más allá de su ángulo máximo.
• El cuerpo de la linterna no está diseñado para ser separado de la correa de la
cabeza. No intente desconectar en cualquier momento.
• Inclinando la linterna a la fuerza y repetidamente hacia adelante y hacia atrás
puede dañar el mecanismo de pivotamiento.
CUIDADO Y MANTENIMIENTO
Si la unidad se ensucia, limpie suavemente la superficie exterior de la linterna
con un paño suave humedecido con una solución suave de agua y detergente.
DETECCIÓN DE PROBLEMAS
La linterna no funciona
1. Asegúrese de que el botón de encendido/de modo de luz no se presiona a
la posición de apagado.
2. Las baterías pueden ser instaladas con la polaridad incorrecta (+ y -). Siga
las instrucciones indicadas en las baterías y dentro del compartimiento de la
batería.
3. Las baterías pueden ser completamente descargadas. Reemplace las baterías
siguiendo las instrucciones dadas en este manual.
4 Si la linterna no funciona después reemplazar las baterías según las
instrucciones, comuníquese con el fabricante en 877-571-2391.
ACCESORIOS
Accesorios recomendados para uso con esta unidad puede ser disponibles a
través del fabricante. Si necesita ayuda con respecto a los accesorios, por favor
póngase en contacto con el fabricante al (877) 571-2391.
ADVERTENCIA: El uso de cualquier accesorio no recomendado para el uso
con esta unidad podía ser peligroso.
INFORMACIÓN DE SERVICIO
Si usted necesita asesoramiento técnico, reparación, o partes genuinas del
fabricante, póngase en contacto con el fabricante al (877) 571-2391.
UN AÑO DE GARANTÍA LIMITADA
El fabricante garantiza este producto contra defectos de materiales y mano
de obra durante un período de UN (1) AÑO a partir de la fecha de compra
del producto por el comprador usuario final (“Período de Garantía”). Si
hay un defecto y una reclamación válida se recibe dentro del período de
garantía, el producto defectuoso puede ser reemplazado o reparado en el las
siguientes maneras: (1) Devuelva el producto al fabricante para reparación
o reemplazo, a opción del fabricante. La prueba de compra puede ser
requerida por el fabricante. (2) Devuelva el producto a la tienda donde el
producto fue comprado para un intercambio (siempre y cuando se trate de un
minorista participante). Devoluciones al minorista deben hacerse dentro del
plazo de póliza de devoluciones del minorista para intercambios solamente
(por lo general 30 a 90 días después de la fecha de compra). La prueba de
compra puede ser requerida por el minorista. Por favor consulte la póliza
de devoluciones del minorista sobre devoluciones que están fuera del plazo
establecido para intercambios.
Esta garantía no se aplica a los accesorios, bombillos, fusibles y baterías;
defectos a consecuencias de desgaste normal; accidentes; daños y perjuicios
sufridos durante el envío y manejo, alteraciones, reparaciones o uso no
autorizado, negligencia, abuso, y si no se siguen instrucciones para el cuidado y
mantenimiento del producto.
Esta garantía le otorga al comprador usuario final, derechos legales específicos
y usted puede tener otros derechos que varían de estado a estado o de
provincia a provincia. Este producto no está diseñado para uso comercial.
Por favor completar la tarjeta de registro del producto dentro de un plazo
de 30 días a partir de la fecha de compra y remitir a: Baccus Global LLC, 595
S. Federal Highway, Suite 210, Boca Raton, FL 33432. Baccus Global LLC,
número de teléfono gratuito: (877) 571 2391.
ESPECIFICACIONES
Luces: 3 vatios bombilla LED
Dos luces de área LED blancos
Dos luces de área LED rojos
Fuente de energía: 3 baterías alcalinas “AAA” (puede ser vendido
por separado)
Importados por Baccus Global LLC
595 S. Federal Highway, Suite 210
Boca Raton, FL 33432
(877) 571-2391
RD031314
HL1S_ManualENSP_031314.indd 2 3/13/2014 10:24:54 AM
-
 1
1
-
 2
2


