Iomega DESKTOP USB FIREWIRE El manual del propietario
- Categoría
- Discos duros externos
- Tipo
- El manual del propietario

Desktop Hard Drive
USB/FireWire
®
Quick Start Guide
Guide de démarrage rapide
Schnellstart-Handbuch
Guida di installazione rapida
Guía de instrucciones rápidas
Guia de uso rápido
Snel aan de slag
Snabbstartguide
Introduktion
Hurtigreferanse
Pikaopas
Οδηγός γρήγορης εκκίνησης
Stručná příručka
Wprowadzenie
Gyors útmutató

If you have a problem, we can help. Please do NOT return this product to the store!
Your answer is on the web. Visit our award-winning web support site www.iomega.com.
Select your region, then select Support and Downloads.
Si vous avez un problème, nous pouvons vous aider. NE RENVOYEZ PAS ce produit au
magasin !
Votre réponse est sur le Web. Site Web d’assistance primé www.iomega.com.
Sélectionnez votre région puis Support et téléchargements.
Si tiene algún problema, podemos ayudar. ¡Por favor, NO devuelva este producto a la
tienda!
Su respuesta está en la web. Destacado sitio Web de atención al cliente
www.iomega.com. Seleccione su región y, a continuación, acceda al
área de asistencia y descarga.
Se você tiver um problema, nós podemos ajudar. NÃO devolva esse produto à loja!
A resposta para você está na web. Site da web vencedor de prêmios www.iomega.com.
Selecione a sua região e Suporte e Downloads.
Wenn Sie ein Problem haben, können wir Ihnen helfen. Bringen Sie dieses Produkt
NICHT zu Ihrem Händler zurück!
Ihre Antwort steht im Netz.
Preisgekrönte Support-Website www.iomega.com. Wählen
Sie Ihr Gebiet aus und klicken Sie auf Support und Downloads.
In caso di problemi, noi possiamo fornire assistenza. NON restituire questo prodotto al
rivenditore!
La risposta
è sul Web. Sito di supporto sul Web premiato www.iomega.com. Selezionare
la propria regione, quindi scegliere Supporto tecnico e download.

Contents • Matières • Inhalt • Sommario • Contenido
Conteúdo • Inhoudsopgave • Innehåll • Indhold • Innhold
Sisällys • Περιεχόµενα • Obsah • Spis treści • Tartalom
Quick Install . . . . . . . . . . . . . . . . . . . . . . . . . . . . . . . . . . . . . . . . . . . . . . . . . . . . 4
Installation rapide . . . . . . . . . . . . . . . . . . . . . . . . . . . . . . . . . . . . . . . . . . . . . . . . .
4
Schnellstart
. . . . . . . . . . . . . . . . . . . . . . . . . . . . . . . . . . . . . . . . . . . . . . . . . . . . 5
Installazione rapida . . . . . . . . . . . . . . . . . . . . . . . . . . . . . . . . . . . . . . . . . . . . . . . .
5
Instalación rápida . . . . . . . . . . . . . . . . . . . . . . . . . . . . . . . . . . . . . . . . . . . . . . . . .
6
Instalação rápida
. . . . . . . . . . . . . . . . . . . . . . . . . . . . . . . . . . . . . . . . . . . . . . . . . 6
Snelle installatie
. . . . . . . . . . . . . . . . . . . . . . . . . . . . . . . . . . . . . . . . . . . . . . . . . 7
Snabbinstallation
. . . . . . . . . . . . . . . . . . . . . . . . . . . . . . . . . . . . . . . . . . . . . . . . . 7
Hurtig installation . . . . . . . . . . . . . . . . . . . . . . . . . . . . . . . . . . . . . . . . . . . . . . . . .
8
Rask installering . . . . . . . . . . . . . . . . . . . . . . . . . . . . . . . . . . . . . . . . . . . . . . . . . .
8
Pika-asennus
. . . . . . . . . . . . . . . . . . . . . . . . . . . . . . . . . . . . . . . . . . . . . . . . . . . 9
Γρήγορη
εγκατάσταση . . . . . . . . . . . . . . . . . . . . . . . . . . . . . . . . . . . . . . . . . . . . . . 9
Rychlá instalace
. . . . . . . . . . . . . . . . . . . . . . . . . . . . . . . . . . . . . . . . . . . . . . . . . . 10
Skrócona instrukcja insalacji
. . . . . . . . . . . . . . . . . . . . . . . . . . . . . . . . . . . . . . . . . . 10
Gyors telepítés
. . . . . . . . . . . . . . . . . . . . . . . . . . . . . . . . . . . . . . . . . . . . . . . . . . . 11
Using Your Drive
. . . . . . . . . . . . . . . . . . . . . . . . . . . . . . . . . . . . . . . . . . . . . . . . . . 12
Troubleshooting
. . . . . . . . . . . . . . . . . . . . . . . . . . . . . . . . . . . . . . . . . . . . . . . . . . 12
User’s Manual
. . . . . . . . . . . . . . . . . . . . . . . . . . . . . . . . . . . . . . . . . . . . . . . . . . . 12
Utilisation du lecteur
. . . . . . . . . . . . . . . . . . . . . . . . . . . . . . . . . . . . . . . . . . . . . . . 13
Dépannage . . . . . . . . . . . . . . . . . . . . . . . . . . . . . . . . . . . . . . . . . . . . . . . . . . . . . 13
Guide de l’utilisateur
. . . . . . . . . . . . . . . . . . . . . . . . . . . . . . . . . . . . . . . . . . . . . . . 13
Verwenden des Laufwerks
. . . . . . . . . . . . . . . . . . . . . . . . . . . . . . . . . . . . . . . . . . . . 14
Fehlerbehebung
. . . . . . . . . . . . . . . . . . . . . . . . . . . . . . . . . . . . . . . . . . . . . . . . . . 14
Benutzerhandbuch
. . . . . . . . . . . . . . . . . . . . . . . . . . . . . . . . . . . . . . . . . . . . . . . . 14
Uso dell’unità
. . . . . . . . . . . . . . . . . . . . . . . . . . . . . . . . . . . . . . . . . . . . . . . . . . . 15
Risoluzione dei problemi . . . . . . . . . . . . . . . . . . . . . . . . . . . . . . . . . . . . . . . . . . . . . 15
Manuale dell’utente . . . . . . . . . . . . . . . . . . . . . . . . . . . . . . . . . . . . . . . . . . . . . . . . 15
Uso de la unidad . . . . . . . . . . . . . . . . . . . . . . . . . . . . . . . . . . . . . . . . . . . . . . . . . . 16
Solución de problemas
. . . . . . . . . . . . . . . . . . . . . . . . . . . . . . . . . . . . . . . . . . . . . . 16
Manual del usuario
. . . . . . . . . . . . . . . . . . . . . . . . . . . . . . . . . . . . . . . . . . . . . . . . 16
Utilização da unidade . . . . . . . . . . . . . . . . . . . . . . . . . . . . . . . . . . . . . . . . . . . . . . . 17
Solução de problemas
. . . . . . . . . . . . . . . . . . . . . . . . . . . . . . . . . . . . . . . . . . . . . . 17
Manual do usuário
. . . . . . . . . . . . . . . . . . . . . . . . . . . . . . . . . . . . . . . . . . . . . . . . 17
De drive gebruiken
. . . . . . . . . . . . . . . . . . . . . . . . . . . . . . . . . . . . . . . . . . . . . . . . 18
Problemen oplossen
. . . . . . . . . . . . . . . . . . . . . . . . . . . . . . . . . . . . . . . . . . . . . . . 18
Gebruikershandleiding
. . . . . . . . . . . . . . . . . . . . . . . . . . . . . . . . . . . . . . . . . . . . . . 18
Customer Support . . . . . . . . . . . . . . . . . . . . . . . . . . . . . . . . . . . . . . . . . . . . . . . . . 19
Assistance clientèle . . . . . . . . . . . . . . . . . . . . . . . . . . . . . . . . . . . . . . . . . . . . . . . . 19
Kundenunterstützung . . . . . . . . . . . . . . . . . . . . . . . . . . . . . . . . . . . . . . . . . . . . . . . 19
Assistenza clienti
. . . . . . . . . . . . . . . . . . . . . . . . . . . . . . . . . . . . . . . . . . . . . . . . . 19
Asistencia al cliente . . . . . . . . . . . . . . . . . . . . . . . . . . . . . . . . . . . . . . . . . . . . . . . . 19
Suporte ao cliente . . . . . . . . . . . . . . . . . . . . . . . . . . . . . . . . . . . . . . . . . . . . . . . . .
19

4
S
t
a
rt
U
p
M
i
s
e
e
n
r
ou
t
e
S
t
ar
t
I
n
i
c
i
o
I
n
i
c
i
a
li
z
aç
ã
o
I
n
st
a
la
c
i
ón
3
1
3
8
7
2
0
0
w
w
w.
i
o
m
e
g
a
.
co
m
C
o
p
y
r
i
g
h
t
©
2
0
0
4
I
o
m
e
g
a
C
o
r
p
o
r
a
t
i
o
n
.
A
l
l
r
i
g
h
t
s
r
e
se
r
ve
d
.
E
xt
ern
a
l
Ha
r
d
D
ri
v
e
W
i
n
do
ws
M
a
c
US
B
A
v
v
i
o
1. Insert the Solutions CD. If it does not start
automatically, double click the CD icon in My
Computer, Windows
®
Explorer or on the Mac
®
desktop,
then double click the Start icon. Connect the drive to
the computer after the Solutions CD has checked your
system.
2. Connect the included power supply to the back of the
drive. Place the drive on a stable surface and connect
the power supply to a power outlet.
CAUTION! To avoid damage to the power supply
connector, make sure it is aligned correctly before
plugging it into the drive. Do not move the drive while
it is powered up to avoid drive damage or data loss.
3. Identify the appropriate cable and connect it to the
back of the drive. Never connect the drive to the
computer with more than one cable.
4. Connect the other end of the cable to the port on your
computer.
The drive icon should appear in My Computer,
Windows Explorer or on the Mac Desktop. After the
drive is recognized by the operating system, install
the software from the Solutions CD.
PC USERS: If your drive includes FireWire 800, your
computer will not recognize the drive until it is
reformatted. See page 7 for more information.
CAUTION! To prevent data loss, do not disconnect the
drive during data transfer (drive activity light flashing).
Refer to the user’s manual on the Solutions CD for
instructions on disconnecting the drive.
1. Insérez le CD Solutions. S’il ne démarre pas
automatiquement, double-cliquez sur l’icône du CD
dans le Poste de travail, dans l’Explorateur Windows
®
ou sur le bureau Mac
®
, puis double-cliquez sur l’icône
Démarrer. Connectez le lecteur à l’ordinateur
après
que le CD Solutions a vérifié votre système.
2. Connectez l’alimentation incluse à l’arrière du
lecteur. Placez le lecteur sur une surface stable et
connectez l’alimentation à une prise secteur.
ATTENTION ! Pour éviter d’endommager le connecteur
d’alimentation, assurez-vous de son alignement
avant de le raccorder au lecteur. Ne déplacez pas
le lecteur alors qu’il est sous tension pour éviter de
l’endommager ou de perdre des données.
3. Identifiez le bon câble et connectez-le à l’arrière du
lecteur. Ne connectez jamais le lecteur à l’ordinateur
à l’aide de plusieurs câbles.
4. Connectez l’autre extrémité du câble au port de votre
ordinateur.
L’icône du lecteur doit apparaître dans le Poste de
travail, l’Explorateur Windows ou sur le bureau du
Mac. Une fois le lecteur reconnu par le système
d’exploitation, installez le logiciel à partir du CD
Solutions.
UTILISATEURS PC : Si le lecteur comprend le FireWire
800, vous devrez le reformater pour que l’ordinateur
puisse le reconnaître. Reportez-vous à la page 8 pour
plus d’informations.
ATTENTION !
Pour éviter toute perte de données, ne
déconnectez pas le lecteur pendant un transfert de
données (voyant d’activité du lecteur clignotant). Reportez-
vous au guide de l’utilisateur sur le CD Solutions pour
obtenir des instructions sur la déconnexion du lecteur.
Quick Install • Installation rapide

5
1.
Legen Sie die Solutions-CD ins Laufwerk ein. Falls
das Programm nicht automatisch gestartet wird,
doppelklicken Sie im Bereich Arbeitsplatz, im Windows
®
Explorer oder auf dem Mac
®
-Desktop auf das CD-Symbol.
Doppelklicken Sie anschließend auf
Start
. Schließen
Sie das Laufwerk an den Computer an,
nachdem
die
Solutions-CD Ihr System untersucht hat.
2.
Schließen Sie das mitgelieferte Netzkabel an der
Rückseite des Laufwerks an. Stellen Sie das Laufwerk
auf eine stabile Oberfläche, und verbinden Sie das
Netzkabel mit einer Steckdose.
VORSICHT! Um Beschädigungen des Netzsteckers
zu vermeiden, stellen Sie sicher, dass er bündig
ausgerichtet ist, bevor Sie ihn in die Festplatte
einstecken. Bewegen Sie das Laufwerk während des
Einschaltvorgangs nicht, um Laufwerkbeschädigungen
oder Datenverluste zu vermeiden.
3.
Wählen Sie das richtige Kabel aus, und verbinden Sie es
mit einem Anschluss auf der Rückseite des Laufwerks.
Schließen Sie das Laufwerk stets nur mit einem Kabel an
den Computer an
.
4.
Verbinden Sie das andere Ende des Kabels mit dem
Anschluss des Computers
.
Das Laufwerksymbol wird im Arbeitsplatz, dem Windows
Explorer oder auf dem Mac-Desktop angezeigt. Nachdem
das Laufwerk vom Betriebssystem erkannt wurde,
installieren Sie die Software von der Solutions-CD.
PC-BENUTZER: Wenn Ihr Laufwerk mit FireWire 800
ausgestattet ist, erkennt der Computer das Laufwerk
erst nach einer Neuformatierung. Weitere Informationen
hierzu finden Sie auf Seite 15.
Achtung!
Um Datenverluste zu vermeiden, trennen Sie das
Laufwerk während der Datenübertragung nicht vom Computer
(Kontrolllämpchen am Laufwerk blinkt). Anweisungen zum
Abklemmen des Laufwerks finden Sie im Benutzerhandbuch
auf der Solutions-CD
.
1. Inserire il CD Soluzioni. Se il CD non si avvia
automaticamente, fare doppio clic sull’icona del CD
in Risorse del computer, in Esplora risorse/Gestione
risorse di Windows
®
o sulla Scrivania del Mac
®
, quindi
sull’icona di Avvio. Collegare l’unità al computer solo
dopo che il CD Soluzioni ha controllato il sistema.
2. Collegare l’alimentatore fornito in dotazione alla
parte posteriore dell’unità. Posizionare l’unità su una
superficie stabile e collegare l’alimentatore a una
presa di corrente.
ATTENZIONE! Per evitare che il connettore
dell’alimentatore si danneggi, assicurarsi che sia
correttamente allineato prima di inserirlo nell’unità.
Non spostare l’unità mentre questa è accesa per
evitare danni o perdite di dati.
3. Individuare il cavo appropriato e collegarlo alla
connessione situata nella parte posteriore dell’unità.
Evitare di collegare l’unità al computer utilizzando più
di un cavo.
4. Collegare l’altra estremità del cavo alla porta del
computer
.
L’icona dell’unità verrà visualizzata in Risorse
del computer, Esplora risorse di Windows o sulla
Scrivania Mac. Una volta che l’unità è stata rilevata
dal sistema operativo, installare il software contenuto
nel CD Soluzioni.
UTENTI PC: Se l’unità include FireWire 800, il
computer non riconoscerà l’unità fino a quando non
sarà riformattata. Per ulteriori informazioni, vedere
pag. 16.
ATTENZIONE! Per evitare che si verifichino perdite di
dati, non scollegare l’unità durante il trasferimento di
informazioni (spia di attività dell’unità lampeggiante).
Per informazioni dettagliate su come scollegare l’unità,
consultare il manuale dell’utente contenuto nel CD
Soluzioni.
Schnellstart • Installazione rapida

6
S
t
a
rt
U
p
M
i
s
e
e
n
r
ou
t
e
S
t
ar
t
I
n
i
c
i
o
I
n
i
c
i
a
li
z
aç
ã
o
I
n
st
a
la
c
i
ón
3
1
3
8
7
2
0
0
w
w
w.
i
o
m
e
g
a
.
co
m
C
o
p
y
r
i
g
h
t
©
2
0
0
4
I
o
m
e
g
a
C
o
r
p
o
r
a
t
i
o
n
.
A
l
l
r
i
g
h
t
s
r
e
se
r
ve
d
.
E
xt
ern
a
l
Ha
r
d
D
ri
v
e
W
i
n
do
ws
M
a
c
US
B
A
v
v
i
o
1. Introduzca el CD de soluciones. Si la instalación no
se inicia automáticamente, haga doble clic en el
icono del CD en Mi PC, en el Explorador de Windows
®
Explorer o en el escritorio de Mac
®
y, a continuación,
haga doble clic en el icono Iniciar. Conecte la unidad
al ordenador después de que el CD de Soluciones
haya comprobado el sistema.
2. Conecte el cable de alimentación incluido a la parte
posterior de la unidad. Coloque la unidad sobre una
superficie estable y conecte el cable de alimentación
a una toma eléctrica.
¡PRECAUCIÓN! Para evitar daños al conector de
alimentación, asegúrese de que esté correctamente
alineado antes de enchufarlo a la unidad. No mueva
la unidad mientras esté encendida para evitar
posibles daños en la unidad o la pérdida de datos.
3. Identifique el cable adecuado y conéctelo a la
conexión en la parte posterior de la unidad. Nunca
conecte la unidad al ordenador con más de un cable.
4. Conecte el otro extremo del cable al puerto del
ordenador.
El icono de la unidad aparecerá en Mi PC, el
Explorador de Windows o en el escritorio de Mac. Una
vez que el sistema operativo reconozca la unidad,
instale el software desde el CD de Soluciones.
USUARIOS DE PC
: Si la unidad dispone de FireWire
800, el ordenador no la reconocerá hasta que se
vuelva a formatear. Consulte la página 9 para obtener
más información.
¡PRECAUCIÓN!
Para impedir la pérdida de datos, no
desconecte la unidad durante el proceso de transferencia
de datos (la luz de actividad de la unidad parpadea).
Consulte el manual de usuario del CD de Soluciones para
obtener instrucciones acerca de la desconexión de la
unidad.
1. Insira o CD Soluções. Caso ele não seja iniciado
automaticamente, clique duas vezes no ícone do CD
em Meu computador, no Windows
®
Explorer ou na
mesa do Mac
®
e, em seguida, clique duas vezes no
ícone Iniciar. Conecte a unidade ao computador
após
o CD Soluções verificar seu sistema.
2. Conecte a fonte de alimentação que acompanha
o produto à parte traseira da unidade. Coloque a
unidade em uma superfície estável e conecte a fonte
de alimentação a uma tomada elétrica.
CUIDADO! Para evitar danos ao conector da fonte de
alimentação, certifique-se de que ele esteja alinhado
corretamente antes de encaixá-lo na unidade. Não
mexa na unidade enquanto ela estiver ligada para
evitar danos à mesma ou perda de dados.
3. Identifique o cabo apropriado e conecte-o à entrada
USB na parte traseira da unidade. Nunca conecte a
unidade ao computador através de mais de um cabo.
4. Conecte a outra extremidade do cabo à porta do seu
computador.
O ícone da unidade aparecerá em Meu computador,
no Windows Explorer ou na mesa do Mac. Assim que
a unidade for reconhecida pelo sistema operacional,
instale o software a partir do CD Soluções.
USUÁRIOS DE PC
: Se a unidade possuir o FireWire
800, seu computador não reconhecerá a unidade até
que ela seja reformatada. Veja a página 10 para obter
mais informações.
CUIDADO!
A fim de evitar a perda de dados, não
desconecte a unidade durante a transferência de dados
(luz de atividade da unidade piscando). Consulte o manual
do usuário no CD Soluções para obter instruções sobre
como desconectar a unidade.
Instalación rápida • Instalação rápida

7
1. Plaats de cd Solutions (Opstarten) in de CD-ROM-drive.
Als de cd niet automatisch start, dubbelklikt u op het cd-
pictogram in Deze Computer, of in Windows
®
Verkenner
of op het Mac
®
-bureaublad en dubbelklikt u daarna op
het pictogram
Start
(Opstarten). Nadat de cd Solutions
uw systeem heeft gecontroleerd, sluit u de drive op de
computer aan.
2. Sluit de meegeleverde voeding aan op de achterkant
van de drive. Plaats de drive op een stabiel oppervlak
en sluit het andere uiteinde van de voeding aan op een
stopcontact.
WAARSCHUWING! Let erop dat u de connector van het
stroomsnoer loodrecht in de connector van de drive
plaatst. Anders kan deze worden beschadigd. Verplaats
de drive niet wanneer deze van stroom is voorzien, om
beschadigingen of gegevensverlies te voorkomen
.
3. Neem de geschikte kabel en sluit die aan op de
connector op de achterkant van de drive. Sluit de drive
nooit met meer dan één kabel op de computer aan.
4. Sluit het andere uiteinde van de kabel aan op de poort
van de computer
.
Het pictogram van de drive verschijnt normaal in
Deze computer, Windows Verkenner of op het Mac-
bureaublad. Nadat het besturingssysteem de drive heeft
herkend, installeert u de software vanaf de cd Solutions.
PC-gebruikers: Als uw drive FireWire 800 bevat, zal uw
computer de drive pas herkennen nadat deze is opnieuw
is geformatteerd.
WAARSCHUWING! Koppel de drive nooit los tijdens een
gegevensoverdracht (wanneer het statuslampje van de
drive-activiteit knippert). Zo vermijdt u dat er gegevens
verloren gaan. Raadpleeg de Gebruikershandleiding op de cd
Solutions voor informatie over het loskoppelen van de drive.
1. Sätt i Solutions-CD:n. Om installationsprogrammet
inte startar automatiskt dubbelklickar du på CD-
ikonen i Den här datorn, Windows
®
Utforskaren eller,
om du har en Mac
®
, på skrivbordet och dubbelklickar
sedan på ikonen Start. Anslut enheten till datorn
efter att installationsprogrammet har analyserat ditt
system.
2. Anslut den medföljande strömkabeln till baksidan av
enheten. Placera enheten på en stabil yta och anslut
strömkabeln till ett eluttag.
VARNING! För att inte skada elkontakten, se till att
den är riktad rätt innan du ansluter den till enheten.
Flytta inte enheten när den startas upp för att undvika
att enheten skadas eller att data går förlorade
.
3. Lokalisera rätt kabel och anslut den till uttaget på
baksidan av enheten. Anslut aldrig enheten till datorn
med mer än en kabel.
4. Anslut den andra änden av kabeln till porten på
datorn.
Ikonen för drivenheten ska visas i Den här datorn,
Windows Utforskaren eller på skrivbordet på en Mac.
När operativsystemet har identifierat drivenheten
installerar du programvaran från Solutions-CD-skivan.
PC-ANVÄNDARE: Om drivenheten innehåller FireWire
800 kommer datorn inte att identifiera drivenheten
förrän den har formaterats om.
OBSERVERA! För att förhindra dataförlust ska du
undvika att koppla ur drivenheten under dataöverföring
(drivenhetens aktivitetslampa blinkar). Anvisningar om
hur drivenheten kopplas ur finns i användarhandboken på
CD-skivan Solutions.
Snelle installatie
•
Snabbinstallation

8
S
t
a
rt
U
p
M
i
s
e
e
n
r
ou
t
e
S
t
ar
t
I
n
i
c
i
o
I
n
i
c
i
a
li
z
aç
ã
o
I
n
st
a
la
c
i
ón
3
1
3
8
7
2
0
0
w
w
w.
i
o
m
e
g
a
.
co
m
C
o
p
y
r
i
g
h
t
©
2
0
0
4
I
o
m
e
g
a
C
o
r
p
o
r
a
t
i
o
n
.
A
l
l
r
i
g
h
t
s
r
e
se
r
ve
d
.
E
xt
ern
a
l
Ha
r
d
D
ri
v
e
W
i
n
do
ws
M
a
c
US
B
A
v
v
i
o
1. Indsæt Start-cd’en. Hvis cd’en ikke starter
automatisk, skal du dobbeltklikke på cd-ikonet
i Denne computer i Windows
®
Stifinder eller på
Start-ikonet på skrivebordet på Mac
®
. Slut drevet til
computeren, når Solutions-cd’en har kontrolleret
systemet.
2. Slut det medfølgende strømkabel til bagsiden af
drevet. Placer drevet på en stabil overflade, og slut
strømkablet til en stikkontakt.
FORSIGTIG! Hvis du vil undgå at beskadige
strømforsyningsstikket, skal du sørge for at vende
det rigtigt, før du sætter det i drevet. Du må ikke
flytte drevet, mens der er strøm på, hvis du vil undgå
at beskadige drevet eller miste data
.
3. Find det korrekte kabel, og slut det til stikket på
bagsiden af drevet. Slut aldrig drevet til computeren
med mere end ét kabel.
4. Slut den anden ende af kablet til porten på
computeren.
Drevikonet skulle blive vist i Denne computer,
Windows Stifinder eller på Mac-skrivebordet. Når
operativsystemet har registreret drevet, skal du
installere softwaren fra Solutions-cd’en.
Pc-brugere: Hvis drevet indeholder FireWire 800,
vil computeren ikke genkende drevet, før det er
formateret igen.
FORSIGTIG! Du må ikke frakoble drevet under
dataoverførsel, hvis du vil undgå tab af data (drevaktivitet
sindikatoren blinker). Se brugervejledningen på Solutions-
cd’en, hvis du ønsker yderligere oplysninger om sikker
fjernelse af drevet.
1. Sett inn Solutions CD (oppstart). Hvis den ikke
starter automatisk, dobbeltklikker du på CD-ikonet i
Min datamaskin, Windows
®
Utforsker eller på Mac
®
-
skrivebordet, og dobbeltklikker deretter på Start
-
ikonet. Koble stasjonen til datamaskinen etter at
Solutions CD (oppstart) har kontrollert systemet.
2. Koble den medfølgende strømforsyningen til på
baksiden av stasjonen. Plasser stasjonen på et
stabilt underlag og koble strømforsyningen til en
stikkontakt.
FORSIKTIG! Pass på å holde
strømforsyningskontakten riktig før du setter den
i stasjonen, slik at du unngår å skade den. For å
unngå skade på stasjonen eller tap av data må ikke
stasjonen flyttes mens den er slått på.
3. Finn frem den riktige kabelen og koble den til på
baksiden av stasjonen. Koble aldri stasjonen til
datamaskinen med mer enn én kabel.
4. Koble den andre enden av kabelen til porten på
datamaskinen
.
Stasjonsikonet skal vises i Min datamaskin, Windows
Utforsker eller på Mac-skrivebordet. Når stasjonen
er oppdaget av operativsystemet, installerer du
programvaren på Solutions CD-platen.
PC-BRUKERE: Hvis stasjonen har FireWire 800, vil
ikke datamaskinen gjenkjenne stasjonen før den er
omformatert.
FORSIKTIG! For å unngå tap av data må du ikke koble
fra stasjonen under overføring av data (lampen for
stasjonsaktivitet blinker). Du finner veiledning om
frakobling av stasjonen i brukerhåndboken på Solutions
CD-platen.
Hurtig installation
•
Rask installering

9
1. Aseta Solutions -levy CD-asemaan. Jos
asennusohjelma ei käynnisty automaattisesti,
kaksoisnapsauta Windows
®
Resurssienhallinnan
Oma tietokone -ikkunassa olevaa CD-levyn
kuvaketta tai kaksoisosoita Mac
®
-työpöydällä
olevaa Start (Käynnistä) -kuvaketta. Kytke kiintolevy
tietokoneeseen sen jälkeen, kun Solutions -
asennusohjelma on tarkastanut järjestelmän.
2. Kytke virtajohto aseman takana olevaan liitäntään.
Aseta kiintolevy vakaan alustan päälle ja kytke
virtajohto pistorasiaan.
VAROITUS: Jotta virtalähteen liitin ei vaurioituisi,
varmista, että se on suorassa, ennen kuin kytket sen
asemaan. Älä siirrä kiintolevyä, kun siihen on virta
kytkettynä. Levy voi vahingoittua tai tietoja voi hävitä
.
3. Ota tarvittava kaapeli ja kytke se kiintolevyn
takaosassa olevaan liitäntään. Kytke kiintolevy
tietokoneeseen vain yhdellä kaapelilla.
4. Kytke kaapelin toinen pää tietokoneen porttiin.
Aseman kuvakkeen tulee näkyä Windowsin
Resurssienhallinnan Oma tietokone -ikkunassa
tai Macintosh-tietokoneen työpöydällä.
Asenna Solutions-levyllä oleva ohjelmisto, kun
käyttöjärjestelmä on tunnistanut kiintolevyn.
PC-KÄYTTÄJÄT: Jos asemassa on FireWire 800 -
liitäntä, tietokone tunnistaa aseman vasta, kun se on
alustettu uudelleen.
VAROITUS: Älä irrota asemaa tiedonsiirron aikana (tällöin
asemassa vilkkuu valo), koska tiedot voivat hävitä. Irrota
asema Solutions-levyllä olevan käyttöoppaan ohjeiden
mukaan.
1. Τοποθετήστε το CD Solutions. Εάν δεν ξεκινήσει αυτόµατα,
κάντε διπλό κλικ στο εικονίδιο του CD στο φάκελο Ο
υπολογιστής µου (My Computer), στην Εξερεύνηση των
Windows
®
(Windows Explorer) ή στο γραφείο του Mac
®
και
στη συνέχεια κάντε διπλό κλικ στο εικονίδιο
Start
. Όταν το
CD Solutions ελέγξει το σύστηµά σας, συνδέστε το δίσκο
στον υπολογιστή.
2. Συνδέστε το καλώδιο τροφοδοσίας που συνοδεύει το δίσκο
στο πίσω µέρος του. Τοποθετήστε το δίσκο σε µια σταθερή
επιφάνεια και συνδέστε το τροφοδοτικό σε µια πρίζα
ηλεκτρικού.
ΠΡΟΣΟΧΗ! Για να αποφύγετε την πρόκληση ζηµιάς
στο βύσµα του τροφοδοτικού, βεβαιωθείτε ότι έχει
ευθυγραµµιστεί σωστά προτού το συνδέσετε στο δίσκο.
Μην µετακινείτε το δίσκο όταν ξεκινά η τροφοδοσία του,
για να µην προκληθεί ζηµιά ή απώλεια δεδοµένων.
3. Εντοπίστε το κατάλληλο καλώδιο και συνδέστε το στην
υποδοχή στο πίσω µέρος του δίσκου. Ποτέ µην συνδέετε
το δίσκο µε τον υπολογιστή µε περισσότερα του ενός
καλώδια.
4. Συνδέστε το άλλο άκρο του καλωδίου σε µια υποδοχή στον
υπολογιστή σας.
Το εικονίδιο του δίσκου πρέπει να εµφανίζεται στο φάκελο
Ο Υπολογιστής µου (My Computer), στην Εξερεύνηση των
Windows (Windows Explorer) ή στο γραφείο του Mac.
Αφού ο δίσκος αναγνωριστεί από το λειτουργικό σύστηµα,
εγκαταστήστε το λογισµικό από το CD Solutions.
ΧΡΗΣΤΕΣ PC: Εάν ο δίσκος που διαθέτετε περιλαµβάνει
FireWire 800, ο υπολογιστής σας δεν θα τον αναγνωρίσει
έως ότου διαµορφωθεί εκ νέου
.
ΠΡΟΣΟΧΗ!
Για να µην χάσετε δεδοµένα, µην αποσυνδέετε
το δίσκο κατά τη διάρκεια µεταφοράς δεδοµένων (η φωτεινή
ένδειξη δραστηριότητας του δίσκου αναβοσβήνει). Για οδηγίες
σχετικά µε την αποσύνδεση του δίσκου, ανατρέξτε στο
εγχειρίδιο χρήσης στο CD Solutions.
Pika-asennus
•
Γρήγορη εγκατάσταση

10
S
t
a
rt
U
p
M
i
s
e
e
n
r
ou
t
e
S
t
ar
t
I
n
i
c
i
o
I
n
i
c
i
a
li
z
aç
ã
o
I
n
st
a
la
c
i
ón
3
1
3
8
7
2
0
0
w
w
w.
i
o
m
e
g
a
.
co
m
C
o
p
y
r
i
g
h
t
©
2
0
0
4
I
o
m
e
g
a
C
o
r
p
o
r
a
t
i
o
n
.
A
l
l
r
i
g
h
t
s
r
e
se
r
ve
d
.
E
xt
ern
a
l
Ha
r
d
D
ri
v
e
W
i
n
do
ws
M
a
c
US
B
A
v
v
i
o
1. Vložte disk CD Solutions. Pokud se program nespustí
automaticky, poklepejte na ikonu disku CD ve složce
Tento počítač, v programu Průzkumník Windows nebo
na pracovní ploše systému Mac a pak poklepejte
na ikonu Start. Po provedení kontroly systému
programem Solutions připojte jednotku k počítači.
2. Připojte přiložený kabel do zadní části jednotky.
Umístěte jednotku na stabilní povrch a připojte kabel
do zásuvky.
UPOZORNĚNÍ! Chcete-li zabránit poškození konektoru
napájení, snažte se jej zasunout do disku rovně.
Nepřemísťujte jednotku, je-li zapojena v elektrické
síti, aby nedošlo k jejímu poškození nebo ke ztrátě
dat.
3. Vyhledejte příslušný kabel a připojte jej do konektoru
na zadní straně jednotky. Nikdy nepřipojujte jednotku
k počítači více než jedním kabelem.
4. Připojte druhý konec kabelu k portu v počítači
.
Ikona jednotky by se měla zobrazit v okně Tento
počítač, Průzkumník Windows nebo na pracovní ploše
systému Mac. Po rozpoznání jednotky operačním
systémem instalujte software z disku Solutions CD.
UŽIVATELÉ PC: Pokud jednotka neobsahuje produkt
FireWire 800, počítač ji nerozezná, dokud nebude
znovu zformátovaná.
UPOZORNĚNÍ! Jednotku neodpojujte během přenosu
dat (bliká indikátor aktivity na jednotce), mohlo by dojít
ke ztrátě dat. Pokyny k odpojení jednotky najdete v
uživatelské příručce na disku Solutions CD.
1. Włóż dysk CD Solutions. Jeoli nie zostanie
uruchomiony automatycznie, kliknij dwukrotnie
ikone dysku CD w oknie Mój komputer, w programie
Eksplorator Windows lub na biurku w systemie Mac
,
a nastepnie kliknij dwukrotnie ikone Start. Pod31cz
naped do komputera po sprawdzeniu systemu przez
dysk CD Solutions.
2. Podłącz dostarczony zasilacz z tyłu napędu. Ustaw
napęd na stabilnej powierzchni i podłącz zasilacz do
gniazda zasilania.
OSTROŻNIE! Aby uniknąć uszkodzenia złącza
zasilacza, przed podłączeniem napędu należy
upewnić się, że jest ono prawidłowo ułożone. Nie
należy przenosić napędu podłączonego do zasilania,
aby uniknąć jego uszkodzenia lub utraty danych
.
3. Znajdź odpowiedni kabel i podłącz go do złącza z tyłu
napędu. Nigdy nie podłączaj napędu do komputera
za pomocą więcej niż jednego kabla.
4. Podłącz drugi koniec kabla do portu w komputerze.
Ikona napędu powinna zostać wyświetlona w oknie
Mój komputer, w programie Eksplorator Windows lub
na biurku w systemie Mac. Po rozpoznaniu napędu
przez system operacyjny zainstaluj oprogramowanie
z dysku CD Solutions (Rozwiązania).
UŻYTKOWNICY KOMPUTERÓW PC: Jeśli napęd jest
wyposażony w interfejs FireWire 800, komputer nie
rozpozna napędu, dopóki nie zostanie on ponownie
sformatowany.
OSTROŻNIE! Aby uniknąć utraty danych, nie należy
odłączać napędu podczas przesyłania danych (lampka
aktywności napędu miga). Instrukcje odłączania napędu
zawiera podręcznik użytkownika na dysku CD Solutions
(Rozwiązania)
.
Rychlá instalace
•
Skrócona instrukcja insalacji

11
1. Helyezze be a Solutions CD-t. Ha nem indul el
automatikusan, kattintson duplán a CD ikonjára a
Sajátgép vagy Windows Intéző ablakban, illetve a
Mac asztalán, majd kattintson duplán a Start ikonra.
Csatlakoztassa a meghajtót a számítógéphez, miután
a Solutions CD ellenőrizte a rendszert.
2. Csatlakoztassa a mellékelt tápegységet a meghajtó
hátuljához. Helyezze a meghajtót stabil felületre,
majd csatlakoztassa a tápegységet egy konnektorhoz.
FIGYELEM! A tápegység csatlakoztatása előtt
ellenőrizze, hogy pontosan illeszkedik-e, nehogy
megsérüljön. A meghajtót működés közben ne
mozgassa, mert megsérülhet vagy adatvesztés
következhet be.
3. Keresse meg a megfelelő kábelt, majd csatlakoztassa
a meghajtó hátuljához. Soha ne csatlakoztassa
egynél több kábellel a meghajtót a számítógéphez.
4. A kábel másik végét csatlakoztassa a számítógép
egyik portjához.
A Sajátgép, Windows Intéző vagy Mac Desktop
ablakban meg kell jelennie a meghajtó ikonjának.
Miután az operációs rendszer felismerte a meghajtót,
telepítse a szoftvert a Solutions CD-ről.
PC-FELHASZNÁLÓK: Ha a meghajtó FireWire 800
rendszerű, a számítógép csak újraformázás után
fogja felismerni. További információt a 14. oldalon
talál.
FIGYELEM! Az adatvesztés elkerülése érdekében ne
válassza le a meghajtót adatátvitel közben (amikor
a meghajtó működését jelző LED villog). A meghajtó
leválasztásával kapcsolatban olvassa el a Solutions CD-n
lévő felhasználói útmutatót.
Gyors telepítés

12
Using Your Drive
Disconnecting the Drive
Always use the safe removal procedure for your operating system when disconnecting the drive.
CAUTION! To prevent data loss, do not disconnect the drive during data transfer (activity light flashing). Use caution
when moving the drive while it is connected to power.
Using the Iomega
®
Hard Drive Side Stand (Some Models)
The side stand is stored on the bottom of the drive. To use the side stand, remove the bottom plate from the hard drive.
Lock the bottom plate tabs securely into the vent slots on the side of the drive opposite the drive access light.
Locating the Iomega Hard Drive Registration Number (Some Models)
On some models the registration number is stored under the drive’s bottom plate. To find the serial number, remove the
bottom plate from the hard drive (as shown in the first illustration above)
.
Troubleshooting
PC USERS: Formatting the Iomega Hard Drive
The FireWire 800/400/USB 2.0 model ships preformatted as a Macintosh Extended (HFS+) volume. This format is not
recognized on Windows operating systems, and you must reformat the drive to either FAT32 or NTFS. Users with Windows
XP/2000 can use the following instructions to format the drive. Users with Windows 98/Me, visit the support section on
www.iomega.com to find detailed formatting instructions.
CAUTION! Reformatting the Iomega Hard Drive will erase all existing data on the drive.
1. Connect the Iomega Hard Drive to your computer following the instructions on page 4.
2. Open Windows Disk Management (right click on My Computer, select Manage, and click on Disk Management
).
3. If the Disk Wizard opens, click Next. Select the disk, click Next, then Finish.
If the Wizard does not open, locate the drive in the lower list. Look for a disk that does not show a drive letter or file
system. Right click on the drive name and select Initialize Disk (Windows XP) or Write Signature (Windows 2000)
,
then OK.
4. The drive will now appear as Unallocated and the bar will be black. Right click on the black bar and select New
Partition (Windows XP) or Create Partition (Windows 2000)
.
5. When the Partition Wizard opens, click Next
.
6. Verify that the partition type is Primary partition and click Next.
7. Leave the maximum disk space selected and click Next.
8. Assign the next drive letter available and click Next.
9. To format the drive with an NTFS file system, click Next, then click Finish. The drive will be ready to use when the
format completes.
NOTE: If you want to use the drive with other operating systems, download the Iomega FAT32 Formatter from the
Support and Downloads area on www.iomega.com and use it to change the format to FAT32 (provides cross-platform
compatibility).
User’s Manual
A complete user’s manual in HTML format is available on the Support & Downloads area on www.iomega.com.

13
Utilisation du lecteur
Déconnexion du lecteur
Utilisez toujours la procédure de retrait sécurisée de votre système d’exploitation lors de la déconnexion du lecteur.
ATTENTION ! Pour éviter toute perte de données, ne déconnectez pas le lecteur pendant un transfert de données (voyant
d’activité clignotant). Déplacez le lecteur avec prudence lorsqu’il est connecté à l’alimentation.
Utilisation du support latéral du disque dur Iomega (Certains modèles)
La façade inférieure peut servir de support latéral. Pour utiliser le support latéral, retirez la façade inférieure du disque
dur. Fixez fermement les ergots de la façade inférieure dans les trous d’aération sur le côté de l’appareil à l’opposé du
voyant lumineux du disque dur.
Localisation du numéro d’enregistrement du disque dur Iomega (Certains modèles)
Sur certains modèles, le numéro d’enregistrement se situe sous la façade inférieure du lecteur. Pour localiser le numéro
de série, retirez le plateau inférieur du disque dur (comme illustré à la première figure ci-dessus).
Dépannage
UTILISATEURS PC : Formatage du disque dur Iomega
Le modèle FireWire 800/400/USB 2.0 est livré préformaté au format HFS+ (Macintosh Extended). Ce format n’est pas
reconnu par les systèmes d’exploitation Windows : vous devez reformater le lecteur au format FAT32 ou NTFS. Les
utilisateurs de Windows XP/2000 peuvent suivre les instructions ci-dessous pour formater le lecteur. Les utilisateurs de
Windows 98/Me sont invités à visiter la section assistance du site www.iomega.com pour obtenir des instructions de
formatage détaillées.
ATTENTION ! Le reformatage du disque dur Iomega efface l’intégralité des données enregistrées sur le disque.
1
.
Connectez le disque dur Iomega à votre ordinateur en suivant les instructions de la page 4.
2. Ouvrez l’utilitaire de gestion des disques de Windows (cliquez avec le bouton droit de la souris sur Poste de travail,
Gérer, puis Gestion des disques
).
3. Si l’Assistant lecteur s’ouvre, cliquez sur Suivant. Sélectionnez le lecteur, cliquez sur Suivant puis sur Terminer
.
Si l’Assistant ne s’ouvre pas, recherchez le lecteur dans la liste inférieure. Recherchez un disque ne présentant
ni lettre de lecteur ni système de fichiers. Cliquez avec le bouton droit de la souris sur le nom du lecteur et
sélectionnez Initialiser le lecteur (Windows XP) ou Ecrire une signature (Windows 2000) puis
OK.
4. Le disque apparaît comme Non attribué et la barre doit être noire. Cliquez avec le bouton droit sur la barre noire et
sélectionnez Nouvelle partition (Windows 2000) ou Créer une partition (Windows XP).
5. Lorsque l’Assistant Création de partition s’ouvre, cliquez sur Suivant
.
6. Vérifiez que le type de partition sélectionné est bien Partition primaire, puis cliquez sur Suivant
.
7. Sélectionnez l’espace disque maximum disponible et cliquez sur Suivant.
8. Attribuez la prochaine lettre de lecteur disponible au disque et cliquez sur Suivant.
9. Pour formater le disque avec système de fichiers NTFS, cliquez sur Suivant, puis sur Terminer. Le disque peut être
utilisé dès que le formatage est terminé.
REMARQUE : pour utiliser le périphérique avec d’autres systèmes d’exploitation, téléchargez Iomega FAT32 Formatter
(logiciel de formatage Iomega FAT32) à partir de la section Support et Téléchargement du site www.iomega.com, puis
utilisez ce logiciel pour formater le périphérique au format FAT32, permettant la compatibilité inter plate-formes.
Guide de l’utilisateur
Un guide de l’utilisateur complet est disponible au format HTML dans la section Support et Téléchargement du site
www.iomega.com
.

14
Verwenden des Laufwerks
Trennen des Laufwerks vom System
Zum Abklemmen des Laufwerks sollten Sie immer die Option zum sicheren Entfernen der Hardware wählen.
ACHTUNG! Um Datenverluste zu vermeiden, trennen Sie das Laufwerk während der Datenübertragung (wenn
Aktivitätsanzeige blinkt) nicht vom Computer. Bewegen Sie das Laufwerk nur vorsichtig, wenn es an die Stromversorgung
angeschlossen ist.
Aufstellen von Iomega
®
-Festplattenlaufwerken auf der Seite (diverse Modelle)
Die Bodenplatte kann für die seitliche Aufstellung verwendet werden. Um das Festplattenlaufwerk auf der Seite
aufzustellen, entfernen Sie die Bodenplatte vom Laufwerk. Lassen Sie die Metallspitzen der Bodenplatte sicher in den
Öffnungsschlitzen auf der Seite des Laufwerks gegenüber der Laufwerkzugriffsleuchte einrasten.
Auffinden der Registrierungsnummer des Iomega-Festplattenlaufwerks (diverse Modelle)
Bei einigen Modellen befindet sich die Registrierungsnummer unter der Bodenplatte des Laufwerks. Um die
Seriennummer zu finden, entfernen Sie die Bodenplatte vom Laufwerk (siehe erste Abbildung oben).
Fehlerbehebung
PC-Benutzer: Formatieren der Iomega Festplatte
Das Modell FireWire 800/400/USB 2.0 wird mit einem für Macintosh Extended (HFS+) vorformatierten Volume geliefert.
Windows-Betriebssysteme erkennen dieses Format nicht, daher müssen Sie das Laufwerk entweder auf FAT32 oder
auf NTFS umformatieren. Benutzer von Windows XP/2000 können das Laufwerk nach den folgenden Anweisungen
formatieren. Benutzer von Windows 98/Me finden ausführliche Formatierungsanweisungen unter www.iomega.com
.
Achtung! Durch das Umformatieren der Iomega Festplatte werden alle auf dem Laufwerk vorhandenen Daten gelöscht.
1. Schließen Sie die Festplatte gemäß den Anweisungen auf Seite 5 an den Computer an.
2. Öffnen Sie die Windows Datenträgerverwaltung (mit rechter Maustaste auf Arbeitsplatz klicken, Verwalten wählen
und dann auf Datenträgerverwaltung klicken).
3. Falls der Assistent für die Datenträgerinitialisierung gestartet wird, klicken Sie auf Weiter. Wählen Sie den
Datenträger aus. Klicken Sie auf Weiter und dann auf Fertig stellen
.
Falls der Assistent für die Datenträgerinitialisierung nicht gestartet wird, suchen Sie das Laufwerk in der unteren
Liste. Suchen Sie nach einem Datenträger, bei dem kein Laufwerksbuchstabe oder Dateisystem angezeigt wird.
Klicken Sie mit der rechten Maustaste auf den Laufwerksnamen und wählen Sie dann Datenträger initialisieren
(Windows XP) oder Signatur schreiben (Windows 2000). Klicken Sie anschließend auf
OK.
4. Das Laufwerk wird dann als Nicht zugeordnet angezeigt und der Balken schwarz dargestellt. Klicken Sie mit der
rechten Maustaste Right auf den schwarzen Balken und wählen Sie Neue Partition (Windows XP) oder Partition
erstellen (Windows 2000).
5. Sobald der Assistent zum Erstellen neuer Partitionen geöffnet wird, klicken Sie auf Weiter
.
6. Überprüfen Sie, ob es sich beim Partitionstyp um Primäre Partition handelt, und klicken Sie auf Weiter
.
7. Lassen Sie die Auswahl (maximaler Speicherplatz ) stehen und klicken Sie auf Weiter
.
8. Ordnen Sie der Festplatte den nächsten Laufwerksbuchstaben zu und klicken Sie auf Weiter
.
9. Um das Laufwerk mit einem NTFS-Dateisystem zu formatieren, klicken Sie auf Weiter und dann auf Fertig stellen
.
Sobald die Formatierung abgeschlossen ist, können Sie das Laufwerk verwenden.
Hinweis
: Wenn Sie das Laufwerk mit anderen Betriebssystemen verwenden möchten, laden Sie
Iomega FAT32 Formatter
aus dem Bereich “Support & Downloads” unter
www.iomega.com
herunter, und ändern Sie damit das Format in FAT32 um.
Dadurch wird eine plattformübergreifende Kompatibilität gewährleistet.
Benutzerhandbuch (vollständig)
Im Bereich “Support & Downloads” unter www.iomega.com steht Ihnen ein vollständiges Benutzerhandbuch im HTML-
Format zur Verfügung.

15
Uso dell’unità
Scollegamento dell’unità
Quando si scollega l’unità, usare sempre la procedura di rimozione sicura specifica per il sistema operativo usato.
ATTENZIONE! Per evitare che si verifichino perdite di dati, non scollegare l’unità durante il trasferimento di informazioni (la spia
verde di attività lampeggia). Se si desidera spostare un’unità collegata alla rete di alimentazione, agire con cautela.
Utilizzo del supporto laterale del disco rigido Iomega (alcuni modelli)
Poiché la piastra inferiore può fungere da supporto laterale, per utilizzarla a questo fine rimuovere la piastra inferiore
dal disco rigido. Fissare saldamente le linguette della piastra inferiore nelle apposite fessure presenti sul lato dell’unità
opposto all’apertura di accesso.
Individuazione del numero di registrazione del disco rigido Iomega (alcuni modelli)
In alcuni modelli il numero di registrazione è situato sotto la piastra inferiore dell’unità. Per individuare il numero di
serie, rimuovere la piastra inferiore del disco rigido (come descritto nella prima illustrazione sopra)
.
Risoluzione dei problemi
UTENTI PC: Formattazione del disco rigido Iomega
Il modello FireWire 800/400/USB 2.0 viene fornito preformattato come volume Macintosh Extended (HFS+). Questo
formato non è riconosciuto nei sistemi operativi Windows ed è necessario ripristinare la formattazione FAT32 o NTFS. Gli
utenti di Windows XP/2000 possono utilizzare le seguenti istruzioni per formattare l’unità. Per ulteriori istruzioni sulla
formattazione per gli utenti di Windows 98/Me, visitare la sezione del supporto tecnico al sito www.iomega.com
.
ATTENZIONE! La riformattazione del disco rigido Iomega comporta l’eliminazione definitiva di tutti i dati presenti
nell’unità.
1. Collegare il disco rigido Iomega al computer seguendo le istruzioni a pag. 5.
2. Aprire Gestione disco di Windows (fare clic con il pulsante destro del mouse su Risorse del computer, selezionare
Gestisci, quindi fare clic su Gestione disco
).
3. Quando si avvia l’Installazione guidata disco, scegliere Avanti. Selezionare il disco, fare clic su Avanti, quindi su
Fine.
Se la procedura guidata non si avvia, cercare l’unità nella parte inferiore dell’elenco. Cercare un disco senza lettera
di unità o file system. Fare clic con il pulsante destro del mouse sul nome dell’unità e selezionare Inizializza disco
(Windows XP) o Riporta la firma (Windows 2000), quindi scegliere
OK.
4. A questo punto l’unità apparirà come Non allocata e la barra diventerà nera. Fare clic con il pulsante destro del
mouse sulla barra nera, quindi selezionare Nuova partizione (Windows XP) o Crea partizione (Windows 2000).
5. Quando si apre la Procedura guidata di partizione, fare clic su Avanti
.
6. Accertarsi che la tipologia di partizione sia impostata su Partizione primaria, quindi fare clic su Avanti.
7. Lasciare selezionato lo spazio massimo su disco e fare clic su Avanti
.
8. Assegnare la successiva lettera di unità disponibile e fare clic su Avanti.
9. Per formattare l’unità con un file system NTFS, fare clic su Avanti, quindi su Fine. L’unità potrà essere utilizzata al
termine della formattazione.
NOTA
: per utilizzare l’unità con altri sistemi operativi, scaricare il programma Iomega FAT32 Formatter dall’area
Assistenza e download all’indirizzo www.iomega.com e utilizzarlo per modificare la formattazione in FAT32 (richiesta per
compatibilità tra diverse piattaforme).
Manuale dell’utente
Il manuale completo dell’utente è disponibile nell’area Assistenza e download all’indirizzo www.iomega.com.

16
Uso de la unidad
Desconexión de la unidad
Utilice siempre un procedimiento de desconexión seguro para su sistema operativo al desconectar la unidad.
PRECAUCION: Para impedir la pérdida de datos, no desconecte la unidad durante el proceso de transferencia de datos
(la luz de actividad parpadea).
Tenga precaución al transportar la unidad cuando esté conectada a la alimentación.
Uso del soporte lateral para la unidad de disco duro Iomega (algunos modelos)
La placa inferior se puede utilizar como un soporte lateral. Para utilizar el soporte lateral, extraiga la placa inferior de la
unidad de disco duro. Fije bien las pestañas de la placa en las ranuras de ventilación situadas en el lateral de la unidad
opuesto a la luz de acceso a la unidad.
Búsqueda del número de registro de la unidad de disco duro Iomega (algunos modelos)
En determinados modelos, el número de registro se ubica bajo la placa inferior de la unidad. Para localizar el número de
serie, retire la placa inferior del disco duro (como se muestra en la primera ilustración más arriba).
Solución de problemas
USUARIOS DE PC: Formateo de la unidad de disco duro Iomega
El modelo FireWire 800/400/USB 2.0 viene preformateado como un volumen extendido de Macintosh (HFS+). Los
sistemas operativos de Windows no reconocen este formato y, por lo tanto, debe volver a formatear la unidad en FAT32 o
NTFS. Los usuarios que disponen de Windows XP/2000 pueden seguir las instrucciones que se muestran a continuación
para formatear la unidad. Los usuarios que disponen de Windows 98/Me, deben visitar la sección de soporte de
www.iomega.com para obtener instrucciones detalladas acerca del formateo.
¡PRECAUCIÓN! Si vuelve a formatear la unidad de disco duro Iomega, se eliminarán los datos existentes en la unidad.
1. Conecte el disco duro Iomega al ordenador siguiendo las instrucciones que se muestran en la página 5.
2. Abra Administración de discos de Windows (haga clic con el botón derecho del ratón en Mi PC, seleccione
Administrar y, a continuación, haga clic en Administración de discos
).
3. Si se abre el asistente para discos, haga clic en Siguiente. Seleccione el disco, haga clic en Siguiente y, a
continuación, en Finalizar
.
Si el asistente no se abre, localice la unidad en la lista de abajo. Busque un disco que no tenga letra de unidad
asignada o sistema de archivos. Haga clic con el botón derecho del ratón en el nombre de la unidad y seleccione
Inicializar disco (Windows XP) o Escribir firma (Windows 2000). A continuación, haga clic en Aceptar.
4. A continuación, la unidad aparecerá como No asignado y la barra se mostrará negra. Haga clic con el botón derecho
del ratón en la barra negra y seleccione Nueva partición (Windows XP) o Crear partición (Windows 2000).
5. Cuando se abra la ventana del asistente para particiones, haga clic en Siguiente
.
6. Compruebe que el tipo de partición sea Partición primaria y haga clic en Siguiente.
7. Deje el máximo espacio en el disco seleccionado y haga clic en Siguiente
.
8. Asigne la siguiente letra de unidad disponible y haga clic en Siguiente.
9. Para formatear la unidad con un sistema de archivos NTFS, haga clic en Siguiente y, a continuación, en Finalizar.
Cuando el formateo finalice, la unidad estará lista para ser utilizada.
NOTA
: Si desea utilizar la unidad con otros sistemas operativos, descargue el software Iomega FAT32 Formatter
(Formateador) del área de asistencia y descargas del sitio www.iomega.com y utilícelo para cambiar el formato a FAT32
(proporciona compatibilidad entre plataformas).
Manual del usuario
El manual de usuario completo en formato HTML está disponible en el área de asistencia y descargas del sitio
www.iomega.com
.

17
Utilização da unidade
Desconexão da unidade
Sempre utilize o procedimento de remoção segura do sistema operacional ao desconectar a unidade.
CUIDADO! A fim de evitar a perda de dados, não desconecte a unidade durante a transferência de dados (luz de
atividade da unidade piscando). Tenha cuidado ao mover a unidade, quando ela estiver recebendo energia.
Utilização do apoio lateral do disco rígido Iomega (Alguns modelos)
A placa inferior pode ser usada como apoio lateral. Para usar o apoio lateral, remova a placa inferior do disco rígido.
Trave as lingüetas da placa inferior de forma segura nos slots de saída na parte lateral da unidade oposta à luz de
acesso da unidade.
Localização do número de registro do disco rígido Iomega (Alguns modelos)
Em alguns modelos, o número de registro está gravado embaixo da placa inferior da unidade. Para encontrar o número
de série, remova a placa inferior do disco rígido (como mostrado na primeira ilustração acima).
Solução de problemas
USUÁRIOS DE PC: Formatação do disco rígido Iomega
Os modelos FireWire 800/400/USB 2.0 são fornecidos pré-formatados como um volume Macintosh Extended (HFS+).
Esse formato não é reconhecido em sistemas operacionais Windows; você deve reformatar a unidade para os formatos
FAT32 ou NTFS. Os usuários do Windows XP/2000 podem utilizar as instruções a seguir para formatar a unidade.
Os usuários de Windows 98/Me devem visitar a seção de suporte no site www.iomega.com para obter instruções
detalhadas sobre a formatação.
CUIDADO! Reformatar o Iomega Hard Drive irá apagar todos os dados existentes na unidade.
1. Conecte o disco rígido Iomega ao seu computador, seguindo as instruções da página 5.
2. Abra o Gerenciamento de Disco do Windows (clique com o botão direito do mouse em Meu Computador, selecione
Gerenciar e, em seguida, clique em Gerenciamento de Disco
).
3. Se o Assistente de Disco abrir, clique em Avançar. Selecione o disco, clique em Avançar e Concluir
.
Se o assistente não abrir, localize a unidade na lista inferior. Procure um disco que não tenha uma letra de unidade
ou um sistema de arquivos. Clique com o botão direito do mouse no nome da unidade, selecione Inicializar Disco
(Windows XP) ou Gravação de Assinaturas (Windows 2000) e
OK.
4. A unidade aparecerá como Não Alocada e a barra estará preta. Clique com o botão direito do mouse na barra preta e
selecione Nova Partição (Windows XP) ou Criar Partição (Windows 2000).
5. Quando o Assistente de Partição do Windows abrir, clique em Avançar
.
6. Verifique se o tipo de partição é Partição primária e clique em Avançar
.
7. Marque o espaço máximo de disco e clique em Avançar.
8. Atribua a próxima letra de unidade disponível e clique em Avançar.
9. Para formatar a unidade com um sistema de arquivos NTFS, clique em Avançar e, em seguida, em Concluir. A
unidade estará pronta para uso quando a formatação estiver concluída.
OBSERVAÇÃO: caso deseje usar a unidade com outros sistemas operacionais, faça o download do Iomega FAT32
Formatter (Formatador Iomega FAT32) na área de Suporte e Downloads a partir da página www.iomega.com. Altere para
o formato FAT32 (oferece compatibilidade entre diferentes plataformas).
Manual do usuário
Está disponível na área de Suporte e Downloads no site www.iomega.com a versão completa do manual do usuário em
formato HTML.

18
De drive gebruiken
De drive loskoppelen
Gebruik voor uw besturingssysteem altijd de procedure voor veilig verwijderen wanneer u de drive loskoppelt.
WAARSCHUWING! Koppel de drive nooit los tijdens een gegevensoverdracht. Zo vermijdt u dat er gegevens verloren
gaan. Wees voorzichtig als u de drive verplaatst wanneer deze op een voedingsbron is aangesloten.
Het zijstatief van de Iomega Hard Drive gebruiken (bepaalde modellen)
Het voetstuk kan als een zijstatief worden gebruikt. Als u het zijstatief wilt gebruiken, verwijdert u het voetstuk van
de drive (Afbeelding 1). Klik de lipjes van het voetstuk vast in de openingen aan de zijkant van de drive, tegenover het
statuslampje van de drive.
Het registratienummer van de Iomega Hard Drive zoeken (bepaalde modellen)
Op bepaalde modellen is het registratienummer vermeld onder het voetstuk van de drive. Als u het serienummer wilt
weten, verwijdert u het voetstuk van de drive (Afbeelding).
Problemen oplossen
Pc-gebruikers: De drive formatteren
Bepaalde modellen worden vooraf geformatteerd als HFS+ (Mac OS) en zo geleverd. Als u de drive op een pc met
Windows gebruikt en de drive wordt niet herkend, formatteert u de drive opnieuw als een NTFS- of FAT32-drive. Als
Windows de drive herkent, is deze al geformatteerd als FAT32 en hoeft u de drive niet opnieuw te formatteren.
WAARSCHUWING! door de drive te formatteren, wist u alle gegevens op de drive!
1. Sluit de Iomega-drive aan op uw computer.
2. Open Windows Schijfbeheer (klik met de rechtermuisknop op Deze computer, selecteer Beheren en klik daarna op
Schijfbeheer
).
3. Als de wizard Schijf wordt geopend, klikt u op Volgende. Selecteer de schijf en klik achtereenvolgens op Volgende
en Voltooien.
Als de wizard niet verschijnt, zoekt u de drive in de lijst onderaan. Zoek naar een schijf zonder een
stationsaanduiding of bestandssysteem. Klik met de rechtermuisknop op de naam van de drive, selecteer Schijf
initialiseren (Windows XP) of Handtekening schrijven (Windows 2000) en klik op
OK.
4. De drive zal nu verschijnen als Niet-toegewezen en de balk zal zwart zijn. Klik met de rechtermuisknop op de zwarte
balk en selecteer Nieuwe partitie (Windows XP) of Partitie maken (Windows 2000).
5. Wanneer de wizard Partitie maken verschijnt, klikt u op Volgende
.
6. Controleer of het partitietype is ingesteld op Primaire partitie en klik op Volgende.
7. Laat de maximale schijfruimte geselecteerd en klik op Volgende.
8. Wijs de volgende beschikbare stationsaanduiding toe en klik op Volgende
.
9. Klik achtereenvolgens op Volgende en Voltooien. De drive is gebruiksklaar nadat de formattering is voltooid.
OPMERKING: als u de drive in andere besturingssystemen wilt gebruiken, downloadt u de Iomega FAT32 Formatter
vanuit de sectie Support & Downloads op www.iomega.com om het formaat in te stellen op FAT32 (wat vereist is voor
compatibiliteit tussen platforms).
Gebruikershandleiding
Voor een gebruikershandleiding van uw Iomega-product bezoekt u de sectie Support & Downloads op
www.iomega.com
.

For service and support for your Iomega product, visit us at www.iomega.com.
Pour obtenir du service et de l’assistance pour votre produit Iomega, visitez notre site à l’adresse suivante :
www.iomega.com
.
Servicedienstleistungen und Kundendienst für Ihr Iomega Produkt finden Sie unter www.iomega.com.
Per ottenere assistenza e supporto per il prodotto Iomega in uso, visitare il sito Web all’indirizzo www.iomega.com.
Para obtener información sobre servicio y asistencia técnica para su producto Iomega, visítenos en www.iomega.com.
Para obter serviços e suporte para seu produto Iomega, visite-nos no site www.iomega.com.
Customer Support • Assistance clientèle • Kundenunterstützung
Assistenza clienti • Asistencia al cliente • Suporte ao cliente

31439904 5/09/06 a
Copyright © 2006 Iomega Corporation. All rights reserved. Iomega, the stylized “i” logo, and all Iomega brand blocks are either registered
trademarks or trademarks of Iomega Corporation in the United States and/or other countries. Microsoft and Windows are either registered
trademarks or trademarks of Microsoft Corporation in the United States and/or other countries. Apple, Macintosh, Mac, and FireWire are
either registered trademarks or trademarks of Apple Computer, Inc. in the United States and/or other countries. Certain other product names,
brand names, and company names may be trademarks or designations of their respective owners.
Transcripción de documentos
Desktop Hard Drive USB/FireWire® Quick Start Guide Guide de démarrage rapide Schnellstart-Handbuch Guida di installazione rapida Guía de instrucciones rápidas Guia de uso rápido Snel aan de slag Snabbstartguide Introduktion Hurtigreferanse Pikaopas Οδηγός γρήγορης εκκίνησης Stručná příručka Wprowadzenie Gyors útmutató If you have a problem, we can help. Please do NOT return this product to the store! Your answer is on the web. Visit our award-winning web support site www.iomega.com. Select your region, then select Support and Downloads. Si vous avez un problème, nous pouvons vous aider. NE RENVOYEZ PAS ce produit au magasin ! Votre réponse est sur le Web. Site Web d’assistance primé www.iomega.com. Sélectionnez votre région puis Support et téléchargements. Wenn Sie ein Problem haben, können wir Ihnen helfen. Bringen Sie dieses Produkt NICHT zu Ihrem Händler zurück! Ihre Antwort steht im Netz. Preisgekrönte Support-Website www.iomega.com. Wählen Sie Ihr Gebiet aus und klicken Sie auf Support und Downloads. In caso di problemi, noi possiamo fornire assistenza. NON restituire questo prodotto al rivenditore! La risposta è sul Web. Sito di supporto sul Web premiato www.iomega.com. Selezionare la propria regione, quindi scegliere Supporto tecnico e download. Si tiene algún problema, podemos ayudar. ¡Por favor, NO devuelva este producto a la tienda! Su respuesta está en la web. Destacado sitio Web de atención al cliente www.iomega.com. Seleccione su región y, a continuación, acceda al área de asistencia y descarga. Se você tiver um problema, nós podemos ajudar. NÃO devolva esse produto à loja! A resposta para você está na web. Site da web vencedor de prêmios www.iomega.com. Selecione a sua região e Suporte e Downloads. Contents • Matières • Inhalt • Sommario • Contenido Conteúdo • Inhoudsopgave • Innehåll • Indhold • Innhold Sisällys • Περιεχόµενα • Obsah • Spis treści • Tartalom Quick Install . . . . . . . . . . Installation rapide . . . . . . . Schnellstart . . . . . . . . . . Installazione rapida . . . . . . Instalación rápida . . . . . . . Instalação rápida . . . . . . . Snelle installatie . . . . . . . Snabbinstallation . . . . . . . Hurtig installation . . . . . . . Rask installering . . . . . . . . Pika-asennus . . . . . . . . . Γρήγορη εγκατάσταση . . . . Rychlá instalace . . . . . . . . Skrócona instrukcja insalacji Gyors telepítés . . . . . . . . . . . . . . . . . . . . . . . . . . . . . . . . . . . . . . . . . . . . . . . . . . . . . . . . . . . . . . . . . . . . . . . . . . . . . . . . . . . . . . . . . . . . . . . . . . . . . . . . . . . . . . . . . . . . . . . . . . . . . . . . . . . . . . . . . . . . . . . . . . . . . . . . . . . . . . . . . . . . . . . . . . . . . . . . . . . . . . . . . . . . . . . . . . . . . . . . . . . . . . . . . . . . . . . . . . . . . . . . . . . . . . . . . . . . . . . . . . . . . . . . . . . . . . . . . . . . . . . . . . . . . . . . . . . . . . . . . . . . . . . . . . . . . . . . . . . . . . . . . . . . . . . . . . . . . . . . . . . . . . . . . . . . . . . . . . . . . . . . . . . . . . . . . . . . . . . . . . . . . . . . . . . . . . . . . . . . . . . . . . . . . . . . . . . . . . . . . . . . . . . . . . . . . . . . . . . . . . . . . . . . . . . . . . . . . . . . . . . . . . . . . . . . . . . . . . . . . . . . . . . . . . . . . . . . . . . . . . . . . . . . . . . . . . . . . . . . . . . . . . . . . . . . . . . . . . . . . . . . . . . . . . . . . . . . . . . . . . . . . . . . . . . . . . . . . . . . . . . . . . . . . . . . . . . . . . . . . . . . . . . . . . . . . . . . . . . . . . . . . . . . . . . . . . . . . . . . . . . . . 4 . 4 . 5 . 5 . 6 . 6 . 7 . 7 . 8 . 8 . 9 . 9 . 10 . 10 . 11 Using Your Drive . . . . . . . Troubleshooting . . . . . . . User’s Manual . . . . . . . . Utilisation du lecteur . . . . Dépannage . . . . . . . . . . Guide de l’utilisateur . . . . Verwenden des Laufwerks . Fehlerbehebung . . . . . . . Benutzerhandbuch . . . . . Uso dell’unità . . . . . . . . Risoluzione dei problemi . . Manuale dell’utente . . . . . Uso de la unidad . . . . . . . Solución de problemas . . . Manual del usuario . . . . . Utilização da unidade . . . . Solução de problemas . . . Manual do usuário . . . . . De drive gebruiken . . . . . Problemen oplossen . . . . Gebruikershandleiding . . . . . . . . . . . . . . . . . . . . . . . . . . . . . . . . . . . . . . . . . . . . . . . . . . . . . . . . . . . . . . . . . . . . . . . . . . . . . . . . . . . . . . . . . . . . . . . . . . . . . . . . . . . . . . . . . . . . . . . . . . . . . . . . . . . . . . . . . . . . . . . . . . . . . . . . . . . . . . . . . . . . . . . . . . . . . . . . . . . . . . . . . . . . . . . . . . . . . . . . . . . . . . . . . . . . . . . . . . . . . . . . . . . . . . . . . . . . . . . . . . . . . . . . . . . . . . . . . . . . . . . . . . . . . . . . . . . . . . . . . . . . . . . . . . . . . . . . . . . . . . . . . . . . . . . . . . . . . . . . . . . . . . . . . . . . . . . . . . . . . . . . . . . . . . . . . . . . . . . . . . . . . . . . . . . . . . . . . . . . . . . . . . . . . . . . . . . . . . . . . . . . . . . . . . . . . . . . . . . . . . . . . . . . . . . . . . . . . . . . . . . . . . . . . . . . . . . . . . . . . . . . . . . . . . . . . . . . . . . . . . . . . . . . . . . . . . . . . . . . . . . . . . . . . . . . . . . . . . . . . . . . . . . . . . . . . . . . . . . . . . . . . . . . . . . . . . . . . . . . . . . . . . . . . . . . . . . . . . . . . . . . . . . . . . . . . . . . . . . . . . . . . . . . . . . . . . . . . . . . . . . . . . . . . . . . . . . . . . . . . . . . . . . . . . . . . . . . . . . . . . . . . . . . . . . . . . . . . . . . . . . . . . . . . . . . . . . . . . . . . . . . . . . . . . . . . . . . . . . . . . . . . . . . . . . . . . . . . . . . . . . . . . . . . . . . . . . . . . . . . . . . . . . . . . . . . . . . . . . . . . . . . . . . . . . . . . . . . . . . . . . . . . . . . . . . . . . . . . . . . . . . . . . . . . . . . . . . . . . . . . . . . . . . . . . . . . . . . . . . . . . . . . . . . . . . . . . . . . . . . . . . . . 12 . 12 . 12 . 13 . 13 . 13 . 14 . 14 . 14 . 15 . 15 . 15 . 16 . 16 . 16 . 17 . 17 . 17 . 18 . 18 . 18 Customer Support . . . Assistance clientèle . . Kundenunterstützung . Assistenza clienti . . . Asistencia al cliente . . Suporte ao cliente . . . . . . . . . . . . . . . . . . . . . . . . . . . . . . . . . . . . . . . . . . . . . . . . . . . . . . . . . . . . . . . . . . . . . . . . . . . . . . . . . . . . . . . . . . . . . . . . . . . . . . . . . . . . . . . . . . . . . . . . . . . . . . . . . . . . . . . . . . . . . . . . . . . . . . . . . . . . . . . . . . . . . . . . . . . . . . . . . . . . . . . . . . . . . . . . . . . . . . . . . . . . . . . . . . . . . . . . . . . . . . . . . . . . . . . . . . . . . . . . . . . . . . . . . . . . . . . . 19 . 19 . 19 . 19 . 19 . 19 . . . . . . . . . . . . . . . . . . Quick Install • Installation rapide rnal Exte Drive Hard e t Up Star en rout Mise t Star o ção Inici aliza Inici lación Insta USB 8 7 200 3 ows Wind Mac 13 o Avvi . m ration ga.co a Corpo iome Iomeg ed. www. 2004 reserv Copyri ght © All rights 1. Insert the Solutions CD. If it does not start automatically, double click the CD icon in My Computer, Windows Explorer or on the Mac desktop, then double click the Start icon. Connect the drive to the computer after the Solutions CD has checked your system. 1. Insérez le CD Solutions. S’il ne démarre pas automatiquement, double-cliquez sur l’icône du CD dans le Poste de travail, dans l’Explorateur Windows ou sur le bureau Mac , puis double-cliquez sur l’icône Démarrer. Connectez le lecteur à l’ordinateur après que le CD Solutions a vérifié votre système. 2. Connect the included power supply to the back of the drive. Place the drive on a stable surface and connect the power supply to a power outlet. 2. Connectez l’alimentation incluse à l’arrière du lecteur. Placez le lecteur sur une surface stable et connectez l’alimentation à une prise secteur. ® ® CAUTION! To avoid damage to the power supply connector, make sure it is aligned correctly before plugging it into the drive. Do not move the drive while it is powered up to avoid drive damage or data loss. 3. Identify the appropriate cable and connect it to the back of the drive. Never connect the drive to the computer with more than one cable. 4. Connect the other end of the cable to the port on your computer. The drive icon should appear in My Computer, Windows Explorer or on the Mac Desktop. After the drive is recognized by the operating system, install the software from the Solutions CD. PC USERS: If your drive includes FireWire 800, your computer will not recognize the drive until it is reformatted. See page 7 for more information. CAUTION! To prevent data loss, do not disconnect the drive during data transfer (drive activity light flashing). Refer to the user’s manual on the Solutions CD for instructions on disconnecting the drive. 4 ® ® ATTENTION ! Pour éviter d’endommager le connecteur d’alimentation, assurez-vous de son alignement avant de le raccorder au lecteur. Ne déplacez pas le lecteur alors qu’il est sous tension pour éviter de l’endommager ou de perdre des données. 3. Identifiez le bon câble et connectez-le à l’arrière du lecteur. Ne connectez jamais le lecteur à l’ordinateur à l’aide de plusieurs câbles. 4. Connectez l’autre extrémité du câble au port de votre ordinateur. L’icône du lecteur doit apparaître dans le Poste de travail, l’Explorateur Windows ou sur le bureau du Mac. Une fois le lecteur reconnu par le système d’exploitation, installez le logiciel à partir du CD Solutions. UTILISATEURS PC : Si le lecteur comprend le FireWire 800, vous devrez le reformater pour que l’ordinateur puisse le reconnaître. Reportez-vous à la page 8 pour plus d’informations. ATTENTION ! Pour éviter toute perte de données, ne déconnectez pas le lecteur pendant un transfert de données (voyant d’activité du lecteur clignotant). Reportezvous au guide de l’utilisateur sur le CD Solutions pour obtenir des instructions sur la déconnexion du lecteur. Schnellstart • Installazione rapida 1. Legen Sie die Solutions-CD ins Laufwerk ein. Falls das Programm nicht automatisch gestartet wird, doppelklicken Sie im Bereich Arbeitsplatz, im Windows Explorer oder auf dem Mac -Desktop auf das CD-Symbol. Doppelklicken Sie anschließend auf Start. Schließen Sie das Laufwerk an den Computer an, nachdem die Solutions-CD Ihr System untersucht hat. ® ® 2. Schließen Sie das mitgelieferte Netzkabel an der Rückseite des Laufwerks an. Stellen Sie das Laufwerk auf eine stabile Oberfläche, und verbinden Sie das Netzkabel mit einer Steckdose. VORSICHT! Um Beschädigungen des Netzsteckers zu vermeiden, stellen Sie sicher, dass er bündig ausgerichtet ist, bevor Sie ihn in die Festplatte einstecken. Bewegen Sie das Laufwerk während des Einschaltvorgangs nicht, um Laufwerkbeschädigungen oder Datenverluste zu vermeiden. 3. Wählen Sie das richtige Kabel aus, und verbinden Sie es mit einem Anschluss auf der Rückseite des Laufwerks. Schließen Sie das Laufwerk stets nur mit einem Kabel an den Computer an. 4. Verbinden Sie das andere Ende des Kabels mit dem Anschluss des Computers. Das Laufwerksymbol wird im Arbeitsplatz, dem Windows Explorer oder auf dem Mac-Desktop angezeigt. Nachdem das Laufwerk vom Betriebssystem erkannt wurde, installieren Sie die Software von der Solutions-CD. PC-BENUTZER: Wenn Ihr Laufwerk mit FireWire 800 ausgestattet ist, erkennt der Computer das Laufwerk erst nach einer Neuformatierung. Weitere Informationen hierzu finden Sie auf Seite 15. Achtung! Um Datenverluste zu vermeiden, trennen Sie das Laufwerk während der Datenübertragung nicht vom Computer (Kontrolllämpchen am Laufwerk blinkt). Anweisungen zum Abklemmen des Laufwerks finden Sie im Benutzerhandbuch auf der Solutions-CD. 1. Inserire il CD Soluzioni. Se il CD non si avvia automaticamente, fare doppio clic sull’icona del CD in Risorse del computer, in Esplora risorse/Gestione risorse di Windows o sulla Scrivania del Mac , quindi sull’icona di Avvio. Collegare l’unità al computer solo dopo che il CD Soluzioni ha controllato il sistema. ® ® 2. Collegare l’alimentatore fornito in dotazione alla parte posteriore dell’unità. Posizionare l’unità su una superficie stabile e collegare l’alimentatore a una presa di corrente. ATTENZIONE! Per evitare che il connettore dell’alimentatore si danneggi, assicurarsi che sia correttamente allineato prima di inserirlo nell’unità. Non spostare l’unità mentre questa è accesa per evitare danni o perdite di dati. 3. Individuare il cavo appropriato e collegarlo alla connessione situata nella parte posteriore dell’unità. Evitare di collegare l’unità al computer utilizzando più di un cavo. 4. Collegare l’altra estremità del cavo alla porta del computer. L’icona dell’unità verrà visualizzata in Risorse del computer, Esplora risorse di Windows o sulla Scrivania Mac. Una volta che l’unità è stata rilevata dal sistema operativo, installare il software contenuto nel CD Soluzioni. UTENTI PC: Se l’unità include FireWire 800, il computer non riconoscerà l’unità fino a quando non sarà riformattata. Per ulteriori informazioni, vedere pag. 16. ATTENZIONE! Per evitare che si verifichino perdite di dati, non scollegare l’unità durante il trasferimento di informazioni (spia di attività dell’unità lampeggiante). Per informazioni dettagliate su come scollegare l’unità, consultare il manuale dell’utente contenuto nel CD Soluzioni. 5 Instalación rápida • Instalação rápida rnal Exte Drive Hard e t Up Star en rout Mise t Star o ção Inici aliza Inici lación Insta USB 8 7 200 3 ows Wind Mac 13 o Avvi . m ration ga.co a Corpo iome Iomeg ed. www. 2004 reserv Copyri ght © All rights 1. Introduzca el CD de soluciones. Si la instalación no se inicia automáticamente, haga doble clic en el icono del CD en Mi PC, en el Explorador de Windows Explorer o en el escritorio de Mac y, a continuación, haga doble clic en el icono Iniciar. Conecte la unidad al ordenador después de que el CD de Soluciones haya comprobado el sistema. ® ® 2. Conecte el cable de alimentación incluido a la parte posterior de la unidad. Coloque la unidad sobre una superficie estable y conecte el cable de alimentación a una toma eléctrica. ¡PRECAUCIÓN! Para evitar daños al conector de alimentación, asegúrese de que esté correctamente alineado antes de enchufarlo a la unidad. No mueva la unidad mientras esté encendida para evitar posibles daños en la unidad o la pérdida de datos. 3. Identifique el cable adecuado y conéctelo a la conexión en la parte posterior de la unidad. Nunca conecte la unidad al ordenador con más de un cable. 4. Conecte el otro extremo del cable al puerto del ordenador. El icono de la unidad aparecerá en Mi PC, el Explorador de Windows o en el escritorio de Mac. Una vez que el sistema operativo reconozca la unidad, instale el software desde el CD de Soluciones. USUARIOS DE PC: Si la unidad dispone de FireWire 800, el ordenador no la reconocerá hasta que se vuelva a formatear. Consulte la página 9 para obtener más información. ¡PRECAUCIÓN! Para impedir la pérdida de datos, no desconecte la unidad durante el proceso de transferencia de datos (la luz de actividad de la unidad parpadea). Consulte el manual de usuario del CD de Soluciones para obtener instrucciones acerca de la desconexión de la unidad. 6 1. Insira o CD Soluções. Caso ele não seja iniciado automaticamente, clique duas vezes no ícone do CD em Meu computador, no Windows Explorer ou na mesa do Mac e, em seguida, clique duas vezes no ícone Iniciar. Conecte a unidade ao computador após o CD Soluções verificar seu sistema. ® ® 2. Conecte a fonte de alimentação que acompanha o produto à parte traseira da unidade. Coloque a unidade em uma superfície estável e conecte a fonte de alimentação a uma tomada elétrica. CUIDADO! Para evitar danos ao conector da fonte de alimentação, certifique-se de que ele esteja alinhado corretamente antes de encaixá-lo na unidade. Não mexa na unidade enquanto ela estiver ligada para evitar danos à mesma ou perda de dados. 3. Identifique o cabo apropriado e conecte-o à entrada USB na parte traseira da unidade. Nunca conecte a unidade ao computador através de mais de um cabo. 4. Conecte a outra extremidade do cabo à porta do seu computador. O ícone da unidade aparecerá em Meu computador, no Windows Explorer ou na mesa do Mac. Assim que a unidade for reconhecida pelo sistema operacional, instale o software a partir do CD Soluções. USUÁRIOS DE PC: Se a unidade possuir o FireWire 800, seu computador não reconhecerá a unidade até que ela seja reformatada. Veja a página 10 para obter mais informações. CUIDADO! A fim de evitar a perda de dados, não desconecte a unidade durante a transferência de dados (luz de atividade da unidade piscando). Consulte o manual do usuário no CD Soluções para obter instruções sobre como desconectar a unidade. Snelle installatie • Snabbinstallation 1. Plaats de cd Solutions (Opstarten) in de CD-ROM-drive. Als de cd niet automatisch start, dubbelklikt u op het cdpictogram in Deze Computer, of in Windows Verkenner of op het Mac -bureaublad en dubbelklikt u daarna op het pictogram Start (Opstarten). Nadat de cd Solutions uw systeem heeft gecontroleerd, sluit u de drive op de computer aan. 1. Sätt i Solutions-CD:n. Om installationsprogrammet inte startar automatiskt dubbelklickar du på CDikonen i Den här datorn, Windows Utforskaren eller, om du har en Mac , på skrivbordet och dubbelklickar sedan på ikonen Start. Anslut enheten till datorn efter att installationsprogrammet har analyserat ditt system. 2. Sluit de meegeleverde voeding aan op de achterkant van de drive. Plaats de drive op een stabiel oppervlak en sluit het andere uiteinde van de voeding aan op een stopcontact. 2. Anslut den medföljande strömkabeln till baksidan av enheten. Placera enheten på en stabil yta och anslut strömkabeln till ett eluttag. ® ® WAARSCHUWING! Let erop dat u de connector van het stroomsnoer loodrecht in de connector van de drive plaatst. Anders kan deze worden beschadigd. Verplaats de drive niet wanneer deze van stroom is voorzien, om beschadigingen of gegevensverlies te voorkomen. 3. Neem de geschikte kabel en sluit die aan op de connector op de achterkant van de drive. Sluit de drive nooit met meer dan één kabel op de computer aan. 4. Sluit het andere uiteinde van de kabel aan op de poort van de computer. Het pictogram van de drive verschijnt normaal in Deze computer, Windows Verkenner of op het Macbureaublad. Nadat het besturingssysteem de drive heeft herkend, installeert u de software vanaf de cd Solutions. PC-gebruikers: Als uw drive FireWire 800 bevat, zal uw computer de drive pas herkennen nadat deze is opnieuw is geformatteerd. WAARSCHUWING! Koppel de drive nooit los tijdens een gegevensoverdracht (wanneer het statuslampje van de drive-activiteit knippert). Zo vermijdt u dat er gegevens verloren gaan. Raadpleeg de Gebruikershandleiding op de cd Solutions voor informatie over het loskoppelen van de drive. ® ® VARNING! För att inte skada elkontakten, se till att den är riktad rätt innan du ansluter den till enheten. Flytta inte enheten när den startas upp för att undvika att enheten skadas eller att data går förlorade. 3. Lokalisera rätt kabel och anslut den till uttaget på baksidan av enheten. Anslut aldrig enheten till datorn med mer än en kabel. 4. Anslut den andra änden av kabeln till porten på datorn. Ikonen för drivenheten ska visas i Den här datorn, Windows Utforskaren eller på skrivbordet på en Mac. När operativsystemet har identifierat drivenheten installerar du programvaran från Solutions-CD-skivan. PC-ANVÄNDARE: Om drivenheten innehåller FireWire 800 kommer datorn inte att identifiera drivenheten förrän den har formaterats om. OBSERVERA! För att förhindra dataförlust ska du undvika att koppla ur drivenheten under dataöverföring (drivenhetens aktivitetslampa blinkar). Anvisningar om hur drivenheten kopplas ur finns i användarhandboken på CD-skivan Solutions. 7 Hurtig installation • Rask installering rnal Exte Drive Hard e t Up Star en rout Mise t Star o ção Inici aliza Inici lación Insta USB 8 7 200 3 ows Wind Mac 13 o Avvi . m ration ga.co a Corpo iome Iomeg ed. www. 2004 reserv Copyri ght © All rights 1. Indsæt Start-cd’en. Hvis cd’en ikke starter automatisk, skal du dobbeltklikke på cd-ikonet i Denne computer i Windows Stifinder eller på Start-ikonet på skrivebordet på Mac . Slut drevet til computeren, når Solutions-cd’en har kontrolleret systemet. 1. Sett inn Solutions CD (oppstart). Hvis den ikke starter automatisk, dobbeltklikker du på CD-ikonet i Min datamaskin, Windows Utforsker eller på Mac skrivebordet, og dobbeltklikker deretter på Startikonet. Koble stasjonen til datamaskinen etter at Solutions CD (oppstart) har kontrollert systemet. 2. Slut det medfølgende strømkabel til bagsiden af drevet. Placer drevet på en stabil overflade, og slut strømkablet til en stikkontakt. 2. Koble den medfølgende strømforsyningen til på baksiden av stasjonen. Plasser stasjonen på et stabilt underlag og koble strømforsyningen til en stikkontakt. ® ® FORSIGTIG! Hvis du vil undgå at beskadige strømforsyningsstikket, skal du sørge for at vende det rigtigt, før du sætter det i drevet. Du må ikke flytte drevet, mens der er strøm på, hvis du vil undgå at beskadige drevet eller miste data. 3. Find det korrekte kabel, og slut det til stikket på bagsiden af drevet. Slut aldrig drevet til computeren med mere end ét kabel. 4. Slut den anden ende af kablet til porten på computeren. Drevikonet skulle blive vist i Denne computer, Windows Stifinder eller på Mac-skrivebordet. Når operativsystemet har registreret drevet, skal du installere softwaren fra Solutions-cd’en. Pc-brugere: Hvis drevet indeholder FireWire 800, vil computeren ikke genkende drevet, før det er formateret igen. FORSIGTIG! Du må ikke frakoble drevet under dataoverførsel, hvis du vil undgå tab af data (drevaktivitet sindikatoren blinker). Se brugervejledningen på Solutionscd’en, hvis du ønsker yderligere oplysninger om sikker fjernelse af drevet. 8 ® ® FORSIKTIG! Pass på å holde strømforsyningskontakten riktig før du setter den i stasjonen, slik at du unngår å skade den. For å unngå skade på stasjonen eller tap av data må ikke stasjonen flyttes mens den er slått på. 3. Finn frem den riktige kabelen og koble den til på baksiden av stasjonen. Koble aldri stasjonen til datamaskinen med mer enn én kabel. 4. Koble den andre enden av kabelen til porten på datamaskinen. Stasjonsikonet skal vises i Min datamaskin, Windows Utforsker eller på Mac-skrivebordet. Når stasjonen er oppdaget av operativsystemet, installerer du programvaren på Solutions CD-platen. PC-BRUKERE: Hvis stasjonen har FireWire 800, vil ikke datamaskinen gjenkjenne stasjonen før den er omformatert. FORSIKTIG! For å unngå tap av data må du ikke koble fra stasjonen under overføring av data (lampen for stasjonsaktivitet blinker). Du finner veiledning om frakobling av stasjonen i brukerhåndboken på Solutions CD-platen. Pika-asennus • Γρήγορη εγκατάσταση 1. Aseta Solutions -levy CD-asemaan. Jos asennusohjelma ei käynnisty automaattisesti, kaksoisnapsauta Windows Resurssienhallinnan Oma tietokone -ikkunassa olevaa CD-levyn kuvaketta tai kaksoisosoita Mac -työpöydällä olevaa Start (Käynnistä) -kuvaketta. Kytke kiintolevy tietokoneeseen sen jälkeen, kun Solutions asennusohjelma on tarkastanut järjestelmän. ® ® 2. Kytke virtajohto aseman takana olevaan liitäntään. Aseta kiintolevy vakaan alustan päälle ja kytke virtajohto pistorasiaan. VAROITUS: Jotta virtalähteen liitin ei vaurioituisi, varmista, että se on suorassa, ennen kuin kytket sen asemaan. Älä siirrä kiintolevyä, kun siihen on virta kytkettynä. Levy voi vahingoittua tai tietoja voi hävitä. 3. Ota tarvittava kaapeli ja kytke se kiintolevyn takaosassa olevaan liitäntään. Kytke kiintolevy tietokoneeseen vain yhdellä kaapelilla. 4. Kytke kaapelin toinen pää tietokoneen porttiin. Aseman kuvakkeen tulee näkyä Windowsin Resurssienhallinnan Oma tietokone -ikkunassa tai Macintosh-tietokoneen työpöydällä. Asenna Solutions-levyllä oleva ohjelmisto, kun käyttöjärjestelmä on tunnistanut kiintolevyn. PC-KÄYTTÄJÄT: Jos asemassa on FireWire 800 liitäntä, tietokone tunnistaa aseman vasta, kun se on alustettu uudelleen. VAROITUS: Älä irrota asemaa tiedonsiirron aikana (tällöin asemassa vilkkuu valo), koska tiedot voivat hävitä. Irrota asema Solutions-levyllä olevan käyttöoppaan ohjeiden mukaan. 1. Τοποθετήστε το CD Solutions. Εάν δεν ξεκινήσει αυτόµατα, κάντε διπλό κλικ στο εικονίδιο του CD στο φάκελο Ο υπολογιστής µου (My Computer), στην Εξερεύνηση των Windows (Windows Explorer) ή στο γραφείο του Mac και στη συνέχεια κάντε διπλό κλικ στο εικονίδιο Start. Όταν το CD Solutions ελέγξει το σύστηµά σας, συνδέστε το δίσκο στον υπολογιστή. ® ® 2. Συνδέστε το καλώδιο τροφοδοσίας που συνοδεύει το δίσκο στο πίσω µέρος του. Τοποθετήστε το δίσκο σε µια σταθερή επιφάνεια και συνδέστε το τροφοδοτικό σε µια πρίζα ηλεκτρικού. ΠΡΟΣΟΧΗ! Για να αποφύγετε την πρόκληση ζηµιάς στο βύσµα του τροφοδοτικού, βεβαιωθείτε ότι έχει ευθυγραµµιστεί σωστά προτού το συνδέσετε στο δίσκο. Μην µετακινείτε το δίσκο όταν ξεκινά η τροφοδοσία του, για να µην προκληθεί ζηµιά ή απώλεια δεδοµένων. 3. Εντοπίστε το κατάλληλο καλώδιο και συνδέστε το στην υποδοχή στο πίσω µέρος του δίσκου. Ποτέ µην συνδέετε το δίσκο µε τον υπολογιστή µε περισσότερα του ενός καλώδια. 4. Συνδέστε το άλλο άκρο του καλωδίου σε µια υποδοχή στον υπολογιστή σας. Το εικονίδιο του δίσκου πρέπει να εµφανίζεται στο φάκελο Ο Υπολογιστής µου (My Computer), στην Εξερεύνηση των Windows (Windows Explorer) ή στο γραφείο του Mac. Αφού ο δίσκος αναγνωριστεί από το λειτουργικό σύστηµα, εγκαταστήστε το λογισµικό από το CD Solutions. ΧΡΗΣΤΕΣ PC: Εάν ο δίσκος που διαθέτετε περιλαµβάνει FireWire 800, ο υπολογιστής σας δεν θα τον αναγνωρίσει έως ότου διαµορφωθεί εκ νέου. ΠΡΟΣΟΧΗ! Για να µην χάσετε δεδοµένα, µην αποσυνδέετε το δίσκο κατά τη διάρκεια µεταφοράς δεδοµένων (η φωτεινή ένδειξη δραστηριότητας του δίσκου αναβοσβήνει). Για οδηγίες σχετικά µε την αποσύνδεση του δίσκου, ανατρέξτε στο εγχειρίδιο χρήσης στο CD Solutions. 9 Rychlá instalace • Skrócona instrukcja insalacji rnal Exte Drive Hard e t Up Star en rout Mise t Star o ção Inici aliza Inici lación Insta USB 8 7 200 3 ows Wind Mac 13 o Avvi . m ration ga.co a Corpo iome Iomeg ed. www. 2004 reserv Copyri ght © All rights 1. Vložte disk CD Solutions. Pokud se program nespustí automaticky, poklepejte na ikonu disku CD ve složce Tento počítač, v programu Průzkumník Windows nebo na pracovní ploše systému Mac a pak poklepejte na ikonu Start. Po provedení kontroly systému programem Solutions připojte jednotku k počítači. 2. Připojte přiložený kabel do zadní části jednotky. Umístěte jednotku na stabilní povrch a připojte kabel do zásuvky. UPOZORNĚNÍ! Chcete-li zabránit poškození konektoru napájení, snažte se jej zasunout do disku rovně. Nepřemísťujte jednotku, je-li zapojena v elektrické síti, aby nedošlo k jejímu poškození nebo ke ztrátě dat. 3. Vyhledejte příslušný kabel a připojte jej do konektoru na zadní straně jednotky. Nikdy nepřipojujte jednotku k počítači více než jedním kabelem. 4. Připojte druhý konec kabelu k portu v počítači. Ikona jednotky by se měla zobrazit v okně Tento počítač, Průzkumník Windows nebo na pracovní ploše systému Mac. Po rozpoznání jednotky operačním systémem instalujte software z disku Solutions CD. UŽIVATELÉ PC: Pokud jednotka neobsahuje produkt FireWire 800, počítač ji nerozezná, dokud nebude znovu zformátovaná. UPOZORNĚNÍ! Jednotku neodpojujte během přenosu dat (bliká indikátor aktivity na jednotce), mohlo by dojít ke ztrátě dat. Pokyny k odpojení jednotky najdete v uživatelské příručce na disku Solutions CD. 10 1. Włóż dysk CD Solutions. Jeoli nie zostanie uruchomiony automatycznie, kliknij dwukrotnie ikone dysku CD w oknie Mój komputer, w programie Eksplorator Windows lub na biurku w systemie Mac, a nastepnie kliknij dwukrotnie ikone Start. Pod31cz naped do komputera po sprawdzeniu systemu przez dysk CD Solutions. 2. Podłącz dostarczony zasilacz z tyłu napędu. Ustaw napęd na stabilnej powierzchni i podłącz zasilacz do gniazda zasilania. OSTROŻNIE! Aby uniknąć uszkodzenia złącza zasilacza, przed podłączeniem napędu należy upewnić się, że jest ono prawidłowo ułożone. Nie należy przenosić napędu podłączonego do zasilania, aby uniknąć jego uszkodzenia lub utraty danych. 3. Znajdź odpowiedni kabel i podłącz go do złącza z tyłu napędu. Nigdy nie podłączaj napędu do komputera za pomocą więcej niż jednego kabla. 4. Podłącz drugi koniec kabla do portu w komputerze. Ikona napędu powinna zostać wyświetlona w oknie Mój komputer, w programie Eksplorator Windows lub na biurku w systemie Mac. Po rozpoznaniu napędu przez system operacyjny zainstaluj oprogramowanie z dysku CD Solutions (Rozwiązania). UŻYTKOWNICY KOMPUTERÓW PC: Jeśli napęd jest wyposażony w interfejs FireWire 800, komputer nie rozpozna napędu, dopóki nie zostanie on ponownie sformatowany. OSTROŻNIE! Aby uniknąć utraty danych, nie należy odłączać napędu podczas przesyłania danych (lampka aktywności napędu miga). Instrukcje odłączania napędu zawiera podręcznik użytkownika na dysku CD Solutions (Rozwiązania). Gyors telepítés 1. Helyezze be a Solutions CD-t. Ha nem indul el automatikusan, kattintson duplán a CD ikonjára a Sajátgép vagy Windows Intéző ablakban, illetve a Mac asztalán, majd kattintson duplán a Start ikonra. Csatlakoztassa a meghajtót a számítógéphez, miután a Solutions CD ellenőrizte a rendszert. 2. Csatlakoztassa a mellékelt tápegységet a meghajtó hátuljához. Helyezze a meghajtót stabil felületre, majd csatlakoztassa a tápegységet egy konnektorhoz. FIGYELEM! A tápegység csatlakoztatása előtt ellenőrizze, hogy pontosan illeszkedik-e, nehogy megsérüljön. A meghajtót működés közben ne mozgassa, mert megsérülhet vagy adatvesztés következhet be. 3. Keresse meg a megfelelő kábelt, majd csatlakoztassa a meghajtó hátuljához. Soha ne csatlakoztassa egynél több kábellel a meghajtót a számítógéphez. 4. A kábel másik végét csatlakoztassa a számítógép egyik portjához. A Sajátgép, Windows Intéző vagy Mac Desktop ablakban meg kell jelennie a meghajtó ikonjának. Miután az operációs rendszer felismerte a meghajtót, telepítse a szoftvert a Solutions CD-ről. PC-FELHASZNÁLÓK: Ha a meghajtó FireWire 800 rendszerű, a számítógép csak újraformázás után fogja felismerni. További információt a 14. oldalon talál. FIGYELEM! Az adatvesztés elkerülése érdekében ne válassza le a meghajtót adatátvitel közben (amikor a meghajtó működését jelző LED villog). A meghajtó leválasztásával kapcsolatban olvassa el a Solutions CD-n lévő felhasználói útmutatót. 11 Using Your Drive Disconnecting the Drive Always use the safe removal procedure for your operating system when disconnecting the drive. CAUTION! To prevent data loss, do not disconnect the drive during data transfer (activity light flashing). Use caution when moving the drive while it is connected to power. Using the Iomega® Hard Drive Side Stand (Some Models) The side stand is stored on the bottom of the drive. To use the side stand, remove the bottom plate from the hard drive. Lock the bottom plate tabs securely into the vent slots on the side of the drive opposite the drive access light. Locating the Iomega Hard Drive Registration Number (Some Models) On some models the registration number is stored under the drive’s bottom plate. To find the serial number, remove the bottom plate from the hard drive (as shown in the first illustration above). Troubleshooting PC USERS: Formatting the Iomega Hard Drive The FireWire 800/400/USB 2.0 model ships preformatted as a Macintosh Extended (HFS+) volume. This format is not recognized on Windows operating systems, and you must reformat the drive to either FAT32 or NTFS. Users with Windows XP/2000 can use the following instructions to format the drive. Users with Windows 98/Me, visit the support section on www.iomega.com to find detailed formatting instructions. CAUTION! Reformatting the Iomega Hard Drive will erase all existing data on the drive. 1. Connect the Iomega Hard Drive to your computer following the instructions on page 4. 2. Open Windows Disk Management (right click on My Computer, select Manage, and click on Disk Management). 3. If the Disk Wizard opens, click Next. Select the disk, click Next, then Finish. If the Wizard does not open, locate the drive in the lower list. Look for a disk that does not show a drive letter or file system. Right click on the drive name and select Initialize Disk (Windows XP) or Write Signature (Windows 2000), then OK. 4. The drive will now appear as Unallocated and the bar will be black. Right click on the black bar and select New Partition (Windows XP) or Create Partition (Windows 2000). 5. When the Partition Wizard opens, click Next. 6. Verify that the partition type is Primary partition and click Next. 7. Leave the maximum disk space selected and click Next. 8. Assign the next drive letter available and click Next. 9. To format the drive with an NTFS file system, click Next, then click Finish. The drive will be ready to use when the format completes. NOTE: If you want to use the drive with other operating systems, download the Iomega FAT32 Formatter from the Support and Downloads area on www.iomega.com and use it to change the format to FAT32 (provides cross-platform compatibility). User’s Manual A complete user’s manual in HTML format is available on the Support & Downloads area on www.iomega.com. 12 Utilisation du lecteur Déconnexion du lecteur Utilisez toujours la procédure de retrait sécurisée de votre système d’exploitation lors de la déconnexion du lecteur. ATTENTION ! Pour éviter toute perte de données, ne déconnectez pas le lecteur pendant un transfert de données (voyant d’activité clignotant). Déplacez le lecteur avec prudence lorsqu’il est connecté à l’alimentation. Utilisation du support latéral du disque dur Iomega (Certains modèles) La façade inférieure peut servir de support latéral. Pour utiliser le support latéral, retirez la façade inférieure du disque dur. Fixez fermement les ergots de la façade inférieure dans les trous d’aération sur le côté de l’appareil à l’opposé du voyant lumineux du disque dur. Localisation du numéro d’enregistrement du disque dur Iomega (Certains modèles) Sur certains modèles, le numéro d’enregistrement se situe sous la façade inférieure du lecteur. Pour localiser le numéro de série, retirez le plateau inférieur du disque dur (comme illustré à la première figure ci-dessus). Dépannage UTILISATEURS PC : Formatage du disque dur Iomega Le modèle FireWire 800/400/USB 2.0 est livré préformaté au format HFS+ (Macintosh Extended). Ce format n’est pas reconnu par les systèmes d’exploitation Windows : vous devez reformater le lecteur au format FAT32 ou NTFS. Les utilisateurs de Windows XP/2000 peuvent suivre les instructions ci-dessous pour formater le lecteur. Les utilisateurs de Windows 98/Me sont invités à visiter la section assistance du site www.iomega.com pour obtenir des instructions de formatage détaillées. ATTENTION ! Le reformatage du disque dur Iomega efface l’intégralité des données enregistrées sur le disque. 1. Connectez le disque dur Iomega à votre ordinateur en suivant les instructions de la page 4. 2. Ouvrez l’utilitaire de gestion des disques de Windows (cliquez avec le bouton droit de la souris sur Poste de travail, Gérer, puis Gestion des disques). 3. Si l’Assistant lecteur s’ouvre, cliquez sur Suivant. Sélectionnez le lecteur, cliquez sur Suivant puis sur Terminer. Si l’Assistant ne s’ouvre pas, recherchez le lecteur dans la liste inférieure. Recherchez un disque ne présentant ni lettre de lecteur ni système de fichiers. Cliquez avec le bouton droit de la souris sur le nom du lecteur et sélectionnez Initialiser le lecteur (Windows XP) ou Ecrire une signature (Windows 2000) puis OK. 4. Le disque apparaît comme Non attribué et la barre doit être noire. Cliquez avec le bouton droit sur la barre noire et sélectionnez Nouvelle partition (Windows 2000) ou Créer une partition (Windows XP). 5. Lorsque l’Assistant Création de partition s’ouvre, cliquez sur Suivant. 6. Vérifiez que le type de partition sélectionné est bien Partition primaire, puis cliquez sur Suivant. 7. Sélectionnez l’espace disque maximum disponible et cliquez sur Suivant. 8. Attribuez la prochaine lettre de lecteur disponible au disque et cliquez sur Suivant. 9. Pour formater le disque avec système de fichiers NTFS, cliquez sur Suivant, puis sur Terminer. Le disque peut être utilisé dès que le formatage est terminé. REMARQUE : pour utiliser le périphérique avec d’autres systèmes d’exploitation, téléchargez Iomega FAT32 Formatter (logiciel de formatage Iomega FAT32) à partir de la section Support et Téléchargement du site www.iomega.com, puis utilisez ce logiciel pour formater le périphérique au format FAT32, permettant la compatibilité inter plate-formes. Guide de l’utilisateur Un guide de l’utilisateur complet est disponible au format HTML dans la section Support et Téléchargement du site www.iomega.com. 13 Verwenden des Laufwerks Trennen des Laufwerks vom System Zum Abklemmen des Laufwerks sollten Sie immer die Option zum sicheren Entfernen der Hardware wählen. ACHTUNG! Um Datenverluste zu vermeiden, trennen Sie das Laufwerk während der Datenübertragung (wenn Aktivitätsanzeige blinkt) nicht vom Computer. Bewegen Sie das Laufwerk nur vorsichtig, wenn es an die Stromversorgung angeschlossen ist. Aufstellen von Iomega®-Festplattenlaufwerken auf der Seite (diverse Modelle) Die Bodenplatte kann für die seitliche Aufstellung verwendet werden. Um das Festplattenlaufwerk auf der Seite aufzustellen, entfernen Sie die Bodenplatte vom Laufwerk. Lassen Sie die Metallspitzen der Bodenplatte sicher in den Öffnungsschlitzen auf der Seite des Laufwerks gegenüber der Laufwerkzugriffsleuchte einrasten. Auffinden der Registrierungsnummer des Iomega-Festplattenlaufwerks (diverse Modelle) Bei einigen Modellen befindet sich die Registrierungsnummer unter der Bodenplatte des Laufwerks. Um die Seriennummer zu finden, entfernen Sie die Bodenplatte vom Laufwerk (siehe erste Abbildung oben). Fehlerbehebung PC-Benutzer: Formatieren der Iomega Festplatte Das Modell FireWire 800/400/USB 2.0 wird mit einem für Macintosh Extended (HFS+) vorformatierten Volume geliefert. Windows-Betriebssysteme erkennen dieses Format nicht, daher müssen Sie das Laufwerk entweder auf FAT32 oder auf NTFS umformatieren. Benutzer von Windows XP/2000 können das Laufwerk nach den folgenden Anweisungen formatieren. Benutzer von Windows 98/Me finden ausführliche Formatierungsanweisungen unter www.iomega.com. Achtung! Durch das Umformatieren der Iomega Festplatte werden alle auf dem Laufwerk vorhandenen Daten gelöscht. 1. Schließen Sie die Festplatte gemäß den Anweisungen auf Seite 5 an den Computer an. 2. Öffnen Sie die Windows Datenträgerverwaltung (mit rechter Maustaste auf Arbeitsplatz klicken, Verwalten wählen und dann auf Datenträgerverwaltung klicken). 3. Falls der Assistent für die Datenträgerinitialisierung gestartet wird, klicken Sie auf Weiter. Wählen Sie den Datenträger aus. Klicken Sie auf Weiter und dann auf Fertig stellen. Falls der Assistent für die Datenträgerinitialisierung nicht gestartet wird, suchen Sie das Laufwerk in der unteren Liste. Suchen Sie nach einem Datenträger, bei dem kein Laufwerksbuchstabe oder Dateisystem angezeigt wird. Klicken Sie mit der rechten Maustaste auf den Laufwerksnamen und wählen Sie dann Datenträger initialisieren (Windows XP) oder Signatur schreiben (Windows 2000). Klicken Sie anschließend auf OK. 4. Das Laufwerk wird dann als Nicht zugeordnet angezeigt und der Balken schwarz dargestellt. Klicken Sie mit der rechten Maustaste Right auf den schwarzen Balken und wählen Sie Neue Partition (Windows XP) oder Partition erstellen (Windows 2000). 5. Sobald der Assistent zum Erstellen neuer Partitionen geöffnet wird, klicken Sie auf Weiter. 6. Überprüfen Sie, ob es sich beim Partitionstyp um Primäre Partition handelt, und klicken Sie auf Weiter. 7. Lassen Sie die Auswahl (maximaler Speicherplatz ) stehen und klicken Sie auf Weiter. 8. Ordnen Sie der Festplatte den nächsten Laufwerksbuchstaben zu und klicken Sie auf Weiter. 9. Um das Laufwerk mit einem NTFS-Dateisystem zu formatieren, klicken Sie auf Weiter und dann auf Fertig stellen. Sobald die Formatierung abgeschlossen ist, können Sie das Laufwerk verwenden. Hinweis: Wenn Sie das Laufwerk mit anderen Betriebssystemen verwenden möchten, laden Sie Iomega FAT32 Formatter aus dem Bereich “Support & Downloads” unter www.iomega.com herunter, und ändern Sie damit das Format in FAT32 um. Dadurch wird eine plattformübergreifende Kompatibilität gewährleistet. Benutzerhandbuch (vollständig) Im Bereich “Support & Downloads” unter www.iomega.com steht Ihnen ein vollständiges Benutzerhandbuch im HTMLFormat zur Verfügung. 14 Uso dell’unità Scollegamento dell’unità Quando si scollega l’unità, usare sempre la procedura di rimozione sicura specifica per il sistema operativo usato. ATTENZIONE! Per evitare che si verifichino perdite di dati, non scollegare l’unità durante il trasferimento di informazioni (la spia verde di attività lampeggia). Se si desidera spostare un’unità collegata alla rete di alimentazione, agire con cautela. Utilizzo del supporto laterale del disco rigido Iomega (alcuni modelli) Poiché la piastra inferiore può fungere da supporto laterale, per utilizzarla a questo fine rimuovere la piastra inferiore dal disco rigido. Fissare saldamente le linguette della piastra inferiore nelle apposite fessure presenti sul lato dell’unità opposto all’apertura di accesso. Individuazione del numero di registrazione del disco rigido Iomega (alcuni modelli) In alcuni modelli il numero di registrazione è situato sotto la piastra inferiore dell’unità. Per individuare il numero di serie, rimuovere la piastra inferiore del disco rigido (come descritto nella prima illustrazione sopra). Risoluzione dei problemi UTENTI PC: Formattazione del disco rigido Iomega Il modello FireWire 800/400/USB 2.0 viene fornito preformattato come volume Macintosh Extended (HFS+). Questo formato non è riconosciuto nei sistemi operativi Windows ed è necessario ripristinare la formattazione FAT32 o NTFS. Gli utenti di Windows XP/2000 possono utilizzare le seguenti istruzioni per formattare l’unità. Per ulteriori istruzioni sulla formattazione per gli utenti di Windows 98/Me, visitare la sezione del supporto tecnico al sito www.iomega.com. ATTENZIONE! La riformattazione del disco rigido Iomega comporta l’eliminazione definitiva di tutti i dati presenti nell’unità. 1. Collegare il disco rigido Iomega al computer seguendo le istruzioni a pag. 5. 2. Aprire Gestione disco di Windows (fare clic con il pulsante destro del mouse su Risorse del computer, selezionare Gestisci, quindi fare clic su Gestione disco). 3. Quando si avvia l’Installazione guidata disco, scegliere Avanti. Selezionare il disco, fare clic su Avanti, quindi su Fine. Se la procedura guidata non si avvia, cercare l’unità nella parte inferiore dell’elenco. Cercare un disco senza lettera di unità o file system. Fare clic con il pulsante destro del mouse sul nome dell’unità e selezionare Inizializza disco (Windows XP) o Riporta la firma (Windows 2000), quindi scegliere OK. 4. A questo punto l’unità apparirà come Non allocata e la barra diventerà nera. Fare clic con il pulsante destro del mouse sulla barra nera, quindi selezionare Nuova partizione (Windows XP) o Crea partizione (Windows 2000). 5. Quando si apre la Procedura guidata di partizione, fare clic su Avanti. 6. Accertarsi che la tipologia di partizione sia impostata su Partizione primaria, quindi fare clic su Avanti. 7. Lasciare selezionato lo spazio massimo su disco e fare clic su Avanti. 8. Assegnare la successiva lettera di unità disponibile e fare clic su Avanti. 9. Per formattare l’unità con un file system NTFS, fare clic su Avanti, quindi su Fine. L’unità potrà essere utilizzata al termine della formattazione. NOTA: per utilizzare l’unità con altri sistemi operativi, scaricare il programma Iomega FAT32 Formatter dall’area Assistenza e download all’indirizzo www.iomega.com e utilizzarlo per modificare la formattazione in FAT32 (richiesta per compatibilità tra diverse piattaforme). Manuale dell’utente Il manuale completo dell’utente è disponibile nell’area Assistenza e download all’indirizzo www.iomega.com. 15 Uso de la unidad Desconexión de la unidad Utilice siempre un procedimiento de desconexión seguro para su sistema operativo al desconectar la unidad. PRECAUCION: Para impedir la pérdida de datos, no desconecte la unidad durante el proceso de transferencia de datos (la luz de actividad parpadea). Tenga precaución al transportar la unidad cuando esté conectada a la alimentación. Uso del soporte lateral para la unidad de disco duro Iomega (algunos modelos) La placa inferior se puede utilizar como un soporte lateral. Para utilizar el soporte lateral, extraiga la placa inferior de la unidad de disco duro. Fije bien las pestañas de la placa en las ranuras de ventilación situadas en el lateral de la unidad opuesto a la luz de acceso a la unidad. Búsqueda del número de registro de la unidad de disco duro Iomega (algunos modelos) En determinados modelos, el número de registro se ubica bajo la placa inferior de la unidad. Para localizar el número de serie, retire la placa inferior del disco duro (como se muestra en la primera ilustración más arriba). Solución de problemas USUARIOS DE PC: Formateo de la unidad de disco duro Iomega El modelo FireWire 800/400/USB 2.0 viene preformateado como un volumen extendido de Macintosh (HFS+). Los sistemas operativos de Windows no reconocen este formato y, por lo tanto, debe volver a formatear la unidad en FAT32 o NTFS. Los usuarios que disponen de Windows XP/2000 pueden seguir las instrucciones que se muestran a continuación para formatear la unidad. Los usuarios que disponen de Windows 98/Me, deben visitar la sección de soporte de www.iomega.com para obtener instrucciones detalladas acerca del formateo. ¡PRECAUCIÓN! Si vuelve a formatear la unidad de disco duro Iomega, se eliminarán los datos existentes en la unidad. 1. Conecte el disco duro Iomega al ordenador siguiendo las instrucciones que se muestran en la página 5. 2. Abra Administración de discos de Windows (haga clic con el botón derecho del ratón en Mi PC, seleccione Administrar y, a continuación, haga clic en Administración de discos). 3. Si se abre el asistente para discos, haga clic en Siguiente. Seleccione el disco, haga clic en Siguiente y, a continuación, en Finalizar. Si el asistente no se abre, localice la unidad en la lista de abajo. Busque un disco que no tenga letra de unidad asignada o sistema de archivos. Haga clic con el botón derecho del ratón en el nombre de la unidad y seleccione Inicializar disco (Windows XP) o Escribir firma (Windows 2000). A continuación, haga clic en Aceptar. 4. A continuación, la unidad aparecerá como No asignado y la barra se mostrará negra. Haga clic con el botón derecho del ratón en la barra negra y seleccione Nueva partición (Windows XP) o Crear partición (Windows 2000). 5. Cuando se abra la ventana del asistente para particiones, haga clic en Siguiente. 6. Compruebe que el tipo de partición sea Partición primaria y haga clic en Siguiente. 7. Deje el máximo espacio en el disco seleccionado y haga clic en Siguiente. 8. Asigne la siguiente letra de unidad disponible y haga clic en Siguiente. 9. Para formatear la unidad con un sistema de archivos NTFS, haga clic en Siguiente y, a continuación, en Finalizar. Cuando el formateo finalice, la unidad estará lista para ser utilizada. NOTA: Si desea utilizar la unidad con otros sistemas operativos, descargue el software Iomega FAT32 Formatter (Formateador) del área de asistencia y descargas del sitio www.iomega.com y utilícelo para cambiar el formato a FAT32 (proporciona compatibilidad entre plataformas). Manual del usuario El manual de usuario completo en formato HTML está disponible en el área de asistencia y descargas del sitio www.iomega.com. 16 Utilização da unidade Desconexão da unidade Sempre utilize o procedimento de remoção segura do sistema operacional ao desconectar a unidade. CUIDADO! A fim de evitar a perda de dados, não desconecte a unidade durante a transferência de dados (luz de atividade da unidade piscando). Tenha cuidado ao mover a unidade, quando ela estiver recebendo energia. Utilização do apoio lateral do disco rígido Iomega (Alguns modelos) A placa inferior pode ser usada como apoio lateral. Para usar o apoio lateral, remova a placa inferior do disco rígido. Trave as lingüetas da placa inferior de forma segura nos slots de saída na parte lateral da unidade oposta à luz de acesso da unidade. Localização do número de registro do disco rígido Iomega (Alguns modelos) Em alguns modelos, o número de registro está gravado embaixo da placa inferior da unidade. Para encontrar o número de série, remova a placa inferior do disco rígido (como mostrado na primeira ilustração acima). Solução de problemas USUÁRIOS DE PC: Formatação do disco rígido Iomega Os modelos FireWire 800/400/USB 2.0 são fornecidos pré-formatados como um volume Macintosh Extended (HFS+). Esse formato não é reconhecido em sistemas operacionais Windows; você deve reformatar a unidade para os formatos FAT32 ou NTFS. Os usuários do Windows XP/2000 podem utilizar as instruções a seguir para formatar a unidade. Os usuários de Windows 98/Me devem visitar a seção de suporte no site www.iomega.com para obter instruções detalhadas sobre a formatação. CUIDADO! Reformatar o Iomega Hard Drive irá apagar todos os dados existentes na unidade. 1. Conecte o disco rígido Iomega ao seu computador, seguindo as instruções da página 5. 2. Abra o Gerenciamento de Disco do Windows (clique com o botão direito do mouse em Meu Computador, selecione Gerenciar e, em seguida, clique em Gerenciamento de Disco). 3. Se o Assistente de Disco abrir, clique em Avançar. Selecione o disco, clique em Avançar e Concluir. Se o assistente não abrir, localize a unidade na lista inferior. Procure um disco que não tenha uma letra de unidade ou um sistema de arquivos. Clique com o botão direito do mouse no nome da unidade, selecione Inicializar Disco (Windows XP) ou Gravação de Assinaturas (Windows 2000) e OK. 4. A unidade aparecerá como Não Alocada e a barra estará preta. Clique com o botão direito do mouse na barra preta e selecione Nova Partição (Windows XP) ou Criar Partição (Windows 2000). 5. Quando o Assistente de Partição do Windows abrir, clique em Avançar. 6. Verifique se o tipo de partição é Partição primária e clique em Avançar. 7. Marque o espaço máximo de disco e clique em Avançar. 8. Atribua a próxima letra de unidade disponível e clique em Avançar. 9. Para formatar a unidade com um sistema de arquivos NTFS, clique em Avançar e, em seguida, em Concluir. A unidade estará pronta para uso quando a formatação estiver concluída. OBSERVAÇÃO: caso deseje usar a unidade com outros sistemas operacionais, faça o download do Iomega FAT32 Formatter (Formatador Iomega FAT32) na área de Suporte e Downloads a partir da página www.iomega.com. Altere para o formato FAT32 (oferece compatibilidade entre diferentes plataformas). Manual do usuário Está disponível na área de Suporte e Downloads no site www.iomega.com a versão completa do manual do usuário em formato HTML. 17 De drive gebruiken De drive loskoppelen Gebruik voor uw besturingssysteem altijd de procedure voor veilig verwijderen wanneer u de drive loskoppelt. WAARSCHUWING! Koppel de drive nooit los tijdens een gegevensoverdracht. Zo vermijdt u dat er gegevens verloren gaan. Wees voorzichtig als u de drive verplaatst wanneer deze op een voedingsbron is aangesloten. Het zijstatief van de Iomega Hard Drive gebruiken (bepaalde modellen) Het voetstuk kan als een zijstatief worden gebruikt. Als u het zijstatief wilt gebruiken, verwijdert u het voetstuk van de drive (Afbeelding 1). Klik de lipjes van het voetstuk vast in de openingen aan de zijkant van de drive, tegenover het statuslampje van de drive. Het registratienummer van de Iomega Hard Drive zoeken (bepaalde modellen) Op bepaalde modellen is het registratienummer vermeld onder het voetstuk van de drive. Als u het serienummer wilt weten, verwijdert u het voetstuk van de drive (Afbeelding). Problemen oplossen Pc-gebruikers: De drive formatteren Bepaalde modellen worden vooraf geformatteerd als HFS+ (Mac OS) en zo geleverd. Als u de drive op een pc met Windows gebruikt en de drive wordt niet herkend, formatteert u de drive opnieuw als een NTFS- of FAT32-drive. Als Windows de drive herkent, is deze al geformatteerd als FAT32 en hoeft u de drive niet opnieuw te formatteren. WAARSCHUWING! door de drive te formatteren, wist u alle gegevens op de drive! 1. Sluit de Iomega-drive aan op uw computer. 2. Open Windows Schijfbeheer (klik met de rechtermuisknop op Deze computer, selecteer Beheren en klik daarna op Schijfbeheer). 3. Als de wizard Schijf wordt geopend, klikt u op Volgende. Selecteer de schijf en klik achtereenvolgens op Volgende en Voltooien. Als de wizard niet verschijnt, zoekt u de drive in de lijst onderaan. Zoek naar een schijf zonder een stationsaanduiding of bestandssysteem. Klik met de rechtermuisknop op de naam van de drive, selecteer Schijf initialiseren (Windows XP) of Handtekening schrijven (Windows 2000) en klik op OK. 4. De drive zal nu verschijnen als Niet-toegewezen en de balk zal zwart zijn. Klik met de rechtermuisknop op de zwarte balk en selecteer Nieuwe partitie (Windows XP) of Partitie maken (Windows 2000). 5. Wanneer de wizard Partitie maken verschijnt, klikt u op Volgende. 6. Controleer of het partitietype is ingesteld op Primaire partitie en klik op Volgende. 7. Laat de maximale schijfruimte geselecteerd en klik op Volgende. 8. Wijs de volgende beschikbare stationsaanduiding toe en klik op Volgende. 9. Klik achtereenvolgens op Volgende en Voltooien. De drive is gebruiksklaar nadat de formattering is voltooid. OPMERKING: als u de drive in andere besturingssystemen wilt gebruiken, downloadt u de Iomega FAT32 Formatter vanuit de sectie Support & Downloads op www.iomega.com om het formaat in te stellen op FAT32 (wat vereist is voor compatibiliteit tussen platforms). Gebruikershandleiding Voor een gebruikershandleiding van uw Iomega-product bezoekt u de sectie Support & Downloads op www.iomega.com. 18 Customer Support • Assistance clientèle • Kundenunterstützung Assistenza clienti • Asistencia al cliente • Suporte ao cliente For service and support for your Iomega product, visit us at www.iomega.com. Pour obtenir du service et de l’assistance pour votre produit Iomega, visitez notre site à l’adresse suivante : www.iomega.com. Servicedienstleistungen und Kundendienst für Ihr Iomega Produkt finden Sie unter www.iomega.com. Per ottenere assistenza e supporto per il prodotto Iomega in uso, visitare il sito Web all’indirizzo www.iomega.com. Para obtener información sobre servicio y asistencia técnica para su producto Iomega, visítenos en www.iomega.com. Para obter serviços e suporte para seu produto Iomega, visite-nos no site www.iomega.com. Copyright © 2006 Iomega Corporation. All rights reserved. Iomega, the stylized “i” logo, and all Iomega brand blocks are either registered trademarks or trademarks of Iomega Corporation in the United States and/or other countries. Microsoft and Windows are either registered trademarks or trademarks of Microsoft Corporation in the United States and/or other countries. Apple, Macintosh, Mac, and FireWire are either registered trademarks or trademarks of Apple Computer, Inc. in the United States and/or other countries. Certain other product names, brand names, and company names may be trademarks or designations of their respective owners. 31439904 5/09/06 a-
 1
1
-
 2
2
-
 3
3
-
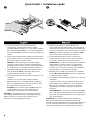 4
4
-
 5
5
-
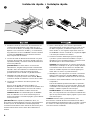 6
6
-
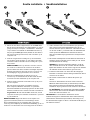 7
7
-
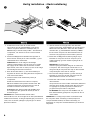 8
8
-
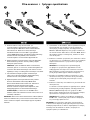 9
9
-
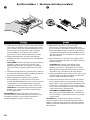 10
10
-
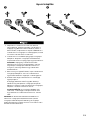 11
11
-
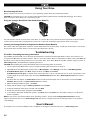 12
12
-
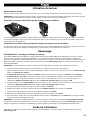 13
13
-
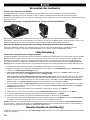 14
14
-
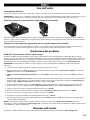 15
15
-
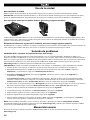 16
16
-
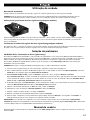 17
17
-
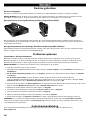 18
18
-
 19
19
-
 20
20


Iomega DESKTOP USB FIREWIRE El manual del propietario
- Categoría
- Discos duros externos
- Tipo
- El manual del propietario
en otros idiomas
- français: Iomega DESKTOP USB FIREWIRE Le manuel du propriétaire
- italiano: Iomega DESKTOP USB FIREWIRE Manuale del proprietario
- English: Iomega DESKTOP USB FIREWIRE Owner's manual
- Deutsch: Iomega DESKTOP USB FIREWIRE Bedienungsanleitung
- Nederlands: Iomega DESKTOP USB FIREWIRE de handleiding
- português: Iomega DESKTOP USB FIREWIRE Manual do proprietário
Artículos relacionados
-
Iomega eGo 34898 Guía de inicio rápido
-
-
Iomega 33948 Guía de inicio rápido
-
-
-
Iomega PORTABLE HARD DRIVE USB El manual del propietario
-
-
-
-
