Windmere JB955G Guía del usuario
- Categoría
- Batidoras
- Tipo
- Guía del usuario
Este manual también es adecuado para

This appliance is for HOUSEHOLD USE ONLY. It may be plugged into any
AC electrical outlet (ordinary household current). Do not use any other type
of outlet.
BEFORE INITIAL USE:
Unpack blender and wash lid, measuring cap, container, gasket, cutting
blade assembly and collar in hot, soapy water before using. Lid/cap and
cutting blade assemblies must be disassembled before washing.
To remove measuring cap from lid: Twist cap until tabs on cap line up with
notches on lid, and disengage cap from lid.
To disassemble cutting blade assembly: Unscrew collar from base, and
cautiously lift out cutting blade assembly. Remove gasket.
IF BLENDER COMES WITH PLASTIC CONTAINER, TURN COLLAR
CLOCKWISE TO DISASSEMBLE FOR CLEANING.
IF BLENDER COMES WITH GLASS CONTAINER, TURN COLLAR
COUNTERCLOCKWISE TO DISASSEMBLE FOR CLEANING.
After washing parts, rinse and dry thoroughly. Wipe the blender base with
a damp cloth or sponge to remove any packaging dust. NEVER IMMERSE
blender base, cord or plug in water or other liquids. Use only gentle liquid
detergents. Do not use harsh detergents or abrasive cleaners on any parts
of the blender.
ASSEMBLY INSTRUCTIONS
1. Place blender base on flat, level surface. DO NOT PLUG IN UNTIL
BLENDER IS COMPLETELY REASSEMBLED.
2. To reassemble blender: Replace gasket on cutting blade assembly and
place assembly inside of collar. Screw the collar securely on the
container, and set assembled container in base. Replace cap in lid and
twist to secure. Place lid on top of container.
HOW TO USE THIS 14-SPEED BLENDER
1. Make sure OFF button is depressed.
2. Plug the cord into any 120-volt 60Hz AC outlet only.
3. Place ingredients into container.
4. Make sure cap is on lid and lid is secure on top of the container.
5. Press button to select the desired function and speed setting.
6. Push the OFF button when processing is finished. Before removing the
lid or the container from the base, wait for cutting blade to stop
rotating. To remove the container from the base, grasp collar and
container handle.
CAUTION: If container rotates during blending, immediately press the OFF
button, then secure by tightening cutting blade assembly on container.
HOW TO USE THIS BLENDER CONTROL PANEL
Push any one of the 7 buttons for up to 14 speed options and functions.
The Low/High/Pulse switch doubles the amount of speeds available.
To ensure precise blending, functions are labeled on each button.
LOW SPEED: Slide the Low/High/Pulse switch to Low. Select the desired
function and depress the corresponding button. Low-speed functions are
labeled on the top line.
HIGH SPEED: Slide the Low/High/Pulse switch to High. Select the desired
function and depress the corresponding button. High-speed functions are
labeled on the bottom line.
PULSE BLENDING: Place thumb on the Low/High/Pulse switch, move
switch toward Pulse setting, and quickly release it for short bursts of
power. Pulse setting is ideal for small quantities or short blending cycles.
For example, use the pulse setting to crumb a variety of dry ingredients:
cookies, crackers, breads. Also ideal for chopping vegetables and nuts,
grating cheese or chocolate.
This blender is not capable of the following functions:
Grinding meat, mashing boiled potatoes, kneading dough, whipping egg
whites stiff, extracting juice from vegetables and fruits.
STIR: Frozen juices, whole eggs, instant puddings, gelatins.
BEAT: Thin batters and sauces.
PUREE: Cooked fruits and vegetables for baby foods, special diet foods.
CREAM: Smooth spreads and dips.
CHOP: Fresh fruits, vegetables, nuts, pickles, hard-cooked eggs,
cooked meats.
MIX: Batters, fillings, sauces, dips, and gravies.
WHIP: Mixed drinks, whipped cream.
MINCE: Onions, garlic, vegetables, nuts and cooked meats.
GRATE: Coconut, citrus peel, hard cheeses, whole spices. Ice (add
liquid first). Add cubes one at a time.
SHRED: Coarsely chopped vegetables.
BLEND: Mayonnaise, nut batters, hollandaise sauce and salad
dressings.
GRIND: Cheese, cooked meats, coffee, split peas, bread, dry cereal,
crackers, cookies and nuts.
FRAPPE: Malts, milk shakes, fitness drinks, and smoothies.
LIQUEFY:Fruits and vegetables in liquid, desserts, and heavy batters.
NOTE: Due to the varieties in amount and consistency of some foods
processed, a higher or lower speed than suggested may occasionally be
preferred.
FOOD PREPARATION SUGGESTIONS
Consult favorite recipes and prepare a variety of culinary delights with
this new blender. Use the blender to create delicious mixed and frozen
beverages. Process on FRAPPE for rich and creamy milk shakes and
fitness drinks. Add flavorful ingredients, fresh or frozen fruits, chocolate
syrup and/or malted powder to a variety of ice creams. Process on
LIQUEFY for a refreshing smoothie -- strawberry, orange, banana, peach
-- or create an exotic drink.
CHOP, MINCE and GRATE ingredients for homemade salsas.
Make dips and salad dressings with the CREAM or BLEND functions.
PUREE fruits and vegetables to make baby food, sauces or soup stock.
GRIND dry ingredients to make tasty crusts or coatings for oven-baked
or fried poultry, meats and fish.
The potential is unlimited!
HELPFUL HINTS
• It only takes seconds to perform a function, not minutes. Stop the
blender after several seconds to check the results. This will help avoid
over-processing.
• Always place lid over container before blending.
• Place liquid ingredients into the blender first, unless recipe instructs
otherwise.
• Extra ingredients may be added while blending by removing cap on
top of lid.
• Shut blender off if blending stops or ingredients stick to the container.
Remove the lid and, with a rubber spatula, push the mixture toward
the blades. Place lid back on top of the container and resume
blending.
• Do not place any utensil in the container - spoon, spatula, knife, etc.-
while blender is in operation.
• To reduce wear on the cutting blade assembly, place solid food
portions in blender 1/2 cup at a time. Raw fruits and vegetables
or cooked meats should be cut in 1" pieces before blending.
• Remove thick mixtures easily through bottom of the container after
removing the cutting blade assembly.
• Do not store food in the container.
• When recipes require different speeds for different blend ingredients,
blend a portion at a time.
• When crushing ice, add only one cube at a time. Blend ice only when
liquid is in the container.
• Always lift container out of base to prevent it from unscrewing from
the blade assembly. Grasp collar and handle to avoid content
spillage.
USER MAINTENANCE INSTRUCTIONS
This appliance requires little maintenance. It contains no user
serviceable parts. Do not try to repair it yourself. Refer it to qualified
personnel if servicing is needed.
NOTE: Do not put parts in an automatic dishwasher, as damage
may occur due to heat and water pressure. However, container may
be placed in dishwasher WITHOUT lid, collar and cutting blade
assembly.
• Always unplug the unit before cleaning.
• To clean the container, disassemble the blender by unscrewing collar
from base and cautiously remove cutting blade assembly from
container.
• Remove cutting blade and gasket from the collar.
• Wash lid, cap, plastic container, gasket, cutting blade and collar in
hot, soapy water. Rinse and dry thoroughly.
• Wipe base with a damp cloth or sponge. NEVER IMMERSE base in
water or any other liquids.
• Re-assemble (see ASSEMBLY INSTRUCTIONS).
• When storing blender, leave lid slightly open to prevent container
odor.
OPERATING INSTRUCTIONS
PRODUCT MAY VARY SLIGHTLY FROM ILLUSTRATIONS
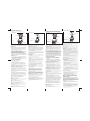
Measuring
Cap
Lid
Container
Cutting Blade
Assembly
Collar
Base
Non-skid
Rubber Feet
Low/High/Pulse
Switch
Control Panel
PRODUCT DIAGRAM
Gasket
Control Panel
Low/High/Pulse
Switch
Base
Collar
Cutting Blade
Assembly
Container
ASSEMBLY DIAGRAM
Este artefacto es para USO DOMESTICO SOLAMENTE y puede ser
enchufado en cualquier tomacorriente de corriente alterna (corriente
ordinaria doméstica). No use ningún otro tipo de tomacorriente eléctrico.
ANTES DE SU USO INICIAL:
Desempaque su licuadora y lave la tapa, la tapa para medir, envase, junta,
las cuchillas y el collar en agua caliente jabonosa antes de usarla. Las
tapas y las cuchillas deben ser desarmadas antes de lavarlas.
Para retirar la tapa de medida de la tapa: Dele vuelta a la tapa hasta que
las lengüetas en la tapa de medida se alineen con las aberturas de la tapa
y retírela.
Para desarmar el ensamblaje de la cuchilla: Desenrosque el collar de la
base y con mucho cuidado levante la cuchilla. Retire la junta.
SI LA LICUADORA VIENE CON ENVASE DE PLASTICO, DELE VUELTA
AL COLLAR HACIA LA DERECHA PARA DESARMARLA Y LAVARLA.
SI LA LICUADORA VIENE CON ENVASE DE VIDRIO, DELE VUELTA AL
COLLAR HACIA LA IZQUIERDA PARA DESARMARLA Y LAVARLA.
Después de lavar todas las partes, enjuague y séquelas completamente.
Limpie la base de la licuadora con un paño o esponja húmeda para
remover el polvo causado al empaquetarlo. NUNCA SUMERJA la base de
la licuadora, cordón o enchufe en el agua u otros líquidos. Use solamente
detergentes líquidos y suaves. No use detergentes ásperos o limpiadores
abrasivos en ninguna parte de la licuadora.
INSTRUCCIONES PARA EL ENSAMBLAJE
1. Coloque la licuadora en una superficie plana. NO ENCHUFE LA
LICUADORA HASTA QUE NO ESTE COMPLETAMENTE
ENSAMBLADA.
2. Para ensamblar la licuadora: Coloque la junta encima de la cuchilla
y coloque éstas en el collar. Enrosque el collar asegurándolo en el
envase y ponga el envase en la base. Coloque la tapa de medida
en la tapa y dele vuelta para asegurarla. Coloque la tapa en el envase.
COMO USAR ESTA LICUADORA DE 14 VELOCIDADES
1. Asegúrese de que el botón APAGADO (OFF) no esté presionado.
2. Enchufe el cordón en cualquier tomacorriente de 120 voltios solamente.
3. Coloque los ingredientes en el envase.
4. Asegúrese de que la tapa para medir esté en la tapa y ésta esté
asegurada en la parte de arriba del envase.
5. Presione el botón para seleccionar la función y velocidad deseada.
6. Empuje el botón APAGADO (OFF) cuando el proceso esté terminado.
Antes de remover la tapa o el envase de la base, espere a que las
cuchillas dejen de rotar. Para retirar el envase de la base agarre la
montura y el mango del envase.
PRECAUCION: Si el envase comienza a rotar durante el funcionamiento,
inmediatamente presione el botón APAGADO (OFF) y asegure ajustando el
ensamblaje de las cuchillas en el envase.
COMO USAR EL PANEL DE CONTROLES DE LA LICUADORA
Presione cualquiera de los 7 botones que tienen 14 velocidades y
funciones opcionales.
El interruptor Bajo/Alto/Impulso al tacto (Low/High/Pulse) dobla la cantidad
de velocidades disponibles.
Para asegurar un licuado preciso, las funciones están indicadas en cada
botón.
Velocidad baja: Deslice el interruptor Alto/Bajo/Impulso al tacto
(Low/High/Pulse) en la posición Bajo (Low). Seleccione la función deseada
y oprima el botón correspondiente. Las funciones de velocidad baja están
nombradas en la línea de la parte de arriba.
Velocidad alta: Encienda el interruptor Bajo/Alto/Impulso al tacto
(Low/High/Pulse) a la posición Alto. Seleccione la función deseada y
oprima el botón correspondiente. Las funciones de velocidad Alta están
nombradas en la línea de la parte de abajo.
Licuar con impulso: Coloque su pulgar en el interruptor Bajo/Alto/Impulso
al tacto (Low/High/Pulse), mueva el interruptor hacia la posición Impulso al
tacto (Pulse) y rápidamente suelte el correspondiente botón para cortos
impulsos con fuerza. La posición Impulso al tacto (Pulse) es ideal para
cantidades pequeñas o ciclos cortos de licuados. Por ejemplo, use
impulso al tacto para desmenuzar una variedad de ingredientes secos:
galletas, pan. Es también ideal para triturar vegetales y nueces, para
quesos o chocolate.
La licuadora no está capacitada para las siguientes funciones:
Moler carne, amasar papas hervidas, amasar la masa, batir las claras de
huevo a punto de nieve, extraer jugo de los vegetales y frutas.
STIR: Bate jugos congelados, huevos enteros, pudín instantáneo,
gelatinas.
BEAT: Bate masas suaves y salsas.
PUREE: Frutas y vegetales cocidos para comidas de bebés, dietas
especiales.
CREAM: Suaviza ciertas cremas.
CHOP: Tritura frutas frescas, vegetales, nueces, pepinillos, huevos
cocidos duros, carnes cocidas.
MIX: Mezcla cremas, rellenos, salsas.
WHIP: Une bebidas, bate cremas.
MINCE: Desmenuza cebollas, ajos, vegetales, nueces y carnes cocidas.
GRATE: Corta coco, cáscaras de los cítricos, quesos duros, especies
enteras. Hielo (añada líquido primero). Añada los cubos uno
a la vez.
SHRED: Tritura los vegetales más gruesos.
BLEND: Bate mayonesa, masas de nueces, salsa holandesa y aliños.
GRIND: Muele quesos, carnes cocidas, café, arvejas, pan, cereal seco,
galletas y nueces.
FRAPPE: Escarcha bebidas malteadas, batidos de leche y bebidas
dietéticas.
LIQUEFY:Licua frutas y vegetales, postres y masas espesas.
NOTA: Debido a la variedad en cantidades y consistencia de algunos
alimentos procesados, una velocidad más alta o más baja que la sugerida
pudiera ocasionalmente ser preferida.
SUGERENCIAS PARA LA PREPARACION DE LOS ALIMENTOS:
Consulte recetas favoritas y prepare una variedad de delicias culinarias
con su nueva licuadora. Use su licuadora para crear deliciosas mezclas
de bebidas congeladas. Prepare en FRAPPE batidos de leche más
cremosos lo mismo las bebidas para las dietas. Añada ingredientes de
mucho sabor, frutas frescas o congeladas, miel de chocolate y/o cebada
en polvo, a una variedad de helados.
Prepare en LIQUEFY refrescos suaves-- fresas, naranja, plátano, durazno-
- o cree una bebida exótica.
Use CHOP, MINCE y GRATE para hacer salsas caseras.
Haga sus propias salsas y aliños con las funciones CREAM o BLEND.
PUREE para las frutas y vegetales para preparar sus propias comidas
para bebés, salsas o sopas.
GRIND (muela) ingredientes secos para las cortezas de los pasteles o
baños para comidas horneadas o pollo frito, carnes y pescado.
¡Una cantidad ilimitada de ideas está a su alcance!
SUGERENCIAS UTILES
• Solo toma unos segundos ejecutar una función, no minutos. Pare la
licuadora después de varios segundos para examinar los resultados.
Esto le ayudara a evitar a un sobre-procesamiento.
• Siempre coloque la tapa en el envase antes de comenzar a licuar.
• Coloque primero los ingredientes líquidos en la licuadora, a no ser que
la recete recomiende lo contrario.
• Ingredientes extras pueden ser añadidos mientras se esté licuando,
removiendo la tapa para medir.
• Apague la licuadora si ésta se para o los ingredientes se pegan al
envase. Retire la tapa y con una espátula de goma, empuje la mezcla
hacia las cuchillas. Coloque nuevamente la tapa en el envase y siga
licuando.
• No coloque ningún utensilio en el envase -- cuchara, espátula, cuchillo,
etc. -- mientras la licuadora esté funcionando.
• Para reducir el desgaste del ensamblaje de las cuchillas, coloque las
porciones de alimentos sólidos en la licuadora, 1/2 taza a la vez. Frutas
o vegetales crudos o carnes cocidas deberán ser cortadas en trozos
de 1" antes de licuarlas.
• Retire las mezclas espesas fácilmente por la base del envase después
de haber sacado las cuchillas.
• No guarde los alimentos en el envase.
• Cuando las recetas requieran diferentes velocidades para los diferentes
licuados de ingredientes, licúe una porción a la vez.
• Cuando esté triturando hielo, añada un cubo a la vez. Licúe el hielo
solamente cuando haya líquido en el envase.
• Siempre levante el envase de la base para prevenir que éste se
desenrosque del ensamblaje de las cuchillas. Sujete el collar y el
mango para prevenir que el contenido se derrame.
INSTRUCCIONES DE MANTENIMIENTO
PARA EL USUARIO
Este artefacto requiere poco mantenimiento. No contiene piezas que
puedan ser reparadas por el usuario. No trate de repararlo usted mismo.
Remítalo a personas calificadas si necesita reparación.
NOTA: No ponga las partes en la lavadora automática de lavaplatos,
ya que el calor y presión de agua podría dañarlas. Sin embargo, éste
puede ser lavado en la lavadora de platos, pero SIN la tapa, collar ni
la cuchilla.
• Siempre desenchufe la unidad antes de limpiarla.
• Para limpiar el envase, desarme la licuadora desenroscando el collar de
la base y cuidadosamente retire el ensamblaje de las cuchillas
del envase.
• Retire las cuchillas y junta del collar.
• Lave la tapa, tapa para medir, envase plástico, junta, cuchillas y collar
en agua caliente jabonosa. Enjuague y seque completamente.
• Limpie la base con un paño o esponja húmeda. NUNCA SUMERJA la
base en agua ni ningún otros líquidos.
• Re-ensamblaje (vea INSTRUCCIONES PARA EL ENSAMBLAJE).
• Cuando guarde la licuadora, deje la tapa ligeramente abierta para
prevenir el mal olor en el envase.
DIAGRAMA DEL
PRODUCTO
DIAGRAMA DEL ENSAMBLAJE
Junta
Panel de control
Interruptor
Bajo/Alto/Impulso al
tacto (Low/High/Pulse)
Base
Collar
Ensamblaje de las
cuchillas
Envase
Tapa para medir
Tapa
Envase
Ensamblaje de
las cuchillas
Collar
Base
Pies de goma
antideslizantes
Interruptor
Bajo/Alto/Impulso al
tacto (Low/High/Pulse)
Panel de control
INSTRUCCIONES DE FUNCIONAMIENTO
ESTE PRODUCTO PUEDE VARIAR LIGERAMENTE DE LAS ILUSTRACIONES

14-SPEED BLENDER
LICUADORA DE 14 VELOCIDADES
USE AND CARE BOOK
MANUAL DE USO
Y MANTENIMIENTO
HOUSEHOLD USE ONLY
PARA USO DOMESTICO
SOLAMENTE
Printed in/Impreso en Hong Kong
R198/7-7-11E/S JB-955G (UL/SPE)
ONE YEAR LIMITED WARRANTY
Within one year of purchase, we will replace this appliance free if defective
in material or workmanship. For replacement, return appliance with
evidence of purchase. This warranty is void if appliance has been dropped,
abused, altered, misused or tampered with in any way.
SAVE THIS FOR YOUR RECORDS
GARANTIA LIMITADA POR UN AÑO
Dentro de un año de garantía, nosotros le reemplazaremos este artefacto
sin costo alguno por defectos en material o manufactura. Para reemplazo,
envíe el artefacto con evidencia de compra. Esta garantía es nula si el
artefacto se ha caído, abusado, alterado o mal usado en cualquier forma.
GUARDE PARA REFERENCIA
POLARIZED PLUG
This appliance has a polarized plug (one blade is wider than the other). As a
safety feature, this plug fits in a polarized outlet only one way. If the plug
does not fit into the outlet, reverse the plug and try again. If it still does not
fit, contact a qualified electrician. Do not attempt to defeat this safety
feature.
An extension cord may be used with care; however, the marked electrical
rating shall be at least as great as the electrical rating of this appliance.
The extension cord should not be allowed to drape over the tabletop where
it can be pulled on by children or tripped over.
LINE CORD SAFETY TIPS
1. Never pull or yank on the cord or the appliance.
2. To insert plug, grasp it firmly and guide it into outlet.
3. To disconnect appliance, grasp plug and remove it from outlet.
4. Before each use, inspect the line cord for cuts and/or abrasion
marks. If any are found, this indicates that the appliance should be
serviced and the line cord replaced. Please return it to our Service
Department or to an authorized service representative.
5. Never wrap the cord tightly around the appliance, as this could
place undue stress on the cord where it enters the appliance and
cause it to fray and break.
DO NOT OPERATE APPLIANCE IF THE LINE CORD SHOWS ANY
DAMAGE, OR IF APPLIANCE WORKS INTERMITTENTLY OR STOPS
WORKING ENTIRELY.
IMPORTANT SAFETY
INSTRUCTIONS
When using electrical appliances, basic safety precautions should always
be followed, including the following:
1. READ ALL INSTRUCTIONS.
2. To protect against risk of electrical shock, do not put motor
end of the appliance in water or other liquid.
3. This appliance should not be used by children, and care should be
taken when used near children.
4. Unplug from outlet when not in use, before putting on or taking off
parts, and before cleaning.
5. Avoid contacting moving parts.
6. Do not operate any appliance with a damaged cord or plug or after
the appliance malfunctions or is dropped or damaged in any manner.
Return appliance to the nearest authorized service facility for
examination, repair or electrical or mechanical adjustment.
7. The use of attachments, including canning jars, not recommended
by the manufacturer may cause a risk of injury to persons.
8. Do not use outdoors.
9. Do not let cord hang over edge of table or counter.
10. Keep hands and utensils out of container while blending to reduce the
risk of severe injury to persons or damage to the blender. A scraper
may be used but must be used only when the blender is not running.
11. Blades are sharp. Handle carefully.
12. To reduce the risk of injury, never place cutter assembly blades on
base without container properly attached.
13. Always operate blender with cover in place.
14. When blending hot liquids, remove center piece of two-piece cover.
SAVE THESE
INSTRUCTIONS
INSTRUCCIONES
IMPORTANTES DE
SEGURIDAD
Cuando esté usando aparatos eléctricos, debe seguir siempre medidas
básicas de seguridad, incluyendo las siguientes::
1. LEA TODAS LAS INSTRUCCIONES.
2. Para protegerse contra peligros eléctricos, no ponga la parte de abajo
del motor del artefacto en agua u otro líquido.
3. Este artefacto no debe ser usado por niños y se debe tener cuidado
cuando se use cerca de los niños.
4. Desenchúfelo cuando no lo esté usando, antes de poner o sacar
alguna parte y antes de limpiarlo.
5. Evite el contacto con las piezas movibles.
6. No opere este artefacto si tiene el cordón o enchufe dañado,
después de un mal funcionamiento o si se ha caído o dañado de
alguna manera. Devuelva su unidad a un lugar autorizado más
cercano para su revisión, reparación o ajuste eléctrico o mecánico.
7. El uso de aditamentos, incluyendo los frascos para almacenar,
no recomendados por el fabricante pueden causar lesiones
a las personas.
8. No lo use fuera de la casa.
9. No deje el cordón colgando de la mesa o del mostrador.
10. Mantenga las manos y utensilios fuera del recipiente mientras esté
licuando para prevenir la posibilidad de severas lesiones personales
o daño a la licuadora. Una espátula puede ser usada, pero debe
usarse solamente cuando la licuadora no esté funcionando.
11. Las hojas son filudas; manéjelas cuidadosamente.
12. Para reducir el riesgo de lesiones, nunca coloque el ensamblaje de las
cuchillas en la base sin el envase propiamente colocado.
13. Haga funcionar siempre la licuadora con la tapa en su lugar.
14. Cuando mezcle líquidos calientes, retire la pieza del centro de la tapa
de dos piezas.
CONSERVE ESTAS
INSTRUCCIONES
ENCHUFE POLARIZADO
Este artefacto tiene un enchufe polarizado (una hoja es más ancha que la
otra). Como medida de seguridad, este enchufe sólo debe usarse en un
tomacorriente polarizado en un solo sentido. Si no entrara en el
tomacorriente, invierta el enchufe y trate nuevamente. Si aún así no entrara,
busque la ayuda de un electricista calificado. No intente anular este
distintivo de seguridad.
Un cordón de extensión puede ser usado con cuidado; sin embargo la
graduación eléctrica deberá ser por lo menos de la misma graduación
eléctrica de este artefacto. La extensión no se deberá dejar que cuelgue de
la mesa, donde pueda ser jalada por un niño o tropezarse.
SUGERENCIAS PARA SEGURIDAD CON EL CORDON
1. Nunca hale o tire del cordón o del artefacto.
2. Para introducir el enchufe, sujételo firmemente y guíelo hacia
el tomacorriente.
3. Para desconectar el artefacto, sujete el enchufe y retírelo del
tomacorriente.
4. Antes de cada uso, inspeccione el cordón si tiene cortes y/o
raspaduras. Si algo fuera encontrado, esto indica que el artefacto
deberá ser revisado y el cordón deberá ser reemplazado. Por favor,
devuélvalo a nuestro Departamento de Servicio o a un
representante de servicio autorizado.
5. Nunca enrolle el cordón ajustadamente alrededor del artefacto, ya
que esto podría causar una presión excesiva en el cordón donde
éste entra al artefacto y causar desgaste y rotura.
NO HAGA FUNCIONAR EL ARTEFACTO SI EL CORDON MUESTRA
CUALQUIER DAÑO, O SI EL ARTEFACTO FUNCIONA
INTERMITENTEMENTE O DEJA DE FUNCIONAR COMPLETAMENTE.
Transcripción de documentos
OPERATING INSTRUCTIONS INSTRUCCIONES DE FUNCIONAMIENTO PRODUCT MAY VARY SLIGHTLY FROM ILLUSTRATIONS PRODUCT DIAGRAM Lid DIAGRAMA DEL ENSAMBLAJE Envase ESTE PRODUCTO PUEDE VARIAR LIGERAMENTE DE LAS ILUSTRACIONES Measuring Cap ASSEMBLY DIAGRAM Container Cutting Blade Assembly Cutting Blade Assembly Tapa Tapa para medir Junta Ensamblaje de las cuchillas Gasket Container DIAGRAMA DEL PRODUCTO Envase Collar Ensamblaje de las cuchillas Collar Base Panel de control Collar Control Panel Control Panel Panel de control Base Low/High/Pulse Switch Low/High/Pulse Switch Non-skid Rubber Feet This appliance is for HOUSEHOLD USE ONLY. It may be plugged into any AC electrical outlet (ordinary household current). Do not use any other type of outlet. BEFORE INITIAL USE: Unpack blender and wash lid, measuring cap, container, gasket, cutting blade assembly and collar in hot, soapy water before using. Lid/cap and cutting blade assemblies must be disassembled before washing. To remove measuring cap from lid: Twist cap until tabs on cap line up with notches on lid, and disengage cap from lid. To disassemble cutting blade assembly: Unscrew collar from base, and cautiously lift out cutting blade assembly. Remove gasket. IF BLENDER COMES WITH PLASTIC CONTAINER, TURN COLLAR CLOCKWISE TO DISASSEMBLE FOR CLEANING. IF BLENDER COMES WITH GLASS CONTAINER, TURN COLLAR COUNTERCLOCKWISE TO DISASSEMBLE FOR CLEANING. After washing parts, rinse and dry thoroughly. Wipe the blender base with a damp cloth or sponge to remove any packaging dust. NEVER IMMERSE blender base, cord or plug in water or other liquids. Use only gentle liquid detergents. Do not use harsh detergents or abrasive cleaners on any parts of the blender. ASSEMBLY INSTRUCTIONS 1. Place blender base on flat, level surface. DO NOT PLUG IN UNTIL BLENDER IS COMPLETELY REASSEMBLED. 2. To reassemble blender: Replace gasket on cutting blade assembly and place assembly inside of collar. Screw the collar securely on the container, and set assembled container in base. Replace cap in lid and twist to secure. Place lid on top of container. HOW TO USE THIS 14-SPEED BLENDER 1. Make sure OFF button is depressed. 2. Plug the cord into any 120-volt 60Hz AC outlet only. 3. Place ingredients into container. 4. Make sure cap is on lid and lid is secure on top of the container. 5. Press button to select the desired function and speed setting. 6. Push the OFF button when processing is finished. Before removing the lid or the container from the base, wait for cutting blade to stop rotating. To remove the container from the base, grasp collar and container handle. CAUTION: If container rotates during blending, immediately press the OFF button, then secure by tightening cutting blade assembly on container. HOW TO USE THIS BLENDER CONTROL PANEL Push any one of the 7 buttons for up to 14 speed options and functions. The Low/High/Pulse switch doubles the amount of speeds available. To ensure precise blending, functions are labeled on each button. LOW SPEED: Slide the Low/High/Pulse switch to Low. Select the desired function and depress the corresponding button. Low-speed functions are labeled on the top line. HIGH SPEED: Slide the Low/High/Pulse switch to High. Select the desired function and depress the corresponding button. High-speed functions are labeled on the bottom line. PULSE BLENDING: Place thumb on the Low/High/Pulse switch, move switch toward Pulse setting, and quickly release it for short bursts of power. Pulse setting is ideal for small quantities or short blending cycles. For example, use the pulse setting to crumb a variety of dry ingredients: cookies, crackers, breads. Also ideal for chopping vegetables and nuts, grating cheese or chocolate. This blender is not capable of the following functions: Grinding meat, mashing boiled potatoes, kneading dough, whipping egg whites stiff, extracting juice from vegetables and fruits. STIR: Frozen juices, whole eggs, instant puddings, gelatins. BEAT: Thin batters and sauces. PUREE: Cooked fruits and vegetables for baby foods, special diet foods. CREAM: Smooth spreads and dips. CHOP: Fresh fruits, vegetables, nuts, pickles, hard-cooked eggs, cooked meats. MIX: Batters, fillings, sauces, dips, and gravies. WHIP: Mixed drinks, whipped cream. MINCE: Onions, garlic, vegetables, nuts and cooked meats. GRATE: Coconut, citrus peel, hard cheeses, whole spices. Ice (add liquid first). Add cubes one at a time. SHRED: Coarsely chopped vegetables. BLEND: Mayonnaise, nut batters, hollandaise sauce and salad dressings. GRIND: Cheese, cooked meats, coffee, split peas, bread, dry cereal, crackers, cookies and nuts. FRAPPE: Malts, milk shakes, fitness drinks, and smoothies. LIQUEFY: Fruits and vegetables in liquid, desserts, and heavy batters. Collar Base NOTE: Due to the varieties in amount and consistency of some foods processed, a higher or lower speed than suggested may occasionally be preferred. FOOD PREPARATION SUGGESTIONS Consult favorite recipes and prepare a variety of culinary delights with this new blender. Use the blender to create delicious mixed and frozen beverages. Process on FRAPPE for rich and creamy milk shakes and fitness drinks. Add flavorful ingredients, fresh or frozen fruits, chocolate syrup and/or malted powder to a variety of ice creams. Process on LIQUEFY for a refreshing smoothie -- strawberry, orange, banana, peach -- or create an exotic drink. CHOP, MINCE and GRATE ingredients for homemade salsas. Make dips and salad dressings with the CREAM or BLEND functions. PUREE fruits and vegetables to make baby food, sauces or soup stock. GRIND dry ingredients to make tasty crusts or coatings for oven-baked or fried poultry, meats and fish. The potential is unlimited! HELPFUL HINTS • It only takes seconds to perform a function, not minutes. Stop the blender after several seconds to check the results. This will help avoid over-processing. • Always place lid over container before blending. • Place liquid ingredients into the blender first, unless recipe instructs otherwise. • Extra ingredients may be added while blending by removing cap on top of lid. • Shut blender off if blending stops or ingredients stick to the container. Remove the lid and, with a rubber spatula, push the mixture toward the blades. Place lid back on top of the container and resume blending. • Do not place any utensil in the container - spoon, spatula, knife, etc.while blender is in operation. • To reduce wear on the cutting blade assembly, place solid food portions in blender 1/2 cup at a time. Raw fruits and vegetables or cooked meats should be cut in 1" pieces before blending. • Remove thick mixtures easily through bottom of the container after removing the cutting blade assembly. • Do not store food in the container. • When recipes require different speeds for different blend ingredients, blend a portion at a time. • When crushing ice, add only one cube at a time. Blend ice only when liquid is in the container. • Always lift container out of base to prevent it from unscrewing from the blade assembly. Grasp collar and handle to avoid content spillage. USER MAINTENANCE INSTRUCTIONS This appliance requires little maintenance. It contains no user serviceable parts. Do not try to repair it yourself. Refer it to qualified personnel if servicing is needed. NOTE: Do not put parts in an automatic dishwasher, as damage may occur due to heat and water pressure. However, container may be placed in dishwasher WITHOUT lid, collar and cutting blade assembly. • Always unplug the unit before cleaning. • To clean the container, disassemble the blender by unscrewing collar from base and cautiously remove cutting blade assembly from container. • Remove cutting blade and gasket from the collar. • Wash lid, cap, plastic container, gasket, cutting blade and collar in hot, soapy water. Rinse and dry thoroughly. • Wipe base with a damp cloth or sponge. NEVER IMMERSE base in water or any other liquids. • Re-assemble (see ASSEMBLY INSTRUCTIONS). • When storing blender, leave lid slightly open to prevent container odor. Interruptor Bajo/Alto/Impulso al tacto (Low/High/Pulse) Base Pies de goma antideslizantes Este artefacto es para USO DOMESTICO SOLAMENTE y puede ser enchufado en cualquier tomacorriente de corriente alterna (corriente ordinaria doméstica). No use ningún otro tipo de tomacorriente eléctrico. ANTES DE SU USO INICIAL: Desempaque su licuadora y lave la tapa, la tapa para medir, envase, junta, las cuchillas y el collar en agua caliente jabonosa antes de usarla. Las tapas y las cuchillas deben ser desarmadas antes de lavarlas. Para retirar la tapa de medida de la tapa: Dele vuelta a la tapa hasta que las lengüetas en la tapa de medida se alineen con las aberturas de la tapa y retírela. Para desarmar el ensamblaje de la cuchilla: Desenrosque el collar de la base y con mucho cuidado levante la cuchilla. Retire la junta. SI LA LICUADORA VIENE CON ENVASE DE PLASTICO, DELE VUELTA AL COLLAR HACIA LA DERECHA PARA DESARMARLA Y LAVARLA. SI LA LICUADORA VIENE CON ENVASE DE VIDRIO, DELE VUELTA AL COLLAR HACIA LA IZQUIERDA PARA DESARMARLA Y LAVARLA. Después de lavar todas las partes, enjuague y séquelas completamente. Limpie la base de la licuadora con un paño o esponja húmeda para remover el polvo causado al empaquetarlo. NUNCA SUMERJA la base de la licuadora, cordón o enchufe en el agua u otros líquidos. Use solamente detergentes líquidos y suaves. No use detergentes ásperos o limpiadores abrasivos en ninguna parte de la licuadora. INSTRUCCIONES PARA EL ENSAMBLAJE 1. Coloque la licuadora en una superficie plana. NO ENCHUFE LA LICUADORA HASTA QUE NO ESTE COMPLETAMENTE ENSAMBLADA. 2. Para ensamblar la licuadora: Coloque la junta encima de la cuchilla y coloque éstas en el collar. Enrosque el collar asegurándolo en el envase y ponga el envase en la base. Coloque la tapa de medida en la tapa y dele vuelta para asegurarla. Coloque la tapa en el envase. COMO USAR ESTA LICUADORA DE 14 VELOCIDADES 1. Asegúrese de que el botón APAGADO (OFF) no esté presionado. 2. Enchufe el cordón en cualquier tomacorriente de 120 voltios solamente. 3. Coloque los ingredientes en el envase. 4. Asegúrese de que la tapa para medir esté en la tapa y ésta esté asegurada en la parte de arriba del envase. 5. Presione el botón para seleccionar la función y velocidad deseada. 6. Empuje el botón APAGADO (OFF) cuando el proceso esté terminado. Antes de remover la tapa o el envase de la base, espere a que las cuchillas dejen de rotar. Para retirar el envase de la base agarre la montura y el mango del envase. PRECAUCION: Si el envase comienza a rotar durante el funcionamiento, inmediatamente presione el botón APAGADO (OFF) y asegure ajustando el ensamblaje de las cuchillas en el envase. COMO USAR EL PANEL DE CONTROLES DE LA LICUADORA Presione cualquiera de los 7 botones que tienen 14 velocidades y funciones opcionales. El interruptor Bajo/Alto/Impulso al tacto (Low/High/Pulse) dobla la cantidad de velocidades disponibles. Para asegurar un licuado preciso, las funciones están indicadas en cada botón. Velocidad baja: Deslice el interruptor Alto/Bajo/Impulso al tacto (Low/High/Pulse) en la posición Bajo (Low). Seleccione la función deseada y oprima el botón correspondiente. Las funciones de velocidad baja están nombradas en la línea de la parte de arriba. Velocidad alta: Encienda el interruptor Bajo/Alto/Impulso al tacto (Low/High/Pulse) a la posición Alto. Seleccione la función deseada y oprima el botón correspondiente. Las funciones de velocidad Alta están nombradas en la línea de la parte de abajo. Licuar con impulso: Coloque su pulgar en el interruptor Bajo/Alto/Impulso al tacto (Low/High/Pulse), mueva el interruptor hacia la posición Impulso al tacto (Pulse) y rápidamente suelte el correspondiente botón para cortos impulsos con fuerza. La posición Impulso al tacto (Pulse) es ideal para cantidades pequeñas o ciclos cortos de licuados. Por ejemplo, use impulso al tacto para desmenuzar una variedad de ingredientes secos: galletas, pan. Es también ideal para triturar vegetales y nueces, para quesos o chocolate. La licuadora no está capacitada para las siguientes funciones: Moler carne, amasar papas hervidas, amasar la masa, batir las claras de huevo a punto de nieve, extraer jugo de los vegetales y frutas. STIR: Bate jugos congelados, huevos enteros, pudín instantáneo, gelatinas. BEAT: Bate masas suaves y salsas. PUREE: Frutas y vegetales cocidos para comidas de bebés, dietas especiales. CREAM: Suaviza ciertas cremas. CHOP: Tritura frutas frescas, vegetales, nueces, pepinillos, huevos cocidos duros, carnes cocidas. Interruptor Bajo/Alto/Impulso al tacto (Low/High/Pulse) MIX: WHIP: MINCE: GRATE: Mezcla cremas, rellenos, salsas. Une bebidas, bate cremas. Desmenuza cebollas, ajos, vegetales, nueces y carnes cocidas. Corta coco, cáscaras de los cítricos, quesos duros, especies enteras. Hielo (añada líquido primero). Añada los cubos uno a la vez. SHRED: Tritura los vegetales más gruesos. BLEND: Bate mayonesa, masas de nueces, salsa holandesa y aliños. GRIND: Muele quesos, carnes cocidas, café, arvejas, pan, cereal seco, galletas y nueces. FRAPPE: Escarcha bebidas malteadas, batidos de leche y bebidas dietéticas. LIQUEFY: Licua frutas y vegetales, postres y masas espesas. NOTA: Debido a la variedad en cantidades y consistencia de algunos alimentos procesados, una velocidad más alta o más baja que la sugerida pudiera ocasionalmente ser preferida. SUGERENCIAS PARA LA PREPARACION DE LOS ALIMENTOS: Consulte recetas favoritas y prepare una variedad de delicias culinarias con su nueva licuadora. Use su licuadora para crear deliciosas mezclas de bebidas congeladas. Prepare en FRAPPE batidos de leche más cremosos lo mismo las bebidas para las dietas. Añada ingredientes de mucho sabor, frutas frescas o congeladas, miel de chocolate y/o cebada en polvo, a una variedad de helados. Prepare en LIQUEFY refrescos suaves-- fresas, naranja, plátano, durazno- o cree una bebida exótica. Use CHOP, MINCE y GRATE para hacer salsas caseras. Haga sus propias salsas y aliños con las funciones CREAM o BLEND. PUREE para las frutas y vegetales para preparar sus propias comidas para bebés, salsas o sopas. GRIND (muela) ingredientes secos para las cortezas de los pasteles o baños para comidas horneadas o pollo frito, carnes y pescado. ¡Una cantidad ilimitada de ideas está a su alcance! SUGERENCIAS UTILES • Solo toma unos segundos ejecutar una función, no minutos. Pare la licuadora después de varios segundos para examinar los resultados. Esto le ayudara a evitar a un sobre-procesamiento. • Siempre coloque la tapa en el envase antes de comenzar a licuar. • Coloque primero los ingredientes líquidos en la licuadora, a no ser que la recete recomiende lo contrario. • Ingredientes extras pueden ser añadidos mientras se esté licuando, removiendo la tapa para medir. • Apague la licuadora si ésta se para o los ingredientes se pegan al envase. Retire la tapa y con una espátula de goma, empuje la mezcla hacia las cuchillas. Coloque nuevamente la tapa en el envase y siga licuando. • No coloque ningún utensilio en el envase -- cuchara, espátula, cuchillo, etc. -- mientras la licuadora esté funcionando. • Para reducir el desgaste del ensamblaje de las cuchillas, coloque las porciones de alimentos sólidos en la licuadora, 1/2 taza a la vez. Frutas o vegetales crudos o carnes cocidas deberán ser cortadas en trozos de 1" antes de licuarlas. • Retire las mezclas espesas fácilmente por la base del envase después de haber sacado las cuchillas. • No guarde los alimentos en el envase. • Cuando las recetas requieran diferentes velocidades para los diferentes licuados de ingredientes, licúe una porción a la vez. • Cuando esté triturando hielo, añada un cubo a la vez. Licúe el hielo solamente cuando haya líquido en el envase. • Siempre levante el envase de la base para prevenir que éste se desenrosque del ensamblaje de las cuchillas. Sujete el collar y el mango para prevenir que el contenido se derrame. INSTRUCCIONES DE MANTENIMIENTO PARA EL USUARIO Este artefacto requiere poco mantenimiento. No contiene piezas que puedan ser reparadas por el usuario. No trate de repararlo usted mismo. Remítalo a personas calificadas si necesita reparación. NOTA: No ponga las partes en la lavadora automática de lavaplatos, ya que el calor y presión de agua podría dañarlas. Sin embargo, éste puede ser lavado en la lavadora de platos, pero SIN la tapa, collar ni la cuchilla. • Siempre desenchufe la unidad antes de limpiarla. • Para limpiar el envase, desarme la licuadora desenroscando el collar de la base y cuidadosamente retire el ensamblaje de las cuchillas del envase. • Retire las cuchillas y junta del collar. • Lave la tapa, tapa para medir, envase plástico, junta, cuchillas y collar en agua caliente jabonosa. Enjuague y seque completamente. • Limpie la base con un paño o esponja húmeda. NUNCA SUMERJA la base en agua ni ningún otros líquidos. • Re-ensamblaje (vea INSTRUCCIONES PARA EL ENSAMBLAJE). • Cuando guarde la licuadora, deje la tapa ligeramente abierta para prevenir el mal olor en el envase. INSTRUCCIONES IMPORTANTES DE SEGURIDAD Cuando esté usando aparatos eléctricos, debe seguir siempre medidas básicas de seguridad, incluyendo las siguientes:: 1. LEA TODAS LAS INSTRUCCIONES. 2. Para protegerse contra peligros eléctricos, no ponga la parte de abajo del motor del artefacto en agua u otro líquido. 3. Este artefacto no debe ser usado por niños y se debe tener cuidado cuando se use cerca de los niños. 4. Desenchúfelo cuando no lo esté usando, antes de poner o sacar alguna parte y antes de limpiarlo. 5. Evite el contacto con las piezas movibles. 6. No opere este artefacto si tiene el cordón o enchufe dañado, después de un mal funcionamiento o si se ha caído o dañado de alguna manera. Devuelva su unidad a un lugar autorizado más cercano para su revisión, reparación o ajuste eléctrico o mecánico. 7. El uso de aditamentos, incluyendo los frascos para almacenar, no recomendados por el fabricante pueden causar lesiones a las personas. 8. No lo use fuera de la casa. 9. No deje el cordón colgando de la mesa o del mostrador. 10. Mantenga las manos y utensilios fuera del recipiente mientras esté licuando para prevenir la posibilidad de severas lesiones personales o daño a la licuadora. Una espátula puede ser usada, pero debe usarse solamente cuando la licuadora no esté funcionando. 11. Las hojas son filudas; manéjelas cuidadosamente. 12. Para reducir el riesgo de lesiones, nunca coloque el ensamblaje de las cuchillas en la base sin el envase propiamente colocado. 13. Haga funcionar siempre la licuadora con la tapa en su lugar. 14. Cuando mezcle líquidos calientes, retire la pieza del centro de la tapa de dos piezas. ENCHUFE POLARIZADO Este artefacto tiene un enchufe polarizado (una hoja es más ancha que la otra). Como medida de seguridad, este enchufe sólo debe usarse en un tomacorriente polarizado en un solo sentido. Si no entrara en el tomacorriente, invierta el enchufe y trate nuevamente. Si aún así no entrara, busque la ayuda de un electricista calificado. No intente anular este distintivo de seguridad. Un cordón de extensión puede ser usado con cuidado; sin embargo la graduación eléctrica deberá ser por lo menos de la misma graduación eléctrica de este artefacto. La extensión no se deberá dejar que cuelgue de la mesa, donde pueda ser jalada por un niño o tropezarse. SUGERENCIAS PARA SEGURIDAD CON EL CORDON 1. Nunca hale o tire del cordón o del artefacto. 2. Para introducir el enchufe, sujételo firmemente y guíelo hacia el tomacorriente. 3. Para desconectar el artefacto, sujete el enchufe y retírelo del tomacorriente. 4. Antes de cada uso, inspeccione el cordón si tiene cortes y/o raspaduras. Si algo fuera encontrado, esto indica que el artefacto deberá ser revisado y el cordón deberá ser reemplazado. Por favor, devuélvalo a nuestro Departamento de Servicio o a un representante de servicio autorizado. 5. Nunca enrolle el cordón ajustadamente alrededor del artefacto, ya que esto podría causar una presión excesiva en el cordón donde éste entra al artefacto y causar desgaste y rotura. NO HAGA FUNCIONAR EL ARTEFACTO SI EL CORDON MUESTRA CUALQUIER DAÑO, O SI EL ARTEFACTO FUNCIONA INTERMITENTEMENTE O DEJA DE FUNCIONAR COMPLETAMENTE. IMPORTANT SAFETY INSTRUCTIONS POLARIZED PLUG When using electrical appliances, basic safety precautions should always be followed, including the following: 1. READ ALL INSTRUCTIONS. 2. To protect against risk of electrical shock, do not put motor end of the appliance in water or other liquid. 3. This appliance should not be used by children, and care should be taken when used near children. 4. Unplug from outlet when not in use, before putting on or taking off parts, and before cleaning. 5. Avoid contacting moving parts. 6. Do not operate any appliance with a damaged cord or plug or after the appliance malfunctions or is dropped or damaged in any manner. Return appliance to the nearest authorized service facility for examination, repair or electrical or mechanical adjustment. 7. The use of attachments, including canning jars, not recommended by the manufacturer may cause a risk of injury to persons. 8. Do not use outdoors. 9. Do not let cord hang over edge of table or counter. 10. Keep hands and utensils out of container while blending to reduce the risk of severe injury to persons or damage to the blender. A scraper may be used but must be used only when the blender is not running. 11. Blades are sharp. Handle carefully. 12. To reduce the risk of injury, never place cutter assembly blades on base without container properly attached. 13. Always operate blender with cover in place. 14. When blending hot liquids, remove center piece of two-piece cover. This appliance has a polarized plug (one blade is wider than the other). As a safety feature, this plug fits in a polarized outlet only one way. If the plug does not fit into the outlet, reverse the plug and try again. If it still does not fit, contact a qualified electrician. Do not attempt to defeat this safety feature. An extension cord may be used with care; however, the marked electrical rating shall be at least as great as the electrical rating of this appliance. The extension cord should not be allowed to drape over the tabletop where it can be pulled on by children or tripped over. LINE CORD SAFETY TIPS 1. Never pull or yank on the cord or the appliance. 2. To insert plug, grasp it firmly and guide it into outlet. 3. To disconnect appliance, grasp plug and remove it from outlet. 4. Before each use, inspect the line cord for cuts and/or abrasion marks. If any are found, this indicates that the appliance should be serviced and the line cord replaced. Please return it to our Service Department or to an authorized service representative. 5. Never wrap the cord tightly around the appliance, as this could place undue stress on the cord where it enters the appliance and cause it to fray and break. DO NOT OPERATE APPLIANCE IF THE LINE CORD SHOWS ANY DAMAGE, OR IF APPLIANCE WORKS INTERMITTENTLY OR STOPS WORKING ENTIRELY. SAVE THESE INSTRUCTIONS CONSERVE ESTAS INSTRUCCIONES ONE YEAR LIMITED WARRANTY GARANTIA LIMITADA POR UN AÑO Within one year of purchase, we will replace this appliance free if defective in material or workmanship. For replacement, return appliance with evidence of purchase. This warranty is void if appliance has been dropped, abused, altered, misused or tampered with in any way. Dentro de un año de garantía, nosotros le reemplazaremos este artefacto sin costo alguno por defectos en material o manufactura. Para reemplazo, envíe el artefacto con evidencia de compra. Esta garantía es nula si el artefacto se ha caído, abusado, alterado o mal usado en cualquier forma. SAVE THIS FOR YOUR RECORDS GUARDE PARA REFERENCIA 14-SPEED BLENDER LICUADORA DE 14 VELOCIDADES USE AND CARE BOOK MANUAL DE USO Y MANTENIMIENTO HOUSEHOLD USE ONLY PARA USO DOMESTICO SOLAMENTE Printed in/Impreso en Hong Kong R198/7-7-11E/S JB-955G (UL/SPE)-
 1
1
-
 2
2


Windmere JB955G Guía del usuario
- Categoría
- Batidoras
- Tipo
- Guía del usuario
- Este manual también es adecuado para
en otros idiomas
- English: Windmere JB955G User guide

