Toro 22in Recycler Lawn Mower Manual de usuario
- Categoría
- Cortadoras de césped
- Tipo
- Manual de usuario

FormNo.3360-519RevA
22inRecycler
®
LawnMower
ModelNo.20066—SerialNo.280000001andUp
ModelNo.20067—SerialNo.280000001andUp
ModelNo.20089—SerialNo.280000001andUp
Operator'sManual
Introduction
Readthisinformationcarefullytolearnhowtooperate
andmaintainyourproductproperlyandtoavoidinjury
andproductdamage.Youareresponsibleforoperating
theproductproperlyandsafely.
YoumaycontactTorodirectlyatwww.Toro.comfor
productandaccessoryinformation,helpndinga
dealer,ortoregisteryourproduct.
Wheneveryouneedservice,genuineToroparts,or
additionalinformation,contactanAuthorizedService
DealerorToroCustomerServiceandhavethemodel
andserialnumbersofyourproductready.Figure1
identiesthelocationofthemodelandserialnumbers
ontheproduct.
Figure1
1.Modelandserialnumberplate
Writetheproductmodelandserialnumbersinthespace
below:
ModelNo.
SerialNo.
Thismanualidentiespotentialhazardsandhas
safetymessagesidentiedbythesafetyalertsymbol
(Figure2),whichsignalsahazardthatmaycauseserious
injuryordeathifyoudonotfollowtherecommended
precautions.
Figure2
1.Safetyalertsymbol
Thismanualuses2wordstohighlightinformation.
Importantcallsattentiontospecialmechanical
informationandNoteemphasizesgeneralinformation
worthyofspecialattention.
Warning
CALIFORNIA
Proposition65Warning
Theengineexhaustfromthisproduct
containschemicalsknowntotheStateof
Californiatocausecancer,birthdefects,
orotherreproductiveharm.
Important:Thisengineisnotequippedwitha
sparkarrestermufer.ItisaviolationofCalifornia
PublicResourceCodeSection4442touseoroperate
theengineonanyforest-covered,brush-covered,or
grass-coveredland.Otherstatesorfederalareas
mayhavesimilarlaws.
ThissparkignitionsystemcomplieswithCanadian
ICES-002.
Theenclosed
Engine Owner’ s Man ual
issupplied
forinformationregardingtheUSEnvironmental
ProtectionAgency(EPA)andtheCalifornia
EmissionControlRegulationofemissionsystems,
maintenance,andwarranty.Replacementsmaybe
orderedthroughtheenginemanufacturer.
Formodelswithstatedenginehorsepower,thegross
horsepoweroftheenginewaslaboratoryratedbythe
enginemanufacturerinaccordancewithSAEJ1940.
Asconguredtomeetsafety,emission,andoperating
©2008—TheToro®Company
8111LyndaleAvenueSouth
Bloomington,MN55420
Registeratwww.Toro.com.
OriginalInstructions(EN)
PrintedintheUSA
AllRightsReserved

requirements,theactualenginehorsepoweronthisclass
oflawnmowerwillbesignicantlylower.
Safety
ThislawnmowermeetsorexceedstheCPSCblade
safetyrequirementsforwalk-behindrotarylawnmowers
andtheB71.1specicationsoftheAmericanNational
StandardsInstituteineffectatthetimeofproduction.
Readandunderstandthecontentsofthismanual
beforeyoustarttheengine.
Thesafetyalertsymbol(Figure2)isusedtoalertyou
topotentialpersonalinjuryhazards.Obeyallsafety
messagesthatfollowthissymboltoavoidpossibleinjury
ordeath.Improperlyusingormaintainingthismower
couldresultininjuryordeath.Toreducethispotential,
complywiththefollowingsafetyinstructions.
Thefollowinginstructionshavebeenadaptedfromthe
ANSI/OPEIstandardB71.1-2003.
Thiscuttingmachinecanamputatehandsandfeet
andthrowobjects.Failuretoobservethefollowing
safetyinstructionscouldresultinseriousinjuryor
death.
GeneralOperation
•Read,understand,andfollowallinstructionsonthe
machineandinthemanual(s)beforestarting.
•Donotputhandsorfeetnearorunderthemachine.
Keepclearofthedischargeopeningatalltimes.
•Onlyallowresponsibleadults,whoarefamiliarwith
theinstructions,tooperatethismachine.
•Cleartheareaofobjectssuchasrocks,wire,toys,
etc.,whichcouldbethrownbytheblade.Stay
behindthehandlewhentheengineisrunning.
•Besuretheareaisclearofbystandersbefore
operating.Stopmachineifanyoneentersthearea.
•Donotoperatemachinebarefootedorwhilewearing
sandals.Alwayswearsubstantialfootwear.
•Donotpullmachinebackwardunlessabsolutely
necessary.Alwayslookdownandbehindbeforeand
whilemovingbackward.
•Neverdirectdischargedmaterialtowardanyone.
Avoiddischargingmaterialagainstawallor
obstruction.Materialmayricochetbacktoward
theoperator.Stopthebladewhencrossinggravel
surfaces.
•Donotoperatemachinewithouttheentiregrass
catcher,dischargeguard,rearguard,orothersafety
protectivedevicesinplaceandworking.
•Neverleavearunningmachineunattended.
•Stoptheengineandwaituntilthebladecomes
toacompletestopbeforecleaningthemachine,
removinggrasscatcher,oruncloggingthedischarge
guard.
•Operatemachineonlyindaylightorgoodarticial
light.
•Donotoperatemachinewhileundertheinuence
ofalcoholordrugs.
•Neveroperatemowerinwetgrass.Alwaysbesure
ofyourfooting;walk;neverrun.
•Disengagethedrivesystem,ifsoequipped,before
startingtheengine.
•Ifthemachineshouldstarttovibrateabnormally,
stoptheengineandcheckforthecauseimmediately.
Vibrationisgenerallyawarningoftrouble.
•Alwaysweareyeprotectionwhenoperatingmachine.
•Seemanufacturer’sinstructionsforproperoperation
andinstallationofaccessories.Onlyuseaccessories
approvedbythemanufacturer.
SlopeOperation
Slopesareamajorfactorrelatedtoslipandfallaccidents,
whichcanresultinsevereinjury.Operationonallslopes
requireextracaution.Ifyoufeeluneasyonaslope,do
notmowit.
•Mowacrossthefaceofslopes;neverupanddown.
Exerciseextremecautionwhenchangingdirection
onslopes.
•Watchforholes,ruts,bumps,rocks,orotherhidden
objects.Uneventerraincouldcauseaslipandfall
accident.Tallgrasscanhideobstacles.
•Donotmowonwetgrassorexcessivelysteepslopes.
Poorfootingcouldcauseaslipandfallaccident.
•Donotmowneardrop-offs,ditches,or
embankments.Youcouldloseyourfootingor
balance.
2

Children
Tragicaccidentscanoccuriftheoperatorisnotalertto
thepresenceofchildren.Childrenareoftenattractedto
themachineandthemowingactivity.Neverassume
thatchildrenwillremainwhereyoulastsawthem.
•Keepchildrenoutofthemowingareaandunder
thewatchfulcareofaresponsibleadultotherthan
theoperator.
•Bealertandturnmoweroffifachildentersthearea.
•Neverallowchildrentooperatethemachine.
•Useextracarewhenapproachingblindcorners,
shrubs,trees,orotherobjectsthatmayblockyour
viewofachild.
Service
SafeHandlingofGasoline
Toavoidpersonalinjuryorpropertydamage,use
extremecareinhandlinggasoline.Gasolineis
extremelyammableandthevaporsareexplosive.
•Extinguishallcigarettes,cigars,pipes,andother
sourcesofignition.
•Useonlyanapprovedgasolinecontainer.
•Neverremovegascaporaddfuelwiththeengine
running.Allowenginetocoolbeforerefueling.
•Neverrefuelthemachineindoors.
•Neverstorethemachineorfuelcontainerwhere
thereisanopename,spark,orpilotlightsuchas
onawaterheateroronotherappliances.
•Neverllcontainersinsideavehicleoronatruck
ortrailerbedwithaplasticliner.Alwaysplace
containersonthegroundawayfromyourvehicle
beforelling.
•Removegas-poweredequipmentfromthetruck
ortrailerandrefuelitontheground.Ifthisisnot
possible,thenrefuelsuchequipmentwithaportable
container,ratherthanfromagasolinedispenser
nozzle.
•Keepthenozzleincontactwiththerimofthefuel
tankorcontaineropeningatalltimesuntilfuelingis
complete.Donotuseanozzlelock-opendevice.
•Iffuelisspilledonclothing,changeclothing
immediately.
•Neveroverllfueltank.Replacegascapandtighten
securely.
Exhaustcontainscarbonmonoxide,an
odorless,deadlypoisonthatcankillyou.
Donotruntheengineindoorsorinanenclosed
area.
GeneralService
•Neveroperatemachineinaclosedarea.
•Keepallnutsandboltstighttobesuretheequipment
isinsafeworkingcondition.
•Nevertamperwithsafetydevices.Checktheir
properoperationregularly.
•Keepmachinefreeofgrass,leaves,orotherdebris
build-up.Cleanupoilorfuelspillageandremove
anyfuel-soakeddebris.Allowmachinetocool
beforestoring.
•Ifyoustrikeaforeignobject,stopandinspectthe
machine.Repair,ifnecessary,beforestarting.
•Nevermakeanyadjustmentsorrepairswiththe
enginerunning.Disconnectthesparkplugwire
andgroundagainstenginetopreventunintended
starting.
•Checkgrasscatchercomponentsandthedischarge
guardfrequentlyandreplacewithmanufacturer’s
recommendedparts,whennecessary.
•Mowerbladesaresharp.Wrapthebladeorwear
gloves,anduseextracautionwhenservicingthem.
•Donotchangetheenginegovernorsettingor
overspeedtheengine.
•Maintainorreplacesafetyandinstructionlabels,as
necessary.
3

SafetyandInstructionalDecals
Important:Safetyandinstructiondecalsarelocatednearareasofpotentialdanger.Replacedamaged
decals.
Manufacturer’sMark
1.Indicatesthebladeisidentiedasapartfromtheoriginal
machinemanufacturer.
94-8072
104-7402
Models20067and20113only
104-7403
Models20067and20113only
104-7953
Electric-startmodelsonly
1.Warning—readtheOperator’sManualforinformationonchargingthebattery;containslead;donotdiscard.
2.ReadtheOperator’sManual.
4

112-8759
1.Warning—readthe
Operator’sManual.
4.Cutting/dismemberment
hazardofhandorfoot,
mowerblade—stayaway
frommovingparts.
2.Thrownobject
hazard—keepbystanders
asafedistancefromthe
machine.
5.Cutting/dismemberment
hazardofhandorfoot,
mowerblade—donot
operateupanddown
slopes;operatesideto
sideonslopes;stopthe
enginebeforeleavingthe
operatingposition;and
lookbehindyouwhen
backing.
3.Cutting/dismemberment
hazardofhandorfoot,
mowerblade—removethe
wirefromthesparkplug,
andreadtheinstructions
beforeservicingor
performingmaintenance.
112-8867
1.Lock2.Unlock
108-4791
Electric-startmodelsonly
115-2896
Model20089only
5

Setup
Important:Removeanddiscardtheprotective
plasticsheetthatcoverstheengine.
1.UnfoldingtheHandle
Procedure
Foldingorunfoldingthehandleimproperlycan
damagethecables,causinganunsafeoperating
condition.
•Donotdamagethecableswhenfoldingor
unfoldingthehandle.
•Ifacableisdamaged,contactanAuthorized
ServiceDealer.
1.Carefullymovetheupperhandleforwarduntilthe
handlehalvesareinlineandnesttogetherasshown
(Figure3).
Figure3
2.Tightenthehandleknobs(Figure4).
Figure4
3.Rotatethehandlerearward(asshown)untilitclicks
intoplace(Figure5).
Figure5
2.FillingtheEnginewithOil
Procedure
Yourmowerdoesnotcomewithoilintheengine,butit
doescomewithabottleofoil.
1.Removethedipstick(Figure6).
Figure6
2.Slowlypouroilintotheoillltubeuntiltheoillevel
reachestheFulllineonthedipstick(Figure6).Do
notoverll.(Max.ll:20oz.(0.59l),type:SAE
6

30WdetergentoilwithanAPIserviceclassication
ofSF,SG,SH,SJ,SL,orhigher.)
3.Installthedipsticksecurely.
Important:
Change the engine oil after the r st
5 operating hour s
;changeityearlythereafter.
RefertoChangingtheEngineOil.
3.InstallingtheFuse
Procedure
Electric-startmodelsonly
Yourmowercomeswitha40-ampfusethatprotectsthe
electricstarter.
Important:Youcannotstartthemowerwiththe
electricstarterorchargethebatteryunlessyou
installthefuse.
1.Unclipbothendsofthebatterycoverandremoveit
(Figure7).
Figure7
2.Insertthefuseintothefuseholder(Figure8).
Figure8
Note:Yourmowercomeswithafuseintheowner’s
packetandanotherfuseinthebatterybox.
3.Installthebatterycover.
4.ChargingtheBattery
Procedure
Electric-startmodelsonly
RefertoChargingtheBatteryintheMaintenance
section.
ProductOverview
Figure9
1.Cuttingheightlever7.Oilll/dipstick
2.Fueltankcap
8.Battery(electric-start
modelsonly)
3.Recoilstarthandle9.Washoutport
4.Bladecontrolbar
10.Sparkplug
5.Handle
11.Airlter
6.Ignitionkey(electric-start
modelsonly)
7

Figure10
1.Grassbag
3.Batterycharger
(electric-startmodels
only)
2.Sidedischargechute
Operation
FillingtheFuelTank
Gasolineisextremelyammableandexplosive.
Areorexplosionfromgasolinecanburnyou
andothers.
•Topreventastaticchargefromignitingthe
gasoline,placethecontainerand/ormower
directlyonthegroundbeforelling,notina
vehicleoronanobject.
•Fillthetankoutdoorswhentheengineis
cold.Wipeupspills.
•Donothandlegasolinewhensmokingor
aroundanopenameorsparks.
•Storegasolineinanapprovedfuelcontainer,
outofthereachofchildren.
Fillthefueltankwithfreshunleadedregulargasoline
fromamajorname-brandservicestation(Figure11).
Note:Neverusemethanol,gasolinecontaining
methanol,orgasoholcontainingmorethan10%ethanol
becausethefuelsystemcouldbedamaged.Donotmix
oilwithgasoline.
Important:Toreducestartingproblems,add
fuelstabilizertothefuelallseason,mixingitwith
gasolinelessthan30daysold.
Figure11
CheckingtheEngineOilLevel
ServiceInterval:Beforeeachuseordaily
1.Removethedipstick,wipeitclean,andfullyinstall
thedipstick(Figure12).
Figure12
2.Removethedipstickandchecktheoillevel
(Figure12).IftheoillevelisbelowtheAddmarkon
thedipstick,slowlypouroilintotheoillltubeto
raisetheoilleveltotheFullmarkonthedipstick.
Donotoverll.(Max.ll:20oz.(0.59l),type:SAE
30WdetergentoilwithanAPIserviceclassication
ofSF,SG,SH,SJ,SL,orhigher.)
3.Installthedipsticksecurely.
8

AdjustingtheCuttingHeight
Adjustingthecuttingheightmaybringyouintocontactwiththemovingblade,causingseriousinjury.
•Stoptheengineandwaitforallmovingpartstostop.
•Donotputyourngersunderthehousingwhenadjustingthecuttingheight.
Iftheenginehasbeenrunning,themuferwillbehotandcanseverelyburnyou.Keepawayfrom
thehotmufer.
Adjustthecuttingheightasdesired.Setthefrontwheelstothesameheightastherearwheels(Figure13).
Figure13
9

StartingtheEngine
1.Holdthebladecontrolbaragainstthehandle
(Figure14).
Figure14
1.Bladecontrolbar
2.Turntheignitionkey(Figure15)(electric-start
modelsonly)orpulltherecoilstarthandle
(Figure16).
Note:Whenyoupulltherecoilstarthandle,keep
yourngersawayfromthecableonthehandle.
Figure15
Figure16
Note:Ifthemowerstilldoesnotstart,contactan
AuthorizedServiceDealer.
UsingtheSelf-propelDrive
Tooperatetheself-propeldrive,simplywalkwithyour
handsontheupperhandleandyourelbowsatyour
sides,andthemowerwillautomaticallykeeppacewith
you(Figure17).
Figure17
10

StoppingtheEngine
ServiceInterval:Beforeeachuseordaily
Tostoptheengine,releasethebladecontrolbar.
Note:Removetheignitionkeywhenyouleavethe
mower.
Important:Whenyoureleasethebladecontrol
bar,boththeengineandbladeshouldstopwithin
3seconds.Iftheydonotstopproperly,stopusing
yourmowerimmediatelyandcontactanAuthorized
ServiceDealer.
RecyclingtheClippings
Yourmowercomesfromthefactoryreadytorecyclethe
grassandleafclippingsbackintothelawn.
Ifthegrassbagisonthemower,removeit(referto
RemovingtheGrassBag)beforerecyclingtheclippings.
Ifthesidedischargechuteisonthemower,removeit
andlockthesidedischargedoor(refertoRemovingthe
SideDischargeChute)beforerecyclingtheclippings.
BaggingtheClippings
Usethegrassbagwhenyouwanttocollectgrassand
leafclippingsfromthelawn.
Aworngrassbagcouldallowsmallstones
andothersimilardebristobethrowninthe
operator’sorbystander’sdirectionandresultin
seriouspersonalinjuryordeathtotheoperator
orbystanders.
Checkthegrassbagfrequently.Ifitis
damaged,installanewTororeplacementbag.
Ifthesidedischargechuteisonthemower,removeit
andlockthesidedischargedoor(refertoRemovingthe
SideDischargeChute)beforebaggingtheclippings.
Thebladeissharp;contactingthebladecan
resultinseriouspersonalinjury.
Stoptheengineandwaitforallmovingpartsto
stopbeforeleavingtheoperatingposition.
InstallingtheGrassBag
1.Raiseandholdupthereardoor(Figure18).
Figure18
2.Installthegrassbag(Figure19).
11

Figure19
3.Lowerthereardoor.
RemovingtheGrassBag
Toremovethebag,reversethestepsabove.
Side-dischargingtheClippings
Usethesidedischargeforcuttingverytallgrass.
Ifthebagisonthemower,removeitbefore
side-dischargingtheclippings.
Thebladeissharp;contactingthebladecan
resultinseriouspersonalinjury.
Stoptheengineandwaitforallmovingpartsto
stopbeforeleavingtheoperatingposition.
InstallingtheSideDischargeChute
1.Unlockthesidedischargedoor(Figure20).
Figure20
2.Installthesidedischargechute(Figure21).
12

Figure21
RemovingtheSideDischargeChute
Toremovethesidedischargechute,reversethesteps
above.
Important:Lockthesidedischargedoorafteryou
closeit(Figure22).
Figure22
OperatingTips
GeneralMowingTips
•Cleartheareaofsticks,stones,wire,branches,and
otherdebristhatthebladecouldhit.
•Avoidstrikingsolidobjectswiththeblade.Never
deliberatelymowoveranyobject.
•Ifthemowerstrikesanobjectorstartstovibrate,
immediatelystoptheengine,disconnectthewire
fromthesparkplug,andexaminethemowerfor
damage.
•Forbestperformance,installanewbladebeforethe
cuttingseasonbegins.
•ReplacethebladewhennecessarywithaToro
replacementblade.
CuttingGrass
•Cutonlyaboutathirdofthegrassbladeatatime.
Donotcutbelowthe2-inch(51mm)settingunless
thegrassissparseoritislatefallwhengrassgrowth
beginstoslowdown.RefertoAdjustingtheCutting
Height.
•Whencuttinggrassover6inches(15cm)tall,mow
atthehighestcuttingheightsettingandwalkslower;
thenmowagainatalowersettingforthebestlawn
appearance.Ifthegrassistoolong,themowermay
plugandcausetheenginetostall.
•Mowonlydrygrassorleaves.Wetgrassandleaves
tendtoclumpontheyardandcancausethemower
toplugortheenginetostall.
Wetgrassorleavescancauseseriousinjuryif
youslipandcontacttheblade.Mowonlyindry
conditions.
13

•Beawareofapotentialrehazardinverydry
conditions,followalllocalrewarnings,andkeep
themowerfreeofdrygrassandleafdebris.
•Alternatethemowingdirection.Thishelpsdisperse
theclippingsoverthelawnforevenfertilization.
•Ifthenishedlawnappearanceisunsatisfactory,try
oneormoreofthefollowing:
–Replacethebladeorhaveitsharpened.
–Walkataslowerpacewhilemowing.
–Raisethecuttingheightonyourmower.
–Cutthegrassmorefrequently.
–Overlapcuttingswathsinsteadofcuttingafull
swathwitheachpass.
–Setthecuttingheightonthefrontwheelsone
notchlowerthantherearwheels.Forexample,
setthefrontwheelsat2inches(51mm)andthe
rearwheelsat2-3/8inches(60mm).
CuttingLeaves
•Aftercuttingthelawn,ensurethathalfofthelawn
showsthroughthecutleafcover.Youmayneedto
makemorethanonepassovertheleaves.
•Iftherearemorethan5inches(13cm)ofleaves
onthelawn,setthefrontcuttingheightoneortwo
notcheshigherthantherearcuttingheight.
•Slowdownyourmowingspeedifthemowerdoes
notcuttheleavesnelyenough.
Maintenance
Note:Determinetheleftandrightsidesofthemachinefromthenormaloperatingposition.
RecommendedMaintenanceSchedule(s)
MaintenanceService
Interval
MaintenanceProcedure
Aftertherst5hours
•Changetheengineoil.
Beforeeachuseordaily
•Checktheengineoillevel.
•Ensurethattheenginestopswithin3secondsafterreleasingthebladecontrolbar.
•Cleangrassclippingsanddirtfromunderthemower.
Every25hours
•Replacetheairlter;replaceitmorefrequentlyindustyoperatingconditions.
•Chargethebatteryfor24hours(electric-startmodelsonly).
Beforestorage
•Emptythefueltankbeforerepairsasdirectedandbeforeannualstorage.
Yearly
•Changetheengineoil.
•Lubricatethewheelgears.
•Replacethebladeorhaveitsharpened(morefrequentlyiftheedgedullsquickly).
•RefertoyourEngineOperator’sManualforanyadditionalyearlymaintenance
procedures.
Important:Refertoyour
Engine Operator’ s Man ual
foradditionalmaintenanceprocedures.
14

PreparingforMaintenance
1.Stoptheengineandwaitforallmovingpartstostop.
2.Disconnectthesparkplugwirefromthesparkplug
andhookitontotheretainingpost(Figure23)
beforeperforminganymaintenanceprocedure.
Figure23
3.Afterperformingthemaintenanceprocedure(s),
connectthesparkplugwiretothesparkplug.
Important:Beforetippingthemowertochange
theoilorreplacetheblade,allowthefueltank
torundrythroughnormalusage.Ifyoumust
tipthemowerpriortorunningoutoffuel,usea
handfuelpumptoremovethefuel.Alwaystip
themowerontoitsside,withtheairlterup.
Tippingthemowermaycausethefueltoleak.
Gasolineisammable,explosiveandcancause
personalinjury.
Runtheenginedryorremovethegasolinewith
ahandpump;neversiphon.
ReplacingtheAirFilter
ServiceInterval:Every25hours
1.Useascrewdrivertoopentheairltercover
(Figure24).
Figure24
2.Replacetheairlter(Figure25).
Figure25
3.Installthecover.
ChangingtheEngineOil
ServiceInterval:Aftertherst5hours
Yearly
Runtheengineafewminutesbeforechangingtheoil
towarmit.Warmoilowsbetterandcarriesmore
contaminants.
1.RefertoPreparingforMaintenance.
2.Removethedipstick(Figure26).
15

Figure26
3.Tipthemowerontoitssidewiththeairlterup
todraintheusedoiloutthroughtheoillltube
(Figure27).
Figure27
4.Slowlypouroilintotheoillltubeuntiltheoillevel
reachestheFulllineonthedipstick(Figure26).Do
notoverll.(Max.ll:20oz.(0.59l),type:SAE
30WdetergentoilwithanAPIserviceclassication
ofSF,SG,SH,SJ,SL,orhigher.)
5.Installthedipsticksecurely.
6.Disposeoftheusedoilproperlyatalocalrecycling
center.
ChargingtheBattery
ServiceInterval:Every25hours
Electric-startmodelsonly
Warning
CALIFORNIA
Proposition65Warning
Batteryposts,terminals,andrelated
accessoriescontainleadandleadcompounds,
chemicalsknowntotheStateofCalifornia
tocausecancerandreproductiveharm.
Washhandsafterhandling.
Chargethebatteryfor24hoursinitially,thenmonthly
(every25starts)orasneeded.Alwaysusethecharger
inashelteredareaandchargethebatteryatroom
temperature(70°or22°C)wheneverpossible.
1.Connectthechargertothemowerwireharness
locatedbelowtheignitionkey(Figure28).
Figure28
2.Plugthechargerintoawalloutlet.
Note:Whenthebatterynolongerholdsacharge,
recycleordisposeofthelead-acidbatteryaccording
tolocalcodes.
ReplacingtheFuse
Electric-startmodelsonly
Ifthebatterydoesnotchargeortheenginedoesnotrun
withtheelectricstarter,thefusemaybeblown.Replace
itwitha40-ampplug-intypefuse.RefertoInstalling
theFuse.
16

LubricatingtheWheelGears
ServiceInterval:Yearly
1.Removethewheelboltsontherearwheelsand
removetherearwheels.
2.Applyalubricatingoiltotheinnerandoutersides
ofthegearasshowninFigure29.
Figure29
3.Installtherearwheels.
ReplacingtheBlade
ServiceInterval:Yearly
Important:
Y ou will need a torque wr ench to install
the blade pr oper l y
.Ifyoudonothaveatorque
wrenchorareuncomfortableperformingthis
procedure,contactanAuthorizedServiceDealer.
Examinethebladewheneveryourunoutofgasoline.If
thebladeisdamagedorcracked,replaceitimmediately.
Ifthebladeedgeisdullornicked,haveitsharpenedor
replaceit.
Thebladeissharp;contactingthebladecan
resultinseriouspersonalinjury.
Weargloveswhenservicingtheblade.
1.RefertoPreparingforMaintenance.
2.Tipthemowerontoitssidewiththeairlterup.
3.Useablockofwoodtoholdthebladesteady
(Figure30).
Figure30
4.Removetheblade,savingallmountinghardware
(Figure30).
5.Installthenewbladeandallmountinghardware
(Figure31).
Figure31
Important:Positionthecurvedendsofthe
bladetopointtowardthemowerhousing.
6.Useatorquewrenchtotightenthebladeboltto
60ft-lb(82N⋅ ⋅
⋅
m).
Important:Abolttorquedto60ft-lb(82N⋅ ⋅
⋅
m)
isverytight.Whileholdingthebladewitha
blockofwood,putyourweightbehindthe
17

ratchetorwrenchandtightentheboltsecurely.
Thisboltisverydifculttoovertighten.
AdjustingtheSelf-propelDrive
Cable
Wheneveryouinstallanewself-propelcableorif
theself-propeldriveisoutofadjustment,adjustthe
self-propeldrivecable.
1.Loosenthecablesupportnut(Figure32).
Figure32
2.Pulldownthecablejacket(towardthemower)until
thereisnoslackinthecable(Figure33).
Figure33
3.Tightenthenutonthecablesupport.
CleaningtheMower
ServiceInterval:Beforeeachuseordaily
Themowermaydislodgematerialfromunder
themowerhousing.
•Weareyeprotection.
•Stayintheoperatingposition(behindthe
handle)whentheengineisrunning.
•Donotallowbystandersinthearea.
Forbestresults,cleanthemowersoonafteryouhave
completedmowing.
1.Lowerthemowertoitslowestcuttingheightsetting.
RefertoAdjustingtheCuttingHeight.
2.Movethemowerontoaatpavedsurface.
3.Attachagardenhosethatisconnectedtoawater
supplytothewashoutportonthemowerhousing
(Figure34).
Figure34
4.Turnthewateron.
5.Starttheengineandrunituntiltherearenomore
clippingsthatcomeoutfromunderthemower
housing.
6.Stoptheengine.
7.Shutoffthewateranddisconnectthegardenhose
fromthemower.
8.Starttheengineandrunitforafewminutestodry
thehousingtopreventitfromrusting.
18

Storage
Storethemowerinacool,clean,dryplace.
PreparingtheMowerfor
Storage
Gasolinevaporscanexplode.
•Donotstoregasolinemorethan30days.
•Donotstorethemowerinanenclosurenear
anopename.
•Allowtheenginetocoolbeforestoringit.
1.Onthelastrefuelingoftheyear,addfuelstabilizer
tothefuelasdirectedbytheenginemanufacturer.
2.Disposeofanyunusedfuelproperly.Recycleit
accordingtolocalcodes,oruseitinyourautomobile.
Note:Oldfuelinthefueltankistheleadingcause
ofhardstarting.Donotstorefuelwithoutstabilizer
morethan30days,anddonotstorestabilizedfuel
morethan90days.
3.Runthemoweruntiltheenginestopsfromrunning
outoffuel.
4.Starttheengineagain.
5.Allowtheenginetorununtilitstops.Whenyoucan
nolongerstarttheengine,itissufcientlydry.
6.Disconnectthewirefromthesparkplugandconnect
thewireontotheretainingpost.
7.Removethesparkplug,add1oz.(30ml)ofoil
throughthesparkplughole,andpullthestarterrope
slowlyseveraltimestodistributeoilthroughoutthe
cylindertopreventcylindercorrosionduringthe
off-season.
8.Looselyinstallthesparkplug.
9.Tightenallnuts,bolts,andscrews.
10.Chargethebatteryfor24hours,thenunplugthe
batterychargeranstorethemowerinanunheated
area.Ifyoumuststorethemowerinaheated
area,youmustchargethebatteryevery90days
(electric-startmodelsonly).
FoldingtheHandle
Foldingorunfoldingthehandleimproperlycan
damagethecables,causinganunsafeoperating
condition.
•Donotdamagethecableswhenfoldingor
unfoldingthehandle.
•Ifacableisdamaged,contactanAuthorized
ServiceDealer.
1.Removetheignitionkey(electric-startmodelsonly).
2.Loosenthehandleknobsuntilyoucanmovethe
upperhandlefreely.
3.FoldtheupperhandleforwardasshowninFigure35.
Important:Routethecablestotheoutsideof
thehandleknobsasyoufoldtheupperhandle.
Figure35
4.Tounfoldthehandle,reversethestepsabove.
RemovingtheMowerfrom
Storage
1.Removethesparkplugandspintheenginerapidly
usingthestartertoblowtheexcessoilfromthe
cylinder.
2.Installthesparkplugandtightenitwithatorque
wrenchto15ft-lb(20N⋅m).
3.Chargethebatteryfor24hours(electric-startmodels
only).
4.Connectthewiretothesparkplug.
19

The following applies to both the Toro Total Coverage Guarantee & the Toro GTS Starting Guarantee:
Items and Conditions Not Covered
There is no other express warranty except for special emission system coverage on some products. This express warranty does not cover the following:
Cost of regular maintenance service or parts, such as fi lters, fuel, lubricants, oil changes, spark plugs, air fi lters blade sharpening/worn blade on mowers, cable/linkage adjust-
ments, or brake and clutch adjustments
Any product or part which has been altered or misused and requires replacement or repair due to accidents or lack of proper maintenance
Repairs necessary due to improper battery care, failure to use fresh fuel (less than one month old), or failure to properly prepare the unit prior to any period of non-use over one
month
Pickup and delivery charges
Operational misuse, neglect, or accidents
Repairs or attempted repairs by anyone other than an Authorized Toro Service Dealer
Repairs or adjustments to correct starting diffi culties due to the following:
Failure to follow proper maintenance procedures
Rotary mower blade striking an object
Contaminants in the fuel system
Improper fuel (consult your Operator’s Manual if in doubt)
Failure to drain the fuel system prior to any period of non-use over one month
Special operational conditions where starting may require more than two pulls:
First time starts after extended period of non-use over one month or seasonal storage
Cool temperature starts such as those found in early spring and late autumn
Improper starting procedures
If you are having diffi culty starting your unit, please check the Operator’s Manual to ensure that you are using the correct starting procedures. This can save an unnecessary visit to a
Service Dealer.
Owner Responsibilities
You must maintain your Toro Product by following the maintenance procedures described in the Operator’s Manual. Such routine maintenance, whether performed by a dealer or by
you, is at your expense.
Instructions for Obtaining Warranty Service
If you think that your Toro Product contains a defect in materials or workmanship, or if a normal, able-bodied adult can no longer start your product’s engine in one or two pulls, follow
this procedure
:
1. Contact any Authorized Toro Service Dealer to arrange service at their dealership. To locate a dealer convenient to you, refer to the Yellow Pages of your telephone directory (look
under “Lawn Mowers”) or access our web site at www.Toro.com. You may also call the numbers listed in item #3 to use the 24-hour Toro Dealer locator system.
2. Bring the product and your proof of purchase (sales receipt) to the Service Dealer. The dealer will diagnose the problem and determine if it is covered under warranty.
3. If for any reason you are dissatisfi ed with the Service Dealer’s analysis or with the assistance provided, contact us at: Customer Care Department, Consumer Division, Toro War-
ranty Company, 8111 Lyndale Avenue South, Bloomington, MN 55420-1196; or call us toll free at 866-214-9807 (U.S. customers) or 866-214-9808 (Canadian customers).
General Conditions
All repairs covered by these warranties must be performed by an Authorized Toro Service Dealer using Toro approved replacement parts.
Neither The Toro Company nor Toro Warranty Company is liable for indirect, incidental, or consequential damages in connection with the use of the Toro Products
covered by these warranties, including any cost or expense of providing substitute equipment or service during reasonable periods of malfunction or non-use pending
completion of repairs under these warranties. Some states do not allow exclusions of incidental or consequential damages, or limitations on how long an implied war-
ranty lasts, so the above exclusions and limitations may not apply to you.
This warranty gives you specific legal rights, and you may also have other rights which vary from state to state.
Countries Other than the United States or Canada
Customers who have purchased Toro products exported from the United States or Canada should contact their Toro Distributor (Dealer) to obtain guarantee policies for your country,
province, or state. If for any reason you are dissatisfi ed with your Distributor’s service or have diffi culty obtaining guarantee information, contact the Toro importer. If all other remedies
fail, you may contact us at Toro Warranty Company.
*Residential purposes means use of the product on the same lot as your home. Use at more than one location is considered commercial use, and the commercial use warranty would apply.
•
•
•
•
•
•
•
-
-
-
-
-
•
-
-
-
Part Number 374-0052 Rev. D
Conditions and Products Covered under The Toro Total Coverage Guarantee
The Toro Company and its affi liate, Toro Warranty Company, pursuant to an agreement between them, jointly promise to repair any Toro Product used for residential purposes*,
if defective in materials or workmanship or if it stops functioning due to the failure of a component for a period of two (2) years from the date of purchase.
This Warranty applies to all 22 in Recycler® walk power mowers and their accessories. This warranty covers the cost of parts and labor, but you must pay transportation costs
.
The following time periods apply from the date of purchase:
Products Warranty Period
All Products and Attachments 2 - year Full warranty
Batteries 1 - year Full warranty
Limited Warranty for Commercial Use*
Gas-powered Toro Products used for commercial, institutional, or rental use are warranted for 45 days against defects in materials or workmanship.
The Toro Total Coverage Guarantee
A Two - Year Full Warranty (Limited Warranty for Commercial Use)
The Toro GTS (Guaranteed to Start) Starting Guarantee
A Three - Year Full Warranty (Not Applicable for Commercial Use)
Conditions and Products Covered under The Toro GTS Starting Guarantee
The Toro Company and its affi liate, Toro Warranty Company, pursuant to an agreement between them, jointly guarantee that your Toro GTS engine, when used for residential
purposes*, will start on the fi rst or second pull for three (3) years from the date of purchase, if you provide the routine maintenance it requires, or we will fi x it free of charge.
This Warranty applies to all 22 in Recycler® walk power mowers and their accessories. This warranty covers the cost of parts and labor, but you must pay transportation costs.
This Toro Starting Guarantee does not apply when the product is used commercially.*
22 in Recycler®
Walk Power Mowers

FormNo.3360-519RevA
CortacéspedRecycler
®
de22pulgadas
Nºdemodelo20066—Nºdeserie280000001ysuperiores
Nºdemodelo20067—Nºdeserie280000001ysuperiores
Nºdemodelo20089—Nºdeserie280000001ysuperiores
Manualdeloperador
Introducción
Leaestemanualdetenidamenteparaaprenderautilizar
ymantenercorrectamentesuproducto,yparaevitar
lesionesydañosalproducto.Ustedeselresponsablede
operarelproductodeformacorrectaysegura.
UstedpuedeponerseencontactodirectamenteconToro
enwww .Toro.comsideseainformaciónsobreproductos
yaccesorios,osinecesitalocalizarundistribuidoro
registrarsuproducto.
Cuandonecesiteasistenciatécnica,piezasgenuinasToro
oinformaciónadicional,póngaseencontactoconun
ServicioTécnicoAutorizadooconAsistenciaalCliente
Toro,ytengaamanolosnúmerosdemodeloyserie
desuproducto.Figura1identicalaubicacióndelos
númerosdemodeloyserieenelproducto.
Figura1
1.Placaconlosnúmerosdemodeloydeserie
Anoteacontinuaciónlosnúmerosdemodeloydeserie
desuproducto:
Nºdemodelo
Nºdeserie
Estemanualidenticapeligrospotencialesycontiene
mensajesdeseguridadidenticadosporelsímbolode
alertadeseguridad(Figura2),queseñalaunpeligroque
puedecausarlesionesgravesolamuertesiustedno
siguelasprecaucionesrecomendadas.
Figura2
1.Símbolodealertadeseguridad
Estemanualutiliza2palabrasmáspararesaltar
información.Importantellamalaatenciónsobre
informaciónmecánicaespecial,yNotaresalta
informacióngeneralquemereceunaatenciónespecial.
Advertencia
CALIFORNIA
AdvertenciadelaPropuesta65
Losgasesdeescapedeesteproductocontienen
productosquímicosqueelEstadodeCalifornia
sabequecausancáncer,defectoscongénitos
uotrospeligrosparalareproducción.
Importante:Estemotornoestáequipadocon
unsilenciadorconparachispas.Esunainfracción
delalegislacióndeCalifornia(CaliforniaPublic
ResourceCodeSection4442)lautilizaciónola
operacióndelmotorencualquierterrenodebosque,
monteoterrenocubiertodehierba.Otrosestados
ozonasfederalespuedentenerunalegislación
similar.
Estesistemadeencendidoporchispacumplelanorma
canadienseICES-002.
El
Man ual del pr opietario del motor
adjunto
ofreceinformaciónsobrelasnormasdelaU.S.
EnvironmentalProtectionAgency(EPA)ydela
CaliforniaEmissionControlRegulationsobre
sistemasdeemisiones,mantenimientoygarantía.
Puedesolicitarseunmanualnuevoalfabricante
delmotor.
©2008—TheToro®Company
8111LyndaleAvenueSouth
Bloomington,MN55420
Registresuproductoenwww.Toro.com.
Traduccióndeloriginal(ES)
ImpresoenEE.UU.
Reservadostodoslosderechos

Enloscasosenqueseindicalapotenciaencvdel
motor,lapotenciabrutadelmotorfuecalculadaenel
laboratorioporelfabricantedelmotor,conarregloalo
estipuladoenSAEJ1940.Debidoaqueelmotorestá
conguradoparacumplirlosrequisitosdeseguridad,
emisionesyoperación,supotenciarealenestetipode
cortacéspedserásignicativamentemenor.
Seguridad
Estecortacéspedcumpleosuperalosrequisitos
deseguridaddecuchillasCPSCparacortacéspedes
giratoriosdirigidosylasespecicacionesB71.1del
InstitutoNorteamericanodeEstándaresNacionalesen
vigorenelmomentodefabricación.
Leaycomprendaelcontenidodeestemanualantes
dearrancarelmotor.
Elsímbolodealertadeseguridad(Figura2)seutiliza
paraadvertirlesobrepotencialesriesgosdelesiones
personales.Observesiempretodoslosmensajesde
seguridadquesiguenaestesímboloconelndeevitar
posibleslesionesolamuerte.Elusoomantenimiento
incorrectosdeestecortacéspedpuedencausarlesiones
olamuerte.Parareducirestaposibilidad,cumplalas
siguientesinstruccionesdeseguridad.
Lassiguientesinstruccioneshansidoadaptadasdela
normaANSI/OPEIB71.1-2003.
Estamáquinadecortepuedeamputarmanosypies
ylanzarobjetosalaire.Elnoobservarlassiguientes
instruccionesdeseguridadpuededarlugara
lesionescorporalesgraveseinclusolamuerte.
Operacióngeneral
•Lea,comprendaysigatodaslasinstruccionesdel/de
losmanual(es)ylascolocadasenlamáquinaantes
dearrancarésta.
•Nocoloquelasmanosolospiescercadelamáquina
odebajodeésta.Manténgasealejadodelconducto
dedescargaentodomomento.
•Sólopermitaqueutilicenestamáquinaadultos
responsablesyfamiliarizadosconlasinstrucciones.
•Despejelazonadeobjetostalescomopiedras,
alambres,juguetes,etc.,quepodríanserarrojados
porlacuchilla.Permanezcadetrásdelmanillar
cuandoelmotorestáenmarcha.
•Asegúresedequenohayaotraspersonasenlazona
antesdeusarlamáquina.Parelamáquinasialguien
entraenlazona.
•Noutilicelamáquinasiustedestádescalzoolleva
sandalias.Llevesiemprecalzadofuerte.
•Notirehaciaatrásdelamáquinaamenosquesea
absolutamentenecesario.Antesdedesplazarsehacia
atrásymientraslohace,miresiemprehaciaabajoy
detrásdeusted.
•Nodirijanuncaelmaterialdescargadohacianadie.
Evitedescargarmaterialcontraunapareduotra
obstrucción.Elmaterialpodríarebotarhaciael
operador.Parelacuchillaalcruzarsuperciesde
grava.
•Nohagafuncionarlamáquinasinoestáncolocados
yfuncionandoelrecogedorcompleto,elprotector
dedescarga,elprotectortraserouotrosdispositivos
deprotección.
•Nodejenuncadesatendidalamáquinasiestá
funcionando.
•Pareelmotoryesperehastaquelacuchillasedetenga
completamenteantesdelimpiarlamáquina,retirarel
recogedorodesatascarelprotectordedescarga.
•Utilicelamáquinasolamenteconluznaturalocon
unabuenailuminaciónarticial.
•Noutilicelamáquinabajolainuenciadedrogaso
alcohol.
•Noutilicenuncaelcortacéspedenhierbamojada.
Asegúresedepisarrmemente;camine;nocorra
nunca.
•Desengraneelsistemadetransmisión,silamáquina
estáequipadaconuno,antesdearrancarelmotor.
•Silamáquinacomienzaavibrardemaneraanormal,
pareelmotorycompruebelacausainmediatamente.
Lavibraciónsueleserunavisodeproblemas.
•Siempreutiliceprotecciónocularalusarlamáquina.
•Consultelasinstruccionesdelfabricanterespectoa
lainstalaciónyoperacióncorrectasdelosaccesorios.
Utilicesolamenteaccesorioshomologadosporel
fabricante.
Operaciónenpendientes
Laspendientessonunfactordeprimeraimportancia
relacionadoconaccidentes,especialmenteresbalones
ycaídas,quepuedencausarlesionesgraves.Entodas
laspendientesycuestassenecesitateneruncuidado
especial.Siustednosesienteconconanzaenuna
pendiente,nolasiegue.
•Sieguedetravéslascuestasypendientes,nuncahacia
arribaohaciaabajo.Extremelasprecaucionesal
cambiardedirecciónencuestasopendientes.
•Estéalertaaagujeros,surcos,montículos,rocas
uotrosobjetosocultos.Losterrenosdesiguales
2

puedencausarcaídasyresbalones.Lahierbaalta
puedeocultarobstáculos.
•Nosieguelahierbamojadaoenpendientes
excesivamenteempinadas.Sinopisarme,puede
resbalarycaer.
•Nosieguecercadeterraplenes,fosasotaludes.
Ustedpodríaperderelequilibrooresbalar.
Niños
Puedenocurriraccidentestrágicossieloperadornoestá
alertaalapresenciadeniños.Amenudolosniñosse
sientenatraídosporlamáquinaylaactividaddesegar.
Nosuponganuncaquelosniñosvanapermaneceren
elúltimolugarenquelosvio.
•Mantengaalosniñosalejadosdelazonadesiegay
bajolaatentamiradadeunadultoresponsableque
noseaeloperador.
•Estéalertaypareelcortacéspedsientranniñosen
lazona.
•Nuncapermitaalosniñosutilizarlamáquina.
•Extremelaprecauciónalacercarseaesquinasciegas,
arbustos,árbolesuotrosobjetosquepuedanimpedir
queustedveaunniño.
Mantenimiento
Manejosegurodelagasolina
Paraevitarlesionespersonalesodañosmateriales,
extremelasprecaucionesalmanejarlagasolina.
Lagasolinaesextremadamenteinamableylos
vaporessonexplosivos.
•Apaguecualquiercigarrillo,cigarro,pipauotra
fuentedeignición.
•Utilicesolamenteunrecipientedegasolina
homologado.
•Noretirenuncaeltapóndecombustibleniañada
combustibleconelmotorenmarcha.Dejequese
enfríeelmotorantesderepostarcombustible.
•Norepostenuncalamáquinaenunrecintocerrado.
•Noguardenuncalamáquinaounrecipientede
combustiblecercadeunallamadesnuda,chispao
llamapiloto,porejemploenuncalentadordeagua
uotroelectrodoméstico.
•Nollenenuncalosrecipientesdentrodeunvehículo
osobrelaplataformadeuncamiónoremolquecon
forrodeplástico.Coloquesiemprelosrecipientes
degasolinaenelsuelo,lejosdelvehículo,antesde
llenarlos.
•Retireunequipoconmotordegasolinadelcamión
odelremolqueyrepósteloenelsuelo.Siestono
esposible,reposteelequipodesdeunrecipiente
portátil,envezdeusarunsurtidoroboquilla
dosicadoradegasolina.
•Mantengalaboquillaencontactoconelbordedel
depósitodecombustibleoeloriciodelrecipiente
entodomomentohastaqueterminederepostar.No
utilicedispositivosquemantenganabiertalaboquilla.
•Sisederramacombustiblesobresuropa,cámbiese
deropainmediatamente.
•Nuncallenedemasiadoeldepósitodecombustible.
Vuelvaacolocareltapóndegasolinayapriételo
rmemente.
Losgasesdeescapedelmotorcontienen
monóxidodecarbono,queesunveneno
inodoroquepuedematarle.
Nohagafuncionarelmotordentrodeun
ediciooenunlugarcerrado.
Mantenimientogeneral
•Nohagafuncionarnuncalamáquinaenunlugar
cerrado.
•Mantengaapretadostodoslostornillosytuercas
paraasegurarsedequeelequipoestáencondiciones
defuncionamientoseguras.
•Nomanipulenuncalosdispositivosdeseguridad.
Comprueberegularmentequefuncionan
correctamente.
•Mantengalamáquinalibredeacumulacionesde
hierba,hojasyotrosresiduos.Limpiecualquier
derramedeaceiteocombustibleyretirecualquier
residuoempapadoencombustible.Dejequese
enfríelamáquinaantesdealmacenarla.
•Sigolpeaunobjetoextraño,pareeinspeccionela
máquina.Siesnecesario,repárelaantesdearrancar
denuevo.
•Nuncahagaajustesoreparacionesconelmotor
enmarcha.Desconecteelcabledelabujíayhaga
masaconélcontraelmotorparaevitarunarranque
accidental.
•Compruebefrecuentementeloscomponentesdel
recogedoryelprotectordedescargaysustitúyalos
porpiezasrecomendadasporelfabricantecuando
seanecesario.
3

•Lascuchillasdelcortacéspedestánmuyaladas.
Envuelvalacuchillaolleveguantes,yextremelas
precaucionesalmanejarlascuchillas.
•Nocambielosajustesdelreguladordelmotorni
hagafuncionarelmotoraunavelocidadexcesiva.
•Reviseosustituyalaspegatinasdeseguridade
instruccionescuandoseanecesario.
Pegatinasdeseguridadeinstrucciones
Importante:Haypegatinasdeseguridadeinstruccionescolocadascercadezonasdepotencialpeligro.
Sustituyacualquierpegatinadañada.
Marcadelfabricante
1.Indicaquelacuchillahasidoidenticadacomopiezadel
fabricanteoriginaldelamáquina.
94-8072
104-7402
Modelos20067y20113solamente
104-7403
Modelos20067y20113solamente
104-7953
Modelosdearranqueeléctricosolamente
1.Advertencia–leaelManualdeloperadorsideseainformaciónsobrecómocargarlabatería;contieneplomo;notiraralabasura.
2.LeaelManualdeloperador.
4

112-8759
1.Advertencia–Leael
Manualdeloperador.
4.Peligrode
corte/desmembramiento
demanoopieporla
cuchilladelcortacésped–
noseacerquealaspiezas
enmovimiento.
2.Peligrodeobjetos
arrojados–mantenga
aotraspersonasauna
distanciaprudencialdela
máquina.
5.Peligrode
corte/desmembramiento
demanoopieporla
cuchilladelcortacésped–
nosieguelaspendientes
haciaarriba/abajo;siegue
laspendientesdetravés;
pareelmotorantesde
abandonarelpuestodel
operador,ymirehacia
atrásmientrasconduceen
marchaatrás.
3.Peligrode
corte/desmembramiento
demanoopie,cuchilladel
cortacésped–desconecte
elcabledelabujíaylea
lasinstruccionesantesde
realizarcualquiertareade
ajusteomantenimiento.
112-8867
1.Bloquear2.Desbloquear
108-4791
Modelosdearranqueeléctricosolamente
115-2896
Modelo20089solamente
5

Montaje
Importante:Retireydesechelahojaprotectorade
plásticoquecubreelmotor.
1.Cómodesplegarelmanillar
Procedimiento
Sipliegaodespliegaelmanillardeforma
incorrecta,puedendañarseloscables,creando
unascondicionesdeoperacióninseguras.
•Nodañeloscablesalplegarodesplegarel
manillar.
•Siuncableestádañado,póngaseencontacto
conelServicioTécnicoAutorizado.
1.Muevaconcuidadolasecciónsuperiordelmanillar
haciaadelantehastaquelasdosmitadesdelmismo
esténalineadasyencajencomomuestralailustración
(Figura3).
Figura3
2.Aprietelospomosdelmanillar(Figura4).
Figura4
3.Gireelmanillarhaciaatrás(segúnseilustra)hasta
queencajeensulugarconun‘clic’(Figura5).
Figura5
2.Llenadodelcárterdeaceite
Procedimiento
Elcortacéspedsesuministrasinaceiteenelmotor,pero
incluyeunabotelladeaceite.
1.Retirelavarilla(Figura6).
Figura6
2.Viertalentamenteaceiteeneltubodellenadohasta
queelnivellleguealamarca"Full"(lleno)dela
varilla(Figura6).Nollenedemasiado.(Capacidad
6

máxima:0,59l(20onzas),tipo:SAE30W ,aceite
detergenteconclasicacióndeservicioAPISF,SG,
SH,SJ,SLosuperior.)
3.Vuelvaacolocarlavarillarmemente.
Importante:
Cambie el aceite del motor
después de las primeras 5 horas de operación
,y
despuéscadaaño.ConsulteCómocambiarel
aceitedelmotor.
3.Instalacióndelfusible
Procedimiento
Modelosdearranqueeléctricosolamente
Sucortacéspedincluyeunfusiblede40amperiosque
protegeelarrancadoreléctrico.
Importante:Ustednopodráarrancarel
cortacéspedconelarrancadoreléctriconicargarla
bateríaamenosqueinstaleelfusible.
1.Desengancheambosextremosdelatapadelabatería
yretírela(Figura7).
Figura7
2.Introduzcaelfusibleenelportafusibles(Figura8).
Figura8
Nota:Sucortacéspedincluyeunfusibleconla
documentacióndelpropietarioyotrofusibleenla
cajadelabatería.
3.Coloquelatapadelabatería.
4.Cómocargarlabatería
Procedimiento
Modelosdearranqueeléctricosolamente
ConsulteCómocargarlabateríaenlasecciónde
Mantenimiento.
7

Elproducto
Figura9
1.Palancadealturadecorte
7.Varilla/tapóndellenadode
aceite
2.Tapóndeldepósitode
combustible
8.Batería(modelosde
arranqueeléctrico
solamente)
3.Arrancador
9.Oriciodelavado
4.Barradecontroldela
cuchilla
10.Bujía
5.Agarradero11.Filtrodeaire
6.Llavedecontacto
(modelosdearranque
eléctricosolamente)
Figura10
1.Bolsaderecortes
3.Cargadordelabatería
(modelosdearranque
eléctricosolamente)
2.Conductodedescarga
lateral
8

Operación
Cómollenareldepósitode
combustible
Lagasolinaesaltamenteinamableyexplosiva.
Unincendioounaexplosiónprovocado(a)por
lagasolinapuedecausarlequemadurasausted
yaotraspersonas.
•Paraevitarqueunacargaestáticaincendie
lagasolina,coloqueelrecipientey/oel
cortacéspeddirectamentesobreelsuelo
antesderepostar,noenunvehículoosobre
otroobjeto.
•Lleneeldepósitoenelexteriorcuandoel
motorestéfrío.Limpiecualquierderrame.
•Nomanejegasolinasiestáfumando,ni
cercadeunallamadesnudaochispas.
•Almacenelagasolinaenunrecipiente
homologadoymanténgalafueradelalcance
delosniños.
Lleneeldepósitocongasolinafrescanormalsinplomo,
deunamarcareconocida(Figura11).
Nota:Nuncausemetanol,gasolinaquecontenga
metanologasoholconmásde10%etanolporquese
podríanproducirdañosenelsistemadecombustibledel
motor.Nomezcleaceiteconlagasolina.
Importante:Parareducirlosproblemasde
arranque,añadaestabilizadordecombustible
alcombustibledurantetodalatemporada,
mezclándolocongasolinacompradohacemenos
detreintadías.
Figura11
Vericacióndelniveldeaceite
delmotor
Intervalodemantenimiento:Cadavezqueseutilice
odiariamente
1.Retirelavarilla,límpiela,yvuelvaacolocarla
(Figura12).
Figura12
2.Retirelavarillaycompruebeelniveldeaceite
(Figura12).Sielniveldeaceiteestápordebajode
lamarca"Add"delavarilla,viertalentamente
aceiteeneltubodellenadohastaqueelnivel
lleguealamarca"Full"delavarilla.Nollene
demasiado.(Capacidadmáxima:0,59l(20onzas),
tipo:SAE30W ,aceitedetergenteconclasicación
deservicioAPISF,SG,SH,SJ,SLosuperior.)
3.Vuelvaacolocarlavarillarmemente.
9

Ajustedelaalturadecorte
Alajustarlaalturadecorte,ustedpodríatocarlacuchillaenmovimiento,loquepodríacausarle
graveslesiones.
•Pareelmotoryespereaquesedetengantodaslaspiezasenmovimiento.
•Nopongalosdedosdebajodelacarcasaalajustarlaalturadecorte.
Sielmotorhaestadoenmarcha,elsilenciadorestarámuycalienteypuedecausarlequemaduras
graves.Manténgasealejadodelsilenciadorsiésteestácaliente.
Ajustelaalturadecortesegúndesee.Ajustelasruedasdelanterasalamismaalturaquelastraseras(Figura13).
Figura13
10

Cómoarrancarelmotor
1.Sujetelabarradecontroldelacuchillacontrael
manillar(Figura14).
Figura14
1.Barradecontroldelacuchilla
2.Girelallavedecontacto(Figura15)(modelosde
arranqueeléctricosolamente)otiredelarrancador
deretroceso(Figura16).
Nota:Altirardelarrancador,mantengalosdedos
alejadosdelcabledelmanillar.
Figura15
Figura16
Nota:Sielcortacéspedtodavíanoarranca,póngase
encontactoconelServicioTécnicoAutorizado.
Usodelatransmisión
autopropulsada
Paraactivarelsistemadeautopropulsión,simplemente
camineconlasmanossobreelmanillarsuperiory
loscodosjuntoalcuerpo,yelcortacéspedmantendrá
automáticamentesumismavelocidad(Figura17).
Figura17
11

Cómopararelmotor
Intervalodemantenimiento:Cadavezqueseutilice
odiariamente
Parapararelmotor,sueltelabarradecontroldela
cuchilla.
Nota:Retirelallavedecontactosidejaelcortacésped
sinsupervisar.
Importante:Cuandoustedsueltelabarrade
controldelacuchilla,elmotorylacuchilla
deberándetenerseen3segundosomenos.Sinose
parancorrectamente,dejedeusarelcortacésped
inmediatamenteypóngaseencontactoconun
ServicioTécnicoAutorizado.
Recicladodelosrecortes
Sucortacéspedvienepreparadodefábricaparareciclar,
esdecir,parapicarlosrecortesdehierbayhojasy
devolverlosalcésped.
Silabolsaderecortesestáinstaladaenelcortacésped,
retírela(consulteCómoretirarlabolsaderecortes)
antesdereciclarlosrecortes.Sielconductodedescarga
lateralestáinstaladoenelcortacésped,retíreloybloquee
lapuertadedescargalateral(consulteCómoretirar
elconductodedescargalateral)antesdereciclarlos
recortes.
Ensacadodelosrecortes
Utilicelabolsaderecortessiusteddesearecogerlos
recortesdehierbayhojasdelcésped.
Silabolsaderecortesestádesgastada,pueden
arrojarsepequeñaspiedrasyotrosresiduos
similaresalazonadondeestáeloperadoruotra
persona,provocandolesionespersonalesgraves
olamuertealoperadoroalaotrapersona.
Compruebefrecuentementelabolsade
recortes.Siestádañada,instaleunabolsade
recambioToronueva.
Sielconductodedescargalateralestáinstaladoen
elcortacésped,retíreloycierreconllavelapuertade
descargalateral(consulteCómoretirarelconductode
descargalateral)antesdeensacarlosrecortes.
Lacuchillaestámuyalada;cualquiercontacto
conlacuchillapuedecausarlesionespersonales
graves.
Pareelmotoryespereaquesedetengantodas
laspiezasenmovimientoantesdeabandonar
elpuestodeloperador.
Instalacióndelabolsaderecortes
1.Levanteysujetelapuertatrasera(Figura18).
Figura18
2.Instalelabolsaderecortes(Figura19).
12

Figura19
3.Bajelapuertatrasera.
Cómoretirarlabolsaderecortes
Pararetirarlabolsa,sigalosmismospasosensentido
inverso.
Descargalateraldelos
recortes
Utiliceladescargalateralalcortarhierbamuyalta.
Silabolsaestáinstaladaenelcortacésped,retírelaantes
deprocederaladescargalateraldelosrecortes.
Lacuchillaestámuyalada;cualquiercontacto
conlacuchillapuedecausarlesionespersonales
graves.
Pareelmotoryespereaquesedetengantodas
laspiezasenmovimientoantesdeabandonar
elpuestodeloperador.
Instalacióndelconductodedescarga
lateral
1.Desbloqueelapuertadedescargalateral(Figura20).
Figura20
2.Instaleelconductodedescargalateral(Figura21).
13

Figura21
Cómoretirarelconductodedescarga
lateral
Pararetirarelconductodedescargalateral,sigalos
mismospasosensentidoinverso.
Importante:Bloqueelapuertadedescargalateral
despuésdecerrarla(Figura22).
Figura22
Consejosdeoperación
Consejosgeneralesdesiega
•Despejelazonadepalos,piedras,alambres,ramas
yotrosresiduosquepodríansergolpeadosporla
cuchilla.
•Evitegolpearobjetossólidosconlacuchilla.No
sieguenuncaporencimadeobjetoalguno.
•Sielcortacéspedgolpeaunobjetooempiezaa
vibrar,pareinmediatamenteelmotor,desconecte
elcabledelabujíaeinspeccioneelcortacéspeden
buscadedaños.
•Paraobtenerelmejorrendimiento,instaleuna
cuchillanuevaantesdequeempiecelatemporada
desiega.
•Sustituyalacuchillacuandoseaprecisoporuna
cuchilladerepuestoToro.
Cómocortarlahierba
•Cortesolamenteunterciodelahojadehierba
cadavez.Nocorteconunajusteinferiora51mm
(2pulg.)amenosquelahierbaseaescasa,oanales
delotoñocuandoelritmodecrecimientodela
hierbaempiezaadecaer.ConsulteAjustedelaaltura
decorte.
•Cuandocortehierbademásde15cm(6pulg.)
dealto,siegueprimerousandolaalturadecorte
másaltayandedespacio,luegosieguedenuevoa
unaalturamenorparaobtenerelmejoraspectode
césped.Silahierbaesdemasiadoalta,puedeatascar
elcortacéspedyhacerquesecaleelmotor.
14

•Sieguesolamentehierbauhojassecas.Lahierba
mojadaylashojasmojadastiendenapegarseal
suelo,ypuedenatascarelcortacéspedohacerquese
caleelmotor.
Lahierbamojadaolashojasmojadaspueden
causarlegraveslesionessiustedresbalaytoca
lacuchilla.Sieguesolamenteencondiciones
secas.
•Estéatentoalposibleriesgodeincendioen
condicionesmuysecas,sigatodaslasadvertencias
localesparacasosdeincendioymantengael
cortacéspedlibredehierbasecayresiduosdehojas.
•Alterneladireccióndecorte.Estoayudaa
dispersarlosrecortesentodoelcésped,dandouna
fertilizaciónmáshomogénea.
•Sielaspectonaldelcéspednoessatisfactorio,
pruebea:
–Cambiarlacuchillaomandarlaaalar.
–Caminarmásdespaciomientrassiega.
–Elevarlaalturadecortedelcortacésped.
–Cortarelcéspedconmásfrecuencia.
–Solaparlospasillosdecorteenlugardecortarun
pasillocompletoencadapasada.
–Ajustarlaalturadecorteunamuescamenosen
lasruedasdelanterasqueenlastraseras.Por
ejemplo,ajustelasruedasdelanterasa51mm
(2pulg.)ylastraserasa60mm(2-3/8pulg.).
Cómocortarhojas
•Despuésdesegarelcésped,asegúresedequela
mitaddelcéspedseveatravésdelacoberturade
hojascortadas.Esposiblequetengaquehacermás
deunapasadaporencimadelashojas.
•Sihaymásde13cm(5pulg.)dehojasenelcésped,
ajustelaalturadecortedelasruedasdelanterasuna
muescaodosmásaltaqueladelasruedastraseras.
•Sieguemásdespaciosielcortacéspednocortalas
hojassucientementenas.
Mantenimiento
Nota:Losladosderechoeizquierdodelamáquinasedeterminandesdelaposiciónnormaldeloperador.
Calendariorecomendadodemantenimiento
Intervalodemanteni-
mientoyservicio
Procedimientodemantenimiento
Despuésdelasprimeras
5horas
•Cambieelaceitedelmotor.
Cadavezqueseutilice
odiariamente
•Compruebeelniveldeaceitedelmotor.
•Asegúresedequeelmotorseparaenelplazode3segundosdespuésdesoltarla
barradecontroldelacuchilla.
•Retirelosrecortesdehierbaylasuciedaddedebajodelacarcasa.
Cada25horas
•Cambieelltrodeaire;cámbieloconmásfrecuenciaencondicionesdemucho
polvo.
•Carguelabateríadurante24horas(modelosdearranqueeléctricosolamente).
Antesdelalmacenamiento
•Vacíeeldepósitodecombustibleantesdeefectuarreparaciones,segúnlas
instrucciones,yantesdelalmacenamientoanual.
Cadaaño
•Cambieelaceitedelmotor.
•Lubriquelosengranajesdelasruedas.
•Cambielacuchillaohagaquelaalen(másamenudosisedesalarápidamente).
•ConsulteenelManualdeloperadordelmotorprocedimientosdemantenimiento
anualesadicionales.
Importante:Consulteenel
Man ual del operador del motor
procedimientosadicionalesdemantenimiento.
15

Preparaciónparael
mantenimiento
1.Pareelmotoryespereaquesedetengantodaslas
piezasenmovimiento.
2.Desconecteelcabledelabujíayengáncheloen
elpostederetención(Figura23)antesderealizar
cualquierprocedimientodemantenimiento.
Figura23
3.Despuésderealizarel/losprocedimiento(s)de
mantenimiento,conecteelcabledelabujíaalabujía.
Importante:Antesdeinclinarelcortacésped
paracambiarelaceiteosustituirlacuchilla,
dejequesevacíeeldepósitodecombustible
conelusonormal.Siesimprescindible
inclinarelcortacéspedantesdequeseacabeel
combustible,utiliceunabombamanualpara
retirarelcombustible.Siemprecoloqueel
cortacéspeddeladoconelltrodeairehacia
arriba.
Alvolcarelcortacésped,puedehaberfugas
decombustible.Lagasolinaesinamabley
explosiva,ypuedecausarlesionespersonales.
Dejefuncionarelmotorhastaquenoquede
combustible,oretirelagasolinaconunabomba
demano;nuncautiliceunsifón.
Cambiodelltrodeaire
Intervalodemantenimiento:Cada25horas
1.Utiliceundestornilladorparaabrirlatapadelltro
deaire(Figura24).
Figura24
2.Cambieelltrodeaire(Figura25).
Figura25
3.Coloquelatapa.
Cómocambiarelaceitedel
motor
Intervalodemantenimiento:Despuésdelasprimeras
5horas
Cadaaño
Hagafuncionarelmotorduranteunosminutosantesde
cambiarelaceiteparacalentarelaceite.Elaceitecaliente
uyemejorytransportamáscontaminantes.
1.ConsultePreparaciónparaelmantenimiento.
2.Retirelavarilla(Figura26).
16

Figura26
3.Coloqueelcortacéspeddeladoconelltrodeaire
haciaarribaparadrenarelaceiteusadoatravésdel
tubodellenadodeaceite(Figura27).
Figura27
4.Viertalentamenteaceiteeneltubodellenado
hastaqueelnivellleguealamarca"Full"(lleno)
delavarilla(Figura26).Nollenedemasiado.
(Capacidadmáxima:0,59l(20onzas),tipo:
SAE30W ,aceitedetergenteconclasicaciónde
servicioAPISF,SG,SH,SJ,SLosuperior.)
5.Vuelvaacolocarlavarillarmemente.
6.Eliminecorrectamenteelaceiteusadoenuncentro
dereciclajehomologado.
Cómocargarlabatería
Intervalodemantenimiento:Cada25horas
Modelosdearranqueeléctricosolamente
Advertencia
CALIFORNIA
AdvertenciadelaPropuesta65
Losbornes,terminalesyotrosaccesorios
delabateríacontienenplomoycompuestos
deplomo,productosquímicosreconocidos
porelEstadodeCaliforniacomocausantes
decáncerydañosreproductivos.Láveselas
manosdespuésdemanejarelmaterial.
Carguelabateríadurante24horasinicialmente,luego
cadames(cada25arranques)osegúnseanecesario.
Utilicesiempreelcargadorenunazonaprotegidadela
intemperie,ycarguelabateríaatemperaturaambiente
(22°C/70°F)siemprequeseaposible.
1.Conecteelcargadoralarnésdecablesdel
cortacésped,situadodebajodelallavedecontacto
(Figura28).
Figura28
2.Conecteelcargadoraunatomadecorriente.
Nota:Cuandolabateríayanoseacapazdeadmitir
lacarga,recicleoeliminelabateríadeácido/plomo
segúnlanormativalocal.
Cambiodelfusible
Modelosdearranqueeléctricosolamente
Silabateríanosecargaoelmotornofuncionaconel
motordearranqueeléctrico,esposiblequeelfusible
estéfundido.Cámbieloporunfusiblede40amperios,
tipoclavija.ConsulteInstalacióndelfusible.
17

Lubricacióndelosengranajes
delasruedas
Intervalodemantenimiento:Cadaaño
1.Retirelospernosdelasruedastraserasyretirelas
ruedastraseras.
2.Apliqueaceitelubricantealinterioryalexteriorde
losengranajes(verFigura29).
Figura29
3.Instalelasruedastraseras.
Cómocambiarlacuchilla
Intervalodemantenimiento:Cadaaño
Importante:
Usted necesitará una lla v e
dinamométrica para instalar la cuchilla
cor r ectamente
.Sinodisponedeunallave
dinamométricaopreerenorealizareste
procedimiento,póngaseencontactoconelServicio
TécnicoAutorizado.
Examinelacuchillacadavezqueseacabelagasolina.
Silacuchillaestádañadaoagrietada,sustitúyala
inmediatamente.Siellodelacuchillaestáromootiene
desperfectos,mandealarlacuchillaocámbiela.
Lacuchillaestámuyalada;cualquiercontacto
conlacuchillapuedecausarlesionespersonales
graves.
Lleveguantesalrealizarelmantenimientode
lacuchilla.
1.ConsultePreparaciónparaelmantenimiento.
2.Coloqueelcortacéspeddeladoconelltrodeaire
haciaarriba.
3.Utiliceunbloquedemaderaparainmovilizarla
cuchilla(Figura30).
Figura30
4.Retirelacuchilla,conservandotodoslosherrajesde
montaje(Figura30).
5.Instalelacuchillanuevaytodoslosherrajesde
montaje(Figura31).
Figura31
Importante:Coloquelacuchillacon
losextremoscurvoshacialacarcasadel
cortacésped.
6.Utiliceunallavedinamométricaparaapretarel
pernodelacuchillaa82Nm(60pies-libra).
18

Importante:Unpernoapretadoa82Nm
(60pies-libra)quedamuyrme.Mientrassujeta
lacuchillaconunbloquedemadera,aplique
todasufuerzaalallaveyaprieteelperno
rmemente.Serámuydifícilapretaresteperno
demasiado.
Ajustedelcabledela
transmisiónautopropulsada
Cadavezqueinstaleunnuevocabledelatransmisión
autopropulsadaosilatransmisiónautopropulsada
estámalajustada,ajusteelcabledelatransmisión
autopropulsada.
1.Aojelatuercadelsoportedelcable(Figura32).
Figura32
2.Tirehaciaabajodelacubiertadelcable(haciael
cortacésped)hastaeliminarlaholguraenelcable
(Figura33).
Figura33
3.Aprietelatuercadelsoportedelcable.
Limpiezadelcortacésped
Intervalodemantenimiento:Cadavezqueseutilice
odiariamente
Elcortacéspedpuedesoltarmaterialdedebajo
delacarcasa.
•Lleveprotecciónocular.
•Permanezcaenlaposicióndeoperación
(detrásdelmanillar)cuandoelmotorestá
enmarcha.
•Nopermitalapresenciadeotraspersonas
enlazona.
Paraobtenerresultadosóptimos,limpieelcortacésped
inmediatamentedespuésdehaberterminadolasiega.
1.Bajeelcortacéspedalaalturadecortemásbaja.
ConsulteAjustedelaalturadecorte.
2.Lleveelcortacéspedaunasupercieplana
pavimentada.
3.Introduzcaunamangueradejardínconectadaa
ungrifoeneloriciodelavadodelacarcazadel
cortacésped(Figura34).
Figura34
4.Abraelgrifodelamanguera.
5.Arranqueelmotoryhágalofuncionarhastaqueno
salganmásrecortesdedebajodelacarcaza.
6.Pareelmotor.
7.Cierreelgrifoydesconectelamangueradel
cortacésped.
8.Arranqueelmotoryhágalofuncionarduranteunos
minutosparaquesesequelacarcasayevitarquese
oxide.
19

Almacenamiento
Almaceneelcortacéspedenunlugarfresco,limpioy
seco.
Preparacióndelcortacésped
paraelalmacenamiento
Losvaporesdelagasolinapuedenexplosionar.
•Noguardelagasolinadurantemásde
30días.
•Noguardeelcortacéspedenunlugar
cerradocercadeunallamadesnuda.
•Dejequeseenfríeelmotorantesde
guardarlo.
1.Enelúltimorepostajedelaño,añadaestabilizador
alcombustiblesiguiendolasinstruccionesdel
fabricantedelmotor.
2.Desecheadecuadamentecualquiercombustible
sobrante.Recíclelosegúnlanormativalocal,o
utilíceloensuautomóvil.
Nota:Lapresenciadecombustibleviejoenel
depósitodecombustibleeslaprincipalcausade
dicultadesenelarranque.Noguardecombustible
sinestabilizadordurantemásde30días,yno
almacenecombustibleestabilizadodurantemásde
90días.
3.Hagafuncionarelcortacéspedhastaqueelmotorse
pareporhabersequedadosingasolina.
4.Arranqueelmotordenuevo.
5.Dejequefuncioneelmotorhastaquesepare.
Cuandoyanosepuedearrancarelmotor,está
sucientementeseco.
6.Retireelcabledelabujíayengancheelcableenel
postederetención.
7.Retirelabujía,añada30ml(1onza)deaceitea
travésdeloriciodelabujía,ytiredelacuerda
delarrancadorlentamentevariasvecesparaquese
distribuyaelaceiteporelcilindro,conelndeevitar
lacorrosiónduranteelperiododeinactividad.
8.Instalelabujíasinapretarla.
9.Aprietetodoslospernos,tuercasytornillos.
10.Carguelabateríadurante24horas,luegodesconecte
elcargadordelabateríayguardeelcortacéspeden
unazonasincalefacción.Siesnecesarioalmacenar
elcortacéspedenunlugarconcalefacción,debe
cargarlabateríacada90días(modelosdearranque
eléctricosolamente).
Cómoplegarelmanillar
Sipliegaodespliegaelmanillardeforma
incorrecta,puedendañarseloscables,creando
unascondicionesdeoperacióninseguras.
•Nodañeloscablesalplegarodesplegarel
manillar.
•Siuncableestádañado,póngaseencontacto
conelServicioTécnicoAutorizado.
1.Retirelallavedecontacto(modelosdearranque
eléctricosolamente).
2.Aojelospomosdelmanillarhastaquepuedamover
librementelasecciónsuperiordelmismo.
3.Plieguehaciaadelantelasecciónsuperiordelmanillar
(verFigura35).
Importante:Asegúresedequeloscables
quedenporfueradelospomosdelmanillaral
plegarlasecciónsuperior.
Figura35
4.Paradesplegarelmanillar,sigalosmismospasosen
sentidoinverso.
20

Despuésdelalmacenamiento
1.Retirelabujíayhagagirarelmotorrápidamente
usandoelarrancadorparaeliminarelexcesode
aceitedelcilindro.
2.Instalelabujíayapriételaconunallave
dinamométricaa20Nm(15pies-libra).
3.Carguelabateríadurante24horas(modelosde
arranqueeléctricosolamente).
4.Conecteelcabledelabujía.
21

Notas:
22

Notas:
23

Lo siguiente es aplicable tanto a la Garantía Toro de Cobertura Total como a la Garantía de Arranque GTS de Toro:
Elementos y condiciones no cubiertos
No hay otra garantía expresa salvo la cobertura especial de sistemas de emisión en algunos productos. Esta garantía expresa no cubre:
El coste de mantenimiento regular, tanto servicio como piezas, como por ejemplo fi ltros, combustible, lubricantes, cambios de aceite, bujías, fi ltros de aire, afi lado de cuchillas/
cuchillas desgastadas en cortacéspedes, ajustes de cables/acoplamientos o ajustes de frenos y embragues.
Cualquier producto o pieza que haya sido modifi cado o mal utilizado y que necesite ser sustituido o reparado debido a accidente o falta de mantenimiento adecuado.
Reparaciones debidas a cuidados incorrectos de la batería, el no utilizar combustible fresco (comprado hace menos de un mes), o no preparar correctamente la unidad antes de
cualquier periodo de inactividad superior a un mes.
Costes de recogida y entrega.
Mal uso, negligencia o accidentes.
Reparaciones o intentos de reparación por parte de personas ajenas a un Distribuidor Autorizado Toro.
Reparaciones o ajustes para corregir problemas de arranque debidos a lo siguiente:
No haber seguido los procedimientos correctos de mantenimiento
La cuchilla de un cortacésped rotativo ha golpeado un objeto
Existen contaminantes en el sistema de combustible
Combustible inadecuado (en caso de duda, consulte el Manual del operador)
No drenar el sistema de combustible antes de un periodo de inactividad superior a un mes.
Condiciones de uso especiales que pueden requerir más de dos intentos de arranque:
El primer arranque después de un periodo extendido de inactividad superior a un mes o del almacenamiento estacional
Arranque a baja temperatura, por ejemplo al inicio de la primavera o al fi nal del otoño
Procedimientos de arranque incorrectos.
Si tiene difi cultad al arrancar su unidad, revise el Manual del operador para asegurarse de que está siguiendo los procedimientos de arranque correctos. Esto puede ahorrarle una
visita innecesaria al Servicio Técnico.
Responsabilidades del Propietario
Usted debe mantener su producto Toro siguiendo los procedimientos de mantenimiento descritos en el Manual del operador. Dicho mantenimiento rutinario, sea realizado por un
distribuidor o por usted mismo, es por cuenta de usted.
Instrucciones para obtener asistencia bajo la garantía
Si usted cree que su Producto Toro tiene un defecto de materiales o mano de obra, o si un adulto de capacidad normal ya no puede arrancar el motor de su producto con uno o dos
intentos, siga este procedimiento
:
1. Póngase en contacto con cualquier Distribuidor Autorizado Toro para concertar el mantenimiento en sus instalaciones. Para localizar un distribuidor cerca de usted, consulte las
Páginas Amarillas (mire en "Cortacéspedes") o visite nuestro sitio web: www.Toro.com. También puede llamar a a los números indicados en el Apartado 3 para utilizar el sistema
de localización de Distribuidores Toro (24 h/día).
2. Lleve el producto y su prueba de compra (recibo o factura de venta) al Distribuidor. El distribuidor diagnosticará el problema y determinará si está cubierto por la garantía.
3. Si por alguna razón usted no está satisfecho con el análisis del Distribuidor o con la asistencia recibida, póngase en contacto con nosotros en la dirección siguiente: Customer
Care Department, Consumer Division, Toro Warranty Company, 8111 Lyndale Avenue South, Bloomington, MN 55420-1196; o llame al teléfono gratuito 866-214-9807 (clientes de
EE. UU.) o al 866-214-9808 (clientes de Canadá).
Condiciones Generales
Todas las reparaciones cubiertas por estas garantías deben ser realizadas por un Distribuidor Toro Autorizado usando piezas de repuesto aprobadas por Toro.
Ni The Toro Company ni Toro Warranty Company son responsables de daños indirectos, incidentales o consecuentes en conexión con el uso de los Productos
Toro cubiertos por estas garantías, incluyendo cualquier coste o gasto por la provisión de equipos de sustitución o servicio durante periodos razonables de mal
funcionamiento o no utilización hasta la terminación de reparaciones bajo estas garantías. Algunos estados no permiten exclusiones de daños incidentales o
consecuentes, ni limitaciones sobre la duración de una garantía implícita, de manera que las exclusiones y limitaciones arriba citadas pueden no serle aplicables a usted.
Esta garantía le otorga derechos legales específi cos; es posible que tenga otros derechos que varían de un estado a otro.
Países fuera de Estados Unidos o Canadá
Los clientes que compraron productos Toro exportados de los Estados Unidos o Canadá deben ponerse en contacto con su Distribuidor Toro para obtener pólizas de garantía para
su país, provincia o estado. Si por cualquier razón usted no está satisfecho con el servicio ofrecido por su Distribuidor, o si tiene difi cultad en obtener información sobre la garantía,
póngase en contacto con el importador Toro. Si fallan todos los demás recursos, puede ponerse en contacto con nosotros en Toro Warranty Company.
* "Propósito residencial" signifi ca el uso del producto en la misma parcela en la que se encuentra su vivienda. El uso en más de un lugar se considera uso comercial, y sería aplicable la
garantía de uso comercial.
•
•
•
•
•
•
•
-
-
-
-
-
•
-
-
-
Pieza Nº 374-0053 Rev. D
Condiciones y productos cubiertos por la Garantía Toro de cobertura total
The Toro Company y su afi liado, Toro Warranty Company, bajo un acuerdo entre sí, prometen conjuntamente reparar cualquier producto Toro usado con propósitos residenciales
normales* si tiene defectos de materiales o mano de obra o si deja de funcionar debido al fallo de un componente durante un periodo de dos (2) años a partir de la fecha de compra.
Esta garantía es aplicable a todos los cortacéspedes dirigidos Recycler® de 22 pulgadas y sus accesorios. Esta garantía cubre el coste de piezas y mano de obra, pero usted
debe pagar los costes de transporte
.
Los siguientes plazos son aplicables desde la fecha de la compra.
Productos Periodo de Garantía
Todos los productos y accesorios Garantía completa de 2 años
Baterías Garantía completa de 1 año
Garantía limitada para el uso comercial*
Los productos Toro de gasolina utilizados con propósitos comerciales, institucionales o de alquiler están garantizados durante 45 días contra defectos en materiales o mano de obra.
La Garantía Toro de Cobertura Total
Una garantía completa de dos años (Garantía limitada para el uso comercial)
La Garantía de arranque GTS (Guaranteed to Start) de Toro
Una garantía completa de tres años (No aplicable al uso comercial)
Condiciones y productos cubiertos por la Garantía de arranque GTS de Toro
The Toro Company y su afi liado, Toro Warranty Company, bajo un acuerdo entre sí, garantizan conjuntamente que su motor GTS de Toro, utilizado con propósitos residenciales*,
arrancará al primer o al segundo intento durante tres (3) años a partir de la fecha de compra, si usted realiza el mantenimiento de rutina requerido, y si no, lo repararemos sin
cargo alguno.
Esta garantía es aplicable a todos los cortacéspedes dirigidos Recycler® de 22 pulgadas y sus accesorios. Esta garantía cubre el coste de piezas y mano de obra, pero usted
debe pagar los costes de transporte.
Esta Garantía de arranque Toro no es aplicable cuando el producto es usado con propósitos comerciales.*
Cortacéspedes dirigidos
Recycler® 22 pulgadas
-
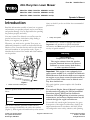 1
1
-
 2
2
-
 3
3
-
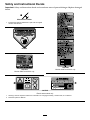 4
4
-
 5
5
-
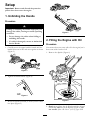 6
6
-
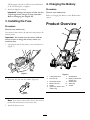 7
7
-
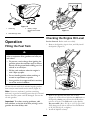 8
8
-
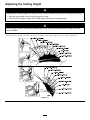 9
9
-
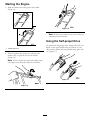 10
10
-
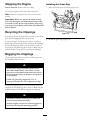 11
11
-
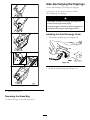 12
12
-
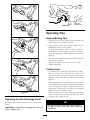 13
13
-
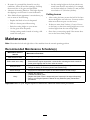 14
14
-
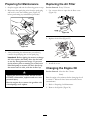 15
15
-
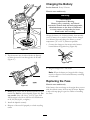 16
16
-
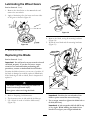 17
17
-
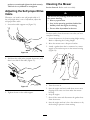 18
18
-
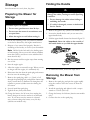 19
19
-
 20
20
-
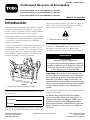 21
21
-
 22
22
-
 23
23
-
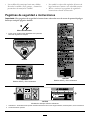 24
24
-
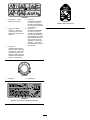 25
25
-
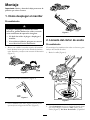 26
26
-
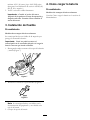 27
27
-
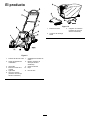 28
28
-
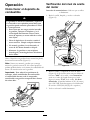 29
29
-
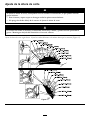 30
30
-
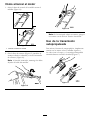 31
31
-
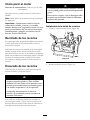 32
32
-
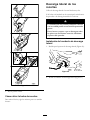 33
33
-
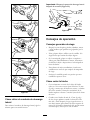 34
34
-
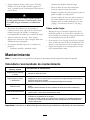 35
35
-
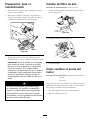 36
36
-
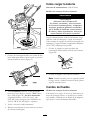 37
37
-
 38
38
-
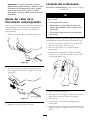 39
39
-
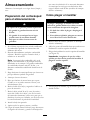 40
40
-
 41
41
-
 42
42
-
 43
43
-
 44
44


Toro 22in Recycler Lawn Mower Manual de usuario
- Categoría
- Cortadoras de césped
- Tipo
- Manual de usuario
En otros idiomas
Documentos relacionados
-
Toro 22in Recycler Lawn Mower Manual de usuario
-
-
-
-
-
-
-
-
-
