Sangean MMR-99DAB Manual de usuario
- Categoría
- Radios
- Tipo
- Manual de usuario

Instruccions de manejo
La marca de Bluetooth® y sus logotipos son
marcas registradas pertenecientes a Bluetooth
SIG, Inc. y el uso de dichas marcas por
SANGEAN ELECTRONICS INC. se realiza bajo
licencia.
1. Importantes instrucciones de
seguridad
1. Lea atentamente estas instrucciones.
2. Conserve estas instrucciones.
3. Observe todas las advertencias.
4. Siga todas las instrucciones.
5. No use este aparato cerca del agua.
6. Límpielo solo con un paño seco.
7. No bloquee ninguna de las aberturas de
ventilación. Instale según las instrucciones
del fabricante.
8. No instale cerca de fuentes de calor, como
radiadores, estufas, fuegos de cocina u
otros aparatos (incluyendo amplicadores)
que produzcan calor.
9. No eluda el propósito de seguridad del
enchufe polarizado o del tipo de toma de
tierra. Un enchufe polarizado tiene dos
hojas, siendo una más ancha que la otra.
Un enchufe del tipo de toma de tierra
tiene dos hojas y una clavija de toma de
tierra. La hoja ancha o la tercera clavija
se le proporcionan por su seguridad. Si
el enchufe no se ajustara a su toma de
corriente, consulte a un electricista para
que se encargue de la sustitución de la
toma obsoleta.
10. Evite pisar o pellizcar el cable de
alimentación, especialmente en la parte del
enchufe, ladrones y el lugar en que este
sale del aparato.
11. Utilice únicamente accesorios especicados
por el fabricante.
12. Coloque el aparato sobre un
carrito, soporte, pie de apoyo o
mesa que haya sido especificado
por el fabricante o vendido con el
televisor. Cuando use el televisor en
combinación con un carrito, tenga cuidado
al desplazarlos juntos, para evitar las
lesiones que podría producir un vuelco de
ambos.
13. Desenchufe este aparato durante las
tormentas o cuando no vaya a usarlo por
un periodo prolongado.
14. Para su reparación, acuda a personal
cualificado. Será necesario reparar el
equipo cuando este haya resultado dañado
en cualquier modo, como en el cable de
alimentación o el enchufe, cuando se haya
derramado líquido o haya caído algún
objeto en la unidad, si el aparato ha sido
expuesto a la lluvia o la humedad, cuando
no funcione con normalidad o en caso de
que se haya caído y recibido un impacto.
15. El aparato no debe ser expuesto a goteos
ni salpicaduras y no deberán colocarse
objetos que contengan líquidos sobre este.
16. Para reducir el riesgo de incendio o
descarga eléctrica, no exponga este
aparato a la lluvia o la humedad.
17. Las pilas no deberán ser expuestas a un
calor excesivo, como el producido por la luz
solar, un fuego, etc.
18. PRECAUCIÓN: peligro de explosión si
la batería se reemplaza incorrectamente.
Reemplácela solo con una del mismo tipo o
equivalente.
19. Para evitar posibles daños en la
audición, no escuche a niveles
altos de volumen durante periodos
de tiempo prolongados.
20. Este aparato está provisto de protección
contra salpicaduras de agua y la entrada
de polvo (IP55).
21. La batería debe usarse o guardarse a una
presión de aire superior a 11,6 kPa, de lo
contrario, podría explotar o perder líquidos
y gases inamables.
PRECAUCIÓN:
Para reducir el riesgo de descarga eléctrica,
no realice ninguna tarea de servicio que no
esté incluida en las instrucciones de uso, a
menos que esté cualificado para hacerlo.
2. Presentación
Vista general de la unidad
principal
1
Botón de linterna LED / luz de emergencia
2 Botón de señal de emergencia
3 Panel solar
Mode d’emploi
La marque et le logo Bluetooth® sont des
marques déposées appartenant à Bluetooth
SIG, Inc. et toute utilisation de ces marques par
SANGEAN ELECTRONICS INC. est faite sous
licence.
1. IInstructions importantes sur la
sécurité
1. Please read these instructions carefully.
2. Please keep these instructions for future
reference.
3. Heed all warnings.
4. Follow all instructions.
5. Do not use this apparatus near water.
6. Clean only with dry cloth.
7. Do not block any ventilation openings.
Install in accordance with the
manufacturer's instructions.
8. Do not install near any heat sources such
as radiators, heat registers, stoves or
other apparatus (including amplifiers) that
produce heat.
9. Do not defeat the safety purpose of
the polarized or grounding-type plug. A
polarized plug has two blades with one
wider than the other. A grounding type
plug has two blades and a third grounding
prong. The wide blade or the third prong
are provided for your safety. If the provided
plug does not t into your outlet, consult an
electrician for replacement of the obsolete
outlet.
10. Protect the power cord from being walked
on or pinched particularly at plugs,
convenience receptacles and the point
where they exit from the apparatus.
11. Only use attachments / accessories
specied by the manufacturer.
12. Use only with the cart, stand, tripod,
bracket or table specified by the
manufacturer or sold with the
apparatus. When a cart is used, use caution
when moving the cart / apparatus
combination to avoid injury from tip-over.
13. Unplug this apparatus during lightning
storms or when unused for a long period of
time.
14. Refer all servicing to qualified service
personnel. Servicing is required when
the apparatus has been damaged in any
way, such as power-supply cord or plug
is damaged, liquid has been spilled or
objects have fallen into the apparatus, the
apparatus has been exposed to rain or
moisture does not operate normally or has
been dropped.
15. Apparatus shall not be exposed to dripping
or splashing and no objects filled with
liquids, such as vases, shall be placed on
the apparatus.
16. To reduce the risk of re or electric shock,
do not expose this apparatus to rain or
moisture.
17. The battery shall not be exposed to
excessive heat such as sunshine, re or the
like.
18. CAUTION: Danger of explosion if battery is
incorrectly replaced. Replace only with the
same or equivalent type.
19. To prevent possible hearing
damage, do not listen at high
volume levels for long periods.
20. This apparatus is provided with protection
against splashing water and dust ingress
(IP55).
21. The battery should be used or stored at an
air pressure above 11.6 kPa, otherwise it
may cause the battery to explode or leak
ammable liquids and gases.
CAUTION:
To reduce the risk of the electric shock, do
not perform any servicing other than that
contained in the operating instructions
unless you are qualified to do so.
2. Introduction
Vue d'ensemble de l'unité principale
1
Lampe de poche LED / bouton d'éclairage
d'urgence
2 Bouton de signal d'urgence
3 Panneau solaire
4 Bouton du mode d'éclairage
5 Haut-parleur
6
Bouton d’alimentation / arrêt automatique
7 Bouton Bande / Verrouillage
Operating instruction
The Bluetooth® word mark and logos are
registered trademarks owned by Bluetooth SIG,
Inc. and any use of such marks by SANGEAN
ELECTRONICS. INC. is under license.
1. Important safety instructions
1. Please read these instructions carefully.
2. Please keep these instructions for future
reference.
3. Heed all warnings.
4. Follow all instructions.
5. Do not use this apparatus near water.
6. Clean only with dry cloth.
7. Do not block any ventilation openings.
Install in accordance with the
manufacturer's instructions.
8. Do not install near any heat sources such
as radiators, heat registers, stoves or
other apparatus (including amplifiers) that
produce heat.
9. Do not defeat the safety purpose of
the polarized or grounding-type plug. A
polarized plug has two blades with one
wider than the other. A grounding type
plug has two blades and a third grounding
prong. The wide blade or the third prong
are provided for your safety. If the provided
plug does not t into your outlet, consult an
electrician for replacement of the obsolete
outlet.
10. Protect the power cord from being walked
on or pinched particularly at plugs,
convenience receptacles and the point
where they exit from the apparatus.
11. Only use attachments / accessories
specied by the manufacturer.
12. Use only with the cart, stand, tripod,
bracket or table specified by the
manufacturer or sold with the
apparatus. When a cart is used,
use caution when moving the cart /
apparatus combination to avoid injury from
tip-over.
13. Unplug this apparatus during lightning
storms or when unused for a long period of
time.
14. Refer all servicing to qualified service
personnel. Servicing is required when
the apparatus has been damaged in any
way, such as power-supply cord or plug
is damaged, liquid has been spilled or
objects have fallen into the apparatus, the
apparatus has been exposed to rain or
moisture does not operate normally or has
been dropped.
15. Apparatus shall not be exposed to dripping
or splashing and no objects filled with
liquids, such as vases, shall be placed on
the apparatus.
16. To reduce the risk of re or electric shock,
do not expose this apparatus to rain or
moisture.
17. The battery shall not be exposed to
excessive heat such as sunshine, re or the
like.
18. CAUTION: Danger of explosion if battery is
incorrectly replaced. Replace only with the
same or equivalent type.
19. To prevent possible hearing
damage, do not listen at high
volume levels for long periods.
20. This apparatus is provided with protection
against splashing water and dust ingress
(IP55).
21. The battery should be used or stored at an
air pressure above 11.6 kPa, otherwise it
may cause the battery to explode or leak
ammable liquids and gases.
CAUTION:
To reduce the risk of the electric shock, do
not perform any servicing other than that
contained in the operating instructions
unless you are qualified to do so.
2. Introduction
Overview of the main unit
1 LED Flashlight / Emergency light button
2 Emergency signal button
3 Solar panel
4 Illumination mode button
5 Speaker
6 Power / Auto off button
7 Band / Lock button
8 LCD display
9 Info / Menu button
01 02 03 04 05
06 08
15
22
07
14
21
09
16
23
10
17
24
11 12
18 19
25 26
3A81f2110001B
MMR-99DAB
GB
13
20
F
E
1 2 3
24
25 26
21 22
13
2927
28 30
14
5 6 7 9 10 11 12
GF
DB
A
C E
H
KLM
8
4
J
15 231617181920
I
10 Page / Alarm button
11 Enter / Autotune button
12 Tuning up / down button
13 Bluetooth LED indicator
14 Charging LED indicator
15 Volume up / down button
16 Preset 5 button
17 Preset 4 / Next track / Fast forward button
18 Preset 3 / Play / Pause button
19 Preset 2 / Previous track / Rewind button
20 Preset 1 / Bluetooth pairing button
21 Low beam (red)
22 High beam (white)
23 Low beam (white)
24 Hand strap
25 Telescopic antenna
26 Dynamo power hand crank
27 DC IN socket (USB Type-C, 5V 2.4A)
28 DC OUT socket (USB Type-A, 5V 1A)
29 Auxiliary input socket
30 3.5mm headphones socket
LCD display and indicators
A FM indicator
B RDS indicator
C Emergency light indicator
D Lock indicator
E FM stereo indicator
F Signal strength indicator
G Battery indicator
H Preset indicator
I Sleep indicator
J Time and radio frequency
K Alarm indicator
L Aux indicator
M DAB indicator
3. Getting started
Powering the radio
The MMR-99DAB is powered by a built-in
2,600mAh Lithium-ion battery. This battery can
be charged by connecting a USB power source
to the radio's DC IN socket, by using the hand
crank at the back of the radio or using the solar
panel on top of the radio.
Before using the radio for the first time, it is
recommended to fully charge the radio's built-
in battery using the radio's DC-in socket and a
USB power source.
Fully charging the battery using USB power
takes approx. 3 hours. The battery indicator
will disappear from the display when the radio's
battery is fully charged. Reduced power,
distortion, stuttering sounds, or an empty
battery icon flashing on the radio's display are
all signs that the battery needs to be recharged.
The radio can play approx. 20 hours when the
battery is fully charged.
Charging the battery using the DC IN
socket
Follow these steps to charge the battery using
the radio's DC IN socket:
1. Connect the type-C end of the supplied USB
charging cable to the DC IN socket on the
right side of the radio.
2. Connect the other end of the USB charging
cable to a USB Type-A port (for example of a
PC, USB charger or powerbank).
Note:
It is recommended to use a USB power
source supplying 5V / 2.4A to prevent battery
failure and to make sure the radio's DC OUT
socket can also be used while charging the
battery.
Charging the battery using the hand
crank
Follow these steps to charge the battery using
the hand crank at the back of the radio:
1. Before using the hand crank, make sure the
telescopic antenna is retracted and placed
back in its rest.
2. Take the hand crank from its rest position.
3. Rotate the hand crank clockwise or
counterclockwise at approx. 100 rotations
per minute. The Charging LED indicator next
to the radio's display will light up green while
the battery is being charged.
4. After you have finished charging the radio
using the hand crank, place the hand crank
back in its rest position.
Note:
Under normal listening conditions, each
minute of charging using the hand crank
adds approx. 5~7minutes of listening time.
Charging the battery using the solar
panel
The radio does not need to be switched on in
order for the solar panel to operate.
To recharge the radio's internal battery using
solar power, position the radio in such a way
that the solar panel receives direct sunlight. The
more direct sunlight that shines on the solar
panel, the more electricity it can generate to
power the radio.
Note:
The best performance of the solar panel
will be achieved when the sun is directly
overhead, and the sunlight is unobstructed
by clouds, foliage, curtains etc. In certain
situations and poor light conditions, the
solar panel may not be effective and should
not be relied upon as the primary energy
source for standard usage. The solar panel
is designed as a supplementary energy
source which under suitable light conditions
is able to contribute up to 100% of the
radio's energy requirements. The solar
panel will charge the battery only under
natural sunlight. It will not deliver a charge
in artificial light.
DO NOT attempt to charge the battery by
placing the solar panel directly under any kind
of sun-lamp, this will cause irreversible damage
to the radio and may damage the casing. (Doing
so will void your warranty.)
Turning the radio on / off
After the radio has been supplied with power,
press and hold the Power button to turn on the
radio. The radio will automatically switch to the
last used mode. To turn off the radio, simply
press the Power button.
Note:
If the radio is battery powered, all buttons
except the LED Flashlight / Emergency light
button, Emergency signal button and Power
button will be disabled when the radio is
turned off. When connected to a USB power
source, the alarm can still be enabled /
disabled by pressing and holding the Alarm
button and the radio menu can be opened
by pressing and holding the Menu button.
Using the LED Flashlight
The MMR-99DAB features three built-in
lights that can be used as an LED Flashlight
by repeatedly pressing the LED Flashlight
button to activate either of the three lights
or to turn off the Flashlight feature. The LED
Flashlight can always be activated, regardless
of whether the radio is turned on or off. After
activating one of the three lights, repeatedly
press the Illumination mode button to select the
illumination mode. The available illumination
modes are: High brightness, Low brightness,
SOS (Morse Code Distress Signal, three short
flashes, three long flashes, three short flashes),
and Blinking.
Using the Emergency signal
feature
The MMR-99DAB also features an emergency
siren and light that can be used to draw
attention in case of emergency. The emergency
signal can always be activated, regardless
of whether the radio is turned on or off. To
active the emergency signal, simply press the
Emergency signal button. The red low beam
light and the white high beam light will now
alternately flash and an alarm sound increasing
in volume will be played from the radio's
speaker.
Using the Key lock feature
The key lock feature can be used to prevent
unintentional operation of the radio and will
disable all buttons except for the LED Flashlight
and Emergency signal buttons.
In order to activate the key lock, simply press
and hold the Lock button until the Lock indicator
appears on the radio's display. To disable the
key lock, press and hold the Lock button again
until the Lock indicator disappears from the
display.
Using the Sleep timer
The sleep timer allows you to automatically turn
off the radio after a preset time has elapsed. It
can be set from 15 to 120 minutes by pressing
and holding the Power button and releasing it
when the desired sleep time is shown on the
display.
When the sleep timer is active, the Sleep
indicator will be shown on the radio's display.
To turn off the sleep timer, either press and hold
the Power button until the [OFF] option appears
on the display or turn off the radio and then turn
it on again.
The radio menu
The radio menu can be opened when the radio
is turned on or off and it can be opened from
any mode. The menu consists of a number of
default items and some items that are specific
to the mode in which the menu is opened (if
applicable).
To open the radio menu, press and hold the
Menu button. Then press the Tuning up / down
button to select an item or a value in the menus
and press the Enter button to confirm your
choice, or press the Menu button to go back
one step in the menu or close the menu (if no
higher level items are available).
The list below gives an overview of the default
items that can be selected from the menu in all
of the radio modes. In some of the radio modes,
the menu also features additional items specific
to the selected mode. These items will be listed
in the chapter belonging to that specific mode
later in this manual.
[TIME]: Select this item to go to the time
submenu featuring the following items:
●[UPDATE]: Select this item to congure the
source for automatically updating the time.
Select [FM] to update the time when tuning
into an FM station with RDS data, select
[DAB] to update the time when tuning into
a DAB station, or select [NONE] to disable
automatic updating of the radio's time.
●[TIME SET]: Select this item to manually set
the radio's time and date.
●[12 / 24 HOUR]: Select this item to select the
12 or 24 hour format.
Note:
If the radio is turned off while using battery
power, the time set will not be saved in order
to save battery life. As a result, the alarm is
disabled as well.
[SW VERSION]: Select this item to view the
radio's software version.
[RESET]: Select this item to reset the radio to
the default settings. Please note that selecting
this item and subsequently selecting [Yes] will
reset the radio to its factory settings and all
information stored on the radio will be deleted.
This includes all settings and stored preset
stations.
[LANGUAGE]: This item is not available when
opening the menu from the radio's Standby
mode.
Select this item to configure the language in
which the radio menus are displayed.
[DCOUT]: This item is only available when the
radio is not connected to a USB power source.
Select this item to enable / disable the radio's
DC OUT socket when using battery power (when
the radio is connected to a USB power source,
the DC OUT socket is always enabled and
available for charging when the radio is turned
off). To use the DC OUT socket to supply power
to an external device when using battery power,
this item must be enabled and the radio must
be turned off.
[LIGHT]: Select this item to go to the light
submenu featuring the following items:
●[B / L]: Select this item to configure the
timeout for the radio's backlight. The available
options are [30S], [20S], [10S] and [OFF].
●[EL]: Select this item to enable / disable the
radio's automatic emergency light feature.
This feature automatically activates the
white high beam LED when the radio is
disconnected from a USB power source.
Repeatedly press the LED Flashlight button
to turn off the ashlight.
[LOUD]: Select this item to enable / disable the
radio's loudness feature.
[ALARM]: Select this item to configure the
radio's alarm. After setting an alarm time, the
alarm source, alarm frequency and alarm
volume can also be selected. The available
options for the alarm source are [DAB], [FM],
and [BUZ], while the available options for
the alarm frequency are [ONCE], [DAILY],
[WEEKDAYS], and [WEEKENDS].
4. Listening to DAB radio
Tuning into DAB stations
To tune into DAB radio stations, follow these
steps:
1. Turn on the radio by pressing and holding the
Power button.
2. Select the DAB radio mode by repeatedly
8 Écran LCD
9 Bouton Info / Menu
10 Bouton Page / Alarme
11 Bouton Entrée / Syntonisation auto (Enter
/ Autotune)
12 Bouton de réglage Tuning haut / bas
13 Indicateur LED Bluetooth
14 Indicateur LED de charge
15 Bouton de réglage du volume haut / bas
16 Bouton de préréglage 5
17 Bouton de préréglage 4 / Piste suivante /
Avance rapide
18 Bouton de préréglage 3 / Lecture / Pause
19 Bouton de préréglage 2 / Piste
précédente / Rembobiner
20 Bouton de préréglage 1 / couplage
Bluetooth
21 Éclairage de faible luminosité (rouge)
22 Éclairage de forte luminosité (blanc)
23 Éclairage de faible luminosité (blanc)
24 Dragonne
25 Antenne télescopique
26 Manivelle dynamo
27 Prise DC IN (USB Type-C, 5V et 2,4A)
28 Prise DC OUT (USB Type-A, 5V et 1A)
29 Prise d'entrée auxiliaire
30 Prise casque de 3,5mm
Écran LCD et indicateurs
A Indicateur FM
B Indicateur RDS
C Indicateur de l’éclairage d’urgence
D Indicateur de verrouillage
E Indicateur FM stéréo
F
Indicateur de la puissance du signal
G Indicateur de batterie
H Indicateur du préréglage
I
Indicateur du mode minuterie de mise en
veille
J Heure et fréquence radio
K Indicateur d’alarme
L Indicateur Aux In
M Indicateur DAB
3. Avant de commencer
Alimenter la radio
Le MMR-99DAB est alimenté par une batterie
lithium-ion intégrée de 2600mAh. Cette
batterie peut être chargée en connectant une
source d'alimentation USB à la prise DC IN
de la radio, en utilisant la manivelle à l'arrière
de la radio ou en utilisant le panneau solaire
sur le dessus de la radio.
Avant d'utiliser la radio pour la première fois,
il est recommandé de charger complètement
la batterie intégrée de la radio à l'aide de
la prise DC-IN de la radio et d'une source
d'alimentation USB.
La charge complète de la batterie à l'aide
de l'alimentation USB prend environ 3
heures. L'indicateur de batterie disparaît
de l'écran lorsque la batterie de la radio
est complètement chargée. Une puissance
réduite, une distorsion, des sons saccadés
ou une icône de batterie vide clignotant sur
l'écran de la radio sont tous des signes que
la batterie doit être rechargée. La radio peut
jouer pendant environ 20 heures lorsque la
batterie est complètement chargée.
Charger la batterie à l'aide de la prise
DC IN
Suivez ces étapes pour charger la batterie à
l'aide de la prise DC IN de la radio:
1. Connectez l'extrémité type C du câble de
charge USB fourni à la prise DC IN sur le
côté droit de la radio.
2. Connectez l'autre extrémité du câble de
charge USB à un port USB Type-A (par
exemple d'un PC, d'un chargeur USB ou
d'une batterie externe portable).
Remarque:
Il est recommandé d'utiliser une source
d'alimentation USB fournissant 5V / 2,4A
pour éviter une panne de la batterie et
pour s'assurer que la prise DC OUT de la
radio peut également être utilisée pendant
la charge de la batterie.
Charger la batterie à l'aide de la
manivelle
Suivez ces étapes pour charger la batterie à
l'aide de la manivelle à l'arrière de la radio:
1. Avant d'utiliser la manivelle, assurez-vous
que l'antenne télescopique est rétractée et
remise en place.
2. Sortez la manivelle de sa position de
repos.
3. Tournez la manivelle dans le sens des
aiguilles d'une montre ou dans le sens
inverse des aiguilles d'une montre à
environ 100 tours par minute. L'indicateur
LED de charge à côté de l'écran de la
radio s'allumera en vert pendant que la
batterie est en charge.
4. Une fois que vous avez ni de charger la
radio à l'aide de la manivelle, replacez la
manivelle dans sa position de repos.
Remarque:
dans des conditions d'écoute normales,
chaque minute de charge à l'aide de la
manivelle ajoute environ 5~7 minutes
d'écoute.
Charger la batterie à l'aide du panneau
solaire
La radio n'a pas besoin d'être allumée pour
que le panneau solaire fonctionne.
Pour recharger la batterie interne de la radio
à l'aide de l'énergie solaire, positionnez
la radio de manière à ce que le panneau
solaire reçoive la lumière directe du soleil.
Plus la lumière directe du soleil se reflète
sur le panneau solaire, plus il peut générer
d'électricité pour alimenter la radio.
Remarque:
les meilleures performances du panneau
solaire seront obtenues lorsque le soleil
est directement au-dessus de votre tête et
que la lumière du soleil n'est pas obstruée
par les nuages, le feuillage, les rideaux,
etc. Dans certaines situations et dans
de mauvaises conditions d'éclairage, le
panneau solaire peut ne pas être efficace
et ne devrait pas être considéré comme
la principale source d'énergie pour une
utilisation standard. Le panneau solaire
est conçu comme une source d'énergie
supplémentaire qui, dans des conditions
d'éclairage appropriées, peut couvrir
jusqu'à 100% des besoins énergétiques de
la radio. Le panneau solaire ne chargera
la batterie que sous la lumière naturelle
du soleil. Il ne fera aucune charge sous
une lumière artificielle.
N'essayez PAS de charger la batterie en
plaçant le panneau solaire directement sous
une lampe solaire quel que soit le type, cela
causerait des dommages irréversibles à la
radio et pourrait endommager le boîtier. (Cela
annulera votre garantie.)
Allumer / éteindre la radio
Une fois la radio alimentée, appuyez et
maintenez enfoncé le bouton d'alimentation
pour allumer la radio. La radio passera
automatiquement au dernier mode utilisé.
Pour éteindre la radio, appuyez simplement
sur le bouton d'alimentation.
Remarque:
si la radio est alimentée par batterie,
tous les boutons, à l'exception du
bouton Lampe de poche LED / éclairage
d'urgence, du bouton de signal d'urgence
et du bouton d'alimentation, seront
désactivés lorsque la radio est éteinte.
Lorsqu'elle est connectée à une source
d'alimentation USB, l'alarme peut toujours
être activée / désactivée en maintenant
enfoncé le bouton Alarme et le menu radio
peut être ouvert en maintenant enfoncé le
bouton Menu.
Utilisation de la lampe de poche
LED
Le MMR-99DAB dispose de trois lumières
intégrées qui peuvent être utilisées comme
lampe de poche à LED en appuyant plusieurs
fois sur le bouton de la lampe de poche
pour activer l'un des trois types d’éclairage
ou pour désactiver la fonction de lampe de
poche. La lampe de poche LED peut toujours
être activée, que la radio soit allumée ou
éteinte. Après avoir activé l'un des trois
types d’éclairage , appuyez plusieurs fois
sur le bouton du mode d'éclairage pour
sélectionner le mode d'éclairage. Les modes
d'éclairage disponibles sont les suivants :
forte luminosité, faible luminosité, SOS (signal
de détresse en code Morse, trois flashs
courts, trois flashs longs, trois flashs courts)
et lumière clignotante.
pressing the Band button.
3. If this is the rst time the DAB radio mode
is being used, the radio will automatically
perform a full scan in order to find all
available DAB radio stations. During the
scanning process, as new stations are
detected the station counter will increase
and the stations will be added to the list
which is stored in the radio.
4. When the full scan has completed, the
radio will automatically tune into the first
DAB station in the station list and play the
station.
5. Use the Tuning up / down button to browse
through the station list and press the Enter
button to tune into the selected station.
Note:
Before selecting the DAB radio mode
and tuning into stations, make sure the
telescopic antenna at the back of the radio
has been fully extended and positioned
upright.
The DAB radio menu
In the DAB radio mode, the radio's menu
features five additional items specific to this
mode:
[FULL SCAN]: Select this option to perform
a full scan and store all DAB radio stations
that were found in the station list.
[MANUAL]: Select this option to manually
tune into a DAB channel / frequency.
[DRC]: Dynamic Range Control (also
known as DRC) can make quieter sounds
easier to hear when your radio is used in a
noisy environment by reducing the dynamic
range of the audio signal. Select this item
to configure the DRC level, the available
options are:
●[0]: DRC is switched off. Broadcast DRC
will be ignored. This is the default setting.
●[1 / 2]: DRC level is set to 1 / 2 that sent by
broadcaster.
●[1]: DRC is set as sent by broadcaster.
[ORDER]: Select this item to configure the
order of the station list. Select [NAME] to
order stations by name, select [ENSEMBLE]
to sort the station list by DAB multiplex, or
select [ACTIVE] to sort the station list by
active / inactive stations.
[PRUNE]: Select this item to delete all
unavailable stations from the station list.
Storing preset DAB stations
The MMR-99DAB features 4 preset pages
containing 5 preset stations for DAB radio (for
a total of 20 presets).
To store a DAB station as a preset DAB
station, follow these steps:
1. Turn on the radio.
2. Select the DAB radio mode by repeatedly
pressing the Band button and tune into
the required DAB station as previously
described.
3. Repeatedly press the Page button to
select the desired preset page.
4. Press and hold the desired Preset button
(1-5) until the radio's display shows the
message "SAVED". The station is now
saved as a preset and the corresponding
preset indicator will appear on the radio's
display.
5. Repeat this procedure as needed for the
remaining presets. Preset stations cannot
be deleted, but they can be overwritten by
storing a new station on an already used
preset.
Recalling preset DAB stations
To recall a preset DAB station follow these
steps:
1. Turn on the radio.
2. Select the DAB radio mode by repeatedly
pressing the Band button.
3. Repeatedly press the Page button to
select the desired preset page.
4. Press the button of the desired preset
station (1-5).
Showing DAB information on
the display
When listening to a DAB radio station,
repeatedly press the Info button to cycle
through the following information on the
radio's display:
●Text
●Program Type
●Program Name
●Time
●Date
●Frequency
●Bit rate
●Audio Codec
●Signal Strength
●DL Plus text (Some stations may provide
other programme related information for
the display in addition to the regular text.
If none is available, a message "no info"
is displayed.)
5. Listening to FM radio
Tuning into FM stations
To tune into FM radio stations, follow these
steps:
1. Turn on the radio by pressing and
holding the Power button.
2. Select the FM radio mode by repeatedly
pressing the Band button.
3. Press the Tuning up or Tuning down
button and then press the Autotune
button to automatically tune into an
FM station with a higher or lower
frequency respectively. Your radio will
stop scanning when it finds a station
of sufficient strength. The display will
show the frequency of the signal which
has been found and the Signal strength
indicator will indicate the strength of
the signal received. If RDS information
is available, the RDS indicator will also
appear on the radio's display and after
a few seconds the display will show the
radio station name.
4. Press the Tuning up / down button to
ne-tune the frequency with steps of 0.05
MHz if needed.
5. Repeat the steps 3 and 4 to tune into
other radio stations.
Note:
Before selecting the FM radio mode
and tuning into stations, make sure
the telescopic antenna at the back of
the radio has been fully extended and
positioned upright.
The FM radio menu
In the FM radio mode, the radio menu
features two additional items specific to this
mode:
[SCAN]: Select this item to configure the
radio's autotune feature. Select [LOCAL]
to only have the autotune feature scan for
local, strong signals, or select [DISTANT] to
have the autotune feature scan for distant,
weaker signals as well.
[AUDIO]: Select this item to configure
playback in the FM mode. Select [MONO]
to force mono playback, or select [Auto] to
allow stereo playback if available. Forcing
mono playback can help reducing hiss from
weak FM signals.
Storing preset FM stations
The MMR-99DAB features 4 preset pages
containing 5 preset stations for FM radio (for
a total of 20 presets).
To store an FM station as a preset FM
station, follow these steps:
1. Turn on the radio by pressing and
holding the Power button.
2. Select the FM radio mode by repeatedly
pressing the Band button and tune into
the required FM station as previously
described.
3. Repeatedly press the Page button to
select the desired preset page.
4. Press and hold the desired Preset button
(1-5) until the radio's display shows the
message "SAVED". The station is now
saved as a preset and the corresponding
preset indicator will appear on the radio's
display.
5. Repeat this procedure as needed for
the remaining presets. Preset stations
cannot be deleted, but they can be
overwritten by storing a new station on
an already used preset.
Recalling preset FM stations
To recall a preset FM station follow these
steps:
1. Turn on the radio by pressing and
holding the Power button.
2. Select the FM radio mode by repeatedly
pressing the Band button.
3. Repeatedly press the Page button to
select the desired preset page.
4. Press the button of the desired preset
station (1-5).
Showing FM information on
the display
When listening to a FM radio station that
is also broadcasting RDS information (the
RDS indicator is shown on the radio's
display), repeatedly press the Info button to
cycle through the following information on the
radio's display:
●Station name
●Text message
●Program type
●Frequency
●Reception type (stereo / mono)
●Current time
●Current date
If no RDS information is available, the radio
will be unable to display the station name, text
message and program type.
6. Listening to music via Bluetooth
streaming
In order to stream Bluetooth music to your
radio, you need to pair your Bluetooth device
with your MMR-99DAB. Pairing creates a 'bond'
so two devices can recognize each other.
Pairing your Bluetooth device for
the first time
1. Turn on the radio by pressing and holding the
Power button.
2. Repeatedly press the Band button to select
the Bluetooth mode. The radio's display
will show the message "PAIRING" and
the Bluetooth LED indicator will blink blue
to indicate that the radio is available for
Bluetooth pairing.
3. Activate Bluetooth on your Bluetooth device
(refer to the manual of the Bluetooth device
if you are unsure about how to active
Bluetooth).
4. Go to the Bluetooth list on your Bluetooth
device and select the device named
"MMR-99DAB".
Note:
On some Bluetooth devices with
Bluetooth version 2.1 or earlier, you might
be requested to enter a pass code. If this
is the case, enter the pass code "0000".
5. After the devices have paired and connected,
a confirmation tone will be played on the
radio and the radio's display will show the
name of the connected Bluetooth device. You
can now play music on your Bluetooth device
and stream the music through the radio's
speaker.
Notes:
●If 2 Bluetooth devices are pairing for the
rst time, both must search for your radio,
it will show its availability on both devices.
However, if one device links with this unit
rst, then the other Bluetooth device won’t
nd it on the list.
●If you take your Bluetooth device out
of range, the connection between your
device and the radio will be temporarily
disconnected. Your radio will automatically
reconnect if the Bluetooth device is
brought back into range. Be aware that
during the period of disconnection, no
other Bluetooth device can pair or link
with your radio.
●If "MMR-99DAB" shows up in your
Bluetooth device list, but your Bluetooth
device cannot connect with it, please
delete the item from your list and pair
the Bluetooth device with the radio again
following the steps described previously.
●The effective operation range between
the radio and the paired Bluetooth device
is approximately 10 meters (30 feet). Any
obstacle between the system and the
device can reduce the operational range.
●Bluetooth connectivity performance
may vary depending on the connected
Bluetooth device. Please refer to the
Bluetooth capabilities of your device
before connecting it to your radio. Not all
features may be supported, depending on
the Bluetooth device used.
●With some mobile phones, making /
receiving calls, text messages, e-mails
or any other activities unrelated to audio
streaming may mute the Bluetooth
audio streaming or even temporarily
disconnect from your device. Such
behavior is a function of the Bluetooth
device and does not indicate a problem
with your MMR-99DAB.
Audio playback in the Bluetooth
mode
When you have successfully connected your
radio with the chosen Bluetooth device you can
start to play your music using the controls on
your connected Bluetooth device.
1. The volume of Bluetooth playback can be
controlled both on your Bluetooth device and
on the radio using the Volume up / down
button.
2. Playback can also be controlled both using
the controls on your Bluetooth device and the
controls on the radio. Press the radio's Play /
Pause button to start / pause playback, press
the Next track or Previous track button to
select the desired track, and press and hold
the Next track or Previous track button to fast
forward or rewind within a track (release the
button when the desired point within the track
is reached).
Note:
Not all player applications or devices may
respond to all of these controls.
Audio playback from a previously
paired Bluetooth device
The MMR-99DAB can memorize up to 8 sets
of paired Bluetooth devices. Once the memory
goes over 8, the earliest device with which
the radio was paired will be overwritten in the
radio's memory.
If your Bluetooth source device has previously
paired with the MMR-99DAB previously, the
radio will still remember your Bluetooth device
and attempt to reconnect with the device that
was last connected. If the last connected
Bluetooth device is not available, the radio
will try to connect to the second last Bluetooth
device.
Disconnecting your Bluetooth
device
Press and hold the Bluetooth pairing button to
disconnect the radio from your Bluetooth device.
You can also press the Band button to select
any mode other than Bluetooth mode or turn off
Bluetooth on your Bluetooth source device to
disable the connection.
If you disconnect from the Bluetooth device in
the Bluetooth mode, a confirmation tone will be
played and the radio's Bluetooth LED indicator
will flash blue to indicate that the radio is
available again for pairing.
7. Using the Auxiliary input socket
and headphones socket
Listening to music via the Auxiliary
input socket
You can listen to the sound of an external
device through your MMR-99DAB's speaker. To
do this, follow these steps.
1. Connect the external device (such as iPod,
MP3 player or CD player) to the radio's Aux
input socket using a 3.5mm audio cable (not
supplied).
2. Make sure both the radio and the external
device are turned on.
3. Repeatedly press the Band button to select
the Aux in mode.
4. The audio output of the external device
will now be played through the speaker of
your MMR-99DAB. Adjust the volume on
the external device to ensure an adequate
volume level and then use the radio's Volume
up / down button as needed to adjust the
volume to a comfortable level.
Listening to music using the
headphones socket
MMR-99DAB is equipped with a Headphones
socket at the right side of the radio, which can
be used to connect a pair of headphones with
a 3.5mm plug. To connect the headphones,
simply plug the 3.5mm jack into the socket. The
radio will then automatically detect that a pair
of headphones has been connected and it will
disable its internal speaker.
We recommend turning the volume down
before connecting the headphones and raising
it slowly to a suitable level after connecting
the headphones to avoid loud sounds and
damaging your hearing.
Note:
Excessive sound pressure from earphones
and headphones can cause hearing loss.
To prevent possible hearing damage, do not
listen at high volume levels for long periods
of time.
Specifications
Power Supply
2600mAh rechargeable built-in Lithium-ion battery
Dynamo - charging to rechargeable built-in Lithium battery.
Solar panel - charging to rechargeable built-in Lithium battery.
DC IN (5V / 2.4A) USB C Type Socket for Charging the
MMR-99DAB.
USB A Type to USB C Type Cable & Hand strap included.
Frequency Coverage
FM 87.5-108 MHz
DAB (BAND III) 5A-13F (174.928MHz - 239.200MHz)
Bluetooth
Bluetooth Specification Bluetooth® 5.0 +EDR
Profile Support A2DP, AVRCP
Bluetooth Audio Codec SBC, AAC
Transmitting Power Power Class 2
Line of Sight Range 10meters / 30feet
The Frequency And Maximum
Transmitted Power 2402MHz ~ 2480MHz: 2dBm (Bluetooth EDR & LE)
Antenna
Telescopic Antenna FM / DAB
Socket
DC Socket
DC IN USB Type C, 5V / 2.4A
This symbol indicates DC voltage.
DC OUT USB Type A, 5V / 1A
Earphones Jack 3.5mm diameter, Stereo Output, 32ohm Impedance
Auxiliary Socket 3.5mm diameter, Stereo Input
Speaker 2.25", 4Ohm, 5Watts
Output Power 1.5Watts
Operating Temperature Range 5°C to 35°C
※ The barcode label on the product is defined as below:
Serial number
Production month
Production year
Product code
The company reserves the right to amend the specification without notice.
If at any time in the future you should need to dispose of this product please note that: Waste
electrical products should not be disposed of with household waste. Please recycle where
facilities exist. Check with your Local Authority or retailer for recycling advice. (Waste Electrical
and Electronic Equipment Directive)
Utilisation de la fonction de signal
d'urgence
Le MMR-99DAB dispose également d'un signal
d'urgence et d'une lumière qui peuvent être
utilisés pour attirer l'attention en cas d'urgence.
Le signal d'urgence peut toujours être activé,
que la radio soit allumée ou éteinte. Pour
activer le signal d'urgence, appuyez simplement
sur le bouton Signal d'urgence. L’éclairage
de faible luminosité rouge et l’éclairage de
forte luminosité blanc clignoteront désormais
alternativement et un son d'alarme augmentant
en volume sera émis par le haut-parleur de la
radio.
Utilisation de la fonction de
verrouillage des touches
La fonction de verrouillage des touches peut
être utilisée pour empêcher le fonctionnement
involontaire de la radio et désactivera tous les
boutons, à l'exception de la lampe de poche
LED et des boutons de signal d'urgence.
Pour activer le verrouillage des touches,
appuyez simplement sur le bouton de
verrouillage et maintenez-le enfoncé jusqu'à
ce que l'indicateur de verrouillage apparaisse
sur l'écran de la radio. Pour désactiver le
verrouillage des touches, appuyez à nouveau
sur le bouton de verrouillage et maintenez-
le enfoncé jusqu'à ce que l'indicateur de
verrouillage disparaisse de l'écran.
Utilisation de la minuterie de mise
en veille
La minuterie de mise en veille vous permet
d'éteindre automatiquement la radio après un
délai prédéfini. Elle peut être réglée de 15 à
120 minutes en maintenant enfoncé le bouton
d'alimentation et en le relâchant lorsque le
temps de mise en veille souhaité s'affiche à
l'écran.
Lorsque la minuterie de mise en veille est
active, l'indicateur de la fonction s'affichera sur
l'écran de la radio. Pour désactiver la minuterie
de mise en veille, appuyez sur le bouton
d'alimentation et maintenez-le enfoncé jusqu'à
ce que l'option [OFF] (désactivé) apparaisse à
l'écran ou éteignez la radio puis rallumez-la.
Menu de la radio
Le menu de la radio peut être ouvert lorsque
la radio est allumée ou éteinte et il peut être
ouvert à partir de n'importe quel mode. Le menu
se compose d'un certain nombre d'éléments
par défaut et de certains éléments spécifiques
au mode dans lequel le menu est ouvert (le cas
échéant).
Pour ouvrir le menu de la radio, appuyez et
maintenez enfoncé le bouton Menu. Appuyez
ensuite sur le bouton de réglage Tuning haut
/ bas pour sélectionner un élément ou une
valeur dans les menus. Appuyez sur le bouton
Entrée pour confirmer votre choix, ou appuyez
sur le bouton Menu pour revenir dans le menu
précédent ou fermer le menu (si aucun niveau
supérieur n’est disponible).
La liste ci-dessous donne un aperçu des
éléments par défaut qui peuvent être
sélectionnés dans le menu dans tous les
modes radio. Dans certains des modes radio,
le menu propose également des éléments
supplémentaires spécifiques au mode
sélectionné. Ces éléments seront répertoriés
dans le chapitre correspondant à ce mode
spécifique plus loin dans ce manuel.
[TIME] (heure): sélectionnez cet élément pour
accéder au sous-menu de l'heure comportant
les éléments suivants:
●[UPDATE] (mise à jour): sélectionnez cet
élément pour configurer la source pour
la mise à jour automatique de l'heure.
Sélectionnez [FM] pour mettre à jour l'heure
lors de la syntonisation d'une station FM avec
des données RDS. Sélectionnez [DAB] pour
mettre à jour l'heure lors de la syntonisation
d'une station DAB, ou sélectionnez [NONE]
(Aucun) pour désactiver la mise à jour
automatique de l'heure de la radio.
●[TIME SET] (réglage de l’heure):
sélectionnez cet élément pour régler
manuellement l'heure et la date de la radio.
●[12 / 24 HOUR] (format 12 / 24 heures):
sélectionnez cet élément pour sélectionner le
format 12 ou 24 heures.
Remarque:
Si la radio est éteinte alors qu'elle est
alimentée par la batterie, l'heure réglée ne
sera pas enregistrée afin de préserver la
durée de vie de la batterie. Par conséquent,
l'alarme est également désactivée.
[SW VERSION]: sélectionnez cet élément pour
afficher la version du logiciel de la radio.
[RESET]: sélectionnez cet élément pour
réinitialiser la radio aux paramètres par défaut.
Veuillez noter que la sélection de cet élément
puis la sélection de [Yes] (Oui) réinitialiseront
la radio à ses paramètres d'usine et toutes
les informations stockées sur la radio seront
supprimées. Cela inclut tous les paramètres et
les stations préréglées enregistrées.
[LANGUAGE]: Cet élément n'est pas disponible
lors de l'ouverture du menu depuis le mode
Veille de la radio. Sélectionnez cet élément pour
configurer la langue dans laquelle les menus
radio sont affichés.
[DCOUT]: Cet élément n'est disponible que
lorsque la radio n'est pas connectée à une
source d'alimentation USB. Sélectionnez
cet élément pour activer / désactiver la prise
DC OUT de la radio lors d’une utilisation sur
batterie (lorsque la radio est connectée à une
source d'alimentation USB, la prise DC OUT
est toujours activée et disponible pour la charge
lorsque la radio est éteinte). Pour utiliser la prise
DC OUT pour alimenter un appareil externe lors
d’une utilisation sur batterie, cet élément doit
être activé et la radio doit être éteinte.
[LIGHT]: sélectionnez cet élément pour accéder
au sous-menu Light (éclairage) contenant les
éléments suivants:
●[B / L]: sélectionnez cet élément pour
configurer le délai d’activation du
rétroéclairage de la radio. Les options
disponibles sont [30S], [20S], [10S] et [OFF]
(Désactivé).
●[EL]: sélectionnez cet élément pour activer /
désactiver la fonction d'éclairage d'urgence
automatique de la radio. Cette fonction
active automatiquement l’éclairage de forte
luminosité blanche lorsque la radio est
déconnectée d'une source d'alimentation
USB. Appuyez plusieurs fois sur le bouton
de la lampe de poche LED pour éteindre la
lampe de poche.
[LOUD]: sélectionnez cet élément pour activer /
désactiver la fonction Loudness de la radio.
[ALARM]: sélectionnez cet élément pour
configurer l'alarme de la radio. Après avoir
réglé une heure d'alarme, la source d'alarme,
la fréquence d'alarme et le volume d'alarme
peuvent également être sélectionnés. Les
options disponibles pour la source d'alarme
sont [DAB], [FM] et [BUZ] (sonnerie de type
buzzer), tandis que les options disponibles pour
la fréquence d'alarme sont [ONCE] (une seule
fois), [DAILY] (tous les jours), [WEEKDAYS]
(jours de semaine), [WEEKENDS].
4. Écouter la radio DAB
Recherche de stations DAB
Pour syntoniser les stations de radio DAB,
procédez comme suit:
1. Allumez la radio en appuyant sur le bouton
d'alimentation et en le maintenant enfoncé.
2. Sélectionnez le mode radio DAB en appuyant
plusieurs fois sur le bouton Bande.
3. Si c'est la première fois que le mode
radio DAB est utilisé, la radio effectuera
automatiquement un balayage complet
afin de trouver toutes les stations de radio
DAB disponibles. Pendant le processus
de balayage, à mesure que de nouvelles
stations sont détectées, le compteur de
stations augmentera et les stations seront
ajoutées à la liste qui est stockée dans la
radio.
4. Lorsque le balayage complet est terminé, la
radio syntonise automatiquement la première
station DAB de la liste des stations et lit la
station.
5. Utilisez le bouton de réglage Tuning haut
/ bas pour parcourir la liste des stations et
appuyez sur le bouton Entrée pour syntoniser
la station sélectionnée.
Remarque:
avant de sélectionner le mode radio DAB et
de syntoniser les stations, assurez-vous que
l'antenne télescopique à l'arrière de la radio
est complètement déployée et positionnée à
la verticale.
Menu de la radio DAB
En mode radio DAB, le menu de la radio
propose cinq éléments supplémentaires
spécifiques à ce mode:
[FULL SCAN]: sélectionnez cette option pour
effectuer un balayage complet et stocker toutes
les stations de radio DAB trouvées dans la liste
des stations.
[MANUAL]: sélectionnez cette option pour
syntoniser manuellement un canal / une
fréquence DAB.
[DRC]: le contrôle de la plage dynamique
(également connu sous le nom de DRC) peut
rendre les sons plus faibles plus faciles à
entendre lorsque votre radio est utilisée dans
un environnement bruyant en réduisant la plage
dynamique du signal audio. Sélectionnez cet
élément pour configurer le niveau du DRC, les
options disponibles sont:
●[0]: le DRC est désactivé. La diffusion DRC
sera ignorée. Ce sont les paramètres par
défauts.
●[1 / 2]: le niveau du DRC est réglé sur 1 / 2
de celui envoyé par le diffuseur.
●[1]: le DRC est déni sur la valeur envoyée
par le diffuseur.
[ORDER]: sélectionnez cet élément pour
configurer l'ordre de la liste des stations.
Sélectionnez [NAME] pour classer les stations
par nom, sélectionnez [ENSEMBLE] pour
trier la liste des stations par multiplex DAB, ou
sélectionnez [ACTIVE] pour trier la liste des
stations par stations actives / inactives.
[PRUNE]: sélectionnez cet élément pour
supprimer toutes les stations indisponibles /
invalides de la liste des stations.
Mémorisation des stations DAB
préréglées
Le MMR-99DAB dispose de 4 pages préréglées
contenant 5 stations préréglées pour la radio
DAB (pour un total de 20 préréglages).
Pour mémoriser une station DAB en tant que
station DAB préréglée, procédez comme suit:
1. Allumez la radio.
2. Sélectionnez le mode radio DAB en
appuyant plusieurs fois sur le bouton Bande
et syntonisez la station DAB requise comme
décrit précédemment.
3. Appuyez plusieurs fois sur le bouton Page
pour sélectionner la page de préréglage
souhaitée.
4. Appuyez sur le bouton de préréglage
souhaité (1-5) et maintenez-le enfoncé
jusqu'à ce que l'écran de la radio affiche
le message « SAVED » (Enregistré). La
station est maintenant enregistrée en tant
que préréglage et l'indicateur de préréglage
correspondant apparaîtra sur l'écran de la
radio.
5. Répétez cette procédure autant de fois que
nécessaire pour les préréglages restants.
Les stations préréglées ne peuvent pas
être supprimées, mais elles peuvent être
écrasées en mémorisant une nouvelle station
sur un préréglage déjà utilisé.
Rappel des stations DAB préréglées
Pour rappeler une station DAB préréglée,
procédez comme suit:
1. Allumez la radio.
2. Sélectionnez le mode radio DAB en appuyant
plusieurs fois sur le bouton Bande.
3. Appuyez plusieurs fois sur le bouton Page
pour sélectionner la page de préréglage
souhaitée.
4. Appuyez sur le bouton de la station préréglée
souhaitée (1-5).
Affichage des informations DAB
sur l'écran
Lorsque vous écoutez une station de radio
DAB, appuyez plusieurs fois sur le bouton Info
pour faire défiler les informations suivantes sur
l'écran de la radio:
●Texte
●Type de programme
●Nom du programme
●Heure
●Date
●Fréquence
●Débit binaire
●Codec audio
●Puissance du signal
●Texte DL Plus (Certaines stations peuvent
fournir d'autres informations relatives au
programme pour l'affichage en plus du
texte normal. Si aucune n'est disponible,
un message « no info » (Aucune info)
s'afchera.)
5. Écouter la radio FM
Recherche de stations FM
Pour syntoniser les stations de radio FM,
procédez comme suit:
1. Allumez la radio en appuyant sur le bouton
d'alimentation et en le maintenant enfoncé.
2. Sélectionnez le mode radio FM en appuyant
plusieurs fois sur le bouton Bande.
3. Appuyez sur le bouton de réglage Tuning
haut ou bas puis appuyez sur le bouton de
syntonisation (Autotune) pour syntoniser
automatiquement une station FM
respectivement par ordre croissant vers
des valeurs de fréquence plus élevée ou
par ordre décroissant vers des valeurs de
fréquence plus basse. Votre radio arrêtera
le balayage lorsqu'elle trouvera une station
sufsamment puissante. L'écran afchera
la fréquence du signal qui a été trouvé
et l'indicateur de la puissance du signal
indiquera la puissance du signal reçu. Si
des informations RDS sont disponibles,
l'indicateur RDS apparaîtra également
sur l'écran de la radio et après quelques
secondes, l'écran affichera le nom de la
station de radio.
4. Appuyez sur le bouton de réglage Tuning
haut / bas pour affiner la fréquence par
incréments de 0,05MHz si nécessaire.
5. Répétez les étapes 3 et 4 pour syntoniser
d'autres stations de radio.
Remarque:
avant de sélectionner le mode radio FM et
de syntoniser les stations, assurez-vous
que l'antenne télescopique à l'arrière de
la radio est complètement déployée et
positionnée à la verticale.
Menu de la radio FM
En mode radio FM, le menu de la radio
propose deux éléments supplémentaires
spécifiques à ce mode:
[SCAN]: sélectionnez cet élément pour
configurer la fonction de syntonisation
automatique de la radio. Sélectionnez
[LOCAL] pour que la fonction de
syntonisation automatique ne recherche que
les signaux locaux forts, ou sélectionnez
[DISTANT] pour que la fonction de
syntonisation automatique recherche
également les signaux distants et plus
faibles.
[AUDIO]: sélectionnez cet élément
pour configurer la lecture en mode FM.
Sélectionnez [MONO] pour forcer la lecture
mono, ou sélectionnez [Auto] pour autoriser
la lecture stéréo si disponible. Forcer
la lecture mono peut aider à réduire le
sifflement des signaux FM faibles.
Mémorisation des stations FM
préréglées
Le MMR-99DAB dispose de 4 pages
préréglées contenant 5 stations préréglées
pour la radio FM (pour un total de 20
préréglages).
Pour mémoriser une station FM en tant que
station FM préréglée, procédez comme suit:
1. Allumez la radio en appuyant sur le bouton
d'alimentation et en le maintenant enfoncé.
2. Sélectionnez le mode radio FM en
appuyant plusieurs fois sur le bouton
Bande et syntonisez la station FM requise
comme décrite précédemment.
3. Appuyez plusieurs fois sur le bouton Page
pour sélectionner la page de préréglage
souhaitée.
4. Appuyez sur le bouton de préréglage
souhaité (1-5) et maintenez-le enfoncé
jusqu'à ce que l'écran de la radio afche
le message « SAVED » (Enregistré). La
station est maintenant enregistrée en
tant que préréglage et l'indicateur de
préréglage correspondant apparaîtra sur
l'écran de la radio.
5. Répétez cette procédure autant de fois
que nécessaire pour les préréglages
restants. Les stations préréglées ne
peuvent pas être supprimées, mais elles
peuvent être écrasées en mémorisant une
nouvelle station sur un préréglage déjà
utilisé.
Rappel des stations FM
préréglées
Pour rappeler une station FM préréglée,
procédez comme suit:
1. Allumez la radio en appuyant sur le bouton
d'alimentation et en le maintenant enfoncé.
2. Sélectionnez le mode radio FM en
appuyant plusieurs fois sur le bouton
Bande.
3. Appuyez plusieurs fois sur le bouton Page
pour sélectionner la page de préréglage
souhaitée.
4. Appuyez sur le bouton de la station
préréglée souhaitée (1-5).
Affichage des informations FM sur
l'écran
Lorsque vous écoutez une station de radio FM
qui diffuse également des informations RDS
(l'indicateur RDS s'affiche sur l'écran de la
radio), appuyez plusieurs fois sur le bouton Info
pour faire défiler les informations suivantes sur
l'écran de la radio:
●Nom de la station
●Message texte
●Type de programme
●Fréquence
●Type de réception (stéréo / mono)
●Heure actuelle
●Date du jour
Si aucune information RDS n'est disponible, la
radio ne pourra pas afficher le nom de la station,
le message texte et le type de programme.
6. Écouter de la musique via le
streaming Bluetooth
Pour diffuser de la musique Bluetooth sur
votre radio, vous devez coupler votre appareil
Bluetooth avec le MMR-99DAB. Le couplage
crée un «lien» afin que deux appareils puissent
se reconnaître.
Couplage de votre appareil
Bluetooth pour la première fois
1. Allumez la radio en appuyant sur le bouton
d'alimentation et en le maintenant enfoncé.
2. Appuyez plusieurs fois sur le bouton Bande
pour sélectionner le mode Bluetooth. L'écran
de la radio afchera le message « PAIRING »
(couplage) et l'indicateur LED Bluetooth
clignotera en bleu pour indiquer que la radio
est disponible pour le couplage Bluetooth.
3. Activez le Bluetooth sur votre appareil
Bluetooth (reportez-vous au manuel de
l'appareil Bluetooth si vous ne savez pas
comment activer le Bluetooth).
4. Accédez à la liste des appareils Bluetooth de
votre périphérique Bluetooth et sélectionnez
le périphérique nommé « MMR-99 DAB ».
Remarque:
sur certains appareils Bluetooth dotés
de la version Bluetooth 2.1 ou antérieurs,
vous devrez peut-être entrer un code
d'accès. Si tel est le cas, saisissez le code
« 0000 ».
5. Une fois les appareils couplés et connectés,
une confirmation sonore sera émise par la
radio et l'écran de la radio afchera le nom de
l'appareil Bluetooth connecté. Vous pouvez
maintenant écouter de la musique sur votre
appareil Bluetooth et diffuser la musique via
les haut-parleurs de la radio.
Remarques:
●Si 2 appareils Bluetooth se couplent
pour la première fois, les deux doivent
rechercher votre radio. Elle affichera
sa disponibilité sur les deux appareils.
Cependant, si un appareil se connecte
d'abord à cet appareil, alors l'autre
appareil Bluetooth ne le trouvera pas dans
sa liste.
●Si vous mettez votre appareil Bluetooth
hors de portée, la connexion entre votre
appareil et la radio sera temporairement
déconnectée. Votre radio se reconnectera
automatiquement si le périphérique
Bluetooth est remis à portée. Sachez
que pendant la période de déconnexion,
aucun autre appareil Bluetooth ne peut se
coupler ou se connecter avec votre radio.
●Si «MMR-99DAB» apparaît dans votre liste
de périphériques Bluetooth, mais que
votre périphérique Bluetooth ne peut pas
se connecter avec lui, veuillez supprimer
l'élément de votre liste et coupler à
nouveau le périphérique Bluetooth avec
la radio en suivant les étapes décrites
précédemment.
●La portée de fonctionnement effective
entre la radio et le périphérique Bluetooth
couplé est d'environ 10 mètres (30 pieds).
Tout obstacle entre le système et l'appareil
peut réduire la portée de fonctionnement.
●Les performances de la connectivité
Bluetooth peuvent varier en fonction du
périphérique Bluetooth connecté. Veuillez
vous référer aux spécications Bluetooth
de votre appareil avant de le connecter
à votre radio. Toutes les fonctionnalités
peuvent ne pas être prises en charge,
selon le périphérique Bluetooth utilisé.
●Avec certains téléphones mobiles, passer
/ recevoir des appels, des messages texte,
des e-mails ou toute autre activité non
liée au streaming audio peut désactiver
le streaming audio Bluetooth ou même
se déconnecter temporairement de votre
appareil. Un tel comportement dépend
du périphérique Bluetooth et n'indique
pas un problème avec votre MMR-99
DAB.
Lecture audio en mode
Bluetooth
Lorsque vous avez connecté avec succès
votre radio avec l'appareil Bluetooth choisi,
vous pouvez commencer à jouer votre
musique à l'aide des commandes de votre
appareil Bluetooth connecté.
1. Le volume de la lecture via la fonction
Bluetooth peut être contrôlé à la fois sur
votre appareil Bluetooth et sur la radio à
l'aide du bouton de réglage du volume
haut / bas.
2. La lecture peut également être contrôlée
à la fois à l'aide des commandes de votre
appareil Bluetooth et des commandes de
la radio. Appuyez sur le bouton Lecture
/ Pause de la radio pour démarrer /
mettre en pause la lecture. Appuyez
sur le bouton Piste suivante ou Piste
précédente pour sélectionner la piste
souhaitée, et maintenez enfoncé le bouton
Piste suivante ou Piste précédente pour
avancer ou reculer rapidement dans une
piste (relâchez le bouton lorsque le point
souhaité dans la piste est atteint).
Remarque:
toutes les applications ou tous les
appareils de lecture peuvent ne pas
répondre à toutes ces commandes.
Lecture audio à partir d'un appareil
Bluetooth précédemment couplé
Le MMR-99DAB peut mémoriser jusqu'à 8
ensembles d'appareils Bluetooth couplés.
Une fois que la mémoire dépasse 8, le
premier appareil avec lequel la radio a été
couplée sera écrasé dans la mémoire de la
radio.
Si votre appareil source Bluetooth a déjà
été couplé avec le MMR-99DAB, la radio
se souviendra toujours de votre appareil
Bluetooth et tentera de se reconnecter avec
le dernier appareil connecté. Si le dernier
appareil Bluetooth connecté n'est pas
disponible, la radio essaiera de se connecter
à l'avant-dernier appareil Bluetooth.
Déconnexion de votre appareil
Bluetooth
Appuyez et maintenez enfoncé le bouton
de couplage Bluetooth pour déconnecter
la radio de votre appareil Bluetooth. Vous
pouvez également appuyer sur le bouton
Bande pour sélectionner un mode autre que
le mode Bluetooth ou désactiver la fonction
Bluetooth sur votre appareil source Bluetooth
pour désactiver la connexion.
Si vous vous déconnectez de l'appareil
Bluetooth en mode Bluetooth, une
confirmation sonore sera émise et le voyant
LED Bluetooth de la radio clignotera en bleu
pour indiquer que la radio est à nouveau
disponible pour le couplage.
7. Utilisation de la prise d'entrée
auxiliaire et de la prise casque
Écouter de la musique via la
prise d'entrée auxiliaire
Vous pouvez écouter l’audio d'un
appareil externe via le haut-parleur de
votre MMR-99DAB. Pour le faire, suivez
ces étapes.
1. Connectez l'appareil externe (tel qu'un
iPod, un lecteur MP3 ou un lecteur CD) à
la prise d'entrée Aux In de la radio à l'aide
d'un câble audio de 3,5mm (non fourni).
2. Assurez-vous que la radio et le
périphérique externe sont allumés.
3. Appuyez plusieurs fois sur le bouton
Bande pour sélectionner le mode Aux in.
4. La sortie audio de l'appareil externe sera
maintenant diffusée via le haut-parleur de
votre MMR-99DAB. Réglez le volume sur
l'appareil externe pour garantir un niveau
de volume adéquat, puis utilisez le bouton
de réglage du volume haut / bas de la
radio au besoin pour régler le volume à un
niveau confortable.
Écouter de la musique à l'aide
de la prise casque
Le MMR-99DAB est équipé d'une prise
casque sur le côté droit de la radio, qui
peut être utilisée pour connecter une paire
d'écouteurs / casque avec une prise de 3,5mm. Pour brancher le casque, il suffit de brancher
la prise jack de 3,5mm dans la prise. La radio détectera alors automatiquement qu'une paire
d'écouteurs / casque a été connectée et elle désactivera son haut-parleur interne.
Nous vous recommandons de baisser le volume avant de brancher le casque et de
l'augmenter lentement jusqu'à un niveau approprié après avoir branché le casque pour éviter
les sons de fortes intensités et endommager votre audition.
Remarque:
une pression acoustique excessive des écouteurs et du casque peut entraîner une
perte auditive. Pour éviter d'éventuels dommages auditifs, n'écoutez pas à des
niveaux de volume élevés pendant de longues périodes.
Caractéristiques
Source d’alimentation
Batterie lithium-ion rechargeable intégrée de 2600mAh
Dynamo - recharge une batterie lithium intégrée
rechargeable.
Panneau solaire - recharge une batterie lithium
intégrée rechargeable.
DC IN (5V / 2,4A) Prise USB de type C pour charger
le MMR-99DAB.
Câble USB de type A vers USB C et dragonne inclus.
Couverture de fréquence
FM 87.5-108 MHz
DAB (BANDE III) 5A-13F (174.928MHZ - 239.200MHZ)
Bluetooth
Spécification du Bluetooth Bluetooth® 5.0+EDR
Profil pris en charge A2DP, AVRCP
CODEC Audio Bluetooth SBC, AAC
Puissance d'émission Classe de puissance 2
Portée de la ligne de visée 10mètres / 30pieds
La fréquence et la
puissance maximale
transmise
2402MHz ~ 2480MHz: 2dBm (Bluetooth EDR & LE)
Antenne
Antenne télescopique FM / DAB
Prise
Prise CC
USB Type C DC IN, 5V / 2,4A
Ce symbole indique une tension continue.
USB Type A DC OUT, 5V / 1A
Prise pour écouteurs 3,5mm de diamètre, sortie stéréo, impédance de 32ohms
Prise auxiliaire AUX 3,5mm de diamètre, entrée stéréo
Haut-parleur 2,25 ", 4Ohm, 5Watts
Puissance de sortie 1,5watts
Plage de température de
fonctionnement de 5°C à 35°C
※ L'étiquette du code-barres sur le produit est définie ci-dessous:
Numéro de série
Mois de production
Année de production
Code du produit
La Société se réserve le droit de modifier les caractéristiques sans avertissement.
Si à l'avenir vous devez vous débarrasser de ce produit, veuillez noter que: Les produits
électriques ne peuvent pas être jetés avec le reste des déchets ménagers. Si possible,
amenez l'appareil à un centre de recyclage. Vérifiez auprès de votre municipalité ou de votre
détaillant pour en savoir plus sur le recyclage. (Directive relative aux déchets d’équipements
électriques et électroniques).
4 Botón de modo de iluminación
5 Altavoz
6
Botón de encendido / apagado automático
7 Botón de banda / bloqueo
8 Pantalla LCD
9 Botón de información / menú
10 Botón de página / alarma
11 Botón de introducir / sintonización
automática
12 Botón de sintonizar hacia arriba / abajo
13 Indicador LED del Bluetooth
14 Indicador LED de carga
15 Botón de subir / bajar volumen
16 Botón de presintonía 5
17 Botón de presintonía 4 / siguiente pista /
avance rápido
18 Botón de presintonía 3 / reproducir / pausar
19 Botón de presintonía 2 / pista anterior /
rebobinar
20 Botón de presintonía 1 / vinculación
Bluetooth
21 Luz corta (roja)
22 Luz larga (blanca)
23 Luz corta (blanca)
24 Correa de mano
25 Antena telescópica
26 Manivela de alimentación de la dínamo
27 Toma de entrada de CC (USB Tipo-C, 5V
2,4A)
28 Toma de salida de CC (USB Tipo-A, 5V 1A)
29 Toma de entrada auxiliar
30 Toma de auriculares de 3,5mm
Pantalla LCD e indicadores
A Indicador de FM
B Indicador de RDS
C Indicador de luz de emergencia
D Indicador de bloqueo
E Indicador de FM estéreo
F Indicador de intensidad de señal
G Indicador de batería
H Indicador de presintonía
I Indicador de apagado automático
J Indicador de hora y frecuencia de la radio
K Indicador de alarma
L Indicador de auxiliar
M Indicador de DAB
3. Primeros pasos
Alimentación de la radio
La MMR-99DAB funciona con una batería
de iones de litio integrada de 2600mAh. Esta
batería puede cargarse conectando una fuente
de alimentación USB la toma de entrada de
CC de la radio, usando la manivela en la parte
posterior de la radio o usando el panel solar en
la parte superior de la misma.
Antes de usar la radio por primera vez, se
recomienda cargar completamente la batería
integrada usando la toma de entrada de CC de
la radio y una fuente de alimentación USB.
Cargar completamente la batería mediante la
alimentación USB toma aproximadamente 3
horas. El indicador de la batería desaparecerá
de la pantalla cuando la batería de la radio
esté completamente cargada. Una potencia
reducida, distorsión, sonidos entrecortados o
que el icono de batería vacía parpadee en la
pantalla de la radio, son todas señales de que
la batería necesita cargarse. Cuando la batería
está completamente cargada, la radio puede
funcionar por aproximadamente 20 horas.
Cargar la batería usando la toma de
entrada de CC
Siga estos pasos para cargar la batería usando
la toma de entrada de CC de la radio:
1. Conecte el extremo de tipo C del cable de
carga suministrado a la toma entrada de CC
en la parte derecha de la radio.
2. Conecte el otro extremo del cable de carga
USB a un puerto USB de tipo A (por ejemplo,
un PC, un cargador USB o una batería
externa).
Nota:
se recomienda usar una fuente de
alimentación USB que suministre 5V /
2,4A para evitar fallos en la batería y para
asegurarse de que la toma de salida de
CC de la radio también pueda usarse
mientras se carga la batería.
Cargar la batería usando la manivela
Siga estos pasos para cargar la batería
usando la manivela en la parte posterior de
la radio:
1. Antes de usar la manivela, asegúrese de
que la antena telescópica esté replegada
y colocada de nuevo en su lugar.
2. Saque la manivela de su posición.
3. Gire la manivela en el sentido de las
agujas del reloj o en el sentido contrario
a aproximadamente 100 rotaciones por
minuto. Mientras la batería se carga, el
indicador LED de carga junto a la pantalla
de la radio se iluminará de color verde.
4. Una vez que haya terminado de cargar
la radio usando la manivela, vuelva a
colocarla en su lugar.
Nota:
en condiciones de uso normal, cada
minuto de carga usando la manivela,
añade aproximadamente 5~7 minutos de
escucha.
Cargar la batería usando el panel solar
Para que el panel solar funcione, la radio no
necesita estar encendida.
Para cargar la batería interna de la radio
usando energía solar, coloque la radio de tal
manera que el panel solar reciba luz solar
directa. Cuando más directa sea la luz solar
en el panel, más electricidad se generará
para alimentar la radio.
Nota:
el mayor rendimiento del panel solar se
logrará cuando el sol esté directamente
encima y la luz solar no esté obstruida
por nubes, follaje, cortinas, etc. En ciertas
situaciones y en condiciones de poca luz,
el panel solar podría no ser efectivo y no
debería depender de él como la fuente de
alimentación primaria para el uso habitual.
El panel solar está diseñado como una
fuente de alimentación suplementaria
que, en condiciones de luz adecuadas,
puede contribuir hasta al 100% de los
requisitos de alimentación de la radio. El
panel solar cargará la batería solo bajo
luz solar natural, no podrá cargarla con
luz artificial.
NO intente cargar la batería colocando el
panel solar directamente bajo algún tipo
de lámparas solares, esto causará daños
irreversibles en la radio y podría dañar la
carcasa (hacerlo anulará la garantía).
Encender y apagar la radio
Después de la radio se haya alimentado,
mantenga presionado el botón de encendido
para encender la radio. La radio cambiará
automáticamente al último modo usado.
Para apagar la radio, presione el botón de
encendido.
Nota:
si la radio está funcionando con la batería,
todos los botones, excepto el botón de
linterna LED / luz de emergencia, el de
señal de emergencia y el de encendido, se
desactivarán cuando se apague la radio.
Al conectarla una fuente de alimentación
USB, la alarma aún puede activarse /
desactivarse manteniendo presionado
el botón de alarma y el menú de la radio
puede abrirse manteniendo presionado el
botón de menú.
Uso de la linterna LED
La MMR-99DAB cuenta con tres luces
integradas que pueden usarse como una
linterna LED presionando repetidamente el
botón de linterna LED para activar cualquier
de las tres luces o para apagar la función
de linterna. La linterna LED puede activarse
siempre, independientemente de si la radio
está encendida o apagada. Tras activar una
de las tres luces, presione repetidamente
el botón de modo de iluminación para
seleccionar el modo de iluminación. Los
modos de iluminación disponibles son: brillo
alto, brillo bajo, SOS (señal de socorro en
código Morse, tres destellos cortos, tres
destellos largos, tres destellos cortos) y
parpadeo.
Uso de la función de señal de
emergencia
La MMR-99DAB también cuenta con una sirena
y luz de emergencia que pueden usarse para
llamar la atención en caso de emergencia.
La señal de emergencia puede activarse
siempre, independientemente de si la radio está
encendida o apagada. Para activar la señal de
emergencia, simplemente presione el botón
de señal de emergencia. La luz corta roja y la
larga blanca parpadearán alternativamente y
desde el altavoz de la radio, se reproducirá un
sonido de alarma que aumentará de volumen
progresivamente.
Uso de la función de bloqueo de
teclas
La función de bloqueo de teclas puede usarse
para evitar el funcionamiento accidental de
la radio y deshabilitará todos los botones,
excepto el de la linterna LED y el de la señal de
emergencia.
Para activar el bloqueo de teclas, mantenga
presionado el botón de bloqueo hasta que el
indicador de bloqueo aparezca en la pantalla de
la radio. Para desactivar el bloqueo de teclas,
mantenga presionado nuevamente el botón
de bloqueo hasta que el indicador de bloqueo
desaparezca de la pantalla.
Uso del temporizador de apagado
automático
El temporizador de apagado automático le
permite apagar automáticamente la radio una
vez transcurrido un tiempo preestablecido.
Puede configurarse de 15 a 120 minutos
manteniendo presionado el botón de encendido
y soltándolo cuando el tiempo de apagado
automático deseado se muestre en la pantalla.
Cuando el temporizador de apagado
automático está activo, el indicador de apagado
automático se mostrará en la pantalla de la
radio. Para apagar el temporizador de apagado
automático, mantenga presionado el botón de
encendido hasta que la opción [OFF] (Apagado)
se muestre en pantalla o apague la radio y, a
continuación, vuelva a encenderla.
El menú de la radio
El menú de la radio puede abrirse cuando
la radio está encendida o apagada, y desde
cualquier modo. El menú consiste de una serie
de elementos predeterminados y algunos
elementos específicos del modo desde el cual
se abre el menú (si corresponde).
Para abrir el menú de la radio, mantenga
presionado el botón de menú. A continuación,
presione el botón de sintonizar hacia arriba /
abajo para seleccionar un elemento o valor
en el menú y presione el botón de introducir
para confirmar la elección, o presione el botón
de menú para retroceder un paso en el menú
o cerrarlo (si no hubiese elementos de nivel
superior disponibles).
La siguiente lista ofrece una visión general de
los elementos predeterminados que pueden
seleccionarse desde el menú en todos los
modos de la radio. En algunos modos de
la radio, el menú también presenta algunos
elementos específicos del modo seleccionado.
Estos elementos se enumerarán más adelante
en este manual, en el capítulo correspondiente
al modo específico.
[TIME] (Hora): seleccione este elemento para
ir al submenú de la hora que contiene los
siguientes elementos:
●[UPDATE] (Actualizar): seleccione este
elemento para configurar la fuente para
la actualización automática de la hora.
Seleccione [FM] para actualizar la hora
cuando sintonice una emisora FM con datos
RDS, seleccione [DAB] para actualizar la
hora cuando sintonice una emisora DAB o
seleccione [NONE] (Ninguna) para desactivar
la actualización automática de la hora de la
radio.
●[TIME SET] (Establecer hora): seleccione
este elemento para congurar manualmente
la hora y fecha de la radio.
●[12 / 24 HOUR] (Formato de 12 / 24 horas):
seleccione este elemento para seleccionar el
formato de 12 o 24 horas.
Nota:
Si la radio se apaga mientras usa la
alimentación por batería, la hora establecida
no se guardará para ahorrar batería. Como
resultado, la alarma también se desactivará.
[SW VERSION] (Versión del software):
seleccione este elemento para ver la versión
del software de la radio.
[RESET] (Restablecer): seleccione este
elemento para restablecer la radio a la
configuración predeterminada. Tenga en
cuenta que seleccionar este elemento,
y a continuación seleccionar [Yes] (Sí),
restablecerá la radio a su configuración de
fábrica y toda la información guardada en
la radio se eliminará. Esto incluye todos
los ajustes y emisoras presintonizadas
guardadas.
[LANGUAGE] (Idioma): Este elemento
no está disponible cuando el menú se
abre desde el modo espera de la radio.
Seleccione este elemento para establecer el
idioma en el que se mostrarán los menús de
la radio.
[DCOUT] (Salida de CC): Este elemento
solo está disponible cuando la radio no está
conectada a una fuente de alimentación
USB. Seleccione este elemento para activar
/ desactivar la toma de salida de CC de
la radio cuando se usa la batería (cuando
la radio está conectada a una fuente de
alimentación USB, la toma de salida de CC
está siempre activada y disponible para la
carga, cuando la radio está apagada). Para
usar la toma de salida de CC para alimentar
un dispositivo mientras usa la batería, este
elemento debe estar activado y la radio
apagada.
[LIGHT] (Luz): seleccione este elemento
para ir al submenú de la luz que contiene los
siguientes elementos:
●[B / L] (Retroiluminación): seleccione
este elemento para configurar el tiempo
de la retroiluminación de la radio. Las
opciones disponibles son: [30S], [20S],
[10S] y [OFF] (Apagada).
●[EL] (Luz de emergencia): seleccione
este elemento para activar / desactivar la
función de luz de emergencia de la radio.
Esta función activa automáticamente
el LED de la luz larga blanca cuando la
radio se desconecta de una alimentación
USB. Presione repetidamente el botón de
linterna LED para apagar la linterna.
[LOUD] (Compensación): seleccione este
elemento para activar / desactivar la función
de compensación de la radio.
[ALARM] (Alarma): seleccione este
elemento para establecer la alarma de la
radio. Tras establecer la hora de la alarma,
también puede seleccionar la fuente, la
frecuencia y el volumen de la misma.
Las opciones disponibles para la fuente
de la alarma son: [DAB], [FM] y [BUZ]
(Zumbador), mientras que las opciones para
la frecuencia son: [ONCE] (Una vez), [DAILY]
(Diaria), [WEEKDAYS] (Días laborables) y
[WEEKENDS] (Fines de semana).
4. Escuchar la radio DAB
Sintonizar emisoras DAB
Para sintonizar emisoras de radio DAB, siga
estos pasos:
1. Encienda la radio manteniendo presionado
el botón de encendido.
2. Seleccione el modo de radio DAB
presionando repetidamente el botón de
banda.
3. Si es la primera vez que se usa el modo
de radio DAB, la radio realizará una
búsqueda completa de forma automática
para encontrar todas las emisoras de
radio DAB disponibles. Durante el proceso
de búsqueda, a medida que se detecten
nuevas emisoras, el contador de emisoras
aumentará y las emisoras se agregarán a
la lista que está guardada en la radio.
4. Cuando la búsqueda se haya completado,
la radio sintonizará y reproducirá
automáticamente la primera emisora DAB
de la lista de emisoras.
5. Use el botón de sintonizar hacia arriba /
abajo para recorrer la lista de emisoras
y presione el botón de introducir para
sintonizar la emisora seleccionada.
Nota:
antes de seleccionar el modo de radio
DAB y sintonizar emisoras, asegúrese
de que la antena telescópica en la parte
posterior de la radio esté completamente
extendida y en posición vertical.
El menú de radio DAB
En el modo de radio DAB, el menú de la
radio contiene cinco elementos adicionales
específicos de este modo:
[FULL SCAN] (Búsqueda completa):
seleccione esta opción para realizar una
búsqueda completa y guardar en la lista de

Bedienungsanleitung
Der Bluetooth®-Markenname und damit
verbundene Logos sind Eigentum der Firma
Bluetooth SIG, Inc. Jegliche Benutzung dieser
Marken durch die SANGEAN ELECTRONICS
INC. stehen unter Lizenz.
1. Wichtige Sicherheitshinweise
1. Lesen Sie sich diese Anleitung durch.
2. Bewahren Sie diese Anleitung auf.
3. Beachten Sie alle Warnhinweise.
4. Befolgen Sie die Anweisungen.
5. Benutzen Sie dieses Gerät nicht in der
Nähe von Wasser.
6. Nur mit einem trockenem Tuch reinigen.
7. Blockieren Sie keine Ventilationsöffnungen.
Stellen Sie das Gerät entsprechend der
Anweisungen des Herstellers auf.
8. Stellen Sie das Gerät nicht in der Nähe
von Hitzequellen, wie z. B. Heizungen,
Herden oder anderen Geräten die Hitze
produzieren (z. B. Verstärker) auf.
9. Wenn Ihr Gerät über einen polarisierten
oder geerdeten Stecker verfügt,
machen Sie auf keinen Fall diese
Sicherheitsfunktion unbrauchbar. Ein
polarisierter Stecker hat zwei Flügel, bei
denen einer breiter als der andere ist.
Verfügt der Stecker über eine Erdung, so
ist ein dritter Erdungsflügel vorhanden.
Der breite und der Erdungsflügel sind
eingebaute Sicherheitsvorrichtungen. Wenn
der Netzstecker Ihres Geräts nicht in Ihre
Steckdose passt, wenden Sie sich bitte an
einen ausgebildeten Elektriker.
10. Schützen Sie das Netzkabel vor
Druckeinwirkung, insbesondere am Stecker,
Steckdosen oder am Ausgangspunkts des
Geräts.
11. Verwenden Sie lediglich vom Hersteller
angegebenes Zubehör.
12. Das Gerät darf nur dann mit
Wagen, Gestellen, Dreifüßen,
Halterungen oder Tischen
verwendet werden, wenn diese
vom Hersteller entsprechend angegeben
wurden oder zusammen mit dem Gerät
verkauft wurden. Wenn ein Wagen benutzt
wird, muss darauf geachtet werden, dass
das Gerät nicht zusammen mit dem Wagen
umkippt und Verletzungen verursacht.
13. Ziehen Sie bei Gewittern oder bei längerer
Nichtbenutzung den Stecker aus der
Steckdose.
14. Wenden Sie sich im Wartungsfall nur
an ausgebildetes Wartungspersonal.
Das Gerät muss in Wartung gegeben
werden, nachdem es in irgendeiner
Weise beschädigt wurde, wie z. B. bei
Beschädigung des Netzkabels, nachdem
Flüssigkeit über das Gerät gegossen wurde
oder Gegenstände in das Gerät gelangt
sind, es herunter gefallen ist, nicht auf
normale Weise funktioniert oder Regen
bzw. Feuchtigkeit ausgesetzt wurde.
15. Dieses Gerät darf keinen Wassertropfen
und -spritzern ausgesetzt werden.
Gegenstände die mit Flüssigkeiten gefüllt
sind dürfen nicht auf das Gerät gestellt
werden.
16. Um Feuer und elektrischen Schlägen
vorzubeugen, vermeiden Sie es das Gerät
Regen oder Feuchtigkeit auszusetzen.
17. Schützen Sie die Batterie vor übermäßiger
Wärme wie Sonneneinstrahlung, Feuer
oder ähnlichem.
18. VORSICHT: Bei falsch eingelegter Batterie
besteht Explosionsgefahr. Ersetzen Sie
die Batterie nur durch eine Batterie des
gleichen oder gleichwertigen Typs.
19. Um Gehörschäden zu vermeiden,
nicht über längere Zeiträume bei
hohen Lautstärken Musik hören.
20. Dieses Gerät ist gegen das Eindringen von
Spritzwasser und Staub geschützt (IP55).
21. Die Batterie muss bei einem Luftdruck von
über 11,6 kPa verwendet bzw. gelagert
werden, da sie anderenfalls explodieren
oder brennbare Flüssigkeiten oder Gase
austreten könnten.
ACHTUNG:
Um die Gefahr von elektrischen Schlägen zu
vermeiden, dürfen nur Wartungsarbeiten, die
in der Betriebsanleitung angegeben werden
durch unqualifizierte Personen vorgenom-
men werden.
Gebruiksaanwijzing
De Bluetooth® markering en logo’s zijn
geregistreerde handelsmerken die eigendom
zijn van Bluetooth SIG, Inc. en elk gebruik
van deze markering en logo’s door
SANGEAN ELECTRONICS INC. is onder
licentie.
1. Belangrijke veiligheidsinstructies
1. Lees deze instructies.
2. Bewaar deze instructies.
3. Neem alle waarschuwingen in acht.
4. Volg alle instructies.
5. Gebruik het apparaat niet in de buurt van
water.
6. Alleen schoonmaken met een droge
doek.
7. Blokkeer de ventilatieopeningen niet.
Installeer in overeenstemming met de
instructies van de fabrikant.
8. Niet installeren in de buurt van
warmtebronnen, zoals radiatoren,
kachels of andere apparaten (inclusief
versterkers) die warmte produceren.
9. Omzeil de veiligheidsdoeleinden van
de gepolariseerde stekker niet. Een
gepolariseerde stekker heeft twee
pinnen, één is breder dan de ander. Een
geaarde stekker heeft twee pinnen en
een derde aardepin. De brede pin of
derde pin is voor uw veiligheid. Als de
geleverde stekker niet in uw stopcontact
past moet u een elektricien raadplegen
voor vervanging van het verouderde
stopcontact.
10. Bescherm het netsnoer tegen stappen of
pletten bij de stekker, het stopcontact en
het punt waar ze het apparaat verlaten.
11. Gebruik alleen accessoires / hulpstukken
die door de fabrikant zijn gespeciceerd.
12. Alleen gebruiken met het
wagentje, standaard, driepoot,
haak of tafel die gespeciceerd
is door de fabrikant of verkocht met het
apparaat. Beweeg, als er een wagentje
wordt gebruikt, het wagentje voorzichtig
om verwonding door omvallen te
voorkomen.
13. Haal de stekker van het apparaat uit
het stopcontact tijdens onweer of als
het apparaat voor lange tijd niet wordt
gebruikt.
14. Laat alle onderhoud over aan
gekwalificeerd onderhoudspersoneel.
Er is onderhoud nodig wanneer het
apparaat is beschadigd, bijvoorbeeld
wanneer het netsnoer is beschadigd, er
vloeistof is gemorst op of voorwerpen zijn
gevallen in het apparaat, het apparaat
is blootgesteld aan regen of vocht of
het apparaat is gevallen en niet meer
normaal werkt.
15. Het apparaat mag niet worden
blootgesteld aan druppend of spattend
water en er mogen geen voorwerpen
gevuld met vloeistof op het apparaat
worden geplaatst.
16. Stel het apparaat niet bloot aan regen
of vocht om het risico van brand of
elektrische schok te voorkomen.
17. De batterij mag niet worden blootgesteld
aan extreme warmte, zoals zonlicht, vuur
en dergelijke.
18. LET OP: Explosiegevaar indien de
batterij onjuist wordt vervangen. Vervang
alleen door eenzelfde of soortgelijk type.
19. Luister niet voor lange perioden
op hoog volume om mogelijke
gehoorschade te voorkomen,
niet luisteren.
20. Dit apparaat is voorzien van bescherming
tegen spatwater en het binnendringen
van stof (IP55).
21. De batterij moet worden gebruikt en
bewaard bij een luchtdruk hoger dan
11,6 kPa. Als de luchtdruk lager is, kan
dit ertoe leiden dat de batterij explodeert
of dat er ontvlambare vloeistoffen en
gassen lekken uit de batterij.
LET OP:
Om het risico op elektrische schokken
te beperken, dient u geen onderhoud
uit te voeren dat niet in de handleiding
wordt beschreven, tenzij u daarvoor
gekwalificeerd bent.
2827 29 3130 32 33
3534 36 3837 39
4241 43 4544 46 47
4948 50 52 53 5451
NL
D
40
emisoras todas las emisoras de radio DAB
encontradas.
[MANUAL]: seleccione esta opción para
sintonizar manualmente un canal / frecuencia
DAB.
[DRC]: el control de rango dinámico (también
conocido como DRC) puede hacer que
los sonidos más bajos sean más fáciles
de escuchar cuando la radio se usa en
un ambiente ruidoso al reducir el rango
dinámico de la señal de audio. Seleccione
este elemento para configurar el nivel de
DRC. Las opciones disponibles son:
●[0]: el DRC está desactivado. El DRC
de la transmisión se ignorará. Esta es la
conguración predeterminada.
●[1 / 2]: el nivel de DRC se establece a la
mitad del enviado por la emisora.
●[1]: el DRC se establece como es enviado
por la emisora.
[ORDER] (Orden): seleccione este elemento
para configurar el orden de la lista de
emisoras. Seleccione [NAME] (Nombre) para
ordenar las emisoras por nombre, seleccione
[ENSEMBLE] (Conjunto) para ordenar la
lista de emisoras por el multiplex DAB o
seleccione [ACTIVE] (Activas) para ordenar
la lista de emisoras por emisoras activas /
inactivas.
[PRUNE] (Depurar): seleccione esta opción
para borrar todas las emisoras no disponibles
de la lista de emisoras.
Presintonizar emisoras DAB
La MMR-99DAB cuenta con 4 páginas de
presintonías que contienen 5 presintonías de
emisoras para radio DAB (para un total de 20
presintonías).
Para guardar una emisora DAB como una
presintonía DAB, siga estos pasos:
1. Encienda la radio.
2. Seleccione el modo de radio DAB
presionando repetidamente el botón de
banda y sintonice la emisora DAB deseada
tal y como se describió anteriormente.
3. Presione repetidamente el botón de
página para seleccionar la página de
presintonías deseada.
4. Mantenga presionado el botón de
presintonía deseado (del 1 al 5) hasta
que la pantalla de la radio muestre el
mensaje de "SAVED" (Guardada). La
emisora estará guardada ahora como
presintonía y el indicador de presintonía
correspondiente se mostrará en la pantalla
de la radio.
5. Repita este procedimiento según sea
necesario para las presintonías restantes.
Las emisoras presintonizadas no pueden
borrarse pero pueden sobrescribirse
guardando una nueva emisora en una
presintonía ya usada.
Seleccionar emisoras DAB
presintonizadas
Para seleccionar una emisora DAB
presintonizada, siga estos pasos:
1. Encienda la radio.
2. Seleccione el modo de radio DAB
presionando repetidamente el botón de
banda.
3. Presione repetidamente el botón de
página para seleccionar la página de
presintonías deseada.
4. Presione el botón de la emisora
presintonizada deseada (del 1 al 5).
Mostrar información DAB en
pantalla
Cuando escuche una emisora de radio
DAB, presione repetidamente el botón
de información para recorrer la siguiente
información en la pantalla de la radio:
●Texto
●Tipo de programa
●Nombre del programa
●Hora
●Fecha
●Frecuencia
●Tasa de bits
●Códec de audio
●Intensidad de señal
●Texto DL Plus (algunas emisoras pueden
proporcionar otra información relacionada
con el programa para la pantalla,
además del texto normal. Si no hay nada
disponible, se mostrará el mensaje de "no
info" (no hay información).
5. Escuchar la radio FM
Sintonizar emisoras FM
Para sintonizar emisoras de radio FM, siga
estos pasos:
1. Encienda la radio manteniendo presionado el
botón de encendido.
2. Seleccione el modo de radio FM presionando
repetidamente el botón de banda.
3. Presione el botón de sintonizar hacia arriba
o hacia abajo y, a continuación, presione
el botón de sintonización automática para
sintonizar automáticamente una emisora
FM con una frecuencia más alta o más
baja, respectivamente. La radio dejará de
buscar cuando encuentre una emisora
lo suficientemente fuerte. En pantalla se
mostrará la frecuencia de la señal que se
ha encontrado, y el indicador de intensidad
de señal indicará la intensidad de la señal
recibida. Si hay información RDS disponible,
también se mostrará el indicador de RDS en
la pantalla de la radio y, tras unos segundos,
la pantalla mostrará el nombre de la emisora
de radio.
4. Si fuera necesario, presione el botón de
sintonizar hacia arriba / abajo para ajustar la
frecuencia a intervalos de 0.05MHz.
5. Repita los pasos 3 y 4 para sintonizar otras
emisoras de radio.
Nota:
antes de seleccionar el modo de radio FM
y sintonizar emisoras, asegúrese de que la
antena telescópica en la parte posterior de
la radio esté completamente extendida y en
posición vertical.
El menú de radio FM
En el modo de radio FM, el menú de la radio
contiene dos elementos adicionales específicos
de este modo:
[SCAN] (Búsqueda): seleccione este elemento
para configurar la función de sintonización
automática de la radio. Seleccione [LOCAL]
(Locales) para que la función de sintonización
automática busque solo emisoras locales y
fuertes, o seleccione [DISTANT] (Lejanas) para
que la función de sintonización automática
busque también señales lejanas más débiles.
[AUDIO]: seleccione este elemento para
configurar la reproducción en el modo FM.
Seleccione [MONO] para forzar la reproducción
en mono o seleccione [Auto] (Automático) para
permitir la reproducción estéreo si estuviese
disponible. Forzar la reproducción mono puede
ayudar a reducir el silbido de las señales FM
más débiles.
Presintonizar emisoras FM
La MMR-99DAB cuenta con 4 páginas de
presintonías que contienen 5 presintonías de
emisoras para radio FM (para un total de 20
presintonías).
Para guardar una emisora FM como una
presintonía DAB, siga estos pasos:
1. Encienda la radio manteniendo presionado el
botón de encendido.
2. Seleccione el modo de radio FM presionando
repetidamente el botón de banda y sintonice
la emisora FM deseada tal y como se
describió anteriormente.
3. Presione repetidamente el botón de página
para seleccionar la página de presintonías
deseada.
4. Mantenga presionado el botón de presintonía
deseado (del 1 al 5) hasta que la pantalla
de la radio muestre el mensaje de "SAVED"
(Guardada). La emisora estará guardada
ahora como presintonía y el indicador de
presintonía correspondiente se mostrará en
la pantalla de la radio.
5. Repita este procedimiento según sea
necesario para las presintonías restantes.
Las emisoras presintonizadas no pueden
borrarse pero pueden sobrescribirse
guardando una nueva emisora en una
presintonía ya usada.
Seleccionar emisoras FM
presintonizadas
Para seleccionar una emisora FM
presintonizada, siga estos pasos:
1. Encienda la radio manteniendo presionado el
botón de encendido.
2. Seleccione el modo de radio FM presionando
repetidamente el botón de banda.
3. Presione repetidamente el botón de página
para seleccionar la página de presintonías
deseada.
4. Presione el botón de la emisora
presintonizada deseada (del 1 al 5).
Mostrar información FM en
pantalla
Cuando escuche una emisora de radio FM
que también transmita información RDS (el
indicador de RDS se muestra en la pantalla
de la radio), presione repetidamente el botón
de información para recorrer la siguiente
información en la pantalla de la radio:
●Nombre de la emisora
●Mensaje de texto
●Tipo de programa
●Frecuencia
●Tipo de recepción (estéreo / mono)
●Hora actual
●Fecha actual
Si no hay información RDS disponible, la radio
no podrá mostrar el nombre de la emisora, el
mensaje de texto ni el tipo de programa.
6. Escuchar música vía
retransmisión por Bluetooth
Para poder transmitir música por Bluetooth a la
radio, necesita vincular el dispositivo Bluetooth
con la MMR-99DAB. La vinculación crea un
"vínculo" para que dos dispositivos puedan
reconocerse entre sí.
Vincular el dispositivo Bluetooth
por primera vez
1. Encienda la radio manteniendo presionado el
botón de encendido.
2. Seleccione el modo Bluetooth presionando
repetidamente el botón de banda. La pantalla
de la radio mostrará el mensaje "PAIRING"
(Vinculando) y el indicador LED del Bluetooth
parpadeará en color azul para indicar que
la radio está disponible para la vinculación
Bluetooth.
3. Active el Bluetooth en el dispositivo
Bluetooth (consulte el manual del dispositivo
Bluetooth si no está seguro de cómo activar
el Bluetooth).
4. Vaya a la lista de Bluetooth en el dispositivo
Bluetooth y seleccione el dispositivo llamado
" MMR-99 DAB ".
Nota:
en algunos dispositivos Bluetooth con
versión de Bluetooth 2.1 o anterior, es
posible que se le solicite introducir
un código de acceso. En dicho caso,
introduzca el código de acceso "0000".
5. Una vez que los dispositivos se hayan
vinculado y conectado, se reproducirá un
tono de confirmación en la radio y en la
pantalla de la radio se mostrará el nombre
del dispositivo Bluetooth conectado. Ahora
podrá reproducir música en su dispositivo
Bluetooth y transmitirla a través del altavoz
de la radio.
Notas:
●Si 2 dispositivos Bluetooth se vinculan
por primera vez, ambos deben buscar la
radio, esta mostrará su disponibilidad
en ambos dispositivos. Sin embargo, si
un dispositivo se vincula primero con la
unidad, el otro dispositivo Bluetooth no
podrá encontrarla en la lista.
●Si lleva su dispositivo Bluetooth fuera
del rango de alcance, la conexión entre
su dispositivo y la radio se desconectará
temporalmente. La radio se reconectará
automáticamente si el dispositivo
Bluetooth se lleva de nuevo dentro del
rango de alcance. Tenga en cuenta que
durante el periodo de desconexión,
ningún otro dispositivo Bluetooth puede
vincularse con la radio.
●Si " MMR-99 DAB " se muestra en la
lista de dispositivos Bluetooth pero el
dispositivo Bluetooth no puede conectarse
con ella, elimine el elemento de la lista y
vincule de nuevo el dispositivo Bluetooth
con la radio siguiendo los pasos descritos
anteriormente.
●El rango de funcionamiento efectivo
entre la radio y el dispositivo Bluetooth
vinculado es de aproximadamente 10
metros (30 pies). Cualquier obstáculo
entre el sistema y el dispositivo puede
reducir el rango de funcionamiento.
●El rendimiento de la conectividad
Bluetooth puede variar dependiendo
del dispositivo Bluetooth conectado.
Consulte las capacidades Bluetooth del
dispositivo antes de conectarlo a la radio.
Según el dispositivo Bluetooth usado, es
posible que no todas las funciones sean
compatibles.
●Con algunos teléfonos móviles, hacer
/ recibir llamadas, mandar mensajes,
correos electrónicos o cualquier
otra actividad no relacionada con la
transmisión de audio, podría silenciar
la transmisión de audio por Bluetooth o
incluso desconectarse temporalmente
del dispositivo. Tal comportamiento es
una función del dispositivo Bluetooth y
no indica que haya un problema con su
MMR-99DAB.
Reproducir audio en el modo
Bluetooth
Cuando haya conectado exitosamente la radio
con el dispositivo Bluetooth elegido, puede
comenzar a reproducir música usando los
controles en el dispositivo Bluetooth conectado.
1. El volumen de la reproducción Bluetooth
puede controlarse tanto desde el dispositivo
Bluetooth como desde la radio usando el
botón de subir / bajar volumen.
2. La reproducción también puede controlarse
tanto desde los controles del dispositivo
Bluetooth como desde los de la radio.
Presione el botón de reproducir / pausar de
la radio para iniciar / pausar la reproducción,
presione el botón de siguiente pista o pista
anterior para seleccionar la pista deseada, y
mantenga presionado el botón de siguiente
pista o pista anterior para avanzar o
retroceder rápidamente dentro de una pista
(suelte el botón cuando alcance el punto
deseado de la pista).
Nota:
puede que no todos los reproductores
o dispositivos respondan a todos estos
controles.
Reproducir audio desde
un dispositivo Bluetooth
anteriormente vinculado
La MMR-99DAB puede memorizar hasta 8
juegos de dispositivos Bluetooth vinculados.
Una vez que la memoria exceda esa cantidad,
el dispositivo que se vinculó con la radio hace
más tiempo se sobrescribirá en la memoria de
la radio.
Si el dispositivo fuente Bluetooth se ha
vinculado previamente con la MMR-99DAB,
la radio aún lo recordará y tratará de volver a
conectarse con el dispositivo que se conectó
la última vez. Si el último dispositivo Bluetooth
conectado no está disponible, la radio tratará
de conectarse con el penúltimo.
Desconectar el dispositivo
Bluetooth
Mantenga presionado el botón de vinculación
Bluetooth para desconectar la radio del
dispositivo Bluetooth. También puede presionar
el botón de banda para seleccionar cualquier
otro modo que no sea el modo Bluetooth o
apagar el Bluetooth del dispositivo Bluetooth
fuente para desactivar la conexión.
Si se desconecta del dispositivo Bluetooth en
el modo Bluetooth, se reproducirá un tono de
confirmación y el indicador LED del Bluetooth
de la radio parpadeará en color azul para
indicar que la radio está nuevamente disponible
para la vinculación.
7. Uso de la toma de entrada
auxiliar y la toma de auriculares
Escuchar audio usando la toma
de entrada auxiliar
Puede escuchar el audio de un dispositivo
externo a través del altavoz de la MMR-99DAB.
Para hacer esto, siga estos pasos:
1. Conecte el dispositivo externo (como un iPod
o un reproductor de MP3 o CD) a la toma de
entrada auxiliar de la radio usando un cable
de audio de 3,5mm (no incluido).
2. Asegúrese de que tanto la radio como el
dispositivo externo estén encendidos.
3. Seleccione el modo de entrada auxiliar
presionando repetidamente el botón de
banda.
4. La salida de audio del dispositivo externo se
reproducirá ahora a través de los altavoces
de la MMR-99DAB. Ajuste el volumen en el
dispositivo externo para garantizar un nivel
de volumen adecuado y, a continuación, use
el botón de subir / bajar volumen en la radio
según sea necesario para ajustar el volumen
a un nivel agradable.
Escuchar audio usando la toma
de auriculares
La MMR-99DAB está equipada con una toma de
auriculares en la parte derecha de la radio, que
puede usarse para conectar unos auriculares
con un conector de 3,5mm. Para conectar los
auriculares, inserte el conector de 3,5mm en la toma. La radio detectará automáticamente que se
han conectado unos auriculares y desactivará el altavoz interno.
Recomendamos bajar el volumen antes de conectar los auriculares y subirlo lentamente a un nivel
adecuado tras conectarlos, para evitar sonidos fuertes y daños a su audición.
Nota:
una presión sonora excesiva de los auriculares puede causar pérdida de audición. Para
evitar posibles daños auditivos, no escuche a volúmenes altos durante periodos de tiempo
prolongados.
Especificaciones
Alimentación
Batería de iones de litio recargable integrada de
2600mAh.
Dinamo: carga de la batería de litio recargable
integrada.
Panel solar: carga de la batería de litio recargable
integrada.
Toma de entrada de CC (5V / 2,4A) USB de tipo C para
cargar la MMR-99DAB.
Cable USB de tipo A a USB de tipo C y correa de mano
incluidas.
Cobertura de frecuencia
FM 87.5-108 MHz
DAB (BANDA III) 5A-13F (174.928MHZ - 239.200MHZ)
Bluetooth
Especificación Bluetooth Bluetooth® 5.0 + EDR
Perfiles soportados A2DP, AVRCP
Códec de audio Bluetooth SBC, AAC
Potencia de transmisión Clase 2
Alcance 10metros / 30pies
Frecuencia y potencia máxima
transmitida 2402MHz ~ 2480MHz: 2dBm (Bluetooth EDR & LE)
Antena
Antena telescópica FM / DAB
Tomas
Toma CC
Entrada de CC USB tipo C, 5V / 2,4A
Este símbolo indica voltaje de CC.
Salida de CC USB tipo A, 5V / 1A
Toma de auriculares 3,5mm de diámetro, salida estéreo, impedancia de 32
ohmios
Toma auxiliar 3,5mm de diámetro, entrada estéreo
Altavoz 2,25", 4ohmios, 5vatios
Potencia de salida 1,5vatios
Rango de temperatura de
funcionamiento de 5°C a 35°C
※ El código de barras en el producto se define de la siguiente manera:
Número de serie
Mes de producción
Año de producción
Código del producto
La empresa se reserva el derecho de modificar las especificaciones sin notificación previa.
Si, en lo sucesivo, usted tuviera que deshacerse de este producto, por favor, tenga en cuenta
que los productos eléctricos usados no deben ser depositados junto con los desechos del
hogar. Por favor, recicle allá donde se disponga de instalaciones para estos fines. Consulte a
las autoridades locales o a su distribuidor sobre consejos de reciclaje (Directiva de Residuos
de Equipos Eléctricos y Elec- trónicos)
2. Inleiding
Overzicht hoofdapparaat
1 LED-zaklamp / Noodverlichting-knop
2 Noodsignaal-knop
3 Zonnepaneel
4 Verlichtingsmodus-knop
5 Luidspreker
6
Aan / Uit / Automatisch uitschakelen-knop
7 Band / Vergrendelen-knop
8 LCD-display
9 Info / Menu-knop
10 Pagina / Alarm-knop
11 Enter / Automatisch afstemmen-knop
12 Afstemmen omhoog / omlaag-knop
13 Bluetooth-indicatielampje
14 Oplaadindicatielampje
15 Knop Volume omhoog / omlaag
16 Voorkeurzender 5-knop
17
Voorkeurzender 4 / Volgende track /
Vooruitspoelen-knop
18
Voorkeurzender 3 / Afspelen / Pauzeren-
knop
19
Voorkeurzender 2 / Vorige track /
Terugspoelen-knop
20
Voorkeurzender 1 / Koppelen via
Bluetooth-knop
21 Kleine lichtstraal (rood)
22 Grote lichtstraal (wit)
23 Kleine lichtstraal (wit)
24 Handriem
25 Telescopische antenne
26 Handslinger voor dynamovoeding
27 Voedingsingang (USB Type-C, 5V / 2,4A)
28 Voedingsuitgang (USB Type-A, 5V / 1A)
29 Aux-ingang
30 3,5mm-hoofdtelefoonaansluiting
LCD-display en indicatoren
A FM-indicator
B RDS-indicator
C Noodverlichtingsindicator
D Vergrendelingsindicator
E FM-stereo-indicator
F Signaalsterkte-indicator
G Batterij-indicator
H Voorkeurzenderindicator
I Slaapindicator
J Tijd en radiofrequentie
K Alarmindicator
L Aux-indicator
M DAB-indicator
3. Aan de slag
De radio van stroom voorzien
De MMR-99DAB wordt gevoed door een
ingebouwde lithium-ionbatterij van 2600mAh.
Deze batterij kan worden opgeladen door
een USB-voedingsbron aan te sluiten op de
voedingsingang van de radio, met behulp
van de handslinger op de achterkant van de
radio of met behulp van het zonnepaneel op
de bovenkant van de radio.
Voordat u de radio voor het eerst gebruikt,
wordt aanbevolen de ingebouwde batterij
van de radio volledig op te laden door de
voedingsingang op de radio aan te sluiten op
een USB-voedingsbron.
Het volledig opladen van de batterij met USB-
stroom duurt ca. 3 uur. Wanneer de batterij
van de radio volledig is opgeladen, wordt het
batterijpictogram niet langer weergegeven op
het display. Een lager vermogen, vervorming,
stotterende geluiden of een leeg en
knipperend batterijpictogram op het display
van de radio zijn allemaal tekenen dat de
batterij moet worden opgeladen. De radio
kan ca. 20 uur afspelen wanneer de batterij
volledig is opgeladen.
De batterij opladen met de
voedingsingang
Volg deze stappen om de batterij op te laden
met behulp van de voedingsingang op de radio:
1. Sluit het type-C-uiteinde van de
meegeleverde USB-oplaadkabel aan op de
voedingsingang op de rechterkant van de
radio.
2. Sluit het andere uiteinde van de USB-
oplaadkabel aan op een USB-type-A-poort
(bijvoorbeeld de USB-poort van een PC,
USB-oplader of powerbank).
Opmerking:
Het wordt aanbevolen een USB-
voedingsbron met een vermogen van 5V /
2,4A te gebruiken om ervoor te zorgen dat
de batterij voldoende vermogen krijgt en
dat de voedingsuitgang van de radio ook
kan worden gebruikt terwijl de batterij wordt
opgeladen.
De batterij opladen met de handslinger
Volg deze stappen om de batterij op te laden
met de handslinger op de achterkant van de
radio:
1. Zorg er voordat u de handslinger gebruikt
voor dat de telescopische antenne is
ingeklapt en terug in de steun is geplaatst.
2. Klap de handslinger uit de steun.
3. Draai de handslinger met de klok mee of
tegen de klok in met ca. 100 omwentelingen
per minuut. Het oplaadindicatielampje naast
het display van de radio licht groen op terwijl
de batterij wordt opgeladen.
4. Als u klaar bent met het opladen van de
batterij met behulp van de handslinger,
plaatst u deze terug in de steun.
Opmerking:
Onder normale luisteromstandigheden voegt
elke minuut opladen met de handslinger ca.
5~7 minuten luistertijd toe.
De batterij opladen met het zonnepaneel
U hoeft de radio niet in te schakelen om het
zonnepaneel te gebruiken en de batterij op te
laden.
Als u de interne batterij van de radio wilt
opladen met zonne-energie, moet u de radio
zo plaatsen dat er direct zonlicht op het
zonnepaneel valt. Hoe meer direct zonlicht er
op het zonnepaneel valt, hoe meer elektriciteit
het zonnepaneel kan genereren om de radio te
voeden.
Opmerking:
Het zonnepaneel levert optimale prestaties
wanneer de zon direct boven de radio
staat en het zonlicht niet wordt gehinderd
door wolken, gebladerte, gordijnen
etc. In bepaalde situaties en slechte
lichtomstandigheden is het zonnepaneel
mogelijk niet effectief en kunt u het niet
gebruiken als primaire energiebron bij
standaard gebruik. Het zonnepaneel is
ontworpen als een aanvullende energiebron
die onder de juiste lichtomstandigheden tot
100% van de energiebehoefte van de radio
kan bijdragen. Het zonnepaneel laadt de
batterij alleen op met natuurlijk zonlicht. Het
kan geen energie genereren uit kunstlicht.
Probeer de batterij NIET op te laden door het
zonnepaneel direct onder een zonnelamp te
plaatsen. Dit veroorzaakt onherstelbare schade
aan de radio en kan de behuizing beschadigen.
(Als u dit toch doet, vervalt uw garantie.)
De radio in- / uitschakelen
Nadat de radio van stroom is voorzien, houdt
u de Aan / uit-knop ingedrukt om de radio in te
schakelen. De radio schakelt automatisch over
naar de laatst gebruikte modus. U kunt de radio
uitschakelen door simpelweg op de Aan / uit-
knop te drukken.
Opmerking:
Als de radio wordt gevoed door de interne
batterij, dan worden alle knoppen behalve
de LED-zaklamp / Noodverlichting-
knop, Noodsignaal-knop en Aan / uit-
knop uitgeschakeld wanneer de radio is
uitgeschakeld. Als de radio is aangesloten
op een USB-voedingsbron en is
uitgeschakeld, dan kan het alarm nog altijd
worden ingeschakeld / uitgeschakeld door
de Alarm-knop ingedrukt te houden en kan
het radiomenu worden geopend door de
Menu-knop ingedrukt te houden.
De LED-zaklamp gebruiken
De MMR-99DAB beschikt over drie ingebouwde
lampen die kunnen worden gebruikt als LED-
zaklamp door herhaaldelijk op de LED-zaklamp-
knop te drukken om een van de drie lampen te
activeren of de zaklamp uit te schakelen. De
LED-zaklamp kan altijd worden geactiveerd,
ongeacht of de radio is ingeschakeld of
uitgeschakeld. Nadat u een van de drie lampen
hebt geactiveerd, kunt u herhaaldelijk op
de Verlichtingsmodus-knop drukken om de
gewenste verlichtingsmodus te selecteren.
De beschikbare verlichtingsmodi zijn: hoge
helderheid, lage helderheid, SOS (morsecode
voor noodsignaal, drie korte flitsen, drie lange
flitsen, drie korte flitsen) en knipperen.
De noodsignaalfunctie gebruiken
De MMR-99DAB beschikt ook over een
noodsirene en -lamp die kunnen worden
gebruikt om de aandacht te trekken in
geval van nood. Het noodsignaal kan altijd
worden geactiveerd, ongeacht of de radio
is ingeschakeld of uitgeschakeld. Als u het
noodsignaal wilt activeren, druk dan simpelweg
op de Noodsignaal-knop. De kleine rode
lichtstraal en grote witte lichtstraal knipperen
nu afwisselend en er klinkt een in volume
toenemend alarmsignaal uit de luidspreker van
de radio.
De toetsvergrendelingsfunctie
gebruiken
De toetsvergrendelingsfunctie kan worden
gebruikt om onbedoelde bediening van de radio
te voorkomen en schakelt alle knoppen uit,
met uitzondering van de LED-zaklamp-knop en
Noodsignaal-knop.
U kunt de toetsvergrendelingsfunctie activeren
door de Vergrendelen-knop ingedrukt te
houden totdat de vergrendelingsindicator op
het display van de radio verschijnt. U kunt de
toetsvergrendelingsfunctie uitschakelen door
de Vergrendelen-knop opnieuw ingedrukt te
houden totdat de vergrendelingsindicator niet
langer wordt weergegeven op het display.
De slaaptimer gebruiken
U kunt de slaaptimer gebruiken om de radio
automatisch uit te laten schakelen nadat er
een vooraf ingestelde tijd is verstreken. De
slaaptimer kan worden ingesteld op een tijd
van 15 tot 120 minuten door de Aan / uit-
knop ingedrukt te houden en deze los te laten
wanneer de gewenste slaaptijd op het display
wordt weergegeven.
Als de slaaptimer actief is, verschijnt de
slaapindicator op het display van de radio. Als
u de slaaptimer wilt uitschakelen, houd de Aan /
uit-knop dan ingedrukt totdat de optie [OFF] op
het display verschijnt of schakel de radio uit en
vervolgens weer in.
Het radiomenu
U kunt het radiomenu openen als de radio
is ingeschakeld of uitgeschakeld en het kan
worden geopend vanuit elke modus. Het menu
bevat een aantal standaard items en een
aantal items die specifiek zijn voor de modus
waarin het menu wordt geopend (indien van
toepassing).
U kunt het radiomenu openen door de Menu-
knop ingedrukt te houden. Druk vervolgens
op de Afstemmen omhoog / omlaag-knop om
een item of waarde te selecteren in de menu's
en druk op de Enter-knop om uw keuze te
bevestigen of druk op de Menu-knop om één
stap terug te gaan in het menu of het menu te
sluiten (indien er geen items van een hoger
niveau beschikbaar zijn).
De onderstaande lijst geeft een overzicht van
de standaard items die in alle radiomodi in het
menu kunnen worden geselecteerd. In sommige
radiomodi biedt het menu ook aanvullende
items die specifiek zijn voor de geselecteerde
modus. Deze items worden vermeld in het
hoofdstuk dat bij die specifieke modus hoort,
later in deze handleiding.
[TIME]: Selecteer dit item om naar het
submenu voor de tijdsinstellingen te gaan met
de volgende items:
●[UPDATE]: Selecteer dit Item om de bron
voor het automatisch bijwerken van de tijd
in te stellen. Selecteer [FM] om de tijd bij te
werken wanneer u afstemt op een FM-zender
met RDS-gegevens, selecteer [DAB] om de
tijd bij te werken wanneer u afstemt op een
DAB-zender of selecteer [NONE] om het
automatisch bijwerken van de radiotijd uit te
schakelen.
●[TIME SET]: Selecteer dit item om de tijd en
datum van de radio handmatig in te stellen.
●[12 / 24 HOUR]: Selecteer dit Item om 12- of
24-uursnotatie te selecteren.
Opmerking:
Als de radio wordt uitgeschakeld terwijl er
gebruik wordt gemaakt van batterijstroom,
wordt de ingestelde tijd niet opgeslagen om
de batterijduur van de radio te verbeteren.
Als gevolg hiervan wordt het alarm ook
uitgeschakeld.
[SW VERSION]: Selecteer dit item om de
softwareversie van de radio weer te geven.
[RESET]: Selecteer dit item om de
instellingen van de radio te herstellen naar de
standaardinstellingen. Houd er rekening mee
dat het selecteren van dit item en vervolgens
[Yes] ertoe leidt dat de fabrieksinstellingen van
de radio worden hersteld en dat alle informatie
die is opgeladen op de radio wordt verwijderd.
Dit omvat alle instellingen en opgeslagen
voorkeurzenders.
[LANGUAGE]: Dit item is niet beschikbaar
wanneer u het menu opent vanuit de stand-
bymodus van de radio. Selecteer dit item om
de taal in te stellen waarin het radiomenu wordt
weergegeven.
[DCOUT]: Dit item is alleen beschikbaar
wanneer de radio niet is aangesloten op een
USB-voedingsbron en wordt gevoed door
de interne batterij. Selecteer dit item om
de voedingsuitgang van de radio in / uit te
schakelen wanneer de radio wordt gevoed
door de interne batterij (als de radio is
aangesloten op een USB-voedingsbron, dan is
de voedingsuitgang altijd ingeschakeld en kan
deze worden gebruikt om een extern apparaat
op te laden wanneer de radio is uitgeschakeld).
Als u de voedingsuitgang wilt gebruiken
om een extern apparaat op te laden of van
stroom te voorzien en de radio wordt gevoed
door de interne batterij, dan moet dit item zijn
ingeschakeld en de radio zijn uitgeschakeld.
[LIGHT]: Selecteer dit item om naar het
submenu voor de verlichting en lampen te gaan
met de volgende items:
●[B / L]: Selecteer dit item om de time-out van
de achtergrondverlichting van de radio in te
stellen. De beschikbare opties zijn: [30S],
[20S], [10S] en [OFF].
●[EL]: Selecteer dit Item om de automatische
noodverlichtingsfunctie van de radio in /
uit te schakelen. Deze functie activeert de
grote witte lichtstraal automatisch wanneer
de radio wordt losgekoppeld van een USB-
voedingsbron. Druk herhaaldelijk op de
LED-zaklamp-knop om de zaklamp uit te
schakelen.
[LOUD]: Selecteer dit item om de loudness-
functie van de radio in / uit te schakelen.
[ALARM]: Selecteer dit item om het alarm
van de radio in te stellen. Nadat u de alarmtijd
hebt ingesteld, kunnen de alarmbron, de
alarmfrequentie en het alarmvolume ook worden
ingesteld. De beschikbare opties voor de
alarmbron zijn [DAB], [FM] en [BUZ] (zoemer),
terwijl u de alarmfrequentie kunt instellen
op [ONCE] (eenmalig), [DAILY] (dagelijks),
[WEEKDAYS] (weekdagen) en [WEEKENDS]
(weekenden).
4. Luisteren naar DAB-radio
Afstemmen op DAB-zenders
Volg deze stappen om af te stemmen op DAB-
radiozenders:
1. Schakel de radio in door de Aan / uit-knop
ingedrukt te houden.
2. Selecteer de DAB-modus door herhaaldelijk
op de Band-knop te drukken.
3. Als de DAB-radiomodus voor het eerst wordt
gebruikt, voert de radio automatisch een
volledige scan uit om alle beschikbare DAB-
radiozenders te vinden. De zenderteller zal,
als er tijdens het scannen nieuwe zenders
worden gevonden, worden opgehoogd en de
gevonden zenders worden toegevoegd aan
de lijst die is opgeslagen in de radio.
4. Wanneer de volledige scan is voltooid, stemt
de radio automatisch af op de eerste DAB-
zender in de zenderlijst en wordt deze zender
afgespeeld.
5. Gebruik de Afstemmen omhoog / omlaag-
knop om door de zenderlijst te bladeren en
druk op de Enter-knop om af te stemmen op
de geselecteerde zender.
Opmerking:
Zorg er voordat u de DAB-radiomodus
selecteert en afstemt op zenders voor dat
de telescopische antenne op de achterkant
van de radio volledig is uitgestrekt en goed
rechtop is geplaatst.
Het DAB-menu
In de DAB-radiomodus bevat het radiomenu vijf
extra items die specifiek zijn voor deze modus:
[FULL SCAN]: Selecteer deze optie om een
volledige scan uit te voeren en alle gevonden
DAB-radiozenders op te slaan in de zenderlijst.
[MANUAL]: Selecteer deze optie om handmatig
af te stemmen op een DAB-kanaal / frequentie.
[DRC]: Dynamic Range Control (ook bekend
als DRC) kan zachtere geluiden eenvoudiger
hoorbaar maken wanneer uw radio wordt
gebruikt in een lawaaiige omgeving door het
dynamisch bereik van het audiosignaal te
reduceren. Selecteer dit item om het DRC-
niveau in te stellen, de beschikbare opties zijn:
●[0]: DRC is uitgeschakeld. Uitgezonden DRC
wordt genegeerd. Dit is de standaardinstelling.
●[1 / 2]: DRC-niveau wordt ingesteld op 1 / 2
van het niveau dat wordt uitgezonden door de
zender.
●[1]: DRC wordt ingesteld zoals uitgezonden
door de zender.
[ORDER]: Selecteer dit item om de volgorde
van de zenderlijst in te stellen. Selecteer
[NAME] om de zenders te sorteren op naam,
selecteer [ENSEMBLE] om de zenderlijst
te sorteren op DAB-multiplex of selecteer
[ACTIVE] om de zenderlijst te sorteren op
actieve / inactieve zenders.
[PRUNE]: Selecteer dit item om alle niet-
beschikbare zenders uit de zenderlijst te
verwijderen.
DAB-voorkeurzenders opslaan
De MMR-99DAB beschikt over 4
voorkeurzenderpagina's die elk 5
voorkeurzenders bevatten voor DAB-radio (in
totaal 20 voorkeurzenders).
Als u een DAB-zender als DAB-voorkeurzender
wilt opslaan, volg dan deze stappen:
1. Schakel de radio in.
2. Selecteer de DAB-modus door herhaaldelijk
op de Band-knop te drukken en stem zoals
eerder beschreven af op de gewenste DAB-
zender.
3. Druk herhaaldelijk op de Pagina-knop om
de gewenste voorkeurzenderpagina te
selecteren.
4. Houd de knop van het gewenste
voorkeurzendernummer (1-5) ingedrukt totdat
de melding 'SAVED' wordt weergegeven
op het display van de radio. De zender
is nu opgeslagen als voorkeurzender en
de bijbehorende voorkeurzenderindicator
verschijnt op het display van de radio.
5. Herhaal deze procedure indien gewenst
voor de resterende voorkeurzenders.
Voorkeurzenders kunnen niet worden
verwijderd, maar ze kunnen wel worden
overschreven door een nieuwe zender op te
slaan op een voorkeurzendernummer dat al
in gebruikt is.
DAB-voorkeurzenders oproepen
Als u een DAB-voorkeurzender wilt oproepen,
volg dan deze stappen:
1. Schakel de radio in.
2. Selecteer de DAB-modus door herhaaldelijk
op de Band-knop te drukken.
3. Druk herhaaldelijk op de Pagina-knop om
de gewenste voorkeurzenderpagina te
selecteren.
4. Druk op de knop van de gewenste
voorkeurzender (1-5).
Informatie over DAB-radio
weergeven op het display
Druk tijdens het luisteren naar een DAB-zender
herhaaldelijk op de Info-knop om op het display
van de radio door de volgende informatie te
bladeren:
●Tekst
●Programmatype
●Programmanaam
●Tijd
●Datum
●Frequentie
●Bitrate
●Audiocodec
●Signaalsterkte
●DL Plus-tekst (sommige zenders kunnen
naast de gewone tekst ook andere
programmagerelateerde gegevens op het
display weergeven. Als er geen informatie
beschikbaar is, wordt de melding 'no info'
weergegeven.)
5. Luisteren naar FM-radio
Afstemmen op FM-zenders
Volg deze stappen om af te stemmen op FM-
radiozenders:
1. Schakel de radio in door de Aan / uit-knop
ingedrukt te houden.
2. Selecteer de FM-modus door herhaaldelijk
op de Band-knop te drukken.
3. Druk op de Afstemmen omhoog-knop of
Afstemmen omlaag-knop en druk vervolgens
op de Automatisch afstemmen-knop om
automatisch af te stemmen op een FM-
zender met een hogere of lagere frequentie.
Uw radio stopt met scannen wanneer
deze een zender met een voldoende sterk
signaal heeft gevonden. Het display toont
de frequentie van het gevonden signaal en
de signaalsterkte-indicator geeft de sterkte
van het ontvangen signaal aan. Als er RDS-
gegevens beschikbaar zijn, verschijnt de
RDS-indicator ook op het display van de
radio en na een paar seconden wordt de
naam van de radiozender op het display
weergegeven.
4. Druk indien nodig aan de Afstemmen omhoog
/ omlaag-knop om de frequentie nauwkeurig
af te stellen met stappen van 0.05MHz.
5. Herhaal de stappen 3 en 4 om af te stemmen
op andere radiozenders.
Opmerking:
Zorg er voordat u de FM-radiomodus
selecteert en afstemt op zenders voor dat
de telescopische antenne op de achterkant
van de radio volledig is uitgestrekt en goed
rechtop is geplaatst.
Het FM-menu
In de FM-radiomodus bevat het radiomenu twee
extra items die specifiek zijn voor deze modus:
[SCAN]: Selecteer dit item om de automatisch
afstemfunctie van de radio in te stellen.
Selecteer [LOCAL] om ervoor te zorgen dat de
automatische afstemfunctie alleen naar lokale,
sterke signalen scant of selecteer [DISTANT]
om ervoor te zorgen dat de automatische
afstemfunctie ook naar zwakkere signalen van
ver weg gelegen zenders scant.
[AUDIO]: Selecteer dit item om de
afspeelmodus voor FM-zenders in te stellen.
Selecteer [MONO] om afspelen in mono te
forceren of selecteer [Auto] om zenders af te
spelen in stereo indien dit mogelijk is. Door
afspelen in mono te forceren, kunt u ruis van
zwakke FM-signalen verminderen.
FM-voorkeurzenders opslaan
De MMR-99DAB beschikt over 4
voorkeurzenderpagina's die elk 5
voorkeurzenders bevatten voor FM-radio (in
totaal 20 voorkeurzenders).
Als u een FM-zender als FM-voorkeurzender
wilt opslaan, volg dan deze stappen:
1. Schakel de radio in door de Aan / uit-knop
ingedrukt te houden.
2. Selecteer de FM-modus door herhaaldelijk
op de Band-knop te drukken en stem zoals
eerder beschreven af op de gewenste FM-
zender.
3. Druk herhaaldelijk op de Pagina-knop om
de gewenste voorkeurzenderpagina te
selecteren.
4. Houd de knop van het gewenste
voorkeurzendernummer (1-5) ingedrukt totdat
de melding 'SAVED' wordt weergegeven
op het display van de radio. De zender
is nu opgeslagen als voorkeurzender en
de bijbehorende voorkeurzenderindicator
verschijnt op het display van de radio.
5. Herhaal deze procedure indien gewenst
voor de resterende voorkeurzenders.
Voorkeurzenders kunnen niet worden
verwijderd, maar ze kunnen wel worden
overschreven door een nieuwe zender op te
slaan op een voorkeurzendernummer dat al
in gebruik is.
FM-voorkeurzenders oproepen
Als u een FM-voorkeurzender wilt oproepen,
volg dan deze stappen:
1. Schakel de radio in door de Aan / uit-knop
ingedrukt te houden.
2. Selecteer de FM-modus door herhaaldelijk
op de Band-knop te drukken.
3. Druk herhaaldelijk op de Pagina-knop om
de gewenste voorkeurzenderpagina te
selecteren.
4. Druk op de knop van de gewenste
voorkeurzender (1-5).
Informatie over FM-radio
weergeven op het display
Als u naar een FM-zender luistert die ook RDS-
gegevens uitzendt (de RDS-indicator wordt
weergegeven op het display van de radio),
drukt u herhaaldelijk op de Info-knop om op
het display van de radio door de volgende
informatie te bladeren:
●Zendernaam
●Tekstbericht
●Programmatype
●Frequentie
●Ontvangsttype (stereo / mono)
●Huidige tijd
●Huidige datum
Als er geen RDS-gegevens beschikbaar zijn,
kan de radio de zendernaam, het tekstbericht
en het programmatype niet weergeven.
6. Luisteren naar muziek via
Bluetooth-streaming
Als u Bluetooth-muziek naar uw radio wilt
streamen, moet u uw Bluetooth-apparaat
koppelen met de MMR-99DAB. Koppelen
creëert een 'band' zodat twee apparaten
elkaar kunnen herkennen.
Uw Bluetooth-apparaat voor het
eerst koppelen
1. Schakel de radio in door de Aan / uit-knop
ingedrukt te houden.
2. Druk herhaaldelijk op de Band-knop om
de Bluetooth-modus te selecteren. Het
display van de radio toont de melding
'PAIRING' en het Bluetooth-indicatielampje
knippert blauw om aan te geven dat de
radio beschikbaar is om te koppelen via
Bluetooth.
3. Activeer Bluetooth op uw Bluetooth-
apparaat (raadpleeg de handleiding van
het Bluetooth-apparaat als u niet zeker
weet hoe u Bluetooth moet activeren).
4. Ga naar de lijst met Bluetooth-apparaten
op uw Bluetooth-apparaat en selecteer het
apparaat met de naam 'MMR-99DAB'.
Opmerking:
Op sommige Bluetooth-apparaten (met
Bluetooth-versie 2.1 of eerder) moet u
mogelijk een pincode invoeren. Als dit
het geval is, voer dan de pincode '0000'
in.
5. Nadat de apparaten zijn gekoppeld en
verbonden, wordt een bevestigingstoon
afgespeeld op de radio en het display van
de radio toont de naam van het verbonden
Bluetooth-apparaat. U kunt nu muziek
afspelen op uw Bluetooth-apparaat en de
muziek streamen via de luidsprekers van
de radio.
Opmerkingen:
●Als 2 Bluetooth-apparaten voor het
eerst koppelen, moeten beide apparaten
zoeken naar de radio en wordt de radio
als beschikbaar getoond op beide
apparaten. Als een van beide apparaten
echter eerst verbinding maakt met de
radio, dan verschijnt de radio op het
andere Bluetooth-apparaat niet in de
lijst.
●Als u uw Bluetooth-apparaat verplaatst
tot buiten het Bluetooth-bereik, wordt
de verbinding tussen uw Bluetooth-
apparaat en de radio tijdelijk verbroken.
De radio maakt automatisch opnieuw
verbinding als het Bluetooth-apparaat
weer binnen bereik komt. U dient er
wel rekening mee te houden dat er
tijdens de periode waarin de verbinding
is verbroken geen ander Bluetooth-
apparaat mag worden gekoppeld of
verbonden met de radio.
●Als ' MMR-99DAB ' wordt weergegeven
in de lijst met Bluetooth-apparaten,
maar uw Bluetooth-apparaat er geen
verbinding mee kan maken, verwijder
het item dan uit de lijst en koppel
vervolgens opnieuw met de radio
volgens de eerder beschreven stappen.
●Het effectieve bereik tussen de radio
en het gekoppelde Bluetooth-apparaat
is ongeveer 10 meter (30 voet).
Eventuele obstakels tussen de radio
en het apparaat kunnen het bereik
verminderen.
●De prestaties van de Bluetooth-
connectiviteit kunnen variëren,
afhankelijk van het Bluetooth-apparaat
waarmee verbinding wordt gemaakt.
Bekijk de Bluetooth-mogelijkheden die
uw apparaat biedt voordat u verbinding
maakt met de radio. Het is mogelijk dat
niet alle functies worden ondersteund,
afhankelijk van het gebruikte Bluetooth-
apparaat.
●Het is bij gebruik van bepaalde mobiele
telefoons mogelijk dat het geluid van de
Bluetooth-audiostream tijdelijk wordt
gedempt of dat de verbinding met het
apparaat zelfs tijdelijk wordt verbroken
tijdens het verzenden / ontvangen van
oproepen, sms-berichten, e-mails of
andere activiteiten die niet in verband
staan met het streamen van audio.
Dergelijk gedrag is een functie van het
Bluetooth-bronapparaat en duidt niet op
een probleem met uw MMR-99DAB.
Audio afspelen in de Bluetooth-
modus
Als u uw radio succesvol met het gekozen
Bluetooth-apparaat hebt verbonden, kunt
u het afspelen van muziek starten met de
bedieningselementen van het verbonden
Bluetooth-apparaat.
1. Het volume kan tijdens het afspelen via
Bluetooth worden ingesteld op zowel uw
Bluetooth-apparaat als op de radio met de
Volume omhoog / omlaag-knop.
2. Het afspelen kan ook worden bediend
met zowel de bedieningselementen
op uw Bluetooth-apparaat als de
bedieningselementen op de radio. Als
u de bedieningselementen op de radio
wilt gebruiken, druk dan op de Afspelen /
Pauzeren-knop om het afspelen te starten
/ pauzeren, druk op Volgende track of
Vorige track om de gewenste track te
selecteren en houd Volgende track of
Vorige track ingedrukt om vooruit of terug
te spoelen binnen een track (laat de knop
los wanneer het gewenste punt van de
track is bereikt).
Opmerking:
Het is mogelijk dat niet alle apps voor het
afspelen van audio of apparaten op alle
bedieningselementen reageren.
Audio afspelen vanaf een eerder
gekoppeld Bluetooth-apparaat
De MMR-99DAB kan tot 8 Bluetooth-
apparaten onthouden waarmee eerder is
gekoppeld. Als er met meer dan 8 Bluetooth-
apparaten is gekoppeld, dan zal het eerste
apparaat waarmee is gekoppeld worden
overschreven in het geheugen van de radio.
Als uw Bluetooth-apparaat al eerder is
gekoppeld met de MMR-99DAB, zal de radio
uw Bluetooth-apparaat nog steeds herkennen
en probeert de radio opnieuw verbinding te
maken met het laatst verbonden apparaat.
Als het laatst verbonden Bluetooth-apparaat
niet beschikbaar is, probeert de radio
verbinding te maken met het voorlaatst
verbonden Bluetooth-apparaat.
De verbinding met uw
Bluetooth-apparaat verbreken
Houd de Koppelen via Bluetooth-knop
ingedrukt om de verbinding tussen de radio
en uw Bluetooth-apparaat te verbreken. U
kunt ook op de Band-knop drukken om een
modus anders dan de Bluetooth-modus te
selecteren of Bluetooth uitschakelen op uw
Bluetooth-bronapparaat om de verbinding te
verbreken.
Als u de verbinding verbreekt vanaf het
Bluetooth-apparaat en de radio nog in
de Bluetooth-modus staat, klinkt er een
bevestigingstoon en begint het Bluetooth-
indicatielampje van de radio weer blauw te
knipperen om aan te geven dat de radio weer
beschikbaar is om te koppelen.
7. De aux-ingang en
hoofdtelefoonaansluiting
gebruiken
Naar muziek luisteren via de aux-
ingang
U kunt via de luidspreker van uw MMR-99DAB
naar het geluid van een extern apparaat
luisteren. Volg hiervoor de volgende stappen:
1. Sluit het externe apparaat (zoals een iPod,
mp3-speler of cd-speler) met een 3,5mm-
audiokabel (niet meegeleverd) aan op de
aux-ingang van de radio.
2. Zorg ervoor dat zowel de radio als het
externe apparaat zijn ingeschakeld.
3. Druk herhaaldelijk op de Band-knop om de
Aux in-modus te selecteren.
4. De audio die wordt afgespeeld op het
externe apparaat wordt nu afgespeeld via
de luidspreker van de MMR-99DAB. Stel
het volume in op het externe apparaat om
ervoor te zorgen dat het volume van het
signaal adequaat is en gebruik vervolgens
de Volume omhoog / omlaag-knop op de
radio om het volume op een comfortabel
niveau in te stellen.
Naar muziek luisteren via de
hoofdtelefoonaansluiting
De MMR-99DAB is uitgerust met
een hoofdtelefoonaansluiting aan de
rechterkant van de radio. Hierop kunt u een
hoofdtelefoon met een 3,5mm-stekker aansluiten. Als u een hoofdtelefoon wilt aansluiten, steek dan
simpelweg de 3,5mm-stekker in de aansluiting. De radio detecteert vervolgens automatisch dat er
een hoofdtelefoon is aangesloten en schakelt de interne luidspreker uit.
We raden aan het volume lager te zetten voordat u de hoofdtelefoon aansluit en het, nadat u de
hoofdtelefoon hebt aangesloten, langzaam te verhogen tot een geschikt niveau om harde geluiden en
gehoorbeschadiging te voorkomen.
Opmerking:
Overmatige geluidsdruk van oortelefoons en koptelefoons kan gehoorverlies veroorzaken.
Luister niet gedurende lange perioden op hoog volume om gehoorschade te voorkomen.
Specificaties
Voeding
Ingebouwde oplaadbare lithium-ionbatterij van
2600mAh
Dynamo - voor opladen van ingebouwde oplaadbare
lithiumbatterij.
Zonnepaneel - voor opladen van ingebouwde
oplaadbare lithiumbatterij.
DC IN (5V / 2,4A) USB Type-C-aansluiting voor opladen
van de MMR-99DAB.
USB Type-A-naar-USB Type-C-kabel en handriem
meegeleverd.
Frequentiebereik
FM 87.5-108 MHz
DAB (BAND III) 5A-13F (174.928MHz - 239.200MHz)
Bluetooth
Bluetooth-specificatie Bluetooth® 5.0 +EDR
Ondersteunde profielen A2DP, AVRCP
Bluetooth-audiocodec SBC, AAC
Zendvermogen Vermogensklasse 2
Bereik in rechte lijn 10meter / 30voet
Bluetooth-frequentie en maximaal
uitgezonden vermogen 2402MHz ~ 2480MHz: 2dBm (Bluetooth EDR & LE)
Antenne
Telescopische antenne FM / DAB
Aansluitingen
DC-aansluiting
DC IN USB Type-C, 5V / 2,4A
Dit symbool geeft gelijkspanning aan.
DC OUT USB Type-A, 5V / 1A
Oortelefoonaansluiting diameter van 3,5mm, stereo-uitgang, impedantie van
32ohm
Aux-ingang diameter van 3,5mm, stereo-ingang
Luidspreker 2,25", 4Ohm, 5watt
Uitgangsvermogen 1,5watt
Bedrijfstemperatuurbereik 5°C tot 35°C
※ De streepjescode op het product is als volgt opgebouwd:
Serienummer
Productiemaand
Productiejaar
Productcode
Het bedrijf behoudt zich het recht voor om de specificaties te wijzigen zonder voorafgaande
kennisgeving.
Als u zich op enig moment in de toekomst van dit product wenst te ontdoen, houd er dan
rekening mee dat elektrische apparaten niet bij het huishoudelijk afval mogen worden
weggegooid. Recycle als hiervoor faciliteiten aanwezig zijn. Raadpleeg uw lokale instantie of
leverancier voor advies over recycling. (Richtlijn voor afgedankte elektrische en elektronische
apparatuur)
2. Einleitung
Produktübersicht
1 LED-Taschenlampe / Notlicht
2 Notsignal
3 Solarpanel
4 Beleuchtungsmodus
5 Lautsprecher
6 Betrieb / Autom. Abschaltung
7 Frequenzband / Sperren
8 LCD
9 Info / Menü
10 Seite / Weckruf
11 Enter / Autom. Sendersuche
12 Tuning + / -
13 Bluetooth LED-Anzeige
14 LED-Ladeanzeige
15 Lautstärke + / -
16 Speichertaste 5
17 Speichertaste 4 / Nächster Titel / Suchlauf
vorwärts
18 Speichertaste 3 / Wiedergabe / Pause
19 Speichertaste 2 / Vorheriger Titel / Suchlauf
rückwärts
20 Speichertaste 1 / Bluetooth-Kopplung
21 Abblendlicht (rot)
22 Fernlicht (weiß)
23 Abblendlicht (weiß)
24 Handriemen
25 Teleskopantenne
26 Kurbel-Dynamo
27 DC-Eingang (USB Typ C, 5V 2,4A)
28 DC-Ausgang (USB Typ A, 5V 1A)
29 Aux-Eingang
30 3,5mm Kopfhörerbuchse
Anzeigen am LCD
A UKW-Anzeige
B RDS-Anzeige
C Notlichtanzeige
D Sperren-Symbol
E UKW-Stereo-Symbol
F Signalstärkesymbol
G Batterie-Symbol
H Speicherplatzanzeige
I Sleep-Anzeige
J Uhrzeit und Radiofrequenz
K Weckrufanzeige
L Aux-Anzeige
M DAB-Anzeige
3. Erste Schritte
Stromversorgung
Das MMR-99DAB wird über eine integrierte
2.600mAh Lithium-Ion-Batterie betrieben. Die
Batterie laden Sie auf, indem Sie eine USB-
Stromquelle mit dem DC-Eingang verbinden,
den Kurbel-Dynamo an der Rückseite
verwenden oder das Solarpanel auf der
Oberseite nutzen.
Vor dem erstmaligen Gebrauch des Radios
wird empfohlen, die integrierte Batterie über
eine an den DC-Eingang angeschlossene USB-
Stromversorgung vollständig aufzuladen.
Bei Verwendung einer USB-Stromversorgung
dauert es ungefähr 3 Stunden, bis die Batterie
vollständig geladen ist. Nach der vollständigen
Aufladung der Batterie verschwindet das
Batteriesymbol aus dem Display. Eine
nachlassende Leistung, ein verzerrter Sound,
stotternde Geräusche sowie das leere
Batteriesymbol sind alles Anzeichen dafür,
dass die Batterie geladen werden muss. Eine
vollständig geladene Batterie ermöglicht eine
Wiedergabedauer von ungefähr 20 Stunden.
Batterie via DC-Eingang auaden
Gehen Sie wie folgt vor, um die Batterie über
den DC-Eingang des Radios aufzuladen:
1. Schließen Sie den Typ C Stecker des
mitgelieferten USB-Ladekabels an den DC-
Eingang rechts am Radio an.
2. Schließen Sie das andere Ende des USB-
Ladekabels an einen USB-Port des Typs A
an (z.B. eines PCs oder einer Powerbank).
Hinweis:
Es wird empfohlen, eine 5V / 2,4A USB-
Stromversorgung zu verwenden, um
Fehlfunktionen der Batterie zu vermeiden
und um zu gewährleisten, dass der DC-
Ausgang des Radios während des
Ladevorgangs weiterhin benutzt werden
kann.
Batterie über den Kurbel-Dynamo
auaden
Gehen Sie wie folgt vor, um die Batterie mit der
Kurbel an der Rückseite des Radios aufzuladen:
1. Vergewissern Sie sich vor der Nutzung
der Kurbel, dass die Teleskopantenne
eingefahren ist und in der dafür
vorgesehenen Haltung sitzt.
2. Entfernen Sie die Kurbel aus ihrer Halterung.
3. Drehen Sie die Kurbel mit einer
Geschwindigkeit von ca. 100 U / min im oder
entgegen dem Uhrzeigersinn. Während des
Aufladens leuchtet die LED-ladeanzeige
neben dem Display grün.
4. Nach dem Aufladen mit der Kurbel
positionieren Sie diese wieder in die
Halterung.
Hinweis:
1 Minute Aufladen mit der Handkurbel ergibt
ungefähr 5~7 Minuten Wiedergabedauer
(unter normalen Wiedergabebedingungen).
Batterie über das Solarpanel auaden
Für den Betrieb des Solarpanels muss das
Radio nicht eingeschaltet sein.
Um die Batterie über das Solarpanel aufzuladen,
positionieren Sie das Radio so, dass die
Sonneneinstrahlung direkt auf das Solarpanel
trifft. Je mehr direkte Sonneneinstrahlung das
Panel erhält, desto mehr Elektrizität kann es für
die Stromversorgung des Radios erzeugen.
Hinweis:
Die beste Leistung kann das Solarpanel
erzielen, wenn die Sonne direkt von oben
auf das Panel scheint und die Sonne nicht
von Wolken, Laub, Gardinen usw. Behindert
wird. Bei ungünstigen Bedingungen
und schlechten Lichtverhältnissen ist
das Solarpanel nicht sehr effizient und
nicht als primäre Energiequelle für den
normalen Gebrauch des Radios geeignet.
Das Solarpanel wurde für die Nutzung als
zusätzliche Energiequelle entwickelt, die
bei optimalen Lichtverhältnissen bis zu
100% der Energie für die Stromversorgung
des Radios bereitstellen kann. Das
Solarpanel lädt die Batterie nur bei
natürlichem Sonnenlicht auf. Bei künstlicher
Beleuchtung erzeugt es keinen Strom.
Versuchen Sie NICHT, das Solarpanel direkt
unter eine Sonnenlampe zu legen und so
die Batterie aufzuladen. Das Radio und
das Gehäuse könnten dadurch permanent
beschädigt werden. (In solch einem Fall erlischt
die Garantie.)
Radio ein- / ausschalten
Halten Sie, nachdem das Radio an die
Stromversorgung angeschlossen wurde,
die Betriebstaste gedrückt, um das Radio
einzuschalten. Das Radio aktiviert automatisch
den zuletzt verwendeten Modus. Um das Radio
wieder auszuschalten, drücken Sie einfach die
Betriebstaste.
Hinweis:
Falls das Radio mit der Batterie versorgt
wird, erlöschen nach dem Ausschalten
des Radios alle Tasten außer der Tasten
LED-Taschenlampe / Notlicht, Notsignal
und der Betriebstaste. Wenn das Gerät mit
einer USB-Stromversorgung verbunden ist,
können der Weckruf durch langes Drücken
der Weckrufaste aktiviert / deaktiviert und
das Radiomenü durch langes Drücken der
Menü-Taste geöffnet werden.
LED-Taschenlampe
Das MMR-99DAB verfügt über drei Lampen,
die als LED-Taschenlampe verwendet werden
können. Drücken Sie wiederholt die Taste
LED-Taschenlampe, um jeweils eine der drei
Lampen einzuschalten oder um die Funktion
zu beenden. Die LED-Taschenlampe kann
sowohl bei ein- als auch bei ausgeschaltetem
Radio aktiviert werden. Drücken Sie nach
dem Einschalten einer der drei Lampen die
Beleuchtungsmodustaste wiederholt, um
den Beleuchtungsmodus auszuwählen: hohe
Helligkeit, niedrige Helligkeit, SOS (Morse-
Notsignal – dreimal kurzes Blinken, dreimal
langes Blinken, dreimal kurzes Blinken) und
Blinken.
Notsignal
Das MMR-99DAB verfügt außerdem über
eine Sirene und ein Notlicht, um im Notfall
Aufmerksamkeit zu erzeugen. Das Notsignal
kann immer aktiviert werden, egal ob das
Radio ein- oder ausgeschaltet ist; drücken
Sie dafür einfach auf die Notsignaltaste.
Nach der Aktivierung des Notsignals blinken
das rote Abblendlicht und das weiße Fernlicht
abwechselnd und es ertönt ein immer lauter
werdendes Alarmsignal.
Tastensperre
Mit der Tastensperre verhindern Sie den
versehentlichen Betrieb des Radios. Diese
Funktion deaktiviert alle Tasten außer der
Tasten für die LED-Taschenlampe und das
Notsignal.
Um die Tastensperre zu aktivieren, halten Sie
die Sperren-Taste gedrückt, bis im Display
das Sperren-Symbol erscheint. Um die
Funktion wieder zu deaktivieren, halten Sie
die Sperren-Taste erneut gedrückt, bis das
Sperren-Symbol verschwindet.
Sleep-Timer-Funktion
Anhand des Sleep-Timers können Sie eine
Zeit einstellen, nach Ablauf derer sich das
Radio automatisch ausschaltet. Sie können
die Dauer mit einem Wert zwischen 15 und
120 Minuten einstellen. Halten Sie dafür die
Betriebstaste gedrückt, bis die gewünschte
Dauer angezeigt wird.
Bei aktiviertem Sleep-Timer erscheint im
Display die Sleep-Anzeige. Um den Timer
zu deaktivieren, halten Sie entweder erneut
die Betriebstaste gedrückt, bis die Anzeige
[AUS] erscheint, oder schalten Sie das Radio
normal aus und wieder ein.
Radiomenü
Sie können das Radiomenü bei ein- oder
ausgeschaltetem Radio sowie aus jedem
Modus heraus öffnen. Das Menü enthält
allgemeine Optionen sowie Optionen, die je
nach Modus, in dem das Menü geöffnet wird,
variieren (sofern zutreffend).
Halten Sie die Menü-Taste gedrückt, um
das Menü zu öffnen. Wählen Sie dann mit
den Tasten Tuning + / - eine Option aus und
bestätigen Sie Ihre Auswahl mit der Enter-
Taste. Drücken Sie alternativ die Menü-
Taste, um zum vorherigen Schritt des Menüs
zurückzukehren oder um das Menü zu
schließen (falls keine übergeordnete Ebene
mehr vorhanden ist).
Die nachfolgende Übersicht listet die
Standardoptionen auf, die von allen Modi aus
im Radiomenü ausgewählt werden können.
In einigen Modi sind darüber hinaus noch
weitere Optionen verfügbar. Diese Optionen
werden in den entsprechenden Kapiteln
dieser Bedienungsanleitung erläutert.
[UHRZEIT]: Wählen Sie diese Option, um
ein Untermenü mit folgenden Optionen zu
öffnen:
●[UPDATE]: Wählen Sie diese Option,
um die Quelle für die automatische
Aktualisierung der Uhrzeit einzustellen.
Wählen Sie die Option [UKW], wird die
Uhrzeit während der Wiedergabe eines
UKW-Senders mit RDS-Daten aktualisiert;
wählen Sie die Option [DAB], wird die
Uhrzeit während der Wiedergabe eines
DAB-Senders aktualisiert. Wählen Sie
[AUS], um die automatische Aktualisierung
der Uhrzeit zu deaktivieren.
●[MANUELL]: Wählen Sie diese Option,
um Uhrzeit und Datum des Radios manuell
einzustellen.
●[12 / 24-FORMAT]: Über diese Option
wählen Sie das 12- oder 24-Stundenformat
für die Uhrzeit aus.
Hinweis:
Falls das Radio während des
Batteriebetriebs ausgeschaltet wird, wird
die eingestellte Zeit nicht gespeichert, um
die Batterie zu schonen. Der Weckruf wird
ebenfalls deaktiviert.
[SW-VERSION]: Wählen Sie diese Option,
um die aktuelle Software-Version des Radios
anzuzeigen.
[RÜCKSTELLUNG]: Wählen Sie
diese Option, um das Radio auf die
Werkseinstellungen zurückzusetzen. Bitte
beachten Sie, dass nach dem Auswählen
dieser Option und deren Bestätigung mit [Ja]
alle von Ihnen vorgenommenen Einstellungen
und gespeicherten Radiosender gelöscht
werden.
[SPRACHE]: Diese Option ist nicht
verfügbar, wenn das Radiomenü im Standby-
Modus des Radios geöffnet wird. Über
diese Option wählen Sie die Sprache für die
Anzeige der Menüs.
[DCOUT]: Diese Option ist nur verfügbar,
wenn das Radio nicht mit einer USB-
Stromquelle verbunden ist. Wählen Sie diese
Option, um den DC-Ausgang des Radios
während des Batteriebetriebs zu aktivieren
/ zu deaktivieren. (Während der Verbindung
des Radios mit einer USB-Stromquelle ist
der DC-Ausgang immer aktiviert und für das
Aufladen anderer Geräte verfügbar, sofern
das Radio ausgeschaltet ist). Damit Sie
während des Batteriebetriebs ein externes
Gerät über den DC-Ausgang aufladen
können, müssen diese Funktion aktiviert und
das Radio ausgeschaltet sein.
[LICHT]: Wählen Sie diese Option, um ein
Untermenü mit folgenden Optionen zu öffnen:
●[B / L]: Über diese Option stellen
Sie die Dauer ein, für die die
Hintergrundbeleuchtung des Displays
eingeschaltet bleibt: [30S], [20S], [10S]
oder [AUS].
●[EL]: Wählen Sie diese Option, um
die automatische Notlichtfunktion des
Radios zu aktivieren oder zu deaktivieren.
Ist die Funktion aktiviert, schaltet das
Radio das weiße Fernlicht ein, wenn das
Radio von der USB-Stromversorgung
getrennt wird. Drücken Sie wiederholt die
Taste LED-Taschenlampe, um das Licht
auszuschalten.
[LAUTHEIT]: Wählen Sie diese Option, um
die Lautheit-Funktion des Radios ein- oder
auszuschalten.
[WECKRUF]: Über diese Option
konfigurieren Sie die Weckrufeinstellungen.
Sie können Einstellungen für die Weckrufzeit,
Weckrufmodus, Weckrufhäufigkeit und
Lautstärke vornehmen. Verfügbare Optionen
für den Weckrufmodus: [DAB], [UKW] oder
[BUZ]. Verfügbare Optionen für die Häufigkeit
des Weckrufs: [EINMAL], [TÄGLICH],
[WOCHENTAGS], [WOCHENENDE].
4. DAB-Radiobetrieb
DAB-Radiosender einschalten
Gehen Sie wie folgt vor, um DAB-
Radiosender einzuschalten:
1. Schalten Sie das Radio ein, indem Sie die
Betriebstaste gedrückt halten.
2. Drücken Sie wiederholt die
Frequenzbandtaste, um den DAB-Modus
auszuwählen.
3. Falls Sie den DAB-Modus das erste Mal
einschalten, startet das Radio automatisch
eine vollständige Suche nach allen
verfügbaren DAB-Radiosendern. Während
dieser Suche werden gefundene DAB-
Sender zur Senderliste hinzugefügt
und die Zähleranzeige erhöht sich
entsprechend.
4. Nach Abschluss der Sendersuche schaltet
das Radio automatisch den ersten DAB-
Sender auf der Senderliste ein.
5. Verwenden Sie die Tasten Tuning + / -,
um durch die Senderliste zu scrollen, und
drücken Sie die Enter-Taste, sobald Sie
einen gewünschten Sender gefunden
haben, um diesen wiederzugeben.
Hinweis:
Vergewissern Sie sich vor der Auswahl des
DAB-Modus und der Suche nach Sendern,
dass die Teleskopantenne an der Rückseite
des Radios vollständig ausgezogen und
senkrecht positioniert ist.
DAB-Radiomenü
Wenn Sie das Radiomenü vom DAB-
Modus aus öffnen, gibt es neben den
Standardoptionen fünf weitere, für diesen
Modus spezifische Optionen:
[AUTOM]: Wählen Sie diese Option, um eine
vollständige Sendersuche durchzuführen
und um alle gefundenen Radiosender in der
DAB-Senderliste zu speichern.
[MANUELL]: Wählen Sie diese Option, um
manuell einen DAB-Sender / eine DAB-
Frequenz einzustellen.
[DRC]: Mit der Funktion der dynamischen
Bereichskontrolle (DRC) können leisere
Töne besser hörbar gemacht werden,
insbesondere wenn sich das Radio in einer
lauten Umgebung befindet; dabei wird
der dynamische Bereich des Audiosignals
reduziert. Wählen Sie diese Option, um eine
DRC-Einstellung auszuwählen:
●[0]: DRC ist deaktiviert und die übertragene
DRC-Einstellung wird ignoriert. Dies ist die
Standardeinstellung.
●[1 / 2]: DRC-Einstellung beträgt die Hälfte der
übertragenen Einstellung.
●[1]: DRC ist identisch mit der übertragenen
Einstellung.
[REIHENFOLGE]: Wählen Sie diese Option,
um die Anzeigereihenfolge der Senderliste
einzustellen. Mit der Option [NAME] werden
Sender nach Name sortiert, mit der Option
[ENSEMBLE] nach DAB-Multiplex und mit der
Option [AKTIV] nach aktiven und inaktiven
Sendern.
[LÖSCHEN]: Wählen Sie diese Option, um
alle nicht verfügbaren Sender aus der Liste zu
löschen.
DAB-Radiosender speichern
Das MMR-99DAB verfügt über 4 Seiten mit
jeweils 5 Senderspeichern für DAB-Radiosender
(insgesamt 20 Senderspeicher).
Gehen Sie wie folgt vor, um DAB-Radiosender
zu speichern:
1. Schalten Sie das Radio ein.
2. Drücken Sie wiederholt die
Frequenzbandtaste zur Auswahl des DAB-
Modus und schalten Sie dann wie bereits
erläutert einen DAB-Sender ein.
3. Drücken Sie wiederholt die Seite-Taste, um
die gewünschte Seite mit Speicherplätzen zu
öffnen.
4. Halten Sie dann die entsprechende
Speichertaste (1-5) gedrückt, bis im Display
die Anzeige “GESPEICHERT” erscheint. Der
Sender wurde dann erfolgreich gespeichert
und im Display leuchtet die Anzeige des
entsprechenden Speicherplatzes auf.
5. Wiederholen Sie diese Vorgehensweise, um
weitere Sender zu speichern. Gespeicherte
Sender können nicht gelöscht, jedoch
anhand der beschriebenen Vorgehensweise
überschrieben werden.
Gespeicherte DAB-Radiosender
aufrufen
Gespeicherte DAB-Sender rufen Sie wie folgt
auf:
1. Schalten Sie das Radio ein.
2. Drücken Sie wiederholt die
Frequenzbandtaste zur Auswahl des DAB-
Modus.
3. Drücken Sie wiederholt die Seite-Taste, um
die gewünschte Seite mit Speicherplätzen zu
öffnen.
4. Drücken Sie dann die gewünschte
Speichertaste (1-5) zur Auswahl eines
gespeicherten Senders.
Informationen von DAB-
Radiosendern anzeigen
Drücken Sie während der Wiedergabe eines
DAB-Radiosenders die Info-Taste wiederholt,
um nacheinander die folgenden Informationen
anzuzeigen:
●Text
●Programmtyp
●Programmname
●Uhrzeit
●Datum
●Frequenz
●Bitrate
●Audio-Codec
●Signalstärke
●DL Plus Text (Einige Sender stellen
möglicherweise noch weitere Informationen
bereit. Falls keine Informationen verfügbar
sind, erscheint die Anzeige “Keine Infos”.)
5. UKW-Radiobetrieb
UKW-Radiosender einschalten
Gehen Sie wie folgt vor, um UKW-Radiosender
einzuschalten:
1. Schalten Sie das Radio ein, indem Sie die
Betriebstaste gedrückt halten.
2. Drücken Sie wiederholt die
Frequenzbandtaste, um den UKW-Modus
auszuwählen.
3. Drücken Sie Taste Tuning + bzw. Tuning
- und anschließend die Taste Autom.
Sendersuche, um einen UKW-Sender
mit höherer oder niedrigerer Frequenz zu
suchen. Sobald das Radio einen Sender mit
ausreichender Signalstärke gefunden hat,
beendet es die Suche. Im Display werden
die Frequenz des Signals und anhand der
Signalstärkeanzeige die Stärke des Signals
angezeigt. Sofern RDS-Daten verfügbar
sind, erscheint auch die RDS-Anzeige und
nach einigen Sekunden zeigt das Radio den
Sendernamen an.
4. Verwenden Sie die Tuningtasten + / - zur
Feineinstellung der Frequenz in Schritten von
0,05MHz, sofern erforderlich.
5. Wiederholen Sie die Schritte 3 und 4, um
weitere UKW-Sender zu suchen.
Hinweis:
Vergewissern Sie sich vor der Auswahl des
UKW-Modus und der Suche nach Sendern,
dass die Teleskopantenne an der Rückseite
des Radios vollständig ausgezogen und
senkrecht positioniert ist.
UKW-Radiomenü
Wenn das Radiomenü vom UKW-Modus
aus geöffnet wird, gibt es neben den
Standardoptionen noch zwei weitere, für diesen
Modus spezifische Optionen:
[AUTOM]: Wählen Sie diese Option, um die
automatische Suchfunktion des Radios zu
konfigurieren. Wählen Sie [LOKAL], um nur
nach lokalen Sendern (starken Signalen) zu
suchen, oder die Option [ENTFERNT], um auch
nach entfernteren Sendern mit schwächeren
Signalen zu suchen.
[AUDIO]: Über diese Option konfigurieren Sie
die Wiedergabe im UKW-Modus. Wählen Sie
[MONO] für die erzwungene Wiedergabe in
Mono, oder [Autom], um die Stereowiedergabe,
sofern verfügbar, zuzulassen. Die erzwungene
Mono-Wiedergabe ist nützlich, um
Störgeräusche bei schwachen UKW-Signalen
zu reduzieren.
UKW-Radiosender speichern
Das MMR-99DAB verfügt über 4 Seiten
mit jeweils 5 Senderspeichern für UKW-
Radiosender (insgesamt 20 Senderspeicher).
Gehen Sie wie folgt vor, um UKW-Radiosender
zu speichern:
1. Schalten Sie das Radio ein, indem Sie die
Betriebstaste gedrückt halten.
2. Drücken Sie wiederholt die
Frequenzbandtaste zur Auswahl des UKW-
Modus und schalten Sie dann wie bereits
erläutert einen UKW-Sender ein.
3. Drücken Sie wiederholt die Seite-Taste, um
die gewünschte Seite mit Speicherplätzen zu
öffnen.
4. Halten Sie dann die entsprechende
Speichertaste (1-5) gedrückt, bis im Display
die Anzeige “GESPEICHERT” erscheint. Der
Sender wurde dann erfolgreich gespeichert
und im Display leuchtet die Anzeige des
entsprechenden Speicherplatzes auf.
5. Wiederholen Sie diese Vorgehensweise, um
weitere Sender zu speichern. Gespeicherte
Sender können nicht gelöscht, jedoch
anhand der beschriebenen Vorgehensweise
überschrieben werden.
Gespeicherte UKW-Radiosender
aufrufen
Gespeicherte UKW-Sender rufen Sie wie folgt
auf:
1. Schalten Sie das Radio ein, indem Sie die
Betriebstaste gedrückt halten.
2. Drücken Sie wiederholt die
Frequenzbandtaste zur Auswahl des UKW-
Modus.
3. Drücken Sie wiederholt die Seite-Taste, um
die gewünschte Seite mit Speicherplätzen zu
öffnen.
4. Drücken Sie die gewünschte Speichertaste
(1-5) zur Auswahl eines gespeicherten
Senders.
Informationen von UKW-Radiosendern
anzeigen
Während der Wiedergabe von UKW-Sendern,
die RDS-Daten übertragen (RDS-Anzeige
leuchtet im Display), können Sie wiederholt die
Info-Taste drücken, um nacheinander folgende
Informationen anzuzeigen:
●Sendername
●Textmitteilungen
●Programmtyp
●Frequenz
●Empfangstyp (Stereo / Mono)
●Aktuelle Uhrzeit
●Aktuelles Datum
Falls keine RDS-Daten verfügbar sind, ist das
Radio nicht in der Lage, den Sendernamen,
Textmitteilungen und den Programmtyp
anzuzeigen.
6. Musikwiedergabe via Bluetooth-
Übertragung
Um via Bluetooth Musik über das Radio
abzuspielen, müssen Sie zunächst Ihr
Bluetooth-Gerät mit dem MMR-99DAB
koppeln. Durch die Kopplung entsteht eine
„Verknüpfung“, anhand derer sich beide Geräte
erkennen.
Erstmalige Kopplung mit Ihrem
Bluetooth-Gerät
1. Schalten Sie das Radio ein, indem Sie die
Betriebstaste gedrückt halten.
2. Drücken Sie wiederholt die
Frequenzbandtaste zur Auswahl des
Bluetooth-Modus. Im Display erscheint die
Anzeige “KOPPELN” und die Bluetooth LED-
Anzeige blinkt blau, um darauf hinzuweisen,
dass das Radio bereit ist für die Bluetooth-
Kopplung.
3. Aktivieren Sie an Ihrem Bluetooth-Gerät
Bluetooth. (Informieren Sie sich in der
Bedienungsanleitung Ihres Bluetooth-Geräts
entsprechend.)
4. Öffnen Sie an Ihrem Bluetooth-Gerät die
Bluetooth-Liste und wählen Sie dann das
Gerät mit dem Namen „MMR-99 DAB“.
Hinweis:
Bei einigen Bluetooth-Geräten mit
Bluetooth-Version 2.1 oder älter ist
eventuell die Eingabe eines Passworts
erforderlich. Geben Sie in solch einem
Fall „0000“ ein.
5. Nach der Kopplung und Verbindung der
Geräte ertönt ein Bestätigungston und im
Display wird der Name des verbundenen
Bluetooth-Geräts angezeigt. Sie können nun
Musik vom Bluetooth-Gerät an das Radio
streamen und über das Radio abspielen.
Hinweise:
●Falls gleichzeitig 2 Bluetooth-Geräte zum
ersten Mal gekoppelt werden, müssen
beide Geräte das Radio suchen und die
Verfügbarkeit wird an beiden Geräten
angezeigt. Sobald jedoch eines der Geräte
mit dem Radio verbunden ist, wird das
Radio nicht mehr in der Liste des anderen
Bluetooth-Geräts angezeigt.
●Gelangt das Bluetooth-Gerät außerhalb
der Reichweite, wird die Verbindung
zwischen Radio und Gerät vorübergehend
unterbrochen. Das Radio wird automatisch
neu verbunden, sobald das Bluetooth-
Gerät wieder in Reichweite ist. Bitte
beachten Sie, dass während der Dauer der
Unterbrechung kein anderes Bluetooth-
Gerät mit dem Radio gekoppelt oder
verknüpft werden kann.
●Falls das „MMR-99 DAB” in der Geräteliste
angezeigt wird, jedoch nicht mit dem
Bluetooth-Gerät verbunden werden kann,
löschen Sie das Radio aus der Liste und
koppeln Sie es dann wie erläutert erneut
mit dem Radio.
●Die effektive Reichweite zwischen Radio
und gekoppeltem Bluetooth-Gerät beträgt
ungefähr 10 Meter (30 Fuß). Hindernisse
zwischen dem Gerät und dem Radio
können die Reichweite beeinträchtigen.
●Die Bluetooth-Verbindungsleistung
kann je nach Bluetooth-Gerät variieren.
Informieren Sie sich über Ihr Bluetooth-
Gerät, bevor Sie es mit dem Radio
verbinden. Je nach Gerät werden eventuell
nicht alle Funktionen unterstützt.
●Bei einigen Handys können eingehende
/ ausgehende Anrufe, Textnachrichten,
E-Mails oder andere Aktivitäten dazu
führen, dass die Audioübertragung
stummgeschaltet oder sogar
vorübergehend vom Gerät getrennt wird.
Solch ein Verhalten ist abhängig von Ihrem
Bluetooth-Gerät und keine Fehlfunktion
des MMR-99 DAB.
Audiowiedergabe im Bluetooth-
Modus
Nach der erfolgreichen Verbindung mit
einem Bluetooth-Gerät können Sie die
Musikwiedergabe mit den Tasten an Ihrem
externen Gerät starten und steuern.
1. Die Lautstärke können Sie sowohl mit den
Tasten am Bluetooth-Gerät als auch mit den
Lautstärketasten + / - am Radio einstellen.
2. Die Wiedergabe steuern Sie mit den Tasten
an Ihrem externen Gerät oder mit denen
am Radio. Drücken Sie am Radio die Taste
Wiedergabe / Pause, um die Wiedergabe
zu starten / zu unterbrechen, die Tasten
Nächster Titel oder Vorheriger Titel, um einen
Titel auszuwählen, oder halten Sie die Tasten
Suchlauf vorwärts oder Suchlauf rückwärts
gedrückt, um eine bestimmte Stelle innerhalb
eines Titels zu suchen (lassen Sie die
Taste los, sobald Sie die gewünschte Stelle
gefunden haben).
Hinweis:
Es ist möglich, dass nicht alle Player-
Anwendungen diese Steuerungen
unterstützen.
Audiowiedergabe eines bereits
zu einem früheren Zeitpunkt
gekoppelten Bluetooth-Geräts
Das MMR-99DAB kann bis zu 8 gekoppelte
Bluetooth-Geräte speichern. Sobald ein
weiteres Bluetooth-Gerät gekoppelt wird, löscht
das Radio das älteste Bluetooth-Gerät aus dem
Speicher und überschreibt es durch das neue
Gerät.
Sofern Ihr externes Bluetooth-Gerät bereits
zu einem früheren Zeitpunkt mit dem Radio
MMR-99DAB gekoppelt wurde, wird das Radio
dieses Gerät erkennen und versuchen, sich
mit dem Gerät zu verbinden. Falls das Radio
im Bluetooth-Modus das zuletzt gekoppelte
Bluetooth-Gerät nicht finden kann, wird es
versuchen, die Verbindung mit dem nächsten
Bluetooth-Gerät in der Liste herzustellen.
Bluetooth-Gerät trennen
Halten Sie die Bluetooth-Kopplungstaste
gedrückt, um das Radio von Ihrem Bluetooth-
Gerät zu trennen. Sie können auch durch
Drücken der Frequenzbandtaste einen anderen
Modus einstellen oder an Ihrem externen Gerät
die Bluetooth-Funktion deaktivieren, um die
Verbindung zu trennen.
Falls Sie die Verbindung trennen, während
am Radio der Bluetooth-Modus aktiviert ist,
ertönt ein Bestätigungston und die Bluetooth
LED-Anzeige des Radios blinkt, um darauf
hinzuweisen, dass das Radio wieder bereit ist
für die Bluetooth-Kopplung.
7. Aux-Eingang und Kopfhörerbuchse
Musikwiedergabe via Aux-Eingang
Sie haben die Möglichkeit, über den
Lautsprecher des MMR-99DAB Audioinhalte
externer Geräte abzuspielen. Gehen Sie dafür
wie folgt vor:
1. Verbinden Sie das externe Gerät (z.B.
iPod, MP3-Player oder CD-Player) unter
Verwendung eines 3,5mm Audiokabels (nicht
enthalten) mit dem Aux-Eingang des Radios.
2. Vergewissern Sie sich, dass sowohl
das Radio als auch das externe Gerät
eingeschaltet sind.
3. Drücken Sie wiederholt die
Frequenzbandtaste zur Auswahl des Aux-
Modus.
4. Das MMR-99DAB gibt nun die Inhalte des
externen Geräts wieder. Stellen Sie die
Lautstärke zunächst am externen Gerät ein,
um ein adäquates Level zu gewährleisten,
und anschließend je nach Bedarf mit den
Lautstärketasten + / - am Radio.
Musikwiedergabe via Kopfhörer
Das MMR-99DAB verfügt an der rechten Seite
über eine Kopfhörerbuchse für den Anschluss
von Kopfhörern mit 3,5mm Stecker. Schließen
Sie Kopfhörer einfach an diese Buchse an. Das
Radio erkennt die Kopfhörer automatisch und
wird den internen Lautsprecher deaktivieren.
Es wird empfohlen, die Lautstärke vor
Anschluss der Kopfhörer zu reduzieren und
nach Anschluss der Kopfhörer langsam auf
das gewünschte Niveau zu erhöhen, um
eine plötzliche hohe Lautstärke und damit
einhergehend Gehörschäden zu vermeiden.
Hinweis:
Übermäßiger Schalldruck von Ohr-
und Kopfhörern kann Gehörverluste
verursachen. Um Gehörschäden zu
vermeiden, hören Sie nicht über längere
Zeiten bei hohen Lautstärken Musik.
Technische Daten
Stromversorgung
2600mAh wiederaufladbare Lithium-Ion-Batterie
Dynamo – zum Aufladen der integrierten Lithium-Ion-
Batterie.
Solarpanel – zum Aufladen der integrierten Lithium-Ion-
Batterie
DC IN (5V / 2,4A) USB-C-Anschluss zum Aufladen des
MMR-99DAB
Einschließlich USB-A auf USB-C Kabel & Handriemen
Frequenzbereich
UKW 87,5-108 MHz
DAB (BAND III) 5A-13F (174,928 MHz bis 239,200 MHz)
Bluetooth
Bluetooth-Version Bluetooth® 5.0 +EDR
Unterstützte Profile A2DP, AVRCP
Bluetooth Audio-CODEC SBC, AAC
Übertragungsleistung Klasse 2
Reichweite 10Meter / 30Fuß
Bluetooth-Frequenz und maximale
Übertragungsleistung 2402MHz ~ 2480MHz: 2dBm (Bluetooth EDR & LE)
Antenne
Teleskopantenne UKW / DAB
Anschlüsse
DC-Anschlüsse
DC IN USB-C, 5V / 2,4A
Dieses Symbol weist auf Gleichstrom hin.
DC OUT USB-A, 5V / 1A
Kopfhörerbuchse 3,5mm, Stereoausgang, 32Ohm Impedanz
Aux-Anschluss 3,5mm, Stereoeingang
Lautsprecher 2,25Zoll, 4Ohm, 5Watt
Ausgangsleistung 1,5Watt
Betriebstemperatur 5°C bis 35°C
※ Folgender Barcode ist am Gerät angebracht:
Seriennummer
Herstellungsmonat
Herstellungstag
Produkt-Code
Veränderungen der Spezifikationen ohne vorherige Ankündigung vorbehalten.
Sollten sind irgendwann das Gerät nicht mehr benutzen, bedenken Sie bei der
Entsorgung bitte, dass Altgeräte niemals mit dem nor- malen Hausmüll entsorgt werden
sollten. Bitte geben Sie das Gerät zur Wiederverwertung ab, wenn entsprechende
Einrichtungen ex- istieren. Erkundigen Sie sich bei Ihrer örtlichen Behörde oder Ihrem
Händler über die sachgerechte Entsorgung des Geräts. (WEEE- Richtlinie - Waste
Electrical and Electronic Equipment Directive)
-
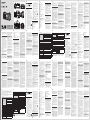 1
1
-
 2
2


Sangean MMR-99DAB Manual de usuario
- Categoría
- Radios
- Tipo
- Manual de usuario
en otros idiomas
- français: Sangean MMR-99DAB Manuel utilisateur
- English: Sangean MMR-99DAB User manual
- Deutsch: Sangean MMR-99DAB Benutzerhandbuch
- Nederlands: Sangean MMR-99DAB Handleiding
- português: Sangean MMR-99DAB Manual do usuário
Artículos relacionados
Otros documentos
-
FlinQ FQC8197 Manual de usuario
-
LED s light 1000440 El manual del propietario
-
Retekess TR401 DAB+Digital Radio Speaker Manual de usuario
-
audizio 102.204 Manual de usuario
-
-
TEAC CR-H260iDAB El manual del propietario
-
ONKYO CS-265DAB Manual de usuario
-
Auna 53034031 El manual del propietario