Craftsman 358351081 El manual del propietario
- Categoría
- Motosierras eléctricas
- Tipo
- El manual del propietario

:___i_)_ Operator's Manual
€;RI:IFTSMRN°
2.4 cu. in./40cc 2-Cycle
GASOLINE CHAIN SAW
Model No.
358.351081 - 18 In. Bar
358.351161 - 16 In. Bar
,&WARNING: •
Read and follow all
Safety Rules and Operating
Instructions before first use
of this product.
For answers tO your
questions about this product:
Call 7 am-7 pm, Mon-Sat;
Sun, 10 am-7 pm
1-800-235-5878
Sears, Roebuck and Co., Hoffman Estates, IL 60179 USA
530-084296 (3/5196)

Warranty 2
Safety Rules 2
Assembly 5
Operation 6
Maintenance 11
Service and Adjustments 14
Storage 16
Troubte Shooting Chart t 7
Spanish 22
•Parts & Ordering Back
FULL ONE YEAR WARRANTY ON CRAFTSMAN ® GAS
CHAIN SAW
For one year from the date of purchase, when this Craftsman Gas Chain Saw is
maintained, lubricated and tuned-up according to the owner's manual, Sears will
repair, free of charge, any defect in material or workmanship.
This warranty excludes the bar, chain, spark plug and air filter, which are
expendable pads, and become worn during normal use.
If this Gas Chain Saw is used for commercial or rental purposes, this warranty
applies for 30 days from the date of purchase.
WARRANTY SERVICE IS AVAILABLE BY RETURNING THIS CHAIN SAW TO
THE NEAREST SEARS SERVICE CENTER IN THE UNITED STATES.
This warranty gives you specific legal rights, and you may also have other rights
which vary from state to state.
Sears, Roebuck and Co., D/817 WA, Hoffman Estates, IL 60179
WARNING: Alwaysdisconnectspark
plug wirewhenmakingrepairsexcept
for carburetoradjustments.Becausea
chainsaw isa high-speedwoodcutting
tool,carelessorimproperuseofthis
toolcancauseseriousinjury.
PLAN AHEAD
• Restrictthe useofyoursaw toadult
userswhounderstandandcanfollow
thesafety rules,precautions,and op-
eratinginstructionsfound in this
manual.
Hearing SafetyHat
Protection dlk'="_ Eye
Snug _ aw_aPr_s""Protection
Fitting_ Heavy Duty
Clothing Gloves
Safety Safety Chaps
Shoes ,_ f
m_llllm
Wear protective gear. Always use
steel-toed safety footwear with non-
slip soles; snug-fitting clothing; heavy-
duty,non-slip gloves; eye protection
such as non-fogging, vented goggles
or face screen; an approved safety
hard hat; and sound barriers (ear
ptugs or mufflers) to protect your
hearing. Regular users should have
hearing checked regularly as chain
saw noise can damage hearing. Se-
cure hair above shoulder length.
• Keep all parts of your body away from
the chain when the engine is running.
• Keep children, bystanders, and ani-
mals at least 30 feet (10 Meters)
away from the work area when start-
ing saw.
• Do not handle or operate a chain saw
when you are fatigued, ill, or upset, or
if you have taken alcohol, drugs, or
medication. You must be in good
physical condition and mentally alert.
If you have any condition that might
be aggravated by strenuous work,
check with doctor before operating.
• Do not start cutting until you have a
clear work area, secure footing, and
especially ifyou are felling a tree, a
retreat path.

OPERATEYOURSAWSAFELY
• Do not operate with one hand. Seri-
ous injury to the operator, helpers, or
bystanders may result from one-
handed operation. A chain saw is in-
tended for two-handed use.
• Operate the chain saw only in a welt-
ventilated outdoor area.
• Do not operate saw from a ladder or
in a tree, unless you are specifically
trained to do so.
• Make sure the chain will not make
contact with any object while starting
the engine. Never try to start the saw
when the guide bar is in a cut.
° Do not put pressure on the saw at the
end of the cut. Applying pressure can
cause you to lose control when the
cut is completed.
• Stop the engine before setting the
saw down.
• Hand carry saw only when engine is
stopped. Carry with muffler away from
body; guide bar & chain projecting be-
hind you; guide bar preferably cov-
ered with a scabbard.
MAINTAIN YOUR SAW IN GOOD
WOR KING ORDER
• Have all chain saw service performed
bya qualifiedservice dealerexcept
the itemslisted inthemaintenance
section ofthismanual.
° Make certainthesaw chainstops
moving whenthethrottletriggerisre-
leased.Forcorrection,referto"Car-
buretor Adjustments."
° Keep the handlesdry,clean,andfree
from oilorfuel mi_ure.
• Keep capsand fasteners securely
tightened.
• Use onlyCraftsmanaccessoriesand
replacementpartsas recommended.
Never modify yoursaw.
HANDLE FUEL WITH CAUTION
° Do not smoke while handling fuel or
while operating the saw.
• Eliminate all sources of sparks or
flame in the areas where fuel is mixed
or poured.
* Mix and pour fuel in an outdoor area
and use an approved, marked con.
tainer for all fuel purposes. Wipe up
all fuel spills before starting saw.
• Move at least 10 feet (3 meters) from
fueling site before starting.
• Turn the engine off and let saw cool in
a non-combustible area, not on dry
leaves, straw, paper, etc. Slowly re-
move fuel cap and refuel unit.
* Store the unit and fuel in a cool, dry
well ventilated space where fuel va-
pors cannot reach sparks or open
flames from water heaters, electric
motors or switches, furnaces, etc.
GUARD AGAINST KICKBACK
WARNING: Rotational Kickback can
occur when the moving chain contacts
an object at the upper portion of the tip
of the guide bar. Contact at the upper
portion of the tip of the guide bar can
cause the chain to dig intothe object,
which stops the chain for an instant,
The result is a lightning fast, reverse
reaction which kicks the guide bar up
and back toward the operator.
_,_ _ KickbackPath
Avoid Obstructions
CIearThe WorkingArea
Pinch-Kickback and Pull-tn occur when
the chain is suddenly stopped by being
pinched, caught, or by contacting a for-
eign object in the wood. This sudden
stopping of the chain results in a rever-
sal of the chain force used to cut wood
and causes the saw to move in the op-
posite direction of the chain rotation.
Pinch-Kickback drives the saw straight
back toward the operator. Pull-In pulls
the saw away from the operator.
REDUCE THE CHANCE OF
KICKBACK
° Recognize that kickback can happen.
With a basic understanding of kick-
back, you can reduce the element of
surprise which contributesto acci-
dents.
i ever let the moving chain contact
any object at the tip of the guide bar.
Keep the working area free from ob-
structions such as other trees,
branches, rocks, fences, stumps, etc.
Eliminate or avoid any obstruction

thatyoursaw chaincouldhit while
cutting.
. Keep saw chainsharpand properly
tensioned. A loose ordull chaincan
increasethechanceofkickback.Fol-
low manufacturer'schainsharpening
and maintenanceinstructions.Check
tensionat regularintervals,but never
withenginerunning.Make sure the
bar clampnutsaresecurelytight-
ened.
• Beginandcontinuecutting,at full
speed. Ifthe chainismovingat a
slowerspeed, there isgreater chance
ofkickbackoccurring.
• Useextremecautionwhen re-enter-
inga cut.
i Donot attemptcutsstarting withthe
tipofthebar (plunge cuts).
Watchfor shiftinglogs or otherforces
thatcouldclosea cutand pinchor fall
intochain.
• Use thespecified Reduced-Kickback
GuideBarand Low-Kickback Chain.
Avoid Pinch-Kickback:
• Beextremely awareofsituations or
obstructionsthat cancausematerial
to pinchthetop of or otherwisestop
thechain.
• Do notcut morethanone logat a
time.
• Donottwistthesaw asthe bariswith-
drawnfrom anundercutwhen buck-
ing.
Avoid Putl-ln:
• Always begincuttingwiththe engine
atfull speedand the saw housing
against wood.
• Usewedgesmadeof plasticor wood;
Neverusemetalto holdthe cutopen.
MAINTAIN CONTROL
Stand to the left of the saw
Thumbon t
ofhandlebar
Elbow
locked
Neverreversehandposffions
• A good, firm grip on thesaw withboth
hands willhelpyou maintain control.
Don't let go. Grip the rear handle with
your right hand whether you are right
or left handed. Wrap the fingers of
your left hand over and around the
front handlebar,and your left thumb
under thefront handlebar.Keep your
left armstraightwiththe elbow locked.
• Position your left hand on the front
handlebar so it isin a straight line with
your right hand on the rear handle
when making bucking cuts. Stand
slightly to the left sideofthe sawto
keep your body from being in a direct
line withthecuttingchain.
• Standwithyourweightevenlybal-
anced on bothfeet.
• Donotoverreach.Youcouldbe
drawn or thrownoffbalance and lose
control.
• Do notcutabove shoulderheight. It
isdifficulttomaintaincontrolofsaw
aboveshoulderheight.
KICKBACK SAFETY FEATURES
WARNING: The following features are
includedonyoursawto helpreduce
hazardofkickback;however,suchfea-
tureswillnottotallyeliminatethisdan-
ger.Do notrelyonlyonsafetydevices.
Followallsafety rulestohelp avoid
kickback and otherforceswhichcan
resultinseriousinjury.
• Handguard: designedto reducethe
chanceofyourlefthandcontacting
thechainifyour handslipsoffthe
front handlebar.
• Positionoffront and rear handlebars,
designedwithdistancebetweenhan-
dlesand "in-line"witheachother.The
spread and "in-line" position ofthe
handsprovidedbythisdesignwork
togetherto givebalanceand resis-
tancein controllingthepivotof the
saw backtowardtheoperatorifkick-
backoccurs.
• Reduced-KickbackGuideBar,de-
signed witha small radiustip which
reducesthe sizeofthekickbackdan-
gerzoneon thebartip.Thistype bar
hasbeen demonstratedtosignificant-
ly reducethenumberandseriousness
of kickbackswhentestedinaccor-
dancewithANSI B175.1.
Reducedl_ckbackSymmetricalGuideBar
_"_'" Small Radius Tip
SymmeNial GuideBar,_
LargeRadiusTip

• Low-Kickback Chain, has met kick-
back performance requirements when
tested on a representative sample of
chain saws below 3.8 cubic inch
displacement specified in ANSI
B175.1_
Low-Kickback Chain
Contoured DepthGauge
AEDIne°_e_li_d/_Gc_l_rdklJ_okrce
Chain With High Kickback Potential
__ Can Obstruct Material
SAFETYNOTICE: Exposure to
vibrations through prolonged use of
gasoline powered hand tools could
cause blood vessel or nerve damage in
the fingers, hands, and joints ofpeople
prone to circulation disorders or
abnormal swelling. Prolonged use in
cold weather has been linked to blood
vessel damage in otherwise healthy
people. If symptoms occur such as
numbness, pain, loss of strength,
change in skin color or texture, or loss
of feeling in the fingers, hands, or joints,
discontinue the use of this tool and
seek medical attention. An
anti-vibration system does not
guarantee the avoidance of these
problems. Users who operate power
tools on a continual and regular basis
must closely monitor their physica!
condition and the condilion of this tool.
CHAIN BRAKE Ifthis saw isto be used
for commercial logging, you must order
and installa chain brake to comply with
Federal OSHA Regulations for Com-
mercial Logging. Contact your Sears
Service Center, or call 1-800-235-5878.
SPARK ARRESTOR: Your saw is
equipped with a temperature limiting
muffler and spark arresting screen
which meets the. requirements of
California Codes 4442 and 4443. All
U.S. forest land and the states of
California, Idaho, Maine, Minnesota,
New Jersey, Oregon, and Washington
require by law that many internal
combustion engines be equipped with a
spark arrestor screen, If you operate a
chain saw in a state or locale where
such regulations exist, you are legally
responsible for maintaining the
operating condition of these pads.
Failure to doso isa violation of the law.
Refer to the CUSTOMER RESPON-
SIBILITIESsection.
STANDARDS: This chain saw is listed
by Underwriters Laboratories, Inc. in
accordance with American National
Standards for Gasoline-Powered Chain
Saws Safety Requirements (ANSI
B175.1-t991).
CARTON CONTENTS
Check carton contents against the fol_
lowing list,
• Models 351081, & 351161
• Chain Saw (fully assembled)
• Chain adjustment tool
• 2-cycle engine oil, (Bar oil not
included)
• Examine pads for damage. Do not
use damaged parts.
• If you need assistance or find parts
missing or damaged, please call
1-800-235-5878.
NOTE: It is normal to hear the fuel filter
rattle in an empty fuel tank.
Your unit has been factory tested and
the carburetor precisely adjusted. As a
result you may smell gasoline or find a
drop of oil/fuel residue on the muffler
when you unpack the unit.
ASSEMBLY
Your saw isfully assembled, and no
assembly is necessary.

KNOW YOUR SAW
READ THiS OPERATOR'S MANUAL AND SAFETY RULES BEFORE OPERAT-
ING YOUR CHAIN SAW. Compare the illustrations with your unit to familiarize
yourself with the location of the various controls and adjustments. Save this
manual for future reference.
Chain Adjust-
mentToo! , . FrontHandle
HandGuarcI J| _/
Bar Oil Fil!Cap Housing Fuel Mix RJlCap
CylinderCover
Throttle
Lockout_
Rear Adjusting
Handle
CRllFTSNNIr
Throttle Choke / Bar Clamp Nuts \
Trigger Knob Bar Clamp Chain Guide Bar
Catcher
Chain
Direction
of Trave!
THROTTLE LOCKOUT CHAIN TENSION
The throttle lockout must be pressed it is normal for a new chain tostretch
before you can squeeze the throttle trig- during first 30 minutes of operation. You
ger. This feature prevents you from ac-
cidentally squeezing the trigger.
CHOKE/FAST IDLE LEVER
The choke and fast idle speed are set
by pulling the choke lever out fully for
cold or for refueled starting. The choke
provides additional fuel when stading a
cold engine.
should check your chain tension fre-
quently. See Chain Tension under the
Service and Adjustments section.

BEFORE STARTING ENGINE
WARNING: Be suretoreadthefuel
handlinginformationin thesafety rules
sectionofthis manualbeforeyoubegin.
Ifyou donot understandthefuelhan-
dlinginformationdonotattempttof_el:_
yourunit.Seek helpfrom someonethat
doesunderstandthe informationor call
thecustomerassistance helplineat
1-800-235-5878.
GUIDE BAR AND CHAIN OIL
The chainoiler providescontinuouslu-
bricationtothechainandguidebar.Be
sure tofillthe bar oiltankwhenyou fill
the fuel tank(Capacity= 6.8 fl. oz.)
Formaximumguidebar andchainlife,
we recommendyou useCraftsman
chainsaw bar oil. IfCraftsmanbar oilis
not available,you may usea good
gradeSAE 30 oiluntilyou areableto
obtainCraftsmanbrand.The oiloutput
is automaticallymetered during opera-
tion. Your saw will use approximately
one tank of bar oil for every tank of fuel
mix.Always fill the bar oiltank when
you fill the fueltank.
FUELING ENGINE
This engine is certified to operate on
unleaded gasoline, Before operation,
gasoline must be mixed with a good
quality 2-cycle air-cooled engine oil. We
recommend Craftsman brand oi!. Mix
gasoline and oil at a ratio of 40:1 (A
40:1 ratio is obtained by mixing 3.2
ounces of oil with 1 gallon of unleaded
gasoline). DO NOT USE automotive oil
or boat oil. These oils wilt cause engine *
damage, When mixing fuel follow the
instructions printed on the container.
Once oil is added tothe gasoline,
shake container momentarily to assure
that the fuel is thoroughly mixed.
Always read and follow the safety rules
relating to fuel before fueling your unit.
IMPORTANT
Experience indicates that alcohol
blended fuels (called gasohol or using
ethanol or methanol) can attract mois-
ture which leads to separation and
formation of acids during storage. Acid-
ic gas can damage the fuel system of
an engine while in storage.
To avoid engine problems, the fuel sys-
tem should be emptied before storage
for 30 days or longer. Drain the gas
tank, start the engine and let it run until
the fuel lines and carburetor are empty.
Use fresh fuel next season.See STOR-
AGEinstructionsfor additionalinforma-
tion.
Neveruseengineor carburetorcleaner
productsin thefuel tankorpermanent
damagemay occur.
See theSTORAGEsectionfor additional
information.
STOPPING YOUR ENGINE
- MoveOn/Stop switchtotheSTOP
position.
* if enginedoes notstop,pullchoke
knoboutfully.
STARTING YOUR ENGINE
COLD ENGINE OR WARM ENGINE
AFTER RUNNING OUT OF FUEL
• Fuelenginefollowing instructionsun-
der FUELINGENGINE.
• Fillbar oiltankwithbar oil.Yoursaw
willuseapproximatelyonetankofbar
oilfor eachtankoffuel mix.
oMove On/Stop switchtoONposition.
• Pullchokeknoboutfully.
- Primeenginebyslowlypressingprim-
erbulbsixtimes.
IgnitiOoNn
° STOP
Primer Bulb
Set saw on the ground. Grip front
handle with your left hand and place
rightfoot through rear handte.
Choke knob
NOTE: When pulling the starter rope,
do not use the full extent of the rope.
Do not let starter rope snap back,
Hold handle. Let rope rewind slowly.
° Sharply pull starter rope handle 5
times with your right hand. The en-
gine may sound as if it is trying to
start before the 5th pull; ff so, proceed
to the next step.
7

, Fully push-in choke lever and contin-
ue to pull starterrope handle untilen-
gine starts.
• Then, squeeze and release the
throttle trigger to return engine to idle
speed.
• To stop engine, move On/Stop switch
to the STOP position.
StarterRope Handle
_{._ J on Front
STARTING A WARM ENGINE
DO NOT use the choke to start a warm
engine or flooding and hard starting
may occur.
• Move On/Stop switch to ON.
• Slowly press primer bulb 6 times.
• Set the chain saw on the ground. Grip
the front handle with your left hand
and place your dght foot through the
opening in the rear handle.
• Pull choke lever outfully, then push it
in fully to set engine in fast idle posi-
ton.
• Sharply pull starter rope handle with
your right hand until the engine
startes, but no more than 5 times.
° Then, squeeze and release the
throttle trigger to return engine to idle
speed.
• To stop engine, move On/Stop switch
to the STOP position.
DIFFICULT STARTING OR
STARTING A FLOODED ENGINE
The engine may be flooded if ithas not
started after 10 pulls. Flooded engines
can be cleared of excess fuel with the
following procedure:
• Pull choke lever out fully, then push it
in fully to set engine in fast idle posi-
ton.
• Verify that the On/Stop switch is in the
ON position.
• With saw on ground, grip front handle
with left hand and place right foot
through rear handle.
• Grip starter rope handle and pull rope
firmly and quickly to start engine. If
not successful, repeat untilengine
starts.
Starting could require many pulls de-
pending on how badly unit is flooded. If
engine still fails to start, refer to TROU-
BLES HOOTING chart or call
1-800-235-5878.
OPERATING TIPS
• Check chain tension before first use
and after 1 minute of operation. See
Chain Tension in the Maintenance
section.
° Cut wood only. Do not cut metal, plas-
tics, masonry, non-wood building ma-
terials, etc.
Stop the saw if the chain strikes a for-
eign object. Inspect the saw and re-
pair parts as necessary.
• Keep the chain out of dirt and sand.
Even a small amount of dirt will quick-
ly dull a chain and increase the possi-
bitity of kickback.
• Practice cutting a few small logs using
the following steps. This will help you
get the "feel" of using your saw before
you begin a major sawing operation.
• Squeeze the throttletrigger and al-
low the engine to reach full speed
before cutting.
• Begin cutting with the saw frame
against the log.
• Keep the engine at full speed the
entire time you are cutting.
• Allow the chain to cut for you. Exert
only light downward pressure.
• Release the throttle trigger as soon
as the cut is completed, allowing the
engine to idle. tf you run the saw at
full throttle without a cutting load,
unnecessary wear can occur.
• To avoid losingcontrol when cut is
complete, do not put pressure on
saw at end of cut.
• Stop the engine before setting the
saw down.
TREE FELLING TECHNIQUES
WARNING: Check for broken or dead
branches which can fall while cutting
causing serious injury. Do not cut near
buildings or electrical wires if you do not
know the direction of tree fall, nor cut at
nightsince you will notbe able to see
well, nor during bad weather such as
rain, snow, or strong winds, etc.
Carefully plan your sawing operation in
advance. Clear the work area. You
need a clear area all around the tree so
you can have secure footing. Study the
8

natural conditions that can cause the
tree to fall in a particular direction, such
conditions include:
• The wind direction and speed.
• The lean of the tree. The lean of a
tree might not be apparent due to un-
even or sloping terrain. Use a plumb
or level to determine tile direction of
tree lean.
• Weight and branches on one side.
• Surrounding trees and obstacles.
Look for decay and rot. Ifthe trunk is
rotted, it can snap and fall toward the
operator.
Make sure there is enough room for the
tree to fall. Maintain a distance of 2-I/2
tree lengths from the nearest person or
other objects. Engine noise can drown
out a warning call.
Remove dirt, stones, loose bark, nails,
staples, and wire from the tree where
cuts are to be made.
et, Planaclearretreat path
.... O"_ - DirectionofFall
FELUNG LARGE TREES
(6 inches in diameter or larger)
The notch method is used to fell large
trees. A notch is cut on the side of the
tree in the desired direction of fall. After
a felling cut is made on the opposite
side oftree, the tree should fall in the
direction of the notch.
NOTE: If the tree has large buttress
roots, remove them before making the
notch.
NOTCH CUT AND FELLING TREE
• Make notch cut by cutting the top of
the notch first. Cut through 1/3 of the
diameter of the tree. Next complete
the notch by cutting the bottom. See
illustration. Once the notch is cut re-
move the wedge of wood from the
tree.
• After removing the wood, make the
felling cut on the opposite side of the
notch. This isdone by making a cut
about two inches higher than the cen-
ter of the notch. This will leave
enough uncut wood between the fell-
ing cut and the notch to form a hinge.
This hinge wilt help prevent the tree
from falling in the wrong direction.
Finalcuthere
First cut =.. /
Notch _
ge
Hinge holds tree on stump and herps
control fall
Opening
of felling
Closing of
notch
NOTE: Before felling cut is complete,
use wedges to open the cut when
necessary to control the direction of fall.
To avoid kickback and chain damage,
use wood or plastic wedges, but never
steel or iron wedges.
• Be alert of signs that the tree is ready
to fall: cracking sounds, widening of
the felling cut, or movement in the up-
per branches.
• As tree starts to fall, stop saw, put it
down, and get away quicklyon your
planned retreat path.
• Be extremely cautious with partially
fallen trees that may be poorly sup
ported. When a tree doesn't fall com-
pletely, set the saw aside and pull
down the tree with a cable winch,
block and tackle, or tractor. Do not
use your saw to cut down a partially
fallen tree.
CUTTING A FALLEN TREE
(BUCKING)
Bucking is the term used for cutting a
fallen tree to the desired log size.
WARNING: Do not stand on the log
being cut. Any portion can roll causing
loss of footing and control. Do not stand
downhill of the log being cut.
IMPORTANT POINTS
• Cut only one log at a time.
• Cut shattered wood very carefully;
sharp pieces of wood could be flung
toward operator.
9

• Use a sawhorse to cut small logs.
Never allow another person to hold
the log while cutting and never hold
the log with your leg or fool
• Do not cut in an area where logs,
limbs, and roots are tangled. Drag the
logs into a clear area before cutting
them.
BUCKING TECHNIQUES
WARNING: tfsaw becomes pinched
or hung in a log, don't try to force it ouL
You can lose control of the saw result-
ing in injury and/or damage to the saw.
Stop the saw, drive a wedge of plastic
or wood into the cut until the saw can
be removed easily, Restart the saw and
carefully reenter the cut. Do not use a
metal wedge. DO not attempt to restart
your saw when it is pinched or hung in
a log.
Usea wedgetoremovepinchedsaw
_ _ Turnsaw OFF and
,_-_.._,. useaplasticor wooden
o force cutopen.
Overcutting begins on the top side of
the log with the bottom of the saw
against the log. When overcutting use
light downward pressure.
Overcutting Undercutting
Undercutting involves cutting on the
underside of the log with top of saw
against the tog. When undercutting use
light upward pressure. Hold saw firmly
and maintain control The saw witl tend
to push back toward you.
WARNING: Never turn saw upside
down to undercut. The saw cannot be
controlled in this position.
Always make your first cut on the pres-
sure side of the tog.
Firstcuton pressureside oflog
Secondcut
Firstcuton pressuresideoftog
BUCKING WITHOUT A SUPPORT
• Overcut through 1/3 of the diameter of
the log.
• Roll the log over and finish with a sec-
ond overcut,
• Watch for logs with a pressure side.
See illustration above for cutting logs
with a pressure side.
Using alog
for support 2ndCut
" 1stCut
2nd Cut
BUCKING USING A LOG OR
SUPPORT STAND
• Remember your first cut is always on
the pressure side ofthe log.
(Refer to the illustrationbelow foryour
first and second cut)
° Your first cut should extend 1/3of the
diameter ofthe log.
• Finish with yoursecond cut.
U=nga
i
LIMBING AND PRUNING
10

WARNING: Neverclimbintoa treeto
limbor prune. DOnotstandonladders,
platforms,a log,orin anyposition
whichcancauseyouto loseyourbal-
ance orcontrolofthesaw.
IMPORTANT POINTS
• Watchoutfor springpoles.
Springpolesare smallsize limbs
whichcan whiptowardyou,or pull
with the 1/3, 2/3 cutting techniques de-
scdbed in the bucking section.
• Always use an overcut to cut small
and freely hanging limbs. UndemuF
ting could cause limbs to fall and
pinch the saw.
PRUNING
WARNING: Limitpruning tolimbs
you off balance. Use extreme caution shoulder height or below. Do not cut if
when cutting small size limbs, branches are higher than your shou}-
• Be alert for spdngback. Watch out for der. Get a professional to do the job.
branches that are bent or under pres- • Make your first cut 1,3 of the way
sure. Avoid being struck by the through the bottom of the limb.
branch or the saw when the tension in • Next make a second cut all the way
the wood fibers is released.
• Frequently clear branches out ofthe
way to avoid tripping on them.
LIMBING
• Limb a tree only after itis cut down.
• Leave the larger limbs underneath the
felled tree to support the tree as you
work.
• Start at the base of the felled tree and
work toward the top, cutting branches
and limbs. Remove small limbs with
one cut.
• Keep the tree between you and the
chain.
- Remove larger, supporting branches
CUSTOMER RESPONSIBILITIES
through the limb. Then cut a third
overcut 1to 2 inches from the trunk of
the :ree.
ut
_1t3ofway
,/_ 3rd cut 1to2 in.
t I_ fromtrunkoftree
Fill in dates as you complete
regular service
Check for damagecVwom parts
Check for loose fasteners/parts
Check chain tension
Check chain sharpness
Check guide bar
Clean unit & labels
Clean air filter
Clean/inspect spark arrestor
screen & inspect muffler
Replace spark plug
Before!After
Use Use
t!
t,-"
Ever_ I Every Yearly
5 hrs. i25 hrs
Service
Dates
11

GENERAL RECOMMENDATIONS
The warranty on this unit does not cov-
er items that have been subjected to
operator abuse or negligence. To re-
ceive full value from the warranty, the
operator must maintain unit as instruct-
ed in this manual. Various adjustments
will need to be made periodically to
properly maintain your unit.
• Once a year, replace the spark plug,
air filter element, and check guide bar
and chain for wear, A new spark plug
and air filter element assures proper
air-fuel mixture and helps your engine
run better and last longer.
WARNING: Disconnect the spark plug
before performing maintenance except
for carburetor adjustments.
LUBRICATION
1 Bar 2 Bar Oil
Sprocket Fill Cap ",,,J ]
Lube . _ t
1 Sprocket lube
2 Craftsman chain saw bar oil
CHECK FOR DAMAGED OR
WORN PARTS
Replacement of damaged/worn parts
should be referred to your Sears Ser-
vice Center.
NOTE; It is normal for a small amount
of oil to appear under the saw after en-
gine stops. Do not confuse this with a
leaking oiltank.
• On/Stop Switch - Ensure On/Stop
switch functions properly by moving
the switch to the "Stop" position.
Make sure engine stops; then restart
engine and continue.
• Fuel Tank - Discontinue use of chain
saw if fuel tank shows signs of dam-
age or leaks.
° Oil Tank - Discontinue use of chain
saw if oil tank shows signs of damage
or leaPs.
CHECK FOR LOOSE
FASTENERS AND PARTS
• BarClamp Nut
• Chain
• Muffler
= Cylinder Shield
• Air Filter
• Clutch Drum/Sprocket
• Handle Screws
• Vibration Mounts
• Starter Housing
• Handguard
CHECK CHAIN TENSION
• Use the screwdriver end of the chain
adjustment tool to move chain around
guide bar to ensure kinks do notexist,
The chain should rotate freely.
Guide
Bar
Chain
BarClamp Adjusting Adjustment
Nuts Screw Tool
• Loosen bar clamp nuts until they are
finger tight against the bar clamp.
• Turn adjusting screw clockwise until
chain barely touches the bottom of
guide bar.
• Roll chain around guide bar to ensure
a!l links are in bar groove.
Bar CJampNuts GuideBar
• Liftup tip of guide bar to check for
sag. Release tip of guide bar, then
tum adjusting screw 1/4 turn clock-
wise. Repeat this step until sag does
not exist.
• While liftingtip of guide bar, tighten
bar clamp nuts with the chain adjust-
ment tool. Torque to 10-15 ft-lbs.
AdjusEngScrew
Bar "_1_
Clamp 1/4"rum
Nuts
° Use thescrewdriver end ofthechain
adjustmenttoolto move chainaround
the guidebar.
° Ifchaindoes notrotate,itistootight.
Slightlyloosen barclampnutsand
12

turn adjusting screw 1/4 turn counter-
clockwise. Retighten bar clamp nuts.
° If chain is too loose, it will sag below
the guide bar. DO NOT operate the
saw ff the chain is loose.
CHECK CHAIN SHARPNESS
A sharp chain makes wood chips. A
dull chain makes a sawdust powder
and cuts slowly.
CHAIN SHARPENING
Chain sharpening requires special
tools. You can purchase sharpening
tools at Sears or go to a professional
chain sharpener.
CHECK GUIDE BAR
Conditions which require guide bar
maintenance:
• Saw outs to one side or at an angle.
,, Saw has to be forced through the cut.
inadequate supply of oil tothe bar
and chain.
Check the condition of the guide bar
each time the chain is sharpened. A
worn guide bar witl damage the chain
and make cutting difficult. To maintain
guide bar:
• Move On/Stop switch to "Stop."
• Remove bar and chain from saw.
• Clean all sawdust and any other
debris from the guide bar groove and
sprocket hole after each use.
Remove SawdustFrom Guide
BarGroo_.__
V _ Sprocket Hole
• Add lubricant to sprocket hole after
each use.
, Burring of guide bar rails isa normal
process of rail wear. Remove these
burrs with a fiat file.
° When rail top is uneven, use a flat file
to restore square edges and sides.
Correct Worn
Groove Groove File Edgesand sides
Square
Replace the guide bar when the groove
is worn, the guide bar is bent or
cracked, or when excess heating or
burring ofthe rails occurs. If replace-
ment is necessary, use only the guide
bar specified for your saw in the repair
parts list, also specified on the replace-
ment bar and chain decal located on
the chain saw.
CLEAN UNIT & LABELS
• Clean the unit using a damp cloth with
a mild detergent.
• Wipe off the unit with a clean dry
cloth.
CLEAN AIR FILTER
A dirty air filter decreases the life and
performance of the engine and in-
creases fuel consumption and harmful
emissions. Always clean your air filter
after 15 tanks offuel or5 hours of op-
eration, whichever comes first. Clean
more frequently in dusty conditions. A
used air filter can never be completely
cleaned. It is advisable to replace your
air filter with a new one after every 50
hours ofoperation, or annually, which-
ever comes first. To clean filter:
• Loosen 3 screws on cylinder cover.
• Remove cylinder cover.
, Remove air filter.
• Clean the air filter using hot soapy
water. Rinse with clean cool water.
Air dry completely before reinstalling.
• Lightly oil air filter before installing.
Use 2-cycle engine oil or motor oil
(SAE 30). Squeeze excess oil from
filter.This will improve the efficiency of
the air filter.
• Reinstall air filter.
• Reinstall cylinder cover and 3 screws
(15-20 in-lbs.).
13

Air Filter
Cylinder
Cover
Screws
Cylinder
Cover
INSPECT MUFFLER AND SPARK
ARRESTOR SCREEN
As the unit is used, carbon deposits
build up on the muffler and spark
arrestor screen, and must be removed
to avoid creating a fire hazard or affect-
ing engine performance.
Replace the spark arrestor screen if
breaks occur.
Muffler Diffuser
Spark
Arrestor
Screen
Muffler
Cover
Screws
Muffle
Body Muffler
Cover
* Remove muffler diffuser and spark
arrestor screen assembly. Notice the
orientation of these parts for reassem-
bling.
- Clean the spark arrestor screen with a
wire brush. Replace screen if breaks
are found.
- Replace any broken or cracked muf-
fler parts.
• Reinstall diffuser and spark arrestor
screen assembly with round holes
facing up and towards muffler cover.
, Reinstall muffler cover and 2 screws
(7-8 ft-lbs.).
REPLACE SPARK PLUG
The spark plug should be replaced
each year to ensure the engine starts
easier and runs better. Ignition timing is
fixed and nonadjustable.
o Loosen the 3 screws on the cylinder
cover.
• Remove the cylinder cover.
• Pull off the spark plug boot,
• Remove spark plug from cylinder and
discard.
• Replace with Champion RCJ7Y spark
plug and tighten with a 3/4 inch socket
wrench (10-12 ft-lbs). Sparkplug gap
should be .025 in.
° Reinstall the spark plug boot,
, Reinstall the cylinder cover and 3
screws (15-20 in-lbs).
Screws
CLEANING THE SPARK
ARRESTOR SCREEN Plug
Cleaning is required every 25 hours of Boot
operation or annually, whichever comes
first.
• Loosen and remove the 2 muffler cov-
er screws.
• Remove the muffler cover (cover Spark
snaps off muffler body). Plug
Cylinder
cover
CHAIN REPLACEMENT
CAUTION: Wear protective gloves
when handling chain. The chain is
sharp and can cut you even when it is
not moving.
It is normal for a new chain to stretch
during the first 30 minutes of operation.
You should recheck your chain tension
frequently and adjust the chain tension
as required. See Chain Tension sec-
tion.
• Move On/Stopswitch to theStop
position.
• Replacetheold chainwhenit be-
comeswornor damaged.
• UseonlytheLow-Kickbackreplace-
mentchainspecified inthe repair
partslist,The correctreplacementbar
and chainisalsospecifiedon a decal
located onthechainsaw.
• See yourSears Service Center tore-
placeand sharpen individualcutters
on yourchain.
14

• Remove barclampnuts.
• Remove bar clamp.
• Remove the old chain.
Bar
Clamp
Bar
Clamp Nuts
• Turn adjustingscrew by handcoun-
terclockwiseuntiladjustingpin just
touches the stop.
• Slide guide bar behind clutch drum
until guide bar stops against clutch
drum sprocket.
• Carefully removenewchainfrom
package. Holdchainwiththedrive
Finksas shown.
Cutters DepthGauge
Drive Links
• Place chain over and behind the
clutch.
= Fit bottom of drive links between teeth
in sprocket nose.
• Fit chain drive links into bar groove.
- Pull guide bar forward until chain is
snug in guide bar groove.
- Now, install bar clamp making sure
the adjusting pin is positioned in the
lower hole in the guide bar.
/
I
k.... Lower
\ Hole Guide
Adjusting Bar
Pin
° Install bar clamp nuts and finger tight-
en only. Do not tighten any further at
this point.
_._Bar ClampNuts
CHAIN ADJUSTMENT
See "Chain Tension" in Maintenance
section.
CLEAN FUEL FILTER
To clean fuel filter, drain your unit by
running dry of fuel, remove fuel cap/re-
tainer assembly from tank. Pull filter
from tank and remove from line. Clean
with mild detergent and dnse. Dry thor-
oughly, reassemble.
CARBURETOR ADJUSTMENT
WARNING: The chain will be moving
during most of this procedure. Wear
your protective equipment and observe
all safety precautions. Dudng the low
speed mixture adjustment recheck idle
speed after each tum of the screw. The
chain must not move at idle speed.
Carburetor adjustment iscritical and if
done improperly can permanently dam-
age the engine as well as the carbure-
tor. If you require further assistance or
are unsure about performing this proce-
dure, call our customer assistance help
line at 1-800-235-5878.
Old fuel, a dirty air filter, dirty fuel filter,
or flooding may give the impression of
an impropedy adjusted carburetor.
Check these conditions before adjust-
ing the carburetor.
The carburetor has been carefully set at
the factory. Adjustments may be neces-
sary if you notice any ofthe following
conditions:
• Chain moves at idle. See "Idle Speed"
under adjusting procedure.
• Saw will not idle. See "idle Speed"
and "Low Speed Mixture"under ad-
justing procedure.
• Engine dies or hesitates when it
should accelerate. See "Acceleration
Check" under adjusting procedure.
• Loss of cutting power. See "High
Speed Mixture H" under adjusting
procedure.
There are three adjustment screws on
the carburetor. They are labeled H, L,
15

andT.Theyarelocatedinthearea just
above the primer bulb.
CARBURETOR PRESETS
When making adjustments, do not force
the plastic limiter caps beyond the
stops or damage will occur.
If carburetor presets are not needed,
proceed to "Idle Adjustments."
° Turn both mixture screws counter-
clockwise until they stop.
• Turn the idle speed screw clockwise
until it stops. Now turn counterclock-
wise 4-1/2 turns.
Start motor, let it run for 3 minutes, and
proceed to the adjustment section. If
engine does not start, refer to trouble-
shooting chart or call 1-800-235-5878.
If engine performance is acceptable at
the preset positions and there is no
chain movement at idle, no further ad-
justment is necessary.
ADJUSTING PROCEDURE
Idle Speed "T"
Allow engine to idle. Adjust speed until
engine runs without chain movement or
stalling.
° Turn clockwise to increase engine
speed if engine stalls or dies.
• Turn counterclockwise to decrease
speed.
No further adjustments are necessary if
chain does not move at idle speed and
if performance is satisfactory.
Low Speed Mixture "L"
Allow engine to idle. Then accelerate
the engine and note performance. If en-
gine hesitates, bogs down, or smokes
during acceleration, turn mixture screw
clockwise in lt16-tum increments until
performance issatisfactory. Repeat this
procedure as necessary for proper ad-
justment. After completing adjustments,
check for acceleration and chain move-
ment at idle. Reset if necessary.
High Speed Mixture "H"
DO NOT operate engine at full throttle
for prolonged periods while making ad-
justments, Damage to the engine can
occur. Make a test cut. Based on per-
formance of the saw while cutting, ad-
just the high speed mixture setting in
1/16-turn increments as follows:
• Clockwise until the saw has good
power in the cut with no hesitation.
Do not adjust by sound or speed, but
judge by how well the saw performs in
the cut.
• Counterclockwise if the saw has
speed, but dies in the cut or lacks
power in the cut.
After completing adjustments, check for
acceleration and chain movement at
idle. Reset if necessary.
Acceleration Check
If the engine dies or hesitates instead of
accelerating, turn the low speed mixture
adjustment counterclockwise until you
have smooth acceleration with no chain
movement at idle. Recheck and adjust
as necessary for acceptable perfor-
mance.
Prepare yourunitfor storage at theend EXTERNAL SURFACES
of the season or if it will not be used for
30 days or more.
WARNING:
• Allow the engine to cool, and secure
the unit before storing or transporting.
• Store chain saw and fuel in a well
ventilated area where fuel vapors
cannot reach sparks or open flames
from water heaters, electric motors or
switches, furnaces, etc.
° Store chain saw with all guards in
place and position chain saw so that
any sharp object cannot accidentally
cause injury.
• Store chain saw well out of the reach
of children.
If your chain saw isto be stored for a
period of time, clean itthoroughly be-
fore storage. Store in a clean dry area.
• Lightly oil external metal surfaces and
guide bar.
* Oil the chain and wrap it in heavy pa-
per or cloth.
FUEL SYSTEM
Under Fueling Engine in the Operating
Section of this manual, see message
labeled IMPORTANT regarding the use
of gasohol in your chain saw.
Fuel stabilizer is an acceptable alterna-
tive in minimizing the formation of fuel
gum deposits during storage. Add stabi-
lizer to the gasoline in the fuel tank or
fuel storage container. Follow the mix
16

instructionsfound on stabilizer contain- • Replace spark plug with new one of
ers. Run engine at least 5 minutes after
adding stabilizer.
CRAFTSMAN 40:1, 2-cycle engine oll
(air cooled)is especially blended with
fue! stabilizer. If you do not use this
Sears oil,you can add a fuel stabilizer
to your fuel tank.
INTERNAL ENGINE
• Removespark plug and pour 1tea-
spoonof40:1,2-cycleengine oil(air
cooled)throughthesparkplugopen-
ing.Slowlypull the starterrope 8 to
10 timestodistributeoil.
recommended type and heat range.
• Clean air filter.
• Check entire unit for loose screws,
nuts, and bolts. Replace any dam-
aged, broken, or worn parts.
• At the beginning of the next season,
use only fresh fuel having the proper
gasoline to oil ratio.
OTHER
• Do notstore gasoline from one sea-
son to another.
• Replace your gasoline can if it starts
to rust.
TROUBLE SHOOTING CHART
TROUBLE CAUSE
Engine will not
start or will run
only a few
seconds after
starting.
Engine will not
idle properly.
Engine will not
accelerate,
lacks power,
or dies under
a load.
Engine smokes
excessively.
• Ignitionswitchoff.
• Engine flooded.
• Fueltankempty.
o Spark plugnotfiring.
• Fuel notreaching
carburetor.
• Carburetorrequires
adjustment.
• Noneof theabove.
° Idlespeed settoohigh
or too low.
• Low Speed Mixture
requiresadjustment.
,o Crankshaft seals worn.
° Compression low.
° None of the above.
• Air filter dirty.
• Spark plug fouled.
• Carburetor requires
adjustment.
° Exhaust ports or muf-
fler outlets plugged.
• Compression low.
'• Noneofthe above.
• Chokepartiallyon.
• Fuelmixture incorrect.
- Airfilter dirty.
° HighSpeed Mixture
requiresadjustment,
• Crankcaseleak,
REMEDY .............
• Move Ignition switchto ON,
I• See =StartingInstructions."
° Filltankwithcorrectfuel mixture
• Installnewsparkplug.
• Checkfor dirtyfuel filter; clean.
Checkfor kinked or splitfuel line
repair or replace.
° See =CarburetorAdjustments."
• Contact Sears Service.
• See "Carburetor Adjustments."
• See "Carburetor Adjustments."
° Contact Sears Service.
• Contact Sears Service.
• Contact Sears Service.
• Clean or replace air filter.
• Clean or replace plug
and regap.
• See "Carburetor Adjustments."
Contact Sears Service.
• ContactSears Service.
• Contact SearsService.
• Adjust choke.
• Emptyfuel tank and refill with
correct fuel mixture.
• Clean or replaceair filter.
° See =CarburetorAdjustments."
Contact Sears Service.
17

TROUBLE SHOOTING CHART - Continued
TROUBLE CAUSE REMEDY
Engine runs • Fuel mixture incorrect. • See "Fueling Your Unit.,
hot. • Spark plug incorrect. • Replace with correct plug;
• High Speed Mixture • See "Carburetor Adjustments."
set too lean.
• Exhaust ports or muf- • Contact Sears Service.
tier outlets plugged.
• Carbon build-up on • Clean spark arrestor screen.
muffler outlet screen.
• Fan housing/cylinder • Clean area.
fins dirty.
• None ofthe above. • Contact Sears Service.
Oil inadequate • Oil tank empty. • Filloil tank.
for bar and • Oil pump or oil filter ° Contact Sears Service.
chain clogged.
lubrication, • Guide bar oil hole • Remove bar and clean.
blocked.
Chain moves * Idle speed requires
at idle speed, adjustment.
• Clutch requires repair.
Chain does • Chain tension too
not move tight.
when engine • Carburetor requires
adjustment.
is accelerated. I, Guide bar rails
pinched.
• Clutch slipping.
Chain clatters • Chain tension incorrect.
or cuts roughly. • Cutters damaged.
• Chain worn.
• Cutters dull, improperly
sharpened, or depth
gauges too high.
° Sprocket worn. - Contact Sears Service.
° Chain installed - Install chain in rightdirection.
backwards.
Chain stops • Chain cutter tops not • See "Sharpening Chain."
within the cut. filed flat.
• Guide bar burred or • Repair or replace guide bar.
bent; rails uneven.
• Clutch slipping • Contact Sears Service.
Chain cuts at ° Cutters damaged on • See =Sharpening Chain._
an angle, one side.
° Chain dull on one side. - See "Sharpening Chain."
• Guide bar bent or worn. • Replace guide bar.
If situations occur which are not covered in this manual, use care and good
judgement. If you need assistance, contact Sears Service or the CUSTOMER
ASSISTANCE HELPLINE at 1-800-235-5878.
° See =Carburetor Adjustments."
• Contact Sears Service.
• See "Chain Tension."
- See "Carburetor Adjustments."
* Repair or replace.
. Contact Sears Service.
• See "Chain Tension."
• Contact Sears Service.
• Resharpen or replace chain.
• See "Sharpening Chain."
18

8
A WARNING
NI repairs, adjustments and
maintenance not deSCribed
In the Operator's Manual
must be peflormed by qua|l-
fled service personnel
REPAIR PARTS
ii i ii ,_,
41
20
43
44
46
66
Rot. Per_ No.
1. 530038988
2. 530038987
3. 530015906
4. 530047581
5, 530047602
& _0042082
7. 530047582
8. 530016018
9 530047605
10, ; 530038406
11. 530047631
' 12. 530015686
13. ! 530069384
14, 530069572
15. 530015922
16. 530069247
17. 530015917
18. 530037803
19, 530014949
20. 530015611
21, 53_0_7_1
22. 53CO15907
23, 530015826
24 61
60
Oescrlptlon
ThtottJoLockout
ThrettfeTrfgger
Screw
Cover_:_e_rHandle
ThrottleCable
Spring
Rear Handle
Screw
ChokeKnob
Grommet-Choke
Knob
Gremmet-Thmltle
Cable
_ew
OsbletorAss'y.
Sw;tchKB
Nut-%PType
Fce!LineKit
Nut-Ber Mounting
ClutchCover
ClutchAsS'y,
ClutchW=sher
C_tch Dn_mAss'y.
w/Beer'_g
Washer
Pin-Bar Adjusting
P,_f, part No.
24. 530069611
25. 530038238
26. 530015905
291 530047600
5300471
30. 530016133
31. 530016"E32
32, 530039187
33. 530400897
34. 6O0001717
530015920
37. 530016080
38. i 536O'238_7
39. 530037817
40. 530027531
41. 530049356
42, 530015892
43, 530037485
44. 53o069232
,45. 530010846
46., 530047583
47. 53@7608
! 48. 530036142
49. 530038224
50, 530016O20
I;_scflpt_on,
B=rA_usting'Kit
w/Screw& Retaine!
Ptale-Bar Mounting
Suew
ChainCatcher
ChassisAss')'.
FuetCap ASS'y_
Bolt-Bar
S_ew
RywheelAss'y.
Washer
t.ockweaher
Nut
Scow
$uew
Sprang---StarterDog
Starter PuIley
Re¢O_Spdng
Fan H_u_ng
Screw
Starter Ha_die
FlopeK_t
O_Cap Ass'y.
FrontHandl_
Limiter
i_o_atcrSleeve
Handguard
Screw
Ref. Part NO,
51. 5-30015843
52. 530016O09
53, 530047934
54, 530015875
5E. 530069788
56, 530015123
57, 53OO16097
58, 713629
59. 5300_g:Z06
60_ 530038241
61. 530030189
62, 53OO37821
_, 533038373
64J ,_00_9931
65. 530O37820
66,i 713636
67, I 530015843
Not Shown
530084296
_92,€6
19
47
56
Oeas;rl?tibn
Screw
Screw
SpdngAshy,
Screw
Oit PumpAss'y.
Washer=Flat
Screw
Cbein*-16"
_eal Blbck
Fitting-EIbaw
Plug-Oil Filter
O_Filter
Pick-up Tube
O_r_ Se_l
Warm Gear
Ba_-I 6"
Screw
OperatorManual
Instmct_n Decal

"REPAIR PARTS .........
,i,, ,H, i ,,,,,
14
12
13
19 20
I
30 3g
530031163
530037793
530016101
530047604
530369722
35
"t,
2,
3,
4,
5.
6.
7.
8,
9+
tO.
lt.
12.
13,
14.
15,
16.
17,
19.
20.
21.
22,
53001923g
53001,_810
530O69920
530016187
530016102
530047578
530038318
530038317
530049244
530047566
5.30069218
530019210
718584_
5300t9238
530_9607
530069605
53003B729
26
Description
BarWrench
Foam-Air Filter
Nut
AirFilterHousing
CarburetorAss')'.Kit
(incL12 & 13)
Catb, Gasket
Screw
Cerb.AdapterKit
(Incl.9 & 17)
Screw
Screw
CyJlnderShleld
I.Jm_erCap.-Hi_
UmiterCep-Low
Gmmmat
PrimerAss':/.
PrimerLineK_t
(Smauots)
Air13oxSea[
Spark Plug(CJ-TY)
Gasket
CylinderKit
PistonKit
(IncL22 & 23)
PistonRing
Ref. Part No.
23. 530015697
24. 53004706_
25. 530047827
26, 530037935
27. 530016136
28, 530016090
29_ 530069608
30. 530049117
31. _14362
32, 530037652
33. 530019221
530047207
36. 530037813
37. 530036103
38. 530016132
39. ._:P.00,39?_
40, 530015905
41. 530047442
42, 9527(_606
NOtShown
530031112
530031(_7
Dascrlptlon
Retainer
CrankshaftASs'y
sea#& BearingAss'y,
Cap-Crankcase
Clip
Screw
F._gineGasketKit
(It_cl,6,17,19 & 33)
WireHarness AsS'y,
Fuet Filter
Heatinsulator
MufflerGasket
MufflerBackPlate
MufflerAss'y.
(IncL33-,34 & 36-38)
MufflerDiffuser
Spark ArrestorSc_,en
,Screw
]gnitioa Module
Screw
GroUndStrap
Chain8_ke Kit
Clutch Ass'y. Tool
Air Gap Gauge
2O

i i,,i
REPAIR PARTS
: :'7
_,_rburetor AssembFvKit Number #530069722
3
1
KiT
2
KIT
KIT
Ref, Pert No. Description
1. 530338318 Lirn]terCap-Hh3h
2. 530038317 L_iter Cap-Low
3. 530035399 CarburetorRepair Kit
(KIT = Conzents)
21


Garantfa 2 Servicio y Ajustes
Reglas deSeguridad 2 Almacenamiento
Montaje 6 Tabla DiagnSstica
Uso "7 Repuestos y Encargos
Mantenimiento 13
16
19
0
Contratapa
GARANTIA COMPLETA DE UN ANO PARA LA SIERRA
DE CADENA A GASOLINA CRAFTSMAN®
Porun a_o a contarde la fechs de compra,siempre que asta Sierrade Cadenaa Gasolina
Craftsmanast_ mantenida,lubricaday ajustadade acuerdoai manualdelusuario,Sears
repara_ gratuitamente cualquier defectode materialas o mano de obra.
Esta garantfa excluye la barra, iacadena,la bujia y elfiltrodeaire, que sonart_culos
fungibles y so gastan durante el funcionamiento normal,
Si seusa esta Sierra de CadenaaGasolina para propSsttoscomarcia_eso de alquiler, esta
garantia tendrd validez de 30 dfas contados a partirde la fecha de compra.
ELSERVtClO BAJO GARANTtA ESTAA SU DISPOSIC!ON CON SOLO DEVOLVERLA
SIERRA DE CADENA AL CENTRO DE SERVICIOSEARS MAS CERCANO EN LOS
ESTADOS UNIDOS.
Estagarant_ale confierederechos jurfdicosespecfficos; adern_s ud. podr&tenerotros
derechos que varfanentre astados.
Sears, Roebuck and Co., Dt817WA, Hoffman Estates, IL 60179
ADVERTENCIA: Desconecte
siempre el cable de la buj_a al reparar
el aparato, excepto en el caso de
ajustes al carburador. Debido a qua las
sierras de cadena son instrumentos
para cortar madera aalta velocidad, el
uso descuidado o indebido de esta
herramiertta puede causar graves
heridas.
PIENSE ANTES DE PROCEDER
• Limiteeluso de la sierraa aquellos
usuarfos adultos que comprendany
puedanimplementar todaslas
precauciones,reglasde seguddade
instruccionesde uso que seencuentranen •
este manual.
Protecci6nde Oidos_,= Casco Duro
i_ _.._ Protecci,nde "
Ojos
Ropa
Ajustada Guantasde
al Cuerpo Us<)Industria! •
Zapatos de
Seguddad
II_lllhl
de Seguridad
• Useequipo protector.Siemprousecalzado
de seguddad con puntas de acero y suelas
anti-deslizantes; ropa ajustada al cuerpo;
guantasgruasos de uso industrial
anti-deslizantes; protecck_ndeojos talas
comogafas de segurfdadque no sela
cara; casco duro aprobado; y barrera de
sonido (tapones de oMou orejeras
anti-sonido)pars proteger laaudici6n.Los
queusansierras defuerzahabitualmente
deberdn hacerserevisarlaaudidSn
frecuentemente ya que elruidode las
sierrasde cadenapuededaSarlosofdos.
Mantsngaelcabelloporencfmadelnivel
do loshombros,atdndeloparatal efectosi
fuere necesado.
Mantengatodaslas partesdot cuerpo
alejadasde_ cadenasiemprequeelmotor
estdenfuncionamiento,
Mantengaa losni_os,espectadoresy
animalesa unadistanciamfnimade 10
metros(30 pies)del drea detrabajoo
cuandoestdhaciendoarrancar el motor.
Nolevantenioperelas sierrasde cadena
cuandoestdfatigado, enfermo,ansiosc osi
ha tornado alcohol,drogaso remedios.Es
inprescindibleque ud.est_en buenas
condicionesfisicas y alertsmentatmente.
Siud.sufre de cualquiercondici6nclue
puedaempeorarconeltrabajoarduo,
ases6rosecon sum_dico.

• Nopongaen marcha ]a sierrasin tener un •
drea detrabajodespejada,una superflcie
eatablepara pararsey,siestdderrubando
drboles, uncaminopredeterminadode ,
retroceso.
USE LA SIERRA OBSERVANDO •
TODOS LOS PROCEDIMIENTOS
DE SEGURIDAD
• Mantengalasdosmanos enlasmanijas:
siempreque elaparatoest_en rnarcha.El
usodel aparatoconunasolamano puede
causargravesheddasal usuario,alos
asistentes oa los espectadores.Las
sierrasde cadenaest_ndisefiadas pars
quese ias useconlasdosmanos en todo
momeRto.
• Hagauso de lasierrade cadena
r,lnieamente en lugares exteriores bien
venfilados.
o Nohags usede lasierradesdelaa
escalerasport,tilesni losdrboles,a menos
quetenga elentranamientoespecificopars
hacedo.
• Aseg,3resede quefacadena novayaa
hacercontactoconnJng_nobjetoantes de
poneren marchael motor.Nuncaintente
hacer arrancarla sierraconla barfs gura
dentrode uncorte.
• Noaplique presi6na lasierraal final delos
cortes.AplicarpresiSnpuedehacerque
pierdael controlalcomp{etarseelcorte.
• Pare elmotorantesde apoyarlasierraan
n}ng_nlado.
• Cuandotrasladela sierraen ramano,
hdgaloOnicamenteconelmotorparado.
Ll_vetacon elsilenciadorapartadodel
cuerpoylabarfs y cadenahacia atrds, con
la barrade preferenciacubiertaporuna
funds.
MANTENGA LA SIERRA EN
BUENAS CONDICIONES DE
FUNCIONAMIENTO
° Lleve lasierra de cadenaaun proveedor
de servicioautorizade pars que hagstodo
serviciomenos aquellos procedimientos
listados en la secciSnde mantenimientode
este manual.
• Aseg0rese de quela cadenasedetenga
poreomptetoeuandosesuelta elgatillo.
Para hacercorrecciones,yea los "Ajustes
al Carburadof'.
• Mantengalas manijassecas, limpiasy
libresde aceiteo demezciade
combustib}e.
• Mantangalastapasy losfijadores bien
flies.
• Use exclusivamente _osaccesorios y
repuestosCraftsmanrecomendedos.
Nuneamodifique lasierra.
No fume mientrastrabajaconel
combustibleni cuandoeat&haciendouso
de lasierra.
Eliminetodaslasposiblesfuantes de
chispasollamasen las_.reasdondese
mezclaoviertee! combustible.
Mezcley viertaelcombustibleafueray use
siemprerecipienteaprobadopars
combustiblesymamado comotar,Umpie
todoslosderramesde combustibleantes
de pOnerelaparatoen marcha.
• Al_jeseaporIomanos3 metros(10 pies)
de! lugarde abastecimientoantesde porter
elmotor en mamha.
• Apagueelmotory dejeque lasierrase
enfdeen unlugarlibrade substancias
combustiblesy no sobre hojassecas,paja,
papel, etc. Retirela tapa lentamentey
reabastezca elaparato.
• Guarde elaparatoy elcombustibleen un
espaciofresco, seco y bien ventilado
donde losvapores de!combustible no
puedanentraren contactoconchispas ni
llamas abiertasprovenientesde
termotangues, motoreso interruptores
el@ctricos,calefactores centra}es,etc.
PROTEJASE CONTRA LAS
RECULADAS
ADVERTENCIA: La RecuJada
Rotacional puede acontecer cuando la
cadena en movimiento entra en
contacto con algen objeto en la en la
parte superior de la punta de ta bars
gufa puede causar que la cadena entre
al material yse detenga por un
instante. El resultado es una reacci6n
inversa, a veloeidad de rel_impago, que
hace recular la barra guia hacia arriba y
hacia atr_,s hacia el usuario.
_._\ _ Trayectoriade le
Evite lasObstmcciones
Despejeel Areade Trabajo
La Recutada por PresiSn y la Impulsi6n
acontecen cuando la cadena se
detiene repentinamente porque estd
apretada, atrapada o en contacto con
MANEJE EL COMBUSTIBLE CON algtln objeto extrafioa lamadera.Esta
EXTREMO CUIDADO detenci6nrepentinade lacadenatiene

come resultado una inversi6n de la
fuerza de la cadena usada para cortar
madera y causa que la sierra se mueva
en sentido opuesto al de la rotaci6n de
la cadena. La Reculada per Presi6n
proputsa la sierra directamente hacia
atr_.s en direcci6n al usuario. La
Impulsibn aleja la sierra del usuado.
REDUZCA LAS
PROBABILIDADES DE
RECULADA
• Est_ conscJente de la posibilidad-de
reculada. Teniendo una buena
comprensi6n bdsica de la reculada,
ud. podrd reducir el elemento de
sorpresa que contribuye a los
accidentes.
• Nunca perrnita que la cadena en
movimiento toque ningtin objeto en la
punta de la barra guia.
• Mantenga el _rea de trabajo libre de
obstrucciones come per ejemp!o
otros drboles, ramas, piedras, cercas,
tocones, etc. Elimine o evite toda
obstrucci6n que la cadena pueda
tocar mientras estd cortando.
• Mantenga la sierra afilada y con la
tensi6n correcta. Las cadenas con
poco file o flojas incrementan la
probabilidad de recutada. Siga las
tnstrucciones del fabricante para afitar
y efectuar mantenimiento de la
cadena. Verifique la tensiSn a
intervalos regulates con el motor
parade, nunca en marcha. Asegdrese
de que las tuercas de la abrazadera
de la barra est6n ajustadas
firmemente.
• Empiece y efectee la totalidad de
cada code con el acelerador a rondo.
Si la cadena se est'A moviendo a una
velocidad menor que la mdxima, hay
mds probabilidad de que la sierra
recule.
• Use cuidado extreme al entrar de
nuevo en un code ya empezado.
• No intente hacer codes empezando
con la punta de la barra (codes de
taladrc).
• Tonga cuidado con troncos que se
desplazan y con las dem&s fuerzas
que podrfan cerrar un code y apretar
la cadena o bien caer sobre ella.
• Use la Barra Gu{a Reducidora de
Recutadas y la Cadena MJnimizadora
de Reculadas recomendadas para su
sierra.
Evite la Reculada per Prest6n-
• Mant_ngase siempre al tanto de toda
situaci6n u obstrucci6n que pueda
apretar la cadena en la pade superior
de la barra o detener ta cadena de
cualquier forrna.
* No code rods que un tronco a la vez.
o AI seccionar troncos con code
asoendiente, no tuerza la sierra al
sacar la barra del code.
Evite la Impulsi6n:
. Empiece los codes siempre con el
motor acelerado a fondo y la caja de
la sierra apoyada en la madera.
- Use cutlas de pldstico o de madera,
no de metal, para mantener abiedo el
code.
MANTENGA EL CONTROL
Pdresehaciala izquierdade la sierra
El pulgar per i
debajo de la manija
Nunca inviedala posici6ndelas manes
• Sostener firmementeconlas dos manes le
_YoUdarda mantenerelcontrol de la sierra.
afloje. Mantengalarnanoderecha
envolviendototalmente la manija trasera,
sea ud. derechoo zurdo. Sostenga ta
manijadelantem con tamane izquierda,
cofocando e!pulgar debajo de la manijay
rodeandola manija con losdedos.
Mantenga el braze izquierdototalmente
extendido conelcodefijo.
- Coloque la mane izquierda en la
manija delantera, de mode que quede
en linea recta con la mane derecha
en la manija trasera, cuando est6
haciendo codes de seccionamiento.
Pdrese levemente hacia ta izquierda
de la sierra para evitar que el cuerpo
est6 en lfnea directa con ]a cadena.
• Pdrese con el peso distribuido
igualmente entre los dos pies.
• No se exttenda excesivamente. La
sierra puede impulsarlo o empujarlo y
ud. puede perder el equilibrio y el
control de la sierra.
• No code ardba del nivel de los
hombres, puedsto que toma diffcil
mantener el control de ta sierra.
DISPOSITIVOS DE SEGURIDAD
CONTRA LAS RECULADAS
ADVERTENCIA: Los siguientes
dispositivos hart sido incluidos en la
sierra pare ayudar a reducir el riesgo
de reculadas; sin embargo, tales
implementos no pueden eliminar

totalmente esta reacci6n peligrosa. No
se confie exclusivamente en los
dispositivos de seguridad. Ud. debe
seguir todas las precauciones e
instmcciones de seguridad para ayudar
a evitar las recutadas y las demds
fuerzas que pueden causar graves
heddas.
• Protector de Mane, diseSado para
reducir ta probabilidad que su mane
izquierda entre en contacto con la
cadena, si la mane se desprende de
la manija delantera.
• La Posici6n de las manijas delantera
y trasera, diseSadas con distancia
entre las manijas y =en linea" la una
con la otra. La separa_i6n y la
colocaci6n en linea que este diset_o
provee se combinan para dar
equilibrio y resistencia para controlar
la propulsl6n de la sierra hacia el •
usuano si acontece una reculada.
= BarraGufaReducidorade Recularias,
diseSadacon puntade radio pequeSoque
reduce eltamaSo de la zona de pe_igroen
la puntade la barra. Estetipo de barra ha
demostradoque reduce significativamente
la cantldady la seriedad de las reculadas
cuando ha side examinado de acuerdocon
ANSI (AmericanNational Standards
Institute, Inc.) B175.1.
Barra Gu_aSim_._ca Reduc_ora de
Reculadas i-_-_
I _ Punta de Radio
PequeSo
BarraGu_'aSim_tTica I_'_
,
Puntade Rari_oGrande
° Las Cadenas Minimizadoras de
Reculadas han satisfecho los
requisites de rendimiento en pruebas
con una muestra representatlva de
sierras de cadena con
desplazamiento de menos de 3,8
pulgadas, come se espeeifica en
ANSI B175.1.
CadenaMinimizadora de Recutarias
._......._ Marcadorde Profundidad
Pe_lado
,l_t_:_._,,=.-..._Eslab6nPmtectorAlargado
t -"_t_ Desvia laFuerzade
_ Reacci6ny Permitequela
Madem Entre
Gradualmente ala Cuchilla
Cadena con AltoPotencial de Reculada
" uede Obstmir
Material
AVISO DE SEGURIDAD: El estar
expuesto alas vibracioens a tray,s del
use pmlongado de herramientas de
fuerza a gasolina puede causar daSos
a los vases sanguineos o a los nervios
de los dedos, las manes y las
coyunturas en aquellas personas que
tienen pmpensidad a lostrastomos de
la circulaci6n o alas hinchazones
anormales. El use prolongado en
tiempo frio ha side asociado con dafios
a los vases sanguineos de personas
que per otra parte se encuentran en
perfecto estado de salud. Si ocurren
sfntomas tales come el
entumecimiento, el dolor, la falta de
fuerza, los cambios en el colorofa
textura de la piet o falta de sentido en
los dedos, las manes o las coyunturas,
pare de usar esta m&quina
inmediatamente y procure atenci6n
m_dica. Los sistemas de anti-vibraci6n
no garantizan que se eviten tales
problemas. Los usuarios que hacen
use continue y prolongando de las
herramientas de fuerza deben fiscalizar
atentamente su estado ffsico y el
estado del aparato.
FRENO DE CADENA Siesta sierra ha
de usarse para ettumbado comercial
de _.rboles, ud. deber_ encargar e
instalar un Irene de cadena para
cumptir con los Reglamentos Federales
del OSHA para el Tumbado Comercia!
de Arboles. Entre en contacto con su
Concesionado de Service Autorizado o
Ilame a! 1-800-235-5878.
REJILLA ANTICHISPA: Su sierra
viene equipada con silenciador
limitador de temperatura y con rejiUa
antichispa que cumple con los
requisites de los CSdigos de California
4442 y 4443. Todas las tierras
forestadas federales, rods los estados
de California, Idaho, Maine, Minnesota,
Nueva Jersey, OregSn y Washington,
requieren per ley que touches metores
de cornbusti6n interna est_n equipados

conrejilla antichispa. Si usted usa una
sierra de cadena donde existen tales
reglament0s, usted tiene la
responsabilidad juridica de mantener
estas piezas en correcto estado de
funeionamiento. De Io contrario, estar&
en infmcci6n de la ley. Vea la secci6n
de RESPONSABILIDADES DEL
USUAR10.
PADRONES: :Este sierra de cadena
consta en la lista de Underwriters
Laboratories, Inc., de acuerdo a los
Requisitos Nacionales de Seguridad
Estadounidenses para Sierras de
Cadenaa Gasolina (ANSI
B175.1-199!).
CONTENIDO DE LA CAJA
Use la siguiente lista para verificar el
contenido.
• Modelos 351081, & 351161
• Sierra de cadean (completamente
montada)
• Herramienta de ajuste de ta
cadena
• Aceite para motores de 2 tiempos.
(No se incIuye aceite lubricante de
barra.)
• Verifique que no hayapiezas dafiadas. No
use piezasdar3adas.
• Si necesit_ ayudaosi faltan pfezaso
encuentrapiezasdaSadas, favor de Ilamar
al 1-800-235-5878.
AVISO: Es normal oir el golpeteo del
filtro de combustible en el tanque vacfo.
Su aparato ha sido puesto a prueba en
la f_brica y se le ha ajustado con
precisi6n el carburader. Como
resultad0, es posible que se sienta un
olor a gasolina o que se encuentre una
gota de residuo de aceite o
combusti/be en el silenciador al
desempacar el aparato.
MONTAJE
El aparato viene completamente
armade y no hay necesidad de
montaje.

CONOZCA EL APARATO _ i
LEA ESTE MANUAL DEL USUARIO Y LAS REGLAS DESEGURIDADANTES
DE USAR LA SIERRA DE CADENA. Compare tas ilustraciones consu aparato
para famitiarizarse con la ubicacibn de los vados controles y ajustes, Guarde este
manual para use future.
Herramienta deAjuste ManijaDelantera
de !a Cadena Protector r_ ,/-
, L. _ deMano "_1| _ SogadeArranque
i-=== /
Oo0eoo /
Lubdcantede Barra Cajadel Arranque Tapa del Tanquede
Combusb'ble
Tapa del Cilindro _. _ _.
Traba del _ / ,L,,,-" I / __ ___ -__\ .
Acelerador /-_/f._ __ ! Direcci6noe
f-.z,._//._,.- \ _ _14" _ I Rotaci6nde la
Cebador Ab Made a de
Acelerader Ia Barra Captadorde Cadena Barra Gu=a
TRABA DELACELERADOR
Es necesadoapretar pdmerola traba
del aceleradorpara poderaccionarel
acelerador.Estedispositivoprevieneel
accionamiento accidentaldel
acelerador.
TRABA DE LA MARCHA LENTA
ACELERADA
La traba de ta mamha lenta acelerada
mantiene el gatilIo en Is posici6n de
arranque, permitiendo asi sostener la
manija delantera y tironear la soga
durante el arranque. Accione la traba
de marcha tenta acelerada de la
siguente manera: Aprete la traba del
aceIerador y luego aprete el gatillo
aceIerador. Con el acelerador apretado,
optima la traba de marcha lenta
acelerada. Suelte la traba del
acelerador y el gatillo mientras
mantiene oprimida la traba de marcha
lenta acelerada.
TENSION DE LA CADENA
Es normal que las cadenas nuevas se
estiren durante los primeros 30 minutes
de use. Deberd verificarse la tensiSn de
la cadena frecuentemente. Vea TensiSn
de la Cadena en la secciSn de Servicio
y Ajustes.
ANTES DE PONER EL MOTOR EN
MARCHA:
ADVERTENCIA: Lea toda la
informaci6n sobre el manejo del
combustible en la secciSn de reglas de
seguridad de este manual antes de
7

empezar. Si no comprende la
informacidn sobre el manejo del
combustible, no intente abastecer su
aparato. Procure ayuda de elguien que
comprenda la informaci6n o Ilame al
tel_fono de ayuda al consumidor al
1--800-235-5878.
ACEITE PARA BARRA Y LA CADENA
El lubricador de ta cadena provee
lubricaci6n continua a la cadena y a la
barra guia. No se olvide de Ilenar el
tanque de aceite pare barra siempre
que Ilene el tanque de combustible
(Capacidad=-6,8 ft. oz.). Pare obtener la
m,-rlximaprolongaci6n de la vida de la
bare y la cadena, recomendamos que
use el aceite para barras de sierra de
cadena Craftsman. Si el aceite
Craftsman no estd dispondible, puede
usarse un aceite SAE 30 de buena
calidad haste obtener el aceite marca
Craftsman. La cantidad de lubricaci6n
es medida autom_ticamente durante el
funcionamiento de la sierra. La sierra
user& m_s o menos un tanque de
aceite para la barra per cada tanque de
combustible. Siempre Ilene e! tanque
de aceite de la barra cuando Irene et
tanque de combustible.
ABASTECIMIENTO DEL MOTOR
Este motor estd habilitado para
funcionar con gasolina sin pfomo.
Antes de user, se deber& mezclar la
gasolina con un aceite de buena
catidad para motores de 2 tiempps
enfriados a aire. Recomendamos el
aceite maroa Craftsman. Mezcle la
gasolina con el aceite en la proporoi6n
de 40:1. (Se obtiene una proporci6n de
40:1 mezclando 3,2 onzas de aceite
con cada galSn de gasolina sin piomo).
NO USE aceite pare autom6viles ni
pare heroes. Estos aceites daSarbn et
motor. AI mezciar el combustible, siga
las instrucciones impresas en el
recipiente. Una vez que haya aSadido
el acelte a ta gasoline, agite el
recipiente brevemente para asegurar
que el combustible est_ completamente
mezclado. Lea siempre y siga las
reglas de seguridad que tienen que vet
con el combustible antes de abastecer
el aparato.
IMPORTANTE
La experienciaindicaque los
combustiblesmezcladosconalcohol
(losIlamadosgasoholo losque
contienen etanol o metan01) pueden
atraer humedad, Io que puede causar
la separaci6n y la formaci6n de &cidos
durante el almacenamiento. La
gasolina acfdica puede da_ar el
sistema de combustible del motor
durante el almacenamiento.
Pare evitar promblemas con el motor,
deber#,vaciarse el sistema de
combustible antes de aimacenar el
aparato per 30 dfas o m#_s.Vacfe el
tanque de combustible, ponga el motor
en marcha y d_jelo en marcha hasta
que las tfneas de combustible y el
carburader queden vaelos. Cuando
vaya a usar el aparato nuevamente,
use combustible fresco. Vea las
instrucciones de ALMACENAMIENTO
pare obtener m_.s informaciones.
Nunca use productos de !impieza de
motor o carburador en el tanque de
combustible ya que hacerlo puede
provocar daSos permanentes.
Vea la secci6n de ALMACENAMIENTO
para m_s informaciones.
PARA PARAR EL MOTOR
• Celoque el interrupter en la posici6n
STOP.
• Si el motor no se detiene, tire la
perilla del cebador a su m_ima
extensi6n.
PARA PONER EL MOTOR EN
MARCHA
MOTOR FRIO O MOTOR CALIENTI=
DESPUES DE QUEDAR SIN
COMBUSTIBLE
• Uene el tanque de aceite de barm
usando el aceite correspondiente. La
sierra usar& aproximadamente un
tanque de aceite de barra per cada
tanque de combustible.
• Prepare el motor apretando el
bombeador seis veces.
ON
IEncendido
Bombeador
• Conecte el encendido colocando el
interrupter en ON.
• Active el cebador tirando la perilla del
cebador hasta su m_ixima extensi6n.

Coloquela sierra en el suelo.
Sostenga la manija delantera con la
mane izquierda y coleque el pie
derecho atravesando el interior de la
manija trasera.
• Active la marcha lenta acelerada
apretando la traba del acelerador con
la mane derecha. Luego, aprete el
gatillo acelerador y mantdngalo
apretadoo Con el pulgar optima ta
traba de la marcha lenta acelerada y
mant_ngala opdmida. Per _ltimo,
suelte el acelerador.
* NO APRETE ELACELERADORdurante el
arranque; de ottomode, ser_ necesario
activarnuevamente latraba dela marcha
lentaacelerada.
AVISO: AI tironear de la soga de
arranque, nunca use la extensi6n
completa de la soga, Tampoco
permita que la soga se rebobine sole;
al contrario, sostenga fa manija y
haga que se rebobine fentamente.
• Tironee de la soga con la mane
derecha haste que el motor intente
arrancar. Luego empuje la perilla del
cebador hasta ta posici6n parciaL
ContinUe tironeando de la soga hasta
que el motor arranque. Vea la
ilustraci6n.
• Si la temperatra ambiente es superior
a 5°C (40°F), deje el motor en
marcha unos 5 segundos. Luego
empuje la peritla del cabador haste la
posici6n OFF; despu_s aprete y
suette el acelerador para dejar el
motor en marcha lenta.
• Con la temperature ambiente per
debajo de 5°C, deje el motor en
mamha entre 30 segundos y un
minute pare que se caliente, con el
cebador en la posici6n parciaL
Despu_s empuje la perilta del
cebador haste la posici6n OFF y per
01time aprete y suelte el acelerador
pare dejar et motor en marcha lenta.
•Para parar el motor, coloque el
interrupter en STOP.
PARA PONER EN MARCHA EL
MOTOR CALIENTE
NO USE et cebador para poner en
marcha el motor caliente; de Io
contrario el motor se puede ahogar o
ponerse diffcil de hacer arrancar.
• Coloque el interrupteren ON.
- Accione la traba de la mamha lenta
acelerada.
• Aseg_mse que el cebador est_ en la
poslci6n OFF.
• Con la sierra en el suelo, sujete ra
manija delantera con la mane
izquierda y coloque el pie derecho
atravesando el interior de la manija
trasera.
• Sujete lamanija de la soga de
arranque firmemente y tironee de la
soga r_pidamente pare hacer
arrancar el motor.
• Aprete y suelte el acelerador pare
dejar el motor en marcha lent a.
Manija de la Soge de Arranque
MOTOR DIFICIL DE PONER EN
MARCHA O MOTOR AHOGADO
El motor puede estar ahogado si no se
pone en marcha despu_s de 10 tirones
de la soga. Se puede tibrar el motor
ahogado del exceso de combustible de
la siguiente manera:
• Active la traba de marcha lenta
acelerada.
• .Verifique aue et interrupter est_ en la
posici6n ON.
- Co!oque la peritla clefcebador en la
posici6n OFF.
. Con la sierra en et suelo, sujete la
manija delantera con la mane
izquierda y coloque el pie derecho
per el interior de la manija trasera.
• Sujete la manija de la soga de
arranque y tironee la soga firrnemente
pare hacer arrancar el motor. Si no
consique arranoar el motor, repita el
proceso hasta que e! motor arranque.
El arranque tel vez requiera muncos
tirones de la soga, dependiendo de la
cantidad de combustible que est&
9

ahogandoelmotor, Si el motoraun asi
noarranca,yea la TABLA
DIAGNOSTICA o llameal
1-800-235-5878.
SUGERENCIAS PARA EL USO
CORRECTO DEL APARATO
• Verifique la tensi6n de ]a cadena
antes del primer uso y despu_s de un
minuto de funcionamiento. Vea
Tensi6n de la Cadena en la secci6n
de Mantenimeinto.
, Cortereaders dnicamente.Nocortemetal,
pl_stico,ladrillos,cemento,otros
mater!aresde construcci6nque nosean de
readers,etc.
• Pare la sierrasi la cadenatocacualquier
objetoajeno,lnspeccTonefasierray repare
IsspiezassegL1nla necesidad.
° Mantengala eadenafuera de la arena y la
tierra. La menorcant!dadde tierradesafila
r_pidamentelascadenase incrementsla
posibilidaddereculadas.
. Cortevadostroncospequefioscomo
pr&ctfca,usandolasiguienta t_cnica,para
acostumbrarsealmanejode lasierra,
antesde empezarunproyectodegrandee
dimensiones.
• Acelere el motor al mdximo antes
de empezar a cortar apretando el
gatillo acelerador a rondo.
• Empiece et corte con el bastidor de
la sierra apoyada contra el tmnco.
• Mantenga el motor con acelerador a
fondo constantemente mientras
corta.
• Deje que la cadena haga todo el
trabajo de codar;, no use mrs que
una muy ligera presi6n hacia abajo.
• Suelte el gatillo acelerador
inmediatamente al terrninar de
cortar, dejando que el motor
funcione a marcha lenta. Si
mantiene ta sierra en marcha con
aceterador a fondo sin estar
cortando, puede causar desgaste
innecesario.
= Pars no perder el control cuando se
hays completado el corte, no le
ponga presi6n a rasierra al final del
corte.
• Pare el motor antes de apoyar la
sierra at finalizar un corte.
TECNICAS PARA TUMBAR
ARBOLES
ADVERTENCIA: Veaque no hays
ramas rotasomuertas que podr/an
caede encima mientras corta,
causando heridas graves. No corte
cema de edificios ni cables el_ctricos si
no sabe la direcci6n de tumbado del
_irbol, ne de noche ya que no podr_ ver
bien, ni durante mal tiempo como Iluvia,
nieve, o vientos fuertes, etc.
Planffique la operaci6n de corte
cuidadosamente par adelantado.
Despeje al _rea de trabajo. Ud. precisa
un drea despejada en todo et contomo
del &rbol donde pueda pisar con
firmeza entodo momento. Estudie las
condiciones naturales que puedan
causar que el drbol caiga en una
direcci6n determinada. Entre las
condiciones natumtes que pueden
causar qua el &rbo! caiga en una
direcci6n determinada, se encuentran:
• La dimcci6ny fa velocidaddelviento.
• Eldngulodeinclinaci6n del&rbol.El_ngulo
de losdrboles a vecesnosenotsdebtdoal
declive delterrenooa terrenodesparejo,
Useplanaocorderde sondapara
determinar la direcciSnde lainclinaciSndel
_rbo!.
° El _rbot esm&spesadootienomucho mrs
ramasde unlado.
° Arbolesy obstdculosen derredor.
Verifique si hay pore!ones
descompuestas o podridas. Si el tronco
estd podrido, puede partirse
repentinamente sin aviso y caer sobre
el usuario.
Aseg_rese de que hays suficiente
espaclo para la cafda del drbol.
Mantenga una distancia equivalente a
dos veces y medio del largo del &rbot
que est& cortando entre et drbol y ]a
persona mds cercana u otros objetos.
El ruido del motor puede impedir que
se escuchen las advertencias gdtadas.
Retire la tierra, tas piedras, la corteza
suelta, los clavos, las grampas y e!
alambre que pueda haber en el drbol
en el lugar de] corte.
_e,, Pianifiqueunaruts
predeterminadaydespeiada
-O ",aOa, a
4.5° /
PARA TUMBAR ARBOLES
GRANDES
(condidmetrode 15cm (6 pulgadas)o
m_s)
Se usa el m_todo de corte de muesca
para los _rboles grandes.La muesca
es un corte en el Jadodel _rbol hacia el
10

cual se desea que caiga. Despu_s de
hacer el carte de tumbado del lade
opuesto, el _irbol tendr_ la tendencia de
caer hacia el lade en que se ha hecho
el carte de mUesca.
AVISO: Si el _rbol tiene farces
grandes de apoyo, retfretas antes de
hacer la muesca.
CORTE DE MUESCA Y TUMBADO
DEL ARBOL
•Haga el cortede muescacortandoprimero
laparte superiorde ta muesca. Haga que
el carte atraviese un tercio del anchodel
trance.Luegocomplete e!carte de muesca
cortando laparte de aba]o de la muesca.
Veala ilustraci6n. Una vezcomplete el
conede muesca, retire la curiade madera
del&fool.
• Despu&sde retirada lacuria de readers,
del lade opuesto al carte de rnuescahags
el carte de tumbado. Elcarte detumbado
debe quedar a 5 cm (2 pulgadas)m_s
arribaque el centre det carte de muesca.
Este procedimientodejar_tsuficiente
maderasin cortarentre elcortede
tumbadoy la muescapara formaruna
bisagra.Esta bisagraayudar&a evitarque
el _rbolcaigaen ladirecci6nequivocada.
Cortefinal aquf
Primercarte
Mues_
Segundg.Ar
La bisagra sostiene el &rbolen eltoc6ny
ayuda a controlarla ca[da
Abertura dsi
cortede tumbado
Cierre de
lamuesca
AVISO: Antes de completar el
tumbado, use cutlas para abrir el corte,
cuando sea necesario, para centrolar la
direcei6n de la cafde. Use cutlas de
readers o de pl&stico, pete nunca de
aceroo de hierro, pars evitar que la
sierra recule y pars evitar dafios a la
cadena.
• Est_alerts a losindicios de que si &rbol
est_ per caer:los crujidos, si
ensanchamientodel cartede tumbadoy los
movimientosde las ramas superiores.
• Enet instante en queel _rbol comienza a
caer, pare lasierra, ap6yela en el suelo y
retroceda r&pidamente,per latrayectoria
de retroceso previs_a`
• Tengaextremecuidado conlos &rbotes
parcialmentetumbados que tienen apoyo
precario.Cuando el&rbol nocae
totalmente,pongaIs sierra de lade y use
un montacargasa cable,unapareio de
poleaso un tractorpars bajarlo. No carte
los &rbolesparciafmente cafdoscon la
sierra.
CORTE DE UN ARBOL TUMBADO
(SECCIONAMIENTO)
El t6rmino seccionamiento significa
cortar un&rbol tumbade en secciones
del largo deseado.
ADVERTENC|A: No se pare encima
det tronco que est& slendo cortado.
Cualquier parte del tronco puede radar
haciendo que el usuario pierda et
equilibrio y el control. No se posiciene
cuesta abajo del tronco que est&
siendo cortado.
Puntos importantes
, Cortet_nicamenteunb'oncoa la VeZo
•Corte consumocuidado!amadem
astillada. Lasierra puedearrojarpedazos
punteadudosy filososhaciae! usuario.
• Useun cab_lete paraeortartroncos
pequeF_os.Nunca pen'nitaaotra persona
quesostengaeltrancemientrasud.certa
nisostengael troncoconla piemaoel pie.
• Nocorteen lugaresdondehaya b'oncos.
ramasy farces entrelazadas.Arrastre los
troncoshastaunlugar despejado antesde
cortarlos.
TIPOS DE CORTE QUE SE USAN
PARA EL SECCIONAMIENTO
ADVERTENCIA: Si la sierra queda
apretada o atascada dentro del tronco,
no intente sacarla a la fuerza. Puede
pettier el control de la sierra, causando
heridad o defies al aparato. Pare la
sierra, martiUe una curia de pl&stico o
de madera en el carte hasta que la
sierra satga f&eilmente. Pangs la sierra
de nuevo en marcha y co!_quela
cuidadosamente de nuevo en el carte.
No use cuSa de mataL No intente poner
en marcha la sierra de nuevo cuando
est,. apretada o ataseada en un trance.
11

Useuna cu6a parasacarlasierraatascada. Usode tronco
comoapoyo
SegundoCorte
APAGUE lasierra y useunacubade
maderaode pk&sticoparaabrirel tajo.
"'; _ PrimerCorte
Corte Descendiente empleza desde el
lado superior del tronco con ta parts de
abajo de la sierra apoyada contra el
tronco; haga una leve presi6n hacia
abajo. Segundo . : ._-
Corte descendiente Corte ascendiente SECClONAMIENTO USANDO
Corte Ascendiente empiezadesde el
ladoinferiordel troncocon lapartsde
arribade lasierraapoyada contrael
tronco;haga unalevefuerza hacia
am'ba. Sujete lasierrafirmementepara
mantenerelcontrol,Lasierratendrdla
tendenciadeempujaral usuariohacia
atrds.
ADVERTENClA: Nuncainviertala
sierrapara hacercortesascendientes.
No se puedecontrolarla sierra de esa
forma,
Haga siempre el primercorte del tado
de!troncoque estdbajo presi6n.
Primercortedeltadodeltroncobajopresi6n
TRONCO O CABALLETE DE APOYO
• Recuerde que el primercodesiemprees
del lado presionadodel tronco,(Veaen la
iiustraci6nque sigueet primeroy segundo
corte.)
- El primercorte deber&extendersepor "f/3
del di_'netro del tronco.
• Termine porel segunco code.
Con caballetecomoapcyo 2do code
ler torte
Segundo corte
/= Segundo_rte
Primercorte del ladodettronco bajo presi6n
SECClONAMIENTO SIN APOYO
. Hagael cortedescendienteatravesando
unterciodel d_netro.
° Haga rodareltroncoy termineconotto
codedescendiente.
• Tengacuidadoespecialmenteconlos
troncospresionadosde unledo, Veale
ilustraci6n anterior parecortartroncos
pres_onadosde unledo,
PARA CORTAR RAMAS Y PODAR
ADVERTENClA: Nunce trepe a los
drboles para cortar ramas o para podar.
No se pare sobre escaleras,
plataformas, troncos ni en ninguna
posici6n que podrfa causarTeque
pierda el equilibrio o el control de la
sierra.
PUNTOS IMPORTANTES
• Tengacuidado con lasremas delgadas
bejo presi6n. El materialde pocodi_"nelro
puede enrederseen tacadene,dendo un
letigazo atusuerio o haciendo que pierdael
equilibrio. Use extreme euidadoe!cortar
ramas pequeCias.
• Est_ alerta contralos rebotes. Tenga
cuidado al cortarramasdoblades obajo
12

presi6nparaevitarser golpeadoporla ADVERTENCIA: Pode tfnicamente
ramao lasierracuandose suelte la tensi6n hasta la altura def hombro. No code las
en lasfibrasde madem, ramas que queden rods altas que los
• Despeje frecuentemente las ramas
acumufadas para no le hagan tropezar.
PARA CORTAR RAMAS
• Corte las ramas del drbol _nicamente
despu_s de que se Io haya tumbado.
• Deje las ramas rods guresas debajo dsi
drbol tumbado para que apoyen el drbol
mientras ud. tmbaja,
• Empiece por la base de! drbol tumbado y
vaya trabajando hacia el tope, cortando las
ramas. Corte tas ramas pequeSas de un
doso corte.
• Mantenga el tronco del _rbol entre ud. y la
cadena.
• Retire las ramas m_s grandes y tas ramas
de apoyo con la t_cnica de un tercio y dos
tercios descrita en la secci6n de
seecionamiento.
• Use siempre un corte descendiente para
cortar ramas pequeSas y ramas que
cuelgan libremente. Los cortes acendientes
podrfan hacer clue las ramas eaigan y
apreten la sierra.
PARA PODAR
hombres. Consiga a un profesional
para efecturar ese trabajo.
• Haga el pdmer corte en forma
ascendiente atravesando 1/3 del
di&metro de la mma.
. Despu6s haga un segundo code
atravesando completamente la
rama, Finalmente haga un tercer
code, descendiente, dejando untoco
de 2,5 a 5 cm. sobresaliendo del
tronco del drbo!.
Se_ndo e,orte
Tercercorte de
2,5 a 5 cmdel
_'- troncodel arbol
RESPONSABILIDADES DEL
USUARIO
Anotelas feehasal completar
el servicJode rutina
Verifique que no hayapiezas da_ada
gastadas
veriflque que no haya fijadoreslpie_'"
zas sueltas
!Verifique Ia tensi6n de'la cadena
!Verifique el filo de la cadena
Inspecc!one ta barra gu{a
Limpie 'et aparato y las placas
Limpie el.filtro de..aire
Limpie e inspeccionelarejillaanti-
chispase Jnspeccioneel
silenciador
Cambie la bujfa
Antes d_ !Despu6: Cada 5Cada 25 Anuak Feehas d,
Usar de horas horas mente Servicio
Usar
I
jt
;t
v"
/!'
RECOMENDACIONES
GENERALES
La garantfa de este aparatono cubre
losartfculosque han sido sometidosal
abusoo a la negligenciadeparte del
usuario.Parapoderrecibirel valortotal
de lagarantfa,elusuariodeber_,hacer
el mantenimiento tal come se indica en
este manual. Hard falta hacer varios
ajustes peri6dicos para mantener el
aparato adecuadamente.
• Unavez peraso, cambie la bujia y el
e_ementode| fiitro deaire e inspeccione la
barra gufay la cadenapara ver que no
13

est_n gastadas. E[ reemptazo de fa bujfa y
de! elemento del filtro de aire asegura una
mezcla correcta de aire y combustible y
ayuda a que el motor marche mejor y que
dure m_s.
ADVERTENCIA: Desconectela bujia
antesde hacercuatquier
mantenimiento, con la excepciSn de los
ajustes al carburador.
LUBRICACION
1 Lubricaci6n 2 Tape de!. I_ !"t
eel-"engran_|e" lanque, oeu _ _
- I..... Ace_te de la"_ J
d_ = u=,_ Barra
1 Lubdeador de engranajes
2 Aceite para barra de sierra de
cadena Craftsman
VERIFtQUE QUE NO HAYA
PIEZAS DA_IADAS O GASTADAS
Elcambiode piezasda6adaso
gastadasdeberd ser efectuadoper el
Centre de ServicioSeam.
AVISO: Esnormalque aparezcauna
pequeSacantidadde aceite debajode
lasierra despu_sde pararel motor.No
confundaestocon p_rdidasdel tanque
deaceite.
• |nterruptor-Aseg_rese que el interrupter
est_ funcionando correctamente
coloc&ndolo en la posici6n STOP.
Aseg0rese de que el motor se haya
detenido per complete, luego ponga el
motor en marcha nuevamente y continue.
• Tanque de Combustible-Deje de user la
sierra si hay sefiates de da_os o fugas del
taoque de combustible.
• Tanque de Aceite-Deje de user la sierra st
el tanque de aceite da sefieles de defio o
fugas.
VERIFIQUE QUE NO HAYA
FIJADORES O PIEZAS SUELTAS
• Tuerca de la Abrazadera de la Barra
• Cadena
• Silenc/ador
• Protector del Citindro
• Filtro de A_'re
• Cilindro y dientes de engranaje del
embrague
• Tomillos de las Manijas
• Fiiadores Anti-Vibraci6n
• Caja del Arranque
• Protector de Mane
VERIFIQUE LA TENSION DE LA
CADENA
• Uselapuntadestomilladoradela
herramientadeajustedelacadenapare
hacer refer la cadena per la bare gula,
ver/ficando que no haya dobleces en la
cadena. La cadena deberd rotar
libremente.
Ba_a
Gu_
Herramienta
Tuercas de la Tornillo de de Ajuste de
Abrazadera Ajuste la Cadena
de la Barra
• Afloje las tuercas de la abrA:,adera do la
barra haste que estdn tan ajustadas come
sise las hubiera ajustsdo centre Ia barra
con los dedos {]nicamente:
o Gire el tomillo de ajuste ala derecha (en el
sentide del reloj) haste que la cadena
apenas toque la supe_cie inferior de la
barragufa.
, Haga refer la cadena pare asegurarse que
redes los eslabones est_n en la ranura de
la barra.
f_-_,-_tfe_I[ I 1T°rA;iuli.'_ede /
Tuercas de la Abrazadera de la Barra
• Levante la punta de la barra para controlar
la separaoi6n entre la barra y Facadena_
Suelte la barra y gire el tomtllo de ajuste
!/4 de vuelte a la derecha (en et sentido del
reloj). Repita este paso haste que no haya
rnds separacf6n.
, Manteniendo _apunta de la barra
levantada, ajuste las tuercas de la
abrazadera con la herramienta de ajuste de
la cadena. Aplique torsi6n de 10 a 15
libras-pie.
Tomitlo de Ajuste
t
• Use lapunta destomi!ladora de la
hertamienta para hacer toter la cadenapo
labarra,
• Si no puede hacer toter lacadena, est_
demasfadoajustada, Af/oje levemente las
tuercas de laabrazadem y gire eltomillo
14

de ajuste 1/4 de vuelte hacia fa izquierda
(en contra cte|sentido del reloj), vuelva a
ajustar las bJercas de la abrazadera.
• Si la cadena est_ demasiado floja, se la
ver& separada de ta parte inferior de la
barra. NO HAGA FUNCIONAR la sierra si
la cadena est,. floja.
Separaci6n
VERIFIQUE SI LA CADENA ESTA
AFILADA
Lascadenasafiladasproducen trocitos
demadera.Lascadenasdesafiladas
producenpolvode aserfiny cortan
lentamente.
AFILACION DE LA CADENA
La afilaci6n de la cadena requiere
herramientas especiales. Se puede
comprar tas herramtentas en Sears o
Ilevar la cadena a un especialista de
afilaci6n.
INSPECCIONE LA BARRA
Condiciones que requieren que se
haga mantenimiento a la barra:
• Lasierracorta paraunladooen _.ngulo.
- Hay queforzada para que atravieseel
corte.
• Cantidadinadecuadade lubdcanteen la
barray lacadena.
Veriflque la condici6n de la barra cada
vez que haga afilar la cadena. Las
barras gastadas daSan la cadena y
toman dificil el trabajo de cortar. Para
mantener la barra gufa:
• Cofoqueelintermptoren "Stop",
• Retireta barray la cadenadelaparato.
• Limpietodoetaserrfny cuatquierotto
escombro de laranurade la barray del
orificiodelengranajedespuSsdecadauso.
Retire el Aserr_nde la
Ranurade la_
• Atlada lubrtcante al odfido del engranaje
despu_s de cada uso.
• Los deles de la barra desarrollan
protubemncias at gastarse. S_.quelas con
una lima plana.
• Si {asuperfic_esupedor del del est_
desnivelada,useuna limaplanapara
restaurarlaforma cuadrada.
_L_ _'_ _ _ILL_ lima
Ranura Ranura
correCta gastada Encuadre los Bordes
con una Lima
Cambie la barra si la ranura est&
gastada, si la barra est& torcide o
resquebrajada o si hay calentamiento
excesivo o formaci6n de
protuberancias en los rieles. Si es
necesario cambiar la barra, use
exclusivamente la barra gufa
especificada para su sierra en ta lista
de repuestos, especificada tambi_n en
ta catcomanfa de repuesto de barra y
cadena que se encuentra en la sierra.
LIMPIE EL APARATO Y LAS
PLACAS
° Ltmpieel aparat_ usandoun trapohLimedo
condetergentesuave.
• Seque el aparatocon un trapo limpioy
seco°
LIMPIE EL FILTRO DE AIRE
El filtro de aire sucio disrninuir&la vida
0tily el rendimiento del motor e
incrementar_, el consumo de
combustible y la producci6n de
contaminantes, Limpie stempre el filtro
de aire despu_s de t 5 tanques de
combustible o 5 horas de uso, et que
acontezca primem. Lfmpielo con m&s
frecuencia en condiciones muy
polvorientas. Los filtros usados nunca
quedan totalmente limpios. Se
aconseja reemplazar al filtro de aire pot
uno nuevo despu_s de cada 50 horas
de uso o anuatmente, Io que acontezca
primero. Para timpiar el filtro:
• Afloje los3 tomillos en latapadelciiindro.
• Ret}relatapa delcilindro.
• Retireelfiitrode arie,
° Limpieelfiltro de aire conagua c_ente y
jab6n.Eniuague bien con agua claray frt'a.
S_queloal aire totatmente antesde
reinstatado.
• Colequeuna peque_fiacantidaddeace_teat
filtroantesde instalar]o.Useaceitepara
motores de2 tiemposo aceite de motores
SAE 30. Escurrabien el excesodeaceite
apretandoel filtm paramejorarla eficiencia
delfiltro de aire.
• Reinstale el filtro de aire.
• Reinstalela tapa del ciiindro y los 3
tomillos (t 5-20 libras per pulgada),
15

Ftltro ..-->..,,P---'-- Tornil[osde
de Aife _/f_ laTapade!
INSPECCIONE EL SILENCIADOR
Y LA REJILLA ANTICHISPAS
A medida que se use el aparato, el
silenciador y la rejilla antichispas se
van oarbonizando. Es necesario sacar
la carbonizaci6n para evitar el desgo de
incendio o afectar el rendimiento del
motor.
Silenciador
Re_lla
Antichispas
Tornillosde
ia Tapadel
Silenciador
Cajade.
Silenciaaor
PARA LIMPIAR LA REJILLA
ANTICHISPAS
Se requiem la limpieza a cada 25 horas
de uso o anualmente, el que acontezca
primero
• Aftojey retke los2 tornillosde la tapadel
siler_iador
• Retirela tapa de[silenciador(la tapa est_
colocadaa presi6n en la cajadel
silenciador)
• Retireeljuego dedifusory rejilla
antichispasTomenotade la orientaci6nde
estas piezasparasu reinstalaci6n
• Limpielarejillaantichispas conuncepitto
de alambre Cambie]a rejillasi encuentra
roturas.
• Cambietodaslaspiezas del silenciador
que est_nrotaso resquebrajadas
• vuelvaainstalar eljuegode dlfusory rejilla
antichispas confoeorificiosredondoshacia
arriba,hacialatapadelsilenciador
• Reinstalela tapa del silenciadory los2
tomillos(7 a 8 librasporpie)
CAMBIE LA BUJIA
Deberd cambiarse la bujfa anualmente
para asegurar que el motor arranque
m_s fdcilmente y mrche mejor La
cronometrizaci6n del encendido es fija
e inalterab!e.
° Afloje lostres tomiltos en tatapa del
cilindro.
- Retirela tapa de!cilindro.
• Saquela cubierta de ta bujia.
Retirela buj_adel cilindro y des_chela.
: Reempt_celacon una bujfa Champion
RCJ7Ya_OstelaconunaIlave de 3/'4de
pulgada(t0 a 12libras por pie).
• Reinstale la cubiertade la buj_a.
• ReinstaEela tapadel cilindro ytostree
tomillos(15a 20 libraspor pulgada).
Tomillos
Tapade!
de la
Buj4"a
Bujfa
PARA REEMPLAZAR
LA CADENA
CUIDADO: Use guantes protectores
paratocarlacadena. Lacadena es
muy fifosaypuedecortaraun no
estandoen movimiento
Es norma! que las cadenas nuevas se
estiren durante los primeros 30 minutos "
de uso Ser& necesario vedficar la
tensi6n de la cadena frecuentemente y o
ajustar la tensi6n segL_nsea necesario.
Vea la secci6n sobre TensiSn de la
Cadena.
• Coloqueelintermptoren laposicidn Stop.
• Cambiela cadenausadacuando est_
gastadao daSada
• Use exclusivamentefacadena de repuesto
Minimizadorade Reculadasespecificada
en lalistade repuestos La cadenay barra
de mpuesto correct'astambi_nestdn
especificadasen unacalcomanfaubicada
en tasierrade cadena.
Entreencontact(}con elOentrode Servicto
Searspara cambiary alitar lascuch_las
individualesde la cadena.
Retirelas tuercas dela abrazaderade la
barra.
Retire]aabrazadera.
° Retire la cadena usada.
16

abra
zadera
Tuercas,
Abrazadera
• Gire el tomi!]o de ajuste a mano hacia la
izquiarda (en contra del sentido del reioj)
basra qua la ¢Javija de ajuste toque el
retentor.
• Haga deslizar ta barra pot detr&s del
cilindro del embrague basra que la barra se
detenga aJtocar el engrana),e del cilindro
del embrague.
• Retire muy cuidadosamente la nueva
cadena del paquete. Sostenga la cadena
con Ion eslabones de impulsi6n orientados
come se ve en ta ilustraei6n.
Cuchillas Medidor de Profundidad
Eslabonesde Propulsi6n
• Coloquetacadenapotencima ypar detr_s
delembrague.
• Coloquelos eslabonesde propulsi6nentre
los dientesde la puntadel engranaje.
• Coloquelos eslabonesdepropulsi6nen la
ranurade la barra.
• "13rela barrahacia adelante haste quela
cadenaquedetirantean la ranurade le
barre.
• Ahora instaleleabrazaderade labarra
asegur,_ndosequela clavijade ajusteest_
posicionadaenelorifieioinferioren labarra
gula.
_ f _O_';cio tnfe-
dor Barra
Cfavija de Guia
Ajuste
• Instale las tuercasde la abrazaderay
ajdstelas a rnano0nicamente. Nolos ajuste
m&spot ahora.
• Ahora procedaa la secciSn"Ajuste de la
Cadena"abajo.
AJUSTE DE LA CADENA
Vea 'q'ensi6n dela Cadena"en la
secciSnde Mantenimiento.
LIMPIE EL FILTRO DE
COMBUSTIBLE
Pare limpiarelfiltro,vacfeel aparato
haciendoque el motormarche haste
quedarsincombustible, tuegoretire el
juego de tapa delfiltro de combustible y
retentor del tanque. Saque elfiltro del
tanquey sepdrelo de la Ifnea.Umpelo
con un detergente suavey enjudguelo.
S_quelo completamentey vuelva a
armarlo.
AJUSTES AL CARBURADOR
ADVERTENCIA: La cadena estard
en movimiento durante ta mayor parte
de este prodecimiento, Use el equipo
protector y observe todas las
precauciones de seguridad. En el
"Ajuste de la Mezcla de Bajas
Revoluciones" verifique la marcha lenta
despu_s de cada ajuste. La cadena no
debe moverse con el motor en marcha
lenta.
El ajuste de! carburador es de
primordial importancia. Si se Io hace
incorrectamente, puede dafter tanto el
motor como el carbrador
permanentemente. Si necesita mrs
ayuda o no estd seguro de c6mo hacer
el procedimiento, Ilame a nuestro
tel_tono de ayuda al consumfdor, al
1800-235-5878.
El combustible vencido, elflltro de aire
sucio, el filtm de combustible sucio o el
motor ahogado pueden dar ¿a
impresi6n de carburaci6n desajustada.
Verifique estas condiciones antes de
hacer cualquier ajuste.
El carburador ha sido ajustado
cuidadosamente en la f_brica,
Posiblemente se hagan necesarios
ajustes si se nota cualquiera de las
siguientes condiciones:
17

o Lac_denase muevecone!motoren
marcha lenta.Vea "Marcha LentaT"bajo
prodecimientode ajuste.
• La sierrano andaa amrchalenta.Vea
"Marcha LentaT"y =Mezclade Bajas
RevolucionesL".
* El motorse para o seahogacuandodebe
acelerar. Vea %'erificaci6nde la
Aceleraci6n".
, Bajade potenciade corte.Vea "Mezciade
Attas RevolucionesH"bajoel
procedimientodeajuste.
Hay tres tomillos de ajuste en el
carburador. Est&n marcados con "H",
%" y _". Est&n ubicados arriba del
bombeador.
PUNTOS DE PRECALIBRAClON
AI hcer ajustes no fueme las tapas
limitadoras de pl_stico m_s ali_. de los
retentores o puede haber daSos. Si no
se necesitan los puntos de
precalibraci6n, pase a la secci6n
=Ajustes a la Marcha Lanta".
= Gire losdos tomillosde ajustede mezclaa
la izquierda(encontradel sentidodel reloj)
hasta que se paren.
o Gire eltomiitodemarchalentaa laderecha
(ane! sentidodelreioj)hastaque se
detenga. Ahora gireto hacialaizquierda4
vueltasy media.
Ponga el motor en marcha y d_jelo en
marcha pot 3 minutos, luego proceda a
ta secci6n de ajustes. Si el motor no
arranca, vea la Tabla Diagn6stica o
Ilame al 1-800-235-5878. Si et
funcionamiento del motor es aceptable
con 1asposiciones anteriores y ta
cadena no se mueve en marcha lenta,
no har_ falta hater m_s ajustes.
PROCEDIMIENTO DE AJUSTE
Marcha Lenta "T"
Deje el motor en marcha lenta. Ajuste
las revoluciones hasta qua el motor se
mantenga en marcha sin que la cadena
se mueva o qua el motor se ahogue.
o Gireet tomilloa laderecha(anelsent_o
delreloj)paraaumentar las revolucionessi
e!motorse ahoga ose para.
. Gireel tomillo a laizquierda(ancontrade1
sentido def retoj)parabajar las
revotuc_ones.
No hace falta ningSn otro ajuste si la
cadena no se mueve en marcha lenta y
si el rendimiento es satisfactorio.
Mezcla para Bajas Revoluciones "L,'
Deje el motor en marcha lenta. Luego
acelere el motor y tome nota de!
funcionamiento. Si el motor se ahoga, o
acelera blen o larga humo al aceferar,
gire el tornillo de ajuste a ta derecha
(an el sentido del retoj)en incrementos
de 1/16 de vuelta dnicamente hasta
obtener un funcionamiento
satisfactodo. Repita este procedimiento
las veces qua sea necesario. Repita
este procedimiento las veces qua sea
neeesado para obtener rendimiento
satisfactodo. Despu6s de completar
estos ajustes, verifique la aceleraci6n y
el movimiento de la cadena en marcha
lenta. Ajuste nuevamente si es
tlecesarlo.
Mezcla para Altas Revoluc|ones "H"
NO HAGA FUNC!ONAR EL MOTOR
con el acelerador a rondopot mucho
tiempo al hacer los ajustes ya qua
puede daSar el motor. Haga un corte de
prueba. Basado en e! funcionamiento
de la sierra durante el corte, ajuste el
tomilto para fa mezcla de altas
revotuciones por incrementos de s61o
1/16 de vuelta, como se detalla a
continuaci6n:
• A la derecha (ane!sentidodotreloj)hasta
quelasierratongabuenapotenciaatcortar
sin hesitaclones. Nohagalosajustesporel
sonidoni portasrevofuciones,sinoporel
buen funcionamientoalcortar.
• A laizquterda(en contradelsentidodel
reloj)silasierratienerevoluc_onesaltas
perose parao lefalta potenciaal cortar,
Despu6s de completar !os ajustes,
verifique la aceleraci6n y el movimiento
de la cadena en marcha lenta. Ajuste
nuevamente si es necesado.
Veriflcaci6n de la Aceleraci6n
Si el motor se para o hesita en vez de
acelerar, gire el tomi¿lode ajuste de la
mezcla para bajas revoluciones a la
izquierda (an contra del sentido del
reloj) hasta conseguir una aceleraci6n
pareja sin movimiento de la cadena en
marcha lenta. Verifique nuevamente y
haga los ajustes necesarios para
conseguir un funcionamiento
aceptable.
18

Prepare el aparato para guardaflo ai
final de la temporada o si no se Io va a
usar pot rods de 30 d/as o m_s.
ADVERTENCIA:
- Dejeque elmotorse enfdey fije bienel
aparatoantesde guardadoo de
tran_portado.
- Guardsla sierray elcombustibleen
unlocaJbien ventilado donde los vapores
de combustibleno puedan entrar en
contacto conch_spasni llamas abiertas
provenientes de lostermotanques, los
motores o}nterruptores el_ctricos,
calefactoreScentrales, etc.
• Guards elaparatocontodos los
protectoresen su lugar ycoloquael
aparatode modeque laspiezas fi}osasno
puedancausarheridas poraccidente.
•Guarde el aparatobien fueradelaicance
de los nifos.
SUPERFICIES EXTERNAS
Siva a guardar el aparato durante
mucho tiempo, Ifmpie!o rigurosamente
primero. Gu_rdelo en un lugar limpio y
seco,
• Aplique unapequefiacantfdaddeaceitea
/assuperficiesextemasmet_licasy a la
barfs gu_a.
• Lubflque la cadena y envu_lvala en papel
gruesoo tela.
SISTEMA DE COMBUSTIBLE
Vea el mensaje marcado
"IMPORTANTE", que se refiere al uso
de combustibles con mezcla de alcohol
en su aparato, en la secci6n de Uso,
bajo Abastecimiento del Motor.
Los estabilizadores de combustible son
una altemativa aceptabte pars
minimizar la formaci6n de dep6sitos de
goma durante el almacenamiento.
Afiada estabilizador a la gasolina en el
tanque de combustible o en et
recipients de almacenado de
combustible. Siga las instrucciones de
mezcla que se encuentran sn los
envases de estabilizador. Ponga el
motor en marcha y c_jelo en marcha
unos 5 minutos despu_s de ponerle
estabilizador.
El aceite CRAFTSMAN 40:1 pars
motores de 2 tiempos (enfriados a airs)
viene mezclado con estabilizador de
combustible. Si no usa este aceite de
Sears, entonces puede afiadir un
estabilizador al tanque de combustible.
INTERIOR DEL MOTOR
• Retirela buj_ay viertaunacucharadade
las de t_ de aceite40:1 pars motoresde 2
_empos(enfriadosa airs) por laabertura
parsla I:_fa. Tironeelentamentede la
sogadearranque 8a 10veces para
distribuir el aceite.
• Reemplacelabuj/a conotradelf_poydela
gamade calorrecomendados.
• Limpieel fiRrodeairs.
° Examinetodoel aparatoparaverificarque
nohaystomillos,tuercasn|pemossueltos.
Cambietodaslas piezas dafiadas,
quebradas ogastadas.
• AI pdncipiode lapr6xirna temporada, use
exclusivamentecombustiblenuevoconla
proporcibn correctsde gasofinaa aceite.
OTRO
• Noguardsgasofinade una temporadaa al
pr6xima.
• Cambieel recipients de gasotina sise
empiezaa oxidar.
19

TABLADIAGNOSITCA
PROBLEMA
IElmotorno
arranca O se
manlJene en
mamha s61o
unos segundos
despu_s de
arrancar.
El motor no
anda en marcha
lenta como
debe.
Eimotorno
acelera,fefalta
)otenciao se
parabajocarga.
E! motor humea
excesivamente.
CAUSA
• El interruptor est& en OFF
• El motor est,_ ahogado.
I• El tanque de combustible
est_ vac_o.
• La bujia no hace chispa.
• El combustible no est&
llegando al carburador.
• El cerburador requiere
ajuste,
• Ninguno de los anteriores
• Las revoluciones de {a"
marcha lenta estdn muy
altos o muy bajas.
• La Mezcla para Bajas
Revoluciones requier
ajuste.
• Las juntas del cig_efial
est&n gastadas.
- La compresiSn estd baja.
• Ninguno de los anteriores
• El filtro de aire estd sucfo.
• La bujfa est,acarbonizada
• El carburador requiere
ajuste,
• Los puertos de escape o
las aberturas de saUda de
silencfador estdn tapados
• La compresi6n est_ baja.
• Ninguno de losanteriores
• El cebador estd ...........
parcialmente aecionado.
• La mezcla de combustibl_
se ha hecho
incorrectamente,
• El filtro de aire est_ sucio,
• La Mezcla para Aitas
Revoluciones requiere
ajuste.
• Ei cdrter estd pe_liendo.
SOLUCION
• Coloquee! inte'rruptoren oN.
• Vea lasInstruccionesde Arranque.
• Lleneeltanque con lamezcla
correctade combustible.
Instale Una buj_a nueva.
-" Verifique si el filtro de combustible
estd sucio; Ifmpieto. Verifique si hay
dobleces en la Ifnea de combustible
o si estd partida: rep_da o cdmbiela.
• Vea"Ajustes al Carburador'.
• Entre en contacto con el Servido
Sears.
'- Limpie o cambie et filtro de aire,
• Limpieo cambieel filtro de alre.
• Entre en contactocon el Servicio
sears.
I " Entreen contactoconel Servicio
Sears.
• Entreen contactocon elServido
Sears.
'' Limpieocambieel filtrode aire.
• Limpieocambiela bujia y calibrela
separacJ(_n.
• Vea"Ajustesal Carburador".
• Entre en contactoconetServicio
Sears.
- Entreen contactoconelServ|cio
Sears,
• Entreen contactoconel Servido
Sears.
• Ajuste el cebador.
- Vact'eel tanque de combustible y
II_neto de combustible con la mezcla
correcta.
• Ltmpie o cambie el filtro de aire.
;- Vea "Ajustes al Carburador".
- Entre en contacto con el Service
Sears.
2O

PROMBLEMA
El motor
marcha con
temperatura
elvada.
CAUSA
• Lamezclade combustible
seha heeho
incorrectamente.
• Seha instalado la bujfa
incorrecta.
• LaMezcla parsAltas
Revolucionesest_
demasiado pobre_
• Lospuertosde escapeo
]asaberturas de saUdadel
silenciador est'dntapados.
• La rejillade escapedel
silenciador estd
carbonizada.
• Lacaja delventiiadorolas
rebabasdel cilindroest_n
suciaso
o Ningunode losanteriores.
Insuficienciade • El tanquede aceiteest,,
aceitepare vacfo.
lubricar labarray - Elbombeador de aceiteo el
cadena, filtro deaceite est_ tapado,
• El orificiopara aceite en ta
barra est_ tapado.
La cadenase • La marcha tenta requiere
mueveen ajuste.
rearcha lenta. * El embraguerequtere
reparaciones,
La cadena nose, • La cadena est&
muevecuando dernasiado
se acelera el tensionada.
motor. • El carburador requiere
ajuste.
• Los delesde la barra
gu+aest_napretados.
- El embragueestd
patienando.
La cadena • La cadean est&
gotpeteaocorta incorrectamente
desparejo, tensionada.
• Lascuchiilas estdn
daSadas.
• La cadean est,.gastada.
• Las cuchiFfasestdn
dasafiladasomarafiladas
o los medidoresde
profundidadest_nmuy
altos.
• El engranajeestd gastado.
. La cadena est_ instalada
a_rev_s.
La cadena
CoFta en
_nguto.
La cadena se
o La psrtede ardba de
las cuchillasnoestdn
planas.
• La barfs t_ene
protuberanciaso est,.
torcidaolos rietes
est&ndesparejos.
• El embragueestd
patinando,.
• Lascuchillasest_n
SOLUCION
• Yea_AbastecimientodelAparato_
• C_mbielapor la bujfacorrecta.
• Vea "Ajustesal Catburador_.
• Entre en contacto con el Servicio
Seam.
• Limpielarejillaan_chispas.
• Limpie eldrea.
• Entreen contacto conel Servicio
Sears,
* Uene eltanquede aceite.
• Entreen contactoconel Servicio
Sears.
• Saque la barfs y Ii'mpiela.
• Vea "Ajustesa! Carburador'.
• Entre en contactoconel Servicio
Sears.
• Vea "Tensi6nde laCadean'.
° Vea "Ajustes al Carburador".
• Repareo reemplace.
• Entreen contactoconet Serv_do
Seam.
• Yea %nsi6n'deI'aCadena".
• Entreencontactoconel Servicio
Sears,
° Afile ocambietacadean.
- Vea "Afilaci6nde ia Cadean".
• Entreen contactoconelServicio
Sears.
• Instale fa cadena en la direcci6n
cerrecPa
• Vea "Af_faci6n de la Cadena".
• Repareocambiela barra.
• Entre en contacto con el Se_cio
Sears,
• V_A =AfiI_t,i_n ,'_ I_ _d_=n_"
21


For the repair or replacement parts you need
delivered directly to your home
Call 7 am - 7 pm, 7 days a week
1-800-366-PART
(1-800.366-7278)
Para ordenar piezas con entrega a
domicilio- 1-800-659-7084
For in-house major brand repair service
Call 24 hours a day, 7 days a week
1-800-4-FIEPAIR
(1-800-473-7247)
Para pedir servicio de reparaci6n a
domicilio - 1-800-676-5811
For the location of a Sears Parts and
Repair Center in your area
Call 24 hours a day, 7 days a week
1-800-488-1222
For information on purchasing a Sears
Maintenance Agreement or to inquire
about an existing Agreement
Call 9 am - 5 pm, Monday-Saturday
1-800-827-6655
When requesting service or ordering
parts, always provide the following
information:
, Product Type • Part Number
• Model Number • Part Description
SEARS
Amenca's Repair Specialists
-
 1
1
-
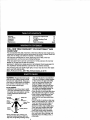 2
2
-
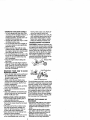 3
3
-
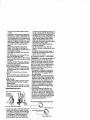 4
4
-
 5
5
-
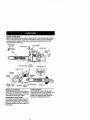 6
6
-
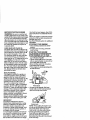 7
7
-
 8
8
-
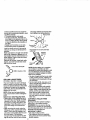 9
9
-
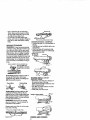 10
10
-
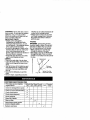 11
11
-
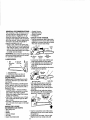 12
12
-
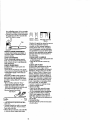 13
13
-
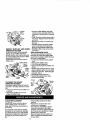 14
14
-
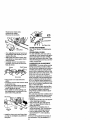 15
15
-
 16
16
-
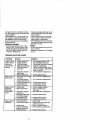 17
17
-
 18
18
-
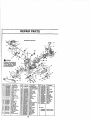 19
19
-
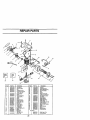 20
20
-
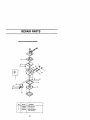 21
21
-
 22
22
-
 23
23
-
 24
24
-
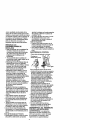 25
25
-
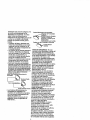 26
26
-
 27
27
-
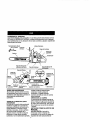 28
28
-
 29
29
-
 30
30
-
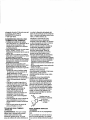 31
31
-
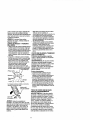 32
32
-
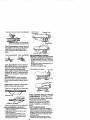 33
33
-
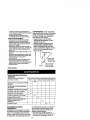 34
34
-
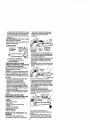 35
35
-
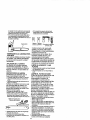 36
36
-
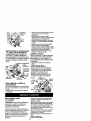 37
37
-
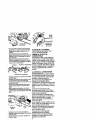 38
38
-
 39
39
-
 40
40
-
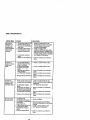 41
41
-
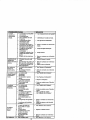 42
42
-
 43
43
-
 44
44


Craftsman 358351081 El manual del propietario
- Categoría
- Motosierras eléctricas
- Tipo
- El manual del propietario
en otros idiomas
- English: Craftsman 358351081 Owner's manual
Artículos relacionados
-
Craftsman 358.351202 Manual de usuario
-
-
-
-
-
-
-
-
-