Philips HD3011/08 Manual de usuario
- Categoría
- Ollas arroceras
- Tipo
- Manual de usuario

www.philips.com/welcomewww.philips.com/welcome www.philips.com/welcome
User manual
Safety leaflet Warranty
a
b
d
l
m
c
e
g
h
i
f
j
k
HD3011
HD3012
HD3015
HD3016
HD3017
HD3018
HD3011
HD3012
HD3015
HD3016
HD3017
HD3018
HD3011
HD3012
HD3015
HD3016
HD3017
HD3018
1
EN User manual
ES-AR Manual del usuario
HI उपयोगकर्ता मैन्युअल
MS-MY Manual pengguna
TH คมือผใช
VI Hướng dẫn sử dụng
ZH-CN 用户手册
All registered and unregistered trademarks are
property of their respective owners.
© 2012 Koninklijke Philips Electronics N.V.
All rights reserved.
HD3011_HD3012_HD3015_HD3016_HD3017_HD3018_UM_AS_V1.0
Register your product and get support at
www.philips.com/welcome
HD3011
HD3012
HD3015
HD3016
HD3017
HD3018
English
1 Your rice cooker
Congratulations on your purchase, and welcome to Philips!
To fully benet from the support that Philips offers, register your
product at www.Philips.com/welcome.
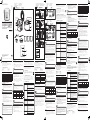
2 What’s in the box
Rice cooker main unit Steam basket
Rice scoop Measuring cup
User manual Safety leaet
Warranty card Power cord
Overview
a
Inner pot
h
Lid release button
b
Water level indications
i
Detachable steam vent cap
c
Scoop holder
j
Main body
d
Heating element
k
Power socket
e
Control Key
l
Keep warm indicator
f
Steam water storage
m
Cooking indicator
g
Outer lid
3 Using the rice cooker
Before rst use
1 Take out all the accessories from the inner pot. Remove the
packaging material of the inner pot.
2 Clean the parts of the rice cooker thoroughly before using the
rice cooker for the rst time (see chapter ‘Cleaning’).
Note
• Make sure all parts are completely dry before you start using the rice cooker.
Preparations before use
Before using the rice cooker, you need to follow the preparation:
1 Measure the rice using the measuring cup provided.
2 Wash the rice thoroughly.
3 Put the pre-washed rice in the inner pot.
4 Add water to the level indicated on the scale inside the inner
pot that corresponds to the number of cups of rice used. Then
smooth the rice surface.
5 Press the release lever to open the lid.
6 Put the inner pot in the rice cooker. Check if the inner pot is in
proper contact with the heating element.
7 Close the lid of the rice cooker, put the plug in the power socket.
Note
• Each cup of uncooked rice normally gives 2 bowls of cooked rice. Do
not exceed the quantities indicated on the inside of the inner pot.
• The level marked inside the inner pot is just an indication. You can
always adjust the water level for different types of rice and your own
preference. If the voltage is unstable at the area you live, it is possible
that the rice cooker overows.
• Besides following the water level indications, you can also add rice and
water at 1:1-1.2 ratio for rice cooking. Do not exceed the quantities
indicated on the inside of the inner pot.
• Make sure that the outside of the inner pot is dry and clean, and that there
is no foreign residue on the heating element or the magnetic switch.
Cooking rice
1 Follow the steps in “Preparations before use”.
2 Press down the control key, and the cooking (
COOK
) indicator
lights up.
3 When the cooking is nished, the cooking (
COOK
) indicator
will be off.
4 The rice cooker switches to keep warm mode automatically, and
the keep warm (
WARM
) indicator lights up.
Note
• Do not exceed the volume indicated nor exceed the maximum water level
indicated in the inner pot, as this may cause the rice cooker to overow.
Steaming
1 Measure a few cups of water with the measuring cup.
2 Pour the water into the inner pot.
3 Put the steam basket into the inner pot.
4 Put the food into the steam basket.
5 Close the lid of the rice cooker, and put the plug in the power
socket.
6 Push down the control key, and the cooking (
COOK
) indicator
lights up.
7 When the steaming is nished, pull up the control key.
8 The rice cooker switches to keep warm mode, and the keep
warm (
WARM
) indicator lights up.
Note
• Use a kitchen glove or a cloth, as the plate and steam basket will be
very hot.
• You can cook rice while steaming food. Do not exceed the volume
indicated nor immerse the steam basket in the water, as this may cause
the rice cooker to overow.
• You can adjust the water level as needed.
Specications
Model Number HD3011/
HD3012
HD3015/
HD3016
HD3017/
HD3018
Rated power output 500W 650W 650W
Rated capacity 3.0L 4.0L 5.0L
Rice volume (cups) 1L (1-6) 1.5L (1-8) 1.8L (1-10)
4 Cleaning and Maintenance
Note
• Unplug the rice cooker before starting to clean it.
• Wait until the rice cooker has cooled down sufciently before cleaning it.
Interior
Inside of the outer lid and the main body:
• Wipe with wrung out and damp cloth.
• Make sure to remove all the food residues stuck to the rice
cooker.
Heating element:
• Wipe with wrung out and damp cloth.
• Remove food residues with wrung out and damp cloth or
toothpicks.
Exterior
Surface of the outer lid and outside of the main body:
• Wipe with a cloth damped with soap water.
• ONLY use soft and dry cloth to wipe the control panel.
• Make sure to remove all the food residues around the control
buttons.
Accessories
Rice scoop, inner pot, steam basket, steam vent cap:
• Soak in hot water and clean with sponge.
5 Environment
Do not throw away the appliance with normal household
waste at the end of its life, but hand it in at an ofcial collection
point for recycling. By doing this, you can help to preserve the
environment.
6 Guarantee and service
If you need service or information, or if you have a problem, visit the
Philips website at www.philips.com or contact the Philips Customer
Care Center in your country. You can nd its phone number in the
worldwide guarantee leaet. If there is no Customer Care Center in
your country, go to your local Philips dealer.
7 Troubleshooting
Problem Solution
The lights on the
buttons does not
go on.
There is a connection problem. Check if
the power cord is connected to the cooker
properly and if the plug is inserted rmly into
the power outlet.
The light is defective. Take the appliance
to your Philips dealer or a service center
authorized by Philips.
The rice is not cooked. There is not enough water. Add water
according to the scale on the inside of the
inner pot.
You did not press down the control key.
Make sure that there is no foreign residue on
the heating element and the outside of the
inner pot before switching the rice cooker on.
The heating element is damaged, or the inner
pot is deformed. Take the cooker to your
Philips dealer or a service center authorized
by Philips.
The rice is not well
cooked.
Add more water.
The cooker does not
switch to keep warm
mode automatically in
"Rice Cooking" mode.
The temperature control is defective. Take
the appliance to your Philips dealer or a
service center authorized by Philips.
The rice is scorched. You have not rinsed the rice properly. Rinse
the rice until water runs clear.
Water spills out of
the rice cooker during
cooking.
• Make sure that you add water to the level
indicated on the scale inside the inner pot
that corresponds to the number of cups
of rice used.
• Make sure the water does not exceed the
next level on the scale, as this may cause
the appliance to overow during cooking.
Rice smells bad after
cooking
Clean the inner pot with some washing
detergent and warm water.
After cooking, make sure the steam vent cap,
inner lid and inner pot is cleaned thoroughly.
Español
1 Su arrocera
Felicitaciones por su compra y bienvenido a Philips!
Para usar los servicios de asistencia técnica de Philips, registre su
producto en www.philips.com/welcome.
2 Contenido de la caja
Unidad principal de la arrocera Cestilla de vapor
Cuchara para arroz Tapón medidor
Manual del usuario Folleto de seguridad
Tarjeta de garantía Cable de alimentación
Descripción general
a
Recipiente interno
h
Botón de apertura de la tapa
b
Indicaciones de nivel de agua
i
Tapa desmontable de
ventilación de vapor
c
Soporte para cuchara
j
Cuerpo principal
d
Placa de calentamiento
k
Toma de corriente
e
Botón de control
l
Indicador de conservación
del calor
f
Almacenamiento de vapor
de agua
m
Indicador de cocción
g
Tapa exterior
3 Uso de la arrocera
Antes del primer uso
1 Saque todos los accesorios del recipiente interno. Retire el
material de envasado del recipiente interno.
2 Limpie a fondo las piezas de la arrocera antes de usar el artefacto
por primera vez (consulte el capítulo “Limpieza”).
Nota
• Asegúrese de que todas las piezas estén completamente secas antes de usar
la arrocera.
Preparaciones antes del uso
Antes de usar la arrocera, debe seguir la preparación:
1 Mida la cantidad de arroz con el vaso medidor suministrado.
2 Lave bien el arroz.
3 Eche el arroz previamente lavado en el recipiente interior.
4 Añada agua hasta el nivel indicado en la escala del recipiente
interior que se corresponda con la cantidad de vasos de arroz
utilizados. A continuación, alise la supercie del arroz.
5 Presione la palanca para abrir la tapa.
6 Coloque el recipiente interior en la arrocera. Revise si el
recipiente interno está adecuadamente conectado al calentador.
7 Cierre la tapa de la arrocera y enchúfela a la toma de
alimentación.
Nota
• Cada vaso de arroz crudo da normalmente 2 tazones de arroz cocido.
No sobrepase las cantidades indicadas al interior del recipiente interno.
• El nivel marcado en el recipiente interno es solo una indicación.
Siempre puede ajustar el nivel de agua para los distintos tipos de arroz
y a su preferencia. Si el voltaje es inestable en el área donde vive, es
posible que la arrocera se desborde.
• Además de seguir las indicaciones de agua, también puede agregar
arroz y agua en una proporción de 1:1-1,2 para cocinarlo. No
sobrepase las cantidades indicadas al interior del recipiente interno.
• Asegúrese de que la parte externa del recipiente interior esté seca y
limpia, y de que no queden restos extraños en el calentador ni en el
interruptor magnético.
Cocción del arroz
1 Siga los pasos en “Preparaciones antes del uso”.
2 Pulse el botón de control, el indicador de cocción (
COOK
) se
encenderá.
3 Cuando termine la cocción, el indicador de cocción
(
COOK
) se apagará.
4 La arrocera cambia al modo de conservación del calor
automáticamente, el indicador de conservación del calor
(
WARM
) se encenderá.
Nota
• No sobrepase el volumen indicado ni sobrepase el nivel máximo de agua
indicado en el recipiente interno, ya que esto puede causar que la arrocera
se desborde.
Cocción al vapor
1 Mida algunos vasos de agua con el vaso medidor.
2 Vierta el agua en el recipiente interno.
3 Ponga la cestilla de vapor dentro del recipiente interno.
4 Ponga los alimentos en la cestilla de vapor.
5 Cierre la tapa de la arrocera y enchúfela a la toma de
alimentación.
6 Pulse el botón de control, el indicador de cocción (
COOK
) se
encenderá.
7 Cuando se detenga el vapor, levante el botón de control.
8 La arrocera cambia al modo de conservación del calor
automáticamente, el indicador de conservación del calor
(
WARM
) se encenderá.
Nota
• Utilice un guante de cocina o un paño, ya que la placa y la cestilla de
vapor estarán muy calientes.
• Puede preparar arroz mientras cocina alimentos al vapor. No
sobrepase el volumen indicado ni sumerja la cestilla de vapor en agua,
ya que esto puede causar que la arrocera se desborde.
• Puede ajustar el nivel de agua como sea necesario.
Especicaciones
Número de modelo HD3011/
HD3012
HD3015/
HD3016
HD3017/
HD3018
Salida nominal 500 W 650 W 650 W
Capacidad nominal 3,0 L 4,0 L 5,0 L
Volumen de arroz (tazas) 1 L (1-6) 1,5 L (1-8) 1,8 L (1-10)
4 Limpieza y mantenimiento
Nota
• Desenchufe la arrocera antes de comenzar a limpiarla.
• Antes de limpiar la arrocera, espere a que se enfríe.
Interior
Dentro de la tapa exterior y el cuerpo principal:
• Limpie con un paño escurrido y húmedo.
• Asegúrese de eliminar todos los residuos de comida adheridos a
la arrocera.
Calentador:
• Limpie con un paño escurrido y húmedo.
• Retire los residuos de comida con un paño escurrido y húmedo o
un mondadientes.
Exterior
Supercie de la tapa exterior y parte externa del cuerpo principal:
• Limpie con un paño humedecido con agua jabonosa.
• Para limpiar el panel de control utilice SOLO un paño suave y
seco.
• Asegúrese de quitar todos los residuos de alimentos alrededor de
los botones de control.
Accesorios
Cuchara para arroz, recipiente externo, cestilla de vapor, tapa de
ventilación de vapor:
• Remójelos en agua caliente y límpielos con una esponja.
5 Medioambiental
Cuando nalice la vida útil del aparato, no lo deseche junto
con los residuos normales del hogar. Llévelo a un punto de
recolección ocial para su reciclado. De esta manera, ayudará a
conservar el medio ambiente.
6 Garantía y servicio técnico
Si necesita servicio, información, o si tiene un problema, visite el sitio
www.philips.com o contáctese con el Centro de atención al cliente de
Phillips en su país. Puede encontrar el número de teléfono en el folleto
de garantía mundial. Si no existe un Centro de atención al cliente en su
país, diríjase al distribuidor de Philips local.
7 Solución de problemas
Problema Solución
Las luces de los botones
no se encienden.
Hay un problema de conexión. Revise si
el cable de alimentación está conectado a
la arrocera adecuadamente y si el enchufe
está rmemente insertado en la toma de
alimentación.
La luz está fallada. Lleve el aparato a
su distribuidor Philips o a un centro de
servicio autorizado por Philips.
El arroz no está cocido. No hay agua suciente. Agregue agua de
acuerdo a la escala que se encuentra en el
recipiente interno.
No presionó el botón de control.
Asegúrese de que no haya residuos
extraños en el calentador y en el exterior
del recipiente interno antes de encender
la arrocera.
El calentador está dañado o el recipiente
interno está deforme. Lleve el aparato a
su distribuidor Philips o a un centro de
servicio autorizado por Philips.
El arroz no está bien
cocido.
Agregue más agua.
La arrocera no enciende
automáticamente el
modo de conservación
del calor en el modo
"Rice Cooking" (cocción
de arroz).
El control de temperatura tiene alguna
falla. Lleve el aparato a su distribuidor
Philips o a un centro de servicio autorizado
por Philips.
El arroz se quemó. No enjuagó el arroz adecuadamente.
Enjuague el arroz hasta que el agua corra
clara.
Durante la cocción, la
arrocera derrama agua.
• Asegúrese de que agregó agua hasta el
nivel indicado en la escala del recipiente
interior que corresponda con la
cantidad de vasos de arroz utilizados.
• Asegúrese de que el agua no sobrepasa
el nivel siguiente en la escala, ya que
esto puede causar que el aparato se
desborde durante la cocción.
El arroz tiene mal olor
después de la cocción
Limpie el recipiente interno con un poco
de detergente y agua tibia.
Después de cocinar, asegúrese de limpiar
bien la tapa de ventilación de vapor, la tapa
interior y el recipiente interno.
हिंदी
1 आपका चावल कुकर
अपकी रीद पर बधाई और Philips में स्वागत है!
Philips द्वारा प्रस्तावित समर्थन का पूर्ण लाभ लेने के लिए, अपने उत्पाद को www.
Philips.com/welcome पर पंजीकृत करें.
2 बॉक्स में क्या है
चावल कुकर मखु ्य यनिटू स्टीम बास्केट
राइस स्कूप मापक कप
उपयोगकर्ता मैन्युअल सरु क्षा पत्रक
वारंटी कार्ड पॉवर कोर्ड
ओवरव्यू
a
इनर पॉट
h
लि़ड रिली बट न
b
जल स्तर सचू क
i
वियोज्य भाप छि द्र आवरण
c
स्कूप होल्डर
j
मखु ्य भाग
d
उष्मी य पदार्थ
k
पॉवर सॉकेट
e
नियंत्रण कुंजी
l
गर्म रखें संकेतक
f
वाष्प जल संग्रहण
m
कुकींग संकेतक
g
बाहरी लिड
3 चावल कुकर का उपयोग करना
पहली बार उपयोग करने से पहले
1 इनर पॉट से सभी सामान निकाल लें. इनर पॉट का पैकेजिंग सामग्री निकालें.
2 पहली बार चावल कुकर का उपयोग करने से पहले चावल कुकर के पार्ट्स को अच्छी
तरह से साफ करें (अध्याय ‘सफाई’ देखें).
नोट
• आपके द्वारा चावल कुकर का उपयोग शुरू करने से पहले सुनिश्चित करें कि सभी पार्ट्स पूरी तरह
से सूख गए हों.
उपयोग से पहले की तैयारियाँ
चावल कुकर का उपयोग करने से पहले, आपको निम्न तैयारी की आवश्यकता होगी:
1 उपलब्ध कराए गए मापक कप का उपयोग करते हुए चावल को मापना.
2 चावलों को अच्छी तरह से धोएं.
3 भीतरी पॉट में धोए हुए चावलों को डालें.
4 भीतरी पॉट के भीतर दिए गए मापक के स्तर तक उसमें पानी डालें जो कि उपयोग किए
जाने वाले चावलों के कपों की संख्या के अनुसार होना चाहिए. फिर चावल को सा करें.
5 लिड खोलने के लिए रिली लीवर को दबाएँ.
6 चावल कुकर में भीतरी पॉट डालें. जांच करें कि भीतरी पॉट उष्मीय पदार्थ से समुचित
रूप से जुड़ा हुआ है.
7 चावल कुकर की लिड बंद करें, प्लग पॉवर सॉकेट में डालें.
नोट
• बिना पके चावलों के प्रत्येक कप से सामान्यतया 2 कटोरे चावल तैयार होते हैं. भीतरी पॉट के
भीतर इंगित मात्रा को पार न करें.
• भीतरी पॉट के भीतर चिह्नित स्तर केवल एक सूचक है. आप चावल के विभिन्न प्रकार तथा
अपनी प्राथमिकता के अनुसार जल स्तर को समायोजित कर सकते हैं. यदि आपके स्थानीय
क्षेत्र का वोल्टेज अस्थिर है तो हो सकता है कि चावल कुकर ओवरफ़्लो करे.
• पानी के स्तर संकेतक का पालन करने के बजाय, आप चावल कुकर में चावल और पानी को
1:1-1.2 के अनुपात में भी डाल सकते हैं. भीतरी पॉट के भीतर इंगित मात्रा को पार न करें.
• सुनिश्चित करें कि इनर पॉट का बाहरी हिस्सा शुष्क और सा रहे, और उष्मीय पदार्थ या
चुंबकीय स्विच पर कोई बाहरी अवशिष्ट न हो.
What’s in the box Contenido de la caja
बॉक्स में क्या है Apa dalam kotak ini
ภายในกลองมีอะไรบาง Trong hộp có gì
包装盒内物品
Steaming Cocción al vapor
स्टीमिंग Mengukus
การนึ่งอาหาร Hp thc ăn
蒸食品
Cooking rice Cocción del arroz
चावल पकाना Memasak nasi
วิธีหุงขาว Cch nu cơm
煮饭
Using the rice cooker Uso de la arrocera
चावल कुकर का उपयोग करना Menggunakan pemasak nasi
การใชหมอหุงขาว Sử dụng nồi cơm điện
使用电饭煲
चावल पकाना
1 “उपयोग से पहले तैयारी” के निम्न चरणों का पालन करें.
2 नियंत्रण कुंजी को नीचे दबाएँ, और कुकींग (
COOK
) संकेतक लाइट जलती है.
3 पकना समाप्त होने के बाद, कुकींग (
COOK
) संकेतक ऑ हो जाएगा.
4 चावल कुकर स्वचालित रूप से गर्म रखें मोड में स्विच करता है, और गर्म रखें
(
WARM
) संकेतक लाइट को जलाए रखता है.
नोट
• भीतरी पॉट में इंगित मात्रा को पार न करें या इंगित अधिकतम जल स्तर से बाहर न हो क्योंकि इससे
चावल कुकर ओवरफ़्लो कर सकता है.
स्टीमिंग
1 मापक कप के साथ कुछ कप पानी मापें.
2 पानी को भीतरी पॉट में डालें.
3 स्टीम बास्केट को इनर पॉट में रखें.
4 भोजन को स्टीम बॉस्केट में रखें.
5 चावल कुकर की लिड बंद करें और प्लग पॉवर सॉकेट में डालें.
6 नियंत्रण कुंजी को नीचे दबाएं, और पकने का (
COOK
) संकेतक लाइट जलता है.
7 भाप निकलना बंद होने के बाद, नियंत्रण कुंजी को ऊपर उठाए.
8 चावल कुकर गर्म रखें मोड में स्विच करता है, और गर्म रखें (
WARM
) संकेतक
लाइट को जलाए रखता है.
नोट
• रसोई दस्तानों या किसी कपड़े का उपयोग करें, क्योंकि प्लेट और स्टीम बास्केट बहुत गर्म
होगी.
• आप खाने को भाप में पकाते समय चावल पका सकते हैं. इंगित मात्रा को पार न करें ना ही
स्टीम बास्केट को पानी में डुबोएं क्योंकि इस के कारण चावल कुकर ओवर्लो हो सकता है.
• आप आवश्यकतानुसार जल स्तर को समायोजित कर सकते हैं.
विनिर्देश
मॉडल संख्या
HD3011/
HD3012
HD3015/
HD3016
HD3017/
HD3018
रेट की गई पावर आउटपुट
500W 650W 650W
रेट की गई क्षमता
3.0L 4.0L 5.0L
चावल की मात्रा (कप्स)
1L (1-6) 1.5L (1-8) 1.8L (1-10)
4 सफाई और रखरखाव
नोट
• चावल कुकर सा करने से पहले इसे अनप्लग करें.
• चावल कुकर के पर्याप्त रूप से ठंडे हो जाने तक इसे सा करने के लिए प्रतीक्षा करें.
आंतरिक भाग
बाहरी लिड और मुख्य भाग के भीतर:
• इसे निचोड़े हुए और नम कपड़े से पोंछें.
• चावल कुकर में बचे हुए खाद्य अवशेष जो अटक गए हैं उन्हें हटाना सुनिश्चित करें.
हीटिंग भाग:
• इसे निचोड़े हुए और नम कपड़े से पोंछें.
• खाद्य अवशेष को निचोड़े हुए और नम कपड़े या टूथपिक्स से हटाएँ.
बाहरी भाग
बाहरी लिड की सतह और मुख्य भाग का बाहरी हिस्सा:
• साबुन में भीगे हुए कपड़े से पोछें.
• कंट्रोल पैनल को केवल मुलायम और सूखे कपड़े से पोछें.
• कंट्रोल बटन के चारों ओर सभी खाद्य अवशेष को हटाना सुनिश्चित करें.
सहायक उपकरण
राइस स्कूप, इनर पॉट, स्टीम बास्केट, भाप छिद्र आवरण:
• इसे गर्म पानी में डुबोएं और स्पंज से सा करें.
5 पर्यावरण
सामान्य घरेलू कचरे के साथ उन उपकरण को ना फैंके जो अब अनोपयोगी हो गए हैं
बल्कि इसे आधिकारिक संग्रह स्थान पर पुनः उपयोग करने के लिए जमा करें. ऐसा
करके आप पर्यावरण को बचाने में मदद कर सकते हैं.
6 गारंटी और सेवा
यदि आप सेवा या जानकारी चाहते हैं या यदि आपकी कोई समस्या है तो Philips वेबसाइट पर
जाएँ www.philips.com या अपने देश के Philips ग्राहक सेवा केंद्र से सम्पर्क करें.
आपको विश्वव्यापी गारंटी पत्रक में इसका फोन नंबर मिल सकता है. यदि आपके देश में ग्राहक
सेवा केंद्र नहीं है तो स्थानीय Philips डीलर के पास जाएँ.
7 समस्या निवारण
समस्या समाधान
बटनों पर लाइटें जलती
नहीं है.
कनेक्शन की समस्या है. जांच करें कि बिजली की तार
कुकर से सही ढंग से कनेक्ट है और प्लग पॉवर आउटलेट में
अच्छी तरह से डाला गया है.
लाइट राब है. उपकरण को अपने Philips डीलर या
Philips द्वारा प्राधिकृत किसी सेवा केंद्र में ले जाएं.
चावल पके नहीं हैं. इनमें पर्याप्त पानी नहीं है. भीतरी पॉट के भीतर माप के
अनुसार पानी डालें.
आपने नियंत्रण कुंजी को नीचे नहीं दबाया.
चावल कुकर को चलाने से पहले यह सुनिश्चित करें कि
इनर पॉट के बाहरी ओर और उष्मीय पदार्थ पर कोई बाहरी
अवशेष नहीं है.
उष्मीय पदार्थ क्षतिग्रस्त हो गया है, या भीतरी पॉट विकृत
हो गया है. कुकर को अपने Philips डीलर या Philips
द्वारा प्राधिकृत किसी सेवा केंद्र में ले जाएँ.
चावल अच्छे से नहीं पके. अधिक पानी डालें.
कुकर "चावल कुकींग" मोड
में स्वचालित रूप से गर्म रखें
मोड में स्विच नहीं करता है.
तापमान नियंत्रण राब है. उपकरण को अपने Philips
डीलर या Philips द्वारा प्राधिकृत किसी सेवा केंद्र में
ले जाएं.
चावल जल गए हैं. आपने चावलों को सही ढंग से नहीं धोया है. चावलों को तब
तक धोएं जब तक पानी सा न दिखने लगे.
कुकिंग के दौरान चावल
कुकर में से पानी छलकता है.
• सुनिश्चित करें कि आपने इनर पॉट के भीतर मापक के
स्तर तक उसमें पानी डाला है जोकि उपयोग किए जाने
वाले चावलों के कपों की संख्या के अनुसार है.
• सुनिश्चित करें कि पानी मापक के अगले स्तर को पार
नहीं करता है, क्योंकि इससे कुकिंग के दौरान उपकरण
ओवरफ़्लो कर सकता है.
चावल पकने के बाद दुर्गंध
छो रहे हैं.
इनर पॉट को किसी वॉशिंग डिटर्जेंट और गर्म पानी के साथ
सा करें.
कुकिंग के बाद, सुनिश्चित करें कि भाप छिद्र आवरण, इनर
लिड और इनर पॉट अच्छे से सा किए गए हैं.
Bahasa Melayu
1 Pemasak nasi anda
Tahniah atas pembelian anda dan selamat menggunakan Philips!
Untuk mendapatkan manfaat sepenuhnya daripada sokongan yang
ditawarkan oleh Philips, daftarkan produk anda di
www.philips.com/welcome.
2 Apa dalam kotak ini
Unit utama pemasak nasi Bakul kukus
Senduk nasi Cawan penyukat
Manual pengguna Risalah keselamatan
Kad waranti Kord kuasa
Gambaran keseluruhan
a
Periuk dalam
h
Butang pelepas tudung
b
Penunjuk paras air
i
Tukup bolong stim boleh tanggal
c
Pemegang senduk
j
Jasad utama
d
Elemen pemanasan
k
Soket kuasa
e
Kekunci Kawalan
l
Penunjuk simpan panas
f
Penyimpanan air stim
m
Penunjuk memasak
g
Tudung luar
3 Menggunakan pemasak nasi
Sebelum penggunaan pertama
1 Keluarkan semua aksesori dari periuk dalam. Alih keluar bahan
pembungkusan periuk dalam.
2 Bersihkan bahagian pemasak nasi dengan menyeluruh sebelum
anda menggunakan pemasak nasi buat kali pertama (lihat bab
‘Pembersihan’).
Catatan
• Pastikan semua bahagian telah kering sepenuhnya sebelum anda mula
menggunakan pemasak nasi.
Persediaan sebelum menggunakan
Sebelum menggunakan pemasak nasi, anda perlu mengikuti penyediaan
tersebut:
1 Ukur beras menggunakan cawan penyukat yang disediakan.
2 Basuh beras dengan sempurna.
3 Tuangkan beras yang sudah dibasuh ke dalam periuk dalam.
4 Tambahkan air sehingga paras yang ditunjukkan pada skala di
bahagian dalam periuk dalam, yang sepadan dengan bilangan
cawan beras yang digunakan. Kemudian, ratakan permukaan beras.
5 Tekan butang pelepas untuk membuka tudungnya.
6 Masukkan periuk dalam ke dalam pemasak nasi. Periksa sama ada
periuk dalam bersentuhan dengan betul dengan elemen pemanas.
7 Tutup tudung periuk pemasak nasi, dan masukkan plag ke dalam
soket kuasa.
Catatan
• Setiap cawan beras biasanya menghasilkan 2 mangkuk nasi. Jangan
melebihi kuantiti yang ditunjukkan di bahagian dalam periuk dalam.
• Paras yang ditandai di dalam periuk dalam hanyalah penunjuk. Anda
sentiasa boleh melaraskan aras air untuk berlainan jenis beras dan
keutamaan anda. Jika voltan di kawasan anda tinggal tidak stabil,
pemasak nasi mungkin melimpah.
• Selain dari mengikut penunjuk paras air, anda juga boleh menambah
beras dan air pada nisbah 1:1-1.2 untuk memasak nasi. Jangan melebihi
kuantiti yang ditunjukkan di bahagian dalam periuk dalam.
• Pastikan bahawa bahagian luar periuk dalam adalah kering dan bersih,
dan bahawa tiada sisa asing pada elemen pemanasan atau suis magnet.
Memasak nasi
1 Ikuti langkah dalam “Persediaan sebelum menggunakan”.
2 Tekan kekunci kawalan ke bawah, dan penunjuk memasak
(
COOK
) menyala.
3 Apabila memasak selesai, penunjuk (
COOK
) memasak akan
mati.
4 Pemasak nasi bertukar ke mod simpan panas secara automatik,
dan penunjuk simpan panas (
WARM
) menyala.
Catatan
• Jangan melebihi isi padu yang ditunjukkan mahupun melebihi paras air
maksimum yang ditunjukkan di dalam periuk dalam, kerana ini boleh
menyebabkan pemasak nasi melimpah.
Mengukus
1 Sukat beberapa cawan air dengan cawan penyukat.
2 Tuang air ke dalam periuk dalam.
3 Letakkan bakul kukus di dalam periuk dalam.
4 Letakkan makanan ke dalam bakul mengukus.
5 Tutup tudung pemasak nasi dan pasangkan plag ke dalam soket
dinding.
6 Tekan kekunci kawalan ke bawah dan penunjuk (
COOK
)
memasak menyala.
7 Apabila pengukusan selesai, tarik ke atas kekunci kawalan.
8 Pemasak nasi bertukar ke mod simpan panas, dan penunjuk
simpan panas (
WARM
) menyala.
Catatan
• Gunakan sarung tangan dapur atau kain, kerana pinggan dan bakul
kukus sangat panas.
• Anda boleh memasak nasi semasa mengukus makanan. Jangan melebihi
isipadu yang ditunjukkan atau merendam bakul stim di dalam air, kerana
ini boleh menyebabkan pemasak nasi melimpah.
• Anda boleh melaraskan paras air seperlunya.
Spesikasi
Nombor Model HD3011/
HD3012
HD3015/
HD3016
HD3017/
HD3018
Output kuasa yang ditarafkan 500W 650W 650W
Kapasiti yang ditarafkan 3.0L 4.0L 5.0L
Jumlah beras (cawan) 1L (1-6) 1.5L (1-8) 1.8L (1-10)
4 Pembersihan dan Penyelenggaraan
Catatan
• Cabut plag perkakas setiap kali sebelum anda mula membersihkannya.
• Tunggu sehingga periuk pemasak nasi telah sejuk secukupnya sebelum
membersihkannya.
Dalaman
Di bahagian dalam tudung luar dan badan utama:
• Lap dengan kain lembap yang telah diperah.
• Pastikan semua sisa makanan yang melekat pada pemasak nasi
dibuang.
Elemen pemanas:
• Lap dengan kain lembap yang telah diperah.
• Buang sisa makanan dengan kain lembap yang telah diperah atau
cungkil gigi.
Luaran
Permukaan tudung luar dan bahagian luar jasad utama:
• Lap dengan kain yang dilembapkan dengan air sabun.
• HANYA gunakan kain lembut dan kering untuk melap panel
kawalan.
• Pastikan semua sisa makanan di sekeliling butang kawalan dibuang.
Aksesori
Senduk nasi, periuk dalam, bakul stim, tukup bolong stim:
• Rendam di dalam air panas dan bersihkan dengan span.
La página se está cargando...
Transcripción de documentos
What’s in the box Contenido de la caja बॉक्स में क्या है Apa dalam kotak ini ภายในกลองมีอะไรบาง Trong hộp có gì 包装盒内物品 Register your product and get support at www.philips.com/welcome HD3011 HD3012 HD3015 HD3016 HD3017 HD3018 1 Using the rice cooker Uso de la arrocera चावल कुकर का उपयोग करना Menggunakan pemasak nasi การใชหมอหุงขาว Sử dụng nồi cơm điện 使用电饭煲 Cooking rice चावल पकाना วิธีหุงขาว 煮饭 Cocción del arroz Memasak nasi Cách nấu cơm Accesorios Cuchara para arroz, recipiente externo, cestilla de vapor, tapa de ventilación de vapor: • Remójelos en agua caliente y límpielos con una esponja. 5 Medioambiental Cuando finalice la vida útil del aparato, no lo deseche junto con los residuos normales del hogar. Llévelo a un punto de recolección oficial para su reciclado. De esta manera, ayudará a conservar el medio ambiente. 6 Garantía y servicio técnico f a g b Hướng dẫn sử dụng EN User manual VI ES-AR Manual del usuario ZH-CN 用户手册 HI उपयोगकर्ता मैन्युअल Steaming स्टीमिंग การนึ่งอาหาร 蒸食品 h i c Cocción al vapor Mengukus Hấp thức ăn 7 Solución de problemas Problema Solución Las luces de los botones no se encienden. Hay un problema de conexión. Revise si el cable de alimentación está conectado a la arrocera adecuadamente y si el enchufe está firmemente insertado en la toma de alimentación. d MS-MY Manual pengguna TH Si necesita servicio, información, o si tiene un problema, visite el sitio www.philips.com o contáctese con el Centro de atención al cliente de Phillips en su país. Puede encontrar el número de teléfono en el folleto de garantía mundial. Si no existe un Centro de atención al cliente en su país, diríjase al distribuidor de Philips local. คมือผใช j e La luz está fallada. Lleve el aparato a su distribuidor Philips o a un centro de servicio autorizado por Philips. k El arroz no está cocido. No hay agua suficiente. Agregue agua de acuerdo a la escala que se encuentra en el recipiente interno. No presionó el botón de control. www.philips.com/welcome www.philips.com/welcome HD3011 HD3012 HD3015 HD3016 HD3017 HD3018 HD3011 HD3012 HD3015 HD3016 HD3017 HD3018 Safety leaflet User manual www.philips.com/welcome Asegúrese de que no haya residuos extraños en el calentador y en el exterior del recipiente interno antes de encender la arrocera. HD3011 HD3012 HD3015 HD3016 HD3017 HD3018 El calentador está dañado o el recipiente interno está deforme. Lleve el aparato a su distribuidor Philips o a un centro de servicio autorizado por Philips. Warranty Nota •• Cada vaso de arroz crudo da normalmente 2 tazones de arroz cocido. No sobrepase las cantidades indicadas al interior del recipiente interno. •• El nivel marcado en el recipiente interno es solo una indicación. Siempre puede ajustar el nivel de agua para los distintos tipos de arroz y a su preferencia. Si el voltaje es inestable en el área donde vive, es posible que la arrocera se desborde. •• Además de seguir las indicaciones de agua, también puede agregar arroz y agua en una proporción de 1:1-1,2 para cocinarlo. No sobrepase las cantidades indicadas al interior del recipiente interno. •• Asegúrese de que la parte externa del recipiente interior esté seca y limpia, y de que no queden restos extraños en el calentador ni en el interruptor magnético. l 1 2 3 HD3011_HD3012_HD3015_HD3016_HD3017_HD3018_UM_AS_V1.0 English Cooking rice 1 2 1 Your rice cooker Congratulations on your purchase, and welcome to Philips! To fully benefit from the support that Philips offers, register your product at www.Philips.com/welcome. 3 4 2 What’s in the box Rice cooker main unit Rice scoop User manual Warranty card Steam basket Measuring cup Safety leaflet Power cord Overview a b c d e f g Inner pot Water level indications Scoop holder Heating element Control Key Steam water storage Outer lid h i j k l m Lid release button Detachable steam vent cap Main body Power socket Keep warm indicator Cooking indicator Before first use 2 Note •• Do not exceed the volume indicated nor exceed the maximum water level indicated in the inner pot, as this may cause the rice cooker to overflow. Take out all the accessories from the inner pot. Remove the packaging material of the inner pot. Clean the parts of the rice cooker thoroughly before using the rice cooker for the first time (see chapter ‘Cleaning’). Note •• Make sure all parts are completely dry before you start using the rice cooker. Preparations before use Before using the rice cooker, you need to follow the preparation: 1 Measure the rice using the measuring cup provided. 2 Wash the rice thoroughly. 3 Put the pre-washed rice in the inner pot. 4 Add water to the level indicated on the scale inside the inner pot that corresponds to the number of cups of rice used. Then smooth the rice surface. 5 Press the release lever to open the lid. 6 Put the inner pot in the rice cooker. Check if the inner pot is in proper contact with the heating element. 7 Close the lid of the rice cooker, put the plug in the power socket. Note •• Each cup of uncooked rice normally gives 2 bowls of cooked rice. Do not exceed the quantities indicated on the inside of the inner pot. •• The level marked inside the inner pot is just an indication. You can always adjust the water level for different types of rice and your own preference. If the voltage is unstable at the area you live, it is possible that the rice cooker overflows. •• Besides following the water level indications, you can also add rice and water at 1:1-1.2 ratio for rice cooking. Do not exceed the quantities indicated on the inside of the inner pot. •• Make sure that the outside of the inner pot is dry and clean, and that there is no foreign residue on the heating element or the magnetic switch. 1 2 3 4 5 6 7 8 Surface of the outer lid and outside of the main body: • Wipe with a cloth damped with soap water. • ONLY use soft and dry cloth to wipe the control panel. • Make sure to remove all the food residues around the control buttons. Accessories Rice scoop, inner pot, steam basket, steam vent cap: • Soak in hot water and clean with sponge. Steaming 3 Using the rice cooker 1 Exterior Follow the steps in “Preparations before use”. Press down the control key, and the cooking ( COOK ) indicator lights up. When the cooking is finished, the cooking ( COOK ) indicator will be off. The rice cooker switches to keep warm mode automatically, and the keep warm ( WARM ) indicator lights up. Measure a few cups of water with the measuring cup. Pour the water into the inner pot. Put the steam basket into the inner pot. Put the food into the steam basket. Close the lid of the rice cooker, and put the plug in the power socket. Push down the control key, and the cooking ( COOK ) indicator lights up. When the steaming is finished, pull up the control key. The rice cooker switches to keep warm mode, and the keep warm ( WARM ) indicator lights up. Note •• Use a kitchen glove or a cloth, as the plate and steam basket will be very hot. •• You can cook rice while steaming food. Do not exceed the volume indicated nor immerse the steam basket in the water, as this may cause the rice cooker to overflow. •• You can adjust the water level as needed. Specifications Model Number HD3011/ HD3012 HD3015/ HD3016 HD3017/ HD3018 Rated power output 500W 650W 650W Rated capacity 3.0L 4.0L 5.0L Rice volume (cups) 1L (1-6) 1.5L (1-8) 1.8L (1-10) 4 Cleaning and Maintenance Note •• Unplug the rice cooker before starting to clean it. •• Wait until the rice cooker has cooled down sufficiently before cleaning it. Interior Inside of the outer lid and the main body: • Wipe with wrung out and damp cloth. • Make sure to remove all the food residues stuck to the rice cooker. Heating element: • Wipe with wrung out and damp cloth. • Remove food residues with wrung out and damp cloth or toothpicks. 5 Environment Do not throw away the appliance with normal household waste at the end of its life, but hand it in at an official collection point for recycling. By doing this, you can help to preserve the environment. 6 Guarantee and service If you need service or information, or if you have a problem, visit the Philips website at www.philips.com or contact the Philips Customer Care Center in your country. You can find its phone number in the worldwide guarantee leaflet. If there is no Customer Care Center in your country, go to your local Philips dealer. 7 Troubleshooting Problem The lights on the buttons does not go on. Solution There is a connection problem. Check if the power cord is connected to the cooker properly and if the plug is inserted firmly into the power outlet. The light is defective. Take the appliance to your Philips dealer or a service center authorized by Philips. The rice is not cooked. There is not enough water. Add water according to the scale on the inside of the inner pot. You did not press down the control key. Make sure that there is no foreign residue on the heating element and the outside of the inner pot before switching the rice cooker on. The heating element is damaged, or the inner pot is deformed. Take the cooker to your Philips dealer or a service center authorized by Philips. The rice is not well Add more water. cooked. The cooker does not The temperature control is defective. Take switch to keep warm the appliance to your Philips dealer or a mode automatically in service center authorized by Philips. "Rice Cooking" mode. The rice is scorched. You have not rinsed the rice properly. Rinse the rice until water runs clear. Water spills out of • Make sure that you add water to the level the rice cooker during indicated on the scale inside the inner pot cooking. that corresponds to the number of cups of rice used. • Make sure the water does not exceed the next level on the scale, as this may cause the appliance to overflow during cooking. Rice smells bad after Clean the inner pot with some washing cooking detergent and warm water. After cooking, make sure the steam vent cap, inner lid and inner pot is cleaned thoroughly. Agregue más agua. La arrocera no enciende automáticamente el modo de conservación del calor en el modo "Rice Cooking" (cocción de arroz). El control de temperatura tiene alguna falla. Lleve el aparato a su distribuidor Philips o a un centro de servicio autorizado por Philips. El arroz se quemó. No enjuagó el arroz adecuadamente. Enjuague el arroz hasta que el agua corra clara. Durante la cocción, la arrocera derrama agua. • Asegúrese de que agregó agua hasta el nivel indicado en la escala del recipiente interior que corresponda con la cantidad de vasos de arroz utilizados. • Asegúrese de que el agua no sobrepasa el nivel siguiente en la escala, ya que esto puede causar que el aparato se desborde durante la cocción. Cocción del arroz m All registered and unregistered trademarks are property of their respective owners. © 2012 Koninklijke Philips Electronics N.V. All rights reserved. El arroz no está bien cocido. 4 Español 1 Su arrocera Nota Felicitaciones por su compra y bienvenido a Philips! Para usar los servicios de asistencia técnica de Philips, registre su producto en www.philips.com/welcome. 2 Contenido de la caja Unidad principal de la arrocera Cuchara para arroz Manual del usuario Tarjeta de garantía Cestilla de vapor Tapón medidor Folleto de seguridad Cable de alimentación Descripción general a b c d e f g Recipiente interno Indicaciones de nivel de agua h i Soporte para cuchara Placa de calentamiento Botón de control j Almacenamiento de vapor de agua Tapa exterior m k l Botón de apertura de la tapa Tapa desmontable de ventilación de vapor Cuerpo principal Toma de corriente Indicador de conservación del calor Indicador de cocción 3 Uso de la arrocera Antes del primer uso 1 2 Siga los pasos en “Preparaciones antes del uso”. Pulse el botón de control, el indicador de cocción ( COOK ) se encenderá. Cuando termine la cocción, el indicador de cocción ( COOK ) se apagará. La arrocera cambia al modo de conservación del calor automáticamente, el indicador de conservación del calor ( WARM ) se encenderá. Saque todos los accesorios del recipiente interno. Retire el material de envasado del recipiente interno. Limpie a fondo las piezas de la arrocera antes de usar el artefacto por primera vez (consulte el capítulo “Limpieza”). Nota •• Asegúrese de que todas las piezas estén completamente secas antes de usar •• No sobrepase el volumen indicado ni sobrepase el nivel máximo de agua indicado en el recipiente interno, ya que esto puede causar que la arrocera se desborde. Cocción al vapor 1 2 3 4 5 6 7 8 Mida algunos vasos de agua con el vaso medidor. Vierta el agua en el recipiente interno. Ponga la cestilla de vapor dentro del recipiente interno. Ponga los alimentos en la cestilla de vapor. Cierre la tapa de la arrocera y enchúfela a la toma de alimentación. Pulse el botón de control, el indicador de cocción ( COOK ) se encenderá. Cuando se detenga el vapor, levante el botón de control. La arrocera cambia al modo de conservación del calor automáticamente, el indicador de conservación del calor ( WARM ) se encenderá. Nota •• Utilice un guante de cocina o un paño, ya que la placa y la cestilla de vapor estarán muy calientes. •• Puede preparar arroz mientras cocina alimentos al vapor. No sobrepase el volumen indicado ni sumerja la cestilla de vapor en agua, ya que esto puede causar que la arrocera se desborde. •• Puede ajustar el nivel de agua como sea necesario. Antes de usar la arrocera, debe seguir la preparación: 1 Mida la cantidad de arroz con el vaso medidor suministrado. 2 Lave bien el arroz. 3 Eche el arroz previamente lavado en el recipiente interior. 4 Añada agua hasta el nivel indicado en la escala del recipiente interior que se corresponda con la cantidad de vasos de arroz utilizados. A continuación, alise la superficie del arroz. 5 Presione la palanca para abrir la tapa. 6 Coloque el recipiente interior en la arrocera. Revise si el recipiente interno está adecuadamente conectado al calentador. 7 Cierre la tapa de la arrocera y enchúfela a la toma de alimentación. Limpie el recipiente interno con un poco de detergente y agua tibia. Después de cocinar, asegúrese de limpiar bien la tapa de ventilación de vapor, la tapa interior y el recipiente interno. हिंदी 1 आपका चावल कुकर अपकी ख़रीद पर बधाई और Philips में स्वागत है! Philips द्वारा प्रस्तावित समर्थन का पूर्ण लाभ लेने के लिए, अपने उत्पाद को www. Philips.com/welcome पर पंजीकृत करें. 2 बॉक्स में क्या है चावल कुकर मखु ्य यनिटू राइस स्कूप उपयोगकर्ता मैन्युअल वारंटी कार्ड a b स्टीम बास्केट मापक कप सरु क्षा पत्रक पॉवर कोर्ड c e f g इनर पॉट जल स्तर सचू क स्कूप होल्डर उष्मी य पदार्थ नियंत्रण कुंजी वाष्प जल संग्रहण बाहरी लिड h i j k l m वियोज्य भाप छि द्र आवरण मखु ्य भाग Número de modelo HD3011/ HD3012 HD3015/ HD3016 HD3017/ HD3018 Salida nominal 500 W 650 W 650 W Capacidad nominal 3,0 L 4,0 L 5,0 L Volumen de arroz (tazas) 1 L (1-6) 1,5 L (1-8) 1,8 L (1-10) 4 Limpieza y mantenimiento Nota •• Desenchufe la arrocera antes de comenzar a limpiarla. •• Antes de limpiar la arrocera, espere a que se enfríe. Interior Dentro de la tapa exterior y el cuerpo principal: • Limpie con un paño escurrido y húmedo. • Asegúrese de eliminar todos los residuos de comida adheridos a la arrocera. Calentador: • Limpie con un paño escurrido y húmedo. • Retire los residuos de comida con un paño escurrido y húmedo o un mondadientes. Exterior Superficie de la tapa exterior y parte externa del cuerpo principal: • Limpie con un paño humedecido con agua jabonosa. • Para limpiar el panel de control utilice SOLO un paño suave y seco. • Asegúrese de quitar todos los residuos de alimentos alrededor de los botones de control. चावल कुकर ओवरफ़्लो कर सकता है. मापक कप के साथ कुछ कप पानी मापें. पानी को भीतरी पॉट में डालें. स्टीम बास्केट को इनर पॉट में रखें. भोजन को स्टीम बॉस्केट में रखें. चावल कुकर की लिड बंद करें और प्लग पॉवर सॉकेट में डालें. नियंत्रण कुंजी को नीचे दबाएं, और पकने का ( COOK ) संकेतक लाइट जलता है. भाप निकलना बंद होने के बाद, नियंत्रण कुंजी को ऊपर उठाए. चावल कुकर गर्म रखें मोड में स्विच करता है, और गर्म रखें ( WARM ) संकेतक लाइट को जलाए रखता है. नोट होगी. •• आप खाने को भाप में पकाते समय चावल पका सकते हैं. इंगित मात्रा को पार न करें ना ही स्टीम बास्केट को पानी में डुबोएं क्योंकि इस के कारण चावल कुकर ओवरफ़्लो हो सकता है. •• आप आवश्यकतानुसार जल स्तर को समायोजित कर सकते हैं. विनिर्देश मॉडल संख्या HD3011/ HD3012 HD3015/ HD3016 HD3017/ HD3018 रेट की गई पावर आउटपुट 500W 650W 650W रेट की गई क्षमता 3.0L 4.0L 5.0L चावल की मात्रा (कप्स) 1L (1-6) 1.5L (1-8) 1.8L (1-10) से सूख गए हों. आंतरिक भाग बाहरी लिड और मुख्य भाग के भीतर: • इसे निचोड़े हुए और नम कपड़े से पोंछें. • चावल कुकर में बचे हुए खाद्य अवशेष जो अटक गए हैं उन्हें हटाना सुनिश्चित करें. हीटिंग भाग: • इसे निचोड़े हुए और नम कपड़े से पोंछें. • खाद्य अवशेष को निचोड़े हुए और नम कपड़े या टूथपिक्स से हटाएँ. बाहरी भाग बाहरी लिड की सतह और मुख्य भाग का बाहरी हिस्सा: • साबुन में भीगे हुए कपड़े से पोछें. • कंट्रोल पैनल को केवल मुलायम और सूखे कपड़े से पोछें. • कंट्रोल बटन के चारों ओर सभी खाद्य अवशेष को हटाना सुनिश्चित करें. नोट •• बिना पके चावलों के प्रत्येक कप से सामान्यतया 2 कटोरे चावल तैयार होते हैं. भीतरी पॉट के भीतर इंगित मात्रा को पार न करें. •• भीतरी पॉट के भीतर चिह्नित स्तर केवल एक सूचक है. आप चावल के विभिन्न प्रकार तथा अपनी प्राथमिकता के अनुसार जल स्तर को समायोजित कर सकते हैं. यदि आपके स्थानीय क्षेत्र का वोल्टेज अस्थिर है तो हो सकता है कि चावल कुकर ओवरफ़्लो करे. •• पानी के स्तर संकेतक का पालन करने के बजाय, आप चावल कुकर में चावल और पानी को 1:1-1.2 के अनुपात में भी डाल सकते हैं. भीतरी पॉट के भीतर इंगित मात्रा को पार न करें. •• सुनिश्चित करें कि इनर पॉट का बाहरी हिस्सा शुष्क और साफ़ रहे, और उष्मीय पदार्थ या चुंबकीय स्विच पर कोई बाहरी अवशिष्ट न हो. l m 1 2 Keluarkan semua aksesori dari periuk dalam. Alih keluar bahan pembungkusan periuk dalam. Bersihkan bahagian pemasak nasi dengan menyeluruh sebelum anda menggunakan pemasak nasi buat kali pertama (lihat bab ‘Pembersihan’). Catatan •• Pastikan semua bahagian telah kering sepenuhnya sebelum anda mula Persediaan sebelum menggunakan Sebelum menggunakan pemasak nasi, anda perlu mengikuti penyediaan tersebut: 1 Ukur beras menggunakan cawan penyukat yang disediakan. 2 Basuh beras dengan sempurna. 3 Tuangkan beras yang sudah dibasuh ke dalam periuk dalam. 4 Tambahkan air sehingga paras yang ditunjukkan pada skala di bahagian dalam periuk dalam, yang sepadan dengan bilangan cawan beras yang digunakan. Kemudian, ratakan permukaan beras. 5 Tekan butang pelepas untuk membuka tudungnya. 6 Masukkan periuk dalam ke dalam pemasak nasi. Periksa sama ada periuk dalam bersentuhan dengan betul dengan elemen pemanas. 7 Tutup tudung periuk pemasak nasi, dan masukkan plag ke dalam soket kuasa. •• Paras yang ditandai di dalam periuk dalam hanyalah penunjuk. Anda sentiasa boleh melaraskan aras air untuk berlainan jenis beras dan keutamaan anda. Jika voltan di kawasan anda tinggal tidak stabil, pemasak nasi mungkin melimpah. •• Selain dari mengikut penunjuk paras air, anda juga boleh menambah beras dan air pada nisbah 1:1-1.2 untuk memasak nasi. Jangan melebihi kuantiti yang ditunjukkan di bahagian dalam periuk dalam. •• Pastikan bahawa bahagian luar periuk dalam adalah kering dan bersih, dan bahawa tiada sisa asing pada elemen pemanasan atau suis magnet. Memasak nasi 1 2 3 4 Ikuti langkah dalam “Persediaan sebelum menggunakan”. Tekan kekunci kawalan ke bawah, dan penunjuk memasak ( COOK ) menyala. Apabila memasak selesai, penunjuk ( COOK ) memasak akan mati. Pemasak nasi bertukar ke mod simpan panas secara automatik, dan penunjuk simpan panas ( WARM ) menyala. Catatan राइस स्कूप, इनर पॉट, स्टीम बास्केट, भाप छिद्र आवरण: • इसे गर्म पानी में डुबोएं और स्पंज से साफ़ करें. 5 पर्यावरण सामान्य घरेलू कचरे के साथ उन उपकरण को ना फैंके जो अब अनोपयोगी हो गए हैं बल्कि इसे आधिकारिक संग्रह स्थान पर पुनः उपयोग करने के लिए जमा करें. ऐसा करके आप पर्यावरण को बचाने में मदद कर सकते हैं. 6 गारंटी और सेवा यदि आप सेवा या जानकारी चाहते हैं या यदि आपकी कोई समस्या है तो Philips वेबसाइट पर जाएँ www.philips.com या अपने देश के Philips ग्राहक सेवा केंद्र से सम्पर्क करें. आपको विश्वव्यापी गारंटी पत्रक में इसका फोन नंबर मिल सकता है. यदि आपके देश में ग्राहक सेवा केंद्र नहीं है तो स्थानीय Philips डीलर के पास जाएँ. समस्या समाधान बटनों पर लाइटें जलती नहीं है. कनेक्शन की समस्या है. जांच करें कि बिजली की तार कुकर से सही ढंग से कनेक्ट है और प्लग पॉवर आउटलेट में अच्छी तरह से डाला गया है. लाइट ख़राब है. उपकरण को अपने Philips डीलर या Philips द्वारा प्राधिकृत किसी सेवा केंद्र में ले जाएं. इनमें पर्याप्त पानी नहीं है. भीतरी पॉट के भीतर माप के अनुसार पानी डालें. आपने नियंत्रण कुंजी को नीचे नहीं दबाया. चावल कुकर को चलाने से पहले यह सुनिश्चित करें कि इनर पॉट के बाहरी ओर और उष्मीय पदार्थ पर कोई बाहरी अवशेष नहीं है. उष्मीय पदार्थ क्षतिग्रस्त हो गया है, या भीतरी पॉट विकृत हो गया है. कुकर को अपने Philips डीलर या Philips द्वारा प्राधिकृत किसी सेवा केंद्र में ले जाएँ. चावल अच्छे से नहीं पके. अधिक पानी डालें. कुकर "चावल कुकींग" मोड में स्वचालित रूप से गर्म रखें मोड में स्विच नहीं करता है. तापमान नियंत्रण ख़राब है. उपकरण को अपने Philips डीलर या Philips द्वारा प्राधिकृत किसी सेवा केंद्र में ले जाएं. चावल जल गए हैं. आपने चावलों को सही ढंग से नहीं धोया है. चावलों को तब तक धोएं जब तक पानी साफ़ न दिखने लगे. कुकिंग के दौरान चावल कुकर में से पानी छलकता है. • सुनिश्चित करें कि आपने इनर पॉट के भीतर मापक के चावल पकने के बाद दुर्गंध छोड़ रहे हैं. k Sebelum penggunaan pertama सहायक उपकरण चावल पके नहीं हैं. j Butang pelepas tudung Tukup bolong stim boleh tanggal Jasad utama Soket kuasa Penunjuk simpan panas Penunjuk memasak melebihi kuantiti yang ditunjukkan di bahagian dalam periuk dalam. •• चावल कुकर साफ़ करने से पहले इसे अनप्लग करें. •• चावल कुकर के पर्याप्त रूप से ठंडे हो जाने तक इसे साफ़ करने के लिए प्रतीक्षा करें. उपयोग से पहले की तैयारियाँ चावल कुकर का उपयोग करने से पहले, आपको निम्न तैयारी की आवश्यकता होगी: 1 उपलब्ध कराए गए मापक कप का उपयोग करते हुए चावल को मापना. 2 चावलों को अच्छी तरह से धोएं. 3 भीतरी पॉट में धोए हुए चावलों को डालें. 4 भीतरी पॉट के भीतर दिए गए मापक के स्तर तक उसमें पानी डालें जो कि उपयोग किए जाने वाले चावलों के कपों की संख्या के अनुसार होना चाहिए. फिर चावल को साफ़ करें. 5 लिड खोलने के लिए रिलीज़ लीवर को दबाएँ. 6 चावल कुकर में भीतरी पॉट डालें. जांच करें कि भीतरी पॉट उष्मीय पदार्थ से समुचित रूप से जुड़ा हुआ है. 7 चावल कुकर की लिड बंद करें, प्लग पॉवर सॉकेट में डालें. g i •• Setiap cawan beras biasanya menghasilkan 2 mangkuk nasi. Jangan नोट कुकींग संकेतक •• आपके द्वारा चावल कुकर का उपयोग शुरू करने से पहले सुनिश्चित करें कि सभी पार्ट्स पूरी तरह d h Catatan 4 सफाई और रखरखाव गर्म रखें संकेतक नोट c Periuk dalam Penunjuk paras air Pemegang senduk Elemen pemanasan Kekunci Kawalan Penyimpanan air stim Tudung luar menggunakan pemasak nasi. •• रसोई दस्तानों या किसी कपड़े का उपयोग करें, क्योंकि प्लेट और स्टीम बास्केट बहुत गर्म पॉवर सॉकेट इनर पॉट से सभी सामान निकाल लें. इनर पॉट का पैकेजिंग सामग्री निकालें. पहली बार चावल कुकर का उपयोग करने से पहले चावल कुकर के पार्ट्स को अच्छी तरह से साफ करें (अध्याय ‘सफाई’ देखें). b 3 Menggunakan pemasak nasi स्टीमिंग 3 चावल कुकर का उपयोग करना 1 2 a f •• भीतरी पॉट में इंगित मात्रा को पार न करें या इंगित अधिकतम जल स्तर से बाहर न हो क्योंकि इससे 1 2 3 4 5 6 7 8 Gambaran keseluruhan e नोट लि़ड रिलीज़ बट न पहली बार उपयोग करने से पहले Especificaciones “उपयोग से पहले तैयारी” के निम्न चरणों का पालन करें. नियंत्रण कुंजी को नीचे दबाएँ, और कुकींग ( COOK ) संकेतक लाइट जलती है. पकना समाप्त होने के बाद, कुकींग ( COOK ) संकेतक ऑफ़ हो जाएगा. चावल कुकर स्वचालित रूप से गर्म रखें मोड में स्विच करता है, और गर्म रखें ( WARM ) संकेतक लाइट को जलाए रखता है. 1 2 3 4 7 समस्या निवारण ओवरव्यू d la arrocera. Preparaciones antes del uso El arroz tiene mal olor después de la cocción चावल पकाना स्तर तक उसमें पानी डाला है जोकि उपयोग किए जाने वाले चावलों के कपों की संख्या के अनुसार है. • सुनिश्चित करें कि पानी मापक के अगले स्तर को पार नहीं करता है, क्योंकि इससे कुकिंग के दौरान उपकरण ओवरफ़्लो कर सकता है. इनर पॉट को किसी वॉशिंग डिटर्जेंट और गर्म पानी के साथ साफ़ करें. कुकिंग के बाद, सुनिश्चित करें कि भाप छिद्र आवरण, इनर लिड और इनर पॉट अच्छे से साफ़ किए गए हैं. Bahasa Melayu 1 Pemasak nasi anda Tahniah atas pembelian anda dan selamat menggunakan Philips! Untuk mendapatkan manfaat sepenuhnya daripada sokongan yang ditawarkan oleh Philips, daftarkan produk anda di www.philips.com/welcome. 2 Apa dalam kotak ini Unit utama pemasak nasi Senduk nasi Manual pengguna Kad waranti Bakul kukus Cawan penyukat Risalah keselamatan Kord kuasa •• Jangan melebihi isi padu yang ditunjukkan mahupun melebihi paras air maksimum yang ditunjukkan di dalam periuk dalam, kerana ini boleh menyebabkan pemasak nasi melimpah. Mengukus 1 2 3 4 5 6 7 8 Sukat beberapa cawan air dengan cawan penyukat. Tuang air ke dalam periuk dalam. Letakkan bakul kukus di dalam periuk dalam. Letakkan makanan ke dalam bakul mengukus. Tutup tudung pemasak nasi dan pasangkan plag ke dalam soket dinding. Tekan kekunci kawalan ke bawah dan penunjuk ( COOK ) memasak menyala. Apabila pengukusan selesai, tarik ke atas kekunci kawalan. Pemasak nasi bertukar ke mod simpan panas, dan penunjuk simpan panas ( WARM ) menyala. Catatan •• Gunakan sarung tangan dapur atau kain, kerana pinggan dan bakul kukus sangat panas. •• Anda boleh memasak nasi semasa mengukus makanan. Jangan melebihi isipadu yang ditunjukkan atau merendam bakul stim di dalam air, kerana ini boleh menyebabkan pemasak nasi melimpah. •• Anda boleh melaraskan paras air seperlunya. Spesifikasi Nombor Model HD3011/ HD3012 HD3015/ HD3016 HD3017/ HD3018 Output kuasa yang ditarafkan 500W 650W 650W Kapasiti yang ditarafkan 3.0L 4.0L 5.0L Jumlah beras (cawan) 1L (1-6) 1.5L (1-8) 1.8L (1-10) 4 Pembersihan dan Penyelenggaraan Catatan •• Cabut plag perkakas setiap kali sebelum anda mula membersihkannya. •• Tunggu sehingga periuk pemasak nasi telah sejuk secukupnya sebelum membersihkannya. Dalaman Di bahagian dalam tudung luar dan badan utama: • Lap dengan kain lembap yang telah diperah. • Pastikan semua sisa makanan yang melekat pada pemasak nasi dibuang. Elemen pemanas: • Lap dengan kain lembap yang telah diperah. • Buang sisa makanan dengan kain lembap yang telah diperah atau cungkil gigi. Luaran Permukaan tudung luar dan bahagian luar jasad utama: • Lap dengan kain yang dilembapkan dengan air sabun. • HANYA gunakan kain lembut dan kering untuk melap panel kawalan. • Pastikan semua sisa makanan di sekeliling butang kawalan dibuang. Aksesori Senduk nasi, periuk dalam, bakul stim, tukup bolong stim: • Rendam di dalam air panas dan bersihkan dengan span.-
 1
1
-
 2
2


Philips HD3011/08 Manual de usuario
- Categoría
- Ollas arroceras
- Tipo
- Manual de usuario
en otros idiomas
- English: Philips HD3011/08 User manual
Artículos relacionados
Otros documentos
-
Panasonic SR2363Z Manual de usuario
-
Premier ED-5339 Manual de usuario
-
IKEA TOLERANT Manual de usuario
-
IKEA AA-2420884-2 SENSUELL Frying Pan Stainless Steel-Grey Manual de usuario
-
IKEA VARDAGEN Instrucciones de operación
-
-
-
Xpelair Simply Silent C4HTR (92967AW) Installation And Maintenance Instructions Manual
-
Hamilton Beach 58770 Guía del usuario
-
Asus Zenpad Z580CA 8" 64Gb Wi-Fi Metallic (1B046A) Manual de usuario