Jones Stephens C77419LF Guía de instalación
- Tipo
- Guía de instalación

PLUMBITE® PUSH ON FITTINGS
ACCESSORIOS DE EMPUJE PLUMBITE®
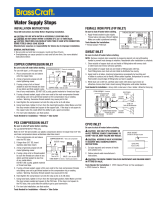
Installation Instructions:
1. For a proper water tight t, use a deburring tool to remove burrs. Use sand cloth to obtain a smooth edge to
pass by rubber seal of tting without damage. Tube must be round and free of scratches and imperfections.
2. Mark the outside of the pipe at the Install Depth to help ensure proper installation.
3. Remove and discard the included inner plastic stiener when using the tting with Copper and CPVC
installations. The stiener is only required when installing PEX and PE-RT tubing. Use disconnect tool (sold
separately) to remove stiener same as if you are removing pipe/tubing.
To Install: While securely holding thetting, push the pipe/tubing straight into the tting. Press pipe/tubing until
you feel it rmly hit the stop inside the tting. It will be at the Install Depth mark.
To Remove: Snap removal tool (sold separately) over pipe/tubing. While rmly pressing removal tool against
plastic collar at tting opening, carefully slide pipe/tubing the opposite
direction out of the tting.
Operate at temperatures from 0 to 180°F (82°C) at a maximum
working pressure of 200 PSI (1379 kPa).
WARNING: Not designed for underground use, do not bury.
Instrucciones de instalación:
1. Para lograr un buen ajuste de la tubería de agua, utilice una herramienta
para quitar rebabas. Utilice papel de lija para obtener un extremo suave y
poder sellar el accesorio con goma sin dañarlo. La tubería debe ser
circular y libre de rayones e imperfecciones.
2. Marque la parte externa de la tubería en la siguiente marca de Profundidad
para la instalación para poder garantizar una instalación adecuada.
3. Retire y deseche el refuerzo interno de plástico incluido cuando utilice el accesorio con instalaciones de cobre
y CPVC. El refuerzo solo se necesita en el caso de instalar tuberías PEX y PE-RT. Utilice una herramienta de
desconexión (se vende por separado) para retirar el refuerzo de la misma manera en que retiraría un caño o
tubería.
Para la Instalación: Mientras sostiene el accesorio rmemente, introduzca el caño o la tubería directamente en
el accesorio. Presione el caño o la tubería hasta sentir que alcanza el cierre dentro del accesorio. Estará en la
marca de Profundidad para la instalación.
Para Retirarlo: Acople la herramienta de extracción (se vende por separado) sobre el caño o tubería. Mientras
presiona la herramienta de extracción rmemente contra el soporte de plástico en la abertura del accesorio,
deslice el caño o la tubería cuidadosamente en sentido contrario fuera del accesorio.
Funciona a temperaturas de 0 a 180° F (82° C) con una presión de operación máxima de 200 PSI (1379 kPa).
ADVERTENCIA: No está diseñado para uso subterráneo, no enterrar.
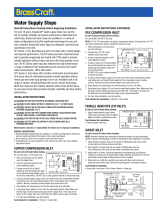
Install Depth/Profundidad
para Instalar
1/4” (3/8”OD)
3/8” (1/2”OD)
1/2” (5/8”OD)
3/4” (7/8”OD)
1” (1-1/8”OD)
1-1/2” (1-3/8”OD)
2” (2-1/8”OD)
11/16“ (17mm)
13/16” (21mm)
15/16” (24mm)
1-1/8” (27mm)
1-3/16” (21mm)
1-11/16” (42mm)
1-3/4” (45mm)
Size Depth
-
 1
1

Jones Stephens C77419LF Guía de instalación
- Tipo
- Guía de instalación
en otros idiomas
Artículos relacionados
Otros documentos
-
 BrassCraft G2CR14X C1 Guía de instalación
-
 BrassCraft G2PS04X C1 Guía de instalación
-
BrassCraft G2CR09X C1 Guía de instalación
-
Watts 0559118 Guía de instalación
-
Powers HydroGuard LFLM490,HydroGuard LM490 - Guía de instalación
-
Watts LFL1170M2-CPVC 1/2 Guía de instalación
-
 BrassCraft G23305X C1 Guía de instalación
-
Glacier Bay 1003421409 Guía de instalación
-


