
MORPHEUS
ZEAL
Dual-mode Stereo Bluetooth
Headphone Morpheus Zeal
USER MANUAL

Languages:
Español....
English..............................3
18
aa............................8
Français..........................13
Deutch.......
Italiano.......23
..28
50
44
.........33
Polski.........39
.........
.........

English
Table of contents
4.1 General fu
4.3 Chargin
4 How to u
6 Service and Su
r
8.

1.Introduction
Congratulations, and thank you for choosing the Bluetooth Stereo Headphone. This manual will help you
operate the Bluetooth Stereo Headphone, but you should first familiarize yourself with the Bluetooth
functionality of your mobile phone or other devices before using the Bluetooth Stereo Headphone
Safety Rules
1\ Please follow the rules depicted in this manual closely to ensure your safety. Before using this Bluetooth
Stereo Headphone, we would strongly encourage you to read through this user manual.
2\ Be more wary of any edges, uneven surfaces, metal parts, accessories and its packaging so as to prevent
any possible injury or damage.
3\ Do not modify, repair or dismantle this Bluetooth Stereo Headphone. Doing so may result in fires, electric
shocks, complete breakdown of this Bluetooth Stereo Headphone, etc. All of which, are not covered under
warranty.
4\ Do not use any diluents or volatile liquid to clean the Bluetooth Stereo Headphone.
5\ Do not use the Bluetooth Stereo Headphone in a hazardous location.
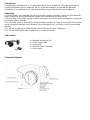
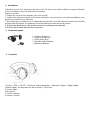
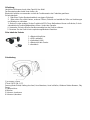
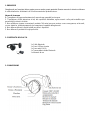
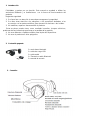
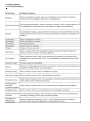
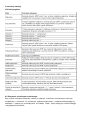
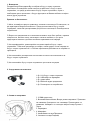
1 x Bluetooth Headphone H11
1 x USB Charger Cable
1 x Audio cable
1 x Bluetooth Audio Transmitter
1 x User Manual
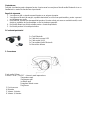
2.Kit Contents
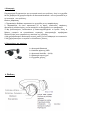
3.Connection Diagram

4.How to use
4.1.General Functions
user manual for more information.
After a few second the phone will list the device as a discover device. Select it and follow your phone
You can play music; watch TV/movie and play game with your phone, then your can hear all the sound or
music form the device. Also you can control the player by operating the device. Example, volume up and
next music.
If there is no Bluetooth function supported by your computer, a Bluetooth adapter is necessary. Fix the
adapter with your computer and ensure its Bluetooth function is activated.
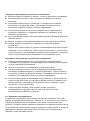
4.2.Pairing to Mobile phone or other device
To use your Bluetooth Headphone, you must first pair your Headphone with a phone or a computer. Once your
Bluetooth Headphone is paired to a specific mobile phone; they will remain paired and automatically recognize
each other whenever they are within range.
Pairing to a phone and Entertainment:
Turn on your phone and ensure its Bluetooth function is activated
Turn on the Bluetooth Stereo Headphone go to the paring mode
Search your Bluetooth devices on your phone by following the phone's instructions. Refer to your phone's
instruction to select this pairing.
Then your phone will request a passkey or PIN, enter 0000 as your PIN or passkey.
Your phone will confirm the pairing, and then press Yes/Ok.
Finally, select to connect with device from your phone.
Pairing to a computer and Entertainment:

Turn on the device go to the paring mode.
efer to user manual of the Bluetooth software for more information.
Open your media player soft to play music, watch TV/move and play game, then all the sound will be
The device is convenient to connect to AC charger or a USB charger with Micro USB port marked with. Make
sure that your device is full charged for at least 6 hours before initial use. Insert one terminal of your charger to
AC main or USB port of PC and other terminal to Micro USB. While charging, he red LED light constantly. When
charging is completed, the blue LED turns on.
Warning:
You must select a qualified charger from a regular manufacturer.
You must charge the Bluetooth Headset if it has been not used for more than 12 months.
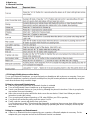
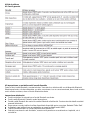
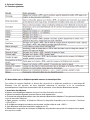
5.Technical specification
4.3.Charging your device

6.Service and Support
Bluetooth version: Bluetooth V2.1 + EDR
Frequance range: 2.4 GHz 2.4835 GHz
Receiving sensitivity: -74 4db
Operating distance: up to 10 m
Working time: up to 8 hours
Charging time: about 2~3 hours
Battery: 270 mAh
Pairing: press and hold the Bluetooth boot button for 6 seconds, until the red and blue LED alternate
flash, open your Bluetooth device and put it into matching condition; the pairing between the Bluetooth
headsets and the transmitter will be done automatically
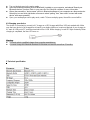
If your device is not performing as it should, please take it to your local service providers or dealer for service.
7. Bluetooth Audio Transmitter
1\ Why is there no power even when the Stereo Headphone is power on?
Ans: Ensure the battery is being charged up to 6 hours for first time using. The LED is lighted when it starts
charging.
2\There is no sound when playback.
Ans: Check the connection between with phone or computer, if the connection is not established, please
reconnect again. Make sure the is paired and connected target phone or other master device. your device
Stereo Headphone device
3\How can I know the Bluetooth Stereo Headphone has been fully charged?
Ans: When the indicator LED turns red to blue when it is charging, it has been fully charged.
4\Why the Headphone cannot connect to second phone
Ans: Please set the Headphone to pairing mode and short press the" M F B " to enable multipoint mode
Connect the Headphone to phone A, Restart the Headphone to pairing mode and connect the Headphone to
phone B, and then use phone A paired device list to reconnect to the Headphone
8.FAQ

Continut
aa
7 Specificatii tehnice pentru transmitatorul audio Bluetooth
e
1 Introducere
i
8 Intrebari frecvent

1.Introducere
Felicitari si multumim pentru alegerea facuta. Acest manual va va ajuta sa folositi castile Bluetooth si sa va
familiarizati cu modul de functionare al produsului.
Reguli de siguranta
1. Va rugam sa cititi cu atentie manualul pentru a va asigura siguranta.
2. Va rugam sa fiti atenti la margini, suprafete denivelate, accesorii sau parti metalice, pentru a preveni
accidentarea sau ranile.
3. Nu modificati, reparati sau dezasamblati produsul. Aceste actiuni pot avea ca rezultat incendii, socuri
electrice, probleme de functionalitate ce duc la pierderea garantiei.
4. Nu folositi diluanti sau lichide volatile pentru a curata dispozitivele.
5. Nu folositi produsul in locatii periculoase.
2.Continutul pachetului
1 x Casti Bluetooth
1 x Cablu de incarcare USB
1 x Cablu audio (AUX)
1 x Transmitator Audio Bluetooth
1 x Manual de utilizare
3. Conectarea
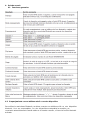
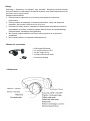
1 jack audio 3,5mm
2 Buton « MFB », ON/OFF – intrare in mod imperechere
Raspundere apel
Respingere apel
Inchidere apel
Reapelare ultimul numar
Play/Pauza
5 Volume -/Anterior
6 Volume +/ Urmator
3 Port incarcare
4 Microfon

4.Ghid de utilizare
4.1.Functii generale
4.2.Imperecherea cu un telefon mobil sau alt dispozitiv
Pentru a folosi castile Bluetooth, acestea trebuiesc conectate la un telefon mobil sau alt dispozitiv Bluetooth.
Odata imprecheate, cele doua dispozitve vor retine conexiunea si se vor conecta automat, atunci cand acestea
sunt in aria de conectare, daca au functia Bluetooth activata.
Imperecherea telefonului:
Porniti-va telefonul si asigurati-va ca functia Bluetooth e activata.
Porniti castile Bluetooth si intrati in modul imperechere.
Cautati castile Bluetooth din meniul de cautare Bluetooth al telefonului. Pentru mai multe detalii consultati
manualul telefonului.
Dupa cateva secunde, telefonul va lista dispozitivele disponibile pentru conectare. Selectati “Tellur Zeal”.
In situatia in care telefonul cere un cod/parola, va rugam sa folositi codul “0000”.
Telefonul dumneavoastra va confima imperecherea, apasati OK.
Selectati conectarea la casti din telefon, aceasta va va permite sa accesati muzica si apelurile, cat si
controlul lor.

Imperecherea cu un computer sau alte dispozitive:
Daca nu exista functie Bluetooth suportata de catre dispozitiv, veti avea nevoie de adaptorul inclus in
pachet. Introduceti mufa jack 3,5 mm in portul de casti al dispozitivului si porniti transmitatorul.
Porniti castile in modul imperechere.
Deschideti programul de Bluetooth al dispozitivului cu care vreti sa conectati castile, apoi din acesta cautati
dispozitivele disponibile. Mai multe detalii despre acesta gasiti in manualul dispozitivului pe care vreti sa il
conectati la casti.
4.3.Incarcarea
Incarcarea se poate face atat de la priza cat si de la un port USB (Lapotop, PC, Adaptor AC, etc). Asigurati-va
ca ati incarcat dispozitivul pentru un minim de 6 ore inainte de prima utilizare. Inserati portul USB in sursa de
curent dorita, si portul microUSB in terminalul castilor. In timpul incarcarii, o lumina LED rosie se va aprinde
intermitent. Odata ce dispozitivul va fi incarcat complet, se va aprinde o lumina LED de culoare albastra.
Atentie:
Folositi doar incarcatoare de incredere, asupra carora nu au survenit modificari fata de forma finala din fabrica.
Dispozitivele trebuiesc incarcate minim 6 ore, in special daca nu au fost folosite o lunga perioada de timp.
5.Specificatii tehnice
6.Service si Suport
Daca dispozitivul dumneavoastra nu functioneaza corect, va rugam sa il prezentati magazinului de unde a fost
achizitionat.
7.Transmitator audio Bluetooth
Versiune Bluetooth: Bluetooth V2.1 + EDR
Frecventa de raspuns: 2.4 GHz – 2.4835 GHz
Sensibilitate: >74 4dB
Camp de lucru: 10 m
Timp de redare: 8 ore
Incarcare: 2~3 ore
Baterie: 270 mAh
Imperechere: apasati lung butonul Bluetooth pentru 6 secunde, cand luminile LED rosu si albastru alterneaza,
deschideti dispozitivul care urmeaza sa fie conectat si porniti modul Bluetooth, imprecherea intre cele doua
dispozitive se va face automat

1\ De ce nu se aud castile, desi acestea sunt pornite?
-Asigurati-va ca ati incarcat castile pentru minim 6 ore inainte de prima utilizare. Consultati LED-ul de
avertizare.
2\De ce nu se aude nimic cand pornesc muzica?
-Verificati conexiunea dintre sursa de redare si casti. In cazul in care nu vedeti o problema, refaceti conexiunea.
-Tineti apasat pe tasta de volum”+” pentru a va asigura ca volumul nu este prea mic.
3\Cum pot stii cand castile sunt incarcate?
-O lumina LED albastra se va aprinde, odata ce castile termina de incarcat. (lumina rosie in timpul incarcarii)
4\De ce nu pot conecta al 2-lea telefon?
-Va rugam asigurati-va ca ati pus castile in “mod imperechere”, apoi apasati o data butonul “MFB” pentru a
activa modul de dubla conexiune. Apoi conectati telefonul 1 la casti. Redeschideti castile si apoi concetati
telefonul 2. La final, reconectati telefonul 1 la casti, din meniul telefonului.
8.Intrebari frecvente

Français
Table des matières
5 Spécifications techniques
6 Service et support
7 Émetteur audio
8 Questions fréquentes
4.1 Fonctions générales
4.2 Association avec le téléphone portable
4.3 Recharge du dispositif
1 Introduction
2 Contenu du paquet
3 Connexion

1. Introduction
2. Contenu du paquet
1 x Casques Bluetooth
1 x Câble de charge USB
1 x Câble audio (AUX)
1 x Émetteur audio Bluetooth
3. Connexion
1 Connecteur jack audio 3,5mm
2 Bouton « MFB », ON/OFF - - - -
- Recomposition du dernier numéro - Play/Pause
3 Port de charge
4 Microphone
5 Volume -/Antérieur
6 Volume +/ Suivant
Félicitations et nous vous remercions pour votre choix. Ce manuel vous aidera à utiliser les casques Bluetooth
et à vous familiariser avec le fonctionnement du produit.
Règles de sécurité
1. Veuillez lire le manuel avec attention, pour votre sécurité.
2. Veuillez faire attention aux bords, aux surfaces irrégulières, aux accessoires ou aux pièces métalliques, pour
prévenir les accidents ou les blessures.
3. Ne modifiez pas, ne réparez pas ou ne démontez pas le produit. Ces actions peuvent conduire aux incendies,
aux décharges électriques, aux problèmes de fonctionnalité qui peuvent annuler la garantie.

4.1 Fonctions générales
4.2 Association avec un téléphone portable ou avec un autre dispositive
Pour utiliser les casques Bluetooth, ils doivent être connectés à un téléphone portable ou un autre dispositif
Bluetooth. Une fois associés, les deux dispositifs retiendront la connexion et ils se connecteront
automatiquement, lorsqu’ils se trouvent dans l’aire de connexion, si leur fonction Bluetooth est activée.
L’association du téléphone
● Allumez votre téléphone et assurez-vous que la fonction Bluetooth soit activée.
● Allumez les casques Bluetooth et entrez dans le mode d’association
● Cherchez les casques Bluetooth du menu de recherche Bluetooth du téléphone. Pour plusieurs informations,
voyez le manuel du téléphone.
● Après quelques secondes, le téléphone affichera les dispositifs disponibles pour la connexion. Choisissez
« Tellur ZEAL ».
● Si le téléphone demande un code/un mot de passe, veuillez utiliser le code « 0000 ».
● Votre téléphone confirmera l’association, appuyez sur OK
● Sélectionnez la connexion aux casques du téléphone, elle permettra votre accès à la musique et aux appels,
ainsi que leur contrôle.

Association avec un ordinateur ou autres dispositifs
du dispositif avec lequel vous voulez connecter les casques et, ensuite,
du celui-là, cherchez les dispositifs disponibles. Plusieurs informations sur cette action sont disponibles dans le
manuel du dispositif que vous voulez connecter aux casques.
s quelques secondes, une liste des dispositifs disponibles sera affichée. Une fois la liste affichée,
sélectionnez « Tellur Zeal
4.3 Charge
Assurez-vous que vous avez chargé le dispositif pour au moins 6 heures avant la première utilisation.
Introduisez le port USB dans la source de courant désirée et le port micro-USB dans le terminal des casques.
Pendant la charge, une lumière LED rouge intermittente sera allumée. Une fois le dispositif chargé entièrement,
une lumière LED bleue sera allumée.
ATTENTION !
dispositifs
longue de temps.
5. Spécifications techniques
Si votre dispositif ne fonctionne pas correctement, veuillez le présenter au magasin d’où vous l’avez acheté.
7. Émetteur audio Bluetooth: FR
• Version Bluetooth: Bluetooth V2.1 + EDR
• Fréquence de réponse: 2.4 GHz – 2.4835 GHz
• Sensibilité: >74 4dB
• Champ de travail: 10 m
• Temps de transmission : 8 heures
• Temps de charge: 2~3 heures
• Batterie: 270 mAh
• Association avec un autre dispositif: Appuyez sur le bouton Bluetooth pendant six secondes , quand
les lumières rouges et bleues LED alterne, ouvrez le dispositif à connecter et activer le mode Bluetooth,
l’association entre les deux appareils se fera automatiquement.
6. Service et support

1. Pourquoi ne peux-je entendre les casques, bien ?
- Assurez-vous que vous avez chargé les casques au moins 6 heures avant la première utilisation. Consultez la
2. Pourquoi ne peux-je entendre rien lorsque je démarre la musique ?
- Vérifiez la connexion entre la source de transmission et les casques. Si vous ne pouvez pas voir un problème,
refaites la connexion.
- Appuyez sur la touche de volume « + » pour vous assurer que le volume ne soit pas trop bas.
3. Comment pourrais-je savoir quand les casques sont chargés ?
-
lumière rouge)
4. Pourquoi ne peux-je connecter le 2ème téléphone ?
- Assurez-vous que vous avez mis les casques dans « », ensuite appuyez une fois sur le
bouton « MFB » pour activer le mode de double connexion. Ensuite, connectez le premier téléphone aux
casques. Redémarrez les casques et puis connectez le 2ème téléphone. Enfin, reconnectez le premier téléphone
aux casques, en utilisant le menu du téléphone
8. Questions fréquentes

Deustch
Inhalt
4.1. Allgemeine Funktionen
4.2.Die Paarung mit dem Mobil Telefon
4.3.Laden des Geräts
1.Einleitung
2.Der Inhalt des Packets
3.Verbindung
4.Benützerhandbuch
5.Technische Daten
6.Service und Beistand
7.Bluetooth-Audio-Sender
8. Häufige Fragen

1.Einleitung
Herzlichen Glückwunsch und vielen Dank für Ihre Wahl.
Der Benutzerhandbuch wird Ihnen helfen, die
Bluetooth-Kopfhörer zu verwenden und mit der Funktionsweise des Produktes gewöhnen.
Sicherheitsregeln
1. Bitte lesen Sie der Benutzerhandbuch um eigene Sicherheit.
2. Bitte achten Sie auf die Kanten, unebene Flächen, Zubehör und metallische Teilen um Verletzungen
und Wunden zu verhindern.
3. Ändern Sie oder zerlegen Sie das Produkt nich523t. Diese Maßnahmen können zu Bränden, Schock
oderelektrische Funktionalitätprobleme führen. Verlust der Garantie.
4. Verwenden Sie keine flüssige Verdünnungsmittel um das Gerät zu säubern.
5. Benutzen Sie das Gerät in keine explosionsgefährdeten Bereichen.
2.Der Inhalt des Packets
3.Verbindung
1 Jack Audio 3.5mm
2 Taste "MFB" ON / OFF,
Paarung Mode Eintritt, Haftung des Anruf, Anruf abweisen, Anruf schließen, Wiederruf letzter Nummer, Play
Pause.
3 Ladeanschluss
4 Mikrofon
5 Volumen -/zunahmne
6 Volumen +/abnahme
1 x Bluetooth Kopfhörer
1 x USB-Ladekabel
1 x Audiokabel (AUX)
1 x Bluetooth-Audio-Sender
1 x-Handbuch

4.Benutzerhandbuch
4.1. Allgemeine Funktionen
4.2. Die Paarung mit dem Mobil Telefon oder andere Geräte
Um die Bluetooth-Kopfhörer verwenden zu können, müssen Sie angeschlossen zu einen Mobil Telefon oder
eine anderen Bluetooth-Gerät werden sein.
Einmal angeschlossen, werden die beiden Geräte sich immer automatisch beibehalten, wenn siesich
Verbindungsfläche befinden und wenn beide Geräte die Bluetooth Option aktiviert haben.
Die Paarung mit dem Mobil Telefon
Starten Sie Ihr Mobil Telefon und stellen Sie sich sicher, dass Bluetooth Option aktiviert ist.
Schalten Sie Bluetooth-Kopfhörer an, und aktivieren Sie den Paarungs Modus.
Suchen Sie die Bluetooth Kopfhörer in den Bluetooth-Telefon-Menü
Mehrere Informationen und Einzelheiten finden Sie in das Menü desTelefon.
Nach ein paar Sekunden, listet das Telefon die verfügbaren Geräte für Konnektivität.
Wählen Sie "Tellur ZEAL" Option
Falls Ihr Telefon einen Code / Passwort benötigt , bitte Verwenden Sie die Code "0000"
Ihr Telefon wird die Paarung bestätigen, drücken Sie OK um zu bestätigen.
Wählen Sie die Bestätigung des Mobil Telefons mit den Kopfhörer, ermöglichend, Zugang zu Musik und Anrufe
und deren Kontrolle zu haben.

4.3. Laden des Geräts
Aufladen kann auch durch der Steckdose oder mit Hilfe einem
USB-Anschluss geführt werden (Laptop, PC, AC-Adapter, etc.)
Stellen Sie sicher, dass, Sie das Gerät für mindestens 6 Stunden geladet haben, insbesonder bevor dem ersten
Gebrauch.
Stecken Sie den USB-Anschluss in der gewünschte Stromquelle und den Micro-USB-Port in den Terminal der
Kopfhörer.
Während des Auflladen Prozesses, blinkt ein rotes LED-Licht und sobald das Gerät voll geladet ist, wird das
blaue LED lichten.
ACHTUNG!!
Verwenden Sie nur vertrauensvolle Ladegeräte, die keine
Änderungen über der Endforn aus der Fabrik aufgetretet haben.
Die Geräte müssen mindestens 6 Stunden geladet sein, insbesonders wenn sie eine längere Zeitperiode nicht
benutzt waren.
5.Technische Daten
5.Technische Daten
Die Paarung mit einem Computer oder andere Geräte
Wenn es keine Bluetooth-Funktion vom Gerät unterstützt ist, benötigen Sie den Adapter der sich im
Lieferumfang befindet.
Legen Sie die Jack Muffe 3.5 mm in den Kopfhörer-Anschluss des Geräts an, und schalten Sie den Sender ein.
Stellen Sie die Kopfhörer in den PaarungsModus ein.
Öffnen Sie Ihr Bluetooth-Programm, mit dem Sie die Kopfhörer einschliessen möchten, dann suchen Sie nach
verfügbaren Geräten.
Weitere Informationen finden Sie im Gerätehandbuch, dass Sie mit den Kopfhörer paaren möchten.
Nach wenigen Sekunden erhalten Sie eine Liste der verfügbaren Geräte zu sehen.
Sobald die Liste angezeigt wird, wählen Sie "Tellur Zeal Option.

6.Service und Beistand
Wenn Ihr Gerät nicht richtig funktioniert, bitte präsentieren Sie es zu den Laden, woher Sie es gekauft haben.
7.Bluetooth-Audio-Sender:
Bluetooth Version: Bluetooth V2.1 + EDR
Antwortfreqenz: 2.4 GHz 2.4835 GHz
Empfindlichkeit: >74 4dB
Arbeitsfeld: 10 m
Wiedergabezeit: 8 Stunden
Ladezeit: 2~3 Stunden
Batterie: 270 mAh
Paarung:Drücken und halten Sie die Bluetooth-Taste 6 Sekunden , wenn abwechselnd roten und blauen
LED-Leuchten , Öffnen Sie das Gerät angeschlossen und auf Bluetooth-Modus, paarung zwischen den
beiden Geräten schalten wird automatisch durchgeführt werden.
8. Häufige Fragen
1. Warum hören sich die Kopfhörer nicht, obwohl sie eingeschaltet sind?
-Stellen Sie sich sicher, dass die Kopfhörer, bei den ersten Verbrauch, mindestens 6 Stunden geladet haben.
Beraten Sie die LED-Licht Signale.
2. Warum hören man nichts, wenn die Musik startet?
-Überprüfen Sie die Verbindung zwischen der Quelle und den Kopfhörer und wiederstarten Sie die Verbindung
wenn es nötig ist.
-Drücken Sie die Taste "+", um sicher zu sein,
dass die Lautstärke nicht zu niedrig ist.
3. Wie wissen Sie, wenn die Kopfhörer geladet sind?
-Das Blaue LED-Licht wird blinken wenndie Kopfhörer fertig geladen sind. (Rotes Licht während des Ladens)
4. Warum kann man nicht ein zweites Telefon anschließen?
Stellen Sie sich sicher, dass Sie die Kopfhörer in "Paarung-Modus gestellt haben,
danach drücken Sie die Taste "MFB" um die
Doppelt- Modus-Verbindung zu aktivieren. Dann schließen Sie das Telefon
1 zu den Kopfhörer an. Anschalten Sie die Kopfhörer und schließen Sie zu den zweiten Mobil Telefon.
Am Ende, schließen Sie die Kopfhörer zu den ersten Mobil Telefon, durch das Telefon-Menü.
8. Häufige Fragen

Italiano
SOMMARIO
1. premesse
2. contenuto del pacco
3. connessione
4. guida di utilizzo
4.1 funzioni generali
4.2. modalità di accoppiamento ai telefonini o ad altri dispositivi
4.3. ricarica
5. specifiche tecniche
6. assistenza e supporto error! bookmark not defined
7. trasmettitore audio bluetooth
8. domande frequenti

le cuffie bluetooth e ad abituarti con il funzionamento del prodotto stesso.
Norme di sicurezza
1. Ti preghiamo di leggere attentamente il manuale per garantirti la sicurezza.
2. Ti preghiamo di fare attenzione ai lati, alle superficie dislivellate, agli accessori o alle parti metalliche per
prevenire gli incidenti o le ferite.
3. Non modificare, riparare o smontare il prodotto. Tali azioni possono portare, come conseguenza, ad incendi,
scosse elettriche, malfunzionamenti che comportano la perdita della garanzia.
4. Non utilizzare diluenti o liquidi volatili per pulire i dispositivi.
5. Non utilizzare il prodotto in luoghi pericolosi.
2. CONTENUTO DEL PACCO
1 x Cuffie Bluetooth
1 x Cavo USB per ricarica
1 x Cavo audio (AUX)
1 x Transmettitore Audio Bluetooth
1 x Manuale di uso
3. CONNESSIONE
1. PREMESSE

4. GUIDA DI UTILIZZO
4.1 Funzioni generali
4.2. Modalità di accoppiamento ai telefonini o ad altri dispositivi
Per utilizzare le cuffie Bluetooth, queste devono essere connesse a un telefonino o ad un altro
dispositivo bluetooth. Una volta accoppiati, i due dispositivi memorizzano la connessione e si
connetteranno automaticamente quando saranno nella relativa aree di connessione se la funzione
bluetooth è attivata.

Modalità di accoppiamento al computer o ad altri dispositivi
la spia jack 3.5 mm nell porta cuffie del dispositivo e accendere il trasmettitore.
Accendere le cuffie in modalità di accoppiamento.
Aprire il programma bluetooth del dispositivo con cui vuoi connettere le cuffie, poi cerchi i dispositivi
disponibili. Puoi trovare maggiori dettagli nel manuale del dispositivo al quale vuoi connettere le cuffie.
Dopo alcuni secondi, visualizzerai un elenco con i di
La ricarica può avvenire sia da una presa sia da una porta USB per ricarica (Laptop, PC, Adattatore AC, ecc.).
Bisogna assicurarsi di aver ricaricato il dispositivo per un minimo di 6 ore prima del suo primo utilizzo. Inserire la
porta USB nella fonte desiderata di corrente e la porta USB nel terminale delle cuffie. Durante la ricarica, sarà
accesso un LED rosso lampeggiante.
Dopo che il dispositivo sarà completamente caricato, si accenderà un LED di colore blu.
Modalità di accoppiamento al telefono
Accendere il telefonino ed assicurarsi che la funzione bluetooth è attiva.
Accendere le cuffie bluetooth ed entrare nella modalità di accoppiamento.
Cercare le cuffie bluetooth dal menu di ricerca bluetooth del telefonino. Per maggiori
dettagli, consultare il manuale del telefonino.
Dopo alcuni secondi, il telefonino indicherà i dispositivi disponibili per la connessione.
Q
Selezionare la connessione alle cuffie dal telefonino; questo ti consentirà di aver accesso
sia alla musica e alle chiamate sia al modo di controllo.
4.3. Ricarica
5.SPECIFICHE TECNICHE

Utilizzare solo caricatori di fiducia che non sono stati modificati rispetto alla loro forma finale di fabbricazione. I
dispositivi devono essere caricati per un minimo di 6 ore, soprattutto se non sono stati utilizzati per un lungo
periodo di tempo.
6. ASSISTENZA E SUPPORTO
Se il tuo dispositivo non funziona correttamente, ti preghiamo di portarlo nel negozio da dove l’hai acquistato. 7.
7.TRASMETTITORE AUDIO BLUETOOTH
8. DOMANDE FREQUENTI
1. Perché non si sentono le cuffie se sono accese?
- Bisogna assicurarsi di aver ricaricato le cuffie per un minimo di 6 ore prima del suo primo utilizzo.
Consultare il LED di avvertimento.
2. Perché non si sente nulla quando parte la musica?
- Verificare la connessione tra la fonte di riproduzione e le cuffie. Rifare la connessione se alcun
problema viene individuate.
- Mantenere premute le tastiere di volume “+” per essere sicuri che il volume non è troppo basso.
3. Come posso sapere se le cuffie sono state ricaricate?
- Si accenderà un LED blu alla fine della ricarica delle cuffie (durante la ricarica è accesa un led
rosso).
4. Perché non posso connettere il secondo dispositivo?
- Bisogna assicurarsi che ci si è nella modalità di accoppiamento, poi premere una volta il
Versione Bluetooth: Bluetooth V2.1 + EDR
Frequenza di risposta: 2.4 GHz – 2.4835 GHz
Sensibilità : >74 4dB
Area di lavoro: 10 m
Tempo di riproduzione: 8 ore
Tempo di ricarica: 2~3 ore
Baterria: 270 mAh
Modalità di accoppiamento : premere e tenere premuto il pulsante Bluetooth per 6 secondi, quando
alternando luci LED rossi e blu , aprire il dispositivo da collegare e attivare la modalità Bluetooth,
imprecherea tra i due dispositivi viene fatto automaticamente.

Español
Índice
1.
2.
3.
4.
4.1.
4.2. l
4.3.
5.
6.
7. Transmisor audio Bluetooth
8.

1. Introducción
Felicidades y gracias por su elección. Este manual os ayudará a utilizar los
auriculares bluetooth y a familiarizaros con la forma de funcionamiento del
producto
Reglas de seguridad
1. Por favor leer con atención el manual para aseguraos la seguridad.
2. Por favor tener atención a los márgenes, a las superficies abolladas, a los
accesorios o a las partes metálicas, para prevenir las lesiones o las heridas.
3. No modificar, reparar o desensamblar el producto.
Estas acciones pueden tener como resultado incendios, choques eléctricos,
problemas de funcionamiento que llevan a la perdida de la garantía.
4. No usar diluentes o líquidos volátiles para limpiar los dispositivos.
5. No usar el producto en sitios peligrosos.
2. Contenido paquete
1 x auriculares bluetooth
1 x cable de carga USB
1 x cable audio
1 x Transmisor audio Bluetooth
1 x manual de usuario
3. Conexión

4. Guía de usuario
4.1. Funciones generales
4.2. Emparejamiento con un teléfono móvil o con otro dispositivo
Para utilizar los auriculares Bluetooth, se deben conectar a un teléfono móvil u a otro dispositivo
bluetooth. Una vez emparejados, los dos dispositivos mantendrán la conexión y se
conectarán automáticamente cuando están en el área de conexión, si tienen la función bluetooth
activada.

Encender los auriculares en modo emparejamiento
Si no hay función bluetooth soportada por el dispositivo, vais a necesitar el adaptador incluido
en el paquete. Introducir la copla Jack 3.5 mm en el puerto de auriculares del dispositivo y
encender el emisor.
Emparejamiento con un ordenador u con otros dispositivos
permitirá el acceso a la música y a las llamadas, como también su control.
Su teléfono os confirma el emparejamiento, pulsar OK
Seleccionar la conexión a los auriculares del teléfono. Esta os
Si el teléfono pide un código/una contraseña por favor usen el código
teléfono. Para más detalles consulten el manual del teléfono.
Después de unos segundos, el teléfono mostrará los dispositivos
Encender el teléfono y asegúrense que la función bluetooth es activa. Encender los auriculares
bluetooth y entrar en modo emparejamiento
Buscar los auriculares bluetooth del menú de búsqueda bluetooth del
Emparejamiento del teléfono
Después de unos segundos aparecerá una lista con los dispositivos disponibles. Una vez la lista
visualizada, seleccionar ʺTellur ZEALʺ
Más detalles sobre este encontráis en el manual del dispositivo que deseáis conectar con los
auriculares.
Abrir el programa de bluetooth del dispositivo con el que deseáis conectar los auriculares,
después de este buscar los dispositivos disponibles.
4.3. Carga
dispositivo para un mínimo de 6 horas antes de su primer uso. Introducir el
puerto USB en la fuente de electricidad deseada, y el puerto microUSB en
el terminal de los auriculares. Durante la carga una luz indicadora roja se
encenderá intermitentemente. Una vez que el dispositivo se haya cargado
completamente, se encenderá una luz indicadora de color azul.
La carga se puede hacer tanto del enchufe como desde un puerto
USB (Portátil, PC, Adaptador AC, etc.). Asegúrense que habéis cargado el
ATENCIÓN!
Utilizar solamente cargadores de confianza, sobre los cuales no
han ocurrido modificaciones frente a la forma final de fábrica. Los
dispositivos deben cargarse mínimo 6 horas, especialmente si no
se ha utilizado un largo periodo de tiempo.

5. Especificaciones técnicas
6. Servicio y soporte
Si su dispositivo no funciona correctamente, os rogamos que lo presentéis a la
cuando se alterna luces LED rojas y azules, abrir el dispositivo a conectar y activar el modo
Bluetooth, emparejamiento entre los dos dispositivos se realiza de forma automática.
7. Transmisor audio Bluetooth
Versión Bluetooth: Bluetooth V2.1 + EDR
Frecuencia de respuesta : 2.4 GHz – 2.4835 GHz
Sensibilidad : >74 4dB
Campo de trabajo : 10 m
Tiempo de reproducción : 8 horas
Tiempo de carga : 2~3 horas
Batería : 270 mAh
Emparejamiento: Presione el botón de Bluetooth durante seis segundos de duracion
8. Preguntas frecuentes
1. Porque no se oyen los auriculares aunque están encendidas?
2. Porque no se oye nada cuando pongo música?
- Verifiquen la conexión entre la fuente de reproducción y los auriculares.
Si no veáis ningún problema rehagáis la conexión.
- Mantenga pulsada el botón de volumen ʺ + ʺ para que os aseguréis
que el volumen no es demasiado bajo.
3. Como puedo saber cuándo los auriculares están cargados?
4. Por qué no puedo conectar el segundo teléfono?
- Por favor asegúrense que habéis puesto los auriculares en modo
- Asegúrense que habéis cargado los auriculares durante mínimo 6 horas antes de
su primer uso. Consulten el indicador luminoso de advertencia.
- Una luz indicadora azul se encenderá una vez que los auriculares han acabado de
cargar. (luz roja durante la carga).
emparejamiento, luego pulsar una vez el botón MFB para activar el modo de doble
conexión. Luego conectar teléfono 1 a los auriculares. Reabrir los auriculares y después
conectar teléfono
2. Al final, reconectar teléfono 1 a los auriculares desde el menú del teléfono
tienda de donde se ha comprado.


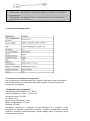
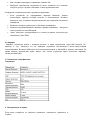
1 x
3.


Bluetooth V4 1
A2DP1.2AVRCP1.4 HSP1.2 HFP1.6
DSP
10m
20HZ-20KHZ
20mW
90dB
THD
3%
180X70X162mm
7.
: Bluetooth V2.1 + EDR
: 2.4 GHz 2.4835 GHz
: >74 4dB
: 10 m
: 8
: 2~3
: 270 mAh
: ,
,
.

8
-
-
-

Polski
1.
2.
3.
4.
4.1
4.2
4.3
5.
6.
7. Nadajnik Bluetooth audio
8.

sposobem pracy tego produktu.
1.
2.
skaleczenia lub inne rany.
3.
4.
5.
2.
1 x Przewód zasilania USB
1 x Kabel audio (AUX)
1 x Nadajnik Bluetooth audio
3.

4.Instrukcja obsługi
4.1Funkcje ogólne
4.2 Połączenie z telefonem komórkowym
Aby używać słuchawek Bluetooth, należy je połączyć z telefonem komórkowym lub innym
urządzeniem z bluetooth. Po pierwszym połączeniu/parowaniu, urządzenia zapamiętają się
nawzajem i połączą się automatycznie za każdym razem, kiedy znajdą się w swoim zasięgu
i mają włączony bluetooth.

ji telefonu.
P
UWAGA!
Parowanie z telefonem
Należy korzystać wyłącznie z zaufanych ładowarek, których nie poddano
modyfikacjom po wyprodukowaniu. Urządzenia należy ładować przez
minimum 6 godzin, szczególnie jeżeli nie były używane przez dłuższy okres.

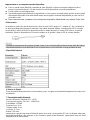
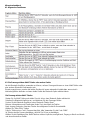
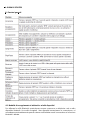
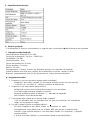
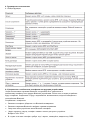
5.Dane techniczne:
Parametr
Versja Bluetooth
Bluetooth V4.1
Profil Bluetooth
A2DP1.2AVRCP1.4HSP1.2HFP1.6
DSP
Pole
10 m
20Hz-20KHz
20 mW
THD
Czas odtwarzania
12 godzin
2 godziny
180 X 70 X 162 mm
Waga
150
6. Serwisowanie i wsparcie techniczne
7. Nadajnik Bluetooth audio:
Versja Bluetooth: Bluetooth V2.1 + EDR
: 2.4 GHz 2.4835 GHz
: >74 4dB
: 10 m
Czas odtwarzania: 8 godzin
: 2~3 godzin
Bateria: 270 mAh
Parowanie: , kiedy
,
p
zostanie wykonana automatycznie.
8.
1.
-
2. Dlaczego nic nie
-
widocznego problemu, podłączyć ponownie urządzenia.
-Nacisnąć i przytrzymać przycisk „+”, aby się upewnić, że ustawiona głośność
jest prawidłowa.
3. Jak mogę wiedzieć, czy słuchawki są ładowane?
-Po zakończeniu ładowania, zapali się niebieskie światełko LED. (podczas
ładowania światełko jest czerwone)
4. Dlaczego nie mogę podłączyć drugiego telefonu?
-Upewnić się, że słuchawki są w trybie parowania po czym nacisnąć raz przycisk
„MFB” dla aktywowania trybu podwójnego parowania. Podłączyć teraz pierwszy
telefon do słuchawek. Ponownie włączyć słuchawki i podłączyć drugi telefon. Na
koniec, podłączyć jeszcze raz pierwszy telefon do słuchawek przy pomocy menu w
telefonie.

7.

1\
2\ -
3\
4\
5\
1
3. Схема на свързване
1. 3.5ММ аудио вход
2. Включване/изключване /Вход в режим свързване / Приемане
на повикване Отхвърляне на повикване Приключване на
повикване Набиране на последно избран номер Пускане /
Пауза
3. Зареждане
4. Микрофон
5. Намаляване на звук/Предишен
6. Усилване на звук/Следващ
3. Схема на свързване

4.2. Свързване на мобилния телефон към други устр
твото,
ойства
За да използвате блутут слушалките, трябва първо да свържете слушалките с телефон
или с компютър. След като блутут слушалките са свързани към конкретен мобилен
телефон; те ще останат свързани и автоматично разпознават устройс когато същото
е в обхват.

че блутут функцията е активирана.
Включете устройството и активирайте режим на свързване.
Отворете софтуера за блутут (като например БлуСолей (BlueSoleil)),
инсталиран на Вашия компютър, и изберете функцията “Търсене на блутут
устройства” (Search your Bluetooth devices). Разгледайте ръководството за
потребителя на софтуера за блутут за повече информация.
След няколко секунди “наименованието на устройството” ще се появи като
открито в списъка на блутут софтуера на Вашия компютър. Изберете тази
икона и натиснете с десния бутон на мишката върху “свързване с аудио
устройство” за същото действие.
Отворете медия плейъра, за да слушате музика, да гледате
телевизия/филм и да играете игри, а след това звукът ще бъде
възпроизвеждан на Вашето устройство.
4.3. Зареждане на устройството
Устройството може удобно да се свърже към зарядно устройство или с USB
зарядно с маркиран микро USB порт. Уверете се, че устройството ви е напълно
заредено в продължение на най-малко 6 часа преди първоначалната му
употреба. Поставете единия терминал на зарядното устройство към източник на
AC или USB порт на компютъра, а другия терминал към микро USB. По време на
зареждането, червения светодиод свети постоянно. Когато зареждането
приключи, синия светодиод светва.

6. Техническо обслужване и поддръжка
Ако устройството не функционира както трябва, може да го занесе до Вашите
местни доставчици на техническо обслужване или до съответния дилър за
техническо обслужване.
7. Bluetooth аудио предавател
версия Bluetooth: Bluetooth V2.1 + EDR
Честотна реакция: 2.4 GHz – 2.4835 GHz
Сигнал-към-шум: >74 4dB
RF обхват: 10 m
Време за експлоатация: 8 часа
Време за зареждане: 2~3 часа
батерия: 270 mAh
Свързване: натиснете и задръжте бутона Bluetooth за 6 секунди, когато
редуващи се червени и сини LED светлини , отваряте устройството да бъде
свързан и включете режим Bluetooth, брачен между двете устройства ще се
извършва автоматично.

8.FAQ
1\
2\
3\
4 \

5.

4.Микрофон
5.Громкость „-”/ предыдущий
6.Громкость „+”/ следующий

получить доступ к музыке и вызовам, а также управление ими.
мобильному телефону или к другим Bluetooth устройствам. После этого, эти два устройства
будут сохранять соединение и будут подключаться автоматически, когда они находятся в
зоне действия Bluetooth.
Сопряжение с телефоном
4.2 Сопряжение с мобильным телефоном или другими устройствами
Чтобы использовать наушники Bluetooth, они должны быть подключены к
Включите телефон и убедитесь что Bluetooth активирован.
Включите наушники Bluetooth и войдите в режим сопряжения.
Запустите поиск устройств в меню Bluetooth телефона.
Через несколько секунд телефон покажет список доступных устройств.
Выбрать Tellur ZEAL.
В случае если ваш телефон требует код / пароль, пожалуйста, введите код “0000

.
4.3 Зарядка
Заряжать устройство можно с помощью розетки, а также посредством порта USB (ноутбук, PC,
адаптер, и т.д.). Убедитесь что вы зарядили устройство как минимум 6 часов перед первым
использованием. Вставьте USB порт в источник электроэнергии и MicroUSB в разьем наушников. Во
время зарядки, красный свет будет мигать. Как только устройство будет полностью заряжено,
загорится синий свет.
5. Технические спецификации
Параметры
6. Обслуживание и сервис
Если ваше устройство не работает правильно, пожалуйста, обратитесь в
Сервис.

2.4835 GHz
10 m
- Убедитесь, что устройство было заряжено как минимум 6 часов перед
первым использованием.
2. Почему ничего не слышно, когда включается музыка?
- Убедитесь что наушники сопряжены с устройством.
- Нажмите кнопку „+” чтобы убедиться, что звук не отключен.
3. Как можно узнать что наушники заряжены?
- Как только устройство будет полностью заряжено, светодиодный индикатор
загорится синим цветом.
4. Почему не удаѐтся подключить второй телефон?
- Проверьте, пожалуйста, если наушники вошли в режим сопряжения, потом
нажмите один раз кнопку MFB для активации двойного режима. Затем
подключите телефон 1 к наушникам. Включите повторно наушники а затем
подключите телефон 2.
-
 1
1
-
 2
2
-
 3
3
-
 4
4
-
 5
5
-
 6
6
-
 7
7
-
 8
8
-
 9
9
-
 10
10
-
 11
11
-
 12
12
-
 13
13
-
 14
14
-
 15
15
-
 16
16
-
 17
17
-
 18
18
-
 19
19
-
 20
20
-
 21
21
-
 22
22
-
 23
23
-
 24
24
-
 25
25
-
 26
26
-
 27
27
-
 28
28
-
 29
29
-
 30
30
-
 31
31
-
 32
32
-
 33
33
-
 34
34
-
 35
35
-
 36
36
-
 37
37
-
 38
38
-
 39
39
-
 40
40
-
 41
41
-
 42
42
-
 43
43
-
 44
44
-
 45
45
-
 46
46
-
 47
47
-
 48
48
-
 49
49
-
 50
50
-
 51
51
-
 52
52
-
 53
53
-
 54
54


en otros idiomas
- français: Tellur TLL511191 Manuel utilisateur
- italiano: Tellur TLL511191 Manuale utente
- English: Tellur TLL511191 User manual
- Deutsch: Tellur TLL511191 Benutzerhandbuch
- русский: Tellur TLL511191 Руководство пользователя
- polski: Tellur TLL511191 Instrukcja obsługi
- română: Tellur TLL511191 Manual de utilizare
Otros documentos
-
BeeWi BBH300 Manual de usuario
-
PNI MIKE 80 Manual de usuario
-
Ibiza Sound DJM150BT-VHF Manual de usuario
-
PNI MIKE 65 Manual de usuario
-
KREAFUNK Ahead Manual de usuario
-
-
NGS Black Artica Deluxe Manual de usuario
-
Blueant Z9 Manual de usuario
-
Trevi DJ 1280 BTR Manual de usuario
-