- Categoría
- Accesorios para motocicletas
- Tipo
- Manual de usuario

Thank you for choosing Fanttik.
Thank you for purchasing the Fanttik X8 APEX air inflator. With its large LED screen and easy-to-use interface, this is
a highly capable inflator fit for a wide range of tasks.
Contents
1. PRODUCT OVERVIEW ...............................................
2. PACKAGE CONTENTS................................................
3. BATTERY LEVEL INDICATOR & CHARGING.............
4. TURNING THE INFLATOR ON/OFF............................
5. CONNECTING THE AIR TUBE AND NOZZLE.............
6. DETECTING THE CURRENT PRESSURE..................
7. DETERMINING THE RIGHT PRESSURE VALUE........
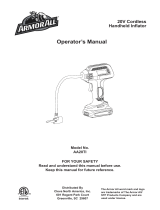
1. Battery indicator
2. Real-time pressure value
3. Target pressure value
4. Power button
5. Light button
6. Preset mode
7. Pressure unit
8. “+” button
9. Mode button
10. “-” button
11. Air outlet
12. USB-A port
13. USB-C port
Carefully check the package contents. If anything is missing or damaged, please contact online customer service for support.
Battery Level Indicator
The battery level is shown by four bars, with each bar representing 25%.
1 bar = under 25%
2 bars = between 25% and 50%
3 bars = between 50% and 75%
4 bars = between 75% and 100%
Note:The battery indicator will flash when the battery level is below 20%.
Charging
Fully charge the inflator before using it for the first time. To charge, connect it to a certified 5.0V/3A
USB charger with the charging cable.
While charging:
1 bar flashing = under 25%
1 bar solid, 2nd bar flashing = between 25% and 50%
2 bars solid, 3rd bar flashing = between 50% and 75%
3 bars solid, 4th bar flashing = 75% and 100%
All 4 bars solid = fully charged
The inflator will automatically switch off if left inactive for 5 minutes after being fully charged.
Note:
• The inflator cannot be used while it is charging.
• The USB charger is sold separately. Make sure to use a certified charger.
ON
Long-press for 1.5 seconds to turn on.
OFF
When the inflator is turned on, long press 1.5 seconds to turn off.
The inflator will automatically turn off in the cases below:
1: After 3 minutes of inactivity.
2: When the charging cable is disconnected during charging.
3: After 5 minutes of inactivity after being fully charged.
4: When the inflator is being used as a power bank, after disconnecting the other device.
5. Inflate over 5 minutes when the target pressure value is below 5psi.
6. Inflate over 3 minutes when the target pressure value is above or equates 120psi.
Connecting the Air Tube
Connect one end of the air tube (with screw thread) to the inflator before inflating.
Valve Type Inflation Adapter
Valve Type Inflation Adapter
Valve Type Inflation Adapter
Schrader Valve
Tires on cars, motorcycles, e-bikes, and most mountain bikes use a Schrader valve.
To inflate: The inflator can be directly connected to a Schrader valve to start inflating.
To deflate: Use an proper tool (such as 4mm Allen wrench) to press the pin inside the air
valve to release air.
Presta Valve Adapter
Road bicycles and certain mountain bikes use a Presta valve which requires the included
Presta valve adapter to be used.
To inflate:
1. Connect the Presta valve adapter to the Schrader valve of the air tube.
2. Unscrew the ring of the Presta valve of the tire.
3. Connect the Presta valve adapter to the tire’s Presta valve to start inflating.
To deflate: Unscrew the ring of the tire’s Presta valve, and press the valve stem down to release air.
Needle Valve Adapter
To inflate balls like basketballs and footballs, the included needle valve adapter will
need to be used.
To inflate: Screw the needle valve adapter onto the Schrader valve adapter, then
insert the needle into the valve of the ball to start inflating.
To deflate: Insert the needle valve adapter into the valve of the ball, and gently apply
pressure to the ball to release air.
When the inflator is turned on, connect the air tube to the device to be inflated, and then the LED screen will display the
current pressure value.
To avoid injuries from bursting items due to over-inflation, make sure you are aware of the maximum inflation pressure
before you start.
Tires
The recommended air pressure of tires for cars, bicycles, and motorcycles is indicated
on the tire's sidewall. The recommended tire pressure for cars is also indicated on the
inside of the driver's side door.
For details concerning load carrying capacity and recommended air pressures, refer to
your vehicle's instructions or manual.
Balls
The recommended air pressure for footballs, basketballs, volleyballs, and other balls is
indicated near the ball's air valve.
Air Pressure Reference Table
Category
Bicycles
Motorcycles
Cars
Balls
Type Recommended
Pressure Range
Electric Folding Bike tires
12-, 14-, & 16-inch bicycle tires
20-, 22-, & 24-inch bicycle tires
26-, 27.5-, & 29-inch mountain bike tires
Electric Scooter tires
700c road bike clincher tires
700c road bike tubular tires
10 - 50psi
30 - 50psi
40 - 50psi
45 - 65psi
40 - 50psi
100 - 130psi
120 - 145psi
Scooter & street motorcycle tires
Car tires
1.8 - 3.0bar
2.2 - 2.8bar
Basketball
Soccer ball
Volleyball
Football
7 - 9psi
8 - 16psi
4 - 5psi
12 - 14psi
Note: Pressure range values are for reference only. Always refer to the instructions or manual of the item being inflated
for actual inflation pressure specifications. (The data above is from the QiCYCLE lab.)
Switch Modes
Click the Mode button to switch between the five inflation modes below. Long press the Mode button to cycle through
psi/bar/kPa. The number on the top of the screen indicates the real-time pressure of the inflated device, and the number
on the bottom indicates the preset pressure.
Adjusting the Preset Pressure
Manual mode: When in the manual mode, no mode icon is selected on the screen.
The preset pressure value is adjustable, and the value and unit will be saved.
Adjustable Range: 3-150psi / 0.2 - 10.3bar
Car Mode: Default 2.5bar
Adjustable Range: 1.8-3.5bar
Motorcycle Mode: Default 2.4bar
Adjustable Range: 1.8-3.0bar
Bicycle Mode: Default 45psi
Adjustable Range: 30-145psi
Ball Mode: Default 8psi
Adjustable Range: 4-16psi
After selecting a mode, press + or - to increase or decrease the target pressure value. Press and hold the
+ or - button to quickly adjust the pressure value.
Press the light button to turn the inflator's light on/off. The light makes it easy to see in the dark when you
have on any tasks, such as connecting the air compressor to a valve.
When the light is on, press the light button to cycle through Spotlight, SOS and OFF.
Caution
Items such as balloons, beach balls, and swim rings cannot be automatically inflated because they have an air pressure
requirement below the air compressor's minimum pressure range. Only inflate these items manually with caution.
Battery Information
The inflator's battery lasts about 40 minutes on a full charge, running without a load at an ambient temperature of 25°C.
Using the air compressor under a heavy load or at lower ambient temperatures may reduce its battery life.
Start Inflating
Press the Power button to start inflating. When inflating, the air compressor may be as loud as 75 - 80 dB.
Please take appropriate precautions to protect your hearing. The air compressor and air tube can get very
hot after running for a while. Avoid prolonged skin contact with the tube to prevent injuries.
Stop Inflating
Once the target pressure value has been reached, the inflator will automatically stop inflating. The inflator
can also be manually stopped at any time by pressing the power button while inflating.
The air compressor's air hose may get very hot after inflating. To prevent injuries, exercise caution when disconnecting it
from a valve. Some air may leak out of the valve when disconnecting the air compressor. To avoid pressure loss, quickly
disconnect the air hose from the valve.
Note:
The inflator should be turned on when being used as a power bank.
When being used as a power bank, the inflator will enter "Energy Saving" mode if inactive for 3 minutes, and the screen
will only display the battery level icon.
In energy saving mode, when disconnecting the charged device from the inflator, it will automatically turn off.
This inflator can be used as a 5V/2A power bank when it is not being charged or inflating other devices.
The battery needs to have a reasonable level of charge in order to work as a power bank.
13. TROUBLESHOOTING
12. POWER BANK FUNCTION
11. DISCONNECTING THE AIR TUBE10. INFLATING
9. LIGHT
8. PRESET PRESSURE VALUE
6. DETECTING THE CURRENT PRESSURE
7. DETERMINING THE RIGHT PRESSURE VALUE
5. CONNECTING THE AIR TUBE AND NOZZLE
4. TURNING THE INFLATOR ON/OFF
3. BATTERY LEVEL INDICATOR & CHARGING2. PACKAGE CONTENTS1. PRODUCT OVERVIEW 14. SPECIFICATIONS 15. SAFETY INSTRUCTIONS
Problem Solution Problem Solution
1. Check whether the air compressor's battery
level is sufficient.
2. Check whether the air hose is leaking.
3. Check whether both ends of the air hose are
securely connected.
4. Check whether the item that is being inflated
is leaking
1. Check whether the air compressor's battery
level is sufficient.
2. Check whether the pressure of the item
being inflated exceeds the preset pressure.
Make sure the air compressor is set to the
correct mode. Manual mode has a blank display
without any icons and allows you to adjust the
preset value within the range of 3 - 150 psi.
The pressure of low-pressure inflatables
including balloons is too low to be measured.
Slow inflation speed
Air leakage after
connecting the air
tube
The battery level
indicator is different
when inflating
compared to standby
state
The battery level
indicator doesn’t
show on the screen
after charging
The inflator cannot
charge other devices.
None of above. The
inflator doesn’t react
with any input
Make sure the air hose is securely connected.
The lithium battery's voltage level significantly
drops when discharging power, causing the
battery level indicator to have a different display
when inflating compared to standby state. This
is normal.
Use a certified adapter and the included charging
cable, and try charging again.
Simultaneously press the light button and mode
button to restart the inflator.
1. Make sure the remaining battery level is
sufficient.
2. The discharging output is 5V/2A. Make sure
this output meets the requirements of the
charged device.
3. The inflator can not charge other devices
while inflating.
Air compressor
turns on but
does not inflate
Unable to increase
or decrease the
preset pressure
The inflator inflates
normally but the
displayed pressure
is zero
Name
Model
Executive Standard
Dimensions
Inflation Pressure Range
Operating Temperature
Storage Temperature
Air Valve Dimensions
Battery Capacity
Working Noise
Input
Output
Input Port
Output Port
Charging Time
Sensor Accuracy
Air Inflator
X8 APEX
QXMQJ0002-2019
200.5×63.5×63.5mm(Excluding air tube)
3-150psi / 0.2-10.3bar
Charging0℃~45℃, Discharging-10℃~45℃
-10℃~45℃
Length 350mm
2600mAh(28.86 Wh)
Lower than 80dB within 1 meter
5V/3A
5V/2A
USB Type-C
USB-A
<4hours
±2psi
8. PRESET PRESSURE VALUE....................................
9. LIGHT.........................................................................
10. INFLATING...............................................................
11. DISCO NNECTING THE AIR TUBE..........................
12. POWER BANK FUNCTION.....................................
13. TROUBLESHOOTING.............................................
14. SPECIFICATIONS...................................................
15. SAFETY INSTRUCTIONS.......................................
02
03
04
05
06
07
07
10
11
12
13
13
14
15
16
Gracias Por Elegir Fanttik.
Gracias por comprar el inflador de neumáticos Fanttik X8 Apex. La gran pantalla LED y el diseño de interfaz fácil de uasr lo
convierten en un inflador de gran capacidad apto para una amplia gama de tareas.
Contenido
1. DESCRIPCIÓN GENERAL DEL PRODUCTO................
2. CONTENIDO DEL PAQUETE.........................................
3. INDICATOR DE LA BATERÍA Y LA CARGA..................
4. ENCENDER Y APAGAR EL INFLADOR DE NUEMÁTICO..
5. CONEXIÓN DEL TUBO DE AIRE Y LA TOBERA...........
6. DETECTAR VALOR ACTUAL DE PRESIÓN..................
7. DETERMINAR CORRECTO VALOR DE PRESIÓN.......
1
2
3
6
7
8
9
10
4
511
12 13
1
2
3
6
7
8
9
10
4
511
12 13
1. Indicador de batería
2. Valor de presión en tiempo real
3. Valor de presión objetivo
4. Botón de encendido
5. Botón de luz
6. modos preestablecidos
7. Unidad de presión
8. "+" botón
9. Botón de modo
10. "-botón "
11. Salida de aire
12. Puerto USB-A
13. Puerto USB-C
Compruebe cuidadosamente el contenido del paquete, si hay alguna omisión o daños, por favor, póngase en contacto con
el servicio de atención al cliente en línea para obtener asistencia.
Indicación del nivel de la batería
Hay 4 rejillas para indicar el nivel de batería restante del inpisos':
1 rejilla se ilumina: 0%nivel de batería≤25%
2 rejilla se iluminan: 25%nivel de batería≤50%
3 rejillas iluminadas: 50%nivel de batería≤75%
4 luces de rejilla: 75%nivel de batería≤100%
Nota: El indicador de la batería parpadea cuando la electricidad está inferior al 20%.
La Carga del inflador
Por favor cargue el inflador completamente antes del primer uso. Para cargarlo, conéctelo a un cargador
USB certificado de 5.0V / 3A con el cable de carga.
Indicación de la batería durante la carga:
1 barra siempre encendida: menos de 25%
1 barra siempre encendida, segunda paradea: 25%-50%
2 barras siempre encendidas, tercera paradea: 50%-75%
3 barras siempre encendidas, cuarta paradea: 75%-100%
4 barras siempre encendidas: carga completa
El inflador se apagará automáticamente sin ninguna operación durante 5 minutos después de la
carga completa completamente cargado.
NOTA:
• No utilizar el inflador durante la carga.
• El cargador USB se vende por separado. Asegúrese de utilizar un cargador certificado.
Encendido
Mantenga pulsado durante 1,5 segundos para encenderlo.
Apagado
En el estado de encendido, mantenga presionado durante 1,5 segundos para apagarlo.
El inflador se apagará automáticamente en los casos lo siguientes:
1: Después de 3 minutos de inactividad.
2: Cuando el cable de carga se desconecta durante la carga.
3: Cuando el cable de carga se desconecta durante la carga.
4: El dispositivo cargado desconectado con el inflador utilizado como un power bank.
5. Infle durante 5 minutos cuando el valor de presión objetivo sea inferior a 5 psi.
6. Infle durante 3 minutos cuando el valor de presión objetivo sea superior o sea igual a 120 psi
Conexión del tubo de aire
Conecte un extremo del tubode aire (con rosca de tornillo) al inflador antes de inflarse.
Tipo de
válvula
Adaptador
de inflación
Tipo de
válvula
Adaptador de
inflación
Tipo de
válvula
Adaptador
de inflación
Válvula Schrader
Los neumáticos de coches, motocicletas, bicicletas electrónicas y la mayoría de los
baberos de montañautilizan una válvula Schrader.
Para inflarse: El inflador se puede conectar directamente a una válvula Schrader para
iniciar la inflación.
Para desinflar: Utilice una llave Allen de4 mm (como 4 mm) parapresionar el pasador
dentro de la válvula de aire para liberar aire.
Adaptador de válvula Presta
Las bicicletas de carretera y ciertas bicicletas de montaña utilizan una válvula Presta que
requiere el uso del adaptador de válvula Presta incluido.
Para inflar:
1. Conecte el adaptador de la válvula Presta a la válvula Schrader del tubo de aire.
2. Desatornille el anillo de la válvula Presta del neumático.
3. Conecte el adaptador de la válvula Presta a la válvula Presta del neumático para
iniciar la inflación.
Para desinflar: Desatornille el anillo de la válvula Presta del neumático y presione el
vástago de la válvula hacia abajo para liberar aire.
Adaptador de válvula de aguja
Para inflar pelotas como pelotas de baloncesto y fútbol, será necesario utilizar el adaptador
de válvula de aguja incluido.
Para inflar: Atornille el adaptador de la válvula de aguja en el adaptador de la válvula
Schrader y luego inserte la aguja en la válvula de la bola para iniciar la inflación.
Para desinflarse: Inserte el adaptador de válvula le needen la válvula de la bola y aplique
suavemente presión a la bola para liberar aire.
Cuando el inflador está encendido, conecte el tubo de aire al dispositivo que se va a inflar, y luego la pantalla LED
mostrará el valor de presión actual.
Para evitar lesiones causadas por la explosión de artículos debido a un inflado excesivo, asegúrese de conocer la presión
máxima de inflado antes de comenzar.
Neumáticos
La presión de aire recomendada de los neumáticos de automóviles, bicicletas y
motocicletas se indica en la pared lateral del neumático. La presión recomendada de
los neumáticos para los coches también se indica en la parte interior de la puerta del
lado del conductor.
Para obtener más información sobre la capacidad de carga y las presiones de aire
recomendadas, consulte las instrucciones o manuales de su vehículo.
bolas
La presión de aire recomendada para balones de fútbol, baloncesto, voleiboles y otras bolas
se indica cerca de la válvula de aire de la pelota.
Tabla de referencia de la presión del aire
categoría
Bicicletas
Motocicletas
Coches
Balones
tipo recomendado
Rango de presión
Neumáticos de bicicleta plegable eléctrica
Neumáticos para bicicletas de 12, 14 y 16 pulgadas
Neumáticos para bicicletas de 20, 22 y 24 pulgadas
Neumáticos de bicicleta de montaña de 26, 27,5 y 29 pulgadas
Neumáticos de Electric Scooter
Neumáticos cubierta de bicicleta de carretera de 700c
Neumáticos tubulares de bicicleta de carretera de 700c
10 - 50psi
30 - 50psi
40 - 50psi
45 - 65psi
40 - 50psi
100 - 130psi
120 - 145psi
Neumáticos para scooters y motocicletas de calle
Neumáticos de coche
1.8 - 3.0bar
2.2 - 2.8bar
baloncesto
Fútbol
voleibol
7 - 9psi
8 - 16psi
4 - 5psi
12 - 14psi
Nota: Los valores del rango de presión son solo para referencia. Consulte siempre las instrucciones o el manual del
artículo que se va a inflar para conocer las especificaciones reales de presión de inflado. (Los datos anteriores
proceden de la Laboratorio QiCYCLE.)
Cambiar el modo
Haga clic en el botón Modo para cambiar entre los cinco modos de inflación siguientes. Mantenga presionado el botón
Mode para alternar entre psi / bar / kPa. El número en la parte superior de la pantalla indica la presión en tiempo real del
dispositivo inflado y el número en la parte inferior indica la presión preestablecida.
Nota:
Cuando termina la inflación en el modo manual, el valor de presión objectivo se guarda como valor de presión for
defecto.
Para una mejor experiencia de inflado, le sugerimos inflar objetos como pelotas a través del modo de balón.
Ajuste de la presión preestablecida
Modo manual: en el modo manual, no se mostra ningún icono de modo en la pantalla. El valor de presión
preestablecido es ajustable, y el valor y la uindad se guardan.
Rango ajustable: 3 - 150psi / 0.2 - 10.3bar
Modo de coche: 2.5bar por defecto
Rango ajustable: 1.8 - 3.5bar
Modo de bicicleta: 45psi por defecto
Rango ajustable: 30 - 145psi
Modo de motocicleta: 2.4 bar por defecto
Rango ajustable: 1.8 - 3.0bar
Modo de balón: 8psi por defecto
Rango ajustable: 4 - 16psi
Después de seleccionar un modo, pulse + o - para aumentar o disminuir el valor de presión preestablecido.
Mantenga pulsado el botón + o - para ajustar rápidamente el valor de presión.
Presione el botón de luz para encender / apagar la luz del inflador. La luz le permite ver fácilmente en la
oscuridad cuando realiza cualquier operación (como conectar el inflador a una válvula).
Cuando la luz esté encendida, presione el botón de luz para alternar entre Spotlight, SOS y OFF.
Precaución
No puede inflar automáticamente artículos como globos, pelotas de playa y anillos de natación cuales requicitos de presión
de aire inferior al rango de presión mínima del inflado. Solo puede inflar estos elementos manualmente con cuidado.
Información de la batería
La batería del Inflador dura unos 40 minutos con una carga completa funcionando sin carga a una temperatura ambiente
Iniciar la inflación
Presione el botón de encendido para iniciar el inflado. La presión actual se muestra en tiempo real durante el
inflado. Al inflar, el inflador puede tener un volumen de 75 a 80 dB. Por favor, tome las precauciones
apropiadas para proteger su audición. El inflador de aire y el tubo de aire pueden calentarse mucho después
de funcionar durante un tiempo. Evite el contacto prolongado de la piel con el tubo para evitar lesiones.
Terminar la inflación
Una vez que se alcanza el valor de presión objetivo, el Inflador detendrá la inflación automáticamente. Durante
el inflado, también puede terminar manualmente el inflador en cualquier momento presionando el botón de
encendido.
de 25°C. El uso del inflador de aire bajo una carga pesada o a temperaturas ambiente más bajas puede reducir su
la vida útil de la batería.
El tubo de aire del compresor de aire puede calentarse mucho después del inflado. Para evitar lesiones, tenga cuidado
al desconectarlo de la válvula. Es posible que se escape algo de aire de la válvula al desconectar el compresor de aire.
Para evitar la pérdida de presión, desconecte rápidamente el tubo de aire de la válvula.
Nota:
El inflador debe estar encendido cuando se usa como banco de energía.
Cuando se utiliza como banco de energía, el inflador entrará en el modo "Ahorro de energía" si está inactivo durante 3
minutos, y la pantalla solo mostrará el icono de nivel de batería.
En el modo "Ahorro de energía", al desconectar el dispositivo cargado del inflador, se apagará automáticamente.
Este inflador se puede utilizar como el banco de energía de 5V / 2A cuando no se está cargando e inflando otros
dispositivos. Se requiere cierto nivel de electricidad cuando el inflador se trabaja como un banco de energía.
13. SOLUCIÓN DE PROBLEMAS
12. FUNCIÓN DEL BANCO DE ENERGÍA
11. DESCONECTAR EL TUBO DE AIRE
10. LA INLFACIÓN
9. LA LUZ DEL INFLADOR
8. VALOR DE PRESIÓN PREESTABLECIDO
6. DETECTAR VALOR ACTUAL DE PRESIÓN
7. DETERMINAR CORRECTO VALOR DE PRESIÓN
5. CONEXIÓN DEL TUBO DE AIRE Y LA BOQUILLA
4. ENCIENDA/APAGUE EL INFLADOR
3. INDICADOR DE LA BATERÍA Y LA CARGA 2. CONTENIDO DEL PAQUETE 1. DESCRIPCIÓN GENERAL DEL PRODUCTO 14. ESPECIFICACIONES 15. INSTRUCCIONES DE SEGURIDAD
Problema Solución Problema Solución
1. Compruebe si la eletricidad de la batería
es suficiente.
2. Compruebe si la manguera de aire tiene fugas.
3. Compruebe si ambos extremos de la manguera
de aire están conectados de forma segura.
4. Compruebe si el artículo inflado tiene fuga.
1. Compruebe si la electricidad de la batería
es suficiente.
2. Compruebe si la presión del artículo inflado
excede la presión preestablecida.
En el modo manual, el icono de modo en la
pantalla LED no se iluminará y puede ajustar el
valor predeterminado dentro del rango de
3-150 psi.
La presión de los inflables de baja presión,
incluidos los globos, es demasiado baja para
medir.
Velocidad de inflado
lenta
Fuga de aire
después de conectar
el tubo de aire
El indicador de nivel
de batería es
diferente al inflarse
en comparación con
el estado de espera
El indicador de nivel
de batería no se
muestra en la pantalla
después de cargar
El inflador no puede
cargar otros
dispositivos.
Ninguna de las
anteriores. El inflador
no reacciona con
ninguna operación.
Asegúrese de que la manguera de aire esté
conectada de forma segura.
El nivel de voltaje de la batería de litio
disminuye significativamente al descargar
energía, lo que hace que el indicador de nivel
de batería tenga una pantalla diferente al
inflarse en comparación con el estado de
espera. Esto es normal.
Utilice el adaptador adecuado e conecte el cable
de carga para cargar de nuevo.
Presione simultáneamente el botón luz y el botón
de modo para reiniciar el inflador.
1. Asegúrese de que el nivel de batería restante
sea suficiente.
2. La potencia de salida de descarga es de
5V / 2A. Asegúrese de que esta salida cumple
los requisitos del dispositivo cargado.
3. El inflador no puede cargar otros dispositivos
mientras se infla.
Compresor de aire
está encendido, pero
no se infla
Incapaz de
aumentar o
disminuir la presión
preestablecida
El inflador se infla
normalmente, pero
la presión mostrada
es cero
Nombre
Modelo
Estándar Ejecutivo
Dimensiones
Rango de Presión de Inflado
Temperatura de Trabajo
Temperatura de Almacenamiento
Longitud del tubo de aire
Capacidad de la Batería
Ruido de Trabajo
Potencia de Entrada
Potencia de Salida
Puerto de Entrada
Puerto de Salida
Tiempo de Carga
Precisión del Sensor
Inflador de neumáticos
X8 APEX
QXMQJ0002-2019
200,5×63,5×63,5mm (tubo de aire no incluido)
3 - 150psi / 0.2 - 10.3bar
Cargando: 0ºC - 45ºC; Descargando: -10ºC - 45ºC
-10°C~45°C
350mm
2600mAh (28.86Wh)
2600mAh (28.86Wh)
5V/3A
5V/2A
USB Tipo-C
USB-A
< 4 horas
±2psi
•
•
•
•
•
•
•
•
Este producto no es un juguete, y no debe ser utilizado por los niños. Los usuarios deben tener más de 16 años.
Los usuarios deben tener más de 16 años. Mantenga una distancia segura entre los niños y el inflador durante el inflado.
Hay una batería de litio incorporada dentro del producto. No tire el producto al fuego ni lo deseche al azar en cualquier
lugar. El sobrecalentamiento, el impacto y la entrada de agua pueden aumentar el riesgo de incendio, combustión
espontánea y explosión. Para evitar una explosión, mantenga el inflador alejado de entornos de alta temperatura, como
un automóvil que tenga una exposición prolongada al sol.
Por favor, guarde el producto en una temperatura entre -10ºC y 45ºC. Los ambientes extremadamente calientes o
fríos pueden dañar la batería y acortar la vida útil del inflador.
El almacenamiento prolongado del producto puede disminuir la eficacia de la batería. Cargue el inflador al menos una vez
cada tres meses para mantener su rendimiento.
El producto tiene un motor de DC incorporado, que puede generar chispas eléctricas durante el funcionamiento. No
lo utilice en un entorno inflamable o explosivo.
Si hay un ruido inusual o la temperatura se vuelve muy alta durante el inflado, apague el inflador inmediatamente.
Antes de configurar el valor de presión de inflado, asegúrese de que la unidad esté seleccionada correctamente. Las
unidades de presión confusas pueden provocar un inflado excesivo peligroso.
Conversión de unidades: 1 bar = 14,5 psi, 1 bar = 100 kPa
No deje el Inflador desatendido mientras esté en funcionamiento.
•
•
•
•
Utilice el producto en un ambiente seco y limpio. La intrusión de arena y polvo puede dañar el producto. No lave
el producto con agua.
Utilice un adaptador calificado de 5V /3A y el cable de carga incluido para cargar este producto.
El mal funcionamiento causado por operaciones no siguen los requisitos anteriores no está cubierto por la garantía.
Después de trabajar durante mucho tiempo, la temperatura de la unión entre el tubo de aire y el cuerpo principal
aumentará. Por favor no lo toque directamente para evitar quemaduras.
El inflador está equipado con protección contra cortocircuitos. No conecte su puerto USB-A con su puerto USB-C.
8. VALOR DE PRESIÓN PREESTABLECIDO..............
9. LA LUZ DEL INFLADOR...........................................
10. LA INFLACIÓN........................................................
11. DESCONECTAR EL TUBO DE AIRE......................
12. FUNCIÓN DE BANCO DE ENERGÍA.....................
13. SOLUCIÓN DE PROBLEMAS................................
14. ESPECIFICACIONES ............................................
15. INSTRUCCIONES DE SEGURIDAD......................
19
20
21
22
23
25
25
28
29
30
31
31
32
33
34
12-Month Coverage
Your Warranty Includes
Within 12 months of purchase, we will provide timely and effective
online after-sales service. We will repair or replace any defective
product (due to manufacturing fault) within the warranty period.
How to Return Your Fanttik Product
Contact support@fanttik.com with your order number.
We will issue you a return label for your return.
Tear off the 'Return Details' page and fill in the details. Include this
inside your return package.
We will issue your replacement/refund on receiving the return
package.
Return Details
In order to process your return as quickly as possible, we require
the following information. Please fill out this form and include it in
your return package.
Purchase Name:
Order Number:
Date of Purchase:
Your Email Address:
Place of Purchase:
If your purchase was fulfilled by Amazon, please use Amazon’s
30-day return service.
www.fanttik.comsupport@fanttik.com
- 01 -
- 18 -
- 02 -
- 19 -
- 03 -
- 20 -
- 04 -
- 21 -
- 05 -
- 22 -
- 06 -
- 23 -
- 07 -
- 24 -
- 08 -
- 25 -
- 09 -
- 26 -
- 10 -
- 27 -
- 11 -
- 28 -
- 12 -
- 29 -
- 13 -
- 30 -
- 14 -
- 31 -
- 15 -
- 32 -
- 16 -
- 33 -
- 17 -
- 34 - - 35 -
Note: After 30 minutes, the light will automatically turn off.
Nota: Después del uso durante más de 30 minutos, la luz se apagará automáticamente.
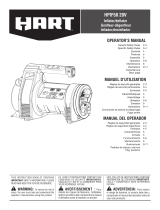
Essential Version X8 APEX Kit
Versión Básica Kit de X8 APEX
Note:
When you have finished inflating an item, the manual mode will remeber the target pressure value as its default pressure value.
For the best inflating experience, we suggest you inflate items like balls via the ball mode. This product is not a toy and should not be used by children. Users should be above 16 years old.
Keep a safe distance between children and the inflator while inflating. There is a built-in lithium battery inside the
product. Don't place the product in fire or dump the battery.
Overheating, damage, or water may increase the risk of fire or explosion. It's best to keep the product away from heat
sources, and not leave it for prolonged periods in a hot car. If the inflator becomes very hot, there is a chance it could
explode.
Please store the product in temperature ranging from -10℃~45℃. Extremely hot or cold environments may damage
the battery and shorten the lifetime of the inflator.
Long-time storage of the product may decrease the effectiveness of the battery. Charge the inflator at least once every
three months to maintain its performance.
The product has a built-in DC motor which may generate sparks during operation. Do not use it in an environment with
dust or gas that is liable to explode.
If there is an unusual noise or the temperature becomes very high during inflating, please turn off the inflator
immediately.
Before setting the inflation pressure value, make sure the pressure unit is correctly selected. Mixing up psi and bar
could lead to dangerous overinflation.
Unit conversion: 1bar = 14.5psi, 1bar = 100kPa
•
•
•
•
•
•
•
•
•
Do not leave the inflator unattended while it is in operation.
Please use the product in a dry and clean environment. The intrusion of sand and dust may cause damage to the
product. Don’t wash the product with water.
Please use a certified 5V/3A adapter and the included charging cable to charge this product. Malfunction caused by
actions not in accordance with the above requirements is not covered by the warranty.
After running for a long time, the temperature of the junction between the air tube and the main body can become very
high. To avoid burns, avoid touching it.
This inflator is equipped with short circuit protection. Do not connect its USB-A port with its USB-C port.
CautionTo reduce the risk of electric shock, do not expose to rain. Store indoor.
•
•
•
•
•
Contents
01~17
18~35
1.English
2.Español
WARRANTY CARD
X8 Apex
air inflator × 1
Needle valve
adaptor × 1
User manual × 1
USB charging
cable × 1
Air tube × 1Storage bag*1
Schrader-Presta
valve adaptor × 1
X8 Apex
air inflator × 1
Needle valve
adaptor × 1
User manual × 1
USB charging
cable × 1
Air tube × 1Storage bag*1
Schrader-Presta
valve adaptor × 1
PU box × 1
X8 Apex Inflador
de neumáticos × 1
Válvula de aguja
adaptador × 1
Manual de
usuario × 1
cable de carga
usb × 1
Tubo de
aire × 1
Bolsa de
alamacenamiento*1
Adaptador de
válvula Schrader
Presta × 1
X8 Apex Inflador
de neumáticos × 1
Válvula de aguja
adaptador × 1
Manual de
usuario × 1
cable de carga
usb × 1
Tubo de
aire × 1
Bolsa de
alamacenamiento*1
Adaptador de
válvula Schrader
Presta × 1
De Caja PU × 1
516-927-8658 Mon-Fri 9AM-5PM (ET)
www.fanttik.com
support@fanttik.com
ACE FARMER LLC
11833 Cutten Rd suite 300 Houston TX 77066 US
X8 APEX Air Inflator
User Manual
Model: X8 APEX
-
 1
1
- Categoría
- Accesorios para motocicletas
- Tipo
- Manual de usuario
en otros idiomas
- English: Fanttik X8 APEX User manual
Otros documentos
-
 Armor All CKA203A Manual de usuario
-
 HART HPIF50 El manual del propietario
-
Ryobi P747 El manual del propietario
-
Ryobi P731 El manual del propietario
-
-
-
-
Craftsman C3 El manual del propietario
-

