
ge.com
©
Safety Instructions ......... 2, 3
Operating Instru,¢ions ...... 4, 5
Care and Cleaning
Air Filter . ................... 6
Outdoor Coils ................ 6
Installation Instructions ...7- i2
Troubleshooting 1@ ........ 14
N,arn;al ()pel':_,ting Sounds ..... 14
Consumer Support
(onsumer Support ........... 16
Warranlx" ................... 15
AEHIO
A EH 12
©
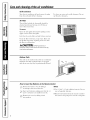
Write the model and serial numbers here:
Model #
Serial #
Find these numbers on a l_d_cl Oll [h{
side of the air conditionen
49-7588-1 01-08JR

IMPORTANTSAFETYINFORMATION.
READALLINSTRUCTIONSBEFOREUSING.
WARNING!
For your safety, the information in this manual must be followed to minimize the risk of fire, electric shock
or personal injurg
SAFETYPRECAUTIONS
_;_Use dfis appliance only fbr its imcn& d
lnnpose as desclibed in this Owner's
Manual.
_¢;This air condidonr r must be properly
installed in accordan* e with the Installation
Instructions beibre it is used.
{¢;Nr_r r unl)lug your air conditioner 1)ypulling
onthr l)*we ' ('° r " Mwtvs, ,g l [) )t,gfi'nv•
and pull straight out fl'om tire re* eptacle.
_;2P-cplace immediately all electric service
cords that have become liv*yrd or othet_vise
damaged. A damaged power supply cord
must be replaced with a new power supply
coM obtained fl-om thr mamtthcmr<:r and
not rt paired. Do not usr a cord that shows
*;tacks or abrasion damage along it•slength
or at tither thr plug or connector <!nrl.
{¢;_Ihrn the unit OFFand tmplug your air
r:ondition<:r betorc clr an(rig.
;;_(;E does not SUl)port any se*Mcing of the air
conditioneL Wc strongly recommr nd that
you do not attempt to sr rvicr fit<: air
condition< r yoursel£
_;_ For yOrlF sat{'*}...do 1101 StOl'*? OF rise
combustible mat_ rials, gasoline or othrr
flammable vapors or liquids in the vicinity
of this or anv other appliance.
_;2MI air conditioners contain refAgcmnts,
which undrr tiarleral law Ittust b( rr movr d
prior to produc{ disposal. Ityou arc getting
rid of an oM product with rcffigetams, check
with the company handling disposal about
what to do.
{¢;If the tvcr ptacle does not match thr plug,
the receptacle IliUM be changed out by a
qualified elecuician.
HOWTOCONNECTELECTRICITY
Do not, under any circumstances, cut or remove
the third (ground) prong from the power cord•
For personal safety, this appliance must be
properly grounded,
DONOTuse an adapterplug with this appliance.
Thr power tom of this appliance is r quipped
will* a 3-prong (grounding) plug which nla.tl.,s
with a standard 3-prong (grounding) x_v*ll
outkt to minimize tire possibility ot electric
shock hazard front this appliance.
Power cord inchldes a Crlrlt!ll[ iIrlcrrllpt(F
device. A *<st and wset button is provided on
the plug <:as<!.The device shouM be t_st<d on a
pr riodic basis by fi*st prr ssing thr TESTbutton
and then tire RESETbutton while plugged into
the outlet. If the TESTlmtton does not trip
or if the RESETbutton will not stay rngwgr d,
discontimle use of"the air conditioner and
contact a qualified se*Mce t<chnician.
Have tire wall outlet and circuit checked by
a qualified ele_ trio(an to make smr tit<: outlel
is properly grounded,
Where a 2-prong wall outlr t is encount_ rr d,
it is your personal r<sponsibility and obli_ltion
u) have it rcplacr d with a properly grounded
3-prong wall outlet.
The air conditionr r should ahvays be plugged
into its own individual dectrical outlet whk:h
has a vohagr rating that matdms the rating
plate.
This provides tit<: bes_ pr rtbrmancr and also
prevems overloading house wiring *ircuits
which couM cause a fire hazard from
ovedmated wirr s.
Set d*e Installation Instructions, Electrical
Requirements sc_tion fbr specific <lectrical
COIIII<_r liOll reqrliF<_lll<'lltS,
2

ge.com
WARNING!
USEOFEXTENSIONCORDS--115-Voltmodelsonly
Because of potential safety hazards under certain
conditions, we strongly recommend against flTe
use of an extension cord.
I tow_-et, if you must use an cxt_ nsion cold,
it is absolutely ncccssat T that it b_' a WE-listed,
14 g_,uge, _wire grounding 17,p( appliance
_xtension cord having a grounding tT,'p_phlg
and outlet and that the ele_ t_ical tv_ting of th<
c,.)rd b_. 1_ an;pe*_.!s (minit*'_ttm) and 1277volts,
CAUTION:
DONOTuse an extension cord with anyof the
230/208 voltmodels.
READANDFOLLOWTHISSAFETYINFORMATIONCAREFULLY.
SAVETHESEINSTRUCTIONS
3

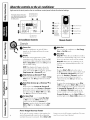
Aboutthecontrolsontheair conditioner
Lights next to the touch pads on the air conditioner control panel indicate the selected settings.
Thedisplayalwaysshowsthe
roomtemperatureexceptwhen
settingthe Settemperatureor
tire Delaytimer.
Lightk_dicatesthe unit
is in the temperatureor
delaytime Setmode¸
Lightindicates the
delaytimer is set
Air ConditionerControls
Decrease
O Mode select
RemoteControl
Delayfimef Increase
Auto Fanon/off
FanspeedIncrease
| Unit powefon/off
Controls
O Power Pad
'I_lrns air (onditioner on and oil When
Itlrned on, fl_e display will show the room
lel_l x m ItIre.
O Oisptav
Shows [he FOOIH [(111I)(I'Hllll'( or[iHle
remaining on the [)clay timc_; Sho_s th_ Set
tt,ml}c_wmrc while setting the tcmpcc, muc in
Cool or EnergySaver modes. Th( Set light will
turn on whilu setting.
NOTE."The display will change to show the
room tempec, mne aider s(ttings have linen
made. 'IS recall tile Set temperature, press the
TempIncrease • or Decrease • pads.
O TempIncrease •/Decrease • Pads
I se to s_l tcmix mmr_ when in Cooler Energy
Saverm(_l_. The Setlight will [lll-ll till whik
s{lting.
O Delay timer Increase • (+)/Decrease • (-)
Pads
Euch torah of tilt' Increase •/Decrease •
pads on the unit or the Increase +/Decrease -
pads on the remote control will set the delay
time when using tile Delay 1-24hr fim(r ((_').
"File Set light will turn on while setting.
O Fan Speed Pads
Lse to sel tll_ tm Slxed to Low, Med, High
ov Auto on the unit. NOTE:On tilt" renlole
control, tlst' lhe f;tn sl)eed Increase +/
Decrease - p_ds to set tilt, fhn speeds to Low,
Med or High. Lse the Auto pad lo mm Auto
fire on.
O Mode Pad
Ls( to set the air (onditioner to Cool,Energy
Saveror FanOnlymode.
e Delay Pads
Delay ON--Whcn the air (ondifion(r is off, il
tall lie s(t IO_lllIOlllalJ(_l]lytoHl( O11 ill 1 to 24
houl_ at its prexious tootle ancl J_ms(tfings.
Delay OFF--Wh(n the air conditioner is on,
il (an I)e set to automati(ally tnrn of} in I Io
24 hours.
Hew toset:
Press lhe Delay 1-2_rpad on the unit or
the _ pad on tile r(mote conlrol. Ea(h totuh
of the Increase •/Decrease • pads on lhe
trait or th( Increase +/Decrease - pads on
the remote control will set tile timer in
1-horn- intervals. The Set light will mrn on
while setting.
"Ib review the remaining time on tile Delay
1-24hrtimcn press the Delay 1-24hr lx_d on tht,
trait or th(_ pad on the Ix'mole (ontrol. [st'
the Increase •/Decrease • [x_ds on the refit
or the Increase +/Decrease- pa(/s on the
remote (ontrol to set ;I llCx,Vlilac if desired.
Tocancel the timer, l)ress the Delay 1-24hr pad
until lhe light Oll th_ Delay 1-24hrl)ad go(s off.
Power Outage Recovery Feature
In tilt" (ase of'a l)(>_*.t'l-oulage or intenul_tion, tilt.
unit will automatically re-stm-t in the seuingb last
used after th( l)OW(r is restored. If th_ Delay 1-24hr
_(_altlFe was qel, il will l'(:Stllll(? COUIltdOXAII. _'%)tl llla_,'
4 need 1o set a new linle il desired.

Delay l_4hr
Delayti r_er
Decrease
Mode select
%n speed
Decrease
Temperature
set Increase
and Decrease
ge.com
Cool Mode
Lse the Coolmode at Low, Med, High or Auto Fan
Speed for cooling. I Js( lh_ Temperature Increase • /
Decrease • pads to s(t tilt, desired romp(ram r(
/)eFWeell 64°F and 86°F ill 1°F ill_lelllell[%,
.Ml electronic th_ m)oslat is used to maintain the
room tempermure. 'I'h( compres*or will wcle oil
and o{1to kee ) th( mum at tile set level of comibl_.
Set the th_ rmo_,ta* at a lower number and th( indoor
air will beconm (oolel; Set tile thermostat at a high(r
lluml)er and the indoor air will become wannel:
NOTE:If theairconditionerisoff andisthenturnedon
whilesettoa Coolsettingorff turned#urnafeesetting
toa Cooleettingit maytakeapprox#natdy3 mioutes
fordTecompreseertostartandceelingtobegb
CoolingDescriptions
ForNormal Cooling--Select lhe Coolmode and
High or Medf_m with _1middle set leml)eralure.
ForMaximum Cooliu_Nelect the Cool mode
and High filn with a lower set mmper, mn-e.
For Quieter & Nighttime Cooling--Select tile
Cool mud( and Low Lm with a middle set
t£!lllpel_ttll-e,
Do Not Operatein FreezingOutdoorConditions
This (eel-only air (onditiont, r wasnot dcsigm'd tbr
ficezing outdoor contlitions. It lnllst not be lls(d ill
fweziug outdoor conditions.
Energy Saver Mode
Controls the fan.
O/V_['he fhn will ode on and offwith the
coml)ressol: This results in wider v_triafions ot room
tempel-4ture and humidil> Normally used wh(n tile
room is unoccupied. NOTE."Thefan maycont/nueto run
for ashort t#neafter the compressorcyclesof_
OF'F_Fh( ihn runs all tile time, while the
compr(ssor cycles on and off.
Fan OnlyMode
Use the Fan Only Mode at Low, Med or High fan
speed to provide air circulation and filtering
without tooling. Since fbn onl) settings do 1101
provide cooling, a Set temperature cannel be
entered. The room temperature will appear
in the display.
NOTE."AutoFanSpeedcannotbeusedwhenindTe
FanOnlyMode
Auto Fan Speed
Set to Autothn speed fbr the fire Slxed to
automaticall_ s(t to tile speed need(d to provid(
optimum comforl settings witll the set wml)eramre.
If tile room needs lnOl-( cooling, the tim speed
will aulomalically incr(ase. If' lhe room needs less
cooling, tile t_m speed will amomaticall} decrease.
NOTE."AutoFanSpeedcannotbeueedwhenfi7the
FanOnlyMode
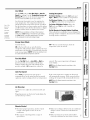
Air Direction
I se the levers to a<!just the air dil-_cfion left and
right.
Fingvrtip pressure on tile louver banks adjusts the
air (lirc(tion up or (IoWll.
Remote Control
i!(#'Ib ensure proper ol)emfion, aim the remow
COlinel at the signal re(eiver on the air
conditionel;
_?The r(mom control signal has a range of
up to 20 [b(t.
i!({_Make sure nothing is belwe( n tile air conditioner
an(I the remora control that (oul(1 [)lock tile
signal.
@{Make sure balt(ri(s are fi-(sh and installed 5
correctly as indicated on the rumote control.

Careand cleaning oftheair conditioner.
Grille and Case
Turn Ihe air (ondifion_ r off mid remo',_ th( plug To dean, use water and a miM (l(t_ rgent. Do not
tiom th( v,'all omkt I)(A_.wecl(aning, use bleada or abrasiv(s.
Air Filter
Th( air filter behind the ['font grill( shouM/x
(he(k(d and (leaned al kast o, ely aOd vs ,.
lllOF( Of[(lli}'ll(((SSaly.
Toremove:
Open tile inkt grille dowmvard by pulling oul th_
up[:< r ( orn(rs of file inl(I grille.
(;tab Ill( lab on the fill(r and I)ull it down and Oul.
(_lean Ihe filler wifll wmm, soap?_ wamr. Rim,e and
lel tile fiher dl_' b(Rn-(_ r( l)la(ing il. Do not (lean
file filter in a dishwashel:
-4,CAUTlON:ooNoro er +te+ir
conditioner without a filter becausedirt and lint will clog
it and reduceperformance
OutdoorCoils
The coils on the outdoor side of the air conditioner
should bu chuckt'd rcgularl?z If thu)arc ,-'logg,.*d
with di_ or soot, they may be proli.:ssionally ck an(d.
How to Insert the Batteries in the Remote Control
] Renlov+ lhe I)allel 3' cover 1)ysliding il
a(:(:Ol-dillg 1o Ill( aFl'OXA (lirectiOll.
] Insert new baHeries, lnaking sure that file (+)
all(] (--) o_" ball(1)' al-e installed corr(cfl):
] R(alta(h the coxer by sliding it back
into position.
NOTES:
i;_;(s( 2 "iYkA" (1.5 voh) alkaline batteries. I)o not
use re(hargeable batteries.
!_ Remove tile batteries fi-om tile remote control ii
tile svst_m is not going Iob( used fbr a long time.
6

Installation
Instructions
Air Conditioner
['_ Questions? Call 80O.GE.CARES (800.432.2737) or Visit our Website at: ge.com
BEFORE YOU BEGIN
Read these instructions completely
and carefully.
• IMPORTANT - Savethese
instructions for local inspector's use.
• IMPORTANT - Observeall
governing codes and ordinances.
• Note to Installer- Be sure to leave these
instructions with the Consumer.
• Note to Consumer- Keep these
instructions for future reference.
• Skill level - Installation of this appliance
requires basic mechanical skills.
• Completion time- Approximately 1 hour
• We recommend that two people install
this product.
• Proper installation is the responsibility
of the installer.
• Product failure due to improper installation
is not covered under the Warranty.
• You MUST use all supplied parts and use
proper installation procedures as described
in these instructions, and any separate kit
instructions, when installing this air
conditioner.
O ELECTRICAL REQUIREMENTS
(_ Some models require a 115/120-volt AC,
60 Hz grounded outlet protected with a
15-amp time delay fuse or circuit breaker.
The 3-prong grounding plug minimizes the
possibility of electric shock hazard. If the wall
outlet you plan to use is only a 2-prong outlet,
it is your responsibility to have it replaced with
a properly grounded 3-prong wall outlet.
Some models require 230/208-volt AC,
protected with a time delay fuse or circuit
breaker. These models should be installed
on their own single branch circuit for
best performance and to prevent
overloading house or apartment wiring
circuits, which could cause a possible
fire hazard from overheating wires.
7
CAUTION:
Do not, under any circumstances, cut or
remove the third (ground) prong from the
power cord.
Do not change the plug on the power cord
of this air conditioner.
Aluminum house wiring may present special
problems--consult a qualified electrician.
If the sill support bolts do not contact the
window sill, or if you have a window
without a sill, you must order accessory kit
RAK87 to properly install this air conditioner.
Call 800.626.2002 or visit ge.com.
TOOLS YOU WILL NEED
Phillips head screwdriver
Adjustable wrench
Flat-blade screwdriver
Pencil
Level
Ruler or tape measure
Scissors or knife
Power cord includes a current interrupter
device. A test and reset button is provided on
the plug case. The device should be tested on a
periodic basis by first pressing the TEST button
and then the RESET button while plugged into
the outlet. If the TEST button does not trip or
if the RESET button will not stay engaged,
discontinue use of the air conditioner and
contact a qualified service technician.

Installation Instructions
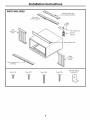
PARTS INCLUDED
Foam top
window g;
Window sash seal
(thin, adhesive-backed)
Left
accordion
panel ""_.
Top mounting rail
Top_eO_
Right
accordion
panel
Window locking
Type A (6) Type B (7) Type C (6) Type D (3) bracket (2)
8

Installation Instructions
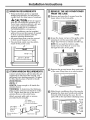
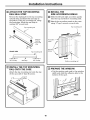
[] WINDOW REQUIREMENTS
• These instructions are for a standard
double-hung window. You will need to
modify them for other types of windows,
./k CAUTION: If the sill support
bolts do not contact the window sill, or
if you have a window without a sill, you
must order accessory kit RAK87 to
properly install this air conditioner.
Call 800.626.2002 or visit ge.com.
• The air conditioner can be installed
without the accordion panels if needed
to fit in a narrow window. See the
window opening dimensions.
• All supporting parts must be secured
to firm wood, masonry or metal.
• The electrical outlet must be within
reach of the power cord.
15 1/2" min.
25 1/4" to 38 1/8"
(With accordion panels)
I
[] STORM WINDOW REQUIREMENTS
A storm window frame will not allow the air
conditioner to tilt toward the outside, and
will keep it from draining properly. To adjust
for this, attach a piece of wood to the sill.
WOOD PIECES -
WIDTH: 2"
LENGTH: Long enough to fit inside the
window frame.
THICKNESS: To determine the thickness,
place a piece of wood on the sill to make
it 1/2" higher than the top of the storm
window frame or the vinyl frame.
Attach securely with nails or screws
provided by the installer.
1/2" higher
than storm
window
frame
1/2" higher
than vinyl frame
_ _ (on some windows)
Sill
Storm window
frame
Vinyl frame
9
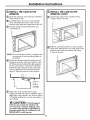
[] REMOVE THE AIR CONDITIONER
FROM THE CASE
[] Remove and save the 2 screws from the
lower sides of the front grille.
-4
FRONT
[] Grasp the lower corners of the grille while
pressing in on the case sides with your
finger tips. Pull out to release and lift it up.
NOTE: Do not pull the bottom edge
toward you more than 3" or you may
damage the tabs of the grille.
! t
FRONT
[] Remove the ground screw from each side
of the case. Keep them in a safe location.
FRONT
[] Slide the air conditioner from the case by
gripping the base pan handle and pulling
forward while bracing the case. Do not
pull or lift on the styrofoam discharge area.
Do not
pull or
lift in
this
area--
damage
to the
unit may
result
FRONT

Installation Instructions
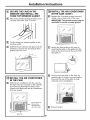
[] ATTACH THE TOP MOUNTING
RAIL SEAL STRIP
Remove the backing from the top mounting
rail seal strip and attach the seal strip to
the bottom of the top mounting rail, along
the front edge. Allow the seal strip to
overlap 3/8" on each end.
Top mounting rail
A, Remove
backing
from seal
strip
FRONT VIEW Top mounting rail
I I
3/8" overlap Seal strip 3/8" overlap
[] INSTALL THE
SIDE ACCORDION PANELS
[] Slide the left and right accordion panels
into the top and bottom mounting rails.
[] Attach the accordion panels to the case
using 3 Type A screws on each side.
Top mounting rail
Accordion
panel
[] INSTALL THE TOP MOUNTING
RAIL ONTO THE CASE
Attach the top mounting rail onto the top
of the case with 3 Type B screws.
screws
[] PREPARE THE WINDOW
• Cut the window sash seal to the window
width and stick the adhesive side to the
bottom of the sash.
IDE
10

Installation Instructions
[] INSTALL THE CASE IN THE
WINDOW
[] Open the window and mark the centerline
of the window sill.
[] Carefully place the case on the window
stool and align the center mark on the
bottom front with the centerline of the sill.
[] Pull the window down behind the top
mounting rail,
NOTE: Do not shut the window so tightly that
movement of the accordion panels is
restricted.
[] Select the position that will place the sill
supports near the outermost point on the
sill, Place the short side of the sill supports,
on the case bottom, toward the window,
Attach the sill supports to the case track
hole in relation to the selected position
using 2 Type B screws in each support.
Long side
of sill
supports
OUTSIDE
[] Adjust the bolt and the nut in each
support so that the case is installed with a
slight tilt to the outside, Use a level; about
1/2 bubble will be the correct case slant to
the outside,
CAUTION: Ifthesillsupport
bolts do not contact the window sill,
or if you have a window without a sill,
you must order accessory kit RAK87 to
properly install this air conditioner. Call
800.626.2002 or visit ge.com.
[] INSTALL THE CASE IN THE
WINDOW (CONT.)
[] Secure the case to the window sill by
using 3 Type D screws.
!
[] Pull the accordion panels to each window
sash track. Attach them on each side to the
window sash and the window sill using
4 Type C screws,
11

Installation Instructions
[] SECURE THE CASE IN THE
WINDOW AND INSTALL THE
FOAM TOP WINDOW GASKET
[] Attach the window locking brackets (one
on each side) with Type C screws.
[] Cut the foam top window gasket to the
window width.
[] Stuff the foam between the glass and the
window to prevent air and insects from
getting into the room.
/
[] INSTALL THE AIR CONDITIONER
IN THE CASE
[] Slide the air conditioner into the case by
the base pan. Do not push on the controls,
styrofoam air discharge housing or the
finned coils. Make sure the air conditioner
is firmly seated.
Do not press on
_, these areas--
damage to the
unit may result
[] INSTALL THE AIR CONDITIONER
IN THE CASE (CONT.)
[] Replace the 2 ground screws removed
earlier, one on each side of the case.
IMPORTANT: The ground screws must be
reinstalled to ensure a proper ground.
[] Attach the front grille to the case by
inserting the tabs on the grille into the
slots on the front top of the case. Push
the grille in.
[] Secure the front grille to the case by
replacing the 2 screws removed earlier.
Press on the top of the grille to help
with side screw installation,
[] Connect power,
Base Pan
12

Notes.
13
r_
_D
ql i._
I --
q L
i
P_L
!
_L

Troubleshootingtips.
Possible Causes What ToDo
The ah- conditioner * Mak_ sure the air conditioner plug is pushed
is unplugged, complea,ly into tbe otltleI.
The fuse is blo_aca/circlfit '*Check the house fuse/cir(uit break_ r 1)ox and replace
breaker is _'ipped. the fllse or reset the breaker.
Power failure. "The unit will automatically rc-_,tart in the settings last
used at_er the power is rcst_wcd.
• There is a protective time dela) (approximately
3 mimltes) to prevent tripping at the compressor
overload. For this l-easel,, tile tlllit l, lay i, o1 start
normal cooling for 3 minutes afler it is turned
back on.
The current interrupter • Pr(ss th( RESErbutton locat(d on the pow(r (ord phlg.
device is tripped. " It tbc RESETbuuon xdll no1 slay engaged, discontimle
us( of the air (ondilion¢ r and COllla('l a qualilied
service technician.
Airflow is resVActed. • Make sur( 1her( are no curtains, blinds or fi4rnimre
blo(:king the front of lhe aJl- (onditioncr.
The temp control may • On models witb loud, pads: In the Cool mode, press the
not be set correctly; Decrease • pad.
• On models with (:onlrol knobs, II11-11lbe teml)emtm-{
knob 1o a bigher llllllll>_ L
• ) , ,
The air Fdter is dirty. • Cl(an the fill(r al least tx(l 3 aO d,I}s.
See th( Care and Cleaning section.
The room may have been hot. .'When lhe air condilioner is iie, I turn(d on, you need
10 _llI()_ till,( _')l" [1,12 l-gain [o (o()l do%n.
Cold air is escaph g. * Ch((k [;,n-o1:)(n filllla( ( r( gist( rs and (old air 1(lIIrl,s.
Cooling coils have iced up. • S(e 'Air conditioner freezing up" beh x_.
Ice blocks the air flow • On models witb col,lrol knobs, sol th( mode (ontrol al
and stops the air conditioner High Fan or High Cool with th( romp :at 1 Ol-2.
from cooling the room. • ()n models with louch [)ads, s(t lbe c(n,lrols at High Fan
or High Cool and sel th( lh( l-lll(_t21t to a higher
tel,ll)121_ltH l-e.
The batteries are inserted Check the position o_ lbe balteri(s. They should be
hzcorrectly; inserl(d in the opposit{ (+) and (-) direction.
The batteries may be dead. • Replace tbe I)atteries.
Hot, hmnid weathel; • This is normal.
The air conditioner is not • For l:)roper x_at_r disl)osal, nlak( su re th( air (ondition_ r
t ,ed,otheou ide, sl mtssl gb,I, ,om ,as, to r..,
Moisture removed from air • This is normal for a short ix _iod in areas with little
and drains hito base pan. humidity; no, mal for a longer period it, ",el'¢ lmmid
aleas.
Normal Operating Sounds
!4
o )
You may bear a pinging nois( caused b?,water
b(ing pick_ d u 1),and throx_ n against* the
(Oll(lellser oil lail,y days or whel, 1 ( t , ( y
is higb. This design t_alure helps remove
lllOisltlr(? _lll(1 improve dtSciency.
2_?{_'_)umay b(ar the IhclllloSlat (lick when tb_
COllll)l-ess()l- Q'(I( S on and o_ ?.
i!i:"Water will collect in tim base pan dilring
high humidit} or on rainy dais. The water
ma} ovcrflow and drip from th( outdoor side
of"the unit.
;&TI e t , n ,_ a {x{ , wh(n tll( compressor
does liar.

GEAir ConditionerWarranty--OneYearLimitedWarranty.
Staple yourreceipt here.
Proof of the original purchase date
is needed to make a warran_/ claim.
We Will Replace:
Replacementunitf_r mW prodilcl which fhils due to a de|;.'ct in materials ()r_orkmanshil).
The ex(hmagc unit is win-ranted for the remainder of3our produtt's oligin_d one-year
warlm_V l)enod.
i!i_"Properly pack your unit. We recommend using, the i!i_,Include in the package a copy of the sales receipt or other
original carton and pac!d[lg materials, evidence of date of original purchase. Also print your
name and address and a description of the defect.
i!i_"ReRun the product to the retail location where it
was purchased.
li_,Customer irtstruction. This o,alaer s manual provides _i_,Replacement of house fuses or resetting," of circttit
information regarding operating instructions and breakers.
user controls.
}'_Improper h_stallation. If you have aal installation problem,
or if the air conditioner is of improper cooling capaciD-
for the intended use, contact your dealer or installer.
You are responsible for provi(_lg adequate electrical
connecth ,lg fadlities.
i'_ Failm-e of the product resulting from modifications to
the product or due to rmreasonable use indudingj failure
to provide reasonable and necessary maintenaalce.
_'_Damage to the product cattsed by improper power supply
voltage, acddent, fire, floods or acts of God.
_'_Incidental or consequential damage caused hy possible
defects with this air conditioner.
I
EXCLUSION OFIMPLIED WARRANTIES--Your sole and exclusive remedy is product exchange as provided in
this Limited Warranty.Any implied warranties, including the implied warranties of merchantability or fitness
for a particular purpose, are limited to one year ar the shortest period allowed by law.
I
This warranty is extended to the original purchaser and any succeeding owner for products purchased for home
use within the USA.
Some states do not allow the exclusion or limitation of incidental or consequential damage& This warranty gives
you specific legal rights, and you may also have other rights which vary from state to state. Toknow what your
legal rights are, consult your local or state consumer affairs office or your state's Attorney General
Exclusion of implied warranties: Except where prohibited or restricted by law, there are no warranties, whether
express, oral or statutory which extend beyond the description on the face hereof, including specificafly the
implied warranties of merchantability or fitness for a particular purpose.
Warrantor: General Electric Company. Louisville, KY 40225
15

ConsumerSupport.
GEAppliancesWebsite
]Iave a question c,r ne(d assistant( _ill_ )ore apphanc(_ It tb( ( L Appliances Wcbsite any da_ of"
the year! For greater c(mvenience and f_aster setxice, you (an now download ()wner's Mamlals, or
/'_,X'll or(l(?r l)_ll-[S Oil-lille.
ge.com
i_l_ ¸
_;ii_(2-5I
RealLifeDesignStudio
ge.com
GE supports th( [ niversal Deqgn concept--products, se_vic(s and environments that (all 1)e used by
people ot all ages, siz(s and capaNlifies. _ rcc_Nnize the need to design ti)r a wide l'dnge ot ph}sical
and mental abilities and impairm(nts. For d(mils of GE's [ nivel-sal Design applications, including kitch(n
design id(as fi)r people with disabiliti(s, ch(ck out ()Ill"_vVcbsite toda}. For th( h(aring impair(d, pleas_ (:all
800iFDD.GIL\C (800.833.4322).
PartsandAccessories
Individuals qualified to s( lwice tbeir o_n appliances can lmxe parts or acc(ssori(s sent directly to their
homes (VISA, Mast( rCard and Discover cards are accept(d). Order on-line to(la x, 24 hours (','( 1_,'day or
by phon( at 8011.{)2b.2(X)2 (hn lllg 13Ol-Illalbtlsilless bol/rs.
Instructions contained in this manual cover procedures to be performed by any user. GEdoes not support
any servicing of the air conditioner. We stronglyrecommend that you donot attempt to service the air
conditioner yourself.
ge.com
ContactUs
ge.com
If:you m-e not satisfied with tile selwice you receive hxml (;E, contact us on our Website with all the derails
including your phone lmmbe_; or write to: Gen(ml Manage1; Customer Relations
GE Appliances, Appliance Park
Louis'dlle, Ix__40225
[ _ Printed in China

ge.com
©
h_strucciones de seguridad .... 2, 3
Ins_ucciones de operaci6n . . .4, 7,
Cuidado y limpieza
gobim_s par_ exteriores ........ 6
Filtro de aire .................... 6
Instrucciones de instalacidn . .7-12
Solucionar problemas .......... 14
Sonidos de opeFacidn nommles ..14
Servicio al consumidor
(;a mlatf;_ ...................... 15
S(lwi(io al ('onsumidor . ......... 16
AEHIO
A EH 12
©
ovii
©
Escribalos numerosde modelo
y serie aquk
# deModelo
# deSerie
ell('d(' _!ll(Oll[lHr _s[os ll[]lll('l-OS
ell 1111_1 ('_iq[l(_[_/ _11 _!l (os[_tdo
del _(ondi(i(mador d_ _,ir_.
49-7588-1 01-08JR

f
INFORMACIONIMPORTANTEDESEGURIDAD.
LEATODASLASINSTRUCCIONESANTESDEUSAR.
A iADVERTENCIA!
Per su seguridad, se flebe seguir la informaciSn en este manual para minimizar e! riesgo de incendios,
flescargas el#ctricas o lesiones personale&
PRECAUCIONESDESEGURIDAD
_ Use estc electrodomdstico solamem( pala
el propdsiu) de_ctminado segfin se &scribe
en el Manual del propiemfio.
#: Este acondicionador d( aire debe instalarse
COITe( l_liilente dc at llel-do (()11 las
[nstruccion(s de insmlacidn anles de su use.
i< Ntmca desenchut_ su acondicionador de
airc titando d(1 cable eldctfico. Siemprc
agarrc firm(mentc el enchutb y tire d(
dl direcmment( hacia Mheta.
i< Reemplace inmediatament_ lodes los (ables
el&ctricos qu( se hayan [)elado o que s(
hawm dafiado de alguna otto man(re.
lTn cable de corrien_c dafiado no d,:be
r(pararse, sine que d(be set sustimido ipor
uno rmevo que se adquiera del fM)ricant(.
No use tm cable (l('ctfico que muestr(
exi& ncias d( detcfioro, o daflos de abmsidn
ell Sll sui_)erticie ell alguno de Sits exH'eIIlOS.
_ Apague la tmidad y desenchufi' su
acondicionador de air( antes de limpim:
_} (;E no es_ff no apoya que se le propor(:ione
ninglln serdcio al acondicionador de air(.
_,'(h(lll(ll_(_Ill(!ll[( I(COIllelldaIllOS (]ue
usted no inmntc propor(:ionar set_icio al
acondicionador de airc usted mismo.
!:,_iPer su segmidad., mo almac(n( ni use
mamfiales combustibles, gasolina u otros
vaporcs o lhluidos inflamables en la
proximidad de &mo algfin otto
( lectrodomdstico.
!:,_iTodos h)s acondicionadorcs d( airc
contiene rcfligemnms, k)s que per L{T
Fed( ral deben set rcmovidos antes d(
desecharlos. Si ustcd i)lan(a deshacers( de
algfin producto que conteng_l rcJiJgeramcs,
pdng_se en (:ontacto con la compaMa que
se ellcat\ga (1( £(coger SII ])HSIII'_t pal'_t qlle 1(
indiquen qu(' hac(l;
_# Si el r(cept_;culo no coincide con el
( nclmfc, un elec_ri(ista (alificado debe
reemplazar (l recept_iculo.
2
COMOCONECTARLAELECTRICIDAD
Bajo ninguna circunstancia, corte o remueva la
tercera pfia (tierra) flel cable elOctrica Enpos
de la seguriflacl personal, este electrodom#stico
clebe siempre conectarse a fierra.
NO useun enchufeadaptador con este
electrodom#stico.
El caM( eldctfico de estc el(cirodom&sti(:o (stxl
(quil)ado (on un en(hut_ de tr(s pfias (ti(m0
que combina con un tomacot riemc es_indar
de ir(s t,.)inas d(! pared para minimiT_w la
posibilidad de una d(sca_ga eldcttica.
El cal)l( de alimentacidn incluv( tm
dispositivo pare in_etrupcidn & corticnte.
Se in(luye un 1)ot(;n d( pru(ba y de reinicio
(n (1 dispositix o. E1 disl)ositix o debe [),.)n(!rse
a pmeba pefiddicamente: pfimero se prcsiona
(1 botdn de rESt (pru(ba) y hi(go BESET
(t*irdcio) mientras se (r,(:uentra (!nchtflhdo al
tomacortiente. Si el botdn TE,.,eTt*ose dispara
o si el botdn RESETno qucda eng:mchado,
deje d( ufilizar el acondicionador de airc y
comtmf(luese con un t_cnico calificado.
Pida a un t&:nico quc inspeccionc el
IOlll_t(OYli(}ll[( y el (it-(tlito pai'a (er( iol-arse
(b-:que el tomacorfientc (st_i conecmdo a
tierm de la man(ra apropiada.
Deride exista un tomacorrient_ de (los
minas, (s su rcsponsabilidad y obligacidn
personal hacer (pie dicho Iomacorrienm
sea rcemplazado per tlllO d(! tl'(% tomas
COil cotlexi0n a tiert_t,
El acondicionador de airc deber_a siemprc
estar coneclado a un U)macorriemc individual
con su circuito de vol_'_je corrcspondiemc.
Esto propor( iona el mayor r(ndimiemo y
ademgs evita que los (ircuitos del rcsto de
la casa se sobl-(:Cal-gll( 11, lo (ual podt_a CallSal
inc(ndios pot (1 sobt* calenmmiento d(1
(ableado.
\\'r las Instmcciones de insmlacidn, (n la
sec(:idn RequisitesEl_cFieos i)a_v_los requisites
(!sp(c_ticos de conexidn.

ge.com
A iADVERTENCIA!
/
USODECABLESDEEXTENSION--Modelosde115voltiossolamente
Debido al potencia! de riesgos de seguridad bajo
ciertas condiciones, en#rgicamente recomendamos
contra el use de cables de extensi6n.
Sin _mbargo, si ust_d s_ v_ en la necesidad
de usar un _able eldctIi_ o de _xtensidn, es
aDso|tll_lll}_ Ill__ _ nec_:salJo que _._| llliSillO (sit*"
lismdo b_io [ JL, sea calibre 14, dd tipo de
3 tomas con conexidn a tietm jpam
d_ cm_domdsficos y el fndice _.:l_ctlJco delx
set d_ 15 ampedos (mflfimo) } 125 voltios.
f
A PRECAUCION:
NO USEun cable deextension con ninguno
de los modelos de 230/208voltios.
LEAYSI6AESTASINSTRUCCIONESDESEGURtDADCUIDADOSAMENTE.
GUARDEESTASINSTRUCCIONES
3

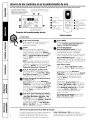
Acercadeloscontrolesenelacondicionadordeaim
Laslucesal tadodelasteclasde toqueenelpanel decontrol del acondicionadordeaire indicar#nlosajustesseleccionados.
Lapantallamuestrasiemprela
temperaturaamNente,exceptoal
configurarla temperaturaDefiNda
oel Shlcrenizadorderetardo.
La luz indicaque la unidadest_ enelmodede
Ajuste de temperaturaode Tier'pOde retardo
La luz indica queeltemporizador
de retarde estacenfNufado
Controlesdel acondicionadordeaire
deretafdo
ventilado[
de aiuste de te:_peratura
Aumento de sincron[zadof de
mta_o
Encendidc/dpagade
autom_ticodel ventilador
Aumentode velocidaddel
ventilador
Encendido/apagadedela
unidad
Contro/es
Control rem0t0
0
Teclade Power (Eecendido)
Apaga y prcnde el acondicionador de aire.
,kl encendep_e, la pant_dla mosum_i la
telllpel_fftl 1-_ _l]]biellte.
0
Pantalla
Muestm l_ Wmperdm]'a mnbiente o
el tiempo resmnle en el Sincroniz_dor de
retaMo. Muesu-4 la temperatm:a DeFmida al
configurar la t_ mpe_'_uwa _n los modes Cool
(Frio) o & Energy Saver (Ahorro de energia).
La luz de Ajustese cncenderfi durmm, l;,
collJ]gtll-at ilSIL
NOTA: la pamalla cmnbim-4 par, i mostmr la
tempeF, itt/r_/aD]bi( life lllla v0z (]tie se haya
realizado la configm-4ci(m. Pro-4 r_stituir [a
telll[)elallllH Definida,puls( las leclas d( Temp
(Temperatura) Aumento• o Reduction V.
@
Teclas de TempAumeeto •/Reduction •
I sado pm'a ajustar la telnpel-amra cuando
s( (ncuentre en tl mode Ceel(Frie)o Energy
Saver (Ahorro de eeergia). La luz de Ajuste st,
{ n(cndcM dtmlnte la configum(idn.
O TeclasdeSincronizadorderetardoAmnento•
(+)/Reduction • (-)
Cada vez tim* toque las tcclas Aumento• /
Bedoccion• dc launi(lad o lostee]asAomento
+/Reducci6n- en cl conu-ol remote ddinir4
el fiempo de remrdo al ufilizar el Delay 1-24hr
timer (Sincronizador deretardo1-24h)(_).
La luz de Ajustesc _m ender_ durante
la configuraci6n.
O Teclas de Fan Speed (Velocidad del ventilador)
l Tsado pare @/sire- la velocidad del v( nlilador
a Low (Bajo), Med (Medic), High (Alto) o Auto
(AutomMica) en ]a uni&ld. NOTA_"_n el comrol
remote, utilk e las tcdas Aumeeto +/Reduccidn
- veloddad de ventilador para ajuslar la
xelocidad del ventilador en Low (Baje), Med
(Medio) o High (Alto). Ltilicv la ted_l Auto pm'_l
a(ti_w cl vcntilador mltomfilk o.
O Tecla de MODO
[ Tsa(lopara _tjustar d acondicionador tie air_
al re(Me COOl(Frio),EnergySaver(Ahorrode
energia)o FanOnly(Soloventilador).
O Teclas de Delay (Retardo)
Delay ON (ENCENDIDORetardo)--CumMo
cl acondidonador d_ airc csu_ apagado,
pu_de ajustarse para que se _nci_ n(la
automfiticamente dentlx) de 1 a 24 hol-,Is en el
me.do y configu mcidn de ventilador anteriol:
Delay ORc(APAGADO Retardo)_ ]uando el
a(ondi(ionador de airc cstfi on( cndido, lm('dc
;/jIISDII\',C 11_11_/ (lilt ' St' _l[)_lgtl(' _tllolll_/tic_llll('llte
dcntr*_ d(' 1 a 24 hems.
C#morealizarel ajuste:
Puls( ]a leclaDelay1-24hr(Retardo1-24h)cn
la unidad o <n lav. cla @del control renloto.
Ca(la t<glue de las t(clas Aumento •/
ReductiOn • en la tmi(lad o las mclas Aumento
+/Reduction-en el _ontrol remote d(,fhfirfi
cl tcmporizador _n intmwalos dc l her4.
H_ luz dc Ajuste s_ en(ender, i durmm, la
( onfigm-,_d6n.
Pare r(Msar el tiempo restame en el
Sincrulfizador de retardo 1-24 h,pulse la lecla
de Delay 1-24hr (Retardo 1-24h)en la unidad o
en la tecla (_ del control remote. E tilice las
re( las Aomeeto •/Hedoooi6n • en la unidad
o las teclas Aumento +/Reduction-en el
( Oll[l'ol l'('l_loto [)_ll'_l d('filliI" till IllleVO
tiumpo, si 1o dose a.
Para eancelar el sineronizador, pulse la tecla
Delay 1-24hr (Retardo 1-24h) h_sm (]tw b luz
de dicho (ontrol s(' _ll)_l,_ue.
4
Funci6n de recuperacidn de perdida de energia
En (:as() de la l)&dida de la enmgin o inwrrupcidn,
la tmidad reiniciar, i aulomfiticamenm en Ins
funciones de la filfima v('z que fue usado una
vez la enelgfa sea restablecida. Si la funcidn del
Delay 1-24hr (Retardo 1-24h) estaba d(finido,
conlinuar_{ la cu{ eta regresiva. Es l)osible que usle(l
lle(esite _jtlsl_l- till lielll])o lllleVO si _sf Io des( a,

go.corn
Mode Cool (Frio)
[ s_ el mode Cool (Frio)a Low(Bajo),Med (Medio),
High(Alto)o AutoFanSpeed(Velocidadde veetilador
automMica) para cnfi-im; [ sc l_s tcdas d_
Temperature(Temperature)Amnento• (+)/ Reduction
• (-) pard @lstm";1la temperature dcscada <ntrc
64<'Fv 86°F en inc,>m{ rites de I°E
Se []sEI 1111 [elln()st_llO {I_ (tr(mi( o 1)_11_1 lllalltenel-
la temperature ambienm. El compresor haFd
ciclo entrt, apagado y enc_ ndklo ixml mantener
la habitacidll a la lempeFdtul-a deseada. Ajusle el
t{q'lllOSta_o a IIIl lll/lllelX) lllellOl" V el aire in[el-lie
se eniriaF,i m_is.Si 1o @]sta a ml _l.hnero mwo*;
la tempel'dmm del airt interne se calentm'fi mils.
NOEl;siel ac'ondicionadord_air_,estbapagadoyso
enciendemientrasestbmnfiguradoenunajusteCool(Frio)
o sisecambiadetinajustedeventiladoraunodeCool
(Frio),puedeclueposenaproximadament_,unos3minutes
hastaqueelcompresorarranqueycomienced enfriamiento
Descripcioeesdeeefriamiento
PareenfriamieetoeormalISclc( dom, cl mo(Io
Cool(Frio)y v( ntilador High(Alto)o Med (Medio)
(on tma tcmpcratura de ;!just<mc(lia.
PareenfriamientomaximoISeleccione el lnodo
Cool(Frio)yvcnti]ador High(Alto)_on un;l
[(,lnp_,l-d[lll-_l d(* _lj//sI_ l_l('llOE
Pareenfriamientosilencioso yenfriamiento
noctumoISele( (ion( el illodo Cool(Frio)y
vcntilador Low(Bajo)(on una temperature
tic @lst_ mcflia.
No useenloscondicionesexternasdebajoelpunto
decongelacilJn
Est_ a(ondi(ionador dc airc no cs (liscflU(Io [);ll_
usar en wmp(,rdml-as externas deb_!jo el punto de
congvlacidn. No use en las condiciones extemas
deb@) el punto (le congelacidn.
Energy Saver Mode (Mode de ahorro de energia)
Controla <1 vcntiladon
ON (ENCENDIDO)--EI ventilador hm5 un cklo
de on( endido y apagado con el (omprcsol_ Eslc
1_sulta ell uu-iaciones ma}orcs <n la mmpemmnl
d_ la habitacidn yen la humedad. Nonnahnente
usado cuando la habitacidn no est_i ocupada.
NOTA: puedeque d venti/adorsiga funcionandoduranteun
corto tiempoctespuesde desactivarseel title del compresor
OFF(APAGADO)--EI v_ ntilador ftmciona rode el
fiempo, mi(nmls qm. el comprcsor l)asa per los
cities (le eriC(halide y apagado.
Mode de Fan Only (Solo ventilador)
[s_ (1 mode Fanonly(Solo ventilador)a w locidad
Low(Baja),Med (Media)o High(Alto)pare
pl-Opl)r( iOll_lr (irculaddn dc _drcyfiltrad6n
sin enfiimniento. Debido a que los nivcles
de vcnlilador dnicamentc no proporcionml
enfliamiento, no s_ puede intrtxhlcir una
tempemtura Definida. .\par(,ceF, i _n
pantalla la lenlpel-dlura ambiente.
NOTA:/aVe/ocidaddeventi/adorautombticanopuede
utilizarseenelmodeFanonly(Soloventilader)
Velocidad de ventilador automatica
Indi(ltm la opcidn en _\'locidad (le ventilador
automfitica para definir mltomfiticamente la
xeloci(lad necesaria ImFd ])rolxn-('ionar una
configumcidn (1_ comodi(lad 6ptima con la
lenll)eFdltll-a elegida.
Sila habimcidn necesita m¢_senfiiami_ rite,
la velocidad del vcntilador aumentar5
automdticmnent_. Sila habitaci6n necesita
menos enfl-iamiento, la velocidad del ventilador
descender_ mltomSticament_.
NOTA:I_gdocidaddeventi/adorautombticanopuede
utilizarseenelmodeFanonly(Soloventilador)
Direccion del ake
L lilice los palancas pare _!justar la direcci6n del
aire, hacia la izquierda y ha_ia la derccha.
Aplique pr_ side con la punta (le los dedo _,en los
lamas de distribucidn para @lstar la dir_ ((idn del
airc hada arriba y hacia ab@).
Control remote
iv?Pare gardntizar una operdci6n apropiada, oriente
el control remote hacia el receptor d_ serial del
acondicionador de airc.
_ICercidrese de que no hm:, nada entre el
acolldicioIladof de airc v _1 contFo1 1"(IllOlt) (111(
pu{da bloquear la sefial_
_ICercidrese de que los bateri;_s sean fl-cscas y se
instalen corrcctameme segdn se indica en el
(Olltl-ol IX'lnoto.
iv?El receptor d_ s_fial tiene un l_lngo mfiximo de
20 pies. 5

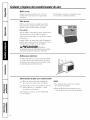
Cuidadoy limpiezadelacondicionadordeaire.
Rejilla y caja
Apague el acondicionador de air(!y retire _1
cHchllt(' (]el [Ol_]a(:oITieHl( de la pared _lUes
de limpial_
F'ara limpial, use agua y ula d(_t_rg(nt,u suave.
N(; rise (loro o llla[elial(! _, abrasivos.
Filtro de aire
El fihro de air,. (letrfis d( la rejilla fr,.mtal (1,A)e
illSl)( ((iOll_/l_( }' limpia_'_e por lo III(IIOS (_I(/H
30 (]£as o tn_s a m( nudo si ]'u( sc H( C(SmiO.
Para retirarlo:
Abra la r@lla de elm-,Jda hacia abajo, fi_-,mdo (le las
esquinas _,uperiores de la r(,jilla de entl-,ida.
Agarre la pestafia del filtro v tire de ella hacia abajo
v hacia fuera.
Limpi,.: el fihro con agua libia y.jab()n. Eqju_gu( 1oy
[)Cl'lllil_ (]//e St' se(]ll( allies (1(! (olocarlo OI1"_ _,(Z (11
su hlgaa_ No lax,.:(1 fihro (nun laxax@llas.
f
A PRECAUCION:No
acondicionadordeairesinel filtrodebidoaquelasuciedad
y/aspelusasIoobstmiranymduciransurendimiento
Bobinas para exteriores
Se (leben inspeccionm-con fie(u('ncia las bobin_ls
en el lado exterior del avondicionador de airc. Si
las naismas esl_in obstruidas con suciedad u hollfn,
p_ll'iml limpiarse profi.,sionahnente.
Como insertar las pilas en el control remoto
] R(lire la (ubi¢ rta d( la F,ila d(sliz:_n(lola
(/,.:a,.al(:rdo con la dire( (i()n ,:1(la fl(cha.
] ]l]S(_l'[(_ pilas m_exas (el( iOl_h](lose (le (llle los
polos positivos (+) 7"negatixos (-) (slfin
ol-i( nl_t(los correclanaenle.
] (_olo(l,.le la cul)ierta otra xez d(slizfindola
(ll SH hlgal2
NOTA&
_!_Is(' 2 pilas _llcalinas ".L_\" (1('1,5 voltios.
No use pilas recalgables.
_I Retire las pilas del conu-ol vemoto si no va
a usar el sislema l)ov un perRulo prolongado.
6

Instrucciones
de instalacion
Acondicionador
de aire
['_ _Preguntas? Llame 800.GE.CARES (800.432.2737) o Visite nuestra pagina en la red en: ge.com
ANTES DE INICIAR
Lea estas instrucciones completa y
cuidadosamente.
• IMPORTANTE - Guardeestas
instrucciones para uso del inspector local.
• IMPORTANTE - Observetodos
los c6digos y 6rdenes de ley.
• Nota al instalador - AsegLirese de dejar
estas instrucciones con el consumidor.
• Nota al consumidor - Conserve estas
instrucciones para referencia futura.
• Nivel de destreza - La instalaci6n de este
aparato requiere de destrezas mecanicas
basicas.
• Tiempo de ejecucion - Aprox. 1 hora
• Recomendamos dos personas para
la instalaci6n de este producto.
• La instalaci6n apropiada es la
responsabilidad del instalador.
• La falla del producto debido a una
instalaci6n inadecuada no esta cubierta
por la garantia.
• Cuando instale este acondicionador
de aire, DEBE usar todas las piezas
suministradas y usar procedimientos
adecuados de instalaci6n como describe
en estas instrucciones y algunas
instrucciones de kit separadas.
PRECAUCION:
Bajo ninguna circunstancia corte o remueva
la tercera pua (conexion a tierra) del cable
electrico.
No cambie el enchufe en el cable electrico
de este acondicionador de aire.
Los cables caseros de aluminio podrian
presentar problemas especiales. Consulte
a un tecnico electricista calificado.
7
PRECAUCION:
Si los tornillos de soporte del umbral no
tienen contacto con el umbral de la ventana,
o si cuenta con una ventana sin umbral,
debe ordenar el kit de accesorios RAK87
para instalar de forma adecuada este
acondicionador de aire. Llame a
800.626.2002 o visite ge.com.
O REQUISITOS ELI_CTRICOS
@
Algunos modelos requieren
tomacorrientes de 115/120 voltios de
corriente alterna y 60 Hz conectados
a tierra, protegidos con un fusible de
dilataci6n de tiempo de 15 amperios
o un cortacircuitos.
El enchufe de tres puas con conexi6n a tierra
minimiza la posibilidad de descargas el6ctricas. Si
el tomacorriente de la pared que usted planea usar
solamente tiene 2 tomas, es su responsabilidad
hacer que un t6cnico Io reemplace per uno de tres
tomas con conexi6n a tierra.
©
@
Algunos modelos requieren 230/208
voltios, de corriente alterna, protegidos
por un fusible de dilatacion de tiempo
o un cortacircuitos. Estos modelos
deberian instalarse en un ramal exclusivo
del circuito para un rendimiento mas
notable y para prevenir sobrecargas en
los circuitos de cableados de su casa o
apartamento, Io cual podria representar
un riesgo de incendio por el
sobrecalentamiento de los alambres.
El cable de alimentaci6n incluye un dispositivo
para interrupcion de corriente. Se incluye un
bot6n de prueba y de reinicio en el dispositivo.
El dispositivo debe ponerse a prueba
periodicamente: primero se presiona el boton de
TEST (prueba) y luego RESET (reinicio) mientras
se encuentra enchufado al tomacorriente. Si el
bot6n TEST no se dispara o si el bot6n RESET
no queda enganchado, deje de utilizar el
acondicionador de aire y comuniquese con
un tecnico calificado.

Instrucciones para la instalacion
HERRAMIENTAS QUE NECESITARA
Un destornillador de estrella
Llave ajustable
Tijeras o cuchilla
Un destornillador
con hoja plana
Nivel
Lapiz
Una regla o cinta metrica
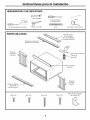
PARTES INCLUIDAS
Empaque superior de
espuma de la ventana
Panel de
acordeon
izquierdo
Sello del marco
de la ventana
(fino, con adhesivo
n la parte posterior)
_ Soporte del umbral (2)
_.__ uerca (2)
Perno (2)
Riel de montaje
superior
Band_e__
montaje superior
Panel de
acordeon
derecho
Soporte para bloqueo
Tipo A (6) Tipo B (7) Tipo C (6) Tipo D (3) de ventana (2)
8

Instrucciones de instalacion
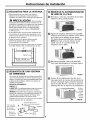
[] REQUISITOS PARA LA VENTANA
• Estas instrucciones son para una ventana
estandar de dos pliegues. Usted necesitara
modificar el proceso para otros tipos de ventanas.
PRECAUCION: siIostornillos
de soporte del umbral no tienen contacto con el
umbral de la ventana, o si cuenta con una ventana
sin umbral, debe ordenar el kit de accesorios
RAK87 para instalar de forma adecuada este
acondicionador de aire. Llame a 800.626.2002
o visite ge.com.
• El acondicionador de aire puede instalarse sin
los paneles de acorde6n para ajustarse a una
ventana mas estrecha. Ver las dimensiones de
la abertura de la ventana.
• Todas las partes de apoyo deben quedar
totalmente aseguradas a algOn metal,
mamposteria o a la madera.
• El tomacorriente el_ctrico debe estar al alcance
del cable electrico del acondicionador de aire.
I I
13====8
15 1/2" mfn.
_25 1/4" a 38 1/8" (con _-
paneles de acordeon)
[] REQUISITOS DE UNA VENTANA
DE TORMENTAS
Un marco de ventana de tormentas no permitira
que el acondicionador de aire se incline hacia el
exterior y evitar_ que drene apropiadamente. Para
solucionar este problema, adhiera un pedazo de
madera a el umbral.
PEDAZOS DE MADERA -
ANCHO:2"
LONGITUD: Lo suficientemente largo como para
ajustar en el interior del marco de la ventana.
GRUESO: Para determinar el grueso, coloque un
pedazo de madera en el umbral para hacerla 1/2"
m_is alta que la pare superior del marco de la
ventana de tormentas o del marco vinilo.
Peguelo firmemente con clavos o con tornillos
proporcionados por el instalador.
| 1/2" mas alto que el
,_ marco vinilo (en algunas1/2" mas alto _ventanas)
que el marco I'_--I_/" Madera
de ventana T [I [Jj ;_ JJ/_l"_
de tormentas tii
Marco de _ __Jblll IUmbra_l_Umbral
ventana de "r_ II
tormentas
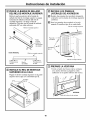
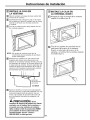
[] REMUEVA EL ACONDICIONADOR
DE AIRE DE LA CAJA
[] Remueva y salve los 2 tornillos de los lados
inferiores de la parrilla frontal.
FRENTE
[] Agarre las esquinas inferiores de la parrilla
mientras presiona hacia adentro en los lados
de la caja con las puntas de sus dedos.
fire hacia afuera para liberarla y lev_ntela.
NOTA: No hale el borde inferior hacia
usted mas de 3" o podria daffar las
lengiJetas de la rejilla.
I 1
FRENTE
[] Remueva el tornillo a tierra de cada lado
de la caja. Mant_ngalos en un lugar seguro.
FRENTE
[] Deslice el acondicionador de aire de la
caja agarrando la manija del recipiente de
la base y halando hacia el frente mientras
apoya la caja. No tire o levante el area de
descarga de aire de espuma de poliestireno,
No tire o
levante
ell esta
8rea--
podffa
dahar la
unidad
FRENTE
9

Instrucciones de instalacion
[] PEGUE LA BANDA DE SELLADO
DEL RIEL DE MONTAJE SUPERIOR
Retire la parte posterior de la banda de
sellado del riel de montaje superior y pegue
la banda de sellado al fondo del riel de
montaje superior a Io largo el borde
delantero. Permita que la banda de sellado
sobresale 3/8" en cada extremo.
Riel de montaje superior
VISTA FRONTAL Riel de montaje superior
J
I I
......................."";'11.
Protuberancia Banda Protuberancia
de 3/8" de sellado de 3/8"
[] INSTALE EL RIEL DE MONTAJE
SUPERIOR EN LA CAJA
Pegue el riel de montaje superior en la parte
superior de la caja con 3 tornillos tipo B.
Tornillos
tipo B
[] INSTALE LOS PANELES
LATERALES DE ACORDEON
[] Deslice los paneles de acorde6n izquierdo
y derecho en los rieles de montaje superior
y inferior,
[] Una los paneles de acordeon a la caja
usando 3 tornillos tipo A en cada lado.
Riel de montaje superior
\
Panel de
acordeon
Tornillos,
tipo A
POSTERIOR
Riel de montaje inferior
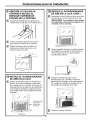
[] PREPARELA VENTANA
• Corte el sello del marco de la ventana
a Io ancho de esta y pegue la cinta
adhesiva en la parte inferior del marco,
INTERIOR
Sello del marco de la ventana
10

Instrucciones de instalacion
[] INSTALE LA CAJA EN
LA VENTANA
Abra la ventana y marque la linea central del
umbral de la ventana.
[] Cuidadoaamente coloque la caja en la repisa
de la ventana y alinee la ventana con la marca
central en el fondo con la linea central en
el umbral.
[] Tire de la ventana hacia abajo detras del riel
de montaje superior.
NOTA: No apriete la ventana tanto que el
movimiento de los paneles de acorde6n
quede restringido.
[] Seleccione la posici6n en que colocar_ los
soportes del umbral cerca del punto m_s
alejado en el umbral. Coloque el lado corto de
los soportes del umbral, en la parte inferior de
la caja, hacia la ventana. Una los soportes del
umbral al agujero de trayectoria de la caja en
relaci6n con la posici6n seleccionada usando
dos tornillos tipo Ben cada soporte.
[L I
_L _ dd!ii_slma_!iO rtes
] _ EXTERIOR
rE-[ Ajuste el tornillo y la tuerca en cada
soporte
i
de forma tal que la caja este instalada con una
inclinaci6n ligera hacia el exterior. Use un
nivel; una burbuja de aproximadamente 1/2
es la inclinaci6n correcta con respecto a la
ventana.
PRECAUCION: si=os
tornillos de soporte del umbral no tienen
contacto con el umbral de la ventana, o
si cuenta con una ventana sin umbral,
debe ordenar el kit de accesorios RAK87
para instalar de forma adecuada este
acondicionador de aire. Llame a
800.626.2002 o visite ge.com.
11
[] INSTALE LA CAJA EN
LA VENTANA (CONT.)
[] Asegure la caja al umbral de la ventana
usando 3 tornillos tipo D.
r_ Tire de los paneles de acorde6n hacia
cada paso del marco de la ventana.
Unalos a cada lado del marco de la
ventana y el umbral de la ventana usando
4 tornillos tipo C,

Instrucciones para la instalacion
[] ASEGURE LA CAJA EN LA
VENTANA E INSTALE EL
EMPAQUE SUPERIOR DE
ESPUMA DE LA VENTANA
[] Coloque las abrazaderas de sujeci6n de la
ventana (una a cada lado) con tornillos _po C.
[] Corte el empaque superior de espuma
de la ventana al ancho de la ventana.
[] Rellene la espuma entre el vidrio y la
ventana para evitar que el aire y los
insectos entren al cuarto.
/
[] INSTALE EL ACONDICIONADOR
DE AIRE EN LA CAJA
[] Deslice el acondicionador de aire hacia el
interior de la caja mediante la rejilla base.
No empuje por los controles, la carcasa de
descarga de aire de espuma de poliestireno
ni las bobinas aleteadas, segL_rese de que
el acondicionador de aire est6 firmemente
asentado.
No apriete sobre
estas areas--
podria dahar
la unidad
[] INSTALE EL ACONDICIONADOR
DE AIRE EN LA CAJA (CONT.)
[] Reemplace los dos tornillos a tierra removidos
anteriormente, uno de cada lado de la caja.
IMPORTANTE: Los tornillos a tierra deben
ser instalados a nuevo para asegurar una
conexion a tierra correcta.
[] Pegue la parrilla frontal a la caja insertando
las orejillas en la parrilla en las ranuras en
el frente superior de la caja. Empuje la
parrilla hacia adentro.
[] Asegure la parrilla frontal a la caja
reemplazando los 2 tornillos removidos
anteriormente. Empuje en la parte superior
de la rejilla para facilitar la instalacion de
los tornillos de cada lado de la caja.
[] Conecte la energia el6ctrica.
Rejilla base
12

NoLas.
€_
ql.
iv113
m
m
nhq.
CB
_3
br.J
w.41m
13

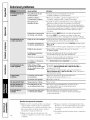
Solucionarproblemas.
Causasposibles Quehacer
H acondicionador de aire *Cerci6re_ _de que el a_ondkionador de aire estfi
estfi desconectado, en('hutildo totalmente en el tomacor_iente.
H fusible se dispard / *]nspe(d(me los fi_sibles / caja de interruptoles de la casa
el cortacireuitos se dispar6, y reelnpLace cualqnier fusible o re _juste el intemlptot;
haten'upci6n en el *La unid_d se reini( b_;_uutomfitk'amente con la configurdci6n
sttmin_slro el_.cMco, ufilizada por filtima vez luego de _eestablecer la electricidad.
*Exisre un retmso de dempo por piotecci6n (de awoximadamente
3 mimm_s) para evitar la dcsconexi6n por sobrecmga deI compreso_:
Pot esm taz6n, es posible que la unidad no comience a enfiiar de
fi,_rma nom_al hast_ mmscurridos 3 minums dcsde que w)M6 a
encenderse.
H disposifivo de interrupcidn *Prcsione el bot6n RESEguNcado en el cable de alimenmcidn.
de con'iente se ha acfivado. *Si _1bot&l RESETnose manti_ neen su lug',n; no utilice mils
el acondicionador de aire y comun/quese con un t_cnico calificado.
H flujo de aire estfi restringido. *Cercidre_ _de que no exisw ninguna c(mina, pmsiana o
mueble bloqueando el fiente del acondicionadot de aire.
H control de temperamra no *l{n los modelos con tedado: En el modo Cool(Frio),presione la tecla
estfi ajustado apmpiadarnente. ReducciooIr
oE//los moddos con bolones, fi_lt' I_1 t(ql/peF, itul_l ;i till //umeYo rl/a)OL
H filtro de afire est,hsucio. *Limpie el filtto cada 30 dfus por lo menos. Vcr la seccidn
de Cuidadoy timpieza.
La habitaci6n podrla haber *Cumldo e] a_ondJcionador de aire st- enciende, usted
estado calienle, ne(esita dmle tiempo pat',J que enfii_ la llabit:Jddn.
H aire frio se _stfi escapando. *(¥rci6re_ _de que los registros de lu calef_acci6n no estfin
abie/tos v se e/lctlel/tl',/i-i retornando el air(' fifo.
Las bobinas de enfriamiento *Ver "Acondicionador do airo ooogolaodoso" mils adelante.
se congelm-on.
H hielo bloquea el flujo *En modelos con los bournes de conm)l, coloque el control
de aire hacia d acondidonador demodoenHigfiFan(VentiladorAIto)dHigfiCool(FrioAIto)con
de aire evi'tandoqtm se enfrie 1:4wtnperatura en 1d 2.
la habitaci6n. *En los modelos con tedas de toque, colo que los controles en
HighFan(VentiladorAito)6 HighCool(FrioAlto)} @lste el termostato a
una tempel'ature rn(_saim.
las baterias es 't't't't_htsermdas *Inspeccione la posicidn de l_tsbaterfas. DebCn estar
hworrec'tmn_lte, inseltadas en la p_,sicidn indicada, + _ -.
Tiempo humedo y caliente. *Esto es nom_al.
Ha_ag_goi_ H acondicionador de afire *Pal'd dretmr el agua apropiadument(, cerciorese de que
no estfi hMhaado hacia afuera, el ac(mdicionador de air( esUi inclinado ligemm(nte
desde el fi'ent, hacia at,a.
ta hmnedad removida del aire *Esto es normal por un co_1o per[odo en fire_s cot, poca
y se drena hasta la bandeja. 1-mmedad; normal por tm per(odo de tiempo mfi-spostergado
Sonidos de operacion normales
14
}v?Quizfis escuch( un sonido metfilico cmlsado pot
el agua tomada y til-,ida colm-,t el condensador
ell lOSdills lluviosos o cuando In humedad es aha.
l{sta caracleristica de disefio ayuda a r( mover
la humedad y mujoto la (ficiencia.
}V?Quizfis escuch( que el lemaosmto hace clic
cuando el compl>sor hace (iclo enu> encel_di(Io
y apagado.
_4 El agua se acumula en la band@l dul-,mte dfas
lhlviosos o con mucha humedad. El agua po(h'f_
derrammse y got_ ar desde el lado externo de:
la unidad.
_4Elv_ntilador podr_u funcionar aun si el (ompresor
no lo hace.

Garantiadesuacondicionadordeaire--garantia limitadadeuna#o.
Grape aqu[ su reeibo.
Se requiere faeilitar prueba de ta fecha de eompra
original para haeer un rectamo de garant[a.
Nosotros reemplazaremos:
!
Unidad de reemplazo pam (ualqui_ r produ( to qu_ ]hll_ dd_ido a deti ( tos _n los matedal_ s o en
de un afro d_ garantfa original dd l)rodt_,lo.
i_ Empaque su unidad apropiadamente. Recomendamos i_ Incluya en el paquete una eopia del recibo de venta
usar el cart6n o_M y los materiales de empaquetado, u oa'a evidencia de la fecha original de la compra.
i_ Regres_ el produeto al local de vent;ts donde usted Adem£s imprhna su nombre y direcci6n y una
lo compr6, descripci6n del defecto.
i_ Instrueciones Mcliente. El Manual del propietario Reemplazo de frtsibles de la casa o reajtt_te del sistema
proporciona informaci6n acerca de l&sinstrucciones de de _@cuito_
operaci6n y de los controles del rtsuario.
(4_Instalacibn hmpropiada. Si usted tlene un problema
durmlte la instalaci6n, o si su acondicionador de ah-e no
fiene la capacidad de elffriamiento que usted necesita,
pinlgase en contacto con nuestro distribuidor o
instalador. Usted es responsable de proporcionar l_s
facJlidades de conexi6n eVectrica nece_,_ws.
•,, ael prv_ducto restdtaa]te de modificaciones al
producto o debido a uso h'razonable hlcluyendo no
proporcionar mamenimiento razonable y necesario.
;_!_Dafio al producto cartsado por volmje hmpropiado hacia
el equipo, accidentes, incendios, inmldaciones o actos
de la naturaleza de fuerza mayor.
;_!_D "- "
anus mcidentales o consecuenciales catvsados por
defectos posibles con este acondicionador de ah-e.
EXCLUSIONDE GARANTIAS IMPLJCITAS--Su unico y exclusivo deracho es el cambio de/producto, tal y
como se indica en esta Garantia limitada. Cualquier garantia implicita, incluyendo las garantias implicitas
de comerciabilidad o adecuacion para un fin determinado, esMn limitadas a un a#o o el periodo de tiempo
mas breve permitido por la ley.
Estagarantia se extiende a! comprador original y cualquier comprador posterior de profluctos comprados para uso
residencial dentro de Estados Unidos.
Algunos estados no permiten la exclusiSn o las limitaciones de dafios incidentales o consecuenciale& Esta garantfa
fla derechos legales especificos, y usted podria tener otros derechos que variar#n de estado a estado. Para saber curies
son sus derechos legales, consulte a la oficina de asuntos de! consumiflor local o la oficina del Attorney General en
su Iocalidad.
Exclusi6n de garantias implicadas: Excepto donfle est# prohibido o restringido por la leg no hay garantias,
expresas, orales o estatutarias que extiendan m#s all# de la descripci6n espec[fica, incluyendo especfficamente
las garantias implicadas de mercantibilidad o propiedad para un prop6sito particula_
Garante: General Electric Company.Louisvifle, KY 40225
15

Apoyoal consumidor.
PaginaWebdeGEAppliances
{Tiene alguna pregunta sobr( su electrodom&tico? iPm(I)( la pfigina We/) de (;E Applianc(s cualquier
d_a del afio! Pare mayor conveniencia x servicio mils r_ipido, ya pued( d(scargar los Mamlal(s d( los
Prol)ietarios, (; inchlso pedir piezas hacer una cita (n lhlea.
ge.com
RealLifeDesignStudio(Estudiode&erieparalavidareal)
ge.com
GE apoya el concepto de I)isefio Univelxal--pr_Muctos, smxicios y ambientes que pueden usar genre de
todas las edade% tamafios y capacidades. Reconocemos la nece,,idad de disel'mr pm-,tuna gmn gama de
habilidades v dificultades fisicas v mentales. Pare mils detall(s col)re las aplicaciones d( (;E I)isefio 1_niv(,rsal,
inchlyendo ideas de disefio pare la cocina l)m-apersonas con discapacktades, mire nuestl:l pfigina Web hoy
mismo. Pare pemonas con dificuhades auditiwls, ti_v_rde llamar al 800.TDD.(;EAC (8t_).833.4322).
Piezasyaccesorios
Aquellos individuos con la calificaci6n necesaria l)am reparar sus propios electrodom&ticos pue(len
pedir que se les manden las piezas o acceso_ios directamenm a sus hogares (aceptamos las tarjetas
VISA, MasterCard y Discover). tlaga su pedido en lfi_ea hoT,;24 hoF,ts cada d_a o llamar pot ml_:fbno
al 800.626.2002 dumnte horns normales (le oficina.
ge.com
Las instrucciones descritas en este manua/ cubren losprocedimientos a seguir por cualquier usuario. GEno esta
no apoya que se le proporcione ningun servicio al acondicionador de aire. Vehementemente recomendamos que
usted nointente proporcionar servicio al acondicionador de aire usted mismo,
PSngaseencon[ac[oconnosotros
ge.com
Si no eslfi satisfb(ho (on el servicio que r( cibe de GE, pdngase en conla(lo con nosolros en ml( sire pfigina
Web indi(ando t(Mos los demlle_, asf (omo su numero de teldf_mo o escrfl)anos a:
(;ell( l'al Managel; Cuslomer Relati(ms
(;E ,kpplian(es, Applial_ce Park
LouisGlle, Ix__40225
76 tmproso on China
-
 1
1
-
 2
2
-
 3
3
-
 4
4
-
 5
5
-
 6
6
-
 7
7
-
 8
8
-
 9
9
-
 10
10
-
 11
11
-
 12
12
-
 13
13
-
 14
14
-
 15
15
-
 16
16
-
 17
17
-
 18
18
-
 19
19
-
 20
20
-
 21
21
-
 22
22
-
 23
23
-
 24
24
-
 25
25
-
 26
26
-
 27
27
-
 28
28
-
 29
29
-
 30
30
-
 31
31
-
 32
32


GE AEH12AMG1 El manual del propietario
- Tipo
- El manual del propietario
- Este manual también es adecuado para
en otros idiomas
- English: GE AEH12AMG1 Owner's manual
Artículos relacionados
-
GE AEE08ASL1 El manual del propietario
-
-
-
-
-
-
-
-
-
