La página se está cargando...

RATED SPEAKER IMPEDANCE:
6 OHMS MIN.
AC INPUT
ANTENNA
RIGHT
RIGHT LEFT
GND
FM
75 OHMS
AM
LOOP
VIDEO/AUX
IN
SUBWOOFER
PRE-OUT
SPEAKERS
LEFT
SPEAKERS
LIGHT-UP
LEFT
RIGHT
Black
Negro
Red
Rojo
1
Accessories
Accesorios
Remote control × 1
Controlador remoto
×
1
TINSZA135AWZZ
04K R AS 1
3
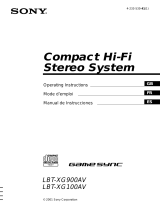
System connections
Conexiones del sistema
XL-MP150
MICRO COMPONENT SYSTEM
SISTEMA MICRO
AM loop antenna × 1
Antena de cuadro de AM
×
1
FM antenna × 1
Antena de FM
×
1
2
Remote control battery installation
Instalación de las pilas del controlador
remoto
1 Open the battery cover.
Abra la cubierta de las pilas.
2 Insert the batteries as shown.
Inserte las pilas como se muestra.
3 Close the cover.
Cierre la cubierta.
Use 2 “AA” size batteries (UM/SUM-3, R6, HP-7 or similar).
Batteries are not included.
Use dos pilas del tamaño “AA” (UM/SUM-3, R6, HP-7 o
equivalentes).
Las pilas no están incluidas.
AC outlet
(AC 120 V, 60 Hz)
Toma de corriente de CA
(120 V de CA, 60 Hz)
Left speaker
Altavoz izquierdo
FM antenna
Antena de FM
AM loop antenna
Antena de cuadro de AM
Right speaker
Altavoz derecho
Printed in Malaysia
Impreso en Malaysia
Speaker Light-up wire
Cable de Iluminar parlante
Speaker Light-up wire
Cable de Iluminar parlante
XL-MP150 QG2 11/26/04, 11:22 AM1

1 Press the CD button.
Pulse el botón CD.
2 Press the 1 button and within 5 seconds, press the OPEN/
CLOSE button to open the disc tray 1.
Pulse el botón 1 y antes de 5 segundos, pulse el botón OPEN/
CLOSE para abrir la bandeja de discos 1.
3 Place the disc on the disc tray 1, label side up.
Coloque el disco compacto en la bandeja de discos 1, con el lado de la
etiqueta hacia arriba.
4 Press the OPEN/CLOSE button to close the disc tray 1.
Pulse el botón OPEN/CLOSE para cerrar la bandeja de discos 1.
5 You can place discs on trays 2 - 5 by following steps 2 - 4.
Podrá colocar los discos en las bandejas 2 - 5 siguiendo los pasos 2 - 4.
6 Press the / button to start playback.
Pulse el botón
/ para iniciar la reproducción.
4
Turn on your system
Conexión de la alimentación de su
sistema
The first time the unit is plugged in, the unit will enter the dem-
onstration mode. You will see words scroll.
Cuando se enchufe por primera vez el aparato, se establecerá en
el modo de demostración. Verá un desplazamiento de palabras.
1 Press the X-BASS (SURROUND)/DEMO button to cancel the
demonstration mode.
Pulse el botón X-BASS (SURROUND)/DEMO para cancelar
el modo de demostración.
2 Press the ON/STAND-BY button to turn the power on.
Pulse el botón ON/STAND-BY para conectar la alimentación.
Listening to a CD or MP3/WMA disc
Audición de un disco CD o MP3/WMA
5” (12 cm)
12 cm
3” (8 cm)
8 cm
Listening to the radio
Audición de la radio
1 Press the TUNER (BAND) button repeatedly to select the desired
frequency band (FM or AM).
Pulse repetidamente el botón TUNER (BAND) para seleccionar la banda
de frecuencias deseada (FM o AM).
2 Press the TUNING ( or ) button to tune in to the desired sta-
tion.
When the TUNING button is pressed for more than 0.5 seconds, scan-
ning will start automatically and the tuner will stop at the first re-
ceivable broadcast station.
Pulse el botón TUNING ( o ) para sintonizar la emisora deseada.
Cuando se pulse el botón
TUNING durante más de 0,5 segundos, la
exploración se iniciará automáticamente y el sintonizador se parará en
la primera emisora difusora que pueda recibirse.
To receive an FM stereo transmission:
Press the TUNER (BAND) button to display the “ST” indicator.
“ ” will appear when an FM broadcast is in stereo.
Para recibir una transmisión de FM en estéreo:
Pulse el botón TUNER (BAND) para que se visualice el indicador “ST”.
“ ” aparecerá cuando una difusión de FM sea en estéreo.
1 Press the TAPE button.
Pulse el botón TAPE.
2 Open the cassette compartment by
pushing the area marked “ PUSH
EJECT”.
Abra la puerta el cassette compartimiento
la parte marcada “
PUSH EJECT
”.
3 Load a cassette into the cassette com-
partment with side A facing you.
Cargue un cassette en el compartimiento del
cassette con la cara A encarada hacia usted.
4 Press the button to choose one side or both sides.
Pulse el botón para elegir una o ambas caras.
5 Press the / ( ) button to listen to side A, or the ( ) button
for side B.
Pulse el botón
/ ( ) para escuchar la cara A, o el botón ( ) para
la cara B.
Listening to a cassette tape
Audición de una cinta de cassette
FM stereo mode indicator
Indicador del modo de FM
en estéreo
FM stereo receiving indicator
Indicador de recepción de FM
en estéreo
XL-MP150 QG2 11/26/04, 11:22 AM2
1/2