
AIR CONDITIONER INSTALLATION
INSTALACIÓN DEL ACONDICIONADOR DE AIRE
AIR CONDITIONER INSTALLATION
INSTALACIÓN DEL ACONDICIONADOR DE AIRE
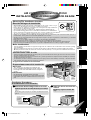
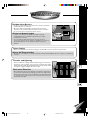
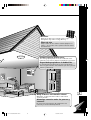
Choosing The Installation Location
Elección del lugar de instalación
• When installing, use the nearest power socket. Make sure the power socket is easy to
reach so you can quickly disconnect your air conditioner if necessary.
• Ensure that the air conditioner is well supported, securely fastened, easily reachable and
not obstructed (see “Dimensions” below).
• Avoid locations with: salty or sulphurous air, draughts, dampness and flammable gas.
• If you install the drainage system, be sure to channel the condensed water to a suitable location.
• Covers, obstructions and unsteady support may cause excessive operating noise and vibration.
•
The rear end of the air conditioner is splash proof. You need not shield or cover it.
• Cuando se este instalando, use el enchufe más cercano. Asegúrese de que el enchufe de poder sea fácil de alcanzar para que el
acondicionador de aire pueda ser desconectado rapidamente si es necesario.
• Asegúrese de que el acondicionador de aire tenga un buen soporte, este sujeto seguramente, a un fácil alcance y no obstruido
(Vea “Dimensiones” abajo).
• Evite lugares con: aire salado o sulfuroso, corrientes de aire, humedad y gas inflamable.
• Si instala el sistema de drenaje, asegúrese de canalisar el agua condensada a un lugar conveniente.
• Cubiertas, obstrucciones y poca estabilidad pueden causar un ruido y vibración excesiva durante el funcionamiento.
• La parte posterior del acondicionador de aire es a prueba de salpicaduras. No es necesario protegerla o cubrirla.
Barda o
equivalente
Menos de 24 cm
70cm
O
ve
r 5
0
cm
C
L
O
S
E
V
E
N
T
O
P
E
N
Fence
or likewise
Less than 24cm
WALL
Over 15cm
66cm
Over 15cm
70cm
CEILING
42.8cm
C
L
O
S
E
V
E
N
T
O
P
E
N
C
O
O
L
M
O
D
E
O
F
F
/
O
N
O
P
E
R
A
T
I
O
N
T
E
M
P
/
T
I
M
E
R
S
E
T
T
I
M
E
R
h
r
C
J
E
T
M
O
D
E
F
A
N
S
P
E
E
D
A
I
R
S
W
I
N
G
S
E
T
/
C
A
N
C
E
L
F
A
N
H
I
G
H
L
O
W
W
i
r
e
l
e
s
s
R
e
m
o
t
e
C
o
n
t
r
o
l
66cm
42,8cm
Más de 50cm
Más de 15cm
PARED
M
á
s
d
e
1
5
c
m
TECHO
Dimensiones
•
No existe ningún tipo de obstáculos alrededor de la unidad.
• Prepare el hueco para la instalación un poco mayor al tamanó de la unidad.
• Lados izquierdos y derecho de la unidad será al menos 15cm lejos de la
pared.
Preparations Before Installation
Preparaciones antes de la instalación
Dimensions
• There should not be any obstacles surrounding the unit.
• Prepare an installation hole slightly bigger than the cabinet size.
• Left and right sides of the unit should be at least 15cm away from
the wall.
Noise considerations
• Select an installation location that can support the weight of the air conditioner and one that will not cause increased operating
noise and vibration.
• Ensure that airflow and noise from the rear side of the unit (outdoor) when installed do not disturb neighbouring residents.
• Obstacles placed in front of the air outlet on the rear side of the unit (outdoor), or covers placed over it will cause excessive noise
and deterioration in performance.
Consideraciones sobre el ruido
• Seleccione un fugar para instalación que pueda soportar el peso del acondicionador de aire y que a la vez no cause un incremento
de ruido y vibración cuando éste operando.
• Asegúrese que durante la instalación, la corriente de aire y el ruido provenientes de la parte trasera de la unidad (en el exterior),
no cause incovenientes a sus vecinos.
• Los obstáculos colocados en frente de la salida de aire de la parte posterior de la unidad (en el exterior), o cubiertas colocadas
sobre la misma, causan ruido excesivo y deterioran su función.
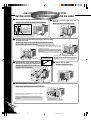
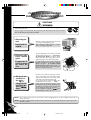
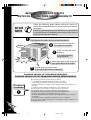
Installation Procedures
Procedimientos de instalación
Counter clockwise
Unscrew and remove the chassis locking bracket from the front of the
cabinet.
Desatornille y quite el soporte de cerradura del chasis del frente del
gabinete.
Remove the chassis locking bracket and screws
Quite el soporte de cerradura del chasis y los tornillos
Slide the chassis out from the
cabinet
Deslice y saque el chasis del
caja
C
O
O
L
M
O
D
E
O
F
F
/
O
N
O
PERAT
IO
N
T
E
M
P
/
T
I
M
E
R
S
E
T
T
I
M
E
R
hr
C
J
E
T
M
O
D
E
F
A
N
S
P
E
E
D
A
I
R
S
W
I
N
G
S
E
T
/
C
A
N
C
E
L
F
A
N
H
I
G
H
L
O
W
W
i
r
e
l
e
s
s
R
e
m
o
t
e
C
o
n
t
r
o
l
C
O
O
L
M
O
D
E
O
F
F
/
O
N
O
P
E
R
A
T
I
O
N
T
E
M
P
/
T
I
M
E
R
S
E
T
T
I
M
E
R
h
r
C
J
E
T
M
O
D
E
F
A
N
S
P
E
E
D
A
I
R
S
W
I
N
G
S
E
T
/
C
A
N
C
E
L
F
A
N
H
IG
H
L
O
W
W
i
r
e
l
e
s
s
R
e
m
o
t
e
C
o
n
t
r
o
l
Chassis locking bracket
Soporte de cerradura
del chasis
Contra las
manecillas
del reloj
16
CW-XC150/180/240EP P16-25 12/15/00, 3:26 PM15

C
O
O
L
MODE
OFF/ON
O
P
E
R
A
T
I
O
N
T
E
M
P
/
T
I
M
E
R
S
E
T
TIMER
hr
C
J
E
T
M
O
D
E
FAN SPEED
AIR SWING
SET/
CANCEL
F
A
N
H
I
G
H
L
O
W
W
i
r
e
l
e
s
s
R
em
o
te
C
o
n
tr
o
l
AIR CONDITIONER INSTALLATION
INSTALACIÓN DEL ACONDICIONADOR DE AIRE
AIR CONDITIONER INSTALLATION
INSTALACIÓN DEL ACONDICIONADOR DE AIRE
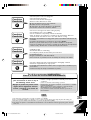
Tilt down for
better drainage
(max. 10mm).
Incline hacia abajo
para mejor
drenaje (maxíma
de 10mm).
C
O
O
L
M
O
D
E
O
F
F
/
O
N
O
P
E
R
A
T
I
O
N
T
E
M
P
/
T
I
M
E
R
S
E
T
T
I
M
E
R
h
r
C
J
E
T
M
O
D
E
F
A
N
S
P
E
E
D
A
I
R
S
W
I
N
G
S
E
T
/
C
A
N
C
E
L
F
A
N
H
I
G
H
L
O
W
W
i
r
e
l
e
s
s
R
e
m
o
t
e
C
o
n
t
r
o
l
Slide the chassis back into the
cabinet
Deslice el chasis de vuelta al caja
Place cabinet into the installation hole
Ponga el caja dentro del agujero de instalación
Lock the chassis to the cabinet reusing the chassis locking
bracket and screw
Encierre el chasis al caja usando nuevamente el soporte
de cerradura del chasis y tornillo.
C
O
O
L
M
O
D
E
O
F
F
/
O
N
O
P
E
R
A
T
I
O
N
T
E
M
P
/
T
I
M
E
R
S
E
T
T
I
M
E
R
h
r
C
JET
MODE
F
A
N
S
P
E
E
D
A
I
R
S
W
I
N
G
S
E
T
/
C
A
N
C
E
L
F
A
N
H
I
G
H
L
O
W
W
ir
e
le
s
s
R
e
m
o
t
e
C
o
n
t
r
o
l
C
O
O
L
M
O
D
E
O
F
F
/
O
N
O
P
E
R
A
T
IO
N
T
E
M
P
/
T
I
M
E
R
S
E
T
T
I
M
E
R
h
r
C
JE
T
M
O
D
E
F
A
N
S
P
E
E
D
A
I
R
S
W
I
N
G
S
E
T
/
C
A
N
C
E
L
F
A
N
H
I
G
H
L
O
W
W
ir
e
le
s
s
R
e
m
o
t
e
C
o
n
t
r
o
l
C
L
O
S
E
V
E
N
T
O
P
E
N
C
L
O
S
E
V
E
N
T
O
P
E
N
Attached the front intake grille to
the cabinet and fasten it with screws
Coloque la rejilla frontal en el caja y
sujetela con los tornillos.
Secure it by wood screws (provided) or nails.
Asegúrelo con tornillos para madera o clavos.
Clockwise
En el sentido del reloj
17
C
L
O
S
E
V
E
N
T
O
P
E
N
C
L
O
S
E
V
E
N
T
O
P
E
N
C
O
O
L
M
O
D
E
O
F
F
/
O
N
O
P
E
R
A
T
I
O
N
T
E
M
P
/
T
I
M
E
R
S
E
T
T
I
M
E
R
h
r
C
J
E
T
M
O
D
E
F
A
N
S
P
E
E
D
A
I
R
S
W
I
N
G
S
E
T
/
C
A
N
C
E
L
F
A
N
H
I
G
H
L
O
W
W
ir
e
le
s
s
R
e
m
o
t
e
C
o
n
t
r
o
l
C
L
O
S
E
V
E
N
T
O
P
E
N
C
L
O
S
E
V
E
N
T
O
P
E
N
C
O
O
L
M
O
D
E
O
F
F
/
O
N
O
P
E
R
A
T
I
O
N
T
E
M
P
/
T
I
M
E
R
S
E
T
T
I
M
E
R
h
r
C
J
E
T
M
O
D
E
F
A
N
S
P
E
E
D
A
I
R
S
W
I
N
G
S
E
T
/
C
A
N
C
E
L
F
A
N
H
I
G
H
L
O
W
W
i
r
e
l
e
s
s
R
e
m
o
t
e
C
o
n
t
r
o
l
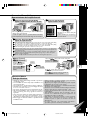
Reattach the front intake grille
Reajuste la rejilla frontal de la toma de aire
Insert the air filter
Inserte el filtro de aire
Lift up to about 90°.
Levante hasta más o menos 90°
Slide the front intake grille slightly to the right to attach it,
then push down to secure it.
Deslice la rejilla frontal de toma de aire un poco a la
derecha para sujetarla, luego presionela hacia abajo para
asegurarla.
Depending upon the location of the AC outlet, route
the AC cord to either the left or right side while
installing the front grille.
Dependiendo de la ubicación de la toma de CA, dirija
el cable hacia la derecha o izquierda mientras instala la
rejilla frontal.
This figure shows the AC cord routed to the left side.
Esta figura muestra el cable de CA dirijida hacia la
izquierda.
CW-XC150/180/240EP P16-25 12/15/00, 3:26 PM16

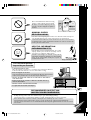
Electrical Work
Trabajo eléctrico
• Always use at the rated voltage and with a specific air
conditioning circuit.
• Some installation locations may require installation of a
shortcircuit breaker.
• Time delay fuse or circuit breaker rating is 16 Ampere.
• Nominal cross sectional area of power supply wire must
be 3 core x 2.0 mm
2
or above.
• The power supply must be from an independent circuit.
• All electrical installation must be made in accordance
with local wiring and safety regulations wherever
applicable.
• There must be a double pole switch with a minimum of
3 mm contact gap in the fixed installation circuit.
(Applicable for models without power supply cord only.)
• Please engage an authorized dealer or specialist for the
installation work.
• Utilícese siempre en voltage estimado y con un circuito
específico de Acondicionador de aire.
• Algunos tipos de lugares para instalación pueden requerir
la instalación de un rompe corto circuito.
• El fusible de la demora del tiempo o la calificación del cachón
del circuito son 16 Amperios.
• El área de la sección cruzada nominal del cable de suministro
eléctrico debe de ser 3 corazón x 2,0 mm
2
o más.
• La fuente de alimentación debe de provenir de un circuito
independiente.
• Toda instalación eléctrica debe ser lievada a cabo de
acuerdo con el alambrado local y las regulaciones de
seguridad que deban ser aplicadas.
• Debe haber un interruptor bipolar con una separación
minima entre contactos de 3 mm en el circuito de
instalación. (Solo se aplica con modelos sin cable de
alimentación.)
• Por favor contectar a un comerciante autorizado o
especialista para hacer el trabajo de instalación.
18
Removal of Front Grille
Removimiento de la rejilla frontal
Remove the Front Intake Grille
Quite la rejilla frontal de toma de aire
Raise the grille by approximately 90°. Slide it to the left to
unhinge then pull outwards.
Levante la rejilla a unos 90° aproximadamente. Deslicela
hacia la izquierda para desmontarla luego tire hacia afuera.
C
L
O
S
E
V
E
N
T
O
P
E
N
C
O
O
L
M
O
D
E
O
F
F
/
O
N
OPER
AT
I
O
N
T
E
M
P
/T
I
M
E
R
S
E
T
T
I
M
E
R
h
r
C
J
E
T
M
O
D
E
F
A
N
S
P
E
E
D
A
I
R
S
W
I
N
G
S
E
T
/
C
A
N
C
E
L
F
A
N
H
I
G
H
L
O
W
W
i
r
e
l
e
s
s
R
em
ot
e
C
on
t
ro
l
C
L
O
S
E
V
E
N
T
O
P
E
N
C
O
O
L
M
O
D
E
O
F
F
/
O
N
O
P
E
R
A
T
I
O
N
T
E
M
P
/
T
I
M
E
R
S
E
T
T
I
M
E
R
h
r
C
J
E
T
M
O
D
E
F
A
N
S
P
E
E
D
A
I
R
S
W
I
N
G
S
E
T
/
C
A
N
C
E
L
F
A
N
H
I
G
H
L
O
W
W
i
r
e
l
e
s
s
R
e
m
o
t
e
C
o
n
t
r
o
l
Lift filter by the holder and pull
outwards.
Levante el filtro por el soporte y
tire hacia afuera.
Remove the Air Filter
Quite el filtro de aire
Air filter
Filtro de aire
C
L
O
S
E
V
E
N
T
O
P
E
N
C
O
O
L
M
O
D
E
O
F
F
/
O
N
OP
E
R
ATI
ON
T
E
M
P
/
T
I
M
E
R
S
E
T
T
I
M
E
R
h
r
C
J
E
T
M
O
D
E
F
A
N
S
P
E
E
D
A
I
R
S
W
I
N
G
S
E
T
/
C
A
N
C
E
L
F
A
N
H
I
G
H
L
O
W
W
i
r
e
l
e
s
s
R
e
mo
t
e
Con
tr
o
l
C
L
O
S
E
V
E
N
T
O
P
E
N
C
L
O
S
E
V
E
N
T
O
P
E
N
C
O
O
L
M
O
D
E
O
F
F
/
O
N
O
P
E
R
A
T
I
O
N
T
E
M
P
/
T
I
M
E
R
S
E
T
T
I
M
E
R
h
r
C
J
E
T
M
O
D
E
F
A
N
S
P
E
E
D
A
I
R
S
W
I
N
G
S
E
T
/
C
A
N
C
E
L
F
A
N
H
I
G
H
L
O
W
W
i
r
e
l
e
s
s
R
e
m
o
t
e
C
o
n
t
r
o
l
To frame
Al marco
Attach the (part
no. CZ-SF6P) to the frame
(part no. CZ-SFW6P).
Adjuntar el filtro
(serie no. CZ-SF6P) a el
marco (serie no. CZ-
SFW6P)
Slot in the and the frame into the front grille.
El ranura el filtro
y el marco a la rejilla frontal.
The and the frame can be obtained
separately from your nearest servicenter.
El filtro
y el marco puede ser obtenido en
su servicentro más cercano por separado.
(Optional)
(Opcional)
(part no.CZ-SF6P)
(serie no.CZ-SF6P)
Remove the Front Grille
Quite la rejilla frontal
Press inwards on the cabinet near the bottom right side of the front grille while pulling
the front grille to the right then slightly towards you to release the right tab.
Press inwards on the cabinet near the bottom left side of the front grille while pulling
the front grille to the left then slightly towards you to release the left tab.
Slide the front grille upwards to release the two top tabs.
Presione hacia adentro en el caja cerca del lado inferior derecho de la rejilla frontal
mientras tira de la rejilla frontal hacia la derecha y luego un poco hacia usted para liberar
la lengüeta derecha.
Presione hacia adentro en el caja cerca del lado inferior izquierdo de la rejilla frontal
mientras tira de la rejilla frontal hacia la izquierda y luego un poco hacia usted para
liberar la lengüeta izquierda.
Deslice la rejilla frontal hacia arriba para liberar las dos lengüetas superiores.
C
O
O
L
M
O
D
E
O
F
F
/
O
N
OPER
ATIO
N
T
E
M
P
/
T
I
M
E
R
S
E
T
T
I
M
E
R
h
r
C
JET
MODE
F
A
N
S
P
E
E
D
A
I
R
S
W
I
N
G
S
E
T
/
C
A
N
C
E
L
F
A
N
H
I
G
H
L
O
W
W
i
r
e
l
e
s
s
R
e
m
o
t
e
C
o
n
t
r
o
l
C
L
O
S
E
V
E
N
T
O
P
E
N
C
L
O
S
E
V
E
N
T
O
P
E
N
CW-XC150/180/240EP P16-25 12/15/00, 3:26 PM17

AIR CONDITIONER INSTALLATION
INSTALACIÓN DEL ACONDICIONADOR DE AIRE
AIR CONDITIONER INSTALLATION
INSTALACIÓN DEL ACONDICIONADOR DE AIRE
C
O
O
L
M
O
D
E
O
F
F
/
O
N
O
P
E
R
A
T
I
O
N
T
E
M
P
/
T
I
M
E
R
S
E
T
T
I
M
E
R
h
r
C
J
E
T
M
O
D
E
F
A
N
S
P
E
E
D
A
I
R
S
W
I
N
G
S
E
T
/
C
A
N
C
E
L
F
A
N
H
I
G
H
L
O
W
W
i
r
e
l
e
s
s
R
e
m
o
t
e
C
o
n
t
r
o
l
Rubber plug
Tapón de goma
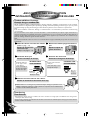
Remove the rubber plug from the base
pan
Quitar el tápon de
goma de la base
Install the drain pan
Instale la bandeja de drenaje
Install the drain pan
at the right corner
of the cabinet.
Instale la bandeja de
drenaje en la esquina
derecha de la caja.
Connect the drain hose
Conectar la manguera de drenaje
INTERNAL VIEW
VISTA INTERIOR
Slide the chassis back into the cabinet
Deslice el chasis hacia el interior de la caja
EXTERNAL VIEW
VISTA EXTERIOR
Drain hose
Manguera
de drenaje
Bottom side view with
drain pan.
Vista desde abajo con la
bandeja de drenaje.
Note: Drain hose or tubing can be purchased locally to satisfy your particular needs.
Nota: La manguera de drenaje o el tubo pueden ser comprados en su localidad a fin de
satisfacer sus necesidades particulares.
C
O
O
L
M
O
D
E
O
F
F
/
O
N
O
PER
A
TIO
N
T
E
M
P
/
T
I
M
E
R
S
E
T
T
I
M
E
R
h
r
C
J
E
T
M
O
D
E
F
A
N
S
P
E
E
D
A
I
R
S
W
I
N
G
S
E
T
/
C
A
N
C
E
L
F
A
N
H
I
G
H
L
O
W
W
i
r
e
l
e
s
s
R
e
m
o
t
e
C
o
n
t
r
o
l
Slide the chassis out from the cabinet
(Refer to page
☞16)
Deslice el chasis hacia
afuera del caja
(Diríjase a la página
☞16)
C
O
O
L
M
O
D
E
O
F
F
/
O
N
O
P
E
R
A
T
I
O
N
T
E
M
P
/
T
I
M
E
R
S
E
T
T
I
M
E
R
h
r
C
J
E
T
M
O
D
E
F
A
N
S
P
E
E
D
A
I
R
S
W
I
N
G
S
E
T
/
C
A
N
C
E
L
F
A
N
H
I
G
H
L
O
W
W
ir
e
le
s
s
R
e
m
o
t
e
C
o
n
t
r
o
l
19
Drain pan
Bandeja de drenaje
Screws
Tornillos
Condensed Water Drainage
Drenaje de agua condensada
This air conditioner employs a “Slinger-Up System” which is designed to splash the condensed water on the condenser
coil for maximum cooling efficiency, thus producing a splashing sound. If the splashing sound annoys you, you can provide
an outside drainage by using the following procedure which may, however, cause a small loss of performance.
Note:
If the unit is installed at coastal area, drainage of condensed water is recommended to prevent the condenser being
corroded easily.
Este acondicionador de aire emplea un “Sistema de lanzado” el cual esta diseñado para salpicar el agua condensada en el
rollo del condensador para maximizar la eficiencia de enfriamiento, por esto se produce un sonido de salpicadura. Si el
sonido de la salpicada le molesta, puede proveer un drenaje externo siguiendo el procedimiento de a continuación que
purde, sin embargo, disminuir el grado de funcionamiento.
Nota:
Si la unidad es instalada en un área costera, se recomienda drenar el agua condensada para prevenir la corrosión en el
condensador.
Transferring
Transfiriendo
• Repositioning or transfer of the air conditioner due to the renovation or moving requires an additional service charge. Please
consult your dealer before moving.
• Al reposicionar o transferir el acondicionador de aire debido a una renovación o mudanza requiere de un pago de servicio adicional.
Por favor consulte a su vendedor.
CW-XC150/180/240EP P16-25 12/15/00, 3:26 PM18

HELPFUL INFORMATION
INFORMACIÓN ÚTIL
HELPFUL INFORMATION
INFORMACIÓN ÚTIL
Random Auto Restart
• If power is resumed after a power failure, the operation will restart
automatically after 3 - 4 minutes.
• Operation will be automatically restarted under the previous
operation mode and airflow direction when power is resumed as
the operation was not stopped by remote control.
Al azar de Autoarranque
• Si hay un corte eléctrico, la unidad comenzará a funcionar
automáticamente de 3 a 4 minutos después de que se haya
restablecido la corriente.
• Se recomenzará el funcionamiento bajo el previo modo de
operación y dirección de aire cuando se restablezca la corriente ya
que el funcionamiento no fue detenido mediante el mando a
distancia.
CORTE DE CORRIENTE
Timer Setting
• When power failure occurs, the timer setting is cancelled. Once power is resumed, reset the timer.
Ajuste del Temporizador
• Si ocurre un corte eléctrico, se cancelará el ajuste del temporizador. Ajústelo de nuevo cuando se restablezca la
corriente.
20
Thunder and lightning
• This air conditioner is equipped with a built-in surge protective device.
However, in order to further protect your air conditioner from being
damaged by abnormally strong lightning activity, you may switch off the
main power supply & unplug from power socket.
Tormentas Electricas
• El acondicionador de aire está equipado con un aparato empotrado de
protección de sobretensión. Sin embargo, para que su acondicionador
de aire tenga más protección y no sea dañado por una actividad anormal
de fuertes rayos, puede desconectar la alimentación principal y
desenchufar el enchufe.
CW-XC150/180/240EP P16-25 12/15/00, 3:26 PM19

CARE AND MAINTENANCE
CUIDADO Y MANTENIMIENTO
CARE AND MAINTENANCE
CUIDADO Y MANTENIMIENTO
The front intake grille can be easily removed for
cleaning purposes (refer to page
☞
18 for Remove
the Front Intake Grille procedures). Gently
wash it with water and a sponge. (Do not use a
scrubbing brush or other hard cleaning aids).
La rejilla frontal de toma de aire puede ser
fácilmente quitada para propósitos de limpieza
(Diríjase a la página
☞
18 para Quite la rejilla
frontal de toma de aire). Lave despacio con
agua y esponja. (No utilice cepillos de fregado u
otra clase de elementos duros).
The filter can be easily cleaned using a vacuum
cleaner. Vacuum the front of the filter and then
wash the back with water. If it is badly soiled,
wash with a mild household detergent.
It is recommended to replace the
(part
no.CZ-SF6P) every 3 months.
El filtro puede ser fácilmente limpiado usando
una aspiradora. Aspire el frente del filtro y luego
lave atrás de él con agua. Si esta muy sucio, lave
con un detergente casero que sea suave.
Es recomendable reemplazar el
(serie
no.CZ-SF6P) filtro cada 3 meses.
Always turn off the air conditioner and the main power supply before unplugging the power
cord to clean the unit.
Siempre apague el acondicionador de aire y la fuente de alimentación antes de desconectar el
cable de alimentación para limpiar la unidad.
CAUTION
CUIDADO
• Cleaning the
unit.
• Limpiando la
unidad.
Clean the cabinet, front grille with a mild soap
or detergent and lukewarm water.
Limpie el caja y la rejilla frontal con un jabón
suave o detergente y agua tibia.
• Cleaning the
front intake
grille.
• Limpiando la
rejilla frontal
de toma de
aire.
• Cleaning the
air filter or
the
.
• Limpieza de
los filtros de
aire o
filtro.
NOTE: Do not dry the front panel or the air filter in direct sunlight. (Exposure to direct sunlight may discolor or
deform the panel.)
NOTA: No saque el panel frontal o el filtro de aire a la luz del sol. (La exposición directa al sol puede decolorar o
deformar el panel.)
C
L
O
S
E
V
E
N
T
O
P
E
N
C
O
O
L
M
O
D
E
O
F
F
/
O
N
O
P
E
R
A
T
I
O
N
T
E
M
P
/
T
I
M
E
R
S
E
T
T
I
M
E
R
h
r
C
J
E
T
M
O
D
E
F
A
N
S
P
E
E
D
A
I
R
S
W
I
N
G
S
E
T
/
C
A
N
C
E
L
F
A
N
H
I
G
H
L
O
W
W
i
r
e
l
e
s
s
R
e
m
o
t
e
C
o
n
t
r
o
l
21
CW-XC150/180/240EP P16-25 12/15/00, 3:26 PM20

• Are the air intake and outlet vanes of the indoor and outdoor
side obstructed?
• Están las paletas de entrada o salida aire del lado interior y
exterior obstruidas?
• Are the remote control batteries weak?
• Las pilas del telecontrol estan flojas ?
• Is the discharged air cold?
After 15 minutes of operation, it is normal for the temperature difference
between intake and outlet air to be more than 8°C for cooling.
• Esta descargado el aire frío?
Luego de 15 minutos de operación, es normal que la diferencia de temperatura
entre la toma y salida de aire sea más de 8°C para enfriamiento.
RECOMMENDED INSPECTION
INSPECCIÓN RECOMENDADA
Pre-season Inspection
Inspección pre-estación
COOL
MODE
OFF/ON
OPERATION
TEMP/TIMER SET
TIMER
hr
C
JET MODE
FAN SPEED
AIR SWING
SET/
CANCEL
FAN
HIGH
LOW
Panasonic
Wireless
Remote Control
• Usage over several seasons will reduce performance as the unit becomes dirty.
A dirty unit may produce foul odors and dust may clog the dehumidifying drainage.
Seasonal inspection is recommended in addition to regular cleaning. Consult your nearest servicenter.
• El uso durante varias estaciones reducirá el desempeño de la unidad ya que esta se ensucia.
Una unidad sucia puede producir malos olores y el polvo puede atascar el drenaje del deshumificador.
Las inspecciones estacionales son recomendadas además de la limpieza regular. Consulte su centro de servicio
más cercano.
22
Do not clean with benzene, thinner, scouring
powder or cloth soaked in caustic chemicals.
No limpie con benzeno, diluyente, polvo de
estregar o un paño empapado en químicos
cáusticos.
ANNUAL CHECK
REVISIÓN ANUAL
If the unit is extremely dirty, heat transfer is less efficient and the unit may not
cool effectively. Contact your nearest servicenter for an annual check.
Si la unidad está extremadamente sucia, la transferencia de calor es menos eficiente
y la unidad puede no enfriar efectivamente. Contacte el centro de servicio más
cercano para una revisión anual.
HELPFUL INFORMATION
INFORMACIÓN ÚTIL
If the air filter becomes clogged with dust, the cooling
capacity will drop, and 6% of the electricity used to
operate the air conditioner will be wasted.
Si el filtro de aire llega a ser atascado con el polvo, la
capacidad de enfriamiento disminuirá, y se desperdiciará
el 6% de la electricidad usada para operar el
acondicionador de aire.
Dolore magna aliquam
erat volutpat wisi enim
veniam quis nostr ud.
Hendr erit in vulputate
velit elitesse molescorpu
at sanconsequat dolore
Desperdiciado
CW-XC150/180/240EP P16-25 12/15/00, 3:26 PM21

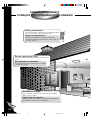
ENERGY SAVING HINTS
CONSEJOS DE AHORRAMIENTO DE ENERGÍA
ENERGY SAVING HINTS
CONSEJOS DE AHORRAMIENTO DE ENERGÍA
Setting temperature
Set the temperature 1°C higher than actually desired. This
can save up to about 10% of electricity costs.
Ajustar la temperatura
Ajusta la temperatura 1ºC más que la temperatura
escogida. Eso puede ahorrar hasta más o menos 10% de
los costos electricos.
Avoid direct sunlight
Keep curtains or drapes closed to keep out direct sunlight
during cooling operation.
Evite la luz solar directa
Mantenga cortinas o cortinillas cerradas para evitar la luz solar
directa durante la operación de enfriamiento.
Do not overcool the room
This may affect your well-being as well as consume more
power.
No sobrenfrie la habitación
Esto puede afectar tanto su bienestar como también
consumir más energía.
P
a
n
a
s
o
n
ic
A
I
R
S
W
I
N
G
M
O
D
E
O
P
E
R
A
T
I
O
N
F
A
N
S
P
E
E
D
J
E
T
M
O
D
E
S
E
T
/
C
A
N
C
E
L
T
E
M
P
/
T
I
M
E
R
T
I
M
E
R
23
CW-XC150/180/240EP P16-25 12/15/00, 3:26 PM22

COOL
MODE
OFF/ON
OPERATION
TEMP/TIMER SET
TIMER
hr
C
JET
MODE
FAN SPEED
AIR SWING
SET/
CANCEL
FAN
HIGH
LOW
P
a
n
as
o
nic
W
ire
le
s
s
R
e
m
o
t
e
C
o
n
t
r
o
l
Air filter
Clean the air filter every 2 weeks (refer to page ☞ 21).
A dirty filter may reduce cooling efficiency.
Filtro de aire
Limpie el filtro de aire cada dos semanas (Diríjase a la
página ☞ 21). Los filtro sucios pueden reducir la eficacia
de enfriamiento.
Keep all doors and windows closed
Otherwise, cooling performance will be reduced and
electricity wasted.
Mantenga cerradas todas las puertas y
ventanas
De otra forma, el desempeño del enfriamiento será
reducido y la electricidad desperdiciada.
Proper capacity of the room
The cooling capacity of the room air conditioner must
match the room size for efficient and satisfactory operation.
Capacidad apropiada en la habitación
La capacidad del acondicionador de aire para habitación
debe ser igual al tamaño de la habitación para una operación
eficiente y satisfactoria.
24
CW-XC150/180/240EP P16-25 12/15/00, 3:26 PM23

C
L
O
S
E
V
E
N
T
O
P
E
N
C
O
O
L
M
O
D
E
O
F
F
/
O
N
O
P
E
R
A
T
I
O
N
T
E
M
P
/
T
I
M
E
R
S
E
T
T
I
M
E
R
h
r
C
J
E
T
M
O
D
E
F
A
N
S
P
E
E
D
A
I
R
S
W
I
N
G
S
E
T
/
C
A
N
C
E
L
F
A
N
H
I
G
H
L
O
W
W
i
r
e
l
e
s
s
R
e
m
o
t
e
C
o
n
tr
o
l
BEFORE CALLING FOR SERVICE
ANTES DE LLAMAR PARA MANTENIMIENTO
BEFORE CALLING FOR SERVICE
ANTES DE LLAMAR PARA MANTENIMIENTO
Check the following points before calling for repairs or
service. If the malfunction persists, please contact your nearest
servicenter.
Revise los siguientes puntos antes de llamar para reparaciones
o mantenimiento. Si el problema persiste, por favor llame al
centro de servicio más cercano.
1
If the unit is too noisy during operation.
Si la unidad está ruidosa durante el funcionamiento.
Humm…
Sssssss…
KACK!
……
If the unit does not operate.
Si la unidad no funciona.
If the unit does not cool
properly.
Si la unidad no enfría
correctamente.
5
If water drips inside the room.
Si agua gotea dentro de la habitación.
3
4
If water drips off the rear of the unit.
Si agua gotea detrás de la unidad.
POSSIBLE CAUSES OF THE ABOVE PROBLEMS
POSIBLES CAUSAS DE LOS PROBLEMAS ARRIBA MENCIONADOS
2
BEFORE
ANTES
The following sounds are normal during operation:
• a low humming sound indicating that the unit is operating.
• a soft clicking sound when the compressor turns on and off.
• a flowing sound due to circulation of the refrigerant when the compressor is
turned on.
• a splashing sound indicating condensation in the condenser coil.
If you hear other noises, please consult your nearest servicenter.
Los siguientes ruidos son normales durante el funcionamiento:
• un murmullo suave para indicar que el aparato está funcionando.
• un suave "clic" cuando el compresor se enciende o apaga.
• un sonido de flujo debido a la circulación del refrigerante cuando el compresor
se enciende.
• un ruido de chapoteo indicando condensación en el condensador.
Si escucha otros sonidos anormales en la unidad, por favor contacte a su
servicentro más cercano.
Condition
Condición
1
25
CW-XC150/180/240EP P16-25 12/15/00, 3:26 PM24

• The room is too big for the unit’s cooling capacity.
• The ventilation lever is set to OPEN.
• The air circulation is impeded by curtains or furniture.
• After 15 minutes of operation, it is normal for the temperature difference
between intake and outlet air to be more than 8°C for cooling.
• El tamaño de la habitación es muy grande para la capacidad de enfriamiento de
la unidad.
• La palanca de ventilación se encuentra en la posición "OPEN".
• El aire no puede circular bien por que cortinas o muebles se lo impiden.
• Luego de 15 minutos de operación, es normal que la diferencia de temperatura
entre la toma y salida de aire sea más de 8°C para enfriamiento.
• The unit is tilted inward. To rectify this, tilt the unit slightly outward.
• Mount the supplied drain pan if you prefer.
• La unidad está inclinada hacia adentro. Para corregir, incline la unidad un poco
hacia afuera.
• Instale la bandeja de drenaje suministrada si prefiere.
• Humidity is high.
• Condensed water is overflowing.
• To rectify the problem, mount a drain pan to the unit.
• La humedad es alta.
• El agua condensada se está desbordando.
• Para solucionar el problema, monte una bandeja de drenaje en la unidad.
Condition
Condición
Condition
Condición
Condition
Condición
5
3
4
Turn off the power and contact
your servicenter as soon as any of
the following events occur.
Apague el poder tan pronto como
alguno de los siguientes eventos
ocurra y contacte a su centro de
servicio
To call the servicenter IMMEDIATELY
Llamar al centro de servicio IMMEDIATAMENTE
• The circuit breaker frequently trips or the fuse blows regularly.
• If water or foreign objects have accidentally entered the air
conditioner.
• If there is abnormal sound during operation.
• El interruptor de circuitos se dispara con frecuencia o el fusible
se funde regularmente.
• Agua u otros objetos ajenos al aparato se han introducido
accidentalmente en el acondicionador de aire.
• Si se producen sonidos anormales durante el período de
funcionamiento.
26
NOTE
NOTA
1. The enclosure opposing the room side is in splash proof (IPX4).
2. Do not install this appliance in a laundry room or other locations where water may drip from the ceiling, etc.
1. El recinto opuesto al lado de la habitación es a prueba de salpicaduras (IPX4).
2. No instale este aparato en una habitación de lavandería u otra localización donde el agua puede gotear desde el
techo, etc.
• The main power cord is not plugged in.
• The internal fuse has blown.
• The main circuit breaker has tripped.
• Remote control batteries are weak.
• El cable de alimentación no está enchufado.
• El fusible interno se ha quemado.
• El interruptor de circuitos del lugar se ha disparado.
• Las baterías remotas del control son débiles.
Condition
Condición
2
CW-XC150/180/240EP P16-25 12/15/00, 3:26 PM25

F563201
Matsushita Electric Industrial Co., Ltd.
Osaka 542-8588, Japan
Printed in Malaysia
F0011-1
CW-XC150/180/240EP P16-25 12/15/00, 3:26 PM26
-
 1
1
-
 2
2
-
 3
3
-
 4
4
-
 5
5
-
 6
6
-
 7
7
-
 8
8
-
 9
9
-
 10
10
-
 11
11
-
 12
12


Panasonic CWXC150EP Instrucciones de operación
- Tipo
- Instrucciones de operación
en otros idiomas
Artículos relacionados
-
Panasonic CWXC150EP Instrucciones de operación
-
-
-
-
-
-
-
-
-