DeckoRail 279487 Instrucciones de operación
- Tipo
- Instrucciones de operación

Tools Needed
Drill/power screwdriver
Miter or circular saw with carbide tip blade
Tape measure
Carpenter’s pencil
Safety goggles
Gloves
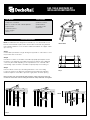
Installation Instructions
Note: The table frame was designed to install with (3) 5-1/2" deck boards or 1x6
boards. Other materials may be used as desired. We recommend using materials
that would be suitable for use as an exterior table.The hardware can support a table
up to 60" long.
Step 1
Cut the table top materials to length. Arrange the (3) boards on a flat surface so that
they are flush with one another.
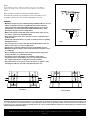
Step 2
Place both “H” frames on the width of the table top equally spaced apart. Secure
the frames to the underside of the table top using the included screws. Additional
screws may be needed depending on the top material chosen. If desired, add a
vertical ledge or lip to the back of the table to help keep objects from falling off.
Step 3
Place the elbow over the top of the railing and allow it to rest on the railing.
Position the clamp on two balusters and tighten with the hand knob until firmly
installed. Repeat for other elbow, spaced to roughly match the frame spacing.
Note: For taller rails, the hand knob and half of the clamp nearest the deck may
need to be removed to clear the railing. Reinstall the clamp and knob, and tighten.
Items Included
RAIL TABLE HARDWARE KIT
INSTALLATION INSTRUCTIONS
Items Included
(2) Metal “H” frames
(2) Metal elbows
(2) Thumb screws
(24) Screws
table rail kit.ai
Step2.ai
Step3a.ai
Step3b.ai
Step3c.ai
Step 2
Step 3
Tall Rail

THE DIAGRAMS AND INSTRUCTIONS IN THIS BROCHURE ARE FOR ILLUSTRATION PURPOSES ONLY AND ARE NOT MEANT TO REPLACE A LICENSED PROFESSIONAL. ANY CONSTRUCTION OR
USE OF THE PRODUCT MUST BE IN ACCORDANCE WITH ALL LOCAL ZONING AND/OR BUILDING CODES. THE CONSUMER ASSUMES ALL RISKS AND LIABILITY ASSOCIATED WITH THE
CONSTRUCTION OR USE OF THIS PRODUCT. UNIVERSAL CONSUMER PRODUCTS, INC. DOES NOT PROVIDE ANY WARRANTY, EITHER EXPRESS OR IMPLIED, AND SHALL NOT BE LIABLE FOR ANY
DAMAGES, INCLUDING CONSEQUENTIAL DAMAGES.
Deckorail.com
©2017 Universal Forest Products, Inc. All rights reserved. DeckoRail is a registered trademark of Universal Forest Products, Inc., in the U.S.
9218_2/17
Step 4
Lift the table into position, and then slide it into the slots on the elbows.
Tighten the thumb screw on the bottom of each elbow to secure frames
in place.
Note: The offset crosspieces on the frame allow the table to
be installed so it extends more towards the center of the deck for more
of a ledge, or further away from the deck, depending on your use.
WARNING!
• Maximum weight capacity is 50 lbs uniformly distributed. Do not exceed.
• Table is designed to attach to a guardrail that meets the structural
requirements of the International Residential Code. Do not use if the
guardrail does not meet the International Residential Code or if the
guardrail is otherwise unsafe or dilapidated.
• While it is designed to work with many common railing styles, do not
use or force to fit a non-compatible railing.
• Never allow any person to sit on, stand on, lean on, or pull themselves
up by the table.
• Check with your homeowner’s or condo association for rules regarding
installation and use.
• It is a best practice to remove the table and hardware when not in use.
Always remove prior to storms or high winds.
• Check your local zoning ordinance for rules on installation and use.
• Maximum weight is inclusive of the weight of whatever material is used
as a table top.
• Prior to installing or removing, ensure nothing (including any people,
animals, furniture, etc.) is below the railing.
• The bracket clamps and thumbscrew should be checked and
re-tightened (if necessary) before every use, especially if the table
has remained attached to a railing for a long period of time.
• If the table top becomes loose from the “H” frames, re-tighten screws
attaching the table top or install a new table top before use.
Step4.ai
Step4.ai
Step5Note.ai
Center Mount Table or Bar Mount
Step5Note.ai
Center Mount Table or Bar Mount
Step 4
Center Mount
Table or Bar Mount

Herramientas necesarias
Destornillador/taladro eléctrico
Sierra ingletadora o circular con hoja de
puntas de carburo
Cinta métrica
Lápiz de carpintero
Lentes de seguridad
Guantes
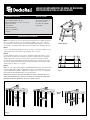
Instrucciones para la instalación
Nota: La montura de la mesa se diseñó para la instalación de (3) tablas de terraza
de 5-1/2 o tablas de 1x6. Los otros materiales se pueden usar como se desee.
Recomendamos usar materiales que serían apropiados para utilizarse como una
mesa exterior. El herraje puede soportar una mesa de hasta 60 pulgadas de largo.
Paso 1
Corte los materiales principales de la mesa a lo largo. Coloque las (3) tablas en una
superficie plana, de manera que estén alineadas unas con otras.
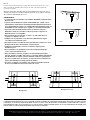
Paso 2
Coloque ambas monturas “H” a lo ancho de la parte superior de la mesa, con la
misma distancia entre ellas. Asegure las monturas en la parte inferior, de la parte
superior de la mesa, usando los tornillos que se incluyen. Se pueden necesitar
tornillos adicionales dependiendo del material superior que se haya seleccionado.
Si lo desea, agregue una repisa vertical o borde a la parte trasera de la mesa para
ayudar a que los objetos no se caigan.
Paso 3
Ubique el codo sobre la parte superior del barandal y permita que descanse en este.
Coloque la abrazadera sobre dos balaustres y ajuste con la perilla de mano hasta
que esté firmemente instalada. Repita la acción para el otro codo, con espaciado,
para emparejar aproximadamente la montura del espacio.
Nota: Puede requerirse, que para barandales más altos, la perilla de mano y la
mitad de la abrazadera más cercana a la cubierta se remuevan para despejar el
barandal. Reinstale la abrazadera, así como la perilla, y ajuste.
Artículos incluidos
JUEGO DE HERRAMIENTAS DE MESA DE BARANDAL
INSTRUCCIONES PARA LA INSTALACIÓN
Artículos incluidos
(2) monturas de metal “H”
(2) codos de metal
(2) tornillos de muletilla
(24) tornillos
table rail kit.ai
Step2.ai
Step3a.ai
Step3b.ai
Step3c.ai
Paso 2
Paso 3
Barandal
superior

LOS DIAGRAMAS E INSTRUCCIONES DE ESTE FOLLETO SON PARA FINES ILUSTRATIVOS SOLAMENTE Y NO ESTÁN DESTINADOS A REEMPLAZAR A UN PROFESIONAL CON LICENCIA. CUALQUIER
CONSTRUCCIÓN O USO DEL PRODUCTO DEBE ESTAR DE ACUERDO CON TODOS LOS CÓDIGOS LOCALES DE CONSTRUCCIÓN O DE ZONIFICACIÓN. EL USUARIO ASUME TODOS LOS RIESGOS Y
RESPONSABILIDADES ASOCIADOS CON LA CONSTRUCCIÓN O EL USO DE ESTE PRODUCTO. UNIVERSAL CONSUMER PRODUCTS, INC., NO PROPORCIONA NINGUNA OTRA GARANTÍA, YA SEA
EXPRESA O TÁCITA, Y NO SERÁ RESPONSABLE DE NINGÚN DAÑO, INCLUIDOS DAÑOS CONSECUENTES.
Deckorail.com
©2017 Universal Forest Products, Inc. All rights reserved. DeckoRail is a registered trademark of Universal Forest Products, Inc., in the U.S.
Todos los derechos reservados. Deckorail es una marca registrada de Universal Forest Products, Inc., en EE. UU. 9218_2/17
Paso 4
Levante la mesa hacia la posición y luego deslícela en las ranuras de los codos.
Ajuste el tornillo de muletilla sobre el fondo de cada codo para asegurar las
monturas en el lugar.
Nota: Los travesaños inclinados permiten la instalación de la mesa, por eso se
extiende más hacia el centro de la cubierta, para más de una repisa o más lejos
de la cubierta, dependiendo de su uso.
¡ADVERTENCIA!
• La capacidad de peso máximo es de 50 libras distribuidos uniformemente.
No lo exceda.
• La mesa está diseñada para sujetar una barandilla que cumpla con los
requerimientos estructurales del Código Residencial Internacional. No la
use si la barandilla no cumple con el Código Residencial Internacional o si
la barandilla es, por lo demás, poco segura o se encuentra deteriorada.
• A pesar de estar diseñada para funcionar con muchos estilos de
barandales comunes, no la utilice ni fuerce para que se ajuste a un
barandal que no sea compatible.
• Nunca permita que una persona se siente o se suba sobre la mesa,
se apoye o se impulse con ella.
• Verifique con su propietario o asociación de condominio las reglas
con relación a la instalación y uso.
• Una práctica idónea es retirar la mesa y herramientas cuando no se usen.
Siempre retírelas antes de tormentas o vientos fuertes.
• Verifique la ordenanza de su zona local sobre las reglas para la
instalación y uso.
• El peso máximo es el equivalente al peso de cualquier material que
se use como un modelo de mesa.
• Antes de instalar o remover, asegúrese de que nada (incluso alguna
persona, animales, mueble, entre otros) se encuentre debajo del barandal.
Las abrazaderas de soporte y tuercas deberían verificarse y reajustarse
(de ser necesario) antes de cada uso, en especial si la mesa permaneció
unida a un barandal por un largo período de tiempo.
• Si la mesa se afloja de las monturas “H”, reajuste los tornillos uniendo
la mesa o instalando una nueva mesa antes de su uso.
Step4.ai
Step4.ai
Step5Note.ai
Center Mount Table or Bar Mount
Step5Note.ai
Center Mount Table or Bar Mount
Paso 4
Montaje central
Montaje de mesa o barra
-
 1
1
-
 2
2
-
 3
3
-
 4
4


