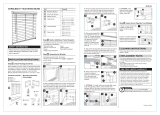
Perfect Lift Window Treatment QJWT284720 Guía del usuario
- Tipo
- Guía del usuario

Printed in China
Imprimé en Chine
Impreso en China
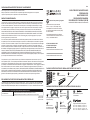
x 1A
BB
Hold Down Bracket
Support de maintien
Sostén
x 2
CC
Medium Screw/Vis moyenne/
Tornillo mediano
Large Screw/Grande vis/Tornillo grande
x 4
B
Valance/Valence/Faldilla
x 1
C
Wand/Tige/Varilla
x 1
PACKAGE CONTENTS/CONTENU DE L’EMBALLAGE/CONTENIDO DEL PAQUETE
HARDWARE CONTENTS/ACCESSOIRES DE FIXATION/ACCESORIOS INCLUIDOS
FF
AA
Mounting Bracket/Support de montage/
Soporte de montaje
x 2
ATTACHEZ VOTRE REÇU ICI
ATTACH YOUR RECEIPT HERE
ADJUNTE AQUÍ EL RECIBO
Serial Number/Numéro de série/Número de serie
Purchase Date/Date d’achat/Fecha de compra
Blind
Store
Celosía
MODEL/MODÈLE/MODELO #QJBK,QJWT 200480-720720
24 in. - 28 in. / 60,96 cm - 71,12 cm = x 4
32 in. - 36 in. / 81,28 cm - 91,44 cm = x 6
40 in. - 44 in. / 101,6 cm - 111,76 cm = x 8
48 in. - 72 in. / 121,92 cm - 182,88 cm= x 10
PART/Nº DE PIÈCE/Nº de PARTE DESCRIPTION/DESCRIPTION/DESCRIPCIÓN
Hardware pack/Ensemble d'accessoires de fixation/Paquete de accesorios
(Contents/Contenu/Incluye AA x2, BB x2, CC x4, DD x2, EE x2, FF x8, GG x2, HH x3)
REPLACEMENT PARTS/PIÈCES DE RECHANGE/PARTES DE REEMPLAZO
3B00Z0WTHW2LA
WARRANTY/GARANTIE/GARANTÍA
For replacement parts, call customer service at 1-844-318-6168, 8:00 a.m. - 4:30 p.m., EST, Monday - Friday./Si vous désirez des
pièces de rechange, appelez le service à la clientèle 1-844-318-6168, du lundi au vendredi de 8 h à 16:30 h (heure normale
de l'est)./Para solicitar partes de reemplazo, llame al 1-844-318-6168, de 8:00 a.m. a 4:30 p.m., hora del Este, de lunes a viernes.
For a period of one (1) year from the date of purchase, the manufacturer will replace this window covering with one of equal or
superior value, if this window covering is found to be defective in material or workmanship. To obtain warranty service contact
our customer service department at 1-844-318-6168. This warranty does not cover damage or defects caused by or resulting
from improper maintenance, negligent or improper use, abuse, misuse, neglect, accidents, act of God, alteration, commercial
use, installation, removal or reinstallation. This warranty is restricted to normal consumer use within the United States and
Canada. MANUFACTURER WILL NOT BE LIABLE FOR INCIDENTAL OR CONSEQUENTIAL DAMAGES, SOME STATES
DO NOT ALLOW THE EXCLUSION OR LIMITATION OF INCIDENTAL OR CONSEQUENTIAL DAMAGES, SO THE ABOVE
LIMITATION OR EXCLUSION MAY NOT APPLY TO YOU. This warranty gives you specific legal rights, and you may also
have other rights which vary from state to state.
Si ce couvre-fenêtre présente un défaut de matériaux ou de fabrication pendant la première suivant la date d'achat, le fabricant
le remplacera par un autre couvre-fenêtre de valeur égale ou supérieure. Si vous désirez déposer une réclamation sous garantie
ou contacter notre service à la clientèle, composez le 1-844-318-6168. Cette garantie ne couvre pas les défauts et les dommages
causés par un mauvais entretien, une négligence, une utilisation inappropriée, un usage abusif, une mauvaise utilisation, un
accident, une catastrophe naturelle, une altération du produit, un usage commercial, ou une erreur d'installation, d'enlèvement ou
de réinstallation. Cette garantie s'applique uniquement si le produit fait l'objet d'un usage domestique normal aux États-Unis et au
Canada. LE FABRICANT RÉFUTE TOUTE RESPONSABILITÉ RELATIVE À QUELQUES DOMMAGES INDIRECTS OU
ACCESSOIRES, SAUF SI VOUS HABITEZ DANS UNE JURIDICTION INTERDISANT D'EXCLURE OU DE LIMITER LES
DOMMAGES INDIRECTS OU ACCESSOIRES. Cette garantie vous accorde des droits juridiques spécifiques, mais il est possible
que vous ayez aussi d'autres droits selon votre lieu de résidence.
Por el período de un (1) año a partir de la fecha de compra, el fabricante reemplazará este cobertor de ventana por uno de
valor equivalente o superior, si se comprueba que tiene defectos de materiales o fabricación. Para obtener el servicio de garantía
comuníquese con nuestro departamento de servicio al cliente al 1-844-318-6168. Esta garantía no cubre daños o defectos
provocados por o resultantes de mantenimiento inadecuado, uso negligente o inadecuado, abuso, mal uso, negligencia, accidentes,
actos fortuitos, alteraciones, uso comercial, instalación, extracción o reinstalación. Esta garantía se limita al uso normal de un
consumidor dentro de los Estados Unidos y Canadá. EL FABRICANTE NO SERÁ RESPONSABLE POR DAÑOS INCIDENTALES
O RESULTANTES; ALGUNOS ESTADOS NO PERMITEN LA EXCLUSIÓN O LIMITACIÓN DE DAÑOS INCIDENTALES O
RESULTANTES, POR LO QUE LA LIMITACIÓN O EXCLUSIÓN ANTERIOR PUEDE NO APLICARSE EN SU CASO. Esta
garantía le confiere derechos legales específicos, y puede también incluir otros derechos que varían según el Estado.
6
1
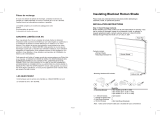
2 INCH CORDLESS FAUX WOOD BLINDS
STORE SIMILI-BOIS
SANS CORDON DE 2 PO
CELOSÍAS IMITACIÓN MADERA
SIN CUERDAS, DE 2 PULGADAS (5,08 CM)
EE
Valence Return
Retour de valence
Retorno de la faldilla
x 2
DD
Valance Connector
Connecteur de valence
Conector de la faldilla
x 2
CARE AND MAINTENANCE/ENTRETIEN/CUIDADO Y MANTENIMIENTO
Clean using damp cloth or vacuum using proper attachments or duster.
Nettoyez ce produit avec un chiffon humide, avec un aspirateur équipé d'un embout approprié ou avec un plumeau.
Limpie con trapo húmedo, plumero o aspiradora con los accesorios adecuados.
M314
Questions?/Des questions?/¿Preguntas?
Call customer service at 1-844-318-6168,
8:00 a.m. - 4:30 p.m., EST, Monday - Friday.
Communiquez avec notre service à la clientèle
au 1-844-318-6168, entre 8:00 h et 16:30 h (HNE),
du lundi au vendredi.
Llame al Departamento de Servicio al Cliente al
1-844-318-6168, de lunes a viernes de 8 :00 a.m. a
4:30 p.m., hora estándar del Este.

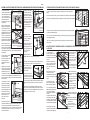
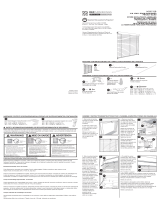
1a
1b
Outside Mount
Installation à l’extérieur
du châssis/Montaje exterior
Inside Mount
Installation à l’intérieur
du châssis/Montaje interior
2a
4
2b
ASSEMBLY INSTRUCTIONS/INSTRUCTIONS D’ ASSEMBLAGE/INSTRUCCIONES DE ENSAMBLADO
1. Mark center of window
opening and center of blind
(A) with pencil (not
included).
Avec un crayon (non
inclus), marquez le centre
de la fenêtre et le centre
du store (A).
Marque el centro de la
abertura de la ventana y el
de la celosía (A)
con un lápiz (no incluido).
3. Remove mounting
brackets (AA) from blind
(A), align with pencil marks
and attach to window
frame or wall using large
screws (FF). Pre-drill holes
with 1/16 in. drill bit
(not included).
Retirez les supports de
montage (AA) du store (A),
alignez-les avec les marques
tracées au crayon et fixez-
les sur le cadre de fenêtre
ou sur le mur avec les gran-
des vis (FF). Percez des
trous de guidage avec un
foret de 1/16 po (non inclus).
.
AA
AA
A
A
A
GG
HH
GG
Valance Clip/
Pince pour valence / Sujetador de la faldilla
Center Bracket/Support central/Soporte central
HARDWARE
CONTENTS
(CONTINUED)/ACCESSOIRES DE FIXATION
(SUITE)/ACCESORIOS
(CONTINUACIÓN)
32
Before beginning installation of product, make sure all parts are present. Compare parts with package contents list and hardware
contents list. If any part is missing or damaged, do not attempt to assemble, install or operate the product.
Estimated Assembly Time: 30 minutes.
Tools Required for Assembly (not included): Pencil, safety goggles, Phillips screwdriver, tape measure, level. Helpful Tools (not
included): Drill, 1/16 in. bit or step stool.
Avant de commencer l'installation, assurez-vous qu'il ne manque aucune pièce. Comparez le contenu de l'emballage avec la liste
de pièces et d'accessoires de fixation. Si vous découvrez qu'une pièce est manquante ou endommagée, ne tentez pas d'assembler,
d'installer ou d'utiliser le produit.
Durée d’assemblage approximative : 30 minutes.
Outils nécessaires pour l'assemblage (non inclus) : crayon, lunettes de sécurité, tournevis à pointe cruciforme, ruban à mesurer,
niveau à bulle. Outils utiles (non inclus) : perceuse, foret de 1/16 po, escabeau.
Antes de comenzar a instalar el producto, asegúrese de que todas las partes estén presentes. Compare las partes con la lista de
contenidos del paquete y la de los accesorios. Si alguna parte no está presente o está dañada, no intente ensamblar, instalar u
operar el producto.
Tiempo de ensamblado estimado: 30 minutos.
Herramientas necesarias para el ensamblado (no incluidas): Lápiz, gafas de seguridad, destornillador Phillips, cinta métrica, nivel.
Herramientas útiles (no incluidas): Taladro, broca de 1/16 pulg. y taburete.
PREPARATION/PRÉPARATION/PREPARACIÓN
4. Slide center bracket (GG)
onto headrail from back of
blind (A). Temporarily hang
blind (A) by sliding headrail
into attached mounting
brackets (AA). Mark location
of center bracket (GG) with
pencil. Remove blind (A).
Glissez le support central
(GG) sur le caisson par
l'arrière du store (A).
Accrochez temporairement le store (A) en glissant le caisson
dans les supports de montage précédemment installés (AA).
Avec un crayon, marquez l'emplacement du support
central (GG). Retirez le store (A).
Deslice el soporte central (GG) sobre el pasador desde la
parte posterior de la celosía (A). Cuelgue temporalmente la
celosía (A) deslizando el pasador en los soportes de montaje
ya fijos (AA). Marque con un lápiz la ubicación del soporte
central (GG). Retire la celosía (A).
2. Slide mounting brackets
(AA) on each end of the
blind (A) headrail. Position
blind (A) in window, on
either the inside or outside,
and align center marks.
Mark position of mounting
brackets (AA) with a pencil.
Glissez un support de
montage (AA) à chaque
extrémité du caisson du
store (A). Placez le store (A)
sur la fenêtre, à l'intérieur
ou à l'extérieur du cadre
de fenêtre, puis alignez les
marques centrales. Avec un
crayon, marquez l'emplace-
ment des supports de
montage (AA).
Deslice los suportes de
montaje (AA) en cada
extremo del pasador de la
celosía (A). Ubique la celosía (A) en la ventana, ya sea en el
interior o el exterior, y alinee las marcas de los centros. Marque
la ubicación de los soportes de montaje (AA) con un lápiz.
26 in./po - 32 in./po / 66,04 cm - 81,28 cm = x 1
40 in./po - 44 in./po / 101,6 cm - 111,76 cm = x 2
48 in./po - 72 in./po / 121,92 cm - 182,88 cm= x 3
26 in./pulg. - 32 in./pulg. / 66,04 cm - 81,28 cm = x 1
40 in./pulg. - 44 in./pulg. / 101,6 cm - 111,76 cm = x 2
48 in./pulg. - 72 in./pulg. / 121,92 cm - 182,88 cm= x 3
24 in./po - 36 in./po / 60,96 cm - 91,44 cm = x 2
40 in./po - 44 in./po / 101,6 cm - 111,76 cm = x 3
48 in./po - 72 in./po / 121,92 cm - 182,88 cm = x 4
24 in./pulg. - 36 in./pulg. / 60,96 cm - 91,44 cm = x 2
40 in./pulg. - 44 in./pulg. / 101,6 cm - 119,38 cm = x 3
48 in./pulg. - 72 in./pulg. / 121,92 cm - 182,88 cm = x 4
FF
AA
AA
FF
3a
FF
AA
3b
Outside Mount
Installation à l’extérieur
du châssis/Montaje exterior
Inside Mount
Installation à l’intérieur
du châssis/Montaje interior
SAFETY INFORMATION/CONSIGNES DE SÉCURITÉ/INFORMACIÓN DE SEGURIDAD
Please read and understand this entire manual before attempting to assemble or install the product./Lisez attentivement et
comprenez ce manuel avant d'assembler ou d'installer ce produit./ Asegúrese de leer y comprender completamente este
manual antes de intentar ensamblar o instalar el producto.
Quite los soportes de mon-
taje
(AA) de la celosía (A),
alinéela con las marcas de
lápiz y fíjela al marco de la
ventana o a la pared con
tornillos largos (FF). Haga
los orificios previos con una broca de 1/16 pulg.
(no incluida).

5a
5b
6
7a
Outside Mount
Installation à l’extérieur du châssis
Montaje exterior
7b
ASSEMBLY INSTRUCTIONS/INSTRUCTIONS POUR L’ASSEMBLAGE/INSTRUCCIONES DE ENSAMBLADO
FF
GG
FF
GG
C
HH
BB
A
CC
BB
A
CC
A
7. OPTIONAL: To install
hold down brackets (BB),
lower blind (A) to desired
position. Screw the hold
down brackets (BB) into the
wall or window sill using
medium screws (CC) and
attach blind (A) at the
hole in the cap on the
bottom rail.
ÉTAPE FACULTATIVE : Si
vous désirez installer les supports de maintien (BB), baissez
le store (A) à la position désirée. Vissez les supports de
maintien (BB) sur le mur ou sur le seuil de fenêtre avec des vis
moyennes (CC) et fixez le store (A) sur le trou dans le cou-
vercle du rail inférieur.
8. OPTIONAL: Slide
valance (B) onto valance
clips (HH) as needed to
center valance (B).
5
4
8
A
B
HH
OPERATING INSTRUCTIONS/MODE D’EMPLOI/ INSTRUCCIONES DE MANEJO
C
A
2
1. Raise or lower the blind (A) by lifting or lowering the bottom rail to the desired
height.
Pour lever ou baisser le store (A), levez ou baissez le rail inférieur à la hauteur désirée.
Suba o baje la celosía (A) levantando o bajando el riel inferior hasta la altura deseada.
2. Open or close the blind (A) slats by turning the wand (C) until the slats are opened
or closed to the desired amount.
Pour ouvrir ou fermer les lattes du store (A), utilisez la tige (C) jusqu'à ce que les lattes
soient à l'angle souhaité.
Abra o cierre la celosía (A) girando la varilla (C) hasta que los listones se cierren o
abran a gusto.
OPCIONAL: Para instalar
los soportes para colgar
(BB), baje la celosía (A)
hasta la posición deseada.
Atornille los soportes para
colgar (BB) en la pared o en
el alféizar de la ventana con
tornillos medianos (CC) y
fije la celosía (A) en el
orificio de la tapa del riel
inferior.
Inside Mount
Installation à l’intérieur du châssis
Montaje interior
Inside Mount
Installation à l’intérieur du châssis
Montaje interior
Outside Mount
Installation à l’extérieur du châssis
Montaje exterior
6. Attach valance clips (HH)
to blind (A) headrail
(optional). Install the wand
(C) to the wand hook
attached to the blind (A)
headrail.
Installez les pinces de val-
ence (HH) sur le caisson du
store (A) (étape facultative).
Installez la tige (C) sur le
crochet prévu à cet effet sur le caisson du store (A).
Fije los broches de la faldilla (HH) al pasador de la celosía
(opcional). Instale la varilla (C) en el gancho fijado al pasador
de la celosía (A).
5. Align center bracket
(GG) with pencil marks and
attach using medium screws
(FF); pre-drill holes with
1/16 in. drill bit. Next, hang
blind (A) and snap the
locking tab of the mounting
bracket (AA).
Alignez le support central
(GG) avec les marques de
crayon et fixez-le avec les
vis moyennes (FF). Percez
préalablement des trous de
guidage avec un foret de
1/16 po. Accrochez ensuite
le store (A) et enclenchez la
languette de verrouillage des
supports de montage (AA).
9. OPTIONAL: When mounting the blinds outside the window
frame, valence returns (EE) will cover the ends of the
headrail. Valence returns
(EE) attach to each end of
valance (B) using valance
connectors (DD).
OPCIONAL: Deslice la
faldilla (B) hacia sus broches (HH) hasta centrarla.
9
EE
DD
B
A
1
ÉTAPE FACULTATIVE : Si
vous désirez installer la
valence (B), glissez-la sur
les pinces de valence (HH)
de sorte à centrer la
valence (B).
ÉTAPE FACULTATIVE : Si
vous installez le store à l'ext-
érieur du cadre de fenêtre, les
retours de valence (EE) couvriront les extrémités du caisson.
Les retours de valence (EE) peuvent être installés sur chaque
extrémité de la valence (B) avec les connecteurs de valence
(DD).
OPCIONAL: Al montar celosías por fuera del marco de la
ventana, los retornos de la faldilla (EE) cubrirán los extremos
del pasador. Los retornos de la faldilla (EE) se fijan al extremo
de la faldilla (B) con conectores (DD).
Alinee el soporte central
(GG) con las marcas de lápiz
y fíjelo con tornillos medianos
(FF); haga los orificios previos con una broca de 1/16 pulg.
Luego cuelgue la celosía (A) y cierre la traba del soporte de
montaje (AA).
7
1. Lower blind (A) to
maximum length. Cut the
desired number of the bottom
most slats, leaving the bottom
rail as is.
Abaissez complètement le
store (A). Coupez le nombre
désiré de lattes au bas du
store, sans toucher au rail
inférieur.
Baje la celosía (A) en toda
su extensión. Corte la
cantidad deseada de listones
inferiores, sin modificar el riel
inferior.
ADJUST LENGTH OF BLIND/RÉGLAGE DE LA LONGUEUR DU STORE/AJUSTE DEL LARGO DE
LA CELOSÍA
4. Remove the plugs from
the bottom rail with a
flathead screw driver.
Avec un tournevis à pointe
plate (non inclus), retirez
les bouchons sur le rail
inférieur.
Quite los tapones del riel
inferior con un destornil-
lador plano (no incluido).
1
2
2. Remove the cut slats.
Retirez les lattes coupées.
Retire los listones cortados.
3. Cut the excess horizontal
ladder strings. CAUTION: do
not cut the vertical ladder
strings, as this will void the
warranty.
Coupez les cordes d'échelle
horizontales en trop. MISE
EN GARDE : Ne coupez pas
les cordes d'échelle verticales
car cela annulerait la garantie.
Corte las tiras horizontales
sobrantes. PRECAUCIÓN: no corte las tiras verticales, de lo
contrario anulará la garantía.
5. Slide the bottom rail up
to 1 inch below the newest
bottom slat.
Glissez le rail inférieur vers
le haut jusqu'à environ 1 po
(2,5 cm) sous la nouvelle
latte inférieure.
Deslice hacia arriba el riel
inferior, hasta 1 pulgada
(2,54 cm) por debajo del
último listón inferior.
6. Twist the cords back
into
the bottom rail and replace
plugs.
Enroulez les cordes dans
le rail inférieur et réinstallez
les bouchons.
Vuelva a enrollar los
cordones en el riel inferior
y vuelva a poner los
tapones.
4
5
6
3
M314-1
Transcripción de documentos
M314 CARE AND MAINTENANCE/ENTRETIEN/CUIDADO Y MANTENIMIENTO 2 INCH CORDLESS FAUX WOOD BLINDS Clean using damp cloth or vacuum using proper attachments or duster. Nettoyez ce produit avec un chiffon humide, avec un aspirateur équipé d'un embout approprié ou avec un plumeau. Limpie con trapo húmedo, plumero o aspiradora con los accesorios adecuados. STORE SIMILI-BOIS SANS CORDON DE 2 PO CELOSÍAS IMITACIÓN MADERA SIN CUERDAS, DE 2 PULGADAS (5,08 CM) WARRANTY/GARANTIE/GARANTÍA For a period of one (1) year from the date of purchase, the manufacturer will replace this window covering with one of equal or superior value, if this window covering is found to be defective in material or workmanship. To obtain warranty service contact our customer service department at 1-844-318-6168. This warranty does not cover damage or defects caused by or resulting from improper maintenance, negligent or improper use, abuse, misuse, neglect, accidents, act of God, alteration, commercial use, installation, removal or reinstallation. This warranty is restricted to normal consumer use within the United States and Canada. MANUFACTURER WILL NOT BE LIABLE FOR INCIDENTAL OR CONSEQUENTIAL DAMAGES, SOME STATES DO NOT ALLOW THE EXCLUSION OR LIMITATION OF INCIDENTAL OR CONSEQUENTIAL DAMAGES, SO THE ABOVE LIMITATION OR EXCLUSION MAY NOT APPLY TO YOU. This warranty gives you specific legal rights, and you may also have other rights which vary from state to state. Si ce couvre-fenêtre présente un défaut de matériaux ou de fabrication pendant la première suivant la date d'achat, le fabricant le remplacera par un autre couvre-fenêtre de valeur égale ou supérieure. Si vous désirez déposer une réclamation sous garantie ou contacter notre service à la clientèle, composez le 1-844-318-6168. Cette garantie ne couvre pas les défauts et les dommages causés par un mauvais entretien, une négligence, une utilisation inappropriée, un usage abusif, une mauvaise utilisation, un accident, une catastrophe naturelle, une altération du produit, un usage commercial, ou une erreur d'installation, d'enlèvement ou de réinstallation. Cette garantie s'applique uniquement si le produit fait l'objet d'un usage domestique normal aux États-Unis et au Canada. LE FABRICANT RÉFUTE TOUTE RESPONSABILITÉ RELATIVE À QUELQUES DOMMAGES INDIRECTS OU ACCESSOIRES, SAUF SI VOUS HABITEZ DANS UNE JURIDICTION INTERDISANT D'EXCLURE OU DE LIMITER LES DOMMAGES INDIRECTS OU ACCESSOIRES. Cette garantie vous accorde des droits juridiques spécifiques, mais il est possible que vous ayez aussi d'autres droits selon votre lieu de résidence. Por el período de un (1) año a partir de la fecha de compra, el fabricante reemplazará este cobertor de ventana por uno de valor equivalente o superior, si se comprueba que tiene defectos de materiales o fabricación. Para obtener el servicio de garantía comuníquese con nuestro departamento de servicio al cliente al 1-844-318-6168. Esta garantía no cubre daños o defectos provocados por o resultantes de mantenimiento inadecuado, uso negligente o inadecuado, abuso, mal uso, negligencia, accidentes, actos fortuitos, alteraciones, uso comercial, instalación, extracción o reinstalación. Esta garantía se limita al uso normal de un consumidor dentro de los Estados Unidos y Canadá. EL FABRICANTE NO SERÁ RESPONSABLE POR DAÑOS INCIDENTALES O RESULTANTES; ALGUNOS ESTADOS NO PERMITEN LA EXCLUSIÓN O LIMITACIÓN DE DAÑOS INCIDENTALES O RESULTANTES, POR LO QUE LA LIMITACIÓN O EXCLUSIÓN ANTERIOR PUEDE NO APLICARSE EN SU CASO. Esta garantía le confiere derechos legales específicos, y puede también incluir otros derechos que varían según el Estado. Questions?/Des questions?/¿Preguntas? MODEL/MODÈLE/MODELO #QJBK,QJWT 200480-720720 Call customer service at 1-844-318-6168, 8:00 a.m. - 4:30 p.m., EST, Monday - Friday. Communiquez avec notre service à la clientèle au 1-844-318-6168, entre 8:00 h et 16:30 h (HNE), du lundi au vendredi. Llame al Departamento de Servicio al Cliente al 1-844-318-6168, de lunes a viernes de 8 :00 a.m. a 4:30 p.m., hora estándar del Este. ATTACH YOUR RECEIPT HERE ATTACHEZ VOTRE REÇU ICI ADJUNTE AQUÍ EL RECIBO Serial Number/Numéro de série/Número de serie Purchase Date/Date d’achat/Fecha de compra PACKAGE CONTENTS/CONTENU DE L’EMBALLAGE/CONTENIDO DEL PAQUETE A x1 Blind Store Celosía REPLACEMENT PARTS/PIÈCES DE RECHANGE/PARTES DE REEMPLAZO For replacement parts, call customer service at 1-844-318-6168, 8:00 a.m. - 4:30 p.m., EST, Monday - Friday./Si vous désirez des pièces de rechange, appelez le service à la clientèle 1-844-318-6168, du lundi au vendredi de 8 h à 16:30 h (heure normale de l'est)./Para solicitar partes de reemplazo, llame al 1-844-318-6168, de 8:00 a.m. a 4:30 p.m., hora del Este, de lunes a viernes. 3B00Z0WTHW2LA Printed in China Imprimé en Chine Impreso en China C Valance/Valence/Faldilla x1 Wand/Tige/Varilla BB x 2 CC x 4 Hold Down Bracket Support de maintien Mounting Bracket/Support de montage/ Sostén Soporte de montaje Medium Screw/Vis moyenne/ Tornillo mediano AA x 2 DD x 2 Valance Connector Connecteur de valence Conector de la faldilla 6 x1 HARDWARE CONTENTS/ACCESSOIRES DE FIXATION/ACCESORIOS INCLUIDOS PART/Nº DE PIÈCE /Nº de PARTE DESCRIPTION/DESCRIPTION/DESCRIPCI ÓN Hardware pack/Ensemble d'accessoires de fixation/Paquete de accesorios (Contents/Contenu/Incluye AA x2, BB x2, CC x4, DD x2, EE x2, FF x8, GG x2, HH x3) B FF EE x 2 Large Screw/Grande vis/Tornillo grande 24 in. - 28 in. / 60,96 cm - 71,12 cm = x 4 32 in. - 36 in. / 81,28 cm - 91,44 cm = x 6 40 in. - 44 in. / 101,6 cm - 111,76 cm = x 8 48 in. - 72 in. / 121,92 cm - 182,88 cm= x 10 Valence Return Retour de valence Retorno de la faldilla 1 HARDWARE CONTENTS (CONTINUED)/ACCESSOIRES DE FIXATION(SUITE)/ACCESORIOS(CONTINUACIÓN) GG HH Center Bracket/Support central/Soporte central Valance Clip/Pince pour valence /Sujetador de la faldilla 24 in./po - 36 in./po / 60,96 cm - 91,44 cm = x 2 40 in./po - 44 in./po / 101,6 cm - 111,76 cm = x 3 48 in./po - 72 in./po / 121,92 cm - 182,88 cm = x 4 26 in./po - 32 in./po / 66,04 cm - 81,28 cm = x 1 40 in./po - 44 in./po / 101,6 cm - 111,76 cm = x 2 48 in./po - 72 in./po / 121,92 cm - 182,88 cm= x 3 24 in./pulg. - 36 in./pulg. / 60,96 cm - 91,44 cm = x 2 40 in./pulg. - 44 in./pulg. / 101,6 cm - 119,38 cm = x 3 48 in./pulg. - 72 in./pulg. / 121,92 cm - 182,88 cm = x 4 26 in./pulg. - 32 in./pulg. / 66,04 cm - 81,28 cm = x 1 40 in./pulg. - 44 in./pulg. / 101,6 cm - 111,76 cm = x 2 48 in./pulg. - 72 in./pulg. / 121,92 cm - 182,88 cm= x 3 SAFETY INFORMATION/CONSIGNES DE SÉCURITÉ/INFORMACIÓN DE SEGURIDAD Please read and understand this entire manual before attempting to assemble or install the product./Lisez attentivement et comprenez ce manuel avant d'assembler ou d'installer ce produit./ Asegúrese de leer y comprender completamente este manual antes de intentar ensamblar o instalar el producto. ASSEMBLY INSTRUCTIONS/INSTRUCTIONS D’ASSEMBLAGE/INSTRUCCIONES DE ENSAMBLADO 1. Mark center of window opening and center of blind (A) with pencil (not included). 3. Remove mounting brackets (AA) from blind (A), align with pencil marks and attach to window frame or wall using large screws (FF). Pre-drill holes with 1/16 in. drill bit (not included). 1a Avec un crayon (non inclus), marquez le centre de la fenêtre et le centre du store (A). Marque el centro de la abertura de la ventana y el de la celosía (A) con un lápiz (no incluido). Retirez les supports de montage (AA) du store (A), alignez-les avec les marques tracées au crayon et fixezles sur le cadre de fenêtre ou sur le mur avec les grandes vis (FF). Percez des . trous de guidage avec un foret de 1/16 po (non inclus). 1b PREPARATION/PRÉPARATION/PREPARACIÓN Before beginning installation of product, make sure all parts are present. Compare parts with package contents list and hardware contents list. If any part is missing or damaged, do not attempt to assemble, install or operate the product. Tools Required for Assembly (not included): Pencil, safety goggles, Phillips screwdriver, tape measure, level. Helpful Tools (not included): Drill, 1/16 in. bit or step stool. Durée d’assemblage approximative : 30 minutes. Outils nécessaires pour l'assemblage (non inclus) : crayon, lunettes de sécurité, tournevis à pointe cruciforme, ruban à mesurer, niveau à bulle. Outils utiles (non inclus) : perceuse, foret de 1/16 po, escabeau. Antes de comenzar a instalar el producto, asegúrese de que todas las partes estén presentes. Compare las partes con la lista de contenidos del paquete y la de los accesorios. Si alguna parte no está presente o está dañada, no intente ensamblar, instalar u operar el producto. Tiempo de ensamblado estimado: 30 minutos. Herramientas necesarias para el ensamblado (no incluidas): Lápiz, gafas de seguridad, destornillador Phillips, cinta métrica, nivel. Herramientas útiles (no incluidas): Taladro, broca de 1/16 pulg. y taburete. 2. Slide mounting brackets (AA) on each end of the blind (A) headrail. Position blind (A) in window, on either the inside or outside, and align center marks. Mark position of mounting brackets (AA) with a pencil. Glissez un support de montage (AA) à chaque extrémité du caisson du store (A). Placez le store (A) sur la fenêtre, à l'intérieur ou à l'extérieur du cadre de fenêtre, puis alignez les marques centrales. Avec un crayon, marquez l'emplacement des supports de montage (AA). 2a AA 4. Slide center bracket (GG) onto headrail from back of blind (A). Temporarily hang blind (A) by sliding headrail into attached mounting brackets (AA). Mark location of center bracket (GG) with pencil. Remove blind (A). Inside Mount Installation à l’intérieur du châssis/Montaje interior A AA FF AA 3b AA Inside Mount Installation à l’intérieur du châssis/Montaje interior FF 4 GG Glissez le support central (GG) sur le caisson par A l'arrière du store (A). Accrochez temporairement le store (A) en glissant le caisson dans les supports de montage précédemment installés (AA). Avec un crayon, marquez l'emplacement du support central (GG). Retirez le store (A). 2b AA Deslice los suportes de Outside Mount montaje (AA) en cada Installation à l’extérieur A du châssis/Montaje exterior extremo del pasador de la celosía (A). Ubique la celosía (A) en la ventana, ya sea en el interior o el exterior, y alinee las marcas de los centros. Marque la ubicación de los soportes de montaje (AA) con un lápiz. 2 FF Quite los soportes de montaje (AA) de la celosía (A), alinéela con las marcas de lápiz y fíjela al marco de la Outside Mount ventana o a la pared con Installation à l’extérieur du châssis/Montaje exterior tornillos largos (FF). Haga los orificios previos con una broca de 1/16 pulg. (no incluida). Estimated Assembly Time: 30 minutes. Avant de commencer l'installation, assurez-vous qu'il ne manque aucune pièce. Comparez le contenu de l'emballage avec la liste de pièces et d'accessoires de fixation. Si vous découvrez qu'une pièce est manquante ou endommagée, ne tentez pas d'assembler, d'installer ou d'utiliser le produit. 3a 3 Deslice el soporte central (GG) sobre el pasador desde la parte posterior de la celosía (A). Cuelgue temporalmente la celosía (A) deslizando el pasador en los soportes de montaje ya fijos (AA). Marque con un lápiz la ubicación del soporte central (GG). Retire la celosía (A). M314-1 ASSEMBLY INSTRUCTIONS/INSTRUCTIONS POUR L’ASSEMBLAGE/INSTRUCCIONES DE ENSAMBLADO OPERATING INSTRUCTIONS/MODE D’EMPLOI/ INSTRUCCIONES DE MANEJO 5. Align center bracket (GG) with pencil marks and attach using medium screws (FF); pre-drill holes with 1/16 in. drill bit. Next, hang blind (A) and snap the locking tab of the mounting bracket (AA). 1. Raise or lower the blind (A) by lifting or lowering the bottom rail to the desired height. Alignez le support central (GG) avec les marques de crayon et fixez-le avec les vis moyennes (FF). Percez préalablement des trous de guidage avec un foret de 1/16 po. Accrochez ensuite le store (A) et enclenchez la languette de verrouillage des supports de montage (AA). OPCIONAL: Para instalar los soportes para colgar (BB), baje la celosía (A) hasta la posición deseada. Atornille los soportes para colgar (BB) en la pared o en el alféizar de la ventana con tornillos medianos (CC) y fije la celosía (A) en el orificio de la tapa del riel inferior. Inside Mount Installation à l’intérieur du châssis Montaje interior 5a FF GG 5b 8. OPTIONAL: Slide valance (B) onto valance clips (HH) as needed to center valance (B). FF ÉTAPE FACULTATIVE : Si vous désirez installer la valence (B), glissez-la sur les pinces de valence (HH) de sorte à centrer la valence (B). 6 7a BB Outside Mount Installation à l’extérieur du châssis Montaje exterior 8 B HH A ÉTAPE FACULTATIVE : Si vous installez le store à l'extDD érieur du cadre de fenêtre, les retours de valence (EE) couvriront les extrémités du caisson. Les retours de valence (EE) peuvent être installés sur chaque extrémité de la valence (B) avec les connecteurs de valence (DD). A OPCIONAL: Al montar celosías por fuera del marco de la ventana, los retornos de la faldilla (EE) cubrirán los extremos del pasador. Los retornos de la faldilla (EE) se fijan al extremo de la faldilla (B) con conectores (DD). BB CC Inside Mount Installation à l’intérieur du châssis Montaje interior ÉTAPE FACULTATIVE : Si vous désirez installer les supports de maintien (BB), baissez le store (A) à la position désirée. Vissez les supports de maintien (BB) sur le mur ou sur le seuil de fenêtre avec des vis moyennes (CC) et fixez le store (A) sur le trou dans le couvercle du rail inférieur. 7 2. Open or close the blind (A) slats by turning the wand (C) until the slats are opened or closed to the desired amount. 2 Pour ouvrir ou fermer les lattes du store (A), utilisez la tige (C) jusqu'à ce que les lattes soient à l'angle souhaité. C Abra o cierre la celosía (A) girando la varilla (C) hasta que los listones se cierren o abran a gusto. A ADJUST LENGTH OF BLIND/RÉGLAGE DE LA LONGUEUR DU STORE/AJUSTE DEL LARGO DE LA CELOSÍA 1. Lower blind (A) to maximum length. Cut the desired number of the bottom most slats, leaving the bottom rail as is. 4. Remove the plugs from the bottom rail with a flathead screw driver. Avec un tournevis à pointe plate (non inclus), retirez les bouchons sur le rail inférieur. Quite los tapones del riel inferior con un destornillador plano (no incluido). 1 Abaissez complètement le store (A). Coupez le nombre désiré de lattes au bas du store, sans toucher au rail inférieur. Baje la celosía (A) en toda su extensión. Corte la cantidad deseada de listones inferiores, sin modificar el riel inferior. 5. Slide the bottom rail up to 1 inch below the newest bottom slat. Glissez le rail inférieur vers le haut jusqu'à environ 1 po (2,5 cm) sous la nouvelle latte inférieure. Deslice hacia arriba el riel inferior, hasta 1 pulgada (2,54 cm) por debajo del último listón inferior. 2 2. Remove the cut slats. Retirez les lattes coupées. Retire los listones cortados. 3. Cut the excess horizontal ladder strings. CAUTION: do not cut the vertical ladder strings, as this will void the warranty. Coupez les cordes d'échelle horizontales en trop. MISE EN GARDE : Ne coupez pas les cordes d'échelle verticales car cela annulerait la garantie. 6. Twist the cords back into the bottom rail and replace plugs. 3 Enroulez les cordes dans le rail inférieur et réinstallez les bouchons. Vuelva a enrollar los cordones en el riel inferior y vuelva a poner los tapones. Corte las tiras horizontales sobrantes. PRECAUCIÓN: no corte las tiras verticales, de lo contrario anulará la garantía. 4 A Suba o baje la celosía (A) levantando o bajando el riel inferior hasta la altura deseada. 9. OPTIONAL: When mounting the blinds outside the window frame, valence returns (EE) will cover the ends of the headrail. Valence returns 9 B (EE) attach to each end of EE valance (B) using valance connectors (DD). HH 1 Pour lever ou baisser le store (A), levez ou baissez le rail inférieur à la hauteur désirée. OPCIONAL: Deslice la faldilla (B) hacia sus broches (HH) hasta centrarla. A Installez les pinces de valence (HH) sur le caisson du store (A) (étape facultative). C Installez la tige (C) sur le crochet prévu à cet effet sur le caisson du store (A). Fije los broches de la faldilla (HH) al pasador de la celosía (opcional). Instale la varilla (C) en el gancho fijado al pasador de la celosía (A). 7. OPTIONAL: To install hold down brackets (BB), lower blind (A) to desired position. Screw the hold down brackets (BB) into the wall or window sill using medium screws (CC) and attach blind (A) at the hole in the cap on the bottom rail. A CC GG Alinee el soporte central Outside Mount Installation à l’extérieur du châssis (GG) con las marcas de lápiz Montaje exterior y fíjelo con tornillos medianos (FF); haga los orificios previos con una broca de 1/16 pulg. Luego cuelgue la celosía (A) y cierre la traba del soporte de montaje (AA). 6. Attach valance clips (HH) to blind (A) headrail (optional). Install the wand (C) to the wand hook attached to the blind (A) headrail. 7b 5 4 5 6-
 1
1
-
 2
2
-
 3
3


Perfect Lift Window Treatment QJWT284720 Guía del usuario
- Tipo
- Guía del usuario
en otros idiomas
Artículos relacionados
-
 Perfect Lift Window Treatment QHGR220720 Guía de instalación
-
 Perfect Lift Window Treatment QJBK606720 Guía de instalación
-
 Perfect Lift Window Treatment 3QCC690720 Guía de instalación
-
 Perfect Lift Window Treatment 3QIV440720 Guía de instalación
-
 Perfect Lift Window Treatment QBWT430640 Manual de usuario
-
 Perfect Lift Window Treatment QAWT320720 Manual de usuario
-
 Perfect Lift Window Treatment QELGWT280640 Guía de instalación


