Kobalt SGY-AIR294 Manual de usuario
- Categoría
- Rociador de pintura
- Tipo
- Manual de usuario

ATTACH YOUR RECEIPT HERE
Serial Number Purchase Date
Questions, problems, missing parts? Before returning to your retailer, please call our
customer service department at 888-3KOBALT, 8:00 a.m. - 8:00 p.m.,EST, Monday -
Sunday. You could also contact us at [email protected].
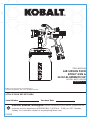
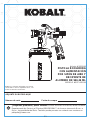
ITEM #5091996
MODEL #SGY-AIR294
AIR SIPHON FEED
SPRAY GUN &
32-OZ ALUMINUM CUP
Español p. 21
SS22258 1
KOBALT and logo design are trademarks or
registered trademarks of LF, LLC. All rights reserved.

2
TABLE OF CONTENTS
Safety Information.........................................................................................................................
Compressor Requirements...........................................................................................................
Package Contents.........................................................................................................................
Preparation ...................................................................................................................................
Spray Gun Set-Up.........................................................................................................................
Product Specifications...................................................................................................................
Assembly Instructions....................................................................................................................
Operating Instructions...................................................................................................................
Care and Maintenance..................................................................................................................
Troubleshooting.............................................................................................................................
Warranty........................................................................................................................................
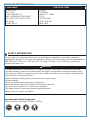
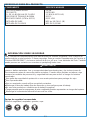
COMPRESSOR REQUIREMENTS
2.3
SCFM 45
PSI
Tool Requirements
Exigences relatives aux outils
Requisitos de herramientas
@
IMPORTANT: To operate correctly, this tool requires airflow that is at least 2.3 cubic feet per
minute (SCFM) at 45 pounds per square inch (PSI). Check the specifications of your air
compressor to be sure that it can support both the minimum SCFM and PSI required. The air
hose length could affect how much air pressure the tool is actually receiving. You may need to
adjust the air pressure higher on the air regulator to achieve the max working pressure of 45 PSI.
19
Replacement Parts List ................................................................................................................20
16
12
9
9
8
8
7
3
3
2

3
PRODUCT SPECIFICATIONS
SPECIFICATIONS
COMPONENT
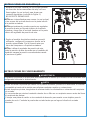
SAFETY INFORMATION
Please read and understand this entire manual before attempting to assemble, operate or
maintain this product. If you have any questions, please call our customer service department at
888-3KOBALT, 8:00 a.m. - 8:00 p.m.,EST, Monday - Sunday. You could also contact us at
Improper operation or maintenance of the paint sprayer could result in serious injury and/or
property damage. Read and understand all warnings and operation instructions before using
this spray gun. When using spray guns, basic safety precautions should always be followed to
reduce the risk of personal injury.
WARNING
FEED TYPE
MIX TYPE
FLUID NOZZLE I.D.
MAX. WORKING PRESSURE
AIR REQ'D (SCFM @ 45 PSI)
AIR INLET
FLUID INLET
SIPHON
EXTERNAL
0.067 IN. (1.7 MM)
45 PSI
2.3 AVERAGE
1/4 IN. NPS (M)
3/8 IN. NPS
Wear protective safety glasses or face shield to protect eyes.
Dress properly.
Wear a respirator when operating a spray gun.
Keep work area clear from clutter and other work hazards.
Do not use this product in unsafe work conditions.
Be aware that air hoses may present tripping hazards.
Keep tool out of reach of children.
Recommended Safety Equipment
Safety Glasses, Respirator, Gloves, Clothing

4
SAFETY INFORMATION
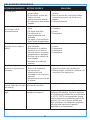
RISK OF EYE OR HEAD INJURY
WARNING
WHAT COULD HAPPEN HOW TO PREVENT IT
Eyes and face can come into direct
contact with sprayed materials,
causing serious injury.
Spraying improper materials or
materials not intended for spray
application could result in serious
injury or death.
Certain materials that can be used
with sprayers may cause skin
irritation if they come in direct
contact with skin.
Always use a face mask/respirator
and
protective clothing when spraying.
Always read the label or
Material Safety Data
Sheet (MSDS)
for the
materials and/or
chemicals before spraying to determine if they
pose a risk of cause skin irritation.
Do not spray acids, corrosive materials, toxic
chemicals, fertilizers or pesticides.
Always read the label or Material Safety Data
Sheet (MSDS) for the materials and/or
chemicals before
spraying to ensure they are
safe to use.
Never aim or spray at yourself or anyone else.
Always wear ANSI approved Z87.1 safety
glasses.
Wear a respirator in accordance with
ANSI Z88.2.
Always wear nitrile gloves.
Always wear protective clothing when spraying.
Always spray in a well-ventilated area to
prevent health and fire hazards.
If eyes or face come into direct contact with
sprayed materials, contact your local doctor or
emergency room for immediate help.
This tool is capable of spraying
flammable materials which can result
in fire or explosion.
Never operate sprayer in the vicinity of open
flame or near ignition sources (pilot lights,
cigarettes, portable electric lamps, etc).
Never operate tools near flammable
substances such as gasoline, naphtha,
cleaning solvents, etc.
Work in a clean, well-ventilated area free of
combustible materials.
Never use oxygen, carbon dioxide or other
bottled gasses as a power source for air tools.
Compressed air can be hazardous, propelling
objects or particles that can cause injury into
soft tissues such as eyes and ears.
Never direct air at yourself or anyone else.
Never leave a pressurized tool unattended.
Disconnect tool from air supply when tool is
not in use or when cleaning.

5
SAFETY INFORMATION
PAINT SPRAYER HAZARDS
WARNING
WHAT COULD HAPPEN HOW TO PREVENT IT
Use of fluids that are incompatible with
aluminum in pressurized equipment can
cause serious chemical reaction and
equipment rupture. Failure to follow this
warning can result in death, serious injury, or
property damage.
Do not use chlorinated solvents (e.g.
1-1-1-trichloroethene, methylene chloride).
Many spray guns contain aluminum, which
reacts strongly to chlorinated solvents.
Contact the solvent or coating manufacturer
regarding questions about potential chemical
reactions.
HOW TO PREVENT IT
RISK OF PERSONAL INJURY
WARNING
WHAT COULD HAPPEN
An unattended tool could be
activated by unauthorized/untrained
persons, leading to their injury or
injury to others.
Air tools can become activated by
accident while being handled, during
accessory changes, tool changes,
maintenance or repair.
Disconnect the tool from the air supply when
cleaning or repairing.
Never carry the tool by the air hose.
Always carry the tool by the handle.
Remove air hose when the tool is not in use
and store tool in a secure location away from
reach of children and untrained users.
Never carry the tool with the trigger depressed
or engaged.
Loss of control of the tool can lead to operator
injury or injury to others in the work area. Before adding paint, cleaning, making repairs,
or when tool is not in use, shut off air supply
and release/drain air pressure from hose.
Disconnect tool from air supply and store in a
safe location.
Never use the tool while using drugs or
alcohol.
Keep proper footing at all times. Do not
overreach, as slipping, tripping, and or falling
can be a major cause of serious injury and/or
death.
Be aware of excess air hose in the working
area or work surface.
Keep handles dry, clean and free from
oil/grease.
Stay alert. Use common sense.
Do not operate tool when you are tired.

6
SAFETY INFORMATION
RISK OF PERSONAL INJURY
WARNING
WHAT COULD HAPPEN HOW TO PREVENT IT
Improperly maintained tools can cause serious
injury. Maintain the tool with care.
Do not abuse hoses or connectors.
Keep hoses away from heat, oil and sharp
edges.
Always check air hoses for weak or worn
connections before each use and make certain
that all connections are secure.
Repetitive motions, awkward positions.
Can be harmful to hands and arms. Discontinue use of tool if discomfort, tingling
feeling or pain occurs.
Consult a physician before resuming use if any
of these symptoms occur.
INHALATION HAZARD
WARNING
WHAT COULD HAPPEN HOW TO PREVENT IT
Paint spraying tools generate paint vapors
which can be harmful to the lungs and
respiratory system.
Wear a respirator in accordance with
ANSI Z88.2.
Some materials such as adhesives
and tar give off vapors which could
cause serious injury with prolonged
exposure.
Always work in a clean, dry, well-ventilated
area.
Be aware of chemicals in the work area and
read all Safety Data Sheets (SDS) for the
materials and/or chemicals that may be
present.

7
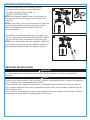
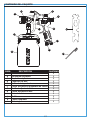
PACKAGE CONTENTS
K
L
B
DE
C
A
J
H
F
G
I
DESCRIPTIONPART QUANTITY
Spray Gun
Paint Cup
Cup Lid
Air Cap
Air Cap Ring
Spray Pattern Adjustment Knob
Fluid Adjustment Knob
Air Adjustment Knob
Air Inlet
Trigger
1
1
1
1
1
1
1
1
1
1
A
B
C
D
E
F
G
H
I
J1
KWrench
Cleaning Brush 1
L

8
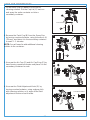
PREPARATION
SPRAY GUN SET-UP
TO PREVENT SERIOUS INJURY FROM EXPLOSION:
Use only clean, dry, regulated, compressed air to power this tool. Do not use oxygen, carbon
dioxide, combustible gases, or any other bottled gas as a power source for this tool. Lubricators
should not be used with spray guns. The use of inline lubricators will contaminate the material
and will ruin the paint finish.
Siphon Feed
Method of material feed where atmospheric pressure creates a partial vacuum to siphon material
to the gun. Only external mix air caps are used with this method. Siphon feed is used with light
bodied latex paints.
Before beginning assembly or operation of product, make sure all parts are present. Compare
parts with package contents list. If any part is missing or damaged, do not attempt to assemble
the product.
Estimated Assembly Time: 1 - 3 minutes.
Tools Required for Assembly (not included):
• 5/8 in. (16 mm) wrench
• Thread Sealant Tape
• Female Plug
WARNING:
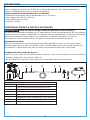
Air Supply Set-up
1. Not all accessories shown are included, but are recommended for best performance
(See Figure 1).
2. It is recommended that an in-line air filter be incorporated into the air supply.
1
Recommended Air Line Set-Up
PART NO. Description
1
L
3
4
5
6
7
Siphon Feed Spray Gun
Air Pressure Regulator (not included)
Female Plug (not included)
Female Coupler (not included)
Air Hose (not included)
In-Line Filter (not included)
Air Compressor (not included)
1
3
L4 3 4
7
5
6
6

9
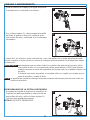
ASSEMBLY INSTRUCTIONS
1. Tighten female plug (not included), turning
clockwise with a wrench (not included) for
air tight connection (See Figure 1).
DO NOT OVERTIGHTEN.
NOTE: Use threaded sealant tape (not included) on
the threading of the male plug on the bottom of the
spray gun.
NOTE: If you use the air pressure regulator, adjust the
air pressure so the gauge on the regulator reads the
recommended pressure when the trigger is pulled.
As an option, you can connect an Air Pressure
Regulator to the bottom of the spray gun and then
attach the female plug to the bottom of the air
pressure regulator.
NOTE:
1
2. Depending on which spray gun you are using, set
the air compressor to the specified pressure. Attach
air line coming from compressor to the spray gun.
I
Air Flow
OPERATING INSTRUCTIONS
Before using desired paint in the spray gun, spray a compatible thinner or solvent through the
gun to remove any containments and residue.
Before adding paint, make sure all thinner or solvents are removed from the spray canister.
It is recommended that you pour the material through a filter into a smaller container prior to
filling the paint cup.
Set up a piece of cardboard or other scrap material to use as a target to test spray. Continue
to test spray until the desired spray pattern is achieved.
The paint sprayer will not properly spray unless the fan direction is either set vertically or
horizontal.
WARNING
NOTE
2

10
NOTE: During normal use, the air cap is adjusted to be
horizontal. This provides a vertical fan-shaped pattern which
gives maximum and even material coverage as the gun is
moved back and forth parallel to the surface being finished.
NOTE: The fluid control knob (G) can be adjusted either
clockwise or counterclockwise to finely adjust the pattern
consistency. Before spraying on workpiece, practice a few
minutes on a cardboard target to ensure that the pattern size
and consistency are set correctly.
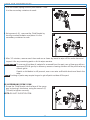
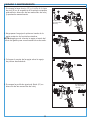
OPERATING INSTRUCTIONS
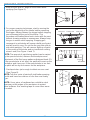
2
1
F
4Paint too fine
Correct
Paint too coarse
Pattern Consistency (Atomization)
4. With the spray gun 6 in. to 9 in. away from workpiece,
spray a short burst while turning the fluid knob
counterclockwise. Observe the spray pattern on the
workpiece and adjust the fluid control knob (G) (see
Figure 3) until desired pattern/atomization is obtained. If
the spray is too fine (caused by too much air), reduce the
air pressure or open the fluid control knob (G) to spray
more paint. If the spray is too coarse or spitting blobs,
reduce the amount of paint with the fluid control knob (G)
or thin the paint more.
3
1. Adjust the direction of the fan by loosening the air cap ring
by hand and turning it to either the horizontal or vertical
direction. Tighten the air cap ring by hand.
2. Set pattern size for desired shape. For full pattern, open
spray pattern adjustment knob (F) counterclockwise. For a
round pattern, turn spray pattern adjustment knob (F)
clockwise.
3. Turn the fluid adjustment knob (G) fully clockwise until
closed.
Air Cap
Air Cap Ring
Horizontal Fan
Vertical Fan
G

Two thin coats of paint will yield better spraying
results and have less chance of runs than one heavy
layer.
NOTE: The amount of paint being applied can be varied
by the speed of stroke, distance from workpiece and
adjustment of the fluid spray pattern adjustment knob (G).
If the speed stroke is too slow, the paint will be wet on the
workpiece and it may run. If the speed stroke is too fast,
the paint will be dry and uneven on the workpiece.
11
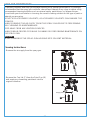
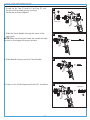
OPERATING INSTRUCTIONS
5
6
7
8
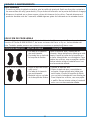
5. Keep the gun at a 90° angle to the surface while
spraying (see Figure 5).
6. For proper spraying techniques, start by moving the
gun at the beginning of the stroke before squeezing
the trigger. Always release the trigger before stopping
gun movement at the end of the stroke. This
procedure will feather/blend each stroke with the next
without showing overlap or unevenness. Always keep
the gun in motion while spraying. Stopping gun
movement in mid-stroke will cause a build-up of paint
and will result in runs. Do not fan the gun from side to
side while painting. This will cause a build-up of paint
in the center of the stroke and an insufficient coating
at each end (See Figure 6 and 7).
7. Overlap strokes just enough to obtain an even coat
(See Figure 8).
NOTE: Use a piece of cardboard as a shield to catch
overspray at the edges of the workpiece to protect
other surfaces. Use masking tape to cover other areas
if needed.
6 - 9 in.
6 - 9 in.
Pull Release
Trigger Trigger
Start Stroke End Stroke
Thin coat Heavy coat Thin coat
NOTE:

12
CARE AND MAINTENANCE
To properly maintain and keep your sprayer working at its optimal performance, it is strongly
recommended that the spray gun nozzle be cleaned and cleared of any clogs or debris using
recommended cleaning solutions such as mineral spirits, paint thinner, or lacquer thinner.
Consult with your local retailer in choosing the correct cleaning solution for the type of paint or
material you are using.
DO NOT USE ACID BASED SOLVENTS, AS ACID BASED SOLVENTS CAN DAMAGE THE
SPRAYER.
ALWAYS REMOVE THE AIR SUPPY FROM THE SPRAY GUN PRIOR TO PERFORMING
ANY CLEANING OR MAINTAINENACE.
KEEP AWAY FROM ANY IGNITION SOURCES.
ALWAYS WEAR PROPER PPE WHILE CLEANING OR PERFORMING MAINTENANCE ON
THE SPRAY GUN.
NEVER SUBMERGE THE SPRAY GUN HOUSING INTO SOLVENT MATERIAL.
WARNING
Cleaning Instructions
1. Remove the air supply from the spray gun.
2. Remove the Cup Lid (C) from the Paint Cup (B)
and empty any remaining paint back into the
original container.
1
2
Empty paint
B
C

13
CARE AND MAINTENANCE
3. Fill the Paint Cup (B) about 1/4 inch full of
cleaning solution. Put the Cup Lid (C) back on
and spray the entire contents out into a
secondary container.
3
4. Remove the Paint Cup (B) from the Spray Gun
by turning counterclockwise, using the wrench (L)
(19 mm), and place it in the secondary container
to soak 3 - 5 minutes.
4
Load cleaner
B
C
NOTE: You will need to add additional cleaning
solution to the container.
5. Unscrew the Air Cap (D) and Air Cap Ring (E) by
hand turning counterclockwise and place it in the
secondary container to soak.
5
Counter-
clockwise
6. Unscrew the Fluid Adjustment Knob (G) by
turning counterclockwise, using a damp cloth
with cleaning solution on it, wipe off the fluid
adjustment knob and set it aside.
6
Counterclockwise
G
B
DE

14
CARE AND MAINTENANCE
NOTE: DO NOT OVERTIGHTEN.
7. Pull out needle spring and the paint needle. Place
it in the secondary container to soak. 7
8. Using wrench (L), unscrew the Fluid Nozzle by
turning counterclockwise and place it in the
secondary container to soak.
9. After 3-5 minutes, remove each item and use a clean dry towel to wipe off the entire item and
inspect it for any remaining paint or dirt to wipe remains.
Fluid
nozzle
8L
Fluid
nozzle
L
1. Screw the Fluid Nozzle into the face of the spray
gun by turning it clockwise, using the wrench (L)
(13 mm) to tighten securely.
1
IMPORTANT: To ensure all residue of material is removed from the part, use a blow gun with an
approved OSHA gun tip to blow any excess cleaning solution off the part that a rag
cannot get to.
If paint or dirt debris is still present, use a non-wire soft bristle brush and brush the
area.
NOTE: Soaking of parts may require longer to get all paint residue off the part.
RE-ASSEMBLING SPRAY GUN

15
CARE AND MAINTENANCE
NOTE: Make sure that you insert the needle through
the hole in the trigger for proper aliment.
2. Screw the Air Cap (D) and Air Cap Ring (E) onto
the face of the spray gun by turning it
clockwise and hand tighten. 2
Clockwise
3. Slide the Paint Needle through the back of the
spray gun. 3
4. Slide Needle Spring over the Paint Needle. 4
5.Screw on the Fluid Adjustment Knob (G) clockwise. 5
Clockwise
G
DE

16
CARE AND MAINTENANCE
TROUBLESHOOTING
If you have any questions regarding sprayer performance, please call our customer service
department at 888-3KOBALT, 8:00 a.m. - 8:00 p.m.,EST, Monday - Sunday. You could also
contact us at [email protected].
Storage
1. When not using the spray gun, turn the fluid adjustment knob counterclockwise (to open)
which will reduce the spring tension on the needle fluid tip.
2. Store the gun in a secure area and out of the reach of children. When storing for longer than
1 week, add a couple drops of lubricant into the air inlet.
Improper spray pattern
Improper spray pattern
1)One side of air cap
is clogged.
2)Dirt on one side of
fluid nozzle.
1)Loose air cap/dirty seal.
2)One side of air cap
is clogged.
3)Dried material on one
side of fluid nozzle.
Remove air cap and soak in solvent, then
blow air through until clean. Wipe off
nozzle tip using a rag moistened with
thinner. To clean holes, use a broom straw
or toothpick. Never try to detach dried
material with a sharp tool.
1)Tighten air cap.
2)Remove air cap and soak in solvent, then
blow air through until clean. Wipe off fluid
nozzle using a rag moistened with
thinner. To clean holes, use a broom
straw or toothpick. Never try to detach
dried material with a sharp tool.
SPRAY PATTERN/PROBLEM
POSSIBLE REASONSOLUTION

17
TROUBLESHOOTING
SPRAY PATTERN/PROBLEM
POSSIBLE REASON SOLUTION
Improper spray pattern
Improper spray pattern
Intermittent/
sputtering spray
1)Atomization air pressure is
set too high. 1)Reduce atomization air pressure.
2)Open fluid adjustment knob.
3)Partially close pattern adjustment
knob.
2)Material too thin; fluid
adjustment turned in too far.
3)Fan pattern open too far.
1)Atomization air
pressure is set too
low.
2)Material too thick.
3)Fan pattern closed
too far.
1)Material level too low.
2)Container tipped too far.
3)Loose fluid inlet connection.
4)Needle seat loose/damaged.
5)Packing around needle
valve is dried out or loose.
6)Fluid nozzle loosely
installed, or dirt between
nozzle and body.
7)Clogged air vent.
1) Reduce atomization air
pressure.
2) Thin to proper viscosity.
3) Partially open pattern
adjustment knob.
1) Refill.
2) Hold more upright.
3) Tighten.
4) Adjust or replace.
5) Lubricate/tighten.
6) Remove, clean, tighten.
7) Clean vent hole.
Improper spray pattern
Unable to get round
spray Fan adjustment screw
not seating properly. Clean or replace adjustment screw.
1)Gun improperly
adjusted.
2)Dirty air cap.
3)Nozzle tip obstructed.
4)Sluggish needle.
1)Re-adjust gun. Follow instructions
carefully.
2)Clean air cap.
3)Clean.
4)Lubricate.

18
TROUBLESHOOTING
SPRAY PATTERN/PROBLEM
POSSIBLE REASON SOLUTION
Will not spray
Fluid leakage from
packing nut 1)Dry packing.
2)Sluggish needle.
3)Tight packing nut.
4)Worn fluid nozzle or
needle.
1)Lubricate.
2)Lubricate.
3)Adjust.
4)Replace.
Air leaking from air cap
without pulling trigger
Thin, sandy, coarse
finish/excessive
overspray
Thick, dimpled finish
resembling orange peel
Low air pressure Regulator/compressor
settings.
Adjust the regulator on the tool to the
maximum setting. Adjust the compressor
regulator to tool maximum of 45 PSI.
NOTE: Air hoses may cause up to 15 PSI loss
in pressure, so you may need to set a higher
compressor output to maintain the required
pressure at the tool.
Gun held too close to
surface. Move gun further from
surface.
1)Gun held too far
from surface.
2)Atomization
pressure set too
high.
3)Improper gun
motion.
1)Move gun closer to
surface.
2)Adjust atomization
pressure.
3)Move at moderate pace,
parallel to surface.
no arcing.
1)Sticking air valve stem.
2)Residue on air valve
or seat.
3)Worn or damaged
air valve or seat.
4)Broken air valve spring.
5)Bent valve stem.
1)Lubricate.
2)Clean.
3)Replace.
4)Replace.
5)Replace.
1)No air pressure at gun.
2)Fluid control screw
not open enough.
3)Material too heavy.
1)Check air supply and air lines.
2)Open fluid control screw. Increase fluid
pressure at tank.
3)Thin material.

19
TROUBLESHOOTING
SPRAY PATTERN/PROBLEM
POSSIBLE REASON SOLUTION
Low air pressure
(continued) Air hose leaks.
Improper hoses.
Tighten and seal hose fittings if leaks are found.
Use sealing tape.
1.Be sure the hose is the proper size. Long
hose or tools using large volumes of air may
require a hose with an I.D. of 1/2 in. or larger
depending on the total length of the hoses.
2.Do not use a multiple number of hoses
connected together with quick-connect fittings.
This causes additional pressure drops and
reduces the tool power. Directly connect the
hoses together.
WARRANTY
This tool is warranted by the manufacturer to the original purchaser from the original purchase
date for three (3) years subject to the warranty coverage described herein.
This warranty gives you specific legal rights, and you may also have other rights that vary from
state to state.
For warranty questions, call our customer service department at 888-3KOBALT, 8:00 a.m. -
8:00 p.m.,EST, Monday - Sunday. You could also contact us at [email protected].
This tool is warranted to the original user to be free from defect in material and workmanship.
If you believe that a tool is defective, return the tool, with proper proof of purchase to the point
of purchase. If it is determined that the tool is defective and covered by this warranty, the
distributor will replace the tool or refund the purchase price.
This warranty is void if: defects in materials or workmanship or damages result from repairs or
alterations which have been made or attempted by others or the unauthorized use of
nonconforming parts; the damage is due to normal wear, damage is due to abuse (including
overloading of the tool beyond capacity), improper maintenance, neglect or accident; or the
damage is due to the use of the tool after partial failure or use with improper accessories or
unauthorized repair or alteration.
Printed in China

20
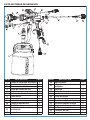
REPLACEMENT PARTS LIST
PART DESCRIPTION QTY
1 1
1
1
1
1
1
1
1
1
1
1
1
1
Paint Cup Set
2 Fluid Connector
3 Air Valve Spring
4 Air Valve Pole
5 E-ring
6 Air Valve Seat
7 O-ring
8 Gasket
9 O-ring
10 Air Cap Set
11 Nozzle
12 Gun Body Fully Assembled
13 E-ring
PART DESCRIPTION QTY
15
14 1
1
1
1
1
1
1
1
1
1
1
1
1
Trigger Stud
16 Fan Adjustment Valve Set
17 Gasket
18 Needle Sleeve
19 O-ring
20 Needle Set
21 Needle Spring
22 Fluid Adjustment Screw
23 Needle Packing Screw
24 Needle Packing
25 Trigger
26 Air Connection
Air Adjustment Valve Set

ADJUNTE SU RECIBO AQUÍ
Número de serie Fecha de compra
¿Preguntas, problemas, piezas faltantes? Antes de volver a la tienda, llame a nuestro
Departamento de Servicio al Cliente al 888-3KOBALT, de lunes a viernes de 8 a.m. a
8 p.m., hora estándar del Este. También puede ponerse en contacto con nosotros en
Artículo # 5091996
MODELO #SGY-AIR294
PISTOLA ROCIADORA
CON ALIMENTACIÓN
POR SIFÓN DE AIRE Y
RECIPIENTE DE
ALUMINIO DE 946,36 ML
21
KOBALT y el diseño del logotipo son marcas
comerciales o marcas registradas de LF, LLC.
Todos los derechos reservados.

22
ÍNDICE
Información sobre seguridad ........................................................................................................
Requerimientos del compresor ...........................................................................................................
Contenido del paquete .................................................................................................................
Preparación ...................................................................................................................................
Configuración de la pistola rociadora .........................................................................................................................
Especificaciones del producto ...................................................................................................................
Instrucciones de ensamblaje .......................................................................................................
Instrucciones de funcionamiento .................................................................................................
Cuidado y mantenimiento ............................................................................................................
Solución de problemas ................................................................................................................
Garantía .......................................................................................................................................
REQUERIMIENTOS DEL COMPRESOR
65,12
LPM 45
PSI
Tool Requirements
Exigences relatives aux outils
Requisitos de herramientas
@
IMPORTANTE: para funcionar correctamente, esta herramienta necesita un flujo de aire de al
menos 65,12 litros por minuto (LPM) a 45 libras por pulgada cuadrada (PSI, por sus siglas en
inglés) en la herramienta. Revise las especificaciones de su compresor de aire para asegurarse
de que puede soportar los requisitos mínimos de flujo de aire y de PSI. El largo de la manguera
de aire podría afectar la cantidad de presión de aire que recibe realmente la herramienta. Es
posible que deba ajustar la presión de aire más alta en el regulador de aire para lograr la presión
de trabajo máxima de 45 PSI.
39
36
32
29
29
28
28
27
24
23
22
Lista de piezas de repuesto .........................................................................................................40

23
ESPECIFICACIONES DEL PRODUCTO
ESPECIFICACIONES
COMPONENTE
INFORMACIÓN SOBRE SEGURIDAD
Lea y comprenda completamente este manual antes de intentar ensamblar, usar o hacerle el
mantenimiento a este producto. Si tiene preguntas, llame a nuestro Departamento de Servicio al
Cliente al 888-3KOBALT, de lunes a viernes de 8 a.m. a 8 p.m., hora estándar del Este. También
puede ponerse en contacto con nosotros en [email protected].
El uso o el mantenimiento inadecuados del rociador de pintura pueden ocasionar lesiones
graves o daños materiales. Lea y comprenda todas las advertencias y las instrucciones de
funcionamiento antes de usar esta pistola rociadora. Cuando utilice pistolas rociadoras, siga
siempre las medidas de precaución y seguridad básicas para reducir el riesgo de lesiones
personales.
ADVERTENCIA
TIPO DE ALIMENTACIÓN
TIPO MIXTO
D.I. DE LA BOQUILLA DE FLUIDO
PRESIÓN DE TRABAJO MÁXIMA
AIRE NECESARIO (LPM a 45 PSI)
ENTRADA DE AIRE
ENTRADA DE FLUIDOS
SIFÓN
EXTERNO
1,7 MM (0.067 PULG)
45 PSI
65,12 LPM
NPS de 1/4 PULG. (M)
NPS DE 9,53 MM
Use gafas de seguridad de protección o una careta protectora para proteger los ojos.
Use ropa adecuada.
Use un respirador cuando utilice una pistola rociadora.
Mantenga el área de trabajo libre de desorden y otros peligros para el trabajo.
No use este producto en condiciones de trabajo inseguras.
Tenga presente que las mangueras de aire comprimido pueden representar un riesgos de tropiezo.
Mantenga la herramienta fuera del alcance de los niños.
Equipo de seguridad recomendado
Gafas de seguridad, respirador, guantes, ropa

24
INFORMACIÓN SOBRE SEGURIDAD
RIESGO DE LESIONES EN LOS OJOS O LA CABEZA
LO QUE PODRÍA OCURRIR CÓMO EVITARLO
Los ojos y la cara pueden entrar en contacto
directo con materiales rociados y causar
lesiones graves.
La pulverización de materiales inadecuados o
materiales no destinados a la pulverización
podrían producir lesiones graves o la muerte.
Algunos de los materiales que se pueden usar
con rociadores podrían irritar la piel si entran
en contacto directo con ella.
Use siempre una mascarilla o el respirador y
ropa protectora cuando rocíe.
Siempre lea la etiqueta o la Hoja de datos de
seguridad de materiales (MSDS, por su sigla
en inglés) de los materiales o productos
químicos antes rociar para determinar si
representan un riesgo que cause irritación de
la piel.
No rocíe ácidos, materiales corrosivos,
sustancias químicas tóxicas, fertilizantes ni
pesticidas.
Siempre lea la etiqueta o la Hoja de datos de
seguridad de materiales (MSDS, por su sigla
en inglés) de los materiales o productos
químicos antes de rociar para asegurarse de
que sean seguros de usar.
No dirija ni rocíe hacia usted mismo ni hacia
otras personas.
Use siempre gafas de seguridad Z87.1
aprobadas por ANSI.
Utilice un respirador de acuerdo con Z88.2 ANSI.
Siempre use guantes de nitrilo.
Siempre use ropa protectora al rociar.
Siempre rocíe en un área bien ventilada para
prevenir riesgos para la salud y peligros de
incendio.
Si los ojos o la cara entran en contacto directo
con el material rociado, póngase en contacto
con su médico o la sala de emergencias local
para solicitar ayuda inmediata.
Esta herramienta es capaz de rociar materiales
inflamables, lo que puede provocar un incendio
o una explosión.
Nunca utilice el rociador cerca de llamas
abiertas o cerca de fuentes de ignición (luces
piloto, cigarrillos, lámparas eléctricas, etc.).
Nunca opere herramientas cerca de
sustancias inflamables como la gasolina, la
nafta, los solventes de limpieza, etc.
Trabaje en un área limpia y bien ventilada sin
materiales combustibles.
Nunca use oxígeno, dióxido de carbono u
otros gases embotellados como fuente de
energía para herramientas neumáticas.
El aire comprimido puede ser peligroso, ya
que puede lanzar objetos y partículas que
pueden causar lesiones a zonas de tejido
blando como los ojos y las orejas.
Nunca dirija el aire hacia usted mismo ni a
otras personas.
Nunca deje una herramienta presurizada sin
supervisión.
Desconecte la herramienta del suministro de
aire cuando la herramienta no esté en uso o
se esté limpiando.
ADVERTENCIA

25
INFORMACIÓN SOBRE SEGURIDAD
PELIGROS DEL ROCIADOR DE PINTURA
ADVERTENCIA
ADVERTENCIA
LO QUE PODRÍA OCURRIR CÓMO EVITARLO
El uso de líquidos incompatibles con el
aluminio en un equipo presurizado puede
causar una reacción química grave y la
ruptura del equipo. No seguir esta advertencia
puede provocar la muerte, lesiones graves o
daños materiales.
No utilice solventes clorados (por ej.,
1-1-1-triclorometano, cloruro de metileno).
Muchas pistolas rociadoras contienen aluminio,
que reacciona fuertemente a disolventes
clorados. Póngase en contacto con el
fabricante de solventes o recubrimientos si
tiene preguntas sobre las reacciones químicas
potenciales.
CÓMO EVITARLO
RIESGO DE LESIONES PERSONALES
LO QUE PODRÍA OCURRIR
Si se deja una herramienta sin supervisión,
esta puede ser activada por personas no
autorizadas o sin capacitación, y otros pueden
sufrir o provocar lesiones.
Las herramientas neumáticas se pueden
activar accidentalmente durante su
manipulación, la limpieza, el mantenimiento o
la reparación.
Desconecte la herramienta del suministro de
aire cuando la limpie o repare.
Nunca transporte la herramienta por la
manguera de aire comprimido.
Nunca transporte la herramienta con el gatillo
apretado o enganchado.
Retire la manguera de aire cuando la
herramienta no esté en uso y almacene la
herramienta en una ubicación segura alejada
del alcance de los niños y de usuarios no
capacitados.
La pérdida del control de la herramienta
puede provocar lesiones al operador o a otras
personas en el área de trabajo.
Antes de cambiar los accesorios, hacer
reparaciones o cuando la herramienta no esté
en uso, cierre el suministro de aire y libere o
drene la presión de aire de la manguera.
Desconecte la herramienta del suministro de
aire y almacene en un lugar seguro.
Nunca utilice la herramienta cuando se
encuentre bajo el efecto de drogas o alcohol.
Mantenga una posición adecuada en todo
momento. No se extienda demasiado, ya que
los resbalones, los tropiezos y/o las caídas
pueden ser la causa principal de lesiones
graves y/o la muerte.
Tenga en cuidado con el exceso de aire en la
manguera en el área de trabajo o superficie
de trabajo.
Mantenga las manijas secas, limpias y libres
de aceite y grasa.
Manténgase alerta. Use el sentido común.
No utilice la herramienta si está cansado.

ADVERTENCIA
ADVERTENCIA
26
INFORMACIÓN SOBRE SEGURIDAD
RIESGO DE LESIONES PERSONALES
LO QUE PODRÍA OCURRIR CÓMO EVITARLO
Las herramientas con mantenimiento
inadecuado pueden causar lesiones graves. Realice un mantenimiento adecuado de la
herramienta.
No maltrate las mangueras o conectores.
Mantenga las mangueras alejadas del calor, el
aceite y los bordes afilados.
Siempre inspeccione las mangueras de aire
comprimido desgastadas o deterioradas antes
de cada uso y asegúrese de que todas las
conexiones estén aseguradas.
Los movimientos repetitivos y las posiciones
extrañas
Podrían ser dañinos para las manos y los
brazos.
Deje de usar la herramienta si siente
molestias, sensación de hormigueo o dolor.
Consulte a un médico antes de volver a
utilizar si se presenta cualquiera de estos
síntomas.
PELIGRO DE INHALACIÓN
LO QUE PODRÍA OCURRIR CÓMO EVITARLO
Las herramientas pulverizadoras de pintura
generan vapores de pintura que pueden ser
perjudiciales para los pulmones y el sistema
respiratorio.
Utilice un respirador de acuerdo con
Z88.2 ANSI.
Algunos materiales, como los adhesivos y el
alquitrán, despiden vapores que pueden
causar lesiones graves tras la exposición
prolongada.
Trabaje siempre en un área limpia, seca y
bien ventilada.
Tenga cuidado con los productos químicos en
el área de trabajo y lea la hoja de datos de
seguridad de materiales (SDS, por sus siglas
en inglés) completa para conocer los
materiales o los productos químicos que
podrían estar presentes.

27
CONTENIDO DEL PAQUETE
K
L
B
DE
C
A
J
H
F
G
I
DESCRIPCIÓNPIEZA CANTIDAD
Pistola rociadora
Recipiente de pintura
Tapa del recipiente
Capuchón de aire
Anillo de la tapa de aire
Perilla de ajuste de modalidad de chorro
Perilla de ajuste de fluido
Perilla de ajuste de aire
Entrada de aire
Gatillo
1
1
1
1
1
1
1
1
1
1
A
B
C
D
E
F
G
H
I
J1
KLlave inglesa
Cepillo limpiador 1
L

28
PREPARACIÓN
CONFIGURACIÓN DE LA PISTOLA ROCIADORA
Use solo aire comprimido regulado seco y limpio para accionar esta herramienta. No use oxígeno,
dióxido de carbono, gases combustibles o cualquier otro gas embotellado como fuente de energía
para esta herramienta. No se deben usar lubricantes con pistolas rociadoras. El uso de
lubricadores en línea contaminará los materiales y arruinará el acabado de pintura.
Alimentación de sifón
Método de alimentación de material donde la presión atmosférica crea un vacío parcial para
alimentar material por el sifón a la pistola. Solo se utilizan tapas de aire de mezcla externa con
este método. La alimentación de sifón se utiliza con pinturas de látex de cuerpo ligero.
Antes de comenzar el ensamblaje o a operar el producto, asegúrese de que no falte ninguna
pieza. Compare las piezas con la lista del contenido del paquete. No intente ensamblar el
producto si falta alguna pieza o si alguna está dañada.
Tiempo estimado de ensamblaje: de 1 a 3 minutos.
Herramientas necesarias para el ensamblaje (no se incluyen):
• Llave inglesa de 5/8 pulg. (16 mm)
• Cinta selladora para roscas
• Conector hembra
W
Configuración del suministro de aire
1. No se incluyen todos los accesorios que se muestran, pero se recomienda su uso para obtener
el mejor rendimiento (consulte la Figura 1).
2. Se recomienda incorporar un filtro de aire en línea dentro del suministro de aire.
1
Configuración recomendada de la línea de aire
1
L
3
4
5
6
7
Pistola atomizadora alimentada por sifón
Regulador de presión de aire (no se incluye)
Enchufe hembra (no se incluye)
Acoplador hembra (no se incluye)
Manguera de aire comprimido (no se incluye)
Filtro en línea (no se incluye)
Compresor de aire (no se incluye)
1
3
L4 3 4
7
5
6
6
PARA EVITAR LESIONES GRAVES DEBIDO A EXPLOSIONES:
ADVERTENCIA:
DescripciónPIEZA NO.

si utiliza el regulador de presión de aire,
ajuste la presión de aire de modo que el medidor del
regulador marque la presión recomendada cuando
se presiona el gatillo.
opcionalmente, puede conectar un regulador
de presión de aire en la parte inferior de la pistola
rociadora y luego fijar el enchufe hembra en la parte
inferior del regulador de presión de aire.
use cinta selladora para roscas (no se incluye)
en las roscas del enchufe macho en la parte inferior
de la pistola rociadora.
29
INSTRUCCIONES DE ENSAMBLAJE
1. Apriete el enchufe hembra (no se incluye) girando
en dirección de las manecillas del reloj con una
llave inglesa (no se incluye) para lograr una
conexión hermética (consulte la Figura 1).
NO APRIETE DEMASIADO.
NOTA:
NOTA:
NOTA:
1
2. Según el modelo de pistola rociadora que esté
utilizando, configure el compresor de aire en la
presión especificada. Fije la línea de aire que
viene del compresor a la pistola rociadora.
I
Air Flow
INSTRUCCIONES DE FUNCIONAMIENTO
Antes de utilizar la pintura que desee en la pistola rociadora, pulverice un disolvente o solvente
compatible a través de la pistola para eliminar cualquier residuo y contenciones.
Antes de aplicar pintura, asegúrese de eliminar todos los disolventes o solventes del recipiente
de rociado.
Se recomienda que vierta el material a través de un filtro en un recipiente menor antes de llenar
el recipiente de pintura.
Coloque una pieza de cartón u otro material de desecho para usarlo como objetivo para la
prueba de rocío. Continúe la prueba de rociado hasta que se logre el diseño de rociado
deseado.
El rociador de pintura no pulverizará adecuadamente a menos que la dirección del ventilador esté
configurada horizontal o verticalmente.
ADVERTENCIA
NOTA
2

la perilla de control de fluido (G) puede girarse en
dirección de las manecillas del reloj o en dirección contraria de
las manecillas del reloj para ajustar la coherencia de la modalidad de manera precisa. antes de
rociar la pieza de trabajo, practique unos minutos sobre un objetivo de cartón para verificar que el
tamaño y la uniformidad de la modalidad sean correctos.
durante el uso normal, la tapa de aire se ajusta para
estar horizontal. Esto proporciona un diseño vertical en forma
de ventilador, lo cual brinda una cobertura máxima y uniforme
del material puesto que la pistola se mueve hacia delante y
atrás paralelamente a la superficie sobre la que se está
aplicando el acabado.
30
NOTA:
NOTA:
INSTRUCCIONES DE FUNCIONAMIENTO
2
1
F
4Pintura demasiado
suave
Correcto
Pintura demasiado
espesa
Uniformidad del diseño (atomización)
4. Con la pistola rociadora a una distancia de 15,24 cm a
22,86 cm de la pieza de trabajo, rocíe en ráfagas cortas
mientras gira la perilla de fluido en dirección contraria a las
manecillas del reloj. Observe la modalidad de rociado sobre
la pieza de trabajo y regule la perilla de control de fluido (G)
(consulte la Figura 3) hasta lograr la modalidad o el rociado
deseado. Si el chorro es muy suave (a causa de mucho
aire), reduzca la presión de aire o abra la perilla de control
de fluido (G) para rociar más pintura. Si el chorro es muy
grueso o deja manchas, reduzca la cantidad de pintura con
la perilla de control de fluido (G) o diluya más la pintura.
3
1. Ajuste la dirección del ventilador soltando el anillo de la
tapa de aire a mano y girándolo hacia una dirección
horizontal o vertical. Apriete el anillo de la tapa de aire a
mano.
2. Configure el tamaño del diseño de la forma deseada. Para
obtener la modalidad completa, abra la perilla de ajuste de
modalidad de rociado (F) girándola en dirección contraria
a las manecillas del reloj. Para obtener un diseño circular,
gire la perilla de control de diseño del rociador (F) en
dirección de las manecillas del reloj.
3. Gire la perilla de control de fluido (G) completamente en
dirección de las manecillas del reloj hasta que se cierre.
Capuchón de aire
Anillo de la
tapa de aire
Ventilador horizontal
Ventilador vertical
G

dos capas finas de pintura darán mejores
resultados de pulverización y tienen menos posibilidades
de desplazarse que una sola capa gruesa.
NOTA: use una pieza de cartón como escudo para
atrapar los excesos de rocío en los bordes de la pieza
de trabajo para proteger otras superficies. Use cinta
protectora para cubrir otras áreas en caso de que sea
necesario.
la cantidad de pintura que se aplicará puede
variar según la velocidad de la pasada, la distancia de la
pieza de trabajo y la configuración de la perilla de ajuste
de modalidad de rociado de fluido (G). Si la velocidad de
aplicación es muy lenta, la pintura quedará húmeda en
la pieza de trabajo y es posible que se corra. Si la
velocidad de aplicación es muy rápida, la pintura estará
seca y dispareja en la pieza de trabajo.
NOTA:
31
INSTRUCCIONES DE FUNCIONAMIENTO
5
6
7
8
5. Mantenga la pistola a un ángulo de 90° de la
superficie al rociar (consulte la Figura 5).
6. Para desarrollar técnicas de rocío correctas, comience
moviendo la pistola al principio de la aplicación antes
de apretar el activador. Siempre libere el gatillo antes
de dejar de mover la pistola al final de la aplicación.
Este proceso permitirá que cada trazo se integre y se
mezcle con el siguiente sin que se vean
superposiciones ni áreas disparejas. Siempre
mantenga la pistola en movimiento al rociar. Detener
el movimiento de la pistola en medio de la aplicación
puede hacer que la pintura se acumule y se corra. No
mueva la pistola de lado a lado al pintar. Esto puede
provocar una acumulación de pintura en el centro del
trazo y una cobertura insuficiente en los extremos
(consulte las Figuras 6 y 7).
7. Superponga los trazos solo lo suficiente como para
obtener una cobertura pareja (consulte la Figura 8).
15,24 cm
a 22,86 cm
15,24 cm
a 22,86 cm
Apriete el gatillo Suelte el gatillo
Inicio de la
aplicación Final de la
aplicación
Capa delgadaCapa gruesa Capa delgada
NOTA:

32
CUIDADO Y MANTENIMIENTO
Para mantener adecuadamente el rociador funcionando con su máximo rendimiento, se
recomienda encarecidamente limpiar la boquilla de la pistola rociadora y eliminar cualquier
obstrucción o suciedad con soluciones de limpieza recomendadas, como aguarrás mineral,
disolvente de pintura o disolvente de laca. Consulte con su distribuidor minorista local para elegir
la solución de limpieza correcta para el tipo de pintura o material que esté utilizando.
NO USE SOLVENTES A BASE DE ÁCIDO, YA QUE ESTOS PUEDEN DAÑAR EL ROCIADOR.
RETIRE SIEMPRE EL SUMINISTRO DE AIRE DE LA PISTOLA ROCIADORA ANTES DE
REALIZAR CUALQUIER LIMPIEZA O MANTENIMIENTO.
MANTÉNGASE ALEJADO DE FUENTES DE IGNICIÓN.
SIEMPRE USE EQUIPOS DE PROTECCIÓN PERSONAL ADECUADOS MIENTRAS LLEVA A
CABO LA LIMPIEZA O EL MANTENIMIENTO DE LA PISTOLA ROCIADORA.
NUNCA SUMERJA LA CARCASA DE LA PISTOLA ROCIADORA EN MATERIAL SOLVENTE.
ADVERTENCIA
Instrucciones de limpieza
1. Retire el suministro de aire de la pistola rociadora.
2. Retire la tapa del recipiente (C) del recipiente de
pintura (B) y vacíe nuevamente cualquier pintura
restante en el contenedor original.
1
2
Vacíe la pintura
B
C

deberá añadir más solución de limpieza al
contenedor.
33
CUIDADO Y MANTENIMIENTO
3. Llene el recipiente de pintura (B) con
aproximadamente 6,35 mm de solución de limpieza.
Vuelva a colocar la tapa del recipiente (C) y rocíe
todo el contenido en un contenedor secundario.
3
4. Retire el recipiente de pintura (B) de la pistola
rociadora girándola en dirección contraria a las
manecillas del reloj con la llave inglesa (L)
(19 mm) y colóquelo en el contenedor secundario
para remojarlo de 3 a 5 minutos.
4
Limpiador
de carga
B
C
NOTA:
5. Desenrosque la tapa de aire (D) y el anillo de la
tapa de aire (E) girando a mano en dirección
contraria a las manecillas del reloj y colóquelos
en el contenedor secundario en inmersión.
5
En dirección
contraria a las
manecillas del reloj
En dirección
contraria a las
manecillas del reloj
6. Desenrosque la perilla de ajuste de fluido (G)
girándola en dirección contraria a las manecillas
del reloj. Limpie la perilla de ajuste de fluido con
un paño húmedo con solución de limpieza y
déjela a un lado.
6
G
B
DE

NO APRIETE DEMASIADO.
34
CUIDADO Y MANTENIMIENTO
NOTA:
7. Quite el resorte de la aguja y la aguja de pintura.
Sumérjala en el contenedor secundario. 7
8. Con la llave inglesa (L), desenrosque la boquilla
de fluido al girarla en dirección contraria a las
manecillas del reloj y sumérjala en el contenedor
secundario.
9. Luego de 3 a 5 minutos, retire cada artículo y use una toalla seca y limpia para limpiar cada
artículo completo e inspecciónelo en busca de cualquier pintura restante o suciedad para limpiar
los desechos.
Boquilla
de fluido
8L
Boquilla
de fluido
L
1. Enrosque la boquilla de fluido en la superficie de
la pistola rociadora girándola en dirección de las
manecillas del reloj y utilice la llave inglesa (L)
(13 mm) para apretar firmemente.
1
IMPORTANTE: para asegurar que se retiren todos los residuos de material de la pieza, utilice
una pistola de aire con una punta de pistola aprobada por OSHA para eliminar
cualquier exceso de solución limpiadora de la parte que no se pueden limpiar con
un paño.
Si todavía hay restos de pintura o suciedad, utilice un cepillo con cerdas que no
sean de alambre y cepille el área.
NOTA: es posible que requiera sumergir las piezas durante más tiempo para eliminar todos los
residuos de pintura.
REENSAMBLADO DE LA PISTOLA ROCIADORA

asegúrese de insertar la aguja a través del
orificio del gatillo para una alimentación adecuada.
35
CUIDADO Y MANTENIMIENTO
NOTA:
2. Enrosque la tapa de aire (D) y el anillo de la tapa
de aire (E) en la superficie de la pistola rociadora
girándola en dirección de las manecillas del reloj
y apretando manualmente.
2
En dirección de
las manecillas
del reloj
3. Haga pasar la aguja de pintura a través de la
parte posterior de la pistola rociadora. 3
4. Coloque el resorte de la aguja sobre la aguja
de pintura deslizándolo. 4
5. Enrosque la perilla de ajuste de fluido (G) en
dirección de las manecillas del reloj. 5En dirección de
las manecillas
del reloj
G
DE

36
CUIDADO Y MANTENIMIENTO
SOLUCIÓN DE PROBLEMAS
Si tiene alguna pregunta sobre el rendimiento del rociador, llame a nuestro Departamento de
Servicio al Cliente al 888-3KOBALT, de lunes a viernes de 8 a.m. a 8 p.m., hora estándar del
Este. También puede ponerse en contacto con nosotros en [email protected].
Almacenamiento
1. Cuando no utilice la pistola rociadora, gire la perilla de ajuste de fluido en dirección contraria a
las manecillas del reloj (para abrirla), lo que reducirá la tensión en la punta de fluido de la aguja.
2. Almacene la pistola en un área segura y lejos del alcance de los niños. Cuando almacene el
producto durante más de 1 semana, añada algunas gotas de lubricante en la entrada de aire.
Patrón de rocío incorrecto
Patrón de rocío incorrecto
1) Un lado de la tapa de
aire está tapado.
2) Suciedad en un lado de
la boquilla de fluidos.
1) Afloje la tapa de aire/el
sello sucio.
2) Un lado de la tapa de
aire está tapado.
3) Material seco a un lado
de la boquilla de fluidos.
Retire la tapa de aire y sumérjala en
solvente, luego aplique aire hasta que esté
limpia. Limpie la punta de la boquilla con
un paño humedecido con disolvente. Para
limpiar los orificios, use una pajilla o palillo.
Nunca intente retirar el material seco con
una herramienta afilada.
1) Apriete la tapa de aire.
2) Retire la tapa de aire y sumérjala en
solvente, luego aplique aire hasta que
esté limpia. Limpie la boquilla de fluido
con un paño humedecido con disolvente.
Para limpiar los orificios, use una pajilla
o palillo. Nunca intente retirar el material
seco con una herramienta afilada.
PATRÓN/PROBLEMA DE ROCÍO
MOTIVO POSIBLENSOLUCIÓN

37
SOLUCIÓN DE PROBLEMAS
PATRÓN/PROBLEMA DE ROCÍO
MOTIVO POSIBLE SOLUCIÓN
Patrón de rocío incorrecto
Patrón de rocío incorrecto
Rociado intermitente/
chisporroteante
1) La presión de aire de
atomización está ajustada
en un nivel muy alto.
2) Material demasiado
delgado; se giró demasiado
el ajuste de fluido.
3) Modalidad de abanico
demasiado abierta.
1) Reduzca la presión de aire de
atomización.
2) Abra la perilla de ajuste de fluidos.
3) Cierre parcialmente la modalidad
de la perilla de ajuste.
1) La presión de aire de
atomización está ajustada
en un nivel muy bajo.
2) El material es demasiado
grueso.
3) Patrón de ventilador
demasiado cerrado.
1) El nivel de material es
demasiado bajo.
2) El contenedor está
demasiado inclinado.
3) La conexión de la entrada
de fluidos está suelta.
4) El asiento de la aguja está
suelto/dañado.
5) El empaque alrededor de la
válvula de aguja está seco
o suelto.
6) Boquilla de fluido mal
instalada o suciedad entre
la boquilla y el cuerpo.
7) La ventilación de aire está
tapada.
1) Reduzca la presión de aire de
atomización.
2) Diluya hasta obtener la viscosidad
adecuada.
3) Abra parcialmente la modalidad de
la perilla de ajuste.
1) Recargue.
2) Sostenga en posición más vertical.
3) Apriete.
4) Ajuste o reemplace.
5) Lubrique/apriete.
6) Retire, limpie, apriete.
7) Limpie el orificio de ventilación.
Patrón de rocío incorrecto
No se puede obtener un
rociado circular. El tornillo de ajuste del
ventilador no está asentado
correctamente.
Limpie o reemplace el tornillo de
ajuste.
1) La pistola no está bien
ajustada.
2) La tapa de aire está sucia.
3) La punta de la boquilla está
obstruida.
4) La aguja está floja.
1) Vuelva a ajustar la pistola. Siga
cuidadosamente las instrucciones.
2) Limpie la tapa de aire.
3) Limpie.
4) Lubrique.

38
SOLUCIÓN DE PROBLEMAS
PATRÓN/PROBLEMA DE ROCÍO
MOTIVO POSIBLE SOLUCIÓN
No sale rocío
Hay una fuga de fluido
en la tuerca de la
empaquetadura.
1) La empaquetadura está
seca.
2) La aguja está floja.
3) La tuerca de la
empaquetadura está
ajustada.
4) La aguja o la boquilla de
fluido están desgastadas.
1) Lubrique.
2) Lubrique.
3) Ajuste.
4) Reemplace.
Pérdida de aire de la
tapa de aire sin jalar el
gatillo.
Acabado delgado,
arenoso y áspero/rocío
excesivo.
Acabado grueso y con
surcos parecido a la piel
de naranja.
La presión de aire es
baja Configuración del
regulador/compresor.
Ajuste el regulador en la herramienta en la
configuración máxima. Ajuste el regulador
del compresor al máximo de la herramienta
en 45 PSI. NOTA: las mangueras de aire
pueden causar una pérdida de presión de
hasta 15 PSI, por lo que es posible que
deba configurar una salida del compresor
más alta para mantener la presión
requerida en la herramienta.
La pistola está demasiado
cerca de la superficie. Aleje la pistola de la superficie.
1) La pistola está demasiado
lejos de la superficie.
2) La presión de
atomización está
ajustada en un nivel muy
elevado.
3) Movimiento incorrecto de
la pistola.
1) Acerque la pistola a la superficie.
2) Ajuste la presión de atomización.
3) Mueva a paso moderado, paralelo a la
superficie. No haga arcos.
1) Vástago de la válvula de
aire adherido.
2) Residuos en la válvula
de aire o en el asiento.
3) Válvula de aire o asiento
desgastados o dañados.
4) Resorte de la válvula de
aire dañado.
5) Vástago de la válvula
doblado.
1) Lubrique.
2) Limpie.
3) Reemplace.
4) Reemplace.
5) Reemplace.
1) No hay presión de aire
en la pistola.
2) El tornillo de control de
fluidos no está
suficientemente abierto.
3) El material es demasiado
pesado.
1) Verifique el suministro y los conductos
de aire.
2) Abra el tornillo de control de fluidos.
Aumente la presión de fluido en el
tanque.
3) Diluya el material.

39
SOLUCIÓN DE PROBLEMAS
PATRÓN/PROBLEMA DE ROCÍO
MOTIVO POSIBLE SOLUCIÓN
La presión de aire es
baja (continuación) Hay fugas en la
manguera de aire
comprimido.
Mangueras
inadecuadas.
Apriete y selle los conectores de la manguera si
se encuentran fugas. Use cinta de sellado.
1. Asegúrese de que la manguera sea del
tamaño adecuado. Las mangueras largas o
las herramientas que usan grandes
volúmenes de aire pueden requerir una
manguera con un DI de 1/2 pulg. o más
grande dependiendo de la longitud total de
las mangueras.
2. No utilice varias mangueras conectadas
juntas con conectores de conexión rápida.
Esto causa bajas de presión adicionales y
reduce la potencia de la herramienta.
Conecte las mangueras directamente entre sí.
GARANTÍA
Esta herramienta está garantizada por el fabricante para el comprador original desde la fecha de
compra original por tres (3) años y está sujeta a la cobertura de garantía que se describe en el
presente.
Esta herramienta tiene una garantía para el usuario original contra defectos en los materiales y la
mano de obra. Si cree que una herramienta está defectuosa, devuélvala con el comprobante de
compra adecuado en el punto de compra. Si se determina que la herramienta está defectuosa y la
garantía la cubre, el distribuidor reemplazará la herramienta o le reembolsará el precio de compra
original.
Esta garantía es nula si ocurre alguno de los siguientes: Los defectos en materiales o mano de
obra o los daños resultan de reparaciones o alteraciones que hayan sido realizadas o intentadas
por otros o el uso no autorizado de piezas no conformes; el daño se debe al desgaste normal, el
daño se debe al abuso (incluida la sobrecarga de la herramienta más allá de su capacidad),
mantenimiento inadecuado, negligencia o accidente; o el daño se debe al uso de la herramienta
después de una falla parcial o uso con accesorios inadecuados o reparación o alteración no
autorizada.
Esta garantía le otorga derechos legales específicos, pero podría tener también otros derechos
que varían según el estado.
Si tiene preguntas acerca de la garantía, llame a nuestro Departamento de Servicio al Cliente al
888-3KOBALT, de lunes a viernes de 8 a.m. a 8 p.m., hora estándar del Este. También puede
ponerse en contacto con nosotros en [email protected].
Impreso en China

40
LISTA DE PIEZAS DE REPUESTO
PIEZA DESCRIPCIÓN CANT.
1 1
1
1
1
1
1
1
1
1
1
1
1
1
Juego de recipiente de pintura
2 Conector de líquido
3 Resorte de la válvula de aire
4 Poste de válvula de aire
5 Anillo E
6 Asiento de válvula de aire
7 Junta tórica
8 Empaque
9 Junta tórica
10 Juego de tapa de aire
11 Boquilla
12
Cuerpo de pistola completamente
ensamblado
13 Anillo E
PIEZA DESCRIPCIÓN CANT.
15
14 1
1
1
1
1
1
1
1
1
1
1
1
1
Viga de gatillo
16
Juego de válvulas de ajuste del
ventilador
17 Empaque
18 Manguito de aguja
19 Junta tórica
20 Juego de agujas
21 Resorte de aguja
22 Tornillo de ajuste de líquido
23
Tornillo del empaque de aguja
24 Empaque de la aguja
25 Gatillo
26 Conexión de aire
Juego de válvulas de ajuste de aire
-
 1
1
-
 2
2
-
 3
3
-
 4
4
-
 5
5
-
 6
6
-
 7
7
-
 8
8
-
 9
9
-
 10
10
-
 11
11
-
 12
12
-
 13
13
-
 14
14
-
 15
15
-
 16
16
-
 17
17
-
 18
18
-
 19
19
-
 20
20
-
 21
21
-
 22
22
-
 23
23
-
 24
24
-
 25
25
-
 26
26
-
 27
27
-
 28
28
-
 29
29
-
 30
30
-
 31
31
-
 32
32
-
 33
33
-
 34
34
-
 35
35
-
 36
36
-
 37
37
-
 38
38
-
 39
39
-
 40
40


Kobalt SGY-AIR294 Manual de usuario
- Categoría
- Rociador de pintura
- Tipo
- Manual de usuario
en otros idiomas
- English: Kobalt SGY-AIR294 User manual