La página se está cargando...

Metal
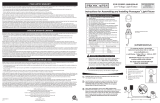
OWNER’S MANUAL/MANUAL DEL PROPIETARIO
ASSEMBLY AND OPERATING INSTRUCTIONS
INSTRUCCIONES DE ARMADO Y OPERACIÓN
LED low voltage
landscape lights
NOTICE TO INSTALLER:
LEAVE THESE INSTRUCTIONS WITH
THE LIGHT OWNER FOR FUTURE
REFERENCE.
AVISO PARA EL INSTALADOR:
ENTREGUE ESTAS INSTRUCCIONES
AL PROPIETARIO DE LA LUZ PARA
REFERENCIA FUTURA.
INS_828-0302-0_Metal 11/3/08 6:02 PM Page 1

WHEN YOU SEE THE SAFTEY ALERT SYMBOL PAY CLOSE ATTENTION TO THE INFORMATION THAT FOLLOWS
READ ALL WARNINGS AND INSTRUCTIONS CAREFULLY BEFORE ASSEMBLING AND
OPERATING YOUR LOW VOLTAGE LIGHTS. PROPERLY DISPOSE OF ALL PACKAGING MATERIAL.
IMPORTANT SAFETY WARNINGS
WARNING
• Install only in a covered Class A GFCI receptacle that has an enclosure which is weatherproof with the attachment plug cap
inserted or removed. Not for use with receptacles that are weatherproof only when receptacle is covered and not in use.
• Do not plug transformer into a damaged or corroded outlet. Always use a 3-wire grounded outlet wired for 120-volts which
is GFCI protected at 15 or 20 amps. If in doubt, contact a qualified electrician.
• FIRE HAZARD: Do not coil cable around transformer. Excess cable between transformer and 1st light shall be coiled outside
of the weatherproof outlet cover or buried.
• RISK OF ELECTRICAL SHOCK: Do not mount transformer within 10 feet of pool, spa or other water sources.
• Do not plug transformer into a damaged or corroded outlet. Always use a 3-wire grounded outlet wired for 120-volts which
is GFCI protected at 15 or 20 amps. If in doubt, contact a qualified electrician.
• Transformer and fixtures must be installed in compliance with national and all local electrical codes and ordinances.
• Do not use an extension cord or a dimmer switch.
• Keep product (cords, transformer, lights, etc) safely away from children and pets.
• Do not repair or tamper with cord, cord plugs or transformer. Do not attempt to open or service transformer. Return the
transformer with prior return authorization number to The Brinkmann Corporation for examination, repair or replacement.
• Do not submerge transformer. Do not install transformer, cables or lights with wet hands or in the rain.
• Not for use with submersible fixtures.
• Only use cables provided with product. Do not splice cables. Coil excess cable between lights around stakes and bury.
• Prior to digging ground to burying cable, be sure that no other cables are located in the same area. Contact your local
authority to determine what cables (telephone, electric, gas) may be buried underground.
• When connecting the cables, be sure the o-ring is present on all male connectors. Hand screw tightly together to get a
proper seal. Do not over tighten.
• Bury cable a minimum of 3 inches and maximum of 6 inches below ground surface. Do not lay or bury low voltage cable
in combustible materials such as leaves, bark or wood chips, etc. Do not bury cable in material that may damage the
cable.
• Inspect housing of transformer to make sure that it is weatherproof. Make sure there are no cracks or other damage.
• If house circuit breaker trips when transformer is turned on, unplug transformer from AC outlet, correct the problem, then
reset the circuit breaker. If problem persists, contact a qualified electrician.
• Additional lights can be added to increase the number of lights in your light set to a maximum of 15 lights total per
transformer. Only use Brinkmann lights that are designed to be used with this system. Never exceed 15 lights per
transformer.
• Do not operate transformer if the cord or plug is damaged or if the transformer is damaged or malfunctions.
• Do not mount transformer or lights near stored flammable liquids, gases or where flammable vapors may be present.
• Do not use this product for other than its intended use.
FAILURE TO ADHERE TO THE SAFETY WARNINGS AND GUIDELINES IN THIS MANUAL COULD RESULT IN
PERSONAL INJURY OR PROPERTY DAMAGE.
INS_828-0302-0_Metal 11/3/08 6:02 PM Page 2

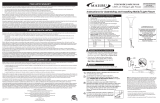
Step 1
Lay out the low voltage lights in predetermined area. Cords allow
for a maximum spacing of 10 feet between lights. Do not install
transformer or bury cable yet.
Step 2
Place each light in the ground so only the stake is buried. (See Below)
WARNING: Only use cables provided with
product. Do not splice cables. Coil excess cable
between lights around stakes and bury.
WARNING: Once connected, bury cable a
minimum of 3 inches and maximum of 6 inches
below ground surface. Do not bury cable in material
that may damage the cable.
WARNING: Prior to digging ground to burying
cable, be sure that no other cables are located in the
same area. Contact your local authority to determine
what cables (telephone, electric, gas) may be buried
underground.
SET UP INSTRUCTIONS
Inspect lights, transformer and power cords to ensure that they are undamaged.
READ ALL WARNINGS AND INSTRUCTIONS BEFORE PROCEEDING.
Stake
NOTE: DO NOT PLUG IN THE TRANSFORMER UNTIL LIGHTS
HAVE BEEN SET UP AND CONNECTED.
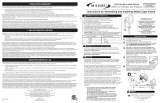
Step 1
Remove dummy cap on the transformer terminal
connector and set aside. Starting from transformer,
connect each male and female connector to each
other throughout light strand.
Step 2
Insert the male connector into the female connector
using the key and key slot as a guide.
Step 3
Once inserted, turn ribbed locking ring clockwise
until tight.
Step 4
Attach the dummy cap (that was set aside from Step 1)
to the last connector at the end of light strand.
Step 5
Install transformer (see next page). Check that all lights
are working properly before burying cable.
CONNECTING INSTRUCTIONS
Key
Key Slot
WARNING: When connecting the cables, be sure the
o-ring is present on all male connectors. Hand
screw tightly together to get a proper seal. Do not
over tighten.
2
Female Connector
Male Connector
Dummy Cap
Ribbed Locking Ring
INS_828-0302-0_Metal 11/3/08 6:02 PM Page 3

3
INSTALLING THE TRANSFORMER
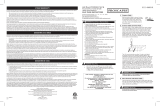
Step 1
Install the transformer photo sensor outdoors away from other
light sources such as porch lights or street lights. These light
sources may keep the dawn to dusk photocell sensor from
activating the lights automatically at night.
WARNING: Do not use an extension cord or a dimmer switch.
NOTE: DO NOT PLUG IN THE TRANSFORMER UNTIL
LIGHTS HAVE BEEN SET UP AND CONNECTED.
Step 2
Plug the transformer into a covered Class A GFCI receptacle that
has an enclosure which is weatherproof with the attachment plug
cap inserted or removed.
WARNING: Transformer and fixtures must be installed in
compliance with national and all local electrical codes and
ordinances.
If lights do not come on 1. Make sure transformer is plugged into outlet and the power
to electrical outlet is ON.
2. Make sure photo cell is not exposed to bright light.
3. Make sure photo cell sensor is not in a heavy shadowed area
or in artificial light.
4. Make sure all connectors on the cable and transformer are
properly connected.
TROUBLESHOOTING &
IMPORTANT INFORMATION
Photo
Sensor
WARNING: FIRE HAZARD: Do not coil cable
around transformer. Excess cable between
transformer and 1st light shall be coiled
outside of the weatherproof outlet cover
or buried.
WARNING: RISK OF ELECTRICAL SHOCK:
Do not mount transformer within 10 feet
of pool, spa or other water sources.
To First Light
INS_828-0302-0_Metal 11/3/08 6:02 PM Page 4

CUANDO VEA EL SÍMBOLO DE ALERTA DE SEGURIDAD, PRESTE MAYOR ATENCIÓN A LA INFORMACIÓN QUE SIGUE
LEA TODAS LAS INSTRUCCIONES Y ADVERTENCIAS CUIDADOSAMENTE ANTES DE ENSAMBLAR Y HACER FUNCIONAR
SUS LUCES DE BAJO VOLTAJE. DESECHE TODO EL MATERIAL DE EMBALAJE DE MANERA APROPIADA.
IMPORTANTES ADVERTENCIAS DE SEGURIDAD
WARNING
• Sólo instale el producto en un receptáculo GFCI (Interruptor Diferencial) de Clase A cubierto que posea un cerramiento a
prueba de agua con el tapón del enchufe de seguridad, ya sea insertado o extraído. No lo use con receptáculos que sean a
prueba de agua sólo cuando el receptáculo se encuentre cubierto o no esté en uso.
• No enchufe el transformador en un tomacorriente dañado o corroído. Siempre utilice un tomacorriente de 3 cables con
conexión a tierra cableado para 120 voltios que esté protegido por GFCI en 15 o 20 amperes. Si tuviese dudas, comuníquese
con un electricista calificado.
• PELIGRO DE INCENDIO: No enrolle el cable alrededor del transformador. El exceso de cable entre el transformador y la primera
luz debe enterrarse o enrollarse fuera de la cubierta del tomacorriente a prueba de agua.
• RIESGO DE DESCARGA ELÉCTRICA: No ensamble el transformador a una distancia menor a los 10 pies (3,05 m.) de la piscina,
spa u otras fuentes de agua.
• No enchufe el transformador en un tomacorriente dañado o corroído. Siempre utilice un tomacorriente de 3 cables con
conexión a tierra cableado para 120 voltios que esté protegido por GFCI en 15 o 20 amperes. Si tuviese dudas, comuníquese
con un electricista calificado.
• El transformador y los accesorios deben instalarse de acuerdo a todos las ordenanzas y códigos eléctricos locales y
nacionales.
• No use cables de extensión ni interruptores reguladores de intensidad.
• Mantenga el producto (cables, transformador, luces, etc.) en un lugar seguro alejado de los niños y mascotas.
• No repare el producto ni interfiera con los cables, los enchufes del cable, ni con el transformador. No intente abrir o reparar el
transformador. Devuelva el transformador con el número de autorización previa de devolución a The Brinkmann Corporation
para su examen, reparación o reemplazo.
• No sumerja el transformador. No instale el transformador, cables ni luces con las manos mojadas o en la lluvia.
• No para el uso con accesorios sumergibles.
• Sólo utilice los cables incluidos con el producto. No empalme los cables. Enrolle el exceso de cable entre las luces, alrededor
de los pilotes y entiérrelo.
• Antes de cavar el suelo para enterrar el cable, asegúrese de que no se encuentre ningún otro cable en el mismo lugar.
Comuníquese con la autoridad local para determinar qué tipo de cables (teléfono, electricidad, gas) pueden ser ocultados bajo
tierra.
• Al conectar los cables, asegúrese de que la junta tórica esté presente en todos los conectores machos. Ajústelos a manos a
todos juntos para sellarlos apropiadamente. No los ajuste en exceso.
• Entierre el cable un mínimo de 3 pulgadas (7,62 cm.) y un máximo de 6 pulgadas (15,24 cm.) por debajo de la superficie de
la tierra. No coloque ni entierre el cable de bajo voltaje en materiales combustibles tales como hojas, cortezas o astillas de
madera, etc. No entierre el cable en materiales que puedan dañarlo.
• Inspeccione la carcasa del transformador para asegurarse de que resista a la intemperie. Asegúrese de que no existan grietas
ni otros daños.
• Si el interruptor automático de la casa se desconectara cuando se enciende el transformador, desenchufe el transformador
del tomacorriente CA, corrija el problema, luego resetee el interruptor automático. Si el problema persistiera, comuníquese
con un electricista calificado.
• Se pueden agregar luces adicionales para incrementar el número de luces en su juego lumínico hasta un máximo de 15 luces
en total por transformador. Sólo use las luces Brinkmann diseñadas para usar con este sistema. Nunca exceda las 15 luces
por transformador.
• No haga funcionar el transformador si el cable o enchufe estuviesen dañados o si el transformador estuviera dañado o
funcionara mal.
• No ensamble el transformador ni las luces cerca de gases o líquidos inflamables almacenados o donde vapores inflamables
pudiesen estar presentes.
• No otorgue a este producto un uso para el que no ha sido diseñado.
DE NO CUMPLIRSE LAS ADVERTENCIAS DE SEGURIDAD Y PAUTAS DE ESTE MANUAL, PODRÍAN OCASIONARSE
LESIONES PERSONALES O DAÑOS A LA PROPIEDAD.
INS_828-0302-0_Metal 11/3/08 6:02 PM Page 5

Paso 1
Acomode las luces de bajo voltaje en un área predeterminada. Los cables
permiten un espaciamiento máximo de 10 pies (3,05 m.) entre las luces.
No instale el transformador ni entierre los cables todavía.
Paso 2
Coloque cada luz en el suelo para que sólo se entierre el pilote. (Ver Debajo)
ADVERTENCIA: Sólo use los cables que se incluyen con
el producto. No empalme los cables. Enrolle el exceso de
cable entre las luces, alrededor de los pilotes y entiérrelo.
ADVERTENCIA: Una vez conectado el cable, entiérrelo
un mínimo de 3 pulgadas (7,62 cm.) y un máximo de 6
pulgadas (15,24 cm.) por debajo de la superficie de la tierra.
No entierre el cable en materiales que puedan dañarlo.
ADVERTENCIA: Antes de cavar el suelo para enterrar el
cable, asegúrese de que no se encuentre ningún otro cable
en el mismo lugar. Comuníquese con la autoridad local para
determinar qué tipo de cables (teléfono, electricidad, gas)
pueden ser ocultados bajo tierra.
INSTRUCCIONES DE INSTALACIÓN
Inspeccione las luces, el transformador y los cables de alimentación para asegurarse de que no estén dañados.
LEA TODAS LAS INSTRUCCIONES Y ADVERTENCIAS ANTES DE PROCEDER.
Pilote
NOTA: NO ENCHUFE EN EL TRANSFORMADOR HASTA QUE LAS LUCES
HAYAN SIDO INSTALADAS Y CONECTADAS.
Paso 1
Quite el casquillo simulado en el conectador del terminal del
transformador y ponga a un lado. Comenzando desde el
transformador, conecte cada conector macho y hembra entre
sí en toda la hilera de luces.
Paso 2
Inserte el conector macho en el conector hembra utilizando la
llave y la ranura de la llave como guía.
Paso 3
Una vez insertados, gire el aro de seguridad acanalado hacia
la derecha hasta ajustarlo.
Paso 4
Ate el casquillo simulado (el que se puso a un lado en Paso 1)
al último conectador en el extremo de su cadena de luces.
Paso 5
Instale el transformador (consulte la siguiente página). Verifique
que todas las luces estén funcionando adecuadamente antes de
enterrar el cable.
INSTRUCCIONES DE CONEXIÓN
Llave
Ranura de la Llave
ADVERTENCIA: Cuando conecte los cables, asegúrese de
que la junta tórica esté presente en todos los conectores
machos. Ajústelos a manos a todos juntos para sellarlos
apropiadamente. No los ajuste en exceso.
5
Conector Hembra
Conector Macho
Casquillo Simulado
Anillo de Cierre Acanalado
INS_828-0302-0_Metal 11/3/08 6:02 PM Page 6

6
PARA INSTALAR EL TRANSFORMADOR
Paso 1
Instale el transformador fotosensor en el exterior, alejado de otras fuentes
de luz tales como las luces del porch o las luces de la calle. Estas fuentes
de luz pueden interferir con el sensor de la fotocélula del amanecer al
anochecer en la activación automática de las luces por la noche.
ADVERTENCIA: No use cables de extensión ni interruptores reguladores de
intensidad
NOTA: NO ENCHUFE EN EL TRANSFORMADOR HASTA QUE LAS
LUCES HAYAN SIDO INSTALADAS Y CONECTADAS.
Paso 2
Enchufe el transformador en un receptáculo GFCI (Interruptor Diferencial)
de Clase A cubierto que posea un cerramiento a prueba de agua con el
tapón del enchufe de seguridad, ya sea insertado o extraído.
ADVERTENCIA: El transformador y los accesorios deben instalarse de
acuerdo a todos las ordenanzas y códigos eléctricos locales y nacionales.
Si las luces no encendieran
1. Asegúrese de que el transformador esté enchufado en el tomacorriente y
de que la energía del tomacorriente eléctrico esté ENCENDIDA.
2. Asegúrese de que la fotocélula no esté expuesta a una luz brillante.
3. Asegúrese de que el sensor de la fotocélula no se encuentre en un área
intensamente sombreada o en la luz artificial.
4. Cerciórese de que todos los conectadores en el cable y el transformador
estén conectados correctamente.
INFORMACIÓN IMPORTANTE Y
LOCALIZACIÓN DE AVERÍAS
Fotosensor
ADVERTENCIA: PELIGRO DE INCENDIO: No enrolle
el cable alrededor del transformador. El exceso de
cable entre el transformador y la primera luz debe
enterrarse o enrollarse fuera de la cubierta del
tomacorriente a prueba de agua.
ADVERTENCIA: RIESGO DE DESCARGA
ELÉCTRICA: No ensamble el transformador a una
distancia menor a los 10 pies (3,05 m.) de la
piscina, spa u otras fuentes de agua.
A la
Primera Luz
INS_828-0302-0_Metal 11/3/08 6:02 PM Page 7

©2008 The Brinkmann Corporation
Dallas, Texas 75244 U.S.A
www.brinkmann.net
For one year from date of purchase, The Brinkmann Corporation warrants the Brinkmann Low Voltage Lights against defects due to
workmanship or materials to the original purchaser. The Brinkmann Corporation’s obligations under this warranty are limited to the
following guidelines:
• This warranty does not cover units that have been altered/modified or damaged due to: normal wear, rust, abuse, improper
maintenance and/or improper use.
• This warranty does not cover surface scratches to fixtures or transformer, which is considered normal wear.
• The Brinkmann Corporation may elect to repair or replace damaged units covered by the terms of this warranty.
• This warranty extends to the original purchaser only and is not transferable or assignable to subsequent purchasers.
The Brinkmann Corporation requires reasonable proof of purchase. Therefore, we strongly recommend that you retain your sales receipt
or invoice. To obtain repair or replacement of your Brinkmann Low Voltage Lights under the terms of this warranty, please call Customer
Service Department at 800-527-0717 for a Return Authorization Number and further instructions. A receipt will be required. The
Brinkmann Corporation will not be responsible for any units forwarded to us without a Return Authorization Number.
EXCEPT AS ABOVE STATED, THE BRINKMANN CORPORATION MAKES NO OTHER EXPRESS WARRANTY.
THE IMPLIED WARRANTIES OF MERCHANTABILITY AND FITNESS FOR A PARTICULAR PURPOSE ARE LIMITED IN DURATION TO ONE YEAR
FROM THE DATE OF PURCHASE. SOME STATES DO NOT ALLOW LIMITATIONS ON HOW LONG AN IMPLIED WARRANTY LASTS, SO THE
ABOVE LIMITATION MAY NOT APPLY TO YOU.
ANY LIABILITY FOR INDIRECT, INCIDENTAL OR CONSEQUENTIAL DAMAGES ARISING FROM THE FAILURE OF THE BRINKMANN LOW
VOLTAGE LIGHTS TO COMPLY WITH THIS WARRANTY OR ANY IMPLIED WARRANTY IS EXCLUDED. CUSTOMER ACKNOWLEDGES THAT THE
PURCHASE PRICE CHARGED IS BASED UPON THE LIMITATIONS CONTAINED IN THE WARRANTY SET OUT ABOVE. SOME STATES DO NOT
ALLOW THE EXCLUSION OR LIMITATION OF INCIDENTAL OR CONSEQUENTIAL DAMAGES, SO THE ABOVE LIMITATION OR EXCLUSION MAY
NOT APPLY TO YOU. THIS WARRANTY GIVES YOU SPECIFIC LEGAL RIGHTS, AND YOU MAY ALSO HAVE OTHER RIGHTS WHICH VARY FROM
STATE TO STATE.
Durante un año a partir de la fecha de compra, The Brinkmann Corporation garantiza al comprador original que la Luces Brinkmann de
Baja Tensión está libre de defectos de materiales o mano de obra. Las obligaciones de The Brinkmann Corporation con respecto a esta
garantía se limitan a lo siguiente:
• Esta garantía no cubre unidades que hayan sido alteradas/modificado o dañadas debido a: uso normal, herrumbre, maltrato,
mantenimiento inadecuado y/o uso inapropiado.
• Esta garantía no cubre rayones superficiales, daño por herrumbre o por calor al acabado, lo cual se considera como uso normal.
• The Brinkmann Corporation puede decidir reparar o reemplazar las unidades dañadas cubiertas bajo los términos de esta
garantía.
• Esta garantía se otorga al comprador original únicamente y no es transferible o asignable a los compradores posteriores.
The Brinkmann Corporation exige un comprobante de compra razonable. Por lo tanto, le recomendamos enfáticamente que retenga su
recibo o factura de venta. Para solicitar reparación o reemplazo de la Luces Brinkmann de Baja Tensión de conformidad con los términos
de esta garantía, sírvase llamar al Departamento de Atención al Cliente al 800-527-0717 para recibir un Número de autorización de
devolución y otras instrucciones. Se requerirá el recibo o comprobante de compra. Brinkmann no puede asumir responsabilidad por
unidades que sean enviadas a nosotros sin un Número de autorización de devolución.
EXCEPTO POR LO INDICADO ARRIBA, THE BRINKMANN CORPORATION NO OTORGA NINGUNA OTRA GARANTÍA EXPRESA.
LAS GARANTÍAS IMPLÍCITAS DE COMERCIABILIDAD Y ADECUACIÓN CON UN FIN EN PARTICULAR SON DE DURACIÓN LIMITADA DE
ACUERDO A LO INDICADO ARRIBA A PARTIR DE LA FECHA DE COMPRA. ALGUNOS ESTADOS NO PERMITEN LIMITACIONES DE DURACIÓN
DE UNA GARANTÍA IMPLÍCITA; POR LO TANTO, LA LIMITACIÓN ANTERIOR PODRÍA NO SER APLICABLE EN SU CASO.
SE EXCLUYE CUALQUIER RESPONSABILIDAD POR DAÑOS INDIRECTOS, INCIDENTALES O CONSIGUIENTES DERIVADOS DE LA FALTA DE
CUMPLIMIENTO DE ESTA GARANTÍA O DE CUALQUIER GARANTÍA IMPLÍCITA DE LUCES BRINKMANN DE BAJA TENSIÓN. EL CLIENTE
RECONOCE QUE EL PRECIO DE COMPRA COBRADO SE BASA EN LAS LIMITACIONES CONTENIDAS EN LA GARANTÍA ANTERIOR. ALGUNOS
ESTADOS NO PERMITEN LA EXCLUSIÓN O LIMITACIÓN DE LOS DAÑOS INCIDENTALES O CONSIGUIENTES; POR LO TANTO, LA LIMITACIÓN
O EXCLUSIÓN ANTERIOR PODRÍA NO SER APLICABLE EN SU CASO. ESTA GARANTÍA LE OTORGA DERECHOS LEGALES ESPECÍFICOS Y
USTED PUEDE TENER ADEMÁS OTROS DERECHOS QUE VARÍAN DE UN ESTADO A OTRO.
1 AÑO DE GARANTÍA LIMITADA
140-0302-0
11/08
1-YEAR LIMITED WARRANTY
Owner’s Manual for Model
Manual del Propietario para el Modelo
828-0302-0
INS_828-0302-0_Metal 11/3/08 6:02 PM Page 8
/