
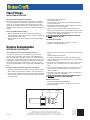
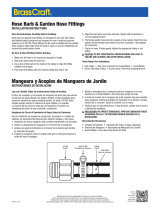
NUT
Tuerca
FLARE
Tubo Acampanado
FLARE CAP
Tapón Acampanado
Read All nstructions Carefully Before Installing.
Flare ttings are typically used with aluminum, copper, brass and welded
steel. These ttings are extensively used in potable and non-potable water
system, fuel, oil, air, liquid petroleum (or LP) and natural gas connections.
Flare ttings are designed for higher pressure systems producing a pressure-
resistant, leak-tight seal. Flared connections offer a high degree of long-term
reliability.
Be Sure To Shut Off Gas Before Starting.
1. Make sure that the tubing is cut square and free from any damage or
debris including dings, dents, burrs, paint, putty or gouges that may prevent
the connection from sealing properly.
2. Slide the nut onto the tube with the threaded end facing outward toward
end of tube.
Flare Fittings
INSTALLATION INSTRUCTIONS
Lea con Cuidado Todas las Instrucciones Antes de Instalar.
Los acoples acampanados se usan generalmente en tuberías de alumi-
nio, cobre, latón y acero soldado. Estos acoples se usan ampliamente en
sistemas de agua potable y no potable, así como en conexiones de tuberías
para gas natural, petróleo líquido (o LP, por sus siglas en inglés), aire, aceite
y combustible. Los acoples acampanados están diseñados para sistemas de
alta presión y proporcionan un sellado hermético y resistente a la presión.
Las conexiones acampanadas ofrecen un alto grado de conabilidad a largo
plazo.
Asegúrese de Cerrar el Suministro de Gas Antes de Comenzar.
1. Asegúrese de que la tubería esté cortada en escuadra y libre de cualquier
daño o residuos, incluyendo golpes, abolladuras, asperezas, pintura, ma
silla o ranuras que pudieran impedir que la conexión selle adecuadamente.
2. Deslice la tuerca en el tubo con el extremo roscado mirando hacia afuera,
al extremo del tubo.
Acoples Acampanados
INSTRUCCIONES DE INSTALACIÓN
3. Flare tubing end with a 45° aring tool.
a. Measure are diameter.
b. Examine the are for surface imperfections, splitting, adequate are
size and excessive thin out.
4. Thread the are nut onto the tting. Lubricate threads with a drop of oil
and assemble nut onto body, hand tighten.
5. Using one wrench to stabilize the tting, the other to tighten the nut,
tighten until the assembly feels “solid”. Then tighten a quarter turn more.
6. Attach the tubing to the other end of the tting, and then check for leaks.
If a leak is present, tighten the appropriate nut.
CAUTION: DO NOT OVER TORQUE. MAY DAMAGE THE FITTING AND
SPLIT THE TUBING AT THE FLARE.
Tools Needed For Installation:
• 45-Degree SAE-Style Flaring Tool • Tube Cutter • Reamer
• Thread Oil • Two Adjustable Wrenches
Scan for
more
information
Escanear
para mayor
información
3. Expanda el extremo de la tubería con una herramienta de acampanado
de 45°.
a. Mida el diámetro del acampanado.
b. Verique si hay imperfecciones o grietas en la supercie acampa
nada, y compruebe que sea del tamaño adecuado y no esté demasiado
delgada en algún lugar.
4. Enrosque la tuerca acampanada en el acople. Lubrique las roscas con
una gota de aceite y ensamble la tuerca en el cuerpo, ajuste con la
mano.
5. Use una llave para estabilizar el acople y la otra para apretar la tuerca
hasta percibir que el ensamble quedó rme. Luego apriete con un
cuarto de vuelta más.
6. Fije la tubería al otro extremo del acople y verique si hay ltración. Si
hay ltración, apriete la tuerca apropiada.
PRECAUCIÓN: NO EXCEDA LA TORSIÓN. PUEDE DAÑAR EL ACOPLE Y
QUEBRAR LA TUBERÍA EN LA ZONA ACAMPANADA.
Herramientas Necesarias:
• Herramienta de Acampanado Estilo SAE de 45°
• Así Como un Cortador de Tuberías • Escariador, Aceite de Roscar
• Dos Llaves Ajustables
Manufacturer assumes no responsibility for failure due to improper installation.
©2015 BrassCraft Mfg., Novi, MI 48375-5331 U.S.A. All Rights Reserved. www.brasscraft.com
El fabricante no asume ninguna responsabilidad si la instalación no se hace de acuerdo al instructivo.
©2015 BrassCraft Mfg., Novi, MI 48375-5331 Estados Unidos Todos los derechos reservados. www.brasscraft.com
225.05 10/15
Transcripción de documentos
Flare Fittings INSTALLATION INSTRUCTIONS Read All nstructions Carefully Before Installing. Flare fittings are typically used with aluminum, copper, brass and welded steel. These fittings are extensively used in potable and non-potable water system, fuel, oil, air, liquid petroleum (or LP) and natural gas connections. Flare fittings are designed for higher pressure systems producing a pressureresistant, leak-tight seal. Flared connections offer a high degree of long-term reliability. Be Sure To Shut Off Gas Before Starting. 1. Make sure that the tubing is cut square and free from any damage or debris including dings, dents, burrs, paint, putty or gouges that may prevent the connection from sealing properly. 2. Slide the nut onto the tube with the threaded end facing outward toward end of tube. 3. Flare tubing end with a 45° flaring tool. a. Measure flare diameter. b. Examine the flare for surface imperfections, splitting, adequate flare size and excessive thin out. 4. Thread the flare nut onto the fitting. Lubricate threads with a drop of oil and assemble nut onto body, hand tighten. 5. Using one wrench to stabilize the fitting, the other to tighten the nut, tighten until the assembly feels “solid”. Then tighten a quarter turn more. 6. Attach the tubing to the other end of the fitting, and then check for leaks. If a leak is present, tighten the appropriate nut. CAUTION: DO NOT OVER TORQUE. MAY DAMAGE THE FITTING AND SPLIT THE TUBING AT THE FLARE. Tools Needed For Installation: • 45-Degree SAE-Style Flaring Tool • Tube Cutter • Reamer • Thread Oil • Two Adjustable Wrenches Acoples Acampanados INSTRUCCIONES DE INSTALACIÓN Lea con Cuidado Todas las Instrucciones Antes de Instalar. Los acoples acampanados se usan generalmente en tuberías de aluminio, cobre, latón y acero soldado. Estos acoples se usan ampliamente en sistemas de agua potable y no potable, así como en conexiones de tuberías para gas natural, petróleo líquido (o LP, por sus siglas en inglés), aire, aceite y combustible. Los acoples acampanados están diseñados para sistemas de alta presión y proporcionan un sellado hermético y resistente a la presión. Las conexiones acampanadas ofrecen un alto grado de confiabilidad a largo plazo. Asegúrese de Cerrar el Suministro de Gas Antes de Comenzar. 1. Asegúrese de que la tubería esté cortada en escuadra y libre de cualquier daño o residuos, incluyendo golpes, abolladuras, asperezas, pintura, ma silla o ranuras que pudieran impedir que la conexión selle adecuadamente. 2. Deslice la tuerca en el tubo con el extremo roscado mirando hacia afuera, al extremo del tubo. 3. Expanda el extremo de la tubería con una herramienta de acampanado de 45°. a. Mida el diámetro del acampanado. b. Verifique si hay imperfecciones o grietas en la superficie acampa nada, y compruebe que sea del tamaño adecuado y no esté demasiado delgada en algún lugar. 4. Enrosque la tuerca acampanada en el acople. Lubrique las roscas con una gota de aceite y ensamble la tuerca en el cuerpo, ajuste con la mano. 5. Use una llave para estabilizar el acople y la otra para apretar la tuerca hasta percibir que el ensamble quedó firme. Luego apriete con un cuarto de vuelta más. 6. Fije la tubería al otro extremo del acople y verifique si hay filtración. Si hay filtración, apriete la tuerca apropiada. PRECAUCIÓN: NO EXCEDA LA TORSIÓN. PUEDE DAÑAR EL ACOPLE Y QUEBRAR LA TUBERÍA EN LA ZONA ACAMPANADA. Herramientas Necesarias: • Herramienta de Acampanado Estilo SAE de 45° • Así Como un Cortador de Tuberías • Escariador, Aceite de Roscar • Dos Llaves Ajustables NUT Tuerca 225.05 10/15 FLARE Tubo Acampanado FLARE CAP Tapón Acampanado Manufacturer assumes no responsibility for failure due to improper installation. ©2015 BrassCraft Mfg., Novi, MI 48375-5331 U.S.A. All Rights Reserved. www.brasscraft.com El fabricante no asume ninguna responsabilidad si la instalación no se hace de acuerdo al instructivo. ©2015 BrassCraft Mfg., Novi, MI 48375-5331 Estados Unidos Todos los derechos reservados. www.brasscraft.com Scan for more information Escanear para mayor información-
 1
1

en otros idiomas
- English: Brass Craft 42-4 Installation guide
Artículos relacionados
Otros documentos
-
 BrassCraft PC69-8-6P P Guía de instalación
-
BrassCraft 120-8X Guía de instalación
-
 BrassCraft 62CA-5XY P Guía de instalación
-
 BrassCraft PNEVCA-NCV4X P Guía de instalación
-
 BrassCraft 73-4X P Guía de instalación
-
 BrassCraft PS1087 Guía de instalación
-
 BrassCraft G2CR14X C1 Guía de instalación
-
BrassCraft G2CR09X C1 Guía de instalación
-
BrassCraft WB00-18N Manual de usuario


