Bella 4.6 Qt Air Fryer El manual del propietario
- Categoría
- Freidoras
- Tipo
- El manual del propietario
Este manual también es adecuado para

WWW.BELLAHOUSEWARES.COM
Register your product and get support • Registrar y obtener asistencia de su producto
4.6QT
AIR FRYER
Instruction Manual and Recipe Guide
FREIDORA DE AIRE
DE 4.6QT
Manual de instrucciones y guía de recetas
14935 BELLA_4.6QT Air Fryer_IM R2.indd 114935 BELLA_4.6QT Air Fryer_IM R2.indd 1 2020-07-03 11:09 AM2020-07-03 11:09 AM

THANK YOU
for your purchase
BellaLifestyle
BellaLife
for special announcements and trendy recipes!
REGISTER
AND SIGN UP
Rate, review or ask us a question.
TELL US WHAT
YOU THINK!
GO TO
:
bellahousewares.com
#myBELLAlife
14935 BELLA_4.6QT Air Fryer_IM R2.indd 214935 BELLA_4.6QT Air Fryer_IM R2.indd 2 2020-07-03 11:09 AM2020-07-03 11:09 AM

Table of Contents
Important Safeguards .................................................................................................................................. 2
Additional Important Safeguards ...............................................................................................................3
Notes on the Plug .........................................................................................................................................4
Notes on the Cord .......................................................................................................................................4
Plasticizer Warning .......................................................................................................................................4
Electric Power................................................................................................................................................4
Getting to Know Your 4.6QT Air Fryer .......................................................................................................5
Control Panel ................................................................................................................................................. 6
Before Using for the First Time ..................................................................................................................6
Operating Instructions .................................................................................................................................7
Helpful Hints .................................................................................................................................................. 8
Air Frying Chart ........................................................................................................................................ 8-9
User Maintenance Instructions .................................................................................................................10
Care & Cleaning Instructions ....................................................................................................................10
Storing Instructions ....................................................................................................................................10
Recipe Guide ..........................................................................................................................................11-20
Warranty ......................................................................................................................................................21
Índice
Medidas de seguridad importantes .........................................................................................................22
Otras medidas de seguridad importantes ..............................................................................................23
Notas sobre el enchufe .............................................................................................................................. 24
Notas sobre el cable ...................................................................................................................................24
Advertencia sobre los plasticantes ........................................................................................................24
Corriente eléctrica ......................................................................................................................................24
Conozca a su 4.6 QT Freidora de aire .....................................................................................................25
Panel de control ..........................................................................................................................................26
Antes de utilizar por primera vez .............................................................................................................26
Instrucciones de funcionamiento ............................................................................................................. 27
Consejos útiles ............................................................................................................................................ 28
Tabla para freír con aire ....................................................................................................................... 28-29
Instrucciones de mantenimiento .............................................................................................................. 30
Instrucciones de cuidado y limpieza ........................................................................................................ 30
Instrucciones de almacenamiento ...........................................................................................................30
Recetas ................................................................................................................................................... 31-39
Garantía........................................................................................................................................................40
14935 BELLA_4.6QT Air Fryer_IM R2.indd 314935 BELLA_4.6QT Air Fryer_IM R2.indd 3 2020-07-03 11:09 AM2020-07-03 11:09 AM

2
IMPORTANT SAFEGUARDS
When using electrical appliances, basic safety precautions should always be
followed, including the following:
1. READ ALL INSTRUCTIONS.
2. Do not touch hot surfaces. Use handles or knobs. Use oven mitts
orpotholders.
3. To protect against electric shock do not immerse cord, plugs, or
applianceinwater or other liquid.
4. This appliance is not intended for use by persons (including children) with
reduced physical, sensory or mental capabilities, or lack of experience
and knowledge, unless they have been given supervision or instruction
concerning use of the appliance by a person responsible for their safety.
5. Children should be supervised to ensure that they do not play with
theappliance.
6. Unplug from outlet when not in use and before cleaning. Allow to cool
beforeputting on or taking off parts, and before cleaning the appliance.
7. Do not operate any appliance with a damaged cord or plug or after
the appliance malfunctions, or has been damaged in any manner.
Bring it to a qualied technician for examination, repair or electrical
ormechanicaladjustment.
8. The use of accessory attachments not recommended by the appliance
manufacturer may cause injuries.
9. Do not use outdoors.
10. Do not let cord hang over edge of table or counter, or touch hot surfaces.
11. Do not place on or near a hot gas or electric burner, or in a heated oven.
12. Extreme caution must be used when moving an appliance containing hot oil
or other hot liquids.
13. To disconnect, turn both the timer dial and temperature dial to OFF.
Thenremove plug from wall outlet.
14. Do not use appliance for other than intended use.
15. Make sure the crisping tray is in place before adding food to be air fried.
16. Make sure the frying basket is locked securely into the front of the Air Fryer,
while the Air Fryer is in operation.
WARNING: The Air Fryer will not operate unless frying basket is fully closed.
CAUTION: After hot air frying, extreme caution must be used when handling
the hot frying basket, crisping tray, and cooked foods.
FOR HOUSEHOLD USE ONLY
14935 BELLA_4.6QT Air Fryer_IM R2.indd 214935 BELLA_4.6QT Air Fryer_IM R2.indd 2 2020-07-03 11:09 AM2020-07-03 11:09 AM

3
ADDITIONAL IMPORTANT
SAFEGUARDS
CAUTION HOT SURFACES: This appliance generates heat and escaping steam
during use. Proper precautions must be taken to prevent the risk of burns, res,
orother injury to persons or damage to property.
CAUTION: This appliance is hot during operation and retains heat for some time
after turning OFF. Always use oven mitts when handling hot materials and allow
metal parts to cool before cleaning. Do not place anything on top of the appliance
while it is operating or while it is hot.
1. All users of this appliance must read and understand this instruction manual
before operating or cleaning this appliance.
2. The cord to this appliance should be plugged into a 120V AC electrical
outletonly.
3. If this appliance begins to malfunction during use, immediately unplug the
cord. Do not use or attempt to repair the malfunctioning appliance.
4. Do not leave this appliance unattended during use.
5. Do not immerse power cord in any liquid. If the power cord to this appliance
is damaged, it must be replaced by contacting Consumer Service.
6. Keep the cord out of reach from children and infants to avoid the risk of
electric shock and choking.
7. Place the Air Fryer on a at, heat-resistant work area.
8. Do not obstruct the air outlet or air inlets on the back and sides of the Air
Fryer, with any objects. Avoid escaping steam from the air outlet during
airfrying.
9. Keep appliance at least 4 inches away from walls or other objects during
operation.
10. Always use the frying basket handle to remove the frying basket.
11. WARNING: After air frying, make sure to place the frying basket on a at,
heat-resistant surface.
12 WARNING: Under or over-lling the frying basket may damage the Air Fryer
and could result in serious personal injury.
13. Never move a hot Air Fryer or an Air Fryer containing hot food. Allow to cool
before moving.
SAVE THESE INSTRUCTIONS
14935 BELLA_4.6QT Air Fryer_IM R2.indd 314935 BELLA_4.6QT Air Fryer_IM R2.indd 3 2020-07-03 11:09 AM2020-07-03 11:09 AM

4
NOTES ON THE PLUG
This appliance has a polarized plug (one blade is wider than the other). To reduce
the risk of electric shock, this plug will t in a polarized outlet only one way. If the
plug does not t fully into the outlet, reverse the plug. If it still does not t, contact
a qualied electrician. Do not modify the plug in any way.
NOTES ON THE CORD
A. A short power-supply cord (or detachable power-supply cord) is to be
provided to reduce the risk resulting from becoming entangled in or tripping
over a longer cord.
B. Longer detachable power-supply cords or extension cords are available and
may be used if care is exercised in their use.
C. If a long detachable power-supply cord or extension cord is used :
1. The marked electrical rating of the cord or extension cord should be at least
as great as the electrical rating of the appliance;
2. If the appliance is of the grounded type, the extension cord should be a
grounding-type3-wire cord; and
3. The longer cord should be arranged so that it does not drape over the
countertop or table top where it can be pulled on by children or tripped
over unintentionally.
PLASTICIZER WARNING
CAUTION: To prevent Plasticizers from migrating to the nish of the counter
top or table top or other furniture, place NON-PLASTIC coasters or place mats
between the appliance and the nish of the counter top or table top. Failure to do
so may cause the nish to darken; permanent blemishes may occur or stains can
appear.
ELECTRIC POWER
If the electrical circuit is overloaded with other appliances, your appliance may not
operate properly. It should be operated on a separate electrical circuit from other
appliances.
Note: keep illustration
callouts aligned
14935 BELLA_4.6QT Air Fryer_IM R2.indd 414935 BELLA_4.6QT Air Fryer_IM R2.indd 4 2020-07-03 11:09 AM2020-07-03 11:09 AM

5
Getting to Know Your 4.6QT Air Fryer
Product may vary slightly from illustration
Figure 1
Orange POWER light
60 Minute Timer Dial
Green HEAT ON Light
Temperature Control
Dial (160ºF - 400ºF)
Cool Touch
Frying Basket
Handle
Power Cord
withPolarized Plug
Frying Basket
Frying Basket
Crisping Tray
14935 BELLA_4.6QT Air Fryer_IM R2.indd 514935 BELLA_4.6QT Air Fryer_IM R2.indd 5 2020-07-03 11:09 AM2020-07-03 11:09 AM

6
Control Panel
Temperature Control Dial
• Select air frying temperatures from 160°F to 400°F. Temperatures can be adjusted at any time.
• When all air frying is nished, turn the temperature control dial to 0 (OFF).
NOTE: The Air Fryer will not turn ON unless the temperature and timer is set.
60 Minute Countdown Timer Dial
• Turn the timer dial to the desired cook time to turn the Air Fryer ON and OFF.
• Once the timer dial is set, the orange POWER light will illuminate to show the Air Fryer is powered
on.
• To assure even cooking/browning, open the frying basket drawer halfway through the cooking time.
Check, turn or vigorously shake foods in the frying basket.
IMPORTANT: When you pull the drawer out from the Air Fryer body, the orange POWER light and
the Air Fryer will turn OFF. The timer will continue to count down when the drawer is opened.
• Heating will resume when the drawer is replaced.
• One beep will sound when the set air frying time has reached 0. The Air Fryer will turn OFF
automatically. The green HEAT ON Light will turn off.
IMPORTANT: When all air frying is nished, turn both the temperature control dial and the timer dial
to 0 (OFF). Unplug the Air Fryer when not in use.
Green HEAT ON Light
• The green HEAT ON Light will illuminate when set temperature is reached.
• The green HEAT ON Light and heating element cycle on and off to maintain the selected
temperature.
• When the set air frying time reaches 0, the Air Fryer will turn OFF. The green HEAT ON Light will
turn off.
Orange POWER light
• Once the timer dial is set, the orange POWER light will illuminate to show the Air Fryer is heating.
• When you pull the frying basket out from the Air Fryer body, the orange POWER light and the Air
Fryer will turn OFF. The timer will continue to count down when the basket is opened. Increase cook
time if necessary.
• When the set air frying time reaches 0, the Air
Fryer will turn OFF automatically. The orange
POWER light remains on.
Before Using for the First Time
1. Your Air Fryer is shipped with the frying basket
locked into the drawer, inside the Air Fryer body.
Firmly grasp the frying basket handle to open
frying basket drawer; then remove the drawer from
the machine and place on a at, clean work area.
2. Remove all packing material and labels from the
inside and outside of the Air Fryer. Checkthat there
is no packaging underneath and around the frying
basket and drawer.
3. Wash frying basket and crisping tray in hot,
soapywater.
4. DO NOT IMMERSE THE AIR FRYER
BODYINWATER. Wipe Air Fryer body
withadampcloth.
Dry all parts thoroughly.
5. 5. Following the shape of the frying basket, turn
the crisping tray with the attened edge facing the
handle. Use the center hole of the crisping tray to
lift crisping tray up and out of the frying basket.
(See Figure 2.) Drop the tray down so that the 2
rubber side grips t snuggly in place in the base of the basket. (See Figure 2).
6. Insert and lock the clean frying basket into the front of the Air Fryer.
Figure 2
Frying Basket
Crisping Tray
14935 BELLA_4.6QT Air Fryer_IM R2.indd 614935 BELLA_4.6QT Air Fryer_IM R2.indd 6 2020-07-03 11:09 AM2020-07-03 11:09 AM

7
Operating Instructions
WARNING! This unit should not be used to boil water or heat oil.
NOTE: During rst use, the Air Fryer may emit a slight odor. This is normal and will not affect food
cooked.
1. Place the Air Fryer on a at, heat-resistant work area, close to an electrical outlet.
2. Firmly grasp the frying basket handle to open frying basket drawer; then remove the drawer from
the machine and place on a at, clean surface.
3. Place the crisping tray into the base of the frying basket. (See Figure 2.)
4. Arrange food on top of the crisping tray. Do not overll frying basket with food. To ensure proper
cooking and air circulation, NEVER ll any frying basket more than 2/3 full. When air frying fresh
vegetables, we do not recommend adding more than 4 cups of food to the frying basket.
5. Fully insert the frying basket into the front of the Air Fryer.
6. Plug cord in the wall outlet.
7. Select air frying temperature from 160°F to 400°F.
8. Turn timer dial to the desired air frying time plus 3 minutes for preheat if the Air Fryer is cold.
The green HEAT ON Light and the orange POWER light will illuminate; the Air Fryer will begin
heating.
IMPORTANT: The Air Fryer will not heat if the temperature or timer dial has not been set or if the
frying basket is not fully closed.
9. The green HEAT ON Light will turn off when set temperature is reached.
NOTE: During air frying, the green HEAT ON Light will cycle on and off as proper air frying
temperature is maintained.
10. To assure even cooking/browning, open the basket drawer halfway through the cooking time
and check, turn or shake foods in the frying basket. Adjust temperature if needed. The timer will
continue to count down when the drawer is opened, but the Air Fryer will stop heating until the
drawer is replaced.
WARNING: Extreme caution must be used when handling the hot frying basket and
drawer.
Avoid escaping steam from the frying basket and the food.
CAUTION: Always use oven mitts when handling the hot air fryer basket.
NOTE: The Air Fryer can be turned OFF at any time by turning the timer dial to 0.
CAUTION: always use a pair of tongs or a long wooden spoon to remove the foods from the frying
basket.. NEVER turn the basket upside down containing air fried foods.
11. One beep will sound when the set air frying time has expired. The Air Fryer will turn OFF
automatically. The green HEAT ON Light will turn off.
12. Shake the frying basket/drawer vigorously and check food for browning and doneness. If additional
air frying is needed, adjust temperature if desired, and set timer for 3 minute increments until fully
cooked.
13. Allow cooked food to rest for 5 to 10 seconds before removing basket drawer from Air Fryer or food
from frying basket.
14. When air frying is nished, remove the drawer from the machine and place on a at, heat resistant
surface.
15. Use tongs or a long fork to remove air fried foods onto a serving plate. Promptly replace the frying
basket into the front of the Air Fryer. Continue with subsequent batches, if any.
16. When all air frying is completed, turn both the temperature control dial and the timer dial to 0 OFF).
The green HEAT ON Light will turn off.
17. Unplug the Air Fryer when not in use.
14935 BELLA_4.6QT Air Fryer_IM R2.indd 714935 BELLA_4.6QT Air Fryer_IM R2.indd 7 2020-07-03 11:09 AM2020-07-03 11:09 AM

8
Helpful Hints
1. Olive oil spray or vegetable oil works well for air frying.
2. Use your Air Fryer to cook pre-packaged foods with a fraction of the oil, in a fraction of the time!
Asa general rule, lower the recipe baking temperature by 50ºF and reduce the cooking time by
30%to 50% depending on the food and amount.
3. Do not overll frying basket with food. NEVER ll any frying basket more than 2/3 full. When air frying
fresh vegetables, we do not recommend adding more than 3 cups of food to the frying basket.
4.
For best results
, some foods need to be shaken vigorously or turned over during the air fry time.
Consult the Air Frying Chart following as a general guide.
5. To avoid excess smoke, when cooking naturally high fat foods, such as chicken wings or sausages,
it may be necessary to empty fat from the frying basket drawer between batches.
6. Always pat food dry before cooking to encourage browning and avoid excess smoke.
7. Air fry small batches of freshly breaded foods. Press breading onto food to help it adhere.
Arrangein frying basket so that food is not touching to allow air ow on all surfaces.
8. The Air Fryer can be used to reheat food. Set the temperature to 300ºF for up to 10 minutes.
Air Frying Chart
WARNING! ALWAYS USE A MEAT THERMOMETER TO ENSURE THAT MEAT, POULTRY AND FISH ARE
COOKED THOROUGHLY BEFORE EATING. The following chart is intended as a guide only. The quantity
offood air fried at one time, the thickness or density of the food, and whether the food is fresh, thawed,
orfrozen may alter the total cooking time necessary.
1. To assure even cooking/browning, open the frying basket drawer halfway through the cooking time.
Check, turn or vigorously shake foods in the frying basket. This chart lists average total air frying
time, the time at which some action is required, and what action is to be taken for best results.
2. Remember, frying smaller batches will result in shorter cooking times and higher food quality.
Adjust air frying temperatures and times as necessary to suit your taste.
IMPORTANT NOTE: Unless food is pre-packaged and pre-oiled, for browned and crispy results,
allfoods should be lightly oiled before air frying.
• Oil may be sprayed or brushed onto foods.
• Spray oils work well as oil is evenly distributed and smaller quantities of oil are needed.
• To ensure crispy results, make sure foods are dried before adding oil.
• Cut pieces smaller to create more surface area for crispier results.
• Blanching is a term that refers to pre-cooking foods at a lower temperature before the nal air fry.
• Add 3 minutes to the AIR FRY TIME to allow the Air Fryer to preheat.
14935 BELLA_4.6QT Air Fryer_IM R2.indd 814935 BELLA_4.6QT Air Fryer_IM R2.indd 8 2020-07-03 11:09 AM2020-07-03 11:09 AM

9
FOOD TEMP AIR FRY TIME* TIME ACTION
Mixed Vegetables (roasted) 400ºF 15 - 20 minutes 8 minutes shake
Broccoli (roasted) 400ºF 15 - 20 minutes 8 minutes shake
Onion Rings (frozen) 400ºF 12 – 18 minutes 8 minutes shake
Cheese Sticks (frozen) 350ºF 8 – 12 minutes — —
Fried Sweet Potato Chips (fresh, hand cut, 1/8 to 1/16-in. thick)
Blanch (Step 1) 325ºF 15 minutes 8 minutes shake
Air Fry (Step 2) 350ºF 10 – 15 minutes 5 minutes shake
French Fries, (fresh, hand cut, 1/4 to 1/3-in. thick)
Blanch (Step 1) 325ºF 15 minutes 8 minutes shake
Air Fry (Step 2) 350ºF 10 – 15 minutes 5 minutes shake
French Fries, thin (frozen) 3 cups 400ºF 12 – 16 minutes 8 minutes shake
French Fries, thick (frozen) 3 cups 400ºF 17 – 21 minutes 10 minutes shake
Meatloaf, 1 lb. 350ºF 35 – 40 minutes — —
Hamburgers, 1/4 lb. (up to 4) 350ºF 10 – 14 minutes (rare to well done) —
Hot Dogs /Sausages 350ºF 10 – 15 minutes 6 minutes turn over
Chicken Wings (fresh/thawed),
Blanch (Step 1)
325ºF 15 minutes 8 minutes shake
Air Fry (Step 2) 350ºF 10 minutes 5 minutes shake
Chicken Tenders/Fingers,
Blanch (Step 1)
350ºF 13 minutes 13 minutes turn over
Air Fry (Step 2) 400ºF 5 minutes 3 minutes shake
Chicken Pieces 350ºF 20 - 30 minutes 10 minutes turn over
Chicken Nuggets (frozen) 350ºF 10 - 15 minutes 5 minutes shake
Catsh Fingers (thawed, battered) 400ºF 10 - 15 minutes 5 minutes turn over
Fish Sticks (frozen) 400ºF 10 - 15 minutes 5 minutes turn over
Apple Turnovers 400ºF 10 minutes — —
Donuts 350ºF 8 minutes 4 minutes turn over
Fried Cookies 350ºF 8 minutes 4 minutes turn over
*Add 3 minutes to the AIR FRY TIME to allow the Air Fryer to preheat.
PLEASE NOTE:
The USDA recommends that meats such as beef and lamb, etc. should be cooked to an internal
temperature of 145ºF/63ºC. Pork should be cooked to an internal temperature of 160ºF/71ºC and poultry
products should be cooked to an internal temperature of 170ºF/77ºC - 180ºF/82ºC to be sure any harmful
bacteria has been killed. When reheating meat/poultry products, they should also be cooked to an internal
temperature of 165ºF/74ºC
14935 BELLA_4.6QT Air Fryer_IM R2.indd 914935 BELLA_4.6QT Air Fryer_IM R2.indd 9 2020-07-03 11:09 AM2020-07-03 11:09 AM

10
User Maintenance Instructions
This appliance requires little maintenance. It contains no user-serviceable parts. Any servicing requiring
disassembly other than cleaning must be performed by a qualied appliance repair technician.
Care & Cleaning Instructions
WARNING! Allow the Air Fryer to cool fully before cleaning.
1. Unplug the Air Fryer. Remove frying basket. Make sure the frying basket and crisping tray have
cooled completely before cleaning. Use the center hole of the crisping tray to lift crisping tray up
and out of the frying basket. (See Figure 2.)
2. Wash the frying basket and crisping tray in hot soapy water. Do not use metal kitchen utensils or
abrasive cleansers or cleaning products as this may damage the non-stick coating.
3. The frying basket and crisping tray are dishwasher-safe. For best results, place in the top rack of
your dishwasher to clean.
4. Wipe the Air Fryer body with a soft, non-abrasive damp cloth to clean.
Storing Instructions
1. Make sure the Air Fryer is unplugged and all parts are clean and dry before storing.
2. Never store the Air Fryer while it is hot or wet.
3. Store Air Fryer in its box or in a clean, dry place.
14935 BELLA_4.6QT Air Fryer_IM R2.indd 1014935 BELLA_4.6QT Air Fryer_IM R2.indd 10 2020-07-03 11:09 AM2020-07-03 11:09 AM

Recipes
11
Stuffed Eggplant Boats
Serves 4
• 2 (6-inch) eggplants
• 2 tablespoons salt
• 1/3 cup chopped onions
• 6 oz. Italian sausage,
bulk or casing removed
• 1/2 cup Italian tomato sauce
• 2 cloves garlic, minced
• 1 cup shredded mozzarella
• 2 tablespoons Parmesan cheese
• 2 tablespoons olive oil
• Kosher salt
• fresh ground black pepper to taste
1. Cut tops off eggplants; then slice in half horizontally.
2. Scoop esh from eggplants halves to make boats. Chop insides into small 1/4” pieces
andplace in colander over a plate or in the sink.
3. Salt eggplant pieces. Salt eggplant halves (boats) and place cut side down in colander.
Allow eggplant to drain for 40 minutes to 2 hours.
4. Rinse pieces and each eggplant boat under cold water.
5. Prepare lling: Sauté onions and sausage until golden brown. Add tomato sauce,
eggplantpieces and garlic. Simmer for 20 minutes.
6. Allow stufng to cool. Add mozzarella and mix well.
7. Place 4 eggplant shells into the basket.
8. Set Air Fryer to 350º and air fry for 15 minutes.
9. Remove par-cooked eggplant boats. Brush insides with olive oil
and sprinkle salt and pepper to taste.
10. Stuff eggplant boats and top with Parmesan cheese.
11. Add 2 stuffed eggplant boats to the frying basket.
12. Set Air Fryer to 400º and air fry for 10 minutes.
13. Check eggplant with a fork. Remove cooked eggplant boats from frying basket, or
replacefrying basket and set timer to air fry for 5 minute intervals until fully cooked.
14. Repeat with 2 remaining stuffed boats.
14935 BELLA_4.6QT Air Fryer_IM R2.indd 1114935 BELLA_4.6QT Air Fryer_IM R2.indd 11 2020-07-03 11:09 AM2020-07-03 11:09 AM

Recipes
12
Stuffed Chicken Breasts
Serves 3
• 3 large skinless, boneless chicken breasts, pounded
• 1/2 box (3 oz.) Stove Top® (or any boxed stufng mix)
• 1/2 cup water
• 1 egg, beaten
• seasoned salt, to taste
• garlic salt, to taste
• freshly ground black pepper, to taste
1. Place chicken breast between 2 pieces of plastic wrap. To prevent shredding,
add a smallsplatter of water between the chicken and the wrap. Pound the thickest
partsof the chicken breasts and atten to a consistent 1/4- to 3/8-inch thickness.
2. In a medium mixing bowl, add stufng mix and water. Let stufng stand for 5 minutes.
Addbeaten egg and mix well.
3. Add 1/2 cup stufng to the center of each chicken breast.
4. Roll each breast and place seam side down into the frying basket.
5. Sprinkle seasoned salt, garlic salt and black pepper over the tops of each rolled
chickenbreast.
6. Set Air Fryer to 350º and air fry for 20 -25 minutes.
7. An audible beep can be heard when the air frying time has expired. Cut a slit into
thethickest piece of chicken to test doneness. When done, juices should run clear.
NOTE: Air frying times may vary based on size and thickness of chicken breast.
8. Remove cooked chicken breasts from frying basket, or replace frying basket and
set timer to air fry for 5 minute intervals until fully cooked.
14935 BELLA_4.6QT Air Fryer_IM R2.indd 1214935 BELLA_4.6QT Air Fryer_IM R2.indd 12 2020-07-03 11:09 AM2020-07-03 11:09 AM

Recipes
13
Air Fried Bacon Topped Meatloaf
• 1-1/2 lbs. – 2 lbs. ground beef, 80/20
• 1 cup Italian seasoned bread crumbs
• 1/2 cup ketchup
• 3 tablespoons milk
• 1 teaspoon salt
• 1 teaspoon pepper
• 1-1/2 tablespoons dried onion
• 2 large eggs, beaten
• 2 strips thin sliced bacon
• barbecue sauce of your choice
1. Combine meatloaf ingredients in a medium mixing bowl.
2. Shape into a loaf. Add to frying basket.
3. Set Air Fryer to 350º and air fry for 20 minutes.
4. When the air frying time expires, cut bacon strips in half and add to top of meatloaf. Brush
with your favorite barbecue sauce. Replace frying basket.
5. Set timer to air fry for 15 minutes.
6. Allow meatloaf to rest for 15 minutes. Remove from frying basket. Test meatloaf for
doneness. Remove from frying basket, or replace frying basket and set timer to air fry for 5
minute intervals until fully cooked.
Francheezie Sliders
Makes: 12 Sliders
• 6 rashers bacon
• 4-6 hot dogs
• 1/4 cup shredded cheddar cheese
• 12 Hawaiian dinner rolls
• Cut each hot dog into 3 equal pieces. Cut each rasher of bacon in half.
1. Depending on the size of the hot dogs, cut each hot dog into 2 or 3 equal piece.
Cut each rasher of bacon in half.
2. Split tops of hot dogs and pull slightly to open.
3. Add a pinch of shredded cheddar cheese. Wrap in 1/2 piece of bacon.
4. Set Air Fryer to 350º and air fry for 15 minutes. Check and turn hot dogs halfway
through cooking.
5. Serve Francheezies with mustard and “the works” on Hawaiian dinner rolls
14935 BELLA_4.6QT Air Fryer_IM R2.indd 1314935 BELLA_4.6QT Air Fryer_IM R2.indd 13 2020-07-03 11:09 AM2020-07-03 11:09 AM

Recipes
14
Air Fried Sweet Potato Chips
Serves 2
• 1 large sweet potato
• 2 teaspoons vegetable oil
• cinnamon sugar or brown sugar, optional
1. Wash the sweet potato and peel if desired.
2. If available, use a mandolin to cut thin and even potato chips.
3. To cut by hand, rst cut potato in half, and with the at side on the cutting board,
hand cut into very thin chips.
4. Place vegetable oil into a large bowl. Add raw potatoes and use your hands
to mix well, making sure every chip is oiled on all sides.
5. Transfer oiled chips to the frying basket.
6. Set Air Fryer to 325ºF and air fry for 15 minutes. Shake the frying basket/drawer
vigorouslyhalfway through air fry time.
7. Increase heat to 350ºF and air fry for 10 minutes. Shake the frying basket/drawer
vigorouslyhalfway through air fry time.
8. Remove from Air Fryer. Sprinkle hot chips with cinnamon sugar or brown sugar foraspecial
sweet treat.
14935 BELLA_4.6QT Air Fryer_IM R2.indd 1414935 BELLA_4.6QT Air Fryer_IM R2.indd 14 2020-07-03 11:09 AM2020-07-03 11:09 AM

Recipes
15
Air Fried Chicken Tenders
Serves 3-4
• 1 -1-1/2 lb. chicken tenders
(8 tenders per package)
• 1 tablespoon mayonnaise
• 1 tablespoon honey mustard
• 1/2 – 3/4 cup panko
bread crumbs, seasoned
• Spray olive oil
1. Use chicken tenders whole or cut 8 chicken tenders into pieces.
2. Set up 2-bowl breading station:
•Add mayonnaise and honey mustard to a small bowl. Mix well.
•Add bread crumbs to a plate; place it next to the mayonnaise bowl.
3. Working one piece at a time, use a brush or knife to apply honey mustard on both sides
ofthe chicken. Dip and use a fork to press and coat both sides with panko bread crumbs.
4. Add 4 breaded chicken tenders (half the chicken) to the air frying basket.
Allow air circulation on all sides of each chicken piece for best browning.
5. Spray with olive oil. (optional)
6. Set Air Fryer to 350ºF and air fry for 10 minutes. Turn chicken at 5 minutes.
7. Set Air Fryer to 400ºF and continue to air fry for 5 minutes. Turn chicken at 3 minutes.
NOTE: Air frying times may vary depending on the size and thickness of tenders. Always
use a meat thermometer to check for doneness.
8. Repeat with remaining chicken.
14935 BELLA_4.6QT Air Fryer_IM R2.indd 1514935 BELLA_4.6QT Air Fryer_IM R2.indd 15 2020-07-03 11:09 AM2020-07-03 11:09 AM

Recipes
16
Fish & Chips
Fried Catsh Nuggets
Makes 12 nuggets
Serves 3 to 4
Treat your family to a delicious Fish & Chips dinner. These sweet and juicy catsh nuggets are
crunchy good and pair fabulously with fresh hand cut French fries (recipe follows). Serve with
fresh slaw and the meal is complete!
• 1 catsh llet
• 1/2 cup our
• 1 tablespoon Old Bay® seasoning
• 1 egg + 1 egg white
• 1 cup seasoned panko bread crumbs
• olive oil spray
1. Cut the catsh into strips approximately 1-inch by 2.5-inches in length.
2. Season each piece of sh, top and bottom, with Old Bay® seasoning.
3. Set up 3-bowl breading station:
•Flour
•Whisk egg and egg white until well blended
•Panko bread crumbs
4. Place each piece of catsh into the our.
Pat gently with your hands to remove any excess.
5. Dip both sides into egg.
6. Dip and use a fork to press and coat both sides with panko bread crumbs.
7. Add 4 to 6 pieces to air frying basket.
Allow air circulation on all sides of each sh piece for best browning.
8. Spray with olive oil. (optional)
9. Set Air Fryer to 400ºF and air fry for 7 to 8 minutes. Turn sh at 3 minutes.
10. Repeat with remaining sh.
14935 BELLA_4.6QT Air Fryer_IM R2.indd 1614935 BELLA_4.6QT Air Fryer_IM R2.indd 16 2020-07-03 11:09 AM2020-07-03 11:09 AM

Recipes
17
Chips (Fresh Hand Cut French Fries)
Serves 3 to 4
• 2 russet potatoes
• 4 teaspoons vegetable oil
• Kosher salt, to taste
Brine
• 6 to 8 cups water
• 4 tablespoons salt
1. Cut potatoes into 1/4” x 1/4” French fries. Two medium potatoes will yield
4 cups raw cut potatoes. It is best to fry in 2 batches.
2. Soak potatoes in brine for 1 hour to overnight.
3. Dry on clean kitchen towel.
4. Place 4 teaspoons of vegetable oil into a large bowl. Add raw potatoes
and use your hands to mix well, making sure every potato is oiled on all sides.
5. Transfer oiled potatoes to the frying basket.
6. Set Air Fryer to 325ºF and air fry for 15 minutes.
Shake the frying basket/drawer vigorously halfway through air fry time.
7. Increase heat to 350ºF and air fry for 10 minutes.
Shake the frying basket/drawer vigorously halfway through air fry time.
8. Remove from Air Fryer and add Kosher salt, or your choice of seasonings, to taste.
9. Repeat with remaining potatoes.
14935 BELLA_4.6QT Air Fryer_IM R2.indd 1714935 BELLA_4.6QT Air Fryer_IM R2.indd 17 2020-07-03 11:09 AM2020-07-03 11:09 AM

Recipes
18
Air Fried Chicken Wings 2 Ways
• 6 fresh or frozen (thawed) chicken wings
• olive oil spray
• 1/8 cup our
• 2 tablespoons Tony’s
®
Creole seasoning
• 1 egg + 1 egg white
• 3/4 cup seasoned panko bread crumbs
• Kosher salt, to taste
Brine
• 2 cups water
• 1/4 cup Ponzu
• 1 tangerine (may substitute orange or any citrus)
1. Trim chicken wings into drummettes, ats, tips.
HINT: Save/Freeze wing tips for soups or stocks for later use.
2. Add chicken and brine to a bowl or resealable container.
Refrigerate for 1 hour to overnight.
3. Drain chicken wings and discard brine.
4. Place wings on a clean kitchen town and wrap to dry.
Naked Air Fried Chicken Wings
5. Set Air Fryer to 325ºF and air fry for 15 minutes. Turn wings over.
6. Increase temperature to 350ºF for 10 minutes.
Breaded Air Fried Chicken Wings
7. Set up 3-bowl breading station:
•Add Tony’s
®
Creole seasoning to our
•Whisk egg and egg white until well blended
•Add panko bread crumbs
8. Place each wing piece into the our.
Pat gently with your hands to remove any excess.
9. Dip both sides into egg.
10. Dip and use a fork to press and coat both sides with panko bread crumbs.
11. Add breaded wings to air frying basket.
12. Spray with olive oil.
13. Set Air Fryer to 325ºF and air fry for 15 minutes. Turn wings over.
14. Increase temperature to 350ºF for 10 minutes.
14935 BELLA_4.6QT Air Fryer_IM R2.indd 1814935 BELLA_4.6QT Air Fryer_IM R2.indd 18 2020-07-03 11:09 AM2020-07-03 11:09 AM

Recipes
19
Apple Turnovers with Vanilla Drizzle
Makes 6 large turnovers
• 1 frozen, prepared puff pastry sheet, thawed
• 3/4 cups apple pie lling (or any prepared avor of your choice)
• 1/2 teaspoon cinnamon
• 3 teaspoons golden raisins (optional)
Vanilla* Drizzle
• 1/2 cup confectioner’s sugar
• 1 tablespoon milk
• 1/4 teaspoon vanilla* extract
Chocolate Drizzle
• 1/2 cup confectioner’s sugar
• 2 tablespoons cocoa powder (unsweetened)
• 1 tablespoon milk
• 1/4 teaspoon vanilla* extract
1. Prepare icings to drizzle on turnovers. Combine ingredients in a small bowl and mix well.
*May substitute caramel, maple, almond, lemon, or orange extract.
1. Unfold thawed puff pastry sheet onto a lightly oured surface.
2. Using a sharp knife, cut puff pastry sheet down the middle, and then into thirds to make 6
(5-in. x 5-in.) squares.
3. Spoon 2 tablespoons lling into the center of each square.
4. Fold pastry over the lling to form a triangle. Crimp edges with a fork to seal.
Add 2 large turnovers to the frying basket.
5. Set Air Fryer to 400º and air fry for 10 minutes.
6. Remove turnover from frying basket. Allow to cool.
7. Repeat with 4 remaining turnovers.
8. Use a small spoon to drizzle vanilla in a zig zag pattern over the top.
*May substitute any avor prepared canned pie lling.
Variation: Cherry Turnovers with Chocolate Drizzle
1. Follow the turnover recipe above. Use cherry pie lling.
2. Drizzle with chocolate icing.
3. Serve warm turnovers topped with your favorite ice cream.
14935 BELLA_4.6QT Air Fryer_IM R2.indd 1914935 BELLA_4.6QT Air Fryer_IM R2.indd 19 2020-07-03 11:09 AM2020-07-03 11:09 AM

Recipes
20
Air Fried Oreos
• 1 small tube pre-made (refrigerated) Crescent Rolls (8/pack)
• 8 Oreo
®
cookies (or any other sandwich cookie of your choice)
• 1/4 cup mini chocolate chips (optional)
1. Unroll and atten biscuit dough on a working surface. Cut each 4 triangles into 4 equal
squares. Place a cookie into the center of each square. Use your hands and fold, then mold
to t around cookie.
2. Sprinkle chocolate chips over the tops of the wrapped cookies.
3. Set Air Fryer to 350ºF and air fry for 8 to 8-1/2 minutes.
NOTE: Leftovers can be warmed in the microwave oven for 3 to 5 seconds.
Air Fried Donuts and Donut Holes
• • 1 tube pre-made (refrigerated) “Flaky Layer” biscuits
• • 3 tablespoons butter, melted
• • Cinnamon sugar, brown sugar, or powdered sugar
• • Jelly, jam, fruit preserves of your choice
Plain (unlled) donuts:
1. Each biscuit makes a perfect donut. Use a 1-inch cookie cutter, small cap or hand cut the
center hole. Try not to atten!
2. Set Air Fryer to 350ºF and air fry for 5 minutes. Check and turn donuts over at 3 minutes.
3. Prepare donut holes separately. Air fry donut holes for 3 minutes.
4. Brush warm donuts and donut holes with butter, then sprinkle with sugar and serve fresh
donuts warm out of the frying basket.
5. If desired, prepare vanilla and/or chocolate drizzle and add to warm, freshly air fried donuts.
Filled donuts:
2. On a clean working surface, stretch dough and add 1 teaspoon lling.
2. Encase the lling and shape into a slightly attened ball.
3. Set Air Fryer to 350ºF for 8 to 10 minutes. Turn donuts over at 5 minutes.
4. Brush warm donuts with butter, then sprinkle with sugar and serve fresh donuts warm out
of the frying basket.
5. If desired, prepare vanilla and/or chocolate drizzle and add to warm, freshly air fried donuts.
NOTE: Leftovers can be warmed in the microwave oven for 3 to 5 seconds
14935 BELLA_4.6QT Air Fryer_IM R2.indd 2014935 BELLA_4.6QT Air Fryer_IM R2.indd 20 2020-07-03 11:09 AM2020-07-03 11:09 AM

Limited TWO-YEAR Warranty
SENSIO Inc. hereby warrants that for a period of TWO YEARS from the date
of purchase, this product will be free from mechanical defects in material and
workmanship, and for 90 days in respect to non-mechanical parts. At its sole
discretion, SENSIO Inc. will either repair or replace the product found to be
defective, or issue a refund on the product during the warranty period.
The warranty is only valid for the original retail purchaser from the date of initial
retail purchase and is not transferable. Keep the original sales receipt, as proof
of purchase is required to obtain warranty validation. Retail stores selling this
product do not have the right to alter, modify, or in any way revise the terms and
conditions of the warranty.
EXCLUSIONS:
The warranty does not cover normal wear of parts or damage resulting from
any of the following: negligent use of the product, use of improper voltage or
current, improper routine maintenance, use contrary to the operating instructions,
disassembly, repair, or alteration by anyone other than qualied SENSIO Inc.
personnel. Also, the warranty does not cover Acts of God such as re, oods,
hurricanes, or tornadoes.
SENSIO Inc. shall not be liable for any incidental or consequential damages
caused by the breach of any express or implied warranty. Apart from the extent
prohibited by applicable law, any implied warranty of merchantability or tness
for a particular purpose is limited in time to the duration of the warranty. Some
states, provinces or jurisdictions do not allow the exclusion or limitation of
incidental or consequential damages, or limitations on how long an implied
warranty lasts, and therefore, the above exclusions or limitations may not apply to
you. The warranty covers specic legal rights which may vary by state, province
and/or jurisdiction.
HOW TO OBTAIN WARRANTY SERVICE:
You must contact Customer Service at our toll-free number: 1-866-832-4843.
A Customer Service Representative will attempt to resolve warranty issues
over the phone. If the Customer Service Representative is unable to resolve the
problem, you will be provided with a case number and asked to return the product
to SENSIO Inc. Attach a tag to the product that includes: your name, address,
daytime contact telephone number, case number, and description of the problem.
Also, include a copy of the original sales receipt. Carefully package the tagged
product with the sales receipt, and send it (with shipping and insurance prepaid)
to SENSIO Inc.’s address. SENSIO Inc. shall bear no responsibility or liability for
the returned product while in transit to SENSIO Inc.’s Customer Service Center.
21
14935 BELLA_4.6QT Air Fryer_IM R2.indd 2114935 BELLA_4.6QT Air Fryer_IM R2.indd 21 2020-07-03 11:09 AM2020-07-03 11:09 AM

22
MEDIDAS DE SEGURIDAD
IMPORTANTES
Cuando se usan artefactos eléctricos, se deben siempre seguir las precauciones
básicas de seguridad, incluso lo siguiente:
1. LEA TODAS LAS INSTRUCCIONES.
2. No toque las supercies calientes. Utilice las asas o los mangos.
Utilice guantes de cocina.
3. Para protegerse del riesgo de descarga eléctrica, no sumerja el cable, el
enchufe ni la unidad en agua ni en ningún otro líquido.
4. Este electrodoméstico no debe ser utilizado por personas (incluidos niños)
con capacidades físicas, sensoriales o mentales reducidas, o con falta de
experiencia y conocimientos, a menos que una persona responsable de su
seguridad les haya brindado supervisión o instrucciones sobre el uso de los
electrodomésticos.
5. Los niños deben ser supervisados para asegurarse de que no juegan
con el aparato.
6. Desenchufe el electrodoméstico del tomacorriente cuando no esté en uso
y antes de limpiarlo. Deje que el aparato se enfríe antes de colocar o
retirar piezas.
7. No utilice ningún electrodoméstico que tenga un cable o enchufe dañado,
que muestre un funcionamiento defectuoso o que se haya dañado de
cualquier manera. Lleve el electrodoméstico a un técnico calicado para
que lo examine, lo repare o le haga ajustes eléctricos o mecánicos.
8. El uso de accesorios no recomendados o vendidos por el fabricante puede
causar fuego, descarga eléctrica o lesiones.
9. No lo utilice en exteriores.
10. No permita que el cable cuelgue del borde de la mesa o encimera o toque
supercies calientes.
11. NO coloque el aparato encima de, cerca de o en un quemador eléctrico o de
gases calientes, ni dentro una estufa encendida.
12. Se debe tener extrema precaución al mover un aparato que contenga aceite
caliente u otros líquidos calientes.
13. Para desconectar, gire el dial del temporizador y el dial de temperatura a
OFF (Apagado). Retire el enchufe de la toma de corriente.
14. No utilice el aparato para otro uso que no sea el previsto.
15. Asegúrese de que la bandeja para dorar esté en su lugar antes de agregar
alimentos para freír con aire.
16. 16. Asegúrese de que la cesta de freír esté bien bloqueada en la parte
delantera de la freidora de aire, mientras la freidora de aire está en
funcionamiento.
ADVERTENCIA: La freidora de aire no funcionará a menos que el cajón de la
cesta de frituras esté completamente cerrado.
PRECAUCIÓN: Después de freír el aire caliente, la cesta de frituras y el cajón
de la cesta de frituras y los alimentos cocidos están calientes. Se debe tener
extrema precaución al manejar la cesta / cajón de la cesta de fritura caliente.
SOLO PARA EL USO DOMESTICO
14935 BELLA_4.6QT Air Fryer_IM R2.indd 2214935 BELLA_4.6QT Air Fryer_IM R2.indd 22 2020-07-03 11:09 AM2020-07-03 11:09 AM

23
OTRAS MEDIDAS DE
SEGURIDAD IMPORTANTES
PRECAUCIÓN, SUPERFICIES CALIENTES: Este aparato emite calor y se escape el
vapor durante el uso. Se deben tomar las medidas necesarias para evitar riesgos
de quemaduras, incendios u otras lesiones a personas o daños a la propiedad.
PRECAUCIÓN: Este aparato está caliente durante el funcionamiento y retiene
el calor durante algún tiempo después de apagarlo. Siempre use guantes de
horno cuando maneje materiales calientes y permita que las partes metálicas se
enfríen antes de limpiar. No coloque nada encima del aparato mientras esté en
funcionamiento o mientras esté caliente..
1. Todos los usuarios de este electrodoméstico deben leer y comprender este
manual de instrucciones antes de poner en funcionamiento o limpiar el
aparato.
2. Enchufe la unidad solamente en un tomacorriente de 120V de CA.
3. Si el aparato comienza a funcionar mal durante el uso, desenchúfelo
inmediatamente. No utilice ni intente reparar el aparato que funciona mal.
4. No deje este aparato desatendido durante el uso.
5. No sumerja el cable de alimentación en ningún líquido. Si el cable de
alimentación de este aparato está dañado, debe ser reemplazado por el
servicio de atención al consumidor.
6. Mantenga el cable fuera del alcance de los niños y bebés para evitar el riesgo
de descarga eléctrica y asxias.
7. Coloque la freidora de aire sobre una supercie plana, resistente al calor.
8. No obstruya la salida de aire o las entradas de aire en la parte posterior y en
los laterales de la freidora con cualquier objeto. Evite el escape de vapor de la
salida de aire cuando freía con aire.
9. Durante su funcionamiento, mantenga el artefacto a una distancia mínima de
4 pulgadas (10 centímetros) desde las paredes u otros objetos.
10. 10. Use siempre el mango de la cesta de freír para quitar la cesta de freír.
11. ADVERTENCIA: De freír con aire, asegúrese de colocar la cesta de freír en una
supercie plana y resistente al calor.
12. ADVERTENCIA: El llenado insuciente o excesivo de la cesta de freír puede
dañar la freidora y provocar lesiones graves.
13. Nunca mueva la freidora caliente o la freidora cuando contenga comidas
calientes. Deje que se enfríe antes de moverse.
GUARDE ESTAS
INSTRUCCIONES
14935 BELLA_4.6QT Air Fryer_IM R2.indd 2314935 BELLA_4.6QT Air Fryer_IM R2.indd 23 2020-07-03 11:09 AM2020-07-03 11:09 AM

24
NOTAS SOBRE EL ENCHUFE
Este aparato tiene un enchufe polarizado (una hoja es más ancha que la otra).
Para reducir el riesgo de descarga eléctrica, este enchufe encajará en una toma de
corriente polarizada sólo de una manera. Si el enchufe no entra completamente
en el tomacorriente, invierta el enchufe. Si el enchufe no puede encajar en la toma
eléctrica, póngase en contacto con un electricista calicado. No modique el
enchufe de ninguna manera.
NOTAS SOBRE EL CABLE
A. El aparato cuenta con un cable de alimentación corto para evitar que se
enrede o que sea un obstáculo.
B. Es posible utilizar una extensión eléctrica con vigilancia.
C. Si utiliza una extensión:
1. Asegúrese de que el calibre indicado en el cordón sea como mínimo tan
alto como las características eléctricas indicadas en el aparato;
2. La extensión debe contar con un cordón de 3 conductores con puesta a
tierra, si el aparato contara con el conductor de puesta a tierra.
3. El cordón y la extensión se deben colocar de modo que no cuelguen de
una supercie plana o una mesa para evitar que estén al alcance de los
niños o que representen un obstáculo para ellos
ADVERTENCIA SOBRE LOS PLASTIFICANTES
PRECAUCION: A n de evitar que los plasticantes se adhieran al acabado de la
encimera, la mesa u otro mueble, coloque un posafuentes o salvamanteles que
NO SEA DE PLÁSTICO entre el electrodoméstico y la supercie de la encimera
o mesa. Si no se hace esto, es posible que el acabado se oscurezca, se formen
marcas permanentes o aparezcan manchas.
CORRIENTE ELÉCTRICA
Si el circuito eléctrico esta sobrecargado con otros artefactos, es posible que el
electrodoméstico no funcione correctamente. El electrodoméstico debe funcionar
en un circuito eléctrico separado de otros aparatos.
Note: keep illustration
callouts aligned
14935 BELLA_4.6QT Air Fryer_IM R2.indd 2414935 BELLA_4.6QT Air Fryer_IM R2.indd 24 2020-07-03 11:09 AM2020-07-03 11:09 AM

25
Conozca a su freidora de aire de 4.6QT
El producto puede diferir levemente de las ilustraciones
60 Minute Timer Dial
Figure 1
La luz naranja de
ENCENDIDO (POWER)
La luz de calentar verde
(HEAT ON)
Diales de control
(160ºF - 400ºF)
Mangos de la cesta
de frituras,frescos al
tacto Handle
Cable de
alimentación con
enchufe polarizado
Cesta de
frituras
Cesta de frituras
Bandeja para dorar
14935 BELLA_4.6QT Air Fryer_IM R2.indd 2514935 BELLA_4.6QT Air Fryer_IM R2.indd 25 2020-07-03 11:09 AM2020-07-03 11:09 AM

26
Diales de control
Dial de control de temperatura
• Seleccione la temperatura de freír de 160°F a 400°F. Se puede ajustar las temperaturas en
cualquiermomento.
• Cuando termine de freír, gire el dial de control de temperatura a 0 (APAGADO).
NOTA: La freidora no se encenderá a menos que la temperatura y el temporizador estén ajustados.
Dial del temporizador regresivo de 60 minutos
• Gire el dial del temporizador la hora de cocción deseada para encender y apagar la freidora.
• Cuando se establece el dial del temporizador, la luz naranja de ENCENDIDO (POWER) se iluminará
para indicar que la freidora de aire se está calentando.
• Para asegurar una cocción/tostado uniforme, abra la cesta de freír a la mitad del tiempo de cocción.
Chequee, dé vuelta o agite fuerte los alimentos en la cesta de freír.
IMPORTANTE: Cuando saque el cajón de la freidora de aire, la luz naranja de ENCENDIDO y la
freidora de aire se APAGARÁN. El temporizador seguirá la cuenta regresiva cuando se abra la cesta.
• La freidora seguirá calentar cuando se cambie la cesta.
• Se escuchará un pitido cuando el tiempo de freír ajustado haya alcanzado 0. La freidora de aire se
APAGARÁ automáticamente. La luz verde de CALENTAR se apagarán.
IMPORTANTE: Cuando termine de freír, gire el dial de control de temperatura y el dial del
temporizador a 0 (APAGADO). Desenchufe la freidora de aire cuando no esté en uso.
La luz de calentar verde (HEAT ON)
• La luz de calentar verde (HEAT ON) se iluminará cuando se alcance la temperatura seleccionada.
• La luz de calentar verde (HEAT ON) y el elemento de calentamiento se encienden y se apagan para
mantener la temperatura seleccionada.
• Cuando la hora de freír ajustada haya alcanzado 0, la freidora se APAGARÁ. La luz de calentar verde
se apagará.
La luz de encendido roja (POWER)
• Cuando se establece el dial del temporizador, la luz de ENCENDIDO (POWER) roja se iluminará para
indicar que la freidora de aire está calentando.
• Cuando saque el cajón de la freidora, la luz de ENCENDIDO roja y la freidora de aire se APAGARÁN.
El temporizador seguirá la cuenta regresiva cuando se abra la cesta. Aumente el tiempo de cocinar
adicional según sea necesario.
• Cuando la hora de freír ajustada haya alcanzado 0, la freidora se APAGARÁ automáticamente. La luz
naranja de ENCENDIDO permanece encendida.
Antes de utilizar por primera vez
1. Su freidora de aire viene con la cesta de freír bloqueada en la parte delantera del cuerpo de la
freidora. Agarre fuerte el mango de la cesta de freír
para abrirla; quite la cesta de freír de la máquina y
coloque en un área de trabajo plana y limpia.
3. Retire todo el material de embalaje y las etiquetas
desde el interior y fuera de la freidora de aire.
Comprueba que no hay embalaje debajo o
alrededor de la cesta de freír.
4. Lave la cesta de freír y bandeja para dorar en el
agua caliente y jabonosa.
5. NO SUMERJA EL CUERPO DE LA FREIDORA EN
AGUA. Limpie el cuerpo de la freidora con un trapo
húmedo. Seque bien todas las partes.
6. En la misma forma de la cesta de freír, gire la
bandeja para dorar con el borde del mango. Use
el agujero de la bandeja para levantarla y sacarla
de la cesta de freír. (Véase la gura 2) Deje caer la
bandeja de modo que las dos agarraderas de goma
queden bien en su lugar en la base de la cesta.
(Véase gura 2).
7. Coloque y asegure la cesta de freír limpia en la
parte delantera de la freidora de aire.
Figura 2
Cesta de frituras
Bandeja para
dorar
14935 BELLA_4.6QT Air Fryer_IM R2.indd 2614935 BELLA_4.6QT Air Fryer_IM R2.indd 26 2020-07-03 11:09 AM2020-07-03 11:09 AM

27
Instrucciones de funcionamiento
¡ADVERTENCIA! Este electrodoméstico no debe ser utilizado para hervir agua u aceite.
NOTA: Durante el primer uso, la freidora de aire puede emitir un ligero olor. Esto es normal y no
afectara las comidas cocidas.
1. Coloque la freidora de aire por convección en un área de trabajo plana y resistente al calor, cerca
deun tomacorriente.
2. Agarre rmemente el mango de la cesta de frituras para abrir el cajón de la cesta de fritura;
Luego retire el cajón de la caja principal y colóquelo en una supercie plana y limpia.
3. Coloque la bandeja para dorar en la base de la cesta de freír. (Véase gura 2)
4. Coloque las comidas encima de la bandeja para dorar.
5. Enchufe el cable en la toma de corriente.
6. Seleccione la temperatura de freír de 160°F a 400°F.
7. Gire el dial del temporizador al tiempo de freír deseado y 3 más para precalentar si la freidora de
aire está fría. La luz verde de CALENTAR (HEAT ON) y la luz naranja de ENCENDIDO (POWER) se
iluminarán; la freidora comenzará a calentar.
IMPORTANTE: La freidora de aire no calentará si no se ha ajustado el dial del temporizador o si la
cesta de freír no está bien cerrada.
8. La luz verde de CALENTAR (HEAT ON) iluminará cuando se alcance la temperatura establecida.
NOTA: Durante el freír con aire, la luz verde de CALENTAR (HEAT ON) se encenderá y apagará una
vez que se mantenga la temperatura adecuada de freír
9. Para asegurar una cocción/dorado uniforme, abra la cesta a la mitad del tiempo de freír y chequee,
dé la vuelta o agite los alimentos en la cesta de freír. Ajuste la temperatura si es necesario.
El temporizador seguirá la cuenta regresiva cuando se abra la cesta, pero la freidora dejará de
calentar hasta que la cesta sea reemplazada
ADVERTENCIA: Hay que tener la precaución extrema al manipular la cesta de freír y el cajón
caliente. Evite escapar el vapor de la cesta de freír y la comida caliente.
PRECAUCIÓN: Siempre use guantes de horno cuando manipule la cesta de freír caliente.
NOTA: La freidora de aire puede ser APAGADO en cualquier momento al girar el dial del
temporizador a 0.
PRECAUCIÓN: Use siempre pinzas o un tenedor largo de madera para sacar los alimentos fritos de
la cesta de freír. NUNCA voltee boca abajo la cesta que tenga alimentos fritos.
10. Se escuchará un pitido cuando el tiempo de freír establecido haya expirado. La freidora de aire se
APAGARÁ automáticamente. La luz verde de CALENTAR (HEAT ON) se apagarán.
11. Agite fuerte la cesta/el cajón de freír y compruebe que los alimentos estén dorados y cocidos.
Siesnecesario de freír más con el aire, ajuste la temperatura, si lo desea, y congure el
temporizador durante intervalos de 3 minutos hasta que esté completamente cocido
12. Permita que los alimentos cocidos descansen de 5 a 10 segundos antes de sacar la cesta de freír
ola comida de la cesta de freír
13. Cuando termine de freír, quite la cesta de la máquina y colóquela en una supercie plana y
resistente al calor.
14. Use pinzas o un tenedor largo para sacar los alimentos fritos en un plato para servir. Sustituya
rápidamente la cesta de freír en la parte delantera de la freidora de aire. Si tiene, siga freír las otras
comidas.
15. Cuando se complete toda la fritura con aire, gire tanto el dial de control de temperatura como el dial
del temporizador a 0 (APAGADO). La luz verde deCALENTAR (HEAT ON) se apagarán
16. Desenchufe la freidora de aire cuando no esté en uso.
14935 BELLA_4.6QT Air Fryer_IM R2.indd 2714935 BELLA_4.6QT Air Fryer_IM R2.indd 27 2020-07-03 11:09 AM2020-07-03 11:09 AM

28
Consejos útiles
1. Aceite de oliva en aerosol o aceite vegetal es bien para freír por aire.
2. ¡Utilice su freidora de aire para cocinar alimentos preempaquetados con una fracción del aceite,
en una fracción del tiempo! Como regla general, baje la temperatura de cocción de la receta en 50ºF
y reduzca el tiempo de cocción en un 30% a 50% dependiendo del alimento y la cantidad.
3. No llene demasiado la cesta con los alimentos. NUNCA llene ninguna cesta de fritura más de 2/3.
Al freír el aire las verduras frescas, no recomendamos agregar más de 3 tazas de comida a la cesta
de frituras.
4.
Para obtener mejores resultados,
algunos alimentos deben ser agitados vigorosamente o
devueltos durante el tiempo de fritada. Consulte la tabla de freiduras de aire como guía general.
5. Para evitar el exceso de humo, al cocinar alimentos naturalmente ricos en grasa, como alitas de pollo
o salchichas, puede ser necesario vaciar la grasa del cajón de la cesta de frituras entre los lotes.
6. Siempre seque la comida antes de cocinar para estimular el dorado y evitar el exceso de humo.
7. Fríe por aire pequeños lotes de alimentos recién empanados. Presione el pan sobre los alimentos
para ayudarlo a adherirse. Coloque en la cesta de frituras para que los alimentos no se toquen para
permitir el ujo de aire en todas las supercies.
8. La freidora de aire se puede utilizar para recalentar los alimentos. Ajuste la temperatura a 300ºF por
hasta 10 minutos.
Tabla para freír con aire
¡ADVERTENCIA! UTILICE SIEMPRE UN TERMÓMETRO DE CARNE PARA ASEGURAR QUE LAS CARNES
Y LOS PESCADOS SE COCINEN COMPLETAMENTE ANTES DE COMER. La tabla siguiente tiene el
propósito de ser solamente una guía. La cantidad de alimento que se alimenta en el aire, el espesor o
densidad del alimento y si el alimento es fresco, descongelado o congelado puede alterar el tiempo de
cocción necesario.
1. Para asegurar la cocción / dorado uniforme, abra el cajón de la cesta de fritura hasta la mitad del
tiempo de cocción. Compruebe, dé vuelta o agite vigorosamente los alimentos en la cesta de
frituras. Esta tabla indica el promedio de tiempos para freír con aire, el momento en que se requiere
alguna tarea y la tarea que se debe hacer para obtener los mejores resultados
2. Recuerde que freír en lotes más pequeños resultará en tiempos de cocción más cortos y una mayor calidad
de los alimentos. Ajuste las temperaturas y tiempos de freír como sea necesario para adaptarse a su gusto.
NOTA IMPORTANTE:
A menos que los alimentos estén preenvasados y pre-engrasados, para obtener
resultados dorados y crujientes, todos los alimentos deben ser ligeramente aceitados antes de freír con aire.
• El aceite puede rociarse o aplicarse sobre los alimentos.
• Los aceites aerosoles funcionan bien, ya que el aceite se distribuye uniformemente y se necesitan
cantidades menores de aceite.
• Para asegurar resultados crujientes, asegúrese de que los alimentos se sequen antes de agregar aceite.
• Corte piezas más pequeñas para permitir más supercie para obtener resultados más crujientes.
• Blanquear es un término que se reere a pre-cocinar los alimentos a una temperatura más baja
antes de freírlos.
• Añada 3 minutos al TIEMPO DE FREÍR CON AIRE para permitir que la freidora se precaliente.
14935 BELLA_4.6QT Air Fryer_IM R2.indd 2814935 BELLA_4.6QT Air Fryer_IM R2.indd 28 2020-07-03 11:09 AM2020-07-03 11:09 AM

29
Alimentos TEMP
TIEMPO DE FREÍR CON AIRE*
TIEMPO TAREA
Verduras (asadas) 400ºF 15 - 20 minutos 8 minutos agítelo
Brócoli (asado) 400ºF 15 - 20 minutos 8 minutos agítelo
Aros de cebolla fritos (congelados) 400ºF 12 – 18 minutos 8 minutos agítelo
Tequeños (congelados) 350ºF 8 – 12 minutos — —
Batatas fritas (frescas, cortadas a mano, 1/8 a 1/16-pulg. de espesor)
Blanquear (Etapa 1) 325ºF 15 minutos 8 minutos agítelo
Freír con aire (Etapa 2) 350ºF 10 – 15 minutos 5 minutos agítelo
Papas fritas, (frescas, cortadas a mano, 1/4 a 1/3-pulg. de espesor)
Blanquear (Etapa 1) 325ºF 15 minutos 8 minutos agítelo
Freír con aire (Etapa 2) 350ºF 10 – 15 minutos 5 minutos agítelo
Papas fritas, nas (congeladas) 3 copas 400ºF 12 – 16 minutos 8 minutos agítelo
Papas fritas, gruesas (congeladas) 3 copas 400ºF 17 – 21 minutos 10 minutos agítelo
Rollo de carne, 1 lb. 350ºF 35 – 40 minutos — —
Hamburguesas, 1/4 lb. (hasta 4) 350ºF 10 – 14 minutos (poco a bien hecho) —
Hot Dogs /Salchichas 350ºF 10 – 15 minutos 6 minutos voltéalo
Alitas de pollo (frescas/descongeladas),
Blanquear (Etapa 1) 325ºF 15 minutos 8 minutos agítelo
Freír con aire (Etapa 2) 350ºF 10 minutos 5 minutos agítelo
Palitos de pollo,
Blanquear (Etapa 1) 350ºF 13 minutos 13 minutos voltéalo
Freír con aire (Etapa2) 400ºF 5 minutos 3 minutos agítelo
Pollo 350ºF 20 - 30 minutos 10 minutos voltéalo
Pollo empanado (congelado) 350ºF 10 - 15 minutos 5 minutos agítelo
Palitos de bagre (descongelados, rebozados) 400ºF 10 - 15 minutos 5 minutos voltéalo
Palitos de pescado (congelados) 400ºF 10 - 15 minutos 5 minutos voltéalo
Tartas de manzana 400ºF 10 minutos — —
Donuts 350ºF 8 minutos 4 minutos voltéalo
Galletas fritas 350ºF 8 minutos 4 minutos voltéalo
*Agregue 3 minutos al TIEMPO DE FREÍR CON AIRE para permitir que la freidora de aire se precaliente.
TENGA EN CUENTA:
El USDA recomienda que las carnes como la carne de res y el cordero, etc., se cocinen a una temperatura
interna de 145ºF / 63ºC. El cerdo debe cocinarse a una temperatura interna de 160ºF / 71ºC y las carnes de
ave deben ser cocinados a una temperatura interna de 170ºF/77ºC - 180ºF/82ºC para asegurarse de que
cualquier bacteria dañina ha sido matada. En el recalentamiento de carnes/carnes de ave, también deben
cocinarse a una temperatura interna de 165ºF/74ºC.
14935 BELLA_4.6QT Air Fryer_IM R2.indd 2914935 BELLA_4.6QT Air Fryer_IM R2.indd 29 2020-07-03 11:09 AM2020-07-03 11:09 AM

30
Instrucciones de mantenimiento
Este aparato requiere poco mantenimiento. No contiene piezas que el usuario pueda reparar. Cualquier
servicio que requiera el desmontaje que no sea la limpieza debe ser realizada por un técnico calicado.
Instrucciones de cuidado y limpieza
¡ADVERTENCIA! Deje que la freidora se enfríe completamente antes de limpiar.
1. Desenchufe la freidora de aire. Quite la cesta de freír. Asegúrese de que la cesta de freír y la bandeja para
dorar se hayan enfriado completamente antes de limpiar. Use el agujero de la bandeja para levantarla y
sacarla de la cesta de freír. (Véase la gura 2)
2. Lave la cesta de freír y la bandeja para dorar en agua jabonosa y caliente. No utilice utensilios de
cocina metálicos ni limpiadores o productos de limpieza abrasivos, ya que esto podría dañar la capa
antiadherente.
3. La cesta de freír y la bandeja para dorar son aptas con lavaplatos. Para obtener los mejores resultados,
colóquelas en el estante superior de su lavaplatos para limpiar.
4. Limpie el cuerpo de la freidora de aire con un paño húmedo, suave y no abrasivo para limpiar.
Instrucciones de almacenamiento
1. Asegúrese de que la freidora esté desenchufada y todas las piezas estén limpias y secas antes de guardarlas.
2. Nunca almacene la freidora de aire mientras esté caliente o húmeda.
3. Almacene la freidora de aire en su caja o en un lugar limpio y seco.
14935 BELLA_4.6QT Air Fryer_IM R2.indd 3014935 BELLA_4.6QT Air Fryer_IM R2.indd 30 2020-07-03 11:09 AM2020-07-03 11:09 AM

Recetas
31
Barcas de berenjenas rellenas
Sirve 4 comensales
• 2 berenjenas (6 pulgadas)
• 2 cucharadas de sal
• 1/3 taza de cebolla picada
• 6 onzas. Salchicha italiana,
• carcasa extraída
• 1/2 taza de salsa de tomate italiana
• 2 dientes de ajo picados
• 1 taza de mozzarella rallada
• 2 cucharadas de queso parmesano
• 2 cucharadas de aceite de oliva
• Sal kosher
• Pimienta negra fresca al gusto
1. Corte las tapas de las berenjenas; Luego corte en la mitad horizontalmente.
2. Recoja la carne de las mitades de berenjenas para hacer los barcos. Pique en pequeños
trozos de 1/4 “y colocarlos en un colador sobre un plato o en el fregadero.
3. Sale las piezas de berenjena. Sale las mitades de berenjena (barcos) y coloque el lado
cortado hacia abajo en el colador. Deje que la berenjena se drene durante 40 minutos a 2
horas.
4. Enjuague las piezas y cada barco de berenjena en agua fría.
5. Prepare el relleno: Saltee las cebollas y las salchichas hasta que estén doradas. Añada salsa
de tomate, piezas de berenjena y ajo. Cocine a fuego lento durante 20 minutos.
6. Deje enfriar el relleno. Añade la mozzarella y mezcle bien.
7. Coloque 4 cáscaras de berenjena en la cesta.
8. Ajuste la freidora de aire a 350º y fría durante 15 minutos.
9. Saque los botes de berenjena poco cocinados. Aplique los interiores con aceite de oliva y
espolvoree sal y pimienta al gusto.
10. Coloque las berenjenas y salpíquelas con queso parmesano.
11. Agregue 2 botes rellenos de berenjena a la cesta de frituras.
12. Ajuste la freidora de aire a 400º y fría durante 10 minutos.
13. Compruebe la berenjena con un tenedor. Quite los barcos de berenjena cocinados de la
canasta de frituras, o reemplace la cesta de frituras y ajuste el temporizador para freír por 5
minutos hasta que esté completamente cocido.
14. Repita con 2 botes de peluche que quedan.
14935 BELLA_4.6QT Air Fryer_IM R2.indd 3114935 BELLA_4.6QT Air Fryer_IM R2.indd 31 2020-07-03 11:09 AM2020-07-03 11:09 AM

Recetas
32
Pechugas de pollo rellenas
Sirve 3 comensales
• 3 grandes pechugas de pollo deshuesadas y sin piel, golpeados
• 1/2 caja (3 onzas) de Stove Top®
(o cualquier mezcla de relleno en caja)
• 1/2 taza de agua
• 1 huevo batido
• Sal sabrosa, al gusto
• Sal de ajo, al gusto
• Pimienta negra recién molida, al gusto
1. Coloque la pechuga de pollo entre 2 trozos de envoltura de plástico. Para evitar la
trituración, Agregue una pequeña salpicadura de agua entre el pollo y el envoltorio.
Golpee las partes más gruesas de las pechugas de pollo y aplane a un espesor consistente
de 1 / 4- a 3/8-pulg.
2. En un tazón de mezcla mediano, agregue la mezcla de relleno y agua. Deje reposar durante
5 minutos. Añada el huevo batido y mezcle bien.
3. Agregue 1/2 taza de relleno al centro de cada pechuga de pollo.
4. Enrolle cada pechuga y coloque el lado de la costura hacia abajo en la cesta de frituras.
5. Espolvoree la sal, la sal de ajo y la pimienta negra sobre las tapas de cada pechuga
de pollo enrollada.
6. Ajuste la freidora de aire a 350º y fríe el aire durante 20-25 minutos.
7. Se escuchará un pitido audible cuando haya transcurrido el tiempo de freír.
Cortar una hendidura en el trozo de pollo más grueso para probar la cocción.
Cuando se hace, los jugos deben correr claro.
NOTA: Los tiempos de freír pueden variar en función del tamaño y espesor de la pechuga
de pollo.
8. Retire las pechugas de pollo cocidas de la cesta de fritura, o reemplace la cesta de fritura y
ajuste el temporizador para freír por 5 minutos hasta que esté completamente cocido.
14935 BELLA_4.6QT Air Fryer_IM R2.indd 3214935 BELLA_4.6QT Air Fryer_IM R2.indd 32 2020-07-03 11:09 AM2020-07-03 11:09 AM

Recetas
33
Rollo de carne con tocino
• 1 taza de pan rallado italiano
• 1/2 taza de ketchup
• 3 cucharadas de leche
• 1 cucharadita de sal
• 1 cucharadita de pimienta
• 1-1 /2 cucharadas de cebolla seca
• 2 tiras de tocino en rodajas nas
• Salsa de barbacoa de su elección
1. Combine los ingredientes de pan de carne en un tazón de mezclar.
2. Forma en un pan, agregue a la cesta de fritura.
3. Ajuste la freidora de aire a 350º y fría durante 20 minutos.
4. Se escuchará un pitido audible cuando haya transcurrido el tiempo de freír.
5. Cuando haya transcurrido el tiempo de freír, corte las piezas de tocino por la mitad y
agregue sobre el rollo de carne. Cepille con su salsa de barbacoa favorita. Vuelve a colocar
la cesta de freír.
6. Deje que el rollo de carne descanse durante 15 minutos. Quite de la cesta de freír.
Compruebe el rollo de carne para la cocción. Retire de la cesta de frituras, o reemplace la
cesta de frituras y ajuste el temporizador para freír aire durante 5 minutos hasta que esté
completamente cocido.
Perritos calientes (Minis)
Cocina 12 hamburguesitas
• 6 lonjas de tocino
• 4-6 hot dogs
• 1/4 taza de queso cheddar rallado
• 12 rollos de cena hawaiana
1. Según el tamaño de los perros calientes, corte cada uno en 2 o 3 piezas iguales. Corte los
tocinos por la mitad.
2. Separe las partes superiores de los perros calientes y tire suavemente para abrir.
3. Agregue un pellizco de queso cheddar rallado. Envuelva en 1/2 pieza de tocino.
4. Ajuste la temperatura de la freidora a 350º y fría durante 15 minutos. Verique y de la
vuelta a los perritos calientes a la mitad de la cocción.
5. Sirva los perritos calientes en panecillos hawaianos.
14935 BELLA_4.6QT Air Fryer_IM R2.indd 3314935 BELLA_4.6QT Air Fryer_IM R2.indd 33 2020-07-03 11:09 AM2020-07-03 11:09 AM

Recetas
34
Batatas fritas de aire
Sirve 3 comensales
• 1 gran batata
• 2 cucharaditas de aceite vegetal
• Azúcar de canela o azúcar negra, opcional
1. Lave la batata y la piel si se desea.
2. Si está disponible, utilice un rebanador para cortar las papas fritas delgadas e en partes
iguales.
3. Para cortar a mano, corte la patata por la mitad por primero y con el lado plano en la tabla
de cortar, corte a mano en pedazos muy nos.
4. Coloque el aceite vegetal en un tazón grande. Agregue las patatas crudas y use sus manos
para mezclar bien, asegurándose de que cada pedazo esté engrasado en todos los lados.
5. Transera los chips engrasados a la cesta de frituras.
6. Ajuste la freidora de aire a 325ºF y fría durante 15 minutos.
Agite vigorosamente la cesta / cajón de frituras a mitad de tiempo de freír.
7. Aumente el calor a 350 ºF y fría por 10 minutos. Agite vigorosamente la cesta / cajón de
frituras a mitad de tiempo de freír.
8. Saque todo de la freidora. Espolvoree las patatas calientes con azúcar de canela o azúcar
negra para un dulce especial.
Palitos de pollo con aire
Sirve 3-4 comensales
• 1-1 1/2 libras de palitos de pollo
• (8 palitos por paquete)
• 1 cucharada de mayonesa
• 1 cucharada de mostaza de miel
• 1/2 - 3/4 taza de panko
• Migas de pan, sazonadas
• Rocíe con aceite de olive
1. Utilice los palitos de pollo enteros o corte los 8 palitos en trozos.
2. Prepare una estación de empanado de 2 tazones:
• Agregue la mayonesa y la mostaza de miel a un tazón pequeño. Mezcle bien.
• Agregue migas de pan a un plato; Colóquelo al lado del plato de mayonesa.
3. Con una pieza a la vez, use un cepillo o un cuchillo para aplicar mostaza de miel en ambos
lados del pollo. Utilice un tenedor para prensar y cubrir ambos lados con migas de pan
panko.
4. Agregue 4 palitos de pollo empanados (la mitad del pollo) a la cesta de frituras.
Permita la circulación de aire en todos los lados de cada pieza de pollo para obtener lo
mejor dorado.
5. Rocíe con aceite de oliva. (Opcional)
6. Ajuste la freidora de aire a 350 ºF y fría durante 10 minutos. Dé vuelta al pollo después
de 5 minutos.
7. Ajuste la freidora de aire a 400 ºF y siga enfriando por 5 minutos. Dé vuelta al pollo después
de 3 minutos.
NOTA: Los tiempos de freír pueden variar según el grosor y tamaño de las piezas. Siempre
use un termómetro para carne para chequear que esté cocido.
8. Repita con el pollo que queda.
14935 BELLA_4.6QT Air Fryer_IM R2.indd 3414935 BELLA_4.6QT Air Fryer_IM R2.indd 34 2020-07-03 11:09 AM2020-07-03 11:09 AM

Recetas
35
Nuggets de bagre fritos
Cocina 12 nuggets
Sirve 3 a 4
Trate a su familia a una cena deliciosa de pescado y papas fritas. Estes nuggets dulces y
jugosos de bagre son crujientes y el par fabulosamente con las patatas fritas cortadas a mano
(la receta sigue). ¡Servir con repollo fresco y la comida está completa!
• 1 lete de bagre
• 1/2 taza de harina
• 1 cucharada de condimento Old Bay®
• 1 huevo + 1 clara de huevo
• 1 taza de migas de pan panko sazonadas
• Aerosol de aceite de oliva
1. Corte el bagre en tiras de aproximadamente 1 pulgada por 2.5 pulgadas de largo.
2. Sazone cada pieza de pescado, arriba y abajo, con el condimento de Old Bay ®.
3. Prepare su estación de empanado de 3 tazones:
• Harina
• Bata el huevo y la clara de huevo hasta que estén bien mezclados
• Migas de pan Panko
4. Coloque cada pieza de bagre en la harina. Aplane suavemente con las manos para eliminar
cualquier harina exceso.
5. Coloque ambos lados en el huevo.
6. Aplane y use un tenedor para prensar y cubrir ambos lados con migas de pan panko.
7. Añada 4 a 6 piezas a la cesta de frituras. Permita la circulación de aire en todos los lados
de cada pedazo del pescado para el mejor bronceado.
8. Rocíe con aceite de oliva. (Opcional)
9. Ajuste la freidora de aire a 400 ºF y fría durante 7 a 8 minutos. Gire el pescado
a los 3 minutos.
10. Repita con los otros pedazos de bagre.
14935 BELLA_4.6QT Air Fryer_IM R2.indd 3514935 BELLA_4.6QT Air Fryer_IM R2.indd 35 2020-07-03 11:09 AM2020-07-03 11:09 AM

Recetas
36
Papas fritas (Papas fritas frescas cortado a mano)
Para 3 a 4 personas
• 2 papas rojizas
• 4 cucharaditas de aceite vegetal
• Sal kosher, al gusto
Poner al salmuera
• 6 a 8 tazas de agua
• 4 cucharadas de sal
1. Corte las papas en pedazos de 1/4 x 1/4 pulgadas.
Dos papas medianas producirán 4 tazas de papas cortadas. Lo mejor es freírlas en 2 tandas.
2. Remoje las papas en salmuera durante 1 hora.
3. Séquelas en un paño de cocina limpiado.
4. Añada 4 cucharaditas de aceite vegetal en un bol grande. Añada las papas y con las manos,
mezcle todo bien para asegurar que las papas son bienengrasadas.
5. Traslade las papas engrasadas en la cesta para freír.
6. Ajuste la freidora a 325ºF y fríalas por 15 minutos.
Agite fuerte la cesta/cajón para freír a la mitad del tiempo de fritura sugerido.
7. Aumente la temperatura a 350 ° F y fríalas por 10 minutos.
Agite fuerte la cesta/cajón para freír a la mitad del tiempo de fritura sugerido.
8. Saque las papas de la freidora y añada sal kosher u el condimento de su preferencia,
algusto.
9. Repita esta receta con las papas restantes.
14935 BELLA_4.6QT Air Fryer_IM R2.indd 3614935 BELLA_4.6QT Air Fryer_IM R2.indd 36 2020-07-03 11:09 AM2020-07-03 11:09 AM

Recetas
37
Alitas de pollo fritas con aire a dos maneras
• 6 alitas de pollo frescas o congeladas (descongeladas)
• Aerosol de aceite de oliva
• 1/8 taza de harina
• 2 cucharadas de aderezo criollo Tony’s
®
• 1 huevo + 1 clara de huevo
• 3/4 taza de pan rallado panko sazonado
• Sal kosher, al gusto
Poner en salmuera
• 2 tazas de agua
• 1/4 taza de Ponzu
• 1 mandarina (puede sustituir con naranja o cualquier fruta cítrica)
1. Corte las alas de pollo en pisos. Consejo: Guarde/congele las puntas de alas para sopas o
para el uso posterior.
2. Agregue el pollo y la salmuera a un tazón o recipiente salado. Enfríe por 1 hora a la noche.
3. Cole las alas de pollo y eche la salmuera.
4. Coloque las alas en una encimera de cocina limpia y envuelva para secar.
Alitas de pollo desnudas y fritas con aire
5. Ajuste la freidora de aire a 325 °F y fría durante 15 minutos. Voltea las alas.
6. Aumente la temperatura a 350 ºF durante 10 minutos.
Alitas de pollo empanadas y fritas con aire
7. Prepare su estación de empanado de 3 tazones:
• Harina
• Bata el huevo y la clara de huevo hasta que estén bien mezclados
• Migas de pan Panko
8. Coloque cada pieza de bagre en la harina. Aplane suavemente con las manos para eliminar
cualquier harina exceso.
9. Coloque ambos lados en el huevo.
10. Aplane y use un tenedor para prensar y cubrir ambos lados con migas de pan Panko.
11. Añada a la cesta de frituras de aire.
12. Rocíe con aceite de oliva.
13. Ajuste la freidora de aire a 325 °F y fría durante 15 minutos. Voltea las alas.
14. Aumente la temperatura a 350 ºF durante 10 minutos.
14935 BELLA_4.6QT Air Fryer_IM R2.indd 3714935 BELLA_4.6QT Air Fryer_IM R2.indd 37 2020-07-03 11:09 AM2020-07-03 11:09 AM

Recetas
38
Tartas de manzana con llovizna de chocolate
Hace 6 tartas grandes
• 1 hoja de hoja de masa preparada, descongelada
• 3/4 taza de relleno de pastel de manzana (o cualquier sabor preparado de su elección)
• 1/2 cucharadita de canela
• 3 cucharaditas de pasas doradas (opcional)
Llovizna de vainilla
• 1/2 taza de azúcar de contería
• 1 cucharada de leche
• 1/4 cucharadita de extracto de vainilla
Llovizna de chocolate
• 1/2 taza de azúcar de contería
• 2 cucharadas de cacao en polvo (sin azúcar)
• 1 cucharada de leche
• 1/4 cucharadita de extracto de vainilla
1. Prepare las glaseados para salpicar las tartas. Combine los ingredientes en un tazón
pequeño y mezcle bien.
* Puede sustituir el extracto de caramelo, arce, almendra, limón o naranja.
1. Despliegue la hoja de masa descongelada sobre una supercie ligeramente enharinada.
2. Con un cuchillo alado, corte la hoja de masa en el centro y luego en los tercios para hacer
6 cuadrados (5-pulg. x 5-pulg.)
3. Cuchara 2 cucharadas de relleno en el centro de cada cuadrado.
4. Doble la masa sobre el relleno para formar un triángulo. Enrosque los bordes con un
tenedor para sellar. Coloque 2 tartas grandes en la cesta de frituras.
5. Ajuste la freidora de aire a 400º y fría durante 10 minutos.
6. Saque la tarta de la cesta de frituras. Deje enfriarse.
7. Repita con las 4 tartas que quedan.
8. Utilice una cuchara pequeña para salpicar la vainilla en un patrón de zigzag sobre las tapas.
* Puede sustituir con cualquier sabor de relleno de pastel preparado.
Variación: Tartas de cereza con llovizna de chocolate
1. Siga la receta de tartas anterior. Utilice relleno de pastel de cereza.
2. Salpique con la llovizna de chocolate.
3. Sirve las tartas con su helado preferido.
14935 BELLA_4.6QT Air Fryer_IM R2.indd 3814935 BELLA_4.6QT Air Fryer_IM R2.indd 38 2020-07-03 11:09 AM2020-07-03 11:09 AM

Recetas
39
Oreos fritos con aire
• 1 tubo pequeño precocido (refrigerado) de cruasanes (8/paquete)
• 8 galletas Oreo® (o cualquier otra galleta de sándwich de su elección)
• 1/4 taza de mini pepitas de chocolate (opcional)
1. Desenrolle y aplane la masa de galletas sobre una supercie. Corta cada 4 triángulos en 4
cuadrados iguales. Coloque una galleta en el centro de cada cuadrado. Use las manos para
doblar y moldear la masa para que quepa alrededor de la galleta.
2. Rocié las pepitas de chocolate sobre la las galletas envueltas.
3. Coloque la freidora de aire a 350 ° F y fría por 8 a 8-1/ 2 minutos.
NOTA: Las sobrantes pueden ser calentados en el horno de microondas durante 3 a 5
segundos.
Donuts y bolas de donuts fritas con aire
• 1 tubo de galletas precocidas (refrigeradas) de “Flaky Layer”
• 3 cucharadas de mantequilla, fundida
• Azúcar de canela, azúcar moreno o azúcar en polvo
• Dulce/mermelada/conservas de frutas de su elección
Donuts simples (sin rellenos):
1. Una galleta hace un donut perfecto. Utilice una taza o un cortador de galletas de 1 pulgada
para hacer las bolas. ¡No aplánelas!
2. Ajuste la freidora de aire a 350 ºF y fría durante 5 minutos. Compruebe y voltea los donuts
en 3 minutos.
3. Prepare las bolas de donut. Fría por 3 minutos.
4. Rocíe los donuts calientes con mantequilla, luego espolvoree con azúcar y sirva los donuts
recién salidas de la cesta de freír.
5. Si lo desea, prepare la vainilla y/o la llovizna de chocolate y agregue unas gotas sobre los
donuts recién hechos.
Donuts con rellenos:
1. En una supercie de trabajo limpia, estire la masa y agregue 1 cucharadita de relleno.
2. Ponga el relleno dentro la masa y forma una bola; aplánela suavemente.
2. Ajuste la freidora de aire a 350 ºF y fría durante 8-10 minutos. Voltea los donuts en 5
minutos
3. Rocíe los donuts calientes con mantequilla, luego espolvoree con azúcar y sirva los donuts
recién salidas de la cesta de freír.
4. Si lo desea, prepare la vainilla y/o la llovizna de chocolate y agregue unas gotas sobre los
donuts recién hechos.
NOTA: Las sobrantes pueden ser calentados en el horno de microondas durante 3 a 5
segundos.
14935 BELLA_4.6QT Air Fryer_IM R2.indd 3914935 BELLA_4.6QT Air Fryer_IM R2.indd 39 2020-07-03 11:09 AM2020-07-03 11:09 AM

Garantía limitada de DOS AÑOS
Mediante la presente, SENSIO Inc. garantiza que, durante el plazo de DOS AÑOS
a partir de la fecha de compra, este producto no presentará defectos mecánicos
en el material ni en la mano de obra, y durante 90 días, no los presentará en las
piezas no mecánicas. A su entera discreción, SENSIO Inc. reparará o reemplazará
el producto que resulte defectuoso, o emitirá un reembolso por el producto
durante el plazo de garantía.
Esta garantía es válida únicamente para el comprador minorista original a partir
de la fecha de compra minorista inicial y no es transferible. Conserve el recibo de
compra original, ya que se exige una prueba de compra para obtener la validación
de la garantía. Las tiendas minoristas no tienen derecho a alterar, modicar ni
corregir de ninguna manera los términos y condiciones de la garantía.
EXCLUSIONES:
La garantía no cubre el desgaste normal de las piezas ni el daño ocasionado
por cualquiera de las siguientes causas: uso negligente del producto, uso de
un voltaje o corriente incorrectos, mantenimiento de rutina inadecuado, uso
contrario al de las instrucciones de funcionamiento, desarmado, reparación o
alteración a cargo de personas que no sean miembros del personal calicado
de SENSIO Inc. Asimismo, la garantía no cubre actos de la naturaleza, como
incendios, inundaciones, huracanes o tornados.
SENSIO Inc. no asumirá responsabilidad por daños incidentales o resultantes
ocasionados por la violación de cualquier garantía expresa o implícita. Salvo en
la medida en que lo prohíban las leyes aplicables, cualquier garantía implícita de
comerciabilidad o aptitud para un propósito particular se limita temporalmente
a la duración de la garantía. Algunos estados, provincias o jurisdicciones no
permiten la exclusión ni la limitación de daños incidentales o resultantes, o
limitaciones sobre la duración de una garantía implícita y, por lo tanto, es posible
que las exclusiones o limitaciones mencionadas no le correspondan. La garantía
cubre derechos legales especícos que pueden variar de un estado, una provincia
o una jurisdicción a otros.
CÓMO OBTENER EL SERVICIO DE GARANTÍA:
Debe comunicarse con el Servicio de atención al cliente a nuestro número
telefónico gratuito: 1-866-832-4843. Un representante del Servicio de atención
al cliente intentará resolver los problemas referidos a la garantía por teléfono.
Si este no puede resolver el problema, le proporcionarán un número de caso
y le solicitarán que devuelva el producto a SENSIO Inc. Adhiera una etiqueta
al producto que incluya: su nombre, dirección, número telefónico de contacto
durante el día, número de caso y descripción del problema. Además, incluya
una copia del recibo de compra original. Envuelva cuidadosamente el producto
etiquetado con el recibo de compra, y envíelo (con el envío y el seguro
prepagados) a la dirección de SENSIO Inc. SENSIO Inc. no asumirá obligación ni
responsabilidad alguna por el producto devuelto que esté en el trayecto hacia el
Centro de servicio al cliente de SENSIO Inc.
40
14935 BELLA_4.6QT Air Fryer_IM R2.indd 4014935 BELLA_4.6QT Air Fryer_IM R2.indd 40 2020-07-03 11:09 AM2020-07-03 11:09 AM

GRACIAS
por su compra
BellaLifestyle
BellaLife
para recibir anuncios especiales y recetas
de moda!
REGISTRARSE
VISITE
:
bellahousewares.com
Reseñas, comentarios o hacernos
alguna pregunta
¡
CUÉNTENOS LO
QUE PIENSA!
#myBELLAlife
14935 BELLA_4.6QT Air Fryer_IM R2.indd 4114935 BELLA_4.6QT Air Fryer_IM R2.indd 41 2020-07-03 11:09 AM2020-07-03 11:09 AM

14935 Rev. 2
Sensio Inc.
New York, NY 10016/USA
For customer service questions or comments
Dudas o comentarios contactar el departamento de servicio al cliente
1-866-832-4843 / [email protected]
14935 BELLA_4.6QT Air Fryer_IM R2.indd 4214935 BELLA_4.6QT Air Fryer_IM R2.indd 42 2020-07-03 11:09 AM2020-07-03 11:09 AM
-
 1
1
-
 2
2
-
 3
3
-
 4
4
-
 5
5
-
 6
6
-
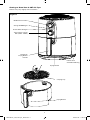 7
7
-
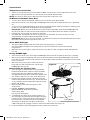 8
8
-
 9
9
-
 10
10
-
 11
11
-
 12
12
-
 13
13
-
 14
14
-
 15
15
-
 16
16
-
 17
17
-
 18
18
-
 19
19
-
 20
20
-
 21
21
-
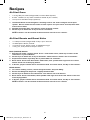 22
22
-
 23
23
-
 24
24
-
 25
25
-
 26
26
-
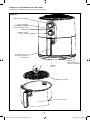 27
27
-
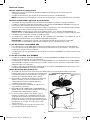 28
28
-
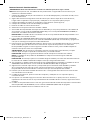 29
29
-
 30
30
-
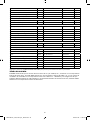 31
31
-
 32
32
-
 33
33
-
 34
34
-
 35
35
-
 36
36
-
 37
37
-
 38
38
-
 39
39
-
 40
40
-
 41
41
-
 42
42
-
 43
43
-
 44
44


Bella 4.6 Qt Air Fryer El manual del propietario
- Categoría
- Freidoras
- Tipo
- El manual del propietario
- Este manual también es adecuado para
en otros idiomas
Artículos relacionados
-
Bella 2 QT El manual del propietario
-
-
Bella 17278 Manual de usuario
-
-
-
-
-
-
-
