
IMPORTANT: DO NOT RETURN TO STORE!
For missing or damaged parts, technical or assembly questions, please call John Louis Customer
Service at 1-800-480-6985
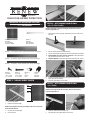
SHELF COVER ASSEMBLY INSTRUCTIONS
Quantity: 1
Shelf Panel
Panel Del Estante
Panneau de Tablette
STEP 1 - SIZING SHELF COVER
1. Measure shelf depth
2. Determine shelf panel depth
NOTE: If shelf length is less than panel length, measure and cut panel to
required length with saw.
Quantity: 1 2 1/2in. Shelf Rail / 6.35cm. Plataforma Carril / 63.5mm. Rail d’étagère
Quantity: 1 2”in. Shelf Rail / 5.08cm. Plataforma Carril / 50.8mm. Rail d’étagère
Quantity: 1 1in. Shelf Rail / 2.54cm. Plataforma Carril / 25.4mm. Rail d’étagère
STEP 2 - ATTACHING SHELF RAIL
- 2in. Or 2.5in. Prole
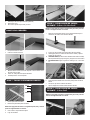
3. Cut away excess panel depth.
4. Place onto shelf.
2. Place a shelf clip on the back of the shelf rail.
3. Use pilot hole that lines clip between shelf wires & repeat at each position.
4. WITH SPACER (Used when shelf has shelf ends) - Place spacers then
clips at locations & secure with 1in. screws.
5. WITHOUT SPACER - Secure shelf clips to shelf rails using 1/2in. screws.
6. Insert the shelf panel into the groove on the back of the shelf rail.
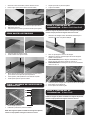
7. Place clips over wire shelf end.
8. Push clips closed tightly over wire shelf.
12in.
16in.
20in.
NOTE: If shelf length is less than rail length, measure and cut rail to
required length with saw.
1. Select desired shelf rail. Typically determined by amount of front face on
wire shelf.
Quantity: 4
1/2in. Screw
1.27 cm.Tornillo
12.7 mm. Visser
Quantity: 4
1/2in. Screw
1.27 cm.Tornillo
12.7 mm. Visser
Quantity: 4
Clip
Recortar
Fixez
Quantity: 4
Spacer
Espaciador
Entretoise
1. Select 1in. shelf rail & remove tape cover.
2. Secure prole to panel (tape adheres to nish side)
NOTE: If shelf length is less than rail length, measure and cut rail to
required length with saw.
STEP 2 - ATTACHING SHELF RAIL
- 1in. Prole
Quantity: 1
Panel Tape
Cinta Del Estante
Ruban de Tablette

3. Attach tape to the end of panel underside (white side).
4. Remove tape cover.
5. Place cover in position & press rmly to secure.
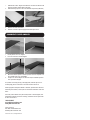
3. Measure distance from the front of the rail prole on the 2nd shelf to end of
the panel on the 1st shelf.
4. Cut the 1st. shelf prole to the required dimension.
5. Install the prole to 1st. the shelf panel.
1. Place panel onto the 1st. shelf.
2. Install cover onto the 2nd shelf.
HOW TO DO CORNERS
PASO 1 - TALLAS PLATAFORMA CUBIERTA
1. Medir la profundidad del estante.
2. Determine la profundidad panel del estante.
NOTA: Si el largo plazo sea inferior a la longitud del panel, mida y corte del
panel a la longitud deseada con la sierra.
3. Corte el exceso de profundidad del panel.
4. Lugar en del estante.
30.48cm
40.64cm.
50.8cm.
PASO 2 - COLOCACIÓN DE CARRIL
ESTANTE - 5.08cm. O 6.35cm Perl
2. Coloque un clip de estante en la parte posterior del riel del estante.
3. Utilice agujero piloto que saturan las líneas entre los cables y repita los
estantes en cada posición.
4. CON ESPACIADOR (Se utiliza cuando estantería tiene extremos estante)
Place espaciadores luego clips en lugares y asegurar con 2.54cm tornillos.
5. SIN ESPACIADOR Asegure los ganchos a carriles guía con 1.27cm tornil-
los.
6. Inserte el panel del estante en la ranura de la parte posterior del riel del
estante.
7. Coloque los clips más de estantería de alambre.
8. Clips de empuje bien cerradas durante estante de alambre.
NOTA: Si el largo plazo sea inferior a longitud de la guía, mida y corte fer-
roviario a la longitud deseada con la sierra.
1. Seleccione riel del estante deseado. Por lo general determinada por la
cantidad de cara anterior en el estante de alambre.
NOTA: Si el largo plazo sea inferior a longitud de la guía, mida y corte fer-
roviario a la longitud deseada con la sierra.
PASO 2 - COLOCACIÓN DE CARRIL
ESTANTE - 2.54cm Perl
La página se está cargando ...

1. Sélectionnez 25.4mm. étagère rail et retirez le couvercle de la bande. Prol
sécurisé à panneau (bande adhère à nir côté)
2. Attacher bande jusqu’à la n de la face inférieure du panneau (côté blanc).
3. Retirer le couvercle de la bande.
4. Placer le couvercle en place et appuyez fermement pour le xer.
3. Mesurer la distance à partir de l’avant du prol du rail sur le 2e plateau à la
n de la table ronde sur la 1ère tablette.
4. Couper le 1er. Prol d’étagère à la dimension requise. Installez le prol de
1ère. le panneau d’étagère.
1. Placez panneau sur le 1er. étagère.
2. Poser le couvercle sur la 2ème étagère.
COMMENT FAIRE ANGLES
For questions concerning missing or damaged parts, technical specs and / or
assembly help, please contact John Louis Home Customer Service at:
Si tiene preguntas sobre partes faltantes o dañadas, especicaciones técnicas o
asistencia para el armado, comuníquese con el Servicio al Cliente de John Louis
Home:
Pour toute question relative à des pièces manquantes ou endommagées, toute
spécication technique et/ou aide au montage, contactez le service après-vente
de John Louis Home au :
1.800.480.6985
www.johnlouishome.com
John Louis Home
4301 Rider Trail North Suite 150
Earth City, Missouri 63045 USA
© 2013 John Louis Inc., All Rights Reserved.
-
 1
1
-
 2
2
-
 3
3
-
 4
4


John Louis Home JLH-240 Guía de instalación
- Categoría
- Soportes de TV
- Tipo
- Guía de instalación


