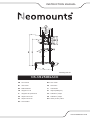
Neomounts NS-M1250BLACK Manual de usuario
- Tipo
- Manual de usuario

NS-M1250BLACK
IT
EN
NL
DE
FR
ES
PT
DK
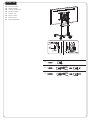
Floor stand
Vloersteun
Bodenständer
Support au sol
Supporto da pavimento
Soporte de suelo
Suporte de chão
Gulvstander
NO
SE
FI
PL
CS
SK
RO
Gulv stativ
Golvstativ
Lattiateline
Stojak podłogowy
Podlahový stojan
Podlahový stojan
Stativ pentru podea
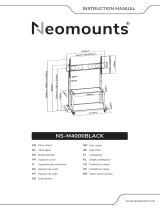
INSTRUCTION MANUAL
WWW.NEOMOUNTS.COM
Measuring unit: mm

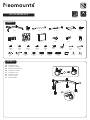
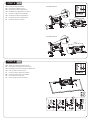
PARTS
NS-M1250BLACK
200x200 -
600x400 mm
0-70 kg
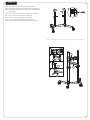
Install the casters
Installeer de wielen
Montieren Sie die Rollen
Installez les roulettes
Installare le ruote
Instalar las ruedas
Instale as rodas
Zainstaluj kółka
EN
NL
DE
FR
IT
ES
PT
PL
STEP 1
A. (x1)
G. (x1) H. (x1) I. (x1) J. (x2) K. (x2) L. (x4)
B. (x4) C. (x2) D. (x2) E. (x1) F. (x2)
M. M8x20
(x8)
M-A. M5x14
(x4)
M-B. M6x14
(x4)
M-C. M6x30
(x4)
M-D. M8x30
(x4)
M-E. M8x50
(x4)
V. 4mm
(x1)
W. 5mm
(x1)
N. M6x8
(x8)
O. M6x12
(x16)
P. M6x18
(x1)
Q. M8x8
(x8)
T. M6
(x1)
U. M10
(x1)
R. (x5) S. (x5)
M-F. (x4) M-G. (x8) M-H. (x8)
Tool
B
A
U

Attach the upright supports to the chassis. Screw tightly
Bevestig de staanders aan het onderstel. Draai stevig aan
Bringen Sie die aufrechten Stützen am Fahrgestell an.
Fest anschrauben
Fixer les supports verticaux au châssis. Visser fermement
Fissare i supporti del montante al telaio. Avvitare salda-
mente
Fije los soportes verticales al chasis. Atornille firmemente
Fixar os suportes verticais ao chassis. Aparafusar firme-
mente
Przymocuj wsporniki pionowe do obudowy. Mocno
przykręcić
EN
NL
DE
FR
IT
ES
PT
PL
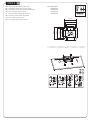
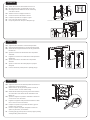
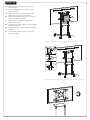
STEP 2
Mount the upper side of the rod
Monteer de bovenzijde van de stang
Montage der oberen Seite der Stange
Montez le haut de la tige
Montare la parte superiore dell'asta
Montar la parte superior de la barra
Monte o lado superior da haste
Zamontuj górną stronę pręta
EN
NL
DE
FR
IT
ES
PT
PL
STEP 3
C
M
W
F
D
N
NV

Attach the crossbar and shelf to the supports
Bevestig de crossbar en het plateau aan de staanders
Befestigen Sie die Querstange und den Regalboden an
den Stützen
Fixer la barre transversale et l'étagère aux supports
Fissare la traversa e il ripiano ai supporti
Fije el travesaño y la balda a los soportes
Fixar a travessa e a prateleira aos suportes
Przymocować poprzeczkę i półkę do wsporników
EN
NL
DE
FR
IT
ES
PT
PL
STEP 4
1
1
2
3
4
5
6
O
G
E
O
O
M
W

* Not Included
Attach the VESA plate to the screen
Bevestig de VESA plaat aan het scherm
Befestigen Sie die VESA-Platte am Bildschirm
Fixez la plaque VESA à l'écran
Fissare la piastra VESA allo schermo
Coloque la placa VESA a la pantalla
Fixar a placa VESA ao ecrã
Przymocuj płytę VESA do ekranu
EN
NL
DE
FR
IT
ES
PT
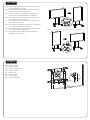
PL 400mm
350mm
300mm
400mm
300mm
200mm
350mm
200mm
VESA 200x200mm
300x300mm
350x350mm
400x200mm
400x400mm
H
A
STEP 5
M-G
M-H
M-A
M-F M-F M-F M-F
M-E
M-B M-D
M-C

Attach the VESA plate to the screen
Bevestig de VESA plaat aan het scherm
Befestigen Sie die VESA-Platte am Bildschirm
Fixez la plaque VESA à l'écran
Fissare la piastra VESA allo schermo
Coloque la placa VESA a la pantalla
Fixar a placa VESA ao ecrã
Przymocuj płytę VESA do ekranu
EN
NL
DE
FR
IT
ES
PT
PL
* Not Included
* Not Included
Install the adapter brackets
Bevestig de adapter steunen
Montage die Halterungsschienen
Installation des adaptateurs sur l'écran
Montare il supporto del adattatore
Instalación de brazos adaptadores
Instalação de braços adaptadores
Zainstaluj ramiona uchwytu
EN
NL
DE
FR
IT
ES
PT
PL
VESA 600x200mm
VESA 600x400mm
600mm
200mm
600mm
400mm
W
JJ
K
K
Q
B-1
STEP 5
B-2
STEP 5
M-G
M-H
M-A
M-F
M-B
M-F M-F M-F
M-E
M-D
M-C

Attach the screen to the bracket and secure it
Bevestig het scherm op de beugel en zet vast
Befestigen Sie den Bildschirm an der Halterung
und sichern Sie ihn
Attachez l'écran au support et fixez-le
Fissare lo schermo alla staffa e fissarlo
Coloque la pantalla en el soporte y fíjela
Fixar o ecrã ao suporte e fixá-lo
Przymocuj ekran do uchwytu i zabezpiecz go
EN
NL
DE
FR
IT
ES
PT
PL
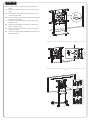
STEP 6
Adjust the tilt mechanism to the desired position
Stel het kantelmechanisme in op de gewenste positie
Stellen Sie den Kippmechanismus auf die gewünschte
Position ein
Ajustez le mécanisme d'inclinaison dans la position
souhaitée
Regolare il meccanismo di inclinazione nella posizione
desiderata
Ajuste el mecanismo de inclinación a la posición
deseada
Ajuste o mecanismo de inclinação para a posição
desejada
Ustaw mechanizm przechylania w żądanej pozycji
EN
NL
DE
FR
IT
ES
PT
PL
STEP 7
Adjust the mount to the desired position and loosen or
tighten the screws if necessary
Stel de steun in op de gewenste positie en draai de
schroeven losser of vaster indien nodig
Stellen Sie die Halterung auf die gewünschte Position
ein und lockern oder ziehen Sie die Schrauben nach
Bedarf an
Ajustez le support à la position souhaitée et desserrez
ou serrez les vis si nécessaire
Regolare il supporto nella posizione desiderata e allen-
tare o serrare le viti se necessario
Coloque el soporte en la posición deseada y gire los
tornillos si es necesario
Ponha o suporte na posição desejada e afrouxe ou
aperte os parafusos, se necessário
Dostosuj pozycję uchwytu do twoich wymagań i poluzuj
zaciśnij śrubki, jeśli to konieczne
EN
NL
DE
FR
IT
ES
PT
PL
STEP 8
10mm
Default Position(0°) Tilted Position(5°)
M
M
W
T

Route the cables
Geleid de kabels
Verlegen Sie die Kabel
Guidez les câbles
Guidare i cavi
Guíe los cables
Guiar os cabos
Poprowadzić kable
EN
NL
DE
FR
IT
ES
PT
PL
STEP 9
To disable the rotation function, turn the screw (P) into
the corresponding screw hole
Om de rotatiefunctie te blokkeren, draai de schroef (P)
in het daarvoor bestemde schroefgat
Um die Drehfunktion zu deaktivieren, drehen Sie die
Schraube (P) in das dazugehörige Schraubenloch
Pour désactiver la fonction de rotation, tourner la vis (P)
dans le trou fileté correspondant
Per disabilitare la funzione di rotazione, ruotare la vite
(P) nel foro corrispondente
Para desactivar la función de rotación, gire el tornillo (P)
en el orificio del tornillo correspondiente
Para desativar a função de rotação, rode o parafuso (P)
no furo do parafuso correspondente
Aby wyłączyć funkcję obrotu, przekręć śrubę (P) w
odpowiedni otwór na śrubę
EN
NL
DE
FR
IT
ES
PT
PL
OPTION
P
P

Attach self-adhesive pads and tie rips and route the
cables
Bevestig de zelfklevende pads en tie rips en geleid de
kabels
Befestigen Sie selbstklebende Pads und Bänder und
verlegen Sie die Kabel
Fixer des pastilles autocollantes, attacher les déchirures
et acheminer les câbles
Applicare i cuscinetti autoadesivi, legare gli strappi e
instradare i cavi
Aplique las almohadillas autoadhesivas, ate los des-
garros y guíe los cables
Fixar almofadas auto-adesivas e amarrar rasgos e en-
caminhar os cabos
Przymocuj samoprzylepne podkładki i zwiąż pasy oraz
poprowadź kable
EN
NL
DE
FR
IT
ES
PT
PL
STEP 10
R
S
S

Route the cables
Geleid de kabels
Verlegen Sie die Kabel
Guidez les câbles
Guidare i cavi
Guíe los cables
Guiar os cabos
Poprowadzić kable
EN
NL
DE
FR
IT
ES
PT
PL
STEP 11
2a
2c
2b
L

0°~+90°
Place the cover and adjust the mount to the
desired position
Plaats de afdekkap en stel de steun in op de
gewenste positie
Abdeckung montieren und positionieren die
Halterung in der gewünschten Position
Placez les capuchons de protection et ajustez le
support à la position souhaitée
Metti le coperte e regolare il supporto nella
posizione desiderata
Coloque las tapas de la cubierta y ajuste el soporte
a la posición deseada
Coloque as tampas e ajuste o suporte na posição
desejada
Umieść osłony i dostosuj pozycję uchwytu do
twoich wymagań
EN
NL
DE
FR
IT
ES
PT
PL
STEP 12
I
O
O

-
 1
1
-
 2
2
-
 3
3
-
 4
4
-
 5
5
-
 6
6
-
 7
7
-
 8
8
-
 9
9
-
 10
10
-
 11
11
-
 12
12


Neomounts NS-M1250BLACK Manual de usuario
- Tipo
- Manual de usuario
en otros idiomas
- français: Neomounts NS-M1250BLACK Manuel utilisateur
- italiano: Neomounts NS-M1250BLACK Manuale utente
- português: Neomounts NS-M1250BLACK Manual do usuário
Artículos relacionados
-
 Neomounts NS-M4000BLACK Manual de usuario
-
 Neomounts PLASMA-M1950E Manual de usuario
-
 Neomounts NS-M3600BLACK Manual de usuario
-
 Neomounts FL50-540BL1 Manual de usuario
-
 Neomounts PLASMA-M1900E Manual de usuario
-
 Neomounts NS-M3800BLACK Manual de usuario
-
 Neomounts NS-M3800BLACK Manual de usuario
-
 Neomounts NS-M3800BLACK Manual de usuario
-
 Neomounts FPMA-D550SBLACK Manual de usuario
-
 Neomounts FPMA-VESA440 Manual de usuario


