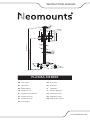
Neomounts PLASMA-M1900E Manual de usuario
- Tipo
- Manual de usuario

PLASMA-M1900E
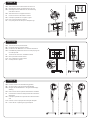
430mm
335mm
min200~max600mm
min200~max404mm
min1325~max1645mm
max2220mm
710mm
840mm
440mm
145mm
724mm
285mm
150mm
100mm
50mm
110mm
60mm
75mm
IT
EN
NL
DE
FR
ES
PT
DK
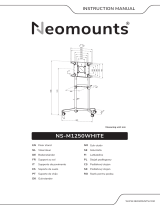
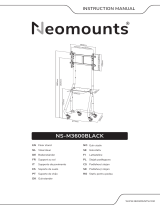
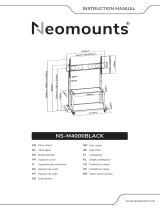
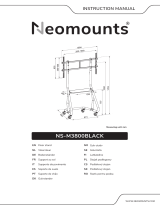
Floor stand
Vloersteun
Bodenständer
Support au sol
Supporto da pavimento
Soporte de suelo
Suporte de chão
Gulvstander
NO
SE
FI
PL
CS
SK
RO
Gulv stativ
Golvstativ
Lattiateline
Stojak podłogowy
Podlahový stojan
Podlahový stojan
Stativ pentru podea
WWW.NEOMOUNTS.COM
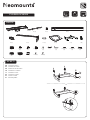
INSTRUCTION MANUAL

PARTS
PLASMA-M1900E
200x200 -
600x400 mm
130-162 cm
0-50 kg
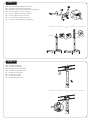
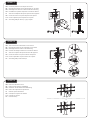
Install the casters
Installeer de wielen
Montieren Sie die Rollen
Installez les roulettes
Installare le ruote
Instalar las ruedas
Instale as rodas
Zainstaluj kółka
EN
NL
DE
FR
IT
ES
PT
PL
STEP 1
I
J
P
Tool
A. (x1) B. (x2) C. (x1)
E. (x1) F. (x1)
M-F. (x4) M-G. (x8) M-H. (x8)
G. (x1)
P. (x1)
H. (x1) I. (x1) J. (x4)
D. (x1)
K. M8x30
(x4)
L. M6x12
(x8)
M. M6x10
(x3)
N. M8x16
(x4)
O. D6
(x2)
M-A. M5x14
(x4)
M-D. M8x30
(x4)
M-E. M8x50
(x4)
M-B. M6x14
(x4)
M-C. M6x30
(x4)
Q. 5mm
(x1)
J
I
P

Attach the upright support to the chassis
Bevestig de staander aan het onderstel
Bringen Sie die aufrechten Stützen am Fahrgestell an
Fixer les supports verticaux au châssis
Fissare i supporti del montante al telaio
Fije los soportes verticales al chasis
Fixar os suportes verticais ao chassis
Przymocuj wsporniki pionowe do obudowy
EN
NL
DE
FR
IT
ES
PT
PL
STEP 2
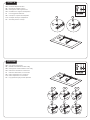
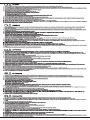
Install the VESA plate
Installeer de VESA plaat
Montieren Sie die VESA-Platte
Installation de la plaque VESA
Installare la piasta VESA
Instalar la placa VESA
Instalar a placa VESA
Instalowanie płytki VESA
EN
NL
DE
FR
IT
ES
PT
PL
STEP 3
pin
Tighten the safety
screw.
Q
M
inner column
D
N
Q
Q
K
A
D
Q
Q
M
A
QN

* Not Included
* Not Included
Install the adapter brackets
Bevestig de adapter steunen
Montage die Halterungsschienen
Installation des supports d'adaptateur
Il montaggio del adattatore
Coloque los soportes del adaptador
Instalação de braços adaptadores
Zainstaluj ramiona uchwytu
EN
NL
DE
FR
IT
ES
PT
PL
STEP 4
Use spacers if necessary
Gebruik afstandhouders indien nodig
Montage der Distanzscheiben wenn nötig
Utilisez des entretoises si nécessaire
Utilizzare distanziatori, se necessario
Utilice separadores si es necesario
Utilize separadores se necessário
Użyj dystansów jeśli jest taka potrzeba
EN
NL
DE
FR
IT
ES
PT
PL
OPTION
M-B
M-F
M-A
M-F
M-G
M-F
M-E
M-F
M-H
M-F
M-G
M-E
M-F
M-H
M-E
M-F
M-G
M-BM-A
M-C M-D M-C M-D M-C M-D
M-F
M-F M-F M-F
M-F M-F
M-G
M-G M-G
M-E M-EM-E
M-G
M-H
M-H M-H
M-H
M-H
M-F M-F

Attach the screen to the bracket and secure it
Bevestig het scherm op de beugel en zet vast
Befestigen Sie den Bildschirm an der Halterung
und sichern Sie ihn
Attachez l'écran au support et fixez-le
Fissare lo schermo alla staffa e fissarlo
Coloque la pantalla en el soporte y fíjela
Fixar o ecrã ao suporte e fixá-lo
Przymocuj ekran do uchwytu i zabezpiecz go
EN
NL
DE
FR
IT
ES
PT
PL
STEP 5
Turn the screen to portrait mode
Draai het scherm in portret modus
Drehen Sie den Bildschirm ins Hochformat/Portrait
Possibilité de positionner l'écran en mode paysage ou
en mode portrait
Trasforma lo schermo in modalità verticale
Gire la pantalla el modo retrato
Virar a tela para o modo retrato
Przekręć ekran w pionie
EN
NL
DE
FR
IT
ES
PT
PL
OPTION
Put the screen in the desired tilting position
Zet het scherm in de gewenste kantelpositie
Bringen Sie den Bildschirm in die gewünschte Kipp-
stellung
Placer l'écran dans la position d'inclinaison souhaitée
Posizionare lo schermo nella posizione di inclinazione
desiderata
Coloque la pantalla en la posición de inclinación dese-
ada
Colocar o ecrã na posição de inclinação desejada
Ustaw ekran w żądanej pozycji odchylenia
EN
NL
DE
FR
IT
ES
PT
PL
STEP 6
G
L
G
L

Install the plateau to the top of the mount
Bevestig het plateau aan de bovenzijde van de steun
Befestigen der Platte am oberen Ende die Halterung
Installation du plateau supérieur à la hauteur désirée
Attaccare l'altopiano alla parte superiore del supporto
Instale la meseta en la parte Superior del soporte
Instale o platô na parte Superior do suporte
Zainstaluj półkę do kamery u góry stojaka
EN
NL
DE
FR
IT
ES
PT
PL
STEP 7
Attach the shelf to the bottom of the mount
Bevestig de plank aan de onderzijde van de steun
Befestigen Sie der Platte an die Halterung
Fixation de l'étagère inférieure à la hauteur désirée
Attaccare il ripiano alla parte inferiore del supporto
Instale el estante en la parte inferior del soporte
Instale a prateleira na parte inferior do suporte
Zainstaluj półkę u dołu uchwytu
EN
NL
DE
FR
IT
ES
PT
PL
STEP 8
Place the decorative cover
Plaats het decoratieve afdekkapje
Montieren Sie die dekorative Abdeckung
Placez les capuchons de protection
Metti le coperte decorative
Coloque las tapas de la cubierta
Coloque as tampas
Umieść osłony
EN
NL
DE
FR
IT
ES
PT
PL
STEP 9
Q
H
L
C
O
M
Q
O
M
Q
H
L
C
Q

Route the cables
Geleid de kabels
Verlegen Sie die Kabel
Guidez les câbles
Guidare i cavi
Guíe los cables
Guiar os cabos
Poprowadzić kable
EN
NL
DE
FR
IT
ES
PT
PL
STEP 10
Adjust the mount to the desired position
Stel de steun in op de gewenste positie
Einstellen die Halterung in die gewünschte Position
Ajustez le support à la position souhaitée
Regolare il supporto nella posizione desiderata
Establecer el soporte en la posición deseada
Ajuste o suporte na posição desejada
Dostosuj pozycję uchwytu do twoich wymagań
EN
NL
DE
FR
IT
ES
PT
PL
STEP 11
DVD
Display panel center
height measured
from floor.
+10°
+90°
-10°
0°

-
 1
1
-
 2
2
-
 3
3
-
 4
4
-
 5
5
-
 6
6
-
 7
7
-
 8
8


Neomounts PLASMA-M1900E Manual de usuario
- Tipo
- Manual de usuario
en otros idiomas
Artículos relacionados
-
 Neomounts NS-M3800BLACK Manual de usuario
-
 Neomounts NS-M1250WHITE Manual de usuario
-
 Neomounts NS-M3800BLACK Manual de usuario
-
 Neomounts NS-M3600BLACK Manual de usuario
-
 Neomounts NS-M4000BLACK Manual de usuario
-
 Neomounts NS-M3800BLACK Manual de usuario
-
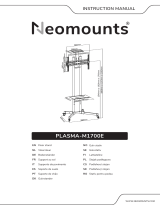 Neomounts PLASMA-M1700E Manual de usuario
-
 Neomounts FL50-540BL1 Manual de usuario
-
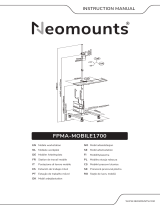 Neomounts FPMA-MOBILE1700 Manual de usuario
-
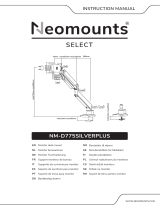 Neomounts NM-D775SILVERPLUS Manual de usuario


