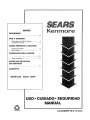
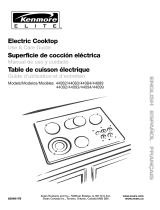
Kenmore 43645 Use El manual del propietario
- Categoría
- Cocinas
- Tipo
- El manual del propietario
Este manual también es adecuado para

CONTENTS
SAFETY
USE AND CARE
Removal of Packaging Tape .....................................................4
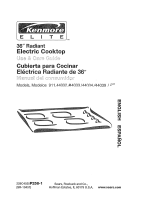
Your Counter Unit and Its Features .............................5
TO START THIHGS COOKIIHG
Cooktop Controls ................................................................6
Cooking Tips ................ ......................................................... 7
CLEANING TiPS
Removable Knobs ........................................................ 10
BEFORE CALLING FOR SERVICE
WARRANTY
MODELS 43645, 43649
K nmol e
0
°SAFETY
RecfcledP_er
229C4020P0"i 2=2 SR10233

T
Y@U
"-:i;:::'
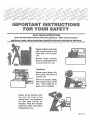
SAVE THESE gHSTRUCTIOHS
Read a!! instruclions before using this appliance. When using electrical
appliances, basic safe_y pwecau_(ons should be followed, including _he following.
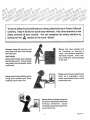
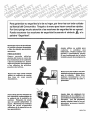
Teach children notto play
with control knobs or any
other part of the counter
unit.
_ever leave children
alone or unattended where
a counter unit is in use.
Caution:
Never store things chil-
dren might want above a
counter unit.
!_leve_, let anyone climb,
sit or stand on the counter
unit. They might be in-
jured on a hot surface.
Here,' let pot handles stick
out over the front of the
counter unit. Turn handles in
so that they cannot be
bumped, Keep the handles
away from other hot surface
elements/burners.
1 NESAF15-2

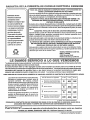
To insure safety for yourself and your home, please read your Owner's_• Manual
carefully. Keep it handy for quick easy reference. Pay close attention to the
safety sections of your manual. You can recogmze the safety sections by
ng A afety _
Iooki for the symbol or the word "S ".
Always keep the counter unit
area clear and free from things
that wilt burn.
CAUTION:
Never store things near cooktop
elements/burners. These things
may catch fire and plastic items
could melt.
Never use your counter unit
for warming or heating a
room. You could be burned or
seriously injured, Such mis-
use could also cause damage
to the unit.
Never wear loose clothing when
using your counter unit. Such
clothing could catch fire.
Never use a towel or other bulky
cloth as a potholder. Such
cloths could catch fire on a hot
element/burner.
Never leave cooktop elements/
burners unwatched at high heat
settings. Boilovers cause
smoking and greasy spillovers
could catch fire.
2 NESAF16-1

RYANY FEYY I
BASIC SAFETY PRECAUYIOHS
Keep this book for later use.
Be sure your counter unit is installed and grounded
properly by a qualified technician.
Always use dry potholders when removing pans from
thecooktop. Moist ordamp potholders can cause steam
burns.
Always follow cleaning instructions in this book_
ABways keep the counter unit clean. Food and grease
are easy to ignite.
Clean Only Parts Listed In Manual.
CAUTIOH: Do not store items of interest to
children in cabinets above a counter unit. Chil-
dren climbing on a counter unit to reach items
could be seriously injured,
Always keep combustible wall coverings, curtains, or
drapes a safe distance away from your counter unit.
Always keep dish towels, dish cloths, potholders and
other linens a safe distance away from your counter
unit. Never store such Items on your counter unit.
Always keep the appliance area clear and free from
things that will burn (gasoline and other flammable
vapors and liquids).
Nevpr try to repair or replace any part of the counter unit
unless instructions are given in this book° All other
work should be done by a skilled technician.
Never heat unopened food containers= Pressure
buildup may make container burst and cause injury.
Never leave jars or cans of fat or drippings on or near
the range. Never let grease build up on your counter
unit. You can keep grease fires from starting if you
clean up grease and spills after each use.
Never try to move a pan of hot fat, especially a deep fat
fryer. Wait until the fat has cooled°
Never touch surface units_ They may be hot even
though they appear dark in color.
A_ways keep wooden utensils, plastic utensils or can ned
food a safe distance away from your counter unitr
Some cleaners produce nox-
ious fumes and wet cloths or
sponges could cause steam
burns if used on a hot surface.
COOKTOP SAFETY
Always use care when touching the cooktop. Cooking
zones could be hot enough to burn you even Ifthey are
dark in color. The glass surface of the cooktop will
retain heat after the controls are turned off.
Only some kinds of glass or ceramic pans can be used
for cooktop cooking. Be sure that the pan you use wilt
not break when heated on the cooktop elements.
Do not cook on broken cooktop, If cooktop should
break, cleaning solutions and spillovers may penetrate
the broken cooktop and create a risk ofelectrical shock.
Contact a qualified technician immediately.
For major spills -- Turn unit to LO; use dry paper
towels to wipe up major spills, and then use a razor
scraper (held in a potholder) to scrape major spills from
a hot cooking zone. DO HOT attempt further cleaning
until cooktop surface has cooiedo
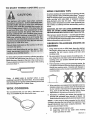
Choose pots and pans
with flat bottoms, large
enough to cover the en-
tire cooking zone. This will save energy and reduce the
risk of potholders and clothing catching on fire on the
uncovered portion of the zone.
3 NESAF81

SAFETY INSTRUCTIONS (continued)
READ AND UNDERSTAND
Should you ever need it, you wiB_
no_: have _:ime fo_ reading°
Be sure everyone in you_ ho_e
knows what to do in case of _i_eo
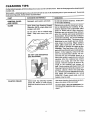
COOKTOP GREASE FIR_:
_ ever pick up a flaming
pan!' Rnstead:
1. Turn off the cooking zone.
2. Smother the fire with a
tightly fitting pan lid, baking soda or an
extinguisher.
_ w_ onlysp_ea4_he 9_ar_es_
R£_OVAL OF PACkAGiNG TAPE:
To remove adhesive left from packing tape and ensure you do not damage the linish of your new appltance_ use an
application of household liquid dish washing detergent, mineral oil, or cooking oil o Apply with soft cloth and allow
to soak° Wipe with soft cloth. DO NOT use plastic pad or equivalento Wipe dry and then apply an appliance polish
to thoroughly clean and protect the surface,, This procedure is also safe for the face of microwave doors and other
plastic parts.
HOTF: The plas_:_c f_ape tha_ _s .o_ removed f_o_ chrome trim on counter uni_ parts CANNOT _e
_'emoved if baked on,
NESAF82

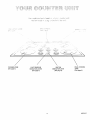
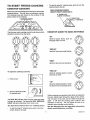
UNIT ON
INDICATOR LIGHT
(See page 6)
T f
COOKING ZONE
(See page 6)
5 HOT SURFACE
INDICATOR LIGHTS
(See page 6)
'2
DUAL COOKING
ZONE
(See page 6)
5 NECUF07

TO START TH NGS COOKmN@
COOKTOP COOK_HG
Before you use the cooktop for the first time, clean itwith
cooktop cleaner. This will leave a protective coating.
The cooking zones are shown by the outlines on the
glass surface of the cooktop.
COOKING ZONES
To use the small 6" cooking area, push to turn the
control knob to the left.
DUAL COOKIHG ZONES
(RIGHT FRONT ZONE ONLY)
9" ZONE FOR
LARGE UTENSILS
The sign near each cooktop control knob shows which
element is turned on by that knob,
®00 0_0 OOe
0 0 0 0 0 0
Left Center Right
Rear Rear Rear
000 000
O 0 0 Q
Left Right
Front Front
To operate cooktop controls:
1, Push to turn.
2Soonorbeweonm
for desired heat.
The UNiT OH indicator light wil! glow when any cook-
ing zone is activated. The individual HOT $URFACI_
UGHT will glow indicating which zone is hot..
The right front element has two cooking zones:
To use the large 9" cooking area, push to turn the
control knob to the right.
COOKTOP GUUDE TO BASIC SETTINGS
"HIP'
Used for quick starts, such as
bringing water to a hollo
Used for frying and rapid boiling,
"UED"
Used for slow boil and sauteing.
"MED-LO"
Used for cooking foods in small
amounts of water,
"LO"
Used for steaming foods or keep-
ing foods at serving temperature.
When a cooking zone surface is activated, coils beneath
the zone radiate heat through the glass to the utensil.
The red glow of the coils will be visible through the
glass. It wilt take the cooking zone surface a few
moments to heat upo The coil cycles on and off to
maintain your selected control setting.
See the Cleaning Tips for important information
about maintaining your cookt0p.
NEMTC75

TO START THINGS COOKING (cont.)
For best cooking results and energy efficient operation,
you should use metal pans that are flat on the bottom.
Match the size of the pan to the size of the cooking zone.
The pan should not extend over the edge of the cooking
zone more than 1"o
HOME CANNING TIPS
In surface cooking of foods other than canning, the use
of large-diameter pots (extending more than 1" beyond
edge of cooking zone) Is not recommended, However,
when canning with water-bath or pressure canner,
large-diameter pots may be used. This is because
boiling water temperatures (even under pressure) are
not harmful to cooktop surfaces surrounding cooking
zones.
HOWEVER, DO NOT USE LARGE DIAMETER CAN-
NERS OR OTHER LARGE DBAMETER POTS FOR
FRYING OR BOBLING FOODS OTHER THAN WATER.
Most syrup or sauce mixtures -- and all types of frying
--cook at temperatures much hlgher than boiling water.
Such temperatures could eventually harm cooktop sur-
faces surrounding cooking zones.
OBSERVE FOLLOWING POliNTS JH
CANNING
1. Bring water to boil on HIGH heat, then after boiling
has begun, adjust heat to the lowest setting which
maintains the boil (saves energy and best uses
cooking zone).
2, Be sure canner fits over center of cooking zone. If
your range does not allow canner to be centered on
cooking zone, use smaller diameter pots for good
canning results.
3o Flat-bottomed canners give best canning results. Be
sure bottom of canner is flat or slight indentation fits
snugly over cooking zone. Canners with flanged or
rippled bottoms (often found in enamelware) are not
recommended.
Note: A sNght odor is norrna_l when a new
cooktop is used for the _rst time, R_:is caused by
2he hea_ing of new parts and insulating materians
and wiSII disappear' in a short time.
WOK C@O tNG
We recommend that you use only a flat-bottom wok.
They are available at your local retail store.
4. When canning, use recipes from reputable sources.
Reliable recipes are available from the manufacturer
of your canner; manufacturers of glass jars for can-
ning, such as Ball and Kerr; and the United States
Department of Agriculture Extension Service.
5. Remember, in following the recipes, that canning is a
process that generates large amounts of steam. Be
careful while canning to prevent burns from steam or heat.
NOTE-. If your range is being operated on low power
(voltage), canning may take longer than expected, even
though directions have been carefully followed° The
process may be improved by:
(I) using a pressure canner, and
(2) beginning with hot tap water when heating
larger quantities of water.
NEMTC61-1

CLEANIHG TIPS
On the following pages, all removable parts on your counter unit are shown, Refer to those pages when cleaning your
counter unit.
Warm water, a mild detergent and a soft cloth are safe to use on all cleanable parts of your counter unit. Do not use
metal scouring pads, except where recommended.
,,l,.,i , ,HN,,, ',,I
CLEANING MATERIALS
,H,,,J i,,1,1 i,,,iu.
Detergent, warm water, soft cloth
Sears Cook Top Cleaning Creme®
(Stock No. 40079), single-edge razor
scraper, soft cloth
HULU ' ....................
PART
i1,,,, i INI,,,,,
CONTROL PANEL
AND KNOBS
GLASS
Do not use a dull or nicked razor
blade, Keep razor away from chit-
dren_
30°
f
DO NOT USE ABRASIVES
(SEE REMARKS)
Sears Cook Top Cleaning Creme®
(Stock No. 40079) or other all-pur-
pose non-abrasive cleaner and asoft
cloth
PAINTED FRAME
REMARKS
H , ,,i ,,., ,,, ,,,,,,,,,.,,i, J ,,.r
Do not use abrasive cleaners. Knobs pull
off for easier cleaning,
Correct and consistent cleaning is essem
tlal to maintaining your cooktop. If soil,
mineral deposits from evaporated water
spills or metal rub-off from aluminum
cookware are not removed, they wlll burn
onto the cooktop and cause permanent
discoloration. Be sure that the cooktop is
cool before cleaning. Do not use cooktop
cleanerona hotsurface. Thefumescanbe
hazardous to your health and can chemi-
cally attack the cooktopo Wipe surface
clean after each use. Do not use a
dish cloth or sponge to wipe up the
cooktop. They may leave a film of deter-
gent which can discolor yourcooktopwhen
heated. If this happens, remove the film
with the recommended cleaner. We rec-
ommend that you use paper towels or a
clean cloth which is used only for cooktop
cleaning. After the cooktop has cooled,
remove any crusty soil with the razor
scraper° Hold the scraper at about a 30 °
angle to the cooktop and scrape off
spot. Scrub cooktop with Sears Cook Top
Cleaning Creme®orotherall-purpose, non-
abrasive cleaner. Rinse well and wipe
dry. NEVER USE ANY ABRASIVE SCOUR-
ING PADS OR POWDERS ON YOUR
COOKTOP. Plastic mesh pads, such as
Dobie®, may be used.
Use same cleaning instructions as given
above for glass surface except:
DO NOT USE A RAZOR SCRAPER. Do
not scrape the frame as this will mar the
metal°
8 NECCH82

GLASS.CERAMIC COOKTOP CLEANING
Cleaning of glass.ceramic cooktop is different
fro_ cleaning a S_andard porcelain finish.
To maintain and protect the su_'iace of your new
glass-ceramic ceoktop follow these basic steps.
DAULY CLEANUNG:
Use only Cook Top Cleaning Creme®on Glass-Ceramic,
For norrna_ light soih
1. Rub a small amount of Cook Top Cleaning Creme®
onto soiled area using a dry paper towel. Wipe until
all soil and creme are removed. Frequent cleaning
leaves a protective coating which is essential in
preventing scratches and abrasions.
2. Clean surface with Cook Top Cleaning Creme®after
each use.
For heavy, burned,on soil:
1. Apply a few drops of Cook Top Cleaning Creme® to
the cool, soiled area.
2. Using a dry paper towel, rub creme into the burned-
on area.
3. Carefully scrape remaining soil with razor scraper°
Hold scraper at a 30° angle against the ceramic
surface.
4. If any soil remains, repeat the steps listed above° For
additional protection after all soil has been removed,
polish the entire surface with the Cook Top Cleaning
Creme®_
HOTE: Using a razor scraper will not damage the sur-
face if the 30° angle is maintained. DO HOT
use a du_ or nicked razor bRade on your
cooktop. Store the razor scraper out of
reach of ch_mdren.
SPECIAL CARE:
Sugar spills (such as jellies, fudge, candy syrups) or
melted plastic can cause pitting of the surface of your
cooktop unless the spill is removed while still hot.
$pec_a_ care should be _ake,_ wher_ removing hot
substances, Follow these instructions carefully and
remove soil while spill is still hot.
1. Turn off all cooking zones affected by the spill.
Remove hot utensils.
2. Wearing an oven mitt, hold the razor scraper at a 30°
angle to the cooktop and scrape hot spill to a cool
area outside the cooking zone.
,
With the spill in a cool area, use a dry paper towel to
remove any excess. Any spill remaining should be
left until the surface of the cooktop has cooled° Do
not continue to use the soiled cooking zone until all
of the spill has been removed. Follow the steps
under Heavy Soil to continue the cleaning process. '
GEHERAL JNFORMATnOH:
As the Cook Top Cleaning Creme® cleans, it leaves a
protective coating on the cooktop surface_ This coating
helps prevent buildup of mineral deposits (water spots)
and wilt make future cleaning easier. Dishwasher deter-
gents remove this protective coating and therefore make
the cooktop more susceptible to staining.
PRECAUT_OHS:
iVlostcleaners contain ammonia, chemicals and abra-
sives which can damage the surface of your cooktop.
Use onRy the Cook Top Ciean_ng C_ertr=e® for
proper cleaning and protection of you_" glass-
ceramic surface,
Ifyou stide aluminum or copper cookware across the
surface of your cooktop, they may leave metal mark*
Ings which appear as scratches. If this should
happen, use the razor scraper and Cook Top Clean.
ing Creme® to remove these markings. Failure to
remove this residue immediately may leave perma-
nent marks.
If pots with a thin overlay of aluminum, copper, or
enamel are allowed to boil dry, the overlay may bond
with the glass-ceramic and leave a black discolora-
tion. This should be removed immediately before
heating again orthe discoloration may be permanent.
Use of window cleaner may leave an iridescent film
on the cooktop. Cook Top Cleaning Creme® will
remove this discoloration.
Water stains (mineral deposits) are removable using
Cook Top Cleaning Creme® or full strength white
vinegar.
9 NECCH60

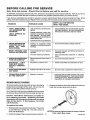
BEFORE CALLIHG FOR SERVICE
Save time and money = Check this list before you call for service.
To eliminate unnecessary service calls, first, read all the instructions in this manual carefully. Then, if you have a
problem, always check this list of common problems and possible solutions before you call for service.
If you do have a problem you cannot fix yourself, call your nearest Sears Store or Service Center for help. When
calling, have this manual and your Repair Parts List handy with the model, serial number and purchase date.
PROBLEM
• TiNY SCRATCHES
OR ABRASIONS ON
COOKTOP
(MAY APPEAR AS
CRACKS)
METAL MARKIING ON
COOKTOP (MAY AP-
PEAR AS TINY
SCRATCHES)
DARK STREAKS AND
SPECKS OH COOKTOP
o AREASOFDISCOLORA-
TION ON COOKTOP
• COUNTER UNIT
DOES NOT WORK;
TOTALLY iNOPERA-
TIVE
o COOKTOPZONE DOES
NOT WORK
• FOODSCOOK SLOWLY
Oh] THE COOKTOP
POSSIBLE CAUSE
Use of Incorrect cleaning ma-
terials
Coarse particles (salt, etc.)
between cookware bottoms
and cooktop. Be sure cook-
ware bottoms and cooktop are
clean before use,
Cookware with rough bottoms
• Sliding or scraping metal
utensils and cookware across
cooktop
• Encrusted boiloversorgrease
spatters
• incorrect cleaning materials
• Mineral deposits from water or
food
No power to counter unit
Improper operation of control
• Improper cookware
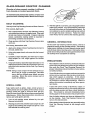
REMOVABLE KNOBS
All control knobs may be removed for easy cleaning by
pulling the knob straight off the stem. Be sure that the
knob is in the OFF position before removal.
Hint: Slip a thin cloth (such as a handkerchief) or a piece
of string under and around the knob edge and pull up.
Caution: Read these instructions carefully be.
fore replacing the knobs. Replacing the knobs
improperly will damage the knobs and the spring
clips on the stems, if this happens, the knobs
will fit loosely.
To replace the knob:
1, The knob stem has a groove in each side, The groove
on one side has a spring clip, The other groove is
L_I._._, ,l==l=,===,,== _ ==
DON'T CALL FOR SERVICE
UNTIL YOU CHECK
• Tiny scratches are not removable and do
not affect cooking_ In time, the scratches
will become smoother and less visible.
• Use recommended cooktop cleaners,
• Use razor scraper and follow directions in
cleaning chart.
• Use recommended cleaners in cleaning
chart.
• Use recommended cleaners.
• Check household circuit breaker or fuse,
• Be sure knob is pushed in while turning°
• Use pansthat have flat bottoms and a tight
fitting lid (if applicable). Pansshould match
cooking zone size. Read the cooktop cook-
ing section for complete information.
3,, Replace the knob by fitting the molded rib inside the
knob into the clear groove on the stem°
.
clear (see illustration).
Check the inside of the knob and find the molded rib, 't0
NOTE: Be sure to replace knobs on correct stems
from which they came.
NESER158

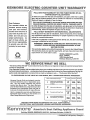
KEN_O_E ELECT_IC _@UHTE_ UHIT _RL_ANTY
_ _ FULL O[_E YEAR WARRANTY O_ TH_ FU_[_3CT_ON_NG OF ALL
f f Ill PARTS EXCEPT GLASS PARTS
I t i I I If, within one year from the date of installation, any part, other than a glass
! I I ! I part, fails to function properly due to a defect in material or workmanship,
I II II searswill r.epair or replace it, free of charge. .
I - - . I II I FULL 30 DAY WARRANTY ON GLASS PARTS AND FINISH OF Poe
t0e_rC._omor: !!1I CSLA,.ENA._L,PAsNTE.OR.RJG.T.STALF_N,S.EDPA.TS
; O.ur cons!ant ef/orts, are I Ill lf' within 30 days from the date of installation, any glass part or the finish on
] directed toward making I I I I any porcelain enamel, painted or bright metal part is defective in material or
] sure your new Kenmore I lit wOrkmanshIp' Sears will replace the part, free of charge.
I Counter Unit will arrive at I JI I FULL 90-DAY WARRANTY ON iVIECHANtCAL ADJUSTMENTS
I your home in perfect con- I I ! ] For 90 days from the date of installation, Sears will provide, free of charge,
I dition and will give you III1a,y mechanical adjustments necessary for proper operation of the range,
I proper performance. As I!11except for normal maintenance.
I ll,, "the unit Is subjected to other than private family use, the above warranty
Ij f_!el tt Is our responsibilitye; !tt'l} iir_!e .s_pi_is/b_iii II I! c_cOverageIs effective for only 90 days
y
, WARRANTY SERVICE DSAVAILABLE BY CONTACTINGTHEtup,uv,u= yuu w... I,l_
_.,u./._yuuw,,,,,,,,_t II I NEARESTSEARSSERVIICI_CEHTSR/DIEPARTMENT iNTHE
j warranty tor your range. I Ill UNITED STATES
I ] _i I This warranty applies only while this product is tn use in the United States.
I I I I I This warranty gives you specific legal rights, and you may also have other
t _ I I I I rights which vary from state to state.
I #% 11" co.
I %_ Iill oo,,.,=o,,o
I IIII a=a= ovo..Roe.
_.._ " " J) tk ..... Hofiman Estates, IlL60179 J
_t#E SERVICE WHAT WE SELL
"We Service What We Sell" is our assurance to you that you can depend on Sears for service because Sears
service is nationwide.
Your Kenmore Counter Unit has added value when you consider that Sears has a service unit near you staffed
by Sears trained technicians.., professional technicians specifically trained on Sears appliances, having the
parts, tools and equipment to ensure that we meet our pledge to you -- "We Service What We Sell!"
TO FURTHER ADD TO THE VALUE OF YOUR RANGE, BUY A SEARS MAINTENANCE AGREEMENT.
Kenmore Counter Units are designed, manufac-
tured and tested for years of dependable opera-
tion. Yet, any modern appliance may require
service from time to time. The Sears Warranty
plus the Sears Maintenance Agreement provides
protection from unexpected repair bills and as-
sures you of enjoying maximum range efficiency,.
Here's a comparative warranty and Maintenance
Agreement chart showing you the benefits of a
Sears Range Maintenance AgreemenL
Years of Ownership Coverage
Replacement of Defective
'l'* Parts other than Porcelain
or Glass
2 Mechanical Adjustment
3
4
Porceta|n and G_ass Paris
Annual Preventive Mainten-
ance Check a! your request
W - War_nly
1st Year 2nd Year 3rd Year
W MA tVlA
g0 DAYS
W IViA MA
30 DAYS
W NA MA
iVlA NA NA
MA - MrJntonance Agreement
COHTACT YOUR SEARS SALESPERSON OR LOCAL SEARS SERVICE
CEHTER TODAY AND PURCHASE A SEARS MAINTENANCE AGREEMENT,
Kenmore ®__me_ica'$ Nest SeH_g _ppl_ance B_an_
Solid by SEARS, ROEBUCK AN_:) CO., Ho_an Estates, IL 60179
Printed in LaFayette, Georgia --

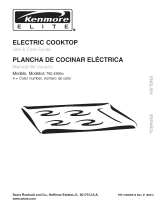
|HDICE
SEGURIDAD
USO Y CUIIDADO
C6mo remover la clnta de empaque ................................4
Su cubierla de cocinar ..............................................................5
COMO _MPEZAR A COCIHAR
Control de la cublerta ..........................................................................
CSmo cocinar ..............................................................................7
CO_S_OS PARA Li_PIAR
............................................... -........................................ 8_ 9
Perill_s removibles .................................................................... 1 0
AHT_S D_ SOLDC_TAR
UH SERV_C_O
GARAHTIA
iViODELOS 43645, 43649
Pa_l Reciclado
O
MANUAL
229C4020P0t 2=2 SR10233

P@ T HT
GUARDE ESTAS IHSTRUCCIOHES
Lea _odas las i.s_rucciones an_es de usar e! apara_o electrodom6stico.
Cuan_o u_ilice an apanage el6c_ico, dleben _o_a_se p_ecauclones b6sicas
¢_ s_gu_'_a(_ qu_ i.c_uyen _as siguien_s:
_nse_e a los ni_os a no jugar
cor_ _as pe_ilgas ni con cuatquie_
otra par_e de la cu_ier_ de
coci_ar. Nunca deje a los ._os
so_os o sin vlglancia en el lugar
deride se est6 usando una
cubierta de cocJnar.
PR_CA_CI_H:
Los ar_cules que pueden set de
i_ter6s papa los ni_es no deben
guardarse e, ga_i_e_es sobre la
cu_ierta de coci.ar. Jam&s
permi_a que alguie, trepe, se
sien_e o se pare sobre |a puerta
abierta del horno o sobre la
cub_erta de cecinar. Podria
resultarcon heridas oquemadu_as
graves.
Hunca deje que los _angos de
las cacerolas sobresalgan de la
cubierta de _a cubie_ta de
cecinar, P6nga_ass de _ede
que no pueda gotpearles al
pasar. Man_enga los mangos
lejos de otros elernentos
calien_es de ia superficie e de
los quemadores.
t NESAF15-2

Para garantizar su seguridad y la de su hogar, por favor lea con todo cuidado
su Manual del Consumidor. Tengalo a la mano para hacer consultas rdpidas.
Por favor ponga mucha atenci_n a las secciones de seguridad de su manual.
Puede reconocer las secciones de seguridad buscando el s_mbolo _ o la
palabra Segundad .
_antenga e! drea de la cub_erta
de cocinar siempre despejada
y libre de objetos que puedan
quemarse,
PRECAUCIO_:
Hunca guarde o_je_os
dentro de! homo o cerca de
los elernentos de |a cu_erta
o de los quemadores. ;:stos
obje_os pueden incendiarse
y los obje_os de pl_stico
pueden derretirse,
Hunca use ropa sue!ta cuando
utillce su cub!erda de coclar.
Ese ttipo de ropa puede
incendiarse°
Jarnds utilice su estufa para
calentar o entibiar una
habi_acidn. Podria resul_ar con
heridas o quemaduras graves,
E! uso inadecuado de la estufa
tambi_n puede descomponerla,
Hunca use una toal!a o una tela
abultada en iugar de agarrade ras
para !o caliente. Estas telas
podrian incendiarse en un
elemen_o generador de calor o
quemador,
Nunca deje que los mangos de
las caceroias so_resa]gan de
la cubierta de ia cubierta de
cocinar, P6ngalas de modo
que no pueda goipearlos a!
pasar. Mar=_enga los mangos
lejos de otros elementos
calien_es de la superficie o de
los quemadores,
\
Jamds deje sin vigilancia los
elementos de la cubier_a o Io
quemadores a tempera_uras muy
elevadas. Las sal picaduras
pueden originar hurno y las sa!
picaduras grasosas pueden
indendiarse,
NESAF16-1

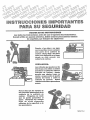
MPORT NTE$ DE
PRECAUCBOHE$ BAS CA$ DE
$ GURIDAD
Guarde este libro para un uso futuro.
Cerctbrese de que su cublerta de cocinar haya sido
Instalada y que haya tierra correctamente por un tdcnico
califlcado.
Siempre use agarraderas secas cuando quite ollas de la
cublerta. Las agarraderas hemedas o mojadas pueden
causar quemaduras por vapor,
Siempre siga las instrucciones de limpleza que vlenen
en este llbro.
Mantenga limplas siempre la cublerta de cocinar. La
comida y la grasa se incendlan con facllidad. Ltmpie la
estufa, el homo y las rejillas de ventllacibn de manera
regular.
Limpie s6to las partes que se enumeran en este Manual.
PRECAUCIION= No guarde articulos de interds para los
nitros en gabinetes sobre la cubierta de coctnar. Los
nitros que trepan a la cubterta de cocinar para alcanzar
dichos articulos podrlan resultar heridos de gravedad.
Slempre mantenga a una distancia segura de lacubtert a
de coclnar et papel taplz de ias paredes, las cortinas o
colgaduras que sean combustibles. Nunca guarde
dichos articulos en su cublerta de cocinar.
Conserve slempre el &rea que rodea la estufa libre de
cosas que puedan quemarse (gasolina y otros liquidos
y gases inflamables).
Jamds intente reparar o reemplazar cualquier parte de la
cubIerta de coclnar a menos que se den instrucciones
al respecto en este llbro. Todos los demos trabajos
deben ser reallzados pot un t_cnico capacitado.
Nunca caliente recipientes con comida que est6n
tapados. E! aumento de la prest6n Interna puede
ocasionar que el recipiente estalle y cause lesiones.
Nunca deje frascos o latas de grasa o goteaduras sobre
o cerca de la cubierta de cocinar. Jam_s permtta que la
grasa se acumule en su cubierta de cocinar. Puede
evitar incendios por grasa si limpia la grasa y cualquier
derrame cada vez que termine de usar la cubterta de
cocinar,
Nunca trate de mover una o!la con grasa caliente, en
especial sl es una freldora. Espere a que la grasa se
haya enfrtado.
Nunca toque las unldades de lasuperficle. Los elementos
generadores decalory pueden estar calientes aunque su
color sea oscuro,
Mantenga siempre los utenslllos de madera, los
utenslltos de pldstico o altmentos enlatados a una
distancia segura de su cubterta de cocinar.
Algunos productos limpiadores
producen vapores perjudiciales
y las telas o esponjas mojadas
podHan causar quemadura s pot
vapor si se utilizan sobre una
supe_icie caliente,
SEGURUDAD LA CUBIIERTA DIE
LA COCIINAR
Siempre tenga cuidado cuando toque la superficie de la
cublerta de coclnar. Los elementos generadores de
calor podrfan estar Io suflclentemente caltentes para
causarle quemaduras aunque se vean de color oscuro.
Sblo pueden utiHzarse clertos tipos de ollas de vtdrto o
cer_mica para cocinar sobre la superficteo Aseg0rese
de que la olIa que use no se rompa si se calienta sobre
los quemadoreso
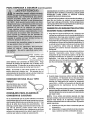
Elija ollas y sartenes con tondo
__________._ o? piano, Io suficientemente
..................... grandes como para cubrir por
completo el elemento
generador de calor. Esto impedlrd el riesgo de que se
incendien las agarraderas o la ropa sl el elemento
generador de calor estuviera descubierto y se
desperdictar_ menos energia,
3 NESAF81

INSTAUCCIONI£S DI!l SEGUR
II11011£IA¢I011 AI_IOIIA!
Si algu_a vez la ,necesi_,_ no _e_t_£ _i.=.,_po papa
lee_la,
Ce_ciS_ese de que to_iose_ su hogar sepan qu&
hacer en caso de incen4io.
Hunca u%ilicea_ua en un incendle causado po_'
g_asa ya que es_o s6ao ayudar_ a extender las
lamas.
FUIQO CAUSADO I_01_ GIIIASA IiN
L_ CUIIIIIT_
Jaln£s le_an_e Ie la es_ufa urla olI_en
Ilan'_eso=.eDluga_'de ello:
I. Apague elelemento que gen-
_ _), era calor.
__ 2. Sofoque el fuego con una tapa
bien ajustada, bicarbonato de
sodio o un extinguidor.
IDAD (cen_inuaci6n)
()O1 0 Q%II 'A CIN!FA
Pars quitar el adhesivo que qued6 como residuode !l
cinta de empaque y asegurarse de no daSar el acsbsdo
de su nuevo aparato, utilce una aplicaci6n de detergente
liquido dom4stico para ropa, aceite mineral, o aceite de
cocin& Apiquelo con una teta suave y permita que
remoje el adhesivo. Ltmpie con una tela suave. NO USE
fibras de pl&stico ni productos similares. Frote hasta
secar y luego aplque una capa de pulidor para fmpiar
perfectamente y proteger la superficle. Este
procedimientotambi_n esseguro para laparte delantera
de los hornos de microondas y otras partes pl_sticas,
NO=t'A: La cinta pl&stica debe sacarse de las molduras
cromadas de las partes de ta estufa,
NO PODRA quitarse si se hornea.
4 NESAF89

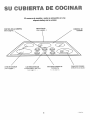
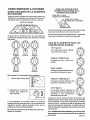
© E CO©
El numero de modelo y serie se encuentra en una
etiqueta debajo de la unidad.
CONTROL DE LA CUBIER'rA
(Yea la p_gina )
Marco Ptntado
(Vea la p_gina )
CUBIERTA DE
COCINAR
ZO_']ADECOCINAR
(Vetola p_gina )
LUZ INDICADORA DE INDICADOR UNIDAD DE
$_;J_E._F!C]E C,_L!ENTE (5) SUPERF_C_E
ZONAS DE COCINAR
_)OBLE (Vea la p_gina ;

COMO EMPEZAR A COCINAR
COMO COCII1NAR I_H LA CUBIiERTA
DE COCmNAR
Antes de usar la cubierta de cocinar por primera vez,
limpiela con un limpiador para cublerta se muestran en
los dibujos sobre la superficie de vtdrlo la cubierta.
ZONAS DE COClNAR
El signo que se encuentra cerca de cada perilla de
control de la cubierta muestra qu_ elemento enciende
esa perilla.
ooo
0 o
lzquierdo
Posterior
©©o
o o
lzqulerdo
Delantera
0¢0 00¢
0 0 0 0
Centro Derecho
Posterior Posterior
@
000
0 e
Derecho
Delantero
IPara operar e! controlador de ia cubierta
1. Oprima para hacerlo girar.
2. Colbquelo en o entre las I ...._,_
marcas para obtener el
calor deseado.
La luz |ndicadora se prender_ cuando se encienda
cualquiera de las zonas de coclnar. La luz indicadora de
superftcle caliente seguir_ prendida hasta que la
cubierta de coclnar se haya enfriado.
E! elemento dellantero de la Derecho tiene dos
zonas de cocinar,
ZONAS DE COCINAR DOBLE
(ELEMENTO DELANTERO DE_LA
IZQUIERDA SOLAMENTEO
ZONA DE9"PARA
UTENSIL1OS GRANDES
X_ONA DE6"PARA
LIOSPEQUEROS
Para usar la _rea de cocinar grande de 9", aprete para
hacer glrar la perllla del control de la derecho.
Para usar la _rea de coclnar pequeSa de 6", aprete para
hacer girar la perlIla del control de la Izquierdo.
GUIA DE ILA CUBIIERTA PARA ILAS
TEMPERATURAS BASgCAS
"H I" ("ALTA")
Se utiliza para tnicios r_pidos,
tales como hervir aguao
"MED-Hi" ("MED-ALTA")
Se utiliza para treir o hervtr con
rapidez
"MED" ("MED")
Se usa para coclnar alimentos con
peque_fias cantidades de agua.
"MED=LO" ("MIED.BAJA")
Se usa para cocinar alimentos con
pequeSas cantidades de agua.
"LO" ("BAJA")
Se usa para cocinar alimentos al
vapor o para mantener caltentes los
alimentos a una temperatura
adecuada para servirlos.
@
@
@
@
Cuando una de las zonas de cocinar se enctende, los
espirales bajo la zona |rradian calor a trav_s del vldrto
hacla el utensiltoo El rojo de los espirales ser_ visible a
tray,s del vidrio. La zona de cocinar se demorarb unos
pocos momentos para calentarse. El espiral slgue t]n
ctclo de encendido y apagado para rnantener su control
seleccionado.
Vea "CONSEJOS PARA UMPIAR" para informaci6n
ir'_perllante acerca de la rnantenci6n de su cubieria
de cocinar. NEMTC75

FARA EMPEZAR A COCINAR (continuaciOn)
SIN EMBARGO, NO USE OLLAS PARA CONSERVAS DE
DIAMETRO MUY GRANDE U OTRAS OLLAS DE GRAN
DIAMETRO PARA FREIR O HERVIR OTROS
ALIMENTOS QUE NO SEAN AGUA.
La mayor|a de los jarabes o de las mezclas de salsas, y
todo ttpo de frituras, se cocinan a una temperatura
mayor que la del agua hirvlendoo Dlchas temperaturas
a la larga pueden dat_ar tas superficies de la cubterta que
rodean las unidades de calentamlento.
OBSERVE LOS $1GUnEINTES PUHTO$
CUAHDO HAGA COHSERVA$
Para cocinar con
mejores resultados
y usar energia
eficlentemente,
usted deberia usar utenstlios de rondo planoo Haga
coincidir el tama5o del utensilio con el tamal_o de la
zona de cocinaro El utensilio no se debe extender m_s
all_ del borde de la zona de cocinar por m_s de 1".
Hota: Es normal un olor tenue cuando se usa una
estufa nueva por primera vez. Es causado por el
calentamiento de las partes nuevas y de los rnateriales
aislantes, y desaparecerd en poco tiempo.
COCIHAR EH UHA OLLA TRPO
Recomendamos que use s01o
ollas con fondo piano. Est_n
dispontbles en la tienda de su
Iocalidad.
COHSEJOS PARA ELABORAR
CONSERVA$ CASERAS
No se recomlenda que al cocinar alimonies mediante
otro proceso que no sea el de hacer conservas, se usen
ollas de gran dl_metro (que se extiendan mas de 1" m_s
all_ de la orilla de la fuente de escurrimtento). Sin
embargo, cuando haga conservas en baOo maria o en
una olla de presiOn, puede utilizar ollas de gran
di_metro. Esto se debe a que la temperatura del agua
caliente (aun bajo preston) no datia la superficie de la
cubierta que rodea la unidad de calentamientoo
1. Haga hervir el agua en HIGH (ALTO)° Despu_s, una
vez que ha comenzado a hervir, ponga laperllla en la
temperatura m_s baja para mantener la ebulliciOn
(ahorra energla y aprovecha mejor la unidad).
2. Asegurese de que la olla para conservas quede blen
colocada en el centro de la unidad de lasuperflcle. Sl
su estufa no permite que la olla se centre en la unidad
de la superficle, utttice ollas de didmetro rods
pequeOo para obtener buenos resultados al hacer
conservas_
3. Las ollas para conservas con rondo piano leofrecen
mejores resultados para hacer conservas.
Asegurese de que el fondo sea piano o de que las
pequet_as hendiduras se ajusten a la untdad de la
superficie. Las oltas con fondo ondulado o con
rebordes (que con frecuencia se encuentran entre
las ollas esmaltadas) no se recomiendan.
4o Cuando haga conservas, utilice recetas de fuentes
de confianza. El fabricante de su olla para hacer
conservas puede facllttarle recetas conflables,
tambi_n los fabricantes de frascos de conservas
como BALL y KERR y la ExtensiOn de Servicio del
Departamento de Agricultura de Los Estados
Unidos.
5. Recuerde, alseguirlasrecetas, quealhacerconservasse
generan grandes cantldades de vapor. Tenga ¢uidado
mientras prepara tas conservas 10amevitar quemaduras
por vapor o calor.
NOTA; SI su estufa est_ stendo operada con baja
energta (voltaic), el proceso de hacer conservas puede
requerir m_s tlempo de 1o esperado, aunque haya
seguido cu|dadosamente las Instrucciones. El proceso
puede mejorarse:
(1) Usando una olla para hacer conservas que sea
de preston y
(2) empezando con agua caliente de la Ilave cuando
vaya a calentar grandes cantidades de agua.
NEMTC61-1

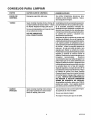
CONSEJ@S PARA LIIIVIPHAR
PARTE
i= i HH llll, ,Hll
PANEL DE
CONTROL
VIDRIO
MARCO
PINTADO
i , i,,,,i
MATERnALES DE LIMPBEZA
Detergente, agua tibia, tela suave
Sears Cook-top Cleaning Creme (Crema de
Limpbr Cubiertasde Coctnar Sears _ Stock
No. 40079) Raspador de hoja, paho suave.
No use una hojagastada o una hoja de n{quel
ensu cublerta de cocinar.
NO USE ABRASIVOS
(VEA COMENTAR,OS).
Sears Cooklop Cleaning Creme (Crema
de Llmpiar Cubiertas de cocinar Sears -
Stock No. 40079) patio suave
ill i iill ii, ,,,111, i i ii i,, ..................
OBSERVACliONES
No utilice limpiadores abraslvos, lana
metdlica o lana abraslva pldstica. Seque
blen despu_s de limptar.
Unalimpiezacorrectay consistenteesesencial
para la mantenclbn de su cubierta de cocinar.
Si la suciedad, dep6sitos minerales de
derrames de agua evaporada o residuos de
a|umln{o que se pelan de los utensil{os para
cocinarno son removtdos, sequemar_n sobre
la cubierta de cocinar y causar_n una
descoloracibn permanente.
Asegt]rese de que la cubierta de cocInar est_
lrb antes de limplarla. No use el limpiador de
cub{ertadecocinarsebreuna superficiecaliente.
Los vapores pueden ser peligrosos para su
selud ypt_len qutmicamenteatacaralacubierta
de cocinar. Limpie la superllcie despu_s de
cada uso0 No use una toalla de platos o una
esponja para limpiar la cublerta de coclnar.
Poddan dejarunacapadedetergentequepodda
desteflir su cublerta de cocinar cuando se
callenta. Siestoocu rre,remuevalacapa conun
limptador recomendado. Nosotros
recomendamos que use toailas de papel o un
pal_oltmpio que se ha ueado solamente para
limpiar|a cubierta decocinar. Despu_sde que
lacubiertadecocinarse hayaenfriado, remueva
la suciedad dura con la hoja del raspador.
Sujete el raspadora un _ngulo decomo 30°de
lacubiertadecocinary raspelamancha. Fdegue
la cubierta de cocinar con Sears Cooktop
CleaningCreme (CremaParaLimpiarCubiertas
de CocinarSeam). Enjuague bien y seque con
un pa_o_ NMNCA USE ALMOHADILLAS
DE FREGAR O POLVOS ABRASIVOS
SOBRE SU CUBIERTA DE COCINAR,
Almohadillas de pl_stico, tales como DOBLE,
podrian ser usadas. Vea la p&gina siguiente
para instrucciones completas de limpieza.
Use las misrnas instruct|ones para limpiar
|a superficie de vidrio e×cepto:
No use una hoja de raspar.
No raspe el marco para que no se dane.
8 NECCH82

La li_piez_ de la cub_er_a de cocinaF de
vidrioce_d_ic_ es diferen_e aBde la li_pieza dei
acabado de porceUana nou'm,_L
P_ra m_n_ene_ y p_o_eger ia supe_icie de su
nuev_ cubie_ de cecinar de v_dr_o-cer_ica
siga es_os p_sos b_s_cos:
30 °
L_P_A D_R_:
Use s61o Cook Top Cleaning Creme sobre Vidrio-
Cer&mica°
Para suc_edad no_'ma_, _eve."
1. Friegue una pequeSa canttdad de Cook Top Clean-
ing Creme sobre el _rea sucia usando una toalla de
papel seca. Limpie hasta que toda la suciedad y la
crema sean removldas. La ltmpieza frecuente deja
una capa protectora que es esencial para prevenir
rayas y abrasiones.
2. Limpte con Cook Top Cleaning Creme despu_s de
cada usoo
Pa_ sucied_d de_sa, _ue_tada:
1o Aplique unas pocas gotas de Cook Top Cleaning
Creme en el drea frta, sucia.
2. Usando una toalla de papel seca, friegue la crema
sobre la _rea quemada_
3. Cuidadosamente raspe el resto de la suctedad con la
hoja del raspador. Sujete et raspador en un _ngulo
de 30° contra la superlicie de cer&micao
4. SI queda algo de sucledad, repita los pasos que se
listan arriba. Para proteccibn adicional despu_s de
que la sucledad haya side removida, s_quele brillo ._
toda ta superficie con Cook Top Cleaning Creme.
HOTA. = El usar la hoja del raspador no daf_ard la
superficie si se mantiene el _ngulo de 30°. He
use una hoja gastada sob='e su cub_er_a
de coc_na_. Gua_'de e_ _'aspade_ con I1_
heja fuera die! _cance de los ni_Ses.
C_t;_ADO _SP_CIIAIL:
Los derrames de azucar (tal come jaleas, dulce de
chocolate, caramelos) o pl_sticos derretidos pueden
causar hoyos en la superficie de la cubierta de cocinar
a menos que el derrame se ltmpie cuando est_ calienteo
Se debe te.er u. cu_dade especia! para remove='
susta_cias cai_en_es. Siga estas instrucciones
cuidadosamente para remover la suciedad cuando el
derrame todavla est_ caliente.
1, Apague todas las zonas de coclnar afectadas per el
derrame. Remueva los utensilios calientes.
2_
Usando un guante de homo, sujete el raspador de
hoja a un _ngulo de 30° sobre la cublerta de cocinar
y raspe el derrame caliente hacta una _rea frfa fuera
de la zona de cocinar_
.
Con el derrame en una _rea fria, use una toalla de
papel seca para removercualquiere_ceso. Cualquter
derrame que quede debe dejarse hasta que la
superficie de la cubierta de cocinar se haya enfriadoo
No continue usando la zona de cocinar sucia hasta
que todo el derrame haya side removido. Siga los
pasos bajo Suciedad Densa pare continuar el proceso
de llmpieza.
_NFOR_AC_H GI_I_ERAL:
A medida que la Cook Top Cleaning Creme limpla, deja
una capa protectora sobre la superficie de la cubierta de
cocinar. Esta capa ayuda a prevenir la acumulaciSn de
depbsitos minerales (manchas de agua) y har_ la limpieza
futura m_s f_cilo Los detergentes para lavar plates
remueven esta capa protectora y per to tanto hacen que
la cubterta de cocinar sea m_s susceptible alas manchas.
PRSCAUC_ONSS:
La mayoria de los limpiadores contienen amonlaco,
sustanctas quimicas y abrastvas que pueden daf_ar la
superitcte de su cubierta de cocinar. Use solarnen_e
Ceo_ Top C_ean_ng Cre_ pa_ _ i_rnp_ez_ y
p_'o_ecci6_ convenience de su superf_cle de
v_dr_o.cer_ica.
Si usted arrastra un utensilio de aluminio o cobre
sobre la superficie de la cubierta de cocinar, usted
puede dejar marcas de metal que aparecen come
rayaduraso Si esto sucede, use el raspador y Cook
Top Cleaning Creme para remover estas marcas. SI
estos residues no se sacan inmediatamente, pueden
dejar marcas permanentes,
Si utenstlios con una capa delgada de aiuminio o
cobre, o porcelana hierven hasta secarse, la capa se
puede pegar con el vidrio-cer_rnica y dejar una
descotoraclbn negra. Esto tiene que removerse
Inmediatamente antes de calentarse nuevamente o la
descoloracion podrta set permanente.
• El use de ilmpiadores de vidrio podrla dejar una capa
irridescente sobre la cubierta de cocinar. La Cook
Top Cleaning Creme remover_ esta descoloracibn.
• Las manchas de agua (depbsitos minerales) se
pueden sacar usando Cook Top Cleaning Creme o
vinagre blanco a toda fuerza.
NECCH60

AHTE$ DE SOLICITAR UN SERVICIO
PROBLEMA
. PEQUEI_iAS RAYAS
O ABRASaONES EN
LA CUBIERTA DE
COCINAR (PUEDEN
APARECER COMO
RAYITAS)
o MARCAS DE METAL
EN LA CUBIERTA DE
COCINAR (PUEDEN
APARECER COMO
PEQUENAS RAYITAS)
o BANDAS Y
MANCHAS
OSCURAS SOBRE
LA CUBIERTA DE
COCJNAR
o AREAS DE
DESCOLORACION
SOBRE LA
CUBIERTA DE
COCINAR
• CUBIERTA DE
COCINAR NO
FUNCIONA; ESTA
INOPERANTE POR
COMPLETE
o LA CUBI_RTA NO
FUNCIONA
o LENTO COCRNAR
ALIMENTO
POSIBLE CAUSA
Uso de materlales de limpieza
Incorrectos
Partlculas ;_speras (sal, etc0
entre elrondo de los utensilios
y la cublerta de coclnar.
Asegurese de que los rondos
de los utenstllos y la cublerta
de coclnar estdn limpios an-
tes de usarse.
Utenstlios con londos _speros
• Arrastrar o raspar la cublerta
de cocinar con utensllios de
metal
Derrames y manchas de grasa
Incrustados
• Mateflalesdelimpieza incorrectos
• Depbsitos minerales deagua o
alimentos
NO SOLICITE UN SERVICIO SIN ANTES
REVISAR LO SIGUIENTE
- Pequettas rayas no se pueden sacar y no
afectan la cocct6n. Con el tiempo, las rayas
se suavlzar;_n y serz_nmenos vlsibles.
• Use Ilmpladores de cublertas de coclnar
recomendados.
• Use raspadorde hoja ysiga las instrucciones
en la tabla.
• Use ltmptadores recomendados en la tabla
de limpleza,
Use ltmpladores recomendados.
• No Ilega energia electrica a la • Revise el fusible o el interruptor del circuito
cubierta de cocinar de la casa.
• Operaci6n incorrecta del con- .
trol
• Se us6 un utensilio tnadecuado
AsegOrese de presionar la perilla mientras la
hace giraro
Use olfas de rondo plano y que queden bien
ajustadas. Lasollasdeben serdelmismotamat_o
de las zonas de cocinar. Lea la seccibn de cbmo
coctnar para lnformace=k_)ncompleta.
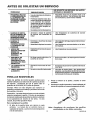
PERBLLA$ REMOVIBLE$
Todas las perillas de control pueden quitarse para
facilitar la limpieza con sblo tirar de la perilla sac&ndola
del soporteo Cercibrese de que la perilla est_ en
poslcibn de APAGADO (OFF) antes de quitarla°
Consejo: Meta una tela delgada (pot ejemplo un
pafiuelo) ocoloque un hilo debajo y alrededo rde la orilla
de la perllla y tire de _1.
Precauclbn: Lea estas Instrucciones con todo cuidado
antes de reemplazar la perilla. El hecho de reemplazar
de manera inadecuada las perillas las daEar_ y tambt_n
a los sujetadores de resorte de los tallos. Si esto
sucede, las perillas quedar_n flojas_
Para reemplazar la perilla;
1. El tallo de la perilla tiene una ranura en cada
extremo. La ranura de un extremo tiene un
sujetador de resorte. Laotra ranura estransparente
(vea la ilustracibn).
2_
3_
Revise el interior de la perilla y Iocatice el canal
moldeado.
Recoloque la perilla insertando el canal moldeado del
interior de lapedlla en la ranura transparente dettallo.
Nora: Asegl_rese de recolocar las periilas
poni_ndolas en los tallos correctos.
10 NESERI58

Estlmado clients:
Nuestros esfuerzos
constantes estdn
dirlgldos a asegurar qua
su nueva Cubierta de
Cocinar Kenmore Ilegue
a su hogar en perfectas
condictones y le d_ el
servlcio adecuadoo
Corns parle de estos
esfuerzos, sentimos que
es responsabilidad
nuestra proporcionarle
esta garantla pare su
cubierta de coctnar.
U;_IA_O DIE GARA_T_A COMPLETA PAPA IJ_$ FUNC_OHES D_-
TODAS LAS PARTES F=XCEPTO LAS DE VItDR_O
St,dentro del lapso de un a_o a partlr delafecha de Instalacl6n, cualquler parts que
no sea de vidrto, funciona real debldo a un defects en el material oen la roans de
obra, Sears la reparard o la reemplazard, sin costs alguno.
GARAI_T_A TOTAL DE 30 DIAS PARA LAS PARTES DE VHDRmOY EL
ADABADO DE ESMALTI_ PORCELAN_7.JIDO, PARTES DE METAL
PINTADO O BRILLAHT_-
St,dentro de los trelnta d|as posteriores ala Instalaci6n, cualquler parts de vidrto
oelacabac!odecualquier esmalte porcelanlzado opa rtede metalplntado obrillante
tiene defectos en el material o marts de obra, Sears reemplazar_ laparle, sin costs
alguno.
GARANTIA TOTAL DE 90 D_AS EN AJIUSTES MECANICOS
Durante 90 dfas a partlr de la fecha de Instalaclbn, Sears proporclonar_, sin costs
alguno, cualquler ajuste mecdnlco necesarlo para la correcta operact(Sn de la
estufa, exceptuando el mantenimiento normal.
Si la estufa estd sujeta a otro uso qt]e no sea el prlvado familiar, la cobertura de la
garant|a mencionada arriba serd efectiva s61odurante 90 dtas.
EL SERVIDIO DE GARANTIA ESTA D|SPONIBL I=CON SOLO PONERS_=
EN CDNTACTO CON EL CEHTRD O DEPARTAMENTO DE SERVIIC_O
SEARS MAS CERCANO EH LOS ESTADOS UN_DOS.
Esta garantia se aplica s(_locuando este products se use en los Estados Unidos.
Esta garanttale brinda derechos legales especfficos, y tambi_n puede tenet otros
derechos qua varlan de un estado a otro_
SEARS, ROEBUCK AND CO.
DEPT. 720PSO
3333 Beverly Read
Hoffman Fsta_es, _L 60179
"Le damos servicio a Io que vendemos" es la manera de asegurarle que puede depender de Sears para el servicio
porque el servlclo Sears se ofrece en rods el pais.
Su Estufa Kenmore tlene un valor agregado cuando usted considera que Sears poses una unldad de servlcio
cerca de usted, qua cuenta conun equips Sears de tdcn_coscapacitados...t_c nlcos profeslonales espec|flcamente
entrenados pare manejar los aparatos Sears, y que ttenen access alas partes, herramientas y equlpo para
asegurar qua cumplamos nuestro compromiso con usted: "iLe damos servtcio a Io que vendemos!"
PARA A_PL_AR EL VALOR DIESU CUBIERTA DE COCINAR, COMPR_ UN CONTRATO DE MANTENIIM_ENTO SEARS.
Las cublerta decoctnar Kenmore est_n dise_adas,
fabrtcadas y probadas para brindarle a_os de
operaclbn conflable. Sin embargo, cualquier
aparato moderns puede requerir de alg_3nservlcio
de vez en cuando_ La garantta Sears, adam,s del
contrato de Mantenlmlento Sears le brindan
proteccl6n contra cuentas de reparaclones
Inesperadas y le aseguran qua disfrute de la
m,_ixima eflclencla en estufas.
He aqul una garantia comparattva y una tabla de;
contrato de Mantenimiento qua le muestra Ios
beneflclos de un contrato Mantenlmlento Sears
para Estufaso
Altos de cobettura de ta proptedad I er al3o 2_'a_o 3er a_to
1 G AM AM
quo no seen d_ porcolarta o vldr]o
go DAYS
2 A lomeo °too G AM AM
30 DAYS
3 Partesdoporcefanayv;d_'io G AM AM
,, ,,,,,,,,u
4, R_vtstSn anual de mant_nfmterlto
prevenltvo a sollcitud de .sled A_]_ AM AM
G - Gm_ntla AM. Conifers de M_ntentmlenlo
PONGASE E_ CONTACTO CON SU VEHDIEDOR DE SEARS O COH EL CIE_TRO D5 SERV_C_O SEARS DIE LA
LOCAL_DAD HOY MISMO Y CDMPRIE DN DONTRATO DiEMANTENI_IEHTO SIEARS.
_f'_ _'_O_La marca de apa_'a_os e_ec_oc_m_s_cos _e m_yo_ venue en America
Vend_da po_ S":ARS_ ROebUCK AND CO,, He_iman Es_ates_ _L 60_ 79
tmpreso en LaFayette, Georgia --
-
 1
1
-
 2
2
-
 3
3
-
 4
4
-
 5
5
-
 6
6
-
 7
7
-
 8
8
-
 9
9
-
 10
10
-
 11
11
-
 12
12
-
 13
13
-
 14
14
-
 15
15
-
 16
16
-
 17
17
-
 18
18
-
 19
19
-
 20
20
-
 21
21
-
 22
22
-
 23
23
-
 24
24


Kenmore 43645 Use El manual del propietario
- Categoría
- Cocinas
- Tipo
- El manual del propietario
- Este manual también es adecuado para
en otros idiomas
- English: Kenmore 43645 Use Owner's manual
Artículos relacionados
-
Kenmore 911.94754 Manual de usuario
-
-
Kenmore 66544083500 El manual del propietario
-
 Kenmore Elite 66544084502 El manual del propietario
-
-
 Kenmore Elite 79043999403 El manual del propietario
-
-