
B0792MXSQT, B0792TFYMJ, B0792H4HFM, B0792T5KMX,
B0792TFYMK, B0792FZBDD
5/8” Room-Darkening Curtain Rod
Tringle Pour Rideaux Occultants De 16 mm
16mm Gardinenstange für Verdunkelungsvorhang
Bastone Per Tenda Oscurante 16 mm
Varilla Para Cortinas Oscurecedoras 16 mm
16 mm 遮光カーテン用ロッド
16 毫米遮光窗帘杆

English ..................................... 3
Français ................................. 10
Deutsch .................................. 17
Italiano ................................... 24
Español .................................. 31
日本語 ..................................... 38
中文 ........................................ 45

3
Welcome Guide
•
English
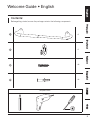
Contents:
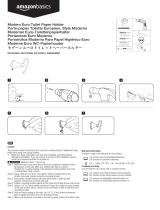
Before getting started, ensure the package contains the following components:
1
x1
2
x1
3
x6
4
x6
Required tools

4
IMPORTANT SAFEGUARDS
Read these instructions carefully and retain them for future use. If this product is passed
to a third party, then these instructions must be included.
When using the product, basic safety precautions should always be followed to reduce the risk of
injury including the following:
• Install the product in a safe, infrequently attended area away from the reach of children.
• Do not lean on the product.
• Use the product for hanging curtains only.
• When drilling holes, make sure that you do not damage any electrical cables or water pipes
behind the wall. Use voltage/metal detector if in doubt.
• Check and tighten the screw connections regularly.
IMPORTANT, RETAIN FOR
FUTURE REFERENCE:
READ CAREFULLY.
Before First Use
• Check for transport damages.
Risk of suffocation! Keep any packaging materials away from children – these
materials are a potential source of danger, e.g. suffocation.
DANGER

5
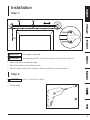
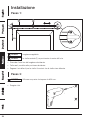
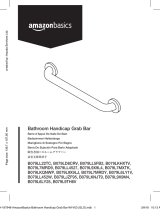
Installation
Step 1:
1
2
The length is adjustable.
The center bracket (2) should be positioned at the middle of the rod.
• Extend the rod to the desired length.
• Place the product in the desired position.
• Mark the screw holes for the brackets. Make sure that the brackets are level.
Step 2:
Use a 1/4” (6.35 mm) drill bit.
• Drill the holes.
NOTICE
NOTICE
NOTICE

6
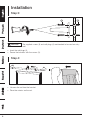
Installation
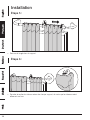
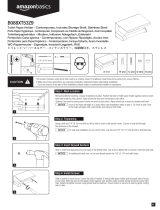
Step 3:
3
4
The supplied screws (3) and wall plugs (4) are intended to be used on a dry
wall.
• Insert the wall plugs (4).
• Secure the brackets with the screws (3).
Step 4:
• Unscrew the rod from the bracket.
• Place the curtains on the rod.
NOTICE

7
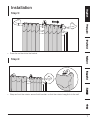
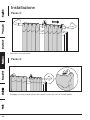
Installation
Step 5:
• Screw the rod back into the bracket.
Step 6:
• Wrap and tuck the curtains around both brackets so that the curtains hang flush to the wall.

8
Cleaning and Maintenance
• To clean, wipe with a soft, slightly moist cloth.
• Never use corrosive detergents, wire brushes, abrasive scourers, metal or sharp utensils to
clean the product.
• Check the components regularly to make sure all screws and bolts are tightened.
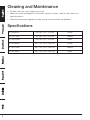
Specifications
B0792MXSQT 48 – 88" (122 – 224 cm) Nickel
B0792TFYMJ 48 – 88” (122 – 224 cm) Bronze
B0792H4HFM 48 – 88” (122 – 224 cm) Black
B0792T5KMX 88 – 120” (224 – 305 cm) Nickel
B0792TFYMK 88 – 120” (224 – 305 cm) Bronze
B0792FZBDD 88 – 120” (224 – 305 cm) Black

9
Warranty Information
To obtain a copy of the warranty for this product:
For US - Visit amazon.com/AmazonBasics/Warranty
For UK - Visit amazon.co.uk/basics-warranty
— or —
Contact Customer Service at 1-866-216-1072
Feedback
Love it? Hate it?
Let us know with a customer review.
AmazonBasics is committed to delivering customer-driven products that live up to your high
standards. We encourage you to write a review sharing your experiences with the product.
Please visit: amazon.com/review/review-your-purchases#
For further services:
Visit amazon.com/gp/help/customer/contact-us
— or —
Contact Customer Service at 1-866-216-1072

10
Guide de Bienvenue
•
Français
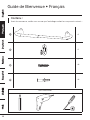
Contenu:
Avant de commencer, veuillez vous assurer que l’emballage contient les composants suivants:
1
x1
2
x1
3
x6
4
x6
Outils nécessaires

11
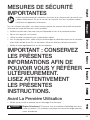
MESURES DE SÉCURITÉ
IMPORTANTES
Veuillez lire attentivement les présentes instructions et les conserver afin de pouvoir vous
y référer ultérieurement. En cas de cession de ce produit à un tiers, le présent manuel
d’utilisation doit également lui être remis.
Lors de l’utilisation du produit, vous devez toujours prendre des mesures de sécurité de base afin
de réduire tout risque de blessures, parmi lesquelles:
• Installez le produit dans une zone sûre, peu fréquentée et hors de la portée des enfants.
• Ne pas vous appuyer sur le produit.
• Utilisez le produit uniquement pour suspendre des rideaux.
• Lors du perçage des trous, veillez à ne pas endommager de câbles électriques ou de conduites
d’eau situés derrière le mur. En cas de doutes, utilisez un détecteur de tension/de métal.
• Vérifiez et serrez régulièrement les vis de raccordement.
IMPORTANT: CONSERVEZ
LES PRÉSENTES
INFORMATIONS AFIN DE
POUVOIR VOUS Y RÉFÉRER
ULTÉRIEUREMENT.
LISEZ ATTENTIVEMENT
LES PRÉSENTES
INSTRUCTIONS.
Avant La Première Utilisation
• Vérifiez que le produit ne présente aucun dommage dû au transport.
Risque d’étouffement! Conservez tous les matériaux d'emballage hors de la
portée des enfants. Ces matériaux constituent une source de danger potentiel,
par ex. étouffement.
DANGER

12
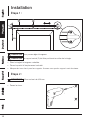
Installation
Étape1:
1
2
Vous pouvez régler la longueur.
Le support central (2) doit être positionné au milieu de la tringle.
• Étirez la tringle à la longueur souhaitée.
• Placez le produit à l’emplacement souhaité.
• Marquez les trous de vis pour les supports. Assurez-vous que les supports sont de niveau.
Étape2:
Utilisez un foret de 6,35 mm.
• Percez les trous.
REMARQUE
REMARQUE
REMARQUE

13
Installation
Étape3:
3
4
Les vis fournies (3) et les chevilles murales (4) sont conçues pour être utilisées
sur une cloison sèche.
• Insérez les chevilles murales (4).
• Fixez les supports à l’aide des vis (3).
Étape4:
• Dévissez la tringle du support.
• Placez les rideaux sur la tringle.
REMARQUE

14
Installation
Étape5:
• Revissez la tringle dans le support.
Étape6:
• Enroulez et repliez les rideaux autour de chaque support, de sorte que les rideaux soient
affleurants au mur.

15
Nettoyage et Entretien
• Nettoyez le produit en l’essuyant à l’aide d’un chiffon doux légèrement humide.
• Ne jamais utiliser de détergents corrosifs, de brosses métalliques, de lavettes abrasives ou
d’ustensiles tranchants ou en métal pour nettoyer le produit.
• Vérifiez régulièrement les composants afin de vous assurer que toutes les vis et tous les boulons
sont bien serrés.
Caractéristiques
B0792MXSQT 122 – 224 cm Nickel
B0792TFYMJ 122 – 224 cm Bronze
B0792H4HFM 122 – 224 cm Noir
B0792T5KMX 224 – 305 cm Nickel
B0792TFYMK 224 – 305 cm Bronze
B0792FZBDD 224 – 305 cm Noir
Informations Sur La Garantie
Pour obtenir une copie de la garantie portant sur ce produit:
Veuillez visiter amazon.fr/basics-garantie
— ou —
Contactez le service clients au 08 00 94 77 15

16
Vos Avis
Vous l’adorez? Vous le détestez?
Faites-le nous savoir en laissant un commentaire.
AmazonBasics s’engage à vous offrir des produits axés sur les besoins de la clientèle et répondant
à vos normes élevées. Nous vous encourageons à rédiger un commentaire visant à partager vos
expériences sur le produit.
Veuillez visiter : amazon.fr/review/review-your-purchases#
Pour obtenir d’autres services:
Veuillez visiter amazon.fr/gp/help/customer/contact-us
— ou —
Contactez le service clients au 08 00 94 77 15

17
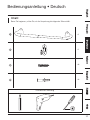
Bedienungsanleitung
•
Deutsch
Inhalt:
Bevor Sie beginnen, prüfen Sie, ob die Verpackung die folgenden Teile enthält:
1
x1
2
x1
3
x6
4
x6
Erforderliches Werkzeug

18
WICHTIGE
SICHERHEITSHINWEISE
Lesen Sie diese Anweisungen sorgfältig und bewahren Sie sie zur künftigen
Verwendung auf. Wenn dieses Produkt an Dritte weitergegeben wird, muss diese
Gebrauchsanweisung beigefügt werden.
Bei der Verwendung des Produktes sollten stets grundlegende Sicherheitsvorkehrungen befolgt
werden, um das Risiko von Verletzungen zu vermeiden. Dazu zählen insbesondere:
• Montieren Sie das Produkt an einem sicheren, nicht frequentierten Bereich, außerhalb der
Reichweite von Kindern.
• Lehnen Sie sich nicht am Produkt an.
• Verwenden Sie das Produkt nur zum Aufhängen von Vorhängen.
• Achten Sie beim Bohren der Löcher darauf, keine elektrischen Kabel oder Wasserleitungen in
der Wand zu beschädigen. Verwenden Sie im Zweifelsfall einen Spannungs-/Metalldetektor.
• Überprüfen und Sie die Schraubverbindungen regelmäßig und ziehen Sie sie regelmäßig fest.
WICHTIG – FÜR
EIN SPÄTERES
NACHSCHLAGEN
AUFBEWAHREN:
SORGFÄLTIG LESEN.
Vor der ersten Verwendung
• Überprüfen Sie das Produkt auf Transportschäden.
Erstickungsgefahr! Halten Sie Verpackungsmaterialien von Kindern fern –
solche Materialien stellen Gefahrensituationen für Kinder, u.a. durch Erstickung,
dar.
GEFAHR

19
Installation
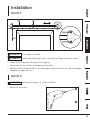
Schritt 1:
1
2
Die Länge ist verstellbar.
Die mittlere Halterung (2) sollte in der Mitte der Stange positioniert werden.
• Ziehen Sie die Stange auf die gewünschte Länge aus.
• Positionieren Sie das Produkt an der gewünschten Stelle.
• Markieren Sie die Schraublöcher für die Halterungen. Achten Sie darauf, dass die Halterungen
waagerecht ausgerichtet sind.
Schritt 2:
Verwenden Sie einen 1/4” (6,35mm) Bohrer.
• Bohren Sie die Löcher.
HINWEIS
HINWEIS
HINWEIS

20
Installation
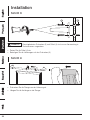
Schritt 3:
3
4
Die mitgelieferten Schrauben (3) und Dübel (4) sind nur zur Verwendung in
Trockenmauern vorgesehen.
• Setzen Sie die Dübel (4) ein.
• Befestigen Sie die Halterungen mit den Schrauben (3).
Schritt 4:
• Schrauben Sie die Stange von der Halterung ab.
• Hängen Sie die Vorhänge an die Stange.
HINWEIS

21
Installation
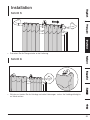
Schritt 5:
• Schrauben Sie die Stange wieder an die Halterung.
Schritt 6:
• Wickeln und streifen Sie die Vorhänge um beide Halterungen, sodass die Vorhänge bündig bis
zur Wand reichen.

22
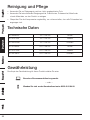
Reinigung und Pflege
• Verwenden Sie zur Reinigung ein weiches, leicht angefeuchtetes Tuch.
• Verwenden Sie keine ätzenden Reinigungsmittel, Drahtbürsten, Scheuermittel, Metall oder
scharfe Materialien, um das Produkt zu reinigen.
•
Überprüfen Sie die Komponenten regelmäßig, um sicherzustellen, dass alle Schrauben fest
angezogen sind.
Technische Daten
B0792MXSQT 122 – 224 cm Nickel
B0792TFYMJ 122 – 224 cm Bronze
B0792H4HFM 122 – 224 cm Schwarz
B0792T5KMX 224 – 305 cm Nickel
B0792TFYMK 224 – 305 cm Bronze
B0792FZBDD 224 – 305 cm Schwarz
Gewährleistung
Eine Kopie der Gewährleistung für dieses Produkt erhalten Sie unter
Besuchen Sie amazon.de/basics-garantie
— oder —
Wenden Sie sich an den Kundendienst unter 08 00-3 63 84 69

23
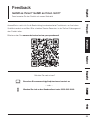
Feedback
Gefällt es Ihnen? Gefällt es Ihnen nicht?
Dann bewerten Sie das Produkt auf unserer Webseite!
AmazonBasics setzt sich für die Bereitstellung kundenorientierter Produkte ein, um Ihre hohen
Qualitätsstandards zu erfüllen. Bitte schreiben Sie eine Rezension, in der Sie Ihre Erfahrungen mit
dem Produkt teilen.
Bitte besuchen Sie: amazon.de/review/review-your-purchases#
Möchten Sie mehr wissen?
Besuchen Sie amazon.de/gp/help/customer/contact-us
— oder —
Wenden Sie sich an den Kundendienst unter 08 00-3 63 84 69

24
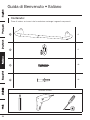
Guida di Benvenuto
•
Italiano
Contenuto:
Prima di iniziare, assicurarsi che la confezione contenga i seguenti componenti:
1
x1
2
x1
3
x6
4
x6
Strumenti richiesti

25
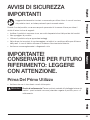
AVVISI DI SICUREZZA
IMPORTANTI
Leggere attentamente le istruzioni e conservarle per utilizzo futuro. In caso di cessione
del prodotto a terzi, accludere parimenti questo manuale utente.
Durante l'uso del prodotto, osservare sempre le precauzioni di sicurezza di base per ridurre il
rischio di lesioni, incluse le seguenti:
• Installare il prodotto in una zona sicura, non molto frequentata fuori dalla portata dei bambini.
• Non appoggiarsi al prodotto.
• Utilizzare il prodotto solo per appendere tendaggi.
• Nel praticare fori accertarsi di non danneggiare cavi elettrici o condutture dell'acqua all'interno
delle pareti. In caso di dubbio utilizzare un rivelatore di tensione/metal detector.
• Verificare e serrare regolarmente i collegamenti a vite.
IMPORTANTE!
CONSERVARE PER FUTURO
RIFERIMENTO: LEGGERE
CON ATTENZIONE.
Prima Del Primo Utilizzo
• Verificare che non vi siano danni causati dal trasporto.
Rischio di soffocamento! Tenere qualsiasi materiale d’imballaggio lontano dai
bambini - questi materiali sono una potenziale sorgente di pericolo, per es. di
soffocamento.
PERICOLO

26
Installazione
Passo 1:
1
2
Lunghezza regolabile.
La staffa centrale (2) va posizionato al centro dell’asta.
• Estendere l'asta fino alla lunghezza desiderata.
• Collocare il prodotto nella posizione desiderata.
• Segnare i fori delle viti per le staffe. Accertarsi che le staffe siano allineate.
Passo 2:
Utilizzare una punta da trapano da 6,35 mm.
• Eseguire i fori.
AVVISO
AVVISO
AVVISO

27
Installazione
Passo 3:
3
4
Le viti fornite (3) e i tasselli a muro (4) sono previsti per l'uso su parete asciutta.
• Inserire i tasselli (4).
• Fissare le staffe con le viti (3).
Passo 4:
• Svitare l'asta dalla staffa.
• Posizionare le tende sull'asta.
AVVISO

28
Installazione
Passo 5:
• Riavvitare l'asta sulla staffa.
Passo 6:
• Avvolgere e fissare le tende attorno alle staffe in modo che siano a filo della parete.

29
Pulizia e Manutenzione
• Per la pulizia passare un panno morbido leggermente inumidito.
• Non usare mai detergenti corrosivi, spazzole metalliche, spugne abrasive o utensili metallici o
affilati per pulire il prodotto.
• Verificare regolarmente i componenti per accertarsi che tutte le viti e i bulloni siano serrati.
Specifiche
B0792MXSQT 122 – 224 cm Nichel
B0792TFYMJ 122 – 224 cm Bronzo
B0792H4HFM 122 – 224 cm Nero
B0792T5KMX 224 – 305 cm Nichel
B0792TFYMK 224 – 305 cm Bronzo
B0792FZBDD 224 – 305 cm Nero
Informazioni Di Garanzia
Per ottenere una copia della garanzia del prodotto:
Visita amazon.de/basics-garantie
— o —
Contattare il Servizio Clienti al
800 62 88 05

30
Feedback
Ti piace? Oppure no?
Faccelo sapere scrivendo la tua recensione.
AmazonBasics si impegna a distribuire prodotti orientati al cliente che siano all’altezza degli
standard più elevati. Pertanto, invitiamo i clienti a scrivere una recensione per condividere le proprie
esperienze con il prodotto.
Visitare:
amazon.it/review/review-your-purchases
Per ulteriori servizi:
Visita amazon.it/gp/help/customer/contact-us
— o —
Contattare il Servizio Clienti al
800 62 88 05

31
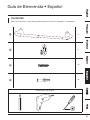
Guía de Bienvenida
•
Español
Contenido:
Antes de comenzar, compruebe que el embalaje incluye los siguientes componentes:
1
x1
2
x1
3
x6
4
x6
Herramientas necesarias

32
CONSEJOS DE SEGURIDAD
IMPORTANTES
Lea estas instrucciones atentamente y guárdelas para futuras consultas. Si transfiere el
producto a una tercera persona, debe incluir también este manual de instrucciones.
Al usar este producto, siempre deben seguirse las precauciones de seguridad básicas para reducir
el riesgo incluyendo las siguientes:
• Instale el producto en una zona segura y poco transitada, lejos del alcance de los niños.
• No se apoye en el producto.
• Utilice el producto solo para colgar cortinas.
• Al perforar los agujeros, asegúrese de no dañar ningún cable eléctrico ni tubería de agua detrás
de la pared. Utilice un detector de metal/tensión en caso de duda.
• Compruebe y apriete las conexiones de los tornillos periódicamente.
¡IMPORTANTE! GUARDAR
PARA FUTURAS
CONSULTAS: LEER
ATENTAMENTE.
Antes Del Primer Uso
• Compruebe si se han producido daños durante el transporte.
¡Riesgo de asfixia! Mantenga los materiales de embalaje alejados de los
niños; estos materiales son peligro potencial (p. ej. asfixia).
PELIGRO

33
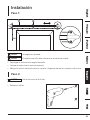
Instalación
Paso 1:
1
2
La longitud es ajustable.
El soporte central (2) debe colocarse en el medio de la varilla.
• Despliegue la varilla hasta la longitud deseada.
• Coloque el producto en la posición deseada.
• Marque los orificios del tornillo para los soportes. Asegúrese de que los soportes están a nivel.
Paso 2:
Utilice una broca de 6,35 mm.
• Perfore los orificios.
AVISO
AVISO
AVISO

34
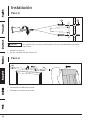
Instalación
Paso 3:
3
4
Los tornillos (3) y los tacos suministrados (4) son solo adecuados para una
pared seca.
• Inserte los tacos (4).
• Fije los soportes con los tornillos (3).
Paso 4:
• Desatornille la varilla del soporte.
• Coloque las cortinas en el suelo.
AVISO

35
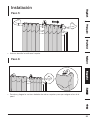
Instalación
Paso 5:
• Vuelva a atornillar la varilla en el soporte.
Paso 6:
• Envuelva y pliegue las cortinas alrededor de ambos soportes para que cuelguen al ras de la
pared.

36
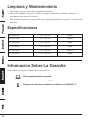
Limpieza y Mantenimiento
• Para limpiar, pase un paño suave y ligeramente húmedo.
• Nunca utilice agentes corrosivos, cepillos de alambre, decapantes, utensilios metálicos o
puntiagudos para limpiar el producto.
• Revise periódicamente los componentes para comprobar que todos los pernos y tornillos están
apretados.
Especificaciones
B0792MXSQT 122 – 224 cm Níquel
B0792TFYMJ 122 – 224 cm Bronce
B0792H4HFM 122 – 224 cm Negro
B0792T5KMX 224 – 305 cm Níquel
B0792TFYMK 224 – 305 cm Bronce
B0792FZBDD 224 – 305 cm Negro
Información Sobre La Garantía
Para obtener una copia de la garantía de este producto:
Visite amazon.de/basics-garantie
— o —
Póngase en contacto con Atención al cliente en el 0900 803 711

37
Comentarios
¿Le encanta? ¿No le gusta nada?
Escriba una opinión como cliente.
En AmazonBasics nos comprometemos a proveer productos pensados para satisfacer a nuestros
clientes y que estén a la altura de sus elevados estándares de calidad. Le animamos a que escriba
una opinión sobre su experiencia con el producto.
Por favor, visite: amazon.es/review/review-your-purchases#
Para otros servicios:
Visite amazon.es/gp/help/customer/contact-us
— o —
Póngase en contacto con Atención al cliente en el 0900 803 711

38
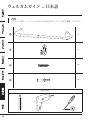
ウェルカムガイド
•
日本語
内容:
スタートする前に、パッケージに以下のものが含まれていることを必ず確認してください。
1
x1
2
x1
3
x6
4
x6
必要な道具

39
安全に関する重要なお知らせ
このお知らせをよく読み、今後のため常に注意深く保存してください。本製品を第3
者にゆずる際は、必ずこの取扱説明書をつけておゆずりください。
本製品を使用する際には、怪我やダメージの可能性を避けるため、常に基本的な安全予防策を
守ってください:
•• 製品は安全かつ人が頻繁に行き来する場所で、子供の手の届かないエリアに設置してくだ
さい。
•• 製品によりかからないください。
•• 製品はカーテンをかけるためのみにご使用ください。
•• ドリルで穴をあける際は、壁の裏側の電気ケーブルや水のパイプを傷つけることが絶対にな
いようご注意ください。はっきりしない場合は検電器や金属探知機などをご使用ください。
•• 定期的にネジや接続を確認し、しめなおしてください。
重要!また見ることができる
ように保管してください:注
意深くお読みください。
最初にお使いになる前に
•• 運送中にダメージが生じていないことをチェックしてください。
窒息のリスクあり!梱包材料はお子様の手の届かない所においてください•-•
これら梱包材料は窒息等、危険の源となり得ます。
危険

40
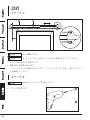
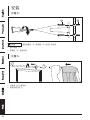
設置
ステップ 1:
1
2
長さは調節できます。
センターブラケット•(2)•はロッドの中央に位置するようにしてください。
•• ロッドを好みの長さまで伸ばします。
•• 製品を好みの位置に合わせます。
•• ブラケットのネジ穴の位置に印をつけます。ブラケットがまっすぐであり、傾いていないこ
とを確認してください。
ステップ 2:
6.35•mm•ドリルビットをお使いください。
•• ドリルで穴をあけます。
注意
注意
注意

41
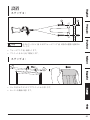
設置
ステップ 3:
3
4
含まれているネジ•(3)•およびウォールプラグ•(4)•は乾式の壁用に意図され
ています。
•• ウォールプラグ•(4)•を挿入します。
•• ブラケットをネジ•(3)•で固定します。
ステップ 4:
•• ロッドをまわすようにしてブラケットから外します。
•• カーテンを製品に通します。
注意

42
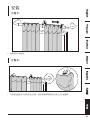
設置
ステップ 5:
•• ロッドをブラケットに再びねじ込みます。
ステップ 6:
•• 両側にあるブラケットにカーテンをかぶせ、カーテンが壁についた状態で下がっているよ
うにします。

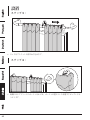
43
掃除およびメンテナンス
•• きれいにするには柔らかい、少し湿らせた布で拭いてください。•
•• 本製品の洗浄には腐食性の洗剤、ワイヤーブラシ、研磨剤たわし、金属や尖った器具は使用
しないでください。
••
定期的に部品をチェックし、全てのネジやボルトがしっかりしまっていることを確認して
ください。
規格
B0792MXSQT
122•–•224•cm ニッケル
B0792TFYMJ
122•–•224•cm ブロンズ
B0792H4HFM
122•–•224•cm ブラック
B0792T5KMX
224•–•305•cm ニッケル
B0792TFYMK
224•–•305•cm ブロンズ
B0792FZBDD
224•–•305•cm ブラック
保証について
この製品の保証書のコピーを入手するには:
ホームページ: amazon.jp/AmazonBasics/Warranty
-•または•-
カスタマーサービス 0120-899-276 にご連絡ください。

44
フィードバック
気に入っていただけましたか?お気に召しませんでしたか?
カスタマーレビューでお知らせください。
Amazonベーシック•は、皆様の高い水準に答えることのできるような消費者志向型の製品をお
届けするのを旨としています。この製品についてのレビューで製品についてのご意見をお聞か
せください。
レビューはこちらへ:•amazon.jp/review/review-your-purchases#
更なるサービスについては:
こちらのリンクへ•amazon.jp/gp/help/customer/contact-us
-•または•-
カスタマーサービス•0120-899-276•にご連絡ください。

45
欢迎指南
•
中文
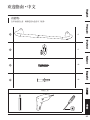
内装物:
在开始组装之前,确保包装内包含以下组件:
1
x1
2
x1
3
x6
4
x6
所需工具

46
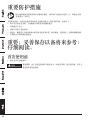
重要防护措施
请仔细阅读指导说明并保存以备将来使用。如果本产品被交付给第三方,须将这些指
导说明书一并转交。
当使用本品时,应该总是遵守基本的安全措施以减少人身伤害的风险,包括以下:
• 将产品安装在安全的、儿童触碰不到的很少接触的地方。
• 勿倚靠在产品上。
• 仅将产品用于悬挂窗帘。
•
钻孔时,确保您不会损坏到墙内的任何电线或者水管。如有疑虑,使用电压/金属探测器检测。
• 定期检查并紧固螺丝连接处。
重要:妥善保存以备将来参考:
仔细阅读。
首次使用前
• 检查是否有运输损坏。
窒息风险!由于这些包装材料可能会成为(如窒息等的)潜在危险源,请让儿
童远离所有包装材料。
危险

47
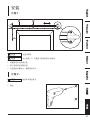
安装
步骤 1:
1
2
长度可调节。
中心挂架(2)应被置于窗帘杆的中间部位。
• 伸展窗帘杆至预期长度。
• 将产品放置在预期位置。
• 为挂架标识螺丝孔。确保挂架水平。
步骤 2:
使用6.35毫米钻头。
• 钻孔。
注意
注意
注意

48
安装
步骤 3:
3
4
随附的螺丝(3)和墙插(4)适用于清水墙。
• 插入墙插(4)。
• 用螺丝(3)紧固挂架。
步骤 4:
• 从挂架上拧下窗帘杆。
• 将窗帘放在杆上。
注意

49
安装
步骤 5:
• 将窗帘杆拧回挂架。
步骤 6:
• 让窗帘包裹住两个挂架并适当打褶,使窗帘紧贴墙壁挂好且看上去丰盈饱满。

50
清洁和保养
• 如要清洁,使用柔软、微湿布擦拭。
• 切勿使用腐蚀性清洁剂、钢丝刷、磨料刷、金属的或锋利的器具清洁本品。
• 定期检查零部件,确保所有螺丝和螺栓均紧固。
规格
B0792MXSQT
122 – 224 厘米 银灰色
B0792TFYMJ
122 – 224 厘米 古铜色
B0792H4HFM
122 – 224 厘米 黑色
B0792T5KMX
224 – 305 厘米 银灰色
B0792TFYMK
224 – 305 厘米 古铜色
B0792FZBDD
224 – 305 厘米 黑色
保修信息
如需获得此产品的保修信息:
访问 amazon.cn/AmazonBasics/Warranty
— 或 —
拨打 400-810-5666 联系客服人员

51
反馈
喜欢这款产品?不喜欢这款产品?
让我们通过客户评论了解您的想法和意见。
亚马逊倍思以客户为导向,致力于供应满足客户高标准的产品。我们邀请您填写评论,分享您使
用产品的体验。
请访问:amazon.cn/review/review-your-purchases
如需更多服务:
访问 amazon.cn/gp/help/customer/contact-us
— 或 —
拨打 400-810-5666 联系客服人员

MADE IN CHINA
amazon.com/AmazonBasics
-
 1
1
-
 2
2
-
 3
3
-
 4
4
-
 5
5
-
 6
6
-
 7
7
-
 8
8
-
 9
9
-
 10
10
-
 11
11
-
 12
12
-
 13
13
-
 14
14
-
 15
15
-
 16
16
-
 17
17
-
 18
18
-
 19
19
-
 20
20
-
 21
21
-
 22
22
-
 23
23
-
 24
24
-
 25
25
-
 26
26
-
 27
27
-
 28
28
-
 29
29
-
 30
30
-
 31
31
-
 32
32
-
 33
33
-
 34
34
-
 35
35
-
 36
36
-
 37
37
-
 38
38
-
 39
39
-
 40
40
-
 41
41
-
 42
42
-
 43
43
-
 44
44
-
 45
45
-
 46
46
-
 47
47
-
 48
48
-
 49
49
-
 50
50
-
 51
51
-
 52
52


en otros idiomas
- français: Amazon B0792H4HFM Manuel utilisateur
- italiano: Amazon B0792H4HFM Manuale utente
- Deutsch: Amazon B0792H4HFM Benutzerhandbuch
- 日本語: Amazon B0792H4HFM ユーザーマニュアル
Artículos relacionados
Otros documentos
-
 AmazonBasics B07PFFFFMT Manual de usuario
-
Amazon Basics B0775YFK3P Manual de usuario
-
AmazonBasics Folding Bike Lock El manual del propietario
-
-
 AmazonBasics B07762NXPM Manual de usuario
-
 AmazonBasics B07BM92FML Manual de usuario
-
-
 AmazonBasics B0775YPH6N Manual de usuario
-
 AmazonBasics GBAR-150-36 Manual de usuario
-
 AmazonBasics B088XT53Z9 Manual de usuario


