GeoSafari GeoSafari® Stereoscope Manual de usuario
- Categoría
- Microscopios
- Tipo
- Manual de usuario
Este manual también es adecuado para


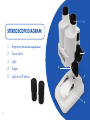
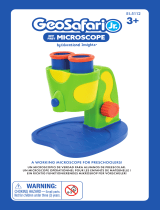
STEREOSCOPE DIAGRAM
1. Eyepiece (10x and 20x magnication)
2. Focus knob
3. Light
4. Stage
5. Light on/off button
1
2
5
4
3
1

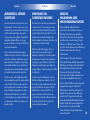
WELCOME, YOUNG SCIENTIST!
Science is all about exploration and discovery. Your new microscope is an instrument
with lenses for making small objects appear larger so they can be studied. There
are millions of plants, animals, fossils, and rocks that you can scope out—in amazing
detail—with this new tool.
In today’s technological world, every eld of science uses microscopes. Microscopes
are used by biologists to study microorganisms, by geologists to study rocks and
minerals, by archaeologists to study ancient artifacts, and by astronomers to study
fallen meteorites.
The GeoSafari Stereoscope you just unpacked is perfect for viewing rocks and fossils.
It is a special kind of microscope that allows you to look with both eyes at once to see
ne detail on 3D objects. Get started with one of the included rocks and then keep
exploring your world to nd new objects to study!
2

• Use a Phillips-head screwdriver to remove the battery
door screws.
• Stereoscope requires 2 AA batteries, not included.
• Batteries must be inserted with the correct polarity.
• Do not mix old and new batteries.
• Do not recharge non-rechargeable batteries.
• Do not mix different types of batteries: alkaline, standard
(carbon zinc), or rechargeable batteries.
• Only use batteries of the same or equivalent type.
• Remove exhausted batteries from the unit.
• Do not short-circuit the supply terminals.
• Only charge rechargeable batteries under
adult supervision.
• Remove rechargeable batteries from the Stereoscope
before charging.
• To prevent corrosion and possible damage to the product,
it is recommended to remove the batteries from the units if
they will not be used for more than two weeks.
• Please retain these instructions for future reference.
BATTERY INSTALLATION INSTRUCTIONS
Note: Before installing batteries, check to make sure there are no eyepieces in the Stereoscope. If there
are, remove them before turning the Stereoscope over to prevent them from breaking.
3
AA
AA

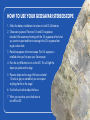
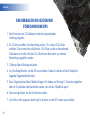
HOW TO USE YOUR GEOSAFARI STEREOSCOPE
1. Follow the battery installation instructions to install 2 AA batteries.
2. Choose an eyepiece. There are 10x and 20x eyepieces
included. We recommend starting with the 10x eyepiece to nd what
you want to inspect and then increasing to the 20x eyepiece later
to get a closer look.
3. Place the eyepiece in the microscope. The 10x eyepiece is
installed when you rst open your Stereoscope.
4. Press the on/off button to turn on the LED. This will light the
object you place on the stage.
5. Place an object on the stage. We have included
12 rocks to get you started but you can inspect
anything that ts on the stage!
6. Turn the focus knob to adjust the focus.
7. When you are done, press the button to
turn off the LED.

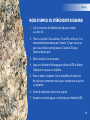
There are 3 main types, or classes, of rocks in the world and in this set. They are igneous,
metamorphic, and sedimentary.
Igneous rocks are formed when magma (molten rock deep in the earth) cools and
hardens. When magma escapes from inside the earth, it is called lava.
Metamorphic rocks are formed when one type or rock changes (metamorphoses) into a new
type of rock due to extreme heat and pressure inside the earth.
Sedimentary rocks are formed when layers of material are added on top of existing rock over a
long period of time. Sedimentary rocks are usually soft and may break apart or crumble easily.
*Rock colors and features may vary.
5

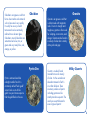
Obsidian is an igneous rock that
forms when molten rock material
such as lava cools very quickly.
It usually has a very smooth
texture and is also commonly
referred to as volcanic glass.
Obsidian is mostly black but can
sometimes be brown, tan, or
green and very rarely blue, red,
orange, or yellow.
Pyrite is a mineral and has
a bright, metallic nish. It is
commonly called “fool’s gold”
since it looks so much like
gold. Use your Stereoscope to
nd the gold ecks in the ore.
Quartz is a widely found
mineral that consists mainly
of silica. It is the second-most
abundant mineral in Earth’s
crust after feldspar. There
are many varieties of quartz
including gemstones like
amethyst and rose quartz. The
sand you see at the beach is
even a type of quartz!
Granite is an igneous rock that
is often mixed with magmatic
rocks. Due to its strength and
toughness, granite is often used
for sculpting, construction, and
design. Granite can be found in
a variety of colors but is mainly
white, pink and gray.
Obsidian
Pyrite Ore Milky Quartz
Granite
6

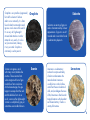
Tufa is a deposit of calcium
carbonate, which is also what
makes up an eggshell. It is a
porous rock that often forms
around mineral springs.
Gneiss is a metamorphic rock
that can be identied by its
bands of varying composition.
Gneiss often forms around
convergent plate boundaries
and forms under very high
temperature and pressure.
Marble is a metamorphic
rock composed most commonly
of calcite. It is formed when
limestone is subjected to
heat and pressure inside the
earth. Marble is commonly
used for sculpting, construction,
and design.
Muscovite is a mineral
belonging to the Mica family.
As a mineral, it can be found in
all three types of rock. It can be
sliced into thin, clear sheets and
therefore has been used to make
windows. It can also be crushed
and used to add a glitter effect
to paints or cosmetics.
Calcareous
Tufa
Gneiss Marble
Muscovite
7

Graphite is a crystalline (organized)
form of the element Carbon
and it occurs naturally. It is often
found in both metamorphic and
igneous rocks around the world.
It is a very soft, lightweight
mineral and attaches to other
materials very easily. It is also
very heat-resistant, making
it very versatile. Graphite is
commonly used in pencils.
Scoria is an igneous rock
with many round, bubble-like
cavities. These cavities form
when magma with lots of gas
inside ows from a volcano.
As the lava emerges, the gas
begins to escape from the rock
and the bubbles form. As a
result, scoria is often lightweight.
Scoria is usually black, gray, or
sometimes even reddish brown.
Limestone is a sedimentary
rock and is composed mainly
of calcium carbonate as the
mineral calcite. Limestone
usually forms in calm, shallow
water from the accumulation of
shell, coral, and algae. Because
of this, limestone is often found in
tropical locations with abundant
reef life and activity. Chalk is a
variety of limestone.
Selenite is a variety of gypsum
and is characterized by a clear
appearance. Gypsum is a soft
mineral and is most often found
in sedimentary deposits.
Graphite
Scoria Limestone
Selenite
8

DIAGRAMA DEL ESTEREOSCOPIO
1. Ocular (10 y 20 aumentos)
2. Rueda para enfocar
3. Luz
4. Platina
5. Botón de encendido/apagado
DIAGRAMME DU STÉRÉOSCOPE
1. Oculaire (grossissement 10x et 20x)
2. Molette de mise au point
3. Éclairage
4. Platine
5. Marche/arrêt de l’éclairage
BESTANDTEILE DES STEREOMIKROSKOPS
1. Okular (10-fache und
20-fache Vergrößerung)
2. Fokussierring
3. Beleuchtung
4. Objekttisch
5. An-/Aus-Knopf für Beleuchtung
1
2
5
4
3
9
Deustche Français Español

10
¡BIENVENIDOS, JÓVENES
CIENTÍFICOS!
La ciencia se basa en la exploración y en el
descubrimiento. Tu nuevo microscopio es un
instrumento que cuenta con lentes con las que
podrás aumentar la imagen de pequeños
objetos para poder estudiarlos. Hay millones
de plantas, animales, fósiles y rocas que
puedes visualizar con todo lujo de detalle con
esta nueva herramienta.
Hoy en día, en la era de la tecnología, se
utilizan microscopios en todos los campos de
la ciencia. Los biólogos utilizan microscopios
para estudiar microorganismos, los geólogos
los usan para estudiar rocas y minerales, los
arqueólogos para estudiar artefactos antiguos
y los astrónomos para estudiar meteoritos.
El estereoscopio de GeoSafari que acabas
de desempaquetar es perfecto para visualizar
rocas y fósiles. Es un microscopio especial
que te permite mirar con ambos ojos a la vez
para ver detalles muy pequeños en objetos
tridimensionales. Empieza con una de las
rocas incluidas y luego, explora el mundo que
te rodea para encontrar nuevos objetos que
puedas estudiar.
BIENVENUE À TOI,
SCIENTIFIQUE EN HERBE !
En science, il n’est question que d’exploration
et de découverte. Ton nouveau microscope
est un instrument doté d’objectifs pour grossir
les petits objets an de les étudier. Ce nouvel
instrument va te permettre d’examiner des
millions de plantes, d’animaux, de fossiles et de
roches, dans les moindres détails.
Dans le monde technologique actuel, on
utilise des microscopes dans toutes les
disciplines scientiques. Ils sont utilisés par les
biologistes pour étudier les microorganismes,
les géologues pour étudier les roches et les
minéraux, les archéologues pour étudier les
vestiges antiques et les astronomes pour étudier
les météorites.
Le stéréoscope GeoSafari que tu viens de
déballer est idéal pour étudier les roches et
les fossiles. Ce type particulier de microscope
te permet d’observer des objets en 3D très
détaillés avec les deux yeux à la fois. Tu
peux commencer par observer l’une des
roches fournies avant de continuer à explorer
le monde qui t’entoure à la recherche de
nouveaux objets à examiner !
HERZLICH
WILLKOMMEN, LIEBE
HWUCHSWISSENSCHAFTLER!
Wissenschaftliches Arbeiten heißt, zu
untersuchen und zu entdecken. Dein neues
Mikroskop ist ein mit Linsen ausgestattetes
Instrument, mit dem sich kleine Gegenstände
vergrößern und untersuchen lassen. Es gibt
Millionen von Panzen, Tieren, Fossilien und
Gesteinen, die du mit diesem neuen Werkzeug
in faszinierenden Details unter die Lupe
nehmen kannst.
In der heutigen technologisch dominierten
Welt setzt die Wissenschaft auf jedem Gebiet
Mikroskope ein. Biologen untersuchen damit
Mikroorganismen, Geologen untersuchen
Gesteine und Mineralien, Archäologen
untersuchen uralte Artefakte und Astronomen
untersuchen herabgefallene Meteoriten.
Das GeoSafari 3D-Mikroskop, das du gerade
ausgepackt hast, eignet sich perfekt zur
Betrachtung von Gesteinen und Fossilien. Es
handelt sich um ein besonderes Mikroskop,
mit dem sich 3D-Gegenständen mit beiden
Augen gleichzeitig detailliert betrachten lassen.
Beginne einfach mit einem der mitgelieferten
Gesteine und suche in deinem Umfeld
dann nach weiteren Gegenständen, die du
untersuchen kannst!
Español Français Deustche

11
CÓMO USAR TU ESTEREOSCOPIO GEOSAFARI
1. Sigue las instrucciones para la instalación de las 2 pilas AA.
2. Elige un ocular. El estereoscopio incluye un ocular de 10 aumentos y otro
de 20. Es recomendable empezar con el ocular de 10 aumentos
para decidir lo que quieres inspeccionar y, más tarde, cambiar al de
20 aumentos para verlo más de cerca.
3. Coloca el ocular en el microscopio.
4. Pulsa el botón de encendido/apagado para encender
la luz LED. La luz iluminará el objeto que coloques en
la platina.
5. Coloca un objeto en la platina. Hemos incluido
12 rocas para que las uses en tus primeras
exploraciones, pero puedes inspeccionar
cualquier objeto que quepa en la platina.
6. Enfoca el objeto haciendo girar la rueda.
7. Cuando termines, presiona el botón
para apagar la luz LED.
Español

MODE D’EMPLOI DU STÉRÉOSCOPE GEOSAFARI
1. Suis les instructions d’installation des piles pour installer
es 2 piles AA.
2. Choisis un oculaire. Deux oculaires 10x et 20x sont fournis. Il est
recommandé de commencer par l’oculaire 10x pour trouver ce
que tu veux étudier, avant de passer à l’oculaire 20x pour
l’observer de plus près.
3. Place l’oculaire sur le microscope.
4. Appuie sur le bouton d’éclairage pour allumer la LED et éclairer
l’objet que tu vas poser sur la platine.
5. Place un objet sur la platine. Douze échantillons de roches ont
été inclus pour commencer, mais tu peux inspecter tout ce qui tient
sur la platine !
6. Tourne la molette pour faire la mise au point.
7. Lorsque tu as terminé, appuie sur le bouton pour éteindre la LED.
12
Français

13
DER GEBRAUCH DES GEOSAFARI
STEREOMIKROSKOPS
1. Beim Einsetzen von 2 AA-Batterien nach der entsprechenden
Anleitung vorgehen.
2. Ein Okular auswählen. Im Lieferumfang sind ein 10x- und ein 20x-Okular
enthalten. Zuerst nimmst du vielleicht das 10x-Okular, um die zu betrachtende
Stelle besser zu nden. Mit dem 20x-Okular kann diese dann zur näheren
Betrachtung vergrößert werden.
3. Okular auf das Mikroskop aufsetzen.
4. An-/Aus-Knopf drücken, um die LED einzuschalten. Dadurch wird der auf dem Objekttisch
liegende Gegenstand beleuchtet.
5. Einen Gegenstand auf den Objekttisch legen. Wir haben zum Einstieg 12 Gesteine mitgeliefert,
aber im Grunde kann alles betrachtet werden, was auf den Objekttisch passt!
6. Fokussierring drehen, um die Schärfe einzustellen.
7. Am Schluss nicht vergessen, den Knopf zu drücken, um die LED wieder auszuschalten.
Deustche

14
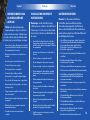
INSTRUCCIONES PARA
LA INSTALACIÓN DE
LAS PILAS
Nota: antes de instalar las pilas,
comprueba que no hay un ocular colo-
cado en el estereoscopio. Si hubiera uno
colocado, retíralo antes de darle la vuelta
al estereoscopio para evitar que se rompa.
• Para colocar las pilas, aoja primero los tornillos
con un destornillador de estrella y retira la tapa
del compartimento de las pilas.
• El estereoscopio funciona con 2 pilas AA, no
incluidas.
• Inserta las pilas con la polaridad correcta.
• No mezcles pilas nuevas y viejas.
• No recargues pilas no recargables.
• No mezcles pilas alcalinas, estándar
(zinc-carbono) o recargables (níquel-cadmio).
• Usa solo pilas de la misma clase o equivalentes.
• Retira siempre las pilas agotadas o casi agota-
das del producto.
• Carga las pilas recargables solo bajo la super-
visión de un adulto.
• Retira las pilas recargables del juguete antes de
recargarlas.
• Retira las pilas si vas a guardar el producto
durante mucho tiempo.
• Guarda estas instrucciones para futuras
consultas.
INSTALLATION DES PILES ET
INSTRUCTIONS
Remarque : avant d’installer les piles,
vérier qu’aucun oculaire n’est installé sur le
stéréoscope. Si c’est le cas, les retirer avant
de retourner le stéréoscope an d’éviter de
les casser.
• Pour installer les piles, dévisser la vis à l’aide
d’un tournevis cruciforme pour ouvrir le clapet.
Installer les piles dans le sens indiqué à l’intérieur
du compartiment.
• Le stéréoscope fonctionne avec 2 piles AA non
fournies.
• Insérer les piles en respectant la polarité.
• Ne pas mélanger les piles neuves et usagées.
• Ne pas recharger les piles non rechargeables.
• Ne pas mélanger les piles alcalines, standard
(carbone-zinc) ou rechargeables (nickel-cad-
mium).
• Utiliser uniquement des piles du même type ou
de type équivalent.
• Toujours retirer les piles faibles ou déchargées
du produit.
• Charger uniquement les piles rechargeables sous
la supervision d’un adulte.
• Retirer les piles rechargeables avant de les
charger.
• Retirer les piles si le produit ne va pas être utilisé
pendant une longue période de temps.
• Veuillez conserver ces instructions pour toute
référence ultérieure.
BATTERIEN EINSETZEN
Hinweis: Vor Einsetzen der Batterien
sicherstellen, dass keine Okulare auf dem
Stereomikroskop aufgesetzt sind. Falls doch,
diese vor dem Umdrehen des Stereomikroskops
zuerst entfernen, damit sie nicht herausfallen und
beschädigt werden können.
• Um die Batterien einzulegen, drehen Sie zuerst die
Schraube mit einem Kreuzschlitzschraubendreher
heraus und entfernen dann den Deckel des
Batteriefachs. Legen Sie die Batterien wie im
Batteriefach angezeigt ein.
• Das Stereomikroskop benötigt 2 AA-Batterien (nicht
enthalten).
• Beim Einsetzen der Batterien auf die richtige
Ausrichtung der Pole achten.
• Nicht neue und alte Batterien zusammen verwenden.
• Nicht versuchen, nichtauadbare Batterien aufzuladen.
• Nicht Alkaline-, herkömmliche (Zink-Kohle) und
wiederauadbare (Nickel-Cadmium) Batterien
zusammen verwenden.
• Nur Batterien desselben oder eines geeigneten Typs
verwenden.
• Entfernen Sie schwache oder leere Batterien immer aus
dem Produkt.
• Wiederauadbare Batterien nur unter Aufsicht
Erwachsener auaden.
• Wiederauadbare Batterien vor dem Auaden aus
dem Spielgerät entnehmen.
• Entfernen Sie die Batterien, falls das Produkt für
längere Zeit weggeräumt wird.
• Bewahren Sie diese Anleitung bitte gut auf.
Español Français Deustche

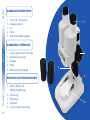
FIND ALL OF THESE AND MORE AT EDUCATIONALINSIGHTS.COM
EI-5305 GeoSafari
®
Omega Telescope
EI-5301 GeoSafari
®
Micropro™
95-Piece Microscope Set
Transcripción de documentos
1 STEREOSCOPE DIAGRAM 1. 2. 3. 4. 5. Eyepiece (10x and 20x magnification) Focus knob Light Stage Light on/off button 2 3 5 4 1 WELCOME, YOUNG SCIENTIST! Science is all about exploration and discovery. Your new microscope is an instrument with lenses for making small objects appear larger so they can be studied. There are millions of plants, animals, fossils, and rocks that you can scope out—in amazing detail—with this new tool. In today’s technological world, every field of science uses microscopes. Microscopes are used by biologists to study microorganisms, by geologists to study rocks and minerals, by archaeologists to study ancient artifacts, and by astronomers to study fallen meteorites. The GeoSafari Stereoscope you just unpacked is perfect for viewing rocks and fossils. It is a special kind of microscope that allows you to look with both eyes at once to see fine detail on 3D objects. Get started with one of the included rocks and then keep exploring your world to find new objects to study! 2 BATTERY INSTALLATION INSTRUCTIONS Note: Before installing batteries, check to make sure there are no eyepieces in the Stereoscope. If there are, remove them before turning the Stereoscope over to prevent them from breaking. • Use a Phillips-head screwdriver to remove the battery door screws. • Stereoscope requires 2 AA batteries, not included. • Batteries must be inserted with the correct polarity. • Do not mix old and new batteries. • Only use batteries of the same or equivalent type. • Remove exhausted batteries from the unit. • Do not short-circuit the supply terminals. • Only charge rechargeable batteries under adult supervision. • Remove rechargeable batteries from the Stereoscope before charging. • To prevent corrosion and possible damage to the product, it is recommended to remove the batteries from the units if they will not be used for more than two weeks. 3 • Please retain these instructions for future reference. AA • Do not mix different types of batteries: alkaline, standard (carbon zinc), or rechargeable batteries. AA • Do not recharge non-rechargeable batteries. HOW TO USE YOUR GEOSAFARI STEREOSCOPE 1. Follow the battery installation instructions to install 2 AA batteries. 2. Choose an eyepiece. There are 10x and 20x eyepieces included. We recommend starting with the 10x eyepiece to find what you want to inspect and then increasing to the 20x eyepiece later to get a closer look. 3. Place the eyepiece in the microscope. The 10x eyepiece is installed when you first open your Stereoscope. 4. Press the on/off button to turn on the LED. This will light the object you place on the stage. 5. Place an object on the stage. We have included 12 rocks to get you started but you can inspect anything that fits on the stage! 6. Turn the focus knob to adjust the focus. 7. When you are done, press the button to turn off the LED. There are 3 main types, or classes, of rocks in the world and in this set. They are igneous, metamorphic, and sedimentary. Igneous rocks are formed when magma (molten rock deep in the earth) cools and hardens. When magma escapes from inside the earth, it is called lava. Metamorphic rocks are formed when one type or rock changes (metamorphoses) into a new type of rock due to extreme heat and pressure inside the earth. Sedimentary rocks are formed when layers of material are added on top of existing rock over a long period of time. Sedimentary rocks are usually soft and may break apart or crumble easily. *Rock colors and features may vary. 5 Obsidian is an igneous rock that forms when molten rock material such as lava cools very quickly. It usually has a very smooth texture and is also commonly referred to as volcanic glass. Obsidian is mostly black but can sometimes be brown, tan, or green and very rarely blue, red, orange, or yellow. Obsidian Pyrite Ore Pyrite is a mineral and has a bright, metallic finish. It is commonly called “fool’s gold” since it looks so much like gold. Use your Stereoscope to find the gold flecks in the ore. Granite Granite is an igneous rock that is often mixed with magmatic rocks. Due to its strength and toughness, granite is often used for sculpting, construction, and design. Granite can be found in a variety of colors but is mainly white, pink and gray. Quartz is a widely found mineral that consists mainly of silica. It is the second-most abundant mineral in Earth’s crust after feldspar. There are many varieties of quartz including gemstones like amethyst and rose quartz. The sand you see at the beach is even a type of quartz! Milky Quartz 6 Calcareous Tufa Tufa is a deposit of calcium carbonate, which is also what makes up an eggshell. It is a porous rock that often forms around mineral springs. Muscovite is a mineral belonging to the Mica family. As a mineral, it can be found in all three types of rock. It can be sliced into thin, clear sheets and therefore has been used to make windows. It can also be crushed and used to add a glitter effect to paints or cosmetics. Gneiss Gneiss is a metamorphic rock that can be identified by its bands of varying composition. Gneiss often forms around convergent plate boundaries and forms under very high temperature and pressure. 7 Muscovite Marble Marble is a metamorphic rock composed most commonly of calcite. It is formed when limestone is subjected to heat and pressure inside the earth. Marble is commonly used for sculpting, construction, and design. Graphite is a crystalline (organized) form of the element Carbon and it occurs naturally. It is often found in both metamorphic and igneous rocks around the world. It is a very soft, lightweight mineral and attaches to other materials very easily. It is also very heat-resistant, making it very versatile. Graphite is commonly used in pencils. Scoria is an igneous rock with many round, bubble-like cavities. These cavities form when magma with lots of gas inside flows from a volcano. As the lava emerges, the gas begins to escape from the rock and the bubbles form. As a result, scoria is often lightweight. Scoria is usually black, gray, or sometimes even reddish brown. Graphite Selenite Selenite is a variety of gypsum and is characterized by a clear appearance. Gypsum is a soft mineral and is most often found in sedimentary deposits. Scoria Limestone is a sedimentary rock and is composed mainly of calcium carbonate as the mineral calcite. Limestone usually forms in calm, shallow water from the accumulation of shell, coral, and algae. Because of this, limestone is often found in tropical locations with abundant reef life and activity. Chalk is a variety of limestone. Limestone 8 Español DIAGRAMA DEL ESTEREOSCOPIO 1. 2. 3. 4. 5. Ocular (10 y 20 aumentos) Rueda para enfocar Luz Platina Botón de encendido/apagado 1 Français DIAGRAMME DU STÉRÉOSCOPE 1. 2. 3. 4. 5. Oculaire (grossissement 10x et 20x) Molette de mise au point Éclairage Platine Marche/arrêt de l’éclairage Deustche BESTANDTEILE DES STEREOMIKROSKOPS 9 1. Okular (10-fache und 20-fache Vergrößerung) 2. Fokussierring 3. Beleuchtung 4. Objekttisch 5. An-/Aus-Knopf für Beleuchtung 2 3 5 4 Español Français ¡BIENVENIDOS, JÓVENES CIENTÍFICOS! BIENVENUE À TOI, SCIENTIFIQUE EN HERBE ! La ciencia se basa en la exploración y en el descubrimiento. Tu nuevo microscopio es un instrumento que cuenta con lentes con las que podrás aumentar la imagen de pequeños objetos para poder estudiarlos. Hay millones de plantas, animales, fósiles y rocas que puedes visualizar con todo lujo de detalle con esta nueva herramienta. En science, il n’est question que d’exploration et de découverte. Ton nouveau microscope est un instrument doté d’objectifs pour grossir les petits objets afin de les étudier. Ce nouvel instrument va te permettre d’examiner des millions de plantes, d’animaux, de fossiles et de roches, dans les moindres détails. Hoy en día, en la era de la tecnología, se utilizan microscopios en todos los campos de la ciencia. Los biólogos utilizan microscopios para estudiar microorganismos, los geólogos los usan para estudiar rocas y minerales, los arqueólogos para estudiar artefactos antiguos y los astrónomos para estudiar meteoritos. Dans le monde technologique actuel, on utilise des microscopes dans toutes les disciplines scientifiques. Ils sont utilisés par les biologistes pour étudier les microorganismes, les géologues pour étudier les roches et les minéraux, les archéologues pour étudier les vestiges antiques et les astronomes pour étudier les météorites. El estereoscopio de GeoSafari que acabas de desempaquetar es perfecto para visualizar rocas y fósiles. Es un microscopio especial que te permite mirar con ambos ojos a la vez para ver detalles muy pequeños en objetos tridimensionales. Empieza con una de las rocas incluidas y luego, explora el mundo que te rodea para encontrar nuevos objetos que puedas estudiar. Le stéréoscope GeoSafari que tu viens de déballer est idéal pour étudier les roches et les fossiles. Ce type particulier de microscope te permet d’observer des objets en 3D très détaillés avec les deux yeux à la fois. Tu peux commencer par observer l’une des roches fournies avant de continuer à explorer le monde qui t’entoure à la recherche de nouveaux objets à examiner ! Deustche HERZLICH WILLKOMMEN, LIEBE HWUCHSWISSENSCHAFTLER! Wissenschaftliches Arbeiten heißt, zu untersuchen und zu entdecken. Dein neues Mikroskop ist ein mit Linsen ausgestattetes Instrument, mit dem sich kleine Gegenstände vergrößern und untersuchen lassen. Es gibt Millionen von Pflanzen, Tieren, Fossilien und Gesteinen, die du mit diesem neuen Werkzeug in faszinierenden Details unter die Lupe nehmen kannst. In der heutigen technologisch dominierten Welt setzt die Wissenschaft auf jedem Gebiet Mikroskope ein. Biologen untersuchen damit Mikroorganismen, Geologen untersuchen Gesteine und Mineralien, Archäologen untersuchen uralte Artefakte und Astronomen untersuchen herabgefallene Meteoriten. Das GeoSafari 3D-Mikroskop, das du gerade ausgepackt hast, eignet sich perfekt zur Betrachtung von Gesteinen und Fossilien. Es handelt sich um ein besonderes Mikroskop, mit dem sich 3D-Gegenständen mit beiden Augen gleichzeitig detailliert betrachten lassen. Beginne einfach mit einem der mitgelieferten Gesteine und suche in deinem Umfeld dann nach weiteren Gegenständen, die du untersuchen kannst! 10 Español CÓMO USAR TU ESTEREOSCOPIO GEOSAFARI 1. Sigue las instrucciones para la instalación de las 2 pilas AA. 2. Elige un ocular. El estereoscopio incluye un ocular de 10 aumentos y otro de 20. Es recomendable empezar con el ocular de 10 aumentos para decidir lo que quieres inspeccionar y, más tarde, cambiar al de 20 aumentos para verlo más de cerca. 3. Coloca el ocular en el microscopio. 4. Pulsa el botón de encendido/apagado para encender la luz LED. La luz iluminará el objeto que coloques en la platina. 5. Coloca un objeto en la platina. Hemos incluido 12 rocas para que las uses en tus primeras exploraciones, pero puedes inspeccionar cualquier objeto que quepa en la platina. 6. Enfoca el objeto haciendo girar la rueda. 7. Cuando termines, presiona el botón para apagar la luz LED. 11 Français MODE D’EMPLOI DU STÉRÉOSCOPE GEOSAFARI 1. Suis les instructions d’installation des piles pour installer es 2 piles AA. 2. Choisis un oculaire. Deux oculaires 10x et 20x sont fournis. Il est recommandé de commencer par l’oculaire 10x pour trouver ce que tu veux étudier, avant de passer à l’oculaire 20x pour l’observer de plus près. 3. Place l’oculaire sur le microscope. 4. Appuie sur le bouton d’éclairage pour allumer la LED et éclairer l’objet que tu vas poser sur la platine. 5. Place un objet sur la platine. Douze échantillons de roches ont été inclus pour commencer, mais tu peux inspecter tout ce qui tient sur la platine ! 6. Tourne la molette pour faire la mise au point. 7. Lorsque tu as terminé, appuie sur le bouton pour éteindre la LED. 12 Deustche DER GEBRAUCH DES GEOSAFARI STEREOMIKROSKOPS 1. Beim Einsetzen von 2 AA-Batterien nach der entsprechenden Anleitung vorgehen. 2. Ein Okular auswählen. Im Lieferumfang sind ein 10x- und ein 20x-Okular enthalten. Zuerst nimmst du vielleicht das 10x-Okular, um die zu betrachtende Stelle besser zu finden. Mit dem 20x-Okular kann diese dann zur näheren Betrachtung vergrößert werden. 3. Okular auf das Mikroskop aufsetzen. 4. An-/Aus-Knopf drücken, um die LED einzuschalten. Dadurch wird der auf dem Objekttisch liegende Gegenstand beleuchtet. 5. Einen Gegenstand auf den Objekttisch legen. Wir haben zum Einstieg 12 Gesteine mitgeliefert, aber im Grunde kann alles betrachtet werden, was auf den Objekttisch passt! 6. Fokussierring drehen, um die Schärfe einzustellen. 7. Am Schluss nicht vergessen, den Knopf zu drücken, um die LED wieder auszuschalten. 13 Español INSTRUCCIONES PARA LA INSTALACIÓN DE LAS PILAS Nota: antes de instalar las pilas, comprueba que no hay un ocular colocado en el estereoscopio. Si hubiera uno colocado, retíralo antes de darle la vuelta al estereoscopio para evitar que se rompa. • Para colocar las pilas, afloja primero los tornillos con un destornillador de estrella y retira la tapa del compartimento de las pilas. • El estereoscopio funciona con 2 pilas AA, no incluidas. • Inserta las pilas con la polaridad correcta. • No mezcles pilas nuevas y viejas. • No recargues pilas no recargables. • No mezcles pilas alcalinas, estándar (zinc-carbono) o recargables (níquel-cadmio). • Usa solo pilas de la misma clase o equivalentes. • Retira siempre las pilas agotadas o casi agotadas del producto. Français INSTALLATION DES PILES ET INSTRUCTIONS Remarque : avant d’installer les piles, vérifier qu’aucun oculaire n’est installé sur le stéréoscope. Si c’est le cas, les retirer avant de retourner le stéréoscope afin d’éviter de les casser. • Pour installer les piles, dévisser la vis à l’aide d’un tournevis cruciforme pour ouvrir le clapet. Installer les piles dans le sens indiqué à l’intérieur du compartiment. • Le stéréoscope fonctionne avec 2 piles AA non fournies. • Insérer les piles en respectant la polarité. Deustche BATTERIEN EINSETZEN Hinweis: Vor Einsetzen der Batterien sicherstellen, dass keine Okulare auf dem Stereomikroskop aufgesetzt sind. Falls doch, diese vor dem Umdrehen des Stereomikroskops zuerst entfernen, damit sie nicht herausfallen und beschädigt werden können. • Um die Batterien einzulegen, drehen Sie zuerst die Schraube mit einem Kreuzschlitzschraubendreher heraus und entfernen dann den Deckel des Batteriefachs. Legen Sie die Batterien wie im Batteriefach angezeigt ein. • Das Stereomikroskop benötigt 2 AA-Batterien (nicht enthalten). • Ne pas mélanger les piles neuves et usagées. • Beim Einsetzen der Batterien auf die richtige Ausrichtung der Pole achten. • Ne pas recharger les piles non rechargeables. • Nicht neue und alte Batterien zusammen verwenden. • Ne pas mélanger les piles alcalines, standard (carbone-zinc) ou rechargeables (nickel-cadmium). • Nicht versuchen, nichtaufladbare Batterien aufzuladen. • Utiliser uniquement des piles du même type ou de type équivalent. • Toujours retirer les piles faibles ou déchargées du produit. • Carga las pilas recargables solo bajo la supervisión de un adulto. • Charger uniquement les piles rechargeables sous la supervision d’un adulte. • Retira las pilas recargables del juguete antes de recargarlas. • Retirer les piles rechargeables avant de les charger. • Retira las pilas si vas a guardar el producto durante mucho tiempo. • Retirer les piles si le produit ne va pas être utilisé pendant une longue période de temps. • Guarda estas instrucciones para futuras consultas. • Veuillez conserver ces instructions pour toute référence ultérieure. • Nicht Alkaline-, herkömmliche (Zink-Kohle) und wiederaufladbare (Nickel-Cadmium) Batterien zusammen verwenden. • Nur Batterien desselben oder eines geeigneten Typs verwenden. • Entfernen Sie schwache oder leere Batterien immer aus dem Produkt. • Wiederaufladbare Batterien nur unter Aufsicht Erwachsener aufladen. • Wiederaufladbare Batterien vor dem Aufladen aus dem Spielgerät entnehmen. • Entfernen Sie die Batterien, falls das Produkt für längere Zeit weggeräumt wird. • Bewahren Sie diese Anleitung bitte gut auf. 14 FIND ALL OF THESE AND MORE AT EDUCATIONALINSIGHTS.COM EI-5305 GeoSafari® Omega Telescope EI-5301 GeoSafari® Micropro™ 95-Piece Microscope Set-
 1
1
-
 2
2
-
 3
3
-
 4
4
-
 5
5
-
 6
6
-
 7
7
-
 8
8
-
 9
9
-
 10
10
-
 11
11
-
 12
12
-
 13
13
-
 14
14
-
 15
15
-
 16
16


GeoSafari GeoSafari® Stereoscope Manual de usuario
- Categoría
- Microscopios
- Tipo
- Manual de usuario
- Este manual también es adecuado para
en otros idiomas
Otros documentos
-
 Educational Insights GeoSafari® Jr. My First Microscope Product Instructions
-
 Educational Insights GeoSafari® Jr. Kidnoculars® Extreme™ Product Instructions
-
 Educational Insights GeoSafari® Jr. Science Utility Vehicle Product Instructions
-
 Educational Insights GeoSafari® Jr. Talking Telescope Product Instructions
-
Plymovent Limestone feeder Manual de usuario
-
Celestron Microscope Kit Manual de usuario
-
Celestron Cosmos Manual de usuario
-
-
 Educational Insights GeoSafari® Jr. Mighty Magnifier™ Manual de usuario
-


