Insignia NS-DCDCHH2 guía de instalación rápida
- Tipo
- guía de instalación rápida

QUICK SETUP GUIDE
Full HD Dual Camera
Dash Cam
NS-DCDCHH2
FIND YOUR USER GUIDE ONLINE!
Go to www.insigniaproducts.com, enter your model in
the search box, then press ENTER. Next to Features,
click Support & Downloads, then next to User Guide,
click the language you want.
Before using your new product, please read these instructions to prevent any damage.
PACKAGE CONTENTS
• Dual Camera Dash Cam
• USB cable
• Vehicle power adapter
FEATURES
• 1080p resolution on front and rear-facing cameras
• G-force sensor automatically starts recording on impact
• Built-in microphone to capture audio
• Loop recording overwrites the oldest footage and prevents
you from running out of storage
Refer to the online User Guide for more button information.
INSTALLING YOUR DASH CAM
Note: Use a card with 8 GB to 256 GB of memory. We recommend using a card
with the highest memory capacity available. Higher memory capacity lets
you record more.
1 Insert a microSD memory card (8 GB to 256 GB memory capacity).
2 Clean and thoroughly dry the windshield area where you want to
mount your dash cam.
3 Insert and slide the mounting bracket on the suction cap into the
mounting slot on the top of your dash cam.
4 Peel the protective lm from the mounting bracket and the dash
cam lens.
5 Position the suction cup on the windshield, then move the
mounting bracket switch clockwise until you hear a click.
6 Connect the provided USB cable to the USB jack on your dash cam,
then thread the cable from your dash cam, around the outer edge
of the windshield, and to a 12V vehicle power socket.
7 Plug the cable into the vehicle power adapter, then plug the
adapter into the power socket and turn on your vehicle. Your dash
cam starts automatically.
Note: The rst time you insert a new SD card into your dash cam, the
screen will prompt you with one of the following error messages if there is
an issue with the card:
• CARD ERROR Replace SD Card - indicates that the new card is not
available to your dash cam (the card may be incompatible or
damaged). Remove the SD card and replace it with another. Only SD
cards between 8 and 256 GB should be used.
OR
• CARD ERROR FORMAT Card in Camera - indicates that the formatting
on the new card is not compatible with your dash cam. Use the Format
tool to format the card. This will delete all of the information on your
dash cam, so please save your les rst.
8 Rotate the mounting bracket to adjust the viewing angle as
needed.
See your online User Guide for information about dash cam settings.
TURNING ON YOUR DASH CAM MANUALLY
1 Press and hold the power button to turn on your dash cam.
2 Press and hold the power button to turn o your dash cam.
Note: If you have an SD card installed and if your dash cam is connected to
a vehicle power socket, it starts recording automatically when you start
your vehicle. You should review your rst video to make sure that the
camera is positioned correctly and that the video recorded correctly.
RECORDING VIDEO WITH YOUR DASH CAM
1 Make sure that your dash cam is turned on.
2 Press the OK button to begin recording.
3 Press the OK button again to stop recording.
TROUBLESHOOTING & SPECIFICATIONS
For troubleshooting and specications information see your
online User Guide.
IMPORTANT SAFETY INSTRUCTIONS
• Always read the safety instructions and the User Guide carefully. Keep the User Guide for future
reference.
• Do not drop or allow forceful impacts to your dash cam, or install it in locations exposed to heavy
vibrations.
• Do not disassemble or modify your dash cam in any way. Disassembly or modication may not only
void the warranty, but may also cause damage.
• Do not use or store your dash cam in damp locations. Liquid entering your dash cam may cause
damage or lead to res or electric shock.
• Do not operate your dash cam in extreme heat conditions. If your vehicle is parked in a hot sunny
climate, let your vehicle cool down before using your dash cam.
LEGAL NOTICES
FCC Part 15
This device complies with Part 15 of the FCC Rules. Operation is subject to the following two conditions:
(1) this device may not cause harmful interference, and (2) this device must accept any interference
received, including interference that may cause undesired operation.
This equipment has been tested and found to comply with the limits for a Class B digital device,
pursuant to Part 15 of the FCC Rules. These limits are designed to provide reasonable protection
against harmful interference in a residential installation. This equipment generates, uses, and can
radiate radio frequency energy and, if not installed and used in accordance with the instructions, may
cause harmful interference to radio communications.
However, there is no guarantee that interference will not occur in a particular installation. If this
equipment does cause harmful interference to radio or television reception, which can be determined
by turning the equipment o and on, the user is encouraged to try to correct the interference by one or
more of the following measures:
• Reorient or relocate the receiving antenna.
• Increase the separation between the equipment and receiver.
• Connect the equipment into an outlet on a circuit dierent from that to which the receiver is
connected.
• Consult the dealer or an experienced radio/TV technician for help.
Warning: Changes or modications not expressly approved by the party responsible for compliance
could void the user's authority to operate the equipment.
CAN ICES-3(B)/NMB-3(B)
ONEYEAR LIMITED WARRANTY
Visit www.insigniaproducts.com for details.
CONTACT INSIGNIA:
For customer service, call 877-467-4289 (U.S. and Canada) or
01-800-926-3000 (Mexico)
www.insigniaproducts.com
INSIGNIA is a trademark of Best Buy and its aliated companies
Distributed by Best Buy Purchasing, LLC
7601 Penn Ave South, Richeld, MN 55423 U.S.A.
©2020 Best Buy. All rights reserved.
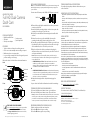
Front
Power button
Up button
Down button
OK button
Front lens
Speaker
Back
Screen
Indicator LED
Back lens
Microphone
• Suction mount
• Quick Setup Guide
V2 ENGLISH 20-0331
MicroSD card

GUÍA DE INSTALACIÓN RÁPIDA
Cámara doble de alta
definición integral de
tablero
NS-DCDCHH2
¡CONSULTE SU GUÍA DEL USUARIO EN LÍNEA!
Visite www.insigniaproducts.com, ingrese su modelo en el
cuadro de búsqueda y presione ENTER (Entrar). A orillas de
Features (Características), haga clic en Support & Downloads (Soporte y
descargas) y después, a orillas de User Guide (Guía del usuario), haga clic
en el idioma deseado.
Antes de usar su producto nuevo, lea este instructivo para prevenir cualquier daño.
CONTENIDO DEL PAQUETE
• Cámara doble de tablero
• Cable USB
• Adaptador de alimentación para el auto
CARACTERÍSTICAS
• Cámaras frontal y posterior con una resolución de 1080p
• El sensor G-force inicia automáticamente la grabación al
impacto.
• Micrófono incorporado para capturar el audio
• La grabación en bucle borra las secuencias más viejas y le
impide quedarse sin espacio de almacenamiento
Reérase a su Guía del usuario en línea para más información
sobre el botón.
INSTALACIÓN DE SU CÁMARA DE TABLERO
Nota: Use una tarjeta con 8 a 256 GB de memoria. Se recomienda usar una
tarjeta con la capacidad de memoria la más elevada disponible. Una memoria
de alta capacidad le permite grabar más.
1 Inserte una tarjeta de memoria microSD (8 a 256 GB de capacidad).
2 Limpie y seque a fondo la zona del parabrisas donde se va a
montar la cámara de tablero.
3 Inserte y deslice el soporte de montaje de la ventosa de succión en
la ranura de montaje en la parte posterior de su cámara de tablero.
4 Quite la película de protección del soporte de montaje y de la lente
de la cámara de tablero.
5 Posicione la ventosa de succión en el parabrisas y mueva el
conmutador del soporte de montaje hacia la derecha hasta que se
oiga un clic.
6 Conecte el cable de USB incluido a la toma USB en su cámara de
tablero e inserte el cable de su cámara de tablero alrededor del
borde exterior del parabrisas y hacia un enchufe de alimentación
del vehículo de 12 V.
7 Enchufe el cable en el adaptador de alimentación del vehículo y
conecte el adaptador en la toma de alimentación y encienda su
vehículo. Su cámara de parabrisas se enciende automáticamente.
Nota: La primera vez que inserte una tarjeta SD nueva en la cámara de
parabrisas, la pantalla le indicará uno de los siguientes mensajes de error si
hay algún problema con la tarjeta:
• CARD ERROR Replace SD Card (Error de tarjeta reemplace la tarjeta SD) –
indica que la nueva tarjeta no está disponible para la cámara del tablero
(la tarjeta puede ser incompatible o estar dañada). Retire la tarjeta SD y
reemplácela por otra. Sólo se deben utilizar tarjetas SD de entre 8 y 256 GB.
O
• CARD ERROR FORMAT Card in Camera (Formato de error de tarjeta
Tarjeta en cámara) – indica que el formato de la tarjeta nueva no es
compatible con la cámara de parabrisas. Utilice la herramienta de
formato para formatear la tarjeta. Esto borrará toda la información de su
cámara de parabrisas, por lo tanto, guarden sus archivos previamente.
8 Gire el soporte de montaje para ajustar el ángulo de visión según
sea necesario.
Reérase a su Guía del usuario en línea para más información sobre la
conguración de la cámara de tablero.
ENCENDIDO MANUAL DE SU CÁMARA DE TABLERO
1 Mantenga presionado el botón de encendido para encender su
cámara de tablero.
2 Mantenga presionado el botón de encendido para apagar su
cámara de tablero.
Nota: Si tiene una tarjeta SD instalada y si su cámara de tablero está
conectada a la toma de alimentación de su vehículo, empieza a grabar
cuando se arranque el vehículo. Tenga que revisar su primera video para
asegurarse que la cámara está posicionada correctamente y que la video se
haya grabado correctamente.
GRABACIÓN DE VIDEO CON SU CÁMARA DE TABLERO
1 Asegúrese de que su cámara de tablero esté encendido.
2 Presione el botón OK (Aceptar) para empezar a grabar.
3 Presione nuevamente el botón OK (Aceptar) para dejar de grabar.
LOCALIZACIÓN Y CORRECCIÓN DE FALLAS Y
ESPECIFICACIONES
Para obtener información sobre la solución de problemas, consulte
la Guía del usuario en línea.
INSTRUCCIONES IMPORTANTES DE SEGURIDAD
• Siempre lea cuidadosamente las instrucciones de seguridad y la Guía del Usuario. Guarde la Guía del
usuario cómo referencia.
• No deje caer el producto, ni lo exponga a golpes fuertes, ni lo instale en lugares expuestos a
vibraciones excesivas.
• No desensamble ni modique su cámara de tablero de ninguna manera. El desmontaje o la
modicación podrían no solamente anular la garantía, sino también causar daños.
• No use ni almacene su cámara de tablero en lugares húmedos. El ingreso de líquido en la cámara de
tablero puede causar daño o provocar un incendio o un choque eléctrico.
• No use esta cámara de tablero con condiciones de calor extremas. Si el vehículo está estacionado en un
clima con sol y mucho calor, deje el vehículo enfriarse antes de usar la cámara de tablero.
AVISOS LEGALES
FCC Parte 15
Este dispositivo satisface la parte 15 del reglamento FCC. Su utilización está sujeta a las siguientes dos
condiciones: (1) este dispositivo no puede causar interferencia dañina, y (2) este dispositivo debe aceptar
cualquier interferencia recibida incluyendo interferencias que puedan causar una operación no deseada.
Este equipo ha sido sometido a pruebas y se ha determinado que satisface los límites establecidos para
clasicarlo como dispositivo digital de Clase B de acuerdo con la Parte 15 del reglamento FCC. Estos
límites están diseñados para proporcionar una protección razonable contra interferencias dañinas en un
ambiente residencial. Este equipo genera, usa y puede emitir energía de radiofrecuencia, y si no se instala
y usa de acuerdo con las instrucciones, puede causar interferencias perjudiciales a las comunicaciones de
radio.
Sin embargo, no se garantiza que no ocurrirá interferencia en una instalación particular. Si el equipo causa
interferencias perjudiciales en la recepción de la señal de radio o televisión, lo cual puede comprobarse
entendiéndolo y apagándolo alternativamente, se recomienda al usuario corregir la interferencia por uno
de los siguientes procedimientos:
• Cambie la orientación o la ubicación de la antena receptora.
• Aumente la distancia entre el dispositivo y el receptor.
• Conecte el equipo a un tomacorriente de un circuito distinto de aquel al que está conectado el
receptor.
• Solicite consejo al distribuidor o a un técnico experto en radio y televisión para obtener ayuda.
Advertencia: Cualquier cambio o modicación que no esté aprobada expresamente por la parte
responsable por el cumplimiento puede anular la autoridad del usuario para operar el equipo.
NORMA CANADIENSE ICES-3 (B)/NMB-3 (B)
GARANTÍA LIMITADA DE UN AÑO
Visite www.insigniaproducts.com para obtener más detalles.
COMUNÍQUESE CON INSIGNIA:
Para obtener servicio al cliente, llame al 877-467-4289 (EE.UU. y
Canadá) o 01-800-926-3000 (México)
www.insigniaproducts.com
INSIGNIA es una marca comercial de Best Buy y sus compañías asociadas.
Distribuida por Best Buy Purchasing, LLC
7601 Penn Av. South, Richeld, MN 55423 E.U.A.
© 2020 Best Buy. Todos los derechos reservados.
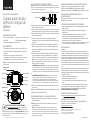
Vista frontal
Botón de encendido
Botón de arriba
Botón (de abajo)
Botón aceptar
Lente frontal
Altavoz
Pantalla
Indicador LED
Lente posterior
Micrófono
• Montaje con ventosa de succión
• Guía de instalación rápida
V2 ESPAÑOL 20-0311
Tarjeta microSD
Vista posterior
-
 1
1
-
 2
2


Insignia NS-DCDCHH2 guía de instalación rápida
- Tipo
- guía de instalación rápida
en otros idiomas
Artículos relacionados
Otros documentos
-
Polaroid PD-G55H Manual de usuario
-
PAPAGO GS30G16G Guía del usuario
-
VAVA VA-VD002 Manual de usuario
-
Amazon Renewed VAVA Dash Cam Manual de usuario
-
 VAVA VA-VD005 Guía del usuario
-
Magellan RoadMate 66 Series Manual de usuario
-
iON DashCam Guía de inicio rápido
-
Kenwood DRV Series User DRV-A201 Guía de inicio rápido
