
BSW 651 M , TK 651 M
Manuale d'uso e manutenzione
Návod k pou!ití a údr!b"
#$%&'&()*'& +& ,%)+-$.*./00
0 *123041)%&5$ &6)-$70'.308
!ivejte, pokud,jste si ne etli Návod k pou!ití a
údr!b".
Manuale d'uso e manutenzione
Návod
Návod
k
#$
%&'&()*'&
IT Spazzatrice manuale
EN Manual sweeper
DE Handkehrmaschine
FR Balayeuse manuelle
ES Barredora manual
CS Ru9ní zametací stroj
RU #$43.: +&(51*.-;3.:
1

IT da 3 a 16
EN by 17 at 30
DE von 31 zu 44
FR
de 45 - 58
ES desde 59 hasta 72
CS od 73 do 89
!" # 96 $% 109
2

3

Complimenti,
avete scelto per le vostre attività l’impiego di una Spazzatrice , una macchina
maneggevole e di semplice utilizzazione.
La spazzatrice manuale è in grado di rispondere efficacemente a tutte le vostre
esigenze di pulizia, dal piccolo impiego al professionale.
La vasta gamma di versioni proposte, si adatta perfettamente ad ogni
tipo di utilizzo.
!"##$%&"'
4
5
6
6
7
8
9
10
11
12
14
15
AVVERTENZE
NORME DI SICUREZZA
DISIMBALLO
MARCATURA E IDENTIFICAZIONE
INSTALLAZIONE
NORME DI UTILIZZO
REGOLAZIONE
SVUOTAMENTO CONTENITORI
MANUTENZIONE ORDINARIA
MANUTENZIONE
STRAORDINARIA NORME DI
GARANZIA INFORMAZIONI
GENERALIU CARATTERISTICHE
TECNICHE 16
4

AVVERTENZE'
Leggere attentamente le istruzioni d’uso,
Il produttore non risponde per eventuali danni a cose o persone dovute
ad un improprio uso della macchina ed all’inosservanza delle
prescrizioni di sicurezza e manutenzione.
Il presente manuale é parte integrante della macchina e deve essere
sempre a disposizione dell’utilizzatore e/o manutentore.
Le indicazioni riportate in questo manuale non sostituiscono le disposizioni
di sicurezza e i dati tecnici, per l’istallazione e il funzionamento, applicate
direttamente sulla macchina.
L’utilizzatore deve attenersi alle norme di sicurezza vigenti nel paese di
istallazione.
Non si deve utilizzare la macchina se si riscontrano eventuali difetti o
deterioramenti che possono compromettere l’originale sicurezza;
l’istallatore,
l’utilizzatore o il manutentore ha l’obbligo di segnalare eventuali
anomalie alla casa costruttrice.
La macchina é costruita per applicazioni specifiche.
Non deve essere modificata e/o usata per applicazioni diverse da quelle
previste nel campo di impiego.
L’utilizzo di questa macchina va effetuato da parte di una persona adulta ed
addestrata all’uso.
L’utilizzo di questa macchina é consentito in aree private esterne/interne
e con fondo asciutto.
5

BSW 651 М
NORME DI SICUREZZA
La spazzatrice а mano поп é
adatta alla spazzatura di
sostanze е materiali
combustibili, esplosivi, tossici,
cancerogeni о altre sostanze е
materiali che rappresentano un
pericolo per la salute.
Non spazzate oggetti ardenti о
roventi, come p.es. sigarette,
fiammiferi о oggetti simili.
Quando togliete del vetro, del
metallo о altri materiali dal
contenitore di raccolta dello
sporco, impiegate guanti robusti
per evitare ferite.
Non impiegate la spazzatrice
nelle immediate vicinanze di
fonti di calore (fuoco, radiatori,
termoventilatori о altri
apparecchi che irradiano
calore).
lmpiegate solamente pezzi di
ricamblo ed accessori originali.
6

BSW 651 &
DISIMBALLO
Sballare la macchina con molta cura evitando manovre che
potrebbero danneggiarla.
!'( motivi di trasporto ' di dimensioni dell'imballo alcune parti
accessorie possono essere fornite smontate, nel qual caso eseguire il
montaggio seguendo le istruzioni contenute nel presente libretto.
Gli elementi dell'imballaggio (sacchetti in plastica, polistirolo espanso,
chiodi, '##.) non devono essere lasciati alla portata dei bamblni, in
quanto potenziali fonti di pericolo.
MARCATURE < IDENTIFICAZIONE
7

BSW 651 &
INSTALLAZIONE
Dopo aver estratto la
spazzatrice dal cartone é
necessario eseguire
l'installazione del manubrio in
posizione di lavoro ' della
spazzola sul relativo braccio di
supporto procedendo !"#$
descritto di seguito:
•
Svitare i volantini di )loccaggio (1).
•
Sollevare il manubrio fino alla
posizione di lavoro (1).
•
Riposizionare i volantini (2)
assicurandosi di serrarli con
forza nella relativa sede sul
manubrio stesso.
2
•
Estrarre la spazzola dal contenitore rifiuti.
•
Sollevare il braccio di supporto
in posizione verticale.
•
Posizionare la spazzola contro il
supporto
rotante assicurandosi
di far combaciare i fori della
spazzola con i fori del supporto
stesso.
•
Fissare saldamente la spazzola al
proprio
supporto utilizzando le
1
1
8

BSW 651 М
viti fornite а corredo (1).
9

BSW 651 М
NORME DI UTILIZZO
Spingete semplicemente la spazzatrice а mano sulla pavimentazione
fino al
punto
in
cui с1é sporcizia
da
eliminare
.
N.B.: Tenere presente che il numero di giri dei rulli spazzatori, е
pertanto il rendimento, dipende dalla velocita di
avanzamento.
Attenzione: Spaghi, fili metallici, nastri da imballaggio ed oggetti simili per
lunghezza dovrebЬero venire raccolti manualmente.
Eventualmente rimuoverli se si arrotolano alle spazzole.
10

BSW 651 &
REGOLAZIONE
La spazzatrice * mano viene
regolata in fabbrica per il lavoro su
terreno piano ' liscio.
Pertanto Voi dovete solamente
portare in posizione di lavoro la
spazzola laterale. ln linea di
massima lespazzole dovrebbero
essere regolate in modo tale che
tocchino il terreno con una leggera
pressione.
Per regolare il rullo spazzatore principale
in seguito ad usura oppure per l'uso
su fondo +%+ piano, ésufficiente
ruotare in
senso orario % antiorario il volantino (1)
fino all'altezza desiderata.
N.B.: Ruotondo il volantino in
senso orario (+) la spazzola
si ab=assa verso il
pavimento, viceversa
ruotondo in senso
antiorario (-) la spazzola si
solleva.
Per regolare la spazzola laterale
é
sufficiente sollevarla in posizione
di riposo
' manualmente dopo
aver allentato il controdado di
)loccaggio (2) ruotare in senso
orario % antiorario la vite di
riscontro (1).
N.B.: Analogamente alla
spazzola precedente,
ruotando in senso orario
(+), la spazzola laterale si
abbassa, viceversa in
senso antiorario (-) si
alza.
Per regolare la spazzola laterale
é
di
aver allentato il controdado di
)
loccaggio
orario
riscontro
N.B.: Analogamente alla
11

BSW 651 &
SVUOTAMENTO CONTENITORI
Ruotare il volantino (2) in seno
antiorario per s)loccare il
contenitore principale.
Per svuotare il contenitore principale é
sufficiente afferrarlo dall'apposita
maniglia ' tirarlo verso l'alto
sfilandolo dalle guide laterali (1).
' ruotando in senso orario il volantino (2).
1
2
2
1
12

BSW 651 &
MANUTENZIONE ORDINARIA
Questa spazzatrice * mano é costruita in modo da +%+ richiedere
manutenzione.
Per la pulizia procedere * secco.
É
vietato lavare con acqua % solventi la macchina.
Per +%+ sciupare le setole della spazzola
laterale, dopo ogni impiego della
spazzatrice dovreste aver cura di
risollevarla dal suolo (1).
ln tal modo si evita che, negli intervalli di
riposo, le setole siano sempre sotto
pressione ' perdano cosi la loro efficacia
pulitrice durante l'impiego .
Nel caso si avesse la necessita di riporre la
spazzatrice in spazi contenuti é
sufficiente
svitare i volantini ' piegare il manubrio in
avanti fino * portarlo in posizione
orizzontale (2).
Riavvitare i volantini ' procedere
all'immagazzinamento.
1
2
13

BSW 651 &
MANUTENZIONE STRAORDINARIA
SOSTITUZIONE DELLE SPAZZOLE
Spazzola Centrale:
-
Asportare completamente il contenitore rifiuti anteriore;
-
Svitare le 2 viti di fissaggio (1);
-
Sfilare la spazzola centrale (2) !"#$ indicato in Figura;
-
Procedere al montaggio della spazzola nuova seguendo al contrario
le operazioni sopradescritte.
Spazzola Laterale:
-
Sollevare il braccio di supporto spazzola in verticale.
-
Svitare le viti di fissaggio (1) ' asportare la spazzola usurata.
-
Rimontare la spazzola nuova seguendo al contrario le
operazioni precedentemente descritte.
N.B.: Dopo aver installato le spazzole nuove verificarne l'altezza ed
eventualmente procedere )&+ la loro regolazione.
1
1
14

BSW 651 &
SOSTITUZIONE CINGHIA SPAZZOLA LATERALE
-Sollevare la spazzola laterale.
-Asportare la spazzola laterale svitando I'apposito dado di )loccaggio centrale
(1).
-Sfilare la cinghia usurata (2).
-Montare la nuova cinghia seguendo al contrario le operazioni
descritte precedentemente.
1
15

NORME DI GARANZIA
La garanzia non si applica alle parti soggette a normale usura derivante
dall’impiego della macchina, ed in particolare: spazzole e cinghia di
trasmissione.
Riparazioni effettuate da personale non autorizzato invalidano la
garanzia con esclusione di ulteriore responsabilità, in particolare per
danni a cose o terzi.
La garanzia é limitata ai difetti dimostrabili ed imputabili alla
fabbricazione e/o al materiale, tale garanzia entra in vigore al momento
dell’acquisto.
La sostituzione o riparazione di parti difettose è subordinata alla insindacabile
decisione del costruttore.
Solamente il servizio assistenza, i rivenditori specializzati potranno ricevere i
pezzi di ricambio, pertanto queste parti di ricambio saranno fornite sulla base
di questa garanzia.
Ogni qual volta vengano effettuati interventi sull’apparecchio e/o sul suo
sistema, senza esplicita autorizzazione del centro assistenza, decadono
tutti i diritti della garanzia.
I casi e/o difetti che risultano dalla normale usura, dallo scorretto e/o
improprio impiego, non sono coperti dalla garanzia.
Nei casi di garanzia l’acquirente si assume i costi di trasporto ed i rischi di
trasporto sul prodotto.
Il servizio assistenza autorizzato sostituisce il produttore negli obblighi e nei
diritti, sui termini espressi dalla presente garanzia.
Non verranno altresì avanzate pretese e/o diritti da parte del Centro di
assistenza autorizzato, che esulano da questi punti richiamati dalla presente
garanzia.
Non sono coperti da garanzia i controlli periodici, tarature, manutenzione e modifiche.
Premessa tassativa per accedere al diritto di garanzia é la
presentazione del relativo scontrino fiscale o fattura.
Il rivenditore deve firmare e timbrare il libretto nell’ultima pagina nello spazio apposito.
La ditta si riserva il diritto di apportare modifiche al presente libretto
ed alle caratteristiche tecniche delle macchine prodotte senza darne
preavviso.
RISERVA DI PROPRIETÀ: i beni oggetto della vendita rimangono di esclusiva
proprietà della venditrice fino al totale pagamento del prezzo pattuito come previsto
dall’art.
1523 del codice civile.
16

CONTROVERSIE: qualsiasi controversia è devoluta esclusivamente alla
competenza territoriale dell’autorità giudiziaria di Reggio Emilia (Italia).
17

BSW 651 М
INFORMAZIONI GENERALI
lmballaggio е trasporto
Il
trasporto о il trasferimento avviene in imballo di cartone. Si
segnala la particolare sensiЬilita di materiali utilizzati per l'imballo
agli agenti atmosferici come pioggia, nebЬia, sole, etc.
ln caso di necessita di trasporto, quando поп si riesca а ripristinare
l'imballo originario, la macchina deve essere immoЬilizzata onde
evitare qualsiasi spostamento allinterno del veicolo.
Demolizione della macchina
Allorche si decida di rottamare la macchina, si raccomanda di
svuotare i vari serbatoi interni dai prodotti in essi contenuti .
lnformazioni di carattere ecologico
Lo smaltimento degli imballaggi della macchina, dei pezzi sostituiti,
della macchina nel suo complesso, dovra essere eseguito nel rispetto
amЬientale, evitando di inquinare suolo acqua е aria rispettando in
ogni caso la normativa in materia.
lndicazioni per un idoneo trattamento dei rifiuti
-
Materiali ferrosi, alluminio, rame: trattasi di materiali riciclaЬili da
conferire ad apposito centro di raccolta autorizzato.
-
Materiali plastici: sono materiali da conferire in discarica, in
inceneritore о in apposito centro di riciclo.
18

BSW 651 М
CARATTERISТICHE TECNICHE
MODELLO
BSW 651 М
AVANZAМENTO
MANUALE А SPINTA
TELAIO
ACCIAIO
CAPACITA САSSЕТТА RACCOLTA RIFIUTI
40 lt
SPAZZOLA CENTRALE
REGOLABILE
SPAZZOLA LATERALE
REGOLABILE
RUOTE
IN GOMMA
PESO
25 kg
19

BSW 651 М
MANUAL SWEEPER
Congratulations,
уои have chosen for your activities the use of а LAVOR Sweeper, а
handy and easily utilizaЫe machine.
The manual sweeper is аЫе to satisfy e.fficiently all your requirements
about cleaning, from the small use to the professional опе.
The various range of proposed versions peifectly conforms to every type of
utilization.
CONTENTS
18
19
20
20
21
22
23
24
25
26
28
29
NOTICE
SAFEТY RULES
UNPACКING
MARКING AND IDENTIFICATION
INSTALLATION
USE
ADJUSTMENT
EMPТYING OF CONTAINERS
ROUTINE MAINTENANCE
EXTRAORDINARY MAINTENANCE
GUARANTEE REGULATIONS
GENERAL INFORМATION
TECHNICAL PARTICULARS
30
20

BSW 651 М
NOТICE
Carefully read the operating instructions.
LAVOR shall not Ье held liaЫe for any damage to property or
persons due to improper use of the machine or failure to observe the
safety and maintenance regulations. This manual is an integral part
ofthe machine and must always Ье at the disposal of the user and/or
maintenance man.
The instructions given in this manual do not substitute the safety
provisions and technical data, for installation and operation, affixed
directly оп the machine. The user must keep to the safety standards in
force in the country of installation.
Never use the appliance if wear or damage which may reduce its
original level of safety is noticed. The installer, user and maintenance
man must notify the manufacturer of any iпegularities.
The machine is made for specific applications.
lt must not Ье modified and/or used for applications other than those
envisaged in the field of use.
This machine should Ье used Ьу an adult person trained to use it.
The utilizing of this machine is allowed in intemal/extemal private
areas and with dry ground.
21

BSW 651 &
SAFETY RULES
The manual sweeper is not fit
for
sweeping substances and
malerials which
are
combusti=le, explosive, toxic,
carcinogenic or which present
health hazards.
Do not sweep burning or scorching
things,
such as cigaretles,
matches and the like.
When removing glass, metal %(
other materials from the dirt
container, use strong gloves to
avoid getting hurt.
The dirt container should )'
emptied after each use.
Do not use the sweeper too near
sources of heat (fire, radiators, air
heaters %( other heating
equipment}.
Use exclusively original spare
parts and accesso+es .
22

BSW 651 &
UNPACKING
Unpack the machine carefully and avoid manoeuvres that may cause
damages. For reasons of transport and packing dimensions, some
accessories may "! furnished disassem"led.
ln this case, assem"ly them following the instructions of this ha ndbook.
'!!( parts of the packing (plastic bags, foam polystyrene, nails, etc.) out
of reach of children. They )*! potential sources of danger.
MARKING AND IDENTIFICATION
23

BSW 651 &
INSTALLATION
After unpacking the sweeper,
install the handle in operating
position and the brush $% the
relative support arm according to
the following procedure:
•
Unscrew locking wheels (1).
•
Lift the handle to the operating position
(1).
•
Reposition wheels (2). Make
sure to tighten them hard in the
proper place $% the handle.
•
Take the brush out of the dirt container.
•
Lift the support arm to ) vertical position.
•
Position the brush against the
rotary support. Make sure that
brush holes and support holes
are ma tching.
•
Firmly secure the brush to its
support with the screws supplied
with the product (1).
1
1
24

BSW 651 М
USE
Simply push the manual sweeper оп the flooring where there is dirt to
elimina- te.
N.B.: Remember that the number of revolutions of sweeping rolls
(thus, efficiency) depends оп the speed of travel.
Attention: Strings, wires, packing tapes and objects with similar lengths
should
bе collected bу hand. Remove them if they get
rolled onto the brushes.
25

BSW 651 &
ADJUSTEMENT
The manual sweeper is factory-
adjusted for the operation %+ plane
and smooth ground. Therefore, you
only need to bring the lateral brush
to the operating position.
As * rule, brushes should )'
adjusted so as to touch the ground
with * light pressure. /% adjust the
worn main sweeping roll or to use
the machine %+ * non-flat ground,
simply rotate the wheel (1)
clockwise or counterclockwise to
the requested height.
N.B.: A clockwise (+) rotation of
the wheel
lowers the
brush to the floor; .
counterclockwise (-) rotation
lifts it.
/% adjust the lateral brush lt's
enough to lift it in rest position and,
after having unloosed the lock nut
(2), turn manually clockwise or
counterclockwise the setscrew (1).
N.B.: Like the a=ove-mentioned
brush, .
clockwise
rotation (+) lowers the
lateral brush, while .
counterclockwise rotation (-)
lifts it.
26

BSW 651 &
EMPTYING OF CONTAINERS
Turn the handwheel (2)
counterclockwise
to unlock the
main basin.
/% empty the main container,
simply take it
"& the handle and
lift it upwards, withdrawing it
from lateral guides (1).
and turn the handwheel (2) clockwise.
1
2
2
1
27

BSW 651 &
ROU>INE MAINTENANCE
This manual sweeper does not require
servicing. Dry clean only.
Do not wash the machine with water or solvents.
/% avoid damaging lateral brush
bristles, lift the brush from the ground
after every usage of the sweeper (1).
ln this way, during rest intervals, bristles
are not constantly under pressure and
do
not loose efficiency in cleaning when
used. lf it is necessary to put the sweeper in
limited
spaces, simply unscrew wheels
and bend the handle forward to )
horizontal position (2).
Retighten wheels and store the product.
2
1
28

BSW 651 &
EXTRAORDINARY MAINTENANCE
REPLACEMENT OF BRUSHES
Central Brush:
-
Remove completely the front basin for wastes;
-
Unscrew the two clamping screws (1);
-
Extract the central brush (2) as shown in Figure;
-
Assembly
-
-
y the new brush following the above-mentioned stages backwards.
Lateral Brush:
-
Lift the brush support arm to * vertical position.
-
Unscrew fastening screws (1) and remove the worn brush.
-
Reassem)ly the new brush following the above-mentioned stages backwards.
N.B.: After installing new brushes, check their height. lf necessary,
adjust
them.
1
29

BSW 651 &
REPLACEMENT OF LATERAL BRUSH B<L>
-
Lift the lateral brush.
-
Remove the lateral brush unloosening the appropriate central lock nut (1).
-
Extract the worn belt (2).
-
Assem)le the new belt following in opposite way the operations
previously described.
1
30

GUARANTEE REGULATIONS
. The warranty is not applied to those parts object of
normal wear due to machine use, and in particular: brushes and driving belt.
The guarantee shall be made void if repairs are carried out by unauthorised
persons. With the exception of additional responsibilities, particularly
damages to people or things.
The guarantee is limited to defects that can be proved and attributable to
manufacturing and/or to the material and enters into force at the time of
purchase.
The replacement or repair of any faulty parts is subject to the
manufacturer’s unquestionable decision.
Only the assistance service and specialised dealers can receive spare parts,
therefore these spare parts will be supplied on the basis of this guarantee.
Each time something is done to the appliance and/or its system without the
explicit authorisation of the assistance centre, all guarantee rights will
become void.
Defects, etc., that are the consequence of normal wear and tear, incorrect and/
or improper use or incorrect connection of the appliance, are not covered by
the guarantee. If the guarantee is used, the purchaser shall pay the shipping
expenses and the goods travel at his own risk.
The authorised assistance centre substitutes the manufacturer insofar as the
obligations and rights of the conditions of this guarantee are concerned. However,
the authorised assistance centre can lay no claims and neither has
it any rights, being irrelevant as far as this guarantee is concerned.
Periodical checks, calibrations, servicing and modifications are not covered
by the guarantee.
It is compulsory to show either the receipt or invoice to have the right to use
this guarantee.
The dealer must put his stamp and signature in the space provided on the last page
of the handbook
LAVOR reserves the right to make modifications to this manual and to the
technical specifications of the appliances produced without notice.
OWNERSHIP RIGHTS: The goods remain the exclusive property of the
selling party until the agreed price has been paid in full as foreseen by art. 1523
of the civil code.
DISPUTES : Any dispute whatsoever falls under the legal jurisdication of
the law court of Reggio Emilia (Italy).
31

BSW 651 М
Packing - shipping
GENERAL INFORMAТION
Shipping and transport is in cardboard cartons. The packing
material is particularly sensitive to rain, fog, direct sunshine, etc.
lf the machine has to Ье transported and the original packing material
is not availaЬle, the machine must Ье immoЬilized to prevent any
movement inside the vehicle.
Demolition of the machine
lf you decide to scrap the machine, it's recommended to empty the
various inner basins from the products contained inside them.
Ecological information
The environment must Ье respected when you want to get rid of
packing materials, the various liquids, spare parts, ог the whole
machine.
The current laws must Ье followed, in order not to poison earth, water and air.
lnstructions for proper treatment of waste
-
Ferrous materials, aluminium, copper: these metals сап Ье recycled
and given to а special authorized collecting center.
-
Plastic materials: they must Ье taken to а dump, an incinerator, ог а
special recycling center.
-
Used oils: they must Ье taken to а special authorized collecting center.
32

BSW 651 М
TECHNICAL PARTICULARS
MODEL
BSW 651 М
ADVANCE
MANUAL THRUSTING
FRAME
STEEL
САРАСIТУ OF WASTE COLLECTING BASIN
40 lt
CENTRAL BRUSH
ADJUSTABLE
LATERAL BRUSH
ADJUSTABLE
WHEELS
RUBBER МАDЕ
WEIGНТ
25 kg
33

KALTWASSER-HOCHDRUCKREINIGER
Wir gratulieren Ihnen!
Sie haben für Ihre Tätigkeiten eine Kehrmaschine LAVOR
gewählt, die handlich und einfach zu verwenden ist.
Die manuelle Kehrmaschine kann allen Ihren Reinigungserfordernissen
entsprechen, egal, ob Sie Profis sind oder nicht.
INHALT
32
33
32
34
34
35
36
37
38
39
40
42
43
HINWEIS
SICHERHEITSNORMEN ENTFERNEN
DER VERPACKUNG MARKIERUNG
UND KENNZEICHNUNG
INSTALLATION GEBRAUCHSNORMEN
EINSTELLUNG
ENTLEEREN DER BEHÄLTER
WARTUNG
SONDERWARTUNG
GARANTIENORMEN
ALLGEMEINE INFORMATIONEN
TECHNISCHE EIGENSCHAFTEN
44
34

35

HINWEIS
Die Gebrauchsanleitung ist aufmerksam durchzulesen.
Der Hersteller haftet nicht für etwaige Sach- oder Personenschäden
infolge der bestimmungswidrigen oder falschen Benutzung der
Maschine oder der Nichtbeachtung der Sicherheits- und
Wartungsvorschriften. Dieses Handbuch ist ein integrierender
Bestandteil der Maschine und muß dem Benutzer und/ oder
Wartungstechniker stets zur Verfügung stehen.
Die in diesem Handbuch enthaltenen Angaben sind kein Ersatz für die
direkt auf der Maschine angebrachten Sicherheitsvorschriften und
technischen Daten für Installation und Betrieb.
Der Benutzer hat die im Installationsland geltenden
Sicherheitsnormen einzuhalten.
Die Maschine darf nicht bei Abnutzungserscheinungen verwendet
werden, die die ursprüngliche Sicherheit beeinträchtigen können.
Der Installateur, Benutzer und Wartungstechniker ist verpflichtet,
eventuelle Anomalien dem Hersteller zu melden.
Die Maschine ist für spezifische Anwendungszwecke konzipiert.
Sie darf nicht geändert und/oder für andere Zwecke als die
vorgesehenen verwendet werden.
Die Maschine darf nur von einer erwachsenen und für den
Gebrauch eingelernten Person benutzt werden.
Die Anwendung dieser Maschine ist nur in privaten Außen- oder
Innenräume und auf einem trockenen Grund gestattet.
36

BSW 651 &
SICHERHEI/SNORMEN
Die Handkehrmaschine ist nicht zum
Kehren von brennbaren, explosiven,
giftigen, krebserzeugenden, sowie von
gesundheitsschadlichen Stoffen und
Materialien geeignet.
Kehren Sie keine gluhenden
Gegenstande, wie z. ". Zigaretten,
Streichholzer ohne ahnliches.
Beim Entfernen von Glas, Metall oder
anderen Materialien aus dem
Schmutzauffangbehalter sollten zwecks
Vermeidung von Wunden
wiederstandsfahige Handschuhe
getragen werden.
Die Kehrmaschine nicht in der Nahe
von Warmequellen (Feuer, Heizk
ö
rpern, Thermoventilatoren oder anderen
warmespendenden Geraten) benutzen.
Es sollten ausschlie
ß
lich
Originalersatzteile und -
zubeh
ö
rteile verwandt werden.
37

BSW 651 &
ENTFERNEN DER VERPACHUNG
Die Maschine sorgfaltig auspacken und Bewegungen vermeiden,
welche
dieselbe beschadigen k&++t1+.
Aus Gründen von Transport oder des Verpackungsumfangs k
ö
nnen einige
Zubeh
ö
rteile abgebaut geliefert werden. ln diesem Fall die Montage nach
den Anweisungen im beiliegenden Handbuch vornehmen.
Die Verpackungselemente (Kunststoffsacke, Schaumstoff, Nagel usw.)
durfen nicht fur Kinder zuganglich gelassen werden, da sie eine
potentielle Gefahrenquelle si nd.
MARKIERUNG UND HENNZEICHNUNG
38

BSW 651 &
1--
INSTALLATION
Nach Entnahme der Kehrmaschine aus der
Schachtel, ist die lnstallation des Handgriffs
in
Arbeitsposition und der Burste auf dem
entsprechenden Haltearm wie folgt
vorzunehmen
: °
die Blockierhandrä
der (1) l1sen.
•
Den Handgriff bis zur Arbeitsposition
anheben (1).
•
Die Handräder erneut anbringen (2)
und sie in ihrem Sitz auf dem Handgriff
selbst gut befestigen.
2
•Die Bürste aus dem Ablallbehälter
entnehmen.
•
Den Haltearm in
Vertikalstellung anheben.
•
Die Bürste gegen die Drehhalterung
anbringen und beachten, daß die
Löcher der Bürste mit denen der
Halterung übereinstimmen.
•Die Bürste fest an ihrer Halterung mit
den entsprechenden Schrauben
befestigen (1).
1
1
39

BSW 651 М
GEDRAUCHSNORMEN
Die Handkehrmaschine ist auf dem Boden bls zur Stelle, an der Schmutz zu
beseitigen ist, vorzuschie ben.
N.B.: Die Drehzahl der Kehrrollen beachten. Die Leistung hёingt von
der
VorschuЬgeschwindigkeit аb.
ACHTUNG: Kordeln, Dr
ä
hte, Verpackungsbёinder und
ä
hnliche lange Gegenst
ä
nde sollten mit der Hand
aufgesammelt werden. Sollten
sie sich um die
B
ü
rsten gewickelt hаЬеп, sind sie eventuell zu
entfernen.
40

BSW 651 &
EINSTELLUNG
Die Handkehrmaschine wird im Werk f
ü
r
das Arbeiten auf ebenen und glatten
Fl
ä
chen eingestellt. Sie m
ü
ssen daher nur
die Seitenburste in Arbeitsstellung bringen.
Allgemein sollten die Bürsten so eingestellt
sein, daß sie den Boden mit einem leichten
Druck berühren.
Zur Einstellung der Hauptkehrrolle nach
Verschleiß derselben oder für den
Gebrauch auf nicht ebener Fläche, genügt
es, das Handrad bis zur gewünschten 0öh'
im Uhrzeigersinn oder entgegen dem
Uhrzeigersinn zu drehen (1).
N.B.
Um die Seitenb
ü
rste zu regulieren, genugt
es, sie bis zur Ruheposition zu heben und
die Einstellschraube (1) im Uhrzeigersinn
pder entgegen dem Uhrzeigersinn manuell
.zu drehen, nachdem die Blockierungs-
gegenmutter (2) gelockert worden ist.
N.B. Genau wie =1i der vorherigen B
ü
rste:
=1i Rechtsdrehung (+) senkt sich die
Seiten=urste und =1i Linksdrehung
wird (-
) sie angeho=en.
41

BSW 651 &
ENTLEEREN DER B<CÄLER
Das Handrad (2) entgegen
dem Uhrzeigersinn zu drehen,
um den Hauptbehalter zu
entblocken .
Der Hauptbehälter ist mit Hilfe des
Griffes aus den Seitenf
ü
hrungen
nach oben hin herauszuziehen (1).
und das Handrad (2) im
Uhrzeigersinn drehen.
1
2
2
1
42

BSW 651 &
WARTUNG
Diese Handkehrmaschine bedarf aufgrund ihrer Bauweise keiner
Wartung. Das Gerät ist trocken zu reinigen.
Die Maschine darf nicht mit Wasser oder Losungsmitteln gewaschen werden.
Um nicht die Borsten der Seitenb
ü
rsten zu
beschädigen, sollte die Handkehrmaschine
nach jedem Gebrauch von Boden
hochgehoben werden (1).
Auf diese Weise wird vermeiden, da
ß
die
Borsten unter Druck sind und ihre
Reinigungsleistungsf
ä
higkeit verlieren.
Sollte die Handkehrmaschine
zwischenzeitlich auf einer
beschr
ä
nkten
Fläche auf)ewahrtwerden
mussen, so sind
die Handr
ä
der zu
lockern und der
Handgriff in
Horizontalstellung nach vorne
zu
bewegen (2).
2
1
43

BSW 651 &
SONDERWARTUNG
BÜRSTENAUSTASUCH
Se ntralbü rs te:
-
Den vorderen Beh
ä
lter f
ü
r die Abf
ä
lle völlig herauszieh en;
-
Die zwei Fixierschrauben (1) aufschrauben;
-
Die Mittelbürste (2) wie im Bild herausziehen;
-
Auf entgegengesetzte Weise die neue B
ü
rste montieren.
Seiteniirste:
-
Den B
ü
rstenhalterarm in Vertikalstellung bringen .
-
Die Feststellschrauben l
ö
sen (1) und die verschlissene B
ü
rste entfernen.
-
Die neue B
ü
rste auf entgegengesetzte Weise montieren.
N.B. Nach lnstallation der neuen B
ü
rsten ist ihre H
ö
he zu
ü
berprufen und
eventuell die Einstellung derselben
vorzunehmen.
1
1
44

BSW 651 &
ERSE>ZUNG RIEMEN DER SEITENBÜRSTE
-Die Seitenb
ü
rste heben.
-Die eigens dazu bestimmte Mittelgegenmutter (1) aufschrauben, um
die Seitenb
ü
rste zu entfernen.
-Den abgenutzten Riemen (2) herausziehen.
-Den neuen Riemen montieren und dabei den obengenannten
Operationen umgekehrt folgen.
1
45

GARANTIENORMEN
.
Die Garantie gilt nicht für die Teile, die mit der Anwendung der Maschine
verschleißen, insbesondere Bürsten und Treibriemen.
Durch unautorisiertes Personal durchgeführte Reparaturen bewirken das
Verwirken der Garantie.
Weitere Verantwortungen, besonders für Schäden an Sachen oder
Dritten sind ausgeschlossen.
Die Garantie deckt ausschließlich vorweisbare Fehler, die auf die Fertigung
und/oder auf das Material zurückzuführen sind und tritt ab Kaufdatum in Kraft.
Die Ersatzleistung oder Reparatur fehlerhafter Teile unterliegt der
unanfechtbaren Entscheidung des Herstellers.
Ersatzteile können ausschließlich den Kundendienststellen und spezialisierten
Händlern geliefert werden; daher können diese Ersatzteile nur auf der
Grundlage dieser Garantie zur Verfügung gestellt werden.
In allen Fällen, in denen Eingriffe ohne ausdrückliche Genehmigung der
Kundendienststelle in die Maschine und/oder das System vorgenommen werden,
entfällt jeder Garantieanspruch.
In Fällen und/oder bei Defekten, die sich aus dem Normalverschleiß,
aus einer unkorrekten und/oder unsachgerechten Verwendung und aus
einem falschen Geräteanschluß ergeben, besteht kein
Garantieanspruch.
In Garantiefällen trägt der Käufer die Transportkosten und -risiken für das
Produkt. Die autorisierte Kundendienststelle vertritt den Hersteller in seinen Pflichten
und Rechten, zu den in dieser Garantie enthaltenen Bedingungen.
Ebenso wird die autorisierte Kundendienststelle keine Ansprüche und/oder
Rechte geltend machen, die den Bedingungen dieser Garantie nicht
entsprechen.
Periodische Kontrollen, Eichungen, Wartungsarbeiten und Änderungen
werden nicht von der Garantie gedeckt.
Unabdingbare Voraussetzung für die Inanspruchnahme der Garantie ist die
Vorlage des entsprechenden Kassenzettels bzw. der Rechnung.
Der Händler muß im entsprechenden Feld auf der letzten Seite dieses Anleitungsheftes
seine Unterschrift und seinen Stempel einsetzen.
Die Firma LAVOR behält sich das Recht vor, im vorliegenden Handbuch
und an den technischen Charakteristiken der hergestellten Maschinen
Abänderungen vorzunehmen, ohne diese zuvor anzukündigen.
EIGENTUMSVORBEHALT: Die verkauften Güter bleiben im Sinne des Art.
1523 des Zivilgesetzbuches bis zur vollständigen Bezahlung des vereinbarten
Preises Alleineigentum des Verkäufers.
STREITIGKEITEN: Für jede Streitigkeit ist ausschließlich die
Gerichtsbehörde von Reggio Emilia (Italien) zuständig.
46

47

BSW 651 &
AL LG EM E IN E IN FO RM A T IO N EN
Verpackung und Transport
Der Transport oder der Transfer erfolgen in einer Kartonverpackung. Es
wird darauf hingewiesen, daß das für die Verpackung verwendete Material
besonders sensibel auf Witterungseinflüsse wie Regen, Nebel, Sonne, usw.
reagiert.
Falls bei Transportbedarf die Originalverpackung nicht mehr hergestellt
werdenkann, muß die Maschine unbeweglich festgehalten werden, damit
jegliche Verschiebung im Fahrzeuginnern vermieden wird .
Demolierung der Maschine
Wenn Sie sich entscheiden, die Maschine zu verschrotten, leeren Sie vorher
die lnnentanke von den Produkten, die sie enthalten.
lnformationen zum Umweltschutz
Die Entsorgung der Maschinenverpackung, der ersetzten Teile, der Maschine
in ihrer Gesamtheit, wie auch der verschiedenen Flüssigkeiten, die in ihr
enthalten sind, muß unter Beachtung des Umweltschutzes vorgenommen
werden. Vermeiden Sie es daher, Luft, Wasser und Boden zu verunreinigen
und beachten Sie in jedem Fall die einschlägigen Bestimmungen..
Angaben zur angemessenen Ablallbehandlung:
-Eisenmateriale, Aluminium, Kupfer: Wiederverwertbare Werkstoffe, die
einem autorisierten Sammelzentrum zuzufuhren sind.
-Kunststoffe: Diese Materialgruppe ist zur Deponierung, Verbrennung oder
zum Recycling bestimmt.
-Altöle: Sie sind einer Alt1lsammelstelle zuzuf
ü
hren.
48

BSW 651 М
TECHNISCHE EIGENSCHAFTEN
MODELL
BSW 651 М
VORSCHUB
МANUELL, DURCH АВSТОß
RAHMEN
STAHL
FASSUNGSVERMÖGEN DES КASTENS FÜR DIE
ABFALLSAМMLUNG
40 lt
MIТТELВ
Ü
RSTE
REGULIERBAR
SEITENB
Ü
RSTE
REGULIERBAR
RÄDER
AUS GUMMI
GEWICHT
25 kg
49

BSW 651 М
44
50

Congratulations,
vous avez choisi, pour vos activités, l’emploi d’une Balayeuse
LAVOR, une machine maniable et de simple utilisation.
La balayeuse manuelle est à même de répondre efficacement à toutes
vos exigences de nettoyage, à partir du petit emploi à celui
professionnel.
51

Lire attentivement les instructions d’utilisation.
La société LAVOR décline toute responsabilité en cas de blessures et/ou
de dommages matériels provoqués par une utilisation impropre de la
machine et/ou par le non-respect des règles de sécurité et d’entretien.
Le présent manuel fait partie intégrante de la machine, aussi doit-il être
conservé de telle sorte qu’il soit toujours à la disposition de l’utilisateur
et/ou du responsable d’entretien.
Les indications reportées dans le présent manuel ne
remplacent pas les dispositions de sécurité ni les données
techniques - d’installation et de fonctionnement - apposées
directement sur la machine.
Ne pas utiliser la machine en cas de détériorations pouvant
compromettre la sécurité originale. L’installateur, l’utilisateur et/ou
le responsable d’entretien sont tenus de signaler au constructeur les
éventuelles anomalies.
La machine a été conçue pour répondre à des applications
spécifiques. Elle ne doit en aucun cas être modifiée et/ou utilisée
pour des applications différentes de celles pour lesquelles elle a
été conçue.
La machine doit être utilisée par une personne adulte qui en connaisse le
fonctionnement.
L’utilisation de cette machine est permise en zones privées
externes/internes et avec fond sec.
52

53

BSW 651 &
CONSIGNES D. SECURI/E
La balayeuse manuelle +'est pas
adaptée au balayage de
substances et de matieres
combustibles, explosives,
toxiques,
cancérigènes ni
d'autres substances et
matieres
pouvant representer un danger
pour la santé.
Ne balayez jamais d'objets
ardents ou brûlants tels que
cigarettes allumees,
allumettes
ou d'autres objets similaires.
Quant vous sortez des morceaux
de verre, du métal ou d'autres
matériaux du récipient
à ordures, mettez des gants épais pour
éviter toute blessure.
N'utilisez jamais la balayeuse aux
environs d'une source de chaleur (feu,
radiateur, thermo-ventilateur ou d' autres
appareils diffusant la chaleur).
Utilisez uniquement les pièces de
rechange et les accessoires originaux.
.
54

BSW 651 &
DEBALLAGE
Déballer la machine avec le plus grand soin, évitant toute action pouvant
I'endommager.
Pour des raisons de transport et à cause de la taille de I'emballage, quelques
parties accessoires pourraient être livrées demontees; en #' cas, il faudra
exécuter le montage de ces piecés en suivant les instructions
contenues dans
cette notice. Les elements de I'emballage (sacs en plastique, polystyrène
expansé, clous, etc.) +' doivent pas être laisses à la portee des enfants,
puisqu'ils repré-
sentent une source de danger potentielle.
PLAQUE D'IDENTIFICATION
55

BSW 651 &
INSTALLATION
Après avoir sorti la balayeuse du
carton, il faut installer le guidon
dans sa position de service et
monter la brosse sur sa patte de
support, en suivant les instructions
ci-dessous:
•
Dévisser les volants de )locage (1).
•
Soulever le guidon jusqu'à atteindre la
position de service (1).
•
Remettre en place les volants (2) et véri-
fier s'ils sont bien serrés dans leur em-
placement qui est situé sur le guidon.
•
Sortir la brosse du récipient à ordur es.
•
Soulever la patte de support en vertical.
•
Placer la brosse contre son
support rotatif et vérifier si les
trous de la brosse et les
trous du support sont )ien superposés.
•
Fixer à fond la brosse à son support en
utilisant les vis livrées avec le tout (1)
.
1
1
2
56

BSW 651 М
REGLES D'UТILISПТION
Pousser tout simplement la balayeuse manuelle sur le sol jusqu' à I'
endroit où il у а de la saleté à éliminer.
NOTA:
Il
faut tenir compte du fait que le nombre de tours des
rouleaux Balayeurs et, par conséquent le rendement,
dépendent de la vitesse d' avancement.
Attention: la ficelle, les fils еп métal, les rubans d' emballage et tout
objet similaire ayant une certaine longueur, devraient
être ramasses
à la main.
S'ils s' enroulent autour des brosses, il faudra les ôter.
57

BSW 651 &
REGULATION
La balayeuse manuelle est calibrée à I' usine
pour pouvoir fonctionner sur tout sol plat et
lisse. Vous +' devez donc que mettre la
brosse laterale dans sa position de service.
En principe, les brosses devraient etre
reglees de façon à #' qu'elles touchent le
sol si I'%+ applique une pression légère.
Pour régler le rouleau balayeur principal
quand il est usé ou si I' %+ souhaite I'utiliser
sur un fond non plat, il suffit de tourner
dans le sens des aiguilles d' une montre ou
dans le sens contraire à celui des aiguilles
d' une montre le volant (1) jusqu' à la hauteur
dési(ée.
NOTA: Si l'&+ tourne le volant dans le sens
des aiguilles d'une montre (+), la
brosse descend vers le plancher;
si l'&+ toume dans le sens contraire
à
celui des aiguilles d'une montre
(-) la brosse monte.
Pour régler la brosse latérale il suffit de la
soulever en position de repos et
manuellement, après voir desserré le contre-
crou de blocage (2), tournez la vis de
réglage (1) dans le sens des aiguilles d' une
montre ou en sens inverse.
NOTA: Comme pour la brosse centrale, si
I'&+ tourne le volant dans le sens
des aiguilles d'une montre (+), la
brosse latérale descend, si l'&+
tourne dans le sens contraire à
celui des aiguilles d'une montre (-
), elle monte.
58

BSW 651 &
VIDAGE DES RECIPIENTS
Tournez le volant à main (2) en
sens inverse de celui des aiguilles
d'une montre, pour débloquer le
container principal .
Pour vider le recipient principal, il
suffit de saisir la poignée con ue
à
cet effet et
de le tirer vers le haut en le faisant
sortir des coulisses latérales (1).
et tournez le volant dans les sens
des aiguilles d'une montre (2).
1
2
2
1
59

BSW 651 &
ENTRETIEN COURANT
Cette balayeuse manuelle à été fabriquée de f7:on à #' qu' elle +'
nécessite d' aucun entretien.
Pour nettoyer I'outil, agir à sec.
Ne jamais laver la machine à I' eau ou avec des solvants.
Pour +' pas abimer les soies de la brosse
latérale, il faudra soulever la brosse du sol
(1), aprés chaque utilisation de la
balayeuse.
De cette façon, %+ évite que pendant le
temps de repos les soies sublssent une
pression continuelle #' qui diminuerait leur
efficacite de nettoyage, quand %+ utilise cet
outil.
Si I'%+ veut ranger la balayeuse dans un
endroit où I'espace est réduit, il suffit de
devisser les volants et de plier le guidon en
avant, jusqu'
à
#' qu'il se trouve dans la
position horizontale (2).
Revisser les volants et ranger la balayeuse.
2
1
60

BSW 651 &
ENTRE>IEN SUPPLEMENTAIRE
SOBSTITUTION DES BROSSES
Brosse centrale:
-Enlevez complétement le container des déchets antérieur;
-Dévissez les 2 vis de fixation (1);
-Enlevez la brosse centrale (2) comme indiqué en Figure;
-Monter la brosse neuve en suivant à rebours les indications ci-dessus.
Brosse laterale:
-soulever la patte de support de la brosse en vertical.
-dévisser les vis de fixation (1) et ôter la brosse usée.
-remonter la brosse neuve n suivant à rebours les indications ci-dessus.
NOTA: aprés avoir installé les brosses neuves, vérifier leur hauteur
et, si =esoin il est, exécuter le reglage.
1
61

BSW 651 &
REMPLACEMENT COURROIE BROSSE LATERAL
-Soulevez la brosse latérale.
-Enlevez la brosse laterale en devissant I'ecrou de )locage central approprie
(1).
-Enlevez la courroie usée (2).
-Montez la nouvelle courroie en suivant au contraire les opérations decrites
précedemment.
1
62

La garantie n’est pas appliquée pas aux parties qui sont
exposées à une usure normale derivant de l’utilisation de la machine, et en
particulier: brosses et courroie de transmission.
Toute réparation effectuée par un personnel non agréé annule la garantie.
Le fabricant décline toute responsabilité en cas de dommages matériels ou
d’accidents subis par des tiers.
La garantie se limite aux vices dûment constatés et imputables à la
fabrication et/ou aux matériaux utilisés; elle est applicable à compter de la
date d’achat.
Le remplacement ou la réparation sous garantie de pièces défectueuses est accordé
à l’appréciation exclusive du fabricant.
Seuls le centre d’assistance et les revendeurs spécialisés sont habilités à
recevoir et fournir les pièces de rechange sous garantie.
En cas d’intervention sur l’appareil, de quelque type de ce soit,
effectuée sans autorisation écrite du centre d’assistance, la garantie
est annulée.
Les pannes ou autre dus à l’usure normale des pièces, à une utilisation
impropre de l’appareil voire à son mauvais branchement, ne sont pas
couverts par la présente garantie.
Pour toute réparation et/ou changement de pièces sous garantie, les frais de
transport et les risques inhérents à celui-ci sont à la charge du client.
Le centre d’assistance agréé se substitue au fabricant, quant aux obligations
et aux droits de ce dernier, dans le respect des termes de la présente
garantie.
Le centre d’assistance ne peut en aucun cas réclamer des droits ou autres
outrepassant les prérogatives qui lui confèrent les conditions de la présente
garantie.
Pour bénéficier de la garantie, la présentation du ticket d’achat ou de la
facture est obligatoire.
Le revendeur a l’obligation de signer et de timbrer le présent livret, à la dernière
page dans l’espace prévu à cet effet.
La Société LAVOR se réserve le droit d’apporter toutes modifications au
présent livret ainsi qu’aux caractéristiques techniques des machines produites
sans en donner de préavis.
DROIT DE PROPRIETE: la marchandise vendue reste la propriété du
vendeur tant qu’elle n’a pas été intégralement payée - au prix convenu -
conformément à l’Art. 1523 du Code civil italien.
LITIGE: seul le tribunal de Reggio Emilia (Italie) peut être appelé à statuer en
cas de litige.
63

64

INFORMATIONS GENERALES
Emballage et transport
Le transport est effectué dans un emballage en carton . Les matériaux
utilisés pour l'emballage +' sont pas prevus pour résister aux
intempéries (pluie, brouillard, soleil, etc.).
En cas de transport de la machine sans I' emballage d' origine,
1'arrimer solidement pour éviter tout déplcement à l'interieur du
véhicule.
Garer la machine sur une sol plat. Pendant les periodes de non-
utilisation, placer la machine à l'abri des intemperie s.
Mise au rebut de la machine
Lorsqu'on decide de ferrailler la machine, il est recommande de vider
les differents reservoirs internes, des produits qui 6 sont contenus..
lnformations pour le respect de I'environnement
L'élimination des emballages de la machine, des piéces remplacees, de la
machine elle-même, des differents liquides doit s'effectuer dans le respect
de l'environnement - pour éviter toute pollution du sol, de l'eau et ou l'air -
et dans le respect de la reglementation en vigueur.
lndications relatives . I'elimination des dechets:
-
Matériaux ferreux, aluminium, cuivre: matériaux
recyclables, à remettre à
un centre de collecte habilité.
-
Matieres plastiques: à la décharge, incineration ou remise à un centre
de (ecyclage spécialisé.
-
Huiles sales: à remettre à un centre de collecte agréé.
65

CARACTERISTIQUES TECHNIQUES
MODELE
BSW 651 ?
AVANCE
, MAIN, , POUSSEE
CHASSIS
ACIER
CAPACITE BOITE DE COLLECTE DES DECHETS
40
lt
BROSSE CENTRALE
REGLAGE
BROSSE LATERALE
REGLAGE
ROUES
EN CAOUTCHOUC
POIDS
25 kg
66

Felicitaciones, Ud. ha elegido para vuestra actividade el uso de una
limpiadora LAVOR, una maquina manejable y simple de usar.
La limpiadora manual es capaz de responder eficazmente a todas
vuestras exigencias de limpieza, desde un uso pequeño hasta la
aplicación profesional. La amplia gama de versiones propuestas se
adapta perfectamente a todo tipo de utilización.
67

Lea detenidamente las instrucciones de uso.
La empresa no se hace responsable de los posibles daños a cosas o
personas por un uso impropio o incorrecto de la máquina y por el
incumplimiento de las disposiciones de seguridad y mantenimiento.
El presente manual forma parte integrante de la máquina y debe quedar
siempre a disposición del usuario y/o del encargado de su manutención;
Las indicaciones presentadas en este manual no sustituyen las medidas de
seguridad y los datos técnicos, para la instalación y el uso, aplicadas
directamente en la máquina.
El usuario debe atenerse a las normas de seguridad vigentes en el
país de instalación.
No se debe utilizar la máquina si se detectan deterioraciones que
puedan comprometer la seguridad original.
El instalador, el usuario o el encargado de la manutención tienen la
obligación de comunicar eventuales anomalías a la casa constructora.
La máquina ha sido diseñada para aplicaciones específicas.
No debe ser modificada y/o usada para aplicaciones diferentes de las
previstas en el campo de empleo.
Esta máquina debe ser usada sólo por parte de persona adulta y capacitada.
luso de esta máquina está permitido en áreas privadas, sea externas que
internas y con piso seco.
68

NORMAS D. SEGURIDAD
La barredora manual +& es
apropiada para barrer
sustancias & materiales
combustibles, explosivos, tóxicos,
cance-
rigenos & cualquier otro
tipo que repre- sente un peligro
para la salud.
No barra objetos encendidos &
incandescentes, como por
ejemplo cigarrillos, cerillas &
similares.
Cuando extraiga cristal, metal u
otro material del recipiente de
recogida, use siempre guantes
gruesos 8%(* evitar heridas.
No use la barredora en proximidad de
fuentes de calor (fuego, radiadores,
termoventiladores u otros aparatos que
irradien calor).
Emplee sólo piezas de recamblo 6
accesorios originales.
69

DESEMBALAJE
Desembale la máquina con mucho cuidado, evitando movimientos que
puedan perjudicarla.
!%( motivos de transporte 6 dimensiones del embalaje, algunas piezas podrian
suministrarse desmontadas, en este caso, móntelas siguiendo las
instrucciones de este manual.
Los elementos del embalaje (bolsas de plastico, poliestireno expanso,
tornillos etc.) tendrán que mantenerse fuera del alcance de los niños,
pues constituyen un potencial peligro .
MARCA ( IDENTIFICACION
70

INSTALACIÓN
Después de haber desembalado
la barredora, habrá que colocar
el mango en posici
ó
n de trabajo,
& el cepillo en el brazo de
soporte correspondiente,
siguiendo la instrucciones que se
indican ) continuación:
•
Desbloquee los manubrios de bloqueo
(1).
•
Levante el mango hasta la
pòsici
ó
n de trabajo (1).
•
Coloque los manubrios (2)
apretándo- los con fuerza en su
alojamiento del mango.
2
•
Extraiga el cepillo del recipiente de resi-
duos.
•
Levante el b*)z$ de soporte en posici6n
vertical.
•
Coloque el cepillo contra el soporte gi-
ratorio asegurandose de que correspon-
dan los orificios del cepillo con los del
soporte.
•
Fije perfectamente el cepillo al soporte
utilizando los tornillos en dotac
ó
in (1).
1
1
71

NORMAS D. USO
Presione la barredora manual contra el pavimento hasta llegar al
punto en el que se halla la suciedad * eliminar.
N.B.: Considere que el número de revoluciones de los rodillos
barredores ), por lo tanto, el rendimiento, dependen de la
velocidad de avance.
Atenci
ó
n: Materiales como cuerda, alambre, cinta de embalaje )
similares, debldo % su longitud, tendrian que recogerse
*+' la mano ), ser retirados de la màquina si por
cualquier motivo se enrollaran &' los cepillos.
72

REGULACIÓN
La barredora manual viene calibrada de
fábrica para operar en cualquier terreno
plano y liso. Solo debe colocar el cepillo
lateral en su posición de servicio.
En principio, los cepillos deben ajustarse de
modo que toquen el suelo si se aplica una
presión ligera.
Para ajustar el rodillo de barrido principal
cuando se usa o si se quiere usar en un
fondo no plano, solo necesitas saber en
un terreno n% llano, es suficiente girar el
manubrio en el sentido de las agujas del
reloj % en sentido contrario, (1) hasta
alcanzar la altura deseada.
N.B.: Girando el manubrio 1+ el sentido
de las agujas del reloj (+), el cepillo
=.j. hacia el pavimento, girando
1+ sentido contrario (-) el cepillo
su=e.
+)*) regular el cepillo lateral es suficiente
levantarlo en posición de reposo, 6 despues
de haber aflojado la contratuerca de
blocaje (2) girar manualmente en sentido
orario % antihorario el tornillo de control
(1).
N.B.: lgual que )&+ el cepillo anterior,
girando 1+ el sentido de las agujas
del reloj (+), el cepillo lateral b.j.,
1+ sentido contrario (-), sube.
73

VADIADE D< LOS RECIPIENTES
Girar el volante (2) en sentido
antihorario para destrabar el
contenedor principal. Para vaciar
el recipiente principal, es
suficiente sujetarlo 8%( la manilla
correspondiente 6 tirar hacia
arriba extra- yendolo de las guias
laterales (1).
1
6
de habergirado en sentido anti
horario el volante (2).
1
2
2
1
74

MANUTENCION ORDINARIA
Esta barredora manual está fabricada de tal manera que +% necesita
mantenimiento.
Límpie la m
á
quina * seco.
Est
á
prohi)ido lavarla con agua % disolventes.
!*(* +% perjudicar las cerdas del cepillo
lateral, después del uso, habr
á
que
levantarlo del suelo (1), evitando asi que
en los intervalos de inactividad, las cerdas
permanezcan presionadas 6 pierdan su
eficacia.
Si se tuviera que conservar la barredora
en espacios pequeños, es suficiente
desenroscar los manubrios 6 plegar el
mango hacia adelante hasta situarlo en
posici
ó
n horizontal (2).
Enrosque los manubrios 6 guardela.
2
1
75

MANUTENCIÓN EXTRAORDINARIA
SOSTITUCIÓN DE LOS CEPILLOS
Cepillo Central:
-
Sacar completamente el contenedor anterior de residuos;
-
Destornillar los dos tornillos de fijaci6n (1).
-
Quitar el cepillo central (2) como indicado en la figura;
-
Monte el cepillo nuevo realizando las operaciones anteriores al contrario.
Cepillo Lateral:
-
Levante verticalmente el brazo de soporte del cepillo;
-
Destornille los tornillos de sujeci6n (1) 6 extraiga el cepillo desgastado;
-
Monte el cepillo nuevo siguiendo las operaciones anteriores al contrario.
N.B.:Despues de ha=er montado los cepillos nuevos, controle su altura $
regulelos si fuera necesario.
1
76

SOSTITUCION DE LA CINTA DEL CEPILLO LATERAL
-
Levantar el cepillo lateral.
-
Quitar el cepillo lateral destornillando la correspondiente tuerca
central de ajuste (1).
-
Quitar la cinta gastada (2).
-
Montar la nueva cinta siguiendo al contrario las operaciones
descriptas anteriormente.
1
77

La garantía no cubre las partes sujetas al normal desgaste derivado del uso
de la maquina, y en particular: cepillos y cintas de transmisión.
Reparaciones efectuadas por pesonal no autorizado invalidan la garantía.
Con la exclusión de ulterior responsabilidad, en especial por daños a cosas y/o
terceros. La garantía se limita a los defectos demostrables y atribuibles a la
fabricación y/o al material; esta garantía empieza a valer en el momento de la
compra.
La sustitución o reparación de partes defectuosas queda subordinada a la
incontrovertible decisión del fabricante.
Sólo el servicio de asistencia y los revendedores autorizados pueden recibir
las piezas de repuesto; por lo tanto tales piezas de repuesto serán
suministradas sobre la base de esta garantía.
Cuando se ejecuten intervenciones sobre el aparato y/o su sistema, sin
autorización explícita por parte del centro de asistencia, finalizan todos los
derechos de la garantía. Los casos y/o defectos derivantes del desgaste normal,
de un empleo incorrecto y/o impropio, de la errada conexión del aparato, no
están amparados por la garantía. En los casos amparados por la garantía el
usuario se hace cargo de los costes y de los riesgos de transporte del producto.
El servicio de asistencia autorizado sustituye al fabricante en cuanto a
obligaciones y derechos, para los términos expresados por la presente garantía.
Por otra parte el Centro de asistencia autorizado no alegará pretextos y/o
derechos fuera de los puntos establecidos por la presente garantía.
No están amparados por la garantía los controles periódicos, los ajustes, el
mantenimiento ni las modificaciones.
Para acceder al derecho de garantía es terminantemente necesaria la
presentación del relativo tiquete de compra o factura.
El revendedor debe firmar y sellar el folleto de instrucciones, en el espacio
al efecto reservado en la última página.
La empresa e reserva el derecho de aportar modificaciones a la presente cartilla
y a las características técnicas de las máquinas producidas
sin previo aviso.
RESERVA DE PROPIEDAD: Los bienes objeto de la venta quedan de
propriedad exclusiva de la vendedora hasta el pago total del precio concertado,
tal y como previsto por el art.1523 del código civil.
CONTROVERSIAS : Toda controversia es sometida exclusivamente a la
competencia territorial de la autoridad judicial de Reggio Emilia (Italia)
78

79

Embalaje &transporte
INFORMACION GENERAL
EI transporte $ el traslado se realiza en un embalaje de cartón. Es
importante recordar que el material usado para el em"alaje es muy
sensible ) los agentes ahnosfericos como la lluvia, la niebla, el sol, etc.
Si se necesita transportar la máquina & %$ se logra restablecer el
em"alaje original, es necesario inmovilizar la m6quina con el fin de
evitar todo desplazamiento al intemrior del vehiculo.
Desguace de la m
á
quina
Si se decide desmontar defintivamente la maquina, se recomienda
vaciar los varios dep
ó
sitos internos de los productos contenidos en
este.
lnformaciones ecológicas
La eliminaci
ó
n de los embalajes de la máquina, de las piezas
sustituidas, de la máquina en general, de los varios liquidos, tendrá
que efectuarse respetando el medio amblente, evitando de contaminar
tierra, agua & aire, & con arreglo ) las normas en materia.
lndicaciones para un tratamiento apropiado de los desechos
-
Materiales ferrosos, aluminio, cobre: se trata de materiales
reciclabes ) entregar ) un centro de recogida autorizado.
-
Materiales plásticos: se trata de materiales ) entregar al vertedero, )
plantas incineradoras $ ) centros de reciclaje al efecto.
-
Aceites agotados: entregar ) centros de recogida autorizados.
80

CRRRCTERISFCRS TECNICRS
MODELO
BSW 651 ?
PARA ADELANTAR
&ANUAL , EMPUJE
C0ÁSIS
ACERO
CAPACIDAD DEL CONTENEDOR QUE RECOGE LOS RESIDUOS
40
lt
CEPILLO CENTRAL
REGULABLE
CEPILLO LATERAL
REGULABLE
RUEDAS
DE GOMA
PESO
25 kg
81

74
74
75
76
76
77
78
79
80
81
82
84
85
RUGNÍ ZAMETACÍ STROJ
Gratulujeme Vám,
*e jste si vybrali pro Va+e ú,ely zametací stroj , jeho* ovládání
a pou*ití je velmi jednoduché.
Ru,ní zametací stroj m-*e efektivn. pokr/t ve+keré Va+e pot0eby a
po*adavky, co se t/,e ,i+t.ní, a to od drobného a* po profesionální
pou*ití.
1iroká +kála dostupn/ch verzí se dokonale p0izp-sobí ka*dému typu pou*ití.
.
OBSAH
PROHLÁHENÍ O SHODI
UPOZORNINÍ
BEZPEGNOSTNÍ POKYNY
VYBALENÍ
OZNAGOVÁNÍ A IDENTIFIKACE
MONTÁJ
POUJITÍ
NASTAVENÍ
VYPRÁZDNINÍ SBIRNKCH NÁDOB
BIJNÁ ÚDRJBA
MIMOLÁDNÁ ÚDRJBA
ZÁRUKA
OBECNÉ INFORMACE
TECHNICKÉ VLASTNOSTI
86
!E Y S K
Y
82

UPOZORNINÍ
Pozorn, si p-e.t,te návod k pou/ití.
V0robce nenese odpov,dnost za p-ípadné 1kody zp2sobené na
lidech nebo majetku, v d2sledku nesprávného pou/ití a nedodr/ení
pokyn2 t0kajících se bezpe.nosti a údr/by.
Tento manuál je nedílnou sou.ástí stroje a musí b0t v/dy k
dispozici u/ivateli a/nebo údr/bá-i.
Upozorn,ní uvedená v tomto manuálu nenahrazují bezpe.nostní
p-edpisy a technické údaje, pro instalaci a provoz, aplikované
p-ímo na stroji.
U/ivatel se musí -ídit bezpe.nostními p-edpisy platn0mi v zemi,
kde je stroj pou/íván.
Stroj se nesmí pou/ívat, pokud se vyskytnou p-ípadné závady .i
po1kození, které by mohly ohrozit p2vodní bezpe.nost stroje;
pracovník provád,jící montá/, u/ivatel nebo údr/bá- mají
povinnost oznámit ve1keré závady u v0robce.
Stroj byl vyroben pro specifické pou/ití.
Stroj nesmí b0t upraven a/nebo pou/it pro jiné ú.ely, ne/ pro které
byl ur.en. Stroj musí b0t pou/íván dosp,lou a za1kolenou osobou.
Tento stroj m2/e b0t pou/íván v soukrom0ch venkovních/vnit-ních
prostorách se such0m povrchem.
!E Y S K
Y
83

BEZPEGNOSTNÍ POKYNY
Ru9ní zametací stroj není
vhodnM na zametání
hoNlavMch, vMbuOnMch,
toxickMch, karcinogenních
nebo jinMch zdraví
nebezpe9nMch látek.
Nezametejte rozpálené nebo
roz!havené pNedm"ty, jako
napN. cigarety, zapalova9e nebo
podobné pNedm"ty.
Kdy9 budete odstra:ovat sklo,
kov nebo jiné materiály ze
sb;rné nádoby, pou9ívejte
pevné rukavice, abyste se
nezranili
Nepou9ívejte
zametací stroj v bezpr ost<ední blízkosti tepeln=ch zdroj> (ohe:, radiátory, horkovzdu?né ventilátory, p<ímotopy nebo jiné p<ístroje, které v
yza<ují teplo).
Pou9ívejte pouze originální
náhradní díly a p<íslu?enství.
!E Y S K
Y
84

VYBALENÍ
Vybalte stroj s maximální opatrností a zabra:te po?kození stroje
vlivem neopatrné manipulace.
Z d>vod> p<epravy a rozm;r> obalu mohou b=t n;které díly
p<íslu?enství dodány rozmontované, v takovém p<ípad; prove@te
montá9 dle instrukcí obsa9en=ch v tomto manuálu.
Obalové díly (plastové sáAky, p;nov= polystyren, h<ebíky atd.)
nesmí b=t ponechány v dosahu d;ti, neboB p<edstavují potenciální
zdroj nebezpeAí.
OZNAGOVÁNÍ A
IDENTIFIKACE
85

MONTÁJ
Poté, co zametací stroj vybalíte
z krabice, je t<eba nastavit
madlo do pracovní polohy a
namontovat kartáAe na
p<íslu?né nosné rameno, a to
dle postup> popsan=ch ní9e:
•
Povolte aretaAní matice (1).
•
Zvedn;te madlo a9 do pracovní polohy
(1).
•
VraBte aretaAní matice (2) na
jejich místo a ujist;te se, 9e
jsou pevn; uta9ené v
p<íslu?ném otvoru na madlu.
2
•
Vytáhn;te kartáA ze sb;rné nádoby.
•
Zvedn;te nosné rameno do
vertikální pozice.
•
Umíst;te kartáA proti rotaAnímu
una?eAi a ujist;te se, 9e otvory
kartáAe jsou proti otvor>m
una?eAe na nosném rameni.
•
KartáA pevn; p<i?roubujte na
una?eA pomocí ?roub>, které
jsou souAástí v=bavy (1).
!E Y S K
Y
1
1
86

POUJITÍ
Jednodu?e dotlaAte ruAní zametací stroj a9 k místu, kde se nachází
neAistoty, které chcete odstranit.
Pozn.:M,jte na pam,ti, /e po.et otá.ek zametacích válc2, a
tudí/ i v0kon stroje, závisí na rychlosti pohybu vp-ed.
Pozor: Motouzy, kovové dráty, balící pásky a podobné
p-edm,ty byste m,li z d2vodu jejich délky ru.n, posbírat.
Pop-. je odstra3te, pokud se namotají na kartá.e.
87

NASTAVENÍ
Zametací stroj je v továrn;
nastaven na práci na rovném a
hladkém povrchu.
Z tohoto d>vodu je t<eba uvést do
pracovní polohy pouze boAní
kartáA. Zpravidla by kartáAe m;ly
b=t nastaveny takov=m
zp>sobem, aby se dot=kaly
terénu lehk=m p<ítlakem.
Pokud chcete nastavit hlavní
zametací válec z d>vodu opot<ebení,
nebo pokud chcete stroj pou9ít na
nerovném povrchu, staAí otoAit
aretaAní maticí bu@ ve sm;ru nebo
proti sm;ru hodinov=ch ruAiAek (1),
dokud nedosáhnete po9adované
v=?ky.
Pozn.: Kdy! oto9íte areta9ní
maticí ve sm"ru
hodinovMch ru9i9ek (+), tak
se kartá9 sní!í sm"rem k
podlaze, naopak, kdy!
oto9íte proti sm"ru
hodinovMch ru9i9ek (-),
kartá9 se zvedne.
Kdy9 chcete nastavit boAní
kartáA, staAí zvednout ho do
klidové pozice a, poté co povolíte
kontramatku dorazu (2), otoAte
bu@ ve sm;ru nebo proti sm;ru
hodinov=ch ruAiAek op;rn= ?roub
(1).
Pozn.: Stejn" jako u
pNedchozího kartá9e,
kdy! otá9íte ve sm"ru
hodinovMch ru9i9ek (+),
bo9ní kartá9 se sní!í,
naopak, kdy! oto9íte
proti sm"ru hodinovMch
ru9i9ek (-), kartá9 se
zvedne.
!E Y S K
Y
88

VYPRÁZDNINÍ SBIRNKCH NÁDOB
OtoAte aretaAní knoflík (2) proti
sm;ru hodinov=ch ruAiAek, Aím9
uvolníte hlavní sb;rnou nádobu.
Na vyprázdn;ní hlavní sb;rné
nádoby staAí uchopit madlo a
zatáhnout za n;ho sm;rem nahoru,
Aím9 sb;rnou nádobu vysunete
z boAních vodících li?t (1)
a otoAit aretaAní knoflík (2)
ve sm;ru hodinov=ch
ruAiAek.
1
Oto
2
2
1
89

BIJNÁ ÚDRJBA
Tento ruAní zametací stroj je bezúdr9bov=.
Ci?t;ní provád;jte za sucha.
Je zakázáno stroj um=vat vodou nebo <edidly.
Aby nedo?lo ke zniAení ?t;tin
boAního kartáAe, je t<eba, po
ka9dém pou9ití zametacího
stroje, zvednout kartáA tak, aby
se nedot=kal zem; (1).
Tímto zp>sobem zabráníte tomu,
aby ?t;tiny kartáAe v klidové fázi
nebyly pod a neztratily tak svoji
Aistící úAinnost.
Kdyby bylo pot<eba uskladnit
stroj v prostorov; omezen=ch
prostorech, staAí od?roubovat
aretaAní matice a sklopit
madlo sm;rem dop<edu, a9 do
horizontální pozice (2).
Namontujte zp;t matice a stroj
uskladn;te.
!E Y S K
Y
2
1
90

MIMOLÁDNÁ ÚDRJBA
VKMINA KARTÁGP
Hl avní ka rtá:
-
Odstra:te p<ední sb;rnou nádobu na neAistoty;
-
Od?roubujte 2 fixaAní ?rouby (1);
-
Vytáhn;te hlavní kartáA (2) jak je vyobrazeno na obrázku;
-
P<i namontování nového kartáAe postupujte dle v=?e popsan=ch
postup>, ale v opaAném po<adí.
Bo!ní kartá!:
-
Zvedn;te nosné rameno kartáAe do svislé polohy.
-
Od?roubujte fixaAní ?rouby (1) a odstra:te opot<ebovan= kartáA.
-
P<i namontování nového kartáAe postupujte dle v=?e popsan=ch
postup>, ale v opaAném po<adí.
Pozn.: Po namontování novMch kartá9Q zkontrolujte jejich vMOku a popN.
pokra9ujte s jejich nastavením.
91

VKMINA LEMENE BOGNÍHO KARTÁGE
-
Zvedn;te boAní kartáA.
-
Od?roubujte hlavní kontramatku dorazu (1), Aím9 sundáte boAní kartáA.
-
Sundejte opot<ebovan= <emen (2).
-
P<i namontování nového <emene postupujte dle v=?e popsan=ch
postup>, ale v opaAném po<adí.
!E Y S K
Y
92

ZÁRUKA
.
Záruka se nevztahuje na ,ásti, jejich* opot0ebení je p0irozen/m d-sledkem
pou*ívání stroje, p0edev+ím: kartá,e a hnací 0emen.
Opravy provedené nepov.0enou osobou znamenají ztrátu záruky s
vylou,ením jakéhokoliv dal+ího závazku, p0edev+ím, co se t/,e
v.cn/ch +kod nebo +kod na zdraví.
Záruka je omezena na prokazatelné v/robní vady a/nebo vady
materiálu, záruka vstupuje v platnost v den nákupu.
V/m.na nebo oprava vadn/ch díl- podléhá v/lu,n. uvá*ení v/robce.
Pouze zákaznick/ servis a specializovaní prodejci mohou obdr*et
náhradní díly, z tohoto d-vodu budou náhradní díly dodány na základ.
této záruky.
Kdykoliv dojde k zásah-m na p0ístroji a/nebo jeho systému, bez v/slovného
souhlasu servisního st0ediska, ve+kerá záru,ní práva zanikají.
Na p0ípady a/nebo závady, které vypl/vají z b.*ného opot0ebení,
nesprávného a/nebo nevhodného pou*ití, se záruka nevztahuje.
V p0ípad. reklamace kupující p0ebírá náklady spojené s dopravou a rizika
p0epravy v/robku.
Autorizovan/ servis zastupuje v/robce v jeho povinnostech a právech,
na základ. v/slovn. stanoven/ch podmínek této záruky.
Nebudou také uplat2ovány nároky a/nebo práva ze strany autorizovaného
servisu, které jsou nad rámec bod- uveden/ch v této záruce.
Do záruky nespadají pravidelné kontroly, kalibrace, údr*ba a úpravy. Pro
uplatn.ní práva na záruku je nezbytn. nutné, abyste p0edlo*ili p0íslu+nou ú,tenku
nebo fakturu.
Na vyhrazeném prostoru na poslední stran. bro*ury se prodejce musí podepsat a
otisknout své razítko.
Firma LAVOR si vyhrazuje právo moci bez p0edchozího
upozorn.ní provést úpravy tohoto manuálu a úpravy technick/ch
vlastností vyráb.n/ch stroj-.
V3HRADA VLASTNICTVÍ: zbo*í, je* je p0edm.tem prodeje, z-stává
v/hradním vlastnictvím prodejce a* do úplného zaplacení dohodnuté ceny, ve
smyslu ,lánku 1523 Ob,anského zákoníku.
SPORY: jakékoliv spory budou v/lu,n. rozhodovány místn. p0íslu+n/mi soudy v
Reggio Emilia (Itálie).
93

Obal a pNeprava
OBECNÉ INFORMACE
P<eprava nebo p<emisBování stroje probíhá v kartonové krabici.
Upozor:ujeme Vás, 9e pou9it= obalov= materiál není odoln= proti
pov;trnostním vliv>m, jako jsou dé?B, mlha, slunce atd.
V p<ípad; pot<eby p<epravy, kdy9 není mo9né znovu pou9ít
originální obal, musí b=t stroj dob<e upevn;n, aby se zabránilo
jakémukoliv pohybu stroje uvnit< vozidla.
Likvidace stroje
Pokud se rozhodnete se?rotovat stroj, doporuAujeme p<edtím
vyprázdnit ve?keré vnit<ní nádr9e.
Ekologické informace
Likvidace obal> stroje, náhradních díl>, samotného stroje musí
b=t provedeno s ohledem na ochranu 9ivotního prost<edí, aby v
9ádném p<ípad; nedo?lo ke zneAi?t;ní podzemních vod a
vzduchu, a to v?e v souladu s platn=mi právními p<edpisy.
Pokyny pro správné nakládání s odpady
-
Delezo, hliník, m;@: jedná se o recyklovatelné materiály, které
je t<eba odevzdat do p<íslu?ného sb;rného st<ediska.
-
Plastové materiály: jedná se o materiály, které je t<eba
odvézt na skládky, do spalovny nebo speciálního
recyklaAního centra.
!E Y S K
Y
94

TECHNICKÉ VLASTNOSTI
MODEL
BSW 651 M
POHON
RUCNÍ POSUV
EASI
OCEL
KAPACITA SBFRNÉ NÁDOBY NA ODPAD
40 I
HLAVNÍ KARTÁC
NASTAVITELNG
BOCNÍ KARTÁC
NASTAVITELNG
KOLA
GUMOVÁ
HMOTNOST 25
kg
95

[4!(!5$6 7 89):;<=7>$*$ <?@>) =) (&77>8A <?@>]
,-./01 2345(!06$/01 5078/0
4"567'89:$;,
<= 8=>7'9& ;'?$87$??%@ & )7"!#%@ 8 &!)"9A5"8'?&& )"6;$#'9A?%@ ;'B&?
% . C%D?': )"6;$#'9A?': ;'B&?' &6$'9A?" )"6"E6$# F'F 69: 6";'B?$E, #'F
& 69: )7"G$!!&"?'9A?"E %>"7F&.
H7$6& B&7"F"I" 7'5?"">7'5&: ?'B&J ;"6$9$E 8= ">:5'#$9A?" )"6>$7$#$ #",
D#" ?%K?" &;$??" 8';!
934(,:0/8(
4+CBJIKC+CMCNGC
4+ELGDE OCPJ4EINJIKG
+EI4E'JL'E
QE+'G+JL'E G GBCNKGRG'EFGH
SIKENJL'E
4+ELGDE GI4JD"PJLENGH
+CTSDG+JL'E
J4J+JMNCNGC 'JNKCUNC+JL
KC'SVCC JOIDSMGLENGC
LNC4DENJLJC JOIDSMGLENGC
TE+ENKGN#C SIDJLGH
JOVEH GNRJ+QEFGH
KCWNGXCI'GC WE+E'KC+GIKG'G
ДЕКЛАРАЦИЯ СООТВЕТСТВИЯ
97
98
99
99
100
101
102
103
104
105
107
109
109
Последняя стр.
RU
96

ПРЕДОСТЕРЕЖЕНИЕ
Внимательно прочтите инструкцию по применению,
Производитель не несет ответственности за какой бы то ни было
материальный или физический ущерб, нанесенный из-за нарушения
условий эксплуатации машины и несоблюдения требований
безопасности и технического обслуживания.
Данное руководство является неотъемлемой частью машины и всегда
должно быть доступно для пользователя и/или специалиста по
техническому обслуживанию.
Инструкции настоящего руководства не заменяют положений по
технике безопасности при эксплуатации и технических требований к
установке и эксплуатации.
Пользователь должен соблюдать правила техники безопасности,
действующие в стране установки.
Эксплуатация машины при наличии дефектов или повреждений,
которые могут поставить под угрозу первоначальную безопасность,
запрещена;
Специалист по установке, пользователь или специалист по
техническому обслуживанию обязаны сообщать изготовителю о
любых неисправностях.
Машина создана для конкретного применения.
Внесение конструктивных изменений или нецелевая эксплуатация
машины запрещены.
К эксплуатации допускаются только взрослые опытные пользователи.
Эксплуатация проводится в частных внешних/внутренних
пространствах и на сухих поверхностях.
97

BSW 651 &
4+ELGDE OCPJ4EINJIKG
,);<%= '+>?&@%AB<%=
?%CD<% <& 'E&><%F<%;&<%
>A= )G+EHD I+EJ;DK,
LFEML++'%*<MK,
@+H*D;<MK,
H%<N&E+I&<<MK D >E)IDK
+'%*<MK >A= F>+E+LB=
L&O&*@L D ?%@&ED%A+L.
/& '+>?&@%P@& I+E=OD&
DAD @A&JOD& 'E&>?&@M:
*DI%E&@M, *'D;HD D @.'.
L$ 8?]!c)=8! %$(!?$5 %(8
&6):!=88 8? >$=9!A=!()
79!>:), Y!9)::) 8 6(.,
=)6!5)A9! %($Z=@! %!(Z)9>8.
N! 87%$:;?&A9!
%$6Y!9):;=&\ Y)`8=& 5
=!%$7(!6795!==$A ]:8?$798
$9 879$Z=8>$5 9!%:) ($*=<,
()68)9$($5,
9!%:$5!=98:<9$($5 8 6(&*8b
8?:&Z)\_8b 9!%:$
%(8]$($5).
G7%$:;?&A9! 9$:;>$
$(8*8=):;=@! ?)%Z)798 8
6!9):8.
RU
98

BSW 651 &
,0920Q3"Q0
4(8 ()7%)>$5>! Y)`8=@ 7$]:\6)9; $79$($c=$79;, 8?]!*)9;
%$5(!c6!=8A Y)`8=@.
B:< %$Y!_!=8< Y)`8=@ 5 9()=7%$(98($5$Z=&\ 9)(&
=!>$9$(@! >$Y%:!>9&\_8! 6!9):8 Y$*&9 ()?]8()9;7<. L
a9$Y 7:&Z)! 5@%$:=89; 7]$(>&, 7:!6&< &>)?)=8<Y,
%(85!6!==@Y
5 =)79$<_!Y (&>$5$6795!.
e:!Y!=9@ &%)>$5>8 (%$:8a98:!=$5@! %)>!9@,
%!=$%$:8798($:, *5$?68 8 9. 6.) =!:;?< $79)5:<9; 5
6$79&%=$Y
6:< 6!9!A Y!79!, %$7>$:;>& $=8 <5:<\97< %$9!=[8):;=@Y8
879$Z=8>)Y8 $%)7=$798.
50,Q8,3"Q0 8 84(/!8R8Q0S81
99

BSW 651 &
-9!0/3"Q0
G?5:!>89! Y)`8=& 8? 9)(@,
%(85!689! (&>$<9>& &%()5:!=8<
5 ()]$Z!! %$:$c!=8! 8 579)5;9!
_!9>& 5 7$$95!9795&\_!!
$%$(=$! %:!Z$, 7:!6&<
8=79(&>[8<Y =8c!:
•
J9>(&989; Y)b$58>8 ]:$>8($5>8 (1).
•
4$6=<9; (&>$<9>& &%()5:!=8<
6$ %(85!6!=8< !! 5 ()]$Z!!
%$:$c!=8! (1).
•
P)>(&989; Y)b$58>8 (2),
&]!685`87;, Z9$ $=8 =)6!c=$
?)58=Z!=@ 5 *=!?6! =)
(&>$<9>!.
2
•
G?5:!Z; _!9>& 8? >$=9!A=!()
6:< $9b$6$5. 4!(!5!798 5
5!(98>):;=$! %$:$c!=8!
$%$(=@A (@Z)*. 4(8:$c89;
_!9>& > 5()_)\_!A7< $%$(!,
&]!685`87;, Z9$ $95!(798<
_!9>8 7$5%)6)\9 7
$95!(798<Y8 7)Y$A $%$(@.
N)6!c=$ ?)>(!%89; _!9>& =)
!! $%$(! 7 %$Y$_;\
%(8:)*)!Y@b 58=9$5 (1).
1
1
RU
100

BSW 651 М
ПРАВИЛА ИСПОЛЬЗОВАНИЯ
Толкать ручную подметальную машину, перемещая ее по
полу до тех пор, не будут убраны все загрязнения.
ПРИМЕЧАНИЕ: Имейте в виду, что количество оборотов
подметающих роликов и, следовательно, эффективность
зависят от скорости движения.
Внимание: шпагаты, металлические провода, упаковочные ленты и
аналогичные по длине предметы следует убирать вручную.
При необходимости удалите застрявшие в щетках предметы.
101

BSW 651 &
,(U-68,3"Q0
P)5$67>8! =)79($A>8 (&Z=$A %$6Y!9):;=$A
Y)`8=@ %(!6&7Y)9(85)\9 ()]$9& =) ($5=$A 8
*:)6>$A %$5!(b=$798.
4$a9$Y& 5)Y =&c=$ 9$:;>$ %(85!798 ]$>$5&\
_!9>& 5 ()]$Z!! %$:$c!=8!. V!9>8 6$:c=@
]@9; $9(!*&:8($5)=@ 9)>8Y $]()?$Y, Z9$]@
>)7)9;7< ?!Y:8 %(8 :!*>$Y =)c)988.
X9$]@ $9(!*&:8($5)9; 8?=$`!==@A
$7=$5=$A %$6Y!9):;=@A ($:8> 8:8
=)79($89; !*$ 6:< ()]$9@ =)
=!($5=$A %$5!(b=$798, 6$79)9$Z=$
%$5$()Z85)9; Y)b$58> (1) %$ Z)7$5$A 79(!:>! 8:8
%($985 =!! 6$ 6$798c!=8<
=&c=$A 5@7$9@.
2,85(.0/8(: 2ED LE%O&<DD ?%K+LDH%
'+ ;%*+L+P *@E&AH& (+) O&@H% +')*H%&@*= H
'+A), 'ED LE%O&<DD 'E+@DL ;%*+L+P
*@E&AHD (-) O&@H% '+><D?%&@*=.
X9$]@ $9(!*&:8($5)9; ]$>$5&\ _!9>&,
%($79$ %$6=8Y89! !! 6$ &%$() 8, $7:)]85
]:$>8(&\_&\ >$=9(*)A>& (2), 5(&Z=&\
5()_)A9! 79$%$(=@A 58=9 (1) %$ Z)7$5$A
79(!:>! 8:8 %($985 =!!.
2,85(.0/8(: Q%H D L *A);%& *
'E&>M>)O&P O&@H+P, 'ED LE%O&<DD '+
;%*+L+P *@E&AH& (+) G+H+L%= O&@H%
+')*H%&@*=, 'ED LE%O&<DD 'E+@DL ;%*+L+P
*@E&AHD (-) +<% '+><D?%&@*=.
RU
102

BSW 651 &
323,3:/(/8(
Q3/!(V/(,3"
4$5!(=89! Y)b$58> (2)
%($985 Z)7$5$A 79(!:>8,
Z9$]@ $9>(!%89; $7=$5=$A
>$=9!A=!(.
X9$]@ $%$($c=89; $7=$5=$A
>$=9!A=!(, 5$?;Y89! !*$ ?)
(&Z>& 8 %$9<=89! 55!(b,
7658*)< !*$ 7 ]$>$5@b
=)%()5:<\_8b (1).
G 5()_)< Y)b$58> %$ Z)7$5$A 79(!:>!
(2).
1
2
2
1
103

BSW 651 &
!(Q-W(( 3X96-:8"0/8(
'$=79(&>[8< Y)`8=@ =! %(!6%$:)*)!9 9!b=8Z!7>$*$ $]7:&c85)=8<.
B:< 7&b$A Z879>8.
JZ879>) Y)`8=@ 5$6$A 8:8 ()795$(89!:<Y8 ?)%(!_!=).
L$ 8?]!c)=8! 8?=$7) _!98=@
]$>$5$A _!9>8, %$7:! >)c6$*$
%(8Y!=!=8< $79$($c=$
%(8%$6=8Y)A9! !! =)6 %$:$Y
(1).
e9$ %(!6$95()_)!9
%$79$<==$!
6)5:!=8! =) _!98=>8 5$
5(!Y< %!(!(@5) 5 a>7%:&)9)[88
8, 7:!6$5)9!:;=$, 7=8c!=8!
a^^!>985=$798 $Z879>8
5$ 5(!Y< 87%$:;?$5)=8<.
C7:8 %($79()=795$ 6:< b()=!=8<
Y)`8=@ $*()=8Z!=$, $9>(&989!
Y)b$58>8 8, =)6)585 =) (&:;,
%(85!689! !*$ 5 *$(8?$=9):;=$!
%$:$c!=8! (2).
P)>(&989! Y)b$58>8 8 %$Y!7989!
Y)`8=& =) b()=!=8!.
.
1
2
RU
104

BSW 651 &
"/(260/3"3( 3X96-:8"0/8(
T05(/0 W(!3Q
S&<@E%AB<%= W&@H%:
-4$:=$79;\ 7=<9; %!(!6=8A >$=9!A=!( 6:< Y&7$();
-J9>(&989; 2 >(!%!c=@b 58=9) (1);
-I=<9; [!=9():;=&\ _!9>& (2) >)> %$>)?)=$ =) +87&=>!;
-S79)=$589; =$5&\ _!9>&, 5@%$:=85 5@`!$%87)==@! $%!()[88
5 $]()9=$Y %$(<6>!.
X+H+L%= W&@H%:
-4(85!798 5 5!(98>):;=$! %$:$c!=8! (@Z)*, &6!(c85)\_8A _!9>&.
-J9>(&989; >(!%!c=@! 58=9@ (1) 8 7=<9; 8?=$`!==&\ _!9>&.
- S79)=$589; =$5&\ _!9>&, 5@%$:=85 5@`!$%87)==@! $%!()[88
5 $]()9=$Y %$(<6>!.
2,85(.0/8(: '+*A& )*@%<+LHD 'E+L&ED@B LM*+@) O&@+H D, &*AD
<&+GK+>D?+, +@E&I)ADE+L%@B DK '+A+Y&<D&.
1
1
105

BSW 651 &
T05(/0 2,8"34/3U3 ,(5/1 X3Q3"3V W(!Q8
-4(8%$6=<9; ]$>$5&\ _!9>&.
-I=<9; ]$>$5&\ _!9>&, $9>(&985 7%![8):;=&\ [!=9():;=&\
79$%$(=&\ *)A>& (1).
-I=<9; 8?=$`!==@A %(85$6=$A (!Y!=; (2).
-S79)=$589; =$5@A (!Y!=;, 5@%$:=85 5@`!$%87)==@!
$%!()[88 5 $]()9=$Y %$(<6>!.
1
RU
106

ГАРАНТИЙНЫЕ УСЛОВИЯ
Гарантия не распространяется на детали, подверженные
нормальному износу в ходе эксплуатации, в частности, на щетки и
приводной ремень.
Ремонт, выполненный неуполномоченными лицами, аннулирует
гарантийные обязательства, исключая дальнейшую
ответственность, в частности, за нанесение ущерба имуществу или
травм третьим лицам.
Гарантия ограничивается явными дефектами изготовления и / или
материалов и вступает в силу с момента покупки.
Только производитель принимает решение о замене или ремонте
неисправных запчастей.
Запчасти поставляются только в сервисные центры и
специализированным дилерам, поэтому эти запасные части будут
предоставляться на основании этой гарантии.
Каждое вмешательство в устройство и/или его систему без
однозначной авторизации сервисного центра аннулирует все
гарантийные обязательства.
На случаи и /или дефекты, возникающие в результате нормального
износа, неправильного и / или неподходящего использования, гарантия
не распространяется.
В случае гарантии покупатель принимает на себя транспортные
расходы и риски по транспортировке товара.
Авторизованный сервисный центр заменяет производителя в
обязательствах и правах на условиях, указанных в настоящей
гарантии.
Кроме того, авторизованный сервисный центр не предъявляет
претензий и / или не заявляет прав, выходящих за пределы положений,
указанных в настоящей гарантии.
Периодические проверки, калибровки, техническое обслуживание и
модификации не покрываются гарантией. Обязательным условием
доступа к гарантийному праву является предъявление
соответствующего чека или счета.
107

Продавец должен поставить подпись и печать на руководстве на
последней странице в отведенном для этого месте.
Компания LAVOR оставляет за собой право вносить изменения в
настоящее руководство и технические характеристики своей
продукции без предварительного уведомления.
СОХРАНЕНИЕ ПРАВА СОБСТВЕННОСТИ: товары, подлежащие
продаже, остаются исключительной собственностью продавца
до полной оплаты согласованной цены, предусмотренной ст.1523 ГК.
СПОРЫ: любой спор относится исключительно к территориальной
юрисдикции судебной власти Реджо-Эмилия (Италия).
108

BSW 651 &
3XW01 8/R3,50S81
-'%H+LH% D@E%<*'+E@DE+LH%
K()=7%$(98($5>) 8:8 %!(!7@:>) $7&_!795:<!97< 5 >)(9$==$A &%)>$5>!. J]()989! 5=8Y)=8! =)
$7$]&\ Z&579589!:;=$79; &%)>$5$Z=@b Y)9!(8):$5 > 9)>8Y )9Y$7^!(=@Y <5:!=8<Y, >)>
6$c6;, 9&Y)=, 7$:=[! 8 9. 6.
L 7:&Z)! =!$]b$68Y$798 9()=7%$(98($5>8, >$*6) ?)5$67>)< 9)() ]!?5$?5()9=$ &9()Z!=),
7:!6&!9 $]!?658c89; Y)`8=&, Z9$]@ 8?]!c)9; !! %!(!Y!_!=8< 5=&9(8 9()=7%$(9=$*$
7(!6795).
-@DADF%ND= ?%CD<M
L 7:&Z)! &98:8?)[88 Y)`8=@, (!>$Y!=6&!97< $75$]$689; 5=&9(!==8!
!Y>$798 $9 8b 7$6!(c8Y$*$.
8<[+E?%ND= \H+A+ID;&*H+I+ K%E%H@&E%
4(8 &98:8?)[88 &%)>$5$Z=@b Y)9!(8):$5 Y)`8=@, ?)Y!=!==@b 6!9):!A, 7)Y$A Y)`8=@ 5
[!:$Y, &Z89@5)A9! 9(!]$5)=8< a>$:$*8Z!7>$A ]!?$%)7=$798, 8?]!*)A9! ?)*(<?=!=8< %$Z5@,
5$6@ 8 5$?6&b), 8 $]<?)9!:;=$ 7$]:\6)A9! 6!A795&\_!! ?)>$6)9!:;795$.
-H%F%<D= '+ H+EE&H@<+P '&E&E%G+@H& +@K+>+L
-X!(=@! Y!9)::@, ):\Y8=8A, Y!6; %$6:!c)9 59$(8Z=$A %!(!()]$9>! 8 %!(!6)\97< 5
7%![8):;=@A )59$(8?$5)==@A [!=9( 7]$().
-G?6!:8< 8? %:)79Y)77@ =!$]b$68Y$ $9%()5:<9; =) 75):>&, 5 Y&7$($7c8*)9!:;=&\ %!Z; 8:8 5
7%![8):;=@A [!=9( %!(!()]$9>8.
!(]/8.(9Q8( ]0,0Q!(,89!8Q8
534(6$ BSW 651 5
4C+CQCVCNGC +SXNJC
KJD'ENGC
'E+'EI
IKED"
JOfCQ 'JNKCUNC+E BDH QSIJ+E
40 :
FCNK+ED"NEH VCK'E
+CTSDG+SCQEH
OJ'JLEH IXCK'E
+CTSDG+SCQEH
'JDCIE
+CPGNJL#C
LCI
25>*
RU
109


cod. 7.100.1759-06
-
 1
1
-
 2
2
-
 3
3
-
 4
4
-
 5
5
-
 6
6
-
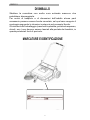 7
7
-
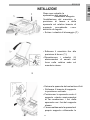 8
8
-
 9
9
-
 10
10
-
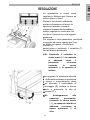 11
11
-
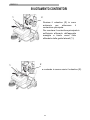 12
12
-
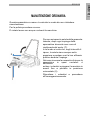 13
13
-
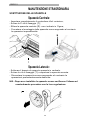 14
14
-
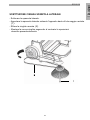 15
15
-
 16
16
-
 17
17
-
 18
18
-
 19
19
-
 20
20
-
 21
21
-
 22
22
-
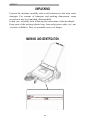 23
23
-
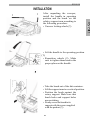 24
24
-
 25
25
-
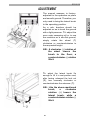 26
26
-
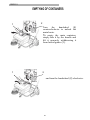 27
27
-
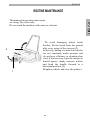 28
28
-
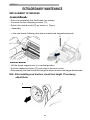 29
29
-
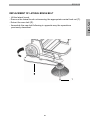 30
30
-
 31
31
-
 32
32
-
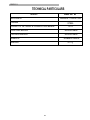 33
33
-
 34
34
-
 35
35
-
 36
36
-
 37
37
-
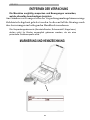 38
38
-
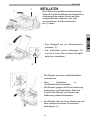 39
39
-
 40
40
-
 41
41
-
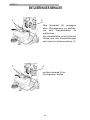 42
42
-
 43
43
-
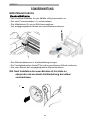 44
44
-
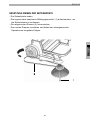 45
45
-
 46
46
-
 47
47
-
 48
48
-
 49
49
-
 50
50
-
 51
51
-
 52
52
-
 53
53
-
 54
54
-
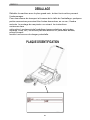 55
55
-
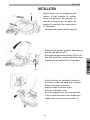 56
56
-
 57
57
-
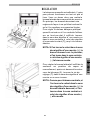 58
58
-
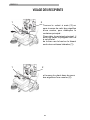 59
59
-
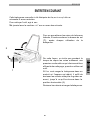 60
60
-
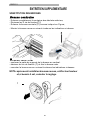 61
61
-
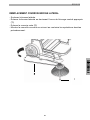 62
62
-
 63
63
-
 64
64
-
 65
65
-
 66
66
-
 67
67
-
 68
68
-
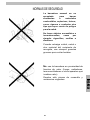 69
69
-
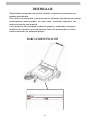 70
70
-
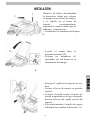 71
71
-
 72
72
-
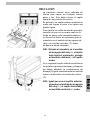 73
73
-
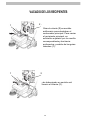 74
74
-
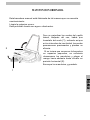 75
75
-
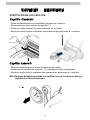 76
76
-
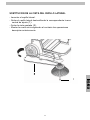 77
77
-
 78
78
-
 79
79
-
 80
80
-
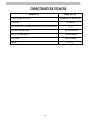 81
81
-
 82
82
-
 83
83
-
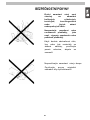 84
84
-
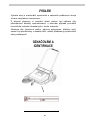 85
85
-
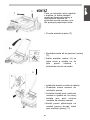 86
86
-
 87
87
-
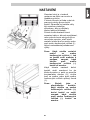 88
88
-
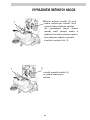 89
89
-
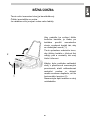 90
90
-
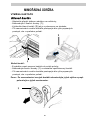 91
91
-
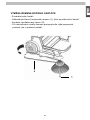 92
92
-
 93
93
-
 94
94
-
 95
95
-
 96
96
-
 97
97
-
 98
98
-
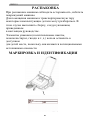 99
99
-
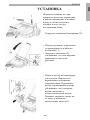 100
100
-
 101
101
-
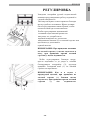 102
102
-
 103
103
-
 104
104
-
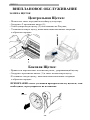 105
105
-
 106
106
-
 107
107
-
 108
108
-
 109
109
-
 110
110
-
 111
111
-
 112
112


en otros idiomas
- français: Lavor BSW 651 M Manuel utilisateur
- italiano: Lavor BSW 651 M Manuale utente
- Deutsch: Lavor BSW 651 M Benutzerhandbuch
- português: Lavor BSW 651 M Manual do usuário
Artículos relacionados
Otros documentos
-
 IPC Gansow 510 M Manual de usuario
-
Columbus KS 51|BM 45 Manual de usuario
-
Rothenberger Power threader SUPERTRONIC 2000 Manual de usuario
-
-
-
Alto FLOORTEC 380M Operating Instructions Manual
-
-
 Ghibli & Wirbel HS MT 80 BC LSB Use And Maintenance

